

FujiFilm Waterproof Case for the FinePix Z100fd, FinePix Z100fd Quick Maintenance Manual
クイックメンテナンスガイド
※防水プロテクターをご使用の際は、必ず携帯してください。
(FinePixZ100fd用防水プロテクター)
Oリングのかたちと色は、それぞれ違うので間違えないようにしよう
JP
Oリング
(白色)
前側Oリング(白色)
後側Oリング(橙色)
後側Oリング(橙色)は取り付け向きに注意しよう。
●Oリングの断面
●溝の断面
Oリング(橙色)
取り付けを確認しよう
指でOリングを全周なぞって、段差
や異物の有無を確かめよう。
Oリングはカメラを水もれから守る非常に大切な部分です。
メンテナンスをしっかりと行い正しく使いましょう!
平らな面
溝の底面
●取り付け図
Oリングにグリスをぬろう
グリスを指の上に出しOリングの全
周にうすく伸ばして均一にぬろう。
ここを確認! !
•Oリングに傷やひび割れがないか?
•Oリングに異物が付着していないか?
•Oリングと密着する壁面一周(A面)に異
物が付着していないか?
Oリングが ねじ れて 取り付けら れて いない
•
か?
•Oリングの前側(白色)、後側(橙色)を
付け間違えていないか?
•後側Oリング(橙色)の取り付け向きはあっ
ているか?
水もれさせないために、念入りに確認
しよう!
防水プロテクターを開けるときは…
水滴をよく拭こう
開ける前に、必ずよく拭こう。
こんな状態で防水プロテクターを開けないで!!
●風が強くてほこりが
舞っているとき
風
埃
防水プロテクターのご使用前の取り扱い方法と事前チェック、メンテナンス、ご使用後
の保管方法などの詳細は使用説明書をご覧ください。
●防水プロテクターに
水滴が付いているとき
使い始める前にもう一度確認しよう
Oリングを指でなぞって、異物の付着がないか確認しよう。
このとき、Oリングと密着する壁面も指でなぞると効果的。
●水しぶきがかかるようなとき
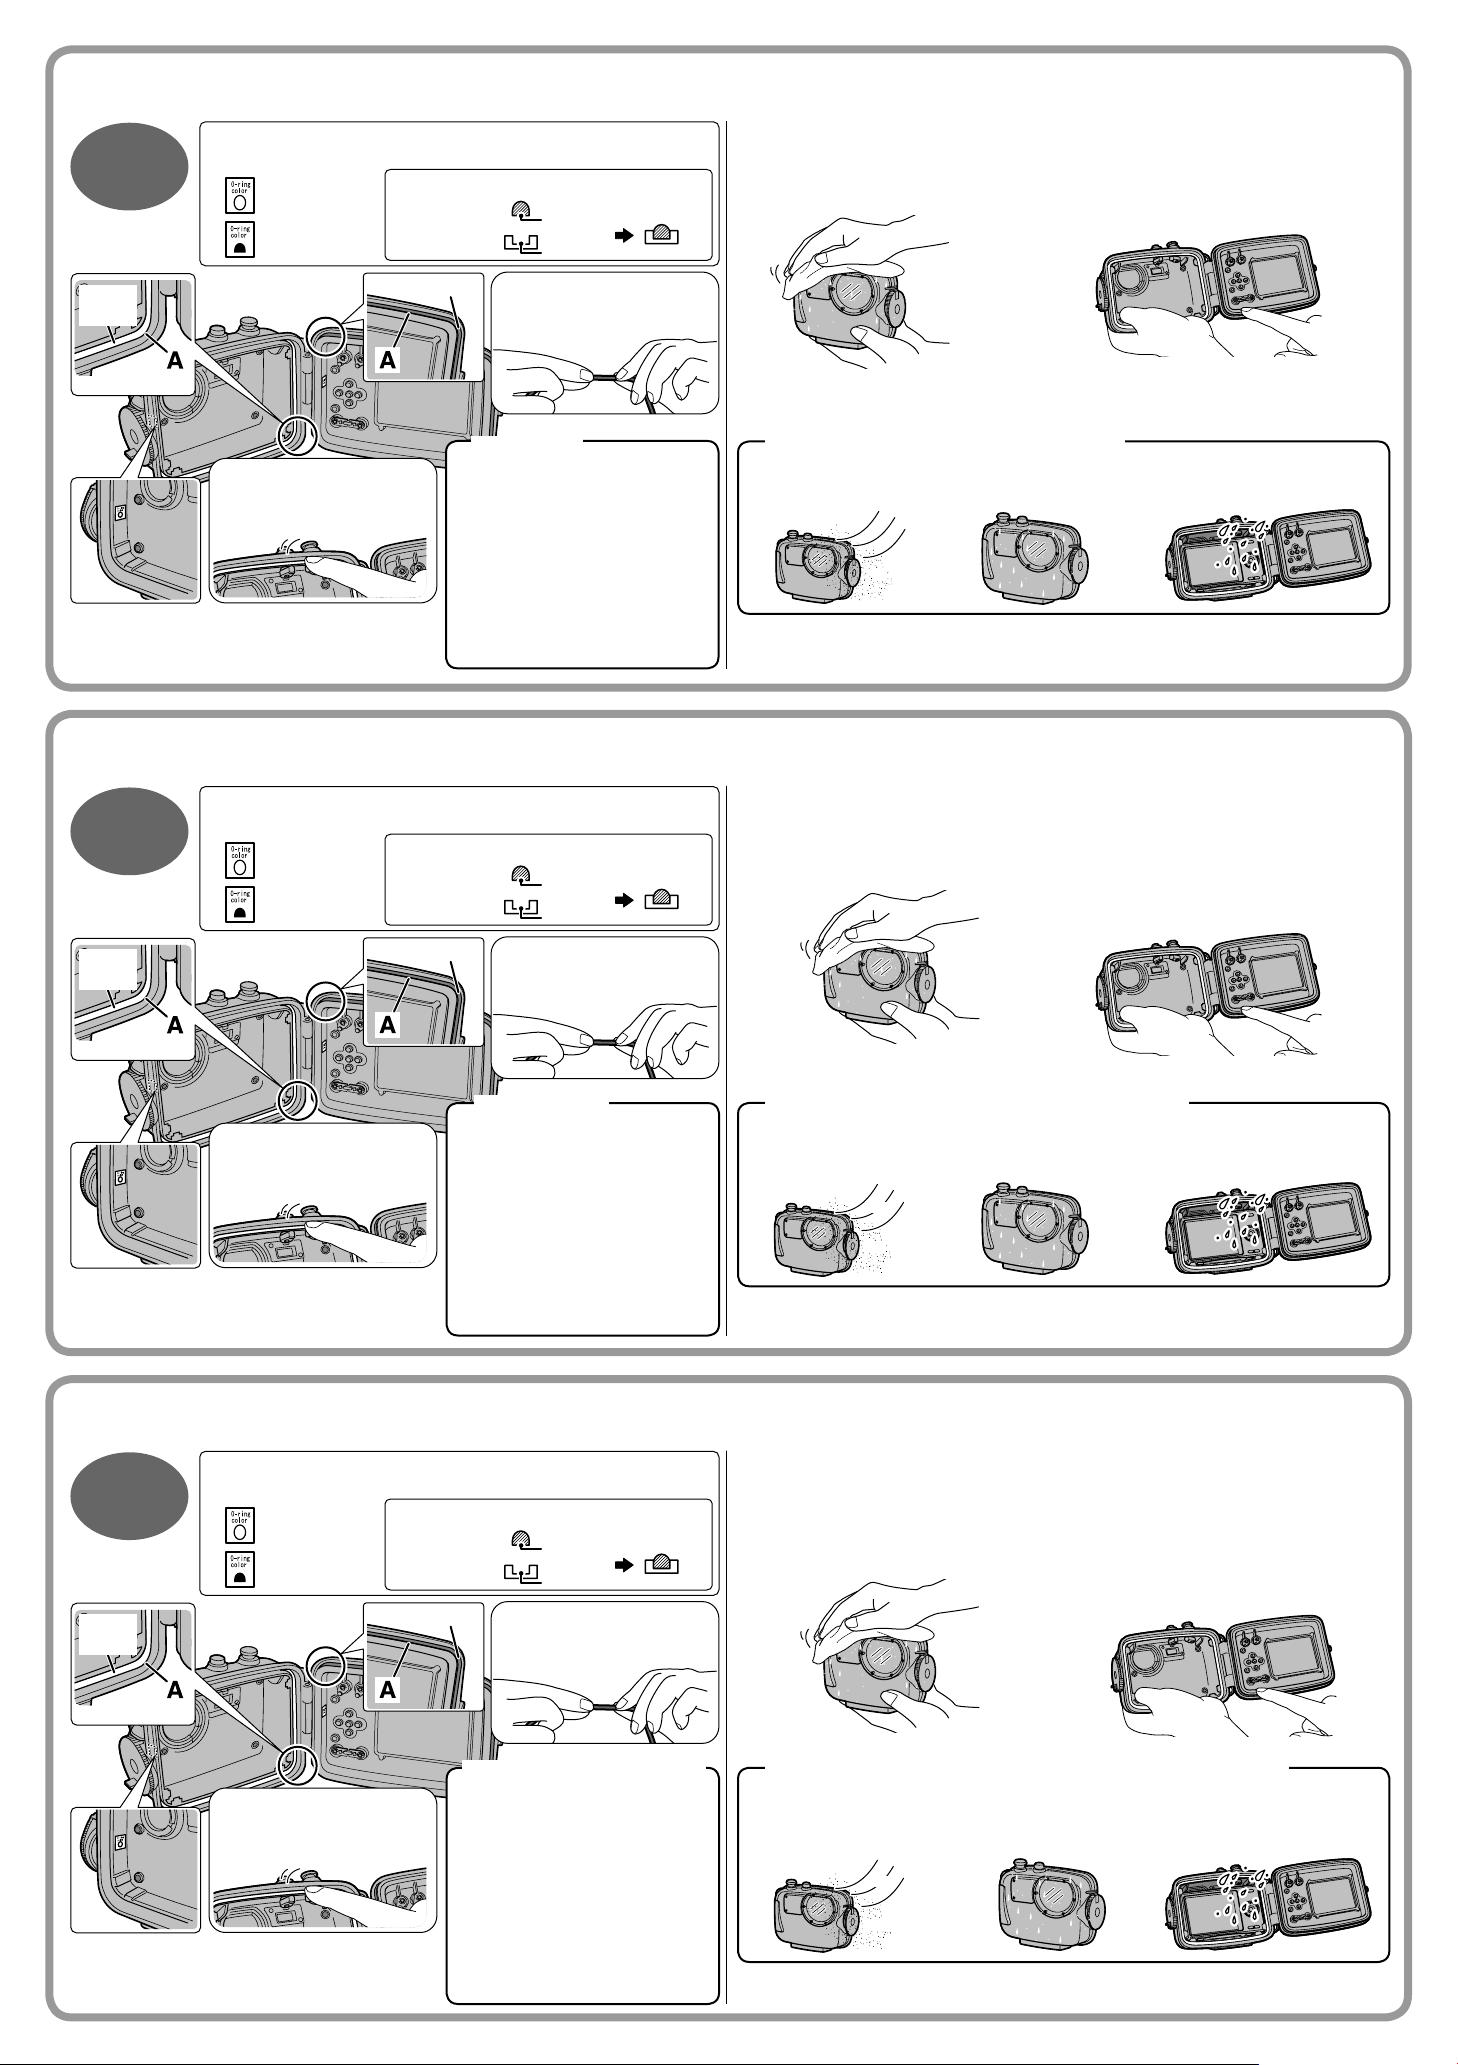
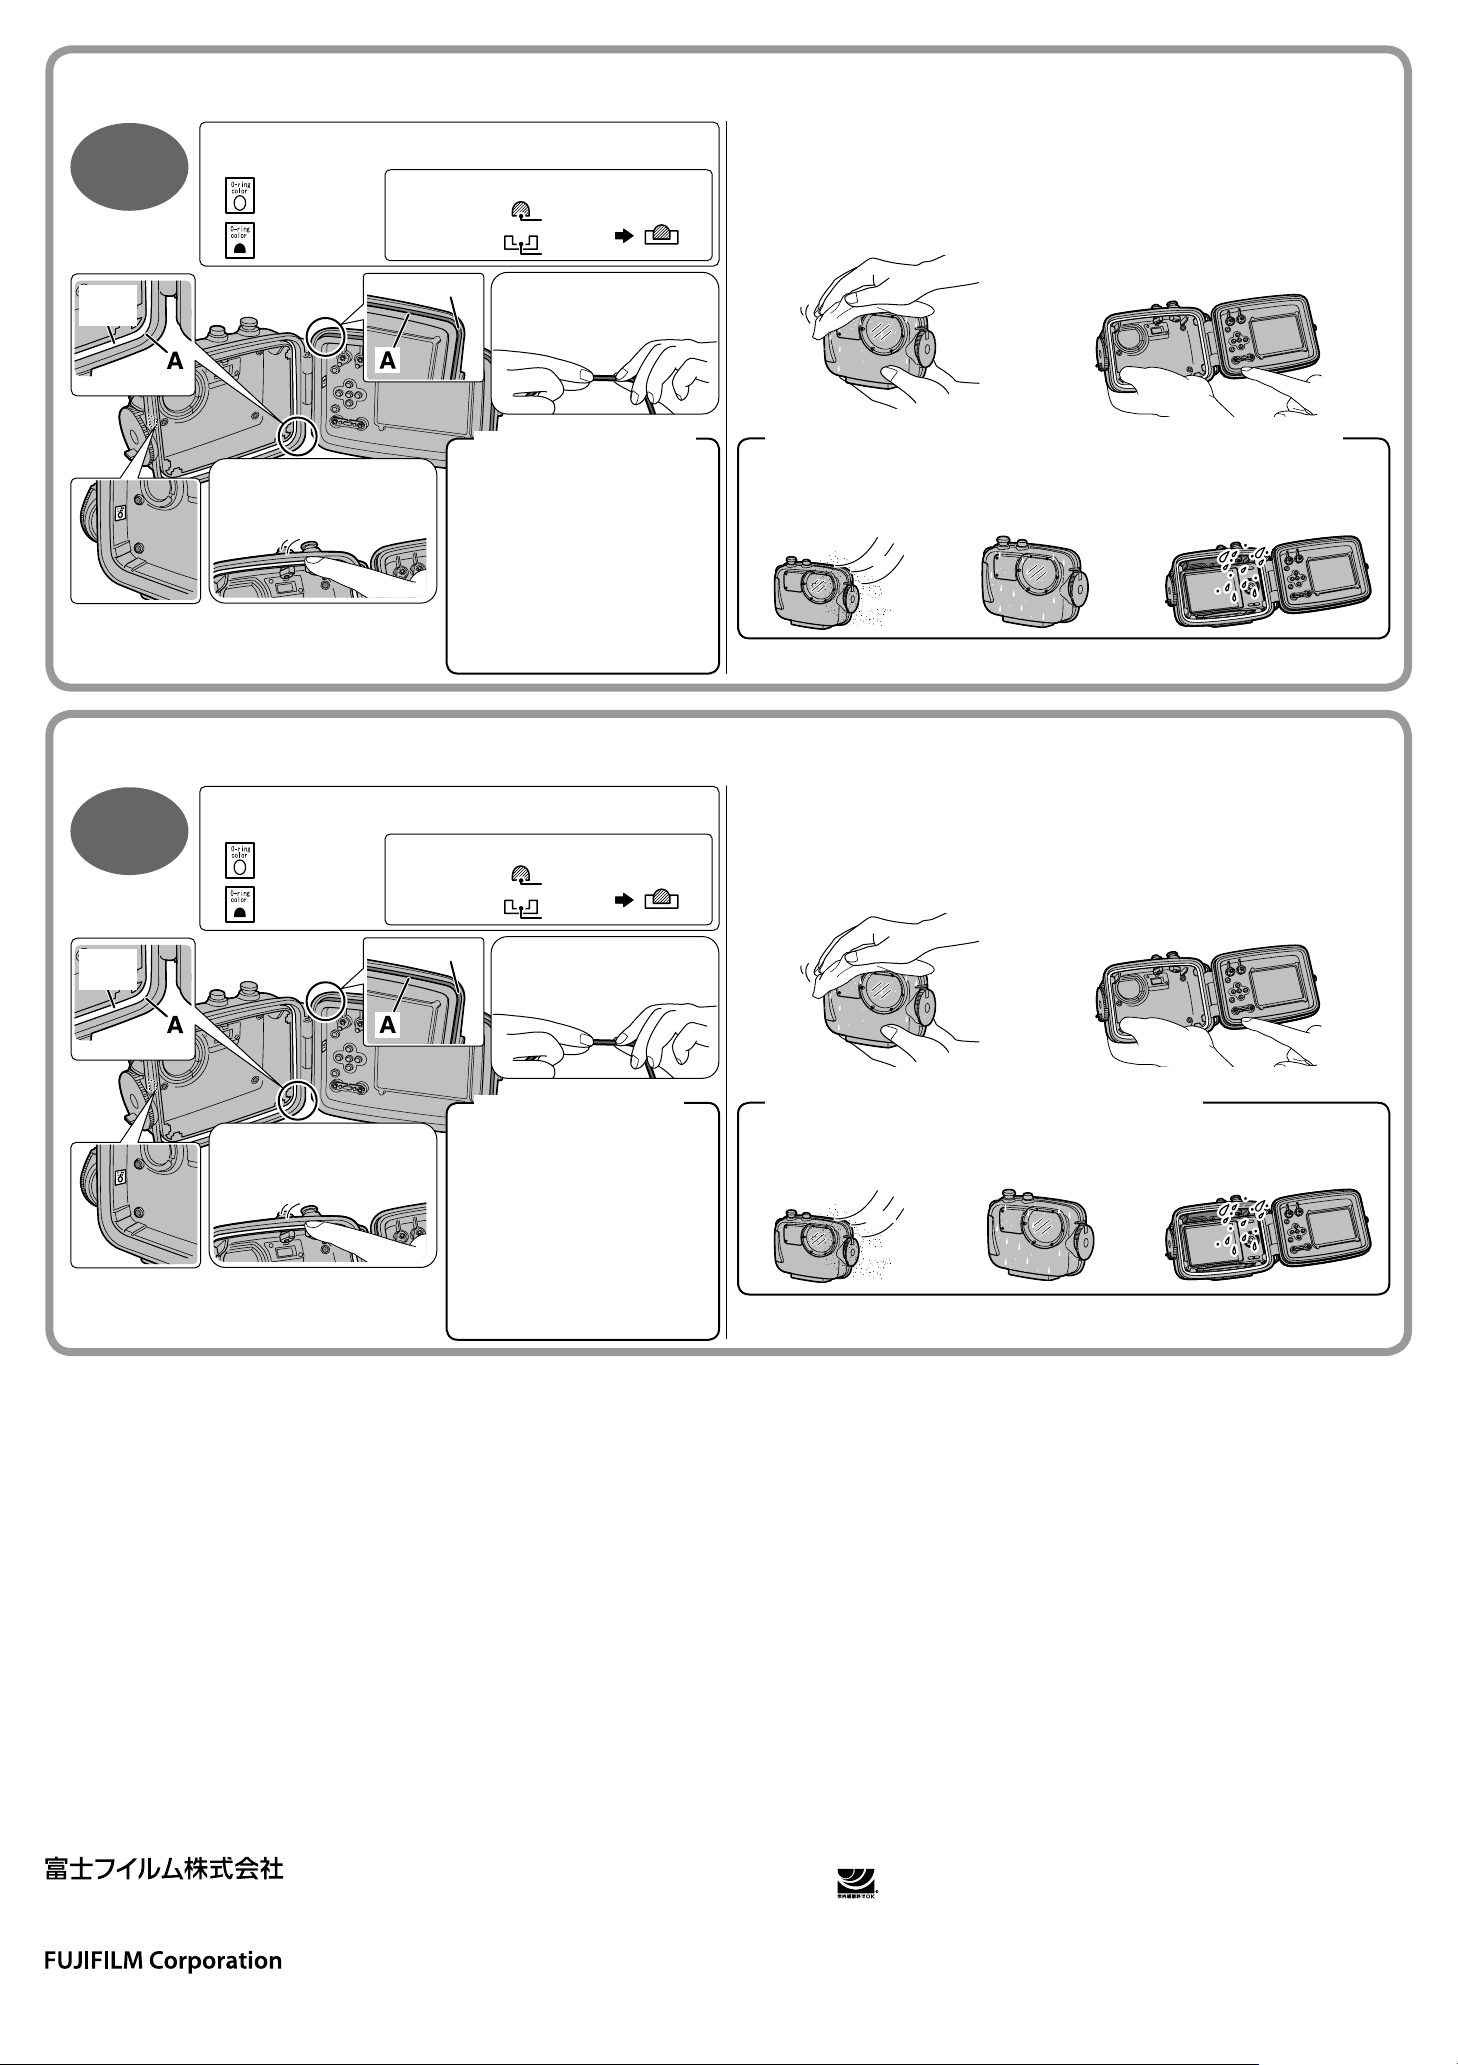
QUICK MAINTENANCE GUIDE (Waterproo f Case for the F inePix Z10 0fd)
The O-rings are different in shape and color. Take care not to
confuse them.
EN
O-ring
(white)
O-rings are extremely important since they prevent
water leaking into the camera.
Regular and careful maintenance will ensure that you
get the maximum enjoyment from your camera.
Front-side O-ring
(white)
Back-side O-ring
(orange)
Check the fi t.
Run your fi nger around the entire
O-ring to check for bulges or
foreign particle on the ring.
Take care that the back-side O-ring (orange) is fi tted
in the correct direction.
● Cros s section of the
O-ring
● Cros s section of the
groove
O-ring (orange)
● Correctly installed
Flat face
Bottom face
of groove
Apply grease to the O-ring.
Apply grease to your fi ngers and
spread a thin, even layer over the
entire O-ring.
O-ring a nd groove
Check for these!
• Are the O -rings damaged or cracked?
• Is there any foreign particle stuck to the
O-rings?
• Is there any foreign particle stuck to the
rear surface flange (A) that fits onto the
O-ring?
• Are there any twists in the O-ring when it
is fitted?
• Have you mistakenly switched the
positions of the front (white) and back
(orange) O-rings?
• Is the back-side O-ring(orange) fitted in
the correct direction?
Check carefully to prevent leaks!
WHEN OPENING THE WATERPROOF CASE…
Carefully dry the case.
Always wipe the case dry before opening it.
Do not open the Waterproof Case in these situations!
● In strong wind
when there is dust
or grit in the air
* Always carry this Maintenance Guide with you when using the Waterproof Case.
Check again before using the camera.
Run your fi nger around the O-ring to check that there
is no foreign particle on the ring. It’s a good idea to
run your fi nger around the rear surface fl ange that fi ts
onto the O-ring.
● When the Waterproof
Case is wet
Wind
Dust
Refer to the Owner’s manual for information on handling and chec king the Waterpro of Case before
use, storing the Waterproof Case after use, and Waterproof Case maintenance.
● When water spray might get
into the case
GUIDE D’ENTRETIEN RAPIDE
Les joints toriques ont des formes et des couleurs différentes.
Veillez à ne pas les confondre.
FR
Joint
torique
(blanc)
Joint torique pour le
côté avant (blanc)
Joint torique pour le
dos (orange)
Vérifi ez que le joint torique
est correctement installé.
Passez vos doigts le long du joint torique afi n de
détecter de possibles ondulations ; veillez également
à retirer toute particule déposée sur le joint.
Les joints toriques sont très importants, car ils
empêchent la pénétration d’eau dans l’appareil photo.
Un entretien régulier des joints vous permettra
d’utiliser votre appareil photo de façon optimale.
Veillez à installer le joint torique (orange) arrière
dans la bonne position.
● Coupe du joint
torique
● Coupe de la rain ure
Joint torique (orange)
Côté plat
Base de la
rainure
Lubrifi ez le joint torique.
Appliquez une petite quantité de
graisse sur vos doigts, puis lubrifi ez
la totalité du joint torique.
Procédez aux vérifi cations suivantes
• Les joints toriques sont ils endommagés
ou fissurés ?
• Des particules sont-elles déposées sur
les joints toriques ?
• Des particules sont-elles déposées sur
l’embase (A) fixée sur le joint torique ?
Le joint torique installé sur le caisson est-il tordu ?
•
•
Avez-vous par erreur inversé le joint torique du côté
avant (blanc) et le joint torique du dos (orange) ?
•
Le joint
torique (orange)
bonne position ?
Pour éviter les fuites, vous
devez toujours procéder à ces
vérifi cations avant utilisation !
(Caisson étanche de l’appareil ph oto FineP ix Z100fd)
LORSQUE VOUS OUVREZ LE CAISSON ÉTANCHE…
Séchez soigneusement le
● Figure d’installation
du joint to rique
arrière est-il dans la
caisson.
Il est important de toujours sécher le
caisson avant de l’ouvrir.
N’ouvrez jamais le caisson étanche dans les situations suivantes !
● S’il y a trop de vent,
de poussière et de
particules dans l’air
*
Lorsque vous utilisez le caisson étanche, gardez ce guide d’entretien à portée de main.
Avant de réutiliser l’appareil photo,
procédez aux vérifi cations.
Passez vos doigts le long du joint torique
afi n de retirer toute particule déposée sur le
joint. Passez également vos doigts le long de
l’embase fi xée sur le joint torique.
● Si le caisson
étanche est humide
Vent
Poussière
Reportez-vous au mode d’emploi pour d e plus amples informatio ns conc ernant l es précautions à
prendre avant d’utiliser le caisson étanche, le stock age et l’entretien du caisso n après ut ilisation.
● Si de l’eau a pénétré à
l’intérieur du caisson
SCHNELLWARTUNGSANLEITUNG
(Unter wassergehäuse für die Fi nePix Z100 fd)
*
Nehmen Sie diese Schnellwartungsanleitung immer mit, wenn Sie das Unterwassergehäuse verwenden.
Die O-Ringe unterscheiden sich in Form und Farbe. Achten Sie
darauf sie nicht zu verwechseln.
DE
O-Ring
(weiß)
Die O-Ringe sind sehr wichtig, da sie verhindern,
dass Wasser in die Kamera eindringt.
Eine regelmäßige und sorgfältige Wartung stellt die
beste Nutzung Ihrer Kamera sicher.
Vorderseitiger
O-Ring (weiß)
Hinterseitiger
O-Ring (orange)
Überprüfen Sie den Sitz.
Fahren Sie mit dem Finger über
den gesamten O-Ring und prüfen
Sie ihn auf Wölbungen oder
Fremdkörper auf dem Ring.
Achten Sie darauf, dass der rückseitige O-Ring
(orange) mit der richtigen Ausrichtung eingesetzt wird.
● Quersc hnitt des
O-Rings
● Quer schnitt der Nut
O-Ring (orange)
Flache
Seite
Grundfläche
der Nut
Fetten Sie den O-Ring ein.
Bedecken Sie Ihre Finger mit Fett und
verteilen Sie eine dünne, gleichmäßige
Schicht auf dem gesamten O-Ring.
eingese tzen O-Rings
bbildung des
● A
Überprüfen Sie Folgendes!
•
Sind die O -Ringe beschädigt oder gerissen?
•
Haften irgendwelche Fremdkörper an den O-Ringen?
• Befinden sich irgendwelche Fremdkörper
an der rückseitigen Oberflächenkante
(A), die auf den O-Ring angepasst ist?
• Ist der O -Ring an irgendeiner Stelle
verdreht, wenn er eingepasst ist?
• Haben Sie versehentlich die Positionen
des vorderen (weiß) und hinteren
(orange) O-Rings vertauscht?
Ist der rückseitige O-Ring
•
richtigen Ausrichtung eingepasst worden?
(orange)
mit der
Überprüfen Sie diese Punkte sorgfältig,
um undichte Stellen zu verhindern!
WENN SIE DAS UNTERWASSERGEHÄUSE ÖFFNEN ...
Trocknen Sie das Gehäuse
sorgfältig ab.
Wischen Sie das Gehäuse immer trocken,
bevor Sie es öffnen.
Öffnen Sie das Unterwassergehäuse nicht in den folgenden Situationen!
● Bei starkem Wind,
wenn Staub oder
Feinteile in der
● Wenn das
Unterwassergehäuse
nass ist.
Luft sind.
Wind
Staub
Informationen zur Handhabung und Überprüfung des Unterwassergehäuse s vor der Verwendung, zur Aufbewahrung des
Unterwasserg ehäuses nach der Ver wendung und zur War tung des Unterwassergehäuses finden S ie in der Bedienungsanl eitung.
Überprüfen Sie diese Punkte noch
einmal, bevor Sie die Kamera verwenden.
Fahren Sie mit dem Finger über den gesamten O-Ring
und prüfen Sie, ob sich Fremdkörper auf dem Ring
befi nden. Sie sollten mit dem Finger auch über die
rückseitige Oberfl ächenkante fahren, die auf den
O-Ring angepasst ist.
● Wenn Gischtwasser in das
Gehäuse gelangen könnte.
GUÍA RÁPIDA DE MANTENIMIENTO
Las juntas tóricas tienen distinta forma y color. Preste atención
para no confundirlas.
ES
Junta
tórica
(blanca)
Las juntas tóricas son especialmente importantes, ya
que impiden que el agua entre dentro de la cámara.
Un mantenimiento frecuente y meticuloso garantizará
las mejores prestaciones de la cámara.
Junta tórica
delantera (blanca)
Junta tórica
trasera (naranja)
Compruebe el ajuste.
Pase el dedo por toda la junta
tórica para comprobar que no hay
salientes ni partículas extrañas.
Tenga cuidado para que la parte posterior de la junta
tórica (naranja) quede ajustada en la dirección correcta.
● Sección transversal
de la junta t órica
● Sección transversal
de la ranura
Junta tórica
(naranja)
Cara plana
Cara inferior
de la ranura
Aplique grasa a la junta tórica.
Aplíquese grasa en los dedos y
extienda una capa fi na y uniforme
en toda la junta tórica.
¡Compruebe lo siguiente!
•
¿Están las juntas tóricas dañadas o agrietadas?
• ¿Hay alguna partícula extraña adherida
en las juntas tóricas?
• ¿Hay alguna partícula extraña adherida
en la pestaña posterior (A) que encaja en
la junta tórica?
¿Se dobla la junta tórica al intentar ajustarla?
•
• ¿Ha cambiado por equivocación las
posiciones de las juntas tóricas frontal
(blanca) y posterior (naranja)?
¿La parte posterior de la junta tórica (naranja)
•
está ajustada en la dirección correcta?
¡Realice las comprobaciones con
cuidado para evitar fi ltraciones!
(Caja est anca para el m odelo Fin ePix Z100 fd)
AL ABRIR LA CAJA ESTANCA…
Séquela con cuidado.
Siempre debe secar la caja estanca antes
Junta tór ica y ranura
●
instaladas correctamente
de abrirla.
¡No abra la caja estanca en las situaciones siguientes!
● Cuando hace mucho
viento o hay polvo y
suciedad en el aire
*
Lleve siempre esta Guía de mantenimiento con usted cuando utilice la caja estanca.
Vuelva a examinarla antes de utilizar la
cámara.
Pase el dedo por la junta tórica para comprobar
que no hay salientes ni partículas extrañas. Lo
recomendable es pasar el dedo alrededor de la
pestaña posterior que encaja en la junta tórica.
● Cuando la caja
estanca está
● Cuando pueda entrar agua
pulverizada en la caja
húmeda
Viento
Polvo
Consulte el Manual del usuario para obtener más información s obre la manipulación y la comprobación
de la caja estanca antes de ut ilizarla, sobre su almacenamiento tras el uso y sobre el mantenimiento.
〒107-0052東京都港区赤坂9丁目7番3号
7-3, AKASAKA 9-CHOME, MINATO-KU, TOKYO 107-0052, JAPAN
BL00655-100 (1)
●本製品に関するお問い合わせは…
富士フイルムFinePixサポートセンター
ナビダイヤル
市内通話料金でご利用いただけます
月曜日〜金曜日 午前9:00 〜午後5:40 土曜日 午前10:00 〜午後5:00
日・祝日・年末年始を除く
0570-00-1060
/携帯電話・PHSからは
042-481-1673
Printed in China Y-709108
 Loading...