

Page 1
OWNER,S MANUAL
PANORAMA
LOADING
Page 2

CONTENTS
SPECIAL FEATURES............................................................... 2
NAMES OF PARTS .................................................................. 3
1. BASIC PROCEDURE
LOAD THE BATTERY .............................................................. 6
ATTACH THE STRAP .............................................................. 8
LOAD THE FILM ....................................................................... 9
TAKING PICTURES................................................................11
END OF FILM..........................................................................17
2. ADVANCED TECHNIQUES
USING THE AUTOFOCUS LOCK.......................................... 19
SELECTING THE EXPOSURE MODE .................................. 21
USING THE SELF-TIMER ...................................................... 25
USING THE REMOTE CONTROL SWITCH.......................... 26
CAMERA FAULTS, POSSIBLE CAUSES,
AND REMEDIES .....................................................................29
PRINT FAULTS, POSSIBLE CAUSES, AND REMEDIES .... 31
CAMERA CARE AND CAUTIONS ......................................... 32
SPECIFICATIONS .................................................................. 33
SPECIAL FEATURES
• A fully automatic 35 mm compact zoom camera
1.Power zoom (35-70 mm).
2.Switchable to panorama format in mid-roll. (Finder shows
red “P” when camera is on panorama mode).
3.Drop-in film loading, automatic threading, film prewinding
system.
4.Active type autofocusing.
5.0.65 m nearest focusing distance (at f=70 mm).
6.Freely selectable exposure modes (autoflash, red-eye re-
ducing, fill-in flash, and flash off modes).
7.Provision for remote control operation.
* Camera design may be different from the one shown in the
illustration.
2
Page 3
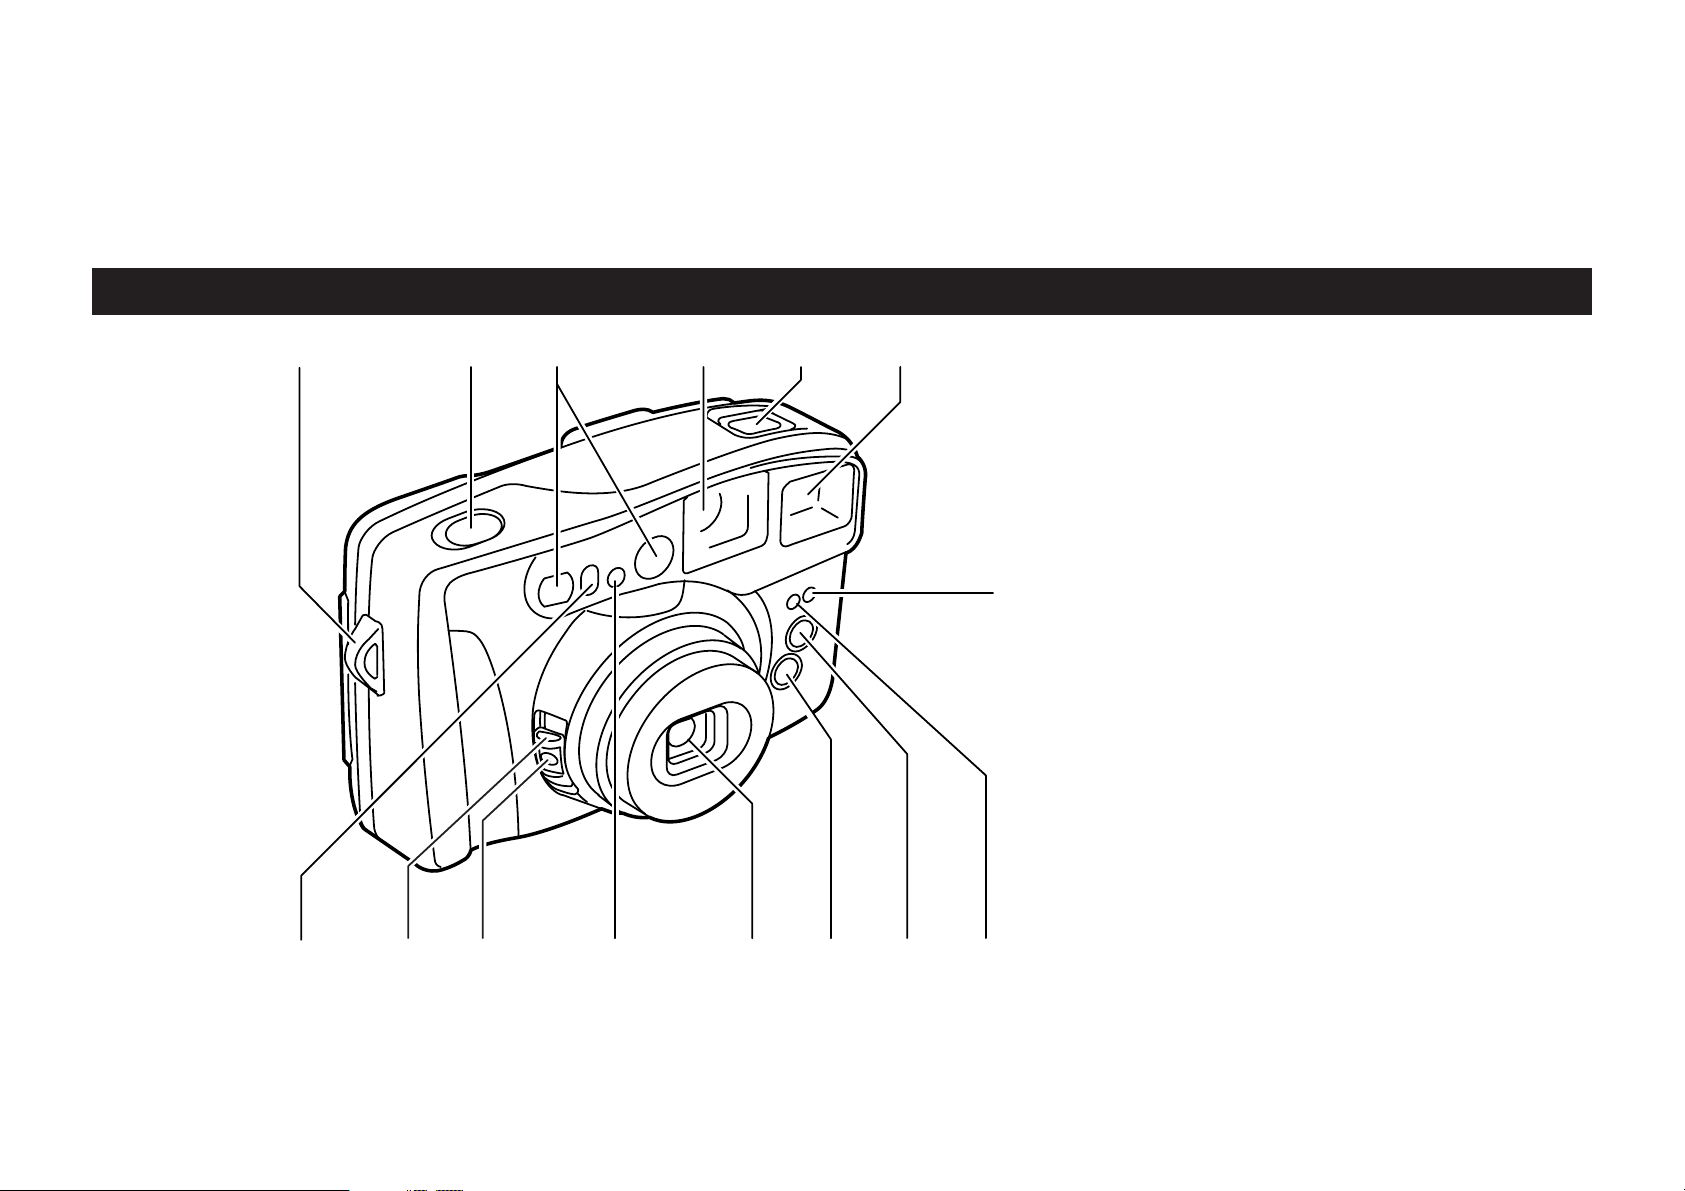
NAMES OF PARTS
123456
E
1 Strap Lug
2 Shutter Release
3 Autof ocus Windows
4 Finder Windo w
5 Liquid Crystal Display
6 Flash Lampface
7 Red-e ye Reducting Lamp
8 Lens Cov er Button/Po wer
switch/Panorama Button
9 Pinhead Button Lock
0 AE Light Sensor
A Lens
B Zoom Button (wide)
C Zoom Button (tele)
D Remote Control Sensor
E Self-timer/Remote Control
Lamp
78 0 ABCD
9
3
Page 4
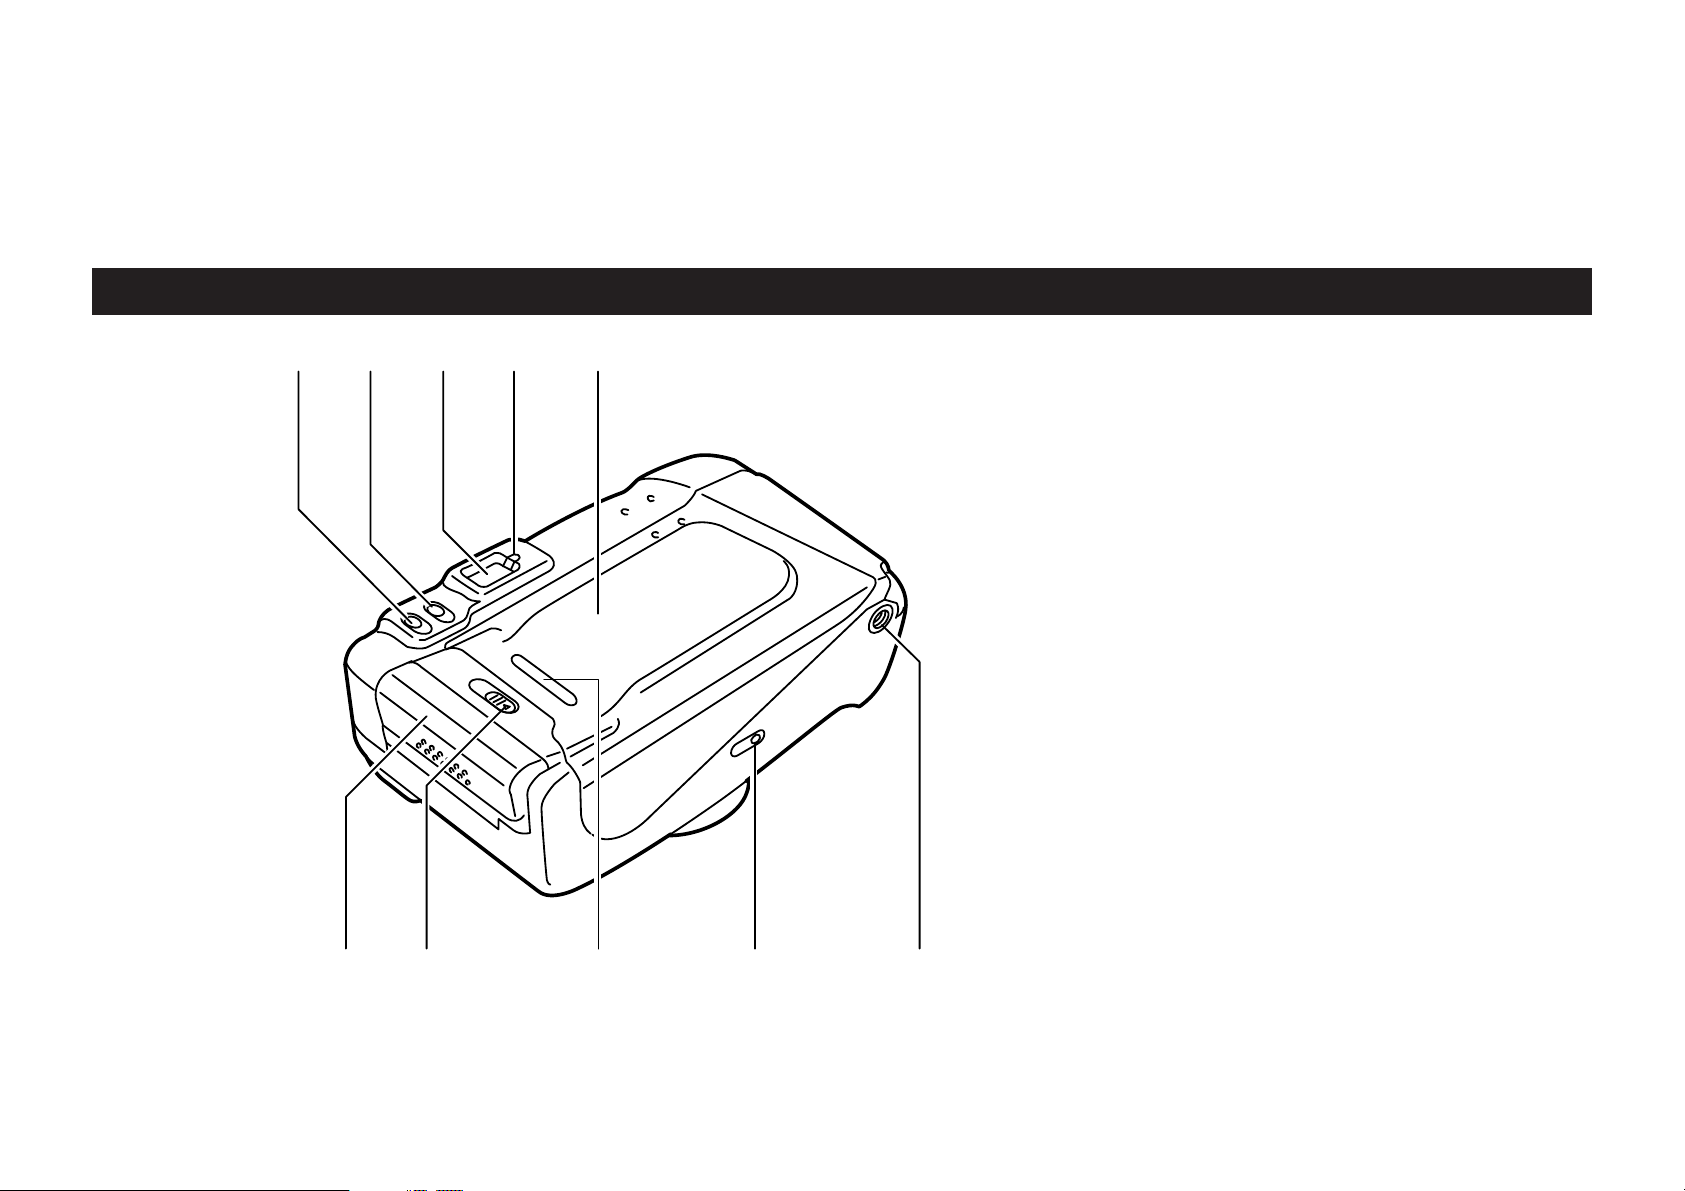
FGHI J
F Self-timer/Remote Control
Button
G Exposure Mode Button
H Finder Eyepiece
I Autofocus Lamp
J Camera Back
K Battery Compartment
Cover
L Camera Back Lock
M Film Confirmation Window
N Mid-roll Rewind Button
O Tripod Socket
4
KL M N
O
Page 5

Liquid Crystal Display
PQR
ST
P Self-timer Mode Sign
Exposure Counter Number
Q
R Red-eye Reducing Flash
Mode Sign
S Remote Control Mode
Sign
T Flash Mode Sign
5
Page 6
1. BASIC PROCEDURE
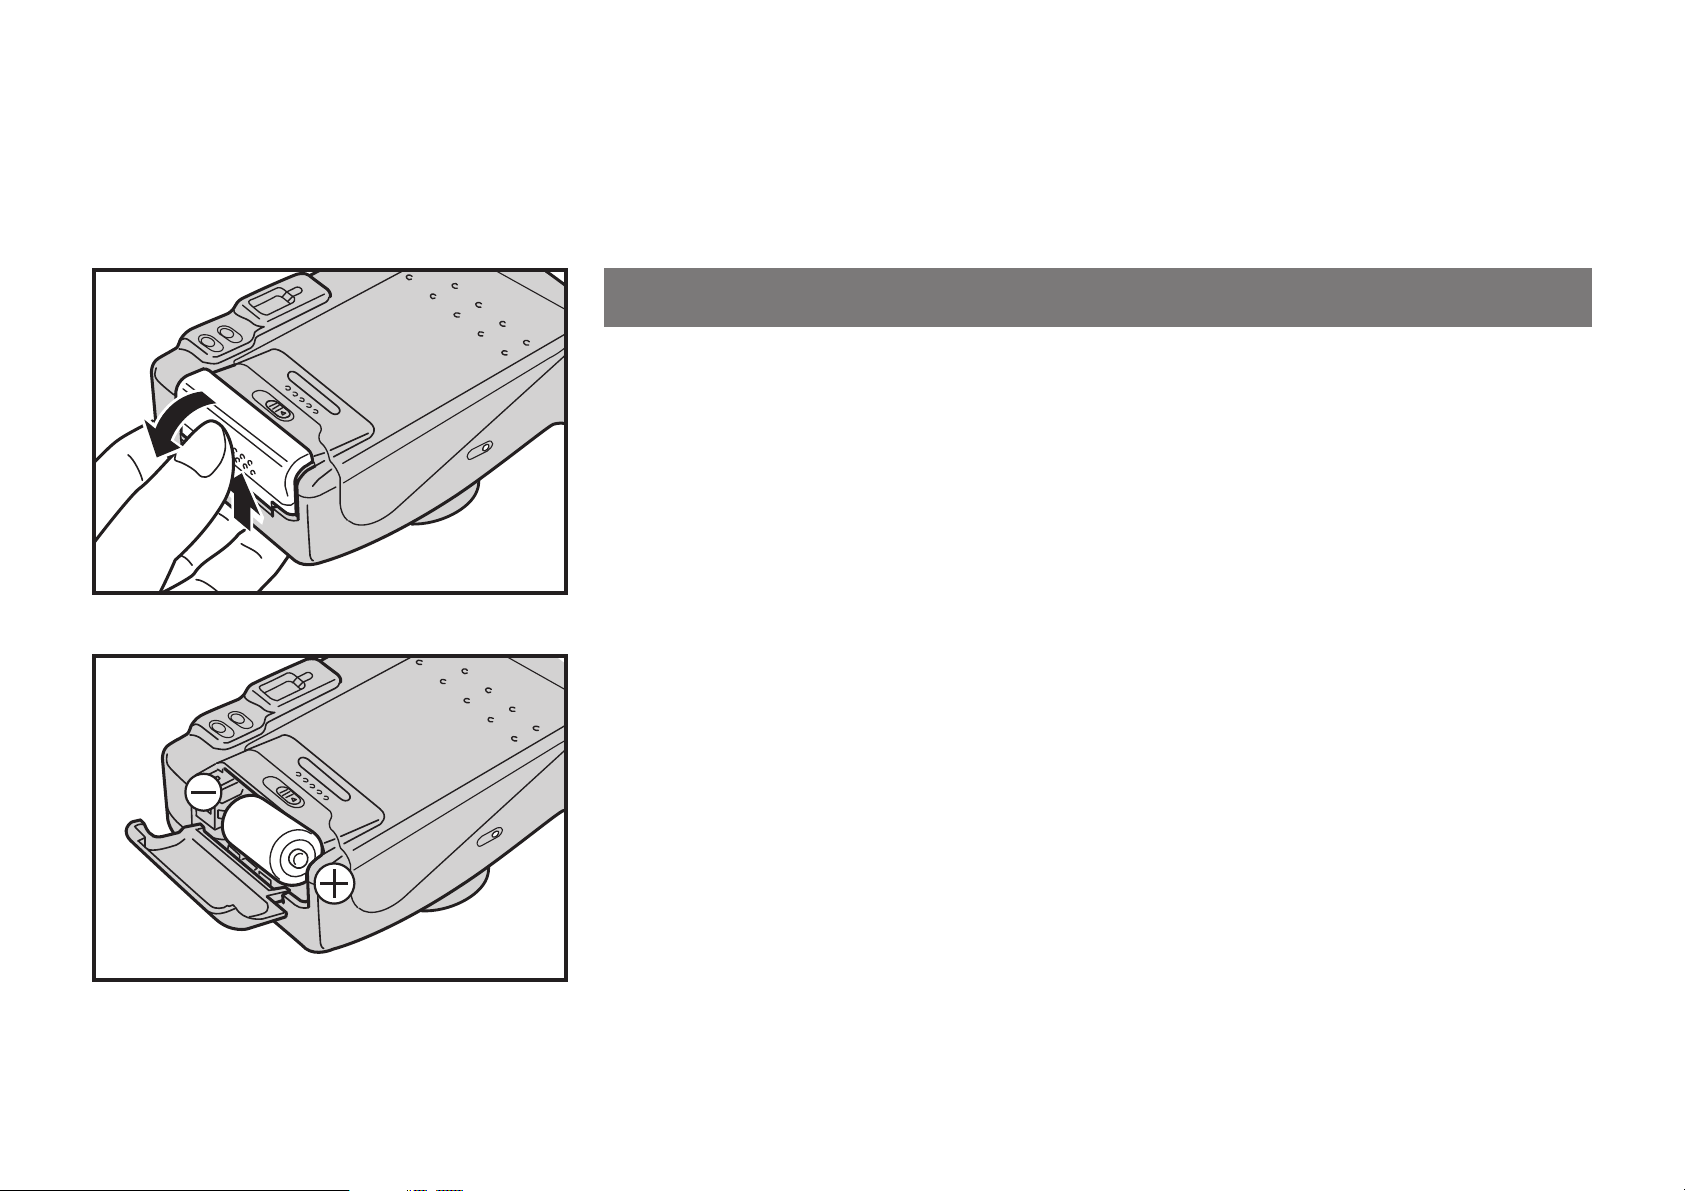
LOAD THE BA TTERY
• Use one 3V CR123A lithium battery.
• A new lithium battery will provide power for taking about 300 pictures, including
150 with flash (as tested according to Fujifilm’s battery testing procedure).
1. Open the battery compartment cover
Push the Cover’s grained part up (toward the camera back) and open the Cover
toward you.
2. Insert the battery
Insert the battery in the Battery Compartment, minus - end first, then press in the
plus + end and close the Battery Compartment Cover.
6
Page 7
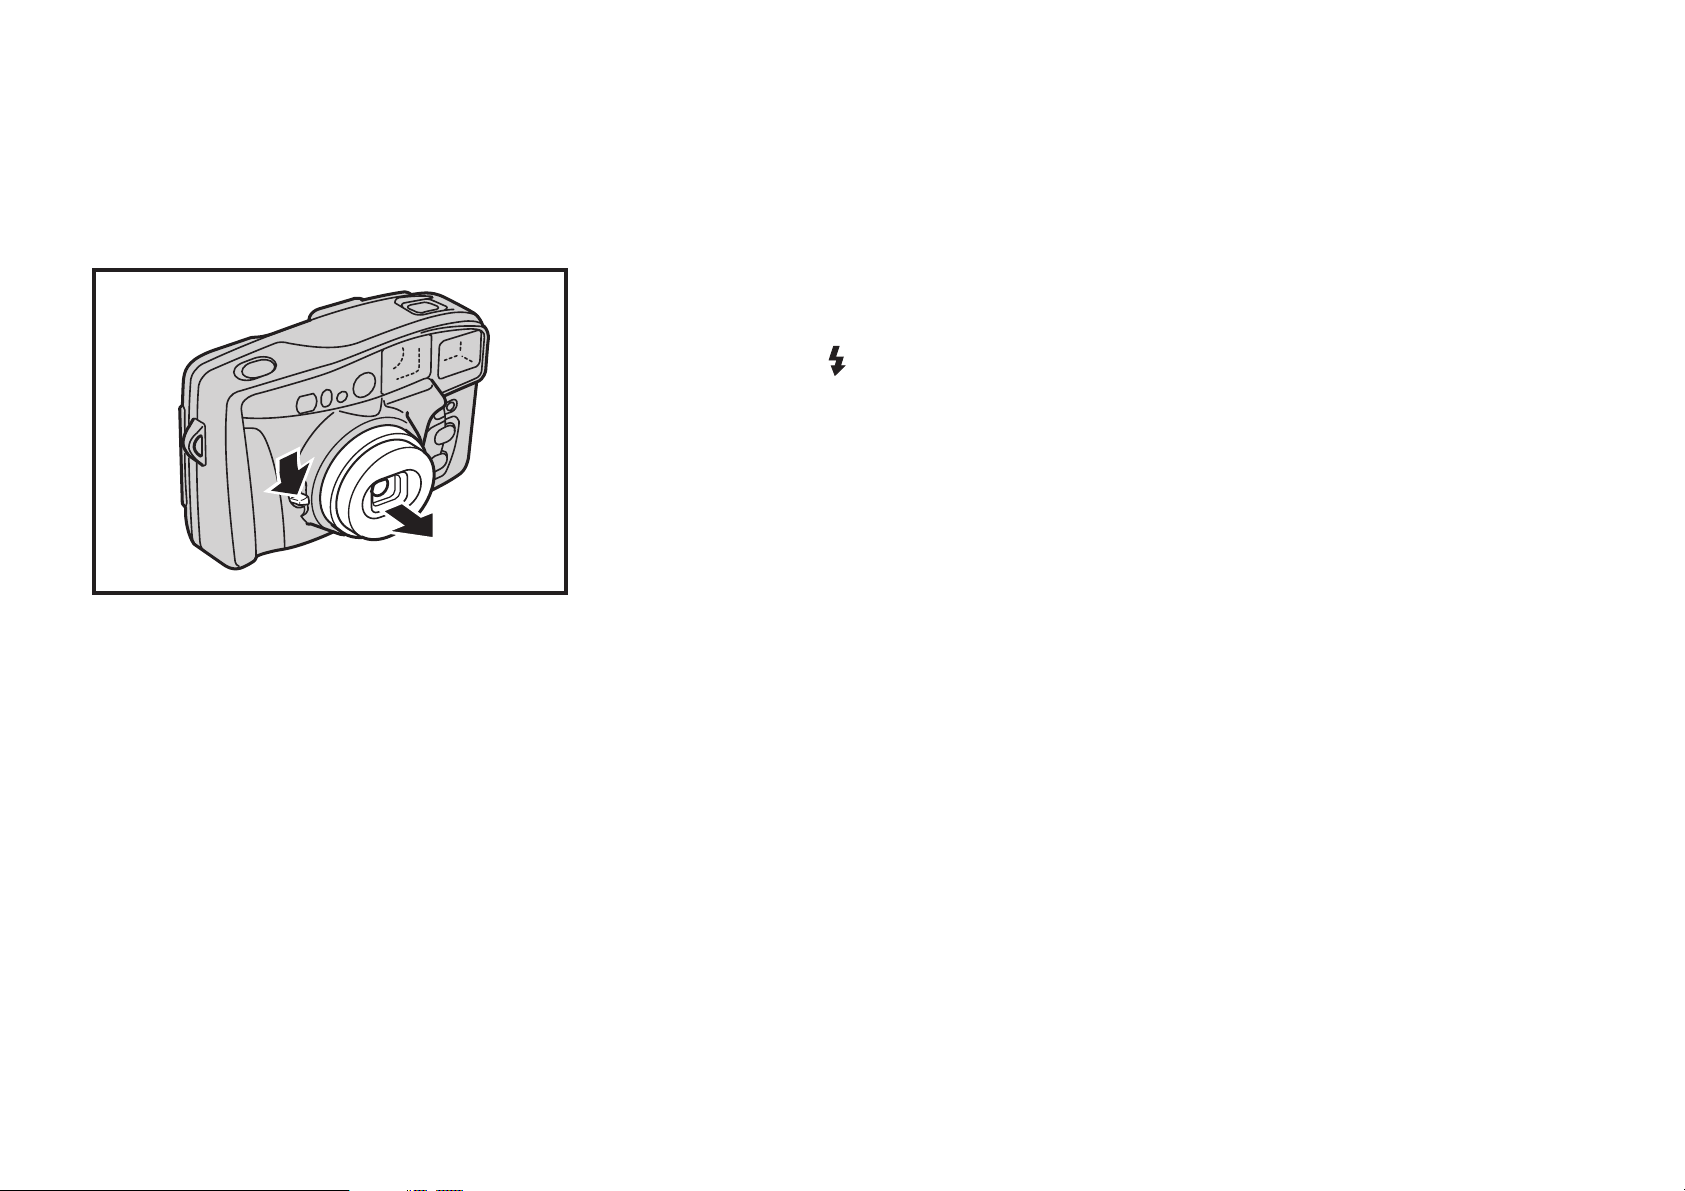
3. Check the loaded battery
Push the Lens Cover Button do wnward. If the Lens Co ver opens and the lens barrel
moves out into shooting position (wideangle), the battery is loaded correctly.
• If the Flash Sign ( ) in the LCD blinks f or 12 seconds or more after taking a flash picture, the
battery is spent. Change the battery with a new one as soon as possible.
• If you are going on a trip or are planning to tak e lots of pictures, take a spare battery along with
you just in case you might need it. This is especially true if you are tr a velling abroad because in
some countries you may not be able to obtain the type of battery you want.
7
Page 8
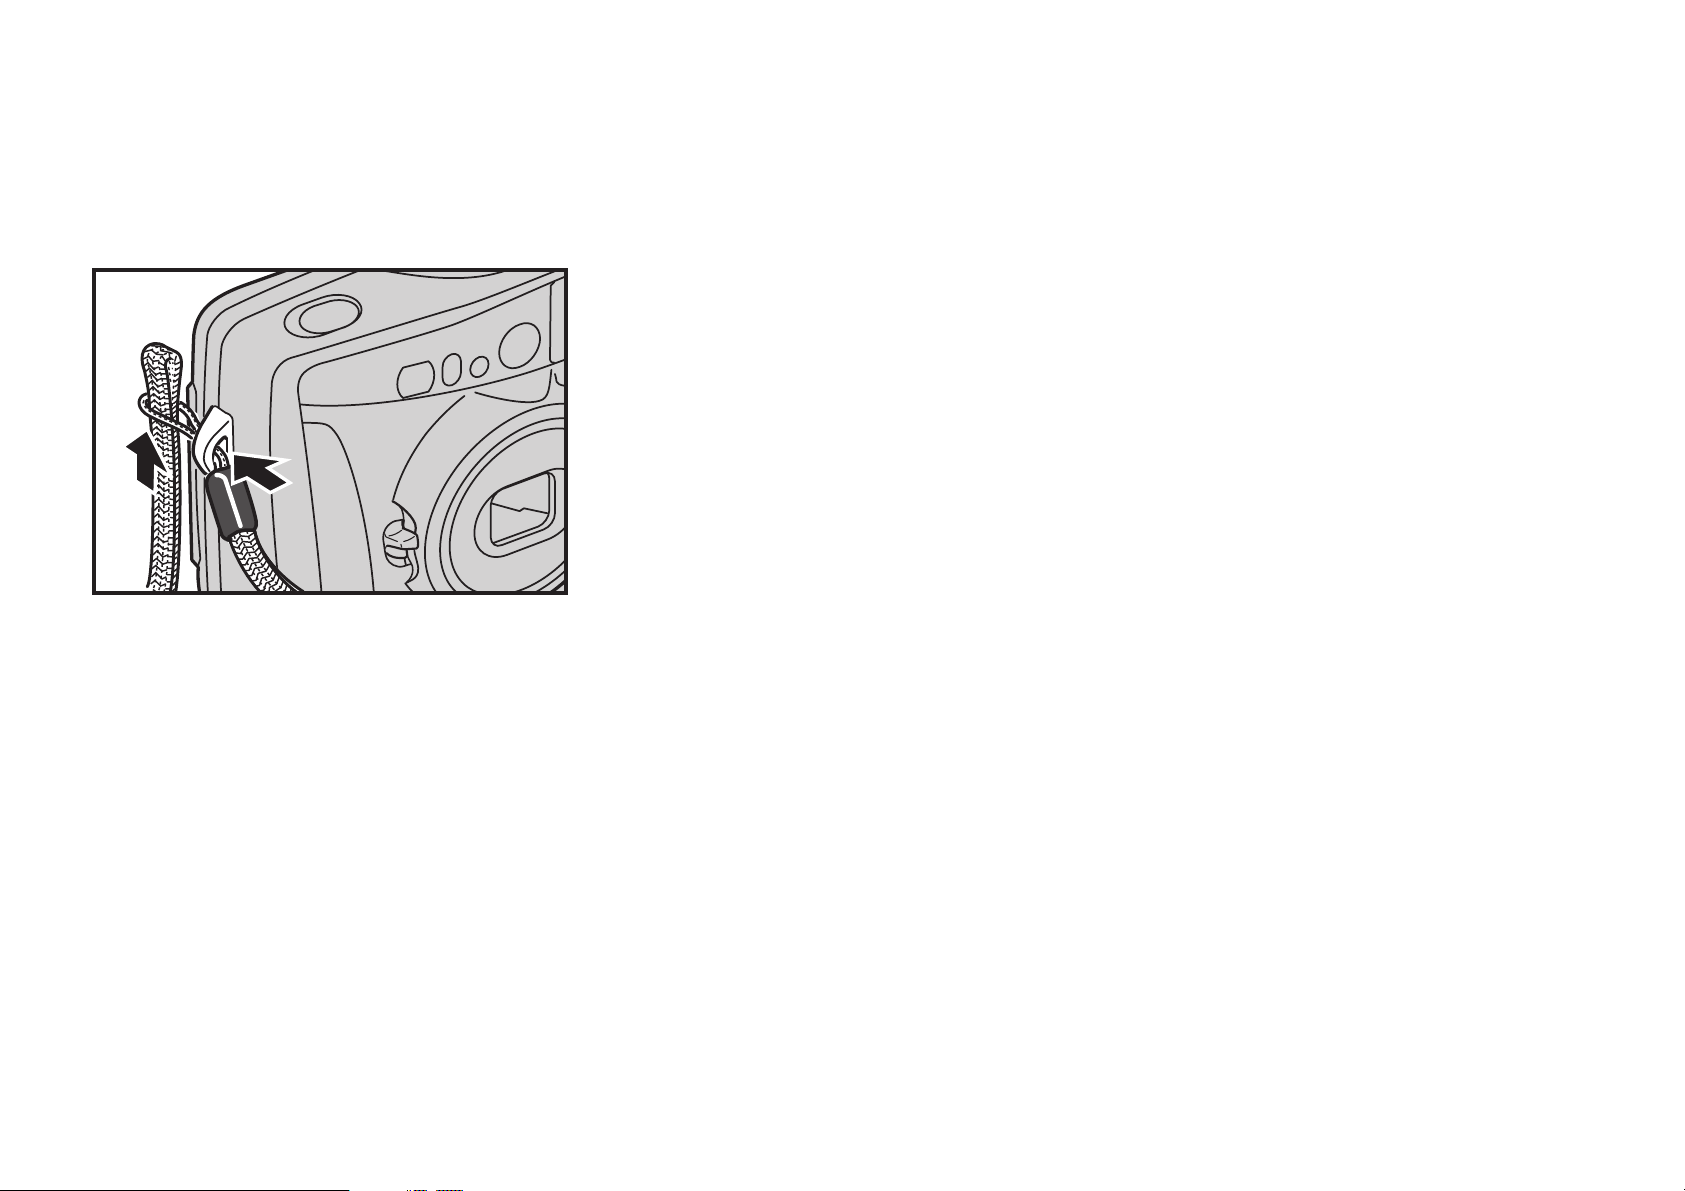
A TT A CH THE STRAP
Pass the looped end of the strap through the camera’s Strap Lug, then pass the
other end of the strap through the loop and pull it firmly.
8
Page 9

LOAD THE FILM
1. Open the camera back
To open, hold the camera bottom side up and push the Camera Back Lock downward.
2. Insert the film
Just push the film gently into the Film Chamber.
• Do not open the Camera Back all the w a y. It is normally set to open about 15° or just enough to
drop the film in smoothly and surely.
• Be sure to use 35 mm DX roll film (film marked DX on the box and cartridge).
• Always use your film before the expiration date printed on the film box.
9
Page 10
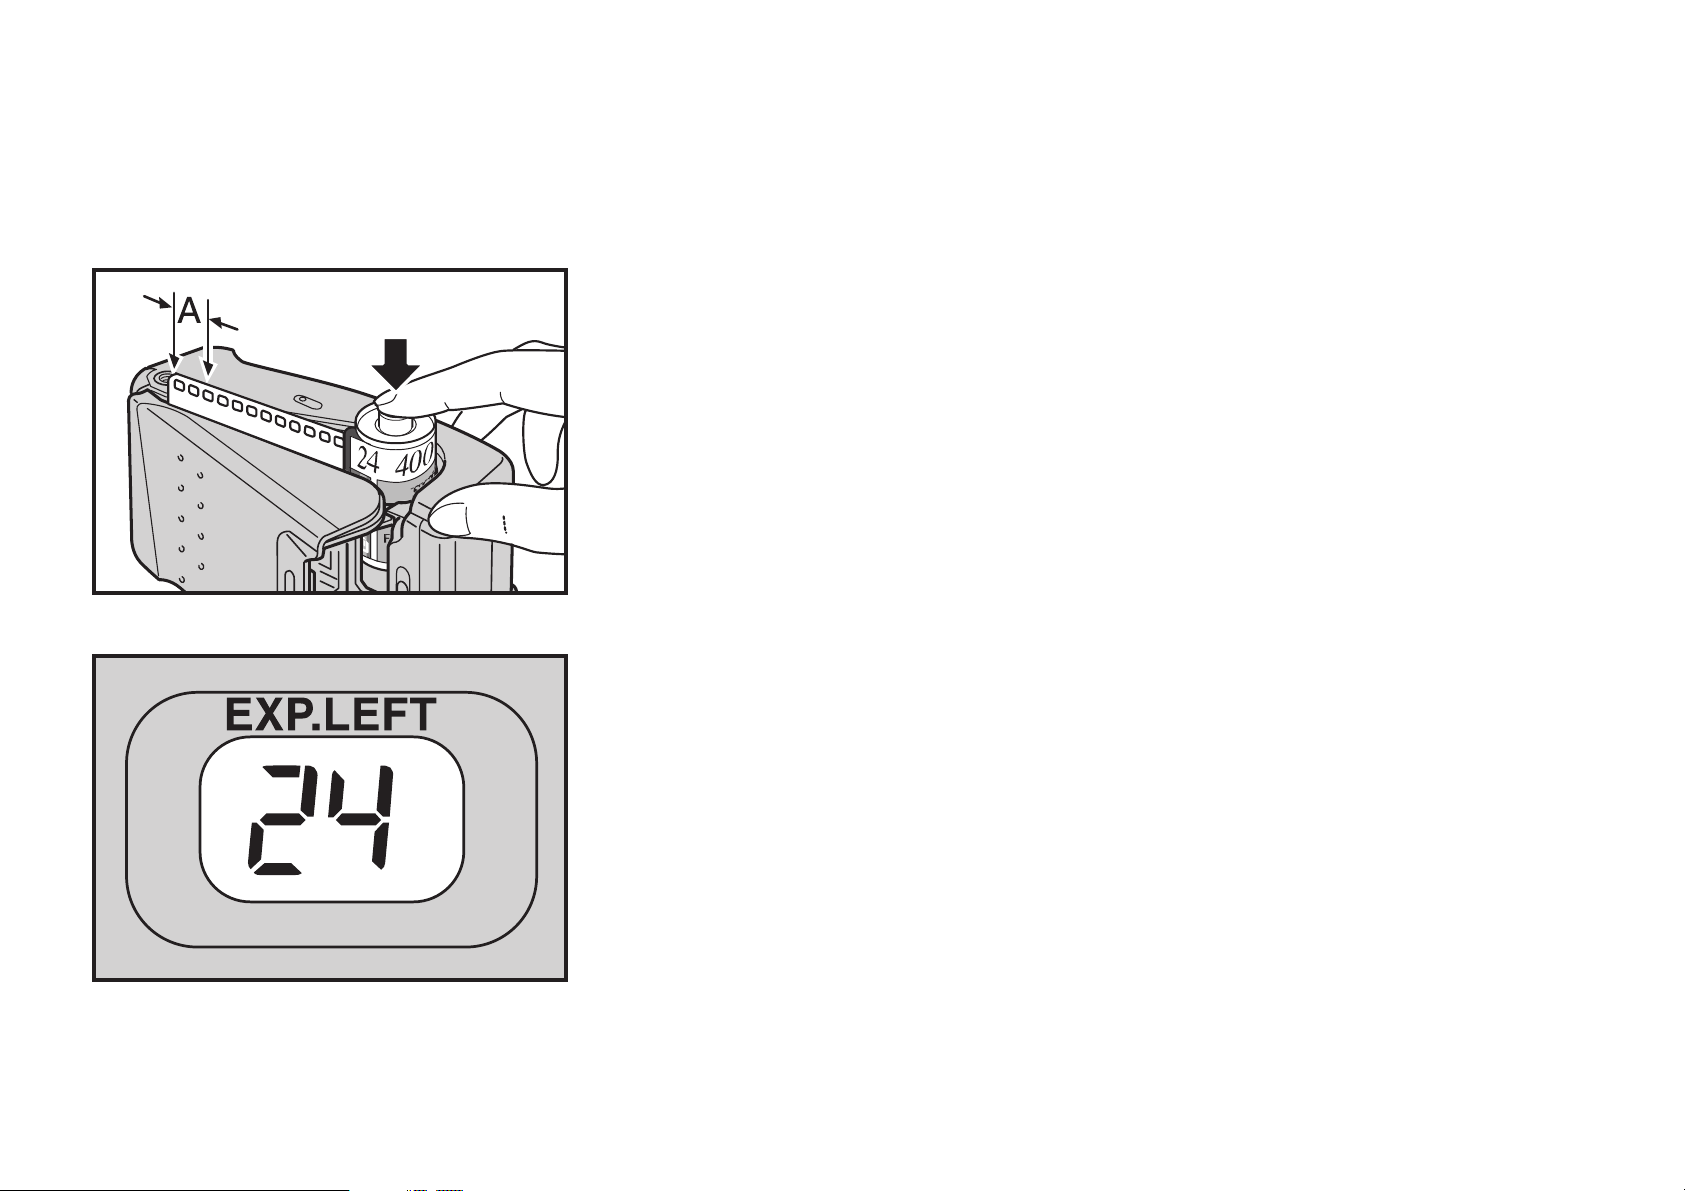
3. Check the film tip position
Make sure the film tip falls within the Film Tip Mark (green lines in the f ar end of the
film track).
4. Close the camera back
As soon as you close the Camera Back, the Exposure Counter will run though
rapidly and the film will prewind itself up to the v ery end. (If the film is a 24-exposure
roll, it will prewind itself in about 20 seconds and the Exposure Counter will stop at
the number “24”).
• If the film leader (the length of film protruding from the cartridge) is too short or too long, howev er, y ou’ll have to adjust it bef ore dropping the cartridge into the camera. To adjust, pull the film
out or wind it in so that the film tip will fall within the camera’s Film Tip Mark (green lines).
• The Film Confirmation Window will show the type and speed of the loaded film and the n umber
of exposures it contains.
10
Page 11
TAKING PICTURES
1. Turn on the power
To turn it on, press the Power Switch downward.
The Lens Cover will automatically open and the Lens will move out into shooting
position. If the Lens is in retracted position, the shutter won’t trip.
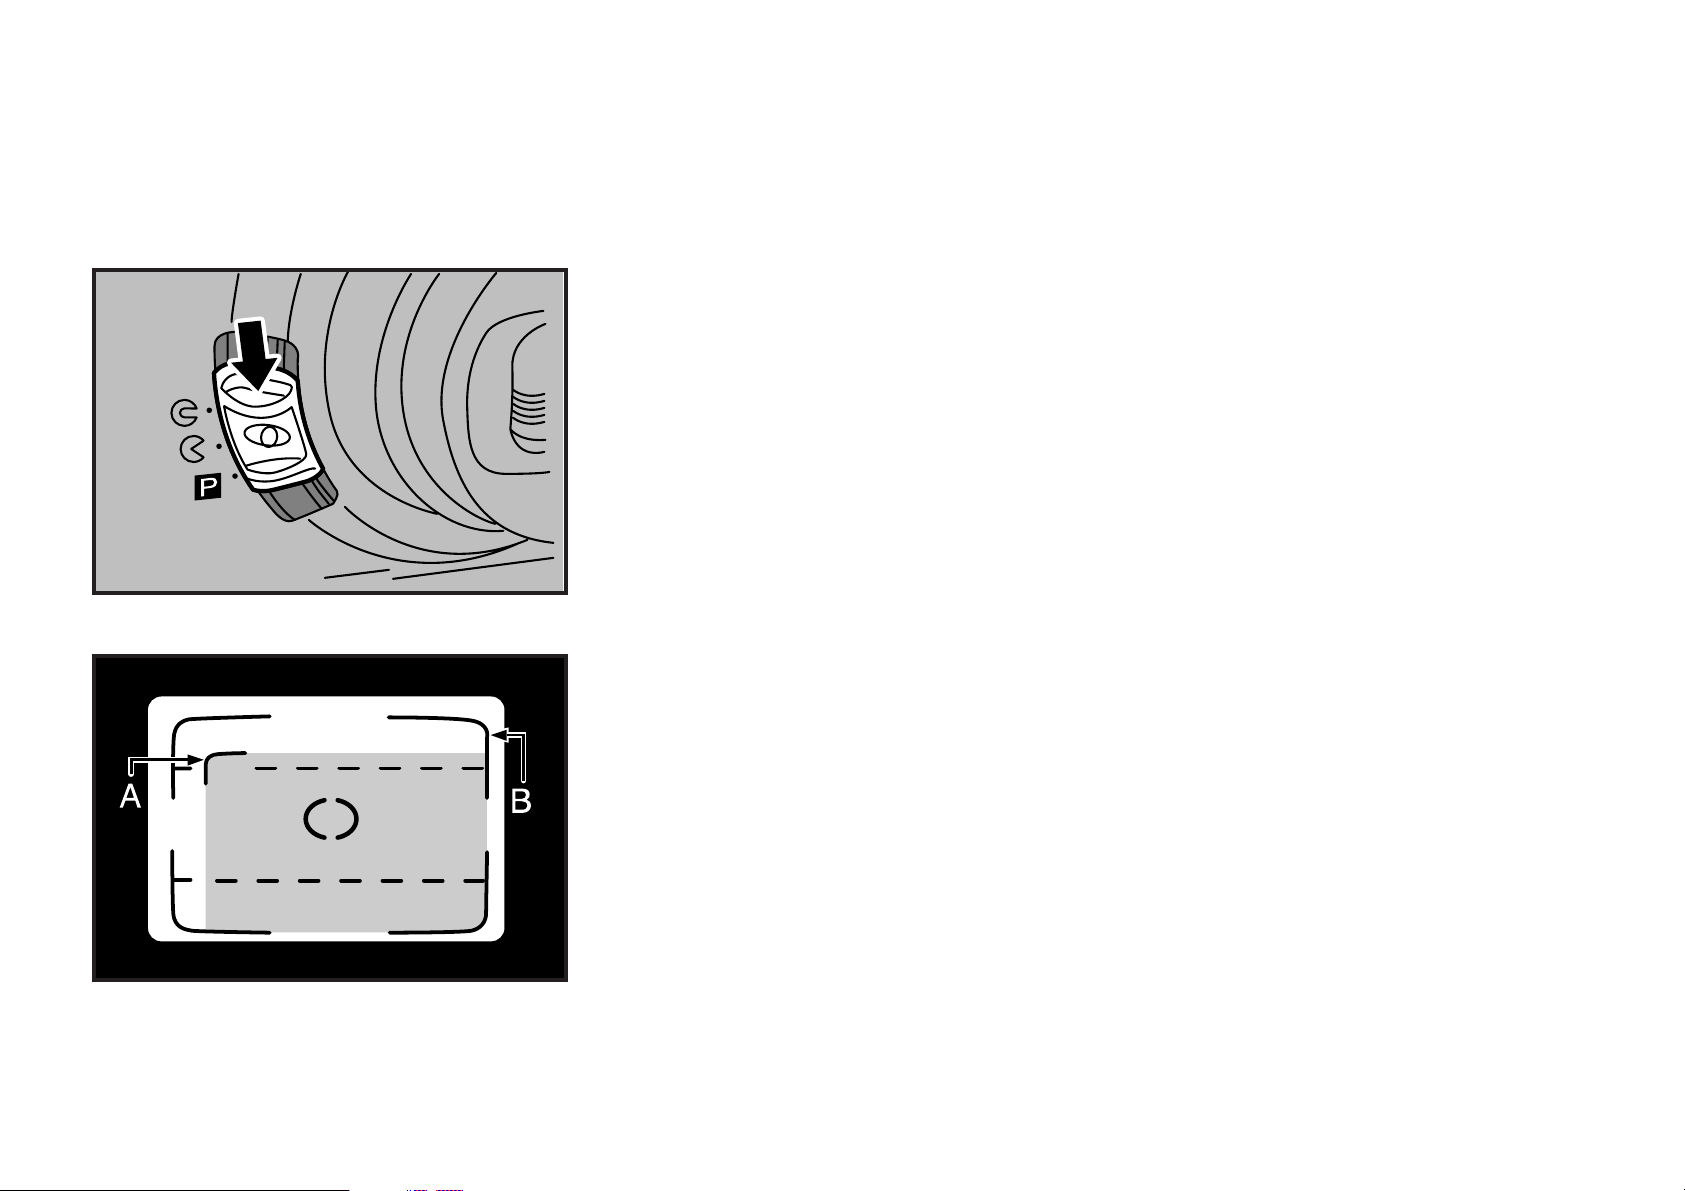
2. 35 mm full-size mode covering area
A: Parallax Correction Mark
B: Bright Frame
If the camera is set to the 35 mm full-size mode , you’ll get in your picture ev erything
you see within the Bright F rame. But if y ou are shooting your subject form about 1.2
meters away or closer, you’ll get in your picture only the area falling within the Parallax Correction Mark.
11
Page 12

P
3. Panorama mode
To set the camer a to the panor ama mode, press in the Pinhead Button Lock and, at
the same time, push the Lens Cover Button all the way down so that a red “P”
appears in the left side of the Finder.
4. Panorama mode covering area
In the panorama mode, you’ll get in y our picture everything you see within the panorama frame (the area enclosed by the hyphenated lines). However, when composing your picture, always leave a slight margin on all sides of the framing area.
• To save battery power, the red “P” in the Finder will automatically turn off if the shutter is not
released or the zoom buttons are not used within 30 seconds.
Before taking your panorama picture, be sure to turn on the red “P” again by pressing the
Shutter Release about halfway down.
12
Page 13

5. Switching back to 35 mm full size mode
T o s witch back to the standard mode, turn off the red “P” in the Finder by pushing the
Lens Cover Button back to center position. You can do it without pressing in the
Pinhead Button Lock.
6. Zooming to telephoto
To z oom to telephoto , press in the upper Zoom Button. The size of the Finder image
will change with the movement of the Lens.
• Do not block the Lens or apply pressure to it while it is zooming.
• If the camera is switched on and ready for shooting but is left idle for five minutes , the Lens will
automatically mov e back to 35 mm wideangle , all the different selected modes will reset themselves , and all the signs in the LCD will vanish. But y ou can reset the camera again f or shooting
by pressing down the Shutter Release or zoom buttons. However, you cannot do it with the
Remote Control Switch.
13
Page 14

7. Zooming to wideangle
To zoom to wideangle, press in the lower Zoom Button.
8. Hold the camera still
When taking pictures, hold the camera still with both hands (camera shake can
result in fuzzy pictures).
To shoot with the camera held vertically, position the Flash side up.
• Before pressing down the Shutter Release, take your finger off the Zoom Button.
• Keep your fingers and camera strap away from the Lens, Autofocus Windows, and Flash
Lampface.
14
Page 15
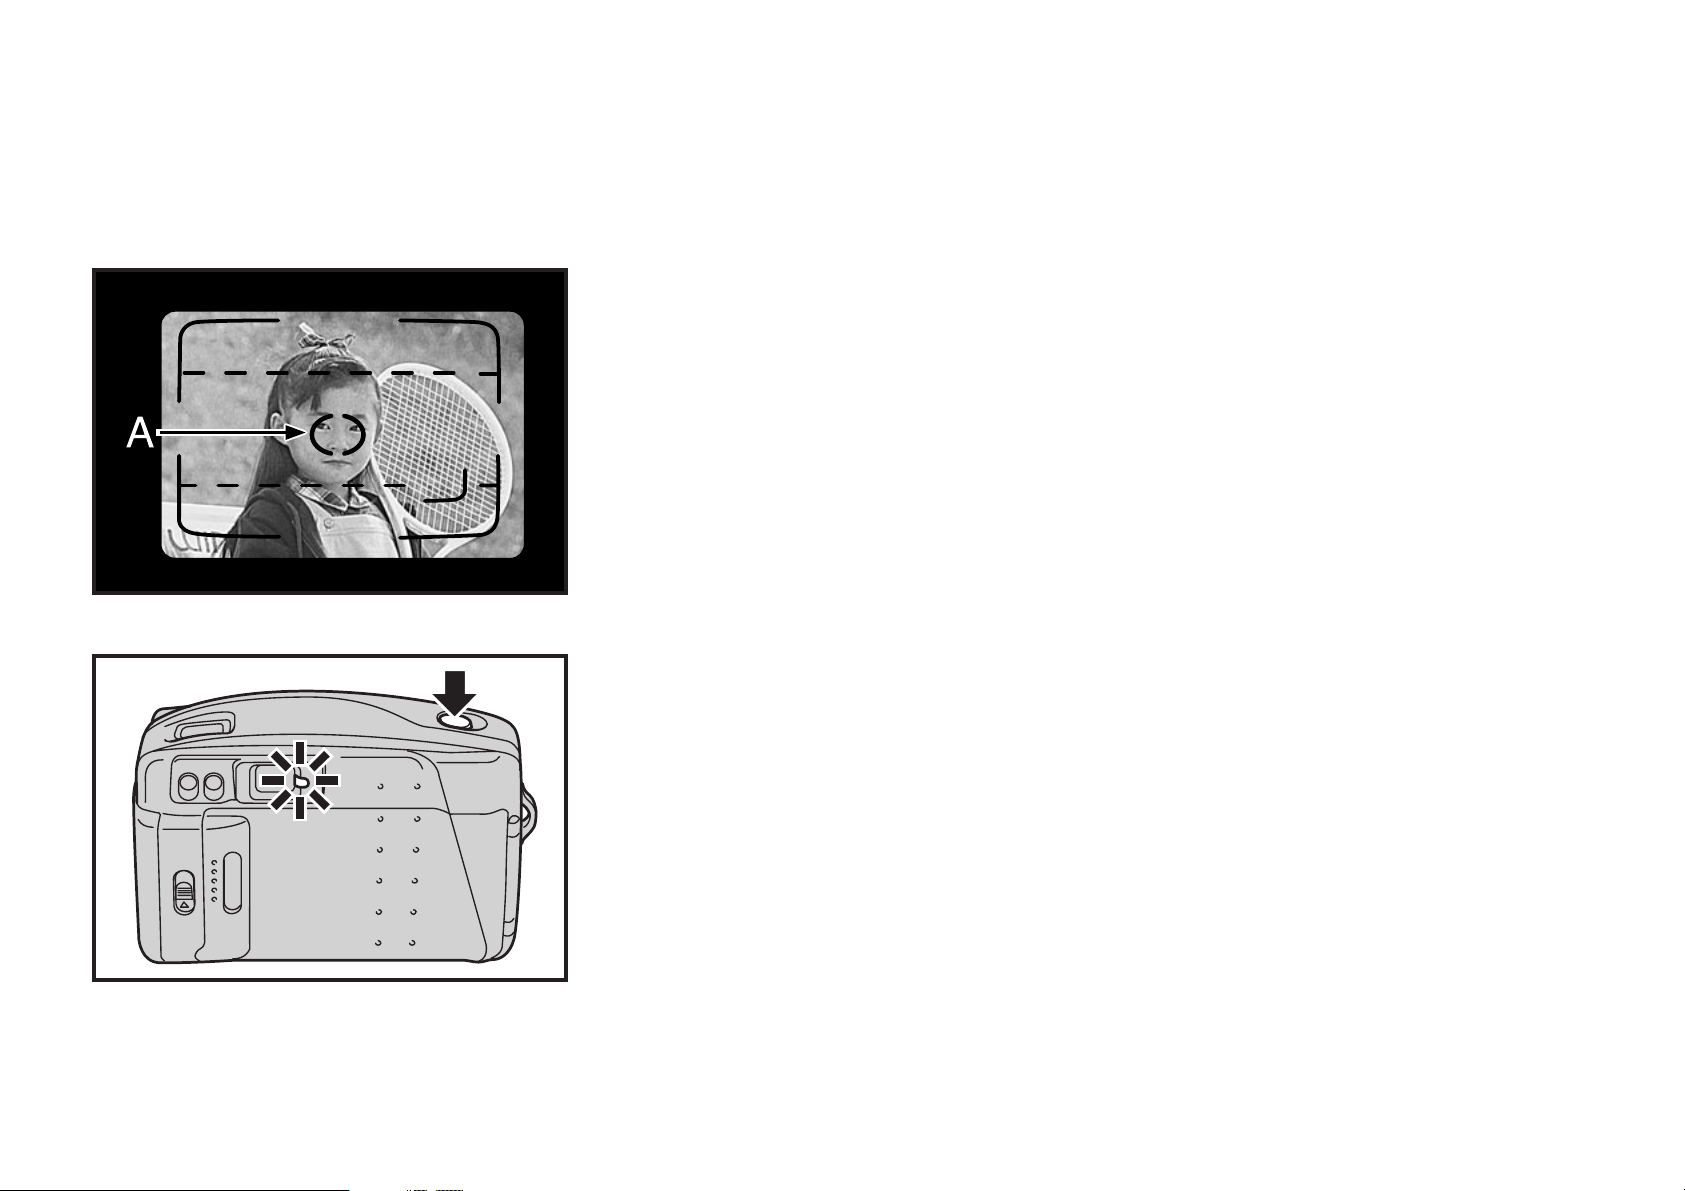
9. Aim the autofocus spot at your subject
A: Autofocus Spot
Aim the Autofocus Spot at your subject. Make sure your subject fills the Finder’s
Autofocus Spot completely.
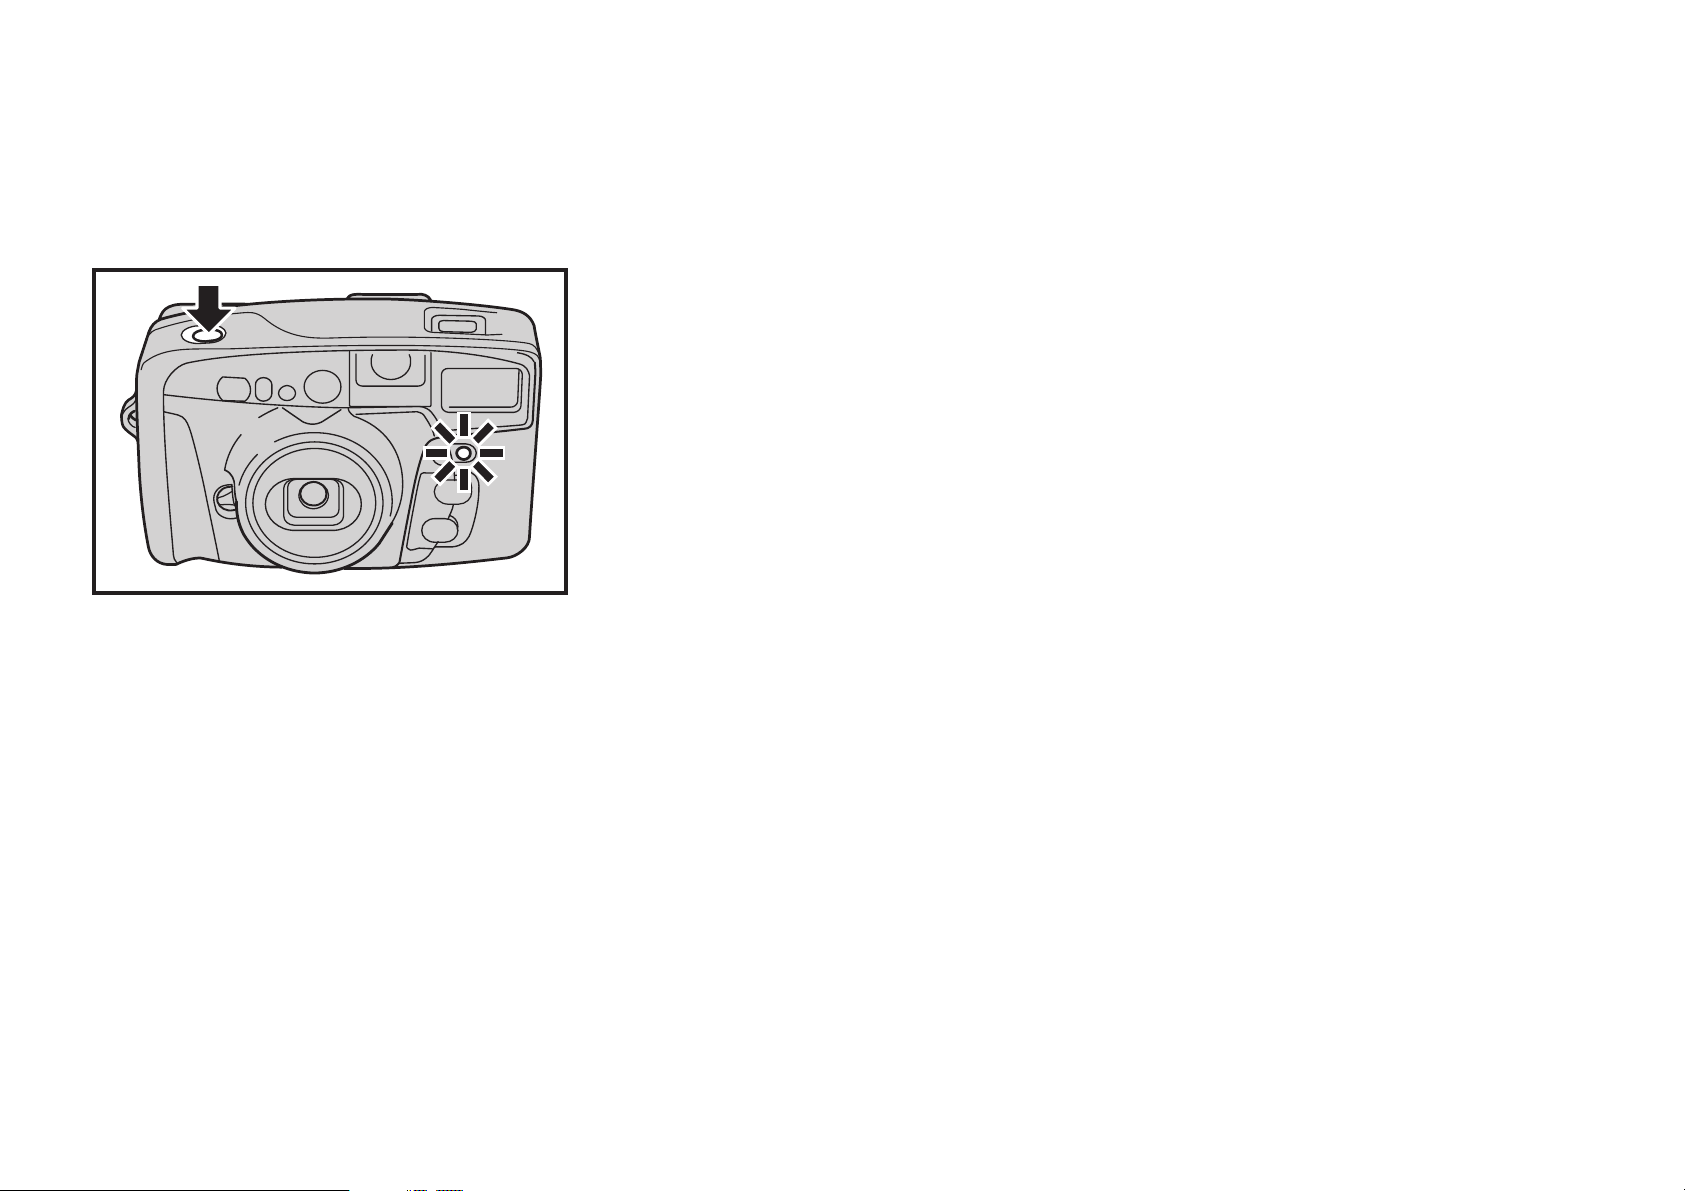
10. Press the shutter release about halfway down
If the Autofocus Lamp (g reen lamp ne xt to the Finder Eyepiece) turns on and glows
when the Shutter Release is pressed about halfway do wn, the Lens has completed
focusing. But if you are too close to your subject, the Autofocus Lamp will blink to
warn you to move back.
• The Autofocus Lamp will blink if y ou are too close to your subject. If it b links, chec k the camerato-subject distance once again.
• When you press the Shutter Release about halfway down, do it slowly and gently.
• Press the Shutter Release about halfway down and check to see whether a red “P” is showing
in the left side of the Finder. If you don’t see the “P”, the camera is set to 35 mm full size, and if
you do see the “P”, it is set to the panorama mode.
15
Page 16
11. Take your picture
To take y our picture, press the Shutter Release gently all the wa y do wn. As soon as
the shutter trips, the film will automatically advance into position for the next shot.
• The shooting distance is 0.65 m - ∞ at f=70 mm (0.9 m - ∞ at other focal lengths).
• Though rarely, the Lens may not be able to focus itself sharply in the following situations . To take
your picture, you’ll have to use the Autofocus Lock (see page 19).
1 If there is a very bright light shining in the vicinity of your subject, such as blazing streaks of
sunlight, dazzling light reflections from the windshield of a car, etc.
2 If your subject is a blac k object, such as a bunch of b lack hair , which cannot reflect enough light.
3 If you are shooting through a glass window.
4 If there is a strongly reflecting object, such as a mirror or shiny piece of metal, near the center
of your subject.
16
Page 17

END OF FILM
• Your camera will expose the film frames in descending order, starting from the highest numbered frame, and rewind each frame into its cartridge as soon as it is exposed.
• You can unload the film as soon as the last frame (frame No. 1) is exposed and the camera
motor comes to a halt because there is no need to rewind it.
1. After exposing the last frame
As soon as the last frame (frame No. 1) is exposed, the Exposure Counter will
switch from “0” to “E” and the camera motor will come to a halt.
2. Unload the exposed film
Make sure the Exposure Counter is showing the “E” sign then open the Camera
Back and take the film out.
17
Page 18

■ Unloading the film in mid-roll
With the tip of a ball-point pen or something similar, press in the Mid-roll Rewind
Button. Wait until the Exposure Counter shows the “E” sign and the camera motor
comes to a halt, then take the film out.
• Do not use anything with too sharp a point to press in the Mid-roll Rewind Button.
• If the Camera Back is accidentally opened in mid-roll, close it quickly, wait until the film winds
itself back into its cartridge, then take it out. All the exposed frames, except the last, will be
saved.
• If the film is unloaded before the Exposure Counter shows the “E” sign, the ne xt roll y ou load will
immediately wind itself back into its cartridge and the Exposure Counter will blink continuously
(see page 30).
18
Page 19

2. ADVANCED TECHNIQUES
USING THE AUTOFOCUS LOCK
1. This is the picture you want but....
the Autofocus Spot is off your subject. It means the Lens is not focused on your
subject.
2. Move the camera slightly and....
aim the Autofocus Spot so that it covers some part of your subject, then press the
Shutter Release about halfway down (to loc k the focus) and mak e sure the Autofocus
Lamp (focusing completed signal) has turned on.
19
Page 20

3. While pressing the shutter release about halfway down....
move the camera back to its original position, recompose your picture, then take it
by pressing the Shutter Release all the way down.
• The Autofocus Loc k can be used f or taking both 35 mm full siz e and panorama format pictures.
• The Autofocus Lock can be used as many times as necessary before tripping the shutter.
20
Page 21

SELECTING THE EXPOSURE MODE
■ A word on the camera’s flash exposure modes
Each time you press in the Exposure Mode Button, the exposure mode setting will
switch in the order shown below:
Auto flash (No sign), Red-ey e Reducing (
mode.
■ Effective flash range
The effectiv e range of your camera’ s built-in flash will diff er with the speed of the film
you are using and the lens focal length as shown below.
Film speed 35 mm wideangle 70 mm telephoto
ISO 100 0.9 – 5 0.65 – 2.5
ISO 200 0.9 – 7 0.65 – 3.5
ISO 400 0.9 – 10 0.65 – 5
(Using color negative film; distance in meters).
), Fill-in Flash ( ) and Flash off ( )
21
Page 22

Taking ordinary pictures
1. Automatic-flash mode in low light
If you don’t see any sign in area “A” of the LCD (see illustration) and the light is low,
the Flash will automatically fire when you press down the Shutter Release. And as
soon as the blinking Flash Sign (
) in the LCD turns off, you can take your next
autoflash picture.
If you want y our subject’s eyes to look natural and beautiful...
2. Red-ey e reducing mode
Bring out the Red-eye Reducing Mode Sign (
) in the LCD by pressing in the
Exposure Mode Button, then take your picture.
• The red-eye reducing mode setting will remain on ever after you turn off the power.
• The Autofocus Lamp (next to the Finder Eye-piece) will turn on the moment the Red-eye Re-
ducing Lamp turns on then turn off the instant the Flash fires. Be sure to hold the camera still
while the Autofocus Lamp is on.
22
Page 23

■ A word on red-eye effect
When you photograph a person’s face in dim light with Flash, the eyes will sometimes turn out red in the picture. This is because the light from the Flash enters the
person’ s eyes and is reflected back into the camer a lens. To reduce the chances of
getting red-eye pictures, observe the following rules:
1 Take your picture with the camera set to the Red-eye Reducing Mode.
2 Ask your subject to stare at the camera.
3 Bring the camera up as close as possible to your subject.
23
Page 24

T o take backlighted pictures of subjects against a windo w or in the shade of a
tree...
3. Fill-in flash mode
Bring out the Flash Sign (
) in the LCD by pressing in the Exposure Mode Button.
The Flash will now fire even in bright sunlight.
Taking non-flash pictures
4. Flash off mode
Bring out the Flash Off Sign (
) in the LCD by pressing in the Exposure Mode
Button, then take your non-flash (existing light) picture.
• The flash mode settings will remain on until you switch them off by closing the Lens Cover.
• To take stage scenes and indoor spor ts events that are beyond reach of the camera’s built-in
flash, shoot with the Flash turned off (flash off mode).
• When shooting in the flash off mode, keep the camera as still as possible by mounting it on a
tripod.
24
Page 25

USING THE SELF-TIMER
1. Set the self-timer
T o set the Self-timer , press in the Self-timer/Remote Control Button (
out the triangular mark (d) in the LCD in the spot where the Self-timer Sign (
showing.
2. Start the Self-timer
T o start it, press do wn the Shutter Release. The Lens will automatically f ocus on the
part of your subject that is covered by the Finder’s Autofocus Spot.
• When you start the Self-timer, do not stand in front of the camera. If y ou do, y ou will either throw
the Lens out of focus or the picture may turn out underexposed.
• The Self-timer has to be reset each time you take a picture.
• To switch off the Self-timer, turn off the triangular mark (d) in the LCD by pressing in the Self-
timer Button a second time.
) to bring
) is
3. Wait 10 seconds
As soon as the Self-timer start, the Self-timer/Remote Control Lamp will turn on and
glow f or seven seconds, then b link for three seconds , then the shutter will trip to take
your picture.
25
Page 26
USING THE REMOTE CONTROL SWITCH
• If the Remote Control Switch is not included with your camera, you’ll hav e to buy it separately.
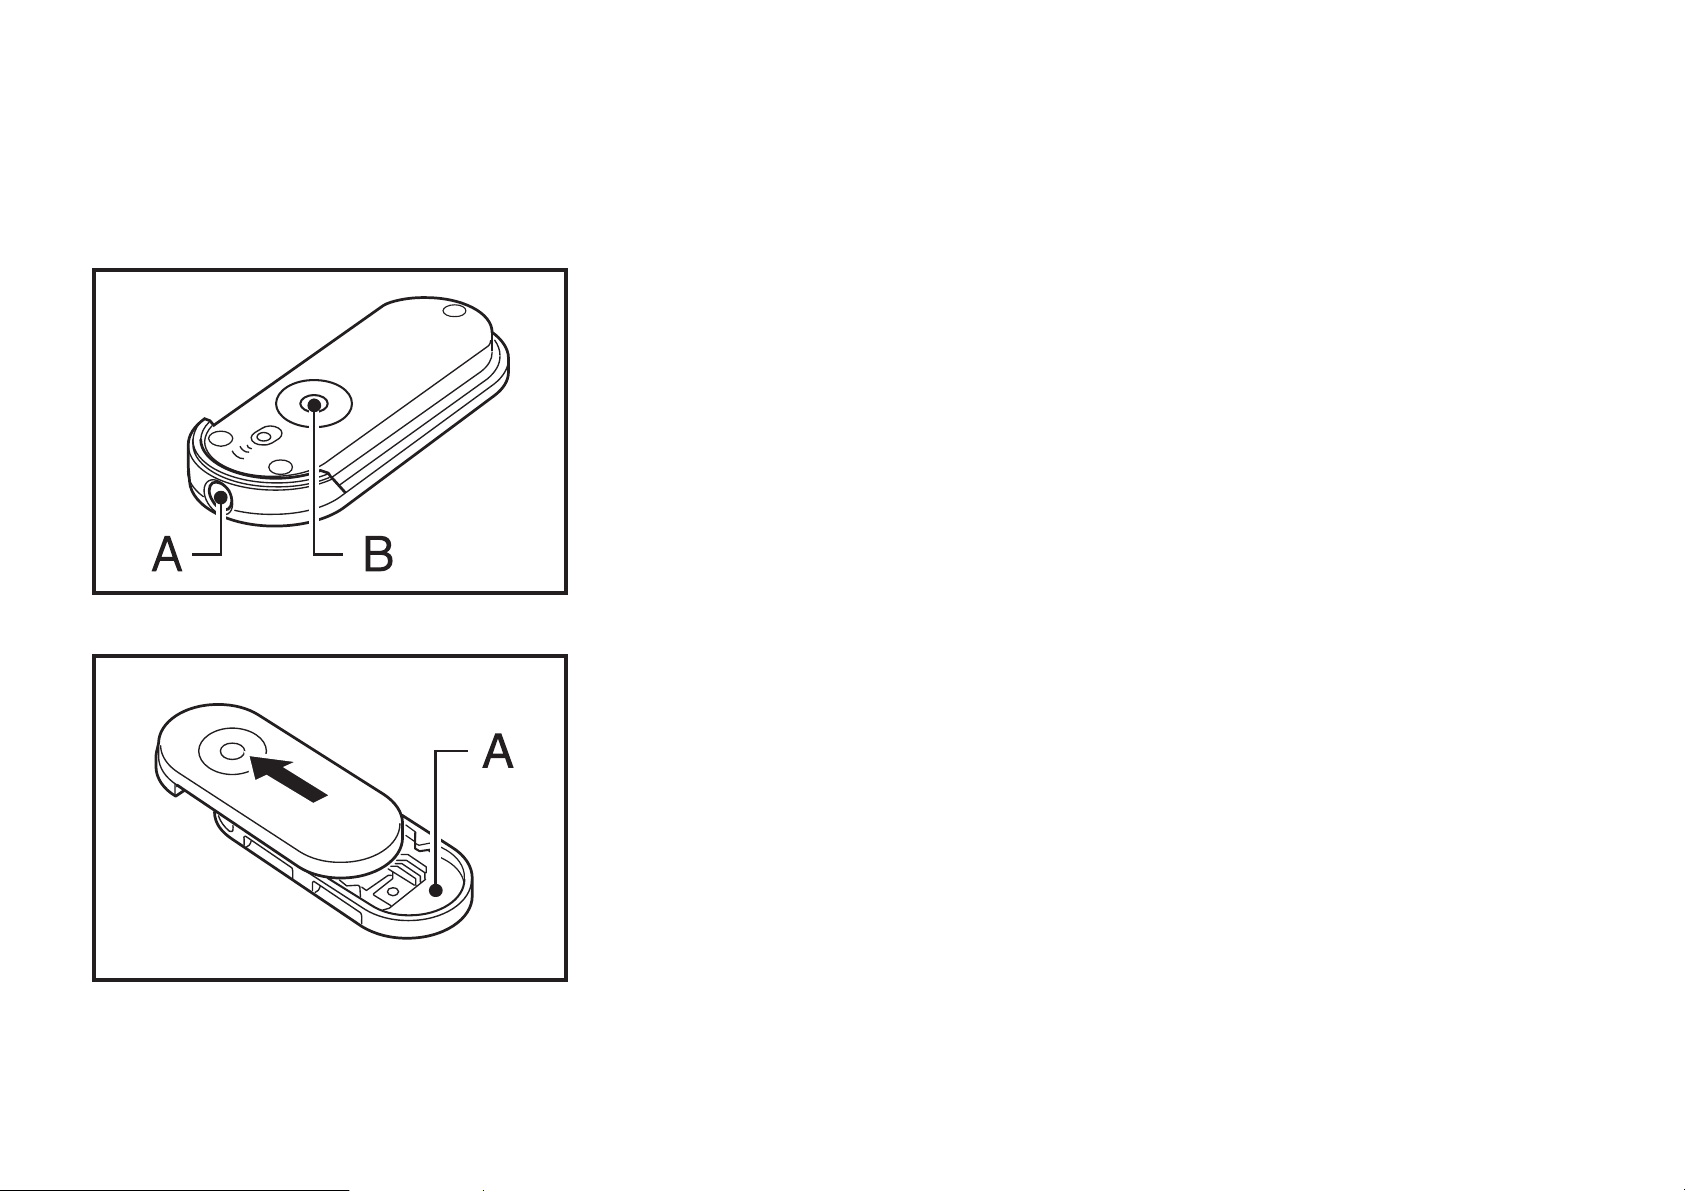
■ Remote control switch
A: Switch Muzzle
B: Shutter Operating Button
1. Take out the remote control switch
To tak e it out its holder , just slide it out. To insert it in its holder , slide it in until it stops
with a click.
A: Switch Holder
26
Page 27

2. Set the camera to remote control
Press in the Self-timer/Remote Control Mode Button (
gular mark (d) in the LCD in the spot where the Remote Control Sign (
) to bring out the trian-
) is
showing.
3. Take your remote control picture
Aim the Autof ocus Spot at y our subject and compose your picture. Face the Switch
Muzzle toward the camera and press down the Shutter Oper ating Button. The Selftimer/Remote Control Lamp will blink for two seconds then the shutter will trip to
take your picture.
• After taking your picture, switch the camera off the remote control mode.
• Take your picture within five minutes after setting the camera to the remote control mode.
• For best results, mount the camera on a tripod when taking remote control pictures.
• Be careful when taking against-the-light pictures because the Remote Control Switch may not
function if direct light enters the camera’s Remote Control Sensor. You may have to use the
Self-timer in such cases.
• The Remote Control Switch’s battery will last about three y ears (as tested according to Fujifilm’s
battery testing procedure). If the battery runs out, you can alwa ys ask your dealer to replace it
for you.
27
Page 28

4. Effective switch range
The effective range of the Remote Control Switch is about five meters when held
directly in front of the camera, and up to 3.5 meters when aimed at the camera at a
20° angle from all sides (left, right, above, and below).
■ Carrying the remote control switch
Just pass the camera strap though the groove (see arrow in the illustration) in the
Switch Holder and carry it together with the camera.
28
Page 29

CAMERA FAULTS, POSSIBLE CAUSES, AND REMEDIES
Faults Possible Causes Remedies Page
1. The shutter won’t
trip.
1 The battery is nearly spent. (The
Autofocus Lamp does not turn on
when the Shutter Release is pressed
halfway down).
2 You forgot to turn on the Power
Switch.
3 The Exposure Counter is showing the
“E” Sign.
4 You blocked the Lens barrel while it
was z ooming, in which case the shutter won’t trip because the Lens is not
in normal position.
1 Change the battery with a new one.
2 Push down the Lens Cover Button and make
sure the Lens has mov ed out into shooting position.
3 Unload the film and insert a new roll.
4 Press in the Zoom Button. The Lens barrel will
automatically collapse then reset itself to
wideangle position.
6
11
17
13
29
Page 30

Faults Possible Causes Remedies Page
2. The Exposure Counter blinks. (The film
winds directly back
into its cartridge the
moment it is loaded).
3. The film wound back
into its cartridge in
the middle of the roll.
4. The film has been
loaded and the Camera Back has been
closed, but the Exposure Counter does
not count.
●
A partly used roll of film was unloaded
without winding it back into its cartridge.
●
While taking pictures or while the film
was prewinding, either the Camera
Back was opened or you meddled
with the Camera Back Lock.
●
You did not load the film correctly.
●
First move the Lens out into shooting position
by pushing down the Lens Co ver Button. Ne xt,
unload the battery, check to mak e sure the Exposure Counter in LCD has turned off, then reload the battery.
●
When there is film in the camera, do not open
the Camera Back or meddle with the Camera
Back Lock.
●
Reload the film correctly.
18
18
9
30
Page 31

PRINT FAULTS, POSSIBLE CAUSES, AND REMEDIES
Faults Possible Causes Remedies Page
1. The picture looks
fuzzy.
2. The picture looks
dark.
1 The Autofocus Spot was not aimed
correctly.
2 The Lens is not clean.
3 You jiggled the camera when you
pressed down the Shutter Release.
1 Y ou took y our picture against the light
(your subject was standing indoors
against a window, etc.).
2 Your subject was beyond reach of the
camera’s built-in flash.
1 Aim the Autofocus Spot correctly at your sub-
ject or use the Autofocus Lock to take your picture.
2 Keep the Lens clean at all times.
3 Hold the camera still with both hands and press
the Shutter Release gently down.
1 Take your against-the-light pictures with the
camera set to the Fill-in Flash Mode.
2 T ak e your flash pictures within the built-in flash’ s
effective range.
15, 19
32
14
24
21
31
Page 32

CAMERA CARE AND CAUTIONS
1 Your camera is a precision instrument which requires
careful handling. Do not wet it, drop it on the floor, or
subject it to any other type of strong shock.
2 If you are not using your camera f or a long interval, k eep
it where it will be safe from heat, dust, and moisture.
3 Remove soil and dust from the lens glass , autofocus win-
dows, and finder window with an air blower and by wiping lightly with a piece of soft, lint-free cloth. If that is not
enough, wipe off gently with Lens Cleaning Paper moistened slightly with Lens Cleaning Fluid. Never use solvents, such as alcohol or benzine , to clean your camera.
4 In hot weather, do not leave your camera in a closed
compartment of your car, or on an ocean beach, and in
moist places except temporarily for a very short time.
5 In case of malfunction, consult your camera dealer. Do
not disassemble the camera yourself because it is
equipped with high-tension circuits.
6 Never dismantle the camer a’s lithium battery , heat it, throw
it into a fire, charge it, or cause it to short circuit.
7 This camera is designed for use within a temperature
range of –10 to +40°C.
32
Page 33

SPECIFICATIONS
•Film
135 (35 mm) DX roll film.
•Picture Size
Standard 35 mm size: 24 × 36 mm, switchable to panorama
format.
•Lens
Fujinon zoom lens, power zoom, f=35–70 mm, 1:5.0 – 9.5, 5
components, 5 elements.
•Finder
Albada zoom finder , 0.4–0.72X magnification, bright frame, panorama frame, autof ocus spot, parallax correction mark, autofocus
lamp (next to finder eyepiece).
•Focusing
Active type autofocusing from 0.65 m -
∞ (at f=70 mm), 0.9 m -
∞ at other focal lengths, provided with autofocus lock.
•Autofocus Lamp
Turns on and glows when subject is in sharp focus, blinks when
subject is too close.
•Exposure Control
Automatic, W: EV 10.4 (9*)–17 (ISO 100) T: EV 12.8 (9*)–17
(ISO 100), (* indicates values for flash off mode).
•Film Speed Setting
Automatic with ISO 50–1600 DX roll film.
•Film Loading
Drop-in system, automatic threading.
•Film Advance
Automatic (motorized), film prewind system, re-winding unnecessary, provision for mid-roll rewinding.
•LCD Signs
Exposure counter, flash mode signs (flash charging, red-eye
reducing, fill-in flash, and flash off signs), self-timer mode and
remote control mode signs.
•Flash
Autoflash, red-eye reducing, fill-in flash, and flash off modes,
electronically controlled flashmatic exposure control, about 5 sec.
recycle time.
•Shutter
Programmed electronic shutter.
33
Page 34

•Self-timer
Electronically controlled, about 10 sec. delay, can be
switched off in mid-run, provided with countdown lamp.
•Power Source
One CR123A lithium battery or comparable battery.
•Remote Control Switch
Infrared system, operates camer a shutter , about 5 m effective range from camera front (available as camera accessory or separately).
•Others
Built-in lens cover (lens cover serves as safety lock when
closed), film confirmation window, tripod socket, provision
for remote control shutter release.
•Dimensions and Weight
Camera: 123 × 75 × 45 mm, 242 g.
(without battery)
Specifications are subject to change without notice.
∗
34
Page 35

<FUJIFILM ABROAD>
In North America FUJI PHOTO FILM U.S.A., INC.
In Europe FUJI PHOTO FILM (EUROPE) G.m.b.H.
In South America FUJI PHOTO FILM DO BRAZIL LTDA.
In Asia FUJI PHOTO FILM CO., LTD., HONG KONG OFFICE
In Oceania FUJI PHOTO FILM CO., LTD., SYDNEY REPRESENTATIVE OFFICE
In Middle East FUJI PHOTO FILM CO., LTD., DUBAI OFFICE
26-30, Nishiazabu 2-chome, Minato- ku, Tokyo 106-8620, Japan.
555 Taxter Road, Elmsford, N.Y. 10523, U.S.A.
FUJI PHOTO FILM CANADA INC.
275 Britannia Road East, Mississauga, Ontario , L4Z 2E7, Canada
FUJI PHOTO FILM HAWAII, INC.
1650 Kalakaua Avenue, Honolulu, Hawaii 96826, U.S.A.
Heesenstrasse 31, 40549 Dusseldorf, Germany
FUJI PHOTO FILM (U.K.) LTD.
Fuji Film House, 125 Finchley Road, Swiss Cottage, London NW3 6JH, England
FUJI FILM ESPAÑA, S.A.
Aragon, 180, 08011-Barcelona, Spain
Avenida Vereador Jose Diniz No. 3.400, Campo Belo- CEP 04.604
Cx. Postal 9.959., Sao Paulo-SP, Brazil
Room 916, Sun Plaza, 28 Canton Road, Tsim Sha Tsui, Kowloon, Hong Kong
FUJI PHOTO FILM (SINGAPORE) PTE. LTD.
10 New Industrial Road, Singapore 536201
FUJI PHOTO FILM (THAILAND) LTD.
S.P. Building, 8th Floor, 388 Phaholyothin Road, Bangkok 10400, Thailand
FUJI PHOTO FILM (MALAYSIA) SDN. BHD.
Letter Box 3, 3rd Floor Office Block 1, Crystal Plaza Lot 4, Jalan 51A/223, 46100 Petaling Jaya Selangor Darul Ehsan Malaysia
FUJI PHOTO FILM CO., LTD., TAIPEI OFFICE
Rm. 601, Hung Chong Bldg., No.38, Sec. 6, Min Chuan E. Road, Taipei 11412, Taiwan, Republic of China
FUJI PHOTO FILM CO., LTD., SEOUL OFFICE
Samduck Bldg. 6F., 144-1, Samsung-Dong, Kang Nam-ku, Seoul 135-090, Korea
FUJI PHOTO FILM CO., LTD., BEIJING REPRESENTATIVE OFFICE
Beijing Fortune Bldg. No. 817, 5, Dong Sanhuan Bei-lu, Chaoyang District, Beijing, China 100004
FUJI PHOTO FILM CO., LTD., HO CHI MINH OFFICE
29-31 Ton That Thiep St., Q.I Ho Chi Minh City, Vietnam
FUJI PHOTO FILM CO., LTD., NEW DELHI OFFICE
Le Meridian Commercial Tower 8F Janpath, New Delhi 110001, India
c/o Hanimex Pty. Limited, Old Pittwater Road, Brookvale, N.S.W. 2100, Australia
No. 4G-17, L.O.B. No. 4, P.O. BOX 17212, Jebel Ali, Dubai, U.A.E.
 Loading...