

Page 1

This manual is for reference
page
This
may not be sold or distributed
may take 3 full minutes for
This
.
This
I have no connection
This is the fulltext and
POSTED
page
and historical
copyright @ by M. Butkus.
is
without the
On-line camera
6-27-'04
purposes,
expressed
with any
camera company
manual library
images from
this PDF document
the manual.
all rights reserved.
NJ.
permission of the
to download.
producer
The r4ain
you
If
find this manual
M. Butkus,
and send
Most other
This will allow me to
you
use Pay Pal or
If
you
If
found
page
is located at
useful, how about
29Lake Ave., High Bridge,
your
would charge
for a hard
It'll make
to use
page
this
please
notify me
e-mail address
you
your
from
places
$18.00
continue to buy new manuals
wish
www.butkus.org/chinon
you
$7.50
to read Xerox
feel better,
credit card, use
any other location
at
mike@butkus.org
a donation of
NJ 08829-1701
copy.
the
(other
pay
Pay Pal
you.
their shipping
then a link)
so I can thank
for a electronic copy or
and
won't it?
to:
$3
Link on my
costs.
page.
Page 2
%
FUJIFITM
COMPACT
CAMERA
Db27o
Z00M
Page 3
NAMES OF
(When
page
this
BEZEICHNUNG
Wenn
tung
schneller
lassen)
PARTS
reading this
open lor
diese
Sie
lesen,
diese
Referenz
quick
DER TEILE
Bedienungsanlei-
aufgeschlagen
NOMENCLATURE
(Lors
chure,
pour
NOMBRE DE
(Al
gada
16pida).
la lecture de cette
de
laisser cette
r6f6rence
une
leer
este manual,
esta hoia
rapide)
LAS PARTES
para
Et+afffi
(
F€:AA{FH
lf Px1D,tIFfl,&I***)
_#EB
=H, {*'+AE
manual, leave
reference)
Seite zwecks
page
bro-
ouverte
deje desple-
referencia
o
o0
Li
O
g
>
F
Page 4
rB
l9
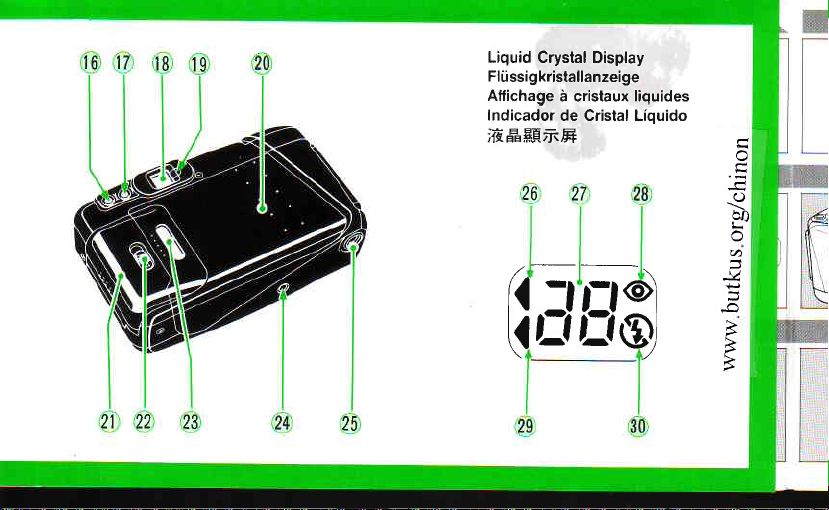
Liquid Crystal Display
Fli.issigkrislallanzeige
Atfichage
Indicador
i cristaux liquides
de Cristal Liquido
;E#RErrrE
26
27
-v
a
-
a
..
2t 22
23
.)E
Page 5
ffiffi
ru
ruffiWffiH
ruK@Mffi
@lt
-?R$sr
r
ffitl@.Wl
ffi
ffi
ffiWru@[
-
\
4lN_(e),*(@l
l\.b:,*',@l
l[_tb:E*'r-ElL
Page 6
YI$E]
EXP.LEFT
[]'@'@
t)
www.
butku
s.
org/chi
non
N
Page 7
-g
(
t_
@
*(i-
-
*j
www.butkus.
Htttl
o
wNl
\
ffir-i,-l
L---J
Page 8

.
illustrations while
See
you
read
this
manual.
This manual will show
camera correctly.
carefully.
Please follow the instructions
you
how to
use
your
m
z
o
tr
(n
E
o
Orientieren Sie sich beim
Anleitung
r
Se
bitte an den
reporter
illustrations
aux
Durchlesen
Abbildungen.
d'emploi.
r
Vea las ilustraciones mientras lee
O
;€&EflEF6-FBEE=H!
IE
ffi[8E36+ffi8.
lisant le mode
en
manual.
el
dieser
CONTENTS
Special features
Names of
I. BASIC PROCEDURE
II. ADVANCED TECHNIOUES
Camera
and
Print faults,
Camera care and caulions
Specilications
parts
Load the
Attach the
Load the film
Taking
End of film
Using
Selecting
Using
Using
battery
strap
pictures
the Autofocus
the
exposure
the
self-timer
the remotecontrol switch
possible
faulls,
remedies
possible
Lock
mode
causes,
causes, and
-
remedies
10
12
14
14
14
1
16
1
16
18
- 20
21
21
8
8
9
I
9
9
Page 9

SPECIAL
v,
o
A lully automatic
(,
t.
z
UJ
2.
3.
4.
q
6.
7.
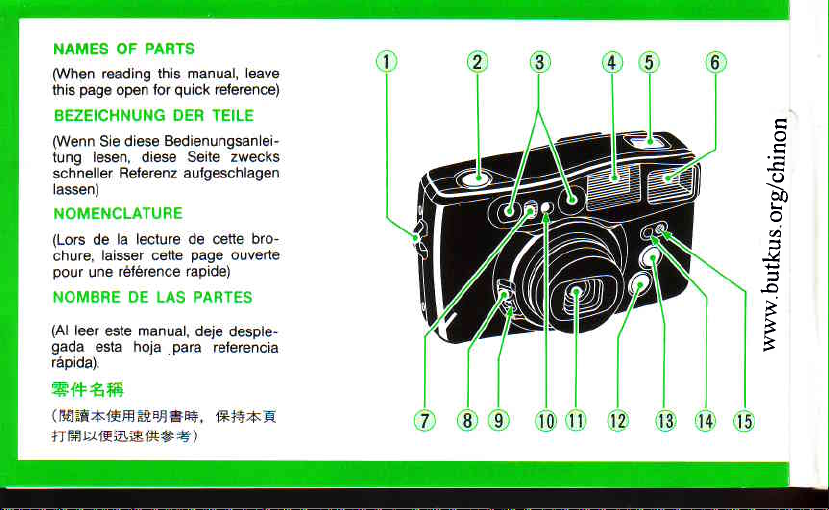
NAMES OF
o
@
FEATURES
mm
35
Power
Switchable
(Finder
panorama
Drop-in
prewinding
Active type autofocusing.
0.65
Freely selectable
red-eye
modes).
Provision
Strap
Shutter
Autofocus
Finder
Liquid Crystal
Flash
Red-eye
Lens Cover
Button
to
shows
mode).
film loading,
system.
m nearest
reducrng,
for remote control operation.
PARTS
Lug
Release
Windows
Window
Lampface
Reducting
Button/Power
(35-70
zoom
compact
mm).
panorama
"P"
red
automatic
focusing distance
exposure
fill-in
Display
LamP
zoom camera
in mid-roll.
format
when camera
threading,
=70
(at
f
(autoflash,
modes
flash, and
Switch/Panorama
flash off
is on
film
mm).
Button Lock
Pinhead
@
AE Light Sensor
@
Lens
@
Zoom Button
@
Zoom Button
@
Remote
@
Self-timer/Remote Control
@
Self-timer/Remote Control
@
Exposure
@
Finder Eyepiece
@
Autofocus
@
Camera
@
Battery Compartment
@
Camera
@
Film Confirmation
@
Mid-roll Rewind Button
@
Tripod
@
Self-timer
@
Exposure Counter
@
Red-eye Reducing
@
Remote Control
@
Flash Mode
@
(wide)
(tele)
Control Sensor
Mode Button
Lamp
Back
Lock
Back
Socket
Mode
Sign
Window
Sign
Mode Sign
Number
Flash Mode Sign
Cover
Lamp
Button
Page 10

I.
BASIC PROCEDURE
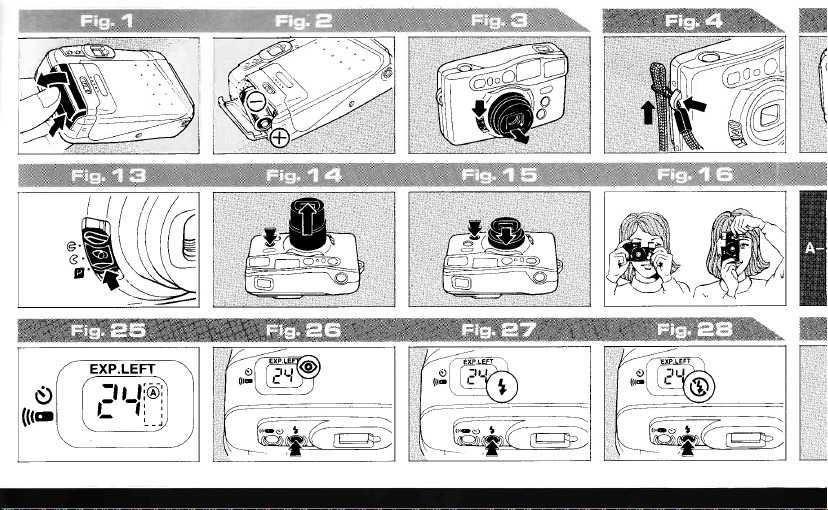
LOAD THE BATTERY
oUse
one
Fujifilm-Eveready
battery.
oA
taking
flash
testing
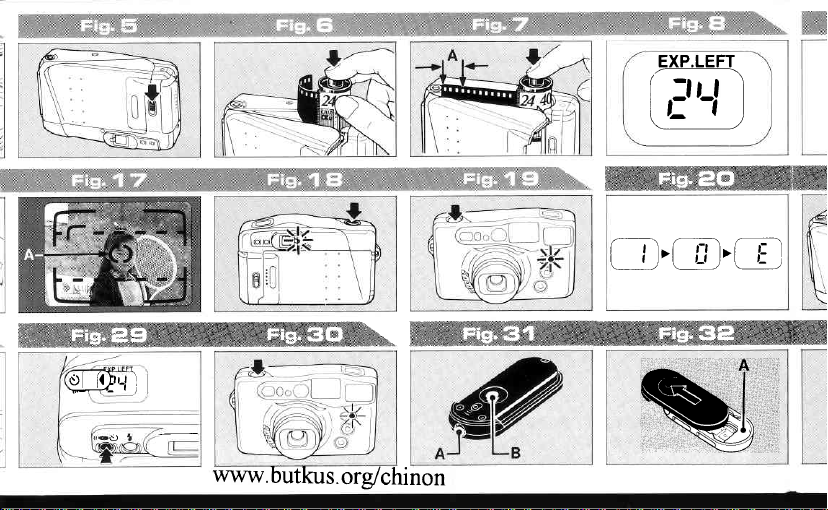
1.
Open the battery compartment
Push the
camera back) and
2. Insert the
Insert the
minus
and close
3. Check the loaded
Push the Lens
Cover opens and the lens
shooting
correctly.
.lf
3V
new lithium
about 300
(as
tested
procedure).
Cover's
battery
battery
end
Q
the
position
Flash
the
will
battery
pictures,
according to Fujifilm's
grained part
the
open
(Fig.
2)
in
the Battery
first,
Battery
Cover
Sign
press
then
Compartment Cover.
battery
Button
(wideangle),
(
in the LCD
)
f
CR123A lithium
provide power
including 150
cover
up
Cover toward
Compartment,
in the
3)
Fig.
downward. lf the Lens
moves
barrel
the
battery is loaded
battery
(Fig.
(toward
you.
plus
@
out
blinks for
with
1)
the
end
into
seconds or more
battery
one
.lf
you
lots
for
12
you
especially true if
because in
to
C
ATTACH
€
eass
!
camera's
[0
strap through the loop
Q
a
r-oao rHE FILM
'1fl
t.
Open the
I
-
To
open, hold the
push
2. Insert
Just
o
Do not
normally
is spent.
as soon as
going
are
pictures,
of
just
in
case
obtain the type
some countries
THE
STRAP
the looped
the
push
Lug,
Strap
camera
Camera Back Lock
(Fig.
the film
the film
open the
to
set
open about 15o
after taking a flash
Change the
possible.
a trip
on
take
you
you
of battery
end of
then
back
camera
6)
gently
Camera Back
battery with a new
or are
a spare battery
might
need it. This
are travelling abroad
you
you
(Fig.
a)
the
strap through
pass
the
pull
and
it firmly.
(Fig.
5)
bottom side
downward.
into the
Film
or
picture,
planning
along with
may not
want.
oiher
end of
Chamber.
the
all
just
enough
the
to take
be able
the
the
and
up
way. lt is
m
z
o
tr
o
-
is
to
Page 11

drop the
-
(t
o
Be sure to
DX on the box
(5
o
z
Always
ut
printed
3. Check the film tip
Make
(green
4.
Close
As
soon as
Exposure
film
will
is a 24-exposure
20
seconds and
the number
.lf
the film
from the
however,
the
film
within the
o
The Film
type and
number
film
in
smoothly and surely.
mm DX roll film
use 35
and cartridge).
your
use
on the film
sure
lines in the far
the
Counter will run through rapidly
prewind
cartridge
out or wind it in
of exposures
film
box.
the film tip falls
"24").
cartridge) is too
you'll
camera's
position
end of the film track).
camera back
you
close the
itself
up to the very end.
roll, it will
the
Exposure
(the
leader
have
into
the camera. To
Confirmation Window will
speed of
Film
the
before
(Fig.
within the Film Tip Mark
(Fig.
8)
Camera
prewind
Counter
length
short or
to adjust it before
that the film tip will fall
so
Tip Mark
the loaded
it
contains.
(film
expiration date
7)
Back, the
(lf
itself in
will
protruding
film
of
too long,
dropping
adjust,
(green
show
film and
marked
the
and
film
the
about
stop
pull
the
lines).
the
the
at
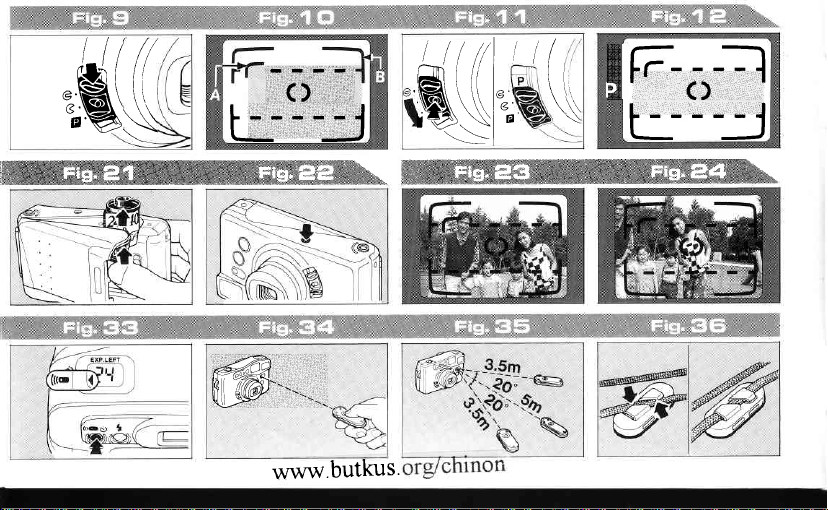
TAKING
1. Turn
To turn
The
Lens
Lens
2.
lf
you'll
the
subject from
you'll
the Parallax
3.
To
the Pinhead
push
that a red
4.
In
everything
PICTURES
on the
it
on,
Lens
Cover will
will move
is in
retracted
35 mm full-size
.
Parallax
.
Bright
Frame
the
camera is
get
in
Bright Frame.
get
in
Panorama
set the
camera to
the
Lens
"P"
Panorama
panorama
the
you
power
(Fig.
press
the Power
automatically
out into
position,
mode
Correction
(Fig.
set to the
your picture
But if
about
your picture
1.2 meters
Correction
(Fig.
mode
the
Button
Lock
Cover Button
appears in
mode
covering area
mode,
see within the
9)
Switch downward.
open and the
shooting
covering
Mark
10-B)
everything
you
only the area falling
Mark.
11)
panorama
and, at the
the left
you'll
position.
the
shutter won't trip.
(Fig.
area
(Fig.
10-A)
35 mm full-size
you
are
shooting
away
mode,
all the way
panorama
same time,
side of the Finder.
(Fig.
12)
get
your
in
lf the
10)
mode,
see within
your
or closer,
within
press
down
so
picture
(the
frame
in
Page 12

area enclosed
when composing
slight
o
To save battery
will automatically
released
30 seconds.
Before taking
turn
Release about
5. Switching
13)
To
switch
"P"
red
Button back
without
Zooming to telephoto
6.
To
zoom
Button.
with the movement of
.
Do
while
.lf
the camera
shooting
by the hyphenated
margin on all sides of
the red
on
in the Finder by
pressing
The
not
it is zooming.
your picture,
power,
zoom
the
or
your
"P"
halfway down.
to
back
the
back to
to
center
in the Pinhead Bufton Lock.
to telephoto,
of the
size
the Lens or apply
block
is switched on and
is
but
left
lines). However,
leave a
always
the framing area.
"P"
red
the
turn off if the shutter
buttons are
panorama picture,
again by
mm full
35
standard
pushing
position.
(Fig.
press
Finder image will
the Lens.
idle for five minutes, the Lens
in the Finder
not
used
pressing
la)
in the
be sure
the
mode
size
mode, turn off the
the Lens Cover
You
can
upper
change
pressure
ready for
is not
within
Shutter
(Fig.
do it
Zoom
to it
butkus.orglchinorr
will automatically move
angle, all the ditferent
themselves,
vanish. But
shooting by
zoom
or
to
the Remote
7. Zooming to wideangle
To zoom to wideangle,
Button.
8.
When taking
both
pictures).
To shoot with the
the Flash
o
Before
your
o
Keep
the Lens. Autofocus
Lamoface.
9. Aim the
Hold the
hands
side up.
pressing
finger
your
.
Autofocus
buttons.
camera still
autofocus spot at
back to 35
and all the signs in the LCD will
you
pressing
Control Switch.
pictures,
(camera
off the Zoom Bufton.
fingers
Spot
selected
reset the
can
down
However,
(Fig.
press
(Fig.
hold the
shake can
camera
the
down
and camera
Windows.
(Fig.
17-A)
the
you
16)
held
Shutter
your
mm wide-
modes will reset
camera again for
15)
in
camera still
vertically,
Release
Shutter
cannot do
the lower Zoom
result in luzzy
strap
subject
it
position
Release, take
away from
Flash
and
(Fig.
with
with
17)
m
z
o
tr
o
-
Page 13

-
Aim
the
o
(,
z
UJ
Autofocus
your
subject fills
completely.
10. Press the
(Fis.
lf the Autofocus Lamp
Finder Eyepiece) turns
Shutter
the Lens has completed focusing. But if
too
close
blink to warn
r
The Autofocus Lamp will
close to
camera-to-subject distance
page
r
When
halfway
.
Press
and check to see whether a red
in the left
"P",
you
mode.
shutter
18)
Release is
your
to
you
your
15).
press
you
down,
the
Shutter
side of
the
camera
do see the
do it
your
Spot at
the
Finder's
release
(green
on and
pressed
subject, the Autofocus Lamp
to move
subject. lf it
the
Shutter
slowly and
Release
the
Finder. lf
is
to
set
"P",
it
is
subject.
Make
Autofocus
about halfway down
lamp next to the
glows
when the
halfway
about
back.
35
you
if
blink
blinks, check
once again
Release
gently.
about halfway down
"P"
is
you
mm full
to the
set
showing
don't see the
size, and
panorama
sure
Spot
down,
you
are
will
are too
the
(see
about
if
11.
Take
To
take
gently
all the
trips,
the film
position
for
oThe
shooting
(0.9
m--
.
Though
itself
sharply
your picture,
(see page
Lock
lf
there
@
vicinity
of
sunlight,
windshield
your
lf
@
bunch
enough
you
lf
are
@
lf there
@
mirror
your
of
END
OF
.
Your
camera
scending
your picture
your picture, press
the next
at
rarely,
is
your
of
subject
of
light.
shooting
is
a
or shiny
subject.
FILM
order,
(Fig.
way
down.
will
automatically
shot.
distance
other focal
the
Lens
in
the
following
you'll
have
14).
a very
subject,
dazzling
of a
car,
is
a
black
hair,
through
strongly
piece
will
expose
starting
As
is
lengths).
may
bright tight
such as
light
etc.
black
which
reflecting
of metal,
from the
19)
the
Shutter
soon
as the
0.65 m-co
not
be able
situations.
to
use the
shining
blazing
reflections
object,
cannot
glass
a
object,
near
the film
frames
Release
shutter
advance
at f=70
to focus
To
Autofocus
in
streaks
irom
such as
reflect
window.
such as
the
center
in
highest
into
mm
take
the
the
a
de-
num-
a
Page 14

bered frame,
cartridge as
.
You
can unload the film as
(frame
comes
rewind it.
1. After
As
soon as the last frame
the Exposure
the
and
2.
Unload the exposed
Make
sure
"E"
sign then
film
out.
I
Unfoading the film
With
the tip
similar,
the Exposure
until
the
camera motor
film
out.
.
Do not
press
o
lf the
mid-roll,
itself
back into
and
soon as
No. 1) is
to a halt
exposing the last frame
Counter will
camera motor will
the
Exposure
open the
of a ball-point
press
in the
use anything
in the Mid-roll
Camera Back
it
close
rewind
each
it is
exposed.
exposed and the
Counter
comes to
quickly,
its
soon as the last frame
because there is
(frame
switch
come to a halt.
(Fig.
film
Counter is
Camera Back
in mid-roll
Mid-roll
cartridge, then
shows the
a halt,
with too
Rewind
is
accidentally
wait
pen
Rewind
Bufton.
until the film
frame
camera motor
no need to
(Fig.
20)
No. 1) is
"0"
from
21)
showing the
and take the
(Fig.22l
or something
Button. Wait
"E"
then take the
sharp
a
opened in
take it
into its
exposed,
"E"
to
sign and
point
to
winds
All
out.
the exposed
saved.
o
lf the film is
Counter shows
load will immediately wind
cartridge and
continuously
IMPORTANT
I Before
finisher
.
Panorama
12 x
shielding
parts
o
When
"panorama
photofinisher
sure to
1. All
Af^it^:
cartridge.
frames,
unloaded
"E"
the
the Exposure
page
(see
your
taking
mm
35
of standard format
you
do as
panorama
"S::i
format
on the film.
light
off
your
take
format
for
follows:
formal roll
exposed film to
exposures
from
mixed" roll
processing
,'j",n3oT,,o;
"all
the last, will be
except
before the Exposure
the next roll
sign,
itself
back
your photo-
measure
are made
format"
film
of
printing,
and
will
to
Counter
19).
They
the
upper and lower
frames.
panorama
lfnloutr',rn I
you
into its
blink
about
by
or
your
be
o
o0
,t,
.5(
Page 15

2. Panorama
14
9,
o
z
UJ
format
Always
RAMA
the film
r
II. ADVANCED
USING THE AUTOFOCUS
1. This is
the Autofocus
Lens
2.
aim the Autofocus
of
about halfway
mixed roll
attach the
+
STANDARD" seal to
cartridge.
you print
lf
in
the
standard size, the result will
than satisfactory
appear in the
picture
area
whitish.
the
is not focused
Move the camera
your
subject,
and standard
panorama
your
because a
upper and lower
the
or
TECHNIOUES
picture
you
Spot is
off
your
on
slightly
Spot
so
press
then
(to
down
"PANO-
format
black band will
picture
wanl
your
that it
lock the focus)
parts
may
LOCK
but.. . .
subject. lt means
subject.
(Fig.
and....
covers
the
Shutter
exposures
be less
of the
turn
out
(Fig.
23)
24)
part
some
Release
and make
the
the Autofocus Lamp
sure
has turned
signal)
While
3.
halfway
move the
recompose
the Shutter Release all
o
The Autofocus Lock
mm full
35
o
The Autofocus Lock can be used
as necessary before tripping
SELECTING
I A word
Each time
the
exposure
shown below:
Auto flash
(
in Flash
I Elfective flash range
(Using
The
effective
will differ
on.
pressing
down...
camera
on
you press
(No
I
color
with
(Fig.
back to
picture,
your
and
size
THE EXPOSURE
the
camera's
mode sefting
sign),
Flash off
and
)
negative film;
range
of
the speed of
(focusing
the shutter
23)
then
the way down.
be
can
panorama
flash exposure
in the Exposure
will
Red-eye
Reducing
(
distance
your
camera's built-in
the film
release
its
original
take it
for taking
used
format
as many times
the
shutter.
MODE
switch
moOe.
)
€t
you
completed
about
position,
pressing
by
both
pictures.
modes
Mode Button,
in
the order
(
Fill-
O
),
in meters).
flash
are using
Page 16

and the lens
35#m,#id$angtd
focal length
rso
0.9-5
as shown below.
1m
70 mm telephoto 0.65-2.5
see
fire
Release.
in the
)
f
picture.
your
reducing
Red-eye
the
LCD by
take
then
after
turn on
will
pictures
in low
mode
any sign
the light is
and
when
as soon
And
LCD turns off,
subiect's
mode
Reducing
pressing
your
Picture.
turn off
Lamp
mode
(next
the
reducing
you
Taking ordinary
1. Automatic-flash
you
lf
don't
(see
illustration)
automatically
Shutter
(
Sign
next autoflash
you
wanl
lf
beautiful...
2. Red-eye
Bring out
in the
Button,
o
red-eye
The
on even
o
Autofocus
The
piece)
-7
o.9
(Fig.
light
"A"
of
low, the
press
down
you
can
natural and
26)
Mode Sign
will remain
the Red-eye
j$O'400,
0.9-10
0.65-5
the
Flash
take
$oeo.CI
1.65-3.5
in area
you
as the blinking
to look
eyes
(Fig.
in the Exposure
setting
the
Power.
to the Finder
moment
25)
LCD
will
the
Flash
your
(
@
Mode
Eye-
Reducing Lamp turns
the Flash fires. Be
while the Autofocus Lamp is
I A word
When
with Flash, the
the
enters
the
red-eye
@
@
@
To
)
window
3. Filf-in flash mode
Bring
pressing
will now fire
on
you photograph a person's
picture.
This is
person's
the
camera
pictures,
your
Take
Red-eye Reducing Mode.
your
Ask
Bring the
your
subject.
take backlighted
or in lhe shade
the Flash
out
in the Exposure Mode Button. The Flash
then turn
on
to hold the
sure
red-eye
will
eyes
because the light from the Flash
eyes and
lens. To reduce the
observe the following rules:
picture
subject to stare at the
camera up as close as
pictures
(Fig.27l
in
even
bright sunlight.
effect
sometimes
with the
of
tree. . .
of a
(
Sign
on.
face in dim light
is reflected
chances of
camera set
subjects
)
f
the instant
off
camera still
turn
red
out
back into
getting
to the
camera.
possible
against a
in the LCD
m
z
o
tr
o
-
in
to
by
Page 17

E
Taking non-flash
o
4. Flash olf
(J
Bring out the
z
pressing
lU
your
non-flash
o
The flash mode settings will remain
them
switch
o
To take
that
are beyond
flash, shoot with the Flash turned
mode).
o
When
shooting
camera
tripod.
USING THE
1.
the
Set
To
the
set
Remote
Control
triangular mark
the Self-timer Sign
2.
the
Start
To
start
Lens will automatically focus
pictures
(Fig.
mode
Flash
in the Exposure Mode Button, then take
stage scenes and indoor sports events
as still as
self-timer
it,
Off Sign
(existing
off by closing
reach
in the flash
SELF.TIMER
(Fig.
Selttimer,
Button
(
{
)
(
U
Self-timer
press
down
28)
light)
of the
possible
29)
press
(
tr,-
in the
LCD
is
showing.
)
(Fig.
30)
the
(
in the LCD by
O )
picture.
the Lens
camera's
mode, keep the
off
mounting it
by
in the
to
t) )
in
the spot where
Shutter
the
on
you
on until
Cover.
built-in
(flash
off
bring out
Release. The
part
on a
Selttimer/
your
of
off
the
that is
subject
Spot.
o
When
front
throw the
turn
o
The
Self-timer
picture.
a
o
To
switch off the
mark ( { ) in the
timer Button
3. Wail 10
As soon
Renrote
seven seconds, then
the
shutter will trip to take
USING
o
lf the Remote
your
I Remote
.Switch
'
Shutter Operating Button
covered by the Finder's
you
of the camera. lf
out underexposed.
as the
Control Lamp will turn
THE
camera,
the
start
Lens out of focus
has
Selttimer,
a second time.
seconds
Self-timer starts, the Selttimer/
REMOTE
Control Switch
you'll
control
switch
Muzzle
Self-timer, do
you
to be reset each time
LCD by
blink
CONTROL SWITCH
have to
(Fig.
(Fig.
31-A)
you
do,
the
or
turn off the triangular
pressing
on and
for
three
your picture.
seconds,
is not included
it
buy
separately.
31)
(Fig.
31-B)
Autofocus
not
stand
will
picture
you
in the
glow
either
may
take
Selt
for
then
with
in
Page 18

1. Take
out the remote
To take it
it in its holder,
2. Set the
Press
Button
(
Control Sign
3.
Aim the
pose
the
Button.
blink
take
o
.
.
.
out
.
Switch Holder
camera to remote
in the
(tro
(
in
the LCD
{
)
your
Take
Autofocus
your picture.
camera and
The
Self-timer/Remote
for
two
your picture.
After taking
the remote
your picture
Take
the
camera to
For
best results,
when
taking remote
Be careful when
because the
control
its holder,
of
slide
Selttimer/Remote
)
U
(
tr-
remote
press
seconds then
your
control mode.
the remote
Remote
just
it in
until
(Fig.
32-A)
to bring
in the
spot where
is
showing.
)
control
Spot
at
Face
the
down the
picture,
within
five minutes
mount the
control
taking
against-the-light
Control
out the triangular
your
(Fig.
switch
slide it
out. To insert
it
stops with
(Fig.
control
Control Mode
the Remote
picture
(Fig.
subject and
Switch
Muzzle toward
Shutter
Control Lamp
the
shutter will
switch
the
camera
Switch may
after
on a tripod
control mode.
pictures.
32)
a click.
33)
mark
3a)
com-
Operating
trip to
camera
setting
pictures
will
not
off
function if direct
Remote
Control
Self-timer
o
The Remote Control Switch's
about
Fujifilm's battery
runs out,
replace it for
4. Eltective
The effective
is
about
the
the camera at a
above, and below).
I
Carrying
Just
(see
and carry
in
three
you
switch
five meters when
and up
camera,
the
pass
the camera strap
in the illustration)
arrow
it together with the camera.
light
You may have
Sensor.
such cases.
years
(as
procedure).
testing
always ask
can
you.
(Fig.
range
range
the Remote Control Switch
of
held
to
meters when aimed
3.5
20o angle from all sides
remote
control
the camera's
enters
tested according
35)
switch
through
in the
battery
lf
your
directly
Switch
to
the
dealer
in
(|eft,
(Fig.
the
use
will last
battery
front
35)
groove
Holder
the
to
to
of
at
right,
m
z
o
tr
g,
I
Page 19

t
o
(t
t
ltJ
CAMERA
FAULTS, POSSIBLE
Fettli$, Fssdbft-Cau$€$ He ieg
The shutter won't
trip.
CAUSES,
The
battery
@
(The
not turn
Release
down).
You forgot to turn on the
@
Power
The Exposure
@
showing
You blocked the
@
while it was zooming,
which
trip because the
normal
AND REMEDIES
is nearly
Autofocus Lamp does
when the
on
pressed
is
Switch.
Counter
"E"
the
Sign.
Lens
the shutter
case
position.
Lens is not in
spent.
Shutter
halfway
barrel
won't
Change
@
new
Push
@
Button and
Lens has moved out
shooting
is
Unload the
@
new roll.
Press in the Zoom Button.
@
in
Lens barrel will automatically
collapse
wideangle
the
one.
the Lens Cover
down
make
position.
film and
then reset itself
position.
battery
with
sure
insert
the
into
The
to
Pagii
9
10
13
a
11
Page 20

Faullt
2.
The Exposure
er blinks.
winds
directly
into its
moment
3. The film
into
its
the middle
4. The
film has
loaded
Camera Back
been
closed,
Exposure
does not
Count-
(The
cartridge the
it is loaded).
wound
cartridge in
the
of
and the
but the
Counter
count.
film
back
back
roll.
been
has
.
o
.You
butkus.orglchinon
PossiHe
partly
A
unloaded
back
into its
While
taking
the
film
the
Camera Back
you
or
Camera
did not
correctly.
used roll
without
cartridge.
pictures
prewinding,
was
meddled
Back
Lock.
Causes,
film
of
winding
or
was
opened
with
load the
was
while
either
the
film
o
it
o
.
First,
move
shooting
down the
Next,
unload the
to make
Counter in
then
reload
When
there is
ra,
do not
Back
or meddle
Camera
Reload
the film
Remedies
the Lens
position
Lens
Cover Button.
battery,
sure the
LCD
has turned
the
battery.
film in
open
Back Lock.
correctly.
out into
pushing
by
Exposure
the
the
Camera
with
check
off,
came-
the
Pqge
13
13
I
m
=
o
tr
o
-
Page 21

-
o
(5
z
UJ
PRINT
1.The
luzzy.
The
2.
dark.
FAULTS,
Faulbl
picture
picture
POSSIBLE
looks
@
@
@
looks
@
CAUSES,
The Autofocus Spot
aimed correctly.
The Lens is not clean.
You
you
Release.
You took
the light
standing
window, etc.).
Your subject
@
reach of
flash.
AND REMEDIES
jiggled
the camera
pressed
down
your
(your
indoors against
the
camera's
not
when
the
Shutter
picture
against
was
subject
was beyond
built-in
Re4qdies
Aim the Autofocus
@
rectly at
Autofocus
the
your picture.
Keep the Lens clean
@
times.
Hold the camera
@
hands and
gently
Release
your
Take
@
pictures
Fill-in Flash
to the
a
your
Take
@
in the built-in
range.
I
your
Spot
subject
Lock to
or use
at all
with both
still
press
the Shutter
down.
against-the-light
with the camera
flash
flash's
Mode.
pictures
etfective
with-
cortake
set
Page
11,14
21
11
15
15
Page 22

CAMERA CARE
1. Your
camera is
requires
careful handling.
on the
floor,
strong
shock.
you
2. lt
3.
4. In
5. In
6. Never
are not
interval,
keep
dust.
and moisture.
Remove
autofocus
air
soft, lint-free
gently
slightly
solvents,
your
closed
beach,
for
dealer.
because
circuits.
soil
windows,
blower
with
with Fuji
such
camera.
hot
weather,
compartment
and in
a very
short
case
of malfunction,
Do not
it is
dismantle
and
Fuji
AND
CAUTIONS
precision
a
or
subject it
using
it where
and
dust from
and finder
by wiping
cloth. lf
that is
Lens
Cleaning
Lens
Cleaning
as
alcohol
do not leave
of
places
moist
time.
disassemble
equipped
the
camera's
your
it
will
and
your
consult
instrument
Do
not wet
to
any
camera
be
lighfly
not
enough,
Paper
Fluid.
benzine,
your
car,
except
the
camera
with
it,
other type
for
safe from
the lens
window
with
piece
with
a
wipe
moistened
Never
to
camera
or on
an ocean
temporarily
your
camera
yourself
high-tension
lithium
battery,
which
drop it
a long
hea[.
glass,
an
off
use
clean
in
7.
of
SPECIFICATIONS
r
o
of
o
o
a
o
o
heat it, throw
to
short
circuit.
This
camera is
perature
Film
135
Picture
Standard
panorama
Lens
Fujinon
1 :5.0-9.5,
Finder
Albada
bright frame,
parallax
finder
Focusing
Active
mm),
with
Autofocus
Turns
range
(35
mm) DX roll
Size
35 mm
format.
zoom
5 components,
zoom
correction
eyepiece).
type
0.9 m-oo
autofocus
Lamp
on
and
it into
a fire,
designed
-10
of
film.
size:24 x
power
lens,
finder,
panorama
mark,
autofocusing
at.other focal
lock.
glows
when
charge it,
for
use within a tem-
+40oC.
to
36 mm.
zoom, f=35-70
5 elements.
0.4-0.72X
frame,
autofocus lamp
from
magnification,
autofocus
0.65 m-o"
lengths,
subject is in
or cause it
switchable to
mm,
spot,
(next
(at
f=70
provided
sharp
m
z
o
tr
U'
I
to
21
Page 23

22
E
focus, blinks
o
r
Shutler
(5
Programmed electronic
z
o
Exposure Gontrol
ul
Automatic,
(9'*)-17 (telephoto), (*
12.8
flash off
r
Film
Speed
Automatic
o
Film Loading
Drop-in system,
o
Film Advance
Automatic
winding
rewinding.
o
LCD Signs
Exposure counter,
charging,
off signs),
mode signs.
o
Flash
Autoflash,
flash
matic exposure
time.
o
Sell-timer
when subiect
(9*)-17 (wideangle)
10.4
EV
mode).
Setting
ISO
with
unnecessary,
red-eye reducing,
modes, electronically
otf
50-1600
automatic
(motorized),
flash mode signs
self-timer
red-eye reducing,
mode and
control,
is too close.
shutter.
indicates
DX roll film.
threading.
prewind
film
provision
fill-in flash, and
fill-in
controlled
about 5 sec.
EV
and
for
values
re-
system,
mid-roll
for
(flash
remote control
llash
flash, and
flash-
recycle
Electronically
be
can
countdown
.
Power
lithium
One
Panasonic
or
.
Remote
Infrared
m effeciive
5
as camera
o
Olhers
Built-in
lock
tripod
release.
.
Dimensions
Camera:
Remote
g.
1o
Notice:
controlled,
swit-ched
lamP.
Source
battery
CR
Conlrol
system,
range
accessory
cover
lens
closed),
when
provision
socket,
and
123x75
Control
Specifications
notice.
out
butkus.orglchinon
about
mid-run,
in
off
(Fujifilm-Eveready
123A).
Switch
operates
Weight
Switch:
camera
from camera
or separately).
(lens
cover
film confirmation
remote
for
x 45 mm,
242g.
57x24x15mm,
subiect
are
10 sec.
provided
shutter,
front
serves
control
(without
(with
to change
delay,
with
123A
CR
about
(available
as safety
window,
shutter
battery).
battery).
with-
 Loading...