

Page 1
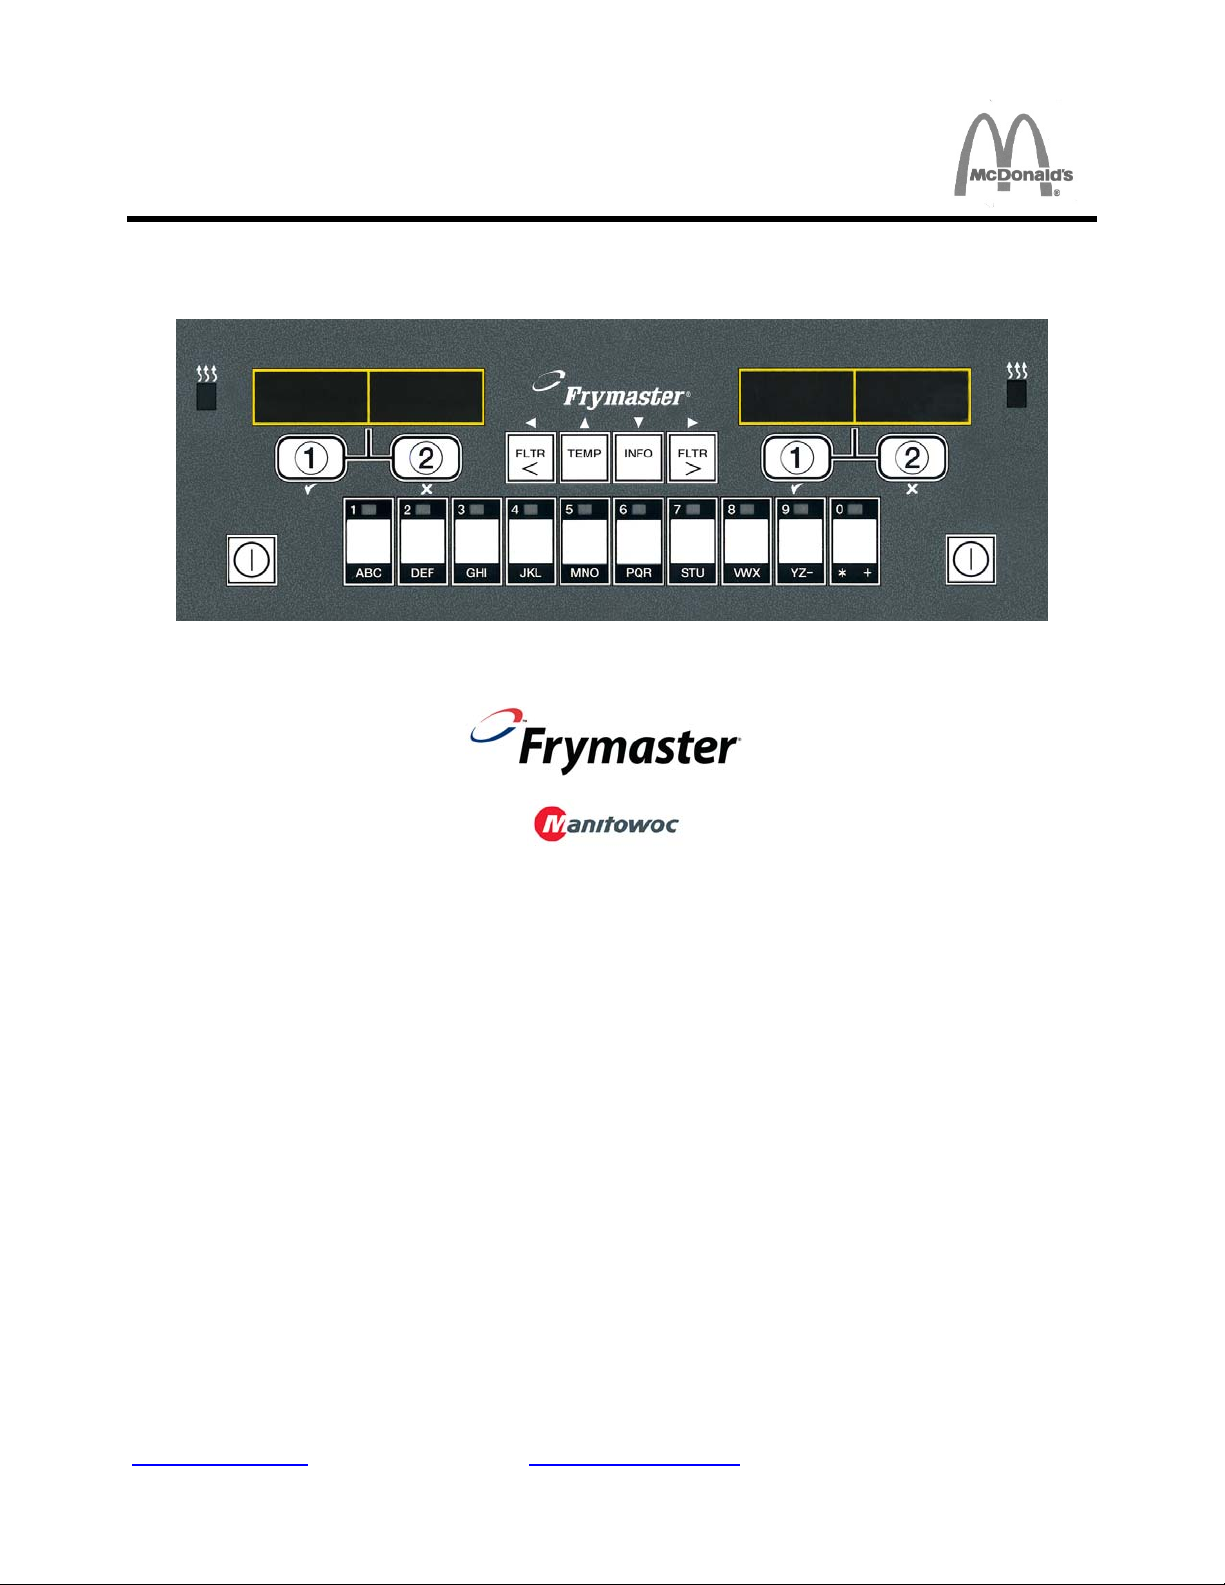
FRYMASTER MANUAL LOV™ M3000 CONTROLLER
This equipment chapter is to be
installed in the Fryer Section of the
Equipment Manual.
OPERATION MANUAL
INSTALLATION INSTRUCTIONS ....................................................................................... Page 1-1
MANUAL LOV™ M3000 OPERATING INSTRUCTIONS ..................................................... Page 2-1
OPERATOR TROUBLESHOOTING ..................................................................................... Page 3-1
PRINTED IN THE UNITED STATES SERVICE HOTLINE 1-800-24-FRYER JULY 2012
www.frymaster.com Email: service@frymaster.com
SHREVEPORT, LOUISIANA 71106
Frymaster L.L.C., 8700 Line Avenue, Shreveport, LA 71106
PHONE 318-865-1711 FAX 318-219-7135
MANUFACTURED
BY
8700 Line Ave.
PHONE: 1-318-865-1711
TOLL FREE: 1-800-551-8633
1-800-24 FRYER
FAX: 1-318-219-7135
TABLE OF CONTENTS
*8196964*
Page 2
NOTICE
IF, DURING THE WARRANTY PERIOD, THE CUSTOMER USES A PART FOR THIS
MANITOWOC FOOD SERVICE EQUIPMENT OTHER THAN AN UNMODIFIED NEW OR
RECYCLED PART PURCHASED DIRECTLY FROM FRYMASTER DEAN, OR ANY OF ITS
FACTORY AUTHORIZED SERVICERS, AND/OR THE PART BEING USED IS MODIFIED FROM
ITS ORIGINAL CONFIGURATION, THIS WARRANTY WILL BE VOID. FURTHER, FRYMASTER
DEAN AND ITS AFFILIATES WILL NOT BE LIABLE FOR ANY CLAIMS, DAMAGES OR
EXPENSES INCURRED BY THE CUSTOMER WHICH ARISE DIRECTLY OR INDIRECTLY, IN
WHOLE OR IN PART, DUE TO THE INSTALLATION OF ANY MODIFIED PART AND/OR PART
RECEIVED FROM AN UNAUTHORIZED SERVICE CENTER.
NOTICE
This appliance is intended for professional use only and is to be operated by qualified
personnel only. A Frymaster Dean Factory Authorized Servicer (FAS) or other qualified
professional should perform installation, maintenance, and repairs. Installation,
maintenance, or repairs by unqualified personnel may void the manufacturer’s warranty.
NOTICE
This equipment must be installed in accordance with the appropriate national and local
codes of the country and/or region in which the appliance is installed.
NOTICE
Drawings and photos used in this manual are intended to illustrate operational, cleaning
and technical procedures and may not conform to onsite management operational
procedures.
NOTICE TO OWNERS OF UNITS EQUIPPED WITH CONTROLLERS
U.S.
This device complies with Part 15 of the FCC rules. Operation is subject to the following
two conditions: 1) This device may not cause harmful interference, and 2) This device must
accept any interference received, including interference that may cause undesired
operation. While this device is a verified Class A device, it has been shown to meet the
Class B limits.
CANADA
This digital apparatus does not exceed the Class A or B limits for radio noise emissions as
set out by the ICES-003 standard of the Canadian Department of Communications.
Cet appareil numerique n’emet pas de bruits radioelectriques depassany les limites de
classe A et B prescrites dans la norme NMB-003 edictee par le Ministre des Communcations
du Canada.
DANGER
Improper installation, adjustment, maintenance or service, and unauthorized alterations or
modifications can cause property damage, injury, or death. Read the installation, operating,
and service instructions thoroughly before installing or servicing this equipment.
NOTICE
The instructions in this manual for using a bulk oil system for filling and discarding oil are
for an RTI system. These instructions may not be applicable to other bulk oil systems.
Page 3

MANUAL LOV™ M3000 CONTROLLER
CHAPTER 1: INSTALLATION INSTRUCTIONS
1.1 Installation
Before attempting to operate your unit, read the instructions in this manual thoroughly before
installation. Installation of the Manual LOV™ (Low Oil Volume) M3000 controller requires some
extra steps prior to use. This controller uses network cables for communication between controllers.
The controllers also require locator connectors which identify the position of the controllers in the
bank of fryers. Finally the network must be terminated on the far left controller and the far right
controller of the network.
1.2 Controller Information for the M3000 Controllers
This equipment has been tested and found to comply with the limits for a Class A digital device,
pursuant to Part 15 of the FCC rules. While this device is a verified Class A device, it has been
shown to meet the Class B limits. These limits are designed to provide reasonable protection against
harmful interference when the equipment is operated in a commercial environment. This equipment
generates, uses and can radiate radio frequency energy and, if not installed and used in accordance
with the instruction manual, may cause harmful interference to radio communications. Operation of
the equipment in a residential area is likely to cause harmful interference in which case the user will
be required to correct the interference at their own expense.
The user is cautioned that any changes or modifications not expressly approved by the party
responsible for compliance could void the user's authority to operate the equipment.
If necessary, the user should consult the dealer or an experienced radio and television technician for
additional suggestions.
The user may find the following booklet prepared by the Federal Communications Commission
helpful: "How to Identify and Resolve Radio-TV Interference Problems". This booklet is available
from the U.S. Government Printing Office, Washington, DC 20402, Stock No. 004-000-00345-4.
1.3 Shipping Damage Claim Procedure
What to do if your equipment arrives damaged:
Please note that this equipment was carefully inspected and packed by skilled personnel before
leaving the factory. The freight company assumes full responsibility for safe delivery upon
acceptance of the equipment.
1. File Claim for Damages Immediately - regardless of extent of damage.
2. Inspect For and Record All Visible Loss or Damage, and ensure that this information is noted
on the freight bill or express receipt and is signed by the person making the delivery.
3. Concealed Loss or Damage- If damage is unnoticed until equipment is unpacked, notify the
freight company or carrier immediately upon discovery and file a concealed damage claim.
1-1
Page 4

This must be submitted within 15 days of date of delivery. Be sure to retain container for
inspection.
Frymaster
DOES NOT ASSUME RESPONSIBILITY FOR DAMAGE OR LOSS
INCURRED IN TRANSIT.
1.4 Service Information
For non-routine maintenance or repairs, or for service information, contact your local Frymaster
Authorized Servicer (FAS). In order to assist you quickly, the Frymaster Authorized Servicer (FAS)
or Service Department representative requires certain information about your equipment. Most of
this information is printed on a data plate affixed to the inside of the fryer door. Part numbers are
found in the Service and Parts Manual. Parts orders may be placed directly with your local FAS or
distributor. A list of Frymaster Factory Authorized Servicers (FAS’s) is located on the Frymaster
website at www.frymaster.com
. If you do not have access to this list, contact the Frymaster Service
Department at 1-800-551-8633 or 1-318-865-1711 or by email at service@frymaster.com.
The following information will be needed in order to assist you efficiently:
Model Number _________________________
Serial Number __________________________
Voltage _______________________________
Gas Type _____________________________
Nature of the Problem ____________________
_____________________________________
_____________________________________
RETAIN AND STORE THIS MANUAL IN A SAFE PLACE FOR FUTURE USE.
1-2
Page 5
CHAPTER 2: MANUAL LOV™ M3000 CONTROLLER
OPERATION INSTRUCTIONS
2.1 M3000 General Information
Welcome to the Manual LOV™ M3000, a controller that retains the one-button ease of the M2000
and 100B and the utility of 40-product menu capability. The controller is easy to use. One button
push starts a cook cycle for an item cooked in a dedicated vat. The same flexible controller on a
multi-product vat requires only two
button pushes to launch a cook
cycle. Just choose a menu item on a
product button and press, and then
press a cook channel button under
the display showing the desired
item. The controller can move
seamlessly from McNuggets to
Crispy Chicken to any added menu
item.
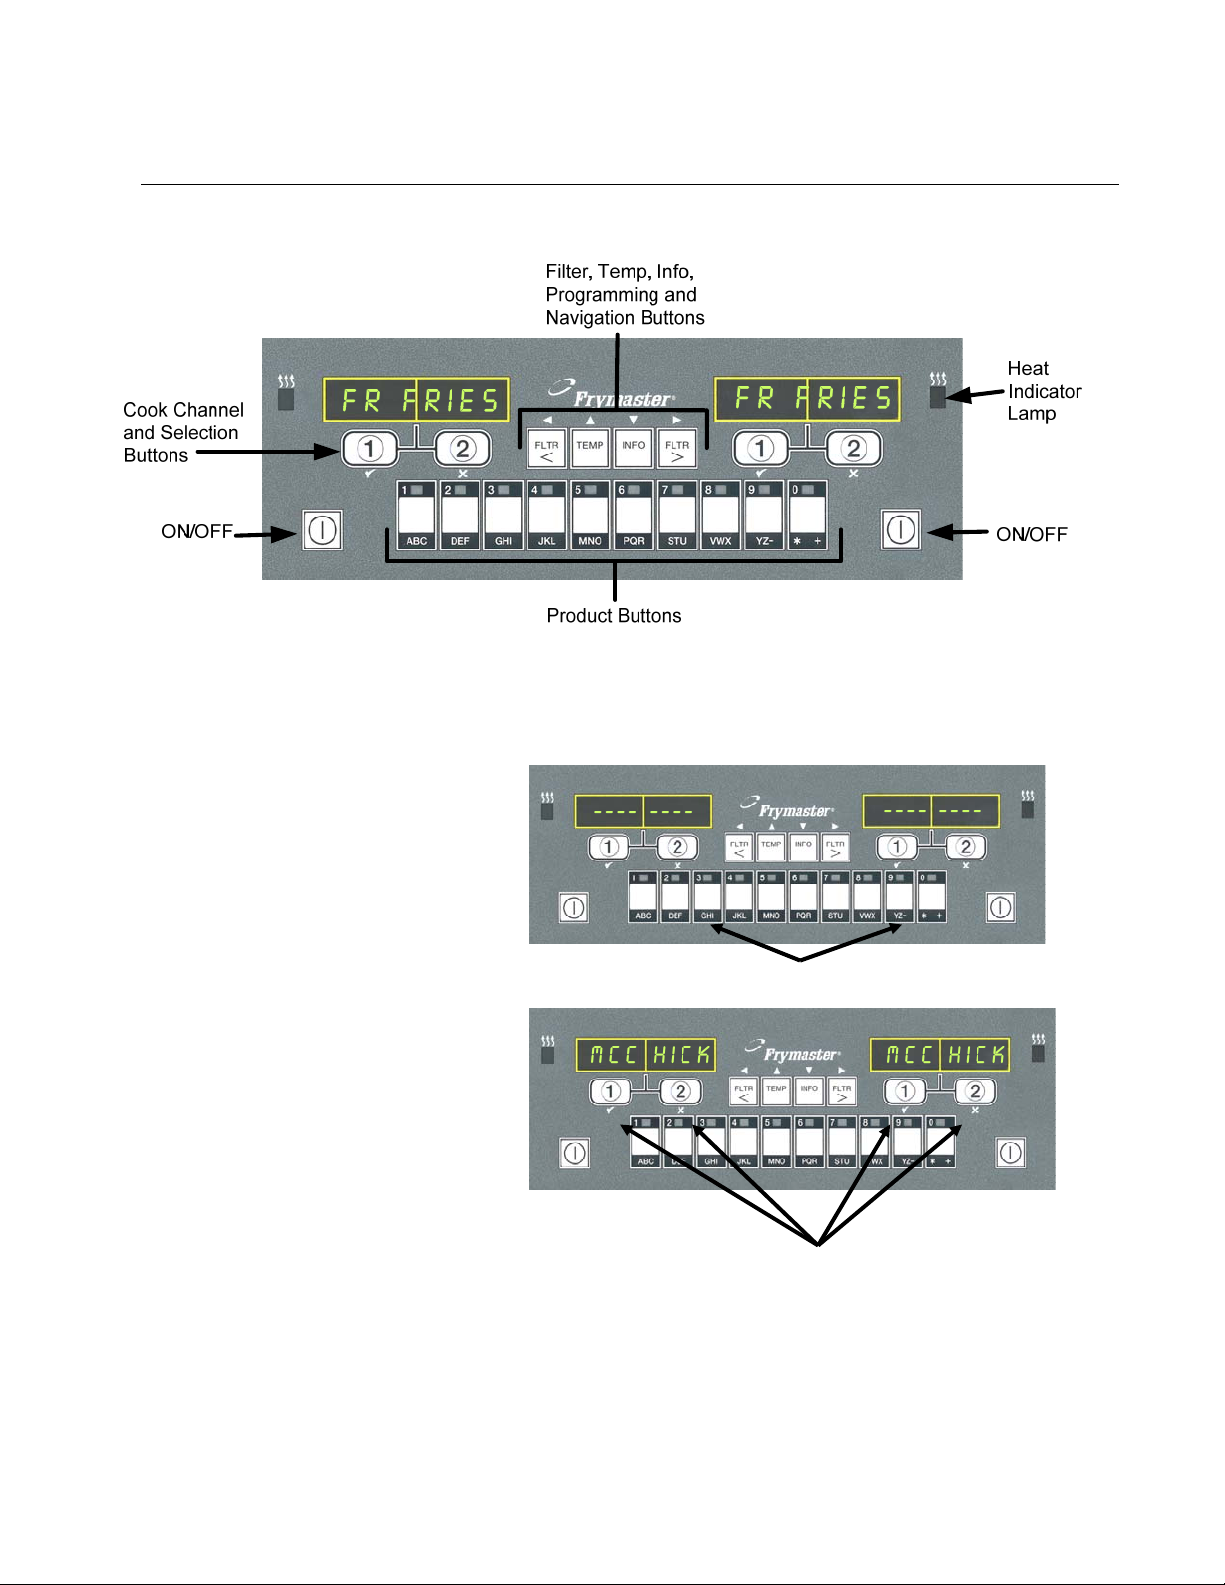
Pressing product buttons 3 or 9 displays McChick.
In a typical store setting, the
M3000s on the three-vat fry station
display FR FRIES (shown above)
and will launch a cook cycle with
one push of a cook channel button.
On the chicken/filet station, the
LED display shows dashed lines.
To launch a cook cycle, press a
product button and then press the
Pressing either cook cycle button under the McChick
displays launches a cook cycle.
cook channel button that
corresponds with the location of the
dropped basket. By pressing the product button for McChicken, McChick will appear in the display.
Just press the cook channel button corresponding to the location of the appropriate dropped basket.
The M3000 will operate with electric and gas fryers, both full- and split-vat.
2-1
Page 6
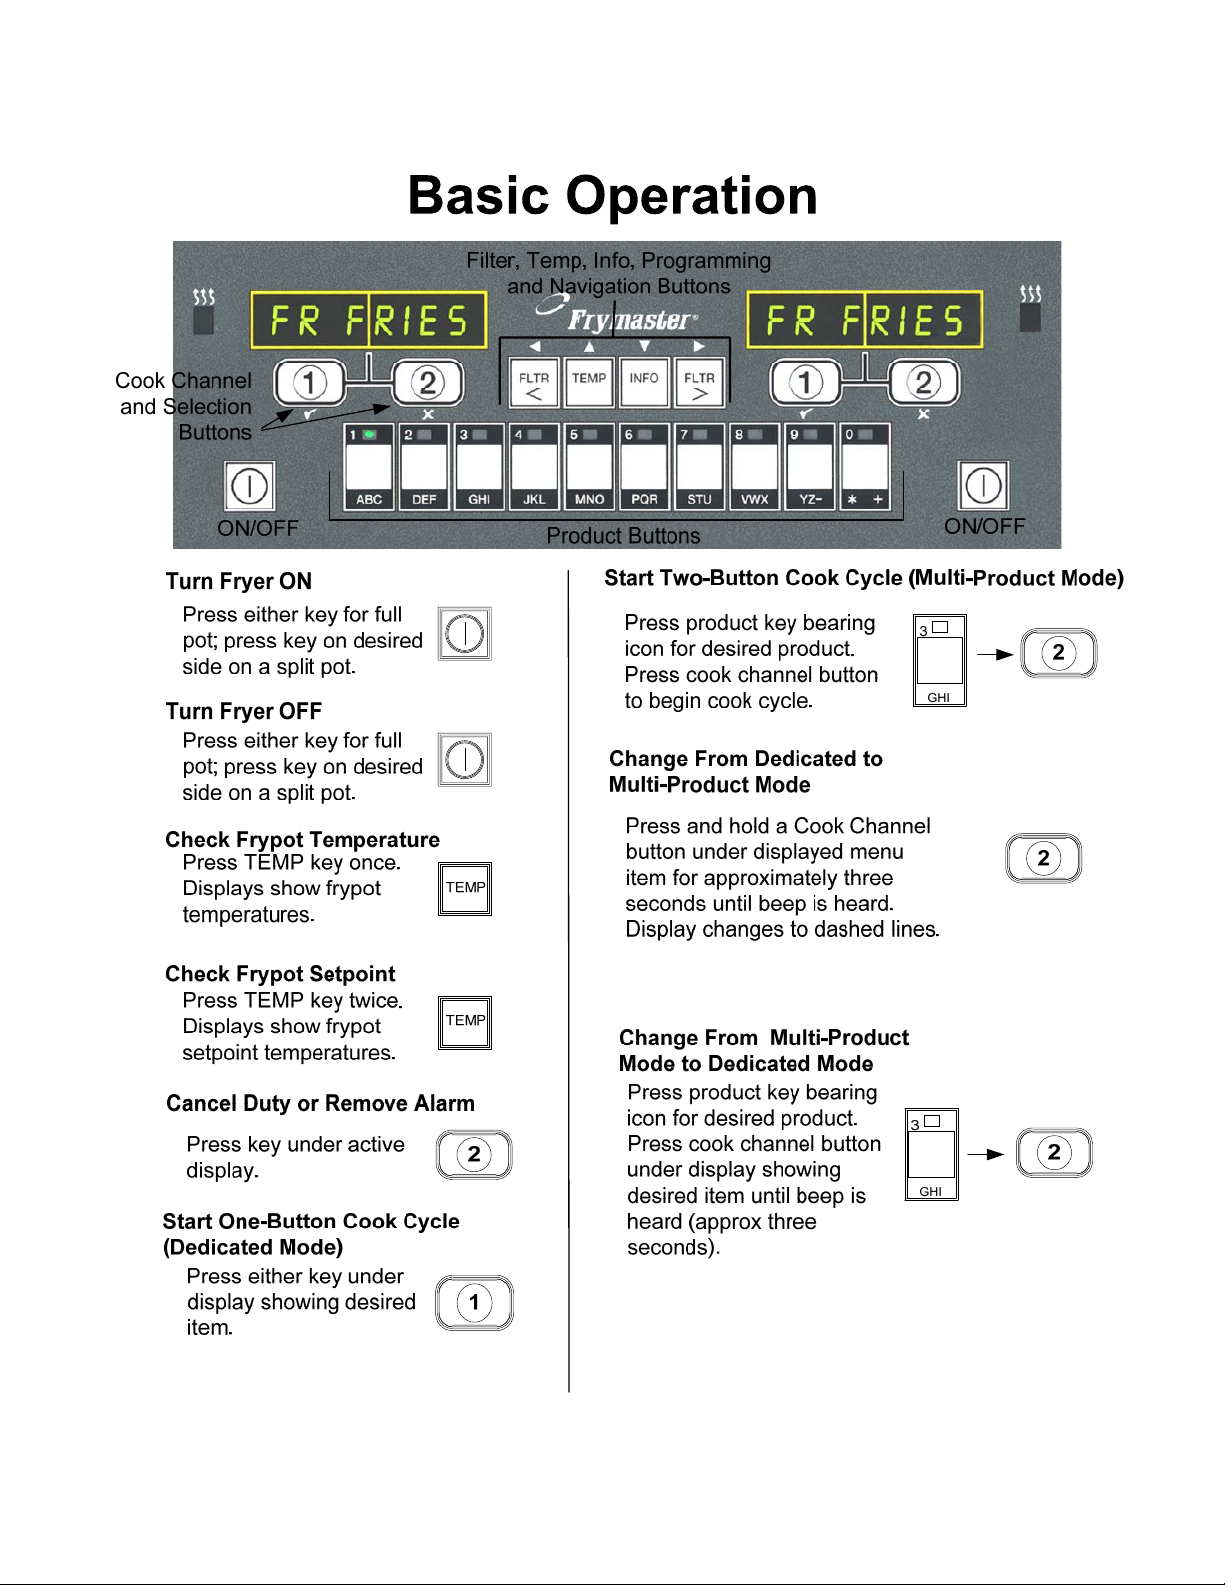
2.2 Basic Operation
2-2
Page 7
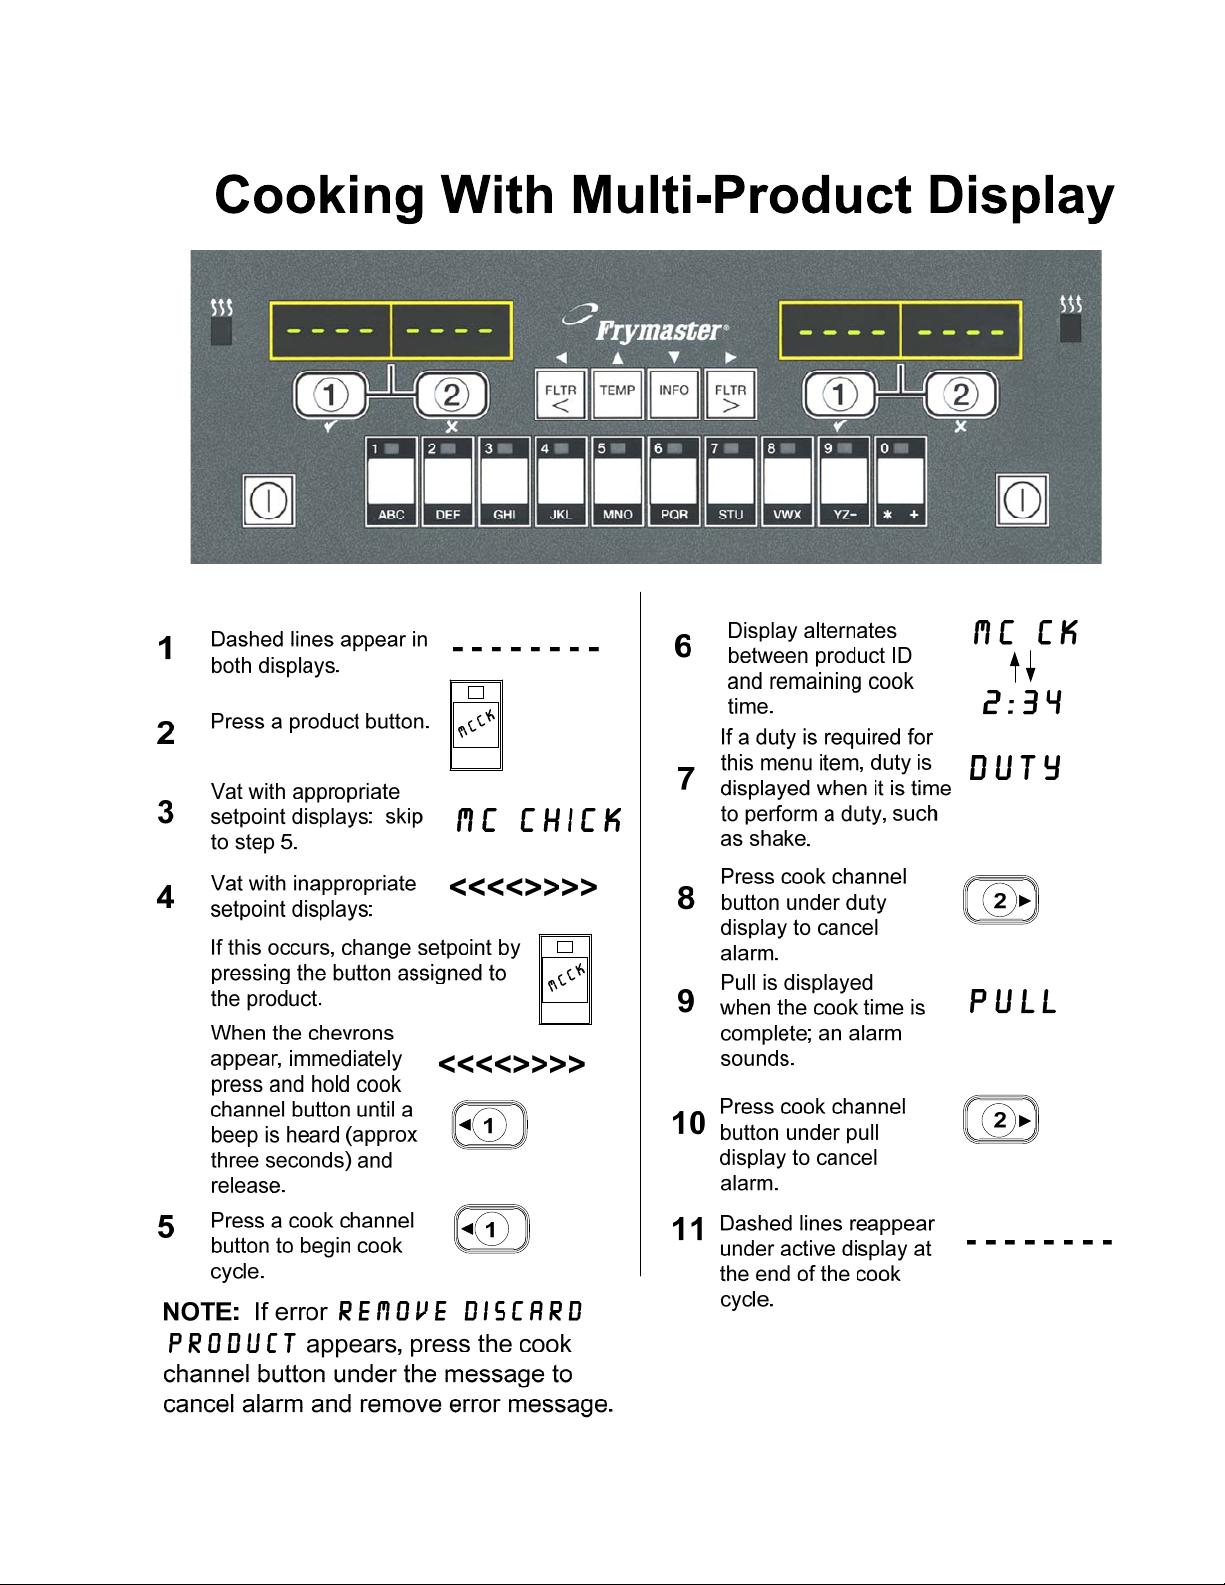
2.3 Cooking with Multi-Product Display
2-3
Page 8
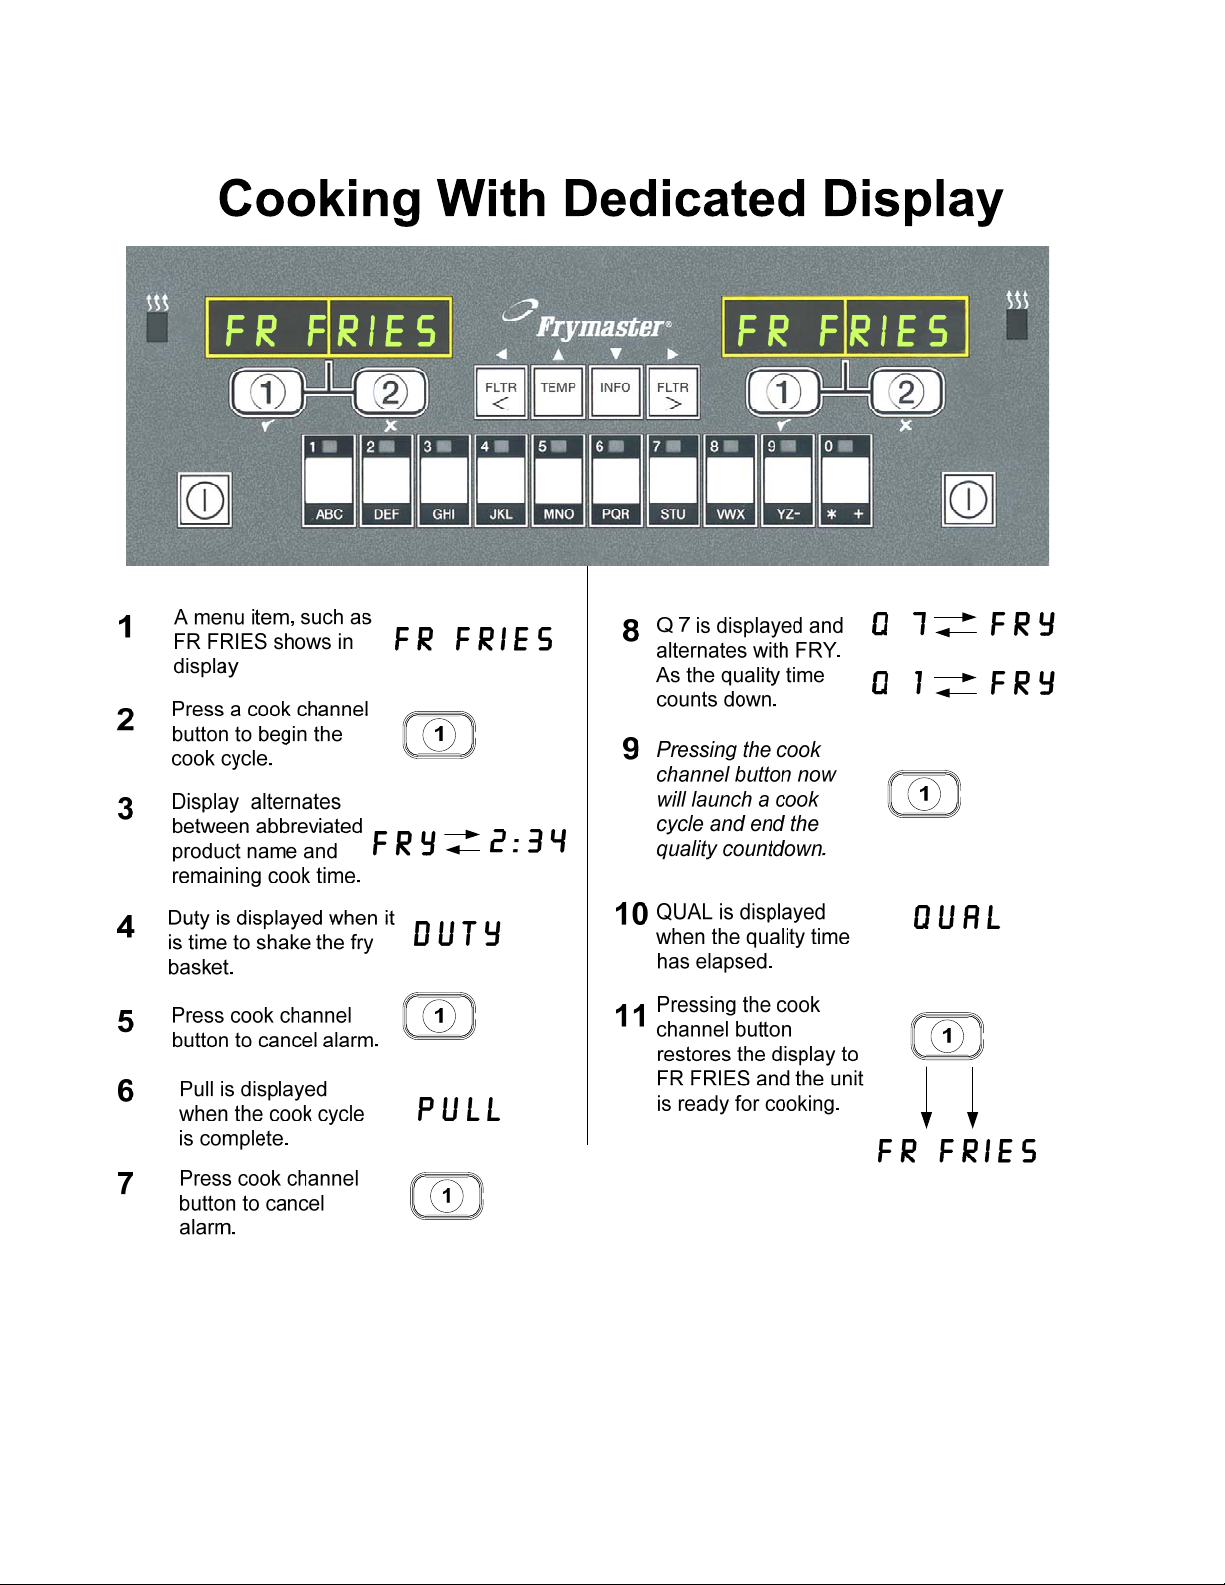
2.4 Cooking with Dedicated Display
2-4
Page 9
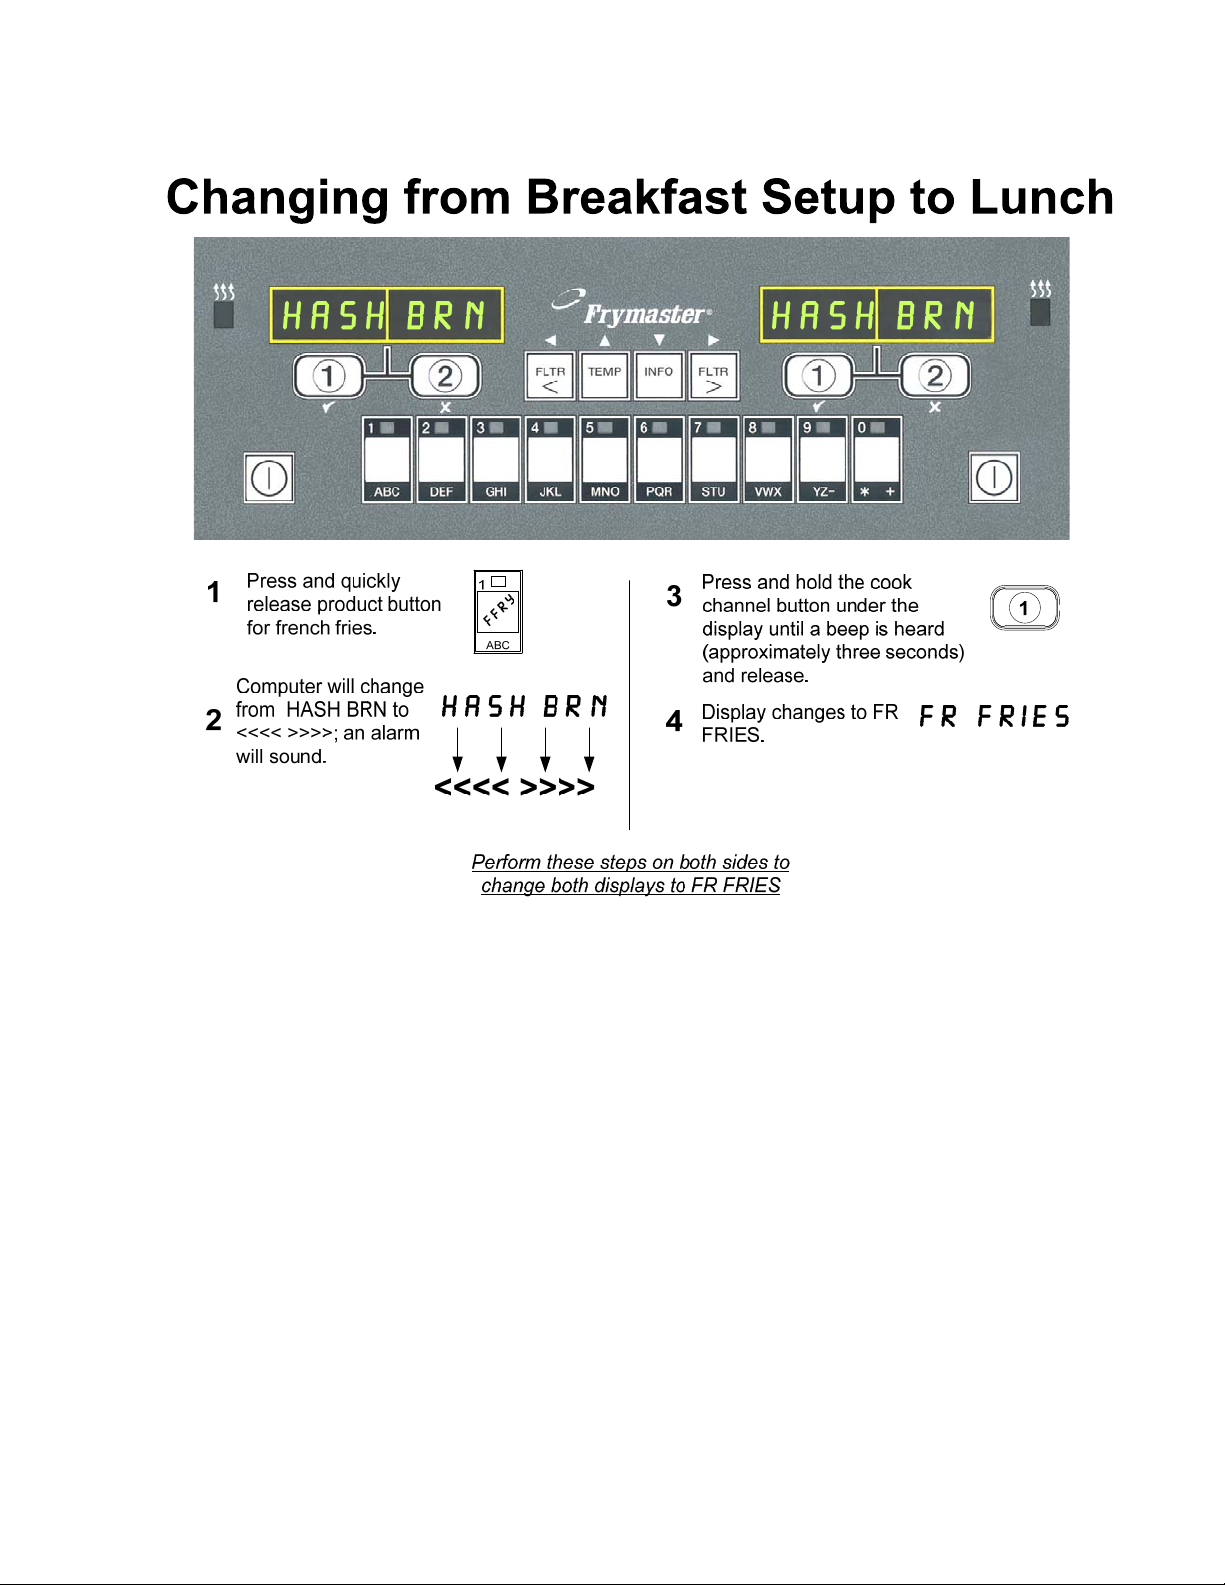
2.5 Changing from Breakfast Setup to Lunch
2-5
Page 10
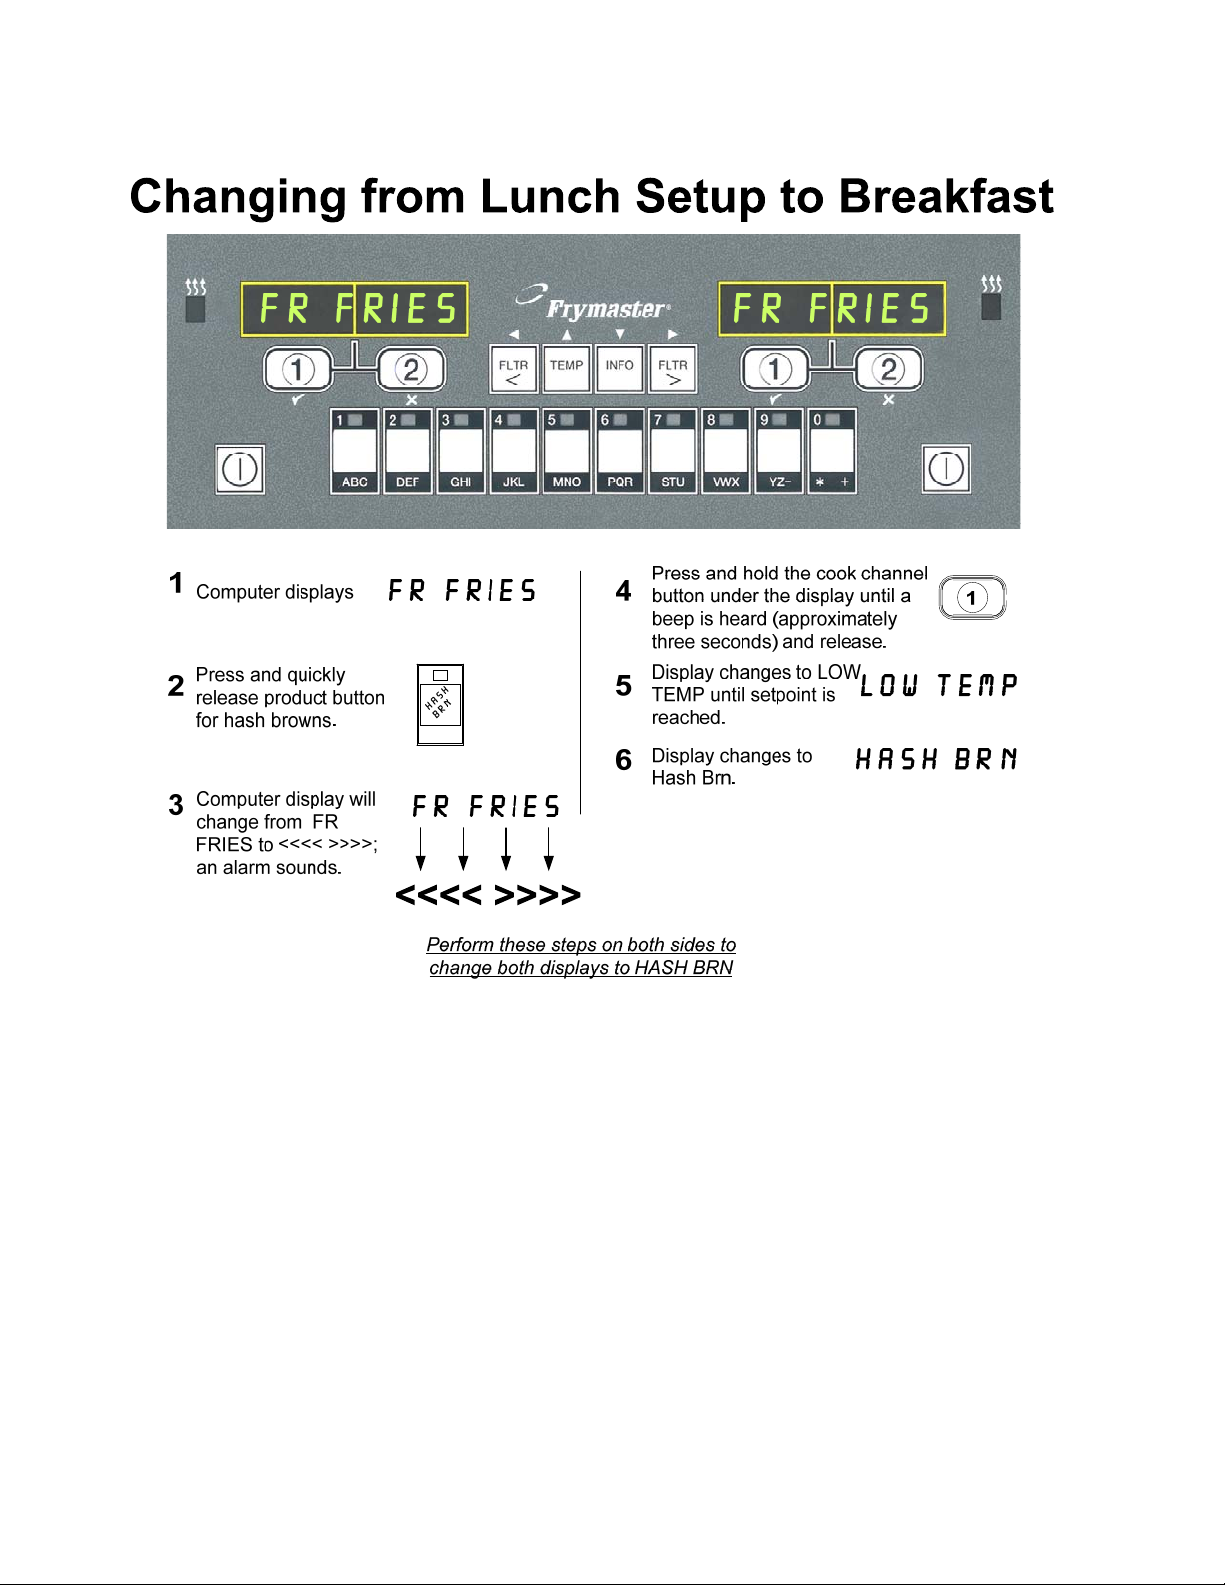
2.6 Changing from Lunch Setup to Breakfast
2-6
Page 11
2.7 M3000 Button Description and Functions
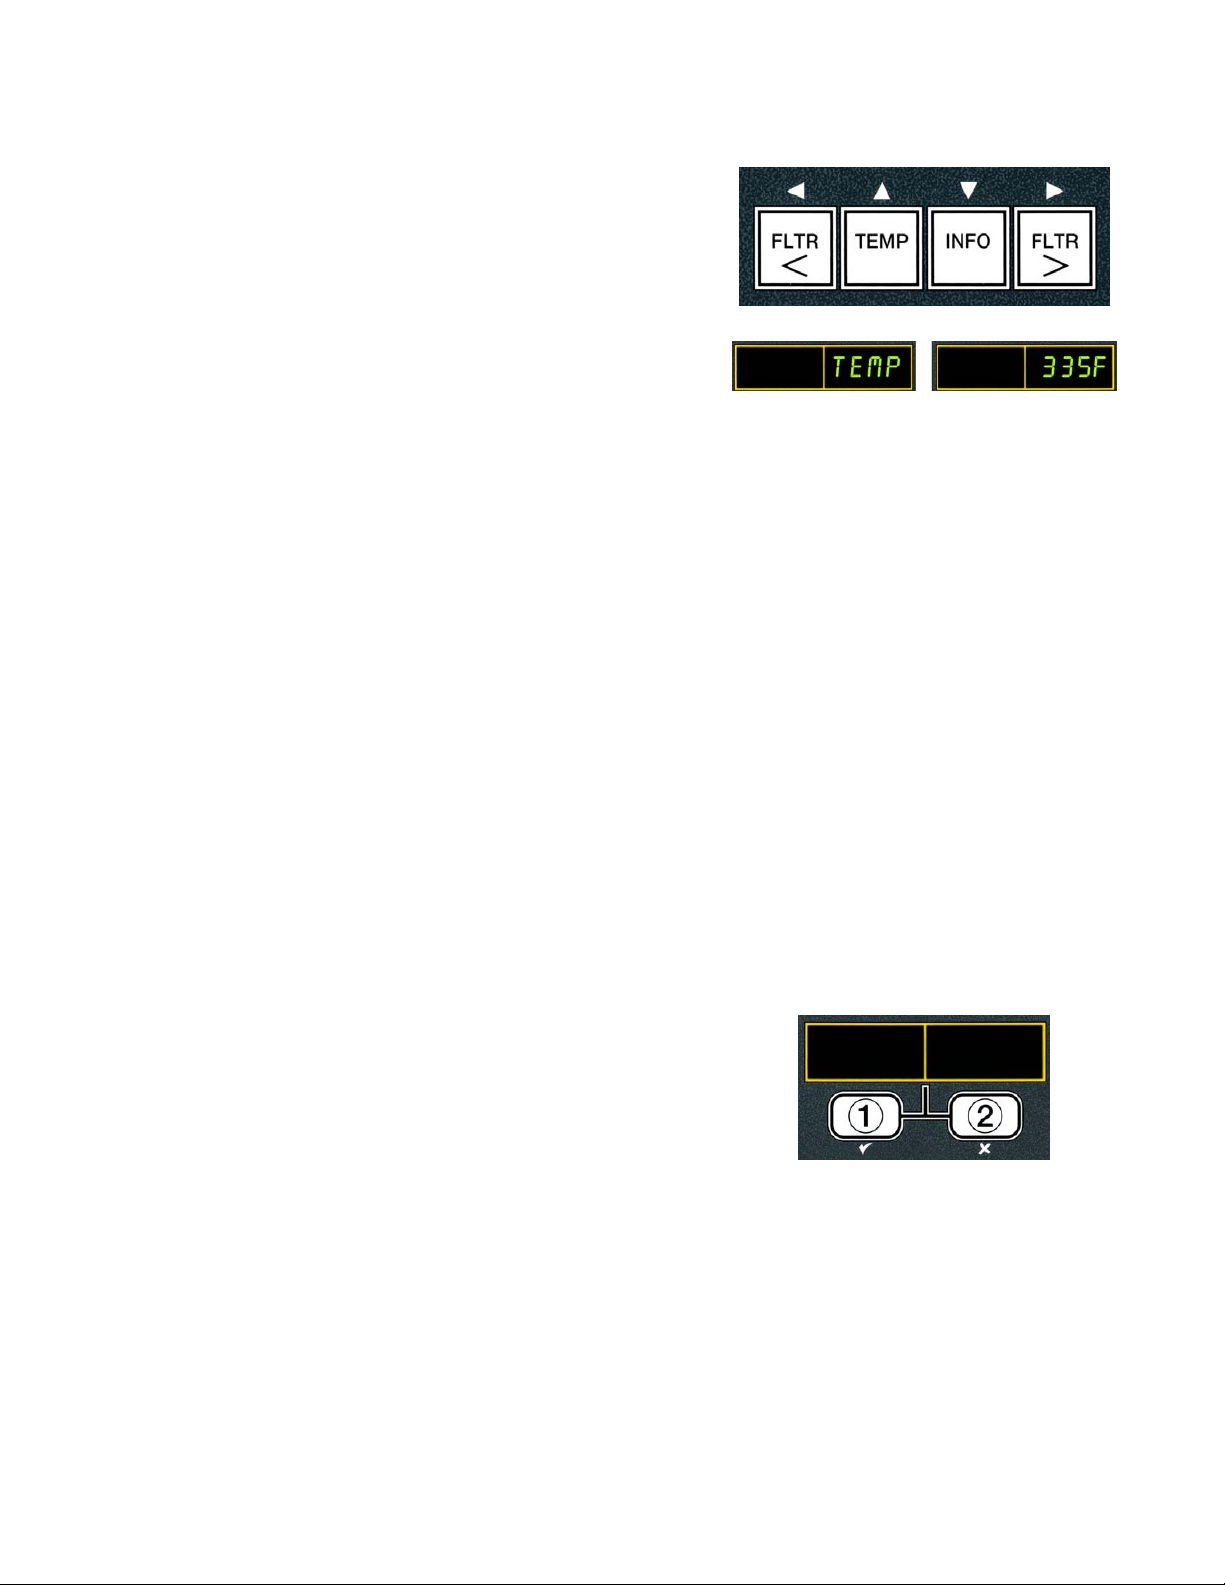
2.7.1 Navigation Buttons
The menu on the M3000 uses 34and tu buttons to
navigate the various menus and submenus.
When programming, the left screen shows a menu or
submenu item. The right screen is for data entry. Data is
entered with alpha-numeric characters, scrolling through
lists or by toggling between choices.
During programming if a button is not pushed within one minute, the controller returns to operation
mode.
Left Display Right Display
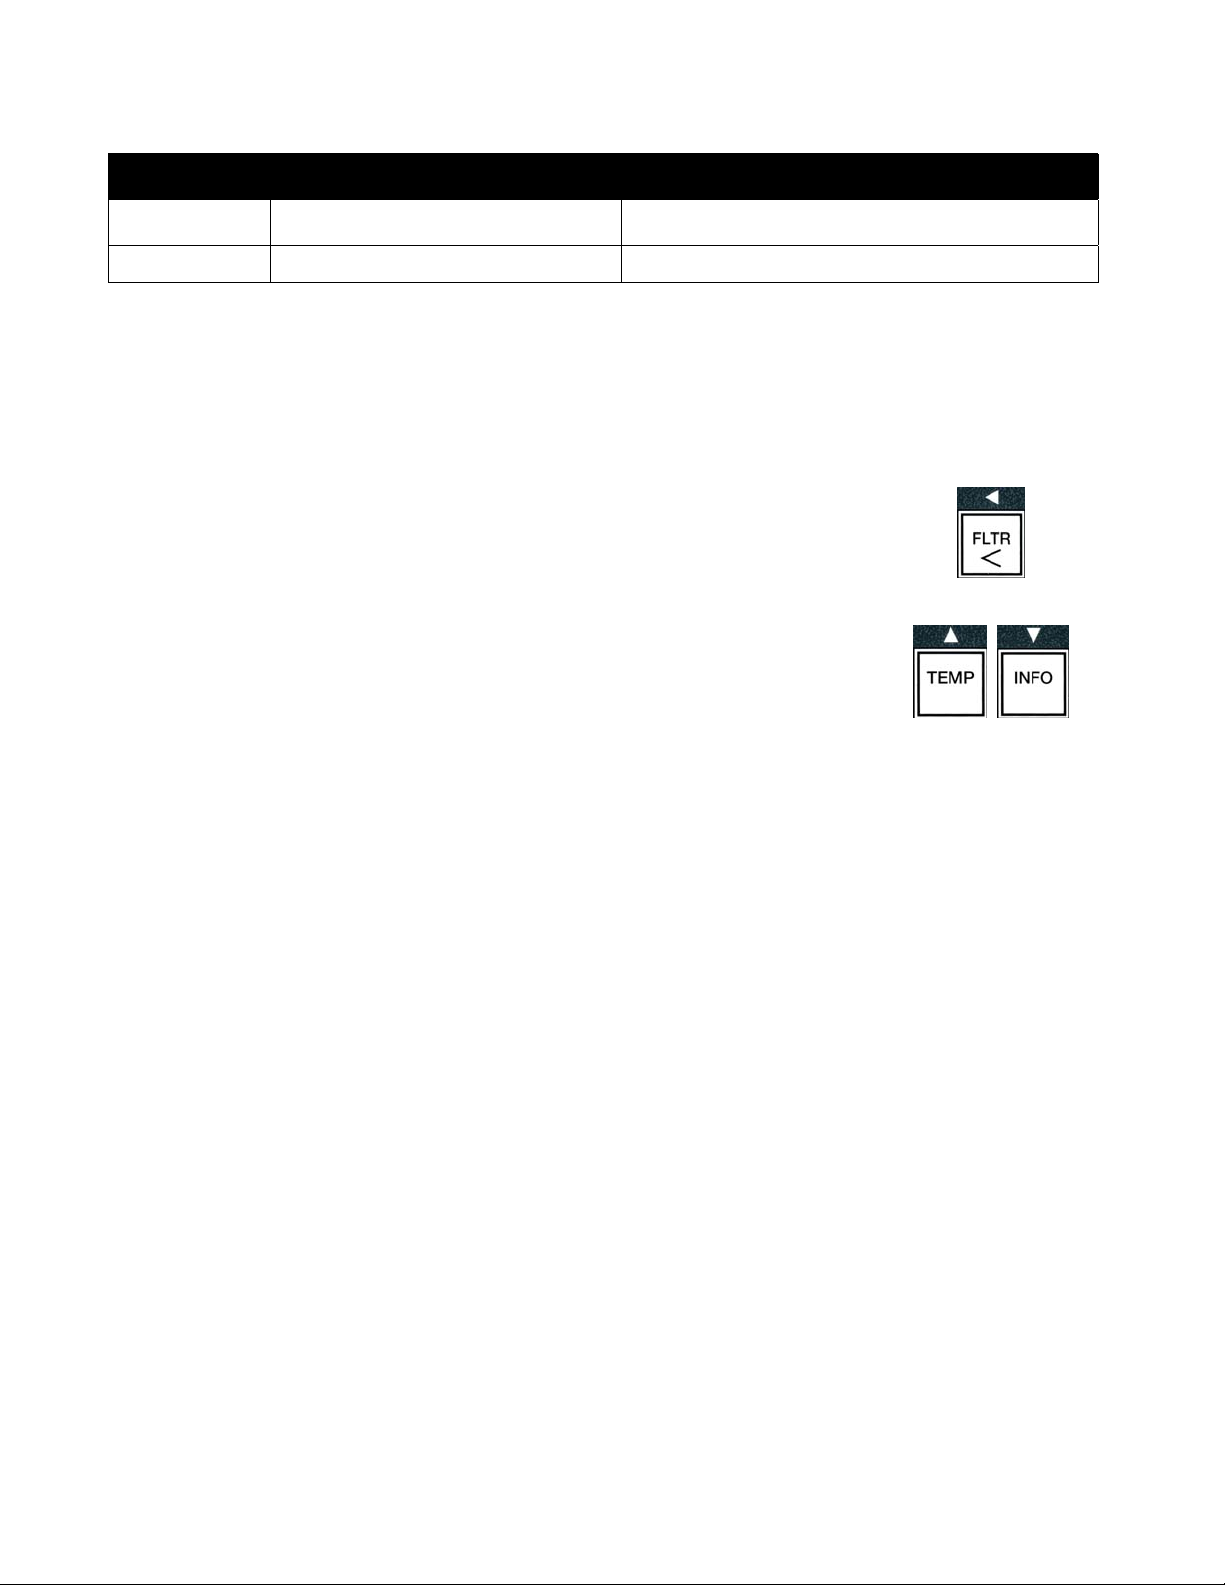
2.7.2 Filter, Temperature and Info Buttons
The < FLTR and FLTR > buttons (see Figure 1) are used to filter the left and right vats of a split
vat or a full vat fryer on demand. The FLTR buttons, if pressed once displays the number of cook
cycles remaining until a filtration prompt. When the FLTR button is pressed twice, the date and
time of the last filter is displayed. The TEMP button, if pressed once while the fryer is on,
displays current vat temperature on both sides. If the TEMP button is pressed twice while the fryer
is on, it shows the setpoint temperatures of the vats. If the fryer is off, the display shows the current
versions of software. The INFO button (see Figure 1), if pressed once when the fryer is on, shows
the recovery time for each vat from the last test. Recovery is the time required for the fryer to raise
the temperature of the oil 50°F (28°C) between 250°F (121°C) and 300°F (149°C). Maximum
recovery time should not exceed 1:40 for electric or 2:25 for gas. If the INFO button is pressed and
held for three seconds it shows information such as usage, filter statistics and last cook cycles (see
page 2-31 for more details on the INFO button).
2.7.3 Cook Channel and Selection Buttons
buttons are dual-function buttons shared with
The
the number 1 and 2 buttons. They are located directly
below the LED displays. Use these buttons to select or
cancel functions. The button is used to back out of and
exit submenus.
2-7
Page 12

2.8 Manual LOV™ M3000 Menu Summary Tree
Reflected below are the major programming sections in the M3000 and the order in which submenu headings will be
found under the sections in the controller operation chapter.
Adding New Product Menu Items (Product Selection) See section 2.10.2
Storing Product Menu Items in Product Buttons See section 2.10.3
Draining, Refilling, and Disposing of Oil See section 2.10.4
Filter Menu
[Press and hold ◄ FLTR or FLTR ►]
Programming
………………………………………………………………………………………………………….. 2.11
Quick Filter
Maint Filter
Dispose
Drain to Pan
Fill Vat from Drain Pan
Level 1 Program
[Press and hold TEMP and INFO buttons, 2 beeps, displays Level 1, enter 1234]
Product Selection
…….……………….....………………………………………………………….. 2.12
..…….....………………………………………………………….. 2.10.2
Name
Cook Time
Temp
Cook ID
Duty Time 1
Duty Time 2
Qual Tmr
AIF Disable
Assign Btn
AIF Clock (Suppress Filter Prompt)
…………………………………… 2.12.1
Disabled
Enabled
Deep Clean Mode
High-Limit Test
Fryer Setup
……..……………………...…………………………………….. 2.12.2
…………….…………………….…………………………………….. 2.12.3
…………………….……………………………………………………………….. 2.9
Level 2 Program (Manager Level)
[Press and hold TEMP and INFO buttons, 3 beeps, displays Level 2, enter 1234]
Prod Comp
E-Log
Password Setup
Sensitivity for product
Log of last 10 error codes
Change passwords
Setup [enter 1234]
Usage [enter 4321]
Level 1 [enter 1234]
Level 2 [enter 1234]
Alert Tone Volume and Tone
Volume 1-9
Tone 1-3
Top Off After
Filter After
Filter Time
Info Mode
………………...………………………...………………………………………..……………………….. 2.14
[Press and hold INFO for 3 seconds, displays Info Mode]
Sets number of cooks before top off prompt
Sets number of cooks before filter prompt
Sets amount of time between filter cycles
Full/Split Vat Configuration
Filter Stats
Review Usage
Last Load
..……………….……………………………………………………………….. 2.14.1
………….……………………………………………………………….. 2.14.2
………………….……………………………………………………………….. 2.14.3
……………………………………………….. 2.13
…………………………………….. 2.13.1
….……...…………………………….. 2.13.2
..……………………………… 2.13.3
...………………………………………….. 2.13.4
…….. 2.13.5
………….. 2.13.6
………….. 2.13.7
2-8
Page 13
2.9 Fryer Setup Mode Programming
Ensure the fryer is OFF and follow the steps below to navigate the options. The setup mode sets the
time, date, date format, language, fryer type, vat type, oil system type and the temperature scale.
These settings should only be changed by a technician.
Left Display Right Display Action
OFF OFF
Press the TEMP and INFO buttons simultaneously for THREE
seconds until LEVEL 1 is displayed.
ENTER
CODE
Blank
LEVEL 1 PROGRAM
Product
Selection
FRYER
SETUP
ENTER
CODE
Blank
Blank
Blank
Enter 1234.
None required.
Press the t button once to scroll to FRYER SETUP.
Press the (1) button.
Enter 1234.
Use the 3and 4buttons to scroll through the language menu.
LANGUAGE ENGLISH
With the desired language selection displayed, press the u
button.
Press the 3and 4buttons to toggle between F and C
TEMP
Format
F
temperature scales.
NOTE: F is used for Fahrenheit, C is used for Celsius.
With the desired format displayed, press the u button.
TIME
FORMAT
12 HR
Press the 3and 4 buttons to toggle between 12hr and
24hR.
With the desired format displayed, press the u button.
ENTER
TIME
hh:MM Enter time in hours and minutes using the number buttons 0-9.
Example:
7:30 AM is entered 0730 if using the 12 hour format. 2:30 is
entered 1430 if using 24 hour format. To change AM and PM
use the tu buttons.
With the correct time displayed, press the u button.
DATE
FORMAT
US
Press the 3and 4 buttons to toggle between US and
interntl.
With the desired format displayed, press the u button.
enter
date
MM-DD-YY or
DD-MM-YY
Enter the date using the number buttons 0-9.
Example:
US Format – Dec. 5, 2010 is entered as 120510.
International Format – 5 Dec. 2010 is entered as 051210
With the correct date displayed, press the u button.
fryer
type
VAT type SPLIT
Elec
Press the 3and 4buttons to toggle between elec and gas.
With the fryer type displayed, press the u button.
Press the 3and 4buttons to toggle between split and
full. With the vat type displayed, press the u button.
2-9
Page 14

Fryer Setup Mode Programming cont.
Left Display Right Display Action
OIl
NONE
Press the u button.
SYSTEM
DISPOSE
NONE
Press the u button.
SYSTEM
LANGUAGE ENGLISH
Press the tu buttons to scroll and edit any additional fields.
Press the (2) button to exit.
setup complete
OFF OFF
None required.
None required.
2.10 M3000 Common Tasks
Covered in this section are common tasks used in stores:
1. Escaping out of a menu or sub-menu.
2. Adding new product items.
3. Storing menu items in product buttons.
4. Draining, disposing and refilling the vats.
2.10.1 Escape Menu Items
To escape or back out of MENUS and SUB-MENUS, press the (2)
button.
2.10.2 Adding New Product Items to the Menu (PRODUCT SELECTION)
This function is used to add additional products to the controller menu. To add a new product to the
menu turn the fryer off and follow the steps below:
Left Display Right Display Action
OFF OFF
ENTER
CODE
Blank
LEVEL 1 PROGRAM
Product
Selection
SELECT
PRODUCT
Blank
FR FRIES
Press the TEMP and INFO buttons simultaneously until
LEVEL 1 is displayed.
Enter 1234.
None required.
Press the (1) button.
Press the tu buttons to advance through menu items until the
menu item to be modified or a numbered spot is displayed (ex.
PROD 13).
With the desired product displayed, press the (1) button.
MODIFY?
YES NO
Blank Press the (1) button.
2-10
Page 15

Adding New Product Items to the Menu (PRODUCT SELECTION) cont.
Left Display Right Display Action
Use the number keys to enter the first letter of the new product.
Each key has three letters. Press until derived character is
displayed.
The full product name is limited to eight characters including
spaces (ex. FR FRIES).
Press the 4 button to advance the cursor to the next display
Name PROD 13
cook time :00
TEMP 32F
cook ID P 13
duty
time1
qual tmr :00
AIF
Disable
:00
NO
space. Use the #0 key to insert a space. The 3button can be
used to move the cursor back.
For example, to enter “WINGS”, press the #8 key two times
until W appears in the display. Then use the 4 button to
advance the cursor to the next display space. Press the #3 key
until I appears. Continue on until WINGS is spelled out on the
display.
With the desired name displayed, press the u (INFO) button.
Use the number keys to enter the product cook time in minutes
and seconds (ex. 3:10 as 310).
With the desired cook time displayed, press the u (INFO)
button.
Use the number keys to enter the cook temperature for the
product (ex. 335° as 335).With the cook temperature entered,
press the u (INFO) button.
Use the instructions above for entering a product name to enter
a four-letter name for the menu item. This is the shortened
name that alternates with the cook time during a cook cycle.
With the cook ID entered, press the u (INFO) button.
Use the number keys to enter the time in minutes and seconds
for the first duty (shake time) to be preformed (ex. shake the
product after 30 seconds is entered as 30).
With the shake time entered, press the u (INFO) button to
scroll to duty time 2. If a product calls for a second duty to be
preformed, it can be entered here. Use the instructions above to
enter duty time two, otherwise press the u (INFO) button
Use the number keys to enter the quality timer time in minutes
and seconds for the product hold time (ex. 7:00 minutes as 700).
This is used to set the hold time before the food is to be
discarded.
With the QUAL TMR (hold time) entered, press the u
(INFO) button.
Use the 3and4 buttons to toggle between YES and NO.
This feature, if set to yes, disables the filter prompts for the
programmed product. This is used to prevent co-mingling of
product-specific oils.
With the filter option displayed, press the u (INFO) button.
2-11
Page 16

Adding New Product Items to the Menu (PRODUCT SELECTION) cont.
Left Display Right Display Action
ASSIGN
BTN
Product name
With the chosen product displayed on the right and ASSIGN
BTN on the left, press a button between 1-0 to assign the
product. The LED in the chosen product button will illuminate.
To unassign a product from a button, press the button assigned
to that product. The LED no longer illuminates.
With the assigned button illuminated, press the u (INFO)
button.
If additional programming, to add other products, is desired
Name
Product name
press the (2) button once and then the u button and return to
MODIFY? YES NO step above. If no further programming is
desired, press the (2) button three (3) times.
OFF OFF None required.
2.10.3 Storing Menu Items in Product Buttons
This function is used to store individual menu items to product buttons for one or two button
cooking. To store menu items to a specific button follow the steps below:
Left Display Right Display Action
OFF OFF
ENTER
CODE
Blank
LEVEL 1 PROGRAM
Product
Selection
SELECT
PRODUCT
MODIFY?
YES NO
Blank
FR FRIES
Blank
Name PROD 13
ASSIGN
Product name
BTN
Name
Product name
OFF OFF
Press the TEMP and INFO buttons simultaneously until
LEVEL 1 is displayed.
Enter 1234.
None required.
Press the (1) button.
Press the tu buttons to advance through menu items until the
menu item to be modified or a numbered spot is displayed (ex.
PROD 13). With the desired product displayed, press the
(1) button.
Press the (1) button.
Press the t button to scroll to the ASSIGN BTN option used
to assign a menu item to a specific product button.
With the chosen product displayed on the right and ASSIGN
BTN on the left, press a button between 1-0 to assign the
product. The LED in the chosen product button will illuminate.
To unassign a product from a button, press the button assigned to
that product. The LED no longer illuminates. With the assigned
button illuminated, press the u (INFO) button.
If additional programming, to add other products, is desired press
the (2) button once and then the u button and return to
MODIFY? YES NO step above. If no further programming is
desired, press the (2) button three (3) times.
None required.
2-12
Page 17

2.10.4 Draining and Refilling Vats, and Disposing of Oil
When cooking oil is exhausted, drain the oil into an appropriate container for transport to the
disposal container. Frymaster recommends a McDonald’s Shortening Disposal Unit (MSDU). Do
not drain deep clean (boil-out) solution into an MSDU. NOTE: If using an MSDU built
before January 2004 the filter pan cover must be removed to allow the unit to be positioned beneath
the drain. To remove the cover, lift up on the front edge slightly and slip the oil guard up and pull it
straight out of the cabinet. Refer to the documentation furnished with your disposal unit for specific
operating instructions. If a shortening disposal unit is not available, allow the oil to cool to 100°F
(38°C), then drain the oil into a METAL container.
2.10.4.1 Oil Disposal
This option is used to dispose of old oil into either an MSDU or a METAL pot. To dispose of oil
turn the fryer off and follow the steps below:
Remove the filter pan and position the MSDU or METAL container under the fryer to drain the oil.
Left Display Right Display Action
OFF OFF
FILTER MENU
Blank
Blank
Blank
MAINT FILTER
DISPOSE
DISPOSE? alternating with
YES NO
NEVER drain deep clean (boil-out) solution into an MSDU. Deep Clean (boil-out)
solution can cause damage to an MSDU.
When draining oil into a disposal unit, do not fill above the maximum fill line
located on the container.
Allow oil to cool to 100°F (38°C) before draining into an appropriate METAL
container for disposal.
DISPOSAL UNIT IN
Blank
PLACE alternating with
CONFIRM
Blank
Blank
Blank
OPEN DRAIN VALVE
DISPOSING
Vat empty? confirm
Press and hold the FLTR button of the
corresponding vat until FILTER
MENU/MAINT FILTER is displayed.
Press the u (INFO) button to scroll to
dispose.
Press the (1) button.
Press the (1 yes) button to continue.
WARNING
DANGER
DANGER
Remove the filter pan and insert the disposal
unit or a METAL container. Press the (1)
button.
Open the drain valve.
None required.
Press the (1) button once the vat is empty.
2-13
Page 18
Oil Disposal cont.
Left Display Right Display Action
Blank
OFF
CLOSE DRAIN VALVE
OFF None required.
Close the drain valve.
2.11 Filter Menu
The filter menu selections are used for filtering, draining, filling and disposing.
2.11.1 Accessing the Filter Menu
1. With the controller on, press and hold the filter button for the selected vat for
three seconds.
The controller displays filter menu for three seconds, changing to QUICK Filter.
2. Press the t and u buttons to scroll between:
a. QUICK filter See pg. 2-15
b. maint filter (Manual or Maintenance Daily Filter) See pg. 2-16
c. dispose See pg. 2-13
d. drain to pan See pg. 2-18
e. fill VAT from DRAIN pan See pg. 2-18
2-14
Page 19

2.11.2 Quick Filter
Prepare the filter for use using the instructions that accompanied the fryer.
Quick Filtration is a feature that, after a number of cook cycles, will automatically prompt to filter a
frypot. Alternatively pressing and holding the filter button with the fryer on and at setpoint will also
prompt a demand filtration.
WARNING
Do not drain more than one frypot at a time into the built-in filtration unit to avoid overflow and
spillage of hot oil that may cause severe burns, slipping and falling.
The filter pad or paper MUST be replaced daily.
DANGER
Left Display Right Display Action
Blank
FILTER NOW? alternating
with
YES NO
After a preset number of cook cycles or time
the controller displays FIltEr now?
alternating with YES NO. Press the (1
yes) button.
Blank
SKIM VAT alternating with
Confirm
Blank
Blank
OPEN DRAIN VALVE
DRAINING
OPEN RETURN VALVE
Blank
Blank
Blank
Blank
alternating with CONFIRM
WASHING
CLOSE DRAIN VALVE
FILLING
CLOSE RETURN VALVE
Blank
when vat full
alternating with CONFIRM
OFF OFF
Skim the vat and press the (1) button to
start filtration
Open the drain valve.
None required.
Open the return valve and press the (1)
button.
None required.
Close the drain valve.
None required.
Close the return valve when the vat is full and
bubbles appear in the oil and press the (1)
button.
2-15
Page 20

2.11.3 Filter Busy
If FILTER BUSY is displayed, another controller has not completed a process, or is waiting on
another vat to be filtered. Wait 15 minutes to see if problem is corre cted. If not, call your local
FAS.
WARNING
The filter pump is equipped with a manual reset switch in case the filter motor overheats or an
electrical fault occurs. If this switch trips, turn off power to the filter system and allow the pump
motor to cool 20 minutes before attempting to reset the switch (see photo below).
WARNING
Use caution and wear appropriate safety equipment when resetting the filter pump reset switch.
Resetting the switch must be accomplished with care to avoid the possibility of a serious burn from
careless maneuvering around the drain tube and frypot.
Filter Pump
Reset Switch
2.11.4 Maintenance (Manual) Filtration
NOTICE
The filter pad or paper must be replaced daily.
DANGER
Do not drain more than one frypot at a time into the built-in filtration unit to avoid overflow and
spillage of hot oil that may cause severe burns, slipping and falling.
Ensure the filter pad or paper is replaced daily to keep the system operating correctly. The fryer
MUST
be at setpoint temperature. Turn the fryer off and follow the steps below:
Left Display Right Display Action
OFF OFF
Press and hold the FLTR button of the
corresponding vat until FILTER
MENU/MAINT FILTER is
displayed.
FILTER MENU/
Blank
changing to MAINT FILTER
Blank Maint filter?
alternating with YES NO
Blank
Blank
OPEN DRAIN VALVE
DRAINING
Blank SCRUB VAT COMPLETE?
alternating with CONFIRM
Press the (1) button.
Press the (1 yes) button.
Open the drain valve.
None required.
Scrub the vat with the no scratch pad
and press the (1) button when
complete.
2-16
Page 21

Maintenance (Manual) Filtration cont.
Left Display Right Display Action
Blank WASH VAT?
alternating with CONFIRM
Blank OPEN RETURN VALVE
alternating with CONFIRM
WASHING
Blank Close drain valve
Blank Rinsing
Blank Close return valve
when vat full
alternating with CONFIRM
Blank
Blank Rinse again?
Blank
Blank OPEN RETURN VALVE
Blank FILL vat?
Blank Close drain valve
Blank filling
Blank CLOSE RETURN VALVE
OFF OFF
OPEN DRAIN VALVE
alternating with YES NO
POLISH? alternating with
CONFIRM
alternating with CONFIRM
POLISHING alternating with 5
minute countdown timer.
alternating with CONFIRM
WHEN VAT FULL alternating with
CONFIRM
Press the (1) button.
Open the return valve and press the
(1) button.
None required.
Close the drain valve.
None required.
Close the return valve and press the
(1) button.
Open the drain valve.
If the pot is clear of debris, press the (2
NO) button to continue. If another rinse
is desired, press the (1 yes) button
and return to CLOSE DRAIN
VALVE step above.
Press the (1) button to continue.
Open the return valve and press the
(1) button.
The polish begins and a alternates with a
five minute countdown timer.
Press the (1) button to continue.
Close the drain valve.
None required.
Close the drain valve and press the
(1) button.
2-17
Page 22

The DRAIN TO PAN and FILL VAT FROM DRAIN PAN functions are used primarily for
diagnostic purposes. They are used to drain oil to the filter pan or returned to the frypot.
2.11.5 Drain to Pan
The drain to pan function drains the oil from the frypot to the filter pan. Turn the fryer off and follow
the steps below:
Left Display Right Display Action
OFF OFF
Press and hold the FLTR button of the
corresponding vat until FILTER
MENU/MAINT FILTER is displayed.
Blank
Blank
FILTER MENU/
changing to MAINT FILTER
DRAIN TO PAN
Press the u (INFO) button to scroll to
Drain to pan
Press the (1) button.
DRAIN TO PAN?
Blank
Blank
Blank
alternating with YES NO
OPEN DRAIN VALVE
DRAINING
Press the (1 yes) button.
Open the drain valve.
None required.
Blank VAT EMPTY?
alternating with CONFIRM
Blank Close drain valve
OFF OFF
Press the (1) button.
Close the drain valve.
2.11.6 Fill Vat from Drain Pan
Fill vat from drain pan function is used to refill the frypot from the filter pan.
Ensure the fryer is off and follow the steps below:
Left Display Right Display Action
OFF OFF
Press and hold the FLTR button of the
corresponding vat until FILTER
MENU/MAINT FILTER is displayed.
Blank
FILTER MENU/ changing to
MAINT FILTER
Press the u (INFO) button to scroll to
FILL VAT FROM Drain pan.
Blank
FILL VAT FROM DRAIN PAN
FILL VAT FROM DRAIN
Blank
PAN? alternating with
YES NO
Blank OPEN RETURN VALVE
alternating with CONFIRM
Blank filling
Blank Close return valve
when vat full alternating with
CONFIRM
OFF OFF
2-18
Press the (1) button.
Press the (1 yes) button.
Open the return valve and press the (1)
button.
None required.
Close the return valve when the vat is full
and bubbles appear in the oil and press the
(1) button.
Page 23

2.12 Programming Level One
Level one programming is used to enter new products, control when AIF (filter prompt clock) is
disabled and perform deep clean (boil-out) and high-limit test. Ensure the fryer is off and follow the
steps below:
Left Display Right Display Action
OFF OFF
Press the TEMP and INFO buttons
simultaneously for THREE seconds until
LEVEL 1 is displayed.
ENTER
CODE
Blank
LEVEL 1 PROGRAM
Enter 1234.
None required.
Press the tu buttons to scroll between:
a. Product selection See pg. 2-10
b. aif clock (Suppress Filter Prompt) See
pg. 2-20
Product
Selection
Blank
c. DEEP CLEAN MODE See pg. 2-21
d. hi limit test See pg. 2-23
e. Fryer setup See pg. 2-9
With the selection displayed, press the (1)
button to select chosen menu item.
2-19
Page 24

2.12.1 AIF CLOCK
The AIF Clock (suppress filter prompt) mode allows programming of times to lock out the filter
prompt. This is useful for busy times of the day, like the noon rush. Ensure the fryer is off and
follow the steps below:
Left Display Right Display Action
OFF OFF
Press the TEMP and INFO buttons
simultaneously for THREE seconds until
LEVEL 1 is displayed.
ENTER
CODE
Blank
LEVEL 1 PROGRAM
Product
Selection
Blank
Enter 1234.
None required.
Press the u (INFO) button to scroll to aif
clock (Filter Prompt).
Press the (1) button.
Use the 3and
4buttons to toggle between
disabled or enabled
Default setting is disabled. Set this function
AIF CLOCK DISABLED
to enabled if there are times in which the AIF
(filter prompt) feature is disabled (ex. noon rush).
If ENABLED is chosen proceed to the next step.
If DISABLED is chosen press the (2 NO)
button to quit and return to OFF.
If enabled is chosen press the u (INFO) button to
Blank
ENABLED
scroll between M-F 1 thru Sun 4. These are
the different time periods which filter prompts will
be suspended.
Enter the starting time, using the number keys,
which no filter prompts are desired. (ex. On
Monday – Friday no filtering is desired during a
M-F 1 12:00am
lunch rush from 11:30 AM until 1:30 PM.) Press
t and u buttons to toggle from AM to PM.
the
Once the starting time is entered, press the u
(INFO) button.
This is the amount of time the filter prompt is to
remain suspended. Use the number keys to enter a
time between 0 and 999 minutes (ex. 1½ hours is
entered as 90 minutes). Enter 90 for this example.
The controller displays 090 DUR. Four
M-F 1 0 DUR
different time periods to suspend filtration are
available for each day or set of days. (M-F 1-4, Sat
1-4 and Sun 1-4)
Press the u (INFO) button to accept time and
move to the next time period. When finished, press
the (2) button two times to return to OFF.
OFF OFF
None required.
2-20
Page 25

2.12.2 DEEP CLEAN MODE (BOIL-OUT)
The deep clean mode is used to remove carbonized oil from the frypot.
NOTE: Refer to the MRC Deep Clean (boil out) instructions to clean the fryer.
DANGER
When draining oil into a disposal unit, do not fill above the maximum fill line located on
the container.
DANGER
Allow oil to cool to 100°F (38°C) before draining into an appropriate METAL container
for disposal.
Left Display Right Display Action
OFF OFF Ensure an MSDU or suitable metal container is in
place under the drain. Open the drain valve to the
corresponding vat and drain the oil.
Once the oil is completely drained close the drain
valve.
Press the TEMP and INFO buttons simultaneously
for THREE seconds until LEVEL 1 is displayed.
ENTER CODE
LEVEL 1 PROGRAM
Product
Selection
DEEP CLEAN?
alternating with
yes no
DEEP CLEAN
alternating with
L and R
IS OIL REMOVED?
Blank
alternating with yes no
Blank DISPOSAL UNIT IN
PLACE alternating with
Blank OPEN DRAIN
Blank
DISPOSING alternating
with countdown timer.
Blank VAT EMPTY?
Blank
CLOSE DRAIN
Blank
Blank
Blank
CONFIRM
VALVE
alternating with
CONFIRM
VALVE
Enter 1234.
None required.
Press the u (INFO) button to scroll to DEEP
CLEAN (Boil-Out). Press the (1) button.
Press the (1 yes) button.
On split vat units press either L to start a deep clean on
the left vat or R to start a deep clean on the right vat.
Press the (1 yes) button if the oil is removed and
skip to SOLUTION ADDED? at the top of the next
page. If not press the (2) button and continue.
Remove the filter pan and insert a disposal unit or
METAL pan. Once in place press the (1) button.
Open the drain valve.
None required.
Press the (1) button.
Close the drain valve.
2-21
Page 26

Left Display Right Display Action
Fill frypot to be cleaned with water and cleaning
Blank
SOLUTION ADDED?
alternating with
CONFIRM
solution mix. Referring to maintenance requirement
card and Kay Chemical provided instructions “Fryer
Deep Clean Procedure” for McDonald’s deep clean
(boil-out) procedure and press the (1 ) button.
None required. The vat heats to 195° F (91° C) for one
hour. To cancel DEEP CLEAN, press and hold the
(2) button for three seconds and proceed to IS
SOLUTION REMOVED? below.
Blank
DEEP CLEAN
alternating with 60:00
minute timer
CLEAN DONE
Blank
alternating with
CONFIRM
Press the (1 ) button.
DANGER
Allow deep-clean (boil-out) solution to cool to 100°F (38°C) before disposal,
otherwise hot liquid can cause injury.
WARNING
Do not drain boil-out solution into a McDonald’s shortening disposal unit (MSDU), a
built-in filtration unit, or a portable filter unit. These units are not intended for this
purpose, and will be damaged by the solution.
Blank
IS SOLUTION
REMOVED? alternating
with yes
Open drain valve to remove the small amount of
solution left in the drain. When finished press the
(1 yes) button.
Scrub vat
Blank
complete?
alternating with
Once the vat is scrubbed and rinsed press the (1)
button.
CONFIRM
OPEN DRAIN
Blank
Blank
VALVE
DRAINING
Open the drain valve.
None required.
Blank RINSE COMPLETE?
alternating with
CONFIRM
Rinse the vat several times and press the (1) button
when complete.
Blank Close drain
valve
Close the drain valve.
Blank Remove pan
alternating with
Remove the filter pan.
CONFIRM
2-22
Page 27

Left Display Right Display Action
Blank Vat and pan
dry? alternating with
CONFIRM
Dry the vat and filter pan thoroughly and press the
(1) button when complete.
DANGER
Ensure that the frypot and filter pan are completely dry and free of water before
filling with oil. Failure to do so will cause splattering of hot liquid when the oil is
heated to cooking temperature.
Blank INSERT PAN
alternating with
CONFIRM
Insert the filter pan and press the (1) button
Blank MANUAL FILL
VAT alternating with
CONFIRM
OFF OFF
Carefully pour oil into the pot until it reaches the low fill
line in the fryer.
None required.
2.12.3 HIGH-LIMIT TEST MODE
The high-limit test mode is used to test the high limit circuit. The high-limit test will destroy the oil.
It should only be performed with old oil. Shut the fryer off and call for service immediately if the
temperature reaches 460°F (238°C) without the second high-limit tripping and the controller
displays high LIMIT FAILURE alternating with DISCONNECT POWER with an alert
tone during testing.
The test is cancelled at any time by turning the fryer off. When the fryer is turned back on, it returns
to the operating mode and displays the product.
Left Display Right Display Action
OFF OFF
ENTER CODE
Blank
LEVEL 1 PROGRAM
Product
Selection
Blank
HI-LIMIT?
alternating with
Blank
yes no
press and
h0ld check
335F
(current
vat temp)
(current vat
Blank
335F
temp)
Press the TEMP and INFO buttons simultaneously for
THREE seconds until LEVEL 1 is displayed.
Enter 1234.
None required.
Press the u (INFO) button to scroll to HIGH LIMIT
TEST.
Press the (1) button.
Press the (1 yes) button or on a split vat on the sides that
corresponds to the vat.
Press and hold the (1 yes) button to initiate the high-limit
test.
None required. The vat begins to heat. The controller
displays the actual vat temperature during the test. When the
temperature reaches 410°F ± 10° F (210°C ± 12°C)*, the
controller displays hot hi-1 alternating with the actual
temperature (ex. 410F) and continues heating.
2-23
Page 28

Left Display Right Display Action
When the temperature reaches 410°F ± 10° F (210°C ±
12°C)*, the controller displays hot hi-1 alternating with
the actual temperature (ex. 410F) and continues heating.
NOTE: In controllers used in the European Union (those
Blank
hot hi-1
alternating with the
actual temperature
with the CE mark), the temperature is 395°F (202°C).
The fryer continues heating until the second (physical) high
limit opens. Generally this happens once the temperature
reaches 423°F to 447°F (217°C to 231°C) for non-CE high
limits and 405°F to 426°F (207°C to 219°C) for CE high
Blank
HELP HI-2
alternating with the
actual temperature
limits.
Release the (1 yes) button.
If the high-limit fails, the controller displays HIGH LIMIT
FAILURE alternating with DISCONNECT POWER.
If this happens, disconnect power to the fryer and call for
service immediately.
Press the soft power button on the controller to cancel the
alarm.
Vat
temperature
Vat
temperature
The vat stops heating and the controller displays the current
temperature setting alternating with the actual temperature
(ex. 430F) until the temperature cools below 400°F
(204°C). Once the temperature cools below 400°F (204°C)
press the (2) button twice to exit to OFF.
OFF OFF
Follow the procedures on page 2-13 to dispose of the oil.
2.13 Programming Level Two
Level two programming is used to adjust compensation (sensitivity), view the error log, change
passwords, adjust alarms and adjust filter prompts. Ensure the fryer is off and follow the steps
below:
Left Display Right Display Action
OFF OFF
ENTER
CODE
Blank
LEVEL 2 PROGRAM
Prod COMP
Blank
Press the TEMP and INFO buttons simultaneously for TEN
seconds until LEVEL 2 is displayed.
Enter 1234.
None required.
Press the tu buttons to scroll between:
a. Prod comp See pg. 2-25
b. e-log See pg. 2-25
c. password SETUP See pg. 2-27
d. alert tone See pg. 2-27
e. TOPOFF After See pg. 2-28
f. filter After See pg. 2-28
g. filter time See pg. 2-29
With the selection displayed, press the (1) button to select
chosen menu item.
2-24
Page 29

2.13.1 PRODUCT COMP MODE
The product comp mode allows the product compensation (sensitivity) to be changed. Some menu
items may need an adjustment, depending on their cooking characteristics. Use caution when
changing the product compensation, as it could have an adverse affect on the products cooking
cycles. The default setting for product compensation is set to (4) four.
Left Display Right Display Action
OFF OFF
Press the TEMP and INFO buttons simultaneously for
TEN seconds until LEVEL 2 is displayed.
ENTER CODE
LEVEL 2 PROGRAM
Prod COMP
Blank
Enter 1234.
None required.
Blank Press the (1) button.
PRODUCT
SELECTION
Select
product
Blank None required.
FR FRIES
Use the t and
With a product selected, press the (1 ) button to select
u to scroll through the product list.
a product.
modify?
alternating with
Product name
Press the (1 yes) button.
yes no
This is the sensitivity setting recommended for this
product.
NOTE: It is highly recommended to NOT adjust
this setting, as it could have an adverse effect
LOAD COMP 4
on the product.
If changing this setting, enter a number between 0-9.
Press the (2) button two times to accept selection and
exit to OFF.
OFF OFF
None required.
2.13.2 E-LOG MODE
The E-LOG mode is used to view the ten most recent error codes encountered on the fryer. These
codes are displayed from 1-10 with the most recent displayed first. The time, date and error code are
displayed.
Left Display Right Display Action
OFF OFF
ENTER CODE
Blank
LEVEL 2 PROGRAM
Prod COMP
Blank
Press the TEMP and INFO buttons simultaneously for
TEN seconds until LEVEL 2 is displayed.
Enter 1234.
None required.
Press the u (INFO) button to scroll to E-LOG.
Press the (1) button.
2-25
Page 30

Left Display Right Display Action
d
r
E-LOG
Blank Press the (1) button.
Press the u (INFO) and u (TEMP) buttons to scroll
through the ten most recent error codes starting with “A”
through “J”. If no errors exist, the controller displays
NO ERRORS. Errors are displayed by position A
through J, the side of the error, if a split vat error code
and time alternating with the date. An error code
displaying and “L” indicates left side of a split vat an
NOW
Current date alternating
with the time
“R” indicates right side of a split vat where the erro
occurred (example –A R E06 06:34AM 06/04/10).
Error codes are listed below.
Press the (2) button two times to exit.
OFF OFF
None required.
E-LOG Error Codes
Code ERROR MESSAGE
E03 ERROR TEMP PROBE FAILURE Temp probe reading out of range.
E04 HI 2 BAD High limit reading is out of range.
E05 HOT HI 1
E06 HEATING FAILURE A component has failed in the high limit circuit such
E20 INVALID CODE LOCATION SD card removed during update.
E21 FILTER PAD PROCEDURE ERROR
(Change Filter Pad)
E22 OIL IN PAN ERROR
E25 RECOVERY FAULT Recovery time exceeded maximum time limit.
E27 LOW TEMP ALARM Oil temperature has dropped lower than 15°F (8°C)
High limit temperature is past more than 410°F
(210°C), or in CE countries, 395°F (202°C).
as controller, interface board, contactor or openhigh limit.
25 hour timer has expired or dirty filter logic has
activated.
The controller detects oil may be in the filter pan.
in idle mode or 45°F (25°C) in cook mode.
EXPLANATION
2-26
Page 31

2.13.3 PASSWORD SETUP MODE
The password mode allows a restaurant manager to change passwords for various modes and levels.
Left Display Right Display Action
OFF OFF
Press the TEMP and INFO buttons simultaneously for
TEN seconds until LEVEL 2 is displayed.
ENTER CODE
LEVEL 2 PROGRAM
Prod COMP
Blank
Blank
Enter 1234.
None required.
Press the u (INFO) button to scroll to password
SETUP.
password
SETUP
Blank
Press the (1) button.
Press the t and u buttons to scroll between:
a. FRYER Setup – Established password to enter
FRYER Setup mode. (Default is 1234)
b. usage – Established password to enter usage
fryer setup
Current date and time
mode to reset usage statistics. (Default is 4321)
c. level 1 – Establishes password to enter level
1 mode. (Default is 1234)
d. level 2 – Establishes password to enter level
2 mode. (Default is 1234)
Press the (1) button once selection is displayed.
modify?
alternating with
Blank
Press the (1 yes) button.
yes no
NEW PASSWORD
FRYER SETUP
flashes for three seconds
then1234 or the
Using the 0-9 keys enter a new password or reenter the
existing password and press the (1 ) button.
current password is
displayed on the right
CONFIRM
PASSWORD
SETUP
OFF OFF
1234 or the new
password
Blank
Press the (1 yes) button.
Repeat process to change other passwords or press the
(2) button to exit.
None required.
2.13.4 ALERT TONE MODE
The alert tone volume is adjustable to nine levels and the tone is adjustable to three frequencies. Use
different frequencies to distinguish protein or French fry stations.
Left Display Right Display Action
OFF OFF
ENTER CODE
Blank
LEVEL 2 PROGRAM
Press the TEMP and INFO buttons simultaneously for
TEN seconds until LEVEL 2 is displayed.
Enter 1234.
None required.
2-27
Page 32

Left Display Right Display Action
Prod COMP
alert tone
Blank
Blank Press the (1) button.
Press the u (INFO) button to scroll to alert
tone.
Use the number keys to set volume level. Select from
volume 1-9 9
nine levels of volume with 1 being the softest and 9 the
loudest. Press the u (INFO) button.
tone 1-3 1
volume 1-9 9
OFF OFF
Use the number keys, to set the tone frequency from 1
to 3. Press the u (INFO) button.
Press the (2) button two times to exit.
None required.
2.13.5 TOP OFF AFTER
The prompt for topoff is initiated after a number of cycles have elapsed. The default is 40 and can be
adjusted. After the number of cycles have elapsed, the controller displays “CHECK OIL LEVEL”
and “CONFIRM”. Check oil level and add oil if necessary. Ensure oil is at the top oil level line and
press the (1) button.
Left Display Right Display Action
OFF OFF
Press the TEMP and INFO buttons simultaneously for
TEN seconds until LEVEL 2 is displayed.
ENTER CODE
LEVEL 2 PROGRAM
Prod COMP
Blank
Blank
Enter 1234.
None required.
Press the u (INFO) button to scroll to TOPOFF
AFTER. Press the (1) button.
Use the 3and 4buttons to toggle between
TOPOFF
AFTER
DISABLED
disabled or enabled
Default setting is disabled. Set this function to
enabled to prompt for top off. Press the u (INFO)
button
Use the number keys from 0 to 9 to enter the number of
TOPOFF
AFTER
40
cook cycles before prompting to top off. (ex. after
every 40 cycles enter as 40). The default is 40. Press
the (2) button two times to exit.
OFF OFF
None required.
2.13.6 FILTER AFTER
The FILTER AFTER option is used to set the number of cooking cycles which occur before the
filtration prompt is displayed.
Left Display Right Display Action
OFF OFF
ENTER CODE
Blank
LEVEL 2 PROGRAM
Press the TEMP and INFO buttons simultaneously for
TEN seconds until LEVEL 2 is displayed.
Enter 1234.
None required.
2-28
Page 33

Left Display Right Display Action
Prod COMP
Blank
Press the u (INFO) button to scroll to FILTER
AFTER. Press the (1) button.
Use the 3and
4buttons to toggle between disabled
or enabled.
FILTER AFTER DISABLED
Default setting is disabled. Set this function to
enabled if filter prompts are desired. Press the u
(INFO) button.
Use the number keys from 0 to 9 to enter the number of
filter after
6 DV
or 12 FV
cook cycles before prompting to filter (ex. after every 6
cycles enter as 6). The default is 6 for DV or 12 for FV.
Press the (2) button two times to exit.
OFF OFF
None required.
2.13.7 FILTER TIME
The FILTER time option is used to set default times for a filtration prompt. Two programmable
quick filter time prompts can be programmed. If this option is enabled, the controller will prompt to
filter at 10:00AM and 2:00PM each day.
Left Display Right Display Action
OFF OFF
Press the TEMP and INFO buttons simultaneously for
TEN seconds until LEVEL 2 is displayed.
ENTER CODE
LEVEL 2 PROGRAM
Prod COMP
FILTER TIME
Blank
Blank
Blank
Enter 1234.
None required.
Press the u (INFO) button to scroll to FILTER TIME.
Press the (1) button.
Use the 3and 4buttons to toggle between disabled
1 QUICK
FILTER
DISABLED
or enabled.
Default setting is disabled. Set this function to
enabled if a time filter prompt is desired. Press the u
(INFO) button.
Use the number keys from 0 to 9 to change the time of the
1 QUICK
FILTER
10:00AM
first timed quick filter prompt. The default is 10:00AM.
Press the u (INFO) button or press the (2) button two
times to exit.
4buttons to toggle between disabled
2 QUICK
FILTER
DISABLED
Use the 3and
or enabled.
Default setting is disabled. Set this function to
enabled if a second time filter prompt is desired. Press
the u (INFO) button.
2 QUICK
FILTER
2:00PM
OFF OFF
Use the number keys from 0 to 9 to change the time of the
second timed quick filter prompt. The default is 2:00PM.
Press the (2) button two times to exit.
None required.
2-29
Page 34

2.14 INFO Mode
The INFO button is used to display information and navigate menus. Pressed once, it shows each
vat’s recovery time. Press for three seconds and it displays usage, filter statistics and last cook
cycles.
Left Display Right Display Action
OFF OFF
info mode
filter stats
Blank
Blank
OFF OFF
2.14.1 FILTER STATS MODE
The filter stats mode displays vat filtration counts and skipped filters by day and the average number
of cook cycles per filter.
Left Display Right Display Action
OFF OFF
info mode
filter stats
Current Day
(ex. TUE)
fIltErEd
flt bpsd
flt avg
fIltErEd
(ex. 06/04/10)
Blank
Blank
Current date
(ex. 4 FRI)
(ex. 0 FRI)
(ex. 12 FRI)
(ex. 4 FRI)
OFF OFF
Press and hold the INFO button for THREE seconds
until info MODE is displayed.
None required.
Press the t and ubuttons to scroll between:
FULL VAT CONFIGURATION
a. filter stats See pg. 2-30
b. review usage See pg. 2-31
c. last load (split vat L or R)See pg. 2-31
None required.
Press and hold the INFO button for THREE seconds
until info MODE is displayed.
None required.
Press the (1) button.
Use the 3and
4 buttons to scroll from the current day
and going back one week. When the day is selected
press the u (INFO) button.
NOTE: Split vats have an L or R in front of the left
display indicating statistics for either the left or right
side of the vat.
Press the u (INFO) button. Number of times vat
filtered and day.
Press the u (INFO) button. Number of times filter was
bypassed and day.
Press the u (INFO) button. Average number of cook
cycles per filter and day.
Use the 3and
4 buttons to scroll to another day or
press the (2) button two times to exit.
None required.
2-30
Page 35

2.14.2 REVIEW USAGE MODE
The review usage displays total cook cycles per vat, number of cook cycles per vat, number of cook
cycles exited prior to completion, the number of hours the vat(s) have been on and the date of last
usage reset.
Left Display Right Display Action
OFF OFF
Press and hold the INFO button for THREE seconds
until info MODE is displayed.
info mode
filter stats
review usage
USAGE SINCE
Date Time
total cooks
quit cook
Blank
Blank
None required.
Press the u (INFO) button to scroll to review
usage.
Blank Press the (1) button.
Blank None required.
Press the u (INFO) button. Usage since date and time
of last reset.
26
3
Press the u (INFO) button. Number of cook cycles for
all products since last reset.
Press the u (INFO) button. Number of cook cycles
exited within first 30 seconds since last reset.
Press the u (INFO) button. Number of hours the vat
on hrs
54:56
has been on since last reset. Split vats will have an L or
R before on hrs to indicate left or right vat.
reset usage
alternating with
Blank
yes no
ENTER CODE
Blank
Reset usage COMPLETE
review usage
Blank
OFF OFF
Press the (1 YES) button to reset usage, otherwise
press (2 NO) button. Resets usage counters
Enter 4321.
None required.
Press the (2) button to exit.
None required.
2.14.3 LAST LOAD MODE
The last load mode displays data for the last cook cycle.
Left Display Right Display Action
OFF OFF
Press and hold the INFO button for THREE seconds
until info MODE is displayed.
info mode
Blank
None required.
Press the u (INFO) button to scroll to last LOAD
filter stats
Blank
for full vats or load l or Load r for split vat
configurations.
Last load
Blank
Press the (1) button.
NOTE – Below numbers are examples. They do not reflect actual conditions.
PRODUCT
STARTED 02:34PM
Product (ex. FRY)
Press the u (INFO) button. Last product cooked.
Press the u (INFO) button. Time last cook cycle
started.
2-31
Page 36

Left Display Right Display Action
Actual TIME 3:15
Press the u (INFO) button. Actual cooking time
including stretch time.
progtime 3:10
Max temp
Min temp
avg temp
heat on 70
ready yes
OFF OFF
337°
310°
335°
Press the u (INFO) button. Programmed cook time.
Press the u (INFO) button. Maximum oil temperature
recorded during the cook cycle.
Press the u (INFO) button. Minimum oil temperature
recorded during the cook cycle.
Press the u (INFO) button. Average oil temperature
recorded during the cook cycle.
Press the u (INFO) button. Percentage of the cook
time the heat source was on.
Press the (2) button two times to exit. Displays if the
fryer was back to proper temperature before the cook
cycle was started.
None required.
2-32
Page 37

MANUAL LOV™ M3000 CONTROLLER
CHAPTER 3: OPERATOR TROUBLESHOOTING
3.1 Introduction
This section provides an easy reference guide to some of the common problems that may occur
during the operation of this equipment. The troubleshooting guides that follow are intended to help
correct, or at least accurately diagnose, problems with this equipment. Although the chapter covers
the most common problems reported, you may encounter problems that are not covered. In such
instances, the Frymaster Technical Services staff will make every effort to help you identify and
resolve the problem.
When troubleshooting a problem, always use a process of elimination starting with the simplest
solution and working through to the most complex. Never overlook the obvious – anyone can forget
to plug in a cord or fail to close a valve completely. Most importantly, always try to establish a clear
idea of why a problem has occurred. Part of any corrective action involves taking steps to ensure
that it doesn’t happen again. If a controller malfunctions because of a poor connection, check all
other connections, too. If a fuse continues to blow, find out why. Always keep in mind that failure
of a small component may often be indicative of potential failure or incorrect functioning of a more
important component or system.
Before calling a service agent or the Frymaster HOTLINE (1-800-24-FRYER):
• Verify that electrical cords are plugged in and that circuit breakers are on.
• Verify that frypot drain valves are fully closed.
• Have your fryer’s model and serial numbers ready to give to the technician assisting
you.
DANGER
Hot oil will cause severe burns. Never attempt to move this appliance when filled
with hot oil or to transfer hot oil from one container to another.
DANGER
This equipment should be unplugged when servicing, except when electrical circuit
tests are required. Use extreme care when performing such tests.
This appliance may have more than one electrical power supply connection point.
Disconnect all power cords before servicing.
Inspection, testing, and repair of electrical components should be performed by an
authorized service agent only.
3-1
Page 38

3.2 Troubleshooting
3.2.1 Controller and Heating Problems
Problem Probable Causes Corrective Action
A. Press the ON/OFF switch to turn
the controller on.
B. Verify controller power cord is
plugged in and that circuit breaker
is not tripped.
D. Call your FAS for assistance.
No Display on
Controller.
A. Controller not turned on.
B. No power to the fryer.
C. Controller has failed. C. Call your FAS for assistance.
D. Damaged controller wiring
harness.
M3000 displays
CHANGE FILTER
PAD?
E. Power supply component or
interface board has failed.
25 hour filter pad change prompt has
occurred or change filter pad was
ignored on a prior prompt.
E. Call your FAS for assistance.
Change the filter pad. Do NOT
ignore CHANGE FILTER PAD
prompts.
A. Verify that both the main power
cord and 120V is fully seated in its
receptacle, locked into place and
that circuit breaker is not tripped
C. Call your FAS for assistance.
Call your FAS for assistance.
Fryer does not heat.
Fryer heats until high-
limit trips with heat
indicator ON.
Fryer heats until high-
limit trips without
heat indicator ON.
A. Main power cord not plugged in.
B. Controller has failed. B. Call your FAS for assistance.
C. One or more other components have
failed.
Temperature probe or controller has
failed.
Contactor or controller has failed Call your FAS for assistance.
3.2.2 Error Messages and Display Problems
Problem Probable Causes Corrective Action
Toggle between F° to C° by pressing
M3000 display is in
wrong temperature
scale (Fahrenheit or
Celsius).
M3000 display shows
hot-hi-1.
M3000 display shows
hELP HI-2 or
High limit
failure.
Incorrect display option programmed.
Frypot temperature is more than 410ºF
(210ºC) or, in CE countries, 395ºF
(202ºC).
Failed high limit
and holding 3and4simultaneously
until TECH MODE appears. Enter
1658. The controller displays OFF.
Turn the controller on to check
temperature. If the desired scale is not
displayed, repeat.
Shut the fryer down immediately and
call your FAS for assistance.
Shut the fryer down immediately and
call your FAS for assistance.
3-2
Page 39

Problem Probable Causes Corrective Action
M3000 display shows
TEMP PROBE
FAILURE.
M3000 display shows
HEATING
FAILURE.
Heating indicator is
on, but fryer is not
heating.
M3000 display shows
RECOVERY
FAULT and alarm
sounds.
M3000 display shows
REMOVE
DISCARD.
Controller locks up.
M3000 displays
SERVICE
REQUIRED followed
by an error message.
DRAIN OPEN
alternating with
CONFIRM
IS VAT FULL?
alternating with
CONFIRM
IS PAN EMPTY?
alternating with
CONFIRM
Problem with the temperature
measuring circuitry including the probe
or damaged controller wiring harness or
connector.
Failed controller, failed interface board,
open high-limit thermostat.
Three phase power cord unplugged or
circuit breaker is tripped.
Recovery time exceeded maximum time
limit.
A product cook is started that has a
different setpoint than the current vat
temperature.
Controller error. Call your FAS for assistance.
An error has occurred which requires a
service technician.
Drain valve is open.
A drain has been opened.
A drain has been opened.
Shut the fryer down and call your FAS
for assistance.
Call your FAS for assistance.
Verify that both the main power cord and
120V is fully seated in its receptacle,
locked into place and that circuit breaker
is not tripped If the problem continues
call your FAS for assistance.
Clear error and silence the alarm by
pressing the 9 button. Maximum
recovery time for electric is 1:40 and 2:25
for gas. If this error continues call your
FAS for assistance.
Remove and discard product. Press the
cook button under the display with the
error to remove the error. Reset the
setpoint of the vat before trying to cook
product.
Press 8 (2 NO) to continue cooking and
call your FAS for assistance. In some
cases, cooking may not be available.
Press either button under CONFIRM and
follow prompts.
Press either button under CONFIRM and
follow prompts.
Press either button under CONFIRM and
follow prompts.
3-3
Page 40

3.2.3 Filtration Problems
Problem Probable Causes Corrective Action
Change or overwrite the filter after
Fryer filters after each
cook cycle.
MAINT FILTER
(Manual Filter) won’t
start.
Filter pump won't
start or pump stops
during filtering.
Filter after setting incorrect.
Temperature too low.
A. Power cord is not plugged in or
circuit breaker is tripped.
B. Pump motor has overheated causing
the thermal overload switch to trip.
C. Blockage in filter pump.
setting by re-entering the filter after
value in level two. See section 2.13.6
on page 2-28.
Ensure fryer is at setpoint before
starting MAINT FILTER.
A. Verify that the power cord is fully
plugged in and the circuit breaker
is not tripped.
B. If the motor is too hot to touch for
more than a few seconds, the
thermal overload switch has
probably tripped. Allow the motor
to cool at least 45 minutes then
press the Pump Reset Switch. (See
page 2-16)
C. Call your FAS for assistance.
Filtration won’t start.
M3000 display shows
filter busy.
A. AIF disable is set to yes.
B. Filter relay has failed.
C. Oil temperature too low.
Another function or filter pad change is
still in process.
A. Set AIF disable in Level 1 to no.
B. Call your FAS for assistance.
C. Ensure oil temperature is at 300°F
(149°C) or above.
Wait until the previous function ends
to start another function. Change filter
pad if prompted.
3-4
Page 41

THIS PAGE INTENTIONALLY LEFT BLANK
Page 42

Frymaster, L.L.C., 8700 Line Avenue, Shreveport, Louisiana 71106
TEL 1-318-865-1711 FAX (Parts) 1-318-688-2200 FAX (Tech Support) 1-318-219-7135
PRINTED IN THE UNITED STATES
SERVICE HOTLINE
1-800-551-8633
819-6964
JULY 2012
 Loading...