

Page 1
*81965
66
*
FRYERS
Frymaster
Fryer
Electric and Gas models using an M2000 Computer
Computer model M2000
Weekly maintenance task
FR 2 W1 Clean area behind
fryers
Bi-weekly maintenance task
FR 2 B1 Calibrate fryer
Monthly maintenance task
FR 2 M1 Calib rate fryer
recovery time
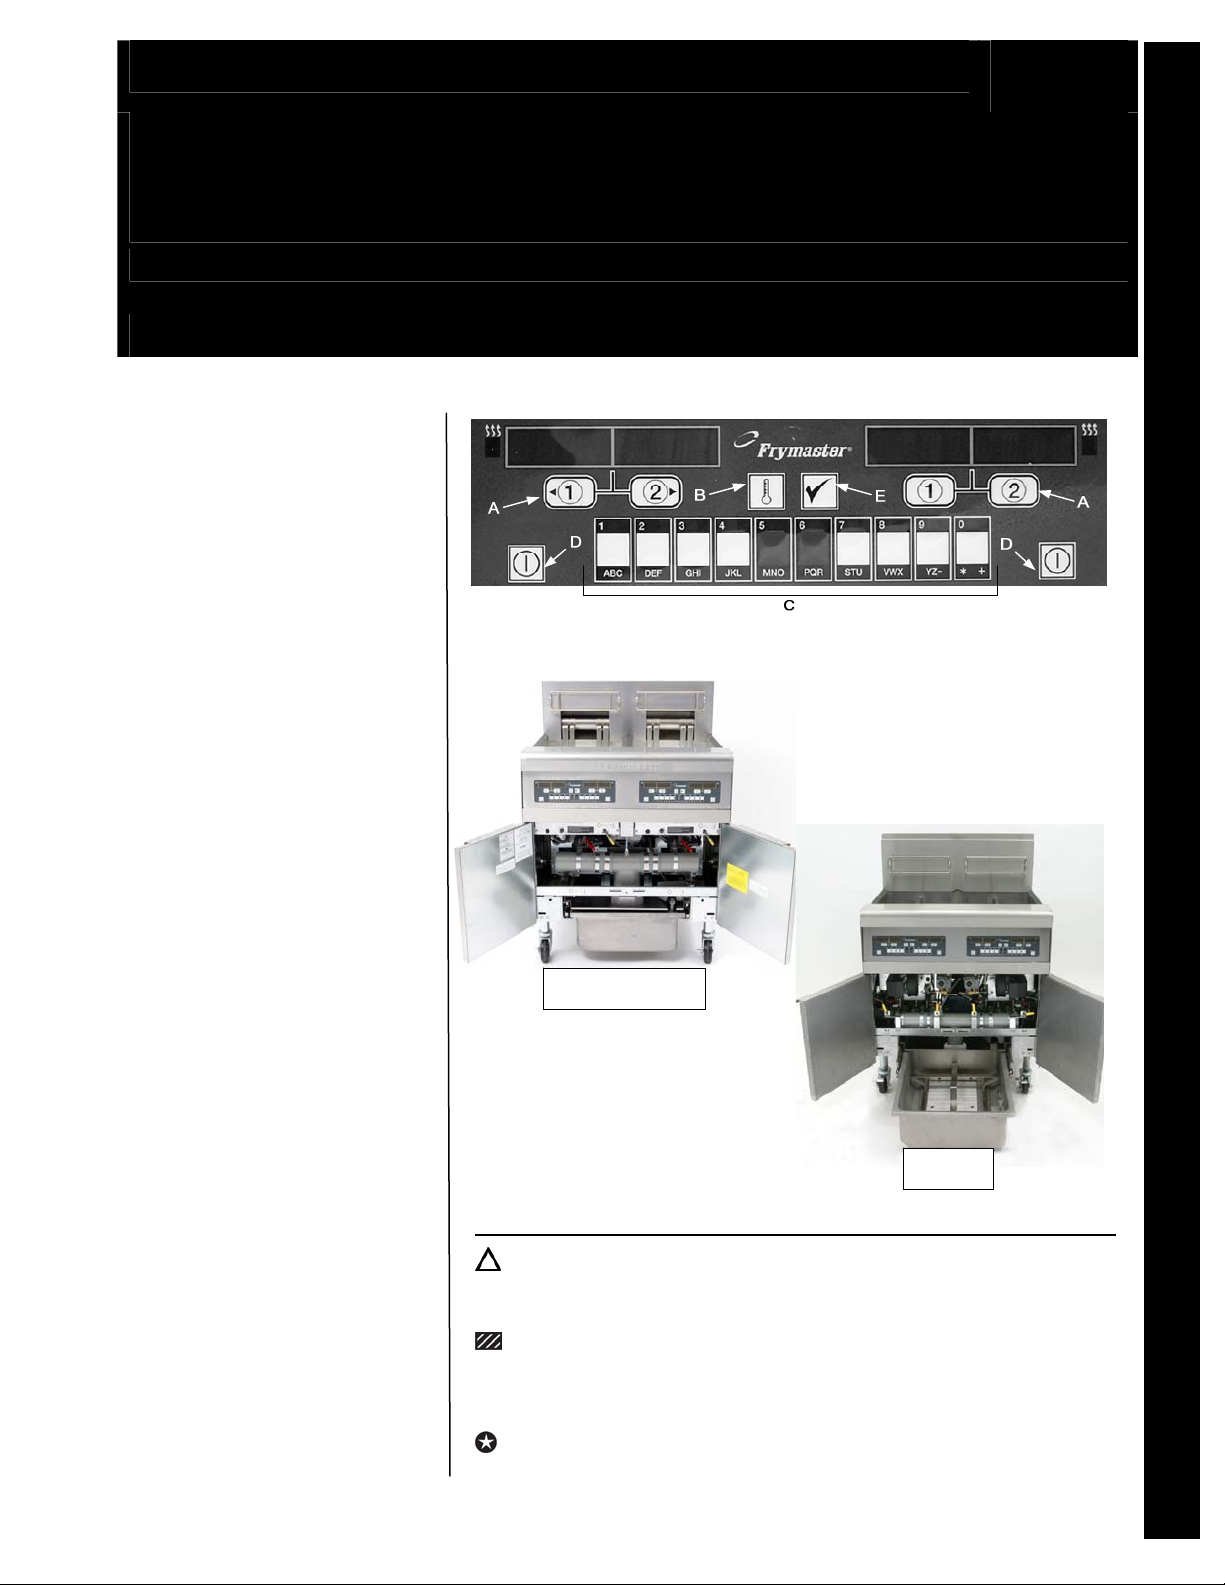
A. Cook cycle buttons, B. Temp button, C. Product Buttons, D. ON/OFF, E. Programming button
FR 2
Frymaster Fryer All models using an M2000 Computer FR 2
Quarterly maintenance tasks
FR 2 Q1 Boil out fry vats
FR 2 Q2 Verify high-limit
FR 2 Q3 Replace filter o-
Semi-annual maintenance task
FR 2 S1 Boil out fry vats
Annual maintenance task
FR 2 A1-T Scratch calibrate
NOV 2009
(electric fryers
only)
controls
rings
(gas fryers only)
ELECTRIC
fry vats
GAS
Hazards
These icons alert you to a possible risk of personal injury.
Equipment alerts
Look for this icon to find information about how to avoid damaging the
equipment while doing a procedure.
Tips
Look for this icon to find helpful tips about how to do a procedure.
©McDonald’s Corporation · Planned Maintenance Manual · Revised June 2008
Page 2
Daily Cleaning of Fryers Daily FR 2 D1
–
Why
Removed caramelized oil from element hub and surroundin g housing.
Frymaster Fryer Model BIPH14
Time required
Time of day
Hazard icons
Tools and supplies
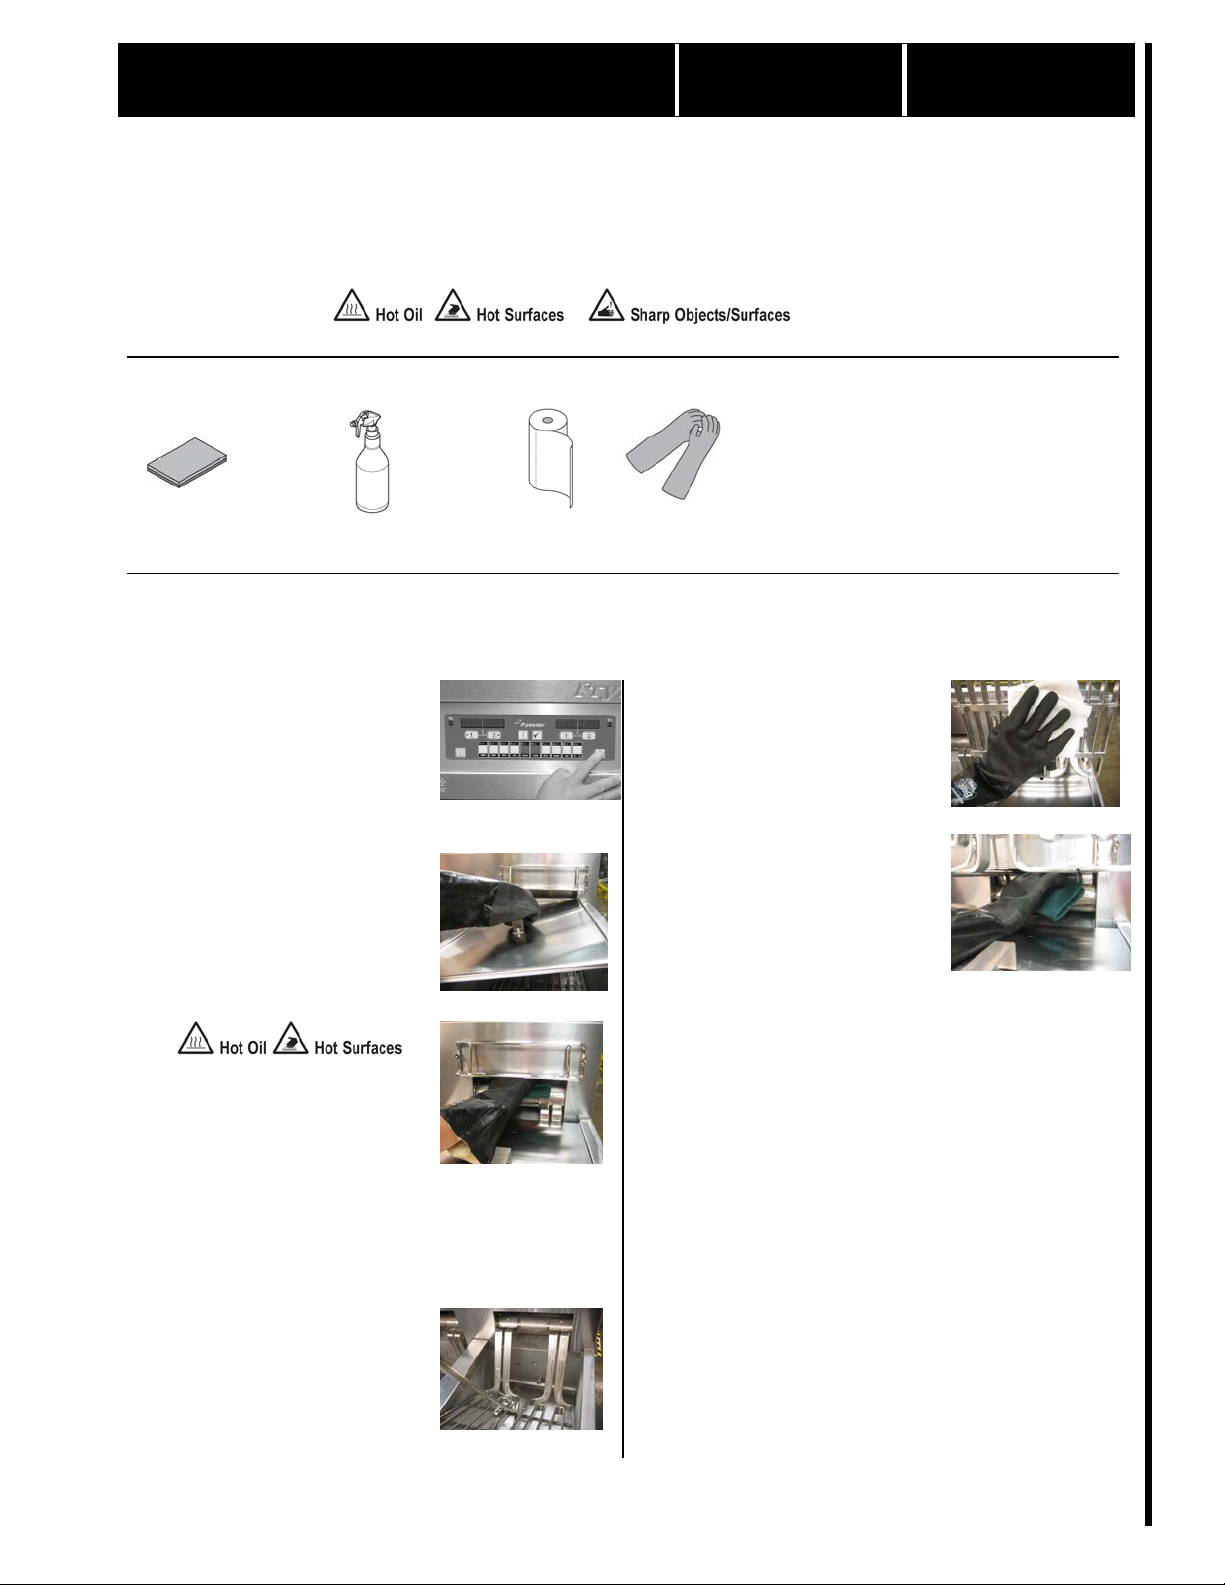
No-scratch pad EXCEED
Procedure
Turn fryers off.
1
Turn all fryer power
switches to the off
position.
5 minutes to prepare 15 minutes to complete (5 minutes per pot)
After close
For 24-hour restaurants: overnight or during lowvolume periods
Glass and Multi-surface cleaner Paper towel
Neoprene Filtering Gloves
Replace frypot covers and
wipe excess oil from the elements with paper towel.
Clean front and topside area
2
of heating element hub.
Wearing heat resistant
gloves, place covers on frypots ensuring they are square
with the frypot.
Spray EXCEED on a
No-scratch pad.
Use No-scratch pad to clean
around the element hub and
surrounding housing area.
Once area has been
cleaned, wipe off excess with
a paper towel.
Remove frypot cover and
remove basket rack using a
fryer’s friend, set aside. Lift
elements using fryer’s friend.
Clean underside area of heat-
3
ing element hub.
Spray EXCEED on a
No-scratch pad.
Use No- scratch pad to clean
the underside of the element
hub and surrounding housing
area.
Once area has been cleaned
wipe off excess with paper
towel.
Remove frypot cover. Using
a fryer’s friend, replace the
basket rack and lower the
elements.
Repeat for remaining frypots.
4
Daily FR2 D1
©McDonald’s Corporation · Planned Maintenance Manual · Revised June 2009 Page 1 of 1
Page 3
Clean area behind fryers Weekly FR 2 W1
Why
To ensure high-quality fried products and reduce the possibility of a fire near the fryer
Frymaster Fryer Models Using Model M2000 Computer
Time required
Time of day
Hazard icons
5 minutes to prepare 45 minutes to complete
After close
For 24-hour restaurants: overnight or during lowvolume periods
Tools and supplies
Brush, hi-lo deck
Brush, pot, nylon
Bucket with McD All
Purpose Super
Concentrate (APSC)
solution
Bucket, clean and
sanitized towels
Bucket, soiled towels
Caution Wet Floor
Sign
Mop bucket
Procedure
Mop wringer
Oil removal cart
Paper towels
Putty knife
Neoprene Gloves
Mop
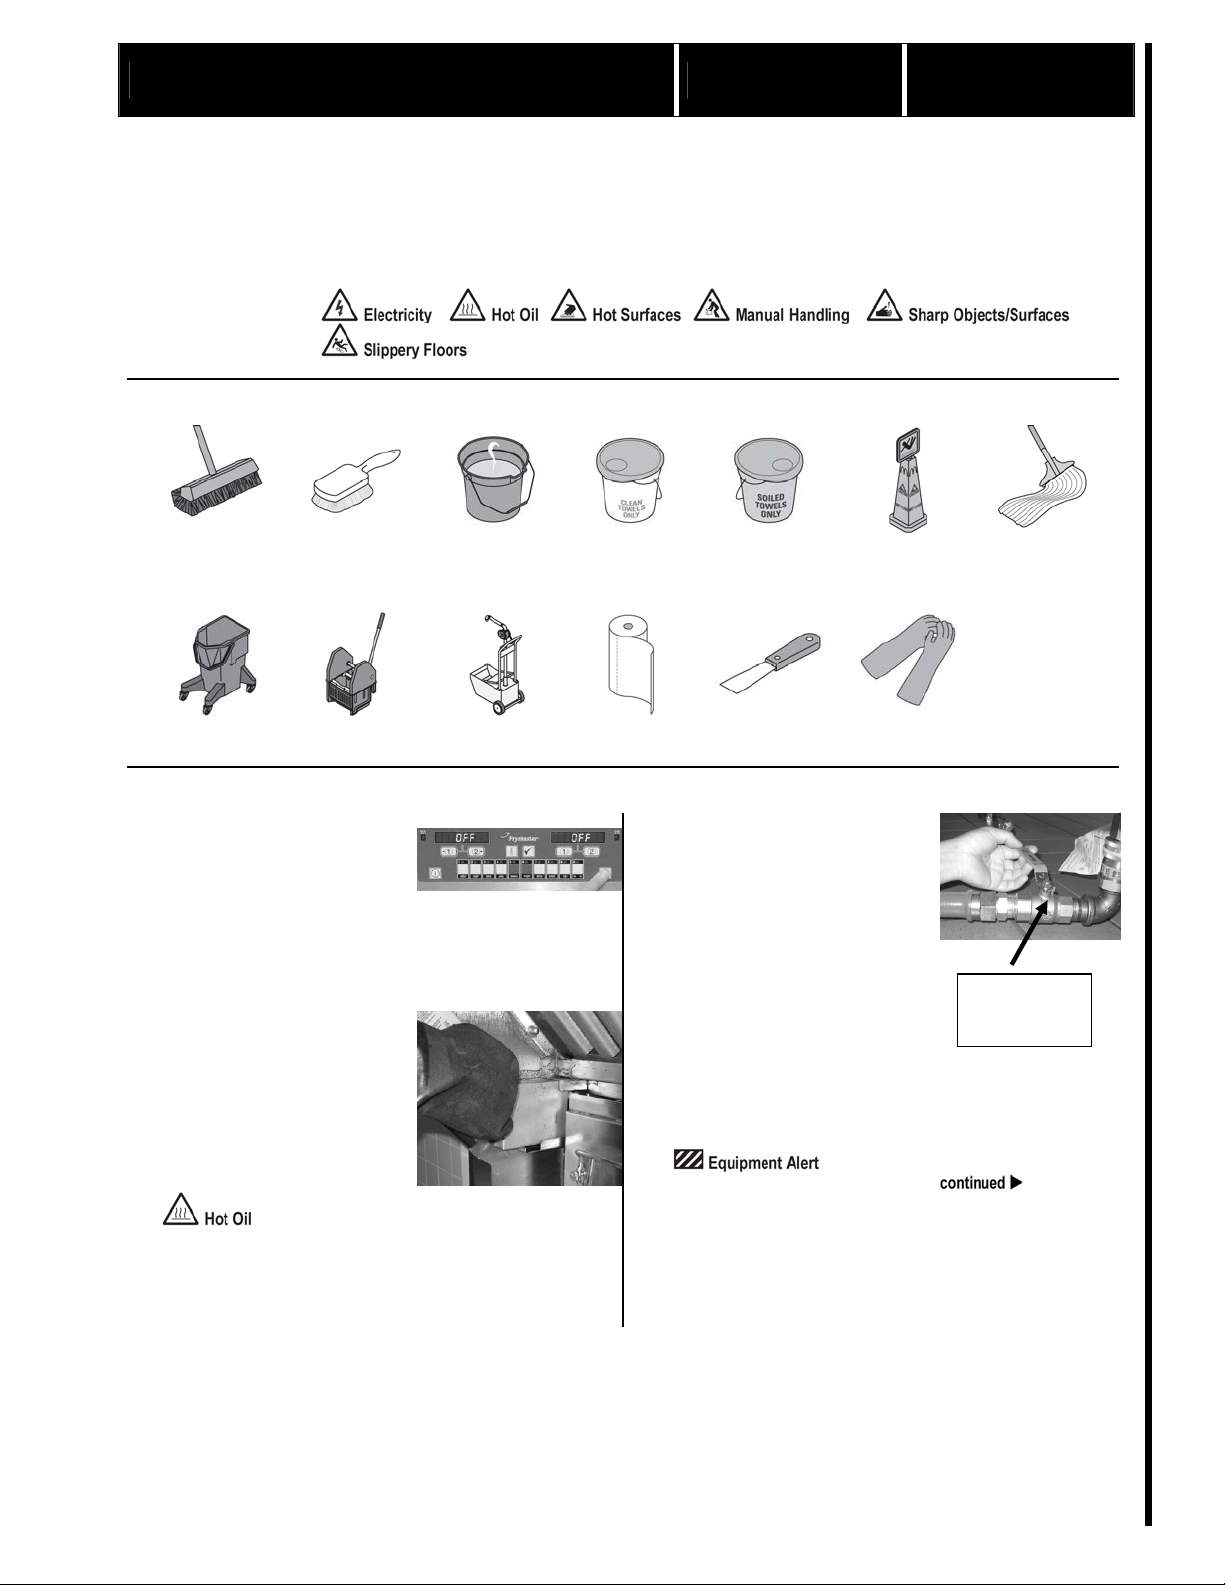
Turn fryers off.
1
Turn all fryer power switches
to the off position.
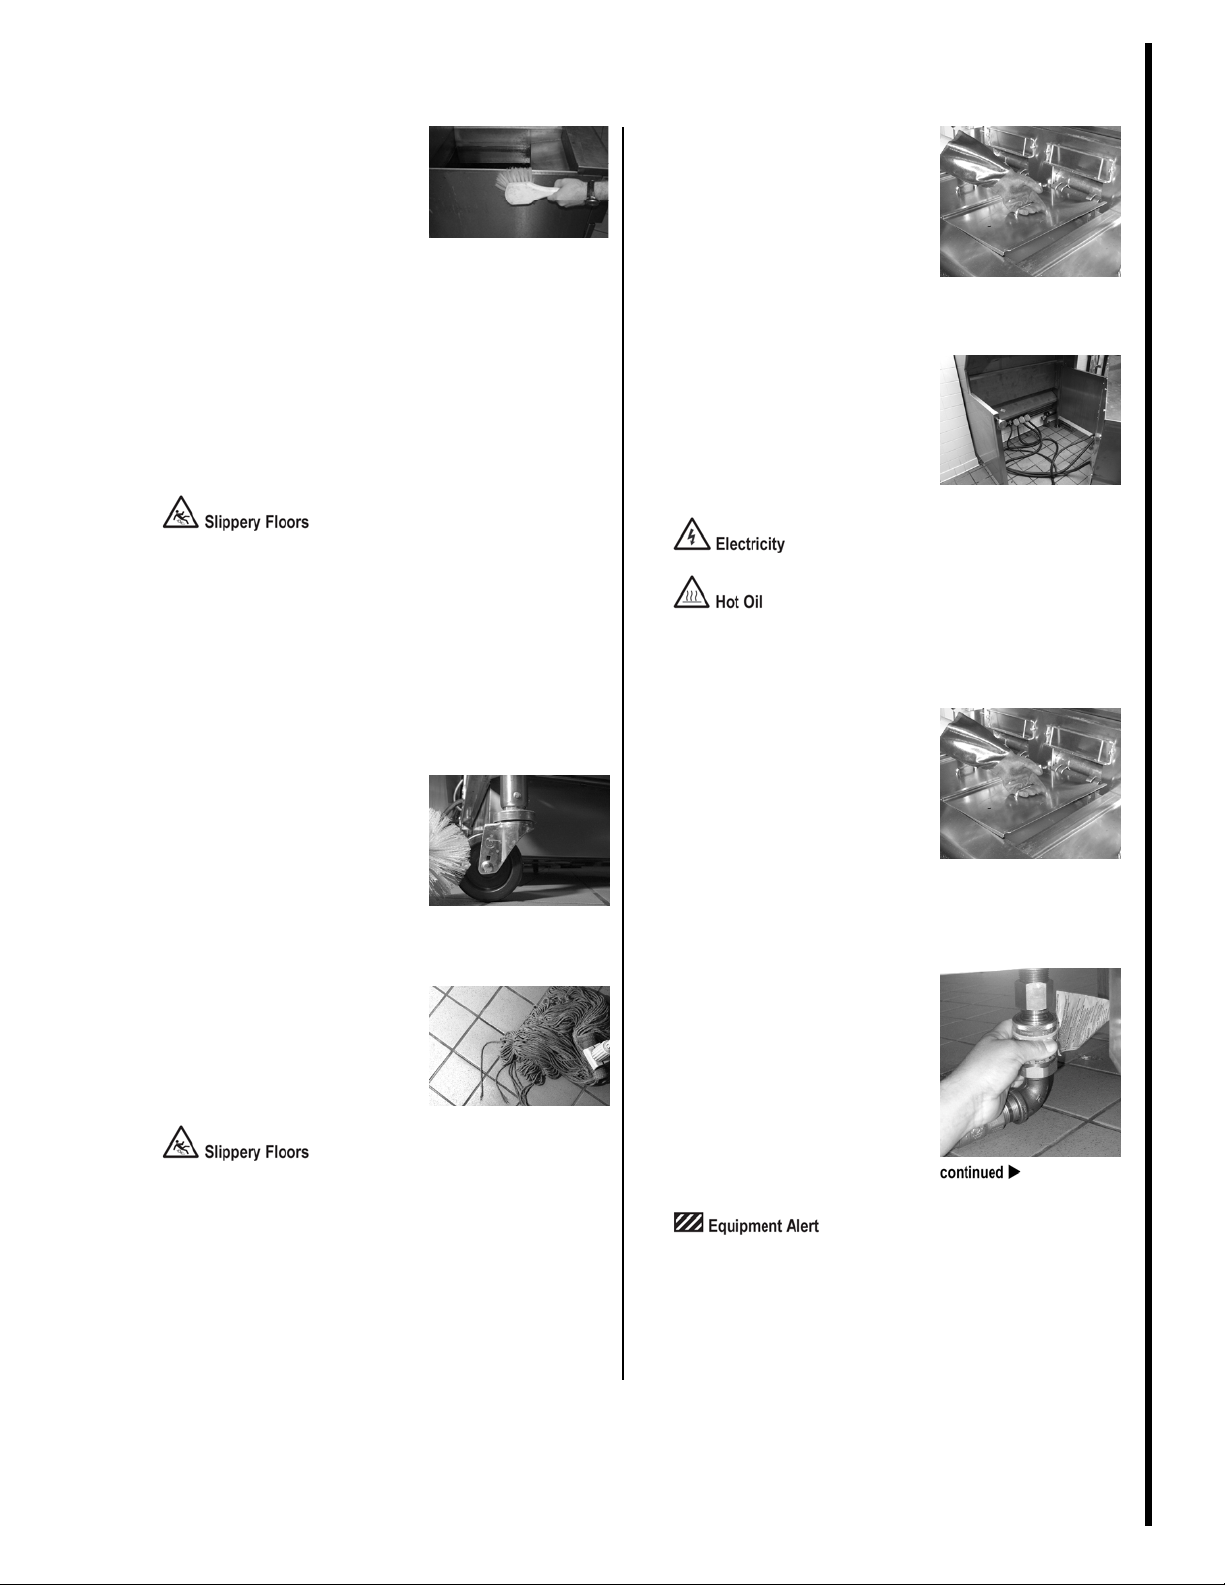
Remove and empty grease
2
trough and cup.
Remove the grease trough
from the exhaust hood. Remove the grease cup from the
hood. The trough and cup are
located beneath the hood filters. Pour any oil in the
trough and cup into the oil
removal cart.
Oil in trough and cup may be
hot. Use gloves.
Shut off and disconnect gas.
3
If the fryer is not a gas fryer,
skip this step.
If the fryer is a gas fryer, use
the manual gas shut-off valve
to shut off the gas supply. The
manual gas shut-off valve is
located on the supply line
before the quick disconnects.
Then disconnect the gas line
from the fryer via the quick
disconnect.
Use only the manual shut-off
Manual
shut-
off
valve to shut off the gas. Do
Weekly FR 2 W1
not use the quick disconnects.
©McDonald’s Corporation · Planned Maintenance Manual · Revised June 2008 Page 1 of 4
Page 4
Clean area behind fryers (continued)
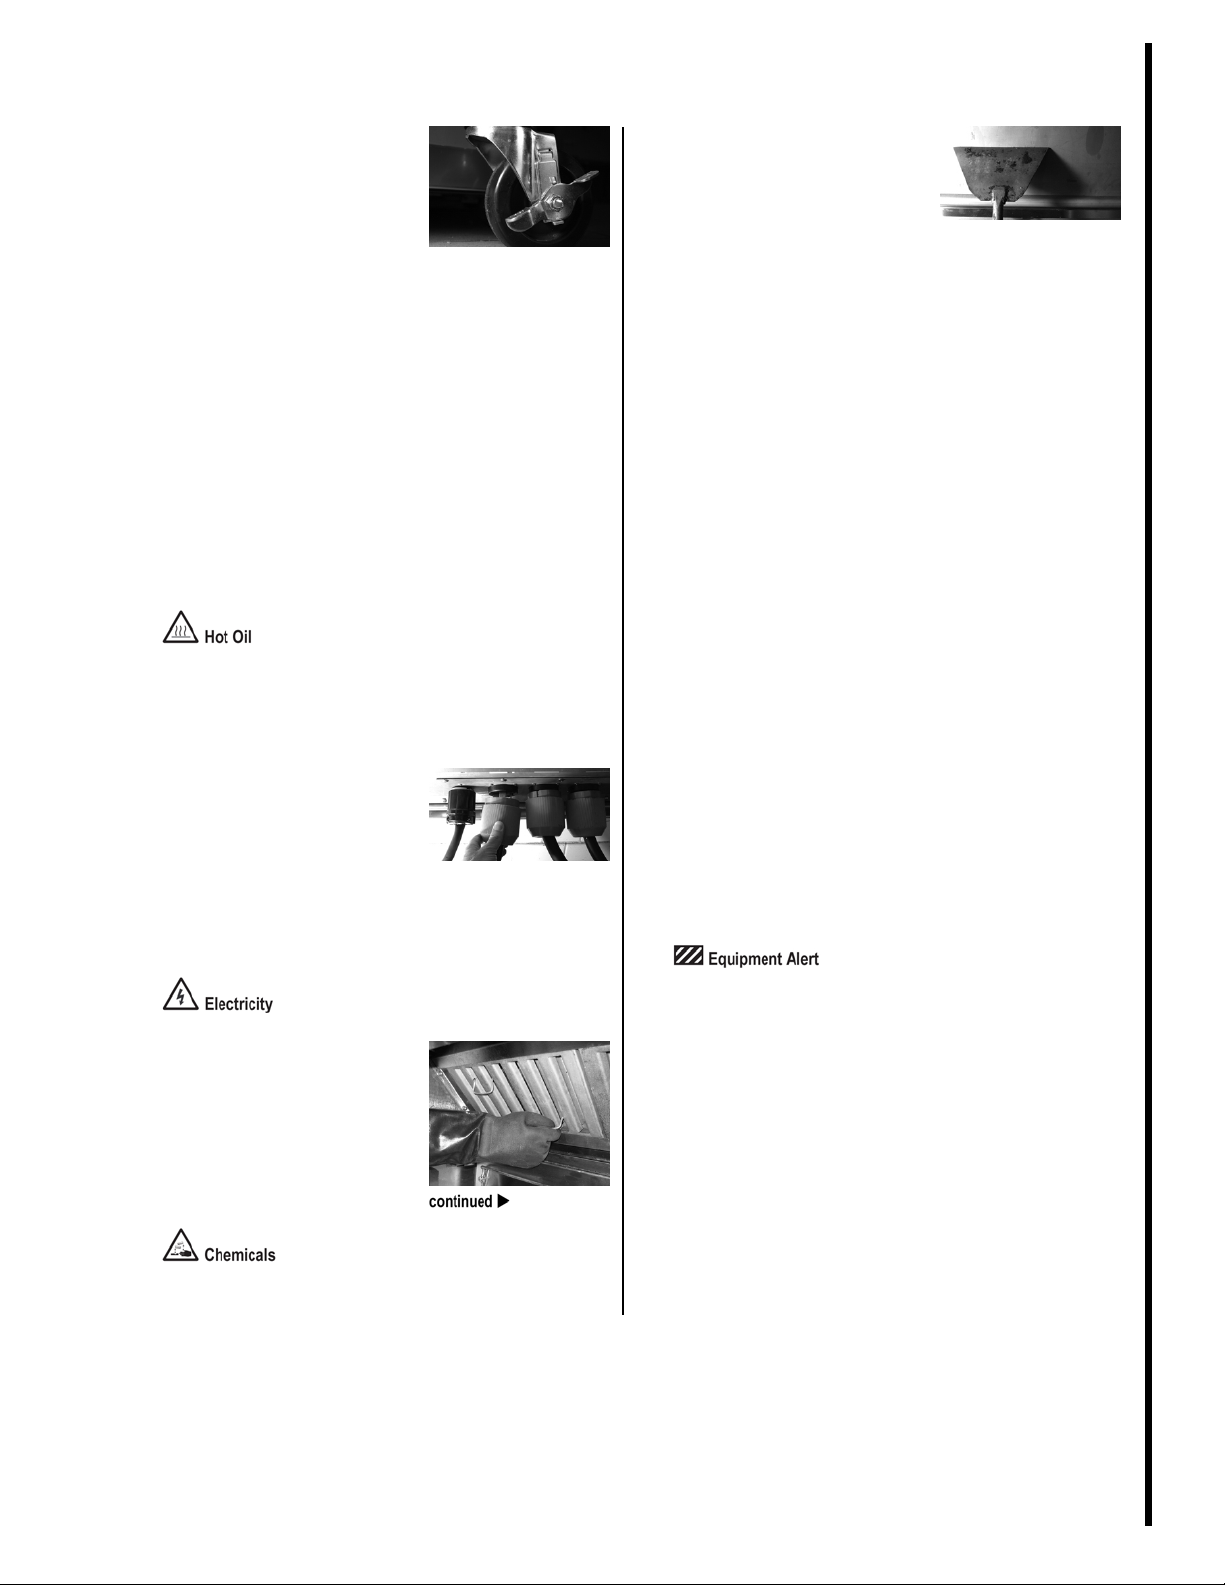
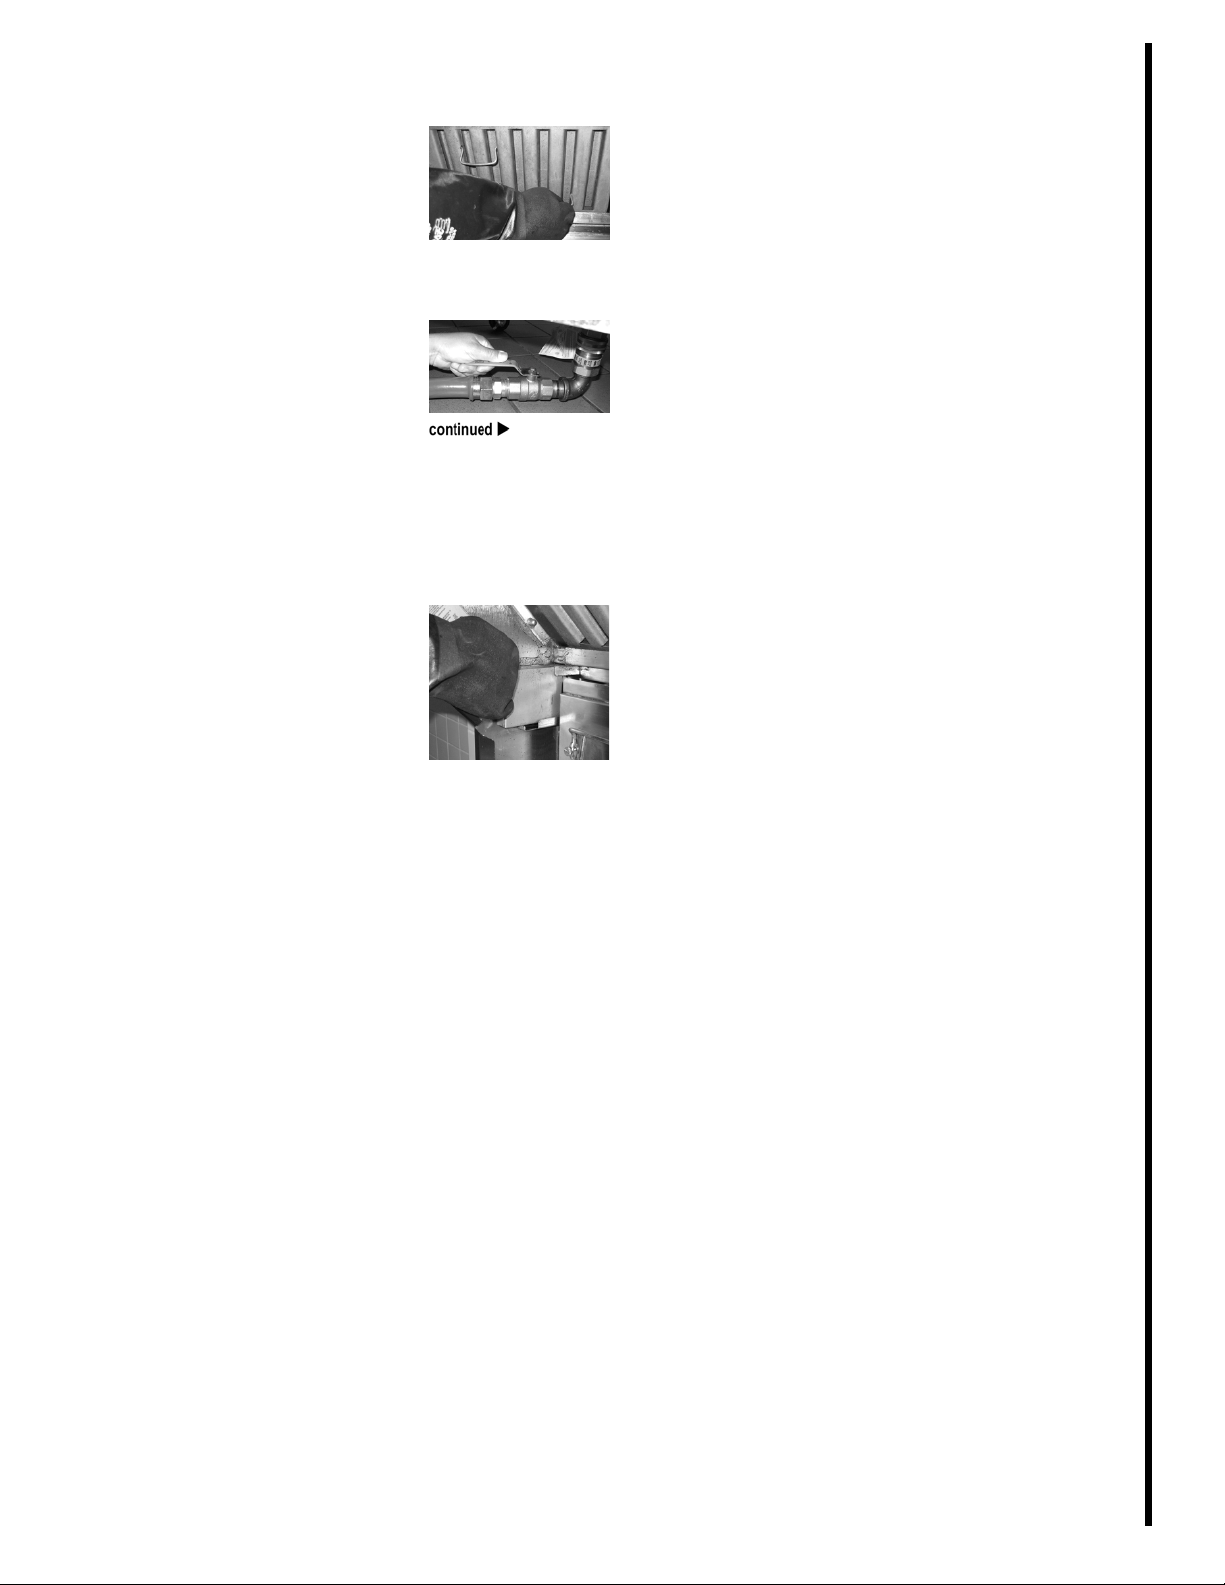
Prepare fryer for cleaning.
4
Release the locks on the fryer
wheels.
If the fryer has a capping
piece, lift the front of the capping piece far enough to let
the backsplash clear the filter
shelf. Roll the fryer carefully
away from the firewall, just
until the capping piece clears
the filter shelf.
Secure the capping piece, if
there is one. Place vat covers
on all vats.
Roll the fryer farther away
from the firewall, far enough
to clean behind the fryer.
Oil in fryer may be very hot.
Roll the fryer slowly to avoid
splashing the oil. Use gloves
Disconnect fryer from
5
electricity.
Unplug the fryer’s electrical
cord from the outlet by pulling on the electrical plug’s
body. You may need to twist
the plug to remove from the
outlet.
Clean fryer filters.
6
Remove the fryer filters from
the exhaust hood. Take the
filters to the threecompartment-sink and soak
them in McD APSC.
Scrape area behind fryer.
7
Use a putty knife to scrape off
all soft grease and hard carbon from the area behind the
fryer. Clean the following
areas in this order: the parts of
the stack you can reach; the
back of the exhaust hood; the
sides of the exhaust hood; and
the fryer filter recess area.
On an electric fryer, next use
the putty knife to scrape all
soft grease and hard carbon
from all sheet metal around
the fryer, the standoff piece,
and the fryer stand. Skip to
step 8 after these areas are
cleaned.
On a gas fryer, next use the
putty knife to scrape all soft
grease and hard carbon from
these areas in this order: the
flue restrictor, all sheet metal
around fryer, the removable
gravity blade, the seal angle,
the stand-off piece, and the
fryer stand.
On a gas fryer, be careful not
to drop any soft grease or
hard carbon into the fryer flue
passage while cleaning.
Do not break the fire protection fusible link in the lower
area of the stack. Breaking the
link will activate the fire extinguishing system.
Frymaster Fryer All models using an M2000 Computer Weekly
McD APSC
FR 2 W1
©McDonald’s Corporation · Planned Maintenance Manual · Revised June 2008 Page 2 of 4
Page 5
Clean area behind fryers (continued)
Clean area behind fryer.
8
Use a nylon pot brush, a hi-lo
deck brush, and a bucket of
hot McD APSC solution to
scrub all of the areas you
scraped in step 7. Clean the
areas in the same order that
you scraped them in step 7.
Then use the hi-lo deck brush
to scrub the floor around the
fryer.
Wipe all areas with paper
towels until they are clean
and dry.
The floor may be wet where
you have scrubbed it.
Ask manager to inspect.
9
Ask a manager to inspect
your work and approve the
cleaning. Repeat any cleaning
as your manager directs.
Wash fryer legs and casters.
10
Use a nylon pot brush and a
bucket of hot McD APSC
solution to wash the legs and
casters of the fryer. Wipe dry
with paper towels.
Allow surfaces to dry.
12
Allow all fryer, wall, and
floor surfaces to air dry.
Reconnect fryer to electricity.
13
Roll the fryer slowly toward
the electrical outlet until it is
close enough to connect the
plug. Plug the fryer into the
outlet.
Oil in fryer may be very hot.
Roll the fryer slowly to avoid
splashing the oil.
Prepare fryer for use.
14
Roll the fryer forward carefully until it is close to the
filter shelf. Remove the vat
covers from all vats. Lift the
front of the capping piece
until the backsplash clears the
filter shelf, and roll the fryer
carefully into its normal position.
Frymaster Fryer All models using an M2000 Computer Weekly
Reconnect fryer to gas supply.
Mop floor around fryer.
11
Use a mop and a bucket of
hot McD APSC solution to
mop the entire floor around
the fryer.
Floor may be wet from mopping.
©McDonald’s Corporation · Planned Maintenance Manual · Revised June 2008 Page 3 of 4
15
If the fryer is an electric fryer,
skip this step.
Check both ends of the quick
disconnect for grease. Wipe
the quick disconnect clean if
necessary. Reconnect the gas
line coupling.
Be sure the gas quick disconnect is fully engaged and
interlocked before turning on
the gas supply.
FR 2 W1
Page 6
Clean area behind fryers (continued)
Reinstall fryer filters and
16
grease trough.
Lock wheels into place. Reinstall the fryer filters and the
grease trough in the exhaust
hood.
Turn on gas supply.
17
If the fryer is an electric fryer,
skip this step.
Turn the manual gas shut-off
valve to the on position. Turn
the computer on to verify
burners will re-light. Once the
burners have been re-lit you
can turn the computer off.
Clean area behind other fryers.
18
Repeat steps 1 through 17 for
all remaining fryers.
Frymaster Fryer All models using an M2000 Computer Weekly
FR 2 W1
©McDonald’s Corporation · Planned Maintenance Manual · Revised June 2008 Page 4 of 4
Page 7
Calibrate fryer Bi-weekly FR 2 B1
Why
To maintain food safety standards
Frymaster Fryer All models using an M2000 Computer Bi-weekly
Time required
Time of day
Hazard icons
Tools and supplies
Pyrometer with fry
vat probe
Procedure
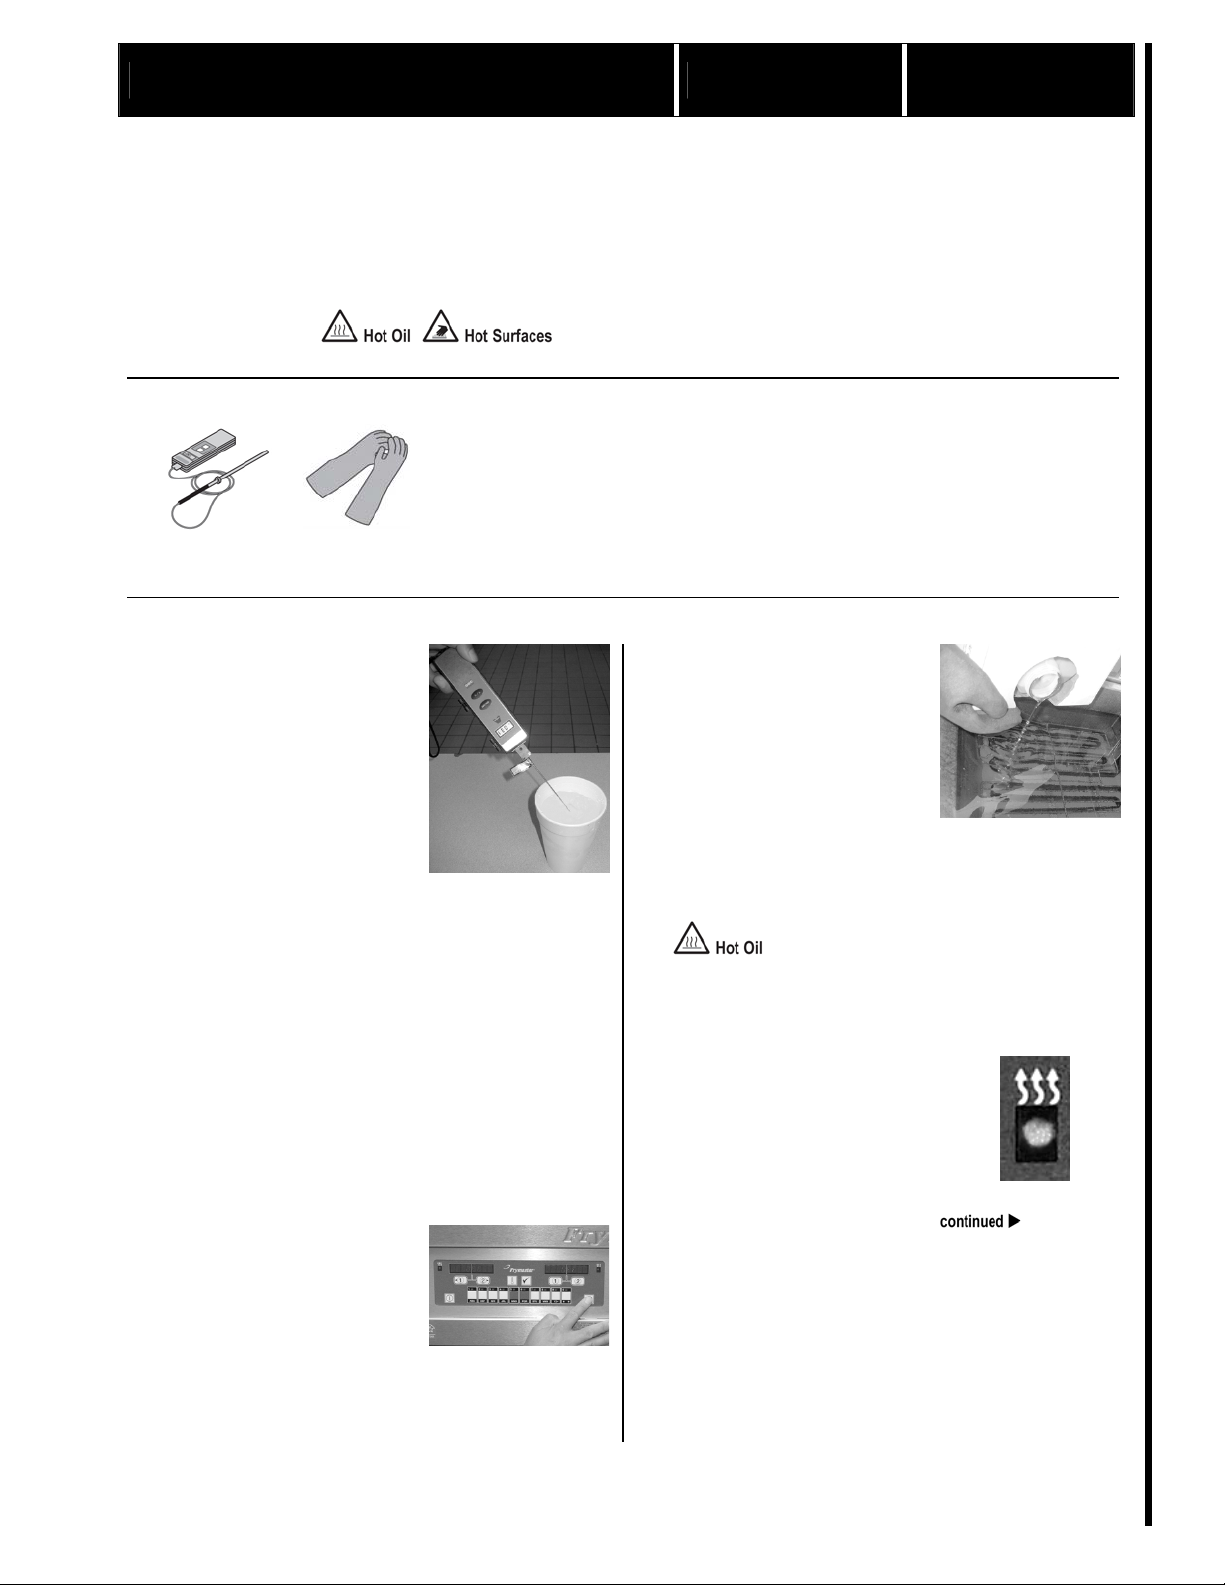
Calibrate pyrometer.
1
Fill a hot beverage cup with
ice and then add cold water
from the drink tower up to
the top of the ice. You should
have 50 percent ice and 50
percent water.
2 Place probe in water
Place the probe in the ice water and stir continuously until
the temperature readout
stabilizes.
3 Read temperature
The readout should be 32°F
(0°C), plus or minus 2°F
(1°C). If not, you need to
calibrate, repair, or replace
the pyrometer. For calibration, follow the calibration,
checking, and adjusting procedures supplied by the
manufacturer of your pyrometer.
Turn on fryer and heat oil.
2
Press the on/off button to turn
the fryer on. Set the fryer for
the product to be cooked.
Allow the oil in the fryer to
reach cooking temperature
and then cycle off.
1 minutes to prepare 5 minutes to complete, once fryer has reached cooking
At open
Neoprene Gloves
temperature. Cook temperature should be reached in
approximately 45 minutes.
For 24-hour restaurants: during low-volume periods
3
Check oil level.
Check the oil level when the
oil has reached cooking temperature. If the oil is above
the “Oil Level” line, remove
oil until the oil is at the line
by draining oil into pan or
disposal unit. If the oil is
below the “Oil Level” line,
add oil until the oil reaches
the line.
Oil in the fryer is very hot.
Use gloves.
Cycle vat.
4
Allow the vat to cycle on and
off three times. The heat light
will come on when the fryer
is heating.
FR 2 B1
©McDonald’s Corporation · Planned Maintenance Manual · Revised June 2008 Page 1 of 2
Page 8
Calibrate fryer (continued)
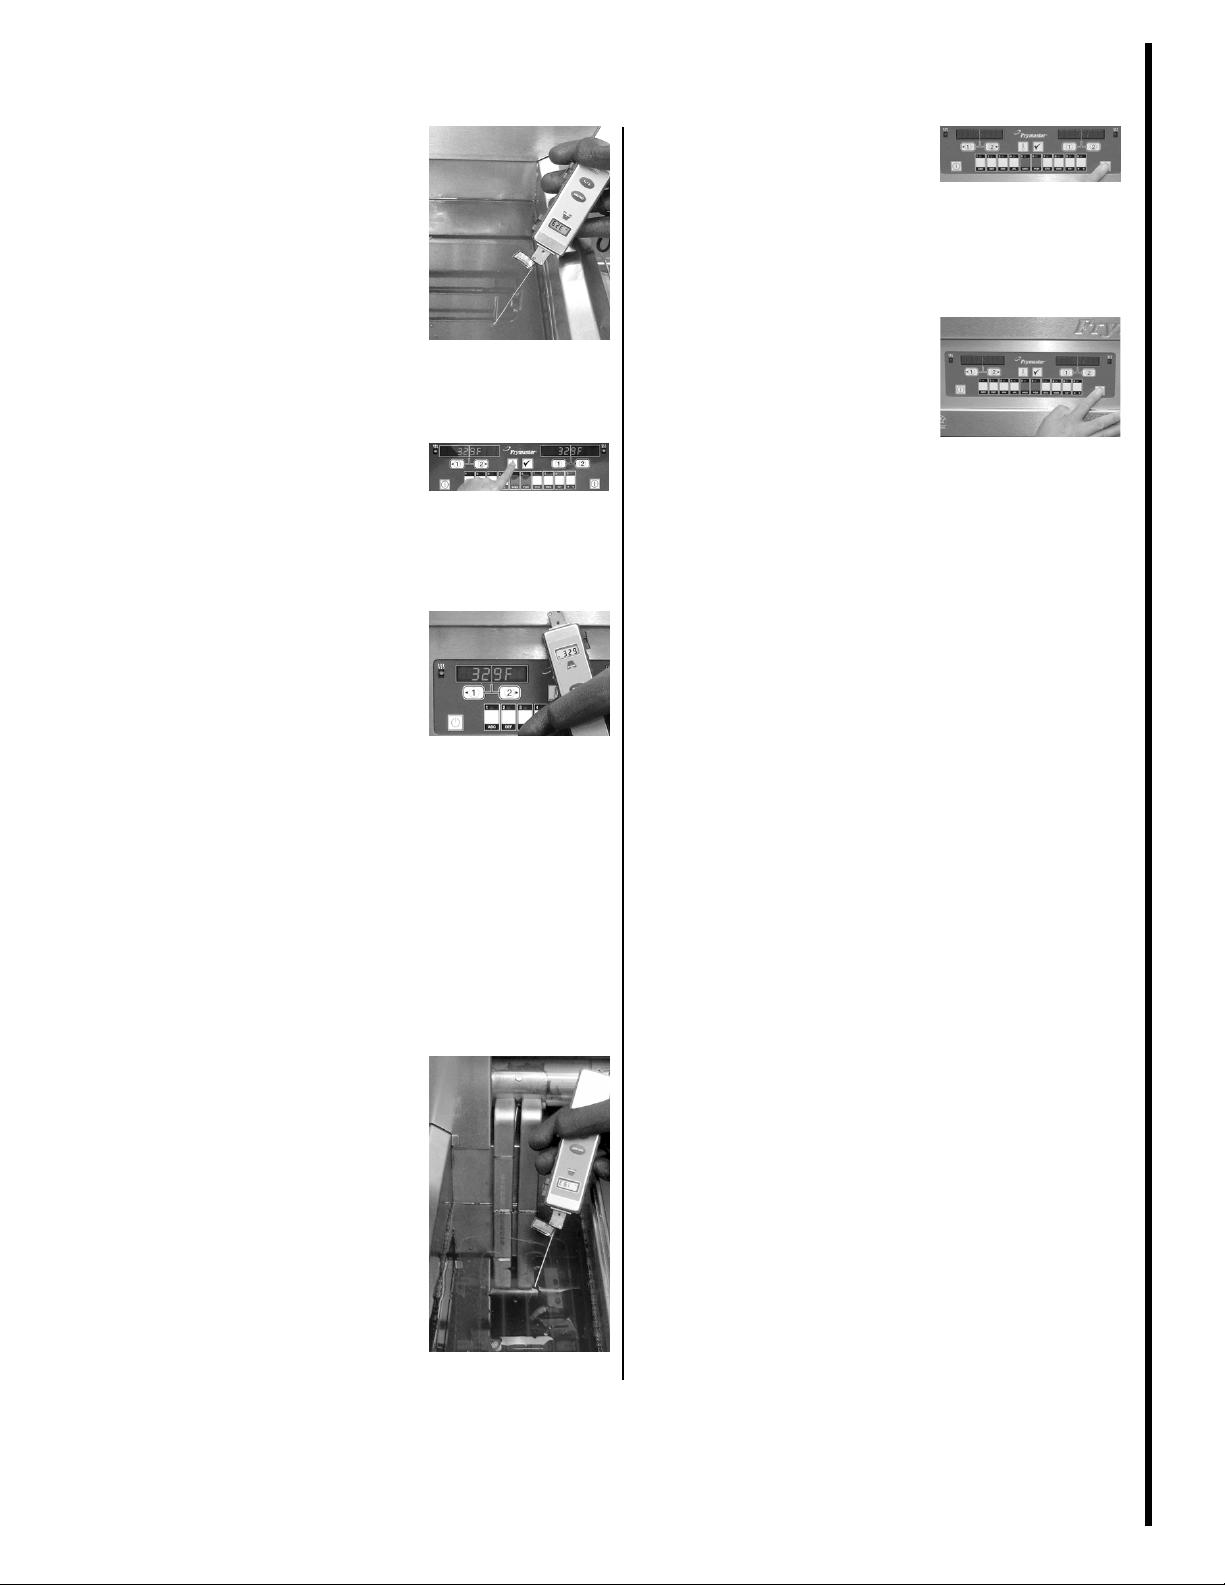
Read oil temperature.
5
Insert the fry vat probe of the
pyrometer into the hot oil to
within 1 inch (2.5 cm) of the
probe’s tip. The tip should
be approximately 3 inches
(7.6 cm) below the surface of
the oil. Allow the temperature
reading to stabilize.
Display temperature on fryer.
6
Press the temperature display
switch for the vat where you
took the pyrometer reading.
The display will show the
temperature for the vat.
Compare temperature
7
readings.
Compare the temperature
reading on the pyrometer with
the corresponding temperature on the display.
If the two temperatures are
less than 5°F (3°C) apart (either plus or minus), you do
not need to adjust the temperature setting.
If the two temperatures are
more than 5°F (3°C) apart
(either plus or minus), call a
service technician to report
the problem.
End calibration check.
9
When you have finished steps
5 through 7 for the vat (including both sides of a splitvat), press the on/off button to
end the calibration check for
the vat.
Calibrate remaining fryers.
10
Repeat steps 1 through 9 for
all remaining fryers.
Frymaster Fryer All models using an M2000 Computer Bi-weekly
Repeat for other side of split-
8
vat.
If the vat you tested was a full
vat, skip this step and go to
step 9.
If the vat you tested was one
side of a split-vat, repeat steps
5 through 7 on the other side
of the split-vat.
FR 2 B1
©McDonald’s Corporation · Planned Maintenance Manual · Revised June 2008 Page 2 of 2
Page 9

Calibrate fryer recovery time Monthly FR 2 M1
Why
To maintain food safety standards for fried products
Frymaster Fryer All models using an M2000 Computer
Time required
Time of day
Hazard icons
Tools and supplies
1 minute to prepare 5 minutes to complete,
At open
For 24-hour restaurants: in the morning
Paper and pencil
Procedure
Turn fryer off.
1
Press the on/off button to turn
the fryer off. The display will
show “OFF.”
Check most recent recovery
2
time.
The fryer automatically records the fryer’s recovery
time each time the vat temperature rises from 250°F
(121°C) to 320°F (160°C).
Press the button marked with
a checkmark to enter the
fryer’s programming mode.
The left display will show
“Code.”
Press the buttons marked “1,
6, 5, 2” in that order to enter
code 1652. The display will
show the most recent recovery time in both displays.
Write down the recovery
time.
3
Compare most recent recovery
time to acceptable recovery
time.
The acceptable recovery time
for electric fryers is less than
100 seconds. The acceptable
recovery time for gas fryers is
less than 145 seconds.
If the recovery time you
wrote down is less than the
fryer’s acceptable recovery
time, the fryer’s performance
is acceptable. Skip to step 5.
If the time you wrote down is
more than the fryer’s acceptable recovery time, the fryer’s
performance is not acceptable. Go to the next step.
Monthly FR 2 M1
©McDonald’s Corporation · Planned Maintenance Manual · Revised June 2008 Page 1 of 2
Page 10

Calibrate fryer recovery time (continued)
Adjust fryer, if necessary.
4
If the fryer’s recovery time is
not acceptable, check the following items on the fryer. If
you find any problems, correct them as described.
If the fryer filters are dirty,
replace them.
If the oil is below the “Oil
Level” line when the fryer is
at cooking temperature, add
oil until it reaches the “Oil
Level” line.
If the oil is above the “Oil
Level” line, remove oil until it
reaches the “Oil Level” line.
For electric fryers only, confirm that the large power plug
is properly plugged in. Adjust
as necessary.
For gas fryers only, check the
seal angle, gravity blade, and
standoff. Adjust their placement if necessary.
For gas fryers only, check the
air flow and combustion air
blower. Adjust as necessary.
For gas fryers only, check the
condition of the radiant burners.
Refer to trouble shooting
guide in Operators manual.
Frymaster Fryer All models using an M2000 Computer Monthly
Check recovery time again.
5
If Recovery Time is not
achieved in the proper time,
call the Frymaster Service
Hotline for assistance at 1800-551-8633.
Recalibrate all remaining
6
fryers.
Repeat steps 1 through 5 for
all remaining fryers.
FR 2 M1
©McDonald’s Corporation · Planned Maintenance Manual · Revised June 2008 Page 2 of 2
Page 11

Boil out fry vats (electric fryers only) Quarterly FR 2 Q1
Why
To keep the fry vats clean and to maintain proper cooking temperatures
Frymaster Fryer All models using an M2000 Computer
Time required
Time of day
Hazard icons
5 minutes to prepare 75 minutes to complete
At close
For 24-hour restaurants: during low-volume periods at
night
Tools and supplies
Apron, heat-resistant
Gloves, neoprene
Procedure
Brush, pot, heatresistant
Goofer stick
Bucket, plastic
Bucket, clean and
sanitized towels
Bucket, soiled towels
Face shield
McD All Purpose
Super Concentrate
(APSC) solution
McD Heavy Duty
DeGreaser
Oil removal cart
Paper towels
Fryer skimmer
Maple Paddle with
no scratch pad
If this is first boil-out, program
1
boil-out into fryer.
If the fryer is new, the boilout procedure must be programmed into the fryer before
it is boiled out for the first
time.
If the fryer has been boiled
out before, skip this step.
Press the on/off button to turn
the fryer off.
Press the button marked with
a check mark. The left display
will show “code.”
Press the number keys
1,6,5,0. Then press the button
marked with a 1 and left arrow to step through the menu
of items and products. Stop
when you reach “boil out”
(#40 product position).
Press a gray product button to
store the “boil out” entry. The
green display of the button
pressed will light up.
Press the on/off button to turn
the fryer off.
Quarterly FR 2 Q1
©McDonald’s Corporation · Planned Maintenance Manual · Revised June 2008 Page 1 of 5
Page 12

Boil out fry vats (electric fryers only) (continued)
Prepare for boil-out and turn
2
fryer off.
Put on neoprene gloves, a
heat-resistant apron, and a
face shield. You must wear
this equipment throughout
this procedure.
This procedure should be
done for only one vat at a
time.
Confirm that the fryer filters
are in place. Turn at least one
exhaust fan on. The fan must
stay on for the entire procedure.
Make sure the basket support
rack is in place in the vat.
Press the on/off key to turn
the fryer off.
Avoid accidentally activating
the fire extinguishing system
by keeping an exhaust fan on
and the fryer filters in place
during the entire procedure.
Remove filter pan.
3
Open the doors to the filter
area and remove the filter
pan. Place it on the floor under the fryer's drain spout or
use an oil removal cart.
After boil out is complete
clean and dry filter pan.
Drain oil from vat.
4
Be sure the filter pan or an oil
removal cart is in place underneath the drain spout on
the fryer. If the fryer has a
swivel drain spout, pull it
outward.
Carefully open the drain
valve, and let the oil drain
into the oil removal cart or
pan. Push any pieces of fried
food or other sediment into
the drain valve, so they drain
out. Close the drain valve.
The oil may be very hot.
Avoid splashing oil.
Add degreaser and hot water
5
to vat.
Pour McD Heavy-Duty Degreaser carefully into the vat.
Use 2 gallons (8 liters) of
degreaser if you are cleaning
a full vat. Use 1 gallon (4
liters) of degreaser if you are
cleaning one side of a split
vat. Finish filling the vat with
hot water. Solution should be
1 inch above fill line.
6
Remove the fryer capping
piece if the fryer has one.
Take back to sink and clean
with McD’s Heavy Duty Degreaser and APSC.
McD Heavy Duty Degreaser
Frymaster Fryer All models using an M2000 Computer
Turn fryer on.
7
Press the on/off key to turn
the fryer on. The display will
show “low temp.”
©McDonald’s Corporation · Planned Maintenance Manual · Revised June 2008 Page 2 of 5
Quarterly FR 2 Q1
Page 13

Boil out fry vats (electric fryers only) (continued)
Start boil-out.
8
Press the gray product button.
The display will show a set of
left arrows and right arrows.
Locate the cook channel button under the vat you want to
boil out. Press and hold the
cook channel button for approximately 5 seconds, then
release the button. The display near the button should
show “boil out.” Press the
button under the display
again. The boil-out should
start.
Allow solution to heat up.
9
The solution will reach a
temperature of 195°F (91°C).
The solution should be at a
soft, rolling simmer. Once the
solution has reached its target
temperature, let it simmer for
approximately 60 minutes.
Complete steps 9 through 11
while the timer is running.
The solution should never
come to a rolling boil, or it
may boil over. If unit starts to
boil over turn fryer off.
Never leave the fryer unattended during boil out.
Clean basket support rack.
11
Use the goofer stick to remove the basket support rack
from the vat. Have another
crew person take the rack to
the three-compartment-sink,
and rinse it thoroughly in hot
water. Dry thoroughly.
The basket support rack is
very hot.
Scrub inside of vat.
12
Scrub the side, front, and
back walls of the vat with a
heat-resistant pot brush to
remove any remaining deposits.
Turn fryer off.
13
When the vat has simmered at
a rolling simmer (boiled out)
for approximately 60 minutes,
press the on/off button to turn
the fryer off.
Frymaster Fryer All models using an M2000 Computer
Clean fry baskets.
10
Place the fry baskets into the
cleaning solution. Have another crew person remove
them when clean and take
them to the threecompartment-sink. Rinse and
dry them thoroughly.
Do not place any aluminum
parts in the boiling solution.
The solid metal basket hangers are made of aluminum.
©McDonald’s Corporation · Planned Maintenance Manual · Revised June 2008 Page 3 of 5
Quarterly FR 2 Q1
Page 14

Boil out fry vats (electric fryers only) (continued)
Drain solution from fryer.
14
Place a 5-gallon (19-liter)
bucket under the fryer's drain.
Open the fryer drain valve far
enough to allow the solution
to flow slowly into the
bucket. Let 2 or 3 gallons of
solution drain into the bucket.
Close valve then change to an
empty bucket and let 2 or 3
gallons of solution drain into
the bucket. You will need
several buckets to drain the
fryer completely.
The cleaning solution should
be discarded or re-used in
another fryer within 3 hours.
After 3 hours, discard the
solution.
The solution will be very hot.
Avoid splashing.
Scrub inside of vat.
15
Use the maple paddle with
non scratch pad to scrub the
side, front, back and top of
vat. Remove any remaining
deposits. McD Fryer Cleanser
may be use also.
Fill vat with water.
16
Fill vat with the appropriate
amount of plain water.
Drain solution from vat.
17
Place a 5-gallon (19-liter)
bucket under the fryer's drain.
Open the fryer drain valve far
enough to allow the dirty solution to flow slowly into the
bucket. Discard the dirty solution. Place the bucket under
the fryer drain again and open
the valve completely.
Do not place more than 2 or 3
gallons of solution in a bucket
at a time.
Scrub any remaining deposits
or carbon in the vat with a
non-scratch pad.
The solution will be very hot.
Avoid splashing.
Drain the solution only into
buckets. Do not drain into the
filter pan or oil removal cart.
Rinse and dry vat.
18
Rinse the vat thoroughly with
warm water (100°F or 38° C).
Be sure to have a bucket underneath the drain to catch
rinse water. Repeat with more
clean, warm water. Wipe the
vat down with a clean, sanitized towel. Close the fryer
drain valve. Thoroughly dry
the inside of the vat with paper towels.
Frymaster Fryer All models using an M2000 Computer
Fill vat with oil.
©McDonald’s Corporation · Planned Maintenance Manual · Revised June 2008 Page 4 of 5
19
Fill the vat with the appropriate amount of oil.
Quarterly FR 2 Q1
Page 15

Boil out fry vats (electric fryers only) (continued)
Prepare fryer for use.
20
Place the basket support rack
in the correct position in the
fryer vat. If the fryer has a
swivel drain spout, push the
spout back inside the fryer
cabinet. Carefully push the
filter pan back into the fryer
cabinet.
Turn fryer on.
21
Turn fryer on.
Press the on/off key to turn
the fryer on. The display will
show “low temp.”
Skim oil.
22
When the oil has heated, skim
off any particles of carbon
floating on the surface of the
oil.
Frymaster Fryer All models using an M2000 Computer
Season baskets and racks.
23
Season the baskets and the
basket support racks by leaving them in the fresh oil for
approximately 2 minutes at
cooking temperature.
Boil-out remaining fryers.
24
Repeat steps 1 through 21 for
each remaining fryer.
Quarterly FR 2 Q1
©McDonald’s Corporation · Planned Maintenance Manual · Revised June 2008 Page 5 of 5
Page 16

Verify high-limit controls Quarterly FR 2 Q2
Why
To ensure fryer safety controls are working effectively
Frymaster Fryer All models using an M2000 Computer
Time required
Time of day
Hazard icons
Tools and supplies
45 minutes for fryer to heat up. 25 minutes per pot to complete.
After closing. Conduct this test when
the cooking oil is due to be changed.
Oil removal cart
Procedure
Prepare for tests.
1
Confirm that the oil in the
fryer is scheduled to be
changed. The oil must be discarded at the end of the
procedure.
Check the oil level in the
fryer. It should be at the upper
“Oil Level” line. If the oil
level is below that line, add
oil until it reaches the “Oil
Level” line.
Check the temperature of the
oil. The oil temperature
should be above 180°F
(82°C).
Confirm that the hood grease
filters are in place, and turn
the exhaust fans on. The fans
must stay on for the entire
procedure. During this procedure, the oil in the fryer is
heated to very high temperatures. The oil may smoke
slightly, and it will be extremely hot.
Neoprene Gloves
1 hour for oil to cool down before disposal.
For 24-hour restaurants: during low-volume periods
when oil is scheduled to be changed
2
3
4
Turn fryer off.
Press the on/off key to turn
the fryer off. The display will
show “OFF.”
Put fryer into programming
mode.
Press the button marked
“checkmark” to put the fryer
into programming mode. The
left display will show “Code.”
Decide which vat to test.
You can test either a full vat
or the right-hand side of a
split-vat, or the left-hand side
of a split-vat.
To test a full vat or the righthand side of a split-vat, press
the key numbered “9” four
times to enter the code 9999.
The right display will show
“Hi-Limit.”
To test the left-hand side of a
split-vat, press the key numbered “8” four times to enter
the code 8888. The left display will show “Hi-Limit.”
Quarterly FR 2 Q2
©McDonald’s Corporation · Planned Maintenance Manual · Revised June 2008 Page 1 of 3
Page 17

Verify high-limit controls (continued)
5
Equipment alert
Be extremely careful during
this procedure.
Test the first (internal) highlimit control.
If you decided to test a full
vat or the right-hand side of a
split-vat, press the right cook
channel button marked “1”
and hold it until the heat indicator button lights up. This
shows the fryer is calling for
heat.
If you decided to test the lefthand side of a split-vat, press
the left cook channel button
marked “1” and hold it until
the heat indicator button
lights up. This shows the fryer
is calling for heat.
The right display will alternate between displaying “HiLimit” and the current oil
temperature until the temperature reaches 410°F (210°C).
When the temperature reaches
410°F (210°C), the display
will alternate between “Hi-1”
and the current temperature.
The heat indicator light will
go out. If you see these
things, the control has passed
the first test.
If the display alternates between “Hi-1” and “bad,” the
control has failed the test.
When the test is finished,
reset the computer by pressing the on/off key to turn the
computer off, and then press
the on/off key again to turn
the computer on.
Test second (mechanical)
6
high-limit control.
If you are testing a full vat or
the right-hand side of a splitvat, press and hold the right
cook channel button marked
“2.”
If you are testing the left-hand
side of a split-vat, press and
hold the left cook channel
button marked “2.”
The display will alternate
between “Hi-Limit” and the
current oil temperature until
the oil temperature reaches
425°F (218°C). At that temperature the display should
show “Hi-2.” If it shows “Hi2” at that temperature, the
control has passed the test.
If the display alternates between “Hi-2” and “bad,” the
control has failed the test.
Press the on/off button to
clear the second test and turn
the computer off.
Frymaster Fryer All models using an M2000 Computer Quarterly
FR 2 Q2
©McDonald’s Corporation · Planned Maintenance Manual · Revised June 2008 Page 2 of 3
Page 18

Verify high-limit controls (continued)
Decide what to do if either
7
control failed.
If both controls pass the test,
skip this step.
If the fryer fails the first highlimit control test but passes
the second one, the vat can be
used if that is absolutely necessary. The computer controls
should be replaced as soon as
possible. Use extreme care
when using the vat in this
case.
If the fryer fails the second
high-limit control test, do not
use the vat until the second
(mechanical) high-limit control has been replaced. Call a
service technician immediately.
In the first test, if the heat
indicator light goes out when
the temperature is less than
410°F (210°C), that means
that the high-limit control has
activated at a lower temperature than normal. You do not
need to replace the computer
controls in this case unless
they are interfering with
proper cooking.
In the second test, if the display begins to alternate
between “HI 2” and “bad”
when the temperature is less
than 425°F (218°C), that
means that the high-limit control has activated at a lower
temperature than normal. You
do not need to replace the
high-limit control in this case
unless it is preventing you
from testing the first highlimit control.
Discard oil.
8
When you have completed
both tests, allow the oil to
cool for one hour. Then discard the oil. Drain the oil into
an oil removal cart. Use Neoprene Gloves
The oil is may be hot.
Verify high-limit controls for all
9
remaining fryers.
Repeat steps 1 through 10 for
all remaining fryers.
Frymaster Fryer All models using an M2000 Computer Quarterly
FR 2 Q2
©McDonald’s Corporation · Planned Maintenance Manual · Revised June 2008 Page 3 of 3
Page 19

Replace filter o-rings Quarterly FR 2 Q3
Pi
Why
To keep the fryer’s filter pump in working order
Frymaster Fryer All models using an M2000 Computer
Time required
Time of day
Hazard icons
Tools and supplies
2 minutes to prepare 5 minutes to complete
At open; the fryer must be cool
For 24-hour restaurants: During a low-volume period
when the fryer can be turned off
O-rings for the filter
pump
Procedure
Prepare fryer for procedure.
1
Check to make sure the fryer
is cool. This procedure should
be done only when the fryer is
cool and the filter pan is
empty.
Remove filter pan.
2
Pull the filter pan out of the
cabinet.
Flat tip screwdriver
4
Reinstall filter pan.
Reinstall the pan into the
fryer cabinet.
Replace O-ring.
3
Remove the O-ring from the
pan nozzle. Replace the Oring with a new O-ring. Orings can be purchased from
your local authorized servicer.
Use only the manufacturer’s
replacement O-ring. These
rings are manufactured specifically for use with hot
cooking oils. Generic O-rings
cannot be used for this purpose.
©McDonald’s Corporation · Planned Maintenance Manual · Revised June 2008 Page 1 of 1
Quarterly FR 2 Q3
Page 20

Boil out fry vats (gas fryers only) Semi-annual FR 2 S1
Why
To keep the fry vats clean and to maintain proper cooking temperatures
Frymaster Fryer all models using an M2000 Computer
Time required
Time of day
Hazard icons
Tools and supplies
Apron, heat-resistant Brush, pot, heat-
Gloves, neoprene
resistant
Goofer stick
Procedure
5 minutes to prepare 75 minutes to complete
At close
For 24-hour restaurants: during low-volume periods at
night
Bucket,, plastic
Bucket, clean and
sanitized towels
Bucket, soiled towels
McD All Purpose
Super Concentrate
(APSC) solution
McD Heavy Duty
DeGreaser
Oil removal cart
Face shield
Paper towels
Fryer skimmer
Maple Paddle with
no scratch pad
If this is first boil-out, program
1
boil-out into fryer.
If the fryer is new, the boilout procedure must be programmed into the fryer before
it is boiled out for the first
time.
If the fryer has been boiled
out before, skip this step.
To program boil-out into the
fryer, follow these steps.
Press the on/off button to turn
the fryer off.
Press the button marked with
a check mark. The left display
will show “code.”
Press the number keys 1, 6, 5,
0. Then press the button
marked “1 and left arrow” to
step through the menu of
items and products. Stop
when you reach “boil out”
(#40 product position).
Press a gray product button to
store the “boil out” entry. The
green display of the button
pressed will light up.
Press the on/off button to turn
the fryer off.
Semi-annually
FR 2 S1
©McDonald’s Corporation · Planned Maintenance Manual · Revised June 2008 Page 1 of 5
Page 21

Boil out fry vats (gas fryers only) (continued)
Prepare for boil-out and turn
2
fryer off.
Put on neoprene gloves, a
heat-resistant apron, and a
face shield. You must wear
this equipment throughout
this procedure.
This procedure should be
done for only one vat at a
time.
Confirm that the fryer filters
are in place. Turn at least one
exhaust fan on. The fan must
stay on for the entire procedure.
Make sure the basket support
rack is in place in the vat.
Press the on/off key to turn
the fryer off.
Avoid accidentally activating
the fire extinguishing system
by keeping an exhaust fan on
and the fryer filters in place
during the entire procedure.
Remove filter pan.
3
Open the doors to the filter
area and remove the filter
pan. Place it on the floor under the fryer's drain spout or
use an oil removal cart.
After boil out is complete
clean and dry filter pan.
Drain oil from vat.
4
Be sure the filter pan or an oil
removal cart is in place underneath the drain spout on
the fryer. If the fryer has a
swivel drain spout, pull it
outward.
Carefully open the drain
valve, and let the oil drain
into the oil removal cart or
pan. Push any pieces of fried
food or other sediment into
the drain valve, so they drain
out. Close the drain valve.
The oil may be very hot.
Avoid splashing oil.
Add degreaser and hot water
5
to vat.
Pour McD Heavy-Duty Degreaser carefully into the vat.
Use 2 gallons (8 liters) of
degreaser if you are cleaning
a full vat. Use 1 gallon (4
liters) of degreaser if you are
cleaning one side of a split
vat. Finish filling the vat with
hot water. Solution should be
1 inch above fill line.
Take back to sink and clean
6
with McD’s Heavy Duty Degreaser and APSC.
McD Heavy Duty Degreaser
Frymaster Fryer All models using an M2000 Computer Semi-annual
Turn fryer on.
7
Press the on/off key to turn
the fryer on. The display will
show “low temp”.
FR 2 S1
©McDonald’s Corporation · Planned Maintenance Manual · Revised June 2008 Page 2 of 5
Page 22

Boil out fry vats (gas fryers only) (continued)
Start boil-out.
8
Press the gray product button.
The display will show a set of
left arrows and right arrows.
Locate the cook channel button under the vat you want to
boil out. Press and hold the
cook channel button for approximately 5 seconds, then
release the button. The display near the button should
show “boil out.” Press the
button under the display
again. The boil-out should
start.
Allow solution to heat up.
9
The solution will reach a
temperature of 195°F (91°C).
The solution should be at a
soft, rolling simmer. Once the
solution has reached its target
temperature, let it simmer for
approximately 60 minutes.
Complete steps 9 through 11
while the timer is running.
The solution should never
come to a rolling boil, or it
may boil over. If unit starts to
boil over turn fryer off.
Never leave the fryer unattended.
Clean basket support rack.
11
Use the goofer stick to remove the basket support rack
from the vat. Have another
crew person take the rack to
the three-compartment-sink,
and rinse it thoroughly in hot
water. Dry thoroughly.
The basket support rack is
very hot.
Scrub inside of vat.
12
Scrub the side, front, and
back walls of the vat with a
heat-resistant pot brush to
remove any remaining deposits.
Turn fryer off.
13
When the vat has simmered at
a rolling simmer (boiled out)
for approximately 60 minutes,
press the on/off button to turn
the fryer off.
Frymaster Fryer All models using an M2000 Computer Semi-annual
Clean fry baskets.
10
Place the fry baskets into the
cleaning solution. Have another crew person remove
them when clean and take
them to the threecompartment-sink. Rinse and
dry them thoroughly.
Do not place any aluminum
parts in the boiling solution.
The solid metal basket hangers are made of aluminum.
FR 2 S1
©McDonald’s Corporation · Planned Maintenance Manual · Revised June 2008 Page 3 of 5
Page 23

Boil out fry vats (gas fryers only) (continued)
Drain solution from fryer.
14
Place a 5-gallon (19-liter)
bucket under the fryer's drain.
Open the fryer drain valve far
enough to allow the solution
to flow slowly into the
bucket. Let 2 or 3 gallons of
solution drain into the bucket.
Close valve then change to an
empty bucket and let 2 or 3
gallons of solution drain into
the bucket. You will need
several buckets to drain the
fryer completely.
The cleaning solution should
be discarded or re-used in
another fryer within 3 hours.
After 3 hours, discard the
solution.
The solution will be very hot.
Avoid splashing.
Scrub inside of vat.
15
Use the maple paddle with
non scratch pad to scrub the
side, front, back and top of
vat. Remove any remaining
deposits. McD Fryer Cleanser
may be use also.
Fill vat with water.
16
Fill vat with the appropriate
amount of plain water.
Drain solution from vat.
17
Place a 5-gallon (19-liter)
bucket under the fryer’s drain.
Open the fryer drain valve far
enough to allow the dirty solution to flow slowly into the
bucket. Discard the dirty solution. Place the bucket under
the fryer drain again and open
the valve completely.
Do not place more than 2 or 3
gallons of solution in a bucket
at a time.
Scrub any remaining deposits
or carbon in the vat with a noscratch pad.
The solution will be very hot.
Avoid splashing.
Drain the solution only into
buckets. Do not drain into the
filter pan or oil removal cart.
Rinse and dry vat.
18
Rinse the vat thoroughly with
warm water (100°F or 38° C).
Be sure to have a bucket underneath the drain to catch
rinse water. Repeat with more
clean, warm water. Wipe the
vat down with a clean, sanitized towel. Close the fryer
drain valve. Thoroughly dry
the inside of the vat with paper towels.
Frymaster Fryer All models using an M2000 Computer Semi-annual
Fill the vat with the appropriate amount of oil.
Fill vat with oil.
19
FR 2 S1
©McDonald’s Corporation · Planned Maintenance Manual · Revised June 2008 Page 4 of 5
Page 24

Boil out fry vats (gas fryers only) (continued)
Prepare fryer for use.
20
Place the basket support rack
in the correct position in the
fryer vat. If the fryer has a
swivel drain spout, push the
spout back inside the fryer
cabinet. Carefully roll the
filter pan back into the fryer
cabinet.
Turn fryer on.
21
Turn fryer on.
Press the on/off key to turn
the fryer on. The display will
show “low temp.”
Skim oil.
22
When the oil has heated, skim
off any particles of carbon
floating on the surface of the
oil.
Frymaster Fryer All models using an M2000 Computer Semi-annual
Season baskets and racks.
23
Season the baskets and the
basket support racks by leaving them in the fresh oil for
approximately 2 minutes at
cooking temperature.
Boil out remaining fryers.
24
Repeat steps 1 through 21 for
each remaining fryer.
FR 2 S1
©McDonald’s Corporation · Planned Maintenance Manual · Revised June 2008 Page 5 of 5
Page 25

Scratch calibrate fry vats (gas fryers only) Annually FR 2 A1-T
Why
To ensure proper cooking temperatures
Frymaster Fryer All models using an M2000 Computer
Time required
Time of day
Hazard icons
Tools and supplies
45 minutes to prepare 20 minutes to complete
At close
For 24-hour restaurants: during low-volume periods or
at night
Tools supplied by
technician
Procedure
QUALIFIED TECHNICIANS ONLY
Check regulated gas pressure.
1
Contact the local gas company or a service agency to
check the gas pressure out of the fryer’s gas regulator.
For natural gas, the pressure must be 3.0 in. W.C.
(76 mm W.C.) For propane gas, the pressure must be
8.25 in. W.C. (210 mm W.C.)
If the pressure does not meet these standards, ask the
service agency or gas company to adjust the pressure to
meet the standard.
Clean and Replace gas valve vent tube.
2
Clean and replace the gas valve vent tube. Follow the
cleaning procedure in the service manual.
5
Check combustion.
If the fryer’s recovery time is less than 145 seconds,
skip this step.
Connect the multimeter in series with the white flame
sensor wire on the igniter. Allow the burner to operate
for at least one minute after the melt cycle is completed. After 1 minute, the reading on the multimeter
should between 2.5 and 3.5 microamps. Any other
reading is not acceptable.
After 90 seconds of continuous operation, check the
color of the burner. The burner should glow bright orange-red. Use the Burner Color Comparison Chart
inside the door of the fryer to identify the correct color.
A blue flame or dark spots on the burner face are not
acceptable.
QUALIFIED TECHNICIANS ONLY
Clean combustion air blower.
3
Clean the combustion air blowers. Follow the cleaning
procedure in the service manual.
Annually
Check fryer recovery time.
4
Choose a vat on the fryer. Check the fryer’s most recent recovery time for that vat, using the procedure in
FR2 M1. The most recent recovery time should be less
than 145 seconds.
If the fryer’s recovery time is less than 145 seconds,
the procedure is complete for this vat. Go to step 7.
©McDonald’s Corporation · Planned Maintenance Manual · Revised June 2008 Page 1 of 1
FR 2 A1-T
Page 26

Scratch calibrate fry vats (gas fryers only) (continued)
Adjust combustion air blower, if necessary.
6
If the fryer’s recovery time is less than 145 seconds,
skip this step.
If either the multimeter reading or the burner color is
not acceptable, adjust the combustion air blower intake
plate.
Loosen the locking nuts on the intake plate with a
small adjustable wrench. Open or close the plate to
adjust the airflow while watching the multimeter reading and the color of the burner. A blue flame usually
means the burner isn’t receiving enough air. Dark spots
on the burner usually mean the burner is receiving too
much air.
When the microamp reading is in the acceptable range
and the burner color is bright orange-red, hol d the
blower intake plate in place. Then tighten the blower
intake plate locking nuts.
Scratch calibrate remaining fryers.
7
Repeat steps 1 through 5 for each remaining vat and
fryer.
Frymaster Fryer All models using an M2000 Computer
QUALIFIED TECHNICIANS ONLY
Annually
FR 2 A1-T
©McDonald’s Corporation · Planned Maintenance Manual · Revised June 2008 Page 2 of 2
 Loading...