

Page 1
GM 2000 Lane Controllers
Operation Manual
www.frymaster.com
Frymaster, a member of the Commercial Food Equipment Service Association, recommends using
CFESA Certified Technicians.
24-Hour Service Hotline
1-800-551-8633
MARCH 12
*8196945A*
Page 2
NOTICETOOWNERSOFUNITSEQUIPPEDWITHCONTROLLERS
U.S.
This device complies with Part 15 of the FCC rules. Operation is subject to the following two
conditions: 1) This device may not cause harmful interference, and 2) This device must accept
any interference received, including interference that may cause undesired operation. While
this device is a verified Class A device, it has been shown to meet the Class B limits.
CANADA
This digital apparatus does not exceed the Class A or B limits for radio noise emissions as set
out by the ICES-003 standard of the Canadian Department of Communications.
Cet appareil numerique n’emet pas de bruits radioelectriques depassany les limites de classe A
et B prescrites dans la norme NMB-003 edictee par le Ministre des Communcations du Canada.
ii
Page 3

GM2000 Lane Controller
Table of Contents
1.1 Overview-Multi-Product Mode 1-1
1.2 Overview-Dedicated Mode 1-2
2.1 Programming New Menu Items in Multi-Product Mode 2-1
2.2 Assigning Products to Menu Keys 2-2
2.3 Changing Menu Items In Dedicated Mode 2-2
2.4 Default Menu 2-3
3.1 Controller Setup 3-1
3.2 Controller Codes 3-1
4.1 Error Messages and Display Problems 4-1
Page 4

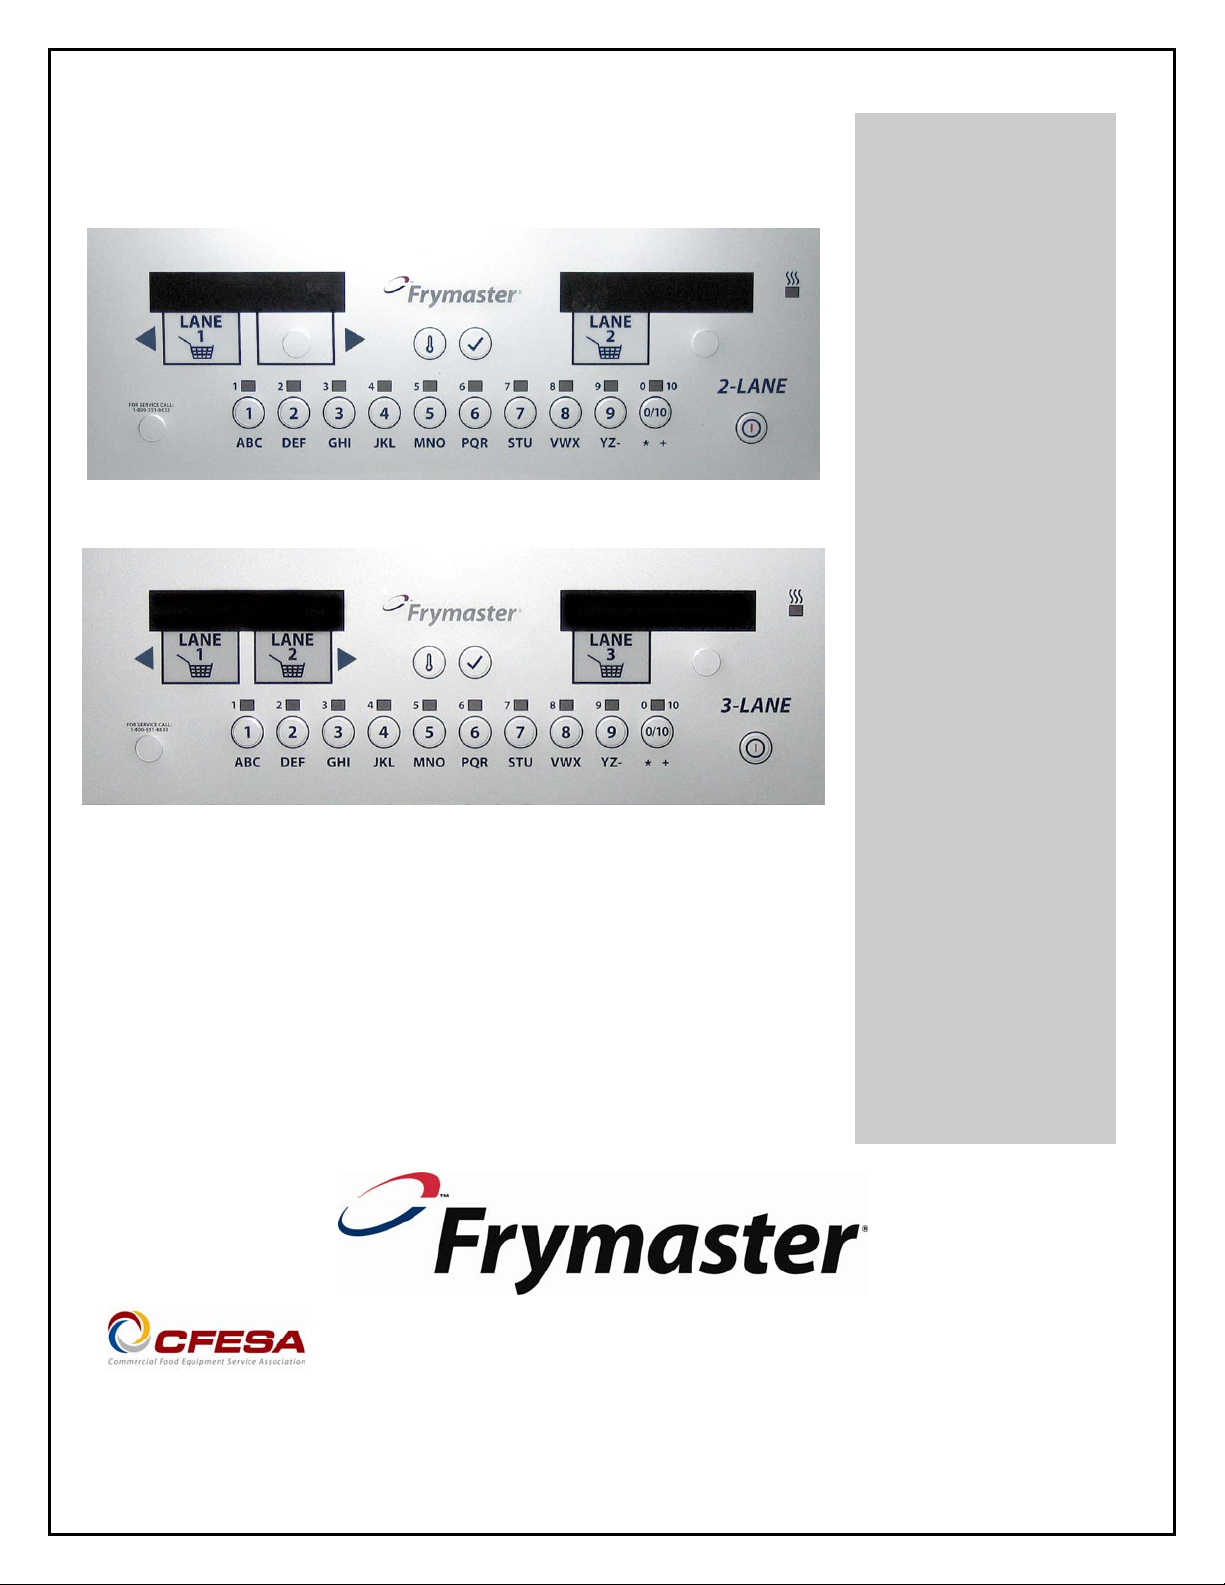
1.1 Overview – Multi-Product Mode (5050)
Overview – Multi-Product Mode (5050)
Temperature Key
Press once for current temperature,
Lane Keys
Press to initiate cook cycle. PROD appears in left display;
press a menu key immediately after pressing the cook key
to launch a cook cycle for the chosen product. Lane keys
are also used to move through programming steps. Press
the right arrow ► key to advance. Press left arrow ◄ key
to go back.
NOTE: The “Lane 2” key is disabled for cooking when
setup for two-lane.
Press a menu key immediately after pressing a lane key to launch a cook cycle for the
desired product. The keys are also used to enter names of products. Each key, when
repeatedly pressed, accesses multiple letters or symbols. See example below.
12
ABC
DEF3GHI JKL MNO PQR STU VWX YZ
Turn Fryer ON
1: OFF appears in status display
when controller is off.
2: Press ON/OFF key.
3: -LO- appears in status display. If
melt cycle is enabled, MLT-CYCL
will appear until temperature is
over 180°F (82°C).
4: Dashed lines appear in the status
display when the fryer is at
setpoint.
twice for setpoint: 350°F(177°C).
Checkmark Key
With controller off, used to
enter and confirm
programming modes.
_ _ _ _
Menu Keys
456 789
Basic Operation
1
2
3
4
OFF
-LO-
----
Status Indicator
Displays OFF when fryer is off,
dashed lines when fryer is at setpoint.
Displays HI, LO and HOT when the
fryer is out of temperature range.
Heat LED
LED is illuminated when
the fryer is heating.
Menu LED’s
LED’s above menu keys
are illuminated when the
product is cooking; flash
to indicate holding time.
ON/OFF
0
* blank space + 0
Launch Cook Cycle
1. Press a lane key.
2. PROD appears in the window above the pressed
button. (An alarm sounds if a menu key is not
pressed in five seconds.)
3. Press the menu key for the desired product.
4. The display changes to the cooktime for the product
and then alternates between remaining cooktime and
the product name.
5. SHAK is displayed if a shake time was programmed.
6. Shake the basket. The alarm automatically cancels.
7. DONE appears at the end of the cook cycle.
8. Press Lane key to eliminate DONE display and
silence the alarm.
9. Hold time is indicated by a flashing LED over the
menu key. Press the key to display remaining time.
10. LED flashes faster and an alarm sounds at the end of
the hold timer countdown. Press the menu key under
the flashing LED to halt the alarm.
5
1
PROD
2
3
SHAK
6
Shake the basket
7
DONE
8
9:36
4
NUGG
NOTE: To halt a cook cycle, press and hold the lane
key under the displayed item for about five seconds.
1-1
Page 5

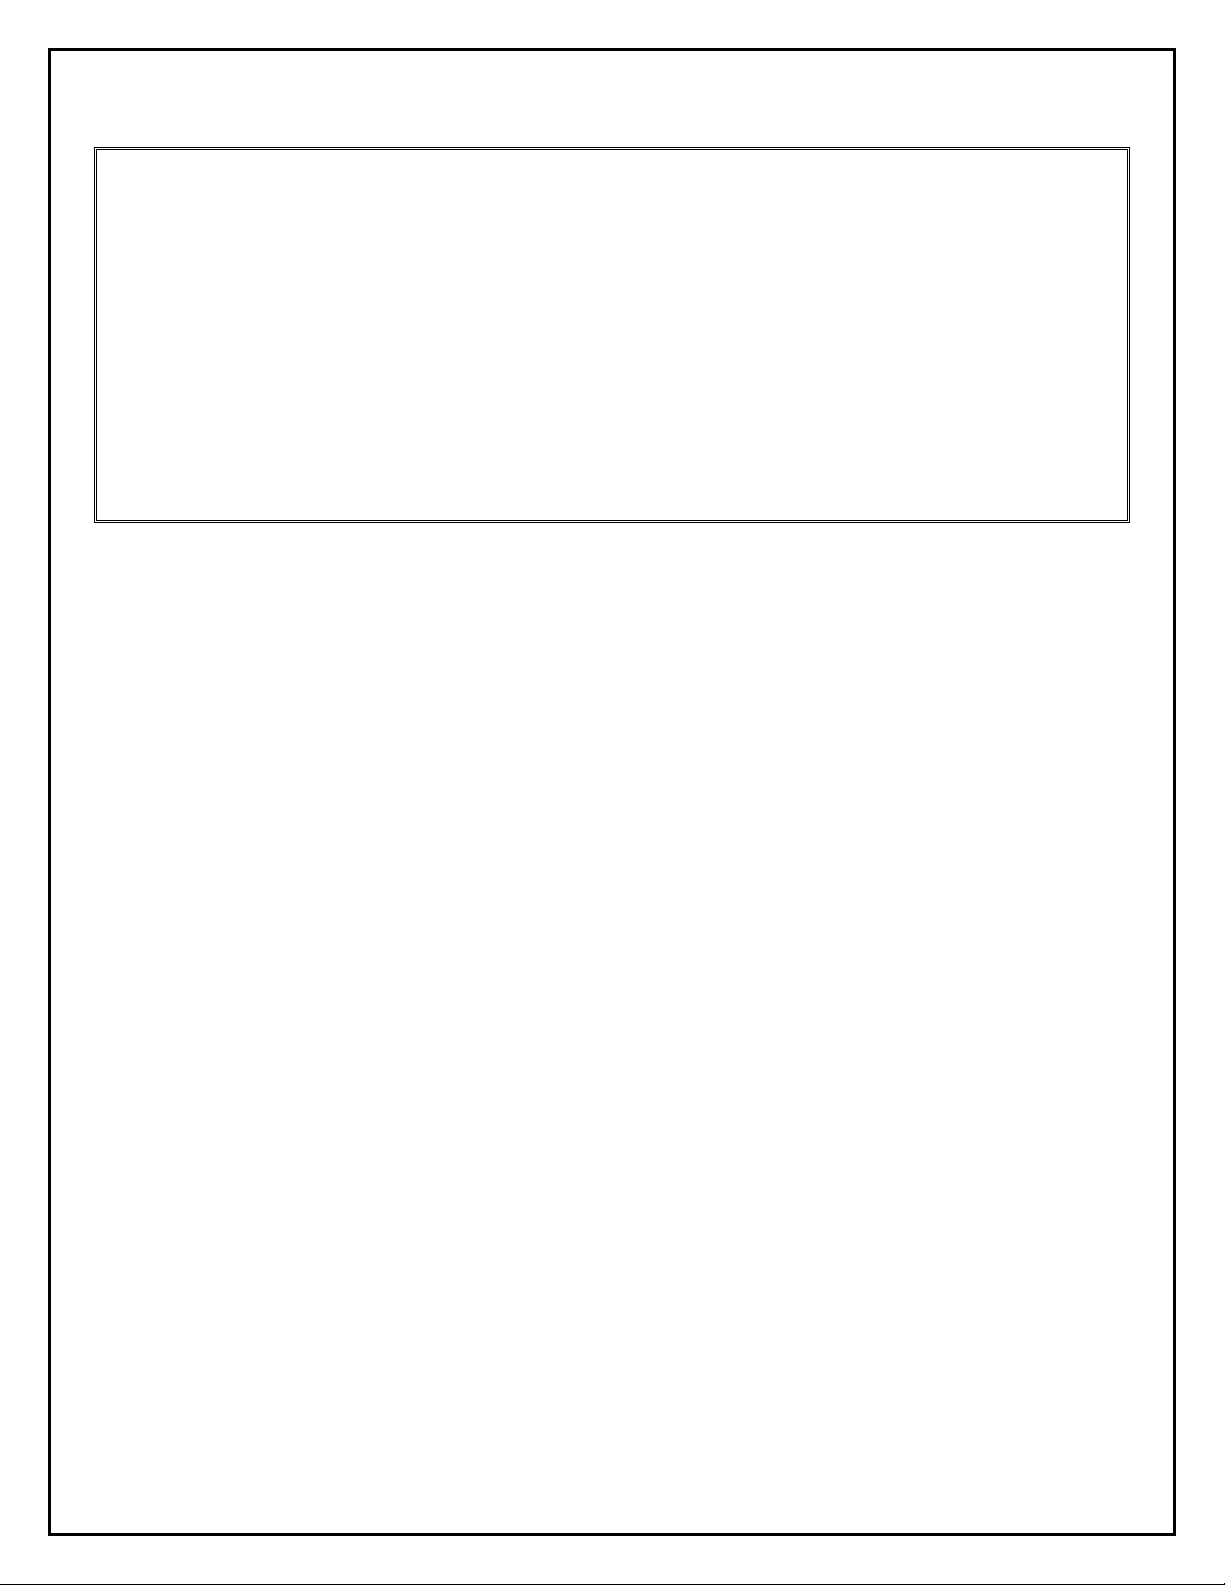
1.2 Overview – Dedicated Mode (5060)
1-2
Page 6

2.1 Programming New Menu Items in Multi Product Mode
Follow these steps to enter a new product in the controller. The actions to be taken are in
the right column; the controller displays are shown in the left and middle columns.
Left Display
OFF Press 9
CODE
CODE
FRNCHFRY YES
Product to be changed
or open position
Product name with
cursor flashing under
first character.
New product name Edit Press Ã.
Position number or
version of previous
name.
Abbreviated name Edit Press Ã.
Full name Press 9.
SHAK(E) 1 A :30
SHAK(E) 1 Your settings Press 9.
SHAK(E) 2 A :00
SHAK(E) 2 Your settings Press 9.
COOKTIME M 2:45
COOKTIME Your settings Press 9.
HOLDTIME M :30
HOLDTIME Your Settings Press 9.
SENS 5 Sens allows the fryer controller to adjust cooking times
SENS Your setting Press 9.
New Product If a key assignment is needed : press a menu key.
New Product YES Key Number
New Product YES Key Number
OFF
Right Display Action
OFF Press 9
Number and Yes Press Ã.
Edit
Edit
Enter 5050 with numbered keys.
Enter 1650 with numbered keys. Press the right
arrow ► key to advance. Press left arrow ◄ key to
go back.
Press the right arrow ► key to advance to desired
product. Press left arrow ◄ key to go back.
Enter first letter of new product with numbered key.
Press until desired letter appears. Press the right
arrow ► key to advance cursor. Repeat until eightletter or less name of product is entered. Eliminate
characters with 0 key.
Enter four-letter abbreviated name, which will
alternate with the cook time display during cook
cycles.
Press à to toggle between M (manually cancelling
alarm) and A (automatically cancelling alarm). Enter
time in the cook cycle to shake the basket with the
numbered keys.
Press à to toggle between M and A. Enter the time in
the cook cycle to shake the basket a second time.
Enter cook time in minutes and seconds with
numbered keys. Press à to toggle between auto and
manually cancelling alarm.
Enter time product can be held after cooking. Press
à to toggle between auto and manually cancelling
alarm.
slightly, ensuring small and large loads cook identically.
Setting the number to 0 allows no time adjustment; a
setting of 9 produces the most time adjustment. Enter
setting with numbered key.
Note: This eliminates any previous link associated with
the chosen key. Key not needed: skip to next step
Repeat steps starting at the top to enter additional
products.
Press
(power key) to save changes and exit.
2-1
Page 7

2.2 Assigning Products to Menu Keys
Left Display Right Display Action
OFF Press 9.
CODE Enter 1650 with numbered keys.
Menu items YES Press the right arrow ► key to advance through menu
items.
Desired menu item YES Choose and press menu key to associate with product.
Note: This eliminates any previous link associated with the
chosen key.
Product name Number YES
Press
(power key).
2.3 Changing Menu Items in Dedicated Mode
Follow these steps to change a product in the computer. The actions to be taken are in the right
column; the computer displays are shown in the left and middle columns.
Left Display Right Display Action
OFF Press 9
CODE
CODE
FFRY YES Press Ã.
Product name with
cursor flashing under
first character.
Product name Edit Press Ã.
Previous abbreviated
name.
Abbreviated name Edit Press Ã.
Full name YES Press 9.
SHAK(E) 1 A :30
SHAK(E) 1 Your settings Press 9.
SHAK(E) 2 Your settings Press 9.
SHAK(E) 2 A :00
COOKTIME M 2:45
COOKTIME Your settings Press 9.
HOLDTIME M :00
HOLDTIME Your Settings Press 9.
Enter 5060 with numbered keys.
OFF Press 9
Edit
Edit
Enter 1650 with numbered keys. Press the right arrow ►
key to advance. Press left arrow ◄ key to go back.
Enter first letter of new product with numbered key.
Press until desired letter appears. Press the right arrow
► key to advance cursor. Repeat until eight-letter or less
name of product is entered. Eliminate characters with 0
key.
Enter four-letter abbreviated name, which will alternate
with the cook time display during cook cycles.
Press à to toggle between M (manually cancelling
alarm) and A (automatically cancelling alarm). Enter time
in the cook cycle to shake the basket with the numbered
keys.
Press à to toggle between M and A. Enter the time in
the cook cycle to shake the basket a second time.
Enter cook time in minutes and seconds with numbered
keys. Press à to toggle between auto and manually
cancelling alarm.
Enter time product can be held after cooking. Press à to
toggle between auto and manually cancelling alarm.
2-2
Page 8

2.3 Changing Menu Items in Dedicated Mode cont.
Left Display Right Display Action
SENS 5 Sens allows the fryer controller to adjust cooking times
slightly, ensuring small and large loads cook identically.
Setting the number to 0 allows no time adjustment; a
setting of 9 produces the most time adjustment. Enter
setting with numbered keys.
SENS Your setting Press 9.
FFRY YES
OFF
Press
(power key) to save changes and exit.
2.4 Default Menu
This is the default domestic USA menu that is programmed into the controller. The international menu is
programmed without times.
Product
Item #
Library &
Default
Button #
1 French Fries FRNCHFRY FFRY
2 French Fries FRNCHFRY FFRY
3 French Fries FRNCHFRY FFRY
4 Chicken
5 Poppers POPPERS POPR
6 Chicken
7 Shrimp SHRIMP SRMP
8 Onion Rings ONINRING ORNG
9 Chicken
10 Fish 3-1/2 oz
11 (Ded) French Fries FRNCHFRY FFRY
Menu Item 8 Character
Max Name
CHICNUGG NUGG
Nuggets
CHICPATY PATY
Patty
CHICTNDR TNDR
Tenders
FISH FISH
fillet
4
Character
Name
Button # Menu Item
1 FFRY
2 FFRY
3 FFRY
4 NUGG
5 POPR
6 PATY
7 SRMP
8 ORNG
9 TNDR
0/10 FISH
Cook Temp
(programmed
in computer
set-up)
350° F/177° C
350° F/177° C
350° F/177° C
350° F/177° C
350° F/177° C
350° F/177° C
350° F/177° C
350° F/177° C
350° F/177° C
350° F/177° C
350° F/177° C
Cook
Time
2:45 5 30 sec 0
2:45 5 30 sec 0
2:45 5 30 sec 0
2.15 6 30 sec 0
3.00 4 30 sec 0
3.00 4 30 sec 0
3:15 3 30 sec 0
3:00 4 30 sec 0
6:00 6 30 sec 0
3.25 7 30sec 0
2:45 5 30 sec 0
Sensitivity
Setting
Shake
Time
Hold
Time
2-3
Page 9

3.1 Controller Setup
Follow these steps to prepare the controller for placement on a fryer:
Left Display Right Display Action
OFF
Press 9.
CODE
GAS YES
Gas
2 Basket NO
2 Basket
SET-TEMP NOND 350
SET-TEMP
SET- TEMP DED 350
SET-TEMP
YES or NO
YES or NO
Entered temperature. Press 9.
Entered temperature. Press 9.
OFF
1656 with numbered keys.
Press à to toggle between YES and NO.
Leave at NO for electric fryer.
With desired answer in place press 9.
Press à to toggle between YES and NO.
Leave at NO for three baskets.
With desired answer in place, press 9.
Enter cooking temperature for non-dedicated
items with the numbered keys; 350°F(177°C) is
the default setting.
Enter cooking temperature for dedicated items
with the numbered keys; 350°F(177°C) is the
default setting.
None. Setup is complete.
3.2 Controller Codes
Left Display Right Display Action
OFF Press D
Enter
• 1650: Add or edit menus
• 1656: Setup, change energy source
• 3322: Reload factory default settings
• 5000: Displays total cook cycles
• 5005: Clears total cook cycles
• 5050: Sets unit to multi-product
CODE
• 5060: Sets unit to dedicated product
• 1652: Recovery
• 1752: Enable/Disable Boil Out
• 1653: Boil Out
• 1658: Change from F° to C°
• 1655: Language Choice/Sound Level
• 1753: Enable/Disable Melt Cycle
(Once enabled, pressing “0” during
melt will bypass melt cycle.)
3-1
Page 10

4.1 Error Messages and Display Problems
Problem Probable Causes Corrective Action
GM2000 display is
in wrong
temperature scale
(Fahrenheit or
Celsius).
GM2000 display
shows
GM2000 display
shows
GM2000 display
shows
GM2000 display
shows
FAILURE.
HI.
HOT.
–LO-.
PROBE
Incorrect display option
programmed.
Fryer is 15ºF (8ºC) above setpoint.
Frypot temperature is more than
410ºF (210ºC) or, in CE countries,
395ºF (202ºC).
Frypot temperature is between
180°F (82°C) and 315°F (157°C).
A. Problem with the temperature
measuring circuitry including
the probe.
B. Damaged controller wiring
harness or connector.
GM2000 controllers may be
programmed to display in either
Fahrenheit or Celsius. Refer to page
3-1 for instructions on changing the
display.
This display will appear only if the
fryer is in the non-dedicated mode
and the frypot temperature rises 16°F
(9°C) or more above the
programmed setpoint. This indicates
a problem with the temperature
control circuitry. Turn the fryer off
and call FAS (Factory Authorized
Servicer).
This in an indication of a
malfunction in the temperature
control circuitry, including a failure
of the high-limit thermostat. Shut
the fryer down immediately and call
FAS.
This display is normal when the
fryer is first turned on and may
appear for a short while if a large
batch of frozen product is added to
the frypot. If the display never goes
out, the fryer is not heating. Shut the
fryer down and call FAS.
This indicates a problem within the
temperature measuring circuitry that
is beyond the scope of operator
troubleshooting. Shut the fryer
down and call FAS.
4-1
Page 11

Problem Probable Causes Corrective Action
A. Press the ON/OFF switch off,
verify that all drain valves are
completely closed, then press the
ON/OFF switch on.
GM2000 display
shows IGNITION
FAILURE.
Heating indicator is
on, but fryer is not
heating.
GM2000 display
shows
alarm sounds, but
Controller will not
upon initial startup.
Display shows HI or
IGNITION
failure
fryer operates
normally (false
go into program
mode or some
buttons do not
Heat indicator off
HOT
with alarm
and
alarm).
actuate.
sounding.
A. Open drain valve
B. Failed controller, failed
interface board, open highlimit thermostat.
Failed controller. Call FAS.
Failed controller.
Failed controller.
B. This indicates that the fryer is not
heating. It is displayed if the fryer
loses its ability to heat oil. It is
also displayed when the oil
temperature is above 450°F
(232°C) and the high-limit
thermostat has opened, halting the
heating of the oil. If this does not
correct the problem, call your
FAS.
Call FAS.
Call FAS.
4-2
Page 12

A
Frymaster, L.L.C., 8700 Line Avenue, Shreveport, Louisiana 71106
TEL 1-318-865-1711 FAX (Parts) 1-318-688-2200 FAX (Tech Support) 1-318-219-7135
PRINTED IN THE UNITED STATES
ENGLISH
SERVICE HOTLINE
1-800-551-8633
819-6945
MAR 2012
 Loading...