

Page 1
Page 2

Publication details
Internet
Further information on Freightliner Vans can
be obtained on the Internet at
www.freightlinersprinterusa.com
Editorial office
You are welcome to forward any queries or
suggestions you may have regarding this
Operator's Manual to the technical
documentation team at the address on the
inside of the front cover.
©
Daimler Vans USA, LLC
Daimler VansUSA, LLC is aDaimler company.
Not to be reprinted, translated, or otherwise
reproduced, in whole or in part, without
written permission.
Vehicle manufacturer
Daimler AG
Mercedesstraße 137
70327 Stuttgart
Germany
Symbols
G
WARNING
Warning notes make you aware of dangers
which could pose athreat to your health or
life, or to the health and life of others.
H
Environmental note
Environmental notes provide you with
information on environmentally aware actions
or disposal.
!
Notes on material damage alert you to
dangers that could lead to damage to your
vehicle.
i
These symbols indicate useful
instructions or further information that
could be helpful to you.
X
This symbol designates an
instruction you must follow.
X
Several consecutive symbols
indicate an instruction with several
steps.
(Y page)
This symbol tells you where you
can find further information on a
topic.
YY
This symbol indicates awarning or
an instruction that is continued on
the next page.
DisplayDisplay
This text indicates amessage on
the display.
Vehicle dealer
Daimler Vans USA,LLC
One Mercedes Drive
Montvale, NJ 07645-0350
www.freightlinersprinterusa.com
Customer Assistance Center:
1-877-762-8267
Daimler Vans USA,LLC is aDaimlercompany.
As at 22.02.2013
Page 3

Thank you for choosing the new Sprinter
First of all, familiarize yourself with your
Audio 15. Read this manual, particularly the
safety and warning notices, before you drive
off. This will help you to obtain the maximum
pleasure from your Audio 15 and avoid
endangering yourself and others.
The equipment and functions of your
Audio 15 may differ depending on:
R
model
R
order
R
country specification
We are constantly updating our systems to
the state of the art.
We reserve the right to make changes to the
following:
R
design
R
equipment
R
technology
Therefore, the descriptions provided may
occasionally differ from your device.
Please consult an authorized Sprinter Dealer
if you have any questions.
The Operator's Manual and all supplements
are an integral part of the vehicle. You should
always keep them in the vehicle and pass
them on to the new owner if you sell the
vehicle.
We wish you safe and pleasant motoring.
9065848002
É9065848002FËÍ
Page 4

Page 5

Index ....................................................... 4
Introduction ........................................... 7
At a glance ............................................. 9
Navigation system .............................. 21
Radio .................................................... 23
SD memory card and USB device ...... 29
Bluetooth®........................................... 37
AUX function ....................................... 55
Technical data ..................................... 59
Contents
3
Page 6

A
Audio fadeout ...................................... 17
AUX function
Connecting a device ........................ 56
Increasing the volume ......................56
Selecting .......................................... 56
B
Balance
Setting ............................................. 16
Basic functions .................................... 14
Bass
Setting ............................................. 16
Becker®MAP PILOT
see Navigation
Bluetooth
®
Activating/deactivating ................... 38
Conditions ....................................... 38
Connecting another mobile phone ... 41
Displaying details ............................. 41
Operating using the multifunction
steering wheel ................................. 53
Pairing a mobile phone .................... 39
Selecting a playback option ............. 52
Selecting a track .............................. 52
Starting and stopping playback ....... 52
Unpairing ......................................... 42
Bluetooth®Audio ................................. 49
Connecting an audio device ............. 49
Connecting another audio device .... 50
Increasing the volume ......................53
Interrupting playback ....................... 52
Pairing an audio device .................... 50
Pairing an audio device (external) .... 50
Reconnecting an audio device ......... 50
Selecting .......................................... 49
Unpairing an audio device ................ 51
Boost function ..................................... 56
C
Call
Accepting ......................................... 42
Ending .............................................. 42
Making ............................................. 43
Rejecting .......................................... 43
Calling
Using Bluetooth®............................. 42
Call lists
Calling up an entry ........................... 46
Call waiting
Accepting ......................................... 45
Changing folders ................................. 33
Cleaning ................................................. 8
Copyright ................................................ 8
Correct use ............................................ 7
D
Day design ........................................... 15
Declaration of conformity ..................... 7
Deleting
Call lists ........................................... 47
Display
Adjusting the brightness .................. 14
On-board computer ......................... 14
Overview .......................................... 11
Selecting the design ........................ 15
Switching on/off .............................. 16
E
Equipment .............................................. 8
Example of operation .......................... 12
F
Factory settings .................................. 19
Fader
Setting ............................................. 16
Fast forward/rewind .......................... 33
Forward/rewind .................................. 33
Frequency input
Manual ............................................. 24
G
GPS reception ...................................... 22
H
Hands-free system
Switching on/off .............................. 44
4
Index
Page 7

I
Interrupting a traffic report ................ 27
L
Language
Setting ............................................. 17
M
Media Interface
Supported file formats ..................... 60
Metadata
Displaying ........................................ 35
Mobile phone
Connecting ...................................... 41
Displaying Bluetooth®details .......... 41
Pairing ............................................. 39
Pairing (external) .............................. 40
Reconnecting ................................... 41
Selecting .......................................... 38
MP3
Selecting a track .............................. 32
Multifunction steering wheel
Adjusting the volume ....................... 14
Operating an audio device ............... 53
Operating the radio .......................... 26
Operating the USB ........................... 35
Overview .......................................... 13
Using the telephone ......................... 46
Mute function ...................................... 14
N
Navigation
Becker®MAP PILOT ......................... 22
GPS reception .................................. 22
Switching to ..................................... 22
Night design ........................................ 15
O
On-board computer
Overview .......................................... 14
Operating the radio
Using the multifunction steering
wheel ............................................... 26
Operator's Manual
General notes .................................... 7
Overview of controls ........................... 10
P
Pairing .................................................. 39
Phone book
Calling an entry ................................ 48
Calling up .........................................47
Deleting an entry ............................. 48
Displaying details ............................. 48
Playback options ................................. 34
Playlists
Playing back ..................................... 33
Protection against theft ........................ 8
Q
Qualified specialist workshop .............. 7
R
Radio
Calling up stored stations ................ 26
Entering a frequency ........................ 24
Searching for a station ..................... 24
Setting a station.............................. 24
Setting stations manually ................ 24
Station list ....................................... 24
Storing stations ............................... 24
Storing stations automatically ......... 25
Storing stations manually ................ 24
Switching wavebands ...................... 26
Random folder ..................................... 34
Random tracks .................................... 34
Rear view camera ................................ 18
Switching on manually ..................... 19
Redial .................................................... 44
Resetting
Factory settings ............................... 19
S
SD function
Displaying metadata ........................ 35
Displaying track information ............ 35
Inserting a memory card .................. 30
Selecting .......................................... 30
Index
5
Page 8

Selecting playback options .............. 34
Switching folders ............................. 33
SD memory card
Ejecting ............................................ 30
Inserting .......................................... 30
Selecting active partition ................... 35
Selecting a track ................................. 32
Settings
Adjusting the display ....................... 14
Brightness ........................................ 14
Display design ................................. 15
Language ......................................... 17
Sound settings ................................. 16
Time format ..................................... 15
Specialist workshop .............................. 7
Speed dial
Calling a number.............................. 48
Station list ............................................ 24
Stations
Calling up .........................................26
Selecting .......................................... 24
Setting manually .............................. 24
Storing ............................................. 24
Storing automatically ....................... 25
Storing manually .............................. 24
Station search ..................................... 24
Switching off ........................................ 14
Switching on ........................................ 14
T
Telephone
Accepting/ending a call ................... 42
Entering phone numbers .................. 43
Making a call ....................................43
Making a call from a call list ............ 46
Redialing .......................................... 44
Rejecting a call ................................ 43
Rejecting or accepting a waiting
call ................................................... 45
Selecting .......................................... 38
Setting the reception and
transmission volume ........................ 45
Switching hands-free system on/
off .................................................... 44
Telephone book
Editing an entry ................................ 48
Time
Setting the format ............................ 15
Tone settings
Balance and fader ............................ 16
Treble and bass............................... 16
Track
Selecting .......................................... 52
Selecting by skipping to a track ....... 32
Selecting by track number ............... 33
Selecting from a track list................ 32
Track information ................................ 35
Track list .............................................. 32
Traffic Announcements (TA)
Activating/deactivating priority ....... 27
Interrupting a traffic report .............. 27
Notes ............................................... 27
Setting the volume ........................... 27
Treble
Setting ............................................. 16
U
Unpairing ............................................. 42
USB (Audio)
Connecting a device ........................ 30
Displaying metadata ........................ 35
Displaying track information ............ 35
File structure ................................... 61
Operating with the multifunction
steering wheel ................................. 35
Requirements .................................. 60
Selecting .......................................... 31
Selecting playback options .............. 34
Switching folders ............................. 33
V
Volume
Adjusting ......................................... 14
W
Wavebands
Switching ......................................... 26
6
Index
Page 9

Operating safety
G
WARNING
If you operate information systems and
communication equipment integrated in the
vehicle while driving, you will be distracted
from traffic conditions. You could also lose
control of the vehicle. There is a risk of an
accident.
Only operate the equipment when the traffic
situation permits. If you are not sure that this
is possible, park the vehicle paying attention
to traffic conditions and operate the
equipment when the vehicle is stationary.
In addition, observe the legal requirements of
the country in which you are currently driving.
Proper use
Audio 15 can be used to receive radio
stations, to play back SD memory cards and
other data carriers and to make calls via the
Bluetooth®function. It can also be used for
the playback of the picture from the rear view
camera and as a navigation system with
Becker®MAP PILOT (optionally).
Observe the requirements in the technical
data for data carriers and permissible
formats.
General notes
Information on the Operating
Instructions
i
This Supplement describes Audio 15 with
optional equipment as was available at the
time of this Supplement going to print.
Country-specific variations are possible.
Therefore, your Audio 15 equipment may
differ from certain descriptions and
illustrations. If you have any questions
concerning the equipment and operation,
consult any authorized Sprinter Dealer.
Qualified specialist workshops
A qualified specialist workshop has the
necessary specialist knowledge, tools and
qualifications to correctly carry out the work
required on Audio 15.
An authorized Sprinter Dealer is a qualified
specialist workshop.
Always have modifications to Audio 15
carried out at a qualified specialist workshop.
Declaration of conformity
Radio-based vehicle components
i
USA only: The wireless devices of this
vehicle comply with Part 15 of the FCC
Rules. Operation is subject to the following
two conditions:
1. These devices may not cause
interference, and
2. These devices must accept any
interference, including interference that
may cause undesired operation of the
device.
Changes or modifications not expressly
approved by the party responsible for
compliance could void the user’s authority
to operate the equipment.
i
Canada only: The wireless devices of this
vehicle comply with Industry Canada
RSS-210 standard. Operation is subject to
the following two conditions:
1. These devices may not cause
interference, and
2. These devices must accept any
interference, including interference that
may cause undesired operation of the
device.
Introduction
7
Z
Page 10

Information on copyright
Registered trademarks
Bluetooth®technology is the standard for
short-range wireless data transmission of up
to approximately 10 meters.
Bluetooth®is a registered trademark of
Bluetooth Special Interest Group (SIG) Inc.
An SD memory card is a digital storage
medium.
SD memory cards carry the logo displayed
above. This logo is a registered trademark of
SanDisk Corporation.
Protection against theft
This device is equipped with technical
measures to protect it against theft.
i
Further information on protection against
theft can be obtained from an authorized
Sprinter Dealer.
Cleaning
To clean, use a slightly damp cloth. The cloth
must be soft and lint-free. For stubborn dirt,
you can use a mild cleaning agent. In
particular, never clean the display with
alcohol, acid or an abrasive cleaning agent.
Equipment
With Audio 15, the following functions are
available:
R
radio reception in wavebands FM and AM
(SW, MW, LW)
R
playback of files stored on SD memory
cards
R
playback of files stored on USB devices
R
playback on external devices via the AUX
jack
R
connection of a personal mobile phone via
Bluetooth®to call using the hands-free
system
R
connection and playback of your personal
audio equipment via Bluetooth®(if
supported by your audio device)
R
navigation (optional, only with Becker
®
MAP PILOT)
R
display of rear view camera images
(optional)
8
Introduction
Page 11

Familiarizing yourself with your
product ................................................ 10
Basic functions .................................... 14
9
At a glance
Page 12
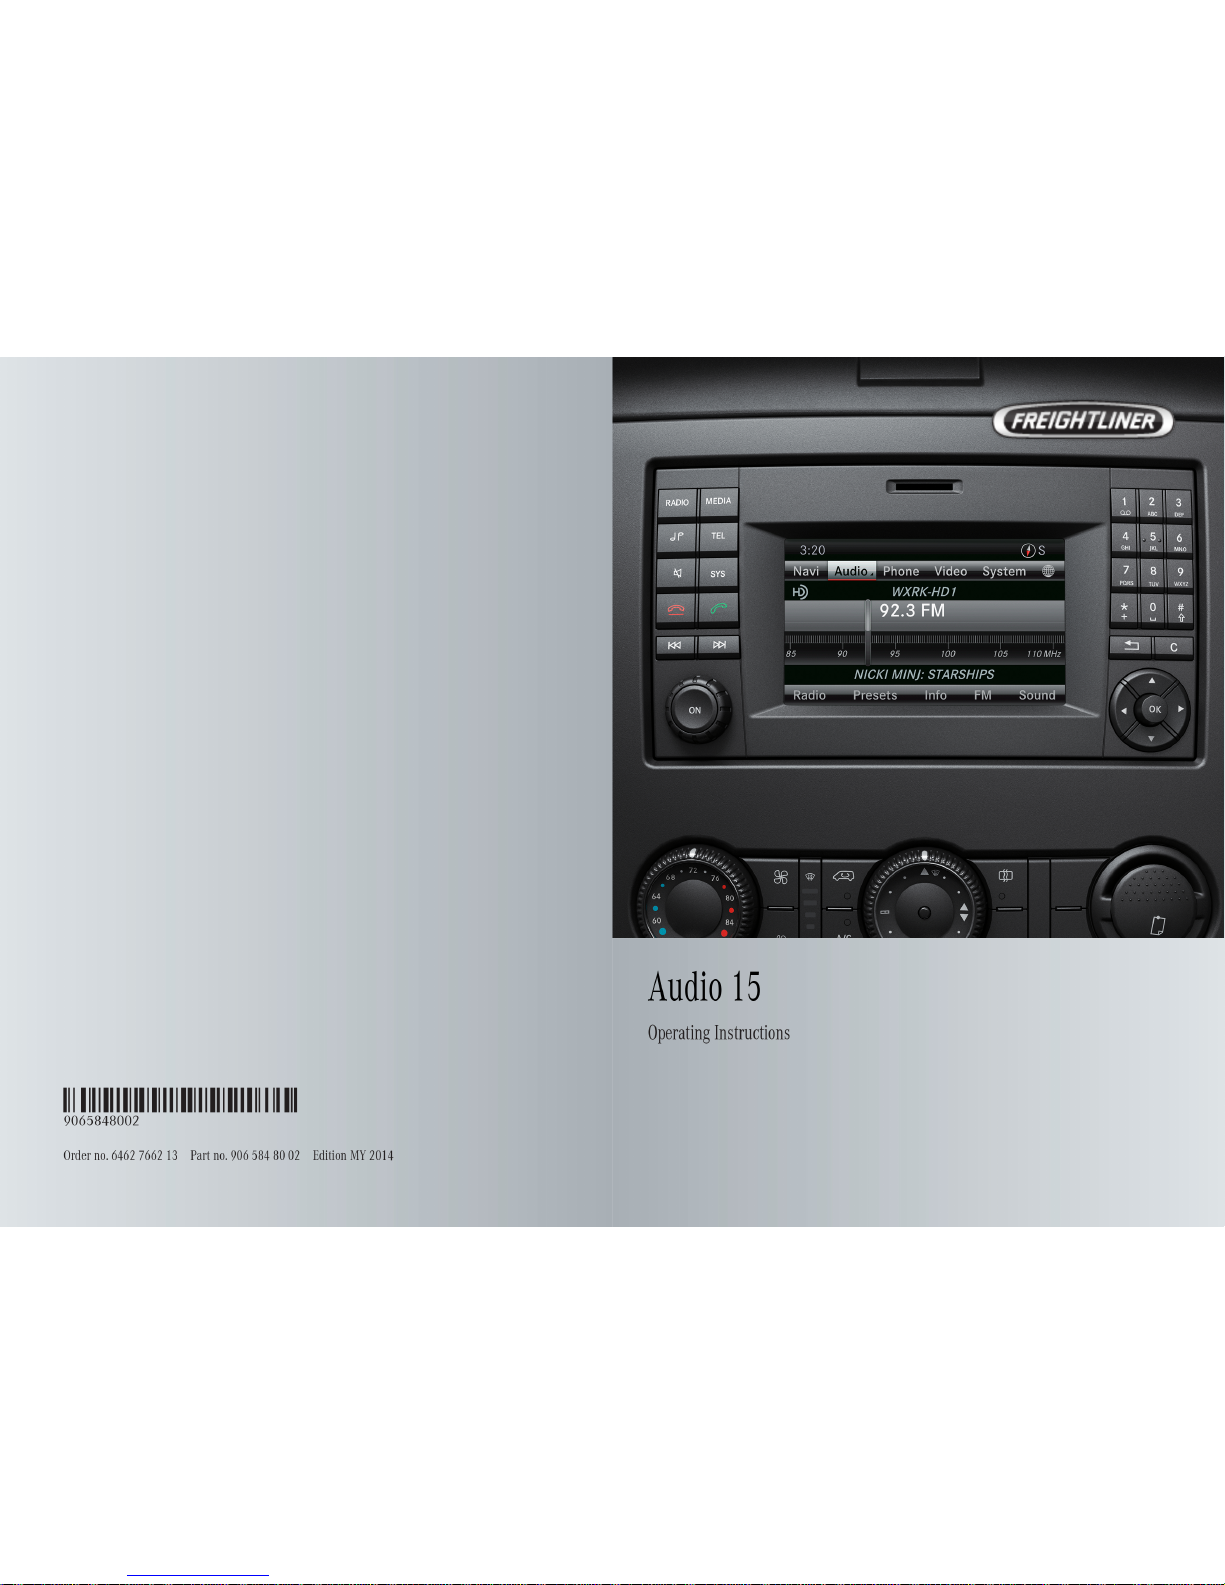
Familiarizing yourself with your product
Audio 15 overview
Audio 15 overview diagram
Function Page
:
Ø
Calls up navigation 22
;
$
Selects radio 24
Switches wavebands 26
=
i
Makes system settings 14
?
Õ
Selects audio source:
SD memory card 30
USB device 31
AUX function 56
BT Audio 49
A
%
Selects the telephone
function 38
B
SD memory card slot
Function Page
C
Display 11
D
x to slm
Selects audio source:
Stores and calls up a
station 24
Sets the frequency
manually 24
Displays radio text
Selects a track 24
Telephone number entry 43
Searches for a phone book
entry 48
Passkey entry 39
E
j
Deletes characters
F
%
Exits menu or jumps up one
menu level higher
10
Familiarizing yourself with your product
At a glance
Page 13
Function Page
G
Navigates within the menus
(turn)
Confirms selection/entry
(press)
H
9:=;
Navigates within the menus
Station search 24
Skip 32
Fast forward/rewind 33
I
o
Sets the volume 14
J
q
Switches on/off 14
K
F
Station search 24
Skips forward 32
Fast forward 33
L
E
Station search 24
Skips back 32
Rewind
33
Function Page
M
6
Accepts a call 42
Makes a call 43
Redials 44
Accepts a waiting call 45
N
~
Ends a call 42
Rejects a call 43
Rejects a waiting call 45
O
8
Mutes audio source 14
Pauses SD memory card/
USB device
Switches the hands-free
system on/off 44
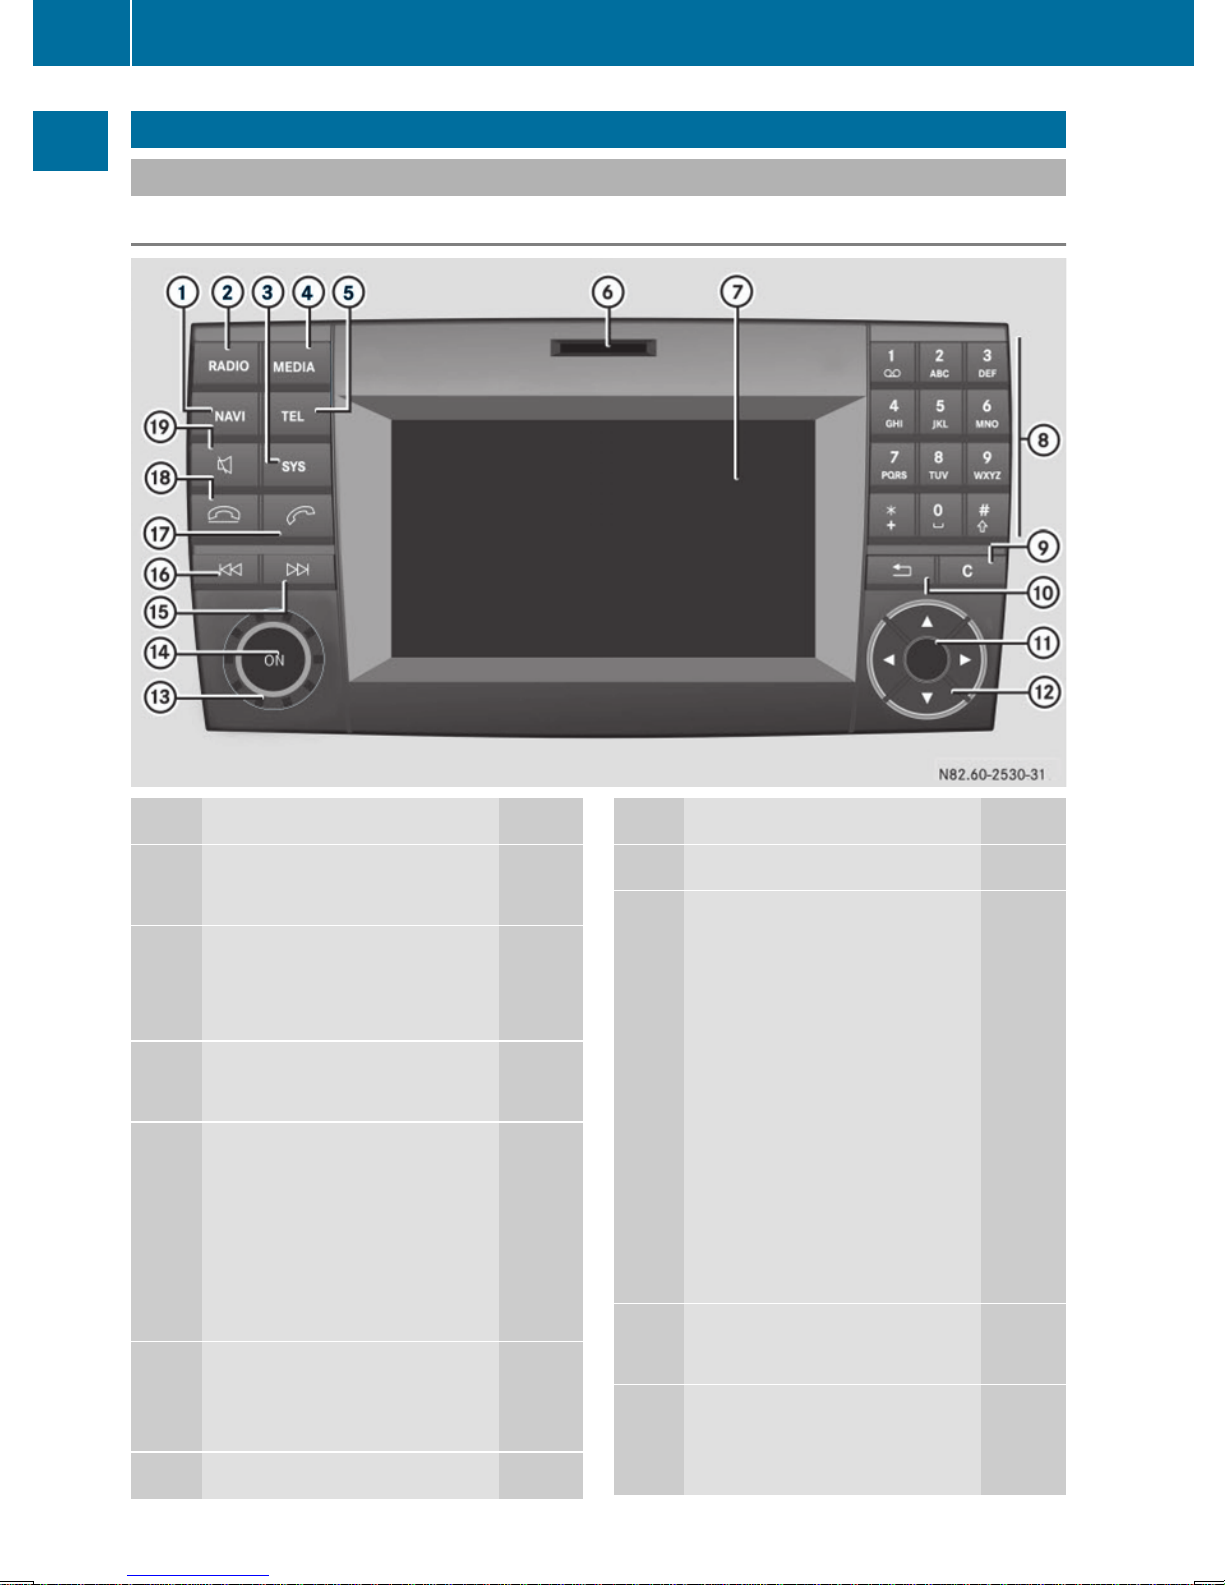
Display
:
Status bar
;
Main menu bar
=
Display/selection window
?
Menu bar
The display shows the function currently
selected with its current settings and
associated menus ?. The following functions
and menus are available:
Function Menu
Navigation
via Becker®MAP
PILOT
Radio Radio
Presets
Info
FM
Sound
SD memory card SD
Familiarizing yourself with your product
11
At a glance
Page 14

Function Menu
Music
Media
Sound
USB device USB
Music
Media
Sound
AUX AUX
Volume
Sound
BT Audio BT Audio
Media
Sound
Telephone Telephone
Call lists
System Settings
Display off
Entry routines
Control knob
Use the control knob to navigate.
Movement Operation
Turn Selects menus and entries
Press Confirms the selection
Buttons and their functions
In addition to the control knob, you can also
operate Audio 15 with the following buttons:
Button Operation
%
Jumps back one menu level
When route guidance is
active: jumps to main menu
j
Deletes last character
entered
When route guidance is
active: cancels route
guidance
9
Selects previous line
:
Selects next line
;
Jumps one entry to the right
Jumps back to the main
menu
Shows other editing
options/menus
=
Jumps one entry to the left
Jumps up one menu level
higher
Hides other editing
options/menus
i
When route guidance is active, all other
buttons for navigation are inoperative.
Example of operation
The following example shows, step by step,
how to select and play tracks which have
been saved on an SD memory card.
Initial situation: you are listening to the
radio and the SD memory card is inserted in
the slot.
X
Press the Õ button.
Audio 15 calls up SD mode.
X
Press the : button repeatedly until the
menu bar is selected.
X
Use the control knob or press the =
and ; buttons to select MusicMusic.
12
Familiarizing yourself with your product
At a glance
Page 15
X
Press the rotary knob/pushbutton.
The display shows the menu. You see the
name of the memory card which is inserted
and a selection list.
X
Use the control knob or press the : and
9 buttons to select PlaylistsPlaylists.
X
Press the rotary knob/pushbutton.
The display shows all playlists which have
been saved on the SD memory card.
X
Use the control knob or press the : and
9 buttons to select the desired playlist.
X
Press the rotary knob/pushbutton.
The display shows a list of titles which
belong to the playlist.
X
Use the control knob or press the : and
9 buttons to select the track you wish
to play first.
X
Press the rotary knob/pushbutton.
Audio 15 plays the selected track and
closes the list.
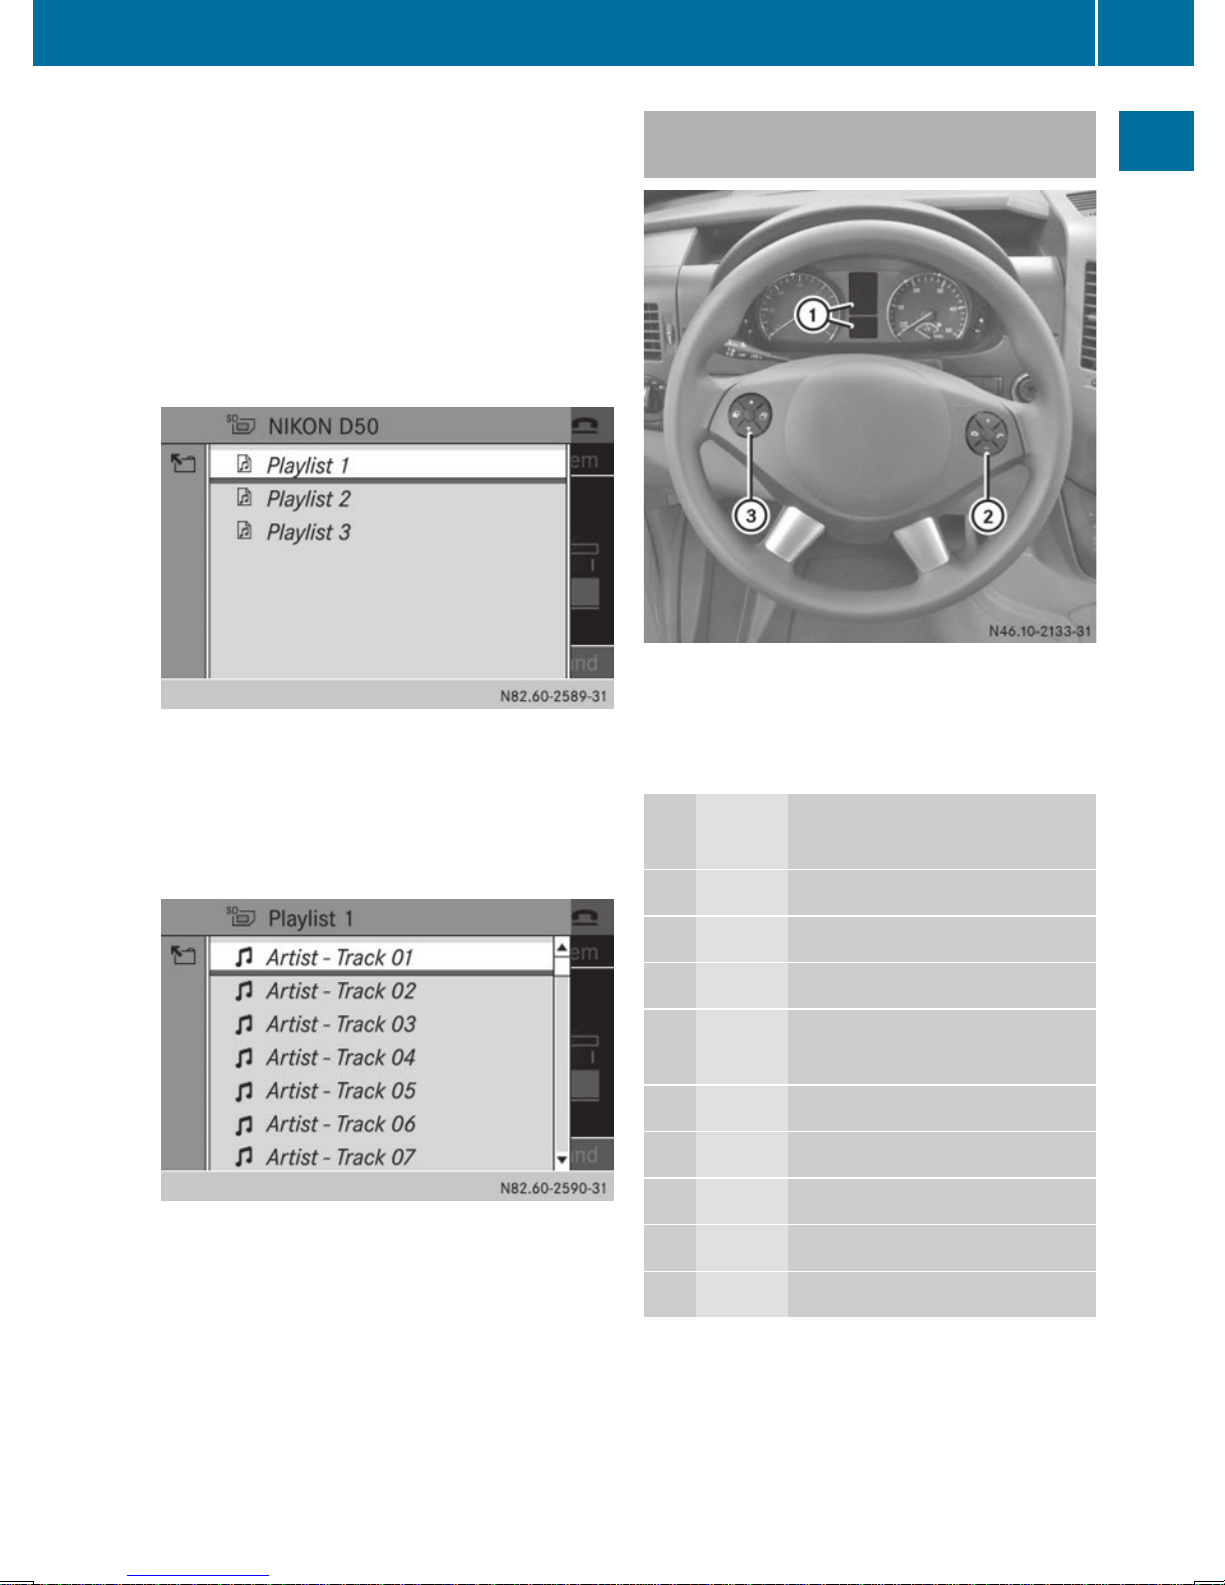
Overview of the multifunction
steering wheel
i
The operation of certain functions is
described in the sections on basic
functions, radio, SD memory card, USB
device and Bluetooth®.
Button
Function
:
On-board computer display
;
W
Increases the volume
X
Reduces the volume
6
Accepts an incoming call/
redials
~
Ends/rejects a call
=
V
Selects next main menu
U
Selects previous main menu
&
Jumps up in the menu bar
*
Jumps down in the menu bar
Familiarizing yourself with your product
13
At a glance
Page 16

Display overview of the on-board
computer
The display of the on-board computer shows
the following menus and functions of Audio
15:
Menu Functions
NavigationRoute guidance
Radio Selects the stored stations on
the current waveband
SD/USB Selects tracks in the current
folder
TelephoneAccepts a call
Ends/rejects a call
Performs calls via the phone
book
Performs calls via call lists
BT Audio Selects a track
Basic functions
Switching on/off
X
Press the q On/Off button.
Once switched on, Audio 15 calls up the
most recently active function.
i
Audio 15 switches itself off automatically
when you remove the ignition key.
i
Audio 15 switches itself off automatically
when the condition of charge of the battery
is low.
i
If Audio 15 is on while the ignition is
switched off, it will switch itself off
automatically after approximately 30
minutes to save the vehicle battery.
Setting the volume
X
Turn the o volume control during
playback.
Or
X
Press the W or X button on the
multifunction steering wheel.
Activating/deactivating the mute
function
X
Press the 8 mute button.
The sound from the audio source is
switched on or off. When the sound has
been muted, the x symbol is shown in
the status bar.
i
If you change the audio source or adjust
the volume, the sound switches on again
automatically.
i
When the mute function is active,
playback from the SD memory card, USB
device and BT audio is paused. When you
deactivate the mute function, playback will
resume from the position where it was
paused.
i
When the TA function is activated, you
hear traffic reports even when the sound is
muted (Y page 27).
Adjusting the display
Setting the brightness
X
Press the i button.
X
Select SettingsSettings.
X
Select DisplayDisplay.
14
Basic functions
At a glance
Page 17
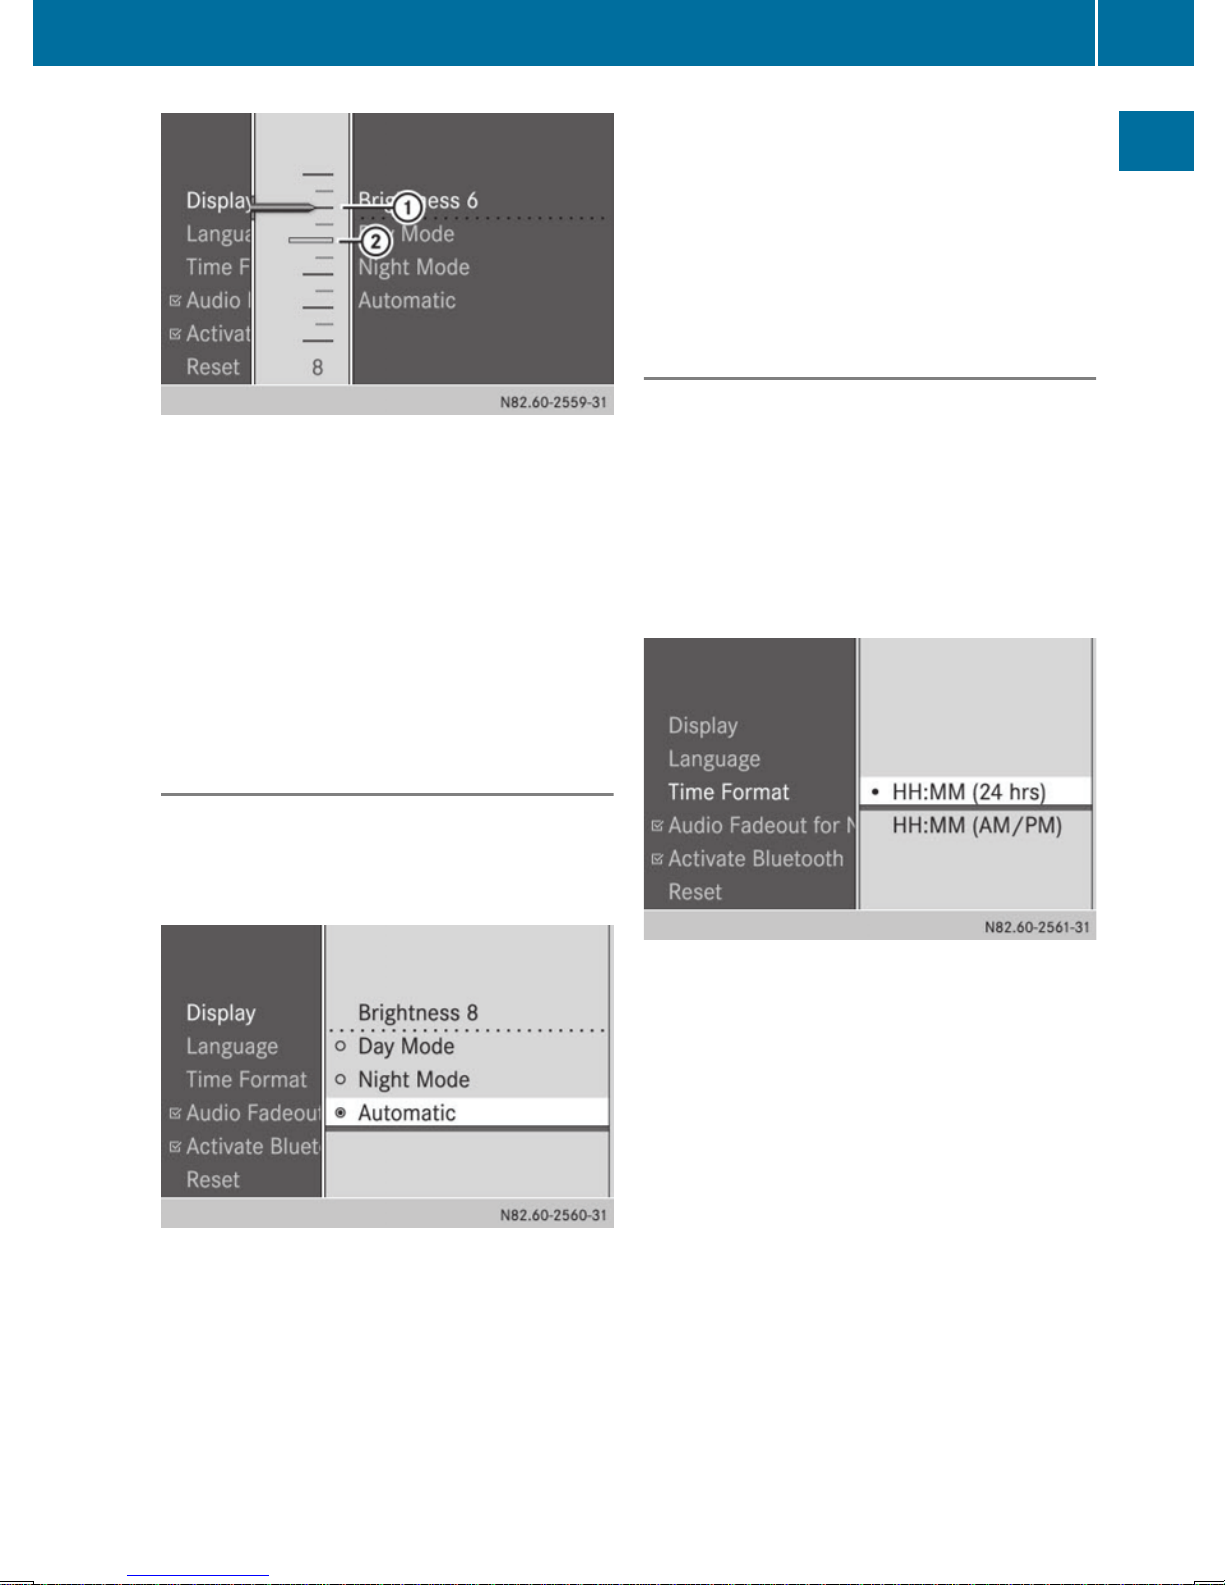
X
Select BrightnessBrightness.
The display shows the brightness with
current level : and previous level ;.
X
Set the brightness to the desired level.
X
Press the rotary knob/pushbutton.
The new setting is saved.
X
Press the % button.
X
To exit system settings: press the $
or Õ button.
Setting the display design
X
Press the i button.
X
Select SettingsSettings.
X
Select DisplayDisplay.
X
Select Day ModeDay Mode, Night ModeNight Mode or
AutomaticAutomatic.
The # dot indicates the display design
selected.
i
When the AutomaticAutomatic setting is selected,
Audio 15 (optionally) evaluates the
readings from the automatic vehicle light
sensor and automatically switches the
display designs. On vehicles without light
sensors, Audio 15 switches over to the onboard computer depending on the light
switch setting and dimming setting.
X
Press the % button.
X
To exit system settings: press the $
or Õ button.
Setting the time format
i
The time is set via the on-board computer,
see the vehicle's Operating Instructions.
On vehicles with a tachograph, the time
must be set on the tachographs.
X
Press the i button.
X
Select SettingsSettings.
X
Select Time FormatTime Format.
X
Set the desired time format:
R
HH:MM (24 hrs)HH:MM (24 hrs): 24-h format, e.g.
13:15
R
HH:MM (AM/PM)HH:MM (AM/PM): 12-h format, e.g.
1:15 pm
The # dot indicates the selected time
format.
X
Press the % button.
X
To exit system settings: press the $
or Õ button.
Basic functions
15
At a glance
Page 18
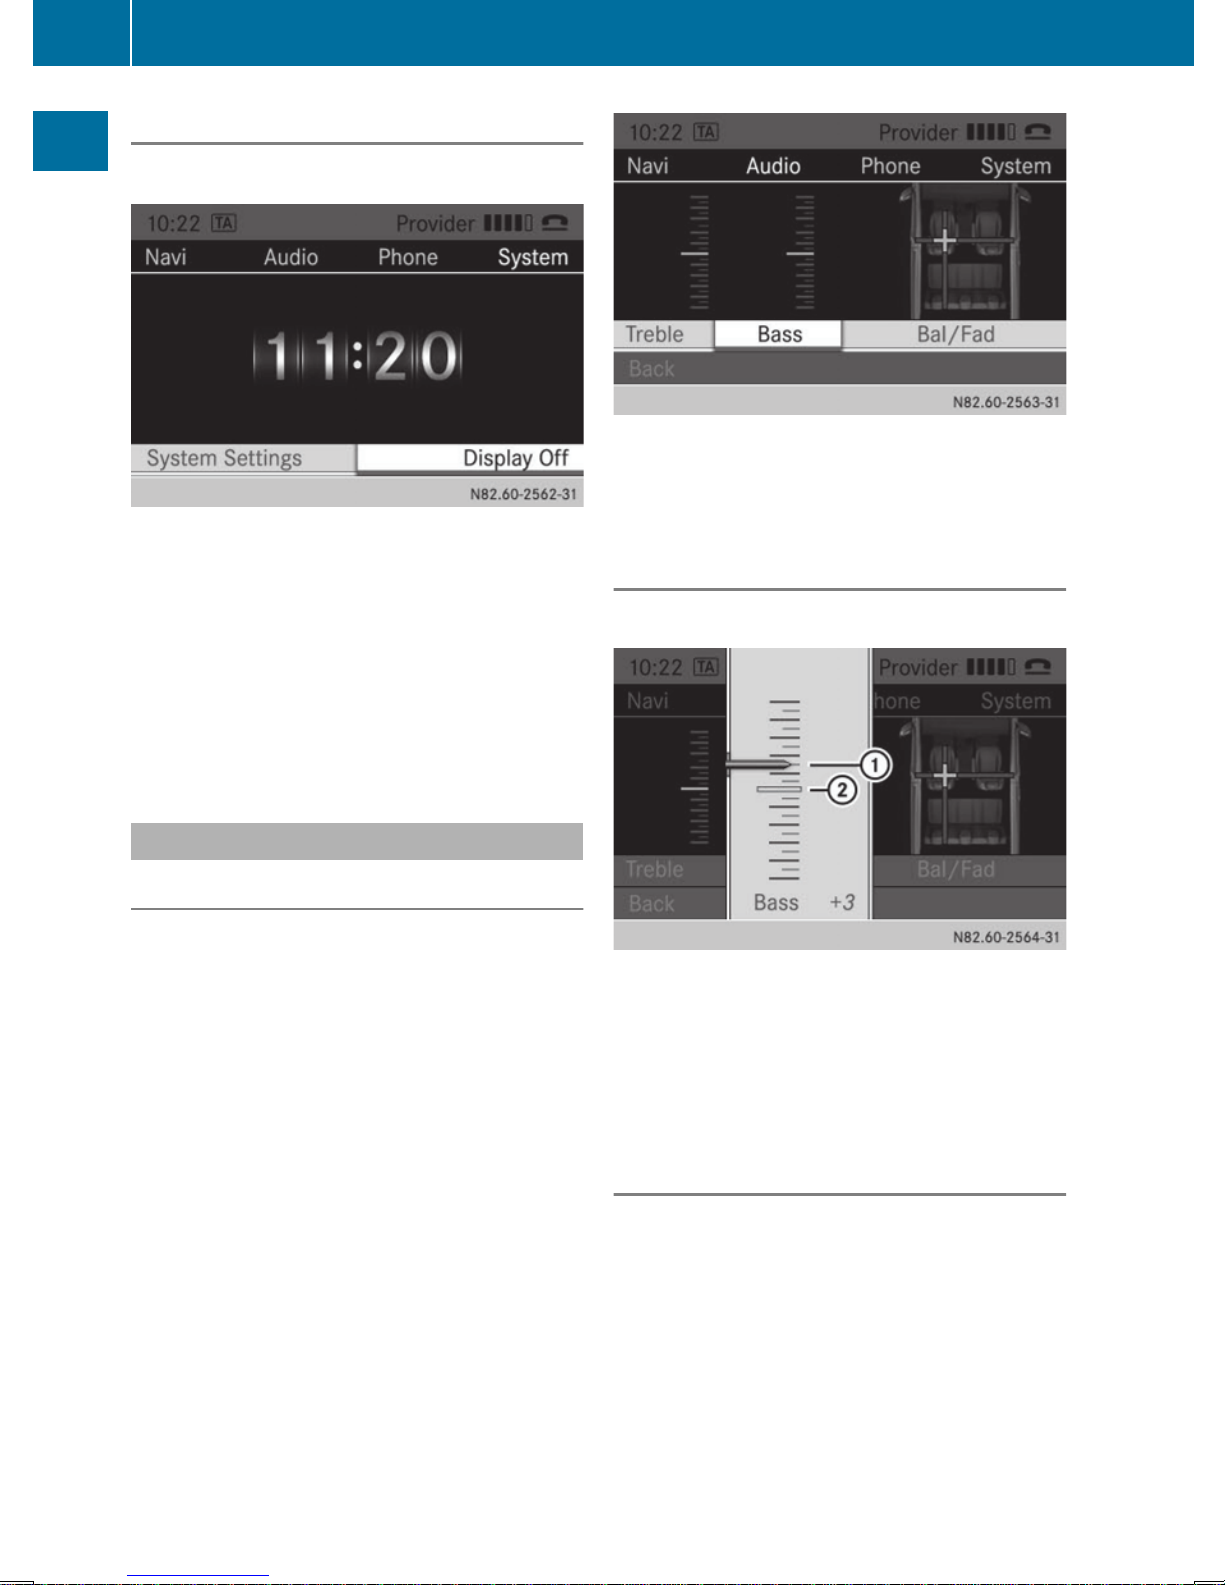
Switching the display on/off
X
Press the i button.
X
Select Display OffDisplay Off.
The display is switched off. Audio 15
functions remain available. The selected
audio source remains audible.
X
To switch on the display again: press the
control knob.
i
Alternatively, you can call up a different
function (e.g. radio).
Adjusting the sound settings
Calling up sound settings
You can make individual tone settings for the
following audio sources:
R
Radio
R
SD/USB
R
AUX
R
Bluetooth®audio
X
Select the audio source for which you wish
to set the sound.
X
Press the : button repeatedly until the
menu bar is selected.
X
Select SoundSound.
The display shows the current sound
settings.
Adjusting treble and bass
X
Call up the sound settings.
X
Select TrebleTreble or BassBass.
The display shows the sound setting with
current sound level : and previous sound
level ;.
X
Select the desired sound level (-10-10 to +10+10).
Setting the sound distribution
In addition to treble and bass, you can also
set the sound distribution.
R
Balance: right/left distribution
R
Fader: front/rear distribution
16
Basic functions
At a glance
Page 19
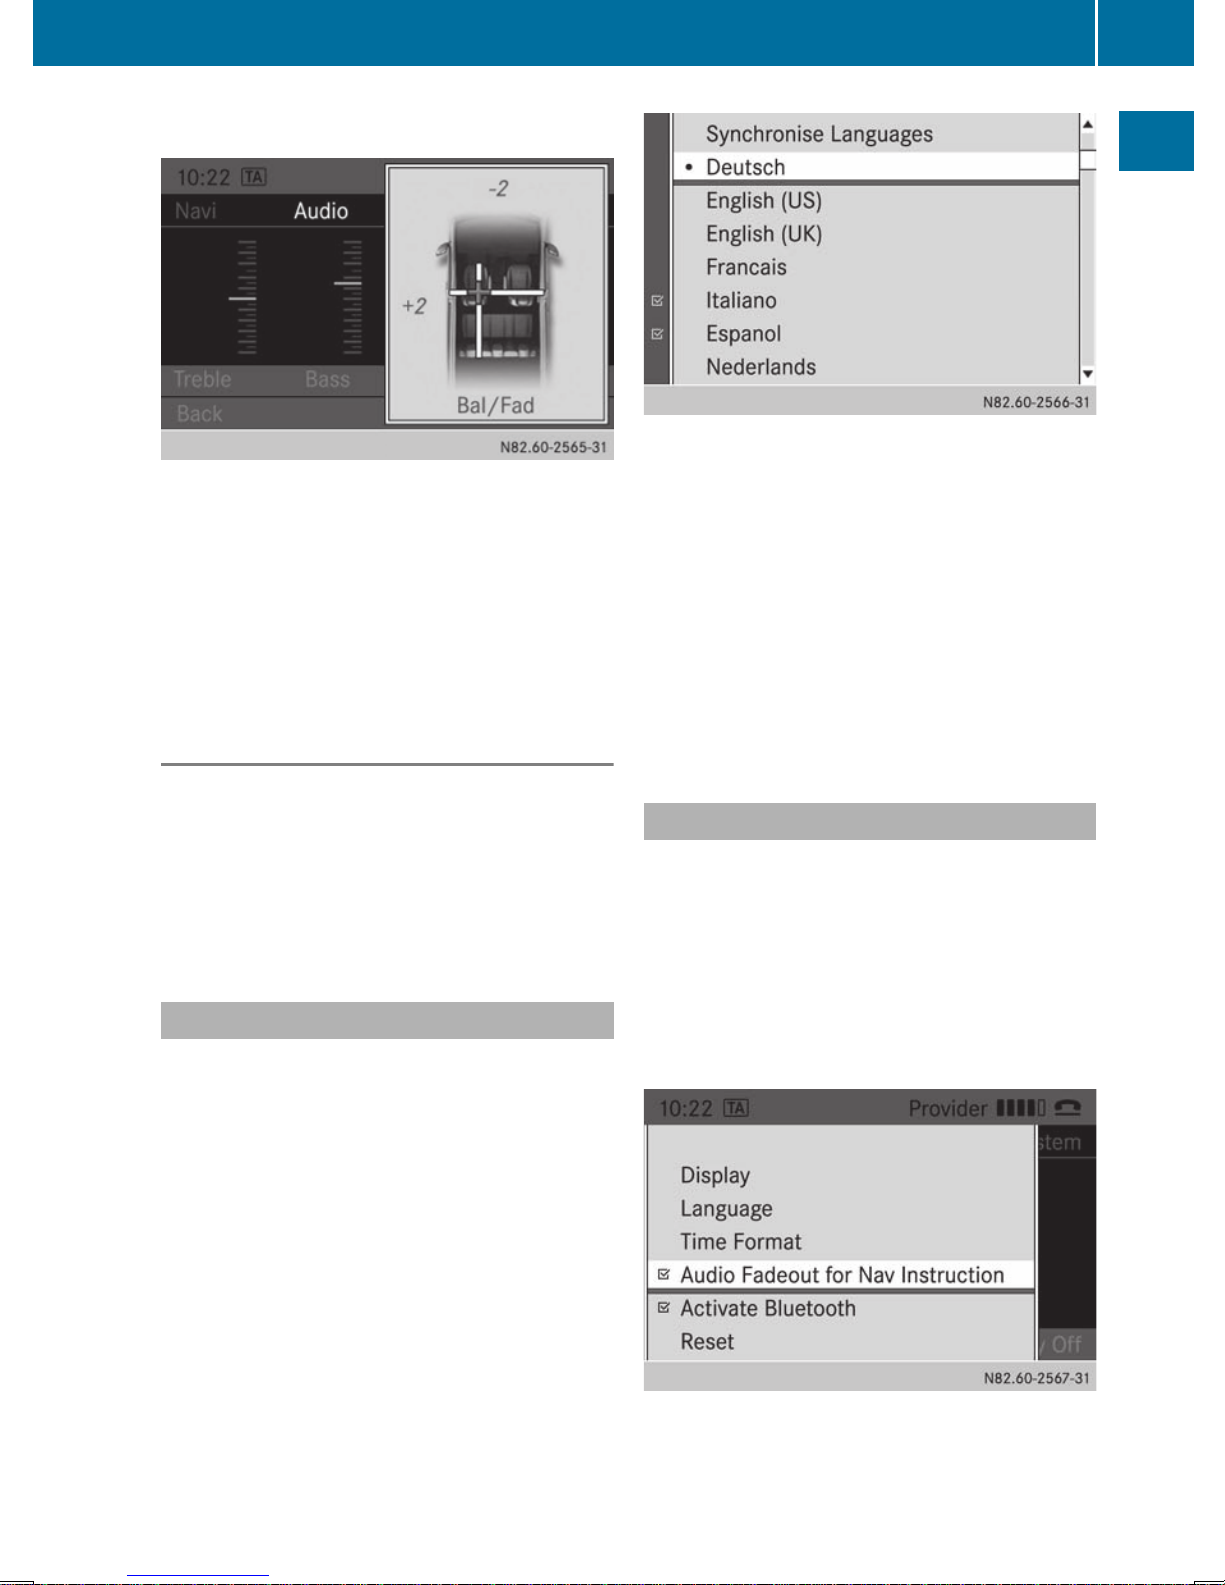
X
Call up the sound settings.
X
Select Bal/FadBal/Fad.
You see a schematic diagram of the
passenger compartment and the current
sound distribution.
X
Set the sound distribution with the
=, ;, : and 9 buttons.
X
Press the rotary knob/pushbutton.
Exiting sound settings
X
Press the % button.
Or
X
Press the : button.
X
Select BackBack.
Audio 15 stores the new sound settings.
Setting the language
As standard, Audio 15 accepts the language
set in the on-board computer. You can also
set the language independently of the onboard computer.
i
You must set the language of the
navigation system separately.
X
Press the i button.
X
Select SettingsSettings.
X
Select LanguageLanguage.
The display shows a list of available
languages. The # dot indicates the
currently set language.
X
Select the desired language.
The display texts of Audio 15 are shown in
the selected language.
Or
X
Select Synchronize LanguagesSynchronize Languages.
The display texts of Audio 15 are shown in
the language selected for the on-board
computer display.
X
To exit system settings: press the $
or Õ button.
Switching audio fadeout on/off
This function can only be switched on if the
optional navigation module is installed. Audio
fadeout reduces the volume of other audio
sources, such as the radio, when you receive
a navigation message.
X
Press the i button.
X
Select SettingsSettings.
X
Select Audio Fadeout for NavAudio Fadeout for Nav
InstructionInstruction.
Basic functions
17
At a glance
Page 20
X
Switch the function on O or off ª using
the control knob.
X
Press the % button.
X
To exit system settings: press the $
or Õ button.
Rear view camera
Safety notes
!
Objects that are not at ground level
appear further away than they actually are,
for example:
R
the bumper of the vehicle parked behind
R
the drawbar of a trailer
R
the ball coupling of a trailer tow hitch
R
the tail-end of a truck
R
slanted posts
Only use the camera guide lines for
orientation. Do not get any closer to
objects than the lowest horizontal guide
line. You may otherwise damage your
vehicle and/or the object.
The rear view camera is only an aid. It cannot
replace your own awareness of the
immediate surroundings. You are responsible
for safe maneuvering and parking. When
maneuvering and parking, make sure that
there are no persons, animals or objects in
the maneuvering area.
Under the following circumstances, the rear
view camera will not function, or will function
in a limited manner:
R
there is very heavy rain, snow or fog
R
at night or when the vehicle is in very dark
places
R
if the camera is exposed to very bright light
R
if the area is lit by fluorescent light or LED
lighting (the display may flicker)
R
if there is a sudden change in temperature,
e.g. when driving into a heated garage in
winter
R
if the camera lens is dirty or obstructed
R
the rear of the vehicle is damaged. In this
case, have the camera position and setting
checked at a qualified specialist workshop.
Rear view camera operation
If your vehicle is equipped with a rear view
camera, the image from the rear view camera
is relayed to the display when you engage
reverse gear. Guide lines in the display
(depending on the vehicle's equipment) help
you with backing up.
The rear view camera is only active when the
ignition is switched on.
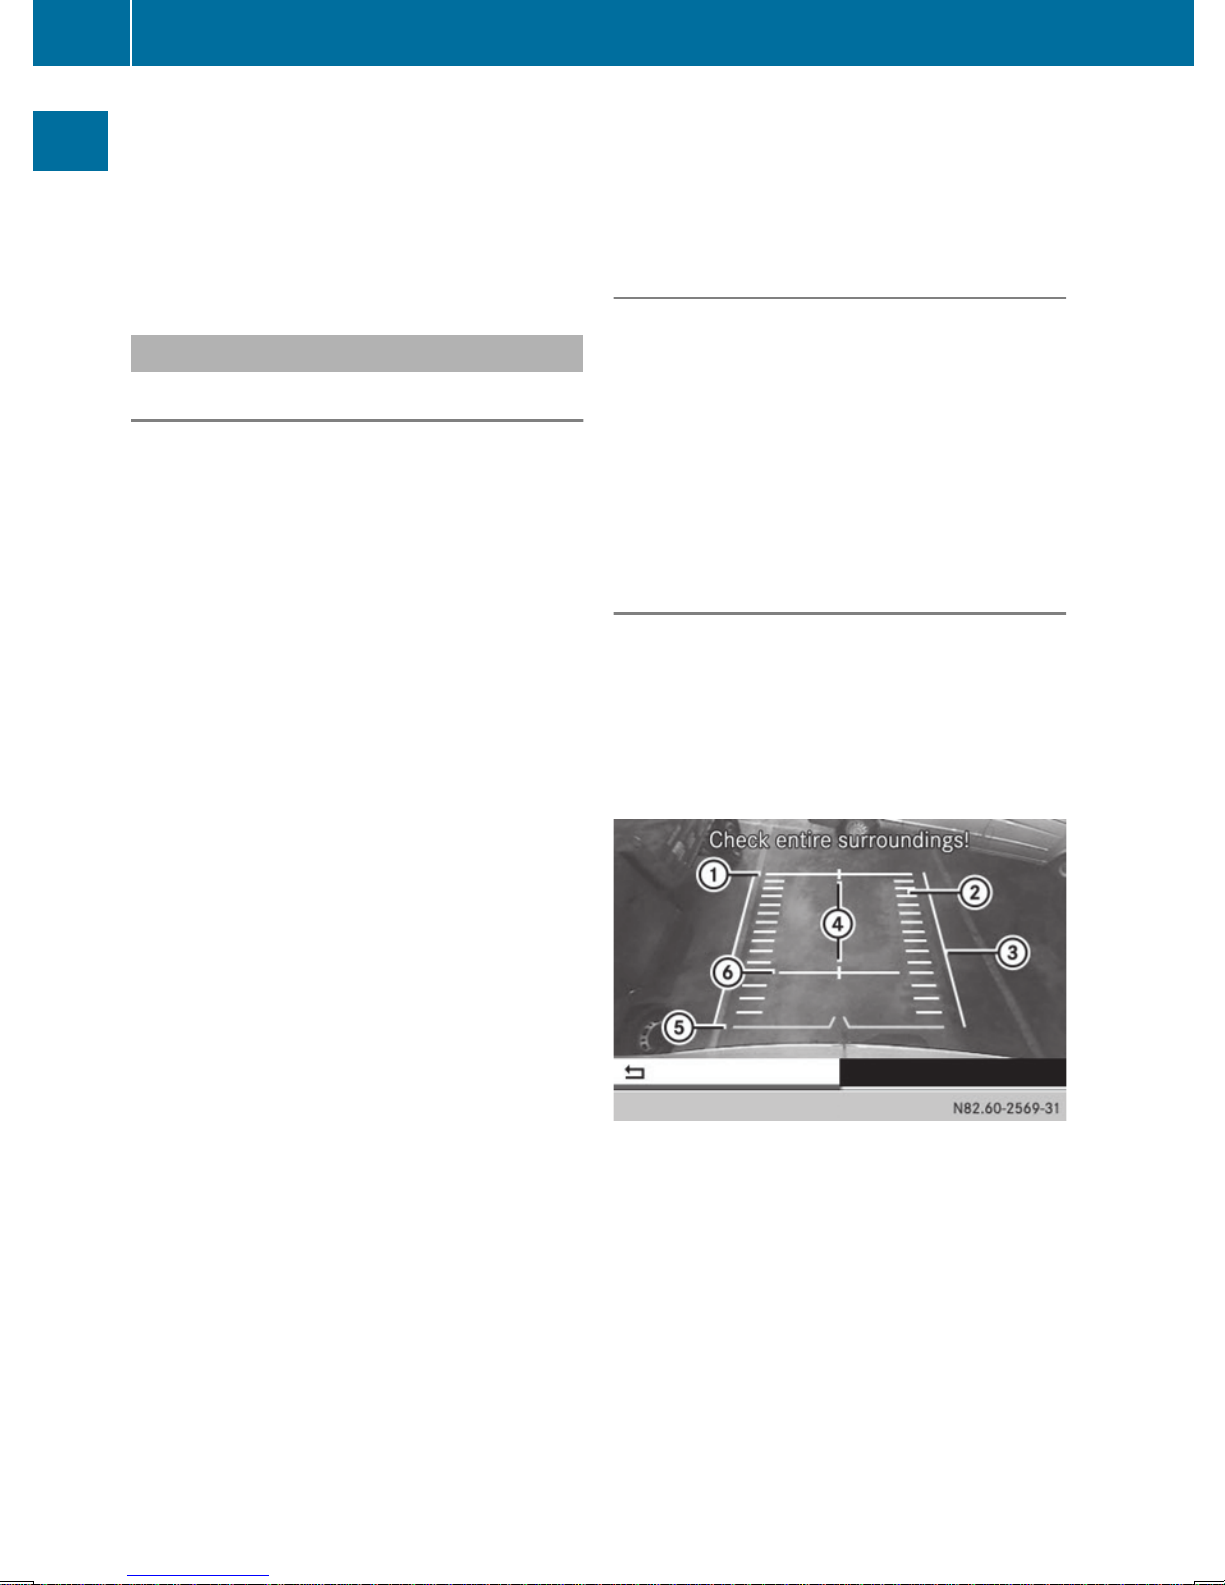
Static guide lines
Depending on the vehicle's equipment, the
rear view camera image displays static guide
lines. These guide lines assist you with
backing up.
The static guidelines have the following
meanings:
i
Please note that all the data is
approximate.
:
Distance from the rear of the vehicle,
10 ft (3 m)
;
Vehicle width (to outer edge of wheels)
=
Vehicle width including exterior mirrors
?
Vehicle center mark (e.g. to improve
visibility of a trailer drawbar)
18
Basic functions
At a glance
Page 21

A
Distance from the rear of the vehicle,
10 in (0.25 m)
B
Distance from the rear of the vehicle,
3 ft (1 m)
Deactivating the rear view camera
When you shift out of reverse gear, the rear
view camera is automatically deactivated
after 15 seconds. Additionally, you can
deactivate it manually.
X
Press the Ø, $, Õ, %, i or
% button.
Or
X
Select % in the menu bar.
The display shows the previous view.
Activating the rear view camera image
when driving forwards
This function is available for the Sprinter.
i
When driving forwards, the display shows
no guide lines.
X
Press the i button for longer than two
seconds.
The display shows the rear view camera
image.
Or
X
Press the i button.
X
Press the : button repeatedly until the
menu bar is selected.
X
Select CameraCamera.
The display shows the rear view camera
image without guide lines.
Resetting to factory settings
You can reset the settings of Audio 15 to the
factory settings. This will delete all personal
data (station memory, phone book etc.).
i
Resetting to factory settings is useful
when you sell the vehicle, for example.
X
Press the i button.
X
Select SettingsSettings.
X
Select ResetReset.
A prompt appears in the display asking
whether the data should be deleted.
X
To delete: select YesYes.
The display shows a further prompt.
X
Confirm the second prompt with YesYes as
well.
Audio 15 is reset and restarted.
Or
X
To cancel the deleting process: select
NoNo.
Audio 15 is not reset.
Basic functions
19
At a glance
Page 22

20
Page 23

Important safety notes ....................... 22
Becker®MAP PILOT navigation
module ................................................. 22
GPS (Global Positioning System) ....... 22
Preparing navigation .......................... 22
21
Navigation system
Page 24

Important safety notes
G
WARNING
If you operate information systems and
communication equipment integrated in the
vehicle while driving, you will be distracted
from traffic conditions. You could also lose
control of the vehicle. There is a risk of an
accident.
Only operate the equipment when the traffic
situation permits. If you are not sure that this
is possible, park the vehicle paying attention
to traffic conditions and operate the
equipment when the vehicle is stationary.
The navigation system calculates the route to
the destination without taking account of the
following, for example:
R
traffic lights
R
stop and give way signs
R
parking or stopping restrictions
R
road narrowing
R
other road and traffic rules and regulations
The navigation system may provide incorrect
navigation announcements if the
surroundings do not correspond to the data
on the digital map. For example, a route may
have been diverted or the direction of a oneway street may have changed.
For this reason, you must always observe
road and traffic rules and regulations during
your journey. Road and traffic rules and
regulations always have priority over the
system's driving recommendations.
Becker®MAP PILOT navigation
module
With the Becker®MAP PILOT navigation
module, you can upgrade Audio 15 to a fullyfledged navigation system.
Further information can be found under
http://www.beckermappilot.com.
GPS (Global Positioning System)
Position finding and route guidance take
place using GPS (Global Positioning System).
For this purpose, the navigation module has
an integrated GPS receiver that receives the
satellite signals and determines your
geographical location.
i
Without GPS reception, route guidance is
not possible.
Preparing navigation
Inserting the navigation module
X
Open the glove box.
X
Insert the navigation module into the
device holder.
The battery built into the navigation module
starts charging when the vehicle ignition is
switched on.
X
Remove the catch on the front side of the
device holder.
This way, the navigation module is secured,
as well as protected against theft.
X
Close the glove box.
Switching on the navigation system
X
Press the ß button.
Or
X
Press the 9 button repeatedly until the
main menu bar is selected.
X
Select NaviNavi.
The display shows the main menu of the
navigation system.
i
If the battery was completely discharged,
it takes up to 1 minute before the
navigation system is ready.
22
Preparing navigation
Navigation system
Page 25

Selecting radio .................................... 24
Selecting a station .............................. 24
Storing stations ................................... 24
Switching wavebands ......................... 26
Operating the radio using the mul-
tifunction steering wheel ................... 26
Traffic program priority (TA) .............. 27
23
Radio
Page 26

Selecting radio
X
Press the $ button.
You will hear the last station selected.
Selecting a station
Station search
X
Press the E or F button briefly.
You will hear the next receivable station.
Setting stations manually
X
Press and hold the E or F button
until the desired position has been
reached.
You will hear the selected station, if it is
receivable.
Setting the frequency manually
X
Press the l button.
X
Using the x to s number keys, enter
desired frequency :.
Or
X
Press the : button repeatedly until the
menu bar is selected.
X
Select RadioRadio.
The display shows the Radio menu.
X
Select Enter FrequencyEnter Frequency.
X
Using the x to s number keys, enter
desired frequency :.
i
You can only enter frequencies which lie
within the selected waveband
(Y page 26).
Storing stations
Storing stations manually using the
number keypad
You can save the current station.
X
Press and hold a number key from x to
s until the display shows the number in
front of the station frequency or station
name :.
The station is stored under the selected
preset.
Storing stations manually using the
station list
You can store the current station in the
station list.
X
Press the : button repeatedly until the
menu bar is selected.
X
Select PresetsPresets.
The display shows a list of the stored
stations. The # dot indicates the current
station.
24
Storing stations
Radio
Page 27

X
Select the preset where the station is to be
stored.
X
To save the station: press and hold the
control knob until the station frequency or
the station name is shown in the list.
Audio 15 continues to play the station.
Storing stations automatically
You can automatically assign 10 presets with
receivable stations from the selected
waveband. The order is determined by
reception quality.
i
Previously stored stations from this
waveband will be lost.
X
Press the $ button to select the desired
waveband.
X
Press the : button repeatedly until the
menu bar is selected.
X
Select PresetsPresets.
The display shows a list of the stored
stations. The # dot indicates the current
station.
X
Select AutostoreAutostore.
Audio 15 searches for the 10 stations with
the best reception and stores them.
X
To cancel the storing process: select
CancelCancel during the storing process.
Audio 15 cancels the automatic storing
process.
X
To exit the menu: select one of the stored
stations in the list.
Audio 15 plays the selected station.
Or
X
Press the % button.
i
If the process is interrupted by a traffic
report, you must repeat it.
Storing stations
25
Radio
Page 28

Calling up stored stations
Calling up stations using the number
keypad
X
Press the $ button to select the desired
waveband.
X
Briefly press a number button from x to
s.
You will hear the station stored in the
selected preset, if it is receivable.
Calling up stations using the station list
X
Press the $ button to select the desired
waveband.
X
Press the : button repeatedly until the
menu bar is selected.
X
Select PresetsPresets.
The display shows a list of the stored
stations. The # dot indicates the current
station.
X
Select the desired station.
You will hear the station stored in the
selected preset, if it is receivable.
Calling up a station using the control
knob
X
Press the $ button to select the desired
waveband.
X
Select the display/selection window
X
Select the desired stored station using the
control knob.
You will hear the station stored in the
selected preset, if it is receivable.
Switching wavebands
Audio 15 can receive the following
wavebands:
Waveband Frequency
FM (VHF) 87.7 – 107.9 MHz
MW (medium wave) 530 – 1710 kHz
X
Press the $ button repeatedly until the
display shows the desired waveband.
Or
X
Press the : button repeatedly until the
menu bar is selected.
X
Select the current waveband (e.g FMFM).
The display shows a list of wavebands. A
# dot indicates the current waveband.
X
Select the desired waveband.
Audio 15 switches waveband and plays the
last station selected.
Operating the radio using the
multifunction steering wheel
You can call up saved stations using the
multifunction steering wheel.
:
Waveband
;
Station
26
Operating the radio using the multifunction steering wheel
Radio
Page 29

X
Press the $ button.
Radio mode is selected.
X
Select RadioRadio with the U or V button
on the multifunction steering wheel.
The on-board computer display shows the
waveband and the station name/frequency
of the selected station.
X
Use the 9 or : button on the
multifunction steering wheel to call up the
previous or next stored station.
Traffic program priority (TA)
TA function
If you listen to a station without traffic reports
or another audio source, Audio 15 can switch
to a station with traffic reports for the
duration of one traffic report. This TA function
is also possible when the system is muted.
i
Traffic program priority is only available in
the FM waveband. Stations which
broadcast traffic announcements are
marked TATA in the status bar.
i
Telephone conversations and navigation
announcements are not interrupted.
Activating/deactivating the TA
function
X
Press and hold the 8 button until the
display shows TATA in the status bar.
Or
X
Press the : button repeatedly until the
menu bar is selected.
X
Select RadioRadio.
X
Select TATA.
X
Activate O or deactivate ª the TA
function as required.
X
To exit the menu: press the % button.
i
If the TA function is switched on, you will
see the TATA symbol in the status bar.
i
You can also activate/deactivate the TA
function in the SD, USB, AUX and BT audio
menus.
Adjusting the volume of traffic
reports
X
Turn the volume control right or left during
a traffic report.
i
The setting also applies for following
traffic reports.
Interrupting a traffic report
X
Briefly press any button except the q
button during the traffic report.
i
The next traffic report can be heard again.
Traffic program priority (TA)
27
Radio
Page 30

28
Page 31

Important safety notes ....................... 30
Inserting/ejecting an SD memory
card ...................................................... 30
Connecting a USB device ................... 30
Selecting the SD function ................... 30
Selecting the USB function ................ 31
Selecting a track ................................. 32
Changing folders ................................. 33
Playing a playlist ................................. 33
Selecting track playback options ...... 34
Selecting an active partition (USB
only) ..................................................... 35
Displaying metadata ........................... 35
Displaying information about the
tracks played ....................................... 35
Operating the SD/USB function
using the multifunction steering
wheel .................................................... 35
29
SD memory card and USB device
Page 32

Important safety notes
G
WARNING
Handling discs while driving may distract you
from traffic conditions. You could also lose
control of the vehicle. There is a risk of an
accident.
Handle discs only when the vehicle is
stationary.
Inserting/ejecting an SD memory
card
Inserting an SD memory card
X
Insert the SD memory card into the SD slot
with the contacts at the front and facing
downwards.
Audio 15 automatically activates SD mode
and loads the files. The display shows
Reading Memory Card...Reading Memory Card....
i
If Audio 15 cannot find any readable files
on the SD memory card, the display shows
No Playable FilesNo Playable Files. Information on
readable file formats can be found in the
technical data (Y page 60).
Ejecting an SD memory card
X
Press the SD memory card.
Audio 15 ejects the SD memory card.
X
Remove the SD memory card.
Connecting a USB device
The port for USB devices is located in the
stowage compartment on the driver's side of
the instrument panel.
X
Connect the USB device to the USB port in
the correct position.
Audio 15 automatically activates USB
mode and loads the files. The display shows
Reading USB device...Reading USB device...
i
If Audio 15 cannot find any readable files
on the USB device, the display shows NoNo
PlayablePlayable FilesFiles. Information on readable
file formats can be found in the technical
data (Y page 60).
i
Due to the wide range of USB devices
available on the market, playback cannot
be guaranteed for all USB device brands.
Information about suitable USB devices
can be obtained from an authorized
Sprinter Dealer.
Selecting the SD function
X
Press the Õ button repeatedly, until the
display in the menu bar shows SDSD.
Playback starts.
Alternatively, you can select the SD function
in the main menu bar.
X
Press the 9 button repeatedly until the
main menu bar is selected.
X
Select AudioAudio.
The display shows all available audio
sources in a selection list.
X
Select SDSD.
Playback starts.
30
Selecting the SD function
SD memory card and USB device
Page 33

You can also select the SD function
accordingly when the USB, AUX or BT Audio
function is active.
X
Press the j button.
Or
X
Press the : button repeatedly until the
menu bar is selected.
X
Select MediaMedia.
The display shows all available audio
sources in a selection list.
X
Select SDSD.
Playback starts.
i
If there is already an SD memory card
inserted, you can see the name of the SD
memory card instead of SDSD.
:
Playback time
;
Track name
=
Folder name
?
Current playback option (no display when
playing in "normal track order")
A
Artist
B
Type of data carrier (SD memory card)
C
Track number
Selecting the USB function
X
Press the Õ button repeatedly, until the
display in the menu bar shows USBUSB.
Playback starts.
Alternatively, you can select the USB function
in the main menu bar.
X
Press the 9 button repeatedly until the
main menu bar is selected.
X
Select AudioAudio.
The display shows all available audio
sources in a selection list.
X
Select USBUSB.
Playback starts.
You can also select the USB function
accordingly when the SD, AUX or BT Audio
function is active.
X
Press the l button.
Or
X
Press the : button repeatedly until the
menu bar is selected.
X
Select MediaMedia.
The display shows all available audio
sources in a selection list.
Selecting the USB function
31
SD memory card and USB device
Z
Page 34

X
Select USBUSB.
Playback starts.
:
Playback time
;
Track name
=
Folder name
?
Current playback option (no display when
playing in "normal track order")
A
Artist
B
Type of data carrier (SD memory card)
C
Track number
Selecting a track
Selecting a track by skipping to a
track
X
Press the E or F button.
Audio 15 plays the previous track again or
the next track.
i
The following principles apply to the skip
back function:
R
If the track has been playing for less than
8 seconds, playback moves back to the
start of the previous track.
R
If the track has been playing for more
than 8 seconds, playback moves back to
the start of the current track.
i
If you have selected random playback
(Y page 34), a random selection follows
as the next track.
Selecting a track with the control
knob
X
Turn the control knob clockwise or counterclockwise.
Audio 15 plays the previous track again or
the next track.
i
If you have selected random playback
(Y page 34), a random selection follows
as the next track.
Selecting a track in the track list
X
Press the : button repeatedly until the
menu bar is selected.
X
Select MusicMusic.
X
Select FolderFolder.
The display shows the track list of the folder
in which the track currently playing can be
found. The # dot indicates the currently
playing track.
X
Select the desired track.
Audio 15 plays the selected track.
32
Selecting a track
SD memory card and USB device
Page 35

Selecting a track by track number
X
Press the l button.
X
Using the number keys x to s, enter
desired track number :.
Audio 15 plays the selected track.
i
You can only enter numbers of tracks
which are in the folder currently being
played.
Fast forward/rewind
X
Press and hold the E or F button.
The current title plays quickly backwards or
forwards.
Changing folders
X
Press the : button repeatedly until the
menu bar is selected.
X
Select MusicMusic.
X
Select FolderFolder.
The display shows the track list of the folder
in which the track currently playing can be
found. The # dot indicates the track
currently playing.
X
Press the % button.
The display shows a list of folders on the
first level. A # dot indicates the folder in
which the track currently playing can be
found.
X
Select the desired folder.
X
Select the track in the folder.
Audio 15 plays the selected track and
closes the folder structure.
You can navigate through the folder structure
of the SD memory card/USB device as
follows:
Process Operation
9 and :
button,
turning the control
knob
Moves within the
folder level
= or % button Jumps one folder
level higher
Pressing the control
knob
Opens a folder/
selects a track
;
Exits the SD/USB
menu
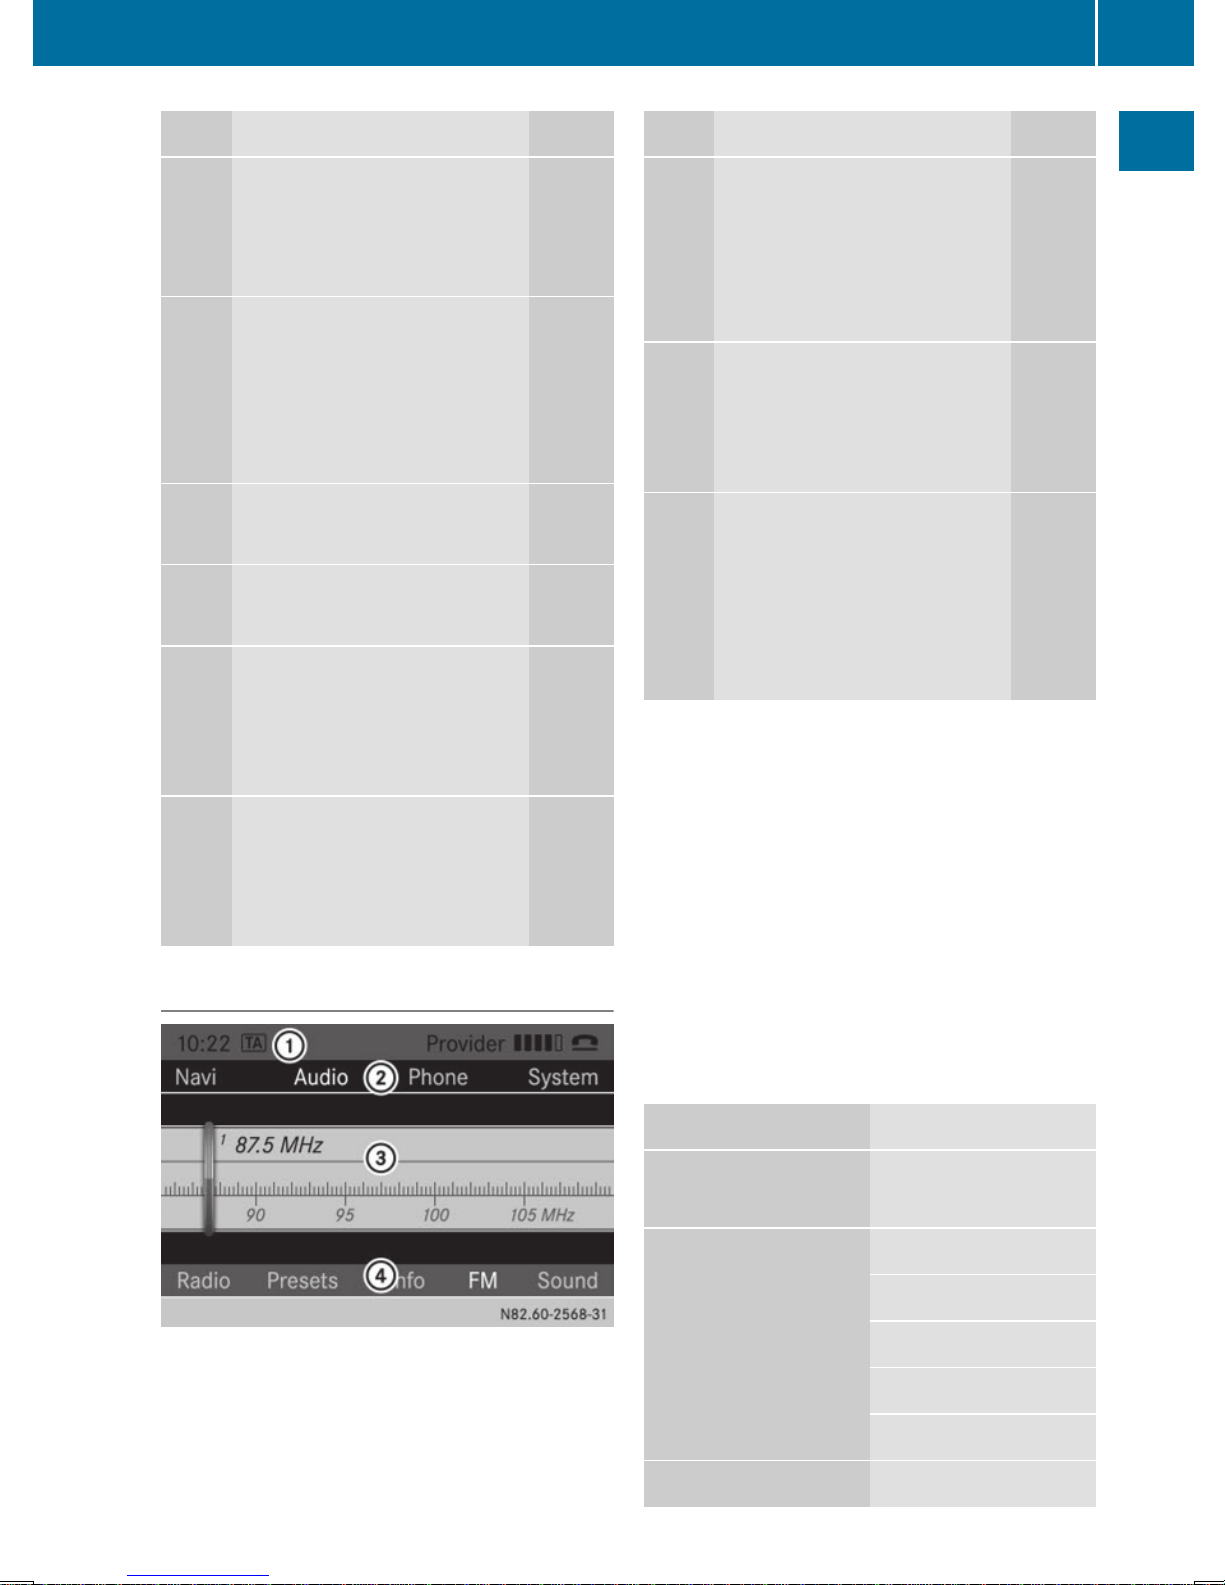
Playing a playlist
X
Press the : button repeatedly until the
menu bar is selected.
X
Select MusicMusic.
Playing a playlist
33
SD memory card and USB device
Z
Page 36

X
Select PlaylistsPlaylists.
The display shows playlists saved on the SD
memory card/USB device.
X
Select the desired playlist.
Audio 15 shows a list of titles associated
with this playlist.
X
Select the title with which the playlist
should start.
Audio 15 plays the selected track and
closes the list.
Selecting track playback options
You may select from the following track
playback options:
Playback
option
Operation
Normal track
sequence
You hear the tracks in the
same order as they are
stored on the SD memory
card/USB device.
Random
tracks
All the tracks on the SD
memory card/USB device
are played in a random
order.
Random
folder
All tracks in the selected
folder and sub-folders are
played in random order.
X
Selecting the SD/USB menu: press
the : button repeatedly until the menu
bar is selected.
X
Select SDSD/USBUSB.
The currently selected playback option is
indicated by the # dot.
X
To select a playback option: select
Normal Track SequenceNormal Track Sequence, RandomRandom
TracksTracks or Random FolderRandom Folder.
You will hear the tracks in the selected
playback option.
i
Depending on the active random
playback mode, the RandomRandom symbol is
shown in the status line in front of the
folder, SD card or USB device symbols.
34
Selecting track playback options
SD memory card and USB device
Page 37

Selecting an active partition (USB
only)
If the USB device is partitioned, this function
is available. Up to 4 partitions (primary, FAT
or FAT32 format) are supported.
X
Selecting the USB menu: press
the : button repeatedly until the menu
bar is selected.
X
Select USBUSB.
X
Select Select Active PartitionSelect Active Partition.
Displaying metadata
There are two ways of displaying the names
of the tracks:
R
with the names stored in the metadata of
the track
R
with the file names
X
Press the : button repeatedly until the
menu bar is selected.
X
Select SDSD/USBUSB.
X
Select Display MetadataDisplay Metadata.
X
Using the control knob, switch the function
as desired, on O or off ª.
X
To exit the menu: press the % button.
Displaying information about the
tracks played
You can display information stored in the
metadata of a track that is currently playing.
X
Press the m button.
The display shows the folder name and title
for approximately 3 seconds.
Operating the SD/USB function using
the multifunction steering wheel
You can call up the previous or next track in
the current folder using the multifunction
steering wheel.
:
Audio source
;
Track number
Operating the SD/USB function using the multifunction steering wheel
35
SD memory card and USB device
Z
Page 38

X
Using the Õ button in Audio 15, select
the SD/USB function.
X
Using the U or V button on the
multifunction steering wheel, select the
SDSD/USBUSB display.
The track currently playing is shown on the
display of the on-board computer.
X
Select the previous or next track using the
9 or : button on the multifunction
steering wheel.
36
Operating the SD/USB function using the multifunction steering wheel
SD memory card and USB device
Page 39

Important safety notes ....................... 38
Conditions ............................................ 38
Activating/deactivating the Blue-
tooth®function ................................... 38
Telephone ............................................ 38
Bluetooth®audio ................................. 49
37
Bluetooth
®
Page 40

Important safety notes
G
WARNING
If you operate information systems and
communication equipment integrated in the
vehicle while driving, you will be distracted
from traffic conditions. You could also lose
control of the vehicle. There is a risk of an
accident.
Only operate the equipment when the traffic
situation permits. If you are not sure that this
is possible, park the vehicle paying attention
to traffic conditions and operate the
equipment when the vehicle is stationary.
Observe the legal requirements of the
country in which you are currently driving.
Conditions
Using Audio 15, you can use the following
functions via Bluetooth®:
R
make a phone call using a mobile phone
R
play an audio file via an audio device
To use the Bluetooth®function of Audio 15,
the following conditions need to be met:
R
you need a mobile phone or audio device
with Bluetooth
®
R
the mobile phone or audio device must be
located inside the vehicle in the vicinity of
Audio 15
R
the Bluetooth®function of Audio 15 is
switched on (Y page 38)
R
the Bluetooth®function of the mobile
phone or audio device is switched on
R
the audio device must support the A2DP
and AVRCP audio profiles
i
Information on recommended
Bluetooth®mobile phones and devices can
be obtained from an authorized Sprinter
Dealer.
Activating/deactivating the
Bluetooth®function
X
Press the i button.
X
Press the : button repeatedly until the
menu bar is selected.
X
Select SettingsSettings.
X
To activate: select ActivateActivate BluetoothBluetooth.
The display shows the O symbol. The
Bluetooth®function is activated.
X
To deactivate: press the control knob
again.
The display shows the ª symbol. The
Bluetooth®function is deactivated.
X
To exit the menu: press the % button.
i
The Bluetooth®function will remain
active until you deactivate it again. If you
switch Audio 15 off, the existing
Bluetooth®connection is disconnected.
The call can be continued on the mobile
phone.
Telephone
Selecting the telephone function
X
Press the % button.
Or
X
Press the ; button.
Or
38
Telephone
Bluetooth
®
Page 41

X
Press the 9 button repeatedly until the
main menu bar is selected.
X
Select TelTel.
The display shows the telephone main
menu.
:
Network provider of mobile phone
currently connected
;
Signal strength of mobile phone network
=
= or ; receiver symbol
?
Bluetooth®name of the currently
connected mobile phone
A
Displays call lists
B
Calls up other functions
C
Displays the phone book
D
Character bar
Pairing/unpairing a mobile phone
What does pairing mean?
When pairing, an authorized connection is
established between Audio 15 and a mobile
phone. Your mobile phone must be visible.
Information on how to make your mobile
phone visible can be found in the operating
instructions of your mobile phone.
If Audio 15 and your mobile phone are paired,
they will connect automatically as soon as
there is a Bluetooth®connection.
i
Audio 15 saves the pairing data of up to
10 mobile phones. If an additional mobile
phone is coupled, Audio 15 overwrites the
pairing data for the mobile phone that has
not been connected to it for the longest
period of time.
There are two ways of pairing:
R
Bluetooth®pairing: Audio 15 searches for
the mobile phone and starts the pairing
process
R
Bluetooth®external: the mobile phone
searches for Audio 15 and starts the pairing
process
Pairing a mobile phone via Bluetooth
®
X
Press the % button.
X
Press the : button repeatedly until the
menu bar is selected.
X
Select TelephoneTelephone.
X
Select Connect PhonesConnect Phones.
X
Select UpdateUpdate.
Audio 15 searches for mobile phones
within range for a certain period of time.
If at least one mobile phone is found, the
display shows the Bluetooth®name of the
mobile phone.
If Audio 15 does not find a mobile phone,
the Search for Bluetooth devicesSearch for Bluetooth devices
failedfailed message is shown in the display.
X
To search again: select UpdateUpdate.
X
Select the desired mobile phone using the
control knob.
The display shows the input menu for the
passkey.
Telephone
39
Bluetooth
®
Z
Page 42

X
Enter an easy to remember, four digit
number using the x to s number
keys.
X
To confirm the entry: select OKOK.
Or
X
Select four digits in the number bar using
the control knob.
X
Select OKOK.
The mobile phone is authorized.
X
Select Bluetooth®device name VAN
Bluetooth.
X
Enter the four digit number selected
previously on the mobile phone, and
confirm.
X
Confirm possible prompts using the mobile
phone.
The Authorization successful.Authorization successful.
message is shown in the display. You will
see the Bluetooth®name of the mobile
phone in the display/selection window.
i
When the Authorization failed.Authorization failed.
message is displayed, you may have
exceeded the prescribed time period.
Repeat the procedure.
Pairing a mobile phone externally via
Bluetooth
®
X
Press the % button.
X
Press the : button repeatedly until the
menu bar is selected.
X
Select TelephoneTelephone.
X
Select Connect PhonesConnect Phones.
The UpdateUpdate message is shown in the
display.
X
Select the list symbol next to the entry
using the ; button.
X
Press the rotary knob/pushbutton.
X
Select External AuthorizationExternal Authorization.
X
Start the Bluetooth®scan process on the
mobile phone.
X
Select Bluetooth®device name VAN
Bluetooth.
A prompt appears in the display asking
whether the mobile phone should be
authorized.
X
To authorize: select YesYes.
The mobile phone is authorized.
X
Enter an easy to remember, four digit
number using the x to s number
keys.
X
Select OKOK.
Or
40
Telephone
Bluetooth
®
Page 43

X
Select four digits in the number bar using
the control knob.
X
Select OKOK.
X
Enter the number selected previously on
the mobile phone, and confirm.
X
Confirm possible prompts using the mobile
phone.
The Authorization successful.Authorization successful.
message is shown in the display. You will
see the Bluetooth®name of the mobile
phone in the display/selection window.
i
When the Authorization failed.Authorization failed.
message is displayed, you may have
exceeded the prescribed time period.
Repeat the procedure.
Reconnecting a mobile phone
Audio 15 always searches for the last
connected mobile phone. If the last
connected mobile phone cannot be
connected, Audio 15 searches for the mobile
phone that was connected prior to that.
Connecting another mobile phone
If you have paired more than one mobile
phone, you can switch between the individual
phones.
i
You can only switch to another authorized
phone if you are not currently making a call.
Audio 15 can only be connected to one
mobile phone at any one time.
X
Press the % button.
X
Press the : button repeatedly until the
menu bar is selected.
X
Select TelephoneTelephone.
X
Select Connect PhonesConnect Phones.
The display shows all paired mobile
phones. The mobile phone currently
connected is indicated by the # dot.
X
Select the phone that you wish to connect.
Audio 15 searches for the mobile phone. If
it finds a mobile phone, it is connected.
Displaying the Bluetooth®details of a
mobile phone
X
Press the % button.
X
Press the : button repeatedly until the
menu bar is selected.
X
Select TelephoneTelephone.
X
Select Connect PhonesConnect Phones.
The display shows all paired mobile
phones. The mobile phone currently
connected is indicated by the # dot.
X
Select the mobile phone, whose details you
want to display.
X
Use the ; button to select the icon next
to the entry.
X
Select DetailsDetails.
The display shows the following
information on the selected mobile phone:
R
Bluetooth®name
R
Bluetooth®address
Telephone
41
Bluetooth
®
Z
Page 44

R
Availability
R
Authorization status
X
To exit the detailed view: press the
% button.
Unpairing a mobile phone
X
Press the % button.
X
Press the : button repeatedly until the
menu bar is selected.
X
Select TelephoneTelephone.
X
Select Connect PhonesConnect Phones.
The display shows all paired mobile
phones. The currently connected mobile
phone is indicated by the # dot.
X
Select the mobile phone that you want to
unpair.
X
Select the list symbol next to the entry
using the ; button.
X
Select DeleteDelete.
A prompt appears in the display asking
whether the mobile phone should be deauthorized.
X
To unpair: select YesYes.
The mobile phone is unpaired from Audio
15. Bluetooth®access to this mobile phone
is deleted.
X
To cancel the unpairing process: select
NoNo.
The mobile phone is not unpaired from
Audio 15. You have canceled the process.
Using the telephone
Accepting and ending a call
When you receive a call, you will hear a ringing
tone via the Audio 15 loudspeakers. The
phone number of the caller is shown in the
display, if it is not withheld.
i
If the mobile phone supports it, the
ringtone of the mobile phone is played to
signal an incoming call. Otherwise, you will
hear the ringtone specified by Audio 15.
X
To accept a call: press the ; button on
the Audio 15 control panel or multifunction
steering wheel.
Or
42
Telephone
Bluetooth
®
Page 45

X
Select AcceptAccept in the display.
The call is played over the Audio 15
loudspeakers. Audio 15 mutes the active
audio source.
X
Use the control knob to adjust the call
volume, if desired.
X
To end a call: press the = button on the
Audio 15 control panel or multifunction
steering wheel.
Audio 15 plays the active audio source
again.
Rejecting a call
X
Press the = button on the Audio 15
control panel or on the multifunction
steering wheel.
Or
X
Select RejectReject in the display.
Audio 15 plays the current audio source
again.
Making a call
Entering a phone number using the
number keys
X
Press the % button.
X
Enter the desired phone number using the
x to s number keys and the l
button.
i Notes on the l button:
R
to enter **: press the l button once.
R
to enter ++: press the l button twice
within 1.5 seconds.
X
To delete individual digits: press the
í button.
X
To delete the entire numerical
sequence: press and hold the í button
until the entire numerical sequence is
deleted.
Or
X
Press the = button.
X
To finish the entry and make a call: press
the ; button on Audio 15 or on the
multifunction steering wheel.
This initiates dialing.
Entering a phone number using the
control knob
You can also enter a phone number via the
display using the control knob.
Telephone
43
Bluetooth
®
Z
Page 46

X
Press the % button.
The entry line is selected.
X
Select and confirm the digits of the phone
number with the control knob.
X
To delete individual digits: select r.
X
To delete the entire numerical
sequence: select r repeatedly until the
entire numerical sequence is deleted.
Or
X
Select =.
X
To finish the entry and make a call:
select ;.
This initiates dialing.
Calling a contact from the telephone book
It is also possible to call contacts from your
telephone book (Y page 48).
Canceling dialing
X
Press the = button when dialing.
Or
X
Select = in the display.
Audio 15 plays the active audio source
again.
Redialing
X
Press the % button.
X
Press the ; button.
The display shows the most recently dialed
phone numbers.
X
Select the desired phone number.
X
Press the ; button.
This initiates dialing.
Switching the hands-free system on/off
You can switch the hands-free function on or
off during a call.
i
When making a call, instead of CallCall
ListsLists, the display shows MicrophoneMicrophone
OffOff or Microphone OnMicrophone On in the menu bar.
X
Press the : button repeatedly until the
menu bar is selected.
X
To switch on: select Microphone OnMicrophone On.
The The microphone is onThe microphone is on message
appears briefly in the display. The Q
symbol disappears from the display/
selection window.
X
To switch off: select Microphone OffMicrophone Off.
The The microphone is offThe microphone is off message
appears briefly in the display and the Q
symbol appears in the display/selection
window.
44
Telephone
Bluetooth
®
Page 47

Accepting/rejecting a waiting call
If you receive an incoming call while already
making a call, the display shows the incoming
call. You also hear a tone.
i
The call waiting function is only available
if it is supported and has been activated by
the mobile phone network provider.
X
To accept: press the ; button.
Or
X
Press the rotary knob/pushbutton.
You are connected to the new party. The
previous call is ended.
X
To reject: press the = button.
Or
X
Select RejectReject in the display.
The waiting call is rejected.
Transferring a call
From the hands-free system to the mobile
phone
i
If you wish to continue a call in private
mode, you will need to perform the
necessary steps on the mobile phone (see
the mobile phone operating instructions).
From the mobile phone to the hands-free
system
i
If you wish to continue a call using Audio
15, you will need to perform the necessary
steps on the mobile phone (see the mobile
phone operating instructions).
Setting the reception and transmission
volume
If a mobile phone is connected, you can
optimize the reception and transmission
volumes – even during a call. Inquire about
the best possible settings at an authorized
Sprinter Dealer.
i
If reception and transmission volumes
have been incorrectly set, call quality may
be impaired.
X
Press the % button.
X
Press the : button repeatedly until the
menu bar is selected.
X
Select PhonePhone.
X
Select Adjust VolumeAdjust Volume.
X
Select Reception VolumeReception Volume or
Transmission VolumeTransmission Volume.
The display shows the corresponding
volume, including the current and previous
setting.
X
Select the desired volume (-2-2 to +2+2).
X
To exit the menu: press the % button
twice.
Telephone
45
Bluetooth
®
Z
Page 48

Operating a mobile phone using the
multifunction steering wheel
:
Phone book entry
It is possible to accept, end and reject calls
using the multifunction steering wheel. You
can also make calls from your telephone
book.
X
Press the % button on Audio 15.
X
Press the U or V button on the
multifunction steering wheel to select the
TelTel display.
X
To accept a call: press the ; button.
X
To end a call: press the = button.
X
To reject a call: press the = button.
X
To call up the telephone book: call up the
telephone book on Audio 15
(Y page 47).
X
Select the desired phone number by using
the 9 or : button.
X
Press the ; button.
This initiates dialing.
Using call lists
Introduction
You can make calls via one of the following
call lists:
R
received calls (accepted and missed calls)
R
dialed numbers
i
Telephone book entries and call lists of
mobile phones with PBAP (Phonebook
Access Profile) are only available if the
mobile phone is connected to Audio 15. If
you connect a different mobile phone, you
will automatically see its telephone book
entries and call lists. Those of the previous
mobile phone connected are no longer
available.
What is PBAP?
PBAP stands for Phonebook Access Profile
and refers to the possibility of transferring
telephone book entries and call lists from the
mobile phone to Audio 15.
Audio 15 supports this profile. Whether you
can transfer the information mentioned
depends on your mobile phone:
R
Bluetooth®phones with Bluetooth®profile
PBAP: telephone book entries and call lists
are transferred automatically if Audio 15
and the mobile phone are connected to
each other.
R
Bluetooth®telephone without PBAP
Bluetooth®profile: telephone book entries
and call lists are not transferred.
Selecting a phone number from the call
lists
X
Press the % button.
X
Press the : button repeatedly until the
menu bar is selected.
X
Select Call ListsCall Lists.
X
To view received calls: select CallsCalls
ReceivedReceived.
46
Telephone
Bluetooth
®
Page 49

Or
X
To view calls made: select CallsCalls
DialedDialed.
The name and phone number of the chosen
list is shown in the display.
i
Missed calls are identified in the CallsCalls
ReceivedReceived list by the á symbol, located
before the name or number.
X
Select the desired entry.
X
Press the ; button.
Or
X
Press the rotary knob/pushbutton.
This initiates dialing.
i
You can also select the Calls DialedCalls Dialed
call list from the telephone main menu by
pressing the ; button.
Deleting call lists
You cannot delete call lists in Audio 15 .
Using the phone book
Introduction
If your mobile phone allows contacts to be
downloaded via PBAP (Phonebook Access
Profile), the mobile phone's telephone book
is automatically transferred to Audio 15 when
they connect.
i
The telephone book is only available for
as long as the mobile phone is connected.
Calling up the phone book
X
Press the % button.
The entry line is selected.
X
Select NameName.
The display shows the telephone book.
Entries are sorted alphabetically by
surname.
Telephone
47
Bluetooth
®
Z
Page 50

Calling a contact from the telephone
book
X
Call up the telephone book.
X
To find a contact: enter the initial letter of
the desired contact by using the l to
s number keys.
The selection window skips to the first
contact with this initial letter.
X
Select the person you wish to call from the
selection list.
X
To call: press the ; button.
Or
X
Press the rotary knob/pushbutton.
If several phone numbers are stored for one
contact, a list of these phone numbers
appears.
X
Select the desired phone number.
X
Press the ; button again.
Or
X
Press the control knob again.
This initiates dialing.
Displaying contact details
X
Call up the telephone book.
X
Select the desired entry using the control
knob.
X
Select the list symbol next to the entry
using the ; button.
X
Press the rotary knob/pushbutton.
X
Select DetailsDetails.
The display shows the contact details of the
entry chosen.
X
To close the detailed display: press the
% button.
X
Press the % button again.
The display shows the telephone book
again.
X
To exit the telephone book: press the
% again.
Deleting/editing contacts
You cannot edit or delete contacts
transferred onto Audio 15.
Using speed dial
If you have assigned phone numbers to
speed-dial keys on your mobile phone, these
may also be used on Audio 15.
i
This access is only possible if it is
supported by your mobile phone.
48
Telephone
Bluetooth
®
Page 51

X
Press the x to s number key
assigned to the entry for longer than 2
seconds.
The display shows the telephone main
menu with the selected entry. This initiates
dialing.
Bluetooth®audio
Selecting the Bluetooth®audio
function
X
Press the Õ button repeatedly until BTBT
AudioAudio is shown in the menu bar in the
display.
Alternatively, you can select the Bluetooth
®
audio function via the main menu bar.
X
Press the 9 button repeatedly until the
main menu bar is selected.
X
Select AudioAudio.
The display shows all available audio
sources in a selection list.
X
Select BT AudioBT Audio.
You can also specifically choose the
Bluetooth®audio function if the SD, USB or
AUX function is active.
X
Press the n button.
Or
X
Press the : button repeatedly until the
menu bar is selected.
X
Select MediaMedia.
The display shows all available audio
sources in a selection list.
X
Select Bluetooth AudioBluetooth Audio.
i
If a Bluetooth®audio device is already
connected, you will see its name instead of
BT AudioBT Audio.
:
Track/artist
;
Current playback option (no display when
playing in "normal track order")
=
Name of the audio equipment
?
Starts M or stops ¯ playback
A
Data medium position in the list of audio
sources
B
Data medium type (Bluetooth®audio)
Pairing/unpairing an audio device
What does pairing mean?
When pairing, an authorized connection is
established between Audio 15 and an audio
device. Your audio device must be visible.
Information on how to make your audio
device visible can be found in the operating
instructions of your audio device.
Bluetooth®audio
49
Bluetooth
®
Z
Page 52

i
Audio 15 saves the pairing data of up to
10 audio devices. If an additional audio
device is coupled, Audio 15 overwrites the
pairing data for the audio device that has
not been connected to it for the longest
period of time.
There are two ways of pairing:
R
Bluetooth®pairing: Audio 15 searches for
the audio device and starts the pairing
process
R
Bluetooth®external: the audio device
searches for Audio 15 and starts the pairing
process
i
If you pair a mobile phone as an audio
device, it is automatically paired as a
mobile phone as well, as long as your
mobile phone supports this.
Pairing an audio device via Bluetooth
®
X
Select the Bluetooth®audio function.
X
Press the : button repeatedly until the
menu bar is selected.
X
Select BT AudioBT Audio.
X
Select Bluetooth Device ListBluetooth Device List.
X
Carry out further steps as described for
pairing a mobile phone (Y page 39).
Pairing an audio device externally via
Bluetooth
®
X
Select the Bluetooth®audio function.
X
Press the : button repeatedly until the
menu bar is selected.
X
Select BT AudioBT Audio.
X
Select Bluetooth Device ListBluetooth Device List.
X
Carry out further steps as described for
pairing a mobile phone (Y page 40).
Reconnecting an audio device
Audio 15 connects automatically to a
Bluetooth®audio device in the following
cases:
R
both previously connected mobile phones
were used as audio devices
R
the mobile phones establishes the
connection automatically
i
Audio 15 does not connect automatically
to an audio device that does not have a
telephone function, even if this was the last
Bluetooth®device connected.
X
To reconnect an audio device without
a telephone function: select the
Bluetooth®audio function.
If no audio device is connected, the NoNo
Bluetooth Audio Device ConnectedBluetooth Audio Device Connected
message appears in the display.
X
Use the : or 9 button to select
Connect Last DeviceConnect Last Device.
X
Press the rotary knob/pushbutton.
Audio 15 searches for the audio device. If
it finds an audio device, it is connected.
Connecting another audio device
If you have paired more than one audio
device, you can switch between the individual
devices.
X
Select the Bluetooth®audio function.
X
Select BT AudioBT Audio using the : button.
50
Bluetooth®audio
Bluetooth
®
Page 53

X
Select Bluetooth Device ListBluetooth Device List.
The display shows all paired audio devices.
The audio device currently connected is
indicated by the # dot.
X
Select the audio device that you want to
connect.
Audio 15 searches for the audio device. If
it finds an audio device, it is connected.
Displaying audio device details
X
Select the Bluetooth®audio function.
X
Press the : button repeatedly until the
menu bar is selected.
X
Select BT AudioBT Audio.
X
Select Bluetooth Device ListBluetooth Device List.
The display shows all paired audio devices.
The audio device currently connected is
indicated by the # dot.
X
Select the audio device, whose details you
want to display.
X
Use the ; button to select the icon next
to the entry.
X
Select DetailsDetails.
The display shows the following
information on the selected audio device:
R
Bluetooth®name
R
Bluetooth®address
R
availability
R
authorization status
X
To exit the detailed view: press the
% button.
Unpairing an audio device
X
Select the Bluetooth®audio function.
X
Press the : button repeatedly until the
menu bar is selected.
X
Select BT AudioBT Audio.
X
Select Bluetooth Device ListBluetooth Device List.
The display shows all paired audio devices.
The audio device currently connected is
indicated by the # dot.
X
Carry out further steps as described for
unpairing a mobile phone (Y page 42).
Bluetooth®audio
51
Bluetooth
®
Z
Page 54

Playing audio files
Starting/stopping playback
X
Press the : button repeatedly until the
menu bar is selected.
X
To start playback: select M in the menu
bar.
Playback starts.
X
To stop playback: select ¯ in the menu
bar.
Playback stops.
Interrupting playback
i
Not all Bluetooth®audio devices support
this function.
X
Press the 8 button.
The sound is switched off. Playback is also
stopped on the audio device.
Starting playback after a pause
If the Bluetooth®connection breaks, the NoNo
Bluetooth Audio Device ConnectedBluetooth Audio Device Connected
message appears in the display. The search
for available audio devices begins.
i
When the search has ended, the audio
device can be reconnected.
X
Select Connect Last DeviceConnect Last Device.
Playback starts immediately if the audio
device permits it.
X
If the Bluetooth Audio Device PausedBluetooth Audio Device Paused
message is shown in the display, start
playback manually.
Selecting a track
i
Not all Bluetooth®audio devices support
this function.
X
Press the C/D button.
You will hear the previous/next track.
Selecting a playback option
You may select from the following track
playback options:
Playback
option
Operation
Normal track
sequence
Tracks are played in the
same order as they are
stored on the Bluetooth
®
audio device.
Random
tracks
All the tracks on the
Bluetooth®audio device
are played in random order.
i
Not all Bluetooth®audio devices support
this function.
X
Press the : button repeatedly until the
menu bar is selected.
X
Select BT AudioBT Audio.
The playback option currently selected is
indicated by the # dot.
52
Bluetooth®audio
Bluetooth
®
Page 55

X
To select a playback option: select
Normal Track SequenceNormal Track Sequence or RandomRandom
TracksTracks.
You will hear the tracks in the desired
playback option. If you have selected
RandomRandom TracksTracks, the display in the display/
selection window shows RandomRandom in front of
the symbol for the audio device.
X
To exit the menu: press the % button.
Increasing the volume
If you play audio files from an audio device, it
is possible that the volume may need to be
significantly increased. You can therefore
select from two volume options:
Volume
option
Operation
Standard The audio device is played
at normal volume.
Boost The audio device is
amplified.
i
The varying volumes of audio sources can
mean that system messages (e.g. traffic
and navigation announcements) are played
at a noticeably increased volume. If
necessary, please deactivate the system
messages or adjust their volume manually.
X
Press the : button repeatedly until the
menu bar is selected.
X
Select BT AudioBT Audio.
X
Select VolumeVolume.
The current volume option is identified by
the # dot.
X
To select the volume option: select
StandardStandard or BoostBoost.
You have set the volume option.
X
To exit the menu: press the % button.
Operating an audio device using the
multifunction steering wheel
You can call up the previous or next track in
the current folder using the multifunction
steering wheel.
X
Select Audio 15 via the BT Audio function.
X
Using the U or V button on the
multifunction steering wheel, select the
BTBT display.
The on-board computer display shows
track currently being played ;.
X
Call up the previous or next track using the
9 or : button on the multifunction
steering wheel.
Bluetooth®audio
53
Bluetooth
®
Z
Page 56

54
Page 57

Important safety notes ....................... 56
Connecting an external device .......... 56
Selecting the AUX function ................ 56
Increasing the volume ........................ 56
55
AUX function
Page 58

Important safety notes
G
WARNING
Handling discs while driving may distract you
from traffic conditions. You could also lose
control of the vehicle. There is a risk of an
accident.
Handle discs only when the vehicle is
stationary.
Connecting an external device
You may connect an external device and play
it back via the loudspeakers. The AUX jack
intended for this purpose (3.5 mm stereo
audio jack) is located in the stowage
compartment on the driver's side of the
dashboard.
X
Connect an external device to the AUX
jack.
i
An adapter cable is required for the AUX
jack.
i
If you connect an external device, Audio
15 does not automatically switch over to
the AUX function.
Selecting the AUX function
X
Press the Õ button repeatedly, until the
display in the menu bar shows AUXAUX.
Audio 15 plays the external device and
produces sound through the loudspeakers
again.
Alternatively, you can select the AUX function
in the main menu bar.
X
Press the 9 button repeatedly until the
main menu bar is selected.
X
Select AudioAudio.
The display shows all available audio
sources in a selection list.
X
Select AUXAUX.
You can also select the AUX function
accordingly when the SD, USB or BT Audio
function is active.
X
Press the m button.
Or
X
Press the : button repeatedly until the
menu bar is selected.
X
Select MediaMedia.
The display shows all available audio
sources in a selection list.
X
Select AUXAUX.
Increasing the volume
If you connect an external device via its
headphones jack, it may be the case that the
volume must be increased significantly. You
can therefore select from two volume
options:
56
Increasing the volume
AUX function
Page 59

Volume
option
Operation
Standard The external device is
played back at a normal
volume.
Boost The external device is
played back louder.
i
External devices may have different
volumes, which can mean that system
messages such as traffic announcements
and navigation system announcements are
much louder. If necessary, please
deactivate the system messages or adjust
their volume manually.
X
Press the : button repeatedly until the
menu bar is selected.
X
Select VolumeVolume.
The current volume option is identified by
the # dot.
X
To select the volume option: select
StandardStandard or BoostBoost.
You have set the volume option.
X
Set the Audio 15 volume to an average
value.
X
Connect the external device and select the
AUX function.
X
Increase the volume of the external
equipment as much as possible without
distortion.
X
Set the desired Audio 15 volume.
Increasing the volume
57
AUX function
Z
Page 60

58
Page 61

Requirements for SD memory
cards/USB devices ............................. 60
Supported file formats ....................... 60
Apple device support .......................... 60
SD memory card/USB device file
structure .............................................. 61
59
Technical data
Page 62

Requirements for SD memory cards/
USB devices
SD memory cards
Model SD, SDHC
Capacity 32 GB
Format FAT/FAT32
i
SD memory cards are available in many
different sizes. Therefore, it cannot be
guaranteed that playback is possible with
every SD memory card.
USB devices
The following USB devices are supported:
R
USB sticks
R
USB hard drives
R
certain MP3 players
Model USB 2.0
Format FAT/FAT32, maximum
of 4 primary partitions
Hard drive size 2.54 cm (1 in)
4.57 cm (1.8 in)
6.35 cm (2.5 in)
Hard drive: startup/permanent
current, max.
(with separate
power supply, if
necessary)
800 mA
i
USB devices are available in many
different sizes. Therefore, it cannot be
guaranteed that playback is possible with
every USB device.
i
Do not use a USB extension cable.
i
Do not use a spiral cable for the USB port.
Supported file formats
SD memory card/
USB device
MP3, AAC, WMA, WAV,
MP4, M4A, M4B
(maximum 2 channels)
BT Audio SBC, MP3
i
To shorten the initialization period, only
load music files onto the USB device, if
possible.
i
Unsupported file formats are not
displayed.
Audio 15 does not support any DRM (Digital
Rights Management) coded files.
Apple device support
You can play music files stored on Apple
devices via AUX, USB or BT Audio. The
following Apple devices are supported:
R
iPod®classic, 6th generation onwards
(limited support for 5th generation)
R
iPod®nano, 3rd generation onwards
(limited support for 1st and 2nd
generations)
R
iPod®touch
R
iPhone
®
i
iPod®and iPhone®are registered
trademarks of Apple Inc., Cupertino,
California, USA.
60
Apple device support
Technical data
Page 63

SD memory card/USB device file
structure
Maximum number
of folders per
directory
200
Maximum number
of tracks per
directory
1000
Maximum number
of tracks in
"Random tracks"
random playback
300
SD memory card/USB device file structure
61
Technical data
Page 64

62
Page 65

63
Page 66

64
 Loading...