

Page 1
Thermal Printer
Model TSSP-TMPTR
Retrot / Installation Instructions
Manual # Revision Date Changes from Previous Revision
000-2080 C July 2012 Added Firmware update Instructions
Franklin Fueling Systems • 3760 Marsh Rd. • Madison, WI 53718 USA
Tel: +1 608 838 8786 • 800 225 9787 • Fax: +1 608 838 6433 • www.franklinfueling.com
Page 2
Printer Installation
The following instructions are for the addition of an internal
printer or replacement of an existing printer in a T5 Series
Fuel Management System.
Note: The thermal printer requires controller module
rmware rev 1.5 or higher. Refer to page 7
Updating Console Firmware.
Included with Printer:
• Plastic Bezel
• Thermal Printer on PCB (Printed Circuit Board)
• Hardware includes:
• (2) stand-offs
• Mounting screws
(Quantity, size and
use shown in chart)
Note: Use only the
provided hardware
to mount the printer.
(4) #6 (2) #8 (2) #10
For lower
4 holes in
the PCB
For top of
PCB, in
stand-offs
For
Plastic
Bezel
Installation Procedure
Warning
1. Open the Tank Gauge front door.
2. Remove the front door’s inside cover plate by
unscrewing the screws located on the plate.
(Number of screws vary by model).
Disconnect power before opening the
console cover.
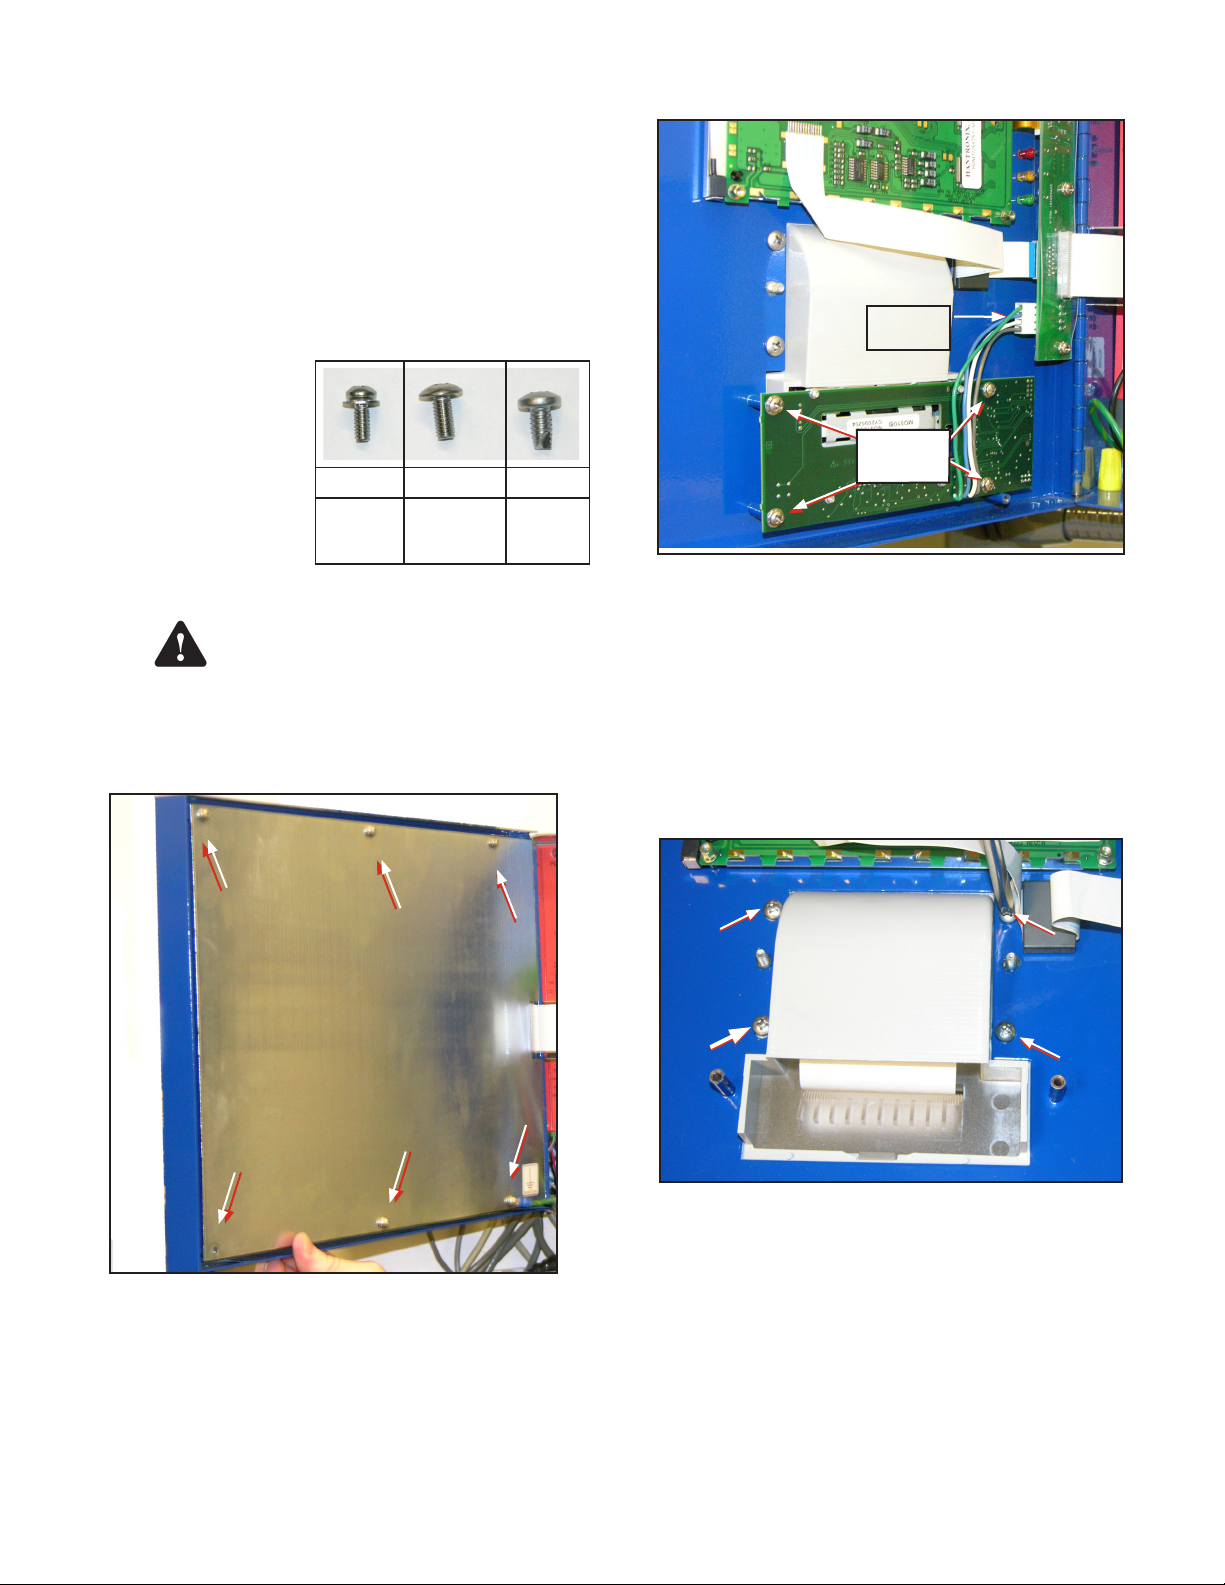
3. Disconnect the cable that connects the impact
printer to the interface board in the front door.
Remove
Cable
Remove
Screws
Figure 2: Disconnect Old Printer
4. Remove the roll of paper from the printer.
5. Remove the 4 screws that hold the impact printer
to the front door.
Note: Be careful not to damage the ribbon cable.
6. Pull the printer gently and slowly a couple of
inches away from the door. Completely remove the
impact printer board.
7. Remove the 4 screws that hold the printer’s plastic
cover printer to the front door.
Figure 1: Remove Inside Cover Screws
To Retrot a Printer in a Console Without One
a. Remove the 4 nuts that secure the blank-off
plate.
b. Remove the plate (blank-off plate may stick to
the overlay).
c. Carefully cut out the part of the overlay that
covers the printer opening using a sharp knife.
Go to step 9.
2
Figure 3: Remove Plastic Cover
8. Remove the plastic cover.
9. Place the new plastic bezel over the cutout in the
front door. Fasten the bezel to the enclosure using
the two #10 self-tapping screws supplied Start the
screws in the lower two mounting holes. Do not
tighten screws all the way at this time. These screws
will be tightened after installing the printer assembly.
10. Install the 2 stand-offs on the studs located next to
the printer opening (Figure 4).
Page 3

Figure 4: Install Stand-offs
11. Mount the printer so that the clear printer cover
faces outward of the front door.
16. Replace the metal inside cover plate on the front
door and fasten the screws. Make sure to reattach
the ground connector to the plate.
17. Lift up on the green panel to open the printer and
load paper (Figures 7-9). Make sure the roll is
oriented as shown.
Figure 7: Load Paper
Plastic Bezel
Figure 5: Mount Printer in Door
12. Attach the 6 screws for the thermal printer board to
the front door (Figure 6). Refer to the screw chart
on the previous page.
Foam Pad
Cable Connected
Figure 6: Printer Circuit Board Installed
13. Connect the cable from the thermal printer board
to the interface board of the front door (Figure 6).
14. Tighten the two screws that hold the plastic bezel
by inserting a screwdriver through the access
holes in the circuit board.
15. Check to make sure the foam pad covers the corner
of the circuit board where the power cables connect.
Figure 8: Do NOT load paper from door, Do NOT have paper
wound loosely
Figure 9: Paper Loaded Correctly
18. Close the printer door.
19. Restore power to the tank gauge.
Paper Specications
Type: Thermal Printer Paper
Width: 58 mm (2.28")
FFS part #: TS-TP2 (box of 5 rolls)
TS-TP2C (Carton of 20 boxes = 100 rolls)
3
Page 4

To print a test page
1. Once the tank gauge is on, press the Main Menu
key on the LCD with the gure of a table
(Figure 10).
Figure 10: Select Main Menu
2. Press the arrow on the right side bar once.
4. Press Print Test Page.
Figure 13: Print Test Page
Printer Operation Notes
• On rare occasions, when printing excessively long
reports at high ambient temperature, the printer may
need to pause momentarily. Printing will resume
automatically after a few seconds.
• An open printer door or no-paper will generate an out-ofpaper alarm.
• If you are trying to print and the paper is spooling but no
text is printing, check paper roll orientation per Figure 7.
• The paper tear-bar is located at the top. Tear the paper
with a lifting motion (Figure 14).
3. Press Diagnostics.
4
Figure 11: Select Arrow Down
Figure 14: Tear Paper with Lifting Motion
Figure 12: Select Diagnostics
Page 5

To Setup a New Printer on a Console That Had No Printer
To physically install the printer, follow Printer Installation steps starting with step 9 on page 2.
The following steps illustrate how to program the T5 system through the computer connection when adding an internal
printer. Log on to the console using a web browser interface (Refer to FMS Operator’s Guide for further information).
From the System Screen, click on Setup
Select System Conguration
Select Modules Expected
A list of all potential modules will be displayed. The number next to the module represents the number of modules that
should be installed. When adding any module to the system, you must increase that module number by 1.
Click on the 0 next to Printer.
5
Page 6

Change the 0 to a 1
Click Yes to Save Changes
If prompted, enter the administrative password
Conrm that the Printer number is now 1. The system will now “look” for an internal printer
6
Page 7

To Replace an Existing Thermal Printer
Warning
1. Remove the back panel shown in Figure 1.
2. Remove the 6 screws as shown in Figure 6.
3. Remove the cable connection.
4. If the existing plastic bezel will still be used, follow installation instructions starting with step 12 on page 3.
5. Print a test page to verify operation.
Disconnect power before opening the console cover.
Updating Console Firmware
To update the rmware on the console, on the internet, go to http://www.franklinfueling.com/ and select
Service and then Software Downloads. After you select the type of console you have, you will also be able
to download the Upgrade Installation Instructions and Release Notes.
7
Page 8

©2012 FFS 000-2080 Rev C
 Loading...