

Page 1
[EN] Use and installation manual 2
[IT] Manuale d’istallazione e uso 20
[DE] Bedienungs-und Montageanleitung 38
[FR] Manuel d’installation et d’utilisation 56
[ES] Manual de instalación y uso 74
model: 7341/645
induction vitroceramic hob
piano cottura induzione in vetroceramica
glaskeramik-induktions-kochfeld
table de cuisson induction en vitrocéramique
placa inducción en vitrocerámica
Page 2

[EN] use and installation manual
Dear Customer,
ENGLISH
congratulations on your purchase.
Please carefully read the instructions for installation and use before using the
cooktop for the first time.
The instructions contain important information for installation, safety, use and
maintenance.
This will protect you from injury and prevent damage to the cooktop.
The manufacturer will not be held liable for damage caused by failure to comply with the
safety instructions and warnings.
Keep the instructions in a safe place and pass them along to any future owner.
TABLE OF CONTENTS
PART 1 - User Guide
important safety instructions 3
Intended use 3
Children at the cooktop 3
Technical safety 3
Proper use 4
induction cooking 6
Advantages of induction cooking 6
Cookware 6
Correct cookware positioning 7
overview 8
Control panel sensor keys 8
Display symbols and leds 9
using the cooktop 10
Switching the appliance on 10
Switching the appliance off 10
Switching the cooking zones on 10
Switching the cooking zones off 10
Pot detection 10
Residual heat 10
Timer 10
Egg timer/reminder 11
Pause 11
Recall 11
Control lock 12
2
Child safety lock 12
Special programs: Warming, Melt, Simmer,
Power Boost, Automatic warm-up 12
Safety switch 13
Bridge (Flexible cooking zones) 14
Power management 15
Technical specifications 15
troubleshooting 16
cleaning and care 18
Important information 18
General information 18
Cleaning the cooktop 18
protecting the environment 19
Disposal of the packing material 19
Disposal of your old appliance 19
Energy-saving advice 19
PART 2 - Installer Guide
installation 20
Installing the cooktop 20
Positioning 22
Ventilation 22
Worktop cut-out 22
Electrical connections 23
Page 3
PART 1 - User Guide
important safety instructions
WARNING!
READ THE OPERATING INSTRUCTIONS CAREFULLY
BEFORE USING THE COOKTOP!
THIS APPLIANCE IS INTENDED FOR
RESIDENTIAL COOKING ONLY.
Intended use
• Use the cooktop only in household-type situations for the preparation and
warming of food. All other types of use are not permitted.
• This cooktop is not intended for outdoor use or in mobile locations such as
ships.
• Individuals who are incapable of using the appliance safely because of their
physical, sensory or mental capabilities or their lack of experience or knowledge
must not use this appliance without supervision or instruction by a responsible
person.
Children at the cooktop
• Children under 8 years of age must be kept away from the cooktop unless they
are under constant supervision.
• Children 8 years and older must only be allowed to use the cooktop if they have
been given supervision or instruction concerning use of the appliance in a safe
way and understand the hazards involved.
• Children shall not play with the appliance.
• Cleaning and user maintenance shall not be made by children without supervision.
• Risk of suffocation! Children could wrap themselves in packaging materials
(e.g. foil) or pull it over their heads during play and suffocate. Keep packaging
materials out of the reach of children.
• Risk of burns! Keep the spaces above and behind the cooktop clear of any
items that could draw the interest of a child. Otherwise, a child could be tempted
to climb onto the cooktop.
• Risk of scalding and burns! ALWAYS turn pot/pan handles inward so that they
do not extend out from the cooktop, where they could be grabbed. This helps
reduce the risk of burns and scalding.
• If available, use the Child Safety Lock to prevent children from turning the cooktop
on. When using the cooktop, turn on the Control Lock to prevent children from
changing the (selected) settings.
ENGLISH
Technical safety
• Installation, repair and maintenance work should only be performed by an
authorized service technician. Work by unqualified persons could be dangerous
for the user.
3
Page 4

important safety instructions
• Connection of the cooktop to the electrical power supply must only be performed
ENGLISH
by a qualified electrician.
• A damaged cooktop can be dangerous. Before installing the cooktop, check for
visible damage. Do not operate a damaged appliance.
• The electrical safety of this cooktop can only be guaranteed if proper grounding
has been installed in compliance with applicable regulations. It is imperative that
this basic safety requirement be met. If in doubt, have the house wiring checked
by a qualified electrician.
• Before installation, make sure that the voltage and frequency on the cooktop’s
data plate correspond with the household electrical supply. These ratings
must match to prevent damaging the cooktop. If in doubt, consult a qualified
electrician.
• Before installation, maintenance or repair work is performed, disconnect the
cooktop from the electrical power supply.
• Multiple power outlets or extension cords are not safe (risk of fire). Do not use
them to connect the cooktop to the electrical power supply.
• To ensure safe operation, use the cooktop only when it has been properly
installed.
• Do not under any circumstances open the cooktop housing. Any contact with
connections carrying voltage or changes to the electrical or mechanical set-up
will endanger you and may impair the functioning of the cooktop.
• Only with original spare parts can the manufacturer guarantee the safety of the
appliance. Defective components should only be replaced with original parts.
• Risk of electric shock! If the cooktop is defective or chipped, cracked or broken
in any way, immediately switch it off and do not continue to use it. Disconnect it
from the electrical power supply.
• WARNING: If the supply cord of the appliance is damaged, it must be replaced
by the manufacturer, its service agent or similarly qualified persons in order to
avoid a hazard.
Proper use
• WARNING: The appliance and its accessible parts become hot during use.
Care should be taken to avoid touching heating elements.
• WARNING: Unattended cooking on a hob with fat or oil can be dangerous and
may result in fire. NEVER try to extinguish a fire with water, but switch off the
appliance and then cover flame e.g. with a lid or a fire blanket.
• WARNING: The cooktop is hot during use and remains so for some time after
being switched off. The risk of burns remains until the residual heat indicators
have gone out.
• CAUTION: The cooking process has to be supervised. A short term cooking
process has to be supervised continuously.
• DANGER OF FIRE: Do not store items on the cooking surfaces!
• Metallic objects such as knives, forks, spoons and lids should not be placed on
4
Page 5

important safety instructions
the hob surface since they can become hot.
• Always switch the cooking zones off after use!
• Spray cans, flammable liquids or flammable materials can ignite if heated. If
there is a drawer below the appliance, do not store flammable items in the
drawer. If there is a cutlery tray below the cooktop, it must be made of heatresistant material.
• Flames can set fire to the grease filters in the exhaust hood. Never flambé food
under an exhaust hood.
• Never heat empty cookware or an empty pot! This can damage the glass
ceramic surface.
• Never use the cooktop to heat closed cans. The increased pressure can cause
the cans to explode.
• If using a small appliance (e.g. a hand mixer) in the vicinity of the cooktop, make
sure that the power cord does not come into contact with the hot cooktop. The
insulation of the cord could get damaged.
• Salt, sugar, and grains of sand or dirt (e.g. from fresh vegetables) between the
cookware and the cooktop can cause scratches. Keep cooktop and cookware
clean.
• Rough cookware can scratch the glass ceramic surface. Use only pots and
pans with a smooth bottom.
• Even light objects such as a salt shaker can cause cracks and chips if they
fall on the glass ceramic surface. Do not drop anything on the glass ceramic
surface.
• Hot objects on the sensor areas or indicators can damage the electronics
underneath. Never place hot pots or pans on the sensor areas or indicators.
• Metal objects stored in a drawer under the cooktop can become hot when the
cooktop is in heavy use over a longer period of time. Do not store metal objects
in a drawer under the cooktop!
• The appliance is not intended to be operated by means of an external timer or
separate remote-control system.
• For users who wear a pacemaker: When the cooktop is in use it is surrounded
by an electromagnetic field. It is unlikely that this will affect a pacemaker.
However, if in doubt consult the manufacturer of the pacemaker or your doctor.
• Objects affected by electromagnetic fields, for instance credit cards, CDs and
calculators, should be kept away from the cooktop when it is on.
• Because induction heating works so quickly, the temperature of the cookware
bottom can quickly reach the ignition point of oils and fats. Never leave the
cooktop unattended during use!
• The cooktop is equipped with a cooling fan. If there is a drawer below the
installed appliance, you will need to ensure there is enough space to allow for
ventilation. Do not use the drawer to store sharp or small objects or paper. They
could pass through or be sucked into the vents in the housing and damage the
fan blades or otherwise interfere with cooling.
ENGLISH
5
Page 6
induction cooking
Advantages of induction cooking
ENGLISH
When cooking with induction, heat is generated directly in the base of the pan.
This provides many benefits for you:
• Time saving when boiling and frying. Cookware is heated directly.
• Less energy is consumed.
• Easy cleaning and maintenance. Spilled food does not burn onto the cooktop
so quickly.
• Controlled supply of heat and increased safety. The burner reacts immediately
to any power change, so heating can be dosed precisely. Heating is interrupted
when you remove the cookware from the burner even if the burner is still
switched on.
Cookware
Only ferromagnetic cookware made of the following materials is suitable for
induction cooktops:
• Enameled steel
• Cast iron
• Induction-capable cookware of stainless steel.
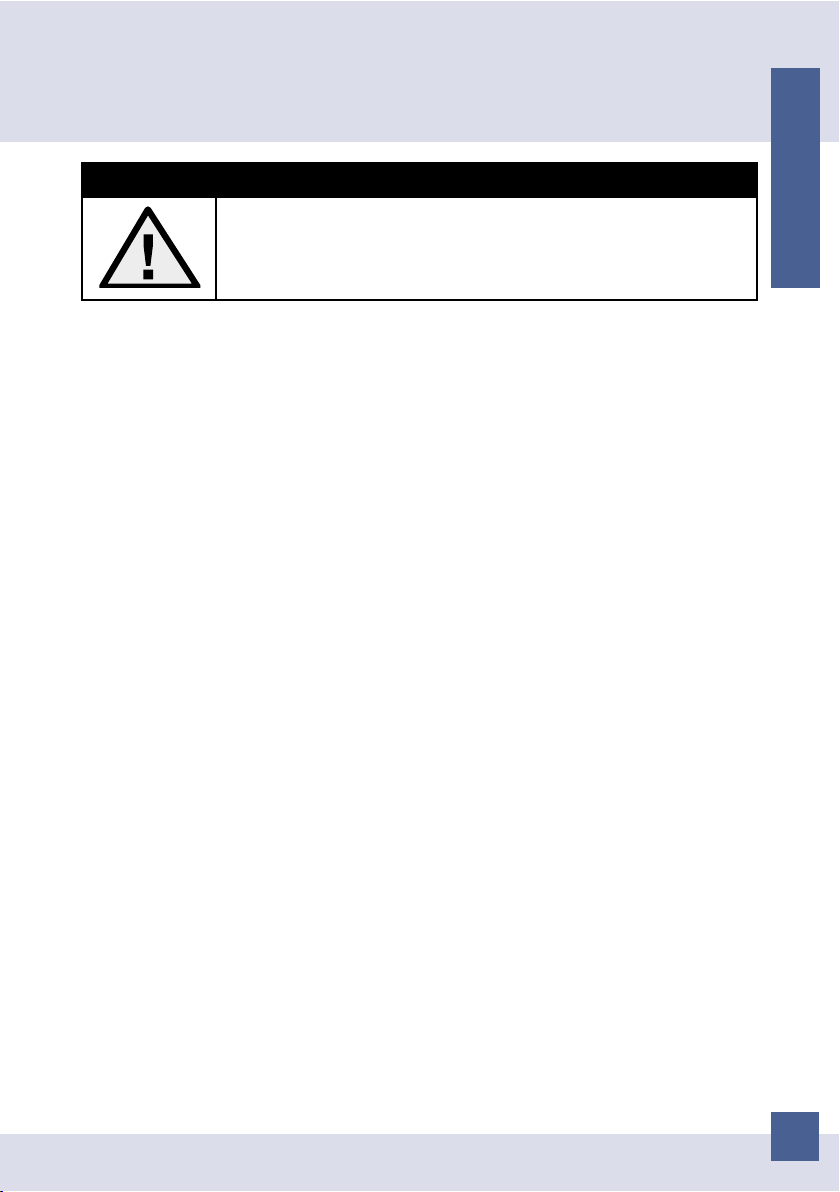
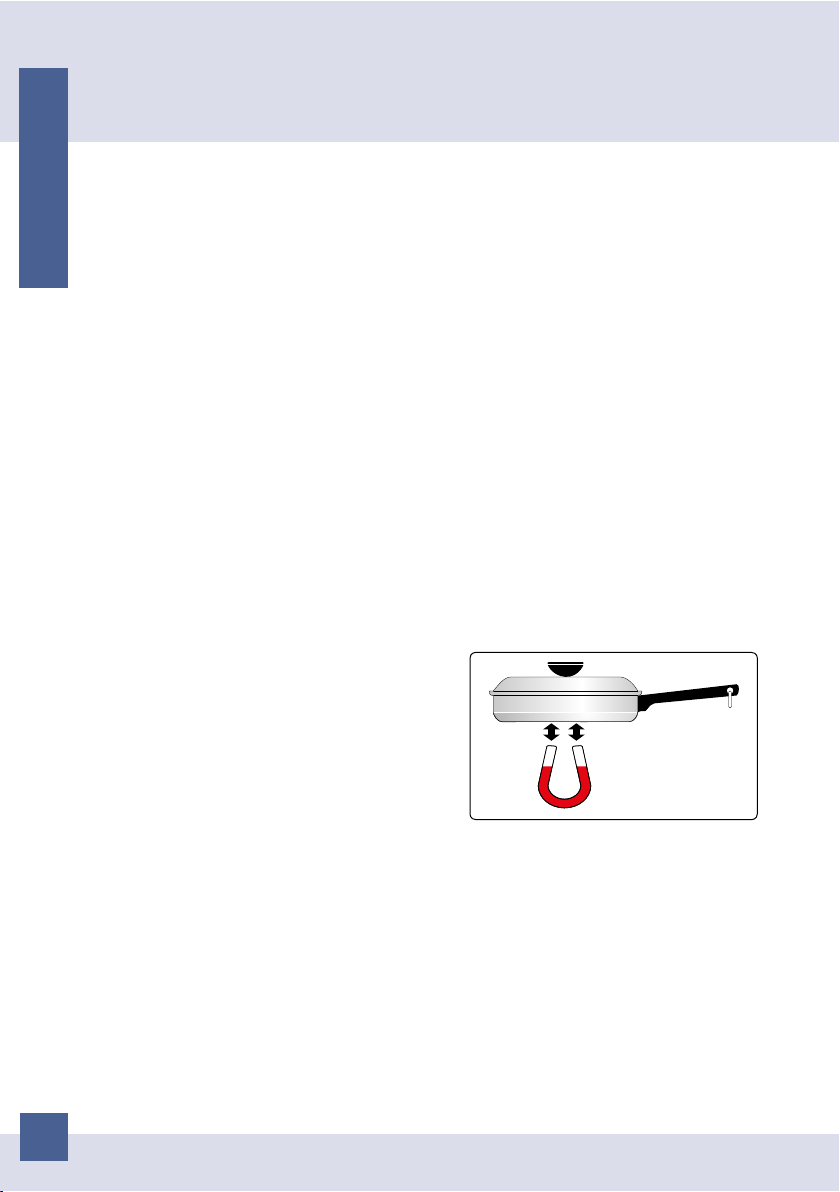
To determine whether the cookware is
suitable, check whether the base of the pot
or pan attracts a magnet.
There are other induction-capable pots
and pans whose bases are not completely
ferromagnetic. If the base of the cookware it’s
not completely ferromagnetic, only the area
that is magnetizable will get hot. Thus it can
happen that the heat is not distributed evenly.
To get good cooking results, we recommend that the dimension of the
ferromagnetic area of the cookware match the size of the burner.
Unsuitable cookware
Do not ever use adapter plates for induction or cookware made of:
• Traditional stainless steel
• Glass
• Clay
• Copper
• Aluminum
6
Page 7
induction cooking
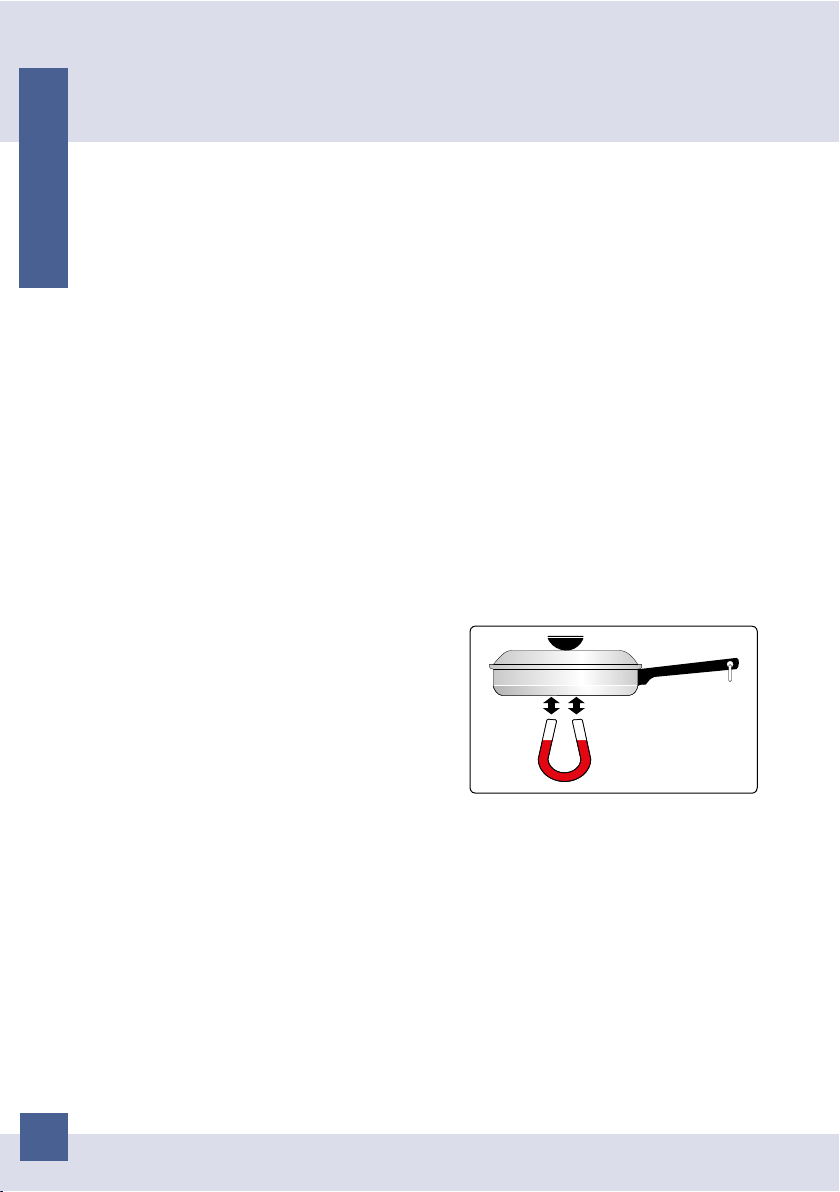
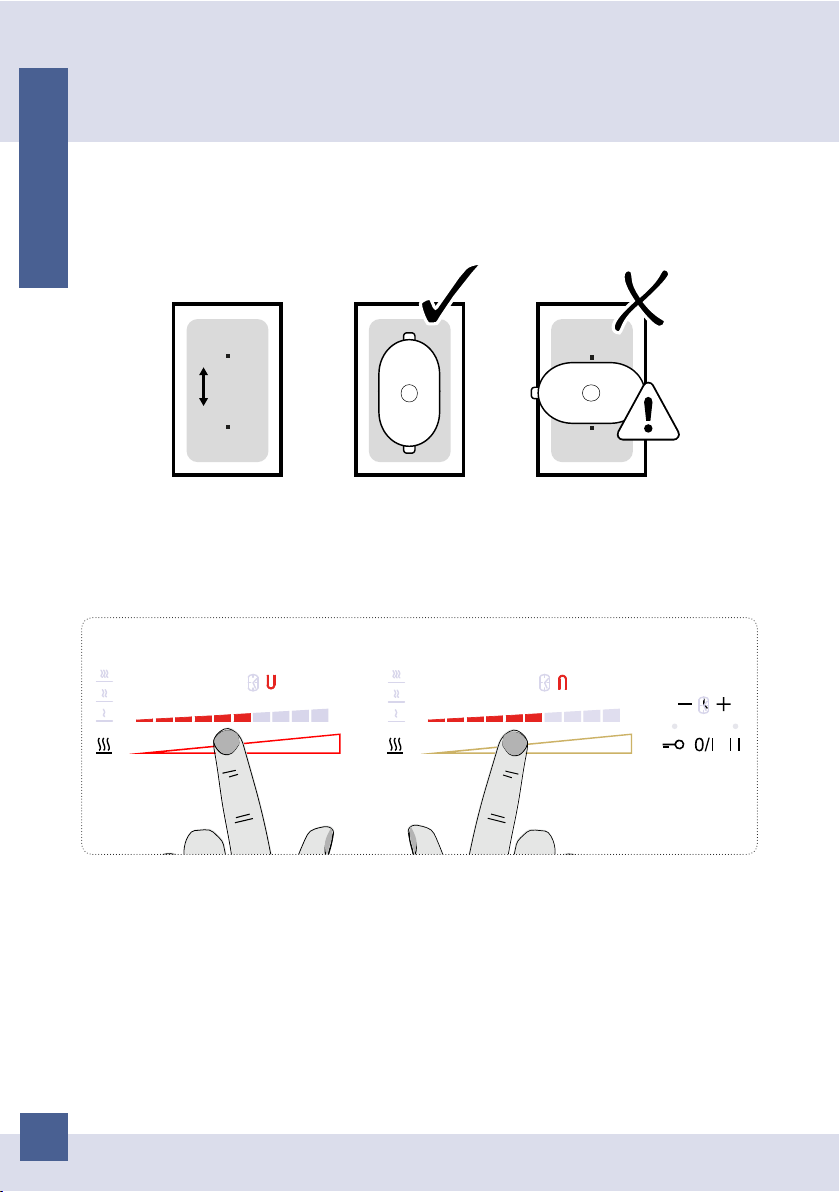
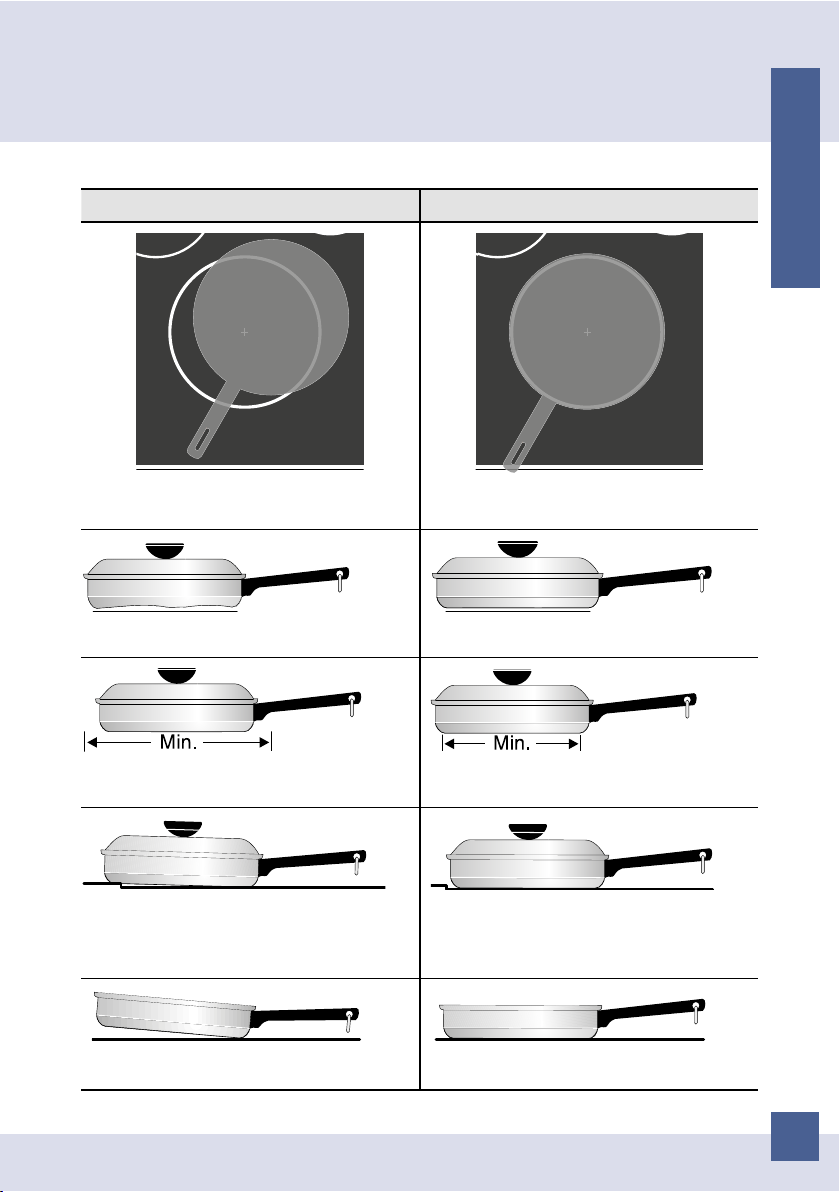
Correct cookware positioning
INCORRECT CORRECT
ENGLISH
Cookware not centered on Cooking Zone
surface.
Curved or warped pan bottoms or sides. Flat pan bottom & straight sides.
Pan does not meet the minimum size
required for the Cooking Zone.
Pan bottom rests on cooktop trim or does
not rest completely on the cooktop surface.
Cookware centered correctly on Cooking
Zone surface.
Pan size meets or exceeds the
recommended minimum size for the
Cooking Zone.
Pan rests completely on the Cooktop
surface.
Heavy handle tilts pan. Pan is properly balanced.
7
Page 8

overview
9 9
02 5
min
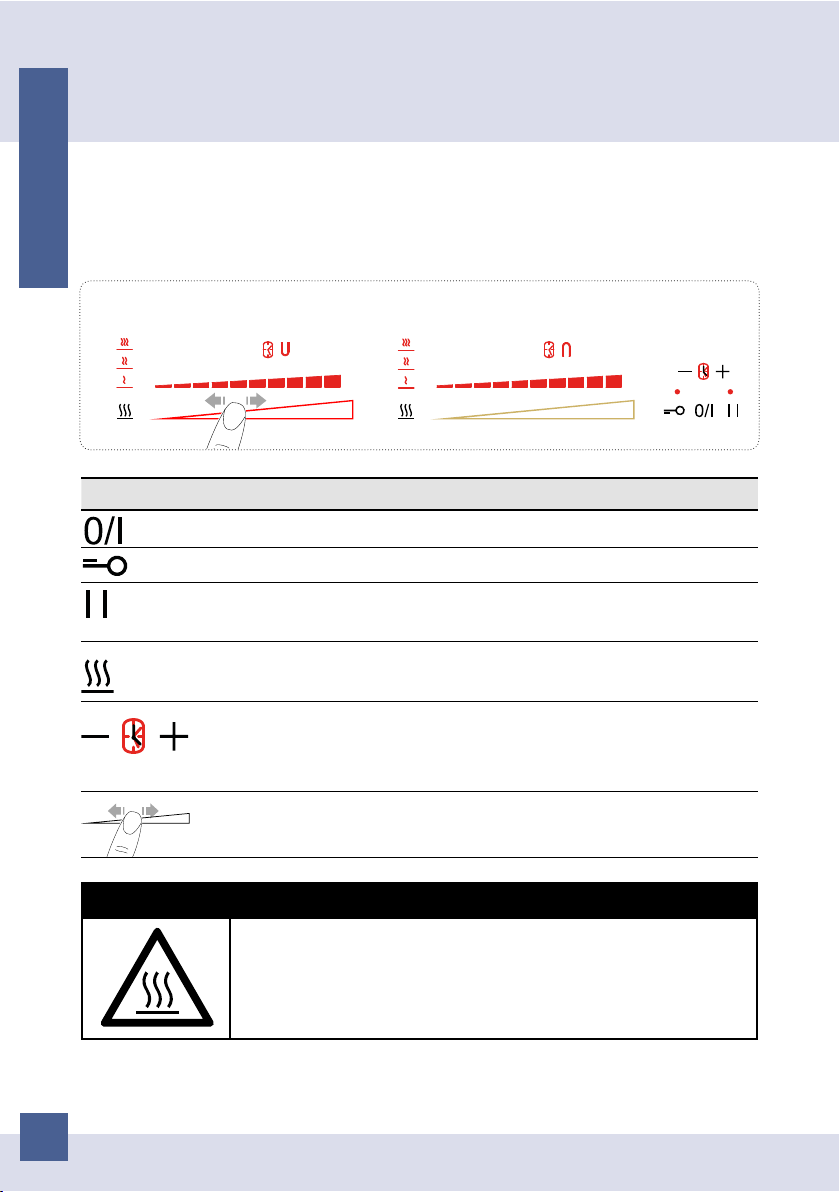
Control panel sensor keys
ENGLISH
The appliance is operated using the control panel sensor keys.
Functions are controlled by touching the sensor keys and confirmed by displays
and acoustic signals. Touch the sensor keys from above, without covering other
sensor keys.
Sensor
key
WARNING! Risk of burns from heat emitted.
Lengthy cooking on higher settings with larger cookware on the front cooking
zones can heat the sensor fields. Take care when touching sensor fields.
Function
Power key - press to switch on the appliance
Control Lock key - press to activate ‘‘Control lock” function
Pause/Recall key - press to activate ‘‘Pause’’ or ‘‘Recall’’ function
‘Programs’ key - press to activate ‘‘Warming’’, ‘‘Melt’’ or ‘‘Simmer’’
program
Timer - press [+] and/or [-] to activate and set a cooking zone
“Timer”, or to set an ‘‘Egg timer/Reminder”
Slidebar - Slide left or right to activate and set the heat level of a
cooking zone
8
Page 9
a 4
0 4
1 4-9 4
025
0 4
h 4
p 4
a 4
e 4
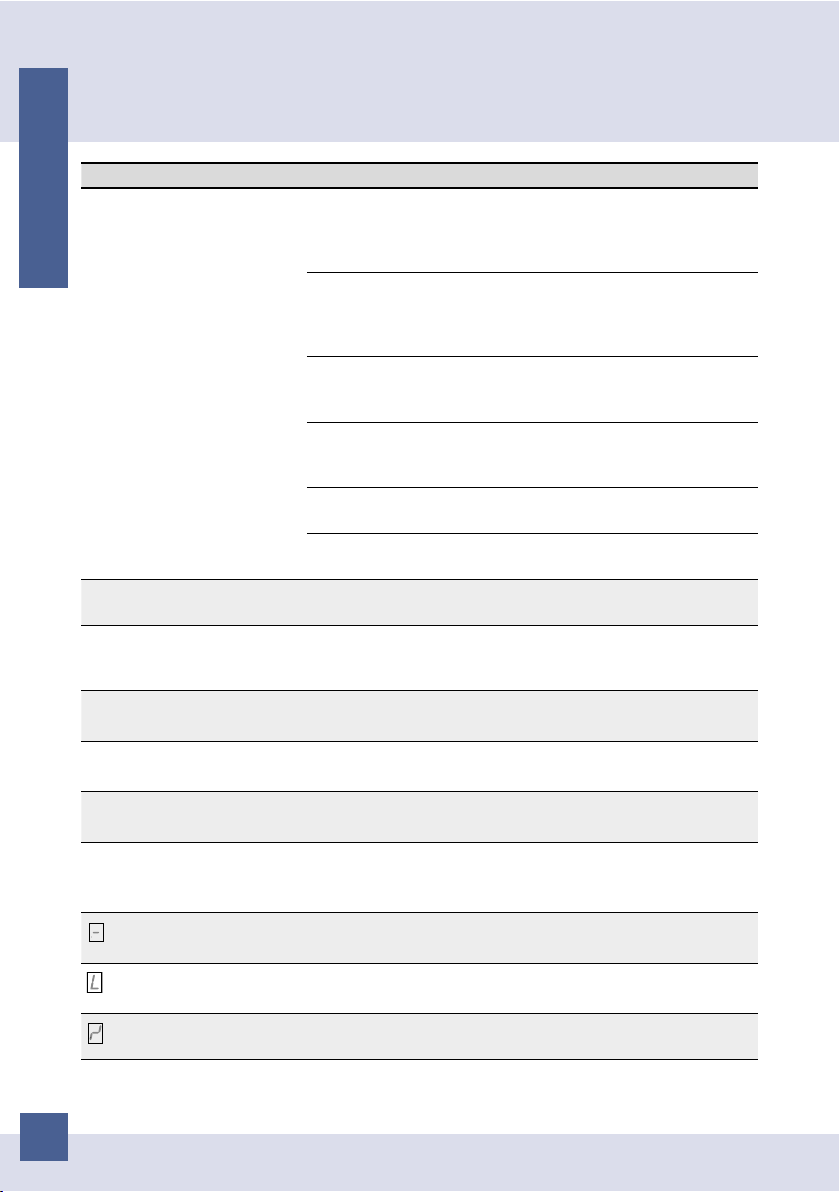
overview
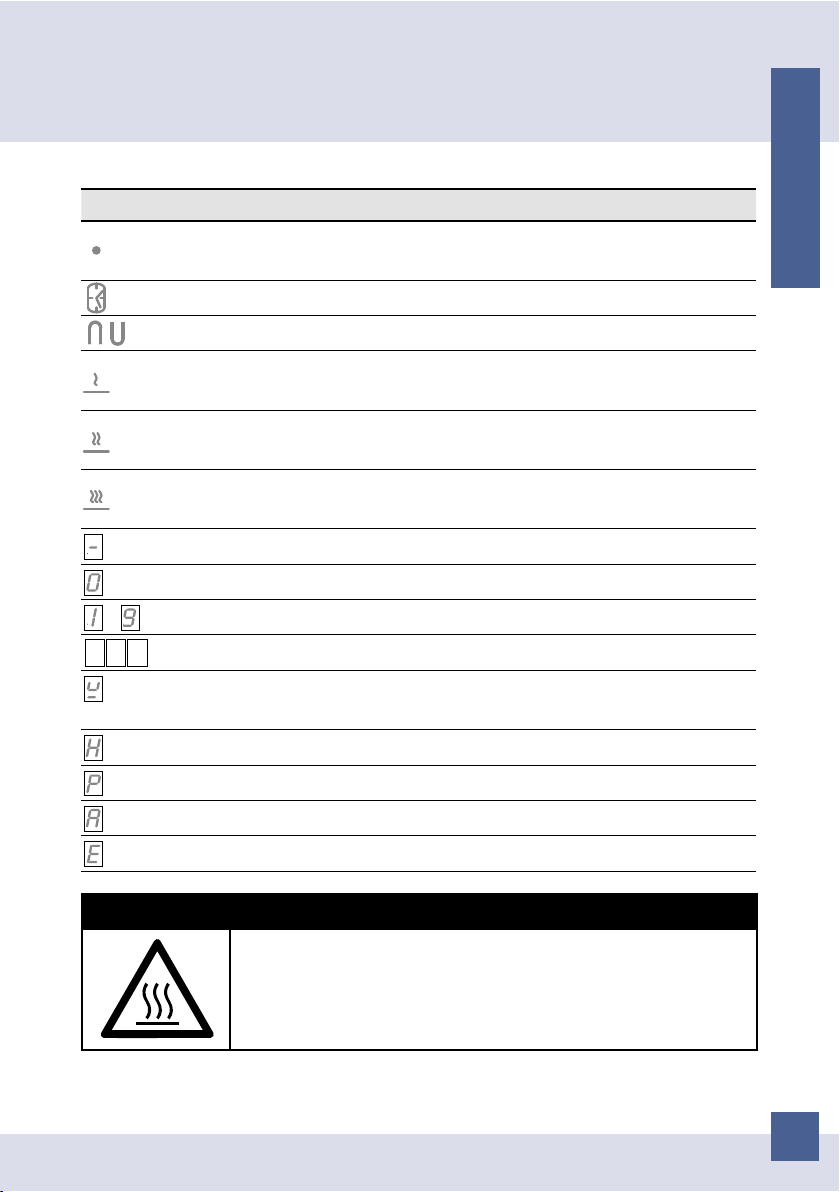
Display symbols and leds
Display Description
active function led - indicates that the corresponding function/zone
is active
timer/egg timer led - cooking zone timer active / egg timer active
bridge led - indicates that the bridge function is active
warming led - indicates that the ‘‘warming’’ program is active (the
cooking zone heat level is set at 42°)
melt led - indicates that the ‘‘melt’’ program is active (the cooking
zone heat level is set at 70°)
simmer led - indicates that the ‘‘simmer’’ program is active (the
cooking zone heat level is set at 94°C)
no timer setting made
the cooking zone is on and ready to be set
active cooking zone heat level
Timer display
ENGLISH
pot detection - cookware is unsuitable, too small or no cookware
has been placed on the cooking zone
residual heat - indicates that the cooking zone is still hot. Warning!
power boost function is activated
automatic warm-up function is activated
+ digit
error - malfunction has occurred. (Refer to ‘‘troubleshooting’’ chapter)
WARNING! RISK OF BURNS FROM RESIDUAL HEAT
Residual heat indicator
After being switched off, the cooking zones need
some time to cool down.
Look at the residual heat indicator.
Tips: Residual heat can be used for melting and keeping food warm.
9
Page 10

0 4
using the cooktop
Switching the appliance on
ENGLISH
Press the Power key to switch the appliance on.
All the displays relative to the cooking zones switch on in the standby position
«0».
The control unit remains active for 10 seconds. If no cooking zone is selected
within this time, the appliance switches off automatically.
Switching the appliance off
To turn off the appliance entirely hold down the power key.
Switching the cooking zones on
Switch on the appliance then adjust the heat setting using the corresponding
cooking zone slidebar within 10 seconds. The heat level of each single cooking
zone can be set in 9 different positions and will be shown in the corresponding
cooking zone display with a number ranging from «1» to «9». Slide right on the
slidebar to increase the heat level, slide left to decrease it.
Switching the cooking zones off
To switch a cooking zone off bring its level back to «0» by sliding left on the
corresponding slidebar.
Pot detection
Each induction cooking zone has a pot detection minimum limit, which
varies according to the material of the cookware being used.
For this reason, you should choose the cooking zone which is most suitable for
the diameter of the cookware you are going to use.
If the symbol
• The cookware used is not suitable for induction cooking.
• The cookware diameter is smaller than the one allowed by the hob.
• No cookware is on the cooking zone.
For more details about this feature refer to chapter ‘‘induction cooking”.
appears on the cooking zone display, it means that:
Residual heat
If the temperature of the cooking zone is still high (over 50°C) after it has been
switched off, the relative display will indicate the symbol «H» (residual heat).
The symbol will stay on even when the appliance is switched off and will only
switch off when the burn risk in no longer present.
Timer
This function allows you to set the time from «1.00» (1 minute) to «1.59» (1 hour
and 59 minutes) for the automatic switch off of a cooking zone.
Switch on a cooking zone by sliding on the slidebar to adjust the heat level. To
activate the timer press simultaneously the [+] and [-] keys on the timer area until
10
Page 11

using the cooktop
the clock symbol lights up beside the cooking zone display, then set the desired
time using the timer [+] and [-] keys within 5 seconds. Wait for 5 seconds for the
automatic confirmation. The time countdown will be start on the timer display.
When time elapses the cooking zone will automatically switch off, the timer
display will show a flashing «000» and an acoustic signal will be heard. Press the
[+] or [-] key on the timer area to stop the signals.
To disable the timer of a cooking zone press repeatedly and simoultaneously
the [+] and [-] keys on the timer area until the clock symbol lights up beside
the display of the desired cooking zone, press again the timer [+] and [-] keys
simoultaneously, then bring the timer value back to «000» by using the timer [-]
key. Wait for 5 seconds for the automatic confirmation.The clock symbol beside
the cooking zone display goes off.
Egg timer/reminder
When no cooking zone is active it is possible to set an acoustic reminder which
stays active after switching the appliance off. When the Egg timer/Reminder
function is active, the Timer function cannot be selected.
To enable this function press simoultaneously the timer [+] and [-] keys. The
clock symbol lights up below the timer display. Set the time, ranging from «1.00»
(1 minute) to «1.59» (1 hour and 59 minutes), by pressing the [+] and [-] keys.
Wait for 5 seconds for the automatic confirmation. The time countdown will be
shown on the timer display.
When time elapses the display will show a flashing «000» and an acoustic signal
will be heard. Press the [+] or [-] key on the timer area to stop the signals.
To disable the Egg timer/Reminder function press simoultaneously the timer [+]
and [-] keys. The clock symbol lights up below the timer display. Bring the timer
value back to «000» by using the [-] key. Wait for 5 seconds for the automatic
confirmation.The clock symbol beside the timer display goes off.
ENGLISH
Pause
When at least one cooking zone is operating it is possible to momentaneously
pause the appliance switching off the cooking zones.
To enable this function press the Pause/recall key. The relative led lights up
and all the cooking zone displays show the symbol
timers will be stopped.
The pause can last for maximum 10 minutes. If this status is not terminated
within this time the appliance switches off.
To disable the Pause function press the Pause/recall key and slide right on the
flashing slidebar within 10 seconds.
. Previously programmed
«II»
Recall
When the appliance has been switched off by mistake it is possible to quickly
recall the previously active settings by pressing the Power key within 5
11
Page 12

using the cooktop
seconds, then pressing the Pause/recall key within another 5 seconds. If the
ENGLISH
recall function is available the relative led will be flashing when the appliance is
switched on again.
Control lock
Controls can be locked in order to prevent any risk of unintentional changes to
the settings (children, cleaning operations, etc.). To activate this function press
the Control Lock key. The relative led will light up. The function remains active
when the appliance is switched off and on again.
To disable the Control Lock function simply press the
relative led will go off.
Child safety lock
This function serves the purpose of preventing children from switching on the
appliance even accidentally or intentionally.
The Child safety lock can only be activated with all the cooking zones off.
To activate this function press simoultaneously the
the
Pause/Recall key, then again the Control Lock key. The symbol
appear on all displays to confirm your selection and the relative led will light up.
When the Child safety lock is enabled you can switch the appliance off. The
Child safety lock is still enabled when the appliance is switched on again.
To unlock the appliance permanently, press simoultaneously the
key and the Pause/Recall key, then again the Pause/Recall key. In this case
the Child safety lock won’t be enabled when the appliance is switched on
again.
To unlock the appliance temporarily press simoultaneously the
key and the Pause/Recall key. In this case the Child safety lock will still be
active each time the appliance is switched on again.
Control Lock key. The
Control lock key and
«L»
Control lock
Control lock
will
Special programs: Warming, Melt, Simmer, Power Boost,
Automatic warm-up
The cooktop has three special programs that have already been set to perform
special cooking operations.
• Warming
The ‘‘Warming’’ program sets the heat temperature of the selected cooking
zone at 42°C to keep food warm. To activate this program press the
Programs key once. The Warming led lights up besides the cooking zone
display.
• Melt
The ‘‘Melt’’ program sets the heat temperature of the selected cooking zone
at 70°C to melt chocolate, butter or the like. To activate this program press
12
Page 13

using the cooktop
the Programs key twice. The Melt led lights up besides the cooking zone
display.
• Simmer
The ‘‘Simmer’’ program sets the heat temperature of the selected cooking
zone at 94°C to bring to a boil slowly preparing sauces or soups and stews.
To activate this program press three times the Programs key, the Simmer
led lights up besides the cooking zone display.
• Power Boost
This program further reduces the cooking time of a certain cooking zone, by
bringing the temperature to the maximum heat level for 10 minutes.
At the end of this timeframe, the cooking zone heat level will automatically go
back to level «9». The use of this function is recommended for heating large
quantities of liquids (e.g. water to cook pasta) or food in a very short time.
To activate this program slide right on the slidebar until the «P» symbol appears
on the cooking zone display.
• Automatic warm-up
All cooking zones are equipped with an “automatic warm up” function. This
feature sets the cooking zone to the highest heat level for a certain period of
time and then automatically switches back to the cooking setting that was
originally set.
The lenght of time that the automatic warm up function operates depends on
the heat setting selected.
To activate the “automatic warm up” function on a cooking zone place your
finger on the slidebar at the desired heat level an hold the position until the
symbol «A», alternating with the selected heat level, appears on the cooking
area display.
ENGLISH
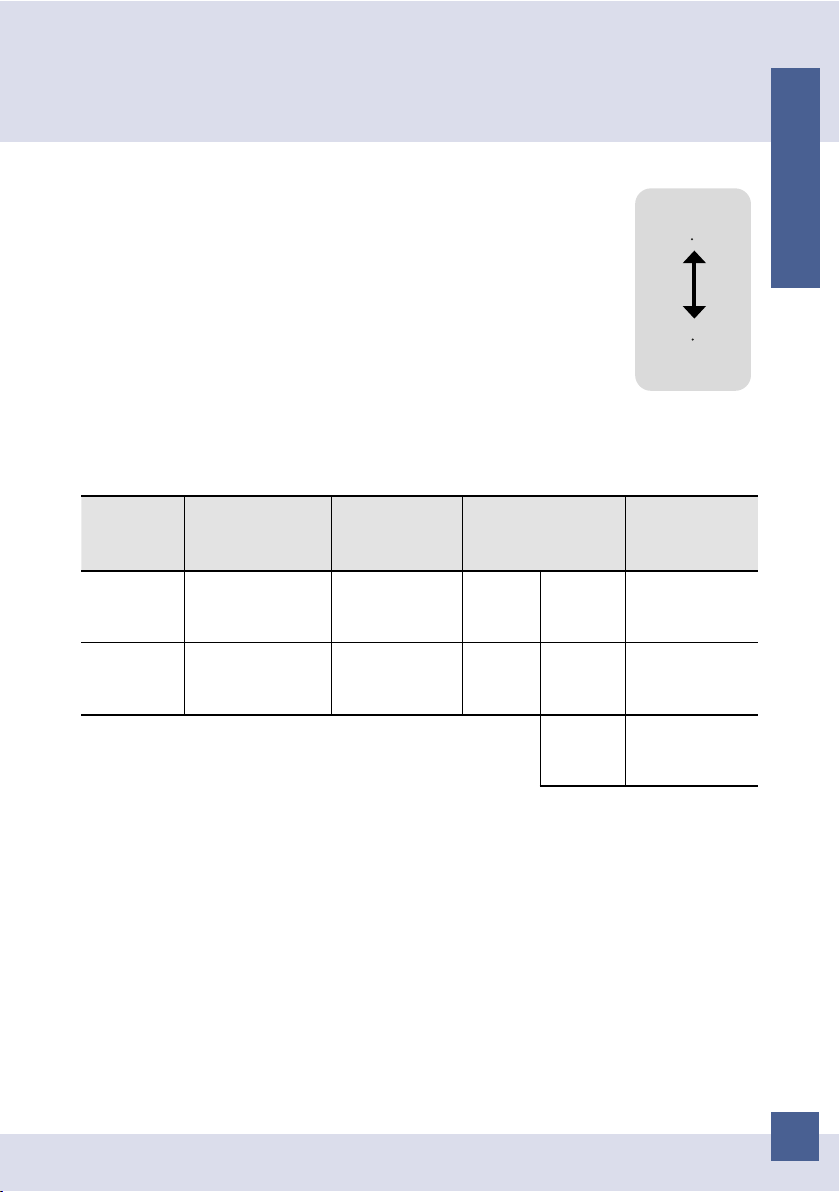
Safety switch
The appliance has a safety switch that
automatically switches off the cooking
zones when they have been operating
for a certain amount of time at a given
heat level. In case of hot surface the
residual heat symbol
«H» is displayed.
HEAT LEVEL OPERATING
TIME LIMIT (hours)
1 - 2 6
3 - 4 5
5 4
6 - 7 - 8 - 9 1,5
13
Page 14
yes
no no
a
b
c
d
6 0
02 5
min
using the cooktop
Bridge (Flexible cooking zones)
ENGLISH
This function allows you to combine the front cooking zone to the rear cooking
zone to create one large zone as shown below (a+b).
Pay attention in placing the cookware in the correct position on the cooking zones.
yes
no
a
b
To activate the Bridge function between two cooking zones press simoultaneously
on both slidebars. The bridge luminous symbol will appear on the side of the two
cooking zones display indicating that the function is active (see image below).
Now it is possible to set the heat level of the bridge zone.
front zone commands rear zone commands
NOTE: the settings of the brige zone are only enabled by the front cooking zone
slidebar and sensor keys.
To disable the Bridge function press simoultaneously on both cooking zones
slidebar.
14
Page 15
using the cooktop
Power management
All cooking zones are connected to one phase (see the
illustration). The phase has a maximum electricity loading of
3700 W/230V (see ‘‘Technical specifications” paragraph below).
The function divides the heat level between cooking zones and
activates when the total electricity loading of the cooking zones
exceeds 3700 W. The function decreases the heat level to the
other cooking zones. The heat setting display of the reduced
zones changes between two levels.
Technical specifications
In acc. with regulation (EU) No. 66/2014
product dimensions: 29x52 cm
Cooking
zone
Cooking zone
dimensions
(cm)
Minimum pot
dimensions
(cm)
Output
(watt) 230V
ENGLISH
a
b
EC - Energy
Consumption
(Wh/kg)
a, b 20x18
a+b 20x37
type of hob: built-in
heating technology: induction
Ø 14,5
23x14,5
normal
booster
normal
booster
max.
power
2100
3700
2100
3700
3700
171
171
171
15
Page 16
troubleshooting
a 4
4
Problem Possible cause Remedy
ENGLISH
You cannot activate or operate
the appliance.
The hob deactivates. You put something on the
Residual heat indicator does not
come on.
Automatic Warm Up function
does not operate.
The heat setting changes
between two levels.
The sensor keys become hot. The cookware is too large
comes on.
comes on.
comes on.
The appliance is not
connected to an electrical
supply or it is connected
incorrectly.
The fuse is released. Make sure that the fuse is the cause
it’s been more than 10
seconds from the switching
on of the appliance.
You touched 2 or more
sensor keys at the same
time.
Pause function operates. Refer to “Using the cooktop”
There is water or fat stains
on the control panel.
sensor key ON-OFF.
The zone is not hot because
it operated only for a short
time.
The zone is hot. Let the zone become sufficiently
The highest heat setting is
set.
Power management
function operates.
or you put it too near to the
controls.
Automatic Switch Off
operates.
The Child Lock function
operates.
Water or cooking utensils
above the control panel.
Check if the appliance is correctly
connected to the electrical supply.
Refer to “electrical connection”
chapter.
of the malfunction.
If the fuse releases again and again,
contact a qualified electrician.
Activate the appliance again and
set the heat setting in less than 10
seconds.
Touch only one sensor key.
chapter.
Clean the control panel.
Remove the object from the sensor
key.
If the zone operated sufficiently
long to be hot contact an Authorised
Service Centre.
cool.
The highest heat setting has the
same power as the function.
Refer to “Using the cooktop”
chapter.
Put large cookware on the rear
zones if possible.
Deactivate the appliance and
activate it again.
Refer to “Using the cooktop”
chapter.
Remove the objects from the control
panel.
16
Page 17

0 4
e 4
7
e21
e03
e03
e03
e03
e03
e03
7
troubleshooting
ENGLISH
comes on.
and a number come on.
comes on.
comes on.
comes on.
comes on.
comes on.
,
,
,7,
or 7comes on.
There is no cookware on
the zone.
The cookware is incorrect. Use the correct cookware. Refer to
The dimension of the
bottom of the cookware is
too small for the zone.
The cookware does not
cover the cooking zone.
There is an error in the
appliance.
The induction coils are
overheated.
The appliance is
overheated. The cooling
fan might be blocked.
Incorrect data
configuration.
None or faulty
communication between
control panel and induction
coils.
Control Panel is wrongly
connected.
An internal component
of the appliance needs
replacing.
Put cookware on the zone.
“Induction Cooking” chapter.
Use cookware with correct
dimensions. Refer to “Induction
Cooking” chapter.
Cover the cooking zone fully.
Disconnect the appliance from
the electrical supply for some
time. Disconnect the fuse from
the electrical system of the house.
Connect it again. If comes on again,
contact an Authorised Service
Centre.
Allow the appliance to cool down.
Allow the appliance to cool down.
Check if objects block the cooling
fan. If comes on again, contact an
Authorised Service Centre.
New configuration needed. Contact
an Authorised Service Centre.
Ensure that connection cable is
plugged on correctly and functional.
Connect to correct mains voltage.
Contact an Authorised Service
Centre.
If you cannot find a solution to the problem yourself, contact your dealer or
an Authorised Service Centre. Give the data from the rating plate.
17
Page 18

cleaning and care
Important information
ENGLISH
• Clean regularly the appliance to prevent the deterioration of the surface
material.
• Deactivate the appliance and let it cool down before you clean it.
• Disconnect the appliance from the electrical supply before maintenance.
• Do not use water spray and steam to clean the appliance.
• Clean the appliance with a moist soft cloth. Only use neutral detergents.
• Do not use abrasive products, abrasive cleaning pads, solvents or metal
objects.
General information
• Clean the hob after each use.
• Always use cookware with clean bottom.
• Scratches or dark stains on the surface have no effect on how the hob
operates.
• Use a special cleaner applicable for the surface of the hob.
• Use a special scraper for the glass.
Cleaning the cooktop
18
• Remove immediately: melted plastic,
plastic foil, and food with sugar.
If not, the dirt can cause damage to the
cooktop. Put the special scraper on
the glass surface at an acute angle and
move the blade on the surface.
• Remove when the hob is sufficiently
cool: limescale rings, water rings, fat
stains, shiny metallic discoloration.
Clean the cooktop with a moist cloth
and non-abrasive detergent. After
cleaning, wipe the cooktop dry with a
soft cloth.
Page 19

protecting the environment
Disposal of the packing material
The cardboard box and packing materials protect the appliance during shipping.
They have been designed to be biodegradable and recyclable.
Ensure that any plastic wrappings, bags, etc. are disposed of safely and kept out
of the reach of children. Danger of suffocation!
Disposal of your old appliance
The European Directive 2002/96/EC on Waste Electrical and Electronic Equipment
(WEEE), requires that old household electrical appliances must not be disposed of
in the normal unsorted municipal waste stream. Old appliances must be collected
separately in order to optimise the recovery and recycling of the materials they
contain and reduce the impact on human health and the environment.
The crossed-out dustbin symbol on the product reminds you of your
obligation regarding separated waste collection. Consumers should
contact their local public service or their local dealer for more information
on the correct disposal of exhausted household appliances.
Energy-saving advice
• Always place a fitting lid on cookware. Cooking with an uncovered pan will result
in a four-fold increase in energy use. Use a glass lid to provide visibility and avoid
having to lift the lid.
• Use cookware equipped with a solid, flat bottom. Curved pan bases increase
energy consumption.
• The diameter of the pan base must match the size of the element. If not, energy
may be wasted. Note: The manufacturer normally indicates the pan’s upper
diameter. This is normally greater than the diameter of the pan’s base.
• Choose cookware of a size suited to the amount of food you are going to cook.
A large pan that is only half full will use a lot of energy.
• Use a small amount of water when cooking. This saves energy, and vegetables
retain a larger percentage of their vitamins and minerals.
• Select a lower power level.
ENGLISH
THE MANUFACTURER DECLINES ALL RESPONSIBILITY FOR
EVENTUAL DAMAGES CAUSED BY BREAKING THE ABOVE WARNINGS.
THE WARRANTY IS NOT VALID IN THE CASE OF DAMAGE CAUSED BY
FAILURE TO COMPLY WITH THE ABOVE WARNINGS.
19
Page 20
PART 2 - Installer Guide
installation
Installing the cooktop
ENGLISH
1. Create the cut-out on the worktop (see paragraph ‘‘Worktop cut-out’’).
CAUTION!
Excessive Weight Hazard
Use two or more people to move and install cooktop.
Failure to do so can result in back or other injury.
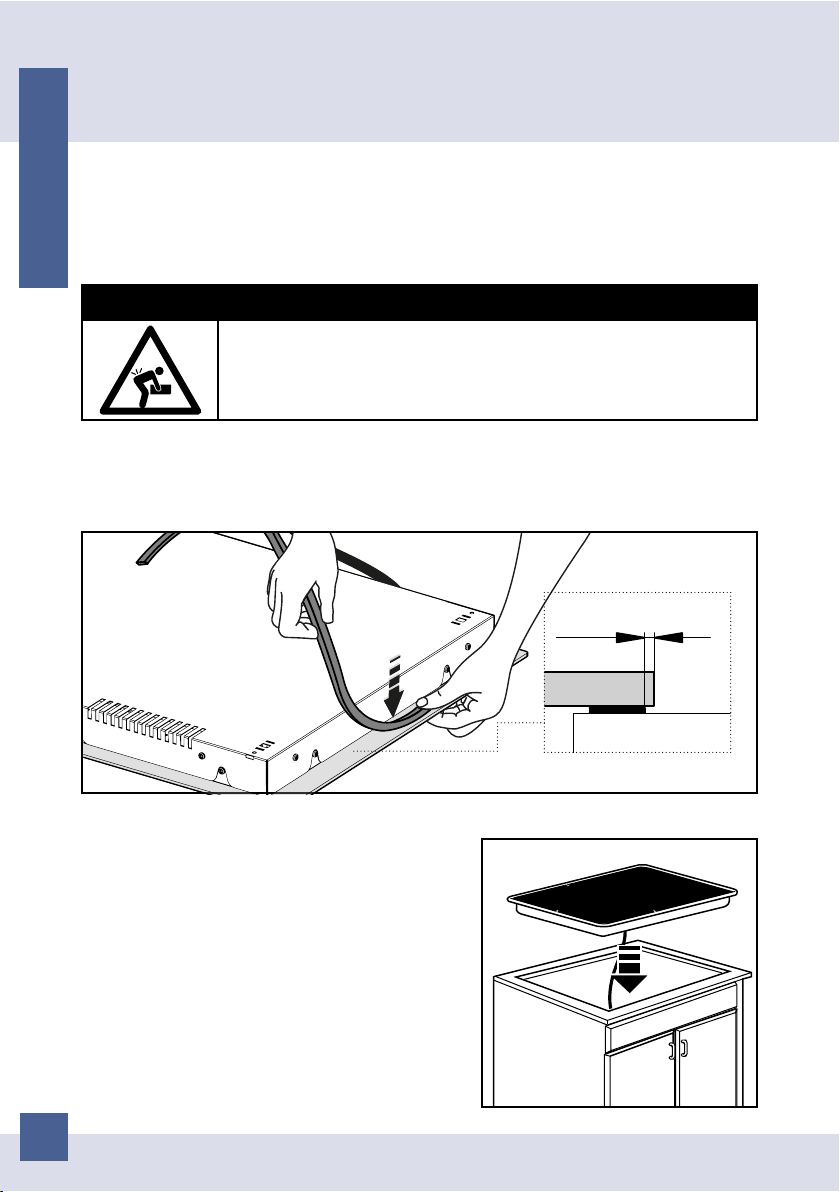
2. Using 2 or more people, place the cooktop upside down on a covered surface
and predispose sealing material along the whole perimeter of the cooktop.
2 mm
3. Place the cooktop centrally in the cut-
out and feed the mains connection cable
down through the cut-out. When doing
this, make sure that the seal under the
cooktop sits flush with the worktop on
all sides. This is important to ensure
an effective seal all round. Do not use
sealant (e.g. silicone). If the seal does
not meet the worktop correctly on the
corners the corner radius can be carefully
scribed to suit.
20
Page 21
installation
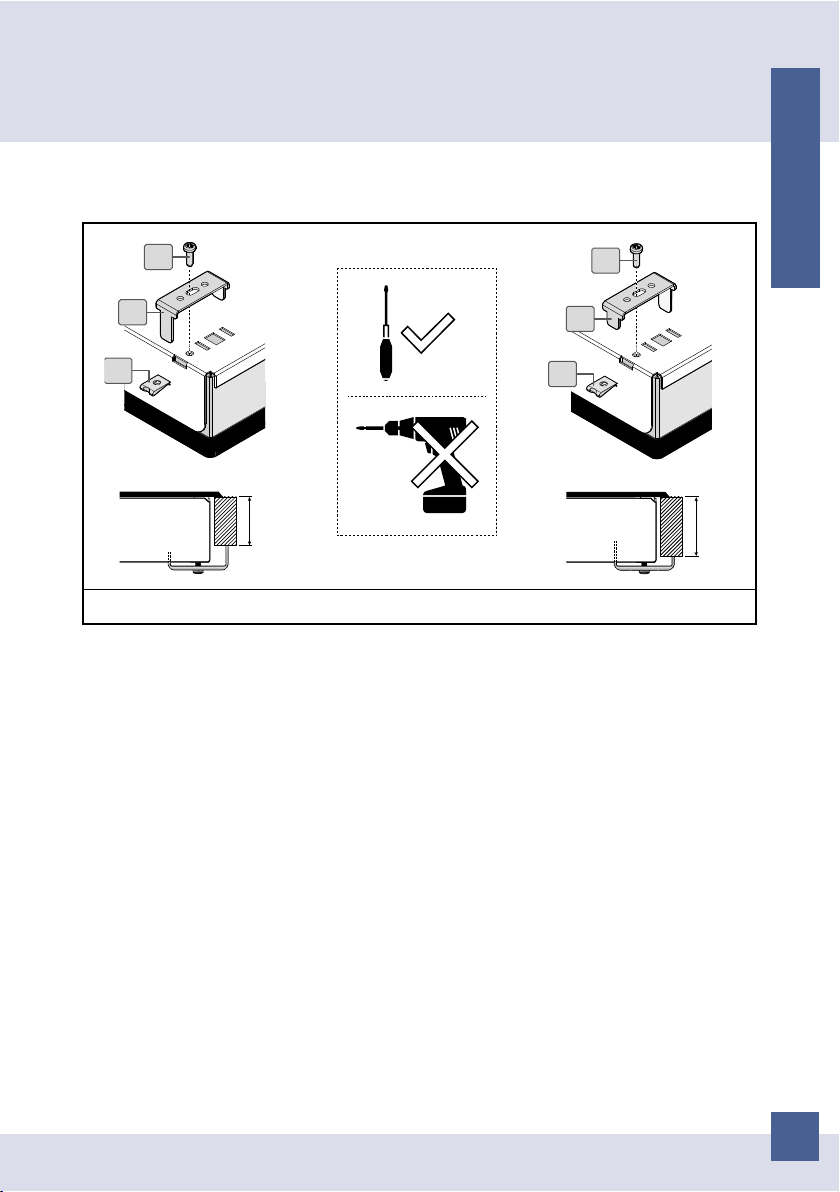
4. Lock the cooktop into place with the 4 brackets provided, keeping in mind
the width of the surface.
ENGLISH
A
B
C
mm
30 mm
03
A. spring B. bracket C. screw
A
B
C
mm
40 mm
04
5. Make electrical connection following the specifications given in this manual
(see chapter ‘‘Electrical connection”)
6. Connect the cooktop to the mains.
7. Check that the cooktop works.
21
Page 22
min. 5 cm
4 mm
installation
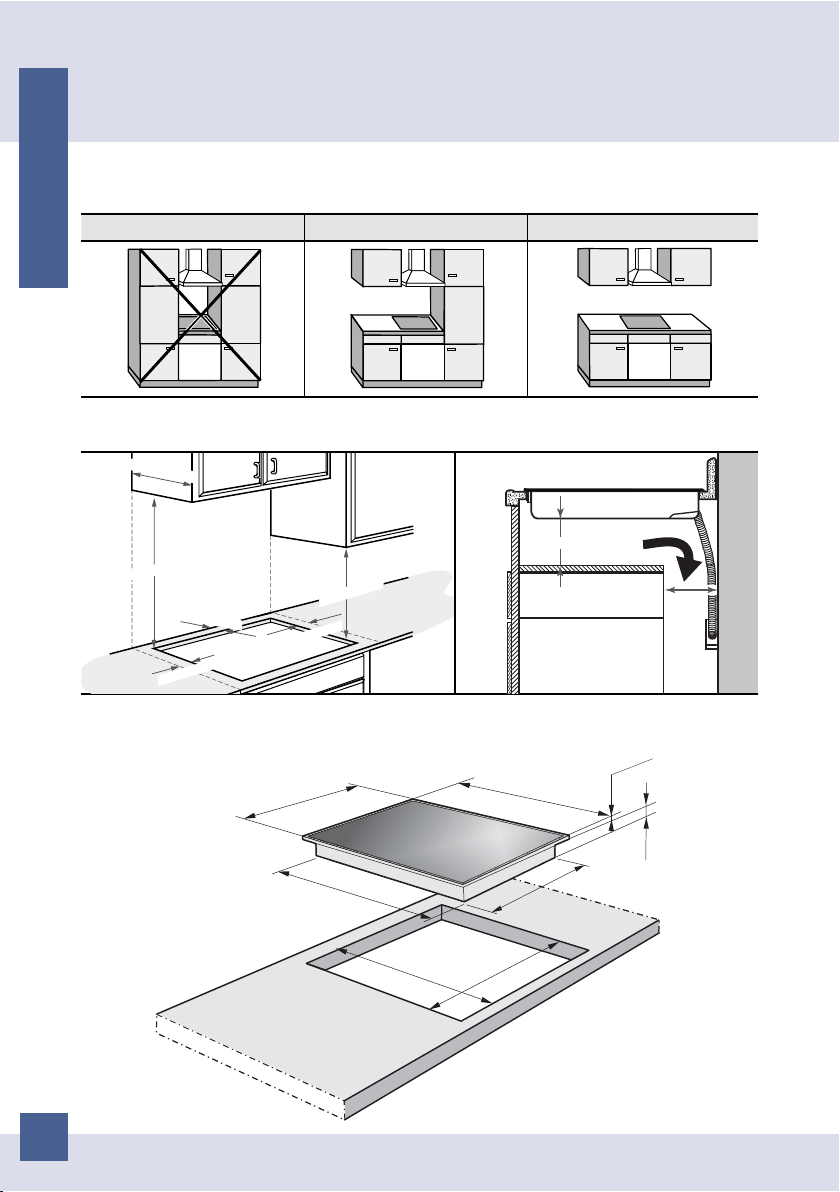
Positioning
ENGLISH
Choose the best possible position for your appliance.
NOT ALLOWED NOT RECOMMENDED RECOMMENDED
Ventilation
Remember to maintain the minimum safety distances to allow proper ventilation.
max 35 cm
5 cm
min.65 cm
min. 5 cm
min.40 cm
min. 5 cm
Worktop cut-out
Make the worktop cut-out according to the dimensions below.
290/380 mm
485 mm
490 mm
280 mm
22
520 mm
275 mm
DRAWER
5 cm
46 mm
Page 23
installation
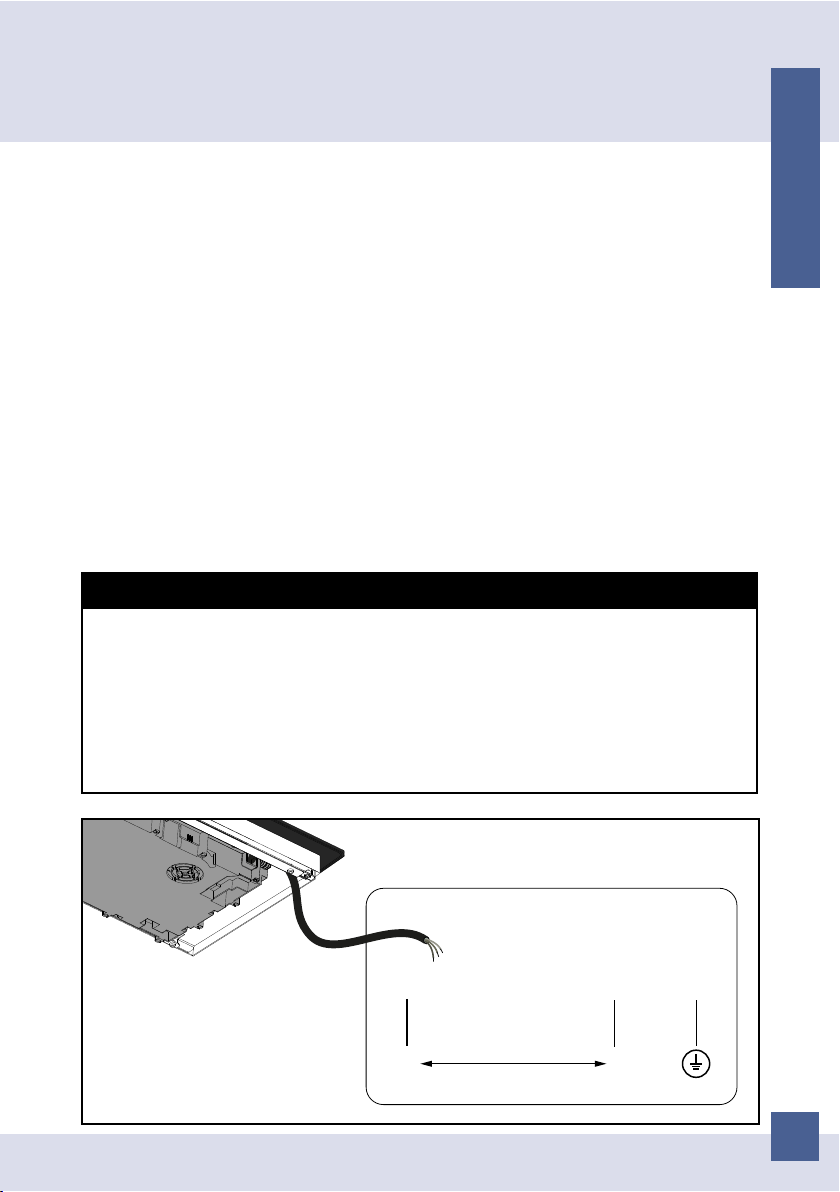
Electrical connection
Before making the electrical connections, check that:
• the system ratings meet the ratings indicated on the identification plate fixed on
the lower part of the worktop;
• the system is fitted with efficient ground wires in accordance with the laws and
current standards.
If the domestic appliance is not supplied with a cable and/or suitable plug, use
material suitable for the absorption value indicated on the identification plate and
the operating temperature.
If wishing to make a direct connection to the mains, an omnipolar switch must be
installed with a minimum 3 mm opening between the contacts and appropriate
for the load indicated on the plate and in accordance with current standards (the
yellow/green ground conductor must not be disconnected by a switch).
When the appliance has been installed, the omnipolar switch must be easily
reachable.
WARNING! THIS APPLIANCE MUST BE GROUNDED
The electrical safety of this appliance can only be guaranteed when continuity is
complete between it and an effective earthing system, which complies with current local
and national safety regulations. It is most important that this basic safety requirement
is present and regularly tested and, where there is any doubt, the electrical wiring in the
home should be inspected by a qualified electrician. The manufacturer cannot be held
liable for the consequences of an inadequate earthing system such as an electric shock.
The manufacturer cannot be held liable for damage which is the direct or indirect result
of incorrect installation or connection.
ENGLISH
brown
L1
220-240 V~
3x1,5mm
220-240 V~
2
blue green/yellow
N
(ground)
23
Page 24

[IT] Manuale d’istallazione e uso
Caro Cliente
ITALIANO
congratulazioni per il suo acquisto.
Questo piano di cottura è conforme a tutti i regolamenti e le leggi di sicurezza applicabili.
Tuttavia, l’uso improprio può causare lesioni personali e danni materiali.
Si prega di leggere attentamente le istruzioni per l’installazione e l’uso prima di utilizzare
il piano di cottura per la prima volta.
Le istruzioni contengono informazioni importanti per l’installazione, la sicurezza, l’uso e
la manutenzione. Questo vi proteggerà da infortuni e preverrà danni al piano di cottura.
Il produttore non potrà essere ritenuto responsabile per danni causati dalla inosservanza
delle avvertenze e delle norme di sicurezza.
Conservare le istruzioni in un luogo sicuro e passarle a qualsiasi futuro proprietario.
SOMMARIO
PT 1 - Guida Utente
avvertenze per la sicurezza 25
Uso previsto 25
Bambini 25
Sicurezza tecnica 25
Impiego corretto 26
la cottura a induzione 28
Vantaggi della cottura a induzione 28
Pentole adatte 28
Posizionamento corretto delle pentole 29
conoscere il piano cottura 30
Pannello di controllo 30
Simboli del display e indicatori LED 31
uso del piano cottura 32
Accensione dell’apparecchio 32
Spegnimento dell’apparecchio 32
Accensione delle zone di cottura 32
Spegnimento delle zone di cottura 32
Riconoscimento Pentole 32
Calore residuo 32
Timer 32
Egg timer/Promemoria 33
Pausa 33
Richiama 34
Blocco comandi 34
Sicurezza bambini 34
Programmi speciali: Warming, Melt,
Simmer, Power boost, Preriscaldamento
Automatico 34
Bridge (Zone cottura flessibili) 36
Spegnimento di sicurezza 37
Gestione della potenza 37
Specifiche tecniche 37
risoluzione dei problemi 38
manutenzione e pulizia 40
Informazioni importanti 40
Informazioni generali 40
Pulizia del piano cottura 40
proteggere l’ambiente 41
Smaltimento del materiale di imballaggio
41
Dismissione dei vecchi elettrodomestici 41
Consigli per il risparmio energetico 41
PT 2 - Manuale Installatore
installazione 42
Installare il piano cottura 42
Posizionamento 44
Ventilazione 44
Incasso del piano di lavoro 44
Connessioni elettriche 45
24
Page 25

PT 1 - Guida Utente
avvertenze per la sicurezza
ATTENZIONE!
LEGGERE ATTENTAMENTE LE ISTRUZIONI
PRIMA DI USARE IL PIANO COTTURA!
QUESTO APPARECCHIO È DESTINATO
AL SOLO USO DOMESTICO.
Uso previsto
• Il piano di cottura deve essere utilizzato sempre nei limiti del normale uso
domestico, non per uso professionale, per preparare e tenere in caldo le pietanze.
Qualsiasi altro impiego non è ammesso.
• Il piano di cottura non è destinato all’impiego in ambienti esterni o in ambienti
mobili, come barche o navi.
• Le persone che per le loro capacità fisiche, sensoriali o psichiche o per la loro
inesperienza o non conoscenza non siano in grado di utilizzare in sicurezza il piano
di cottura, non devono farne uso senza la sorveglianza e la guida di una persona
responsabile.
Bambini
• I bambini sotto gli 8 anni di età devono essere tenuti lontani dal piano di cottura a
meno che non siano sotto controllo costante di un adulto.
• I bambini al di sopra degli 8 anni possono eventualmente utilizzare l’apparecchio
da soli, se sono in grado di usarlo correttamente. È importante che sappiano
riconoscere i pericoli che possono derivare da un uso non corretto.
• Sorvegliare i bambini che si trovano nelle immediate vicinanze del piano di cottura,
non permettere che ci giochino.
• I bambini non devono effettuare operazioni di pulizia o manutenzione del piano di
cottura a meno che non siano sotto la supervisione di un adulto.
• Pericolo di soffocamento! Alcuni componenti dell’imballaggio (come il nylon o il
polistirolo) possono rivelarsi pericolosi. Conservare l’imballaggio fuori della portata
dei bambini e provvedere al più presto al suo smaltimento.
• Pericolo di ustioni! Conservare fuori della portata dei bambini oggetti che
potrebbero attirare la loro attenzione, riponendoli in vani sopra o dietro il piano di
cottura. Questi oggetti potrebbero indurli a salire sull’apparecchio.
• Rischio di scottature e ustioni! Accertarsi che i bambini eventualmente presenti
in casa non abbiano la possibilità di rovesciare a terra pentole e padelle calde.
Girare le maniglie e i manici di pentole e padelle di lato, sulla superficie di lavoro,
in modo che si trovino sopra il piano di lavoro.
• Se disponibili, servirsi dei dispositivi di sicurezza “Blocco comandi” e “Sicurezza
bambini” per impedire che i bambini possano accendere inavvertitamente
l’apparecchio o modificarne le funzioni.
ITALIANO
Sicurezza tecnica
• Lavori di installazione e manutenzione, nonché riparazioni, devono essere eseguiti
da personale specializzato. Lavori o riparazioni non correttamente eseguiti possono
creare seri pericoli per l’utente. Il produttore non risponde di questo tipo di danni.
25
Page 26

avvertenze per la sicurezza
• Per questioni di sicurezza, il piano di cottura deve essere usato solo dopo essere
ITALIANO
stato incassato.
• Prima di procedere all’incasso controllare se il piano di cottura presenta eventuali
danni visibili. Non mettere mai in funzione un apparecchio danneggiato. Un
apparecchio danneggiato può essere rischioso per la sicurezza.
• Prima di allacciare il piano di cottura bisogna confrontare i dati di allacciamento
(tensione e frequenza), riportati sulla targhetta, con quelli della rete elettrica Questi
dati devono assolutamente corrispondere, altrimenti la macchina potrebbe subire
dei danni. In caso di dubbi rivolgersi a un elettricista.
• La sicurezza elettrica è garantita solo se il piano di cottura è allacciato a un regolare
collegamento a terra. È molto importante assicurarsi che questa premessa sia
verificata, perché fondamentale per la sicurezza. In caso di dubbi, far controllare
l’impianto elettrico da un elettricista qualificato. Il produttore non risponde dei
danni (ad es. scossa elettrica) causati da un conduttore di protezione interrotto o
addirittura assente.
• Non aprire mai l’involucro dell’apparecchio. L’eventuale contatto con parti sotto
tensione o la modifica delle strutture elettriche o meccaniche possono causare
anomalie di funzionamento.
• Per eseguire i lavori di installazione e di manutenzione nonché di riparazione
scollegare l’apparecchio dalla rete elettrica.
• Sostituire eventuali pezzi guasti o difettosi con ricambi originali; solo usando pezzi
di ricambio originali si garantisce il rispetto degli standard di sicurezza.
• Non allacciare il piano di cottura alla rete elettrica con prolunghe o prese multiple,
perché non garantiscono la necessaria sicurezza (ad es. rischio di surriscaldamento).
• Pericolo di scossa elettrica! Non mettere in funzione o spegnere subito il
piano di cottura se la lastra in vetroceramica è danneggiata o crepata. Staccare
l’apparecchio dalla rete elettrica.
• ATTENZIONE: Se il cavo di alimentazione dell’apparecchio è danneggiato deve
essere sostituito dal produttore, dal servizio assistenza autorizzato o da personale
qualificato al fine di evitare rischi.
Impiego corretto
• ATTENZIONE: L’apparecchio e le sue parti accessibili diventano caldi durante l’uso.
Si deve prestare attenzione per evitare di toccare gli elementi riscaldanti.
• ATTENZIONE: La cottura con olio o grasso può essere pericolosa e può provocare
incendi. Se olio o grasso dovessero incendiarsi, non utilizzare MAI acqua per cercare
di spegnere il fuoco. Soffocare le fiamme ad es. con un coperchio, un panno da
cucina umido o simili.
• ATTENZIONE: Il piano di cottura è molto caldo quando è in funzione e rimane caldo
anche per un certo tempo dopo averlo spento. Il rischio di ustione non sussiste più
solo quando si spengono le spie del calore residuo.
• ATTENZIONE: Il normale processo di cottura deve essere sorvegliato. Un processo
di cottura di breve durata deve essere sorvegliato continuamente. Pentole dalle quali
evaporano completamente i liquidi possono provocare danni al piano in vetroceramica.
Grasso o olio surriscaldati possono iniziare a bruciare e provocare un incendio.
26
Page 27

avvertenze per la sicurezza
• Pericolo di incendio: Non conservare oggetti sulle superfici di cottura!
• Oggetti metallici quali coltelli, forchette, cucchiai e coperchi non devono essere posti
sulla superficie del piano di cottura in quanto possono surriscaldarsi.
• Spegnere sempre le zone di cottura dopo l’uso!
• Se sotto il piano di cottura è posizionato un cassetto, si consiglia di non conservarvi
oggetti infiammabili, come per esempio bombolette spray. Il portaposate del
cassetto, se presente, deve essere in materiale resistente al calore.
• Non preparare pietanze flambé sotto la cappa aspirante. Le fiamme possono
arrivare alla cappa e incendiarla.
• Non riscaldare mai pentole e padelle senza contenuto, se non espressamente
consentito dalla casa produttrice.
• Non riscaldare contenitori chiusi, p.es. in latta, sulle zone di cottura. La
sovrappressione generata potrebbe far scoppiare il contenitore. Pericolo di ferirsi e
ustionarsi.
• Se nelle immediate vicinanze del piano di cottura si utilizza un apparecchio elettrico,
p.es. un frullatore, fare attenzione che il cavo di alimentazione elettrica non venga a
contatto con il piano. L’isolamento del cavo potrebbe danneggiarsi.
• Tenere sempre pulito il piano di cottura. Sale, zucchero o granelli di sabbia, ad es.
derivanti da verdure mondate, possono graffiarlo.
• Usare solo pentole e padelle a fondo liscio. Pentole e padelle con fondo ruvido
possono graffiare il piano in vetroceramica.
• Attenzione a non far cadere sulla superficie in vetroceramica oggetti oppure stoviglie.
Anche oggetti leggeri (p.es. una saliera) possono crepare o danneggiare la lastra di
vetroceramica.
• Non appoggiare mai pentole o padelle molto calde sull’area comandi. L’elettronica,
situata sotto i comandi, potrebbe riportare dei danni.
• Oggetti metallici conservati in un cassetto posto sotto l’apparecchio possono
diventare incandescenti se l’apparecchio viene usato in maniera prolungata.
• L’apparecchio non è destinato ad essere utilizzato per mezzo di un timer esterno o
un sistema di comando a distanza separato.
• Avvertenza per persone con pacemaker: tenere presente che nelle immediate
vicinanze dell’apparecchio in funzione si genera un campo elettromagnetico. La
possibilità che il funzionamento del pacemaker ne risenta è molto remota. In caso di
dubbi rivolgersi al produttore del pacemaker o al proprio medico.
• Oggetti magnetizzabili, ad es. carte di credito, floppy disk, calcolatrici tascabili non
devono essere tenuti nelle immediate vicinanze dell’apparecchio in funzione, perché
questo potrebbe compromettere il loro funzionamento.
• Dato che i piani di cottura a induzione riscaldano molto velocemente, la temperatura
del fondo può eventualmente raggiungere il punto di autocombustione di grassi e oli.
• L’apparecchio è dotato di una ventola di raffreddamento. Se sotto il piano di cottura
incassato si trova un cassetto, deve essere garantita una certa distanza tra il
contenuto del cassetto e la parte inferiore dell’apparecchio, per non comprometterne
la ventilazione. Oggetti piccoli o appuntiti non devono essere conservati nel cassetto.
Potrebbero essere risucchiati all’interno dell’apparecchio attraverso le feritoie di
ventilazione e danneggiare la ventola o pregiudicare il sistema di raffreddamento.
ITALIANO
27
Page 28
la cottura a induzione
Vantaggi della cottura a induzione
ITALIANO
Nel sistema di cottura ad induzione il calore si genera direttamente alla base della
pentola, per questo motivo presenta una serie di vantaggi:
• Risparmio di tempo mentre si bollono cibi o si frigge, grazie al riscaldamento
proveniente direttamente dal recipiente.
• Risparmio di energia.
• Cura e pulizia più semplici. Gli alimenti fuoriusciti non si bruciano con rapidità.
• Controllo della temperatura e maggiore sicurezza. L’induttore reagisce
immediatamente alle variazioni della temperatura, in questo modo la potenza
può essere dosata in modo preciso. La zona di cottura a induzione smette di
produrre calore non appena si toglie la pentola anche se l’induttore è ancora
acceso.
Pentole adatte
Solo pentole/recipienti ferromagnetici sono adatti alla cottura ad induzione e
possono essere in:
• Acciaio smaltato
• Ghisa
• Recipienti/pentole speciali per induzione in acciaio inossidabile.
Per sapere se i recipienti sono adeguati,
verificare che siano attratti da un magnete.
Esistono in commercio alcune pentole
speciali per induzione i cui fondi non sono
totalmente ferromagnetici. In questo caso
si scalda solamente la zona magnetizzabile,
pertanto può succedere che il calore non
venga distribuito uniformemente.
Per ottenere una buona cottura vi suggeriamo di utilizzare pentole la cui zona
ferromagnetica abbia le stesse dimensioni della pentola.
Recipienti non adatti
Non utilizzare in nessun caso piastre di adattamento per l’induzione o pentole
fatte in:
• Acciao inox standard
• Vetro
• Terracotta
• Rame
• Alluminio
28
Page 29
la cottura a induzione
Posizionamento corretto delle pentole
SCORRETTO CORRETTO
ITALIANO
Pentola non centrata sulla superficie della
zona cottura
Pentola con fondo curvo o deformato Pentola con fondo piatto
La pentola non soddisfa la dimensione
minima richiesta per la zona di cottura
Il fondo della pentola poggia sulla cornice del
piano cottura o non poggia completamente
sulla superficie del piano cottura.
Pentola centrata correttamente sulla
superficie della zona cottura
La pentola soddisfa o eccede la dimensione
minima richiesta per la zona di cottura
Il fondo della pentola poggia completamente
sulla superficie del piano cottura.
Il manico troppo pesante inclina la pentola La pentola è perfettamente bilanciata.
29
Page 30
9 9
02 5
min
conoscere il piano cottura
Pannello di controllo
ITALIANO
Questo apparecchio utilizza il sistema di programmazione elettronica “touch
control” in cui le funzioni sono attivate toccando i tasti sensori e confermate da
indicazioni sui display e segnali acustici. Toccare i tasti dall’alto senza coprirli.
Tasto
Funzione
Tasto ON/OFF - accende/spegne l’apparecchio
Tasto Chiave - premere per attivare la funzione ‘‘Control lock”
Tasto Pausa - premere per attivare le funzioni ‘‘Pausa’’ o
‘‘Richiama’’
Tasto Programmi - premere per attivare i programmi “Warming”,
‘‘Melt’’ o ‘‘Simmer’’
Tasti Timer - premere [+] e/o [-] per attivare e programmare il
“Timer” di una zona cottura o per impostare la funzione ‘Egg timer/
Promemoria’
Slider - Scorrere verso sinistra o verso destra per impostare la
potenza di una zona cottura
ATTENZIONE! RISCHIO DI SCOTTATURE
INDICATORE CALORE RESIDUO
Dopo lo spegnimento le zone di cottura
necessitano di tempo per raffreddarsi.
Fare attenzione all’indicatore del calore residuo «H»
Suggerimenti: Il ‘Calore residuo’ può essere utilizzato per tenere i cibi in caldo.
30
Page 31

conoscere il piano cottura
a 4
0 4
1 4-9 4
025
0 4
h 4
p 4
a 4
e 4
Simboli del display e indicatori LED
Display Descrizione
led funzione attiva - indica che la funzione corrispondente è attiva
led del timer - indica che il ‘timer’ o il ‘promemoria’ sono attivi
led del Bridge - indica che il ‘bridge’ tra due zone cottura è attivo
led ‘warming’ - indica che la funzione ‘‘warming’’ è attiva (la
temperatura della zona di cottura è impostata su 42°)
led ‘melt’ - indica che la funzione ‘‘melt’’ è attiva (la temperatura della
zona di cottura è impostata su 70°)
led ‘simmer - indica che la funzione ‘‘simmer’’ è attiva (la temperatura
della zona di cottura è impostata su 94°)
nessun settaggio effettuato
la zona cottura è pronta per essere impostata
livello di potenza della zona cottura attiva
ITALIANO
+ digit
display del Timer
Riconoscimento pentole - indica che pentole non adatte, troppo
piccole, o addirittura nessuna pentola è stata posizionata sulla zona
cottura
Calore residuo - indica che la zona cottura è ancora calda. Attenzione!
Power boost - indica che la funzione ‘power boost’ è attiva
Automatic warm-up - indica che la funzione ‘preriscaldamento
automatico’ è attiva.
errore - si è verificato un problema di funzionamento. (Consultare il
capitolo ‘‘Risoluzione dei problemi”)
31
Page 32

0 4
uso del piano cottura
Accensione dell’apparecchio
ITALIANO
Premere il tasto ON/OFF per accendere l’apparecchio.
Tutti i display relativi alle zone di cottura si accendono in posizione «0».
Il pannello di controllo rimane attivo per 10 secondi. Se entro questo tempo non
si effettua alcuna regolazione su una zona di cottura l’apparecchio si spegne
automaticamente.
Spegnimento dell’apparecchio
Per spegnere completamente l’apparecchio tenere premuto il tasto ON/OFF.
Accensione delle zone di cottura
Accendere l’apparecchio e regolare il livello di potenza della zona di cottura agendo
sullo slider corrispondente entro 10 secondi. La potenza di ogni singola zona può
essere regolata in 9 diversi livelli è sarà visualizzata nel display corrispondente con
un numero da «1» a «9». Scorrere il dito sullo slider verso destra per aumentare la
potenza, verso sinistra per diminuirla.
Spegnimento delle zone di cottura
Per spegnere una zona di cottura agire sullo slider per riportare il livello a zero.
Riconoscimento Pentole
Ogni zona di cottura ad induzione, ha un limite minimo di rilevamento del recipiente
che varia in funzione del materiale del recipiente che si sta utilizzando. Per questo
motivo, si deve utilizzare la zona di cottura più adeguata al diametro del recipiente.
Se sul display di una zona di cottura compare il simbolo
• il recipiente utilizzato non è idoneo per la cottura ad induzione.
• il diametro della pentola utilizzata è inferiore a quello consentito dall’apparecchio.
• sulla piastra non è presente nessuna pentola.
Per maggiori dettagli fare riferimento al capitolo ‘‘la cottura a induzione’’.
, significa che:
Calore residuo
Se dopo lo spegnimento la temperatura della zona di cottura è ancora alta (sopra
i 50°) il relativo display mostrerà il simbolo «H» (calore residuo).
Il simbolo rimane attivo anche dopo lo spegnimento dell’apparecchio e scompare
solo quando non vi è più rischio di scottature.
Timer
Questa funzione permette di stabilire un tempo da «1.00» (1 minuto) a «1.59» (1 ora
e 59 minuti) per lo spegnimento automatico di una zona di cottura.
32
Page 33

uso del piano cottura
Per attivare il timer su una zona di cottura, selezionarla regolandone la potenza e
premere simultaneamente i tasti [+] e [-] del timer fino all’accensione del simbolo
della clessidra accanto al display della zona di cottura. Agire sui tasti [+] e [-] del
timer entro 5 secondi per regolare il tempo dell’autospegnimento. Attendere 5
secondi, il conto alla rovescia verrà visualizzato sul display del timer. Allo scadere
del tempo la zona di cottura si spegne automaticamente, il display indica lo «000»
lampeggiante e viene emesso un segnale acustico. Premere il tasto [+] o [-] del
timer per spegnere i segnali.
Per disattivare il timer di una zona cottura premere più volte simultaneamente i tasti
[+] e [-] fino alla comparsa del simbolo della clessidra accanto al relativo display. A
questo punto premere nuovamente e simultaneamente i tasti [+] e [-] e poi agire
sul tasto [-] entro 5 secondi per riportare il tempo sul valore «000». Attendere 5
secondi, il simbolo della clessidra accanto al display della zona cottura si spegne
confermando la disattivazione della funzione.
Egg timer/Promemoria
Quando nessuna zona di cottura è in funzione è possibile stabilire un promemoria
acustico che rimane attivo anche dopo lo spegnimento dell’apparecchio. Quando
l’Egg timer/Promemoria è attivo la funzione Timer non può essere attivata.
Per attivare il promemoria premere simultaneamente i tasti [+] e [-] fino alla
comparsa del simbolo dell’orologio sotto il display dell’area Timer. Agire sui tasti
[+] e [-] del timer entro 5 secondi per regolare il tempo. Attendere 5 secondi, il
conto alla rovescia viene visualizzato sul display del timer. Allo scadere del tempo il
display indica lo «000» lampeggiante e viene emesso un segnale acustico. Premere
il tasto [+] o [-] del timer per spegnere i segnali. Per disattivare il promemoria attivo
premere simultaneamente i tasti [+ ] e [-]. Il simbolo dell’orologio compare sotto
il display dell’area Timer. A questo punto agire sul tasto [-] entro 5 secondi per
riportare il tempo sul valore «000». Attendere 5 secondi per la conferma, il simbolo
dell’orologio si spegne confermando la disattivazione della funzione.
ITALIANO
Pausa
Quando almeno una zona di cottura è in azione è possibile mettere in pausa
l’apparecchio interrompendo momentaneamente la cottura.
Per attivare questa funzione premere il tasto Pausa. Il led relativo si accende e i
display di tutte le zone cottura mostrano il simbolo
attivi vengono interrotti. La pausa ha una durata massima di 10 minuti al termine
dei quali l’apparecchio si spegne.
Per disattivare la Pausa premere il tasto Pausa e scorrere il dito verso destra sullo
slider lampeggiante entro 10 secondi.
. Tutti i Timer eventualmente
«II»
33
Page 34

uso del piano cottura
Richiama
ITALIANO
Se si spegne l’apparecchio accidentalmente è possibile richiamare i settaggi
precedentemente attivi sulle zone di cottura premendo il tasto ON/OFF entro
6 secondi. Se la funzione Richiama è disponibile il led relativo lampeggia alla
riaccensione del piano. Richiamare quindi i settaggi premendo il tasto Pausa entro
5 secondi.
Blocco comandi
E’ possibile bloccare i comandi del pannello di controllo per evitare il rischio di
modifiche non intenzionali alle regolazioni (operazioni di pulizia, bambini, etc.).
Per attivare questa funzione premere il tasto Chiave. Il led relativo si accende.
Quando la funzione è attiva è comunque possibile spegnere e accendere
l’apparecchio.
Per disattivare la funzione premere il
Sicurezza bambini
Questa funzione ha lo scopo di evitare che i bambini accendano l’apparecchio
accidentalmente o intenzionalmente e può essere attivata solo se tutte le zone di
cottura sono spente.
Per attivare la Sicurezza bambini premere simultaneamente il
il
tasto Pausa, poi nuovamente il tasto Chiave. Il simbolo «L» appare su tutti i
display e il relativo led si accende.
La funzione rimane attiva allo spegnimento e alla successiva riaccensione
dell’apparecchio.
Per disattivare il blocco di Sicurezza bambini in modo temporaneo, premere
simultaneamente il
ogni riaccensione dell’apparecchio.
Per disattivare il blocco di Sicurezza bambini in modo permanente, premere
simultaneamente il
Alla riaccensione dell’apparecchio la funzione non è più attiva.
tasto Chiave e il tasto Pausa. La funzione rimane attiva ad
tasto Chiave e il tasto Pausa, poi nuovamente il tasto Pausa.
tasto Chiave. Il led relativo si spegne.
tasto Chiave e
Programmi speciali: Warming, Melt, Simmer, Power boost,
Preriscaldamento Automatico
Il piano cottura è provvisto di quattro programmi speciali che sono già stati
impostati per effettuare delle tipologie di cottura speciali.
• Warming
Il programma ‘‘Warming” imposta la potenza della zona di cottura selezionata
a 42°C per tenere i cibi cucinati in caldo. Per attivare questo programma
34
Page 35

uso del piano cottura
premere una volta il tasto Programmi. Il led ‘Warming’ si accende nel display
della zona cottura.
• Melt
Il programma ‘‘Melt’’ imposta la potenza della zona di cottura selezionata
a 70°C per sciogliere cioccolata, burro o alimenti simili. Per attivare questo
programma premere due volte il tasto Programmi. Il led ‘Melt’ si accende nel
display della zona cottura.
• Simmer
Il programma ‘‘Simmer’’ imposta la potenza della zona di cottura selezionata a
94°C per portare ad una ebollizione lenta nella preparazione di sughi, minestre
e stufati. Per attivare questo programma premere tre volte il tasto Programmi.
Il led ‘Simmer’ si accende nel display della zona cottura.
• Power Boost
Questo programma riduce ulteriormente il tempo di cottura di una zona cottura,
portando la temperatura al livello di potenza massima per 10 minuti.
Allo scadere di questo tempo, la potenza della zona cottura torna
automaticamente al livello «9». L’utilizzo di questa funzione è indicato per il
riscaldamento in tempi brevissimi di grandi quantità di liquidi (es. acqua per
cuocere la pasta) o di altre pietanze.
Per attivare questo programma scorrere il dito verso destra sullo slider fino a
che il simbolo «P» appare sul display della zona cottura.
ITALIANO
• Preriscaldamento automatico
Tutte le zone di cottura sono dotate di una funzione di preriscaldamento
automatico. L’uso di questa funzione è indicato per il riscaldamento in tempi
brevissimi di grandi quantità di liquidi (es. acqua di cottura per la pasta) o di
altre pietanze. Quando si attiva la funzione la zona di cottura viene impostata
al livello massimo di potenza per un certo intervallo di tempo al termine del
quale torna automaticamente al livello di potenza originariamente impostato.
La durata del preriscaldamento dipende dal livello di cottura selezionato.
Per attivare la funzione su una zona di cottura agire sul relativo slider per
selezionare la potenza mantenendo la posizione fino a che il simbolo «A»
compare sul display in alternanza con il livello di potenza selezionato.
35
Page 36

yes
no no
a
b
c
d
6 0
02 5
min
uso del piano cottura
Bridge (Zone cottura flessibili)
ITALIANO
Questa funzione consente di combinare la zona cottura anteriore con quella
posteriore (a+b) al fine di creare una zona cottura più ampia, come mostrato nella
figura qui sotto. Prestare particolare attenzione nel posizionare le pentole in modo
corretto sulle zone cottura.
yes
no
a
b
Per attivare la funzione Bridge tra le due zone cottura premere contemporaneamente
su un punto di entrambe gli slider (si veda l’immagine sotto).
Il simbolo luminoso della funzione ‘bridge’ apparirà accanto al display delle due zone
cottura ad indicare che la funzione è attiva. A questo punto è possibile impostare la
potenza della zona ‘‘bridge”.
comandi zona anteriore
comandi zona posteriore
NOTA: le regolazioni della zona “bridge” si effettuano agendo sullo slider e i tasti
sensori della zona anteriore (comandi a sinistra).
Per disattivare la funzione Bridge, premere contemporaneamente su un punto di
entrambe gli slider.
36
Page 37

uso del piano cottura
ITALIANO
Spegnimento di sicurezza
L’apparecchio è provvisto di un
sistema di sicurezza che spegne
POTENZA TEMPO LIMITE
ACCENSIONE (ore)
1 - 2 6
automaticamente le zone di cottura
trascorso il tempo limite di accensione
ad una data potenza. In tal caso
l’indicazione del calore residuo «H»
viene visualizzata nel display della zona.
3 - 4 5
5 4
6 - 7 - 8 - 9 1,5
Gestione della potenza
Tutte le zone cottura sono collegate ad una fase (si veda
l’illustrazione). La fase ha un carico massimo di elettricità di
3700 W/230V (si veda il paragrafo ‘‘Specifiche Tecniche”).
La funzione divide la potenza tra le zone cottura e si attiva
quando il carico totale di elettricità delle zone cottura supera
i 3700 W. La funzione diminuisce la potenza sulle altre zone
cottura. Il display della potenza delle zone in cui la stessa è stata
ridotta cambia tra due livelli.
Specifiche tecniche
Ai sensi del regolamento (EU) No. 66/2014
dimensioni prodotto: 29x52 cm
Zona
cottura
Dimensioni
zona
(cm)
Dimensioni
minime
pentola
(cm)
Output
(W) 230V
EC -
Consumo
Energetico
(Wh/kg)
a
b
a, b 20x18
a+b 20x37
tipologia piano cottura: a incasso
tecnologia di riscaldamento: induzione
Ø 14,5
23x14,5
normale
booster
normale
booster
totale
2100
3700
2100
3700
3700
171
171
171
37
Page 38

risoluzione dei problemi
a 4
Problema Possibile causa Soluzione
ITALIANO
Non è possibile attivare il
piano cottura o metterlo
in funzione.
Il piano di cottura non è
collegato a una fonte di
alimentazione elettrica
o non è collegato
correttamente.
È scattato il fusibile. Verificare se l’anomalia di
Sono passati più di 10
secondi dall’accensione
del piano.
Sono stati toccati
2 o più tasti
contemporaneamente.
Accertarsi che il piano di cottura
sia collegato correttamente alla
rete elettrica. Fare riferimento
al paragrafo “collegamento
elettrico”.
funzionamento sia dovuta al
fusibile. Nel caso in cui il fusibile
continui a scattare, rivolgersi ad
un elettricista qualificato.
Accendere di nuovo il piano di
cottura e impostare il livello di
potenza in meno di 10 secondi.
Toccare un tasto alla volta.
la funzione ‘‘Pausa’’ è
attiva.
Il pannello dei comandi
è bagnato o presenta
macchie di unto.
Il piano cottura si
disattiva.
La spia del calore residuo
non si accende.
La funzione
“Riscaldamento
Automatico” non
funziona.
L’impostazione della
potenza varia fra due
livelli.
I tasti del pannello di
controllo si surriscaldano.
compare nel display. La funzione “Spegnimento
compare nel display. La funzione “Sicurezza
Uno o più tasti del pannello
di controllo sono stati
coperti.
La zona non è calda
perché è rimasta in
funzione solo per
brevissimo tempo.
La zona è calda. Lasciare raffreddare la zona.
E’ stata impostata la
potanza più alta.
La funzione “Gestione
potenza” è attiva.
Le pentole sono troppo
grandi oppure sono state
collocate troppo vicino ai
comandi.
Automatico” è attiva.
bambini” è attiva.
Consultare il capitolo “Uso del
piano cottura”
Pulire il pannello dei comandi.
Rimuovere gli oggetti dai tasti
del pannello di controllo.
Se la zona ha funzionato
abbastanza a lungo da essere
calda, contattare il Centro di
Assistenza Autorizzato.
La potenza più alta ha la stessa
potenza della funzione.
Consultare il capitolo “Uso del
piano cottura”
Se possibile, collocare le
pentole grandi sulle zone
posteriori.
Spegnere e riaccendere
l’apparecchio.
Fare rifermento al capitolo “uso
del piano cottura”
38
Page 39

4
0 4
7
e 4
e21
e03
e03
e03
e03
e03
e03
7
risoluzione dei problemi
ITALIANO
compare nel display. Acqua o utensili da cucina
compare nel display. Non vi sono pentole sulla
compare nel display.
e un numero
compaiono nel display.
compare nel
display.
compare nel
display.
compare nel
display.
display.
, 7,7 o
compare nel display.
compare nel
,
,
presenti sul quadro
comandi.
zona.
Le pentole non sono
adatte.
Il diametro del fondo della
pentola è troppo piccolo
rispetto alla zona.
Le pentole non coprono
il riquadro/ la croce/il
cerchio.
Le piastre a induzione
sono surriscaldate.
C’è un errore
nell’apparecchio.
L’apparecchio è
surriscaldato.
La ventola di
raffreddamento potrebbe
essersi bloccata.
Configurazione dati errata. E’ necessaria una nuova
Comunicazione assente
o difettosa tra il quadro
comandi e le serpentine ad
induzione.
Il quadro comandi è stato
collegato in modo errato.
Un componente interno
dell’apparecchio deve
essere sostituito.
Rimuovere gli oggetti dal quadro
comandi.
Appoggiare una pentola sulla
zona.
Utilizzare pentole idonee.
Fare riferimento al capitolo “la
cottura a induzione”.
Usare pentole delle dimensioni
corrette. Fare riferimento al
capitolo “la cottura a induzione”.
Fare in modo che la croce/
il riquadro/il cerchio siano
completamente coperti.
Lasciare raffreddare
l’apparecchio.
Scollegare per un certo
periodo di tempo l’apparecchio
dall’alimentazione elettrica.
Scollegare il fusibile
dall’impianto elettrico
domestico. Ricollegarlo. Se il
codice di errore compare di
nuovo, rivolgersi al Centro di
Assistenza Autorizzato.
Far raffreddare l’apparecchio.
Verificare se degli oggetti
stiano bloccando la ventola di
raffreddamento. Se il simbolo
appare ancora, contattare un
centro assistenza.
configurazione. Contattare un
centro assistenza autorizzato.
Assicurarsi che il cavo di
connessione sia correttamente
inserito e funzionante.
Collegare alla tensione di
alimentazione corretta.
Contattare un centro assistenza
autorizzato.
Qualora non sia possibile trovare una soluzione al problema, contattare il
rivenditore o il Centro di Assistenza Autorizzato. Fornire i dati riportati sulla
targhetta dei dati.
39
Page 40

manutenzione e pulizia
Informazioni importanti
ITALIANO
• Pulire regolarmente l’apparecchio per prevenire il deterioramento della
superficie vetroceramica.
• Disattivare l’apparecchio e lasciarlo raffreddare prima di pulirlo.
• Scollegare l’apparecchio dalla rete elettrica prima di effettuare operazioni di
manutenzione.
• Non usare pulitori a vapore per pulire l’apparecchio.
• Pulire l’apparecchio con un panno morbido inumidito. Utilizzare solo detergenti
neutri.
• Non usare prodotti abrasivi, spugnette abrasive, solventi o oggetti metallici.
Informazioni generali
• Pulire il piano di cottura dopo ogni uso.
• Usare sempre pentole con fondo pulito.
• Graffi o macchie scure sulla superficie non hanno alcun effetto sul funzionamento
del piano di cottura.
• Utilizzare un detergente adatto per la pulizia della superficie vetroceramica del
piano di cottura.
• Utilizzare un raschietto speciale per rimuovere residui dalla superficie del piano.
Pulizia del piano cottura
• Rimuovere immediatamente: plastica
fusa, pellicola di plastica, cibo contenente
zucchero. In caso contrario, la sporcizia
può causare danni al piano di cottura.
Posizionare il raschietto sulla superficie
del vetro con un angolo acuto e spostare
la lama sulla superficie.
• Rimuovere quando il piano di cottura
è sufficientemente freddo: tracce di
calcare, residui d’acqua, macchie di
grasso, scolorimento metallico lucido.
Pulire il piano di cottura con un panno
umido e detersivo non abrasivo. Dopo la
pulizia, asciugare il piano di cottura con
un panno morbido.
40
Page 41

proteggere l’ambiente
Smaltimento del materiale di imballaggio
La scatola di cartone e i materiali di imballaggio proteggono l’apparecchio durante
il trasporto e sono stati progettati per essere biodegradabili e riciclabili.
Assicurarsi che eventuali involucri di plastica, sacchetti, ecc vengano smaltiti in
modo sicuro e tenuti fuori dalla portata dei bambini. Pericolo di soffocamento!
Dismissione dei vecchi elettrodomestici
La direttiva Europea 2002/96/CE sui rifiuti di apparecchiature elettriche ed
elettroniche (RAEE), prevede che gli elettrodomestici non debbano essere smaltiti
nel normale flusso dei rifiuti solidi urbani. Gli apparecchi dismessi devono essere
raccolti separatamente per ottimizzare il tasso di recupero e riciclaggio
dei materiali che li compongono ed impedire potenziali danni per la salute
e l’ambiente. Il simbolo del cestino barrato è riportato su tutti i prodotti
per ricordare gli obblighi di raccolta separata. Per ulteriori informazioni,
sulla corretta dismissione degli elettrodomestici, i detentori potranno
rivolgersi al servizio pubblico preposto o ai rivenditori.
Consigli per il risparmio energetico
• Posizionare sempre un coperchio sulla pentola. Cucinare con una pentola
scoperta si tradurrà in un aumento di quattro volte del consumo energetico.
Utilizzare un coperchio di vetro per fornire visibilità ed evitare di dover sollevare il
coperchio.
• Utilizzare pentole dotate di un, fondo piatto solido. Pentole con fondo curvo
aumentano il consumo di energia.
• Il diametro del fondo della pentola deve corrispondere alla dimensione della
zona di cottura per evitare sprechi di energia. Nota: Il produttore normalmente
indica il diametro della parte superiore della pentola. Questo è normalmente
maggiore del diametro della base della pentola.
• Scegliere pentole di dimensioni adeguate alla quantità di cibo che si sta per
cucinare. Un grande tegame riempito solo a metà utilizzerà una grande quantità
di energia.
• Utilizzare piccole quantità di acqua durante la cottura. Ciò consente di risparmiare
energia e le verdure mantengono una percentuale maggiore delle loro vitamine
e minerali.
• Selezionare un livello di potenza inferiore.
ITALIANO
SI DECLINA OGNI RESPONSABILITÀ PER EVENTUALI DANNI
PROVOCATI DALLA INOSSERVANZA DELLE SUDDETTE AVVERTENZE.
LA GARANZIA NON E’ VALIDA NEL CASO DI DANNI DERIVANTI DALLA
INOSSERVANZA DELLE SUDDETTE AVVERTENZE.
41
Page 42

PT 2 - Manuale Installatore
installazione
Installare il piano cottura
ITALIANO
1. Creare l’incasso sul piano di lavoro (v. paragrafo “Incasso del piano di lavoro”).
ATTENZIONE!
Peso eccessivo
Servirsi di due o più persone per posizionare e
installare il piano cottura per evitare
il rischio di infortuni alla schiena.
2. Con l’aiuto di 2 persone, posizionare il piano di cottura capovolto su una
superficie coperta e predisporre il materiale sigillante lungo tutto il perimetro
del piano di cottura.
2 mm
3. Posizionare il piano cottura al centro
dell’incasso facendo attenzione a far
passare il cavo elettrico.
Assicurarsi che la guarnizione sotto il
piano di cottura si trovi a filo con il piano di
lavoro su tutti i lati. Questo è importante
per garantire una tenuta efficace.
Non usare sigillante (es. silicone).
42
Page 43

installazione
4. Bloccare l’apparecchio sul piano di lavoro con le 4 staffe fornite, tenendo
presente lo spessore del piano.
ITALIANO
A
B
C
mm
30 mm
03
A. molla B. staffa C. vite
A
B
C
mm
40 mm
04
5. Effettuare il collegamento elettrico secondo le specifiche riportate in questo
manuale (v.capitolo “Connessioni Elettriche)
6. Collegare il piano di cottura alla rete elettrica.
7. Verificare il funzionamento del piano cottura.
43
Page 44

min. 5 cm
4 mm
installazione
Posizionamento
ITALIANO
Scegliere la migliore posizione possibile per l’apparecchio.
NON PERMESSA NON CONSIGLIATA RACCOMANDATA
Ventilazione
Mantenere le distanze minime di sicurezza per consentire una corretta ventilazione.
max 35 cm
5 cm
min.65 cm
CASSETTO
min. 5 cm
min.40 cm
min. 5 cm
DRAWER
Incasso del piano di lavoro
Realizzare l’incasso del piano di lavoro secondo le dimensioni indicate di seguito.
290/380 mm
485 mm
490 mm
520 mm
46 mm
275 mm
280 mm
44
5 cm
Page 45

installazione
Connessioni elettriche
Prima di effettuare le connessioni elettriche assicurarsi che:
• le caratteristiche dell’impianto siano tali da soddisfare le indicazioni sulla targhetta
identificativa applicata sulla parte inferiore del piano di lavoro;
• l’impianto sia dotato di una messa a terra efficiente conforme alle norme e alle
disposizioni di legge in vigore.
Nel caso in cui l’elettrodomestico non sia dotato di cavo e/o della relativa spina,
utilizzare materiale adatto per l’assorbimento indicato nella targhetta identificativa
e per la temperatura di funzionamento.
Se si desidera una connessione diretta alla linea elettrica, è necessario interporre
un interruttore omnipolare, con un’apertura minima di 3 mm fra i contatti,
appropriato al carico indicato nella targhetta e conforme alle norme vigenti (il
conduttore di terra giallo/verde non deve essere interrotto dal commutatore).
Terminata l’installazione dell’apparecchiatura, l’interruttore omnipolare deve
essere facilmente raggiungibile.
ATTENZIONE! LA MESSA A TERRA E' OBBLIGATORIA
La sicurezza elettrica di questo apparecchio può essere garantita solo in presenza
di un sistema di messa a terra efficace, conforme con le vigenti norme di sicurezza
locali e nazionali. E' importante che tale dispositivo di sicurezza sia presente, che sia
regolarmente collaudato e che, in presenza di dubbi, l'impianto elettrico della casa venga
controllato da un elettricista qualificato.
Il costruttore non può essere ritenuto responsabile per le conseguenze di un sistema di
messa a terra inadeguato, come una scossa elettrica.
Il produttore non può essere ritenuto responsabile di danni che siano il risultato diretto o
indiretto di una errata installazione o collegamento.
ITALIANO
brown
marrone
L1
220-240 V~
3x1,5mm
220-240 V~
2
blue green/yellow
giallo/verde
blu
N
(terra)
(ground)
45
Page 46

[DE] Bedienungs-und Montageanleitung
Liebe Kundin, lieber Kunde,
DEUTSCH
Vielen Dank für Ihren Einkauf.
Dieses Kochfeld entspricht den vorgeschriebenen Sicherheitsbestimmungen.
Ein unsachgemäßer Gebrauch kann jedoch zu Schäden an Personen und Sachen
führen. Lesen Sie die Gebrauchs- und Montageanweisung aufmerksam durch, bevor
Sie das Gerät in Betrieb nehmen.
Sie enthält wichtige Hinweise für den Einbau, die Sicherheit, den Gebrauch und die
Wartung. Dadurch schützen Sie sich und vermeiden Schäden am Gerät.
Der Hersteller kann nicht für Schäden verantwortlich gemacht werden, die infolge von
Nichtbeachtung dieser Sicherheitshinweise und Warnungen verursacht werden.
Bewahren Sie die Gebrauchs- und Montageanweisung auf, und geben Sie sie einem
eventuellen Nachbesitzer weiter.
INHALTSVERZEICHNIS
PT 1 - Bedienungsanleitung
Sicherheitshinweise 47
Bestimmungsgemäße Anwendung 47
Kinder im Haushalt 47
Technische Sicherheit 47
Sachgemäßer Gebrauch 48
Induktionskochen 50
Vorteile des Induktionskochens 50
Kochgeschirr 50
Empfehlungen zum Kochgeschirr 51
Gerätbeschreibung 52
Bedienfeld 52
Bedienung des Kochfelds und Anzeigen
53
Bedienung des Kochfelds 54
Kochfeld einschalten 54
Kochfeld ausschalten 54
Kochzonen einschalten 54
Kochzonen ausschalten 54
Topferkennung 54
Restwärme 54
Timer 54
Egg-Timer/Memory 55
Pause 55
Recall 55
Verriegelung 56
46
Kindersicherheit 56
Sonderprogramme: Warming, Melt,
Simmer, Power Boost, Ankochautomatik
56
Sicherheitsausschaltung 57
Bridge (Flexible Kochzonen) 58
Power Management 59
Technische Daten 59
Störungssuche 60
Reinigung und Pflege 62
Wichtige Hinweise 62
Allgemeine Hinweise 62
Reinigung des Kochfelds 62
Umweltschutz 63
Entsorgung der Transportverpackung 63
Entsorgung von Elektro- und ElektronikAltgeräten 63
Tipps zum Energiesparen 63
PT 2 - Montagehinweise
Installation 64
Einbau 64
Einbaulage 66
Lüftung 66
Einbau des Kochfelds 66
Elektroanschluss 67
Page 47

PT 1 - Bedienungsanleitung
Sicherheitshinweise
ACHTUNG!
LESEN SIE BITTE VOR GEBRAUCH DES GERÄTES
ALLE ANWEISUNGEN SORGFÄLTIG DURCH!
DAS GERÄT IST NUR FÜR DEN HAUSHALTSÜBLICHEN
GEBRAUCH BESTIMMT.
Bestimmungsgemäße Anwendung
• Verwenden Sie das Kochfeld ausschließlich im haushaltsüblichen Rahmen zum
Zubereiten und Warmhalten von Speisen. Alle anderen Anwendungsarten sind
unzulässig.
• Dieses Kochfeld ist nicht für die Verwendung im Außenbereich bestimmt und darf
nicht an nicht stationären Aufstellungsorten (z. B. Schiffen) betrieben werden.
• Personen, die aufgrund ihrer physischen, sensorischen oder geistigen Fähigkeiten
oder ihrer Unerfahrenheit oder Unkenntnis nicht in der Lage sind, das Kochfeld
sicher zu bedienen, müssen bei der Bedienung beaufsichtigt werden.
Kinder im Haushalt
• Kinder unter acht Jahren müssen vom Kochfeld ferngehalten werden - es sei denn,
sie werden ständig beaufsichtigt.
• Kinder ab acht Jahren dürfen das Kochfeld nur ohne Aufsicht bedienen, wenn ihnen
das Gerät so erklärt wurde, dass sie es sicher bedienen können. Kinder müssen
mögliche Gefahren einer falschen Bedienung erkennen und verstehen können.
• Beaufsichtigen Sie Kinder, die sich in der Nähe des Kochfeldes aufhalten. Lassen Sie
Kinder niemals mit dem Gerät spielen.
• Kinder dürfen das Kochfeld nicht ohne Aufsicht reinigen oder warten.
• Erstickungsgefahr! Verpackungsbestandteile (z. B. Nylon oder Polystyrol) von
Kindern fernhalten und, soweit möglich, entsorgen.
• Verbrennungsgefahr! Bewahren Sie in Stauräumen über oder hinter dem Kochfeld
keine Gegenstände auf, die für Kinder von Interesse sein könnten. Die Kinder werden
sonst dazu verleitet, auf das Gerät zu klettern.
• Verbrennungs- und Verbrühungsgefahr! Drehen Sie Topf- und Pfannengriffe IMMER
nach hinten, sodass sie nicht über das Kochfeld ragen, wo sie heruntergezogen
werden könnten. Dadurch wird die Verbrennungs- und Verbrühungsgefahr verringert.
• Nutzen Sie die Verriegelungsfunktionen “Verriegelung” und “Kindersicherheit”
damit Kinder das Kochfeld nicht unbeaufsichtigt einschalten oder die gewählten
Einstellungen nicht verändern können (siehe Kapitel ‘‘Bedienung des Kochfelds’’).
DEUTSCH
Technische Sicherheit
• Durch unsachgemäße Installations- und Wartungsarbeiten oder Reparaturen können
erhebliche Gefahren für den Benutzer entstehen. Der Hersteller haftet nicht für diese
Schäden.
47
Page 48

Sicherheitshinweise
• Aus Sicherheitsgründen verwenden Sie das Kochfeld nur im eingebauten Zustand.
• Beschädigungen am Kochfeld können Ihre Sicherheit gefährden. Kontrollieren Sie
DEUTSCH
es vor dem Einbau auf sichtbare Schäden. Nehmen Sie niemals ein beschädigtes
Gerät in Betrieb.
• Die Anschlussdaten (Frequenz und Spannung) auf dem Typenschild des Kochfeldes
müssen unbedingt mit denen des Stromnetzes übereinstimmen, damit keine
Schäden am Gerät auftreten. Vergleichen Sie diese vor dem Anschließen. Fragen
Sie im Zweifelsfall eine Elektrofachkraft.
• Die elektrische Sicherheit des Kochfeldes ist nur dann gewährleistet, wenn es an
ein vorschriftsmäßig installiertes Schutzleitersystem angeschlossen wird. Diese
grundlegende Sicherheitsvoraussetzung muss vorhanden sein. Lassen Sie im
Zweifelsfall die Elektroinstallation durch eine Elektrofachkraft überprüfen. Der
Hersteller haftet nicht für Schäden (z.B. Stromschlag), die durch einen fehlenden
oder unterbrochenen Schutzleiter verursacht werden.
• Öffnen Sie auf keinen Fall das Gehäuse des Gerätes. Werden Spannung führende
Anschlüsse berührt und/oder der elektrische und mechanische Aufbau verändert,
besteht Stromschlaggefahr. Darüber hinaus können Funktionsstörungen am Gerät
auftreten.
• Bei Installations- und Wartungsarbeiten sowie Reparaturen muss das Kochfeld vom
Stromnetz getrennt sein.
• Ersetzen Sie schadhafte oder defekte Bauteile nur durch Original-Ersatzteile zur
Gewährleistung der Sicherheitsanforderungen.
• Verwenden Sie aus Sicherheitsgründen keine Verlängerungskabel oder
Mehrfachsteckdosen (Brandgefahr durch Überhitzung).
• Stromschlaggefahr! Nehmen Sie das Kochfeld bei einem Defekt oder bei Brüchen,
Sprüngen oder Rissen in der Glaskeramikscheibe nicht in Betrieb bzw. schalten Sie
es sofort aus. Trennen Sie es vom Stromnetz.
• ACHTUNG: Falls das Stromkabel beschädigt ist, muss es vom Hersteller,
Kundendienst oder Fachpersonal ersetzt werden, um jede Gefahr zu verhindern.
Sachgemäßer Gebrauch
• ACHTUNG: Das Gerät und die zugänglichen Geräteteile werden während des
Betriebs heiß. Berühren Sie nicht die Heizelemente.
• ACHTUNG: Öle und Fette können sich bei Überhitzung entzünden. Löschen Sie
niemals Öl- und Fettbrände mit Wasser. Schalten Sie das Gerät aus und ersticken Sie
die Flammen vorsichtig mit einem Deckel oder einer Löschdecke.
• ACHTUNG: Das Kochfeld wird bei Betrieb heiß und bleibt es noch einige Zeit nach
dem Ausschalten. Erst wenn die Restwärmeanzeigen erloschen sind, besteht keine
Verbrennungsgefahr mehr.
• ACHTUNG: Lassen Sie das Kochfeld während des Betriebs nicht unbeaufsichtigt.
Einen kurzfristigen Kochübergang ständig überwachen. Leerkochende Töpfe können
zu Schäden an der Glaskeramikscheibe führen. Öle und Fette können sich bei
Überhitzung entzünden.
• Brandgefahr: Verwenden Sie das Kochfeld nicht als Ablagefläche!
• Legen Sie keine Metallgegenstände wie Messer, Gabeln, Löffel oder Topfdeckel auf
48
Page 49

Sicherheitshinweise
die Oberfläche des Kochfelds, da diese heiß werden können.
• Schalten Sie die Kochzonen nach Gebrauch aus!
• Bewahren Sie leicht entflammbare Gegenstände (z.B. Spraydosen) niemals in
Schubladen direkt unter dem Kochfeld auf. Eventuell vorhandene Besteckkästen
müssen aus hitzebeständigem Material sein.
• Flammen können die Fettfilter einer Dunstabzugshaube in Brand setzen. Flambieren
Sie niemals unter einer Dunstabzugshaube.
• Erhitzen Sie niemals Geschirr ohne Inhalt, sofern dies nicht ausdrücklich vom Hersteller
genehmigt ist.
• In geschlossenen Dosen (z.B. Blechdosen) entsteht beim Einkochen und Erhitzen
Überdruck, durch den sie platzen können. Verletzungs- und Verbrennungsgefahr.
• Wenn Sie ein Elektrogerät (z. B. Handmixer) in der Nähe des Kochfeldes verwenden,
achten Sie darauf, dass das Netzkabel nicht mit dem heißen Kochfeld in Berührung
kommt. Die Isolierung der Anschlussleitung könnte beschädigt werden.
• Salz, Zucker oder Sandkörner, z. B. vom Gemüse putzen, können Kratzer verursachen,
wenn sie unter den Geschirrboden gelangen.
• Verwenden Sie nur Töpfe und Pfannen mit glattem Boden. Raue Topf- und
Pfannenböden verkratzen die Glaskeramikscheibe.
• Herabfallende Gegenstände (auch leichte Gegenstände wie Salzstreuer) können
Risse oder Brüche in der Glaskeramikscheibe verursachen.
• Stellen Sie niemals heiße Töpfe oder Pfannen auf den Sensortasten und Anzeigen ab.
Diese können die darunter liegende Elektronik beschädigen.
• Bewahren Sie keine metallischen Gegenstände in einer Schublade direkt unter dem
Kochfeld auf, da diese bei längerer, intensiver Benutzung des Gerätes heiß werden
können.
• Das Kochfeld ist nicht für den Betrieb mit einer externen Zeitschaltuhr oder einem
Fernbedienungssystem bestimmt.
• Nur für Personen mit einem Herzschrittmacher: In unmittelbarer Nähe
des eingeschalteten Kochfeldes entsteht ein elektromagnetisches Feld. Eine
Beeinträchtigung des Herzschrittmachers ist jedoch unwahrscheinlich. Wenden Sie
sich im Zweifelsfall an den Hersteller des Herzschrittmachers oder an Ihren Arzt.
• Kreditkarten, Datenspeicher, Taschenrechner usw. dürfen sich nicht in unmittelbarer
Nähe des eingeschalteten Kochfeldes befinden. Das elektromagnetische Feld des
eingeschalteten Kochfeldes kann die Funktion magnetisierbarer Gegenstände
beeinträchtigen.
• Aufgrund der hohen Aufheizgeschwindigkeit von Induktionskochzonen kann unter
Umständen die Temperatur am Boden des Kochgeschirrs innerhalb kürzester Zeit
die Selbstentzündungstemperatur von Ölen oder Fetten erreichen. Lassen Sie das
Kochfeld während des Betriebs nicht unbeaufsichtigt!
• Das Kochfeld ist mit einem Kühlgebläse ausgestattet. Wenn sich unter dem
eingebauten Gerät eine Schublade befindet, müssen Sie auf einen ausreichenden
Abstand zwischen dem Schubladeninhalt und der Unterseite des Gerätes achten,
damit die ausreichende Kühlluftzufuhr für das Kochfeld gewährleistet ist. Bewahren
Sie keine spitzen oder kleinen Gegenstände oder Papier in der Schublade auf, da
diese durch die Lüftungsschlitze in das Gehäuse eindringen oder angesaugt werden
können und so das Kühlluftgebläse beschädigen oder die Kühlung beeinträchtigen.
DEUTSCH
49
Page 50

Induktionskochen
Vorteile des Induktionskochens
DEUTSCH
Beim Induktionskochen entwickelt sich die Hitze direkt am Pfannenboden. Daraus
ergeben sich viele Vorteile für Sie:
• Zeitersparnis beim Kochen und Braten. Das Kochgeschirr wird direkt erhitzt.
• Geringerer Energieverbrauch.
• Einfache Reinigung und Wartung. Verspritztes Essen brennt sich nicht so schnell
in das Kochfeld ein.
• Kontrollierte Wärmezufuhr und höhere Sicherheit. Die Kochzone reagiert
unverzüglich auf jede Leistungsstufenänderung, so kann die Temperatur
präzise eingestellt werden. Die Wärmezufuhr wird unterbrochen, sobald Sie das
Kochgeschirr von der Kochzone entfernen, auch wenn diese noch eingeschaltet
ist.
Kochgeschirr
Nur ferromagnetisches Kochgeschirr aus folgenden Materialien ist für
Induktionskochfelder geeignet:
• Emaillierter Stahl
• Gusseisen
• Induktionstaugliches Kochgeschirr aus Edelstahl.
Um festzustellen, ob das Kochgeschirr
geeignet ist, prüfen Sie, ob der Topf- oder
Pfannenboden einen Magneten anzieht.
Es gibt andere induktionstaugliche Töpfe
und Pfannen, deren Böden nicht voll
ferromagnetisch sind. Wenn der Boden des
Kochgeschirrs nicht voll ferromagnetisch ist,
wird nur der magnetische Bereich heiß.
So kann es passieren, dass die Hitze nicht gleichmäßig verteilt wird.
Für gute Kochresultate empfehlen wir, dass die Dimension des ferromagnetischen
Bereichs des Kochgeschirrs mit der Größe der Kochzone übereinstimmt.
Ungeeignetes Kochgeschirr
Verwenden Sie niemals Induktions-Adapterplatten oder Kochgeschirr aus:
• Traditionellem Edelstahl
• Glas
• Ton
• Kupfer
• Aluminum
50
Page 51

Induktionskochen
Empfehlungen zum Kochgeschirr
FALSCH RICHTIG
DEUTSCH
Das Kochgeschirr steht nicht mittig auf der
Kochzone.
Gewölbte oder unebene Pfannenböden. Flacher Pfannenboden & gerade Seiten.
Pfanne entspricht nicht der Mindestgröße
der gewählten Kochzone.
Pfannenboden steht auf dem
Kochfeldrahmen oder nicht vollständig auf
der Kochfeldoberfläche.
Das Kochgeschirr steht mittig auf der
Kochzone.
Pfannengröße entspricht der für die
Kochzone empfohlenen Mindestgröße oder
übersteigt diese.
Pfanne steht vollständig auf der
Kochfeldoberfläche.
Der schwere Griff neigt die Pfanne. Pfanne ist richtig ausbalanciert.
51
Page 52

Gerätbeschreibung
9 9
02 5
min
Bedienfeld
DEUTSCH
Dieses Kochfeld ist mit elektronischen Sensortasten ausgestattet, die auf
Fingerkontakt reagieren. Die Anzeigen auf das Bedienfeld und die Signaltone
bestätigen die Aktivierung der ausgewählten Funktion. Die Sensortasten nicht
abdecken.
Sensortaste
ACHTUNG! Verbrennungsgefahr
Langes Kochen bei hohen Leistungsstufen und mit großen Töpfen können das
Bedienfeld überhitzen. Vorsichtig, wenn Sie die Taste berühren.
Funktion
EIN/AUS-Taste – Zum Ein- und Ausschalten
Verriegelung-Taste – Aktiviert/Deaktiviert die Verriegelung
Pause/Recall-Taste – Aktiviert/Deaktiviert die Funktionen
Pause und Recall (siehe Kapitel „Bedienung des Kochfelds“)
Programme-Taste- Aktiviert die Programme “Warming”, ‘‘Melt’’
und ‘‘Simmer’’
Tasten +/- Timer – Aktiviert/deaktiviert die Timer- und Memory-
Taste (siehe Kapitel „Bedienung des Kochfelds“)
Slider – Schieben Sie Ihren Finger nach rechts oder links, um
die Temperatur einzustellen.
52
Page 53

a 4
0 4
1 4-9 4
025
0 4
h 4
p 4
a 4
e 4
Gerätbeschreibung
Bedienung des Kochfelds und Anzeigen
Anzeige Beschreibung
Eingeschaltete Funktion – Die Kochzone oder Funktion ist aktiviert
Uhr-Anzeige – Die Memory-Funktion ist aktiviert
Bridge-Kontrollleuchte – zeigt an, dass die Bridge-Funktion in Betrieb ist
„Warming“-Kontrollleuchte - zeigt an, dass das „Warming“-Programm in
Betrieb ist (die Hitzestufe der Kochzone ist bei 42°)
„Melt“-Kontrollleuchte - zeigt an, dass das „Melt“-Programm in Betrieb ist
(die Hitzestufe der Kochzone ist bei 70°)
„Simmer“-Kontrollleuchte - zeigt an, dass das „Simmer“-Programm in
Betrieb ist (die Hitzestufe der Kochzone ist bei 94°)
Die Timer-Funktion ist nicht eingestellt
Nach Aktivierung der Kochzone, die Leistungsstufe innerhalb von 10
Sekunden einstellen
Aktive Kochzone Wärmeleistung
DEUTSCH
Timer-Display
Topferkennung – Kochgeschirr ist ungeeignet, zu klein oder kein
Kochgeschirr befindet sich auf der Kochzone
Restwärme – Zeigt, dass die Kochzone noch heiß ist. Achtung!
Power-Boost - Funktion ist in Betrieb
Ankochautomatik – Die Funktion ist aktiviert
+ digit
Hinweis: Sie können die Restwärme zum Schmelzen oder Warmhalten der
Speisen verwenden.
Error – Störung ist aufgetreten. (Siehe Kapitel „Störungssuche“)
ACHTUNG! Restwärme-Anzeige
Nach dem Ausschalten der Kochzonen das Gerät abkühlen
lassen. Achten Sie auf die Restwärme-Anzeige.
53
Page 54

0 4
Bedienung des Kochfelds
Kochfeld einschalten
DEUTSCH
Auf die Ein/Aus-Taste drücken, um das Kochfeld einzuschalten.
Auf dem Display aller Kochzonen erscheint «0».
Das Bedienfeld bleibt 10 Sekunden lang aktiv. Erfolgt keine weitere Eingabe,
schaltet sich das Kochfeld wieder aus.
Kochfeld ausschalten
Die Ein/Aus-Taste drücken bis das Kochfeld sich ausschaltet.
Kochzonen einschalten
Das Kochfeld einschalten und die Leistungsstärke mittels des Sliders innerhalb
von 10 Sekunden einstellen. Jede Kochzone ist mit 9 Leistungsstufen
programmiert und wird mit einer Nummer von «1» bis «9» auf dem entsprechenden
Display angezeigt. Schieben Sie Ihren Finger nach rechts, um die Einstellung zu
erhöhen, nach links, um die Einstellung zu verringern.
Kochzonen ausschalten
Schieben Sie Ihren Finger auf dem Slider bis «0».
Topferkennung
Jede Induktionskochzone hat eine Mindesterkennungsgrenze des Kochgeschirrs,
die je nach Material des verwendeten Kochgeschirrs variiert.
Aus diesem Grund muss die Kochzone benutzt werden, die am besten zum
Durchmesser des Kochgeschirrs passt. Wenn auf der Anzeige eines Kochfelds
das Symbol «
• das verwendete Kochgeschirr nicht für das Induktionskochen geeignet ist.
• der Durchmesser des verwendeten Topfes kleiner ist als vom Gerät erlaubt.
• sich kein Topf auf dem Kochfeld befindet.
Genauere Informationen finden Sie im Kapitel „Induktionskochen“.
» erscheint, bedeutet das, dass:
Restwärme
Nach dem Ausschalten der Kochzonen wird die Restwärme der noch heißen
Kochzonen (über 50°) mit einem «H» (Restwärme) angezeigt. Die Anzeige
erlischt, wenn die Kochzonen ohne Gefahr berührt werden können.
Timer
Mit dem Timer können Sie für jede Kochzone eine individuelle Kochdauer von
1.00 (1 Minute) bis 1.59 (1 Stunde und 59 Minuten) einstellen. Um den Timer der
54
Page 55

Bedienung des Kochfelds
gewünschten Kochzone einzustellen, die Leistung einstellen und gleichzeitig die
Tasten [+] und [-] drücken bis die Sanduhr-Anzeige neben der entsprechenden
Kochzone aufleuchtet. Die gewünschte Kochdauer mittels den Tasten [+] und
[-] innerhalb von 5 Sekunden einstellen. Nach 5 Sekunden erscheint auf dem
Timer-Display das Countdown. Nach Ablauf der programmieten Kochdauer
schaltet sich die Kochzone automatisch aus, auf dem Timer-Display erscheint
«000» und ein Signalton ertönt. Die Tasten [+] und [-] drücken, um den Signalton
auszuschalten. Um den Timer zu deaktivieren, drücken Sie gleichzeitig
mehrmals die Tasten [+] und [-]. Sofort innerhalb con 5 Sekunden die [-] Taste
bis «000» drücken. Nach 5 Sekunden erlöscht die Sanduhr-Anzeige neben der
entsprechenden Kochzone zur Bestätigung der Deaktivierung dieser Funktion.
Egg-Timer/Memory
Diese Funktion erlaubt wenn keine der Kochzonen in Funktion ist, ein MemorySignal zu programmieren, das einen Signalton auch nach Ausschalten des
Kochfelds erlaubt. Ist die Egg-Timer/Memory-Funktion aktiviert, kann die TimerFunktion nicht eingestellt werden. Um diese Funktion zu aktivieren, gleichzeitig
die Tasten [+] und [-] drücken bis die Uhr-Anzeige unter dem Timer-Display
aufleuchtet. Innerhalb von 5 Sekunden mittels den Tasten [+] und [-] die Zeit
einstellen. Nach 5 Sekunden erscheint auf dem Timer-Display das Countdown.
Nach Ablauf der programmieten Zeit, erscheint auf dem Timer-Display «000»
und ein Signalton ertönt. Die Tasten [+] und [-] drücken, um den Signalton
auszuschalten. Um die Memory-Funktion zu deaktivieren, drücken Sie die
Tasten [+] und [-] bis die Uhr-Anzeige unter dem Timer-Display aufleuchtet. Jetzt
die [-] Taste innerhalb von 5 Sekunden bis «000» drücken. Nach 5 Sekunden
erlöscht die Uhr-Anzeige zur Bestätigung der Deaktivierung dieser Funktion.
DEUTSCH
Pause
Mit der Pausenfunktion können Sie den Kochvorgang unterbrechen. Um diese
Funktion zu aktivieren, drücken Sie die Pause-Taste. Die entsprechende Anzeige
leuchtet auf und auf dem Display aller Kochzonen erscheint «II». Alle aktivierten
Timer werden gestoppt. Die Pause dauert max. 10 Minuten. Nach Ablauf dieser
Zeit schaltet sich das Gerät automatisch aus. Um die Pause zu deaktivieren, die
Pause-Taste drücken und Ihren Finger innerhalb von 10 Sekunden auf dem
Slider nach rechts schieben.
Recall
Schaltet sich das Gerät versehentlich aus, können Sie die zuvor eingestellten
Funktionen aufrufen, indem Sie die EIN/AUS-Taste innerhalb von 5 Sekunden
55
Page 56

Bedienung des Kochfelds
drücken. Diese Funktion ist gewährt, wenn die entsprechende Anzeige nach
DEUTSCH
Einschalten des Kochfelds blinkt. Die Pause-Taste innerhalb von 5 Sekunden
drücken, um die Zurückschaltung zu aktivieren.
Verriegelung
Das Bedienfeld kann verriegelt werden, um eine ungewollte Änderung der
Kochzoneneinstellung zu vermeiden (während der Reinigung, Kinder, usw.).
Um diese Funktion zu aktivieren, die Schlüssel-Taste drücken. Die entsprechende
Anzeige leuchtet auf. Während diese Funktion kann das Gerät ein- und
ausgeschaltet werden. Um diese Funktion zu deaktivieren, die Schlüssel-Taste
wieder drücken. Die entsprechende Anzeige erlöscht.
Kindersicherheit
Diese Funktion verhindert, dass Kinder versehentlich oder absichtlich das Gerät
einschalten. Diese Funktion kann nur aktiviert werden, wenn alle Kochzonen
ausgeschaltet sind. Um diese Funktion zu aktivieren, die Schlüssel- und die
Pause-Taste gleichzeitig drücken, dann wieder die Schlüssel-Taste. Auf allen
Displays erscheint «L» und die entsprechende Anzeige leuchtet auf.
Diese Funktion bleibt nach Ausschalten bis zum nächsten Einschalten aktiv.
Um diese Funktion zu deaktivieren, die Schlüssel- und die Pause-Taste
gleichzeitig drücken, dann wieder die Schlüssel-Taste.
Nach Wiedereinschalten des Gerätes ist diese Funktion nicht mehr aktiv.
Sonderprogramme: Warming, Melt, Simmer, Power Boost,
Ankochautomatik
Das Kochfeld hat drei Sonderprogramme, die bereits eingestellt sind, um
besondere Kochvorgänge auszuführen.
• Warming
Das „Warming“-Programm stellt die Temperaturstufe der ausgewählten
Kochzone auf
Aktivierung dieses Programms drücken Sie einmal die «Programme-Taste».
42°C
und ist für das Warmhalten der Speisen gedacht.
• Melt
Das „Melt“-Programm stellt die Temperaturstufe der ausgewählten Kochzone
auf 70°C, um Schokolade, Butter oder ähnliches zu schmelzen. Zur
Aktivierung dieses Programms doppel drücken Sie die «Programme-Taste».
• Simmer
Das „Simmer“-Programm stellt die Temperaturstufe der ausgewählten
Kochzone auf 94°C, um Saucen, Suppen und Eintöpfe langsam zum Köcheln
56
Zur
Page 57

Bedienung des Kochfelds
zu bringen. Zur Aktivierung dieses Programms drücken Sie dreimal auf die
«Programme-Taste».
• Power Boost
Diese Programm reduziert zusätzlich die Kochzeit einer bestimmten Kochzone,
durch Erhöhung der Temperatur für 10 Minuten auf maximale Stufe.
Am Ende dieses Zeitrahmens kehrt die Hitzestufe der Kochzone automatisch
auf Stufe «9» zurück. Die Verwendung dieser Funktion wird empfohlen für das
Kochen großer Mengen Flüssigkeit (z.B. Wasser zum Kochen von Nudeln)
oder Speisen in sehr kurzer Zeit. Zur Aktivierung dieses Programms bewegen
Sie Ihren Finger auf dem Slider nach rechts bis das Symbol «P» ist auf der
Anzeige der Kochzone zu sehen.
• Ankochautomatik
Alle Kochzonen sind mit einer Ankochautomatik ausgestattet. Diese Funktion
ist für das Ankochen großer Flüssigkeitsmengen (z.B. Wasser für Pasta)
oder andere Speisen gedacht. Bei aktivierter Ankochautomatik heizt die
Kochzone automatisch mit höchster Leistung an und schaltet dann auf die
eingestellte Leistungsstufe zurück. Die Ankochzeit hängt von der eingestellten
Leistungsstufe ab. Um diese Funktion zu aktivieren, bewegen Sie den
entsprechenden Slider bis zur gewählten Kochleistung und abwarten, bis auf
dem Display ein «A» mit der gewählten Kochleistung erscheint.
DEUTSCH
Sicherheitsausschaltung
Dieses Gerät ist mit einer
Sicherheitsausschaltung
ausgestattet, das alle Kochzonen
nach der Betriebsdauer-Begrenzung
automatisch ausschaltet. In diesem Fall
erscheint auf dem Kochzonen-Display
die Restwärme «H».
LEISTUNG BETRIEBSDAUER-
BEGRENZUNG (Stunden)
1 - 2 6
3 - 4 5
5 4
6 - 7 - 8 - 9 1,5
57
Page 58

yes
no no
a
b
c
d
6 0
02 5
min
Bedienung des Kochfelds
Bridge (Flexible Kochzonen)
DEUTSCH
Mit dieser Funktion können Sie die vordere und die hintere Kochzone (a+b) wie
unten abgebildet zu einer großen Kochzone zusammenschalten.
Achten Sie darauf, das Kochgeschirr richtig auf die Kochzonen zu stellen.
yes
no
a
b
Zur Aktivierung der Bridge-Funktion zwischen den beiden Kochzonen drücken
dann gleichzeitig auf die beiden Slider (siehe Abbildung unten).
Das Bridge-Symbol leuchtet neben den Anzeigen der beiden Kochzonen auf
und zeigt an, das die Funktion in Betrieb ist.
HINWEIS: Die Einstellung der Hitzestufe kann nur auf dem Slider und den
Sensortasten der vorderen Kochzone eingestellt werden.
Um die Bridge-Funktion zu deaktivieren,drücken dann gleichzeitig auf die
beiden Slider.
58
Page 59

Bedienung des Kochfelds
Power Management
Alle Kochzonen sind zu einer Phase zusammengeschlossen
(siehe Abbildung). Die Phase hat eine maximale Leistung von
3700 W/230V (siehe Kapitel „Technische Daten“).
Die Funktion verteilt die Hitzeleistung zwischen den Kochzonen
und aktiviert sich, wenn die Gesamtleistung der Kochzonen
3700 W übersteigt. Die Funktion reduziert die Hitzestufe auf
die anderen Kochzonen. Die Anzeige der Hitzeeinstellung der
reduzierten Kochzonen wechselt zwischen den beiden Stufen.
Technische Daten
Gemäß Verordnung (EU) No. 66/2014
Produktabmessungen: 29x52 cm
Kochzone
Messer
Kochzone
(cm)
Mindestdurch-
messer
(cm)
Output
(W) 230V
DEUTSCH
a
b
Energiever-
brauch
EC (Wh/kg)
a, b 20x18
a+b 20x37
Kochfeld-Typ: Einbau
Heiztechnologie: Induktion
Ø 14,5
23x14,5
normal
booster
normal
booster
max.
2100
3700
2100
3700
3700
171
171
171
59
Page 60

a 4
4
60
Störungssuche
Problem Mögliche Ursache Abhilfe
DEUTSCH
Das Gerät lässt sich
nicht einschalten.
Das Kochfeld schaltet
sich aus.
Die Restwärme-Anzeige schaltet sich nicht
ein.
Die Ankochautomatik
funktioniert nicht.
Die Hitzeeinstellung
wechselt zwischen zwei
Stufen.
Die Sensortasten
werden heiß.
erscheint. Die Ausschaltautomatik ist
erscheint. Die Kindersicherung ist in
erscheint. Wasser oder Kochutensilien
Das Gerät ist nicht oder
nicht korrekt an das
Stromnetz angeschlossen.
Die Sicherung ist gefallen. Vergewissern Sie sich, dass
Seit dem Einschalten
des Kochfelds sind
mehr als 10 Sekunden
vergangen.
Sie haben 2 oder mehr
Sensortasten gleichzeitig
berührt.
Auf dem Bedienfeld sind
Wasser- oder Fettflecken.
Die Pausen-Funktion ist in
Betrieb.
Sie haben etwas auf die
EIN/AUS-Taste gestellt.
Die Zone ist nicht heiß,
weil sie nur kurz in Betrieb
war.
Die Zone ist heiß. Lassen Sie die Zone
Die höchste Hitzestufe ist
eingestellt
Die Power-ManagementFunktion ist in Betrieb.
Das Kochgeschirr ist zu
groß oder es steht zu
nahe am Bedienfeld.
in Betrieb.
Betrieb.
auf dem Bedienfeld.
Prüfen Sie, ob das Gerät
korrekt an das Stromnetz angeschlossen ist. Siehe Kapitel
„Elektroanschluss“.
die Sicherung die Störung ausgelöst hat. Fällt die Sicherung
immer wieder, wenden Sie
sich an eine Elektrofachkraft
Schalten Sie das Gerät wieder
ein und stellen Sie die Hitzestufe innerhalb von 10 Sekunden
ein.
Berühren Sie nur eine Sensortaste.
Reinigen Sie das Bedienfeld.
Siehe Kapitel „Bedienung des
Kochfelds“.
Entfernen Sie den Gegenstand
von der Sensortaste.
War die Zone lange genug in
Betrieb, um heiß zu werden,
wenden Sie sich an den Kundendienst.
ausreichend abkühlen.
Die höchste Hitzestufe hat
die gleiche Leistung wie die
Funktion.
Siehe Kapitel „Bedienung des
Kochfelds“.
Stellen Sie großes Kochgeschirr wenn möglich auf die
hinteren Kochzonen.
Schalten Sie das Gerät aus
und wieder ein.
Siehe Kapitel „Bedienung des
Kochfelds“.
Entfernen Sie die Gegenstände
vom Bedienfeld.
Page 61

Störungssuche
0 4
e 4
7
e21
e03
e03
e03
e03
e03
e03
7
DEUTSCH
erscheint. Kein Kochgeschirr ist auf
und eine Zahl
erscheint.
erscheint.
erscheint.
erscheint.
erscheint.
erscheint. Das Bedienfeld ist falsch
,
,7,7 oder
erscheint.
,
der Zone.
Das Kochgeschirr ist
falsch.
Die Größe des
Topfbodens ist zu klein
für die Zone.
Das Kochgeschirr
bedeckt nicht die
Kochzone.
Fehler am Gerät. Trennen Sie das Gerät
Die Induktionsspulen sind
überhitzt.
Das Gerät ist überhitzt.
Das Gebläse könnte
blockiert sein.
Nicht korrekte Datenkonfigurierung.
Keinee oder falsche
Kommunikation zwischen
Bedienfeld und Induktionsspulen.
angeschlossen.
Ein innerer Bestandteil
des Geräts muss ersetzt
werden.
Stellen Sie Kochgeschirr auf
die Zone.
Verwenden Sie das richtige
Kochgeschirr. Siehe Kapitel
„Induktionskochen”.
Verwenden Sie Kochgeschirr
der richtigen Größe. Siehe
Kapitel „Induktionskochen”.
Bedecken Sie die Kochzone
vollständig.
vorübergehend vom
Stromnetz. Entfernen Sie
die Sicherung aus dem
Schaltkasten. Schließen Sie
alles wieder an. Tritt das
Problem erneut auf, wenden
Sie sich an den Kundendienst.
Lassen Sie das Gerät
abkühlen.
Lassen Sie das Gerät
abkühlen.
Prüfen Sie, ob etwas die
Lüfterblätter blockiert. Tritt das
Problem erneut auf, wenden
Sie sich an den Kundendienst.
Neue Konfigurierung nötig.
Wenden Sie sich an den
Kundendienst.
Vergewissern Sie sich, dass
das Stromkabel richtig angeschlossen ist und funktioniert.
Schließen Sie an korrekte
Netzspannung an.
Wenden Sie sich an den
Kundendienst.
Wenn Sie selbst keine Lösung für Ihr Problem finden können, wenden Sie
sich an Ihren Händler oder den Kundendienst. Geben Sie die Daten auf dem
Typenschild an.
61
Page 62

Reinigung und Pflege
Wichtige Hinweise
DEUTSCH
• Das Gerät regelmäßig reinigen, damit die Glaskeramikscheibe nicht zu
Schaden kommt und lange hält.
• Vor der Reinigung das Gerät ausschalten und abkühlen lassen.
• Vor jede Wartungsarbeit das Gerät vom Stromnetz trennen.
• Keinesfalls ein Dampf-Reinigungsgerät verwenden.
• Das Gerät mit einem weichen und feuchten Lappen reinigen. Nur neutrales
Reinigungsmittel verwenden.
• Keinesfalls scheuernde Reinigungsmittel, Scheuerschwämme, Lösungsmittel
oder Topfkratzer verwenden.
Allgemeine Hinweise
• Das Kochfeld nach jedem Gebrauch reinigen.
• Nur Kochgeschirr mit sauberen Boden verwenden.
• Kratzer oder dunkle Flecke auf der Oberfläche beeinträchtigen nicht den
richtigen Betrieb des Gerätes.
• Nur Reinigungsmittel für Glaskeramik verwenden.
• Reste auf der Oberfläche mit einem Glasschaber entfernen.
Reinigung des Kochfelds
• Sofort entfernen: Geschmolzene
Kunststoffe, Folie, Zucker. Diese können
das Kochfeld beschädigen.
Die Reste mit einem Glasschaber
entfernen, indem Sie mit der Klinge im
spitzen Winkel den Rest abschieben.
• Nachdem das Kochfeld abgekühlt ist:
Kalkspuren, Wasser- und Ölrückstände,
metallisch schimmernde Flecken. Das
Kochfeld mit einem feuchten Tuch und
milden Reinigungsmittel putzen. Danach
mit einem weichen Tuch trocken wischen.
62
Page 63

DEUTSCH
Umweltschutz
Entsorgung der Transportverpackung
Die Verpackung schützt das Gerät vor Transportschäden. Die
Verpackungsmaterialien sind nach umweltverträglichen und
entsorgungstechnischen Gesichtspunkten ausgewählt und deshalb recycelbar.
Die Kunststoffhüllen und -tüten und andere Teile des Verpackungsmaterials
richtig entsorgen und von Kindern fernhalten. Erstickungsgefahr!
Entsorgung von Elektro- und Elektronik-Altgeräten
Dieses Symbol weist darauf hin, dass das Produkt gemäß WEEE Richtlinie
(Richtlinie über Elektro- und Elektronik-Altgeräte) (2002/96/EC) und nationalen
Gesetzen nicht über den Hausmüll entsorgt werden darf.
Dieses Produkt muss bei einer dafür vorgesehenen Sammelstelle abgegeben
werden. Dies kann z. B. durch Rückgabe beim Kauf eines ähnlichen
Produkts oder durch Abgabe bei einer autorisierten Sammelstelle für die
Wiederaufbereitung von Elektro- und Elektronik-Altgeräten geschehen.
Informationen zu Sammelstellen für Altgeräte erhalten Sie bei Ihrer
Stadtverwaltung, dem öffentlich-rechtlichen Entsorgungsträger, einer
autorisierten Stelle für die Entsorgung von Elektro- und ElektronikAltgeräten oder Ihrer Müllabfuhr.
Tipps zum Energiesparen
• Garen Sie nach Möglichkeit nur in geschlossenen Töpfen oder Pfannen. So
wird verhindert, dass Wärme unnötig entweicht.
• Wählen Sie für kleine Mengen einen kleinen Topf. Ein kleiner Topf benötigt
weniger Energie als ein großer, nur wenig gefüllter Topf.
• Garen Sie mit wenig Wasser.
• Schalten Sie nach dem Ankochen oder Anbraten rechtzeitig auf eine niedrigere
Leistungsstufe zurück.
• Verwenden Sie einen Schnellkochtopf, um die Garzeit zu reduzieren.
FÜR SCHÄDEN, DIE DURCH NICHTBEACHTUNG DIESER
BEDIENUNGSANLEITUNG ENTSTEHEN, ÜBERNIMMT DER
HERSTELLER KEINE HAFTUNG.
DIE GARANTIE GILT NICHT FÜR SCHÄDEN, DIE DURCH
NICHTBEACHTUNG DIESER BEDIENUNGSANLEITUNG ENTSTEHEN.
63
Page 64

PT 2 - Montagehinweise
Installation
Einbau
DEUTSCH
1. Einen Ausschnitt in der Arbeitsplatte durchführen (siehe Kapitel „Einbau des
Kochfelds“).
ACHTUNG!
Sehr schwer
Der Einbau sollte von zwei oder mehr
Personen durchgeführt werden,
um Rückenverletzungen zu vermeiden.
2. Mit Hilfe von zwei Personen das Kochfeld seitenverkehrt hinlegen und das
Dichtungsmaterial entlang des gesamten Kochfeldrandes aufbringen.
2 mm
3. Das Kochfeld in der Mitte des Ausschnitts
aufsetzen und den Elektro-Kabel
durchführen. Achten Sie, dass die
Dichtung unter dem Kochfeld mit dem
Ausschnitt übereinstimmt, um eine
sichere Abdichtung zu gewährleisten.
Keine Dichtungsmasse verwenden (z.
B. Silicon).
64
Page 65

Installation
4. Das Gerät an der Arbeitsplatte mit den 4 mitgelieferten Bügeln befestigen.
Achten Sie auf die Dicke der Arbeitsplatte.
DEUTSCH
A
B
C
mm
30 mm
03
A. Feder B. Halterung C. Schraube
A
B
C
mm
40 mm
04
5. Den elektrischen Anschluss gemäß den angegebenen Anleitungen
durchführen (siehe Kapitel „Elektroanschluss“)
6. Das Kochfeld am Stromnetz anschließen.
7. Den Betrieb des Kochfelds überprüfen.
65
Page 66

min. 5 cm
4 mm
Installation
Einbaulage
DEUTSCH
Wählen Sie die beste Lage für das Kochfeld aus.
NICHT ERLAUBT NICHT EMPFOHLEN EMPFOHLEN
Lüftung
Die Mindestabstände müssen eingehalten werden, um eine ausreichende Lüftung
zu gewährleisten.
max 35 cm
5 cm
min.65 cm
min. 5 cm
min.40 cm
min. 5 cm
Einbau des Kochfelds
Einen Ausschnitt nach den unten angegebenen Maßen durchführen.
290/380 mm
485 mm
490 mm
520 mm
275 mm
280 mm
66
SCHUBLADE
DRAWER
5 cm
46 mm
Page 67

Installation
Elektroanschluss
Vor dem Stromanschluss versichern Sie sich, dass:
• Die Spannungsangabe auf dem Typenschild, das sich auf der unteren Seite des
Kochfelds befindet, mit der Netzspannung übereinstimmt.
• Die Elektroanlage mit einer Erdung gemäß den geltenden Richtlinien versehen
ist.
Falls das Gerät nicht mit einem Stromkabel und/oder Stecker ausgestattet
ist, geeignetes Material für die Absorption und die Betriebstemperatur, die am
Typenschild angegeben sind, verwenden.
Falls ein direkter Stromanschluss benötigt wird, muss ein allpoliger Trennschalter
mit einer Kontaktöffnung von mindestens 3 mm nach der am Typenschild
angegebenen Belastung und gemäß den geltenden Richtlinien vorgesehen werden
(das gelb/grüne Erdungskabel darf nicht vom Schalter unterbrochen werden).
Nach dem Einbau des Gerätes muss der allpolige Schalter leicht erreichbar sein.
ACHTUNG!
DIE ERDUNG IST GESETZLICH VORGESCHRIEBEN
Die elektrische Sicherheit dieses Geräts ist nur dann gewährleistet, wenn
das Gerät entsprechend den geltenden Sicherheitsvorschriften geerdet ist.
Elektrische Anlagen sollten regelmäßig vom Fachmann auf Sicherheit und
Funktionstüchtigkeit überprüft werden.
Der Hersteller haftet nicht für Personen- oder Sachschäden (z.B. Stromschlag),
die durch den Einsatz des Gerätes ohne vorschriftsmäßige Erdung entstehen.
Der Hersteller haftet nicht für Personen- oder Sachschäden, die durch
unsachgemäße Installation entstanden sind.
DEUTSCH
brown
braun
L1
220-240 V~
3x1,5mm
220-240 V~
2
blue green/yellow
blau grün/gelb
N
(erdung)
(ground)
67
Page 68

[FR] Manuel d’installation et d’utilisation
Cher Client,
Félicitations pour votre achat.
FRANÇAIS
Veuillez lire attentivement les instructions d’installation et le mode d’emploi avant d’utiliser
la table de cuisson pour la première fois.
Ces instructions contiennent des renseignements importants concernant l’installation,
la sécurité, l’utilisation et l’entretien. Elles vous aideront à assurer votre sécurité et à
prévenir tout dommage à la table de cuisson.
Le fabricant ne sera pas tenu responsable des dommages causés en raison du nonrespect des présentes instructions.
Conservez les instructions en lieu sûr et remettez-les au prochain propriétaire de
l’appareil, s’il y a lieu.
TABLE DE MATIÈRES
PT 1 - Mode d’emploi
consignes de sécurité 69
Utilisation recommandée 69
Les enfants et la table de cuisson 69
Sécurité technique 69
Utilisation appropriée 70
la cuisson par induction 72
Avantages de la cuisson par induction 72
Ustensiles de cuisson 72
Le bon positionnement des casseroles 73
description de la table de cuisson
74
Panneau de commande 74
Affichages et voyants 75
utilisation de la table de cuisson
76
Allumage de l’appareil 76
Extinction de l’appareil 76
Allumage des zones de cuisson 76
Extinction des zones de cuisson 76
Détection de récipient 76
Chaleur résiduelle 76
Minuterie 76
Egg-Timer/Rappel 77
Pause 77
Rappel 78
Verrouillage de sécurité 78
68
Sécurité enfants 78
Programmes spéciaux: Warming, Melt,
Simmer, Power Boost, Réchauffage
Automatique 78
Extinction de sécurité 79
Bridge (Zones de cuisson flexibles) 80
Gestion de la puissance 81
Spécifications techniques 81
résolution de problèmes 82
nettoyage et entretien 84
Informations importantes 84
Informations générales 84
Nettoyage de la table 84
protection de l’environnement 85
Nos emballages 85
Votre ancien appareil 85
Conseils d’économie l’énergie 85
PT 2 - Instructions pour
l’installation
installation 86
Installation de la table de cuisson 86
Positionnement 88
Ventilation 88
Encastrement de la table de cuisson 88
Branchement électrique 89
Page 69

PT 1 - Mode d’emploi
consignes de sécurité
AVERTISSEMENT !
LIRE ATTENTIVEMENT LES INSTRUCTIONS
AVANT L’UTILISATION DE LA TABLE DE CUISSON !
CET APPAREIL EST DESTINÉE
À UN USAGE DOMESTIQUE SEULEMENT.
Utilisation recommandée
• Utilisez la table de cuisson pour préparer et chauffer des aliments seulement dans des
situations domestiques. Tout autre type d’utilisation est interdit.
• Cette table de cuisson n’est pas conçue pour être utilisée à l’extérieur ou les installations
mobiles comme les bateaux.
• Les personnes qui, en raison de capacités physiques, sensorielles ou mentales réduites,
ou d’un manque d’expérience ou de connaissances, ne sont pas en mesure d’utiliser
cet appareil de façon sécuritaire doivent être supervisées ou formées par une personne
responsable.
Les enfants et la table de cuisson
• Ne laissez pas les enfants âgés de moins de 8 ans s’approcher de la table de cuisson
sans surveillance.
• Les enfants âgés de 8 ans et plus ne peuvent utiliser la table de cuisson sans surveillance
seulement si le fonctionnement de l’appareil leur a été expliqué de façon à ce qu’ils
puissent l’utiliser en toute sécurité. Ils doivent comprendre et reconnaître les dangers
éventuels d’une utilisation inadéquate.
• Ne laissez pas des enfants sans surveillance à proximité de la table de cuisson. Ne
laissez pas les enfants jouer avec l’appareil.
• Les enfants ne doivent pas nettoyer la table de cuisson sans surveillance.
• Risque de suffocation ! Les enfants pourraient s’envelopper dans les emballages (p.
ex. le papier) ou encore en recouvrir leur tête pendant qu’ils jouent et ainsi suffoquer.
Gardez les emballages hors de la portée des enfants.
• Risque de brûlure ! Ne laissez pas d’objet qui pourrait susciter l’intérêt d’un enfant sur
ou derrière la table de cuisson. Un enfant pourrait vouloir grimper sur la table de cuisson.
• Risque de brûlure et d’ébouillantage ! Orientez toujours les poignées des poêlons et
des casseroles vers l’intérieur, de manière à ce qu’elles ne dépassent pas de la table de
cuisson, car les enfants pourraient les attraper.
• Utilisez la «Sécurité enfants» pour empêcher les enfants d’allumer la table de cuisson.
Lorsque vous utilisez la table de cuisson, activez le «Verrouillage de sécurité» pour éviter
que les enfants ne modifient les paramètres sélectionnés.
FRANÇAIS
Sécurité technique
• Les travaux d’installation, de réparation et d’entretien ne doivent être effectués que
par un technicien autorisé par le fabricant. Il peut être dangereux pour l’utilisateur de
l’appareil de confier ces travaux à des personnes non qualifiées. Le fabricant décline
toute responsabilité pour ces dommages.
• Pour des raisons de sécurité, utilisez la table de cuisson après son installation.
69
Page 70

consignes de sécurité
• Avant d’installer la table de cuisson, assurez-vous qu’elle n’est pas endommagée. Une
table de cuisson endommagée présente des risques. N’utilisez pas la table de cuisson
FRANÇAIS
si elle est endommagée.
• Avant d’installer l’appareil, assurez-vous que la tension et la fréquence indiquées
sur la plaque signalétique de la table de cuisson correspondent à celles du système
d’alimentation électrique de la résidence. Ces caractéristiques doivent concorder
afin d’éviter toute détérioration de la table de cuisson. En cas de doute, consultez un
électricien qualifié.
• La sécurité électrique de cette table de cuisson ne peut être garantie que si celle-ci est
raccordée à un système de mise à la terre conforme à la réglementation en vigueur. Il
est essentiel de respecter cette exigence élémentaire en matière de sécurité. En cas
de doute, faites vérifier l’installation électrique de votre résidence par un électricien
qualifié. Dans le cas contraire, le fabriquant ne répond pas des dommages (p.ex. choc
électrique) causés par un conducteur de protection coupé ou même absent.
• N’ouvrez jamais le boîtier de la table de cuisson. Il est dangereux de toucher aux
branchements électriques ou de modifier l’installation électrique ou mécanique de
l’appareil. Cela peut également nuire au fonctionnement de la table de cuisson.
• Avant de procéder à l’installation ou d’effectuer des travaux d’entretien ou de réparation,
il faut couper l’alimentation électrique de la table de cuisson.
• Seules des pièces de rechange d’origine permettent au fabricant de garantir la sécurité
de l’appareil. Les pièces défectueuses doivent être remplacées par des pièces d’origine
uniquement.
• Il n’est pas sécuritaire d’utiliser plusieurs prises de courant ou des rallonges (risque
d’incendie). N’utilisez pas ce type de dispositif pour brancher la table de cuisson à la
source d’alimentation électrique.
• Attention, risque de choc électrique! Si vous découvrez des ébréchures, des
égratignures ou des bris de quelque sorte que ce soit sur la table de cuisson, éteignezla immédiatement et cessez de l’utiliser. Débranchez-la de la source d’alimentation
électrique.
• ATTENTION: Si le cordon d’alimentation de l’appareil est endommagé, il doit être
remplacé par le producteur, un centre de service autorisé ou un personnel qualifié afin
d’éviter tout risque.
Utilisation appropriée
• ATTENTION: L’appareil et ses composants deviennent très chauds lors l’utilisation.
Faites attention et ne touchez pas aux éléments chauds.
• ATTENTION: Les huiles et les graisses peuvent s’enflammer en cas de surchauffe.
Ne laissez pas l’appareil sans surveillance lorsque vous cuisinez avec de l’huile ou de
la graisse. N’utilisez pas d’eau pour éteindre un feu d’huile ou de graisse. Éteignez la
table de cuisson et utilisez un couvercle ou un linge à vaisselle humide pour étouffer les
flammes.
• ATTENTION: L’appareil devient chaud pendant son utilisation et reste chaud pendant
un certain temps après avoir été éteint. Le risque de brûlure subsiste jusqu’à ce que les
voyants de chaleur résiduelle se soient éteints.
• ATTENTION: Ne laissez jamais la table de cuisson sans surveillance lors son
fonctionnement. Le contenu d’un récipient qui dessèche par ébullition et qui surchauffe
70
Page 71

consignes de sécurité
peut endommager la vitrocéramique. La graisse ou l’huile surchauffée peut s’enflammer
et provoquer un incendie.
• Danger d’incendie: N’utilisez pas l’appareil comme surface de rangement !
• Les objets métalliques comme les couteaux, les fourchettes, les cuillères et les couvercles
ne doivent pas être déposés sur la surface de cuisson puisqu’ils peuvent devenir très
chauds.
• Éteignez toujours les zones de cuisson après leur utilisation!
• S’il y a un tiroir sous l’appareil, n’y entreposez pas de matières inflammables. S’il y a un
plateau à ustensiles dans le tiroir sous la table de cuisson, il doit être thermorésistant.
• Les flammes peuvent mettre le feu dans les filtres à graisses de la hotte de ventilation.
Ne faites jamais flamber d’aliments sous une hotte de ventilation.
• Ne chauffez jamais une casserole à vide, à moins d’une autorisation expresse du
fabricant.
• N’utilisez jamais la table de cuisson pour chauffer des boîtes de conserve scellées, p.ex.
en fer-blanc. L’augmentation de la pression pourrait faire éclater les boîtes de conserve.
Danger de brûlures.
• Si vous utilisez un petit appareil (p. ex. un batteur à main) à proximité de la table de
cuisson, assurez-vous que le cordon électrique n’entre pas en contact avec la table
de cuisson. L’enveloppe isolante du cordon d’alimentation pourrait être endommagée.
• Le sel, le sucre et les grains de sable ou la saleté (provenant des légumes frais, par
exemple) peuvent produire des égratignures.
• Les récipients rugueux peuvent égratigner la surface en vitrocéramique. N’utilisez que
des poêlons et des casseroles à fond lisse.
• Même un objet léger, comme une salière, peut fissurer la céramique s’il tombe sur la
surface en vitrocéramique et en enlever un éclat.
• Des objets chauds placés sur les zones des touches ou les voyants peuvent
endommager les composantes électroniques qui se trouvent en dessous. Ne placez
jamais de casseroles ou de poêlons chauds sur les zones des touches ou les voyants.
• Les articles métalliques entreposés dans le tiroir sous la table de cuisson peuvent devenir
chauds lorsque l’appareil est utilisé de façon intensive pendant une longue période.
• La table de cuisson n’est pas conçue pour être utilisée avec une minuterie externe ou
un système de commande à distance.
• Pour les utilisateurs ayant un stimulateur cardiaque: Un champ magnétique se
forme à proximité de l’appareil lorsque celui-ci est allumé. Il est peu probable que cela
ait une incidence sur un stimulateur cardiaque. Toutefois, en cas de doute, consultez
votre médecin ou le fabricant du stimulateur cardiaque.
• Gardez les objets qui sont sensibles au champ magnétique, tels que les cartes de crédit,
les disques compacts et les calculatrices, loin de la table de cuisson lorsque celle-ci est
allumée.
• Le processus de chauffage par induction est très rapide. La température du fond du
récipient peut donc très vite atteindre le point d’inflammation des huiles ou des graisses.
Ne laissez jamais la table de cuisson sans surveillance lorsqu’elle est allumée.
• La table de cuisson est dotée d’un ventilateur. S’il y a un tiroir sous l’appareil, vous devez
vous assurez que l’espace est suffisant pour permettre la ventilation. N’utilisez pas le
tiroir pour entreposer des objets tranchants, de petits objets ou du papier. Ils pourraient
passer par la grille de ventilation (ou y être aspirés) jusqu’au meuble d’encastrement et
endommager les lames du ventilateur ou gêner le refroidissement.
FRANÇAIS
71
Page 72

la cuisson par induction
Avantages de la cuisson par induction
Lors de la cuisson par induction, la chaleur est directement générée dans le fond de
FRANÇAIS
casserole. Cela présente de nombreux avantages:
• Gain de temps lors de la cuisson et le rôtissage. Les récipients sont chauffés
directement.
• Réduction de la consommation d’énergie.
• Entretien et nettoyage faciles. Les aliments qui débordent brûlent moins facilement.
• Puissance thermique contrôlée et sécurité accrue. Le foyer réagit immédiatement à
chaque changement de puissance. La chaleur peut ainsi être dosée avec exactitude.
Le foyer cesse immédiatement de chauffer lorsque vous retirez l’ustensile de cuisson
du foyer, même s’il est encore allumé.
Ustensiles de cuisson
Seuls les ustensiles de cuisson ferromagnétiques composés des matériaux
suivants sont adaptés aux foyers à induction:
• acier émaillé
• fonte
• casseroles adaptées pour l’induction, en acier
inoxydable.
Pour savoir si un ustensile est adapté pour
l’induction, vérifiez si le fond de la casserole ou
de la poêle peut attirer un aimant.
Il existe d’autres ustensiles de cuisson dont le
fond n’est pas entièrement ferromagnétique.
Si le fond du récipient n’est pas entièrement
ferromagnétique, seule la surface magnétisable
chauffera. Dans ce cas, il se peut que la chaleur
ne soit pas répartie uniformément.
Si le fond de l’ustensile est constitué entre autres d’aluminium, ses propriétés
ferromagnétiques seront réduites. Il se peut que ce récipient ne chauffe pas correctement
ou qu’il ne soit pas reconnu. Pour obtenir de bons résultats de cuisson, nous vous
recommandons de faire correspondre le diamètre de la surface ferromagnétique de
l’ustensile de cuisson avec la taille du foyer. Si une casserole ou une poêle n’est pas
reconnue sur son foyer, tentez de la placer sur un foyer de diamètre inférieur.
Ustensile de cuisson non adapté
N’utilisez en aucun cas une plaque d’adaptation pour l’induction ou un ustensile de
cuisson en:
• inox traditionnel
• verre
• terre
• cuivre
• aluminium
72
Page 73

la cuisson par induction
Le bon positionnement des casseroles
PAS CORRECTE CORRECTE
FRANÇAIS
La casserole n’est pas au centre de la
surface de la zone de cuisson
Casserole ayant un fond courbé ou déformé
La casserole ne correspond pas à la
dimension minimale de cette zone de cuisson
Le fond de la casserole pose sur le cadre de la
table de cuisson ou ne pose pas correctement
sur la surface de la table de cuisson
Casserole ayant un fond plat
La casserole se trouve au centre de la
surface de la zone de cuisson
La casserole correspond ou dépasse la
dimension minimale de cette zone de cuisson
Le fond de la casserole pose correctement
sur la surface de la table de cuisson
Le manche est trop lourd et penche la
casserole
La casserole est parfaitement équilibrée
73
Page 74

description de la table de cuisson
9 9
02 5
min
Panneau de commande
Cet appareil utilise un système de programmation électronique « Touch Control ».
FRANÇAIS
Pour activer les fonctions, il suffit de toucher les touches tactiles correspondantes.
Des indications sur les displays et des signaux sonores accompagnent chaque
réponse. Touchez les touches par le haut sans les couvrir.
Touche
Fonction
Power - allume/éteint l’appareil
Control Lock - active/désactive la fonction «Verrouillage de
sécurité»
Pause/Recall -
(voir chapitre «Utilisation de la table de cuisson»)
Touche Programmes - appuyez pour activer le programme
«Warming» (garder au chaud), «Melt» (fondre) ou «Simmer»
(cuisson à feu doux).
Minuterie - appuyez sur [+] et/ou [-] pour activer et régler la
minuterie d’une zone de cuisson ou pour régler la fonction «EggTimer/Rappel».
Slider - glissez votre doigt vers la droite ou la gauche pour
régler la température de la zone de cuisson.
ATTENTION ! DANGER DE BRÛLURES
Des cuissons longues en utilisant des grandes casseroles
peuvent surchauffer le panneau de commande.
Faites attention lorsque vous touchez aux touches.
active/désactive les fonctions Pause et Rappel
74
Page 75

description de la table de cuisson
a 4
0 4
1 4-9 4
025
0 4
h 4
p 4
a 4
e 4
Affichages et voyants
Affichage Description
Voyant fonction active - Indique que la zone de cuisson et/ou la
fonction est active
Voyant Timer/Egg-Timer - indique que la minuterie de la zone de
cuisson est active/l’Egg-Timer est actif.
Voyant Bridge - indique que la fonction « Bridge » est active.
Voyant Warming - indique que le programme « Warming » est actif (le
niveau de la chaleur de la zone de cuisson est réglé à
Voyant Melt - indique que le programme « Melt » est actif (le niveau de
la chaleur de la zone de cuisson est réglé à
Voyant Simmer - indique que le programme « Simmer » est actif (le
niveau de la chaleur de la zone de cuisson est réglé à 94°C).
Minuterie pas sélectionnée
La zone de cuisson est active, réglez la puissance dans les 10 secondes
Niveau de puissance de la zone de cuisson
Affichage de la minuterie
Détection des récipients - des récipients non compatibles, trop petits
ou même aucun récipient n’est positionné sur la zone de cuisson.
Chaleur résiduelle - Indique que la zone de cuisson est encore
chaude. Attention!
La fonction Power Boost est active.
70°
42°
).
).
FRANÇAIS
Réchauffage automatique - La fonction est active
+ digit
error – une erreur de fonctionnement s’est produite (veuillez consulter
le chapitre « Résolution des problèmes »).
ATTENTION ! DANGER DE BRÛLURES
Voyant chaleur résiduelle
Après avoir éteint l’appareil, la zone de cuisson se refroidie
après quelques minutes;
faites attention au voyant de la chaleur résiduelle.
Conseil: Utilisez la chaleur résiduelle pour fondre ou maintenir au chaud les plats. Les
zones de cuisson à induction produisent la chaleur nécessaire pour cuire directement sur
le fond de vos casseroles et poêlons.
75
Page 76

0 4
utilisation de la table de cuisson
Allumage de l’appareil
Appuyez sur la «touche Power» pour allumer l’appareil. Tous les affichages
FRANÇAIS
correspondants aux zones de cuisson s’allument en position stand-by «0».
Le panneau de commande reste actif pendant 10 secondes. Si dans ce laps
de temps aucun réglage n’est effectué pour aucune zone de cuisson, l’appareil
s’éteint automatiquement.
Extinction de l’appareil
Pour éteindre l’appareil, gardez appuyée la touche Power.
Allumage des zones de cuisson
Allumez l’appareil et réglez, dans les 10 secondes, le niveau de puissance de
la zone de cuisson par la «touche Slider» correspondante. La puissance de
chaque zone est réglable en 9 différents niveaux. L’affichage correspondant
indique la puissance de « 1 » à « 9 ». Glissez votre doigt sur le Slider vers la droite
pour augmenter la puissance, vers la gauche pour la diminuer.
Extinction des zones de cuisson
Pour éteindre une zone de cuisson glissez votre doigt sur le Slider vers la gauche
pour ramener la puissance au niveau «0».
Détection de récipient
Chaque zone à induction a un délai minimum de détection de récipient qui varie
selon le matériel du récipient utilisé. Pour cette raison, il faut utiliser la zone de
cuisson la plus appropriée au diamètre du récipient. Si l’affichage de la zone de
cuisson indique le symbole «
• Le récipient utilisé n’est pas approprié pour la cuisson à induction.
• Le diamètre du récipient utilisé est plus petit de celui permis par l’appareil.
• Aucun récipient n’est positionné sur la zone de cuisson.
Pour toute information supplémentaire, faire référence au chapitre «la cuisson
par induction».
», cela veut dire que:
Chaleur résiduelle
Si après l’extinction la température de la zone de cuisson est encore très chaude
(au-dessus de 50°C), l’affichage indique le symbole « H » (chaleur résiduelle). Le
symbole reste actif même après l’extinction de l’appareil et s’éteint seulement
lorsqu’il n’y a plus de danger de brûlure.
Minuterie
Cette fonction permet d’établir une durée de 1.00 (1 minute) à 1.59 (1 heure
et 59 minutes) pour l’extinction automatique d’une zone de cuisson. Glisser
votre doigt sur le Slider de la zone de cuisson sélectionne pour régler le niveau
de puissance.
76
Page 77

utilisation de la table de cuisson
Pour activer la minuterie, appuyez simultanément sur les touches [+] et [-] de la
minuterie jusqu’à ce que le symbole «horloge» s’allume à côté de l’affichage de
la zone de cuisson. Dans les 6 secondes appuyez sur les touches [+] et [-] de
la minuterie pour régler la durée souhaitée. Après 5 secondes l’affichage de la
minuterie indique le compte à rebours.
Une fois le temps écoulé, la zone de cuisson s’éteint automatiquement, l’affichage
de la minuterie indique «000» clignotant et l’appareil émet un signal sonore.
Appuyez sur les touches [+] et [-] de la minuterie pour éteindre les signaux.
Pour désactiver la minuterie d’une zone de cuisson, appuyez plusieurs fois
simultanément sur les touches [+] et [-] jusqu’à ce que le symbole «horloge»
s’allume à côté de l’affichage correspondant. Appuyez à nouveau simultanément
sur les touches [+] et [-] puis appuyez sur la touche [-] jusqu’à ce que l’affichage
indique «000». Attendez 5 secondes pour la confirmation automatique. Le
symbole « horloge » à côté de l’affichage de la zone de cuisson s’éteint.
Egg-Timer/Rappel
Lorsque aucune zone de cuisson n’est active il est possible d’établir un rappel
sonore qui reste actif même après l’extinction de l’appareil. Lorsque l’EggTimer/Rappel est actif, la fonction Minuterie ne peut pas être activée.
Pour activer cette fonction, appuyez simultanément sur les touches [+] et [-]
de la zone Minuterie, le symbole «horloge» s’allume au-dessous de l’affichage
de la zone Minuterie. Sélectionnez une durée de 1.00 (1 minute) à 1.59 (1
heure et 59 minutes) par les touches [+] et [-]. Attendez 5 secondes pour
la confirmation automatique. L’affichage de la minuterie indique le compte à
rebours.
Une fois le temps écoulé l’affichage indique «000» clignotant et émet un signal
sonore. Appuyez sur les touches [+] ou [-] de la minuterie pour éteindre les
signaux.
Pour désactiver la fonction Egg-Timer/Rappel, appuyez simultanément sur les
touches [+] et [-], le symbole «horloge» s’allume au-dessous de l’affichage de
la zone minuterie. Appuyez sur la touche [-] jusqu’à ce que l’affichage indique
«000». Attendez 5 secondes pour la confirmation automatique. Le symbole
«horloge» à côté de l’affichage minuterie s’éteint.
FRANÇAIS
Pause
Lorsqu’au moins l’une des zones de cuisson est active, il est possible de mettre
en pause l’appareil en arrêtant momentanément la cuisson.
Pour activer cette fonction, appuyez sur la «touche Pause/Recall». Le voyant
correspondant s’allume et l’affichage de toutes les zones de cuisson indique
le symbole « II ». Toutes les minuteries actives s’interrompent. La durée de la
pause est de maximum 10 minutes, après cette durée l’appareil s’éteint. Pour
désactiver cette fonction, appuyez sur la «touche Pause/Recall» et, dans les 10
secondes, glissez votre doigt sur le «Slider» clignotant vers la droite.
77
Page 78

utilisation de la table de cuisson
Rappel
Lorsque l’appareil s’éteint par inadvertance, il est possible de rappeler les
FRANÇAIS
fonctions préalablement activées sur les zones de cuisson en appuyant dans les
6 secondes la «touche Power» et puis, dans le 6 secondes, la «touche Pause/
Recall». Si la fonction “Rappel” est disponible, le voyant correspondant clignote
après le rallumage de la table de cuisson.
Verrouillage de sécurité
Il est possible de verrouiller les commandes du panneau de commande pour
éviter toute modification accidentelle aux réglages (opérations de nettoyage,
enfants, etc.). Pour activer cette fonction, appuyez sur la «touche Control Lock».
Le voyant correspondant s’allume. Lorsque cette fonction est active, il est tout de
même possible d’éteindre et d’allumer l’appareil. Pour désactiver cette fonction,
appuyez sur la «touche Control Lock». Le voyant correspondant s’éteint.
Sécurité enfants
Cette fonction vise à ce que les enfants n’allument pas l’appareil, par inadvertance
ou intentionnellement, et peut être activée seulement si toutes les zones de
cuisson sont éteintes.
Pour activer la fonction “Sécurité enfants”, appuyez simultanément sur la «touche
Control Lock» et la «touche Pause/Recall», puis de nouveau sur la touche «touche
Control Lock». Tous les affichages indiquent le symbole « L » pour confirmer votre
sélection et le voyant correspondant s’allume. La fonction “Sécurité enfants” reste
active après l’extinction et au rallumage de l’appareil.
Pour désactiver de façon permanente la fonction “Sécurité enfants”, appuyez
simultanément sur la touche Verrouillage des commandes et la «touche Pause/
Recall», puis de nouveau sur la «touche Pause/Recall». Au prochain allumage de
l’appareil, la fonction n’est plus active.
Pour désactiver de façon provisoire la fonction “Sécurité enfants”, appuyez
simultanément la «touche Control Lock» et la «touche Pause/Recall». Ainsi, la
fonction reste active à chaque allumage de l’appareil.
Programmes spéciaux: Warming, Melt, Simmer, Power
Boost, Réchauffage Automatique
La table de cuisson est équipée de quatre programmes spéciaux, déjà
programmés en usine, pour des cuissons spéciales.
• Warming
Le programme “Warming” règle la puissance de la zone de cuisson
sélectionnée à 42°C pour garder les aliments au chaud. Pour activer ce
programme, appuyez une fois sur la «touche Programmes» jusqu’à ce que
l’affichage indique le symbole «Warming».
78
Page 79

utilisation de la table de cuisson
• Melt
Le programme “Melt” règle la puissance de la zone de cuisson sélectionnée à
70°C pour fondre le chocolat, le beurre ou d’autres aliments similaires. Pour
activer ce programme, appuyez deux fois sur la «touche Programmes» jusqu’à
ce que l’affichage indique le symbole «Melt».
• Simmer
Le programme “Simmer” règle la puissance de la zone de cuisson sélectionnée
à 94°C pour porter lentement à ébullition les sauces, les soupes et les daubes.
Pour activer ce programme, appuyez trois fois sur la «touche Programmes»
jusqu’à ce que l’affichage indique le symbole «Simmer».
• Power Boost
Ce programme réduit davantage le temps de cuisson d‘une zone de cuisson
en réglant la température au niveau de puissance maximum pendant 10
minutes. Une fois le temps écoulé, la puissance de la zone de cuisson passe
automatiquement au niveau « 9 ».
L’utilisation de cette fonction est indiquée pour réchauffer en peu de temps
des grandes quantités de liquides (p.ex. de l’eau pour cuire les pâtes) ou
d’autres plats.
Pour activer cette fonction faites glisser votre doigt sur le «Slider» vers la droite
jusqu’au l’affichage de la zone de cuisson indique le symbole « P ».
FRANÇAIS
• Réchauffage automatique
Toutes les zones sont pourvues d’une fonction de réchauffage automatique.
En activant cette fonction, la zone de cuisson est réglée au niveau maximum
pendant un intervalle de temps, après lequel il retourne automatiquement
au niveau préalablement réglée. La durée du réchauffage dépend du niveau
sélectionné. Pour activer cette fonction sur une zone de cuisson, utilisez le
«Slider» et sélectionnez la puissance en gardant la position jusqu’à ce que
l’affichage indique le symbole « A » en alternance avec le niveau de puissance
sélectionné.
Extinction de sécurité
L’appareil est pourvu d’un dispositif de
sécurité qui éteint automatiquement les
zones de cuisson en fonctionnement
une fois le temps limite écoulé à la
puissance sélectionnée. Dans ce cas,
l’affichage correspondant la zone de
cuisson indique la chaleur résiduelle
par le symbole « H ».
PUISSANCE TEMPS LIMITE DE
FONCTIONNEMENT
(heures)
1 - 2 6
3 - 4 5
5 4
6 - 7 - 8 - 9 1,5
79
Page 80

utilisation de la table de cuisson
a
b
c
d
yes
no no
6 0
02 5
min
Bridge (Zones de cuisson flexibles)
Cette fonction permet de combiner la zone de cuisson de devant avec celle de
FRANÇAIS
derrière (a+b) pour créer une zone de cuisson plus grande, comme indiqué dans
la figure ci-dessous. Faites attention à bien positionner les récipients sur les zones
de cuisson.
oui
yes
non
no
a
b
Pour activer la fonction “Bridge” appuyez simultanément sur un point des deux
«Slider» (voir dessin ci-dessous). Le voyant de la fonction “Bridge” s’allume à côté
de l’affichage des deux zones de cuisson en indiquant que la fonction est active.
Maintenant il est possible de régler le niveau de puissance du ‘‘Bridge”.
zone de cuisson avant zone de cuisson arrière
NOTE: La puissance est réglé par le «Slider» et les touches tactiles de la zone de
cuisson avant.
Pour désactiver la fonction “Bridge”, appuyez simultanément sur un point des
deux «Slider».
80
Page 81

utilisation de la table de cuisson
Gestion de la puissance
Toutes les zones de puissance sont en phase (voir le dessin).
La tension maximale de la phase est de 3700W/230V (voir
section « Spécifications techniques »). La fonction répartit
la puissance entre les zones de cuisson et s’active lorsque
la puissance totale des zones de cuisson dépasse 3700W.
La fonction réduit la puissance des autres zones de cuisson.
L’affichage de la puissance des zones dont la puissance a été
réduit change entre deux niveaux.
Spécifications techniques
Conformément au règlement (EU) No. 66/2014
dimensions du produit: 29x52 cm
Zone de
cuisson
Dimension
de la zone de
cuisson (cm)
Dimension
minimale du pot
(cm)
Output
(W) 230V
Consommation
d’énergie
EC (Wh/kg)
FRANÇAIS
a
b
a, b 20x18
a+b 20x37
type de cuisson: encastrable
technologie de réchauffement: induction
Ø 14,5
23x14,5
normal
booster
normal
booster
max.
2100
3700
2100
3700
3700
171
171
171
81
Page 82

résolution de problèmes
a 4
Problème Cause probable Solution
FRANÇAIS
Vous ne pouvez pas allumer
la table de cuisson ni la faire
fonctionner.
La table de cuisson est
désactivée.
Voyant de chaleur résiduelle ne
s’allume pas.
La fonction ‘Réchauffage
automatique’ de la cuisson ne
fonctionne pas.
Le niveau de cuisson change. La fonction ‘Gestion de la
Les touches sensitives sont
chaudes.
s’allume.
s’allume.
La table de cuisson n’est
pas connectée à une source
d’alimentation électrique ou
le branchement est
incorrect.
Le fusible a disjoncté. Vérifiez que le fusible est bien la
Il y a eu plus de 10 secondes
depuis l’alimentation de la
table de cuisson.
Vous avez appuyé sur
plusieurs touches sensitives
en même temps.
La fonction ‘Pause’ est
activée.
Il y a de l’eau ou des taches
de graisse sur le bandeau
de commande.
Vous avez posé quelque
chose sur la touche
sensitive ON-OFF.
La zone de cuisson n’est
pas chaude parce qu’elle
n’a fonctionné que peu de
temps.
La zone est chaude. Laissez la zone de cuisson refroidir.
Le niveau de cuisson le plus
élevé est réglé.
puissance’ est activée.
Le récipient est trop grand
ou vous l’avez placé trop
près des commandes.
La fonction ‘Extinction de
sécurité’ est activée.
La fonction ‘Sécurité
enfants’ est activée.
Vérifiez que la table de cuisson
est correctement branchée à une
source d’alimentation électrique.
Consultez le chapitre “Branchement
électrique”.
cause de l’anomalie. Si les fusibles
disjonctent de manière répétée,
faites appel à un électricien qualifié.
Allumez de nouveau la table de
cuisson et réglez le niveau de
cuisson en moins de 10 secondes.
N’appuyez que sur une seule touche
sensitive à la fois.
Reportez-vous au chapitre «utilisation
de la table de cuisson».
Nettoyez le bandeau de commande.
Retirez l’objet de la touche sensitive.
Si la zone de cuisson a eu assez de
temps pour chauffer, faites appel à
votre service après-vente agréé.
Le niveau de cuisson le plus élevé
est identique à la fonction.
Reportez-vous au chapitre «utilisation
de la table de cuisson».
Placez les récipients de grande taille
sur les zones de cuisson arrière, si
possible.
Éteignez la table de cuisson puis
allumez-la de nouveau.
Reportez-vous au chapitre «utilisation
de la table de cuisson».
82
Page 83

4
0 4
e 4
7
e21
e03
e03
e03
e03
e03
e03
7
résolution de problèmes
FRANÇAIS
s’allume.
s’allume.
et un chiffre s’affichent.
s’allume.
s’allume.
s’allume.
s’allume.
s’allume.
,
,
ou 7s’allume.
De l’eau ou d’autres objets
se trouvent sur le panneau
de commande.
Il n’y a pas de récipient sur
la zone de cuisson.
Le récipient n’est pas
adapté.
La dimension du fond du
récipient de cuisson est
trop petit pour la zone de
cuisson.
Le récipient de cuisson ne
recouvre pas la zone de
cuisson.
Une erreur s’est produite
dans la table de cuisson.
Les serpentins à induction
sont surchauffés.
L’appareil est surchauffé.
Le ventilateur de
refroidissement peut être
bloqué.
Configuration des données
erronée.
Interface absente ou
dysfonctionnelle entre le
panneau de commande et
les serpentins à induction.
Le panneau de commande
n’est pas connecté
correctement.
Un composant de l’appareil
,7,
doit être remplacé.
Enlevez les objets du panneau de
commande.
Placez un récipient sur la zone de
cuisson. Reportez-vous au section
“Détection de récipient”.
Utilisez un récipient adapté.
Reportez-vous au chapitre «la
cuisson par induction».
Utilisez un récipient de dimensions
appropriées.
Reportez-vous au chapitre «la
cuisson par induction».
Recouvrez complètement la zone
de cuisson.
Débranchez la table de cuisson de
l’alimentation électrique pendant
quelques minutes. Déconnectez le
fusible de l’installation domestique.
Rebranchez l’appareil.
Si s’affiche à nouveau, faites appel
au service après-vente agréé.
Laissez refroidir l’appareil.
Laissez refroidir l’appareil. Vérifiez si
aucun objet ne bloque le ventilateur
de refroidissement. Contactez le
Centre d’Assistance Technique
autorisé si le problème persiste.
Une nouvelle configuration est
nécessaire. Contactez le Centre
d’Assistance Technique autorisé.
Assurez-vous que le câble de
connexion est bien connecté et qu'il
fonctionne bien.
Vérifiez si la tension du réseau est
compatible.
Contactez le Centre d’Assistance
Technique autorisé.
Si vous ne trouvez pas de solution au problème, veuillez contacter votre
revendeur ou un Centre d’Assistance Technique autorisé.
83
Page 84

nettoyage et entretien
Informations importantes
• Nettoyez régulièrement l’appareil afin de maintenir le revêtement en bon état.
FRANÇAIS
• Éteignez l’appareil et laissez-le refroidir avant de le nettoyer.
• Débranchez l’appareil de l’alimentation électrique avant toute opération de
maintenance.
• Ne pulvérisez pas d’eau ni de vapeur pour nettoyer l’appareil.
• Nettoyez l’appareil avec un chiffon doux humide. Utilisez uniquement des
produits de lavage neutres.
• N’utilisez pas de produits abrasifs, de tampons à récurer, de solvants ni d’objets
métalliques.
Informations générales
• Nettoyez la table de cuisson après chaque utilisation.
• Utilisez toujours un plat de cuisson dont le fond est propre.
• Les rayures ou les taches sombres sur la surface n’ont aucune incidence sur le
fonctionnement de la table de cuisson.
• Utilisez un nettoyant spécialement adapté à la surface de la table de cuisson.
• Utilisez un racloir spécial pour la vitre.
Nettoyage de la table
• Enlevez immédiatement: plastique
fondu, films plastiques et aliments
contenant du sucre.
Sinon, la saleté pourrait endommager la
table de cuisson. Tenez le racloir spécial
incliné sur la surface vitrée et faites
glisser la lame du racloir pour enlever les
salissures.
84
• Enlevez lorsque la table a suffisamment
refroidi: traces de calcaire, traces
d’eau, taches de graisses, décoloration
métallique brillante.
Nettoyez la table de cuisson à l’aide
d’un chiffon humide et d’un détergent
non-abrasif. Après le nettoyage, séchez
l’appareil à l’aide d’un chiffon doux.
Page 85

protection de l’environnement
Nos emballages
Nos emballages protègent votre appareil des dommages pouvant survenir
pendant le transport. Nous les sélectionnons en fonction de critères écologiques
permettant d’en faciliter le recyclage.
En participant au recyclage de vos emballages, vous contribuez à économiser
les matières premières et à réduire le volume des déchets. Votre revendeur
reprend vos emballages.
Votre ancien appareil
• La plupart du temps, les anciens appareils électriques et électroniques
contiennent encore des matériaux précieux. Cependant, ils contiennent
aussi des substances toxiques nécessaires au bon fonctionnement et à la
sécurité des appareils. En déposant ces appareils usagés avec vos ordures
ménagères ou en les manipulant de manière inadéquate, vous risquez de
nuire à votre santé et à l’environnement. N’éliminez donc en aucun cas
votre ancien appareil avec les ordures ménagères.
• Faites appel au service d’enlèvement mis en place par votre commune,
déposez votre ancien appareil dans un point de collecte ou renseignez-vous
auprès de votre revendeur.
• Afin de prévenir tout risque d’accident, veuillez garder votre ancien appareil
hors de portée des enfants jusqu’à son enlèvement.
FRANÇAIS
Conseils d’économie l’énergie
• Toujours poser le couvercle correspondant sur les récipients. En cuisinant
sans couvercle, la consommation d’énergie est multipliée par quatre. Utiliser
un couvercle en verre qui permet de contrôler la cuisson sans avoir à le
soulever.
• Utilisez des récipients avec une base épaisse et plate. Les fonds irréguliers
font augmentent la consommation d’énergie.
• Le diamètre de la base des récipients doit concorder avec la taille de la zone
de cuisson. Si ce n’est pas le cas, il peut y avoir un gaspillage d’énergie.
Observez: En général, le fabriquant indique le diamètre maximal du récipient.
Celui-ci est en général supérieur au diamètre de la base du récipient.
• Choisiz des récipients de taille adaptée à la quantité d’aliments à préparer.
Un récipient de grandes dimensions et à moitié plein consomme beaucoup
d’énergie.
• Faites cuire avec le minimum d’eau. Cela économise de l’énergie. Dans le cas
des légumes, les vitamines et minéraux sont préservés.
• Abaissez à temps le niveau de cuisson.
85
Page 86

PT 2 - Instructions pour l’installation
installation
Installation de la table de cuisson
FRANÇAIS
1. Réalisez l’encastrement dans le plan de travail (voir section « Encastrement
dans le plan de travail »).
ATTENTION !
Poids excessif
Il faut deux ou plus personnes pour positionner
et installer la table de cuisson pour éviter
tout risque d’accident au dos.
2. Avec l’aide de 2 personnes, placez la table de cuisson à l’envers sur une
surface et appliquez le produit d’étanchéité autour de la table de cuisson.
2 mm
3. Placez la table de cuisson au milieu de
l’encastrement en faisant attention à
passer le cordon électrique. Assurezvous que la garniture au-dessous de la
table de cuisson coïncide avec le plan de
travail de chaque côté afin d’assurer une
tenue efficace. N’utilisez pas une colle
pour sceller (p.ex. de la silicone).
86
Page 87

installation
4. Fixez l’appareil sur le plan de travail avec les 4 étriers fournis en tenant compte
de l’épaisseur du plan.
FRANÇAIS
A
B
C
mm
30 mm
03
A. ressort B. étrier C. vis
A
B
C
mm
40 mm
04
5. Effectuez le branchement électrique selon les spécifications indiquées dans
ce manuel (voir chapitre « Branchement électrique »).
6. Branchez la table de cuisson au réseau électrique.
7. Vérifiez le bon fonctionnement de la table de cuisson.
87
Page 88

installation
2”min.
4 mm
Positionnement
Choisissez la meilleure place pour votre appareil.
FRANÇAIS
NOT ALLOWED NOT RECOMMENDED RECOMMENDED
Ventilation
Maintenez les distances de sécurité minimales pour permettre une adéquate ventilation.
13”max
30”min.
2”min.
15”min.
2”min.
min.3”(75mm)
DRAWER
TIROIR
min.3”
(75mm)
Encastrement de la table de cuisson
Réalisez l’encastrement de la table de cuisson selon les dimensions indiquées ci-dessous.
290/380 mm
485 mm
490 mm
520 mm
280 mm
46 mm
275 mm
88
Page 89

installation
Branchement électrique
Avant de brancher l’appareil, assurez-vous que:
• Les caractéristiques de l’installation répondent aux données indiquées sur la
plaque signalétique positionnée au-dessous de la table de cuisson ;
• L’installation doit être fournie de mise à la terre, conformément aux dispositions
en vigueur.
Au cas où l’appareil n’est pas doté d’un câble et/ou d’une prise, utilisez un
matériau approprié pour l’absorption indiquée sur la plaque signalétique et pour
la température de fonctionnement. Si vous souhaitez une connexion directe, il est
nécessaire d’entreposer un interrupteur omnipolaire avec séparation des contacts
de 3 mm minimum entre chaque pôle, adapté à la charge indiquée sur la plaque
de signalisation et conformément aux dispositions en vigueur (le conducteur
de terre jaune/vert ne doit pas être interrompu par le commutateur). Une fois
l’installation terminée, l’interrupteur omnipolaire doit être facilement accessible.
ATTENTION ! LA MISE À LA TERRE EST REQUISE PAR LA LOI
La sécurité électrique de cet appareil est garantie uniquement quand il est
correctement branché à une installation de mise à la terre efficace, comme
le stipulent les normes de sécurité électrique en vigueur. Assurez-vous que
ce dispositif de sécurité est bien installé et régulièrement contrôlé; en cas
de doute, faites vérifier l’installation électrique par un électricien qualifié. Le
fabricant décline toute responsabilité pour tout dommage direct ou indirect
découlant d’une mauvaise installation ou mauvais branchement.
FRANÇAIS
brown
marron
L1
220-240 V~
3x1,5mm
220-240 V~
2
blue green/yellow
bleu vert/jaune
N
(ground)
(terre)
89
Page 90

[ES] Manual de instalación y uso
Estimado Cliente,
ESPAÑOL
felicitaciones por su compra.
Esta Placa vitrocerámica respeta todas las reglas y las leyes aplicables en materia de
seguridad. Sin embargo,el uso inapropiado puede causar lesiones personales o daños
materiales. Por favor lea atentamente las instrucciones para la instalación y uso antes de
usar la Placa vitrocerámica por primera vez.
Las instrucciones contienen informaciones importantes para la instalación, la seguridad,
el uso y el mantenimiento. Esto la protegerà de accidentes preveniendo daños a la Placa
vitrocerámica. El productor no se hace responsable por daños causados por no haber
respetado las advertencias y las normas de seguridad.
Guardar las instrucciones en un lugar seguro y entregarlas a cualquier futuro propietario.
RESUMEN
PT 1 - Guía para el usuario
instrucciones para la seguridad 91
Uso previsto 91
Niños 91
Seguridad técnica 92
Uso correcto 93
la cocción por inducción 95
Ventajas de la cocción por inducción 95
Ollas adecuadas 95
Posición correcta de las ollas 96
conocer la placa vidrocerámica 97
Panel de control 97
Símbolos de la pantalla de visualización y
LED 98
uso de la placa vitrocerámica 99
Encendido del aparato 99
Apagar el aparato 99
Encender la zona de cocción 99
Apagado de la zona de cocción 99
Detección de Ollas 99
Calor residual 99
Temporizador 99
Reloj de cocina/ Pro memoria 100
Pausa/Volver a la configuración 100
Volver a la configuración 101
Bloque de comandos (Control Lock) 101
Bloque de seguridad niños 101
Programas especiales: Warming, Melt,
Simmer, Power boost, Calentamiento
Automático 101
Apagado de seguridad 102
Bridge (Zonas de cocción flexibles) 103
Gestión de la Potencia 104
104
Especificaciones técnicas 104
resolución de los problemas 105
mantenimiento y limpieza 107
Información importante 107
Información general 107
Limpieza de la placa 107
protección medioambiental 108
Eliminación del embalaje de transporte 108
Reciclaje de aparatos inservibles 108
Consejos para ahorrar energía 108
PT 2 - Manual de Instalación
instalación 109
Instalar la placa vetrocerámica 109
Colocación 111
Ventilación 111
Empotramiento de la mesa de trabajo 111
Conexiones eléctricas 112
90
Page 91

PT 1 - Guía para el usuario
instrucciones para la seguridad
¡ATENCIÓN!
¡LEER ATENTAMENTE LAS INSTRUCCIONES
ANTES DE USAR LA PLACA VITROCERÁMICA!
ESTE APARATO ESTÁ DESTINADO
EXCLUSIVAMENTE PARA USO DOMÉSTICO.
Uso previsto
• Esta Placa vitrocerámica està destinada exclusivamente para uso doméstico, o
similar al doméstico.
• La placa vitrocerámica se tiene que usar siempre dentro de los límites del normal
uso doméstico para preparar y mantener calientes los alimentos, y no para un uso
profesional. No se admite ningún otro uso.
• La placa vitrocerámica no se puede utilizar en ambientes externos.
• La placa vitrocerámica no se puede utilizar en ambientes móviles, como barcos o
naves.
• Las personas que por sus capacidades físicas, sensoriales o psiquicas o por su
inexperiencia o desconocimiento no fueran capaces de utilizar de manera segura la
placa vitrocerámica, no tienen que utilizarla sin la supervisión y la guía de una persona
responsable.
ESPAÑOL
Niños
• Los niños que tengan menos de 8 años tienen que estar lejos de la placa vitrocerámica
excepto si estuvieran acompañados por un adulto que los controle.
Eventualmente, los niños que tengan una edad superior a los 8 años podrían utilizar
solos el aparato, si fueran capaces de hacerlo correctamente. Es importante que
sepan reconocer los peligros que puedan derivar de una utilización incorrecta.
• Vigilar a los niños que se encuentren cerca de la placa vitrocerámica, no permitir que
jueguen con ella.
• Los niños no tienen que limpiar ni realizar mantenimiento a la placa vitrocerámica a
menos que no estén vigilados por un adulto.
• La placa vitrocerámica se calienta mucho cuando està en función y el calor persiste
por unos minutos hasta después de haberla apagado. Alejar a los niños hasta que el
aparato se haya enfriado por completo.
• ¡ Riesgo de asfixia ! Algunos componentes del embalaje (como el nylon o el
poliestireno) pueden resutar peligrosos. Manténgalos alejados de los niños y se
deshaga de ellos lo antes posible.
• ¡ Riesgo de quemaduras ! Mantenga fuera del alcance de los niños los objetos que
puedan llamar su atención, ponièndolos arriba o debajo de la placa vitrocerámica.
Estos objetos podrían atraerlos haciéndolos subir sobre el aparato.
91
Page 92

instrucciones para la seguridad
• ¡ Riesgo de quemaduras más o menos graves ! Controle que los niños que se
ESPAÑOL
encuentren en casa no puedan arrojar al suelo las ollas o sartenes calientes. Dar
vuelta lateralmente las manijas y los mangos de las ollas y sartenes apoyados
sobre la superficie de trabajo, de modo que se encuentren sobre la misma.
• Usar los dispositivos de seguridad “Bloque comandos” y “
niños
” para que los niños no puedan encender el aparato sin querer o cambiar
las funciones. (v. capítulo “uso de la placa vitrocerámica”)
Seguridad técnica
• Trabajos de instalación y mantenimiento, así como reparaciones, tienen que
ser realizados por personal especializado. Si los trabajos o reparaciones no
se realizan correctamente, pueden causar graves peligros para el usuario. El
productor declina toda responsabilidad por estos tipos de daños.
• Por razones de seguridad, la placa vitrocerámica tiene que ser usada sólo
después de haberla empotrada.
• Antes de iniciar el empotrado controlar si la placa vitrocerámica presenta algunos
daños visibles. No poner nunca en función un aparato dañado ya que este puede
arriesgar la seguridad.
• Confrontar los datos de conexión (tensión y frecuencia), puestos en la etiqueta,
con los de la red eléctrica, antes de conectar la placa vitrocerámica, (v. Capítulo
sobre la conexión eléctrica). Estos datos tienen que corresponder absolutamente,
de lo contrario la máquina podría sufrir daños. En caso de dudas contacte con
un electricista.
• La seguridad eléctrica sólo quedará garantizada si la placa vitrocerámica
està conectada con una normal toma prevista de conexión a tierra. Es muy
importante que esto se verifique, ya que es fundamental para la seguridad.
En caso de dudas, verifique el sistema eléctrico por medio de un electricista
calificado. El productor no se harà cargo de ningún daño (ejemplo: descarga
eléctrica) que pudiera derivarse de un conductor de protección interrumpido o
incluso ausente.
• No abrir nunca la envoltura del aparato. El contacto eventual con partes en baja
tensión o el cambio de las estructuras eléctricas o mecánicas pueden causar
anomalías en el funcionamiento.
• Desconectar el aparato de la red eléctrica si se desea realizar trabajos de instalación,
mantenimiento o reparación. El aparato se desconecta de la red sólo si:
– El interruptor principal del sistema está desconectado,
– Los fusibles del sistema eléctrico están totalemte destornillados,
– El cable de alimentación està desenchufado de la red eléctrica; para desenchufarlo
de la red no tirar el cable, sino agarrar el enchufe.
• Cambiar eventuales piezas en avería o defectuosas con repuestos originales,
92
Bloque de Seguridad
Page 93

instrucciones para la seguridad
sólo usando estos se garantiza el respeto de las normas de seguridad.
• No conectar la placa vitrocerámica a la red eléctrica con cables alargadores o
tomas múltiples, porque no se garantiza la necesaria seguridad ( ejemplo.: riesgo
de sobrecalentamiento).
• ¡ Riesgo de descarga eléctrica ! No poner en marcha o apagar enseguida la
placa vitrocerámica si la misma presenta grietas o està dañada. Desconectar el
aparato de la red eléctrica.
Uso correcto
• ATENCIÓN: El aparato y sus piezas accesibles alcanzan temperaturas elevadas
durante el uso.Procure no tocar las partes calientes.
• ATENCIÓN: La cocción con aceite o grasa puede ser peligrosa y puede
provocar incendios. Si el aceite o la grasa se incendiaran, no usar NUNCA agua
para tratar de apagar el fuego. Sofoque las llamas por ejemplo con una tapa, un
trapo de cocina húmedo o algo por el estilo.
• ATENCIÓN: La placa vitrocerámica se calienta mucho cuando està en función
y queda caliente por un rato hasta después de haberla apagado. El riesgo de
quemaduras deja de existir cuando se apagan los indicadores del calor residual.
• ATENCIÓN: vigilar el normal proceso de cocción.
Un proceso de cocción de corta duración tiene que ser continuamente vigilado.
Ollas de las que continuamente se evaporan líquidos pueden provocar daños
a la placa vitrocerámica. Grasa y aceite que se calienten demasiado pueden
empezar a quemar y provocar un incendio.
• ¡Riesgo de incendio! No colocar objetos sobre la superficie de cocción!
• Objetos metálicos como cuchillos, tenedores, cucharas y tapas no tienen que
apoyarse en la superficie de la placa vidrocerámica porque se pueden calentar
demasiado.
• ¡Apagar siempre las zonas de cocción después de haberlas usado! Cuando
la placa vitrocerámica está encendida si está todavía caliente o si se enciende
sin querer, los objetos metálicos se pueden calentar demasiado (riesgo de
quemaduras). Otro material apoyado sobre la placa vitrocerámica podría fundirse
o incendiarse. Tapas húmedas podrían quedar pegadas a la placa como si fuera
una ventosa. Se aconseja, por esto, apagar la zona de cocción después del uso.
• Si debajo de la placa vireocerámica se encontrara un cajón, no ponga en él
objetos inflamables, como por ejemplo aerosoles. La bandeja de cubertería, si
existiera, tiene que ser de material resistente al calor.
• No cocine flambeado debajo de la campana extractora. Las llamas pueden
llegar hasta la campana e incendiarla.
• No poner nunca a calentar ollas y sartenes vacíos, sino fuera expresamente
permitido por el fabricante.
ESPAÑOL
93
Page 94

• No poner nunca a calentar recipientes cerrrados, por ejemplo de lata, en las zonas
ESPAÑOL
de cocción, la sobrepresión generada podría hacer explotar el recipiente. Riesgo de
heridas y quemaduras.
• Si en la cercanía de la placa vitrocerámica se usa un aparto eléctrico, por ejemplo:
mezcladoras, tenga cuidado en no poner el cable sobre la placa. El aislamiento del
cable podría dañarse.
• Trabajando sobre la placa vitrocerámica se aconseja proteger las manos usando
manoplas especiales o agarra ollas secas.
• Mantener siempre limpia la placa vitrocerámica. Sal, azúcar y granitos de arena, por
ejemplo, procedentes de la limpieza de las verduras, podrían rayarla.
• Usar sólo ollas y sartenes con fondo liso. Ollas y sartenes con fondo rugoso podrían
rayar la placa vidrocrámica.
• Atención, no haga caer sobre la superficie de vidrocerámica objetos o vajillas. Otros
objetos livianos (como por ejemplo una salera) podrían generar grietas o dañar la
placa vitrocerámica.
• No apoyar nunca, sobre la zona de control, ollas o sartenes muy calientes. La
electrónica situada debajo de los mandos, podría dañarse.
• Objetos metálicos puestos en un cajón debajo del aparato pueden ponerse
incandescentes si este se utiliza por largo tiempo.
• El destino del aparato no es el de ser usado mediante un temporizador externo o un
sistema de control remoto por separado.
• Advertencia para personas que poseen marcapasos: Hay que considerar que
en las cercanías del aparato en función se genera un campo elctromagnético. Es
muy rara la posibilidad de que el marcapasos no funcione. Si tiene dudadas consulte
con el productor del marcapasos o con el propio médico.
• Objetos magnetizables, por ejemplo tarjetas de crédito, disquetes, calculadoras de
bolsillo tienen que mantenerse lejos del aparato en función, porque esto podría
comprometer su funcionamiento.
• Debido a la alta velocidad de calentamiento de las placas de inducción, en
determinadas circunstancias la temperatura de la base de los recipientes pueden
alcanzar en un tiempo mínimo la temperatura de autocombustión de aceites y
grasas. ¡Nunca deje la placa de cocción desatendida durante su funcionamiento!
• La placa de cocción está equipada con un ventilador de refrigeración. Cuando
haya un cajón situado debajo de un aparato montado, deberá haber una distancia
suficiente entre el contenido del cajón y la parte inferior del aparato para que se
garantice la cantidad de aire suficiente para refrigerar la placa de cocción. Asegúrese
de que no haya ningún objeto puntiagudo o papel en el cajón, ya que estos se
pueden introducir en la carcasa por las ranuras de ventilación o ser aspirados y
dañar el ventilador de refrigeración o afectar a la refrigeración.
94
Page 95

la cocción por inducción
Ventajas de la cocción por inducción
Cuando se usa la cocción por inducción el calor se genera directamente en la
base de la olla. Por este motivo, presenta varias ventajas:
• Ahorro de tiempo mientras se hierven los alimentos o se fríen, gracias al calor
que llega directamente del recipiente.
• Ahorro de energía.
• Resultan más fáciles el cuidado y la limpieza. Los alimentos que se vuelcan no
se queman tan rápidamente.
• Control de la temperatura y mayor seguridad. El quemador reacciona
inmediatamente al cambio de temperatura; de esta manera la potencia se
puede dosificar de forma precisa. La zona de cocción por inducción deja de
producir calor si se quita la olla aunque si el quemador todavía está encendido.
Ollas adecuadas
Sólo son adecuados para cocinar por inducción ollas/recipientes
ferrromagnéticos y pueden ser de:
• Acero esmaltado
• De fundición de hierro
• Recipientes/ ollas especiales para la inducción en acero inoxidable.
ESPAÑOL
Para saber si los recipientes son adecuados,
verifique que un imán los pueda atraer.
Hay otras ollas especiales para la
inducción cuyos fondos no son totalemte
ferromagnéticos. Si la base de las ollas no es
completamente ferromagnética, se calentará
sólo la parte magnetizada, es por eso que
puede occurrir que el calor no se distribuya
de manera uniforme. Para obtener una buena cocción, les aconsejamos utilizar
ollas cuya zona ferromagnética tenga el mismo tamaño del quemador.
Recipientes no adecuados
No utilizar nunca recipientes adaptador para placas de inducción u ollas hechas
de:
• Acero inoxidable normal
• Vidrio
• Barro
• Cobre
• Aluminio
95
Page 96

la cocción por inducción
Posición correcta de las ollas
ESPAÑOL
INCORRECTO CORRECTO
Olla no centrada en la superficie de la zona
de cocción
Olla con el fondo curvo deformado Olla con el fondo liso
La olla no tiene el tamaño mínimo solicitado
para la zona de cocción
El fondo de la olla apoya sobre el marco
della placa o no se apoya completamente
sobre la superficie de la placa
Olla correctamente al centro della zona de
cocción
La olla tiene o excede el tamaño mínimo
solicitado para la zona de cocción
El fondo de la olla apoya completamente
sobre la superficie de la placa
La asa demasiado pesante inclina la olla La olla está perfectamente balanceada
96
Page 97

conocer la placa vidrocerámica
9 9
02 5
min
Panel de control
Este aparato usa un sistema de programación electrónico “touch control” en el
que las funciones se activan tocando las teclas sensoriales y se conferman con
las indicaciones en la pantalla de visualización y con señales acústicas. Tocar las
teclas desde arriba sin cubrirlas.
ESPAÑOL
Tecla de
contacto
Función
Tecla power (encendido) – pulsar para encender el aparato
Tecla Control Lock (Bloque de comando) – pulsar para activar
la función “Control Lock (Bloque de comando)”
Tecla Pause/Recall (Pausa/Volver a la configuración) – pulsar
para activar la función ‘‘Pausa’’ o ‘‘volver a la configuración’’
Tecla Programas - pulsar para activar los programas ‘‘Warming’’,
‘‘Melt’’ o ‘‘Simmer’’
Timer (Temporizador) - pulsar + y/o – para activar el programa
“Temporizador” de una zona de cocción o para ajustar la función
‘Reloj de cocina/Pro memoria”
Slidebar (Deslizador)- Desliza hacia la izquierda o hacia la
derecha para configurar la potencia de la zona de cocción.
¡ATENCIÓN! RIESGO DE QUEMADURAS
Cocciones largas con altos niveles de potencia con ollas de
grande tamaño pueden calentar el panel de control.
Prestar atención antes de tocar las teclas.
97
Page 98

a 4
0 4
1 4-9 4
025
0 4
h 4
p 4
a 4
e 4
conocer la placa vidrocerámica
Símbolos de la pantalla de visualización y LED
ESPAÑOL
Pantalla de
visualización
Descripción
función activa - indica que la zona de cocción y/o función está activada
temporizador/reloj de cocina – indica que el temporizador de la zona
de cocción està activado / el reloj de cocina está activado
‘bridge’ – indica que la función ‘bridge’ está activada
‘Warming’ (mantener caliente)’ – indica que el programa ‘‘Warming
(mantener caliente)’’ está activado (el nivel de calor de la zona de cocción
está configurado a 42°C)
‘Melt (derretir)’ – indica que el programa ‘‘Melt (derretir)’’ está activado (el
nivel de calor de la zona de cocción está configurado a 70°C)
‘Simmer (hervir)’- indica que el programa ‘‘Simmer (hervir)’’ está activado
(el nivel de calor de la zona de cocción está configurado a 94°C)
ninguna selección del temporizador programada
la zona de cocción está activada, programar la potencia dentro de 10
segundos
nivel de potencia de la zona de cocción
display del tempo Temporizador (Timer)
Detección de ollas – detecta las ollas que no son adecuadas,
demasiado pequeñas, o si ninguna olla estuviese en la zona de cocción
calor residual - indica que la zona de cocción está todavía caliente.
98
La función Power boost (aumento de potencia) está activada
calentamiento automático - la función está activada
+ digit
error – hubo un problema en el funcionamiento . (Consultar el capítulo
‘‘Resolución de los problemas”)
¡ATENCIÓN! RIESGO DE QUEMADURAS
Después de haber apagado la zona de cocción es necesario esperar
que se enfríe. Prestar atención al indicador de calor residual.
Consejos: El calor residual se puede utilizar para descongelar o mantener
calientes los alimentos.
Indicador calor residual
Page 99

0 4
uso de la placa vitrocerámica
Encendido del aparato
Pulsar la tecla Power(encendido) para encender el aparato.
Todos los display relativos a las zonas de cocción se encienden en la posición
de espera ‘‘0’’. El panel de control queda activado por 10 segundos. Si durante
este tiempo no se selecciona ninguna zona de cocción el aparato se apaga
automáticamente.
Apagar el aparato
Para apagar completamente el aparato pulsar la tecla Power (encendido).
Encender la zona de cocción
Encender el aparato y ajustar el calor con el nivel de potencia usando el deslizador
corrispondente dentro de 10 segundos. La potencia de cada zona se puede regular
en 9 niveles diferentes y se podrá ver en la pantalla de visualización correspondiente
con un número que va de «1» a «9». Deslizar el dedo sobre el deslizador hacia la
derecha para aumentar la potencia y hacia la izquierda para bajarla.
Apagado de la zona de cocción
Para apagar la zona de cocción deslizar el dedo sobre el deslizador hacia la derecha
para devolver el valor a «0».
Detección de Ollas
Cada zona de cocción por inducción, tiene un límite mínimo de detección del
recipiente que varía en función del material del recipiente que se está utilizando. Es
por esto que, se tiene que usar la zona de cocción más adecuada al diámetro del
recipiente.
Si en la pantalla de visualización de una zona de cocción aparece el símbolo
«
» significa que:
• el recipiente no es adecuado para la cocción por inducción.
• el diametro de la olla usada es inferior al permitido por el aparato.
• sobre la placa no hay ninguna olla.
Para más detalles consulte el capítulo “la cocción por inducción”
ESPAÑOL
Calor residual
Si después del apagado la temperatura de la zona de cocción sigue estando
caliente (sobre los 50°C la misma pantalla de visualización mostrará el símbolo «H»
(calor residual). El símbolo permanece activado aún cuando el aparato se apague y
desaparece sólo cuando no se corre más el riesgo que se produzcan quemaduras.
Temporizador
Esta función permite establecer un tiempo de 1.00 (1 minuto) a 1.59 (1 hora y 59
minutos) para el apagado automático de una zona de cocción. Encender una zona
de cocción deslizando con el dedo sobre el deslizador y regular la potencia.
99
Page 100

uso de la placa vitrocerámica
Para activar el temporizador pulsar al mismo tiempo las teclas [+] y [-] del temporizador
ESPAÑOL
hasta que se encienda el símbolo del reloj al lado de la pantalla de visualización de la
zona de cocción. Accionar las teclas [+] y [-] del temporizador dentro de 6 segundos
para configurar el tiempo deseado. Esperar 5 segundos para la confirmación. La
cuenta regresiva se verà en la pantalla de visualización del temporizador.
Cuando el tiempo termine, la zona de cocción se apagará automáticamente, la
pantalla de visualización del temporizador indicará un «000» parpadeante emitiendo
una señal acústica. Pulsar la tecla [+] o [-] del temporizador para apagar las señales.
Para desactivar el temporizador de una zona de cocción pulsar más de una vez al
mismo tiempo las teclas [+] y [-] hasta que aparezca el símbolo del reloj cerca della
misma pantalla de visualización. Pulsar las teclas [+] y [-] y volver la potencia al valor
«000» pulsando la tecla [-]. Esperar 5 segundos para la confirmación autmática. El
símbolo del reloj al lado de la pantalla de visualización de la zona de cocción se
apaga.
Reloj de cocina/ Pro memoria
Cuando todas las zonas de cocción están desconectadas, se puede establecer
un pro memoria acústico que permanece activado aún después que el aparato se
apague. Cuando el reloj de cocina /Pro memoria se activa la función temporizador
no se puede activar.
Para activar el pro memoria pulsar más de una vez al mismo tiempo las teclas [+]
y [-] hasta que aparezca el símbolo del reloj debajo de la pantalla de visualización
de la zona temporizador. Poner un tiempo de «1.00» (1 minuto) a «1.59» (1 hora y
59 minutos) tocando las teclas [+] y [-]. Esperar 5 segundos para la confirmación
automática. La cuenta regresiva se verá en la pantalla de visualización del
temporizador. Al terminar el tiempo la pantalla de visualización indica un «000»
parapadeante emitiendo una señal acústica. Pulsar la tecla [+] o [-] del temporizador
para apagar las señales.
Para desactivar la función reloj de cocina/ pro memoria pulsar al mismo tiempo
las teclas [+] y [-] hasta que aparezca el símbolo del reloj debajo de la pantalla de
visualización de la zona Temporizador. Volver a configurar el tiempo al valor «000»
usando la tecla [-]. Esperar 5 segundos para la confirmación automática, el símbolo
del reloj al lado de la pantalla de visualización del temporizador se apaga.
Pausa/Volver a la configuración
Cuando al menos una zona de cocción està en función es posible poner en pausa el
aparato interrumpiendo momentáneamente la cocción.
Para activar esta función pulsar la tecla Pausa/Volver a la configuración. El led en
cuestión se enciende y la pantalla de visualización de todas las zonas de cocción
muestran el símbolo «II». Todos los temporizadores eventualmente activados se
interrumpen. La pausa tiene una duración mínima de 10 minutos y cuando terminan
el aparato se apaga.
Para desactivar la pausa pulsar la tecla Pausa /Volver a la configuración y deslizar el
dedo en el deslizador parapadeante hacia la derecha dentro de 10 segundos.
100
 Loading...