


USER'S MANUAL FOR BUILT-IN OVEN
Compact, cod. 7170 052 - 7172 042
Foster spa
via M.S. Ottone, 18/20
42041 Brescello (RE) - Italy
tel. +39.0522.687425 - tel. Servizio Assistenza +39.0522.684450
fax +39.0522.686019 - fax Servizio Ricambi +39.0522.962166
e-mail: service@fosterspa.com
www.fosterspa.com

CONTENTS
INSTRUCTIONS FOR THE USER
1. WARNINGS FOR SAFE USE ..............................................................21
2. DESCRIPTION OF THE OVEN ............................................................23
3. MODELS AND FEATURES ..................................................................24
4. DESCRIPTION OF CONTROLS ..........................................................25
4.1 FUNCTION KNOB ...................................................................................................25
4.2 THERMOSTAT KNOB .............................................................................................25
4.3 DIGITAL PROGRAMMER .......................................................................................26
5. USING THE OVEN ................................................................................29
5.1 FAN-ASSISTED COOKING ....................................................................................29
5.2 COOKING ON THE RACK .....................................................................................30
5.3 GRILLING ................................................................................................................30
5.4 FAN-ASSISTED GRILL COOKING ........................................................................30
5.5 COOKING TABLES ................................................................................................. 31
6. OVEN MAINTENANCE .........................................................................32
6.1 GENERAL CLEANING ............................................................................................32
6.2 REMOVING THE DOOR ........................................................................................32
6.3 CLEANING THE GLASS PANELS .........................................................................33
6.4 DOOR SEAL ............................................................................................................34
6.5 CHANGING THE LIGHT BULB ..............................................................................34
6.6 TROUBLESHOOTING ............................................................................................34
20
INSTRUCTIONS FOR THE INSTALLER
A. FITTING ..................................................................................................35
B. ELECTRICAL CONNECTION ..............................................................36
1. WARNINGS FOR SAFE USE
This manual is an integral part of the appliance and must be kept in its
entirety and for the full life time of the oven. It must be read carefully before
using and installing the appliance.
This oven was designed for use only as a household appliance for cooking
and heating food. All other uses (for example, heating rooms) is to be
considered improper, and therefore dangerous. The manufacturer declines
all responsibility for different uses.
It is intended to come into contact with food products and complies with
European Directive 89/109/CEE.
It has been designed, manufactured and introduced into the market in
compliance with:
- safety requirements of the Low Voltage Directive 2006/95/CE;
- protection requirements of the directive EMC 2004/108/CE.
- requirements of the directive 93/68/CEE.
The various parts of the packaging must not be dispersed in the
environment, but disposed of in compliance with the local regulations for
refuse disposal.
This appliance is subject to European Directive 2002/96/CE for the disposal
of electrical and electronic refuse. The symbol to the side indicates that
the product must not be dealt with as domestic refuse, but must, instead,
be delivered to an authorised collection centre for recycling electrical and
electronic refuse.
Before disposing of it, you must make it unusable by cutting off the power
cable.
GB
The identifying data of the oven (model, serial number and technical data)
are included on the rating plate applied on the door stop.
Installation must be carried out by qualifi ed personnel in accordance with
the regulations in force.
Should the appliance not function, disconnect it from the power supply and
call the nearest Foster Technical Assistance Centre.
Do not attempt to repair the appliance!
21

FOR CORRECT USE OF THE OVEN:
• The appliance is intended for use by adults; do not allow children
near it.
• Do not put infl ammable objects into the oven that could start a fi re.
• It is an appliance that generates heat, therefore limit contact with the
outside and avoid all contact with the internal parts.
• To open the door correctly, hold the handle in the middle.
• Always use oven gloves to insert or extract containers.
• Do not obstruct ventilation openings and heat dispersal slits.
• Do not rest any weights on the door while it is open which could
damage the hinges.
• Don not hang any weight from the handle of the oven door.
• Do not pull the power cable when removing the plug from the
socket.
TO SAVE ENERGY:
• Pre-heat the oven only for the time strictly necessary.
• Use dark coloured oven containers because they absorb heat much
better.
• Open the door only when strictly necessary, in order not to let heat
escape.
• Use the oven from late afternoon until the early hours of the morning
in order to reduce the power consumption demand on electricity
companies.
• Keep seals clean and effi cient, so that they do not allow any heat to
escape.
• When fi nished using it, always make sure that the oven is switched
off.
22
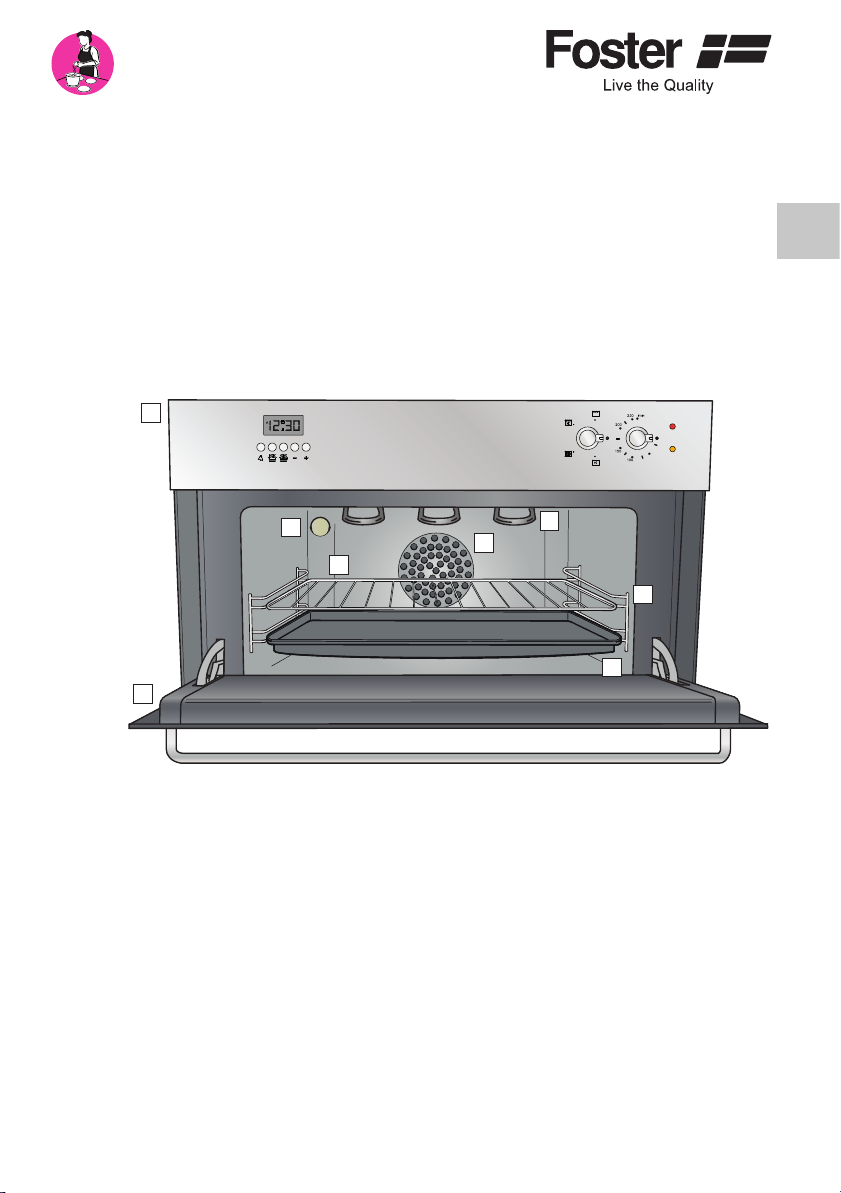
2. DESCRIPTION OF THE OVEN
1. CONTROL PANEL
2. DOOR
3. OVEN LIGHT BULB
4. OVEN FAN
5. INFRARED GRILL
6. SHELF AND TRAY RUNNERS
7. RACK
8. TRAY / DRIPPING-PAN
1
GB
3
7
2
The oven is heated by hot air which is circulated evenly by a motorised fan and heated by electrical resistor positioned around the fan. The temperature of the oven is
kept constant at the value set for the whole cooking time.
For the best cooking results, always use the lower shelf to cook any type of food and
the upper shelf only for grilling, toasting or gratineeing.
4
5
6
8
23
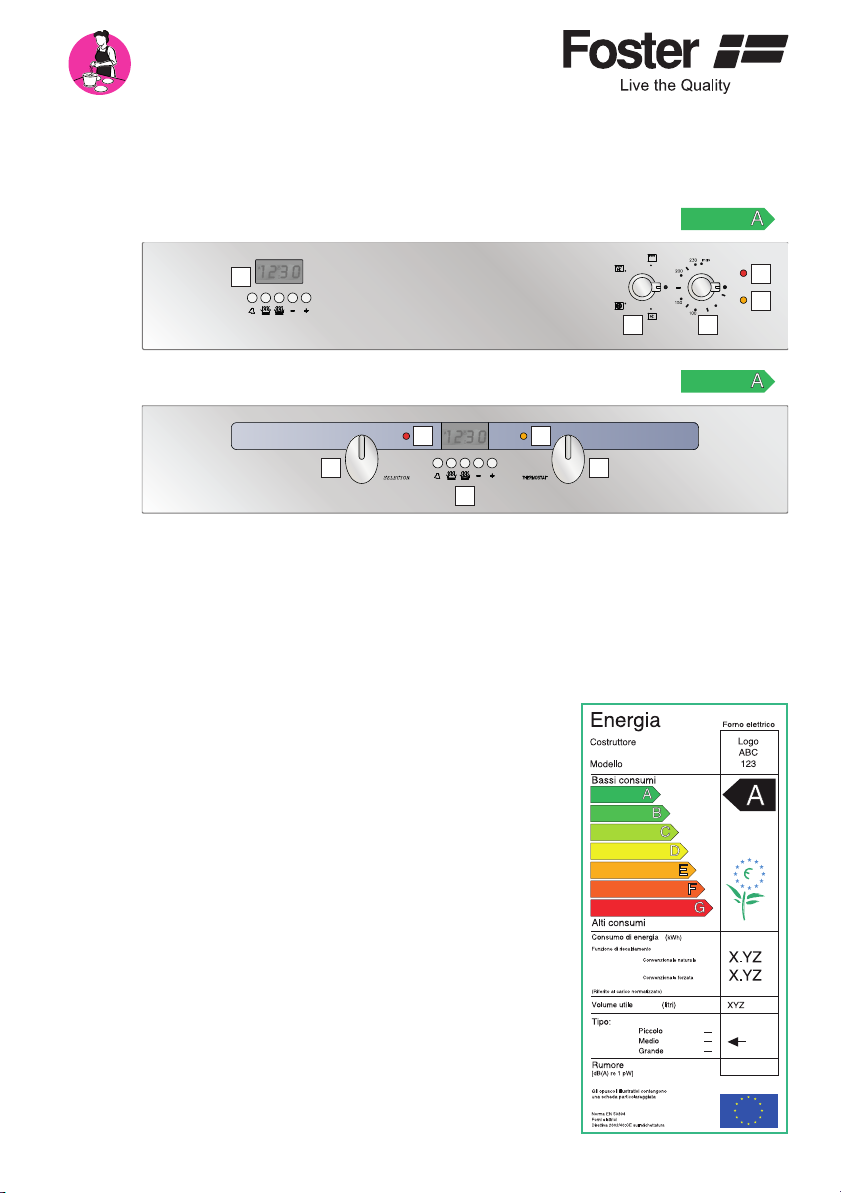
3. MODELS AND FEATURES
The COMPACT series consists of 2 models of fan ovens.
COMPACT KRISTAL - 7170052 (CLASS A ENERGY EFFICIENCY)
5
COMPACT 1810 - 7172042 (CLASS A ENERGY EFFICIENCY)
3
2
5
4
1
1. THERMOSTAT KNOB
2. FUNCTION KNOB
3. RED POWER ON LIGHT
4. ORANGE THERMOSTAT LIGHT
5. DIGITAL PROGRAMMER
In order to fi t in with the style of your kitchen, Foster has
created 2 models of COMPACT ovens, with different
aesthetic, functional and performance characteristics.
3
4
2
1
24
Energy effi ciency classes for ovens go from A to G,
where the letter A indicates the lowest consumption, as
illustrated on the energy label at the side.

4. DESCRIPTION OF CONTROLS
4.1 FUNCTION KNOB
Selecting various cooking functions couldn’t be easier; just turn the knob clockwise
and stop on the desired position.
List of functions:
EVERYTHING OFF
OVEN LIGHT AND FAN
LIGHT, FAN AND CIRCULAR HEATING ELEMENT
LIGHT, INFRARED GRILL AND FAN
LIGHT AND INFRARED GRILL
The oven light and the red indicator light always remain on during operation
of the oven.
4.2 THERMOSTAT KNOB
GB
The temperatures indicated on the front panel can be selected by turning the thermostat knob in a clockwise direction, stopping the knob indicator at the selected
temperature.
The temperature remains constant for the entire duration of cooking.
The orange indicator light comes on to indicate that the thermostat is functioning.
When it switches off it indicates that the heating elements have been deactivated
because the temperature has been reached.
25

4.3 DIGITAL PROGRAMMER
TIMER BUTTON (MINUTE
MINDER)
COOKING DURATION BUTTON
END OF COOKING BUTTON
NUMBER INCREASE BUTTON
NUMBER DECREASE BUTTON
TIME SETTING
Select the clock function clock by pressing the and buttons at the same
time; the dot at the centre of the display begins to fl ash. Adjust the clock using the
- buttons; at the end of adjustment the dot remains lit constantly.
or
This adjustment can be carried out at any time; if there are any programmes
set, these will be cancelled.
MANUAL OPERATION
+
26
For manual operation there is no need to use the digital programmer.
Turn the function knob to the desired type of cooking and set the temperature using
the thermostat knob.
Turn both knobs to the off position at the end of the type and time of cooking selected.
SEMI-AUTOMATIC OPERATION (WITH COOKING TIME)
Press the
fl ashes; use the
After 5 seconds the time reappears with the letter
Position the two knobs on the temperature and the type of cooking desired.
At the end of the minutes set, the buzzer signals the end of cooking, the letter
starts fl ashing again and the oven switches off.
button, then release it; the digits 0.00 appear and the letter A
+ button to set the cooking minutes.
A.
A

Turn the two knobs to the off position and press the and buttons at the
same time in order to stop the buzzer and to cancel the program in use.
SEMI-AUTOMATIC OPERATION (WITH COOKING END TIME)
Press the
fl ashes; use the
After 5 seconds the current time reappears with the letter
Position the two knobs on the temperature and the type of cooking desired.
When the set time is reached, the buzzer signals the end of cooking, the letter
starts to fl ash again and the oven switches off.
Turn the two knobs to the off position and press the
same time in order to stop the buzzer and to cancel the program in use.
AUTOMATIC OPERATION
Press the
fl ashes; use the
Press the
button, then release it; the time remains displayed and the letter A
+ button to set the cooking end time.
A.
and buttons at the
button, then release it; the digits 0.00 appear and the letter A
+ button to set the cooking minutes.
button, then release it; the clock time remains displayed and the letter
A fl ashes; use the + button to set the cooking end time.
After 5 seconds the time reappears with the letter
Position the two knobs on the temperature and the type of cooking desired.
The oven remains off and will be activated automatically.
At the end of the minutes set, the buzzer signals the end of cooking, the letter
starts fl ashing again and the oven switches off.
Turn the two knobs to the off position and press the
same time in order to stop the buzzer and to cancel the program in use.
A.
and buttons at the
GB
A
A
Example: it is 12:00 AM, I set 20 cooking minutes and I set the cooking to fi nish at
01:00 PM. The oven will then be activated at 12:40 AM and will switch off at 01:00
PM.
27

TIMER (MINUTE MINDER)
Press the
using the
After 5 seconds, the time reappears with the symbol
At the end of the minutes set, the buzzer signals that the time is up, the
starts fl ashing again; use the
This function can be used either for manual cooking or whenever a warning is required during cooking activities.
button and then release it; the digits 0.00 appear; set the minutes
+ button.
.
symbol
+ or - buttons to stop the buzzer.
To cancel this function, push the button
using the button
BUZZER
The buzzer indicates the end of some kind of operation for a duration of 7 minutes.
To interrupt the buzzer, press the
The buzzer has three volume levels. Adjust it according to requirements by pressing
- button for a few seconds: the buzzer will emit the currently set sound; press the
the
-.
+ and - buttons at the same time.
and bring the time back to 0.00 by
- button again to hear another sound level.
ERROR IN SETTINGS (AUTOMATIC OPERATION)
For automatic operation the setting is not corrected if the clock time is between the
cooking start time and the cooking end time.
The error is indicated by an acoustic signal and by the letter A which continues to
fl ash.
CANCELLING A PROGRAMME
A programme that has been set can be cancelled by pressing the
at the same Time.
and keys
28

5. USING THE OVEN
FIRST TIME USE
Clean the oven carefully with water and activate the oven at the maximum
temperature for approximately 30 minutes, in order to get rid of any manufacturing grease residues that could give off unpleasant smells during cooking.
During cooking, do not place any pans or trays on the bottom of the oven as this
could damage the enamel. If using baking paper, position it in such a way that it
does not obstruct the circulation of air inside the oven.
Attention: keep cooking under control, given that high temperatures are involved.
The grill can also be used to gratinee and brown food after it has been cooked.
While the grill is on, the door must remain closed. Before opening it, switch
off the appliance a wait for a few minutes.
In accordance with the height of the containers and the food to be cooked, the lower
shelf runner should be used for normal baking and the highest one for the using
the grill.
GB
5.1 FAN-ASSISTED COOKING
Various types of food can be cooked
at the same time because the hot
air at the set temperature circulates
evenly throughout the whole oven.
Cooking times with the hot air system
are quicker than traditional static cooking, and therefore temperatures15°20°C lower than those normally suggested in cookery books should be
used.
29

5.2 COOKING ON THE RACK
Turn the function knob to the
position, set the desired temperature
and pre-heat the oven until it reaches
the selected temperature.
Then insert the rack 1 with the food to
be cooked resting on top of it, lightly
oiled. Then slide in the drip tray 2 immediately under the rack.
The warm air immediately surrounds
the food to be cooked at all points and
causes it to brown all over.
5.3 GRILLING
Turn the function knob to the position and the thermostat knob to the max position. Pre-heat the grill for about 5 minutes; in the oven roof, you will see the infrared
grill element 3 becoming a bright red colour. Next insert the food to be grilled, lightly
oiled, in the most convenient position, which is usually the position closest to the grill.
Slide in the drip tray if the food is placed on the rack.
5.4 FAN-ASSISTED GRILL COOKING
Turn the function knob to the position and the thermostat knob to the max position; the strong heating of the grill is increased by the action of the fan, which allows
more a more tender and even roasting of foods.
30

5.5 COOKING TABLES
FAN-ASSISTED COOKING
FOODS
FIRST COURSES
Stuffed cannelloni 100 20
Lasagne 150 50
Macaroni au gratin 100 30
Baked macaroni or
cappelletti
Egg fl an 175 25
MEATS
Roast veal (kg.1) 150 120 - 150
Roast lamb 150 60 - 90
Roast pork 150 50 - 60
Roast pheasant 150 60 - 90
Chicken 150 60 - 90
Fish (kg.1) 150 30 - 40
BAKING
Biscuits with yeast 150 20 - 25
Short pastry 175 20 - 25
Meringues 100 30 - 35
Light sponge cake 150 20 - 25
Fruit cake 100 50 - 60
Muffi ns 150 40 - 50
Layer cake 175 25 - 35
Margherita Layer Cake 150 40 - 45
Paradise cake 150 40 - 45
Sweet and savoury puff
pastry biscuits
Bignole (glazed cream
puffs)
Strudel 225 30 - 40
Biscuit roll 225 15 - 20
Sterilising fruit 200 20 - 30
Sterilising vegetables 200 20 - 30
Pizza 250 20 - 30
Bread 250 20 - 30
Temp.
Cooking
(° C)
150 45
175 15 - 20
175 15 - 20
time
(minutes)
GRILL
FOODS
Ribs max 35 - 45
Cutlets max 30 - 40
Sausages max 30 - 40
Chops max 35 - 45
Fish (slices) max 35 - 45
Chicken legs max 40 - 50
Kebabs max 40 - 50
Temp.
(° C)
Spare ribs
1/2 chicken max 45 - 55
Cooking
time
(minutes)
max 35 - 45
FAN-ASSISTED GRILL
FOODS
1/2 chicken max 45 - 55
Whole chicken max 60 - 70
Roast (pork, beef) max 60 - 70
Duck max 70 - 80
Leg of lamb max 70 - 80
Roast beef max 50 - 60
Roast potatoes max 50 - 60
Fish (sea bream, trout) max 50 - 60
Temp.
(° C)
Cooking
time
(minutes)
Important: The times and temperatures
are suggestions and may be interpreted
according to experience, the weight of
the foods and personal preference.
GB
31

6. OVEN MAINTENANCE
Before any maintenance operation, disconnect the appliance from the electrical power supply by removing the plug from the socket.
Never disconnect the plug by pulling on the power supply lead.
6.1 GENERAL CLEANING
The external parts made of glass and stainless steel and rubber seals can be cleaned using a sponge dampened with lukewarm water, and neutral soap.
Rinse and dry with a soft cloth after cleaning.
Do not use abrasive powders or corrosive substances.
The inside of the oven must ideally be cleaned every time after use, while it is still
lukewarm. Avoid leaving acid or alkaline substances on the surfaces such as lemon
juice, vinegar, salt, tomato, etc.
Use warm water and detergent; rinse and dry with a soft cloth.
If the marks are diffi cult to remove, always use specifi c products followed by thorou-
gh rinsing.
Avoid using abrasive powders or corrosive substances containing chlorine and acids.
The accessories can be washed as normal kitchenware, also in a dishwasher.
6.2 REMOVING THE DOOR
For more thorough cleaning it is possible to remove the oven door:
32
1. open the door fully;
2. using your thumbs, press the two le-
vers A positioned on the two hinges;
3. while holding the levers down, hold the
door at the two outside edges, closing
it slowly but not completely;
4. then, pull the door towards you, lifting
up the lower levers B of the hinges
using your index fi ngers.
2
1
A
4
3
B

To replace the door after cleaning:
5. hold the door at the two outside edges
and keep it in a slanting position;
C
6
5
6. using your index fi ngers, keep the lo-
wer levers B held up and insert them,
together with the levers C into their
slots;
B
7. when all 4 levers B and C are perfectly
inserted into the slots, open the door
fully;
8.
in doing this, the levers A return to an
upright position and the door is moun-
8
7
ted.
A
6.3 CLEANING THE GLASS PANELS
To clean the glass panels of the door:
1. remove the door A as described previously;
2. unscrew the screws B that attach the bottom frame C of the door;
3. remove the frame and slide out the two glass panels D.
When cleaning is completed, insert the two glass panels back into their slots (see
detail) and replace the lower frame using the screws.
GB
D
A
B
C
B
33

6.4 DOOR SEAL
Periodically check the condition of the seal. If it appears damaged, contact the Foster
Technical Assistance Centre. You are advised not to use the oven until it has been
repaired.
6.5 CHANGING THE LIGHT BULB
To replace the oven lighting light bulb:
1. unscrew the protective cover A;
2. unscrew the bulb B and replace it
with the same type: power 25 W,
connection E 14, T 300°C;
3. replace the cover.
6.6 TROUBLESHOOTING
If the oven does not work, make sure that:
• there is power in the electrical supply;
• the oven is connected to the electricity outlet;
• that the red indicator light comes on when the Function Knob is rotated.
34
If the oven has been connected for the fi rst time, or their has been a cut in the
power supply, press the buttons
If the problem persists after carrying out these checks, contact:
• the nearest Technical Assistance Centre which you can fi nd in the guarantee book-
let supplied with the appliance, or by looking up the web site www.fosterspa.com
•
Foster Assistance Service – tel. 0522 684450 – e-mail: service@fosterspa.com
and at the same time.

A. FITTING
The appliance is suitable for fi tting into furniture of any material (wood, laminated
plastic, metal and masonry) as long as it is heat resistant.
To embed it into the furniture, the dimensions specifi ed in the diagram must be respected.
GB
mm 40
560
595
560
360
540
353
Whether it is positioned under a worktop or on a pedestal, airing channels must be
provided as shown in the fi gure.
To guarantee proper airing the rear wall of the oven compartment must be removed.
When the oven is in position, attach it to the furniture with 4 screws inserted in the
holes A that are visible when you open the door.
10
50
50
Never use the oven door handle to insert the oven into place when fi tting.
Avoid exerting pressure on the oven door when open.
35

B. ELECTRICAL CONNECTION
Before carrying out the electrical connection make sure, referring to the data on the
identifi cation plate, that:
• the supply voltage corresponds to the voltage specifi ed for the appliance;
• the household system and the power outlet can support the power of the appliance.
The rating plate is affi xed on the door stop.
• Connection to the electrical mains supply must be carried out by qualifi ed
personnel in accordance with current regulations.
• The installer is responsible for correct connection in compliance with safety
regulations.
• A plug that is adequate for the power of the appliance must be attached to
the power supply cable. The plug must be connected to a power outlet that
has an earth connection.
• The connection can be made to an omnipolar switch with a minimum
opening of 3mm between the contacts, of adequate size for the power
and compliant with current regulations.
• The earth wire must not be interrupted by the switch.
• The socket or omnipolar switch used for the connection must remain accessible when the domestic appliance is installed.
• The power supply cable must not be able to touch points that are 50°C above
the ambient temperature.
• Avoid use of adapters and shunts as these could cause overheating and risk
of burns. If the power supply cable is replaced, the new cable must have a
cross-section of no less than 1.5 mm2 (3 x 1.5 cable) and must resist temperatures up to 90°C.
36
It is mandatory to attach the appliance to the earthing system. Our company
declines all responsibility for non-functioning of the earthing system and for
connections that are not compliant with the provisions of the law.
 Loading...