

Page 1

Manuale d’istruzione
User’s manual
Notice d’utilisation
Bedienungsanleitung
Manual de instrucciones
Page 2

2
Page 3

3
IT
Gentile cliente
Questo apparecchio è destinato all’uso domestico.
Per l’imballaggio dei nostri prodotti usiamo materiali che rispettano l’ambiente, riciclabili ed
idonei ad essere deposti o distrutti.
Quando l’apparecchio non sarà più utilizzato e sarà d’ingombro, si raccomanda di
consegnarlo ad una ditta per il recupero di apparecchi »fuori uso« in modo che l’ambiente
non venga inquinato.
Istruzioni d’uso
Le istruzioni d’uso sono destinate al consumatore. Descrivono l’apparecchio e il suo
utilizzo.
All’interno sono descritti vari tipi/modelli di apparecchi, per cui potreste trovare descrizioni
di funzioni che il Vostro apparecchio non possiede.
Queste istruzioni sono valide per i paesi indicati sull’apparecchio. Se NON È INDICATO
nessun paese, osservare le istruzioni tecniche per l’adattamento dell’apparecchio
secondo le normative/regolamenti del paese.
Istruzioni di
collegamento
Il collegamento deve essere realizzato solo da un tecnico specializzato, secondo il
capitolo “Collegamento alla rete elettrica” e le norme in vigore.
Targhetta
La targhetta con i dati tecnici di base è posizionata nella parte inferiore dell’apparecchio.
Il produttore si impegna per continui miglioramenti. Per questa ragione, il testo e le
illustrazioni in questo manuale possono essere cambiate senza preavviso.
Conservare queste istruzioni e consegnarle a eventuali successivi utenti insieme
all'apparecchio.
Avvertenze importanti 4
Installazione 5
Collegamento alla rete elettrica 6
Caratteristiche tecniche 7
Funzionamento 9
Funzioni di sicurezza e segnalazione errori 14
Pulizia e manutenzione 15
Page 4
4
AVVERTENZE IMPORTANTI
L'apparecchio e le sue parti accessibili diventano molto calde durante l'uso. Si deve prestare attenzione a non toccare gli
elementi riscaldanti. I bambini con meno di 8 anni di età devono essere tenuti lontani se non continuamente sorvegliati.
Fate attenzione ai bambini, non lasciateli nelle vicinanze dell’apparecchio e avvertiteli del pericolo d’ustioni.
L’apparecchio può essere utilizzato da bambini dagli 8 anni in su e da persone con capacità fisiche, sensoriali o mentali
ridotte o con mancanza di esperienza e conoscenza, a condizione che siano sorvegliati o che abbiano ricevuto istruzioni
per l'uso dell'apparecchio in modo sicuro per capire i rischi inerenti.
I bambini non devono giocare con l’apparecchio.
La pulizia e la manutenzione non devono essere effettuate dai bambini senza la supervisione di un adulto.
La cottura automatica con grasso o olio può essere pericolosa e può provocare incendi. Usare la massima
cautela durante la preparazione degli alimenti che necessitano utilizzo di lardo o d’olio (ad esempio patatine fritte). Non
cercare di spegnere un eventuale incendio con l'acqua ma, spegnere l'apparecchio e poi coprire la fiamma con un
coperchio o una coperta antincendio.
Pericolo d’incendio: non conservare oggetti sulle superfici di cottura.
Se la superficie è incrinata, spegnere l’apparecchio per evitare la possibilità di scosse elettriche.
L’apparecchio non deve essere pulito con apparecchi a vapore o ad alta pressione.
Oggetti metallici quali coltelli, forchette, cucchiai o coperchi non dovrebbero essere posti sopra l’apparecchio perché
possono scaldarsi.
L'apparecchio non è destinato ad essere utilizzato per mezzo di un timer esterno o di un sistema separato di controllo
remoto.
Non usare l’apparecchio per riscaldare l’ambiente.
Attenzione al collegamento elettrico di altri apparecchi nelle immediate vicinanze che non venga in contatto con
l’apparecchio caldo.
Non conservate sotto all’apparecchio oggetti sensibili a cambiamenti di temperatura, come, ad esempio, detersivi, spray,
etc.
Nel caso di distrurbi staccate immediatamente la presa dalla rete elettrica e chiamate il Servizio di Assistenza.
L’apparecchio è prodotto secondo gli standard di sicurezza in vigore.
Non allacciare il piano di cottura alla rete elettrica con prolunghe o prese multiple, perché non garantiscono la necessaria
sicurezza (ad es.rischio di surriscaldamento).
Collegare l'apparecchio ad una connessione permanente.
L’apparecchio può essere installato nel mobile della cucina, collegato alla rete elettrica solo da un tecnico autorizzato.
Non posizionare, sulle zone cottura, pentole vuote.
Le zone cottura non devono funzionare a vuoto, senza le pentole.
Non usare la superficie dell’apparecchio come piano di lavoro. Gli oggetti appuntiti potrebbero graffiarla.
La preparazione di cibi in contenitori di plastica o di alluminio sulle zone cottura calde è vietata. Non posizionare sulla
superficie di cottura oggetti in plastica o carta d’alluminio.
L’uso duraturo di pentole in ghisa può cambiare la superficie e la cornice dell’apparecchio. L’intervento del servizio
d’assistenza non è sotto garanzia.
Se l'apparecchio viene installato sopra un forno dotato di sistema pirolitico, non deve essere utilizzato mentre il
procedimento pirolitico è in corso poiché può far scattare la protezione di surriscaldamento del piano cottura.
Il simbolo sul prodotto o sulla confezione indica che il prodotto non deve essere considerato come un
normale rifiuto domestico, ma deve essere portato nel punto di raccolta appropriato per il riciclaggio di
apparecchiature elettriche ed elettroniche.
Provvedendo a smaltire questo prodotto in modo appropriato, si contribuisce a evitare potenziali
conseguenze negative per l’ambiente e per la salute, che potrebbero derivare da uno smaltimento
inadeguato del prodotto. Per informazioni più dettagliate sul riciclaggio di questo prodotto, contattare
l’ufficio comunale, il servizio locale di smaltimento rifiuti o il negozio in cui è stato acquistato il
prodotto.
Page 5
5
INSTALLAZIONE
Avvertenze importanti
L’apparecchio deve essere installato solo da un tecnico autorizzato.
Il rivestimento del mobile deve essere trattato con colle termoresistenti (100°C) altrimenti, a causa di minore resistenza
termica, può cambiare la forma e il colore.
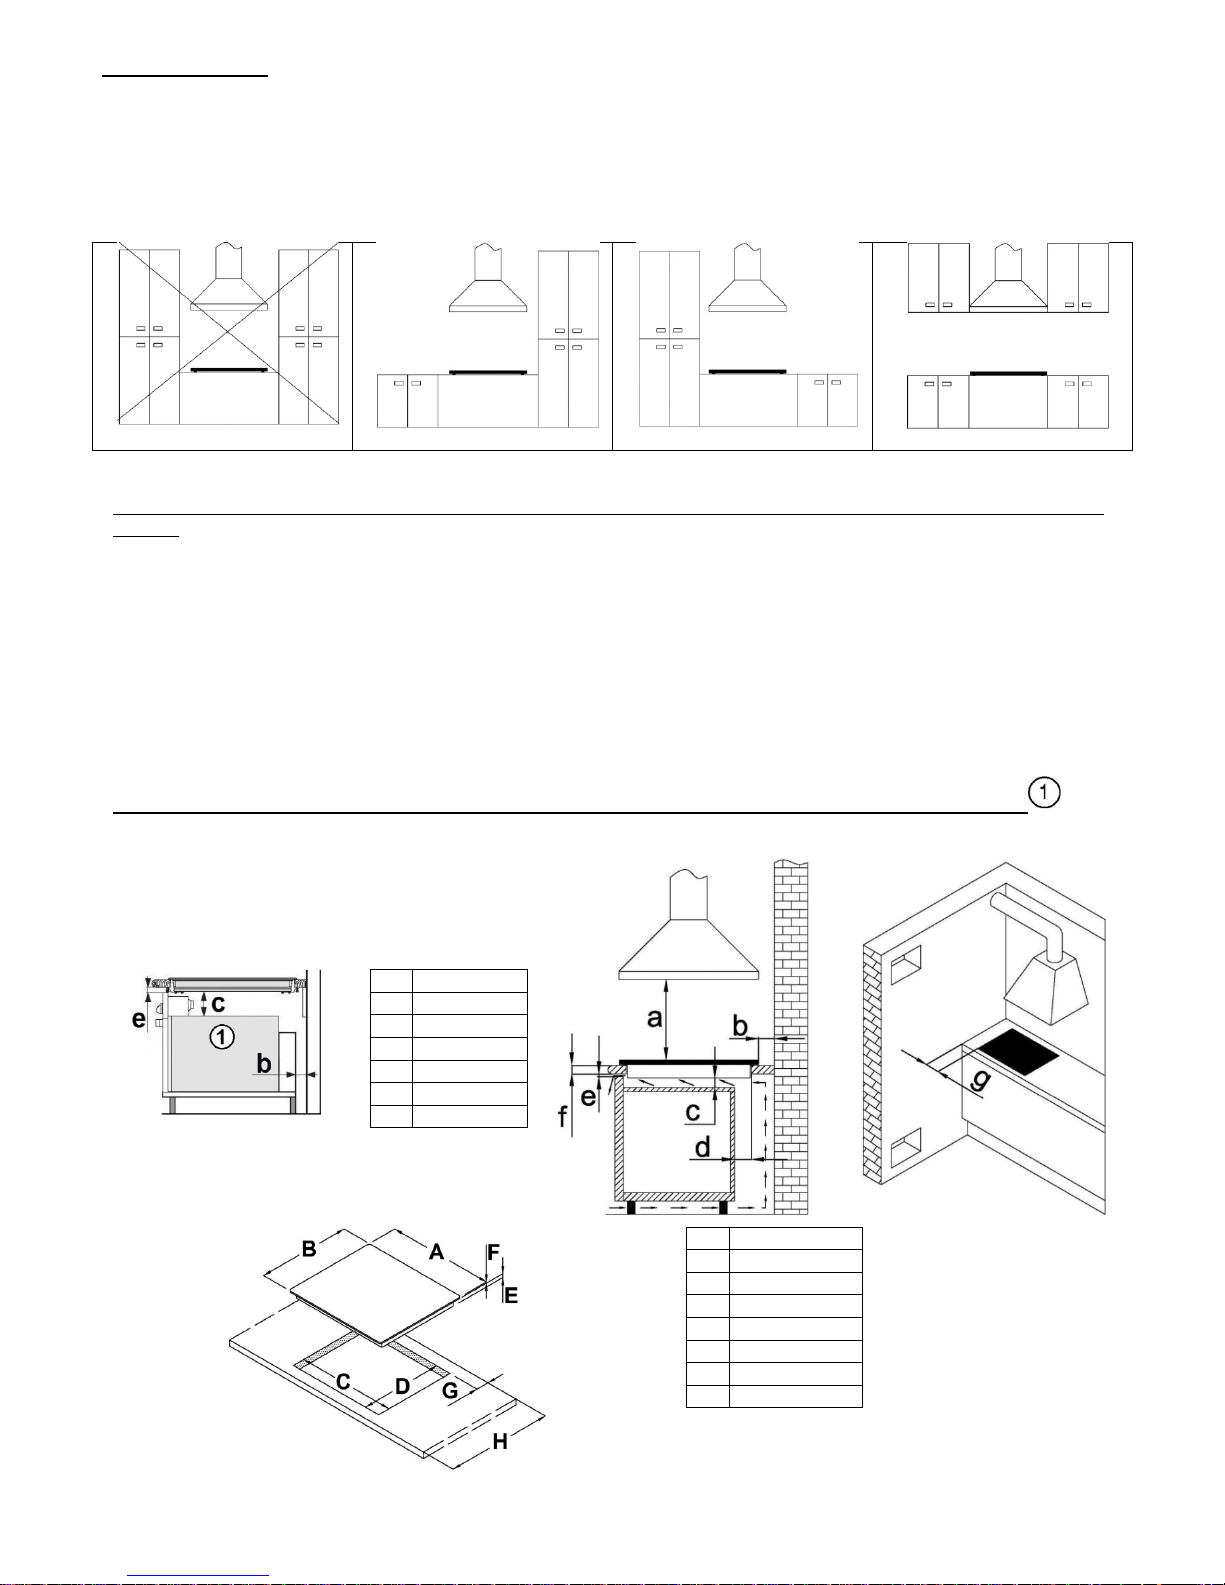
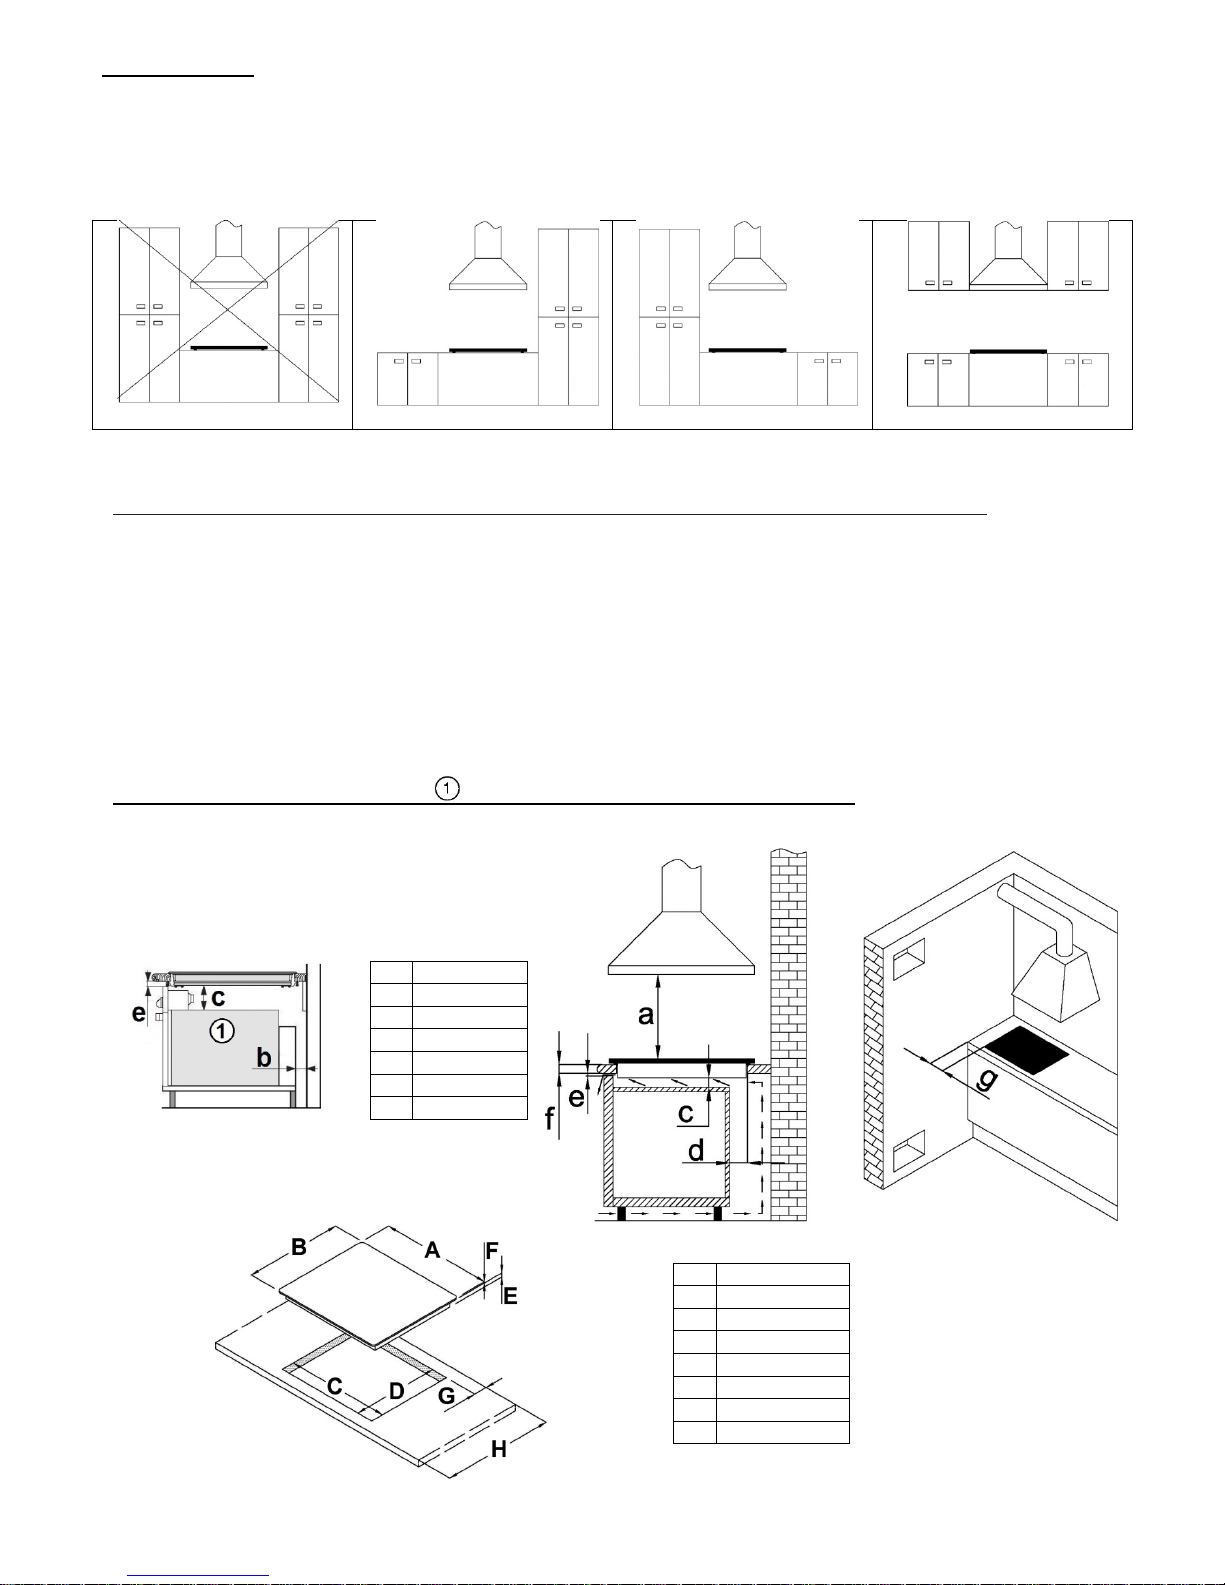
Idealmente l’apparecchio deve essere installato senza mobili o pareti su entrambi i lati. È consentita la presenza di mobili
oppure pareti solo su un lato dell’apparecchio; sull’altro lato, invece, non è assolutamente possibile posizionare mobili o
pareti più alti dell’apparecchio, per la protezione dal pericolo di incendio.
NON CONSENTITO NON RACCOMANDATO NON RACCOMANDATO RACCOMANDATO
Non è permesso l’uso di assicelle di decorazione di legno.
La distanza minima fra il bordo dell’apparecchio e il mobile/parete è di 250mm.
Tutte le dimensioni e le distanze da adottare per il corretto funzionamento dell’apparecchio sono riportate nelle figure di
seguito.
Il mobile non deve avere un cassetto. Se il mobile della cucina possiede un divisorio orizzontale, quest’ultimo deve
essere distante min.20mm dalla superficie inferiore dell’apparecchio. Lo spazio fra il divisorio e l’apparecchio deve
essere vuoto e dentro non si devono lasciare oggetti.
I mobili appesi sopra l’apparecchio e un’eventuale cappa, devono essere posizionati alla giusta altezza in modo che non
venga disturbato il processo lavorativo.
Se l’apparecchio viene installato sotto una cappa aspirante, è necessario rispettare la distanza di sicurezza indicata dal
produttore della cappa. In assenza di precise indicazioni o, se al di sopra dell’apparecchio si trovano materiali facilmente
infiammabili (ad es.una mensola), la distanza di sicurezza deve essere di almeno 800 mm.
Installare l’apparecchio solo dopo aver montato il mobile pensile e la cappa aspirante per evitare di danneggiarlo.
Deve esserci un’apertura di minimo 5mm nella parte anteriore.
L'apparecchio non deve essere installato sopra frigoriferi, congelatori, lavastoviglie, lavatrici e asciugabiancheria.
Nella parte inferiore del mobile è possibile installare un forno solo se dotato di ventilatore tangenziale .
Prima di installare il forno, togliere, la parete posteriore del mobile (parete di almeno 40mm di spessore); inoltre, deve
esserci un’apertura di minimo 5mm nella parte anteriore.
a ≥ 800 mm
b ≥ 50 mm
c ≥ 20 mm
d ≥ 80 mm
e ≥ 5 mm
f ≥ 30 mm
g ≥ 250 mm
A
900 mm
B
400 mm
C
870 mm
D
370 mm
E
45 mm
F
5 mm
G
≥ 50 mm
H
≥ 600 mm
Page 6
6
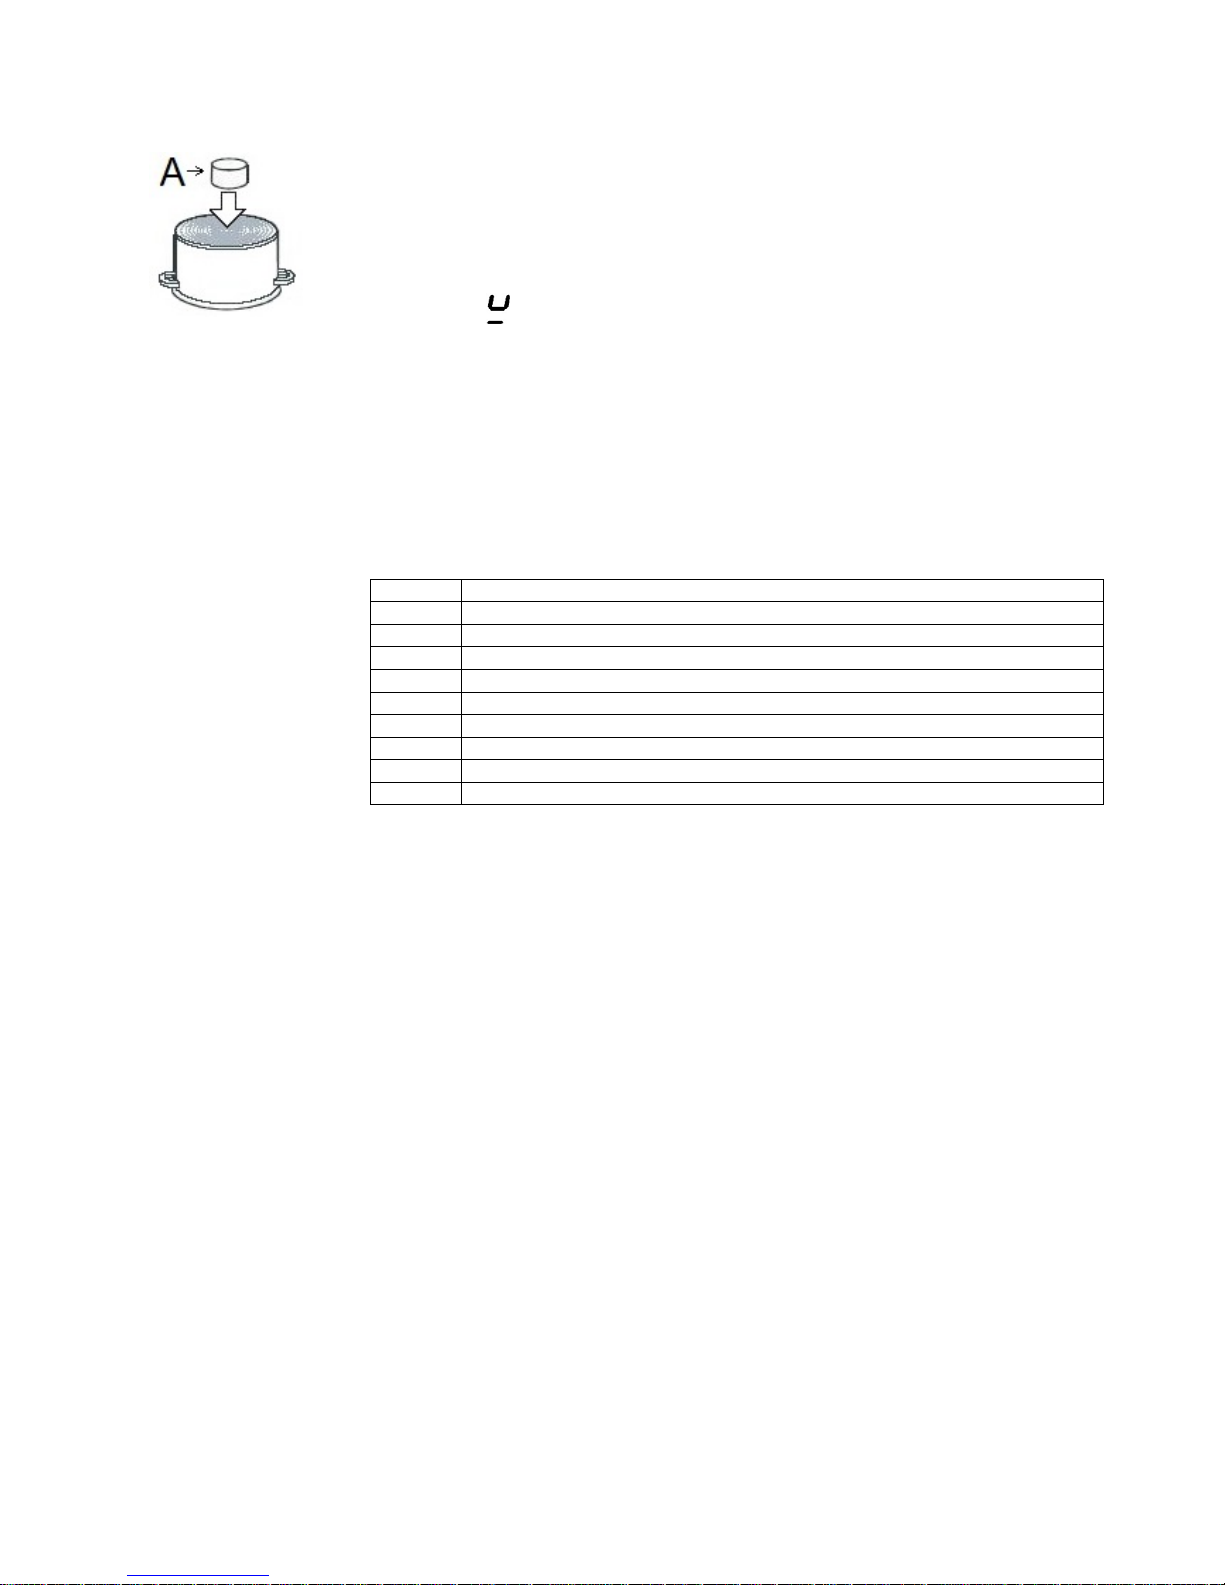
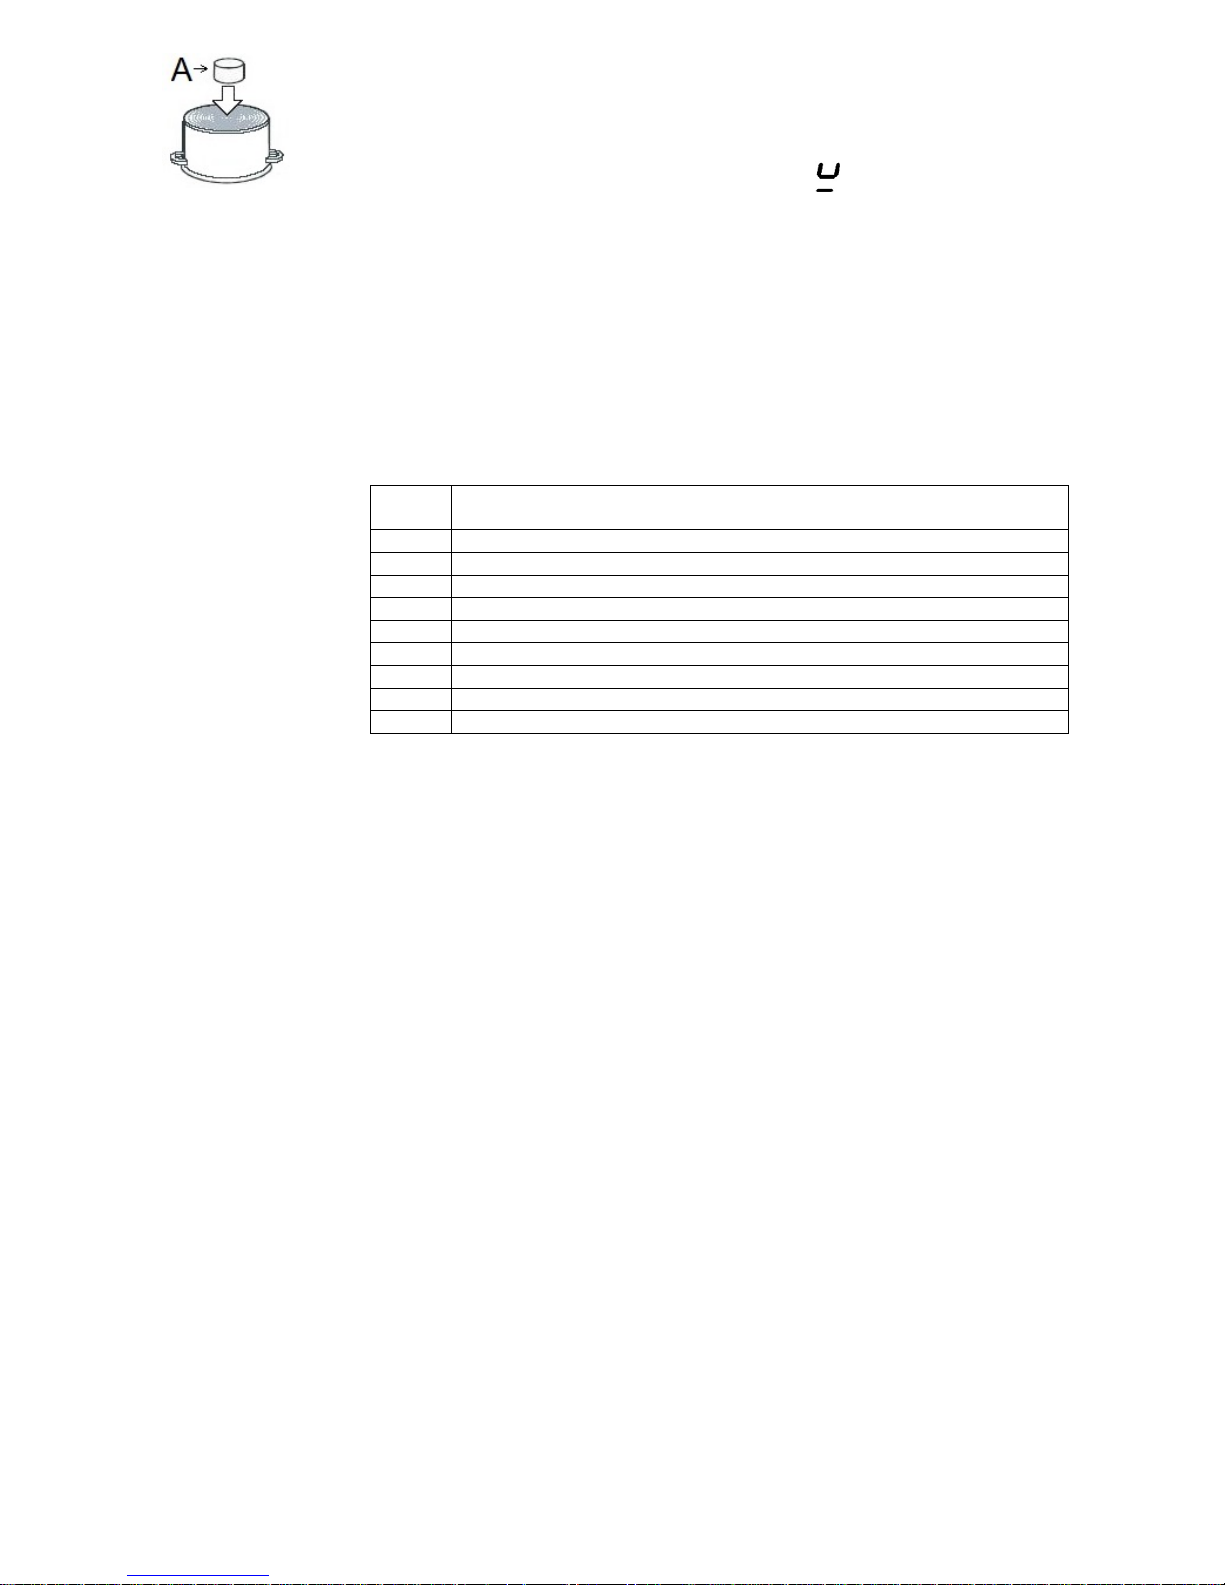
Posizionamento
della guarnizione in
poliuretano espanso
(apparecchi in vetro)
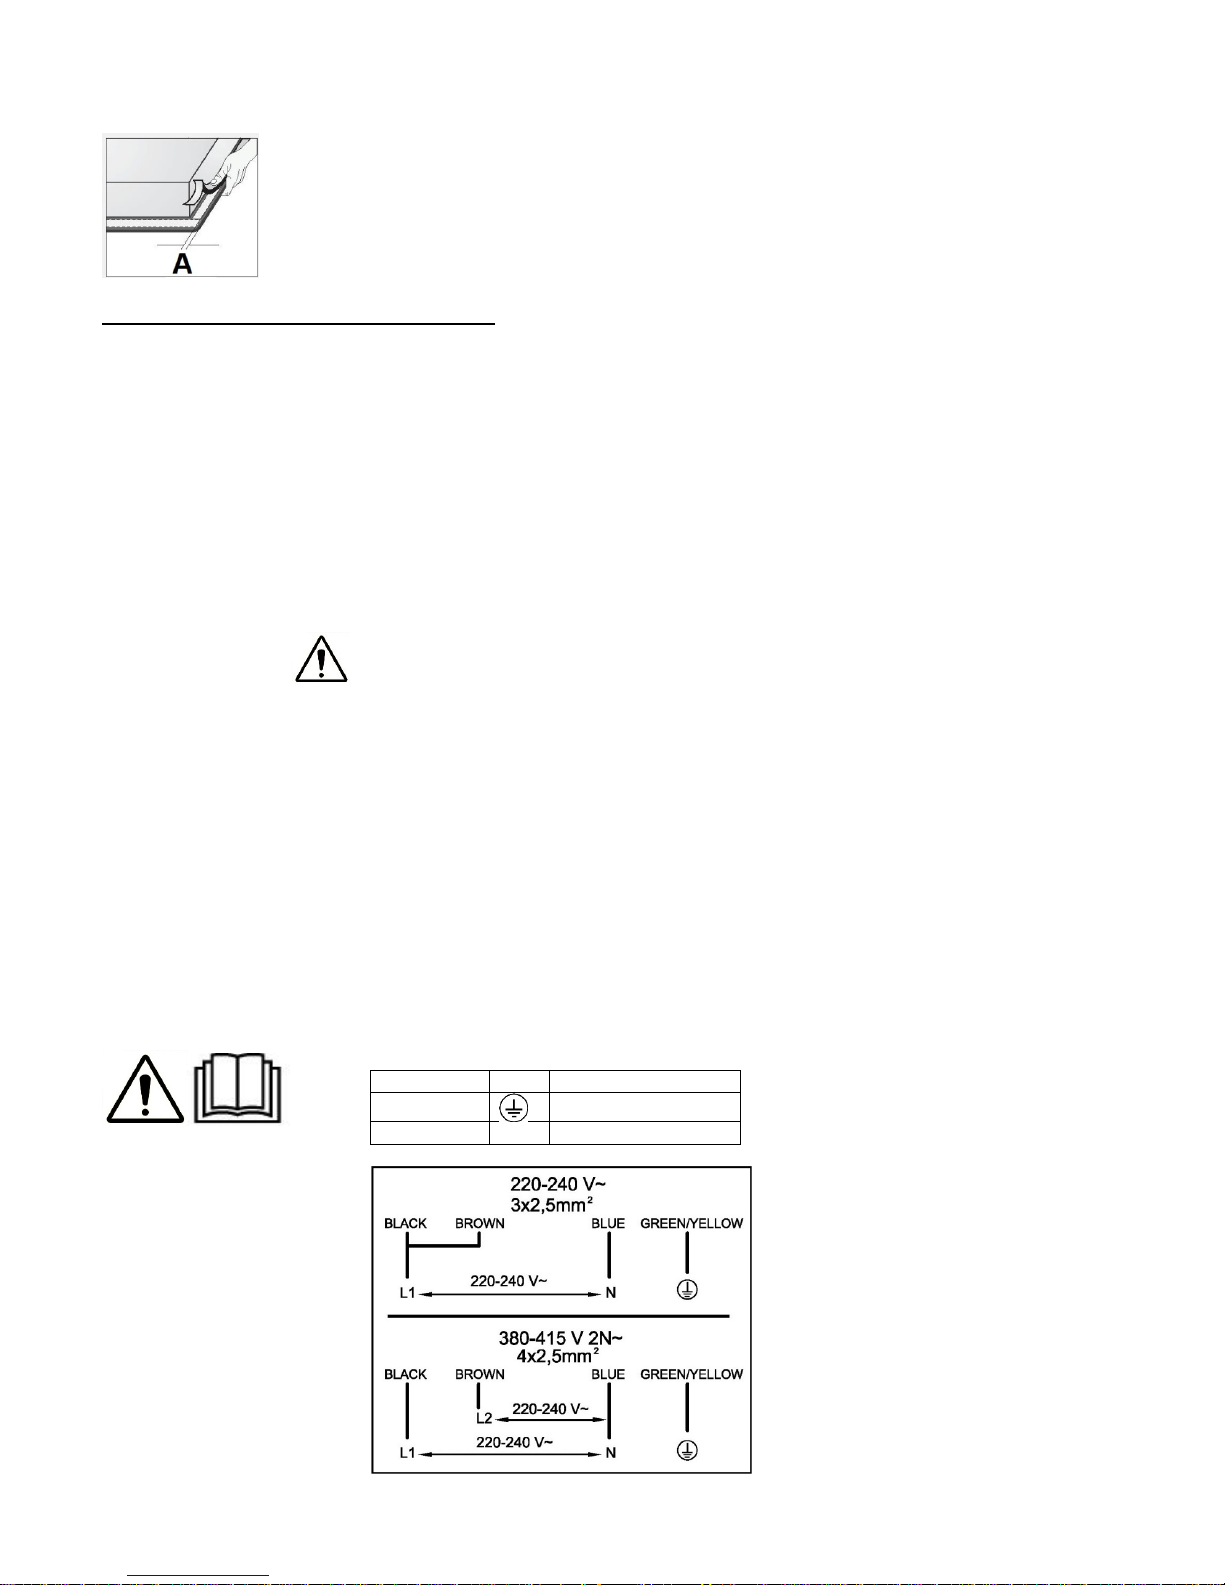
Prima dell’installazione dell’apparecchio nel piano di lavoro, incollare, sulla parte inferiore
del vetro, la guarnizione in poliuretano espanso, che è in dotazione con l’apparecchio.
L’installazione senza la guarnizione è vietata!
La guarnizione deve essere posizionata nel modo seguente:
Togliere la pellicola protettiva;
Incollare la guarnizione ad A=2-3mm dal bordo del vetro, su tutti e 4 i lati senza
sovrapporla negli angoli.
Durante il posizionamento evitare qualsiasi contatto fra il vetro e qualche oggetto affilato.
COLLEGAMENTO ALLA RETE ELETTRICA
Il collegamento elettrico deve essere eseguito SOLO da un tecnico specializzato.
La protezione del collegamento elettrico deve rispettare le norme in vigore.
I morsetti di collegamento sono raggiungibili quando aprite il coperchio dei conduttori.
Prima del collegamento verificare che la tensione, indicata sulla targhetta, corrisponda
alla tensione della rete elettrica.
La targhetta con tutti i dati tecnici è posizionata nella parte inferiore del piano cottura.
Per realizzare una connessione fissa alla rete, si dovrà interporre, tra l’apparecchio e la
rete un dispositivo omnipolare d’interruzione. Questo dispositivo deve assicurare una
separazione dei contatti, che fornisca una disconnessione completa nelle condizioni di
sovratensione della categoria III.
Dopo l’installazione, le parti isolate e quelle che portano corrente elettrica devono essere
protette dall’eventuale contatto.
Prima di ogni intervento staccare l’apparecchio dalla rete elettrica. Il collegamento
elettrico dell’apparecchio deve seguire lo schema, secondo la tensione della rete
elettrica.
Collegate il cavo di protezione al morsetto segnato con il simbolo del cavo di terra.
Il cavo di collegamento deve passare attraverso la staffa che lo protegge da strappi
accidentali.
Dopo il collegamento accendetelo, per circa 3 minuti, per verificare il funzionamento.
Per un collegamento sbagliato o non a norma si possono rovinare parti dell’apparecchio
e in questo caso la garanzia non risponde!
Il cavo di collegamento NON deve toccare la parete posteriore dell’apparecchio perchè
quest’ultima si scalda molto durante il funzionamento.
Adattamento di base dei
sensori all’ambiente
Dopo ogni collegamento alla rete elettrica si esegue automaticamente l’adattamento di
base che assicura la funzione ottimale dei sensori. Tutti i display si accendono per alcuni
secondi. Durante l’adattamento dei sensori non ci devono essere alcuni oggetti. Se non è
così, l’adattamento si interrompe finchè non togliete gli oggetti. Durante questo tempo non
potete usare il pannello cottura.
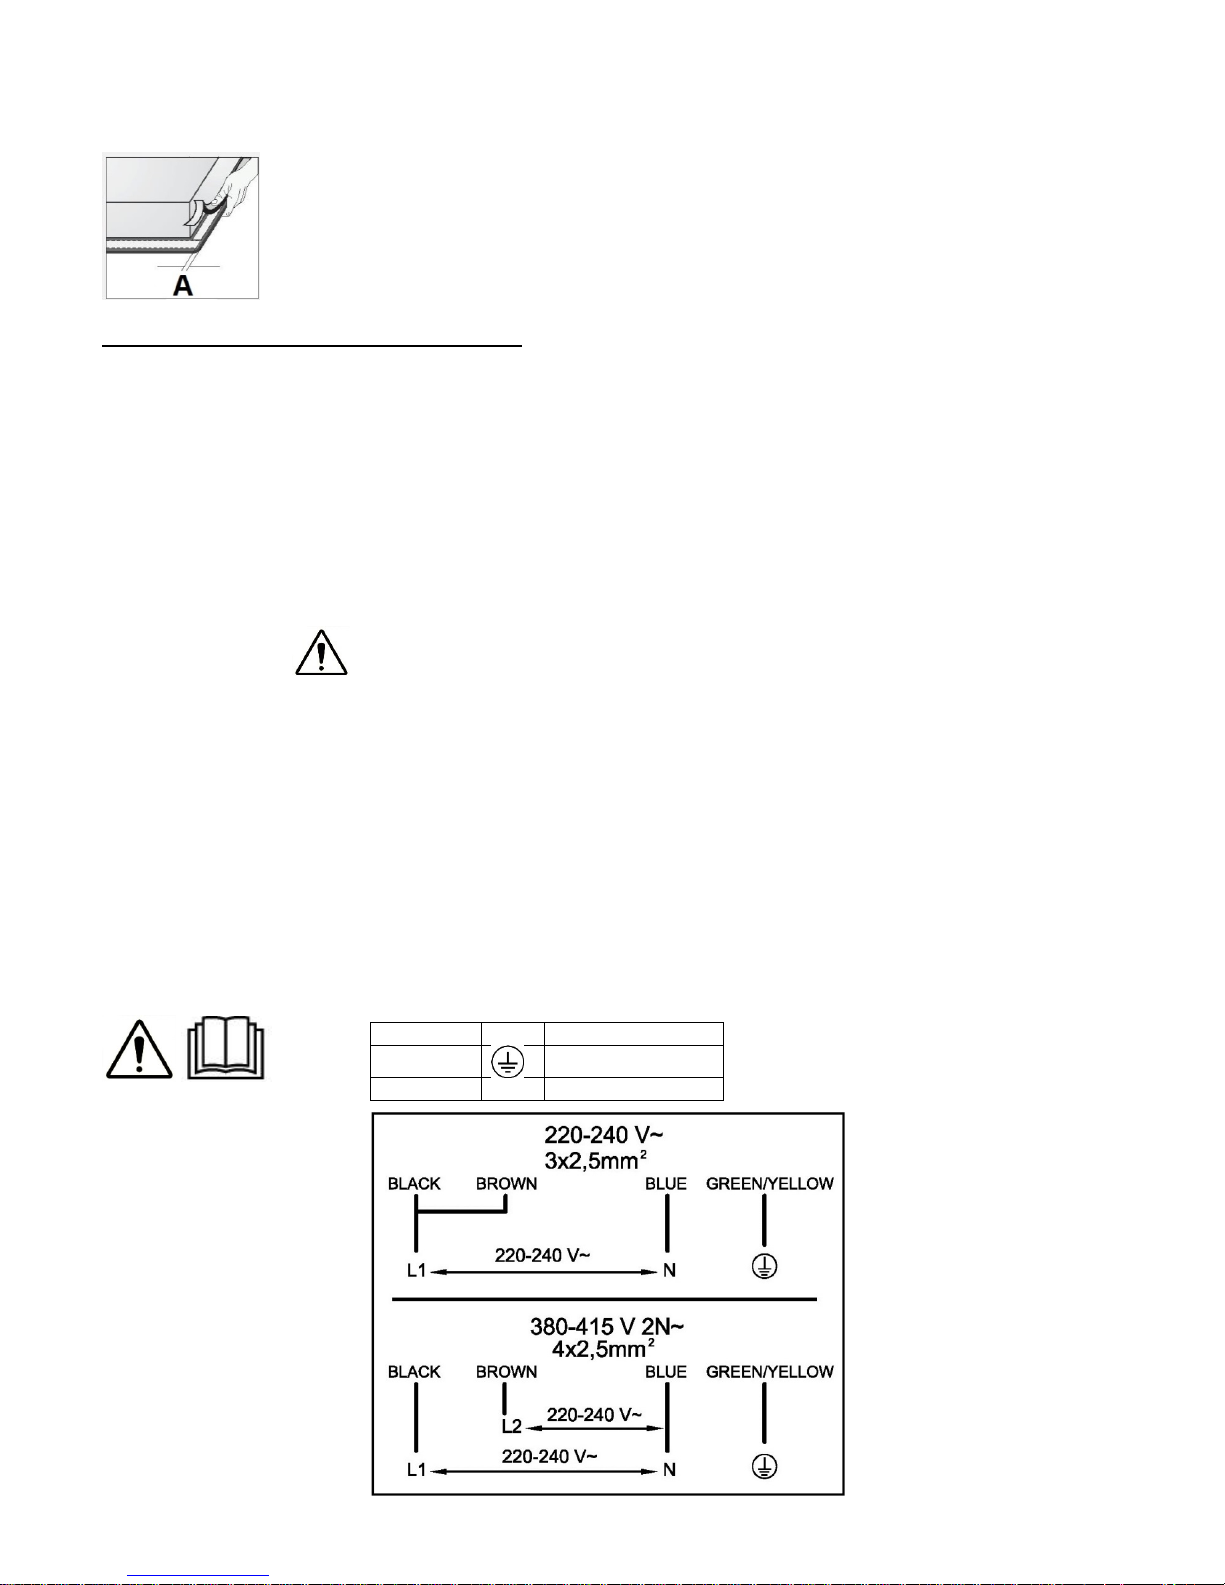
Schema di collegamento
Per il collegamento si devono usare cavi del tipo H05V2V2-F.
LINEA L MARRONE
TERRA GIALLO / VERDE
NEUTRO N BLU
Page 7
7
CARATTERISTICHE TECNICHE
7334245
Tensione di alimentazione 220-240 V~ o 380-415 V 2N~
Frequenza di alimentazione 50/60 Hz
P
TOT
7400 W
18,4x22 cm / 2,1 kW (P=3,7 kW)
P= Potenza massima
EFFICIENZA ENERGETICA
ZONA / AREA EC
ZONA ELETTRIC
A
18,9x24,5 cm 189,6 Wh/kg
TIPO DI PIANO INCASSATO
ZONE / AREE INDUZIONE
2
EC
PIANO ELETTRICO
189,6 Wh/kg
Principio funzionamento
Il piano è dotato di zone cottura a induzione altamente funzionanti. Il calore si forma
direttamente nel fondo della pentola, dove serve di più, senza inutili perdite. Così il
consumo energetico è molto minore rispetto alle zone cottura standard.
La superficie in vetroceramica non si scalda direttamente, ma solamente con il calore che
ritorna dalla pentola riscaldata. Questo calore è indicato (dopo lo spegnimento) con .
Il riscaldamento nella zona cottura è assicurato dalla bobina a induzione, inserita sotto la
superficie in vetroceramica. La bobina stabilizza il campo magnetico; sul fondo delle
pentole (che possono essere magnetizzate) si formano vortici di corrente, che le
scaldano.
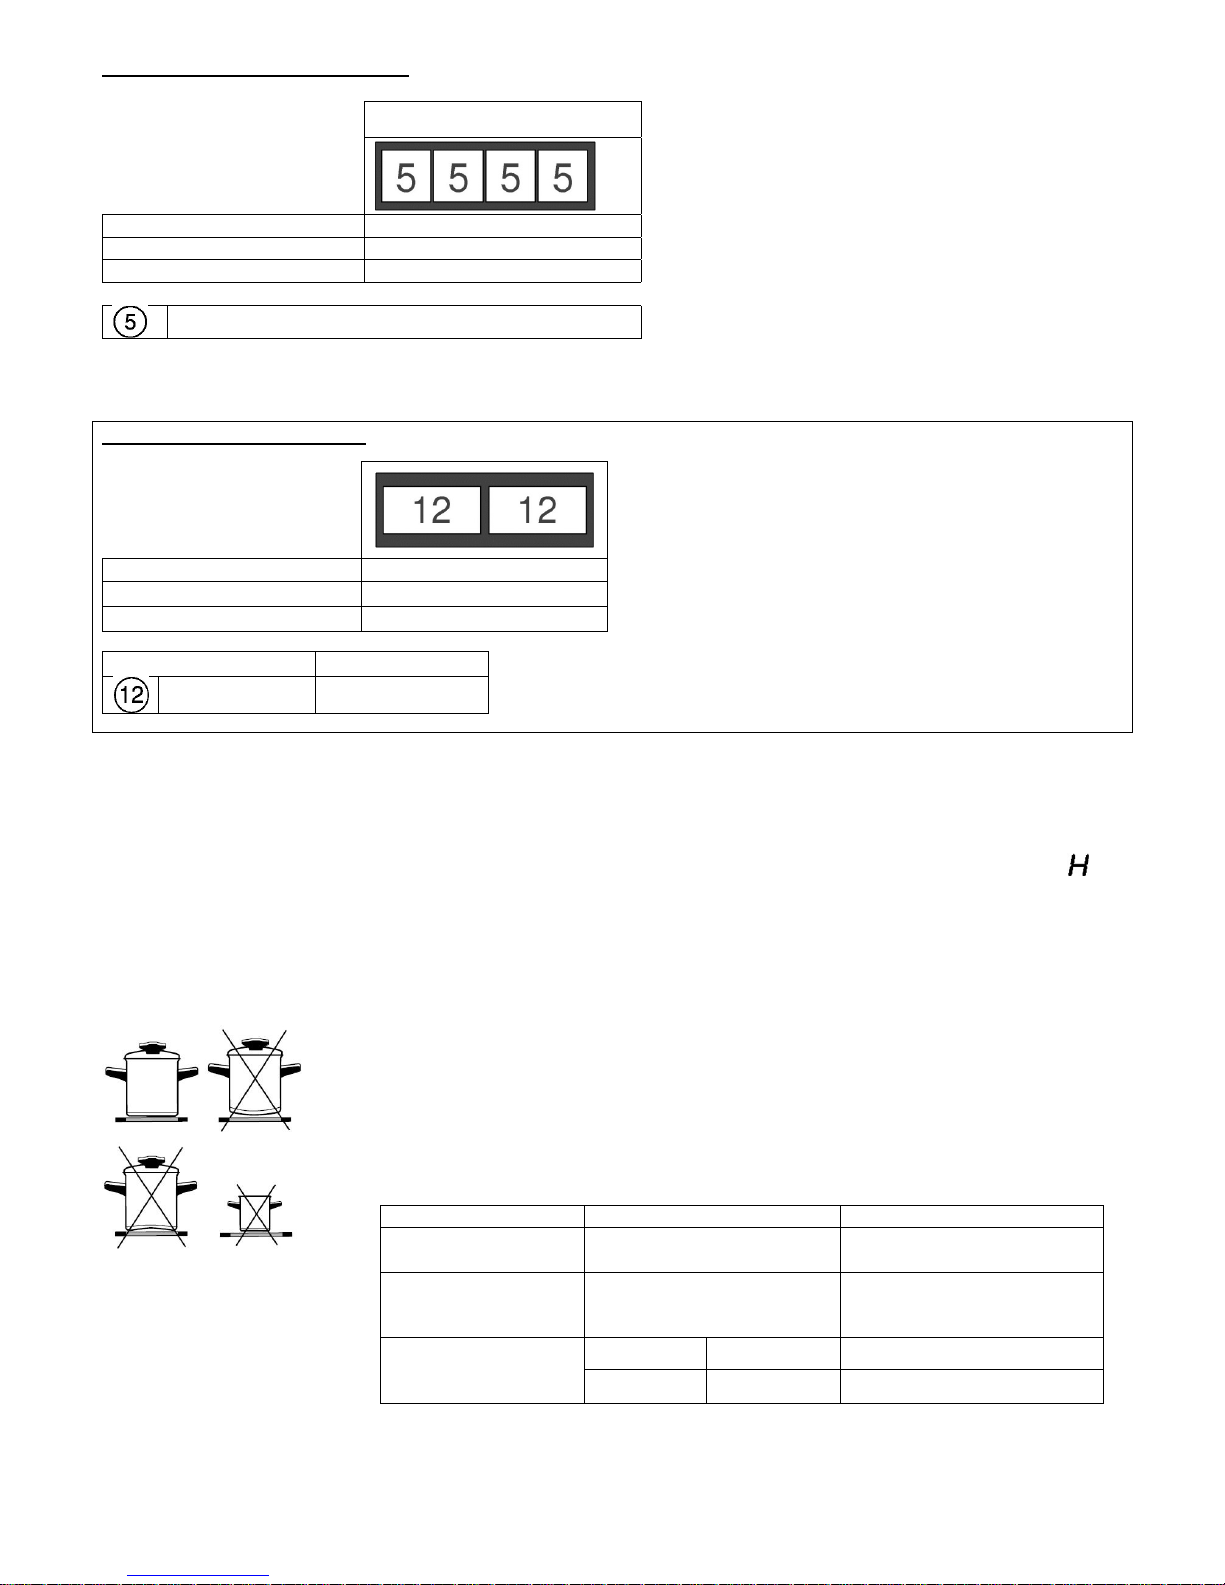
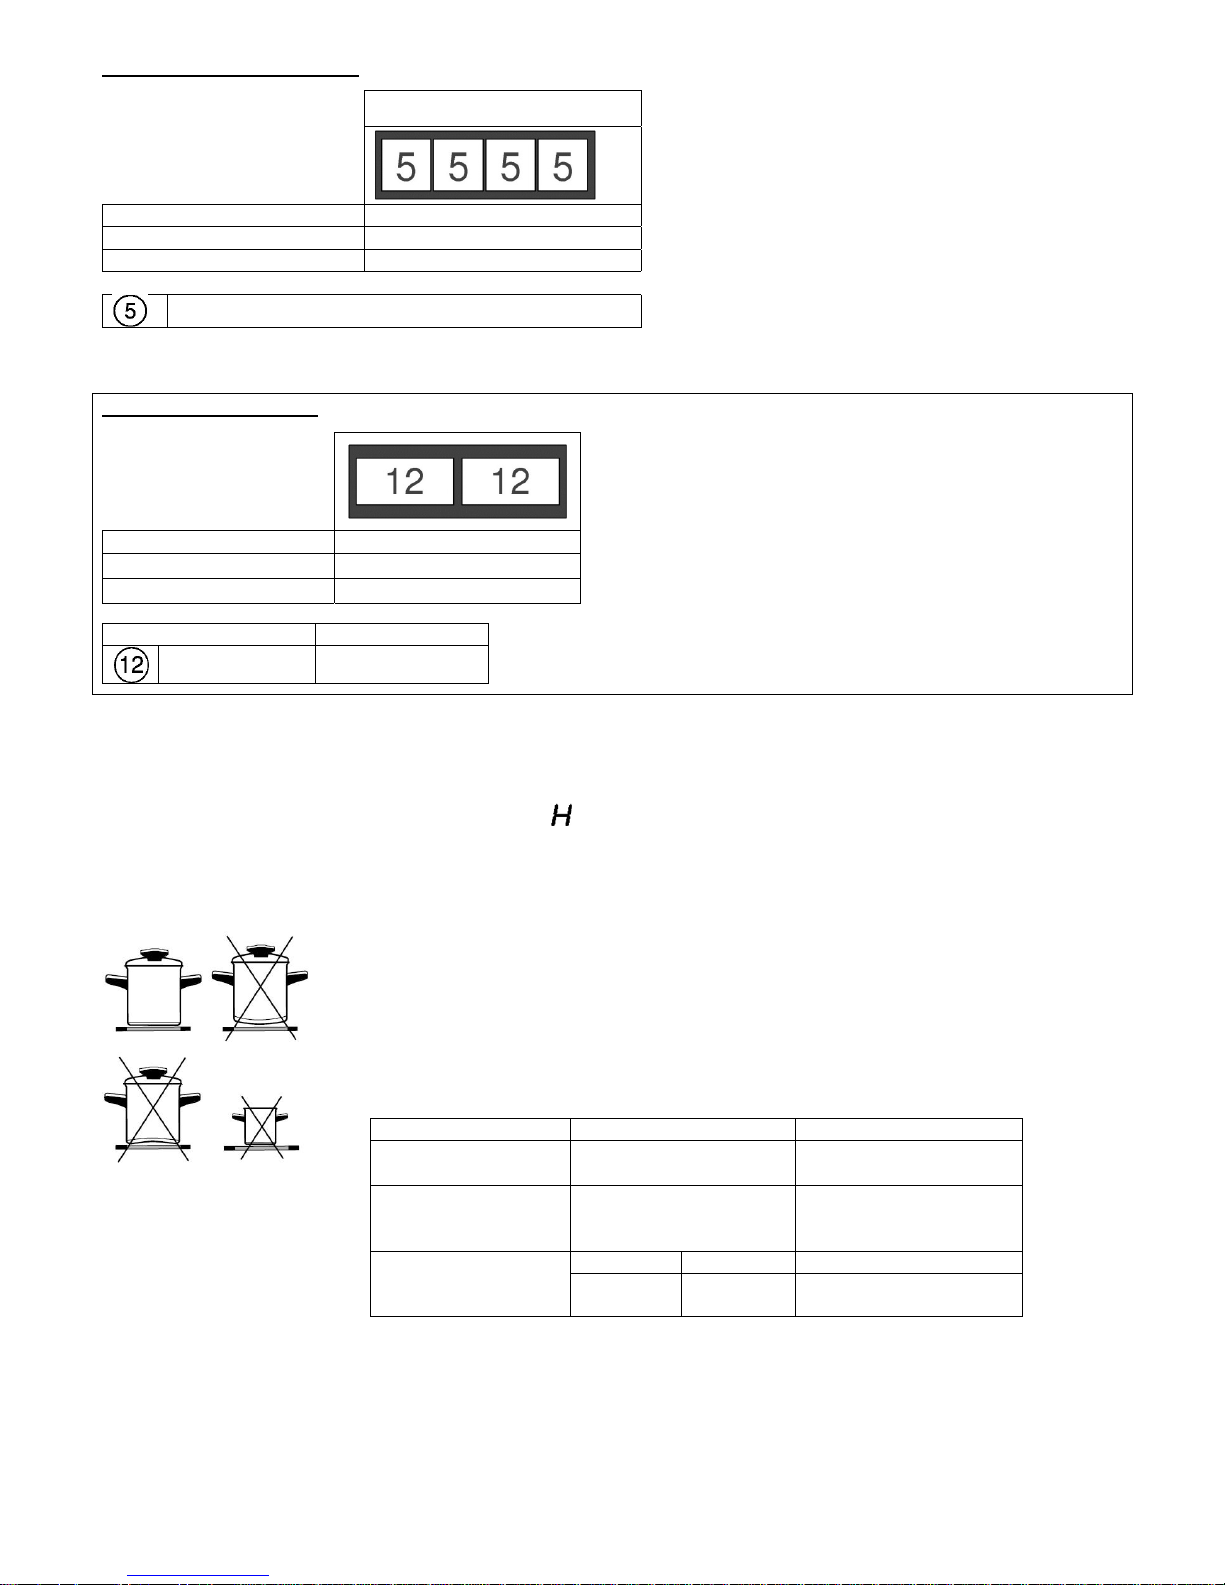
Pentole adatte
• Le pentole, durante la cottura, devono stare in mezzo alla zona cottura.
• Le pentole, che assicurano induzione, sono stoviglie di acciaio, smaltate d’acciaio o
gettate d’acciaio. Le pentole d’acciaio con il fondo di rame o alluminio o le stoviglie di
vetro non sono adatte.
• Se usate la pentola a pressione la dovete controllare finchè non raggiunge la pressione
giusta. All’inizio la zona cottura funziona alla massima potenza, dopo, secondo le
indicazioni del produttore della pentola, con il sensore adatto abbassate la potenza di
cottura.
• Fare attenzione nel momento dell’acquisto delle pentole alla nota »rende possibile
induzione«.
ZONA COTTURA Ø MIN. FONDO PENTOLA Ø MAX. FONDO PENTOLA
184x220 mm
(SINGOLA)
Ø 115 mm Ø 180 mm
184x220 mm
(SINGOLA) CON
FUNZIONE BRIDGE
Ø 135 mm Ø 180 mm
184x220 mm
(COPPIA) CON
FUNZIONE BRIDGE
2 ZONE - 380x220 mm
4 ZONE Ø 330 mm Ø 400 mm
Note:
Quando viene inserita la funzione Bridge, la zona che si crea può essere utilizzata in due modi:
▪ Con due pentole.
▪ Con una pentola.
Page 8
8
Se si usano pentole più grandi rispetto alla dimensione massima consigliata, il tempo per
il riscaldamento sarà più lungo, in quanto il riscaldamento si propagherà dal centro ai
bordi della pentola per conduzione, in questo caso anche la temperatura sarà molto
disomogenea.
Esperimento con calamita
Con una calamita A potete verificare se il fondo della pentola può essere magnetizzato.
Usate le pentole dove la calamita rimane sul fondo.
Riconoscimento pentole
Uno dei vantaggi dei piani cottura a induzione è il riconoscimento pentole.
Se sulle zone cottura non ci sono pentole, quando il piano viene acceso, i display
mostreranno . Se nel tempo di 10 minuti posizionate la pentola sulla zona cottura, la
zona la percepisce e si accende sul livello impostato.
Nel momento in cui togliete la pentola dalla zona cottura, la fornitura d’energia
s’interrompe. Se sulla zona cottura posizionate pentole con il diametro più piccolo, la zona
lo percepisce e userà solo l’energia necessaria per il riscaldamento.
Piano cottura si danneggia:
• se è acceso e lo lasciate vuoto o posizionate sopra una pentola vuota.
• se usate pentole non adatte (p.e. con il fondo non piatto o con diametro troppo piccolo).
• se usate le pentole di argilla che lasciano graffi sulla superficie in vetroceramica.
• la pentola non è perfettamente asciutta.
Livelli cottura
La potenza delle zone cottura può essere selezionata su nove livelli differenti.
Nella tabella sono descritti gli esempi delle singole impostazioni.
Livello Intenzione
0
Spegnimento, uso del calore residuo
1-2
Conservazione cibo caldo, cottura piccole quantità di cibo
3
Cottura lenta (proseguimento cottura dopo riscaldamento forte)
4-5
Cottura lenta grandi quantità
6
Cottura per arrostire,rosolare il cibo
7-8
Cottura per arrostire il cibo
9
Inizio cottura, arrosto
A
Riscaldamento veloce automatico
P
Cottura particolarmente potente per quantità estremamente grandi di cibo
Consigli per il risparmio
energetico
• Fate attenzione al momento d’acquisto delle pentole, perché il diametro indicato
corrisponde al diametro superiore o del coperchio che è sempre maggiore del fondo
della pentola.
• Le pentole a pressione sono particolarmente indicate per il risparmio poichè grazie alla
pressione interna elevata, riescono a finire la cottura in tempo minore.
• Fate attenzione che nella pentola a pressione ci siano sempre abbastanza liquidi perché
altrimenti potrebbe verificarsi il surriscaldamento che danneggierebbe sia la pentola sia il
piano cottura.
• Coprire sempre le pentole con adeguati coperchi.
• Usate pentole adeguate per la quantità di cibo che cucinate.
Page 9
9
FUNZIONAMENTO
• Al momento dell’accensione del piano cottura in vetroceramica si accendono tutti gli
indicatori (per un attimo). Il piano cottura è pronto per l’uso.
• Il piano cottura è dotato di sensori elettronici che si accendono se toccate le superfici
indicate per almeno 1 secondo.
• Ogni accensione dei sensori è confermata con un segnale acustico.
• Non posizionate gli oggetti sulla superficie dei sensori (Comunicazione di errori_ ).
• Fate in modo che la superficie dei sensori sia sempre pulita.
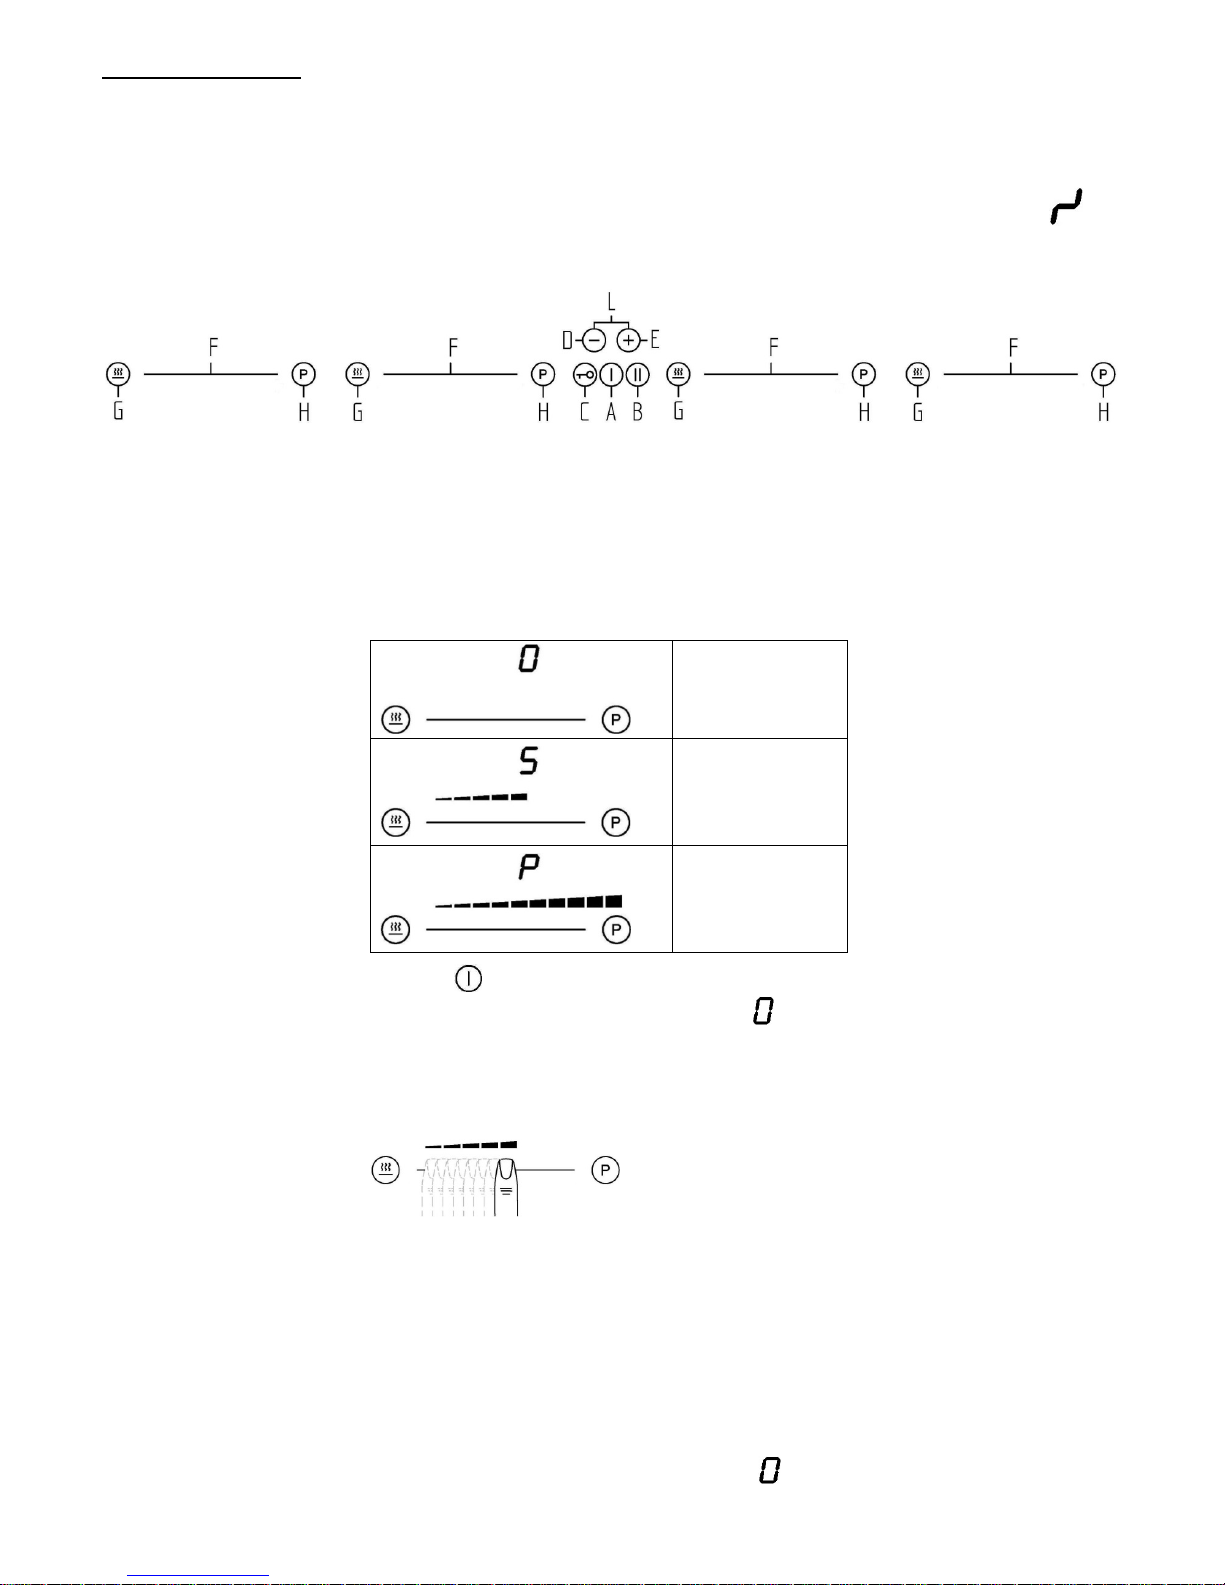
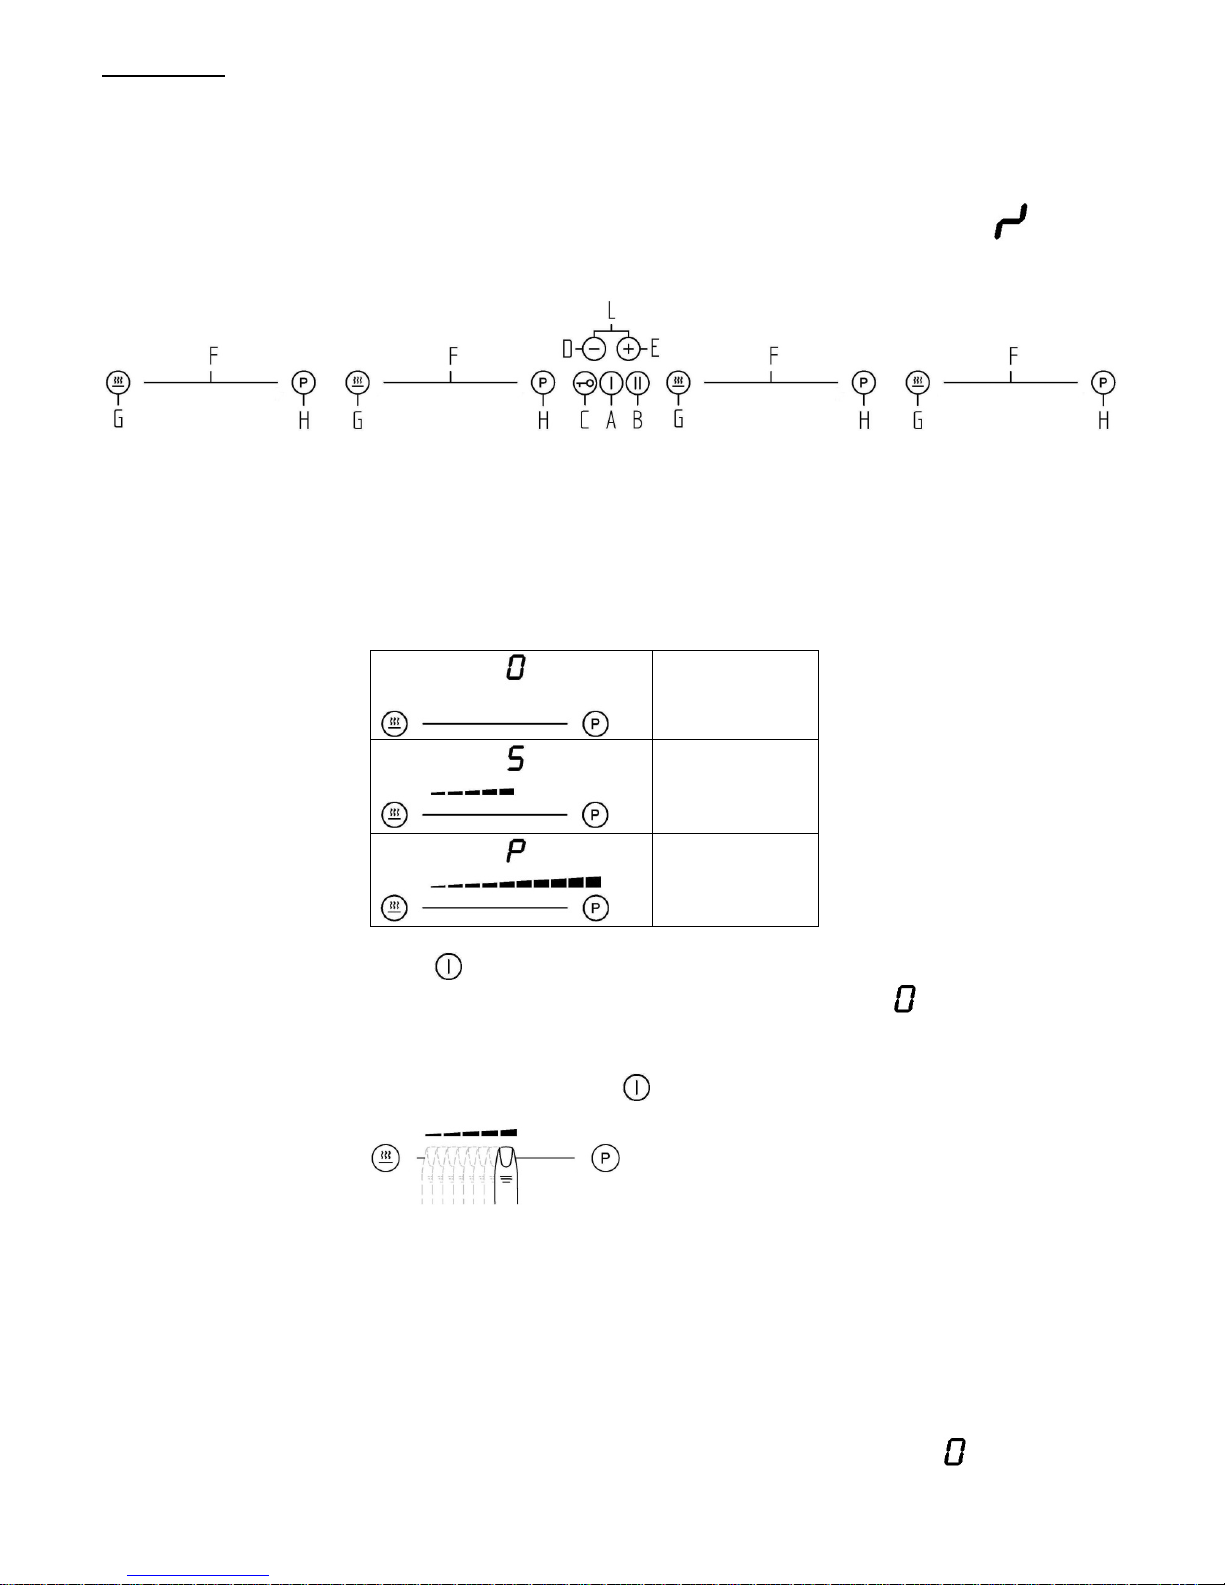
Comando
A. Accensione/Spegnimento piano cottura
B. Pausa
C. Blocco
D. (-) Timer
E. (+) Timer
F. Cursore
G. Riscaldamento
H. Cottura veloce
L. Timer
Funzionamento del
cursore
0
Semivalore
Valore massimo
Accensione del piano
cottura
Toccare per almeno 1 secondo.
Il comando è attivo e tutti i display mostrano .
La prossima impostazione deve essere eseguita in 10 secondi altrimenti il
comando si spegne.
Accensione delle zone
cottura
Se avete acceso il comando, nei prossimi 10 secondi scegliere la zona cottura desiderata
premendo e scorrendo sul rispettivo cursore, per impostare il livello di cottura da 1-9.
Premendo il cursore per la prima volta, il valore viene impostato conforme al posto
di contatto. Si accendono le spie di controllo sopra al cursore, proporzionalmente
al valore impostato.
Scivolando con il dito sul cursore, si può cambiare il valore del livello di cottura:
verso destra il valore aumenta, verso sinistra viene ridotto.
Quando il dito viene rimosso dal cursore, la zona di cottura inizia a riscaldarsi
secondo la potenza impostata.
Se si preme, per almeno 3 secondi, un punto preciso del cursore, si attiva il sistema di
cottura automatico (vedere il capitolo ʺRiscaldamento veloce automaticoʺ).
Spegnimento delle zone
cottura
La zona di cottura scelta deve essere attivata.
Premere l’inizio del cursore, il display mostra . Un breve segnale acustico conferma lo
Page 10
10
spegnimento.
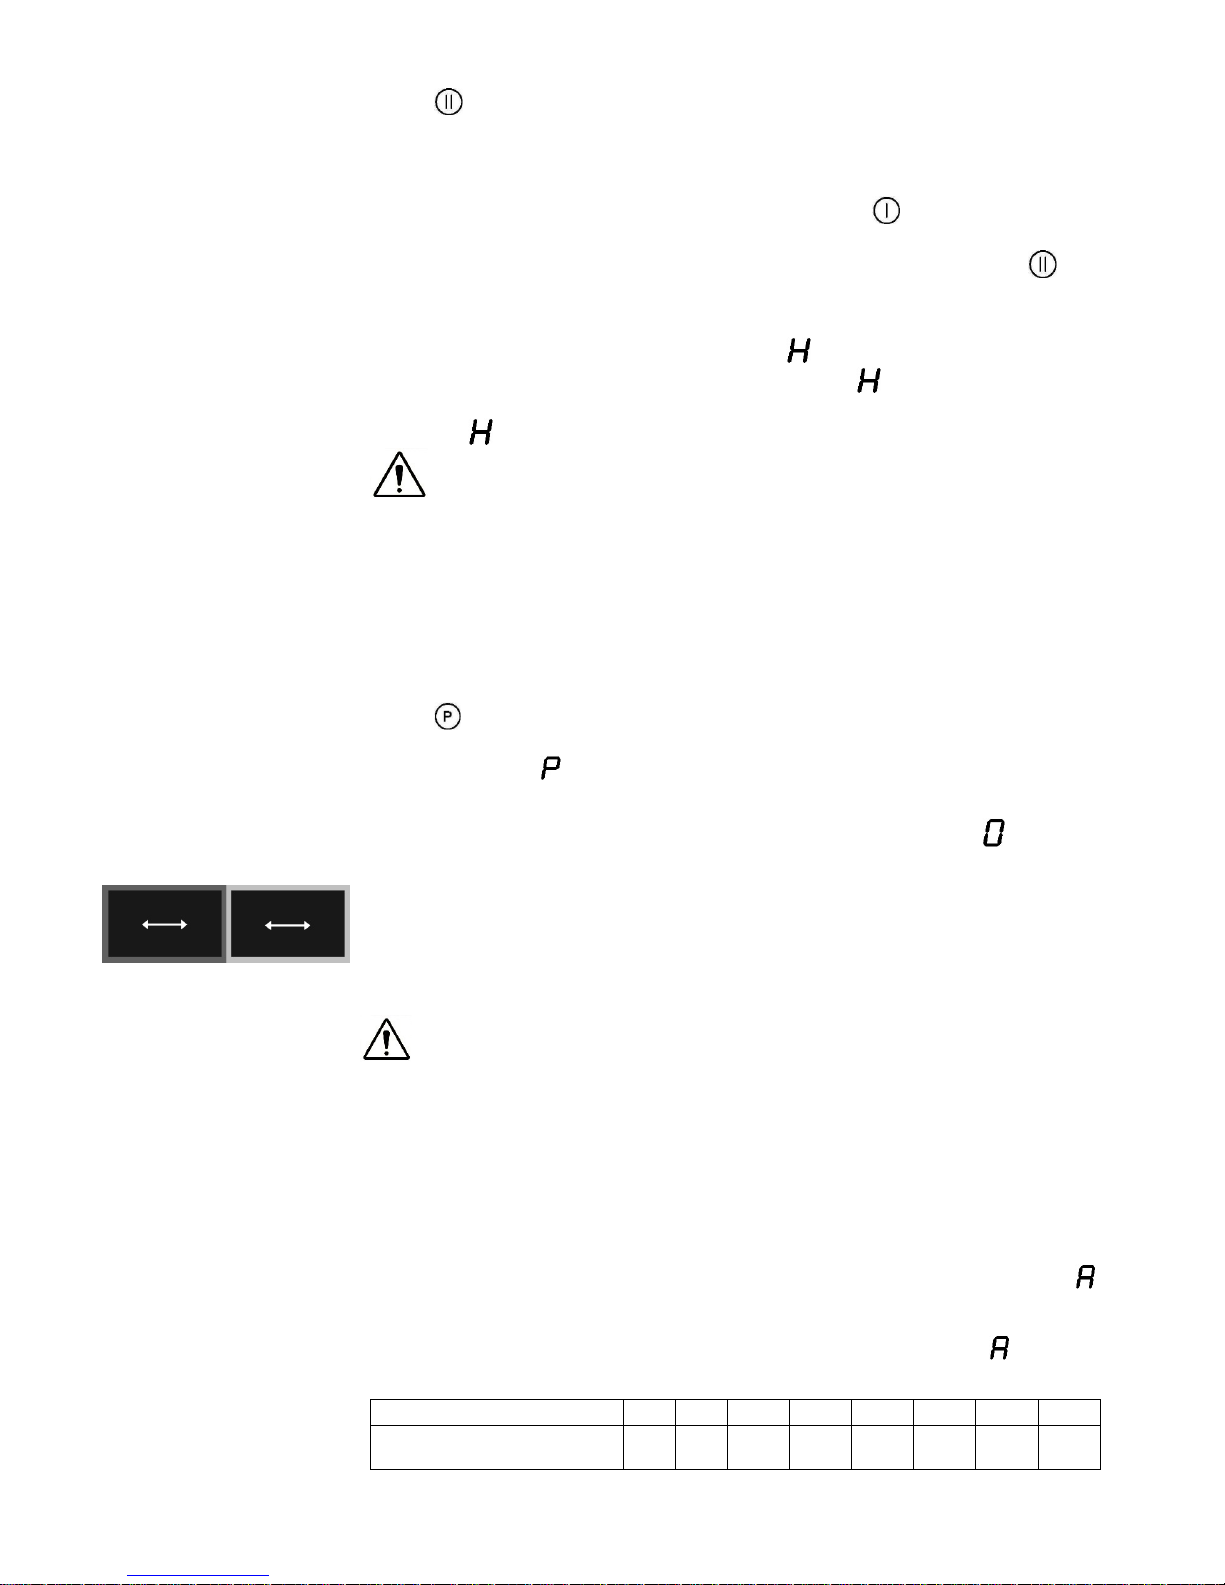
Spegnimento del piano
cottura
Il piano di cottura può essere spento in qualsiasi momento premendo .
Si attiva il segnale acustico e vengono spenti tutti i display/led tranne quelli delle zone di
cottura ancora calde che visualizzano , indicazione del calore residuo.
Blocco
Attivando tale Funzione è possibile impedire l’utilizzo delle zone di cottura anche da parte
dei bambini.
Attivazione
Il piano cottura deve essere acceso.
Premere per circa 1 secondo, il rispettivo LED si accende, il blocco è attivo.
Il blocco protegge tutti i sensori contro un azionamento involontario, tranne e .
Se il piano viene spento quando la funzione di blocco è attiva, quest’ultima rimarrà in
memoria fino ad una nuova accensione del piano.
Quando i Timer programmati terminano il rispettivo tempo, gli allarmi possono essere
spenti premendo o senza bisogno di sbloccare il controllo.
Disattivazione
Il piano cottura deve essere acceso.
Premere per circa 1 secondo, la disattivazione è confermata da un breve segnale
acustico.
Protezione bambini
Questa funzione può essere attivata/disattivata solo dopo aver acceso il piano con il tasto
.
Attivazione
Premere contemporaneamente e , dopo il segnale acustico premere .
La funzione è attiva e tutti i display mostrano
Il comando si spegne automaticamente dopo 10 secondi.
La protezione bambini disattiva tutti i tasti tranne . Una volta attiva, il comando
rimane bloccato anche se viene spento e riacceso.
Disattivazione
Entro 10 sec. premere contemporaneamente e , dopo il segnale acustico
premere .
La funzione è disattivata.
Disattivazione temporanea
Premere contemporaneamente e
Si disattiva la funzione per la sessione di cottura.
Dopo lo spegnimento del piano cottura, la funzione si riattiva.
Pausa
L’esecuzione della funzione è possibile solo se almeno una zona cottura è in
funzione.
La pausa può essere attivata anche con errori specifici delle zone cottura, l’errore
viene nascosto; anche l’indicazione del calore residuo, messaggi speciali come ,
o , sono nascosti, la pausa ha la priorità. Se c’è un errore generico durante la
pausa, il controllo si spegne e termina la modalità.
Attivazione
Premere per almeno 1 secondo, il rispettivo LED si accende e tutti i display
mostrano il simbolo .
Durante la funzione
I timer già programmati vengono bloccati e continuano quando la funzione termina.
Il riscaldamento automatico e la funzione Booster vengono spenti.
Il calcolo del calore residuo e la limitazione del tempo di funzionamento continuano.
Le altre funzioni dei LED (timer, multi circuiti, ecc…) continuano ad essere accesi
secondo lo stato.
La Funzione può durare max. 10 minuti.
Il piano cottura può essere acceso o spento in qualsiasi momento premendo , in
questo caso una possibile modalità di pausa attiva è quindi terminata.
Page 11
11
Disattivazione
Premere , si illuminano i LED sopra al cursore di una delle zone cottura.
Entro 10 secondi, premere e scorrere, da sinistra a destra, sul cursore della zona
illuminata.
Il LED sopra al tasto di pausa si spegne e viene ristabilita la condizione prima della
modalità di pausa.
Richiamo
Usando questa funzione le impostazioni possono essere salvate velocemente quando,
per errore, il controllo viene spento premendo .
Dopo lo spegnimento, l’operatore ha 6 secondi per riaccendere il controllo e altri
6 secondi per premere .
Tale funzione può essere utilizzata solo se è attiva almeno una zona cottura (livello di
cottura> 0) indipendentemente che sia attivo o meno la Funzione blocco.
Indicazione calore
residuo
Il piano cottura è dotato dell’indicatore di calore residuo . La zona cottura non si scalda
direttamente, ma attraverso il calore di ritorno trasmesso dalla pentola. Dopo lo
spegnimento della zona, il display mostra il simbolo illuminato e, finché è attivo, lo
potete usare per riscaldare le pietanze o scongelare gli alimenti.
Quando il simbolo sparisce, la zona cottura è sempre calda.
Pericolo di ustioni!
Cottura veloce
Potete usare questa funzione per una cottura veloce; con l’aiuto di potenza aggiuntiva,
potete scaldare velocemente anche grandi quantità di cibo. Dopo l’attivazione, la potenza
aggiuntiva è attiva per 10 minuti, dopodiché passa automaticamente al livello di cottura 9.
Quando è attiva la cottura veloce, la potenza di una delle zone cottura è limitata, sul
display vengono visualizzati, alternandosi per pochi secondi, il livello di cottura e la
potenza limitata dovuta alla cottura veloce sull’altra zona cottura.
Attivazione
Premere della zona cottura desiderata;
La potenza aggiuntiva è attiva;
Il display mostra il simbolo .
Disattivazione
Premere e scorrere sul cursore della zona cottura desiderata, fino ad arrivare a se si
vuole spegnere la zona oppure, fino al livello di cottura desiderato.
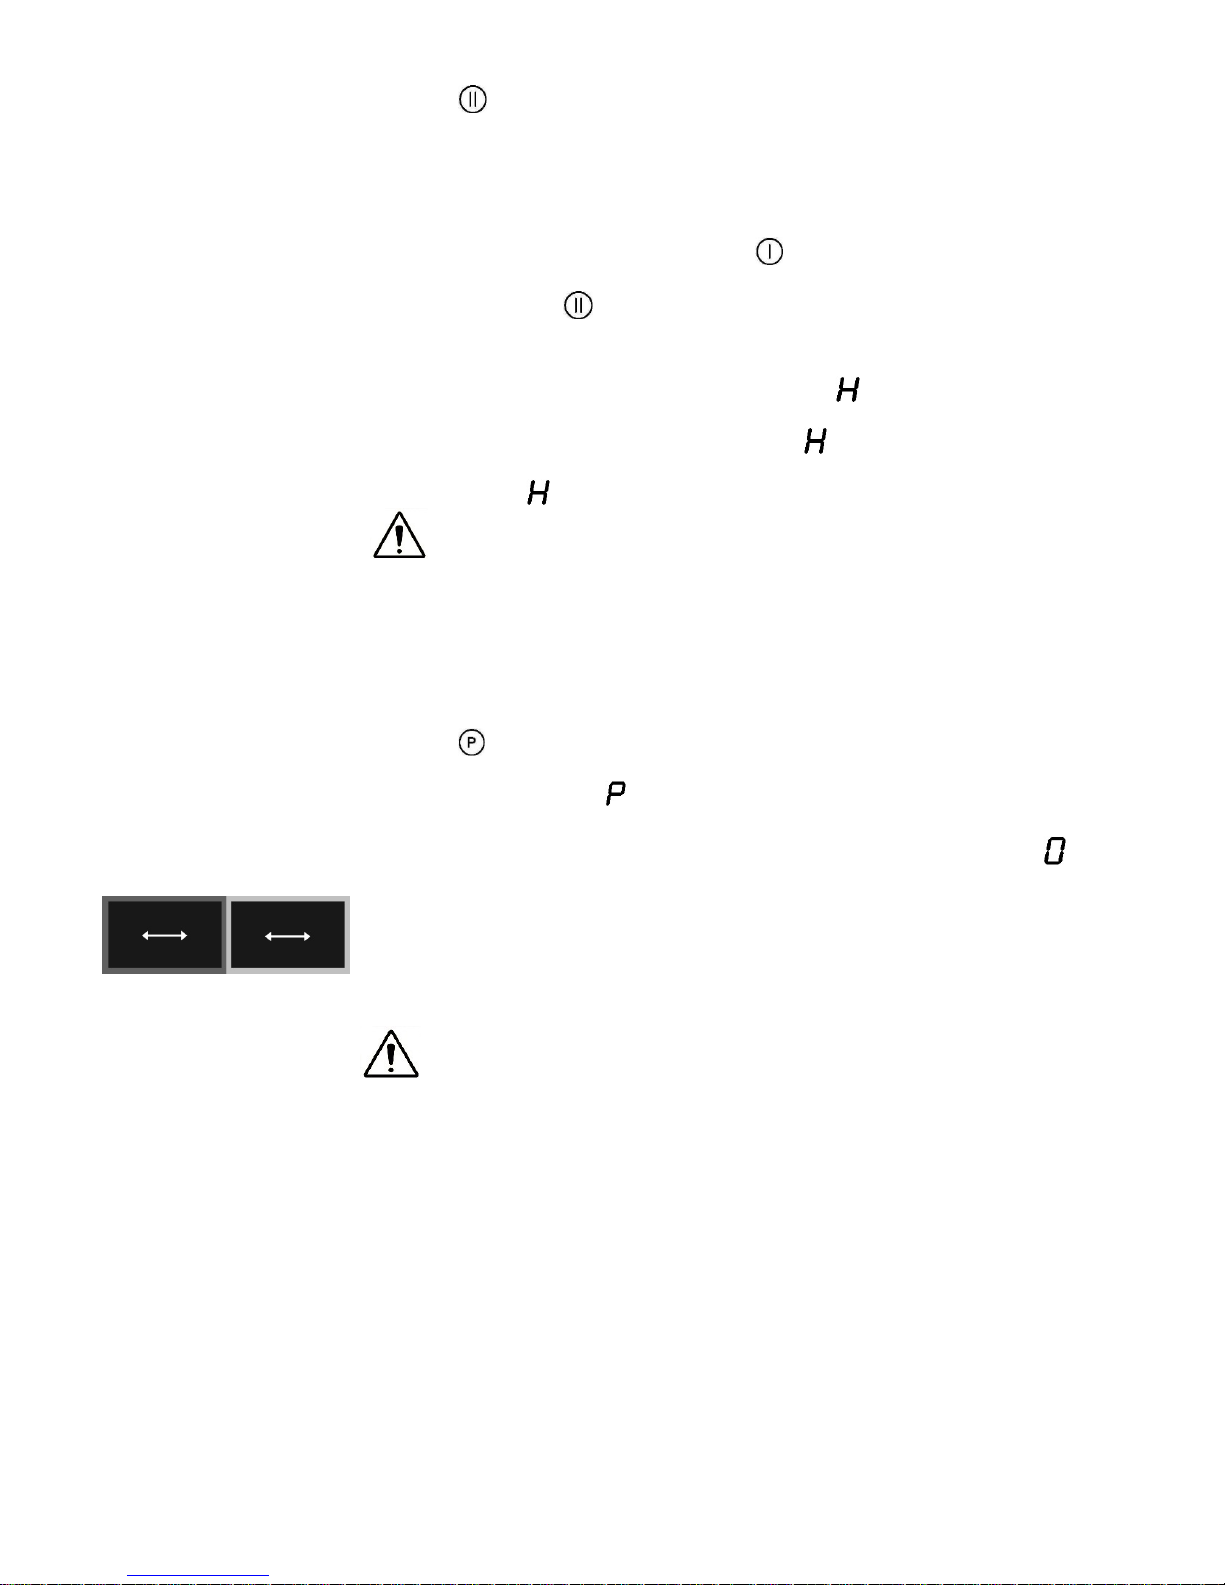
SISTEMA POWER MANAGEMENT
Il sistema Power Management ripartisce la potenza disponibile tra le zone cottura
disposte a coppie (come la/le figure a lato), fornendo la potenza massima a una zona di
cottura e riducendo automaticamente la potenza disponibile all’altra zona di cottura. Il
display della seconda zona di cottura alterna, per pochi secondi, la potenza di cottura
prescelta e la potenza limitata.
In determinate circostanze la funzione di cottura particolarmente potente si
può disinserire automaticamente, per proteggere i componenti elettronici
interni al piano cottura.
Page 12
12
Riscaldamento veloce
automatico
Questa funzione preriscalda la zona alla massima temperatura in modo da portarla
velocemente alla temperatura richiesta. Dopo un tempo definito (indicato nella tabella
sottostante) il livello di cottura ritornerà al livello precedentemente impostato.
Può essere attivata su ogni zona di cottura, per tutti i livelli di cottura, tranne per il livello 9
dove la potenza è al massimo costantemente.
Attivazione
Premere per almeno 3 sec. un punto qualsiasi del cursore della zona di cottura
prescelta;
Nel rispettivo display, per alcuni secondi, viene visualizzato in alternanza con il livello
di cottura selezionato, che sarà il livello di cottura a cui dovrà funzionare la zona al
termine del riscaldamento veloce;
A scadenza del tempo indicato nella tabella, la funzione viene disinserita e si spegne.
Il sistema di cottura automatica può essere disinserito in qualsiasi momento modificando
il livello di potenza della cottura.
Livello 1 2 3 4 5 6 7 8
Durata risc. Automatico
(minuti)
40 72 120 176 256 432 120 192
Bridge
Con questa funzione è possibile gestire due zone di ugual diametro e potenza.
Le due zone vengono attivate nello stesso istante e controllate operando solo su una di
esse.
Attivazione
sia che le due zone di cottura funzionino ad un diverso livello, sia che siano a livello 0,
premere contemporaneamente un punto qualsiasi dei rispettivi cursori:
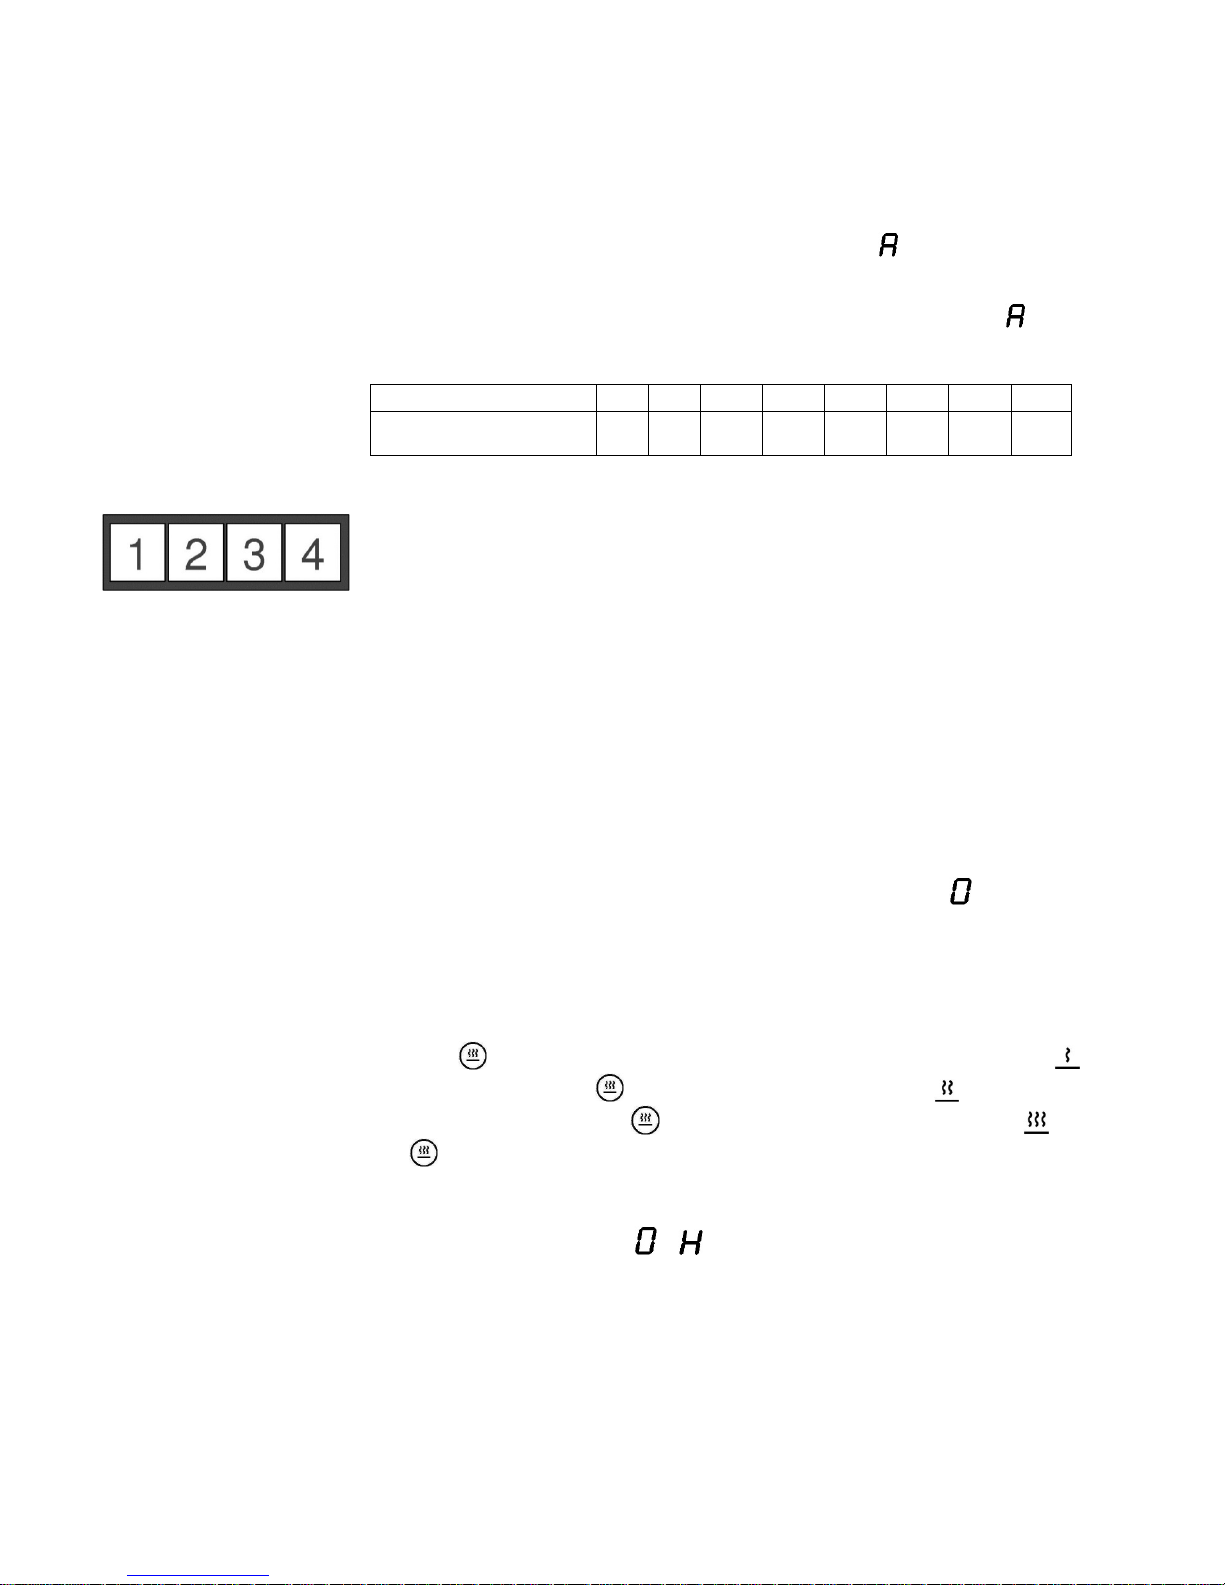
1 e 2
3 e 4
ora le due zone funzionano insieme, si accendono i LED a destra dei rispettivi display.
Sul display della zona di controllo viene visualizzato il livello mentre, il display della zona
controllata si spegne;
quando la funzione è attiva, è possibile impostare il timer, il led si accenderà vicino a
entrambi i display, inoltre, non è possibile impostare la funzione di cottura veloce.
Se entro 10 minuti non viene rilevata nessuna pentola sulla zona cottura finale, la
funzione Bridge viene disattivata automaticamente.
Disattivazione
Premere contemporaneamente un punto qualsiasi dei rispettivi cursori delle zone
interessate (stesso procedimento dell’attivazione).
Si disattiva la funzione, i display delle due zone cottura visualizzano e possono essere
impostati di nuovo.
Riscaldamento
La funzione di riscaldamento viene usata per mantenere caldi i cibi precedentemente
cucinati e può anche essere usata come funzione di scongelamento o cottura a fuoco
lento.
Attivazione
Premere della zona cottura desiderata, si attiva la modalità “scongelamento” ;
Se si preme nuovamente , si attiva la modalità “riscaldamento” ;
Se si preme per la terza volta , si attiva la modalità “cottura a fuoco lento” ;
Se viene premuto nuovamente, la funzione si disattiva.
Spegnimento di
Sicurezza
Il funzionamento ininterrotto alla massima potenza di ogni zona cottura è limitato nel
tempo (vedi tabella). Quando si spegne la zona cottura per il meccanismo di sicurezza,
sul display si illumina il simbolo o , se c’è il calore residuo.
Page 13
13
Esempio: Impostate la zona cottura al livello di cottura 5 e lo lasciate funzionare per un
certo tempo. Se non cambiate il livello di cottura, il meccanismo di sicurezza, dopo
210min. di funzionamento, spegnerà la cottura.
Livello Minuti prima dello spegnimento di
sicurezza
Scongelamento 480
Riscaldamento 480
Cottura a fuoco lento 480
1 516
2 402
3 318
4 258
5 210
6 138
7 138
8 108
9 90
P 10
Sistema di Sicurezza
contro il
Surriscaldamento
Il piano a induzione è dotato di un sistema di sicurezza contro il surriscaldamento, che
protegge la parte elettronica dai danni. Questo sistema di sicurezza funziona su più livelli.
Quando la temperatura della zona cottura raggiunge livelli molto alti, si attiva per primo il
ventilatore a due livelli. Se questo non dovrebbe bastare, si disattiva la ʺFunzione cottura
veloceʺ; così facendo si abbassa il livello di cottura di alcune zone oppure subentra il
sistema di sicurezza e lo spegne del tutto. Quando la superficie si raffredda, avete ancora
a disposizione tutta la potenza delle zone cottura.
Timer
Tale funzione facilita la cottura.
Attivazione
Il piano cottura deve essere acceso e la zona su cui si vuole impostare il timer deve
essere in funzione.
Premere contemporaneamente e , nel display del timer compare e, si
accende , della prima zona di cottura attiva, partendo da sinistra.
Premere contemporaneamente e il numero di volte necessario, per selezionare la
zona su cui si vuole impostare il timer. si accende solo per le zone di cottura attive.
Entro 10 secondi dalla pressione di e potete impostare il valore del timer agendo
su o .
Il valore del timer può essere visualizzato:
- in minuti e secondi, fino a 9min59sec;
- in ore e minuti, fino a 9h59min. In questo caso si accende la scritta “min” sotto il
display del timer.
Il tempo di cottura può essere impostato indipendentemente per ogni zona cottura.
Modifica del tempo di cottura
Il tempo di cottura può essere modificato in qualsiasi momento durante il funzionamento.
Premere contemporaneamente e ;
Premere contemporaneamente e il numero di volte necessario per selezionare la
zona di cui si vuole modificare il timer. La zona è individuata dall’accensione di ;
Entro 10 secondi premere e per la modifica del tempo.
Tempo residuo
Viene visualizzato sempre il tempo minore. ( della zona cottura interessata ha
un’illuminazione più forte rispetto agli altri);
Premere contemporaneamente e ;
Premere contemporaneamente e il numero di volte necessario, per selezionare la
zona di cui si vuole vedere il tempo residuo. La zona è individuata dall’accensione di ;
Sul display del timer verrà visualizzato il tempo residuo della zona cottura selezionata.
Disattivazione
Passato il tempo impostato di funzionamento, si attiva il segnale acustico e la zona di
Page 14
14
cottura si spegne. Il segnale acustico si può spegnere premendo o oppure si
spegne da solo dopo 2 minuti.
Disattivazione prima della scadenza del tempo impostato
Premere contemporaneamente e ;
Premere contemporaneamente e il numero di volte necessario, per selezionare la
zona a cui si vuole disinserire il timer. La zona è individuata dall’accensione di ;
Premere fino al valore .
della zona di cottura si spegne e il timer si disattiva.
Avvertitore
Il timer può essere usato come avvertitore anche se lo state già usando per la cottura a
tempo.
Attivazione
Se il pannello di cottura è spento:
Premere per accenderlo;
Premere contemporaneamente e per attivare il timer. Nel display del timer
compare . Se è attiva qualche zona di cottura, si accende della prima zona di
cottura attiva, partendo da sinistra.
Premere contemporaneamente e il numero di volte necessario per la selezione
dell’avvertitore, si trova tra e ;
Il valore del timer viene impostato agendo su o ;
Anche per l’avvertitore è possibile impostare il tempo in minuti e secondi o, in ore e
minuti.
Disattivazione
Passato il tempo impostato, si accende il segnale acustico a intervalli, che può essere
spento premendo o , oppure si spegne da solo dopo 2 minuti.
Se volete spegnere l’avvertitore prima del tempo impostato:
Premere contemporaneamente e ;
Premere contemporaneamente e il numero di volte necessario per la selezione
dell’avvertitore, si illumina;
Premere fino al valore . L’avvertitore è disattivato.
FUNZIONI DI SICUREZZA E SEGNALAZIONE ERRORI
Durante il periodo di garanzia possono essere eseguite le riparazioni solo dal Servizio di Assistenza autorizzato.
Prima della riparazione, staccare l’apparecchio dalla rete elettrica, cioè, staccare il cavo di alimentazione o svitare il
fusibile.
Gli interventi e le riparazioni non autorizzati possono provocare la folgorazione o il corto circuito, per cui non eseguiteli.
Lasciate questi lavori ai tecnici autorizzati.
Nel caso di piccoli disturbi potete cercare di risolvere il problema seguendo i consigli delle istruzioni d’uso.
L’intervento del servizio di assistenza durante la garanzia non è gratuito, se l’apparecchio non funziona per l’uso non
corretto.
L’eliminazione dei guasti o i reclami, che sono stati provocati dall’uso o dall’installazione non corretta, non saranno
riparati in garanzia. Le spese di riparazione saranno a carico dell’utente.
CODICE
ERRORE
DESCRIZIONE ERRORE LIBRETTO ISTRUZIONI
E03 o Er03 o
+ suono
continuo
Attivazione continua dei sensori per più di 10
secondi, causata dalla presenza di oggetti o
liquidi sul vetro nella zona del comando.
Rimozione oggetti e/o liquidi + pulizia del vetro. Se
il problema persiste, contattare il centro di
assistenza tecnica autorizzato, specificando il
codice di errore.
L
Nessun errore!
Sicurezza bambini attiva.
Sbloccare il piano.
Pentola non adatta. Usare pentole adatte per l’induzione. Se il
problema persiste, contattare il centro di
assistenza tecnica autorizzato, specificando il
codice di errore.
Page 15
15
E8
Errata velocità della ventola; errore della
ventola sinistra o destra.
Aria di scarico bloccata, ad esempio da carta.
Contattare il centro di assistenza tecnica
autorizzato, specificando il codice di errore.
E21 o Er21
E22 o Er22
E20 o Er20
E36 o Er36
E31 o Er31
E47 o Er47
E2
EA
U400
E5
E6
E9
Contattare il centro di assistenza tecnica autorizzato –specificando il codice di errore.
PULIZIA E MANUTENZIONE
La superficie in vetroceramica deve essere pulita dopo ogni utilizzo, poichè ogni piccola
macchia che rimane si brucerà sulla superficie calda.
Per la manutenzione ordinaria usate detersivi speciali che formano una specie di pellicola
protettiva dallo sporco.
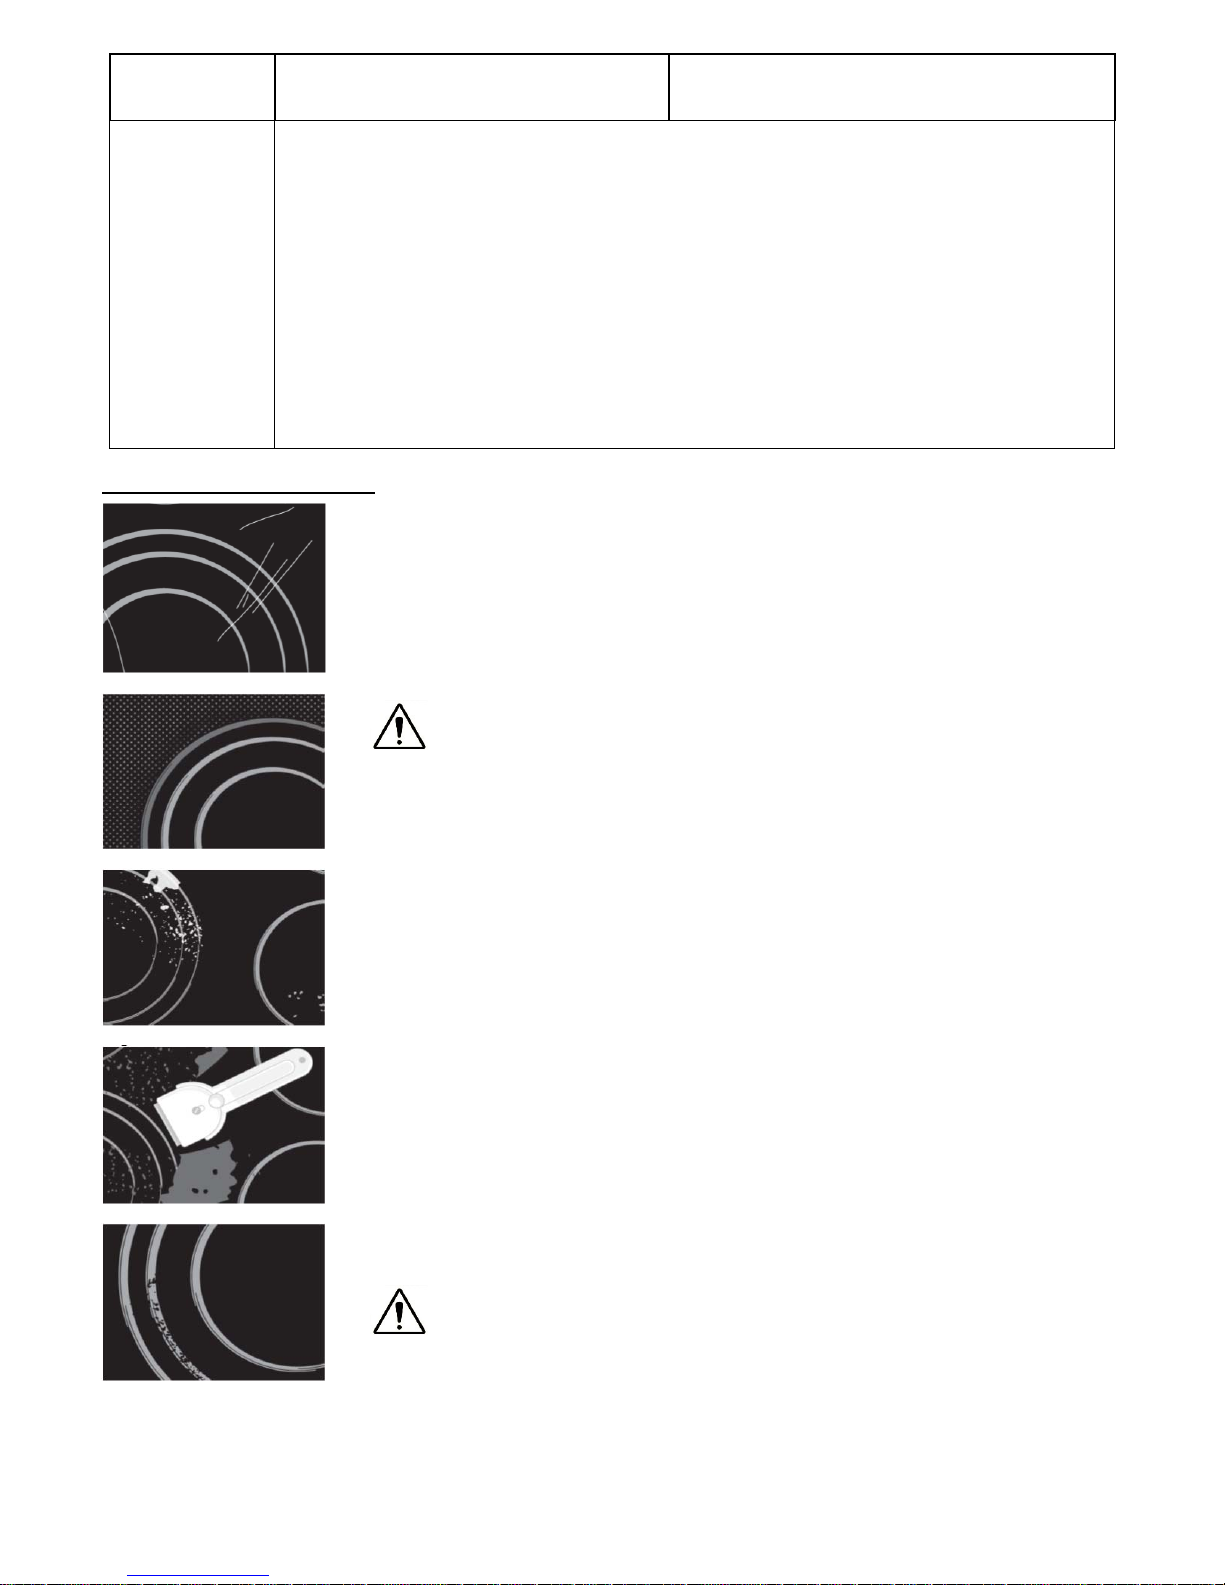
Prima di ogni utilizzo della superficie in vetroceramica bisogna togliere la polvere dalla
superficie e possibile sporcizia dal fondo delle pentole, che potrebbe graffiare le zone
cottura (Fig.1).
Non usate le spugne d’acciaio o i detersivi abrasivi che possono graffiare la
superficie. Altrettanto si può danneggiare usando spray aggressivi o detersivi non
adeguati (Fig.1 e Fig.2).
La segnaletica si può consumare per l’uso dei detersivi aggressivi, spugne d’acciaio o i
fondi delle pentole sporchi (Fig.2). La sporcizia più piccola può essere eliminata con una
spugna umida e poi la pentola asciugata per bene (Fig.3).
Le macchie d’acqua si possono eliminare con la soluzione di aceto, con la quale però non
potete passare sulla cornice (di alcuni modelli) perchè può perdere la sua brillantezza.
Non dovete usare detersivi e spray aggressivi per eliminare il calcare (Fig.3).
La sporcizia più ostinata si elimina con detersivi specifici per la pulizia delle superfici in
vetroceramica. Seguite i consigli del produttore del detersivo.
Attenzione a togliere completamente il detersivo dalla superficie poichè qualche residuo
potrebbe danneggiare la superficie in vetroceramica (Fig.3).
La sporcizia più ostinata o bruciata va tolta con il raschietto. Fate attenzione che la
maniglia in plastica del raschietto, non venga in contatto con il piano cottura caldo (Fig.4).
Fate attenzione a non farvi male quando usate il raschietto! Lo zucchero o le pietanze che
contengono tanto zucchero possono danneggiare per sempre la superficie in
vetroceramica (Fig.5), per questo bisogna immediatamente eliminare con il raschietto i
residui di zucchero dalla superficie in vetroceramica anche se è ancora calda (Fig.4).
Cambio di colore della superficie in vetroceramica non influisce sul funzionamento o sulla
stabilità della superficie. Quest’ultima è conseguenza di utilizzo delle pentole in rame o in
alluminio o i residui del cibo sul fondo della pentola, che però è molto difficile eliminare.
Tutti gli errori sopra indicati sono di carattere estetico e non influenzano
direttamente sul funzionamento dell’apparecchio. Essi non possono essere eliminati in
garanzia.
Fig.1
Fig.2
Fig.3
Fig.4
Fig.5
Page 16

16
Page 17

17
EN
Dear customer!
This appliance is intended for household use only.
Materials used for packaging are nature friendly and may be recycled, deposited or
destroyed without any threats to the environment. In order to recognize these features, all
packing materials are marked with relevant symbols.
Once your appliance has become obsolete and you do not intend to use it any longer,
take adequate care not to litter the environment. Deposit your old appliance with the
authorized depot dealing with used household appliances.
Instructions for use
Instructions for use describe the appliance and the way it is handled.
These instructions are intended for various types of appliances, so you can find some
descriptions of functions that your particular appliance may not have.
These instructions are only valid for the country indicated on the appliance. If there is NO
country on the appliance, technical instructions should be observed for adapting the
appliance to comply with the requirements and regulations in your country.
Instructions for
connection
The appliance must be connected in compliance with the instructions attached to it, as
well as in compliance with relevant regulations and standards. The connection may only
be performed by a qualified person.
Rating plate
The rating plate indicating the basic information is attached on the bottom of the
appliance.
The Manufacturer strives for continuous improvements. For this reason, the text
and illustrations in this book are subject to change without notice.
Keep these instructions in a safe place and ensure that new users are familiar with
the contents. Pass them on to any future owner.
Important warnings 18
Installation 19
Connection to the power supply 20
Tecnical information 21
Operation 23
Safety functions and error display 28
Cleaning and maintenance 29
Page 18
18
IMPORTANT WARNINGS
The appliance and its accessible parts become hot during use. Care should be taken to avoid touching heating elements.
Children less than 8 years of age shall be kept away unless continuously supervised.
Prevent the children to hang around the appliance and warn them properly against the danger of burns.
This appliance can be used by children aged from 8 years and above, and persons with reduced physical, sensory or
mental capabilities or lack of experience and knowledge if they have been given supervision or instruction concerning
use of the appliance in a safe way and understand the hazards involved.
Children shall not play with the appliance.
Cleaning and user maintenance shall not be made by children without supervision.
Unattended cooking with fat or oil can be dangerous and may result in fire. Be sure having the preparation of
such food (fries) under constant control. Never try to extinguish a fire with water, but switch off the appliance and then
cover flame e.g. with a lid or a fire blanket.
Danger of fire: do not store items on the cooking surfaces.
If the surface is cracked, switch off the appliance to avoid the possibility of electric shock.
Don’t use high-pressure steam cleaner or hot steam to clean the appliance.
Never place any metal objects upon the appliance surface, such as knives, forks, spoons, pot lids, and the like, as they
may get very hot.
The appliance can not be activated by external timers or remote controls systems.
Do not use the appliance for room heating.
If there is a wall power outlet located near the appliance and another appliance is plugged into it, make sure the power
cord does not come into contact with the hot cooking zones.
Do not store any temperature-sensitive objects, materials, or substances underneath the appliance, e.g. detergents,
sprays, etc.
In case of a failure of the appliance, immediately disconnect the appliance from the power mains and contact the service
center.
The appliance is manufactured in compliance with the relevant effective safety standards.
Don't connect the appliance to the power supply with an extension cable or multiple sockets, because they don't assure a
sufficient safety (e.g. overheating risk of multiple sockets).
Connect the appliance to a permanent connection.
Installation of the appliance into a kitchen worktop and its connection to the power mains may only be performed by an
adequately qualified technician.
Do not place empty pans on the appliance.
Appliance surface should not be used as a worktop. Sharp objects may cause scratches.
Preparing food in thin aluminum of plastic containers on the cooking zones is not allowed. Do not place any plastic
objects or aluminum foil on the appliance surface.
After a prolonged use of cast iron plates, the area of the plate and the edge of the cooking zone may faded. Repair
service is not covered by the warranty.
If the appliance is built-in over an oven with a pyrolytic system, it should not be operated while the pyrolytic process is in
progress because it can trigger its overheating protection.
The symbol on the product or on its packaging indicates that this product may not be treated as
household waste. Instead it shall be handed over to the applicable collection point for the
recycling of electrical and electronic equipment. By ensuring this product is disposed of correctly,
you will help prevent potential negative consequences for the environment and human health,
which could otherwise be caused by inappropriate waste handling of this product. For more
detailed information about recycling of this product, please contact your local city office, your
household waste disposal service or the shop where you purchased the product.
Page 19
19
INSTALLATION
Important warnings
Installation of the appliance into a kitchen worktop must be performed by an adequately qualified technician.
Veneer or other finish of the piece of kitchen furniture into which the hob is to be built in should be treated with heat
resistant glue (100°C); otherwise, the worktop finish may be discolored or deformed.
Ideally the appliance should be installed with plenty of space on either side. There may be a wall at the rear and a tall
unit or wall at one side. On the other side, however, no unit or divider should stand higher than the appliance.
NOT ALLOWED NOT RECOMMENDED NOT RECOMMENDED RECOMMENDED
Use of massive wood decoration plates or boards on the worktops behind the appliance is not permitted.
The distance between the appliance edge and the adjacent tall kitchen furniture element should amount to no less than
250 mm.
All sizes and distances to be taken for the proper functioning of the appliance are shown in figures below.
The kitchen furniture element underneath the hob should not be fitted with a drawer. If the kitchen furniture element as a
horizontal partition wall, it should be installed no less than min 20mm from the lower surface of the appliance. The space
between the partition wall and the appliance must be empty; no objects should be placed into that gap.
Hanging, or wall-mounted kitchen elements should be installed high enough not to interfere with the work process.
A minimum safety distance must be maintained between the appliance and the cooker hood above it. See the cooker
hood manufacturer's operating and installation instructions for details. If the manufacturer's instructions are not available
or, if there are any flammable objects (e.g. utensil rails, wall units etc) above the appliance, a minimum safety distance of
at least 800 mm must be maintained between them and the appliance below.
Fit the wall units and cooker hood before fitting the appliance to avoid damaging it.
The front part must have an opening of no less than 5 mm.
The appliance must not be installed over a fridge, fridge-freezer, freezer, dishwasher, washing machine, washer-dryer or
tumble dryer.
Only ovens fitted with a cooling fan may be installed underneath this appliance.
Before installing an oven, the rear wall of the kitchen furniture element should be removed in the area of the appliance
cut-out. Furthermore, a gap of at least 5 mm should be left at the front side.
a ≥ 800 mm
b ≥ 50 mm
c ≥ 20 mm
d ≥ 80 mm
e ≥ 5 mm
f ≥ 30 mm
g ≥ 250 mm
A
900 mm
B
400 mm
C
870 mm
D
370 mm
E
45 mm
F
5 mm
G
≥ 50 mm
H
≥ 600 mm
Page 20
20
Installing the foam
gasket
(for glass appliances)
Before inserting the appliance into the opening in the kitchen worktop, the supplied foam
gasket must be attached to the lower side of the glass.
Do not install the appliance without the foam gasket!
The gasket should be attached to the appliance in the following way:
Remove the protective film from the gasket.
Attach the gasket to the lower side approximately A=2-3 mm from the edge. The gasket
must be attached along the entire length and should not overlap at the corners.
When installing the gasket, make sure that the glass does not come into contact with any
sharp objects.
CONNECTION TO THE POWER SUPPLY
The appliance may ONLY be connected by an authorized qualified technician.
Electric system protection should comply with all relevant regulations.
The connection clips can be accessed when the connection clip covers are opened /
removed.
Before connecting the appliance, make sure the voltage indicated on the rating plate is
consistent with the voltage in your home network. Connection voltage should be checked
by a qualified technician using a corresponding measuring device!
The rating plate with basic information is attached on the lower side of the appliance.
In order to make a fixed connection to the mains, insert an all-pole circuit breaker
between the appliance and the mains. This device shall have a contact separation in all
poles, providing full disconnection under overvoltage category III conditions.
The current conducting and isolated parts must be protected from any possibility of direct
contact.
Before any intervention, disconnect the appliance from the power mains. Connect the
appliance in compliance with the electric connections diagram supplied; make sure the
relevant network voltage is observed!
The ground wire should be connected to the clip indicated by the earth symbol.
The mains cable should be fed through the fastening clip which protects it from being
accidentally pulled out.
After connecting the appliance, turn on all cooking zones / heaters for approximately
three minutes to make sure they are operating correctly.
Incorrect connection may destroy parts of the appliance, making the warranty void.
Connection cable on the back of the appliance should be led in such way that it does not
touch the appliance back wall, as this part will get very hot during operation.
Basic adjustment of
sensors to the ambience
Upon each connection to the power supply the sensors of the appliance are automatically
adjusted to the environment to ensure their proper function. All displays turn on and are
fully illuminated for a few seconds.
During the adjustment procedure the sensors must be free of any objects, otherwise the
adjustment procedure will be interrupted until such objects are removed from the sensor
surface. During this period the regulation of the cooktop is impossible.
Installation diagram
The following cables must be used for connection: H05V2V2-F.
LIVE L BROWN
EARTH GREEN / YELLOW
NEUTRAL N BLUE
Page 21
21
TECNICAL INFORMATION
7334245
Supply voltage 220-240 V~ o 380-415 V 2N~
Supply frequency 50/60 Hz
P
TOT
7400 W
18,4x22 cm / 2,1 kW (P=3,7 kW)
P= EXTRA POWERFUL SETTING
ENERGY EFFICIENCY
ELECTRIC COOKING EC
ELECTRIC COOKING
18,9x24,5 cm 189,6 Wh/kg
TYPE OF HOB BUILT-IN
N° INDUCTION ZONES
2
EE
ELECTRIC HOB
189,6 Wh/kg
Cooking zones function
principle
The hob is fitted with high power induction hotplates. Heat is generated directly at the
bottom of the dish, where it is most needed, without any losses through the glass
surface.
The glass surface is not heated directly, but only by return heat transmitted by the dish.
This heat figures as after the hotplate is turned off.
The induction hotplate generates heat from the induction coil, installed underneath the
glass surface. The coil creates magnetic field at the bottom of the dish (which can be
magnetized) which in turn originates whirling flows of current which then heat.
Appropriate cookware
Induction hotplate will function perfectly only if appropriate pot is used.
The pot should be in the middle of the hotplate during cooking.
The appropriate pot is the one which enables induction, for example steel, enamel or
steel alloy. Pots made from steel alloy with copper or aluminium bottom, or glass pots
are inappropriate.
If you use the pressure pot, keep it under close surveillance until proper pressure is
obtained. Hotplate should first operate on maximum power, then follow the
manufacturer’s instructions.
When buying cook ware, check if it bears the label “allows induction”.
COOKING ZONES MIN. PAN BOTTOM Ø MAX. PAN BOTTOM Ø
184x220 mm
(SINGLE)
Ø 115 mm Ø 180 mm
184x220 mm
(SINGLE) WITH
BRIDGE FUNCTION
Ø 135 mm Ø 180 mm
184x220 mm
(DOUBLE) WITH
BRIDGE FUNCTION
2 ZONES - 380x220 mm
4 ZONES Ø 330 mm Ø 400 mm
Note:
When Bridge function is selected, you can use the created zone in different ways, with
one or two pots.
If you use larger pots than the recommended maximum size, the heating time will be
longer, because the heating will propagate from center to edges of the pot by conduction,
in this case also the temperature will be very inhomogeneous.
Page 22
22
Magnet test
Use small magnet A to test if the dish bottom is magnetic. Only dishes where magnet
sticks to the bottom are suitable.
Dish recognition
One of great advantages of the induction hotplate is dish recognition.
When the hotplate is on, the power indicator displays . If you place the dish over that
hotplate within the following 10 minutes, the hotplate recognizes the dish and turns on to
the pre-set power value.
At the moment you remove the dish from the hotplate, power is suspended. If you place
smaller dish upon the hotplate and it is recognized, the hotplate will only use the amount
of energy required to heat the dish according to its size.
Hotplate may be damaged if:
it is turned on and left empty, or an empty dish is placed on it;
you don’t use the appropriate pots
you use clay dishes which leave scratches on the glass surface;
you don’t wipe the pot bottom.
Power regulation
Heating power of the hotplates may be set at nine different levels.
The following chart indicates illustrative use of each power setting.
Power
Setting
Purpose
0
Off, using remaining heat
1-2
Maintaining warm food, slow simmer of smaller quantities
3
Slow simmer (continuation of cooking after a powerful start-up)
4-5
Slow cooking (continuation) of larger quantities, roasting larger chunks
6
Roasting, browning
7-8
Roasting
9
Start of cooking, roasting
A
Automatic initial setting
P
Especially powerful setting for extremely large quantities of food
Energy saving tips
When buying pots, be careful in selecting size: pot diameter usually refers to the top
edge of the pot, which is often larger than the bottom;
Steam-pressure pots, which use pressure in tightly sealed interior, are especially
economic, and save both time and energy. Shorter cooking time leaves more vitamins in
food;
Always leave enough water in steam-pressure pots, otherwise it may result in
overheating which may damage both the pot and the appliance;
Always cover pots with lids of appropriate size;
Use such pot size to accommodate the quantity of food to be prepared.
Page 23
23
OPERATION
• After turning the ceramic glass hob on all displays come on for a moment. The hob is
ready for operation.
• The hob is fitted with electronic sensors which are switched on if you touch the relevant
circle for at least one second.
• Each sensor activation is followed by a sound signal.
• Avoid placing any objects on sensor surface (possible error signalization_ ).
• Always keep the sensor surface clean.
Hob control
A. ON/OFF hob
B. Pause and Recall
C. Key-Lock
D. (-) of Timer
E. (+) of Timer
F. Slide control
G. Warming
H. Fast cooking
L. Timer
Slide control
0
Medium power
Full power
Turn the hob on
Press for at least one second.
The hob is now active, and all cooking zone displays indicate .
Now you need to select the next setti ng within 10 seconds, otherwise the hob
switches off.
Turn cooking zones on
After turning the hob on using , within the next 10 seconds start one of the cooking
zones. Set the power level 1-9 by touching the slider control.
At the first touch, the level is set according to the part of the slider that you touch.
Upon the slider control, the LEDs light up, according to the level set.
By sliding along the slider, the power level setting is changed. By sliding to the
right, the level increasing, while sliding to the left decreases the level.
When you move your finger away from the slider control, the cooking field starts
to operate at the level set.
If a specific point of the slider control is pressed for at least 3 seconds, the automatic
cooking is activated (see Automatic fast heating).
Turn cooking zones off
Selected hotplate must be activated.
By touching the slider sensor at the start, bring the power setting to . Short beep
confirms the OFF position
.
Page 24
24
Turn the hob off
The hob is switched off by pressing .
The sound signal beeps and all indicators go off, except for those hotplates which are
still hot and display the warning sign as an indication of the remaining heat.
If you switch the hob off prior end of cooking session, use the remaining heat and save
electric energy.
Key-Lock
By activating the key lock protection you can stop the operation of the appliance and the
use of hotplates.
Activation
The cooktop must be turned on.
Press for approximately 1 second, the corresponding LED turns on above the key,
the block is active.
Safety lock prevents the activation of al sensors, except for and .
If the hob is switched off when the lock function is activated, it remains in memory until a
new switch on of the hob.
When set timers end their time, alarms can be switched off pressing or without
need for unlocking the control.
Deactivation
The cooktop must be turned on
Press for 1 second; after that, the unlocking is confirmed by a beep.
Child-Lock This function can only be activated/deactivated after turning on the hob with
Activation
• Press and simultaneously, then press again.
• The function is active and all displays show
• Hob control remains locked and switches automatically off after 10 sec.
The Child-Lock deactivates all keys except . Once activated electronic stays
locked even if the control is switched off and on again.
Deactivation
• Within 10 sec. press and simultaneously, then press again.
The function is not active.
One- time unlocking (for one cooking event)
• Press and simultaneously.
• The Child-Lock is off for cooking session.
• After switching off the hob, Child-Lock is reactive and hence active when switched on the
hob again.
Pause
The execution of the function is only possible if at least one zone is on.
The pause condition may also be activated with cooking zone specific errors, here,
the error display is hidden. Also residual heat indication, special messages such as
, or are hidden; the pause display has priority. If there is a general error
during the pause, the control switches off and terminates the mode.
Activation
Press for at least 1 second, the corresponding LED turns on above the key and all
displays show .
While the Pause function is active
Any Timer (also Alarm Timer) set before the pause will be stopped during the pause and
continue when pause mode is quitted.
A selected booster or heat up time automatic function is terminated.
Residual heat calculation and maximum operation time limitations will not be interrupted
and keep on working in the background.
Functional LED’s such as Timer, multi-zone, keep on glowing according to their status.
The pause mode can only be active for maximum 10 min.
Throughout the pause time can be used to switch the control off. In this case
the pause mode is also deactivated.
Page 25
25
Deactivation
Press , the LEDs light up above the cursor of one of cooking zones.
Within 10 seconds press and scroll from the left to the right on the slider cursor of the
illuminated area. The LED above the pause key turns off and the condition before the
pause mode is restored.
Recall
If the control was accidentally switched off through the main all settings can be
restored using the recall function. After switching the control off from the main switch the
user has 6s to switch the control on again and then he has another 6s to press in
order to recall the settings. The recall function can only be used if at least one cooking
zone was active (cooking level >0) independent from key lock.
Remaining heat indicator
Appliances also features remaining heat indicator . Hotplates are not heated directly,
but through return heat radiating from the dish. As long as is on after the hotplate was
switched off, the remaining heat may be used for warming up food or for melting.
Even when disappears, the hotplate may still be hot.
Be careful of burns!
Fast cooking
Extra powerful setting may be additionally switched on for fast cooking. This extra power
is used for heating large quantities of food.
After switching on, the extra power is activated for 10 minutes then automatically switches
back on to the maximum normal level 9.
During the time extra power is activated, the power of other hotplates is limited. This is
indicated on the power display by intermittently flashing the selected cooking level and
limited power for a few seconds.
Activation
Press of the desired cooking zone;
The extra power is active;
The display shows .
Premature deactivation
Press and scroll on the slider cursor of the wanted zone, until you get to if you want to
turn off the zone, or until the wanted cooking level.
POWER MANAGEMENT SYSTEM
The Power Management system distributes power between the available cooking zones
arranged in pairs (such as figures on the side), providing maximum power at a cooking
zone and automatically reducing the power available to the other one. The display of the
second cooking zone alternates, for a few seconds, the power of cooking chosen and the
limited power.
In certain circumstances, the Extra powerful setting function may turn off
automatically to protect the electronic components inside the hob.
Heat up time automatic
This function preheats the burner on maximum power in order to bring it rapidly up to the
required temperature. After a given time interval, the power level returns spontaneously to
the established setting.
It may be switched on in any of the hotplates for all power settings except for setting “9”
where power is set at maximum all the time.
Activation
Automatic cooking mode is activated on any idle hotplate.
Choose the required continuous cooking level and hold it for 3 seconds.
The activated heat up time automatic will be displayed through alternating between
and the selected continuous cooking level on the display.As soon as the parboiling time
is over, the preselected continuous cooking level is valid again.
Once the time in the chart below expires, the function is switched off and disappears.
You can also switch the automatic cooking mode off anytime by modifying power level.
Power setting 1 2 3 4 5 6 7 8
Max. power cooking time
(minutes)
40 72 120 176 256 432 120 192
Page 26
26
Bridge
With the bridge function two separate cooking zones with the same diameter and equal
power can be turned on at the same time and controlled with only one operation.
Activation
Whether the two zones are working at a different level, whether they are at level 0:
Simultaneously press anywhere on the slider control of the zones:
1 and 2
3 and 4
Now the two areas work together, the LEDs to the right of the corresponding displays
turn on. The level is shown on the display of the control zone, in the meanwhile the
controlled zone’s display turns off.
When this function is active, you can set the timer, the LED lights on near both displays
of the zones, moreover it’s not possible setting a particularly powerful cooking function.
If in 10 uninterrupted minutes no cookware is detected on one of the two elements, the
bridge function is automatically deactivated.
Deactivation
The end of the Function can be done by repeating the simultaneous selection of both
cooking elements (the same as activation).
If the function is deactivated while in operation, than both cooking elements go to level
and can then be set again.
Warming
The warming function is used to keep cooked food warm. Hence this function can also be
used as melting or simmer function.
Activation
Press of a cooking zone activates the “melting” ;
If is pressed a second time “warming” is activated ;
If is pressed a third time “simmering” is activated ;
If is pressed a fourth time the warming function ends.
Safety switch off
Maximum continuous operation of a particular hotplate is limited, and the duration is
displayed in the above chart. When the hotplate is switched off by the safety mechanism,
the indicator displays symbols , or in case there is any remaining heat left.
Example:
Set the hotplate to power level 5 and leave it operate for some time. If you do not change
the above setting, the safety mechanism will switch the hotplate off after 210 minutes.
Power setting Minutes lapse prior safety switch off
melting 480
warming 480
simmering 480
1 516
2 402
3 318
4 258
5 210
6 138
7 138
8 108
9 90
P 10
Protection from
overheating
Induction hotplate is also fitted with safety device against overheating which protects
electronic parts from damages. This device operates on several levels. When temperature
of the hotplate excessively rises, it switches on two-stage fan. If this is not enough, extra
powerful heating is deactivated, and finally the safety device either reduces the heating
power of certain hotplates or turns them off completely. When the hotplate cools off, the
full power of hotplate is again available.
Timer
Use of timer facilitates cooking by setting the time of hotplate operation.
Activation
The cooktop must be turned on and the zone where you want to set the timer must be
working.
Page 27
27
Simultaneously press and , the timer's display shows , and of the first
active cooking zone from the left, lights on.
Simultaneously press and , as many times as necessary, to select the zone where
you want to set the timer. lights on only for the active cooking zones.
Within 10 seconds since pressing and set the timer value by pressing or .
The value of the timer can be displayed:
-
in minutes and seconds up to 9min59sec;
-
in hours and minutes up to 9h59min, in this case the word “min” is shown under
the timer’s display.
Operation time can be set for each hotplate separately.
Changing pre-set cooking time
Cooking time can be changed anytime during the operation.
Simultaneously press and ;
Simultaneously press and as many times as necessary, to select the zone of
which you want to adjust the timer. The zone is identified by the lighting on of ;
Within 10 seconds press or to change the time;
Checking remaining cooking time
Last set timer is always displayed, ( has a lighting stronger than the others).
Simultaneously press and ;
Simultaneously press and as many times as necessary, to select the zone of
which you want to see the remaining time. The zone is identified by the lighting on of ;
The timer's display will display the remaining time of the selected cooking zone.
Deactivation
When pre-set time elapses, a beep signals the end, and the hotplate is switched off.
Switch off the alarm by pressing the sensor or or it switches off automatically after
2 minutes.
If you want to deactivate the timer prior the end of pre-set time:
Simultaneously press and ;
Simultaneously press and as many times as necessary, to select the zone of
which you want to disable the timer. The zone is identified by the lighting on of ;
Press to the value ;
is turned off and the timer is deactivated.
Alarm
Timer can be used as alarm also if it is already employed in timer control of one of the
hotplates.
Timer setting
With the hob off:
Press to activate the cooking hob;
Simultaneously press and to activate the alarm. The timer's display shows
and if some cooking zone is active, of the first active cooking zone from the
left, lights on;
Simultaneously press and as many times as necessary to select the alarm. The
respective is located between and
;
The timer value is set by pressing or ;
It’s possible setting the time in minutes and seconds or, in hours and minutes also for the
alarm.
Switching the alarm off
When the pre-set time expires a beep is heard which you can either turn off by pressing
or
, or leave it to turn off automatically after 2 minutes.
If you want to switch the timer off prior expiry of pre-set time:
Page 28
28
Simultaneously press and .
Simultaneously press and as many times as necessary to select the alarm,
lights on.
Press until the value . The alarm is deactivated.
SAFETY FUNCTIONS AND ERROR DISPLAY
During the warranty period, only a service center authorized by the manufacturer may carry out any repairs.
Before making any repairs, make sure the appliance is disconnected from the power mains either by removing the fuse
or by disconnecting the power plug from the wall outlet.
Unauthorized tampering with and repairs of the kitchen range (cooking hob) can result in electric shock or short circuit;
hence, do not attempt to perform any repairs by yourselves. Leave such tasks to an expert or an authorized service unit.
In case of minor faults or problems with the appliance operation, check the following instructions to see whether you can
eliminate the causes by yourselves.
Elimination of any errors or warranty claims that resulted from improper connection or use of the appliance is not covered
by our warranty. In such cases, the costs of repair are borne by the user.
ERROR CODE ERROR DESCRIPTION INSTRUCTION MANUAL
E03 or Er03 or
+
continuous tone
Permanent use of sensors; Control unit
cuts off after 10 sec. Water or cooking
utensils on the glass above the control
unit.
Cleaning of the operational surface. If the problem
persists, Contact authorized center for technical
assistance, specifying the error code.
L
No error!
Child lock activated.
Deactivate child lock.
Inappropriate pan. Use appropriate pan. If the problem remains Contact
authorized center for technical assistance - specify the
error code.
E8 Incorrect fan speed; error on fan left or
right.
Air exhaust blocked, for example by paper.
Contact authorized center for technical assistance,
specifying the error code.
E21 o Er21
E22 o Er22
E20 o Er20
E36 o Er36
E31 o Er31
E47 o Er47
E2
EA
U400
E5
E6
E9
Contact authorized center for technical assistance, specifying the error code.
Page 29
29
CLEANING AND MAINTENANCE
Ceramic glass hob should be cleaned only when completely cooled down, preferably after
each use, otherwise even the slightest stains remaining after cooking may burn into the
hob surface with each following use.
For regular maintenance of ceramic-glass hob use special cleansing agents, produced in
such way to create protective film upon the surface.
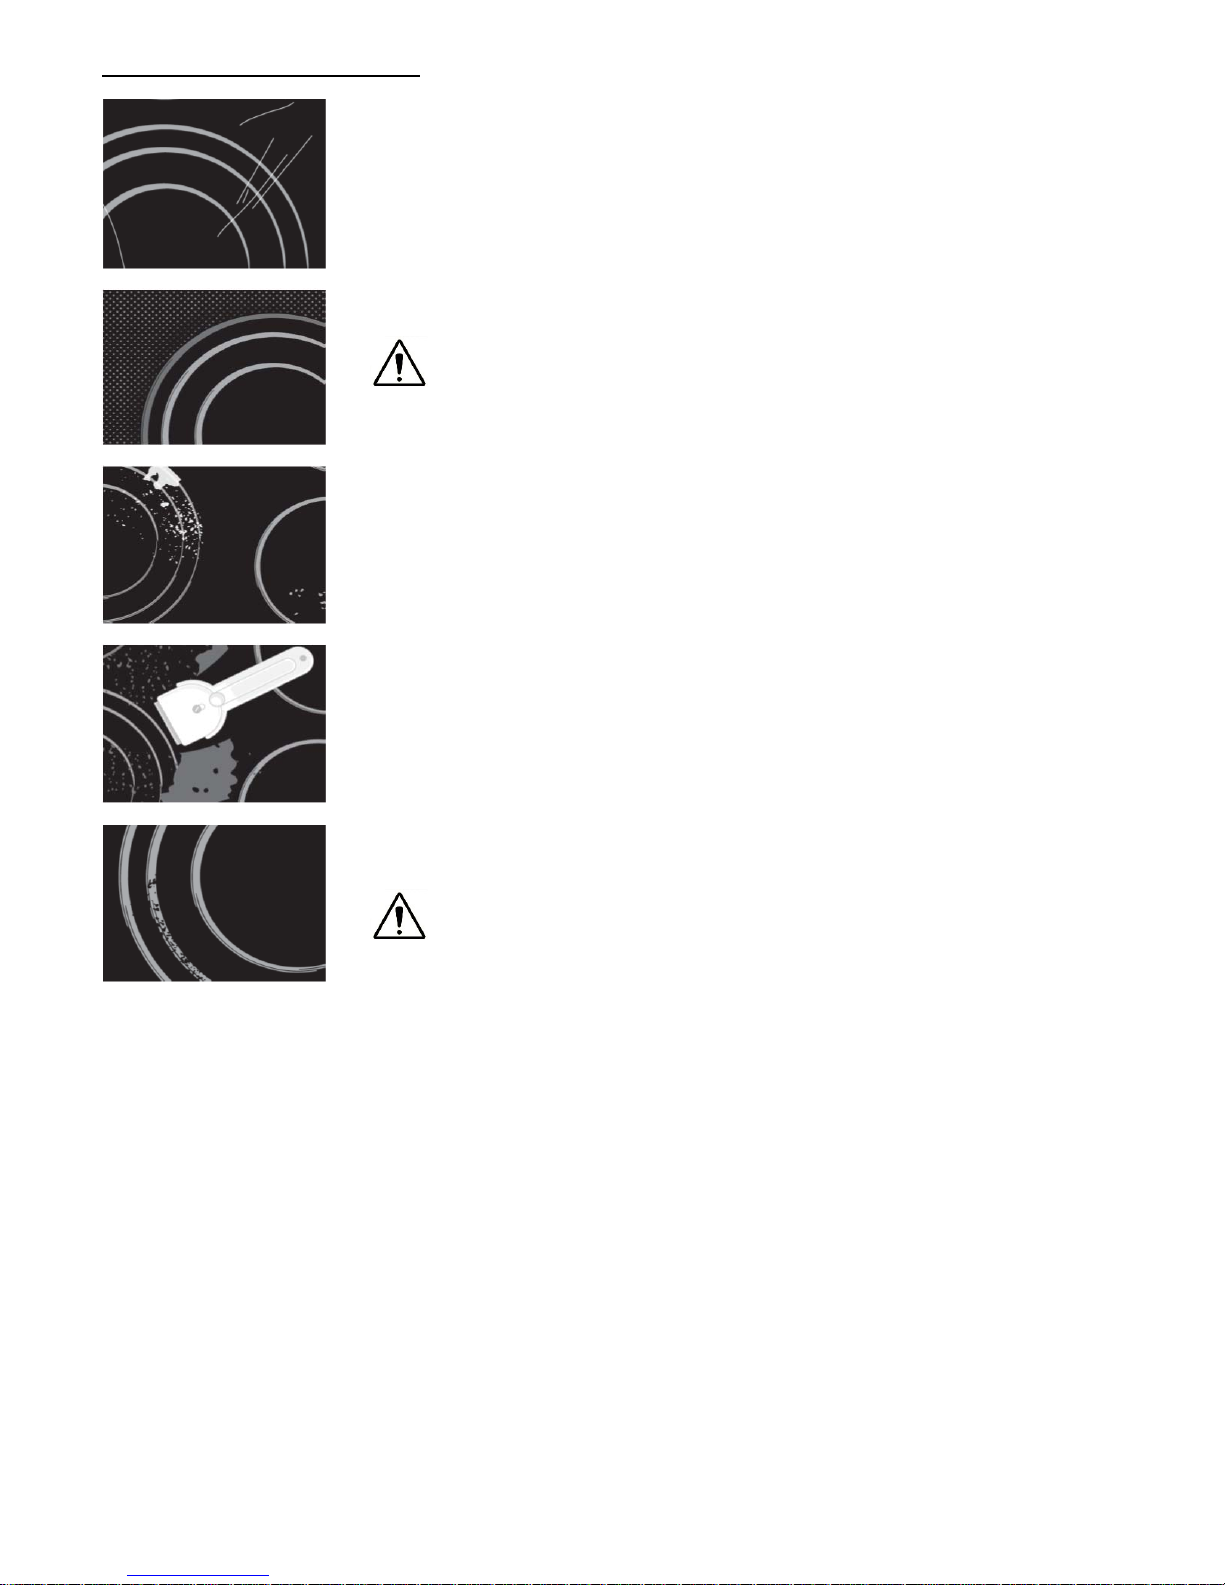
Before each use, wipe the dust and other particles from the hob, they may scratch the
surface (Fig. 1).
Use of steel wool, abrasive cleaning sponges, and abrasive detergents can scratch the
surface of the hob. The surface may also be damaged by the use of aggressive sprays
and inappropriate liquid chemicals (Fig.1 and 2).
Pattern marks can be erased by the use of aggressive cleansing agents or rough
and damaged cookware bottoms (Fig. 2).
Minor stains are removed with moist soft cloth; after that the surface should be wiped dry
(Fig. 3).
Water stains are removed with gentle vinegar solution, but you must not wipe the frame
with it (certain models only), since it may lose its glow. Never use any aggressive sprays
or limestone removers (Fig. 3).
Major stains are removed with special ceramic-glass cleansers.
Follow strictly the manufacturer’s instructions.
Be careful to remove any remains of cleansing agent from the hob surface, otherwise they
will be heated during the next use and can damage the hob (Fig. 3).
Stubborn and burnt stains are removed with special ceramic-glass scraper. Be careful,
however, not to touch the hotplate surface with the scraper handle (Fig. 4).
Handle the scraper with utmost care to avoid injuries!
Sugar and sugar containing food may permanently damage the ceramic-glass hob surface
(Fig. 5), so the remains of sugar and sugar containing food must be scraped off from the
hob surface immediately, when the hotplates are still hot (Fig. 4).
Discoloring of ceramic-glass hob has no effect whatsoever on its operation and stability. In
most cases, it appears as the consequence of burnt in food remains, or as a result of
dragging pots and pans (especially aluminium or copper bottom cookware) across the
surface, and such discoloring is rather hard to remove.
All described faults are mostly esthetical and do not affect directly the operation of
the appliance. Remedy of such faults is not covered by warranty.
Fig.1
Fig.2
Fig.3
Fig.4
Fig.5
Page 30

30
Page 31

31
FR
Chère Cliente,
Cher Client,
Cet appareil est destiné à un usage ménager.
L’emballage est constitué de matériaux écologiques qui peuvent être recyclés, remis à une
déchetterie ou détruits sans nuire à l’environnement. Ils sont pourvus dans ce but des
marquages appropriés.
Lorsque cet appareil sera parvenu en fin de vie et que vous ne l’utiliserez plus, veillez à ce
qu’il ne pollue pas l’environnement et remettez-le aux déchetteries ou aux services collectant
les appareils ménagers usagés.
Notice d'utilisation
Cette notice est destinée à l’utilisateur. Elle décrit l’appareil et la manière de s'en servir. Elle
est rédigée pour différents modèles, et il est donc possible qu’elle décrive des fonctions dont
votre appareil ne dispose pas.
Ces instructions s’appliquent uniquement au pays dont le symbole figure sur l’appareil. En
l’absence de symbole, il convient de se reporter à la réglementation et aux normes en
vigueur dans votre pays pour installer l’appareil et l'adapter à un autre type de gaz.
Instructions de
raccordement
Le raccordement doit être réalisé selon les instructions de la notice jointe à l'appareil et
conformément aux réglementations et normes en vigueur. Il devra être exécuté
exclusivement par un professionnel qualifié.
Plaque signalétique
La plaque signalétique comportant les principales caractéristiques techniques est apposée
sur la face inférieure de la table de cuisson.
Le fabricant s'efforce d'apporter des améliorations continues. C'est pourquoi le texte
et les illustrations de cette notice peuvent être modifiés sans préavis.
Conservez soigneusement cette notice et gardez-là à portée de main. Si vous vendez
votre appareil, remettez-la à son nouveau propriétaire.
Consignes de securite 32
Installation 33
Raccordement au réseau électrique 34
Caractéristiques techniques 35
Fonctionnement 37
Fonctions de sécurité et messages d’erreur 42
Nettoyage et entretien 43
Page 32

32
CONSIGNES DE SECURITE
L'appareil et ses parties accessibles deviennent très chauds durant l'utilisation. Faites bien attention à ne pas toucher
les éléments chauffants. Maintenez les enfants de moins de 8 ans à l'écart de l'appareil, sauf si vous les surveillez en
permanence.
Ne laissez pas les jeunes enfants sans surveillance lorsque l’appareil est en service. Ils risqueraient de se brûler.
Les enfants à partir de 8 ans et les personnes disposant de capacités physiques, sensorielles ou mentales réduites, ou
manquant d'expérience et de connaissances, peuvent utiliser cet appareil à condition de rester sous la surveillance d'un
adulte responsable, d'avoir reçu des instructions préalables sur la manière de s'en servir en toute sécurité et d'avoir
compris les risques auxquels ils s'exposent.
Ne laissez pas les enfants jouer avec l’appareil.
Surveillez les enfants s’ils procèdent à son nettoyage ou à son entretien.
Sur une table de cuisson, les fritures à l'huile ou à la graisse peuvent s'enflammer. Surveillez-les en permanence
(surtout les frites). Ne tentez jamais d'éteindre le feu avec de l’eau, mais mettez immédiatement l'appareil à l'arrêt, puis
posez un couvercle sur le récipient et essayez d'étouffer les flammes avec une couverture antifeu.
Risque d'incendie ; ne laissez aucun objet sur l’appareil.
N’utilisez pas votre appareil si elle est fêlée. Si une fente apparaît, coupez immédiatement l’alimentation
électrique de l’appareil. Risque de choc électrique.
Ne nettoyez jamais l’appareil avec un appareil à vapeur ou à haute pression : vous vous exposeriez à un risque de choc
électrique.
Ne posez jamais de couteaux, fourchettes, cuillères, couvercles et objets similaires sur l’appareil, car ces ustensiles
peuvent devenir extrêmement chauds.
Il n'est pas possible de mettre l’appareil en marche avec un programmateur externe ou une télécommande.
N’utilisez jamais l’appareil pour chauffer la pièce.
Si un autre appareil électrique est branché à proximité de l’appareil, veillez à ce que le cordon d’alimentation ne touche
pas l’appareil chaud.
Ne rangez pas sous l’appareil des produits inflammables ou sensibles à la chaleur (détergents, aérosols, etc.).
En cas de dysfonctionnement, mettez immédiatement l’appareil hors tension et contactez le service après-vente.
Cet appareil est fabriqué selon les normes de sécurité en vigueur.
Ne raccordez pas l'appareil au réseau électrique par l'intermédiaire d'une rallonge ou d'une multiprise, car elles n'offrent
pas une sécurité suffisante (risque de surchauffe avec une prise multiple).
Connectez l'appareil par un raccordement permanent.
L’appareil (Appareil de la classe 3) doit être encastré dans le plan de travail et raccordé au gaz et au réseau électrique
exclusivement par un professionnel qualifié.
Ne posez jamais de récipients vides sur les brûleurs.
N’utilisez pas l'appareil comme plan de travail. Les objets pointus peuvent rayer sa surface.
Ne préparez jamais les aliments dans des barquettes en aluminium ou en plastique. Ne déposez ni objet en plastique, ni
feuille d’aluminium sur la surface en vitro.
Avec le temps, la surface des plaques électriques en fonte et les collerettes peuvent se décolorer. Leur remise en état
n'est pas couverte par la garantie.
Si l'appareil est intégré dans un four avec un système pyrolytique, il ne doit pas être utilisé pendant le processus de
pyrolyse car il peut déclencher sa protection contre la surchauffe.
Ce symbole figure sur le produit ou sur son emballage en application de la directive européenne
2002/96/CE sur les Déchets d’Équipement Électrique et Électronique (DEEE). Cette directive sert
de règlement cadre à la reprise, au recyclage et à la valorisation des appareils usagés dans toute
l’Europe. Ce produit doit donc faire l’objet d’une collecte sélective. Lorsque vous ne l’utiliserez
plus, remettez-le à un service de ramassage spécialisé ou à une déchetterie qui traite les DEEE ;
vous contribuerez ainsi à éviter des conséquences néfastes pour la santé et l’environnement.
Pour tout renseignement sur la mise au rebut et le recyclage de ce produit, veuillez contacter la
mairie ou le service de la propreté de votre commune, ou encore le magasin dans lequel vous
l’avez acheté.
Page 33

33
INSTALLATION
Consignes de sécurité
L’appareil doit être encastré dans le plan de travail exclusivement par un professionnel qualifié.
Les placages et autres finitions du plan de travail doivent être assemblés avec un adhésif réfractaire (100°C), afin
d’éviter qu’ils ne se décollent ou se déforment.
Idéalement, l'appareil doit être installé avec beaucoup d'espace de chaque côté. Étant donné sa classe de protection
contre l’incendie, l’appareil peut être encastrée à côté d’un meuble plus haut que le plan de travail, mais dans ce cas,
l’élément installé de l’autre côté ne doit pas dépasser la hauteur du plan de travail.
INTERDIT NON CONSEILLÉ NON CONSEILLÉ CONSEILLÉ
Des profils de finition en bois massif ne peuvent être posés pas sur le plan de travail.
Si un meuble plus haut que le plan de travail est installé à côté de la table de cuisson, la distance entre ce meuble et
l’appareil doit être au moins de 250mm.
Toutes les dimensions et distances à prendre pour le bon fonctionnement de l'appareil sont indiqués dans les chiffres ci-
dessous
Le meuble sous la table de cuisson ne doit comporter aucun tiroir. Si le meuble intègre une étagère, celle-ci doit être
éloignée d’au moins 20 mm de la surface inférieure du plan de travail. L’espace entre l’étagère et l’appareil doit rester
libre, ne l’utilisez pas comme rangement.
Les éléments suspendus au-dessus de la table de cuisson doivent être placés suffisamment haut pour ne pas gêner
votre travail.
La distance entre le plan de cuisson et la hotte doit être conforme aux instructions de montage de la hotte et ne pas être
inférieure à 700 mm.
Mettez en place les éléments muraux et la hotte aspirante avant d'installer l'appareil afin de ne pas l'endommager.
Une ouverture d’au moins 5 mm doit être ménagée en façade.
N'installez pas l'appareil au-dessus d'un réfrigérateur, d'un réfrigérateur congélateur, d'un congélateur, d'un lave-linge,
d'un lave-linge séchant ou d'un sèche-linge.
Seuls les fours équipés d’un ventilateur de refroidissement peuvent être installés sous cette table de
cuisson.
Avant d’encastrer un four, il convient de retirer le panneau arrière du meuble de cuisine sur toute la largeur de la
découpe destinée à la table de cuisson. Par ailleurs, une ouverture d’au moins 5 mm doit être ménagée en façade.
a ≥ 800 mm
b ≥ 50 mm
c ≥ 20 mm
d ≥ 80 mm
e ≥ 5 mm
f ≥30 mm
g ≥ 250 mm
A
900 mm
B
400 mm
C
870 mm
D
370 mm
E
45 mm
F
5 mm
G
≥ 50 mm
H
≥ 600 mm
Page 34

34
Pose du joint en
mousse (Table de
cuisson en verre)
Avant d’insérer l’appareil dans la découpe du plan de travail, il est indispensable de poser
sur la face inférieure du verre le joint en mousse fourni.
N’installez pas l’appareil sans le joint en mousse !
Pour poser le joint, procédez de la façon suivante :
Retirez la bande adhésive qui protège le joint ;
Ensuite, appliquez le joint sur la face inférieure du verre, à A=2 ou 3 millimètres du bord. Le
joint doit être collé sur tout le pourtour du verre et ne pas déborder dans les coins.
Pendant que vous posez le joint, veillez à ce que le verre ne soit pas en contact avec des
objets pointus.
RACCORDEMENT AU RÉSEAU ÉLECTRIQUE
Le raccordement ne doit être réalisé que par un professionnel qualifié.
Le dispositif de protection du système doit être conforme aux réglementations en vigueur.
Pour accéder aux bornes de raccordement, ouvrez ou retirez les cache-bornes.
Avant de procéder au raccordement, vérifiez que la tension indiquée sur la plaque
signalétique correspond à la tension du secteur dans l’habitation.
La plaque signalétique comportant les principales caractéristiques techniques est apposée
sous l’appareil.
Si l'appareil est branché directement au réseau, intercalez un dispositif de sectionnement
omnipolaire entre l'appareil et le départ du circuit. Ce dispositif devra ouvrir les contacts
pour tous les pôles, permettant ainsi une coupure totale en cas de surtension de catégorie
III.
Les pièces conductrices et isolées doivent être protégées de façon à éviter tout contact
accidentel.
ATTENTION !
Avant chaque intervention, coupez l’alimentation électrique de l’appareil. Raccordez-le
selon la tension du réseau et en observant le schéma de connexion électrique fourni.
Raccordez le conducteur de terre à la borne repérée par le symbole standard de mise à la
terre.
Maintenez le câble d’alimentation en place à l’aide du serre-câble qui le protège contre
l’arrachement accidentel.
Après avoir effectué le raccordement, allumez tous les brûleurs pendant 3 minutes environ
pour vérifier leur bon fonctionnement.
Un raccordement incorrect peut détériorer certains éléments de l’appareil. Ces dommages
ne sont pas couverts par la garantie.
Le câble d’alimentation à l’arrière de l’appareil devra être positionné de façon à ne pas
toucher le panneau arrière de la table de cuisson, en raison de la température élevée de ce
dernier durant le fonctionnement.
Réglage de base des
boutons de
commande
Au moment du raccordement au secteur, un réglage automatique des boutons de
commande est effectué afin de garantir leur fonctionnement optimal.
Tous les voyants s’allument pendant quelques secondes. Aucun objet ne doit se trouver sur
le panneau de commande pendant le réglage des boutons de commande. Si c’est le cas, le
réglage est interrompu jusqu’à ce que les objets soient enlevés.
Pendant ce temps, la table de cuisson ne peut pas être utilisée.
Schéma de connexion
Câbles appropriés au raccordement: H05V2V2-F
PHASE L MARRON
TERRE
JAUNE / VERT
NEUTRE N BLEU
Page 35

35
CARACTÉRISTIQUES TECHNIQUES
7334245
Tension d'alimentation 220-240 V~ o 380-415 V 2N~
Fréquence d'alimentation 50/60 Hz
P
TOT
7400 W
18,4x22 cm / 2,1 kW (P=3,7 kW)
P= PUISSANCE MAXIMALE
EFFICACITÉ ÉNERGÉTIQUE
ZONE ÉLECTRIQUE EC
ZONE ÉLECTRIQUE
18,9x24,5 cm 189,6 Wh/kg
TYPE DE TABLE DE CUISSON ENCASTRÉ
N° ZONES INDUCTION
2
EE
PLAN ÉLECTRIQUE
189,6 Wh/kg
Principe de
fonctionnement
La table de cuisson se compose de foyers à induction hautes performances. La chaleur est
directement produite dans le fond de la casserole, c’està-dire exactement là où on en a
besoin, sans pertes inutiles dans la surface en vitrocéramique. Cette méthode consomme
par conséquent beaucoup moins d’énergie que les plaques conventionnelles qui doivent
être chauffées.
La surface en vitrocéramique n’est pas chauffée directement, mais est chauffée par la
chaleur dégagée par la casserole. Cette chaleur (encore perceptible après l’extinction des
foyers) est appellee «chaleur résiduelle» . L’échauffement d’un foyer à induction est
assuré par une bobine d’inductance située sous la surface en vitrocéramique et qui génère
un champ magnétique régulier, provoquant dans le fond de la casserole (en métal
ferromagnétique) des courants de Foucault qui font chauffer la casserole.
Casseroles adaptées
La table à induction fonctionne parfaitement si vous utilisez des casseroles adaptées.
Les casseroles et poêles doivent être posées au centre du foyer pendant la cuisson.
Les casseroles adaptées à l’induction sont en acier ou avec revêtement acier. Les poêles
en acier à fond en cuivre ou en aluminium ainsi que les casseroles en verre ne conviennent
pas à la cuisson à induction.
Les autocuiseurs doivent être surveillés jusqu’à ce qu’ils atteignent la bonne pression.
Après sa mise en marche, le foyer fonctionne à la puissance maximale. Celle-ci peut être
réduite en fonction des indications du fabricant de la casserole à l’aide des boutons de
commande correspondants.
A l’achat, choisissez impérativement des cas seroles et poêles portant la mention
«Induction».
FOYERS MINI. FOND DE LA POÊLE MAXI. FOND DE LA POÊLE
184x220 mm
(Foyer individuel)
Ø 115 mm Ø 180 mm
184x220 mm
(Foyer individuel) avec
fonction double zone
Ø 135 mm Ø 180 mm
184x220 mm
(Foyer double) avec
fonction double zone
2 Foyers - 380x220 mm
4 Foyers Ø 330 mm Ø 400 mm
Page 36

36
Remarque:
Une fois la fonction double zone activée, le foyer peut être utilisé de deux manières:
• avec deux casseroles
• avec une seule casserole
Le chauffage dure plus longtemps en cas d’utilisation de casseroles dont le fond est plus
grand que le diamètre maximum recommandé, car la chaleur se répartit en partant du centre
de la casserole, vers les bords. Dans ce cas, la répartition de la chaleur est également très
irrégulière.
Test magnétique
Vous pouvez aisément vérifier à l’aide d’un petit aimant A si le fond de la poêle est
magnétique. N’utilisez que des casseroles et poêles dont le fond est magnétique (l’aimant
est attiré).
Reconnaissance de casserole
L’un des avantages des tables à induction est la reconnaissance de casseroles. En
l’absence de casserole sur la table à induction ou en présence de casseroles de diamètre
inférieur à celui du foyer, aucune énergie n’est gaspillée. Après la mise en marche de la
table de cuisson, le symbole s’allume sur le panneau de commande. Si vous posez une
casserole sur le foyer dans les 10 minutes qui suivent la mise en marche, celle-ci est
détectée et le foyer chauffe à la température réglée.
Dès que vous enlevez la casserole du foyer, l’alimentation en énergie s’arrête. Le foyer
reconnaît également les casseroles de petit diamètre et réduit en conséquence l’énergie
consommée pour chauffer le fond de la casserole.
La table de cuisson s’abîme
• si elle reste vide après la mise en marche ou si vous y posez une casserole vide,
• si vous utilisez des casseroles non adaptées (p. ex. avec un fond non plat ou un diamètre
trop petit).
• N’utilisez pas de casseroles en terre cuite, car cellesci pourraient rayer la surface en
vitrocéramique.
• Avant de poser la casserole sur la table de cuisson, vérifiez que celleci est parfaitement
sèche afin de garantir une bonne transmission de la chaleur et d’éviter tout
endommagement.
• Pour cuire et rôtir, utilisez des poêles et casseroles ferromagnétiques, c’est-à-dire en acier
ou à revêtement acier. La table à induction ne fonctionne qu’avec ce type de casseroles.
Puissances de
cuisson
La puissance des foyers est divisée en neuf niveaux.
Ce tableau contient quelques exemples pour les différents réglages.
Puissance Application
0 Eteindre, utiliser la chaleur résiduelle
1-2 Chauffe-plats, cuisson de petites portions
3 Mijoter (poursuite lente de la cuisson après un fort chauffage)
4-5 Cuisson lente de grandes quantités
6 Faire revenir, rissoler
7-8 Rissoler
9 Début de la cuisson, rôtir
A Chauffage rapide automatique
P Puissance maximale pour la préparation de grandes quantités
Conseils en économie
d’énergie
Avant d’acheter des casseroles, vérifiez que le diamètre indiqué concerne le couvercle et
est supérieur à celui du fond.
Les autocuiseurs sont particulièrement économes en énergie, car ils permettent de réduire
le temps de cuisson grâce à la haute pression. Cette réduction du temps de cuisson permet
également de conserver les vitamines.
Veillez toujours à ce que la quantité de liquide dans l’autocuiseur soit suffisante, sous peine
de surchauffe et d’endommagement de l’autocuiseur et de la table de cuisson.
Utilisez toujours les couvercles assortis aux casseroles.
Utilisez des casseroles dont la taille est adaptée à la quantité d’aliments à préparer.
L’utilisation de casseroles remplies à moitié entraîne un gaspillage d’énergie.
Page 37

37
FONCTIONNEMENT
Après la mise en marche de la table de cuisson vitrocéramique, tous les voyants s’allument
brièvement. La table de cuisson est prête.
La table de cuisson est dotée de boutons électroniques qui s’allument quand vous les
touches pendant plus d’une seconde.
L’activation des boutons est confirmée par un signal acoustique.
Ne posez pas d’objets sur les boutons (message d’erreur_ ).
Veillez à ce que le panneau de commande reste toujours propre.
Eléments de commande
A. Bouton de mise en marche/arrêt de la table de cuisson
B. Pause
C. Sécurité
D. Minuterie (–)
E. Minuterie (+)
F. Sélecteur
G. Chauffe-plats
H. Booster
L. Minuteur
Sélecteur
0
Puissance moyenne
Puissance maximale
Mise en marche de la
table de cuisson
Appuyez pendant au moins 1 seconde sur le bouton
La table de cuisson est en marche et tous les voyants de puissance affichent .
Le réglage suivant doit être effectué dans un délai de 10 secondes. Sinon, la table de
cuisson s’éteint.
Mise en marche du
foyer
Après avoir mis la table de cuisson en marche en touchant le bouton , vous pouvez
sélectionner le foyer voulu dans un délai de 10 secondes. La puissance de cuisson peut être
réglée entre 1 et 9 à l’aide du sélecteur du panneau de commande.
La puissance correspondant à la pos ition de votre doigt est réglée lorsque vous
posez votre doigt sur le sélecteur. Le nombre de points correspondant s’allume audessus du sélecteur.
déplacez votre doigt sur le sélecteur pour régler la puissance voulue: vers la droite
pour augmenter la puissance, vers la gauche pour la réduire.
Lorsque vous enlevez votre doigt, le foy er chauffe jusqu’à la puissance réglée.
Le démarrage automatique de la cuisson s’active lorsque vous touchez le sélecteur pendant
au moins 3 secondes (voir le chapitre Démarrage automatique de la cuisson).
Eteindre le foyer
Le foyer sélectionné doit être en marche.
Touchez l’extrémité gauche du sélecteur pour régler la puissance sur . La désactivation
est confirmée par un signal acoustique.
Page 38

38
Eteindre la table de
cuisson
Touchez le bouton .
Un signal acoustique retentit et tous les voyants s’éteignent, sauf ceux de la chaleur
résiduelle .
La désactivation de la table de cuisson avant la fin de la cuisson permet d’économiser de
l’énergie en utilisant la chaleur résiduelle.
Verrouillage du
panneau de
commande
La fonction de sécurité permet de verrouiller la table de cuisson.
Verrouillage
La table de cuisson doit être en marche.
Touchez le bouton pendant environ 1 seconde, jusqu’à ce que la LED au-dessus de la
touche s’allume. Le verrouillage est activé.
La fonction de sécurité protège tous les boutons contre une activation involontaire. Seuls
les boutons et ne sont pas verrouillés.
Lorsque vous éteignez la table de cuisson alors que le verrouillage est actif, celui-ci reste
actif jusqu’à la prochaine mise en marche.
Les signaux sonores indiquant la fin de la minuterie peuvent être désactivés à l’aide des
touches ou sans qu’il soit nécessaire de désactiver le verrouillage.
Déverrouillage
La table de cuisson doit être en marche.
Touchez le bouton pendant environ 1 seconde; le déverrouillage du panneau de
commande est confirmé par un court signal sonore.
Verrouillage parental Cette fonction ne peut être activée/désactivée qu'après avoir allumé la plaque de cuisson avec
Activation
• Appuyez simultanément sur et , puis appuyez à nouveau sur .
• La fonction est active et tous les écrans affichent
• La commande de la plaque de cuisson reste verrouillée et s'éteint automatiquement après
10 secondes.
Le verrouillage parental désactive toutes les touches sauf . Une fois activé,
l’électronique reste verrouillée même si la commande est désactivée et réactiv ée encore.
Désactivation
• Avant 10 secondes, appuyez simultanément sur et , puis appuyez à nouveau sur .
La fonction n’est pas active.
Déverrouillage singulier (pour événement de cuisson singulier)
• Appuyez simultanément sur et .
• Le verrouillage parental est désactivé pour la session de cuisine.
• Après la mise hors tension de la plaque de cuisson, le verrouillage parental est réactif et
donc actif lors de la remise en marche de la plaque de cuisson.
Pause
Cette fonction ne peut être activée que si au moins un foyer est en marche.
La fonction Pause peut également être activée en présence de certaines erreurs sur le
foyer. Les messages d’erreur disparaissent alors. L’affichage de la chaleur résiduelle
et les messages spéciaux
, ou
disparaissent également, la function Pause
étant prioritaire. En cas d’erreur générale pendant la pause, la commande s’éteint et
annule la fonction Pause.
Activation
Touchez le bouton pendant au moins 1 seconde, jusqu’à ce que la Led au-dessus de la
touche s’allume et que tous les voyants affichent .
Pendant la fonction Pause
Les minuteries en cours s’arrêtent et reprennent après l’annulation de la pause.
Le préchauffage automatique et la fonction Booster s’arrêtent.
Le calcul de la chaleur résiduelle et la limitation de la durée d’utilisation se poursuivent.
Les autres fonctions à LED (minuterie, circuits multiples, etc.) continuent à s’afficher selon
leur état.
La fonction Pause dure maximum 10 minutes. Si elle n’est pas annulée au bout de ce
délai, la commande s’éteint.
Page 39

39
Le foyer peut être mis en marche et arrêté à tout moment à l’aide du bouton ce qui
entraîne l’annulation éventuelle de la fonction Pause.
Interruption
Touchez le bouton , jusqu’à ce que les LED audessus du sélecteur du foyer concerné
s’allument.
Dans un délai de 10 secondes, touchez le sélecteur du foyer allumé et déplacez votre doigt
vers la droite ou la gauche. La LED au-dessus de la touche Pause s’éteint et la table de
cuisson retrouve son état d’origine avant l’activation de la Pause.
Rétablir
Cette fonction permet de rétablir rapidement les réglages précédents après, par exemple,
une désactivation involontaire de la commande avec le bouton .
Après la désactivation, l’utilisateur dispose de 6 secondes pour remettre la table de cuisson
en marche et de 6 secondes supplémentaires pour actionner le bouton .
La fonction de rétablissement ne peut être utilisée que si au moins un foyer est en marche
(puissance > 0), que le verrouillage des touches soit actif ou non.
Indicateur de chaleur
résiduelle
La table de cuisson vitrocéramique dispose d’un indicateur de chaleur résiduelle . Le foyer
n’est pas chauffé directement, mais indirectement par la chaleur dégagée par la casserole. Une
fois le foyer éteint, le voyant reste allumé tant qu’il reste de la chaleur résiduelle, que vous
pouvez utiliser pour maintenir des aliments au chaud ou décongeler des aliments.
Le foyer est encore tiède quand le voyant s’éteint.
Attention! Risque de brûlure!
Booster
Certains foyers peuvent être chauffés avec une très forte puissance, pour un début de
cuisson très rapide. Vous pouvez ainsi chauffer rapidement de grandes quantités. La
fonction Booster reste active pendant 10 minutes. Le foyer passe alors automatiquement
à la puissance 9.
Lorsqu’un foyer fonctionne avec la fonction Booster, la puissance des autres foyers est
limitée. Leur voyant alterne alors entre la puissance réglée et la puissance réelle limitée en
raison de l’activation de la fonction Booster sur l’autre foyer.
Activation
Pour activer la fonction Booster, toucher le bouton du foyer voulu.
Le symbole s’affiche sur le panneau de commande.
Désactivation anticipée
Toucher le sélecteur du foyer concerné et déplacer le doigt: Jusqu’à pour éteindre le
foyer ou jusqu’à la puissance voulue.
SYSTÈME DE GESTION PUISSANCE
Le système de gestion de l’énergie répartit la puissance entre les zones de cuisson
disponibles disposées par paires (comme affiché dans les figures sur le côté), fournissant
ainsi une puissance maximale sur une zone de cuisson et réduisant automatiquement la
puissance disponible pour l’autre. L'affichage de la deuxième zone de cuisson alterne,
pendant quelques secondes, la puissance de cuisson choisie et la puissance limitée.
Dans certaines circonstances, la fonction de réglage puissance Extra peut
être désactivée automatiquement pour protéger les composants
électroniques à l'intérieur de la plaque de cuisson.
Démarrage
automatique de la
cuisson
Une fois cette fonction activée, le foyer concerné chauffe à la puissance maximale avant de
retourner automatiquement à la puissance réglée. Le démarrage automatique de la cuisson
peut être réglé pour chaque foyer et chaque puissance, à l’exception de la puissance «9»,
qui chauffe toujours à la puissance maximale.
Activation
Touchez un endroit quelconque du sélecteur pendant au moins 3 secondes sur le panneau
de commande du foyer concerné.
Choose the required continuous cooking level and hold it for 3 seconds.
Le symbole s’affiche pour indiquer l’activation du démarrage automatique de la cuisson.
La puissance réglée indique la valeur à laquelle le foyer chauffera à la fin du démarrage
automatique de la cuisson.
Le panneau de commande affiche en alternance et la puissance réglée.
Lorsque la durée indiquée dans le tableau est écoulée, la fonction s’éteint et l’affichage
Page 40

40
disparaît. Le démarrage automatique de la cuisson peut être désactivé à tout moment par
modification de la puissance.
Puissance 1 2 3 4 5 6 7 8
Durée de la fonction
autom.(minutes)
40 72 120 176 256 432 120 192
Foyer double zone
Cette fonction permet de commander deux foyers de même diamètre et de même
puissance. Ils sont alors activés en même temps et gérés par le biais d’un seul panneau de
commande.
Activation
Que les deux foyers soient réglés sur différentes puissances ou qu’ils soient tous deux
éteints:
Touchez le sélecteur des deux foyers en même temps:
– 1 et 2
– 3 et 4
Les deux foyers chauffent alors en même temps et les LED situées à droite des deux
panneaux de commande s’allument. La puissance s’affiche sur le panneau de commande,
alors que l’affichage du foyer sélectionné s’éteint.
Cette fonction est compatible avec la fonction minuteur. La LED des panneaux de
commande des deux foyers s’allume. Par contre, il n’est pas possible d’activer la fonction
Booster pour les deux foyers.
Le foyer double zone s’éteint automatiquement au bout de 10 minutes en l’absence de
casserole sur l’un des deux foyers. Le foyer non utilisé s’éteint, alors que le foyer sur lequel
une casserole a été détectée reste en marche avec la puissance réglée.
Désactivation
Touchez simultanément les panneaux de commande des deux foyers (comme pour activer
le foyer double zone).
La fonction est désactivée. Les panneaux de commande des deux foyers affichent et
peuvent à nouveau être programmés.
Chauffe-plats
Cette fonction permet de maintenir au chaud des plats déjà cuits. Elle peut également être
utilisée pour décongeler ou faire mijoter des aliments.
Activation
Touchez le bouton du foyer concerné. La fonction est activée dans le mode
«décongélation». ;
Touchez à nouveau le bouton pour activer la fonction «Chauffeplats». ;
Si vous touchez une troisième fois le bouton la fonction «Mijoter» s’active ;
La fonction Chauffe-plats s’annule quand vous actionnez une nouvelle fois le bouton
Safety switch off
Maximum continuous operation of a particular hotplate is limited, and the duration is
displayed in the above chart. When the hotplate is switched off by the safety mechanism, the
indicator displays symbols , or in case there is any remaining heat left.
Exemple: réglez le foyer sur la puissance 5 et laissez- le chauffer avec ce réglage. Si vous
ne modifiez pas la puissance, la fonction de sécurité éteint le foyer au bout de 210 minutes.
Power setting Minutes lapse prior safety switch off
480
480
480
1 516
2 402
3 318
4 258
5 210
6 138
7 138
8 108
9 90
P 10
Page 41

41
Protection surchauffe
La table à induction est dotée d’une protection contre la surchauffe, qui protège
l’électronique. La protection contre la surchauffe fonctionne sur plusieurs niveaux.
Lorsque la température du foyer atteint une valeur très élevée, le ventilateur biétagé se
met en marche. Si cela ne suffit pas, la fonction Booster est désactivée. La température
de cuisson de certains foyers diminue alors ou la protection surchauffe se déclenche et
éteint tout. Vous disposez à nouveau de la puissance maximale des foyers une fois que la
surface a refroidi.
Minuteur
Le minuteur de la table à induction facilite la surveillance du temps de cuisson.
Réglage du temps
La table à induction doit être en marche et le foyer pour lequel vous voulez régler le
minuteur doit être en service.
Touchez simultanément les boutons et . s’affiche. Le symbole d’horloge
s’allume à droite du premier panneau de commande en partant de la gauche.
Touchez plusieurs fois simultanément les boutons et , pour sélectionner le foyer
pour lequel vous voulez régler une durée. La ne s’allume que si le foyer est en
marche.
Dans un délai de 10 secondes après avoir touché les boutons et réglez la durée
du minuteur en touchant les boutons ou .
La durée réglée peut être affichée de la manière suivante:
-
En minutes et secondes, jusqu’à maximum 9 minutes et 59 secondes.
-
En heures et minutes, jusqu’à maximum 9 heures et 59 minutes. Dans ce cas,
s’affiche sous la durée.
La durée de cuisson peut être réglée individuellement pour chaque foyer.
Modifier la durée de cuisson réglée
La durée de cuisson peut être modifiée à tout moment pendant la marche.
Touchez simultanément les boutons et ;
Touchez plusieurs fois simultanément les boutons et pour sélectionner le foyer
pour lequel vous voulez modifier la durée de cuisson. Le foyer sélectionné est indiqué
par la sur la droite du panneau de commande;
Touchez les boutons ou ;
Si vous ne modifiez pas le réglage dans les 10 secondes suivant l’actionnement des
boutons et le minuteur conserve la durée réglée auparavant.
Temps restant
C’est toujours le plus petit temps restant qui s’affiche sur le panneau de commande (le
symbole d’horloge à droite du panneau de commande du foyer concerné est plus clair
que les autres.
Touchez simultanément les boutons et ;
Touchez plusieurs fois simultanément les boutons et pour sélectionner le foyer
pour lequel vous voulez afficher le temps restant. Le foyer sélectionné est indiqué par la
sur la droite du panneau de commande;
Le temps restant pour le foyer sélectionné s’affiche.
Eteindre le minuteur
Lorsque la durée réglée est écoulée, un signal retentit et le foyer s’éteint. Pour arrêter le
signal sonore, toucher le bouton ou . Sinon, il s’éteint automatiquement au bout de
2 minutes.
Arrêt du minuteur avant la fin de la durée réglée
Touchez simultanément les boutons et ;
Touchez plusieurs fois simultanément les boutons et pour sélectionner le foyer
pour lequel vous voulez désactiver la durée réglée. Le foyer sélectionné est indiqué par
la sur la droite du panneau de commande;
Touchez le bouton jusqu’à ce que la valeur s’affiche.
Le symbole d’horloge à droite du panneau de commande concerné s’éteint et le
minuteur automatique est désactivé.
Page 42

42
Fonction de rappel
L’affichage du temps peut être utilisé comme fonction de rappel, même s’il est déjà utilisé
pour le réglage du temps de cuisson.
Réglage de la fonction de rappel
Quand la table de cuisson est éteinte:
Touchez le bouton
Touchez simultanément les boutons et pour activer le minuteur. s’affiche.
- Si un foyer est allumé, le symbole d’horloge s’affiche sur le côté droit du panneau de
commande du premier foyer allumé.
Touchez plusieurs fois simultanément les boutons et pour activer la fonction de
rappel. Le symbole concerné s’affiche entre les boutons et
;
- Si aucun foyer n’est allumé, le symbole de la fonction de rappel s’affiche.
Pour afficher la durée réglée, toucher les boutons ou ;
La fonction de rappel peut être réglée soit en minutes et secondes, soit en heures et
minutes.
Désactivation
Une fois le temps réglé écoulé, un signal retentit. Pour l’arrêter, toucher les boutons ou
. Sinon, il s’éteint automatiquement au bout de 2 minutes.
Arrêt de la fonction de rappel avant la fin de la durée réglée:
Touchez simultanément les boutons et .
Touchez plusieurs fois simultanément les boutons et pour sélectionner la fonction
de rappel. Le symbole correspondant s’allume.
Touchez le bouton jusqu’à ce que la valeur s’affiche. La fonction de rappel est
désactivée.
FONCTIONS DE SÉCURITÉ ET MESSAGES D’ERREUR
Durant la période de garantie, confiez toutes les réparations aux professionnels du service après-vente agréé par le
fabricant.
Avant de commencer la réparation, il est impératif de mettre l’appareil hors tension en retirant les fusibles ou en
débranchant le cordon secteur.
Les interventions ou réparations effectuées par des personnes non qualifiées peuvent entraîner un risque de choc
électrique ou de court-circuit. Par conséquent, n’entreprenez aucune réparation vous-même. Confiez toute intervention à
un professionnel qualifié ou à un technicien de notre service après-vente.
En cas de défauts ou problèmes mineurs, reportez-vous aux conseils ci-dessous pour essayer de remédier vous-même
aux anomalies de fonctionnement.
Les prestations du Service Après-Vente réalisées durant la période de garantie seront facturées si le dysfonctionnement
est dû à une utilisation incorrecte de l’appareil.
Si le dysfonctionnement de l’appareil est dû à un raccordement non conforme ou à une utilisation incorrecte,
l’intervention du service après-vente n’est pas couverte par la garantie. Dans ce cas, la réparation sera à la charge du
client.
CODE D’ERREUR DESCRIPTION DE L’ERREUR INSTRUCTIONS
E03 or Er03 or
+ bip continu
Actionnement continu des boutons
(TOUCHES) pendant plus de 10
secondes dû à la présence d’objets ou
liquides sur le panneau de commande.
Enlevez les objets et/ou le liquide et nettoyez la
surface en verre. Si le problème persiste, veuillez
vous adresser au service après-vente d’un revendeur
agréé en indiquant le code d’erreur.
L
Aucune erreur!
Verrouillage parental activé.
Désactiver le verrouillage parental.
Poêle inappropriée. Utiliser une poêle appropriée. Si le problème persiste,
contactez le centre d'assistance technique agréé spécifiez le code d'erreur.
E8 Vitesse du ventilateur incorrecte; erreur
sur le ventilateur de droite ou de
gauche.
Evacuation bouchée, p. ex. par du papier. Si le
problème persiste, veuillez vous adresser au service
après-vente d’un revendeur agréé en indiquant le
code d’erreur.
Page 43

43
E21 o Er21
E22 o Er22
E20 o Er20
E36 o Er36
E31 o Er31
E47 o Er47
E2
EA
U400
E5
E6
E9
Veuillez vous adresser au service après-vente d’un revendeur agréé en indiquant le code
d’erreur.
NETTOYAGE ET ENTRETIEN
La surface en vitrocéramique doit être nettoyée après chaque utilisation, car toutes les
taches non éliminées brûlent et s’incrustent sur la surface chaude.
Pour le nettoyage quotidien, utilisez un produit spécial formant un film antisalissant.
Avant chaque utilisation, enlevez les restes de poussière de la surface en vitrocéramique et
les restes de saleté du fond de la casserole afin d’éviter de rayer les foyers (fig. 1).
N’utilisez pas d’éponges en acier ou de produit à récurer, car ils pourraient rayer la
surface.
Les produits à pulvériser ou les nettoyants non adaptés peuvent également attaquer la
surface (fig. 1 et fig. 2).
Les nettoyants agressifs, éponges en acier et fonds de casseroles encrassés peuvent
attaquer les inscriptions (fig. 2). Enlever les petites particules de saleté à l’aide d’un carré
vaisselle humide. Les fonds de casseroles et poêles doivent être secs avant d’être posés sur
la table à induction (fig. 3).
Les taches d’eau peuvent être supprimées avec une solution de vinaigre, qui ne doit
cependant pas être utilisée sur le cadre de certains modèles, car elle leur ferait perdre leur
brillant. N’utilisez pas de produits de nettoyage agressifs ou à pulvériser pour enlever les
résidus de calcaire (fig. 3).
Pour enlever les résidus coriaces, utilisez un produit spécial pour surfaces en
vitrocéramique. Suivez les instructions du fabricant du produit.
Enlevez tous les résidus de produit de nettoyage de la surface en vitrocéramique afin de ne
pas la rayer (fig. 3).
Supprimer les résidus coriaces ou incrustés à l’aide d’un grattoir vitrocéramique. Ne posez
pas la poignée en plastique du grattoir sur la plaque chaude (fig. 4).
Utilisez le grattoir avec précaution pour ne pas vous blesser! Le sucre et les aliments à forte
teneur en sucre peuvent endommager durablement la surface en vitrocéramique (fig. 5). Il
est par conséquent impératif d’éliminer immédiatement avec le grattoir les restes de sucre,
même s’ils sont encore chauds (fig. 4).
Les changements de couleur de la surface en vitrocéramique n’ont aucune influence sur le
fonctionnement ou la stabilité de la table à induction. Ils sont dus à l’utilisation de casseroles
en cuivre ou en aluminium ou à la présence de restes de nourriture sur le fond des
casseroles et ne peuvent être supprimés qu’avec beaucoup de difficulté.
Toutes les modifications décrites cidessus sont purement esthétiques et n’ont
aucune influence directe sur le fonctionnement de l’appareil. Elles ne peuvent pas faire
l’objet d’une garantie.
Fig.1
Fig.2
Fig.3
Fig.4
Fig.5
Page 44

44
Page 45

45
DE
Sehr geehrte Kundin,
sehr geehrter Kunde
Dieser Gerät ist für den Gebrauch im Haushalt bestimmt.
Zum Verpacken unserer Geräte werden umweltfreundliche Materialien verwendet, die
ohne Gefahr für die Umwelt wiederverwertet, entsorgt oder vernichtet werden können.
Hierzu sind die Verpackungsmaterialien entsprechend gekennzeichnet.
Sobald die Lebensdauer Ihres Geräts abgelaufen ist, sorgen Sie dafür, dass die Umwelt
mit dem ausgedienten Gerät nicht belastet wird und bringen Sie es zu einer autorisierten
Sammelstelle für elektrische und elektronische Altgeräte.
Gebrauchsanleitung
Die Gebrauchsanleitung ist für den Benutzer bestimmt und beschreibt das Gerät und
seine Bedienung. Diese Anleitung wurde für verschiedene Gerätetypen verfasst,
deswegen können auch einige Funktionen beschrieben sein, die Ihr Gerät nicht enthält.
Diese Gebrauchsanleitung gilt nur, wenn das Symbol des jeweiligen Landes auf dem
Gerät angebracht ist. Falls das entsprechende Ländersymbol nicht auf dem Gerät
angebracht ist, müssen Sie die technischen Hinweise für den Umbau des Geräts gemäß
den Vorschriften des Landes berücksichtigen, in welchem das Gerät betrieben wird.
Anschlusshinweise
Der Anschluss des Geräts ist in Einklang mit den beigelegten Hinweisen und unter
Beachtung der einschlägigen Vorschriften und Normen durchzuführen. Die
Anschlussarbeiten dürfen nur von einem qualifizierten Fachmann durchgeführt werden.
Typenschild
Das Typenschild mit allen Daten des Geräts ist auf der Unterseite der Kochmulde
angebracht.
Der Hersteller bemüht sich um kontinuierliche Verbesserungen. Aus diesem Grund
können Text und Abbildungen in dieser Gebrauchsanleitung ohne Vorankündigung
geändert werden.
Bewahren Sie die Gebrauchsanleitung so auf, dass sie immer griffbereit ist. Wenn
Sie das Gerät verkaufen, legen Sie dem Gerät die Gebrauchsanleitung bei.
Wichtige hinweise 46
Einbau 47
Anschluss an das stromversorgungsnetz 48
Technische daten 49
Betrieb 51
Sicherheitsfunktionen und fehlermeldungen 57
Reinigung und Pflege 58
Page 46

46
WICHTIGE HINWEISE
Das Gerät und seine frei zugänglichen Teile werden während des Betriebs sehr heiß, deswegen sollten Sie das
Berühren der Heizelemente vermeiden. Kinder unter 8 Jahren sollen sich nicht in der Nähe des Geräts aufhalten, es sei
denn, sie sind die ganze Zeit unter der Aufsicht von Erwachsenen.
Erlauben Sie Kindern nicht, sich in der Nähe des Geräts aufzuhalten. Erklären Sie ihnen die Risiken der
Verbrennungsgefahr.
Dieses Gerät kann von Kindern ab acht Jahren sowie von Personen mit verminderten körperlichen, sensorischen und
mentalen Fähigkeiten oder Mangel an Erfahrung und/oder Wissen benutzt werden, wenn sie entsprechend beaufsichtigt
werden oder bezüglich des sicheren Gebrauchs des Geräts unterwiesen wurden und die daraus resultierenden Gefahren
verstanden haben.
Kinder sollen mit dem Gerät nicht spielen.
Kinder sollen ohne entsprechende Aufsicht von Erwachsenen das Gerät nicht reinigen oder Instandhaltungsarbeiten am
Gerät ausführen.
Unbeaufsichtigtes Kochen oder Braten mit Öl oder Fett kann gefährlich sein, weil sich überhitztes Fett auf dem
Kochfeld plötzlich entzünden und einen Brand verursachen kann, deswegen sollten Sie die Zubereitung von solchen
Speisen (z.B. pommes frites) ständig beaufsichtigen. Versuchen Sie nicht, einen Brand mit Wasser zu löschen; schalten
Sie die Kochzone sofort aus und bedecken Sie die Brandstelle mit einem Topfdeckel von entsprechender Größe oder mit
einer feuchten Plane.
Brandgefahr! Auf dem Kochfeld keine Gegenstände aufbewahren.
Ein Glaskeramikkochfeld, das Risse oder Sprünge aufweist, darf nicht benutzt werden. Falls im Kochfeld Risse
oder Sprünge sichtbar sind, müssen Sie sofort die Stromzufuhr zum Gerät unterbrechen, um die Möglichkeit eines
elektrischen Schlags zu verhindern.
Verwenden Sie zum Reinigen des Geräts keine Dampf- oder Hochdruckreiniger, da dies zu Stromschlägen führen kann.
Auf dem Kochfeld keine Metallgegenstände (Messer, Löffel, Gabeln, Topfdeckel und Ähnliches) stellen, weil diese sehr
heiß werden können.
Das Kochfeld kann nicht durch externe Zeitschaltuhren oder Fernbedienungssysteme aktiviert werden.
Verwenden Sie die Kochmulde nicht zur Beheizung des Raumes.
Beim Anschluss von anderen Geräten an Steckdosen in Herdnähe ist darauf zu achten, dass das Anschlusskabel dieser
Geräte nicht mit den heißen Kochzonen in Berührung kommt.
Keine temperaturempfindlichen Gegenstände, Materialien oder Stoffe wie z. B. Reinigungsmittel, Sprays u.Ä. unter dem
Kochfeld aufbewahren.
Im Störungsfall das Gerät umgehend vom Netz trennen und den nahegelegenen Kundendienst anrufen.
Das Gerät wurde in Einklang mit den geltenden Sicherheitsnormen hergestellt.
Das Kochfeld nicht mit Verlängerungskabeln mit mehreren Steckdosen an das Stromversorgungsnetz anschließen, weil
diese keine entsprechende Sicherheit gewährleisten (es kann zur Überhitzung des Verlängerungskabels kommen).
Schließen Sie das Gerät mit einem fixen Anschluss an das Stromversorgungsnetz an.
Der Einbau des Geräts in eine Küchenarbeitsplatte und der Anschluss an das Strom- dürfen nur von einem
entsprechend qualifizierten Fachmann durchgeführt werden.
Stellen Sie niemals leere Kochtöpfe auf die eingeschalteten Kochzonen/Kochstellen.
Verwenden Sie das Glas nicht als Arbeitsfläche. Scharfe Gegenstände können die Glas zerkratzen.
Die Zubereitung von Speisen in dünnen Aluminium- und Kunststoffbehältern auf heißen Kochzonen ist nicht gestattet.
Keine Gegenstände aus Kunststoff oder Alufolie auf die heiße Kochzone stellen.
Nach längerer Verwendung von Gusseisenplatten, können sich die Kochmulde und der Rand der Kochzone verfärben.
Ein diesbezüglicher Eingriff des Kundendienstes wird nicht durch die Garantie gedeckt.
Wenn das Gerät über einem Ofen mit Pyrolyseanlage eingebaut ist, sollte es nicht während des Pyrolyseprozesses
betrieben werden, da sonst der Überhitzungsschutz ausgelöst werden könnte.
Das Symbol auf dem Produkt oder seiner Verpackung weist darauf hin, dass dieses Produkt nicht
als Hausmüll entsorgt werden darf. Das ausgediente Gerät muss an einer Sammelstelle für das
Recycling von elektrischen und elektronischen Geräten abgegeben werden. Durch die korrekte
Entsorgung dieses Produktes helfen Sie mögliche negative Folgen für die Umwelt und die
menschliche Gesundheit zu vermeiden, die durch unsachgemäße Entsorgung dieses Produktes
entstehen könnten. Für weitere Informationen über das Recycling dieses Produkts wenden Sie
sich bitte an Ihre Gemeindeverwaltung, Müllabfuhr oder das Geschäft, in dem Sie das Produkt
gekauft haben.
Page 47

47
EINBAU
Wichtige Hinweise
Der Einbau des Geräts in eine Küchenarbeitsplatte dürfen nur von einem entsprechend qualifizierten Fachmann
durchgeführt werden.
Das Furnier bzw. die Beschichtung der Küchenmöbel, in welche die Kochmulde eingebaut werden soll, müssen mit
hitzebeständigem Kleber (100°C) verarbeitet sein, sonst kann es wegen geringer Temperaturbeständigkeit der
Materialien zu Farb- und Formänderungen kommen.
An jeder Seite des Geräts soll genug freier Platz zur Verfügung stehen. An der Rückseite des Geräts kann eine Wand
sein, an einer Seite des Geräts kann eine Wand oder ein Küchenhochschrank sein. Auf der anderen Seite sollte keine
Einheit oder Trennwand höher sein als das Kochfeld.
NICHT ERLAUBT NICHT EMPFOHLEN NICHT EMPFOHLEN EMPFOHLEN
Die Verwendung von Dekorplatten oder Abschlussleisten aus massivem Holz auf der Arbeitsplatte hinter der Kochmulde
ist nicht zulässig.
Der Mindestabstand zwischen dem Geräterand und dem benachbarten Küchenhochelement soll mindestens 250 mm
betragen.
Alle Dimensionen und Abstände, die für eine störungsfreie Funktion des Geräts notwendig sind, sind auf den
Abbildungen unten dargestellt.
Das unter der Kochmulde liegende Küchenelement darf keine Schublade besitzen. Falls das Küchenelement über eine
waagrechte Trennwand verfügt, muss diese mindestens 20mm von der unteren Fläche der Arbeitsplatte entfernt sein.
Der Raum zwischen der Trennwand und der Kochmulde muss leer sein, es dürfen dort keine Gegenstände abgelegt
werden.
Über der Kochmulde hängende Küchenelemente müssen so hoch montiert sein, dass sie den Arbeitsablauf nicht
behindern.
Der Abstand zwischen der Kochmulde und der Dunstabzugshaube muss so groß gewählt werden, wie es in der
Montageanleitung der Dunstabzugshaube angegeben ist. Falls die Anweisungen des Herstellers nicht verfügbar sind
oder brennbare Gegenstände (z. B. Schienen für Utensilien, Hängeschränke usw.) oberhalb des Geräts angebracht sind,
der Mindestabstand beträgt 800 mm.
Installieren Sie Hängeschränke oder eine Dunstabzugshaube vor der Montage des Geräts, um Beschädigungen des
Geräts zu vermeiden.
Auf der Vorderseite muss ein mindestens 5 mm großer Spalt freigelassen werden.
Das Gerät darf nicht, über einem Kühlschrank, einer Kühl-Gefrierkombination, einem Gefrierschrank, Geschirrspüler,
einer Waschmaschine oder Waschmaschine-/Trockner-Kombination oder Wäschetrockner installiert werden.
Unter der Kochmulde dürfen nur mit Kühlventilatoren ausgestattete Backöfen eingebaut werden .
Vor dem Einbau des Backofens muss im Bereich der Einbauöffnung unbedingt die Rückwand des Küchenelements
entfernt werden. Ebenso muss eine mind. 5 mm große Öffnung auf der Vorderseite freigelassen werden.
a ≥ 800 mm
b ≥ 50 mm
c ≥ 20 mm
d ≥ 80 mm
e ≥ 5 mm
f ≥ 30 mm
g ≥ 250 mm
Page 48

48
A
900 mm
B
400 mm
C
870 mm
D
370 mm
E
45 mm
F
5 mm
G
≥ 50 mm
H
≥ 600 mm
Montage der
Schaumdichtung
(für Glas-Geräte)
Vor dem Einbau des Geräts in die Öffnung der Küchenplatte, muss auf die Unterseite der
Glas die dem Gerät beigelegte Schaumdichtung geklebt werden.
Der Einbau des Geräts ohne Schaumdichtung ist nicht gestattet!
Montieren Sie die Dichtung auf die Kochmulde wie folgt:
Schutzfolie von der Dichtung abziehen.
Dichtung auf die Unterseite der Kochmulde kleben und zwar A=2 bis 3 mm vom Rand
entfernt; die Dichtung muss über den kompletten Rand geklebt werden und darf sich an
den Ecken nicht überdecken.
Bei der Montage der Dichtung dafür sorgen, dass die Glaskeramikoberfläche nicht durch
scharfe Gegenstände zerkratzt wird.
ANSCHLUSS AN DAS STROMVERSORGUNGSNETZ
Der Anschluss darf nur von einem qualifizierten Elektrofachmann durchgeführt werden.
Die Schutzvorrichtung der elektrischen Installation muss den gültigen Vorschriften
entsprechen.
Die Anschlussklemmen sind nach Entfernung der Klemmenabdeckung zugänglich.
Überprüfen Sie vor dem Anschluss, ob die auf dem Typenschild angegebene Spannung
mit der Netzspannung der Hausinstallation übereinstimmt. Die Anschluss-Spannung ist
von einem qualifizierten Fachmann mit einem Messinstrument zu überprüfen!
Das Typenschild mit allen Daten ist auf der unteren Seite der Kochmulde angebracht.
Bei einer festen Verbindung des Geräts mit dem Stromnetz, ist eine allpolige
Trennvorrichtung zwischen Gerät und Stromversorgungsnetz zu installieren. Diese
Trennvorrichtung muss über eine Kontakttrennung an allen Polen verfügen und bei
Vorfällen der Überspannungskategorie III die volle Trennung vom Netz gewährleisten.
Stromführende und isolierte Teile müssen nach dem Einbau vor direktem Kontakt
geschützt sein.
Vor jedem Eingriff sicherstellen, dass das Gerät stromlos geschaltet ist. Der Anschluss
an das Stromversorgungsnetz ist gemäß dem beiliegenden Schaltbild durchzuführen;
vergewissern Sie sich, dass die Daten auf dem Typenschild mit den Daten der
Hausinstallation übereinstimmen!
Der Schutzleiter ist an die mit dem Erdungszeichen markierte Anschlussklemme
anzuschließen.
Das Anschlusskabel unbedingt durch eine Zugentlastungsklemme führen, die das Kabel
vor ungewolltem Herausziehen schützt.
Schalten Sie nach dem Anschluss das Gerät ca. drei Minuten lang alle
Kochzonen/Kochbrenner ein und überprüfen Sie das Gerät auf einwandfreie Funktion.
Wegen eines unsachgemäß durchgeführten Anschlusses können Geräteteile beschädigt
werden, in einem solchen Fall verliert die Garantie ihre Gültigkeit.
Das Anschlusskabel auf der Hinterwand des Geräts ist so zu verlegen, dass es die
Hinterseite der Kochmulde nicht berührt, weil sich diese während des Betriebs stark
erwärmt.
Grundeinstellung der
Schaltflächen
Beim Anschluss an die Stromversorgung wird automatisch eine Grundeinstellung der
Schaltflächen vorgenommen, um deren optimale Funktion sicherzustellen.
Sämtliche Anzeigen leuchten für einige Sekunden auf. Während der
Schaltflächeneinstellung dürfen sich keine Gegenstände auf dem Bedienfeld befinden.
Andernfalls wird die Einstellung unterbrochen, bis die Gegenstände entfernt werden.
So lange kann das Kochfeld nicht benutzt werden.
Page 49

49
Anschluss
Zum Anschluss können folgende Anschlusskabel verwendet werden: H05V2V2-F
LINIE L BRAUN
ERDLEITER GELB / GRÜN
NEUTRAL N BLAU
TECHNISCHE DATEN
7334245
Betriebsspannung 220-240 V~ o 380-415 V 2N~
Netzfrequenz 50/60 Hz
P
TOT
7400 W
18,4x22 cm / 2,1 kW (P=3,7 kW)
P= MAXIMALLEISTUNG
ENERGIEEFFIZIENZ
ELEKTRISCHE ZONE EC
ELEKTRISCHE ZONE
18,9x24,5 cm 189,6 Wh/kg
TIP EINGEBAUT
ANZAHL INDUKTIONSZONEN
2
EE
ELEKTRISCHER PLAN
189,6 Wh/kg
Funktionsprinzip des
Kochfelds
Die Oberfläche des Kochfelds ist eben und randlos, um Schmutzablagerungen zu
vermeiden.
Das Kochfeld besteht aus hocheffizienten Induktionskochzonen. Die Wärme wird direkt
im Boden des Kochgeschirrs und somit genau dort erzeugt, wo sie gebraucht wird –
ohne unnötige Verluste über die Glaskeramikoberfläche. Dadurch wird im Vergleich zu
herkömmlichen Kochstellen, die erhitzt werden müssen, wesentlich weniger Energie
verbraucht.
Die Glaskeramikoberfläche wird nicht direkt erhitzt, sondern erwärmt sich durch die
Wärme, die vom Topf abstrahlt. Diese (nach dem Abschalten noch vorhandene) Wärme
wird als «Restwärme» bezeichnet. Die Erwärmung auf einem Induktionskochfeld wird
durch die Induktionsspule sichergestellt, die sich unter der Glaskeramikoberfläche
befindet. Die Spule erzeugt ein gleichmässiges Magnetfeld. Dadurch bilden sich im
Boden des (ferromagnetischen) Kochtopfes Wirbelströme, die den Topf erhitzen.
Page 50

50
Induktionsgeeignete
Kochtöpfe
Das Induktionskochfeld funktioniert einwandfrei, wenn Sie geeignetes Kochgeschirr
verwenden.
Platzieren Sie die Kochtöpfe und Pfannen während des Kochvorgangs in der Mitte der
Kochstelle.
Induktionsgeeignetes Kochgeschirr besteht aus Stahl oder ist stahlbeschichtet oder
stahlgegossen. Nicht induktionsgeeignet sind dagegen Stahlpfannen mit Kupfer- oder
Aluminiumboden oder Glasgeschirr.
Bei Verwendung eines Dampfkochtopfes ist dieser zu beaufsichtigen, bis er den
richtigen Druck erreicht hat. Nach dem Einschalten arbeitet die Kochstelle mit maximaler
Leistung. Danach lässt sich die Leistung je nach den Angaben des
Kochgeschirrherstellers über die entsprechenden Schaltflächen verringern.
Achten Sie beim Kauf von Kochgeschirr auf den Hinweis «Induktionsgeeignet».
KOCHSTELLEN Ø MIND. PFANNENBODEN Ø MAX. PFANNENBODEN
184x220 mm
(Einzelkochstelle)
Ø 115 mm Ø 180 mm
184x220 mm
(Einzelkochstelle) mit
Kombifunkton
Ø 135 mm Ø 180 mm
184x220 mm
(Doppelkochstelle)
mit Kombifunkton
2 Kochstellen - 380x220 mm
4 Kochstellen Ø 330 mm Ø 400 mm
Hinweis:
Nach Aktivieren der Kombifunktion lässt sich die Kochstelle auf zweierlei Arten nutzen:
• mit zwei Kochtöpfen
• mit einem Kochtopf
Bei der Verwendung von Kochgeschirr, das den empfohlenen Maximaldurchmesser
überschreitet, dauert das Erwärmen länger, da sich die Hitze vom Mittelpunkt der
Geschirrs zu den Rändern hin ausbreitet. In diesem Fall ist auch die Temperaturverteilung
sehr ungleichmässig.
Magnettest
Mit Hilfe eines kleinen Magneten A lässt sich leicht feststellen, ob der Pfannenboden
magnetisch ist. Verwenden Sie nur Kochtöpfe und Pfannen, an deren Boden der Magnet
haften bleibt.
Topferkennung
Einer der Vorteile von Induktionsherden ist die Topferkennung.
Wenn auf dem Kochfeld keine Töpfe oder solche mit einem kleineren Durchmesser als
der des Kochfeldes stehen, kommt es zu keinerlei Energieverschwendung. Nach dem
Einschalten des Kochfeldes leuchtet auf dem Bedienfeld das Kochsymbol auf.
Wenn Sie innert 10 Minuten nach dem Einschalten einen Topf auf der Kochstelle
platzieren, so wird dieser erkannt und die Kochstelle auf den eingestellten Wert erhitzt.
Sobald Sie den Topf von der Kochstelle nehmen, wird die Energiezufuhr unterbrochen.
Die Kochstelle erkennt auch, wenn Sie einen Topf mit kleinerem Durchmesser verwenden
und reduziert dementsprechend die Energiemenge zum Erwärmen eines kleineren
Topfbodens.
Das Kochfeld wird beschädigt,
wenn es nach dem Einschalten leer bleibt oder ein leerer Topf darauf abgestellt wird,
wenn Sie nicht geeignete Töpfe verwenden (beispielsweise mit nicht ebenem Boden
oder einem zu kleinen Durchmesser).
Verwenden Sie keine Tontöpfe, da diese die Glaskeramikoberfläche verkratzen.
Vor dem Einstellen des Topfes auf dem Kochfeld muss dieses komplett trocken sein, um
die Wärme gut zu übertragen und um die Oberfläche des Kochfelds nicht zu
beschädigen.
Verwenden Sie zum Kochen und Braten ferromagnetische Pfannen und Töpfe, also
Kochgefässe aus Stahl oder stahlbeschichtetes bzw. Stahlgegossenes Kochgeschirr.
Nur dann funktioniert das Induktionskochfeld.
Page 51

51
Kochstufen
Die Leistung der Kochstellen ist in neun unterschiedliche Kochstufen unterteilt.
Die Tabelle liefert einige Beispiele für die unterschiedlichen Einstellungen.
Stufe Anwendung
0 Ausschalten, Nutzen der Restwärme
1-2 Warmhalten von Speisen, Kochen von kleinen Portionen
3 Langsames Garen (fortgesetztes Garen nach starker Erhitzung)
4-5 Langsames Garen von grossen Mengen
6 Anbraten, Rösten von Speisen
7-8 Rösten von Speisen
9 Kochbeginn, Braten
A Automatische Schnellerwärmung
P
Besonders kräftige Kochstufe für die Zubereitung von grossen
Speisemengen
Tipps zu Energiesparen
Beachten Sie beim Kauf von Kochgeschirr, dass sich der angegebene Durchmesser
immer auf den Deckel bezieht und somit grösser als der Topfboden ist.
Dampfkochtöpfe eignen sich besonders zum Energiesparen, da sie auf Grund des
hohen Drucks eine kürzere Garzeit benötigen. Wegen der kürzeren Garzeiten bleiben
auch Vitamine besser erhalten.
Achten Sie beim Verwenden eines Dampfkochtopfs darauf, dass immer genügend
Flüssigkeit vorhanden ist, da es sonst zu einer Überhitzung kommt, wodurch sowohl der
Topf als auch das Kochfeld beschädigt werden können.
Verwenden Sie immer zum Kochgeschirr passende Deckel.
Verwenden Sie Topfgrössen, die den Mengen der zubereiteten Speisen entsprechen.
Das Kochen mit halbvollen Töpfen ist Energieverschwendung.
BETRIEB
• Nach dem Einschalten des Glaskeramikkochfelds leuchten (kurzfristig) alle Anzeigen
auf. Das Kochfeld ist betriebsbereit.
• Das Kochfeld ist mit elektronischen Schaltflächen ausgestattet, die sich einschalten,
wenn deren Oberfläche länger als eine Sekunde lang berührt wird.
• Das Aktivieren der Schaltflächen wird durch ein akustisches Signal bestätigt.
• Legen Sie keine Gegenstände auf den Schaltflächen ab (Fehlermeldung_ ).
• Achten Sie darauf, dass das Bedienfeld immer sauber bleibt.
Bedienelemente
A. Schaltfläche zum Ein- und Ausschalten des Kochfelds
B. Pausentaste
C. Kindersicherung
D. Zeitschaltuhr (–)
E. Zeitschaltuhr (+)
F. Regler
G. Warmhaltefunktion
H. Boosterfunktion
L. Zeitschaltautomatik
Reglerfunktion
0
Mittlere Leistung
Maximale Leistung
Page 52

52
Einschalten der
Kochstelle
Drücken Sie mindestens 1 Sekunde lang auf die Schaltfläche
Das Kochfeld ist eingeschaltet und alle Leistungsanzeigen zeigen an.
Die nächste Einstellung muss innert 10 Sekunden erfolgen. Andernfalls schaltet
sich das Kochfeld wieder aus.
Einschalten der
Kochfelds
Nach dem Einschalten des Kochfelds durch Berühren der Schaltfläche , kann innert
der nächsten 10 Sekunden die gewünschte Kochstelle ausgewählt werden. Durch
Berühren und Verschieben des Reglers auf dem Bedienfeld der gewünschten Kochstelle
lässt sich eine Kochstufe zwischen 1 und 9 einstellen.
Mit der ersten Berührung wird der Wert am Berührungspunkt eingestellt. Je nach
eingestelltem Wert leuchtet über dem Regler die entsprechende Anzahl von
Punkten auf.
Verschieben Sie den Regler mit dem Finger, um die gewünschte Kochstufe
auszuwählen: durch Schieben nach rechts wird der Wert erhöht, durch Schieben
nach links verringert sich der Wert.
Wenn Sie den Finger vom Regler nehmen, erwärmt sich die Kochstelle bis zur
eingestellten Leistung.
Durch mindestens 3 Sekunden währendes Berühren des Reglers wird die
Ankochautomatik aktiviert (siehe Kapitel Ankochautomatik).
Ausschalten der
Kochfelds
Die angewählte Kochstelle muss eingeschaltet sein.
Durch Berühren des Anfangsregelbereichs wird die Leistung auf gesetzt. Das
Ausschalten wird durch ein kurzes akustisches Signal bestätigt.
Ausschalten der
Kochstelle
Das Kochfeld lässt sich jederzeit durch Berühren der Schaltfläche ausschalten.
Es ertönt ein akustisches Warnsignal und alle Anzeigen erlöschen – mit Ausnahme
derer, die die Restwärme durch den Buchstaben anzeigen.
Durch Ausschalten des Kochfelds vor dem Garende lässt sich durch Nutzen der
Restwärme Energie sparen.
Bedienfeld sperren
Durch Aktivieren der Sicherheitsfunktion lässt sich das Kochfeld sperren.
Aktivierung
Das Kochfeld muss eingeschaltet sein.
Berühren Sie die Schaltfläche ür zirka 1 Sekunde, bis die LED über der Taste zu
leuchten beginnt. Damit ist die Sperre aktiviert.
Mit der Sicherheitsfunktion werden alle Schaltflächen vor der versehentlichen Aktivierung
geschützt. Davon ausgenommen sind die Schaltflächen und .
Wenn das Kochfeld bei aktiver Sperre ausgeschaltet wird, so bleibt diese bis zum
nächsten Einschalten gespeichert.
Wenn eingestellte Zeitschaltuhren abgelaufen sind, lassen sich die Signaltöne durch
Drücken der Tasten oder ohne Aufheben der Sperre abstellen.
Deaktivierung
Das Kochfeld muss eingeschaltet sein.
Berühren Sie die Schaltfläche für zirka 1 Sekunde; das Aufheben der
Bedienfeldsperre wird durch einen kurzen Signalton angezeigt.
Kindersicherung
Diese Funktion kann nur nach dem Einschalten des Kochfelds durch Drücken der
Schaltfläche aktiviert/deaktiviert werden
Aktivierung
• Drücken Sie gleichzeitig und und drücken Sie dann erneut .
• Die Funktion ist aktiv und alle Displays zeigen an
• Die Bedienung des Kochfelds ist gesperrt und schaltet sich nach 10 Sekunden
automatisch aus.
Die Kindersicherung deaktiviert alle Schaltflächen außer . Nach der Aktivierung
bleibt die Elektronik auch bei Aus- und Wiedereinschalten der Steuerung gesperrt.
Page 53

53
Deaktivierung
• Drücken Sie gleichzeitig innerhalb von 10 Sekunden und und drücken Sie dann
erneut .
Die Funktion ist nicht aktiv.
Einmalige Entsperrung (für einen Kochvorgang)
• Drücken Sie gleichzeitig und .
• Die Kindersicherung ist für den Kochvorgang ausgeschaltet.
• Nach dem Ausschalten des Kochfelds ist die Kindersicherung reaktiv und somit beim
Wiedereinschalten des Kochfelds aktiv.
Pausenfunktion
Die Funktion kann nur dann ausgeführt werden, wenn zumindest eine Kochstelle
eingeschaltet ist. Die Pausenfunktion kann auch dann aktiviert werden, wenn bestimmte
Fehler an der Kochstelle vorliegen. Die Fehlermeldungen sind dabei ausgeblendet. Auch
die Restwärmeanzeige oder Sondermeldungen wie
, oder
sind ausgeblendet, da
die Pausenfunktion Vorrang hat. Falls während der Pause ein allgemeiner Fehler auftritt,
so schaltet die Steuerung ab und beendet die Pausenfunktion.
Aktivierung
Berühren Sie die Schaltfläche mindestens 1 Sekunde lang, bis die Led über der
Taste zu leuchten beginnt und alle Bedienfelder anzeigen.
Während der Pausenfunktion
Bereits programmierte Zeitschaltuhren werden angehalten und laufen nach Beendigung
der Pausenfunktion weiter.
Das automatiche Vorheizen und die BoosterFunktion werden ausgeschaltet.
Die Berechnung der Restwärme und die Begrenzung der Betriebszeit werden
fortgesetzt.
Die anderen durch LED angezeigten Funktionen (Zeitschaltuhr, Mehrfachkreisläufe etc.)
werden je nach Zustand weiter angezeigt.
Die Pausenfunktion dauert maximal 10 Minuten.
Wenn die Funktion innerhalb dieses Zeitraums nicht beendet wird, schaltet sich die
Steuerung ab. Die Kochstelle kann jederzeit über die Schaltfläche ein- oder
ausgeschaltet werden. Dadurch wird die eventuell aktivierte Pausenfunktion be endet.
Deaktivierung
Berühren Sie die Schaltfläche , bis die LEDs über dem Regler der betreffenden
Kochstelle aufleuchten.
Berühren Sie innert der nächsten 10 Sekunden den Regler der beleuchteten Kochstelle
und verschieben Sie ihn von links nach rechts. Die LED über der Pausentaste erlischt
und das Kochfeld kehrt in die vor der Pause gewählte Betriebsart zurück.
Wiederherstellen
Mit dieser Funktion lassen sich die zuvor gewählten Einstellungen schnell wieder
aufrufen, wenn man beispielsweise durch versehentliches Berühren der Schaltfläche
die Bedienung deaktiviert hat.
Nach dem Ausschalten bleiben dem Bediener 6 Sekunden zum erneuten Einschalten und
weitere 6 Sekunden zum Betätigen der Schaltfläche . Die Wiederherstellungsfunktion
kann nur dann verwendet werden, wenn mindestens eine Kochstelle eingeschaltet ist
(Kochstufe > 0), unabhängig davon, ob die Tastensperre aktiv ist oder nicht.
Restwärmeanzeige
Das Glaskeramikkochfeld verfügt über eine Restwärmeanzeigeindicator . Die
Kochstelle wird nicht direct erwärmt, sondern durch die Wärmeabstrahlung des
Kochtopfes erhitzt. Nach dem Ausschalten der Kochstelle leuchtet die Anzeige weiter,
solange noch Restwärme vorhanden ist, die Sie zum Warmhalten von Speisen oder zum
Auftauen von Lebensmitteln verwenden können.
Auch wenn die Anzeige erlischt, ist die Kochstelle noch warm.
Achtung! Verbrennungsgefahr!
Powerstufe
Für schnelles Ankochen können die entsprechend gekennzeichneten Kochstellen mit
besonders hoher Leistung betrieben werden. So können Sie dank zusätzlicher Leistung
auch grosse Mengen schnell erhitzen. Die Powerstufe bleibt 10 Minuten lang aktiv und
Page 54

54
wird anschliessend automatisch auf die Kochstufe 9 zurückgeschaltet.
Bei aktivierter Powerstufe ist die Leistung der anderen Kochstellen begrenzt. Die Anzeige
erfolgt durch das abwechselnde, kurzzeitige Aufleuchten der eingestellten Kochstufe und
der auf Grund der aktivierten Powerstufe begrenzten Leistung auf der anderen Kochstelle.
Aktivierung
Die Powerstufe wird durch Berühren der Schaltfläche der gewünschten Kochstelle
aktiviert;
Auf dem Bedienfeld wird das Symbol angezeigt.
Vorzeitiges Ausschalten der Powerstufe
Den Regler der gewünschten Kochstelle berühren und verschieben: Bis zur wenn die
Kochstelle ausgeschaltet werden soll, ansonsten bis zur gewünschten Kochstufe.
POWER-MANAGEMENT-SYSTEM
Das Power-Management-System verteilt die Leistung auf die verfügbaren, paarweise
angeordneten Kochzonen (z. B. nebenstehende Abbildungen), sorgt für maximale
Leistung an einer Kochzone und reduziert automatisch die verfügbare Leistung für die
andere. Das Display der zweiten Kochzone zeigt für einige Sekunden die gewählte
Kochleistung und die begrenzte Leistung abwechselnd an.
Unter bestimmten Umständen kann sich eine besonders starke
Kochfunktion zum Schutz der elektronischen Komponenten im Inneren des
Kochfelds automatisch ausschalten.
Ankochautomatik
Nach dem Aktivieren dieser Funktion arbeitet die betreffende Kochstelle je nach
eingestellter Leistungsstufe mit maximaler Leistung, um dann automatisch auf die für die
jeweilige Kochstufe eingestellte Leistungsstufe zurückzuschalten. Die Ankochautomatik
kann für jede Kochstelle und jede Kochstufe eingestellt werden, mit Ausnahme der
Kochstufe «9», die immer mit maximaler Leistung arbeitet.
Aktivierung
Berühren Sie für mindestens 3 Sekunden eine beliebige Stelle des Reglers auf dem
Bedienfeld der gewünschten Kochstelle. Es erscheint das Symbol das die Aktivierung
der Ankochautomatik anzeigt. Die eingestellte Kochstufe zeigt den Wert an, mit dem die
Kochstelle am Ende der Ankochautomatik arbeitet.
Auf dem Bedienfeld werden abwechselnd und die eingestellte Kochstufe angezeigt.
Nach Ablauf des in der Tabelle angegebenen Zeitraums wird die Funktion ausgeschaltet
und die Anzeige erlischt. Die Ankochautomatik kann jederzeit durch Verändern der
Kochstufe deaktiviert werden.
Stufe 1 2 3 4 5 6 7 8
Dauer der
Automatikfunktion
40’’ 72’’ 120’’ 176’’ 256’’ 432’’ 120’’ 192’’
Kombinieren von
Kochstellen
Mit dieser Funktion können Sie zwei Kochstellen mit gleichem Durchmesser und
gleicher Leistung steuern. Beide Kochstellen werden gleichzeitig aktiviert und über nur
ein Bedienfeld gesteuert.
Aktivierung
Ganz gleich, ob die beiden Kochstellen auf unterschiedlichen Stufen betrieben werden
oder auf 0 stehen:
Berühren Sie gleichzeitig eine beliebige Stelle des Reglers auf den Bedienfeldern der
Kochstellen:
– 1 und 2
– 3 und 4.
Die beiden Kochstellen funktionieren nun gemeinsam und die LEDs rechts der beiden
Bedienflächen leuchten. Auf dem Bedienfeld wird die Stufe angezeigt, während die
Anzeige der angesteuerten Kochstelle erlischt.
Wenn diese Funktion aktiv ist, lässt sich die Zeitschaltautomatik einstellen. Die LED
leuchtet auf den Bedienfeldern beider Kochstellen. Allerdings ist es nicht möglich, die
Powerstufe für beide Kochstellen zu aktivieren.
Wenn innert der nächsten 10 Minuten auf einer der beiden Kochstellen kein Topf erkannt
wird, so schaltet die Kombifunktion automatisch ab. Die nicht verwendete Kochstelle wird
ausgeschaltet, während die Kochstelle, auf der ein Topf erkannt wurde, mit der zuvor
eingestellten Kochstufe eingeschaltet bleibt.
Deaktivierung
Berühren Sie gleichzeitig eine beliebige Stelle auf den Bedienfeldern der beiden
Page 55

55
gekoppelten Kochstellen (genau wie bei der Aktivierung der Kombifunktion).
Damit ist die Funktion deaktiviert. Die Bedienfelder der beiden Kochstellen zeigen an
und können erneut programmiert werden.
Warmhaltefunktion
Diese Funktion dient zum Warmhalten von bereits fertig gegarten Gerichten. Darüber
hinaus kann sie zum Auftauen oder langsamen Kochen von Speisen verwendet werden.
Aktivierung
Berühren Sie die Schaltfläche der betreffenden Kochstelle. Die Funktion wird in der
Betriebsart «Auftauen» aktiviert;
Durch erneutes Berühren der Schaltfläche wird die Funktion «Warmhalten»
aktiviert;
Wenn Sie die Schaltfläche ein drittes Mal berühren, wird die Funktion «Simmern»
aktiviert;
Durch erneutes Betätigen der Schaltfläche wird die Warmhaltefunktion
ausgeschaltet.
Sicherheitsabschaltung
Der kontinuierliche Betrieb der Kochstellen mit maximaler Leistung ist zeitlich begrenzt
(siehe nachfolgende Tabelle). Wenn eine Kochstelle durch die Sicherheitsfunktion
abgeschaltet wurde, so erscheint auf dem Bedienfeld das Zeichen , bzw. solange
noch Restwärme vorhanden ist.
Beispiel: Stellen Sie eine Kochstelle auf die Kochstufe 5 ein und lassen Sie die Kochstelle
eine Weile in diesem Betriebszustand. Wenn Sie die Kochstufe nicht verändern, schaltet
die Sicherheitsfunktion die Kochstelle nach 210 Minuten ab.
Stufe Minuten bis zur Sicherheitsabschaltung
480
480
480
1 516
2 402
3 318
4 258
5 210
6 138
7 138
8 108
9 90
P 10
Überhitzungsschutz
Das Induktionskochfeld ist mit einem Überhitzungsschutz ausgestattet, der die Elektronik
vor Beschädigung schützt. Der Überhitzungsschutz arbeitet auf mehreren Ebenen. Wenn
die Temperatur der Kochstelle sehr hoch wird, läuft zuerst der zweistufige Lüfter an. Sollte
das nicht genügen, so wird die Powerstufe deaktiviert. Dadurch wird die Kochtemperatur
einiger Kochstellen gesenkt oder der Überhitzungsschutz wird ausgelöst und schaltet
alles ab. Nachdem die Oberfläche abgekühlt ist, steht ihnen wieder die volle Leistung der
Kochstellen zur Verfügung.
Zeitschaltautomatik
Die Zeitschaltautomatik des Kochfelds erleichtert das Überwachen der Kochzeit.
Aktivierung
Das Kochfeld muss eingeschaltet und die Kochstelle, für die Sie eine Zeit einstellen
möchten, muss in Betrieb sein.
Berühren Sie gleichzeitig die Schaltflächen und . Auf der Zeitanzeige erscheint
. Auf der rechten Seite des ersten Bedienfelds von links leuchtet das Uhrsymbol
auf.
Berühren Sie gleichzeitig mehrmals hintereinander die Schaltflächen und , um die
Kochstelle auszuwählen, für die Sie die Zeit einstellen möchten. Die LED leuchtet nur
bei eingeschalteter Kochstelle auf.
Stellen Sie innert 10 Sekunden nach Berühren der Schaltflächen und die Zeit für
Page 56

56
die Zeitschaltautomatik durch Berühren der Schaltflächen oder ein.
Die eingestellte Zeit kann folgendermassen angezeigt werden:
in Minuten und Sekunden bis maximal 9 Minuten und 59 Sekunden
in Stunden und Minuten bis maximal 9 Stunden und 59 Minuten; in diesem Fall
erscheint unter der Zeitanzeige der Schriftzug «min».
Die Kochzeit kann für jede Kochstelle individuell eingestellt werden.
Ändern der eingestellten Kochzeit
Die Kochzeit lässt sich während des Betriebs jederzeit ändern.
Berühren Sie gleichzeitig die Schaltflächen und ;
Berühren Sie gleichzeitig mehrmals hintereinander die Schaltflächen und um die
Kochstelle auszuwählen, für die Sie die Zeit ändern möchten. Die angewählte Kochstelle
wird durch die LED auf der rechten Seite des Bedienfelds angezeigt;
Berühren Sie die Schaltflächen oder .
Wenn die Zeit innert 10 Sekunden nach Berühren der Schaltflächen und nicht
geändert wird, so zählt der Timer weiterhin die zuvor eingestellte Zeit.
Restdauer
Auf dem Bedienfeld wird immer die kürzeste Restdauer angezeigt (das Uhrsymbol auf
der rechten Seite des Bedienfelds der betreffenden Kochstelle leuchtet heller als die
anderen).
Berühren Sie gleichzeitig die Schaltflächen und ;
Berühren Sie gleichzeitig mehrmals hintereinander die Schaltflächen und um die
Kochstelle auszuwählen, für die Sie die Restdauer anzeigen möchten. Die angewählte
Kochstelle wird durch die LED auf der rechten Seite des Bedienfelds angezeigt.
Auf der Zeitanzeige wird die Restdauer der ausgewählten Kochstelle angezeigt.
Ausschalten der Zeitschaltautomatik
Nach Ablauf der eingestellten Zeit ertönt ein akustisches Signal und die Kochstelle wird
abgeschaltet. der Signalton lässt sich durch Berühren der Schaltfläche oder
abstellen. Andernfalls schaltet er nach 2 Minuten automatisch ab.
Ausschalten der Zeitschaltautomatik vor Ablauf der eingestellten Zeit
Berühren Sie gleichzeitig die Schaltflächen und ;
Berühren Sie gleichzeitig mehrmals hintereinander die Schaltflächen und um die
Kochstelle auszuwählen, für die Sie die eingestellte Zeit deaktivieren möchten. Die
angewählte Kochstelle wird durch die LED auf der rechten Seite des Bedienfelds
angezeigt.
Berühren Sie die Schaltfläche bis der Wert angezeigt wird.
Das Uhrsymbol auf der rechten Seite des betreffenden Bedienfelds erlischt und die
Zeitschaltautomatik ist deaktiviert.
Erinnerungsfunktion
Die Zeitanzeige kann auch als Erinnerungsfunktion genutzt werden, und zwar auch dann,
wenn sie bereits zum Einstellen der Kochzeit verwendet wird.
Einstellen der Erinnerungsfunktion
Bei ausgeschaltetem Kochfeld:
Berühren Sie zum Einschalten die Schaltfläche
Berühren Sie gleichzeitig die Schaltflächen und um den Timer zu aktivieren. Auf
der Zeitanzeige erscheint ; Wenn eine Kochstelle eingeschaltet ist, erscheint auf
der rechten Seite des Bedienfelds der ersten eingeschalteten Kochstelle das Uhrsymbol
.
Berühren Sie gleichzeitig mehrmals hintereinander die Schaltflächen und um die
Erinnerungsfunktion zu aktivieren. Das betreffende Symbol erscheint zwischen den
Schaltflächen und
;Wenn keine Kochstelle eingeschaltet ist, wird das Symbol der
Erinnerungsfunktion eingeblendet.
Die eingestellte Zeit wird durch Berühren der Schaltflächen oder angezeigt.
Auch die Erinnerungsfunktion kann entweder in Minuten und Sekunden eingestellt
Page 57

57
werden oder in Stunden und Minuten.
Abstellen der Erinnerungsfunktion
Nach Ablauf der eingestellten Zeit ertönt ein Signalton, der durch Berühren der
Schaltflächen oder
, abgestellt werden kann. Andernfalls schaltet er nach 2
Minuten automatisch ab.
Abstellen der Erinnerungsfunktion vor Ablauf der eingestellten Zeit:
Berühren Sie gleichzeitig die Schaltflächen und .
Berühren Sie gleichzeitig mehrmals hintereinander die Schaltflächen und um die
Erinnerungsfunktion auszuwählen. Das betreffende Symbol leuchtet auf.
Berühren Sie die Schaltfläche bis der Wert angezeigt wird. Die
Erinnerungsfunktion ist abgestellt.
SICHERHEITSFUNKTIONEN UND FEHLERMELDUNGEN
Während der Garantiefrist dürfen Reparaturen nur von einem vom Hersteller autorisierten Kundendienst durchgeführt
werden.
Vor der Durchführung von Reparaturarbeiten muss das Gerät unbedingt durch Ausschalten der Sicherung oder
Herausziehen des Steckers aus der Steckdose vom Stromversorgungsnetz getrennt werden.
Unbefugte Eingriffe und Reparaturen können Stromschlag- oder Kurzschlussgefahr hervorrufen, deswegen dürfen Sie
diese nicht selbst durchführen. Überlassen Sie Reparaturarbeiten einem Fachmann oder einem autorisierten
Kundendienst.
Überprüfen Sie bei geringeren Funktionsstörungen des Geräts anhand dieser Gebrauchsanleitung, ob Sie die Ursachen
selbst beseitigen können.
Die Beseitigung einer Störung bzw. Reklamation, die wegen eines unfachmännischen Anschlusses oder Gebrauchs
entstanden ist, ist nicht Gegenstand der Garantie. Die Reparaturkosten trägt in diesem Fall der Benutzer.
FEHLERCODE FEHLERBESCHREIBUNG ANLEITUNG
E03 oder Er03
oder +
Dauerton
Dauerhafte Betätigung der Schaltflächen
(TASTEN) für mehr als 10 Sekunden,
verursacht durch das Vorhandensein
von Gegenständen oder Flüssigkeiten
auf dem Bedienfeld.
Entfernen der Gegenstände und/oder Flüssigkeit
sowie Reinigen der Glasoberfläche. Sollte das
Problem weiterhin bestehen, dann wenden Sie sich
unter Angabe des Fehlercodes an den Kundendienst
eines autorisierten Vertragshändlers.
L
Kein Fehler!
Kindersicherung aktiviert.
Kindersicherung deaktivieren.
Ungeeignete Pfanne. Geeignete Pfanne verwenden. Wenn das Problem
weiterhin besteht, wenden Sie sich an das autorisierte
Kundendienstzentrum - geben Sie den Fehlercode an.
E8 Falsche Lüfterdrehzahl; Fehler am
rechten oder linken Lüfter.
Abluft verstopft, zum Beispiel durch Papier. Sollte das
Problem weiterhin bestehen, dann wenden Sie sich
unter Angabe des Fehlercodes an den Kundendienst
eines autorisierten Vertragshändlers.
E21 o Er21
E22 o Er22
E20 o Er20
E36 o Er36
E31 o Er31
E47 o Er47
E2
EA
U400
E5
E6
E9
Wenden Sie sich unter Angabe des Fehlercodes an den Kundendienst eines autorisierten
Vertragshändlers.
Page 58

58
REINIGUNG UND PFLEGE
Die Glaskeramikoberfläche muss nach jeder Verwendung gereinigt werden, da sich jeder
Fleck, der nicht entfernt wird, auf der warmen Oberfläche einbrennt.
Verwenden Sie für die tägliche Reinigung einen Spezialreiniger, der einen
schmutzabweisenden Film bildet.
Entfernen Sie vor jedem Gebrauch Staubreste von der Glaskeramikoberfläche und
Schmutzreste vom Boden des Kochgeschirrs, um das Verkratzen der Kochstellen zu
vermeiden (Abb. 1).
Achtung: Verwenden Sie keine Stahlschwämme oder Scheuermittel zum
Reinigen, da diese die Oberfläche verkratzen. Auch aggressive Sprühreiniger oder nicht
geeignete Putzmittel können die Oberfläche angreifen (Abb. 1 und Abb. 2).
Aggressive Reinigungsmittel, Stahlschwämme und verschmutzte Kochgeschirrböden
können die aufgedruckten Beschriftungen angreifen (Abb. 2). Kleine Schmutzpartikel
lassen sich mit einem feuchten Schwammtuch entfernen. Achten Sie darauf, dass die
Böden von Pfannen und Kochtöpfen trocken sind, bevor Sie diese auf dem Kochfeld
abstellen (Abb. 3).
Wasserflecken lassen sich mit einer Essiglösung entfernen, die allerdings nicht auf dem
Rahmen einiger Modelle verwendet werden darf, da dieser dadurch seinen Glanz verliert.
Verwenden Sie keine aggressiven Putzmittel oder Sprühreiniger zum Entfernen von
Kalkrückständen (Abb. 3).
Verwenden Sie zum Entfernen von hartnäckigen Schmutzrückständen Spezialreiniger für
Glaskeramikoberflächen.
Befolgen Sie die Anweisungen des Reinigungsmittelherstellers.
Achten Sie darauf, etwaige Reinigungsmittelrückstände gründlich von der
Glaskeramikoberfläche zu entfernen, damit diese nicht verkratzt wird (Abb. 3).
Hartnäckige oder eingebrannte Schmutzrückstände sind mit dem Schaber zu entfernen.
Achten Sie darauf, den Kunststoffgriff des Schabers nicht auf dem heissen Kochfeld
abzulegen (Abb. 4).
Verwenden Sie den Schaber mit Vorsicht, damit Sie sich nicht verletzen! Zucker oder
stark zuckerhaltige Speisen können die Glaskeramikoberfläche dauerhaft schädigen (Abb.
5). Zuckerreste sind deshalb sofort mit dem Schaber von der Glaskeramikoberfläche zu
entfernen, selbst dann, wenn diese noch warm ist (Abb. 4).
Farbänderungen der Glaskeramikoberfläche haben keinerlei Einfluss auf die Funktion
oder Stabilität des Kochfelds. Sie entstehen durch die Verwendung von Kupfer- oder
Aluminiumkochtöpfen oder Speiserückständen am Topfboden und sind nur schwer zu
beseitigen.
Alle oben aufgeführten Abweichungen sind rein äusserlich und haben keinerlei
direkte Auswirkung auf die Funktion des Geräts. Sie können nicht auf Garantie beseitigt
werden.
Abb.1
Abb.2
Abb.3
Abb.4
Abb.5
Page 59

59
ES
¡Estimado cliente!
Esto electrodomésticos ha sido diseñada para su uso doméstico.
Nuestros electrodomésticos se empaquetan con materiales respetuosos con el
medioambiente que pueden reciclarse, depositarse o destruirse sin riesgos para el
medioambiente. Dichos materiales de embalaje están etiquetados correspondientemente.
Cuando finalice el ciclo de vida útil de su electrodoméstico, asegúrese de no contaminar
el ambiente y entréguelo en un punto de reciclaje de electrodomésticos autorizado.
Instrucciones de uso
Las instrucciones de uso han sido preparadas para el usuario y describen el
electrodoméstico y la manera de manejarlo. Estas instrucciones han sido redactadas para
distintos tipos de aparatos, por tanto encontrará descripciones de funciones de las que su
electrodoméstico en particular no dispone.
Estas instrucciones sólo son válidas para el símbolo del país indicado en el aparato. Si el
electrodoméstico no presenta NINGÚN símbolo de país, deberán seguirse las
instrucciones técnicas para la adaptación del aparato a los requisitos y normativas de uso
de su país.
Instrucciones para la
conexión
El aparato debe conectarse de acuerdo con las instrucciones que lo acompañan así como
con las normativas y las reglamentaciones pertinentes. Sólo una persona cualificada
debe
realizar la conexión.
Placa de
características
La placa de características que contiene la información básica del electrodoméstico está
instalada en la parte inferior de la encimera.
El fabricante se esfuerza por ofrecer mejoras continuas. Por este motivo, el texto y
las ilustraciones de este libro están sujetos a cambios sin previo aviso.
Guarde estas instrucciones en un lugar donde pueda acceder a ellas rápidamente;
si transfiere el aparato a otra persona, deberá incluir también las instrucciones.
Advertencias importantes 60
Instalación 61
Conexión a la red eléctrica 62
Características técnicas 63
Funcionamiento 65
Funciones de seguridad y señalización de errores 71
Limpieza y mantenimiento 72
Page 60

60
ADVERTENCIAS IMPORTANTES
El electrodoméstico y sus partes accesibles se calientan durante su uso. Debe tener cuidado para evitar tocar los
elementos calientes.
Los niños menores de 8 años deben permanecer alejados, a no ser que estén vigilados en todo momento. Impida la
presencia de niños alrededor del electrodoméstico y adviértales adecuadamente acerca del peligro de sufrir
quemaduras.
Este electrodoméstico pueden utilizarlo niños a partir de 8 años y personas con discapacidades físicas, sensoriales o
mentales o carentes de experiencia y conocimientos si han recibido instrucciones relativas al uso seguro del aparato y
conocen los riesgos relativos al mismo o si lo hacen bajo supervisión.
Los niños no deben jugar con el electrodoméstico.
Los niños no deberán realizar su limpieza ni su mantenimiento sin supervisión.
La cocción no supervisada con grasa o aceite sobre la encimera puede ser peligrosa y causar incendios.
Asegúrese de que la preparación de dichos alimentos (fritos) se realiza bajo control constante. Nunca intente apagar el
fuego con agua. En lugar de ello, apague el electrodoméstico y cubra la llama con una tapa o una manta ignífuga.
Peligro de incendio: no deposite objetos sobre las superficies de cocción.
Si la superficie está agrietada, apague el electrodoméstico para evitar posibles descargas eléctricas.
Nunca utilice limpiadores de vapor a alta presión ni vapor caliente para limpiar el aparato.
Nunca coloque objetos metálicos sobre la superficie de el electrodoméstico, como cuchillos, tenedores, cucharas, tapas
de ollas, y objetos semejantes, ya que podrían calentarse excesivamente.
El electrodoméstico no puede activarse con temporizadores externos ni sistemas de control remoto.
Nunca utilice el electrodoméstico de cocción para calentar la sala.
Si hay algún enchufe situado cerca de el electrodoméstico y otro electrodoméstico está conectado a él, asegúrese de
que el cable de alimentación no entra en contacto con las zonas de cocción calientes.
Nunca guarde objetos, materiales o sustancias sensibles a la temperatura, como detergentes, sprays, etc., debajo de el
electrodoméstico.
En caso de avería del aparato, desconéctelo inmediatamente de la corriente eléctrica y póngase en contacto con el
centro de servicio.
Este aparato ha sido fabricado de acuerdo con las normativas de seguridad relevantes en vigor.
Nunca conecte el electrodoméstico a la red eléctrica con un cable alargador ni una toma múltiple, ya que no garantizan
una seguridad suficiente (p.ej. existe el riesgo de sobrecalentamiento de la toma múltiple).
Conecte el electrodoméstico a una conexión permanente.
La instalación del aparato en la encimera de la cocina y su conexión a la red eléctrica sólo deberá realizarlas un técnico
adecuadamente cualificado.
Nunca coloque ollas vacías sobre el electrodoméstico.
Las superficies de el electrodoméstico no deben utilizarse como encimeras de cocina. Los objetos afilados pueden
causar rayaduras.
No está permitido preparar alimentos sobre el aluminio fino de los contenedores de plástico colocados sobre las zonas
de cocción calientes. No coloque ningún objeto de plástico ni láminas de aluminio sobre la superficie de el
electrodoméstico.
Después de un uso prolongado de los platos de hierro fundido, la zona del plato y el borde de la zona de cocción
pueden decolorarse. El servicio de reparación no está cubierto por la garantía.
Si el aparato se instala sobre un horno con sistema pirolítico, no debe ponerse en funcionamiento mientras esté activado
el proceso pirolítico porque puede dispararse su protección contra el sobrecalentamiento.
El símbolo en el producto o en el envase indica que el aparato no se debe desechar como un residuo
doméstico normal, sino que se debe entregar en un punto de recogida selectiva para el reciclado de
aparatos eléctricos y electrónicos.
La correcta eliminación de este producto contribuye a evitar posibles consecuencias negativas para el
medio ambiente y la salud de las personas. Si desea más información sobre el reciclado de este
producto, contacte con las autoridades municipales, el servicio de eliminación de desechos local o la
tienda donde lo ha adquirido.
Page 61

61
INSTALACIÓN
Advertencias importantes
La instalación del aparato en la encimera de la cocina sólo deberá realizarlas un técnico adecuadamente cualificado.
Los chapados u otros acabados del mobiliario de la cocina en los que se va a instalar la encimera deben ser procesados
con cola resistente al calor (100°C); de lo contrario, el acabado de la encimera de la cocina puede decolorarse o
deformarse.
Si es posible instalar el aparato dejando mucho espacio a ambos lados. Puede haber una pared en la parte trasera del
aparato y junto al aparato un mueble de altura o en la pared en un lado. En este caso en el otro lado no debe haber
ningún mueble u obstáculo de mayor altura que el aparato.
NO ESTÁ PERMITIDO NO ESTÁ PERMITIDO NO ESTÁ PERMITIDO ESTÁ PERMITIDO
El uso masivo de placas o tableros decorativos de madera en la encimera de cocina detrás de la encimera de cocción
no está permitido.
La distancia entre el borde del aparato y el mueble alto de cocina adyacente no debe ser inferior a 250 mm.
Todos los tamaños y distancias que deben considerarse para el buen funcionamiento del aparato se muestran en las
siguientes imagenes.
El mueble de cocina situado debajo de la encimera no debe disponer de cajones. Si el elemento del mobiliario de la
cocina es una pared de partición horizontal, debe instalarse a un mínimo de 20 mm de la superficie inferior de la
encimera de cocina. El espacio situado entre la pared de partición y la encimera debe estar vacío; no deben colocarse
objetos en este espacio.
Los elementos de cocina colgantes o montados en la pared deben estar instalados a una altura suficiente para no
interferir en el proceso de trabajo.
La distancia entre la encimera de cocción y la campana extractora no debe ser inferior a la indicada en las instrucciones
de instalación de la campana. Consulte los detalles en las instrucciones de uso y montaje del fabricante de la campana
extractora. Si las instrucciones del fabricante no están disponibles o si hay objetos inflamables encima del aparato (por
ejemplo soportes para utensilios de cocina, piezas de mobiliarios de pared, etc.), la distancia entre estos elementos y el
aparato debe ser de al menos 800 mm.
Montar primero los armarios superiores o la campana extractora antes de instalar el aparato para evitar dañarlo.
La parte delantera debe disponer de una abertura de, como mínimo, 5 mm.
El aparato no debe instalarse sobre una nevera, un aparato combinado de nevera y congelador, un congelador, un
lavavajillas, una lavadora, una lavadora-secadora o una secadora.
Debajo de esta encimera de cocción sólo pueden instalarse hornos equipados con ventilador de refrigeración
. Antes de instalar un horno, la pared trasera del mueble de cocina debe desmontarse en la zona coincidente con el
corte de la encimera de la cocina. Además, debe dejarse un espacio de, al menos, 5 mm en la parte delantera.
a min. 800 mm
b min. 50 mm
c min. 20 mm
d min. 80 mm
e min. 5 mm
f 25-40 mm
g min. 250 mm
A
900 mm
B
400 mm
C
870 mm
D
370 mm
E
45 mm
F
5 mm
G
≥ 50 mm
H
≥ 600 mm
Page 62

62
Instalación de la junta de
espuma (para encimera
de vitro)
Antes de colocar el aparato en la abertura de la encimera de cocina, debe colocarse la
junta de espuma suministrada en la parte inferior de la encimera de cocción vitro.
¡No instale el aparato sin la junta de espuma!
La junta debe instalarse en el aparato de la siguiente forma:
Despegue la película protectora de la junta.
A continuación, instale la junta en la parte inferior del cristal a, aproximadamente, A= 2-3
milímetros del borde. La junta debe colocarse a lo largo de todo el borde del cristal y no
debe superponerse en las esquinas.
Cuando instale la junta, asegúrese de que el cristal no entra en contacto con ningún
objeto afilado.
CONEXIÓN A LA RED ELÉCTRICA
Sólo un técnico cualificado debe conectar el aparato.
La protección del sistema eléctrico debe cumplir todas las normativas pertinentes.
Puede accederse a los clips de conexión cuando sus cubiertas estén abiertas /
desmontadas.
Antes de conectar el aparato, asegúrese de que el voltaje indicado en la placa de
características concuerda con el de su red doméstica. Un técnico cualificado debe
comprobar el voltaje de la conexión utilizando un dispositivo de medición adecuado!
La placa de características que contiene la información básica está instalada en la parte
inferior de la encimera.
Para realizar una conexión fija a la red eléctrica, coloque un disyuntor omnipolar entre el
electrodoméstico y la red eléctrica. Este dispositivo deberá contar con una separación
de contacto en todos los polos, proporcionando una desconexión completa en caso de
sobretensión de categoría III.
Las piezas conductoras de corriente y las aisladas deben protegerse contra la
posibilidad de contacto directo.
Antes de realizar cualquier intervención, desconecte el aparato de la red eléctrica.
Conecte el aparato siguiendo el diagrama de conexiones eléctricas suministrado;
¡asegúrese de respetar el voltaje pertinente de la red!
El cable de conexión a tierra debe conectarse al clip que porta el símbolo de conexión a
tierra.
El cable de alimentación debe guiarse a través del clip de sujeción que lo protege contra
su desconexión accidental.
Después de conectar el aparato, encienda todas las zonas de cocción / calentadores
durante, aproximadamente, tres minutos para asegurarse de que funcionan
correctamente.
Una conexión incorrecta puede destruir los componentes del aparato, anulando la
garantía.
El cable de conexión situado en la parte trasera del aparato debe guiarse de forma que
no toque la pared trasera del mismo, ya que esta parte se calentará durante el
funcionamiento.
Adaptación básica de
los sensores al ambiente
Una vez realizada la conexión eléctrica, automáticamente se efectúa la adaptación básica
que asegura el funcionamiento óptimo de los sensores. Todos los indicadores se
encienden unos segundos. Durante la adaptación de los sensores no debe haber ningún
objeto apoyado sobre la placa. En caso contrario, la adaptación se interrumpe. Durante la
adaptación no es posible utilizar la placa de cocción.
Esquema de conexión
Para la conexión pueden utilizarse los siguientes componentes: H05V2V2-F
BAJO TENSIÓN
L
MARRÓN
TIERRA VERDE/AMARILLO
NEUTRAL
N
AZUL
Page 63

63
CARACTERÍSTICAS TÉCNICAS
7334245
Voltaje de funcionamiento 220-240 V~ o 380-415 V 2N~
Frecuencia de alimentación 50/60 Hz
P
TOT
7400 W
18,4x22 cm / 2,1 kW (P=3,7 kW)
P= POTENCIA MÁXIMA
EFICIENCIA ENERGÉTICA
COCCIÓN ELÉCTRICA EC
COCCIÓN ELÉCTRICA
18,9x24,5 cm 189,6 Wh/kg
Tipo de encimera Incorporado
N.º DE ZONAS DE INDUCCIÓN
2
EEPL
PLACA ELÉCTRIC
A
189,6 Wh/kg
Principio de
funcionamiento
El panel de cocción está dotado de zonas de cocción por inducción de altas prestaciones.
El calor se genera directamente en el fondo de la olla, donde más se necesita, sin
pérdidas en la superficie de vitrocerámica. De esta manera el consumo energético resulta
mucho menor que en las zonas de cocción estándar que funcionan según el principio de
calentamiento.
La superficie de vitrocerámica no se calienta directamente, sino sólo con el calor de
retorno de la olla calentada directamente. Este calor se indica como . El calentamiento
en la zona de cocción por inducción está asegurado por la bobina de inducción instalada
debajo de la superficie de vitrocerámica. La bobina estabiliza el campo magnético; en el
fondo de las ollas (que pueden ser magnetizadas) se encuentran los vórtices de la
corriente, que las calientan.
Ollas adecuadas
• Las zonas de cocción por inducción requieren el uso de ollas adecuadas.
• Las ollas deben colocarse en el centro de la zona de cocción.
• Las ollas que aseguran la inducción son de acero, esmaltadas de acero o moldeadas en
acero. Las ollas de acero con fondo de cobre o aluminio y las vajillas de vidrio no son
adecuadas.
• Si se utilizan ollas a presión, asegurarse de que alcancen la presión adecuada. Al
Page 64

64
principio, la zona de cocción funciona a la máxima potencia; luego, según las
indicaciones del fabricante de la olla, bajar la potencia de cocción utilizando el sensor.
• Comprar sólo ollas que presenten la indicación »apta para la cocción por
inducción«.
ZONAS DE COCCIÓN Ø MÍN. FONDO OLLA Ø MÁX. FONDO OLLA
184x220 mm
(SENCILLA)
Ø 115 mm Ø 180 mm
184x220 mm
(SENCILLA) CON
FUNCIÓN BRIDGE
Ø 135 mm Ø 180 mm
184x220 mm (DOBLE)
CON FUNCIÓN
BRIDGE
2 ZONAS - 380x220 mm
4 ZONAS Ø 330 mm Ø 400 mm
Notas:
Cuando se activa la función Bridge, se genera una zona que puede ser utilizada:
▪ Con dos ollas.
▪ Con una olla.
Si el tamaño de las dos ollas utilizadas supera el tamaño máximo recomendado, el
tiempo de calentamiento aumenta debido a que el calor se propaga por conducción
desde el centro de las ollas hacia sus bordes y la temperatura no es homogénea.
Con un pequeño imán A es posible verificar si el fondo de la olla se magnetiza. Utilizar
ollas en cuyo fondo el imán permanezca.
Reconocimiento de las ollas
Una de las ventajas de las placas de cocción por inducción es el reconocimiento de las
ollas. Si en la zona de cocción no hay ollas o hay ollas de un diámetro menor que el de la
zona, no se desperdicia energía eléctrica. Al encendido de la placa de cocción, en el
indicador aparece el símbolo de cocción . Si en un plazo de 10 minutos se coloca una
olla sobre la zona de cocción, la zona la detecta y se enciende en el nivel programado.
En el momento en que la olla se quita de la zona de cocción, el suministro de energía se
interrumpe. Si en la zona de cocción se coloca una olla de menor diámetro y la zona la
detecta, se utilizará sólo la energía necesaria para calentar el diámetro de la olla.
La placa de cocción se daña:
• si está encendida y se deja vacía o con ollas vacías;
• si se utilizan ollas no adecuadas (ej. con fondo no plano o de diámetro demasiado
pequeño).
• No utilizar ollas de arcilla, ya que rayan la superficie de vitrocerámica.
• Cuando la olla se coloca sobre la placa de cocción, ésta debe estar perfectamente seca
para poder transmitir el calor sin que su superficie se dañe.
• Para la cocción y la fritura se deben utilizar ollas que se puedan magnetizar, es decir, de
acero, esmaltadas de acero o moldeadas en acero. Es la única forma de asegurar el
buen funcionamiento de la cocción por inducción.
Niveles de cocción
Es posible seleccionar nueve niveles de potencia para las zonas de cocción.
En la tabla se indican algunos ejemplos.
Nivel Intención
0
Apagado, uso del calor residual
1-2
Mantenimiento de alimentos calientes, cocción de pequeñas cantidades de
alimentos
3
Cocción lenta (continuación de la cocción después del calentamiento fuerte)
4-5
Cocción lenta de grandes cantidades
6
Cocción para asar o dorar alimentos
7-8
Cocción para asar alimentos
9
Comienzo de la cocción, asado
A
Calentamiento rápido automático
P
Cocción particularmente potente para grandes cantidades de alimentos
Consejos para el ahorro
energético
• Cuando se compra una olla, el diámetro indicado es el diámetro superior o el de la tapa,
que es mayor que el fondo de la olla.
• Las ollas a presión son particularmente indicadas para el ahorro energético porque
gracias a la presión interna elevada cocinan en menos tiempo. Además, con tiempos de
cocción breves, las vitaminas de los alimentos se conservan mejor.
• En las ollas a presión debe haber suficiente líquido para evitar recalentamientos que
podrían dañar tanto las ollas como la placa de cocción.
Page 65

65
• Tapar las ollas con tapas adecuadas.
• Utilizar ollas del tamaño adecuado para la cantidad de alimento que se va a cocinar. El
uso de una olla por la mitad implica un derroche de energía eléctrica.
FUNCIONAMIENTO
• En el momento del encendido de la placa de cocción en vitrocerámica se encienden
todos los indicadores (un instante). La placa de cocción está lista para el uso.
• La placa de cocción está dotada de sensores electrónicos que se encienden al tocar las
superficies correspondientes al menos 1 segundo.
• Cada encendido de los sensores se acompaña de una señal acústica.
• No apoyar ningún tipo de objeto sobre la superficie de los sensores (comunicación de
errores_ ).
• La superficie de los sensores se debe mantener limpia.
Elementos de gestión
A. Encendido/Apagado de la placa de cocción
B. Pausa/ Recuperación
C. Bloqueo
D. (-) Timer
E. (+) Timer
F. Cursor
G. Calentamiento
H. Booster
Funcionamiento del
cursor
0
Semivalor
Valor máximo
Encendido de la placa de
cocción
Pulsar durante al menos 1 segundo.
La placa de cocción se enciende y todos los indicadores de potencia muestran .
Si en 10 segundos no se realiza ninguna elección , la placa de cocción se apaga.
Encendido de las zonas
de cocción
Cuando el usuario enciende la placa de cocción con el sensor de , dispone de
10 segundos para elegir la zona de cocción deseada.
Pulsar y deslizar el dedo sobre el cursor (F) de la zona de cocción deseada para
seleccionar un nivel de cocción entre 1 y 9.
Al pulsar el cursor una vez, se activ a el valor asociado al punto de contacto. Los
indicadores de control situados sobre el cursor se encienden de modo
proporcional al valor configurado.
Deslizar el cursor con el dedo hacia la derecha para aumentar el valor del nivel de
cocción y hacia la izquierda para reducirlo.
Al retirar el dedo del cursor, la zona de cocción se calienta en función del nivel de
potencia seleccionado.
Manteniendo pulsado un punto concreto del cursor durante 3 segundos, se activa el
Page 66

66
sistema de cocción automática (ver el capítulo de calentamiento rápido automático).
Apagado de las zonas de
cocción
• La zona de cocción elegida debe estar activada.
• Pulsar el inicio del cursor para seleccionar el nivel de potencia . Se activa una señal
acústica para confirmar que la zona de cocción se ha apagado.
Apagado de la placa de
cocción
• La placa de cocción se puede apagar en cualquier momento pulsando .
• La señal acústica se activa y todos los indicadores, excepto los de las zonas de cocción
que aún están calientes, se apagan. La letra indica que en dichas zonas aún existe
calor residual.
• Si se apaga la placa antes de que se complete la cocción, es posible aprovechar el calor
residual para ahorrar energía eléctrica.
Bloqueo
Activar el bloqueo de seguridad para impedir que se utilicen las zonas de cocción.
Bloqueo
• La placa de cocción debe estar encendida.
• Pulsar durante 1 segundo aproximadamente. El LED que hay sobre la tecla se
enciende para indicar que el bloqueo está activado.
• El bloqueo de seguridad protege todos los sensores contra su accionamiento
involuntario, excepto los sensores y .
• Al apagar la placa de cocción cuando el bloqueo está activado, la función de bloqueo
permanece memorizada hasta que se vuelve a encender la placa.
• Las alarmas que se activan al cumplirse el tiempo de temporización se pueden apagar
sin desbloquear la pantalla pulsando o .
Desbloqueo
• La placa de cocción debe estar encendida.
• Pulsar durante 1 segundo; la señal acústica avisa que la unidad de control se ha
desbloqueado.
Seguro para niños Esta función puede activarse/desactivarse solamente después de encender la placa con
Activación
• Presione y simultáneamente y después, presione otra vez.
• La función se activa y todas las pantallas mostrarán
• El control de la placa permanecerá bloqueado y se apagará automáticamente después
de 10 segundos.
El Seguro para niños desactiva todas las teclas excepto . Una vez activado, la
electrónica permanecerá bloqueada aunque el control se apague y se encienda otra v ez.
Desactivación
• Antes de que pasen 10 s presione y simultáneamente y después, presione
otra vez.
La función ya no estará activa.
Desbloqueo para una vez (para una sesión de cocinado)
• Presione y simultáneamente.
• El Seguro para niños se desactiva para la sesión de cocinado.
• Una vez que se apaga la placa, el Seguro para niños se activa de nuevo y así, estará
activado cuando la placa se encienda de nuevo.
Pausa
Esta función solo se puede activar si hay al menos una zona de cocción
funcionando.
La función pausa también se puede activar cuando hay errores específicos en la
zona de cocción. En este caso, tanto el error como la indicación de calor residual y
los mensajes especiales
, u se apagan porque la función pausa tiene
prioridad. Si se produce un error general cuando la función pausa está activada, el
control se apaga y desactiva la modalidad de funcionamiento.
Activación
• Pulsar durante al menos 1 segundo; el LED que hay sobre la tecla se enciende y
todas las pantallas muestran el símbolo .
Page 67

67
Durante la función pausa
• Los timers ya programados se bloquean y se vuelven a activar al desactivar la función.
• El calentamiento automático y la función Booster se apagan.
• El cálculo del calor residual y el limitador del tiempo de funcionamiento permanecen
activados.
• El resto de LEDS (timer, multi circuito, etc.) permanecen encendidos según el estado de
la función asociada.
La función pausa puede permanecer activada hasta 10 minutos como máximo. Si la
pausa continúa después de dicho tiempo, el control se apaga.
La zona de cocción se puede encender o apagar en cualquier momento con el
sensor , al hacerlo la función pausa se desactiva.
Desactivación
• Pulsar ; los LEDS que hay sobre el cursor de una de las zonas de cocción se
iluminan.
• En 10 segundos, pulsar y deslizar el dedo de izquierda a derecha sobre el cursor de la
zona iluminada. El LED que hay sobre la tecla de pausa se apaga y se restablece la
modalidad de funcionamiento seleccionada antes de que se activara la función pausa.
Recuperación
Utilizando esta función es posible memorizar rápidamente la programación si el operador
apaga el control por error pulsando el sensor .
Tras el apagado, el operador dispone de 6 segundos para volver a encender el control y
de 6 segundos más para pulsar .
La función de recuperación sólo se puede utilizar cuando hay al menos una zona de
cocción (nivel de cocción >0) activada e independientemente de que el bloqueo de las
teclas esté o no activado.
Indicación de calor
residual
La placa en vitrocerámica está dotada de indicador . La zona de cocción no se calienta
directamente, sino sólo con el calor de retorno de la olla. Después del apagado de la
zona, se enciende el símbolo ; el calor residual se puede utilizar para calentar comidas
o descongelar alimentos.
Cuando el símbolo se apague, la zona de cocción aún estará caliente.
¡Peligro de quemaduras!
Cocción particularmente
potente
Para una cocción rápida se puede utilizar la cocción particularmente potente, en las
zonas de cocción indicadas. Con la potencia adicional, es posible calentar rápidamente
grandes cantidades de alimentos. Tras el encendido, la potencia adicional se activa
durante 10 minutos y, a continuación, pasa automáticamente al nivel de cocción 9.
Con la cocción rápida activada, la potencia de una de las zonas de cocción es limitada.
Lo muestra el indicador de nivel de potencia, que alterna la potencia de cocción elegida
con la potencia limitada debida a la cocción rápida en la otra zona de cocción.
Activación
• Pulsar en la zona de cocción deseada para activar la potencia adicional de cocción.
Aparece la indicación
Desactivación de la potencia adicional antes de tiempo
• Pulsar y deslizar el dedo sobre el cursor de la zona deseada hasta para apagar la
zona o bien hasta el nivel de cocción deseado.
SISTEMA DE GESTIÓN ENERGÉTICA
El sistema de Gestión Energética distribuye la potencia entre las zonas de cocción
disponibles agrupadas en parejas (como puede verse al lado), suministrando la potencia
máxima a una zona de cocinado y automáticamente, disminuyendo la potencia disponible
para la otra. La pantalla de la segunda zona de cocción alterna, durante unos segundos,
la potencia de cocinado elegida y la potencia limitada.
En determinadas circunstancias, la función de configuración de la potencia
Extra puede apagarse automáticamente para proteger los componentes
electrónicos en el interior de la placa.
Page 68

68
Calentamiento rápido
automático
Si esta función está activada, la zona de cocción funciona a potencia máxima durante un
determinado periodo de tiempo que depende del nivel de potencia seleccionado y, a
continuación, pasa automáticamente al nivel de potencia elegido para la siguiente
cocción. El sistema de cocción automático se puede activar en todos los niveles de todas
las zonas de cocción, excepto en el nivel 9 donde la potencia máxima es constante.
• Pulsar durante al menos 3 segundos un punto cualquiera del cursor de la zona de
cocción elegida. El valor indica que el sistema de cocción automático está activado.
El nivel de cocción pulsado será el nivel de cocción de la zona al finalizar el
calentamiento rápido.
• En la pantalla aparecen de modo alterno la indicación y el nivel de cocción
seleccionado.
Al cumplirse el tiempo indicado en la tabla, la función se desactiva y la indicación se
apaga. El sistema de cocción automática se puede desactivar en cualquier momento
modificando el nivel de potencia de cocción.
Nivel 1 2 3 4 5 6 7 8
Tiempo de calentamiento
automático (acta)
40 72 120 176 256 432 120 192
Bridge
Con esta función es posible gestionar dos zonas de igual diámetro y potencia.
Ambas zonas se activan al mismo tiempo y solo se pueden controlar desde una de ellas.
Activación
Tanto si el nivel de cocción de ambas zonas es distinto como si es 0:
• Pulsar al mismo tiempo un punto cualquiera de los cursores de las dos zonas que se
desean combinar:
– 1 y 2
– 3 y 4.
• Ahora ambas zonas funcionan de modo combinado y los LEDS situados a la derecha de
sus respectivas pantallas se encienden. En la pantalla de la zona de control aparece el
nivel y en la pantalla de la zona controlada se apaga.
• El timer también se puede programar cuando esta función está activada; el led que se
encuentra cerca de las pantallas de cada una de las zonas se enciende y no será
posible programar la función de cocción con potencia adicional.
• Si en 10 minutos no se detecta una olla sobre una de las dos zonas de cocción, la
función Bridge se desactiva automáticamente: la zona de cocción que está libre se
apaga y la zona de cocción ocupada permanece encendida como elemento único de
cocción y mantiene el nivel de cocción configurado.
Desactivación
• Pulsar al mismo tiempo un punto de los cursores de las dos zonas que se desean
combinar (el mismo procedimiento de activación).
La función se desactiva, en las pantallas de ambas zonas de cocción aparece la
indicación y es posible configurarlas nuevamente.
Calentamiento
La función de calentamiento se utiliza para mantener calientes los alimentos ya
cocinados.
Esta función también se puede utilizar para descongelar o cocinar a fuego lento.
Activación
• Pulsar el sensor de la zona de cocción deseada, la función se activa en modalidad
de “descongelación”
• Al pulsar por segunda vez el sensor , se activa la modalidad de “calentamiento”
• Al pulsar por tercera vez el sensor , se activa la modalidad de “cocción a fuego lento”
Al pulsar por cuarta vez el sensor , la función de calentamiento se apaga.
Page 69

69
Apagado de seguridad
El funcionamiento a la máxima potencia de cada zona de cocción es limitado (ver tabla).
Cuando la zona de cocción se apaga por el mecanismo de seguridad, se encenderá la
indicación o si hay calor residual.
La zona de cocción se puede apagar deslizando el cursor (F) hacia la izquierda para
programar el nivel de cocción.
Ejemplo: Se programa la zona de cocción en el nivel de cocción 5, y la placa se deja en
funcionamiento. Si no se cambia de nivel, a las 4 horas el mecanismo de seguridad
apaga la placa de cocción.
Nivel Acta antes del apagado de seguridad
descongelación 480
calentamiento 480
cocción a fuego lento 480
1 516
2 402
3 318
4 258
5 210
6 138
7 138
8 108
9 90
P 10
Aparato de seguridad
contra el
recalentamiento
La placa de cocción por inducción está dotada de un aparato de seguridad contra el
recalentamiento que protege la parte electrónica. El aparato de seguridad funciona en
varios niveles. Cuando la temperatura de la zona de cocción alcanza niveles muy altos,
primero se activa el ventilador en dos niveles. Si no es suficiente, la potencia
particularmente fuerte se desactiva para bajar el nivel de cocción de algunas zonas, o
bien el aparato de seguridad contra el recalentamiento la apaga del todo. Cuando la
superficie se enfríe, estará nuevamente disponible toda la potencia de las zonas de
cocción.
Timer
El reloj para la cocción por tiempo de la placa facilita la cocción.
Activación
• La placa de cocción y la zona en la que se desea programar el timer deben estar
encendidas.
• Pulsar al mismo tiempo y , en la pantalla del timer aparece y se enciende
de la primera zona de cocción activada, empezando por la izquierda.
• Pulsar al mismo tiempo y , el número de veces necesario para seleccionar la
zona en la que se desea programar el timer. Sólo se enciende de las zonas de
cocción que están activadas.
• Antes de 10 segundos desde que se pulsó y , programar el valor del timer con los
sensores o .
• El valor del timer se puede visualizar:
- en minutos y segundos, hasta 9 m 59 s;
- en horas y minutos, hasta 9 h 59 m; En este caso, debajo de la pantalla del timer
aparece la indicación
El tiempo de cocción se puede programar de modo independiente en cada una de
las zonas de cocción.
Modificación del tiempo de cocción programado
• El tiempo de cocción se puede modificar en cualquier momento durante el
funcionamiento.
• Pulsar al mismo tiempo los sensores y .
• Pulsar al mismo tiempo y , el número de veces necesario para seleccionar la
zona en la que se desea modificar el timer. Para indicar la zona, se enciende de la
derecha de la pantalla.
• Pulsar los sensores o .
• Si el tiempo no se modifica en 10 segundos desde que se pulsó el sensor y , el
Page 70

70
timer continúa la cuenta atrás previa a la modificación.
Tiempo residual
• Se visualiza siempre el menor tiempo. de la derecha de la pantalla de la zona de
cocción correspondiente se ilumina de modo más intenso que el resto
• Pulsar al mismo tiempo los sensores y .
• Pulsar al mismo tiempo y , el número de veces necesario para seleccionar la
zona en la que se desea ver el tiempo residual. Para indicar la zona, se enciende de
la derecha de la pantalla.
• En la pantalla del timer aparece el tiempo residual de la zona de cocción seleccionada.
Ajuste del timer
Al cumplirse el tiempo de funcionamiento programado, se activa la señal acústica y la
zona de cocción se apaga. La señal acústica se puede apagar pulsando o o bien
automáticamente a los 2 minutos.
Desactivación del timer antes de que se cumpla el tiempo programado:
• Pulsar al mismo tiempo los sensores y .
• Pulsar al mismo tiempo y , el número de veces necesario para seleccionar la
zona en la que se desea desactivar el timer. Para indicar la zona, se enciende de la
derecha de la pantalla.
• Pulsar hasta que aparezca el valor .
• de la derecha de la pantalla de la zona de cocción se apaga y el timer se desactiva.
Avisador
El timer se puede utilizar como avisador por más que ya se esté utilizando para la cocción
temporizada.
Programación del avisador
Si el panel de cocción está apagado:
• Pulsar para encenderlo.
Pulsar al mismo tiempo y . En la pantalla del timer aparece . Si hay una
zona de cocción activada, se enciende de la derecha de la pantalla, de la primera
zona de cocción activada, empezando por la derecha.
Pulsar al mismo tiempo y , el número de veces necesario para seleccionar el
avisador; correspondiente se encuentra entre las teclas y . Si no hay ninguna
zona de cocción activada: se enciende del avisador.
• El valor del timer se programa con los sensores o .
El tiempo del avisador se puede programar en minutos y segundos o en horas y
minutos.
Apagado del avisador
Terminado el tiempo programado, se activa la señal acústica intermitente, que se puede
apagar pulsando o ; si no, se apaga sola a los 2 minutos.
Si se desea apagar el avisador antes del tiempo programado:
• Pulsar al mismo tiempo los sensores y .
• Pulsar al mismo tiempo y , el número de veces necesario para seleccionar el
avisador; correspondiente se ilumina.
• Pulsar hasta que aparezca el valor . El avisador se desactiva.
Page 71

71
FUNCIONES DE SEGURIDAD Y SEÑALIZACIÓN DE ERRORES
Durante el periodo de garantía, sólo los centros de servicio autorizados por el fabricante podrán realizar las labores de
reparación necesarias.
Antes de realizar cualquier reparación, asegúrese de que el aparato está desconectado de la red eléctrica extrayendo el
fusible o desconectando el cable de alimentación del enchufe.
La manipulación y las reparaciones de la gama de cocina (encimera de cocción) no autorizadas pueden causar
descargas eléctricas o cortocircuitos; por tanto, no intente realizar ninguna reparación usted mismo. Deje dichas tareas
en manos de expertos o de la unidad de servicio autorizada.
En caso de que se produzcan fallos o problemas menores en el funcionamiento del electrodoméstico, compruebe las
instrucciones siguientes para ver si puede eliminar las causas usted mismo.
Nuestra garantía no cubre la eliminación de los errores o las reclamaciones de garantía causadas por una conexión
incorrecta o un uso inadecuado del aparato. En estos casos, el coste de la reparación se cargará al usuario.
CÓDIGO
ERROR
DESCRIPCIÓN ERROR MANUAL DE INSTRUCCIONES
E03 o Er03 o
+ sonido
continuo
Activación continua de los sensores (TECLAS)
durante más de 10 segundos, causada por la
presencia de objetos o líquidos en el cristal de
la pantalla táctil.
Eliminar los objetos y/o los líquidos y limpiar el
cristal. Si el problema persiste, contactar con el
centro de asistencia técnica autorizado y
especificar el código de error.
L
¡Ningún error!
Seguro para niños activado.
Desactivar el seguro para niños.
Olla inadecuada. Utilizar una olla adecuada. Si el problema
persiste, contacte con un centro autorizado para
solicitar asistencia técnica, especificando el código
de error.
E8 Velocidad del ventilador incorrecta; error en el
ventilador izquierdo o derecho.
Aire de descarga bloqueado, por ejemplo, por un
papel. Contactar con el centro de asistencia
técnica autorizado, y especificar el código de
error.
E21 - Er21
E22 - Er22
E20 - Er20
E36 - Er36
E31 - Er31
E47 - Er47
E2
EA
U400
E5
E6
E9
Contactar con el centro de asistencia técnica autorizado y especificar el código de error.
Page 72

72
LIMPIEZA Y MANTENIMIENTO
La superficie de vitrocerámica se debe limpiar después de cada uso, ya que cualquier
pequeña mancha que quede se quemará sobre la superficie caliente.
Para el mantenimiento ordinario utilizar detergentes especiales que forman una especie
de película de protección contra la suciedad.
Antes de cada uso de la superficie de vitrocerámica hay que eliminar el polvo de la
superficie y la suciedad del fondo de las ollas, para evitar rayar las zonas de cocción
(Fig.1).
No utilizar esponjas de acero o detergentes abrasivos, ya que pueden rayar la
superficie. También se producen daños con el uso de sprays agresivos o detergentes no
adecuados (Fig.1 y Fig.2).
Las señales se pueden ir borrando por el uso de detergentes agresivos, esponjas de
acero o fondos de olla sucios (Fig.2). Las partículas pequeñas de suciedad se pueden
eliminar con una esponja húmeda; secar bien la olla (Fig.3).
Las manchas de agua se pueden eliminar con una solución de vinagre, pero sin pasar
sobre el marco (de algunos modelos) para no quitarle el brillo. No utilizar detergentes o
sprays agresivos para eliminar la cal (Fig.3).
La suciedad más persistente se elimina con detergentes específicos para la limpieza de
superficies de vitrocerámica. Seguir los consejos del fabricante del detergente.
Eliminar bien el detergente, ya que cualquier residuo podría dañar la superficie de
vitrocerámica (Fig.3).
La suciedad más persistente o quemada se debe quitar con una rasqueta. La manija
plástica de la rasqueta no debe entrar en contacto con las zonas de cocción calientes
(Fig.4).
Prestar atención para no lesionarse cuando se utilice la rasqueta. El azúcar y las comidas
con alto contenido de azúcar pueden dañar irremediablemente la superficie de
vitrocerámica (Fig.5): eliminar inmediatamente con la rasqueta los residuos de azúcar de
la superficie de vitrocerámica aunque todavía esté caliente (Fig.4).
El cambio de color de la superficie de vitrocerámica no influye en el funcionamiento o la
estabilidad de la superficie. El cambio de color es consecuencia del uso de ollas de cobre
o de aluminio o de residuos de alimentos sobre el fondo de la olla muy difíciles de
eliminar.
Estas alteraciones son de carácter estético y no influyen directamente en el
funcionamiento del aparato. Su reparación no está cubierta por la garantía.
Fig.1
Fig.2
Fig.3
Fig.4
Fig.5
Page 73

Page 74

Page 75

Page 76

Foster S.p.A.
via M.S. Ottone, 18/20 - 42041 Brescello (RE) - Italy
www.fosterspa.com info@fosterspa.com
LIB30771
R00-040518
Page 77

Gebruikshandleiding
Návod k použití
Instrukcja obslugi
Page 78

2
Page 79

3
NL
Geachte cliënt!
Dit apparaat is bestemd voor huishoudelijk gebruik.
Onze toestellen zijn verpakt in milieuvriendelijke materialen die kunnen worden gerecycled,
gestort of vernietigd zonder gevaar voor het milieu. Dergelijke verpakkingsmaterialen zijn ook
dienovereenkomstig geëtiketteerd.
Zorg ervoor dat, als de levenscyclus van uw apparaat teneinde is, u het milieu niet vervuild maar
het afdankte apparaat aflevert op een inzamelpunt voor
afgedankte huishoudelijke apparaten.
Instructies voor
gebruik
Deze instructies voor gebruik zijn bestemd voor de gebruiker en beschrijven het apparaat en de
manier waarop het moet worden behandeld. Deze instructies zijn bestemd voor verschillende
uitvoeringen van het apparaat, waardoor u een aantal beschrijvingen van functies kunt
tegenkomen die uw toestel niet bezit.
Deze instructies zijn alleen geldig, indien het symbool van het land op het apparaat is
aangegeven. Als er GEEN landsymbool op het apparaat is aangebracht, moeten de technische
instructies in acht worden genomen voor de aanpassing van het toestel om te voldoen aan de
eisen en voorschriften voor gebruik in uw land.
Instructies voor
de aansluiting
Het apparaat moet worden aangesloten in overeenstemming met de bijgaande instructies en met
de van toepassing zijnde voorschriften en normen. De aansluiting mag alleen worden uitgevoerd
door een erkend vakman.
Typeplaatje
Het typeplaatje met de basisgegevens van het apparaat is bevestigd aan de onderzijde van het
kooktoestel.
De fabrikant streeft naar constante verbeteringen. Daarom zijn de tekst en illustraties in dit
boekje onderhevig aan veranderingen zonder voorafgaande kennisgeving.
Bewaar deze instructies op een plaats waar zij altijd gemakkelijk toegankelijk zijn. Als het
apparaat door iemand anders wordt overgenomen geef dan ook de instructies mee.
Belangrijke waarschuwingen 4
Inbouw 5
Verbinding met het net 6
Technische kenmerken 7
Operatie 9
Beveiligingsfuncties en signalering
van fouten
15
Schoonmaak en onderhoud 16
Page 80

4
BELANGRIJKE WAARSCHUWINGEN
Het apparaat en sommige toegankelijke delen van het apparaat kunnen tijdens de werking erg heet worden, vermijdt dus
elk kontakt met de verwarmingselementen. Kinderen, jonger dan 8 jaar mogen niet in de nabijheid van het toestel
komen, tenzij ze onder voortdurende toezicht staan.
Prevent the children to hang around the appliance and warn them properly against the danger of burns.
Kinderen, ouder dan acht jaar en personen met verminderde lichamelijke, zintuiglijke en verstandelijke vermogens of met
gebrekkige kennis van de werking mogen dit apparaat alleen bedienen onder juist toezicht of als ze adequate instructies
hebben gekregen voor een veilig gebruik van het apparaat en zich bewust zijn van de gevaren, verbonden aan het
gebruik van het apparaat.
Kinderen mogen niet met het apparaat spelen.
Kinderen mogen het apparaat niet reinigen en onderhoudstaken uitvoeren zonder adequaat toezicht.
Ongecontroleerd koken of bakken met het gebruik van olie of andere vetten kan gevaarlijk zijn omdat het
oververhitte vet op de apparaat gemakkelijk vlam kan vatten en brand kan veroorzaken, zodat u dergelijke
voedselbereiding (bijv. het frituren van patat frites) constant in het oog moet houden. Probeer niet om vuur te blussen
met water, maar zet eerst het apparaat uit, dek dan het vuur af met een geschikt deksel of een vochtige doek.
Brandgevaar! Op de apparaat geen voorwerpen plaatsen.
Gebruik de apparaat niet als hij gebarsten of gebroken is. Bij een eventuele zichtbare barst onmiddellijk de
stekker uit het stopcontact trekken om de mogelijkheid van een elektrische schok te voorkomen.
Gebruik geen stoom of hogedruk om de apparaat te reinigen, aangezien dit kan leiden tot een elektrische schok.
Plaats op het oppervlak van de apparaat geen metalen voorwerpen, zoals messen, lepels, vorken, deksels en dergelijke,
omdat deze erg heet kunnen worden.
De apparaat kan niet door externe timers of afstandsbedieningenssystemen worden geactiveerd.
Gebruik het apparaat niet voor verwarming van de ruimte.
Als er een stopcontact in de buurt van de apparaat zit en een ander apparaat is hierop aangesloten, zorg er dan voor dat
het netsnoer niet in aanraking komt met de hete kookzones.
Bewaar geen hittegevoelige voorwerpen, materialen of stoffen, bijv. detergenten, sprays, etc., onder de apparaat.
Koppel in geval van een storing in de werking het apparaat onmiddellijk los van het elektriciteitsnet en neem contact op
met het servicecentrum.
Het apparaat is vervaardigd in overeenstemming met de desbetreffende van kracht zijnde veiligheidsnormen.
Sluit het apparaat niet aan op het elektriciteitsnet met behulp van een verlengsnoer met meerdere stopcontacten,
aangezien dit niet voldoende veiligheid biedt (het verlengsnoer met meerdere stopcontacten kan oververhit raken en
brand veroorzaken).
Sluit het apparaat aan op de netspanning met een permanente aansluiting.
De installatie van het apparaat in een keukenblad en de aansluiting op het elektriciteitsnet mogen alleen worden
uitgevoerd door een gekwalificeerde monteur.
Plaats geen lege pannen op het apparaat.
Apparaat mogen niet als werkblad worden gebruikt. Scherpe voorwerpen kunnen krassen veroorzaken.
Het bereiden van voedsel in dunne aluminium of plastic containers op hete kookzones is niet toegestaan. Plaats geen
kunststof voorwerpen of aluminiumfolie op de apparaat.
Als het apparaat is ingebouwd boven een oven met een pyrolyse-systeem mag het niet worden gebruikt terwijl het
pyrolyse-proces wordt uitgevoerd, aangezien het de oververhittingsbeveiliging kan activeren.
Dit symbool op het product of op de verpakking wijst erop dat dit product niet mag worden
behandeld als gewoon huishoudelijk afval. In plaats daarvan moet het worden afgegeven bij een
inzamelpunt voor recycling van elektrische en elektronische apparatuur. Door dit product correct
te verwijderen, helpt u mee om mogelijke negatieve gevolgen voor het milieu en de menselijke
gezondheid, die zich zouden kunnen voordoen in geval van verkeerde afvalverwerking, te
vermijden. Neem voor meer gedetailleerde informatie over recycling van dit product, contact op
met uw gemeentelijke dienst, uw afvalophaaldienst of de winkel waar u het product hebt gekocht.
Page 81

5
INBOUW
Belangrijke waarschuwingen
De inbouw van het apparaat in een keukenblad mag alleen worden uitgevoerd door een gekwalificeerde servicemonteur.
Fineer of andere afwerking van het element van het keukenblok, waarin de kookplaat wordt ingebouwd moet worden
behandeld met hittebestendige lijm (100 ° C) , anders kan het bovenblad verkleuren of vervormen.
In het ideale geval moet het apparaat worden geïnstalleerd met veel ruimte aan beide zijden. Er kan zich een wand aan
de achterzijde en een hoge kast of wand aan een zijde bevinden. Aan de andere kant mag zich echter geen wand of
meubel bevinden dat hoger is dan het werkblad.
NIET TOEGESTAAN NIET AANBEVOLEN NIET AANBEVOLEN AANBEVOLEN
Het gebruik van massief houten decoratie planelen of platen op de werkbladen achter de apparaat is niet toegestaan.
De afstand tussen de rand van het kooktoestel en het aangrenzende hoge keukenelement mag niet minder dan 250 mm
bedragen.
Alle maten en afstanden die moeten worden aangehouden staan aangegeven in de afbeeldingen hieronder.
Het keukenelement onder de kookplaat mag niet zijn uitgerust met een lade. Als het keukenelement voorzien is van een
horizontale scheidingswand , mag deze niet minder dan minimaal 20 mm onder het oppervlak van het werkblad
geplaatst. De ruimte tussen de scheidingswand en het kooktoestel moet leeg zijn, er mogen geen voorwerpen in deze
ruimte worden geplaatst.
Aan de muur gemonteerde keukenelementen moeten hoog genoeg worden opgehangen om niet het werkproces te
belemmeren.
De afstand tussen het kooktoestel en de afzuigkap mag niet kleiner zijn dan in de instructies voor de afzuigkap installatie
wordt aangegeven. Als de instructies van de fabrikant niet beschikbaar of, indien er sprake is van brandbare voorwerpen
(rail voor keukengerei, wandrekken, kastjes enz.) boven het apparaat, de minimum afstand bedraagt 800 mm.
Bevestig de wandeenheden en afzuigkap voor het aanbrengen van het apparaat om beschadiging te voorkomen.
Het voorste gedeelte moet een opening hebben van niet minder dan 5 mm .
Het apparaat mag niet worden geïnstalleerd boven een koelkast, koel-vriescombinatie, vriezer, vaatwasser, wasmachine,
wasdroger of droger.
Alleen ovens uitgerust met een koelventilator kunnen onder deze kookplaat worden geïnstalleerd.
Voor de installatie van een oven moet de achterwand van het keukenelement achter de uitsparing van de kookplaat
worden verwijderd. Voorts moet aan de voorzijde een ruimte van ten minste 5 mm worden gelaten.
a ≥ 800 mm
b ≥ 50 mm
c ≥ 20 mm
d ≥ 80 mm
e ≥ 5 mm
f ≥ 30 mm
g ≥ 250 mm
A
900 mm
B
400 mm
C
870 mm
D
370 mm
E
45 mm
F
5 mm
G
≥ 50 mm
H
≥ 600 mm
Page 82

6
Aanbrengen van de
schuimpakking
(voor glas apparaten)
Voordat u het apparaat in de opening in het keukenblad plaatst, moet de meegeleverde
schuimrubber afdichting aan de onderzijde van het glazen worden bevestigd.
Installeer het apparaat niet zonder de schuimpakking!
De pakking moet als volgt aan het apparaat worden gehecht:
Verwijder de beschermfolie van de strip.
Plak de pakking aan de onderzijde van het glas, ongeveer A=2-3 mm vanaf de rand. De
pakking moet worden bevestigd langs de gehele lengte van de glasrand en mag niet
overlappen op de hoeken.
Zorg ervoor dat bij het installeren van de pakking het glas niet in contact komt met scherpe
voorwerpen.
VERBINDING MET HET NET
Het apparaat mag alleen worden aangesloten door een erkend vakman .
Het elektrische beveiligingssysteem moet voldoen aan alle van toepassing zijnde voorschriften
.
De aansluiten kunnen worden bereikt wanneer het aansluitingsdeksel wordt geopend /
verwijderd .
Zorg er voor aansluiting van het apparaat voor dat de spanning op het typeplaatje in
overeenstemming is met de spanning van het net. De aansluitspanning moet worden
gecontroleerd door een erkend vakman met een professioneel meetinstrument!
Het typeplaatje met basisinformatie bevindt zich aan de onderzijde van het kooktoestel.
Om een vaste aansluiting te maken met het lichtnet, plaatst u een meerpolige
stroomonderbreker tussen het apparaat en het stopcontact. Deze inrichting zorgt voor een
contactonderbreking op alle polen en zorgt voor volledige onderbreking in geval van
overspanning onder voorwaarden van categorie III.
De stroomvoerende en geisoleerde delen moeten worden beschermd tegen elke mogelijkheid
van direct contact.
Voor elke werkzaamheid, dient het apparaat losgekoppeld te worden van het elektriciteitsnet.
Sluit het apparaat aan in overeenstemming met het bijgeleverde schema voor de elektrische
aansluitingen, zorg er voor dat de desbetreffende netspanning in acht wordt genomen!
De aarddraad worden aangesloten op de klem, aangegeven met het aardingssymbool.
De voedingskabel dient te worden geleid door de bevestigingsclip die het beschermt tegen per
ongeluk uittrekken.
Zet nadat u het apparaat hebt aangesloten alle kookzones / verwarmers drie minuten aan om
uzelf te overtuigen van de correcte werking.
Verkeerde aansluiting kan onderdelen van het toestel vernietigen, waardoor de garantie
vervalt.
De aansluitkabel moet zodanig langs de achterkant van het apparaat worden geleid dat hij niet
in aanraking komt met de achterwand van het apparaat, aangezien dit gedeelte zeer heet kan
worden tijdens het gebruik.
Basisaanpassing
van de sensoren
aan de omgeving
Na iedere aansluiting op het elektrische net wordt automatisch een basisaanpassing uitgevoerd,
die de optimale werking van de sensoren verzekert. Alle displays gaan enkele seconden lang
oplichten. Tijdens de aanpassing van de sensoren mogen er geen voorwerpen op de plaat
aanwezig zijn. Als dit niet het geval is, wordt de aanpassing onderbroken tot de voorwerpen
worden weggenomen. In deze tijdsspanne mag de kookplaat niet worden gebruikt.
Page 83

7
Aansluiting
Het volgende kan worden gebruikt voor de aansluiting: H05V2V2-F
LIJN L BRUIN
AARDE
GEEL / GROEN
NUL N BLAUW
TECHNISCHE GEGEVENS
7334245
Werkspanning 220-240 V~ o 380-415 V 2N~
Macht frequentie 50/60 Hz
P
TOT
7400 W
18,4x22 cm / 2,1 kW (P=3,7 kW)
P= EXTRA KRACHTIGE STAND
ENERGIE-EFFICIËNTIE
ELEKTRISCH KOKEN EC
ELEKTRISCH KOKEN
18,9x24,5 cm 189,6 Wh/kg
Type apparaat INGEBOUWD
AANTAL INDUCTIEZONES
2
EE
ELEKTRISCH KOOKVELD
189,6 Wh/kg
Werkingsprincipe
kookplaat
Het kookpaneel is voorzien van zeer potentierijke kookzones met inductie. De warmte wordt
rechtstreeks zonder nutteloos verlies op de bodem van de kom gevormd, waar die het meeste
nodig is, via het vitrokeramische oppervlak. Zo is het energieverbruik veel minder in vergelijking
met standaard kookzones, die werken via het principe van verwarming.
Het vitrokeramische oppervlak wordt niet rechtstreeks opgewarmd, maar enkel met de warmte
die terugkeert van de kom die rechtstreeks verwarmd wordt. Deze warmte wordt (na
uitschakeling) aangegeven als »restwarmte« . De opwarming in de inductiekookzone wordt
verzekerd door de inductiespoel, die onder het vitrokeramische oppervlak zit. De spoel maakt
een magnetisch veld; daarom bevinden zich op de bodem van de potten (die gemagnetiseerd
Page 84

8
kunnen worden) stroomwindingen, die opgewarmd worden
Potten geschikt
• De inductiekookzone werkt perfect indien geschikte potten worden gebruikt.
• Tijdens de bereiding moeten de potten in het midden van de kookzone staan.
• Geschikte potten die inductie verzekeren, zijn vaatwerk in staal, geëmailleerd staal of in
gietijzer. Stalen poten met een bodem in koper of aluminium, of vaatwerk in glas zijn niet
geschikt.
• Indien snelkookpannen worden gebruikt, moet u goed controleren tot de juiste druk is bereikt.
In het begin werkt de kookzone op maximumvermogen, daarna wordt volgens de aanwijzingen
van de fabrikant van de kom het kookvermogen via de speciale sensor verlaagd.
• Let op bij aankoop van de potten of »inductie mogelijk« wordt vermeld.
KOOKZONES MIN. Ø BODEM VAN
DE KOM
MAX. Ø BODEM VAN
DE KOM
184x220 mm
(ENKEL)
Ø 115 mm Ø 180 mm
184x220 mm
(ENKEL) MET
BRUGFUNCTIE
Ø 135 mm Ø 180 mm
184x220 mm
(DUBBEL) MET
BRUGFUNCTIE
2 ZONES - 380x220 mm
4 ZONES Ø 330 mm Ø 400 mm
Opmerking:
Wanneer de Brugfunctie is geselecteerd, kunt u de gecreëerde zone op verschillende manieren
gebruiken, met één of twee pannen.
Als u pannen gebruikt die groter zijn dan de aanbevolen maximale afmetingen zal meer tijd
nodig zijn om ze te verwarmen aangezien de warmte via geleiding wordt verspreid, van het
midden naar de rand van de pan. In dit geval zal ook de temperatuur zeer ongelijkmatig zijn.
Proef met een magneet
Met een kleine magneet A kunt u nagaan of de bodem van de kom gemagnetiseerd kan worden.
Gebruik kommen waar de magneet aan de bodem vasthecht.
Herkenning van de kommen
Eén van de voordelen van inductiekookplaten os het herkennen van de kommen. Indien er op
de kookzone geen kommen staan of als de kommen een kleine diameter dan de kookzone
hebben, is er geen verspilling van elektrische energie. Wanneer de kookzone wordt aangezet,
zal de indicator het symbool laten oplichten. Indien er binnen 10 minuten een kom op de
kookzone wordt gezet, zal de zone dit waarnemen en gaat aan op het ingestelde niveau.
Wanneer de kom van de kookzone wordt weggenomen, wordt de energievoorziening
onderbroken. Indien op de kookzone kommen met een kleine diameter worden gezet, zal de
zone dit waarnemen: deze zone zal enkel de energie verbruiken die nodig is om de kom met de
kleinere diameter te verwarmen.
De kookplaat wordt beschadigd:
• als de zone aan is en leeg wordt gelaten, of als er een lege kom op wordt gezet.
• Als u kommen gebruikt die niet geschikt zijn (vb. met een bodem die niet vlak is of met een te
kleine diameter).
• Gebruik geen potten in aardewerk, deze laten krassen na op het vitrokeramische oppervlak.
• Vooraleer de kom op de kookplaat te zetten, moet de plaat perfect droog zijn om de warmte
door te geven en om het oppervlak van de kookplaat niet te beschadigen.
• Voor het bereiden en het frituren moet men kommen gebruiken die gemagnetiseerd kunnen
worden, dit betekent van staal, geëmailleerd staal of gietijzer. Alleen in dit geval zal de
inductiekookplaat werken.
Page 85

9
Kookniveaus
Het vermogen van de kookzones kan op negen verschillende niveaus worden geselecteerd.
In de tabel worden voorbeelden van de afzonderlijke instellingen beschreven.
Niveau Bedoeling
0 Uitschakeling, gebruik van de restwarmte
1-2 Voeding warm houden, bereiding van kleine hoeveelheden
3 Trage bereiding (voortzetting bereiding na hevige opwarming)
4-5 Trage bereiding van grote hoeveelheden
6 Bereiding om te braden, aanbakken van voeding
7-8 Bereiding om voeding te braden
9 Begin bereiding, bakken
A Automatisch snel opwarmen
P Zeer krachtige bereiding voor uitzonderlijk grote hoeveelheden voeding
Tips voor
energiebesparing
Let op bij aankoop van de kommen, omdat de aangegeven diameter van de kom overeenkomt
met de bovendiameter of het deksel en altijd groter is dan de bodem van de kom.
De snelkookpannen zijn bijzonder aangewezen voor energiebesparing, omdat ze dankzij de
hoge interne druk de kooktijd tot een minimum kunnen beperken. Door de kortere kooktijd gaan
er ook minder vitamines van de voeding verloren.
Let op dat er in de snelkookpan altijd voldoende vloeistof is, omdat er anders oververhitting kan
optreden die zowel de kom als de kookplaat zou kunnen beschadigen.
Dek de kommen altijd af met geschikte deksels.
Gebruik kommen die geschikt zijn voor hoeveelheid voeding die u bereidt. Indien u enkel de
helft van de kom gebruikt, wordt veel elektrische energie verspild.
OPERATIE
• Na het inschakelen van het keramische glaskookveld, gaan alle displays kortstondig aan. Het
kookveld is klaar voor gebruik.
• Het kookveld is voorzien van elektronische sensoren die worden ingeschakeld als u minstens
één seconde de desbetreffende cirkel aanraakt.
• Elke activering van de sensor wordt gevolgd door een geluidsignaal.
• Zet geen voorwerpen op het sensoroppervlak (kans op storingssignalering_ ).
• Houd altijd het sensoroppervlak schoon.
Bediening kookveld
A. AAN/UIT kookveld
B. Pauze en Geheugenoproep
C. Vergrendeling
D. (-) van Timer
E. (+) van Timer
F. Schuifregelaar
G. Verwarmen
H. Snel koken
L. Timer
Schuifregelaar
0
Gemiddeld vermogen
Vol vermogen
Page 86

10
Het kookveld
inschakelen
Druk minstens één seconde op .
Het kookveld is nu actief, en op alle kookzone-displays verschijnt .
U moet nu binnen 10 seconden de volgende stand selecteren, anders wordt het
kookveld uitgeschakeld.
Kookzones
inschakelen
Na het inschakelen van het kookveld met , schakelt u binnen de volgende 10 seconden één
van de kookzones in. Stel het vermogensniveau 1-9 in door de schuifregelaar aan te raken.
Bij de eerste aanraking wordt het niveau ingesteld, overeenkomstig het deel van de
schuifregelaar dat u aanraakt. De ledlampjes op de schuifregelaar gaan aan,
overeenkomstig het ingestelde niveau.
Door het verschuiven van de schuifregelaar, verandert de stand van het
vermogensniveau. Als u de schuifregelaar naar rechts verschuift, neemt het niveau toe;
als u de schuifregelaar naar links verschuift, neemt het niveau af.
Wanneer u uw vinger van de schuifregelaar afhaalt, begint het kookveld te werken op het
ingestelde niveau.
Als minstens 3 seconden op een specifiek punt van de schuifregelaar wordt gedrukt, wordt
automatisch koken geactiveerd (zie Automatisch snel verwarmen).
Kookzones
uitschakelen
De geselecteerde kookplaat moet geactiveerd zijn.
Door de schuifregelaar vooraan aan te raken, de vermogensinstelling naar brengen. Een
korte pieptoon bevestigt de UIT-stand
.
Het kookveld
uitschakelen
Het kookveld wordt uitgeschakeld door op te drukken.
Het geluidsignaal klinkt en alle indicatoren gaan uit, behalve die voor de kookplaten die nog
warm zijn en waarvoor een waarschuwing wordt weergeven om aan te duiden dat nog
restwarmte aanwezig is.
Als u het kookveld voor het einde van de kooksessie uitschakelt, kunt u de restwarmte
gebruiken en zo elektrische energie besparen.
Vergrendeling
Door de sleutelvergrendeling te activeren, kunt u de werking van het apparaat en het gebruik
van de kookplaten stoppen.
Activering
De kookplaat moet ingeschakeld worden.
Druk circa 1 seconde op , de bijbehorende ledlampjes boven de toets gaan aan, de
vergrendeling is actief.
De veiligheidsvergrendeling voorkomt de activering van de sensoren, behalve van en .
Als het kookveld wordt uitgeschakeld wanneer de vergrendelingsfunctie is geactiveerd, blijft het
in het geheugen tot een nieuwe inschakeling van het kookveld.
Wanneer ingestelde timers aflopen, kunnen de alarmen worden uitgeschakeld door op of
te drukken zonder dat de bediening ontgrendeld moet worden.
Deactivering
De kookplaat moet ingeschakeld zijn
Druk 1 seconde op ; daarna wordt de ontgrendeling bevestigd door een pieptoon.
Kinderslot
Deze functie kan alleen worden geactiveerd/gedeactiveerd na het inschakelen van het kookveld met
Activering
• Druk tegelijkertijd op en , druk vervolgens weer op .
• De functie is actief en op alle displays verschijnt
• De bediening van het kookveld blijft vergrendeld en wordt automatisch na 10 sec.
uitgeschakeld.
Het kinderslot deactiveert alle toetsen behalve . Eenmaal geactiveerd blijft de
elektronica vergrendeld zelfs als de bediening wordt uitgeschakeld en weer ingeschakeld.
Deactivering
• Druk binnen 10 sec. tegelijkertijd op en , druk vervolgens weer op .
Page 87

11
De functie is niet actief.
Eenmalige ontgrendeling (voor één kooksessie)
• Druk tegelijkertijd op en .
• Het kinderslot is uitgeschakeld voor de kooksessie.
• Na het uitschakelen van het kookveld is het kinderslot reactief en zodoende actief wanneer het
kookveld opnieuw wordt ingeschakeld.
Pauze
De uitvoering van de functie is alleen mogelijk als ten minste één zone aan is.
De pauze kan ook worden geactiveerd bij specifieke storingen van de kookzone, hier is de
storingsweergave verborgen. Ook de weergave van restwarmte, speciale meldingen zoals
, of zijn verborgen; de pauzeweergave heeft prioriteit. Als er sprake is van een
algemene storing tijdens de pauze, wordt de bediening uitgeschakeld en de modus
beëindigd.
Activering
Druk minstens 1 seconde op , de bijbehorende ledlampjes boven de toets gaan aan en op
alle displays verschijnt .
Terwijl de Pauze-functie actief is
Elke voor de pauze ingestelde timer (ook alarmtimer) wordt tijdens de pauze gestopt en
vervolgt wanneer de pauzemodus wordt afgesloten.
Een geselecteerde automatische boosterfunctie of opwarmfunctie wordt beëindigd.
De restwarmteberekening en de beperkingen voor maximale werkingstijd worden niet
onderbroken en blijven op de achtergrond werken.
De functionele ledlampjes zoals timer, multizone, blijven branden overeenkomstig hun status.
De pauze-modus kan ten hoogste 10 min. actief zijn.
Gedurende de pauzetijd kan worden gebruikt om de bediening uit te schakelen. In dat
geval wordt ook de pauze-modus gedeactiveerd.
Deactivering
Druk op , de ledlampjes boven de aanwijzer van één van de kookzones gaan aan.
Druk binnen 10 seconden op de schuifregelaar van het verlichte gebied en schuif deze van
links naar rechts. Het ledlampje boven de pauzetoets gaat uit en de staat, aanwezig voor de
pauzemodus, wordt hersteld.
Geheugenoproep
Indien de bediening per ongeluk werd uitgeschakeld door de hoofd- kunnen alle instellingen
worden hersteld door middel van de geheugenoproep-functie. Na het uitschakelen van de
bediening via de hoofdschakelaar heeft de gebruiker 6 sec. om de bediening opnieuw in te
schakelen en vervolgens nog eens 6 sec. om op te drukken en de instellingen uit het
geheugen op te roepen. De geheugenoproep-functie kan alleen worden gebruikt als ten minste
één kookzone actief was (kookniveau >0) onafhankelijk van de toetsvergrendeling.
Restwarmteindicator
De apparaten zijn ook uitgerust met een restwarmte-indicator . De kookplaten worden niet
direct verwarmd maar de warmte, uitgestraald door de schaal, wordt teruggegeven. Zolang
aan is, nadat de kookplaat werd uitgeschakeld, kan de restwarmte worden gebruikt voor het
opwarmen van voedsel of voor smelten.
Ook als verdwijnt, kan de kookplaat nog heet zijn.
Kijk uit voor brandwonden!
Snel koken
De extra krachtige stand kan tevens worden ingesteld voor snel koken. Dit extra vermogen wordt
gebruikt voor het verwarmen van grote hoeveelheden voedsel.
Na inschakeling, wordt het extra vermogen 10 minuten geactiveerd, waarna het automatische
terugschakelt naar het normale maximumniveau 9.
Tijdens de periode dat het extra vermogen wordt geactiveerd, is het vermogen van de andere
kookplaten beperkt. Dit wordt aangegeven op de vermogensdisplay doordat het geselecteerde
kookniveau en het beperkte vermogen gedurende enkele seconden afwisselend knipperen.
Activering
Druk op van de gewenste kookzone;
Het extra vermogen is actief;
Op de display verschijnt .
Vroegtijdige deactivering
Druk op de schuifregelaar van de gewenste zone en verschuif hem totdat hij op staat als u
Page 88

12
de zone wilt uitschakelen of tot op het gewenste kookniveau.
ENERGIEBEHEERSYSTEEM
Het energiebeheersysteem verdeelt het vermogen tussen de beschikbare kookzones, ingedeeld
in koppels (zie afbeeldingen aan de zijkant): het maximum vermogen wordt aan één kookzone
geleverd waardoor het beschikbare vermogen aan de andere kookzone automatisch wordt
gereduceerd. De display van de tweede kookzone geeft gedurende enkele seconden
afwisselend het gekozen kookvermogen en het beperkte vermogen weer.
Onder bepaalde omstandigheden kan de Extra krachtige stand automatisch worden
uitgeschakeld om de elektronische onderdelen in het kookveld te beschermen.
Automatische
opwarmtijd
Deze functie verwarmt de brander op maximaal vermogen om deze snel op de vereiste
temperatuur te laten komen. Na een bepaald tijdsinterval keert het vermogensniveau spontaan
terug naar de ingestelde stand.
Deze functie kan voor elke kookplaat worden ingeschakeld, voor alle kookstanden behalve voor
stand “9”, waar het vermogen steeds op het maximum is ingesteld.
Activering
De automatische kookmodus is geactiveerd op elke inactieve kookplaat.
Kies het vereiste niveau voor continue koken en houd het 3 seconden ingedrukt.
De geactiveerde automatische opwarmtijd wordt op de display weergegeven door afwisselend
en het geselecteerde niveau voor continu koken te tonen. Zodra de voorkooktijd voorbij is, is
het vooraf geselecteerde niveau voor continu koken opnieuw geldig.
Zodra de tijd in de onderstaande tabel is verstreken, wordt de functie uitgeschakeld en
verdwijnt ze. U kunt ook op elk moment de automatische kookmodus uitschakelen door het
vermogensniveau te wijzigen.
Vermogensinstelling 1 2 3 4 5 6 7 8
Max. vermogen kooktijd
(minuten)
40 72 120 176 256 432 120 192
Brug
Met de brugfunctie kunnen twee afzonderlijke kookzones met dezelfde diameter en gelijk
vermogen tegelijkertijd worden ingeschakeld en met slechts één handeling worden bediend.
Activering
Hetzij twee zones op een verschillend niveau, hetzij op twee zones op 0-niveau:
Druk tegelijkertijd ergens op de schuifregelaar van de zones:
1 en 2
3 en 4
Nu de twee gebieden samenwerken worden de ledlampjes aan de rechterkant van de
bijbehorende displays ingeschakeld. Het niveau wordt weergegeven op de display van de
bedieningszone en de display van de bediende zone wordt intussen uitgeschakeld.
Wanneer deze functie actief is, kunt u de timer instellen, de ledlampjes bij beide displays van
de zones gaan aan. Bovendien kan geen zeer krachtige kookfunctie worden ingesteld.
Als binnen 10 minuten, zonder onderbreking, geen kookgerei op één van de twee elementen
worden gedetecteerd, wordt de brugfunctie automatisch gedeactiveerd.
Deactivering
De functie kan worden beëindigd door de gelijktijdige selectie van beide kookelementen te
herhalen (dezelfde als activering).
Als de functie tijdens de werking wordt gedeactiveerd, gaan beide kookelementen naar niveau
en kunnen opnieuw worden ingesteld.
Verwarmen
De verwarmingsfunctie wordt gebruikt om het bereide voedsel warm te houden. Behalve
hiervoor kan het ook worden gebruikt als smelt- of sudderfunctie.
Activering
Druk op van een kookzone voor het activeren van “smelten” ;
Als een tweede keer wordt ingedrukt, wordt “verwarmen” geactiveerd ;
Als een derde keer wordt ingedrukt, wordt “sudderen” geactiveerd ;
Als een vierde keer wordt ingedrukt wordt de verwarmingsfunctie beëindigd.
Page 89

13
Veiligheidsuitschak
eling
De maximale continue werking van een bepaalde kookplaat is beperkt en de duur is
weergegeven in de bovenstaande tabel. Wanneer de kookplaat wordt uitgeschakeld door het
veiligheidsmechanisme, toont de indicator de symbolen ofwel in het geval er restwarmte is
overgebleven.
Voorbeeld:
Stel de kookplaat in op vermogensniveau 5 en laat enige tijd werken. Indien u de bovenstaande
stand niet verandert, schakelt het veiligheidsmechanisme de kookplaat na 210 minuten uit.
Vermogensinstelling Tijdsverloop in minuten voor veiligheidsuitschakeling
smelten 480
verwarmen 480
sudderen 480
1 516
2 402
3 318
4 258
5 210
6 138
7 138
8 108
9 90
P 10
Bescherming tegen
oververhitting
De inductiekookplaat is tevens voorzien van een veiligheidsinrichting tegen oververhitting die de
elektronische onderdelen beschermt tegen beschadiging. Deze inrichting werkt op verschillende
niveaus. Wanneer de temperatuur van de kookplaat overmatig stijgt, wordt de tweetraps
ventilator ingeschakeld. Als dit niet voldoende is, wordt de extra krachtige verwarming
gedeactiveerd en als laatste reduceert de veiligheidsinrichting de verwarmingscapaciteit van
bepaalde kookplaten of schakelt ze volledig uit. Wanneer de kookplaat afkoelt, is het volledig
vermogen van de kookplaat weer beschikbaar.
Timer
Het gebruik van de timer vergemakkelijkt het koken door de werkingstijd van de kookplaat in te
stellen.
Activering
De kookplaat moet worden ingeschakeld en de zone moet werken waarvoor u de timer wilt
instellen.
Druk tegelijkertijd op en , de display van de timer toont en van de eerste
actieve kookzone op de linkerkant gaat aan.
Druk zo vaak als het nodig is gelijktijdig op en om de zone te selecteren waarvoor u de
timer wilt instellen. gaat enkel aan voor de actieve kookzones.
Nadat u op en hebt gedrukt, moet u binnen de 10 seconden de waarde van de timer
instellen door op of te drukken.
De waarde van de timer kan weergegeven worden:
-
in minuten en seconden tot 9 min 59 sec.;
-
in uren en minuten tot 9 uur 59 min, in dat geval wordt de tekst “min” onder de display
van de timer getoond.
De werkingstijd kan voor elke kookplaat afzonderlijk worden ingesteld.
Vooraf ingestelde kooktijd wijzigen
De kooktijd kan op elk moment tijdens de werking worden gewijzigd.
Druk tegelijkertijd op en ;
Druk zo vaak als nodig is gelijktijdig op en om de zone te selecteren waarvan u de timer
wilt aanpassen. De zone wordt vastgesteld door de verlichting van ;
Druk binnen 10 seconden op of om de tijd te wijzigen;
Overgebleven kooktijd controleren
De laatst ingestelde timer wordt altijd weergegeven ( heeft een sterkere verlichting dan de
andere).
Druk tegelijkertijd op en ;
Druk zo vaak als nodig is gelijktijdig op en om de zone te selecteren waarvan u de
overgebleven kooktijd wilt zien. De zone wordt vastgesteld door de verlichting van ;
Page 90

14
De timerdisplay geeft de overgebleven tijd van de geselecteerde kookzone weer.
Deactivering
Wanneer de vooraf ingestelde tijd is verstreken, signaleert een pieptoon het einde en de
kookplaat wordt uitgeschakeld. Schakel het alarm uit door op de sensor of te drukken.
Anders wordt het automatisch na 2 minuten uitgeschakeld.
Indien u de timer voor het einde van de vooraf ingestelde tijd wilt deactiveren:
Druk tegelijkertijd op en ;
Druk zo vaak als nodig is gelijktijdig op en om de zone te selecteren waarvan u de timer
wilt uitschakelen. De zone wordt vastgesteld door de verlichting van ;
Druk op tot de waarde ;
wordt uitgeschakeld en de timer wordt gedeactiveerd.
Alarm
De timer kan worden gebruikt als alarm, ook al wordt hij reeds gebruikt voor de tijdregeling van
één van de kookplaten.
Instelling timer
Met het kookveld uit:
Druk op om het kookveld te activeren;
Druk tegelijkertijd op en om het alarm te activeren. De display van de timer toont
en indien er een kookzone actief is, gaat van de eerste actieve kookzone op de
linkerkant branden.
Druk zo vaak als nodig is gelijktijdig op en om het alarm te selecteren. De
desbetreffende bevindt zich tussen en
;
De timerwaarde wordt ingesteld door op of te drukken;
De tijd kan worden ingesteld in minuten en seconden of in uren en minuten. Dit geldt ook voor
het alarm.
Het alarm uitschakelen
Wanneer de vooraf ingestelde tijd is verstreken, klinkt een pieptoon die uitgeschakeld kan
worden door op of
te drukken. Anders wordt hij automatisch na 2 minuten uitgeschakeld.
Indien u de timer wilt uitschakelen voordat de vooraf ingestelde tijd afloopt:
Druk tegelijkertijd op en .
Druk zo vaak als nodig is gelijktijdig op en om het alarm te selecteren, gaat aan.
Druk op totdat de waarde . Het alarm wordt gedeactiveerd.
Page 91

15
BEVEILIGINGSFUNCTIES EN SIGNALERING VAN FOUTEN
Gedurende de garantieperiode mogen reparaties alleen uitgevoerd worden door een door de fabrikant gemachtigd
servicecentrum.
Zorg ervoor dat, alvorens eventuele reparaties uit te voeren, het apparaat is losgekoppeld van het elektriciteitsnet, hetzij
door het verwijderen van de zekering of door de stekker uit het stopcontact te nemen.
Ongeoorloofde en ondeskundige reparaties aan het kooktoestel kunnen leiden tot elektrische schokken of kortsluiting,
probeer daarom nooit eventuele reparaties zelf uit te voeren, maar laat dergelijke taken over aan een deskundige of een
gemachtigde service.
Volg in geval van kleine storingen of problemen met de werking van het apparaat, de volgende instructies om te zien of u
de oorzaken zelf kunt verhelpen.
Verwijdering van eventuele fouten of garantieclaims die voortkomen uit een verkeerde aansluiting of gebruik van het
apparaat valt niet onder onze garantie. In dergelijke gevallen komen de kosten van de reparatie voor rekening van de
gebruiker.
FOUTCODE BESCHRIJVING VAN DE FOUT INSTRUCTIEBOEKJE
E03 or Er03 or
+ continue
toon
Permanent gebruik van sensoren; De
bedieningseenheid schakelt na 10 sec.
uit. Water of kookgerei op het glas
boven de bedieningseenheid.
Reinig het werkingsoppervlak. Als het probleem
aanhoudt, neem dan contact op met een erkend
servicecentrum voor technische assistentie onder
vermelding van de storingscode.
L
Geen storing!
Kinderslot geactiveerd.
Deactiveer het kinderslot.
Ongeschikte pan. Gebruik een geschikte pan. Als het probleem blijft,
neem dan contact op met een erkend servicecentrum
voor technische assistentie onder vermelding van de
storingscode.
E8 Onjuiste ventilatorsnelheid; storing bij
ventilator links of rechts.
Luchtuitlaat geblokkeerd, bijvoorbeeld door papier.
Neem contact op met een erkend servicecentrum voor
technische assistentie onder vermelding van de
storingscode.
E21 o Er21
E22 o Er22
E20 o Er20
E36 o Er36
E31 o Er31
E47 o Er47
E2
EA
U400
E5
E6
E9
Neem contact op met een erkend servicecentrum voor technische assistentie onder vermelding
van de storingscode.
Page 92

16
SCHOONMAAK EN ONDERHOUD
Het vitrokeramische oppervlak moet na elk gebruik worden schoongemaakt, omdat iedere
achtergebleven vlek in het warme oppervlak inbrandt.
Gebruik speciale schoonmaakmiddelen voor het gewone onderhoud, die een soort
beschermende laag tegen vuil vormen.
Vooraleer het vitrokeramische oppervlak te gebruiken, moet men het stof van het oppervlak
wegnemen en mogelijk vuil van de onderkant van de kommen, die krassen in de kookzones
kunnen maken (Fig.1).
Gebruik geen schuursponsjes of schurende detergenten die krassen op het oppervlak
kunnen maken. Agressieve sprays of ongeschikte schoonmaakproducten kunnen eveneens
schade veroorzaken (Fig.1 en Fig.2).
De signalisering kan versluiten door gebruik van agressieve schoonmaakmiddelen,
schuursponsjes of door de bodem van vuile kommen (Fig.2). Kleiner vuil kan men met een
vochtige spons wegnemen en daarna de kom goed afdrogen (Fig.3).
Vlekken van water kan men met een azijnoplossing wegnemen, maar wrijf hiermee niet over de
lijsten (van sommige modellen) omdat die daardoor hun glans kunnen verliezen. Gebruik geen
agressieve schoonmaakmiddelen of spray om kalk te verwijderen (Fig.3).
Hardnekkig vuil kan men met specifieke producten voor de schoonmaak van vitrokeramische
oppervlakken verwijderen. Volg de aanwijzingen van de producent van het schoonmaakmiddel.
Let erop dat het schoonmaakmiddel volledig van het oppervlak wordt verwijderd, omdat resten
het vitrokeramische oppervlak kunnen beschadigen (Fig.3).
Hardnekkig of aangebrand vuil moet met het schrapertje worden verwijderd. Let op dat de
plastic handgreep van het schrapertje niet in contact komt met de warme kookplaat (Fig.4).
Let op dat u zich niet verwondt wanneer u het schrapertje gebruikt! Suiker of gerechten die veel
suiker bevatten kunnen het vitrokeramische oppervlak blijvend beschadigen (Fig.5), daarom
moeten suikerresten onmiddellijk met het schrapertje van het vitrokeramische oppervlak worden
verwijderd, zelfs als het oppervlak nog warm is (Fig.4).
Verandering van kleur van het vitrokeramische oppervlak heeft geen invloed op de werking of
op de stabiliteit van het oppervlak. Dit is het gevolg van gebruik van kommen in koper of
aluminium of van voedingsresten die aan de bodem van de kom kleven, die echter moeilijk te
verwijderen is.
Alle bovenvermelde fouten zijn van esthetische aard en hebben geen rechtstreekse
invloed op de werking van het toestel. Ze kunnen niet in garantie worden verwijderd.
Fig.1
Fig.2
Fig.3
Fig.4
Fig.5
Page 93

17
CS
Vážený zákazníku!
Tento spotřebič je vyroben pro použití v domácnosti.
Naše spotřebiče jsou baleny do ekologických materiálů, které lze recyklovat, ukládat
nebo likvidovat bez jakéhokoliv nebezpečí pro životní prostředí. Tyto obalové materiály
jsou v souladu s tím také označeny.
Jakmile skončí životní cyklus vašeho spotřebiče, dbejte na to, abyste neznečistili životní
prostředí, a dopravte ho autorizovaným společnostem, které zajišťují sběr starých
domácích spotřebičů.
Návod k použití
Návod k použití byl vypracován pro uživatele a popisuje spotřebič a způsob manipulace
s ním. Tento návod je určen pro různé typy spotřebiče, takže zde můžete najít některé
popisy funkcí, kterými váš konkrétní spotřebič není vybaven.
Tento návod je platný pouze tehdy, pokud je na spotřebiči uveden národní symbol.
Jestliže na spotřebiči není uveden ŽÁDNÝ národní symbol, je nutno dodržovat technické
pokyny pro úpravu spotřebiče, aby splňoval požadavky a předpisy pro použití ve vaší
zemi.
Návod k připojení
Spotřebič musí být připojen v souladu s přiloženým návodem i v souladu s příslušnými
předpisy a normami. Připojení smí provádět pouze kvalifikovaná osoba.
Typový štítek
Typový štítek, který uvádí základní údaje o spotřebiči, je připevněn ke spodní straně
varné desky.
Výrobce se snaží výrobek neustále vylepšovat. Z toho důvodu text a ilustrace v
této příručce podléhají změně bez předchozího oznámení.
Uložte tyto pokyny na místo, na kterém budou vždy snadno dostupné; v případě,
že spotřebič předáváte další osobě, pokyny by měly být přiloženy.
Důležitá upozornění 18
Instalace 19
Připojení k elek. síti 20
Technické informace 21
Provoz 23
Chybová hlášení 28
Čištění a údržba 29
Page 94

18
DŮLEŽITÁ UPOZORNĚNÍ
Spotřebič a jeho přístupné části jsou během používání horké. Dejte pozor, aby set se nedotkli topných částí. Děti mladší
8 let musí být neustále pod dohledem, nenechávejte je samy při spotřebiči.
Nenechávejte malé děti bez dozoru, když je spotřebič v provozu. Nebezpečí popálení nebo opaření!
Tento spotřebič mohou používat děti ve věku od 8 let a více, osoby s omezenými fyzickými, smyslovými nebo duševními
schopnostmi, nebo bez patřičných zkušeností a znalostí, pouze pod dohledem nebo po poskytnutí přesných instrukcí
jako se spotřebiči zacházet, musí být poučeny jak používat spotřebič a jaké jsou spojeny rizika s nesprávným
používáním spotřebiče.
Děti se nesmí se spotřebičem hrát.
Čištění a údržbu nesmí děti provádět bez dozotu .
Vaření na varné desky s použitím oleje může být bez vaší přítomnosti nebezpečné a může mít za následek
vznícení oleje. Přípravu pokrmů s použitím tuků provádějte vždy pod stálou kontrolou. Nikdy se nesnažte uhasit oheň
vodou, ale vypněte spotřebič a pak zakryjte nádobu, ve které vaříte pokličkou, nebo jiným nehořlavým povrchem.
Nebezpečí požáru - neskladujte žádné předměty na varné ploše.
Nepoužívejte sklokeramickou varnou desku, pokud je prasklá nebo zlomená. Jestliže se objeví jakákoli viditelná
prasklina, odpojte spotřebič ihned od zdroje napájení, abyste předešli možnosti zasažení elektrickým proudem.
Pro čištění varné desky nepoužívejte parní čističe nebo vysokotlaké čističe, protože to může mít za následek úraz
elektrickým proudem.
Nikdy nepokládejte žádné kovové předměty na povrch varné desky, jako jsou nože, vidličky, lžíce, poklice a podobně,
jejich povrch se velmi rychle rozehřívá a hrozí popálení.
Varnou desku nelze aktivovat pomocí vnějších časovačů ani systémů dálkového ovládání.
Nepoužívejte varnou desku pro vytápění místnosti.
Pokud se v blízkosti varné desky nachází zásuvka ve zdi, do které je zapojen jiný spotřebič, dbejte na to, aby síťový
kabel nepřišel do kontaktu s horkými varnými zónami.
Neskladujte žádné předměty, materiály ani látky citlivé na teplotu pod varnou deskou, např. čisticí prostředky, spreje atd.
V případě poruchy spotřebiče odpojte spotřebič ihned od sítě a kontaktujte servisní středisko.
Spotřebič je vyroben podle příslušných platných bezpečnostních norem.
Nepřipojujte plotýnku k elektrické síti prodlužovačkou, nebo pomocí více zásuvek, protože nezajišťují dostatečnou
bezpečnost (např. Při více zásuvkách hrozí přehřátí, apod.).
Připojte zařízení do trvalého připojení na elektrickou síť.
Spotřebič musí instalovat do kuchyňské pracovní desky a připojit k napájecí síti pouze přiměřeně kvalifikovaný technik.
Nepokládejte na desku prázdné nádoby.
Sklokeramické varné desky by se neměly používat jako pracovní plocha. Ostré předměty mohou způsobit poškrábání.
Není dovolena příprava jídla v hliníkové fólii plastových nádob na horkých varných zónách. Nepokládejte žádné
předměty z umělé hmoty nebo hliníkovou fólii na sklokeramickou varnou desku.
Pokud je spotřebič zabudovaný nad troubou s pyrolytickým systémem, neměl by být provozován v době, kdy je
pyrolytický proces v provozu, jelikož může spustit jeho ochranu před přehříváním.
Tento symbol na výrobku nebo na jeho obalu (popř. v návodu) znamená, že tento použitý výrobek
nepatří do běžného komunálního odpadu a už vůbec ne na černou skládku. Můžete ho bezplatně
odevzdat na tzv. místech zpětného odběru (sběrné dvory, mobilní svozy, apod.) nebo u prodejce při
koupi nového výrobku. Informace o tom, kde je možné elektrozařízení zdarma odložit, získáte u
vašeho prodejce, na obci nebo na www.elektrowin.cz. (zpětně odebrané zařízení musí být kompletní).
Page 95

19
INSTALACE
Důležitá upozornění
Spotřebič musí instalovat do kuchyňské pracovní desky pouze přiměřeně kvalifikovaný technik.
Obklad nebo jiná povrchová úprava kusu kuchyňského nábytku, do kterého je varná deska zabudovaná, by měly být
ošetřeny žáruvzdorným lepidlem (100 °C); v opačném případě může dojít k vyblednutí nebo k deformaci povrchové
úpravy pracovní plochy.
Ideálně by zařízení mělo být instalováno s dostatkem místa po obou stranách. Na zadní straně může být zeď a na jedné
straně vysoká jednotka nebo také zeď. Nicméně na druhé straně by neměla žádná jednotka nebo dělící příčka stát výše
než samotné zařízení.
NEDOVOLENO NEDOPORUČOVÁNO NEDOPORUČOVÁNO DOPORUČENO
Použití ozdobných desek z masivního dřeva na pracovní ploše za varnou deskou je dovoleno, pokud minimální
vzdálenost zůstane stejná jako hodnota uvedená v instalačních výkresech.
Veškeré rozměry a vzdálenosti pro správnou funkci zařízení jsou na níže uvedených obrázcích.
Vzdálenost mezi hranou spotřebiče a přilehlým vysokým prvkem kuchyňského nábytku by měla být minimálně 150 mm.
Prvek kuchyňského nábytku pod varnou deskou by neměl být vybaven zásuvkou. Pokud je prvkem kuchyňského nábytku
vodorovná příčka, nesmí být nainstalovaná ve vzdálenosti menší než minimálně 20 mm od spodní plochy pracovní
desky. Prostor mezi příčkou a varnou deskou musí být prázdný, do tohoto prostoru se nesmějí vkládat žádné předměty.
Závěsné nebo nástěnné kuchyňské prvky by měly být nainstalovány dost vysoko, aby nezasahovaly do pracovního
procesu.
Mezi spotřebičem a odsavačem musí být dodržena minimální bezpečná vzdálenost. Pro bližší informace si přečtěte
návod k použití a pokyny k instalaci od výrobce. Pokud pokyny od výrobce nejsou k dispozici nebo pokud se nad
spotřebičem nacházejí hořlavé předměty (např. závěsné systémy, nástěnné skříňky apod.), musí být mezi spotřebičem a
odsavačem zachována bezpečná vzdálenost minimálně 800 mm.
Smontujte nábytkovou stěnu a digestoř před instalací zařízení z důvodu předcházení jejího poškození.
Přední část musí mít pod sebou mezeru minimálně 5 mm.
Zařízení nesmí být instalováno nad lednicí, lednicí s mrazákem, mrazákem, myčkou nádobí, pračkou, pračkou-sušičkou
nebo bubnovou pračkou.
Pod tuto varnou desku mohou být instalovány pouze trouby vybavené chladicím ventilátorem .
Před instalací trouby byste měli odstranit zadní stěnu prvku kuchyňského nábytku v prostoru pro vypojení varné desky. Kromě
toho byste měli nechat minimální prostor 5 mm na přední straně.
a ≥ 800 mm
b ≥ 50 mm
c ≥ 20 mm
d ≥ 80 mm
e ≥ 5 mm
f 25-40 mm
g ≥ 250 mm
A
900 mm
B
400 mm
C
870 mm
D
370 mm
E
45 mm
F
5 mm
G
≥ 50 mm
H
≥ 600 mm
Page 96

20
Instalace pěnového
těsnění (skleněné varné
desky)
Před zasunutím spotřebiče do otvoru v kuchyňské pracovní desce se musí na spodní
stranu skleněné nalepit pěnové těsnění (viz obrázek výše).
Není dovoleno instalovat spotřebič bez pěnového těsnění!
Těsnění se musí připevnit ke spotřebiči následujícím způsobem:
Odstraňte z těsnění ochrannou fólii.
Poté připevněte těsnění ke spodní straně skla, cca A=2–3 milimetry od hrany (jak je
znázorněno na obrázku). Těsnění musí být připevněné po celé délce skleněné hrany a
v rozích by nemělo přečnívat.
Při instalaci těsnění dbejte na to, aby sklo nepřišlo do kontaktu s žádnými ostrými
předměty.
PŘIPOJENÍ K ELEKTRICKÉ SÍTI
Spotřebič smí zapojit jen oprávněný a zkušený technik.
Ochrana elektrického systému by měla vyhovovat všem příslušným předpisům.
Spojovací svorky musejí být přístupné při otevření/odstranění krytu spojovacích svorek.
Před zapojením spotřebiče zkontrolujte, zda hodnota napětí uvedená na typovém štítku
odpovídá hodnotě napětí okruhu ve vaší domácnosti.
Typový štítek se základními údaji je připevněn ke spodní straně varné desky.
Pro fixní připojení k síti vložte mezi spotřebič a hlavní přívod všepólový jistič. Toto
zařízení musí mít mezeru mezi kontakty na všech pólech, zajišťující úplné odpojení za
přepěťových podmínek kategorie III.
Vedení proudu a izolované části musejí být chráněny před jakoukoli možností přímého
kontaktu.
Před jakýmkoli zásahem odpojte spotřebič od sítě. Připojte spotřebič v souladu s
dodaným schématem zapojení, ujistěte se, že je zachováno příslušné síťové napětí!
Zemnicí vodič by měl být připojen na svorku označenou značkou pro uzemnění.
Síťový kabel by měl být napájen přes upevňovací svorku, která ho chrání před
náhodným vytažením.
Po zapojení spotřebiče zapněte všechny varné zóny/varná tělesa na dobu cca tří
minut, abyste zkontrolovali, zda správně fungují.
Nesprávné připojení může zničit části spotřebiče a zrušit platnost záruky.
Připojovací kabel na zadní straně spotřebiče by měl být veden tak, aby se nedotýkal
zadní stěny spotřebiče, protože tato část se během provozu velmi zahřívá.
Základní nastavení
senzorů
Při každém zapojení varné desky do elektrické sítě se automaticky nastavují všechny
senzory dle prostředí, kde je deska umístěna. Všechny displeje se na pár vteřin rozsvítí.
Během toho nastavování nesmí senzory nic zakrývat, jinak se celý proces přeruší dokud
nejsou senzory plně odkryty. Během tohoto procesu není možno desku ovládat.
Schéma připojení
Pro připojení je možné použít následující: H05V2V2-F
FÁZOVÝ VODIC L HNEDÝ
ZEMNICÍ VODIC ŽLUTOZELENÝ
NULOVÝ VODIC N MODRÝ
Page 97

21
TECHNICKÉ INFORMACE
7334245
Napájecí napětí 220-240 V~ o 380-415 V 2N~
Napájecí frekvence 50/60 Hz
P
TOT
7400 W
18,4x22 cm / 2,1 kW (P=3,7 kW)
P= EXTRA VÝKON
ENERGY EFFICIENCY
ELEKTRICKÝ VARNÝ PRVEK EC
ELEKTRICKÝ VARNÝ PRVEK
18,9x24,5 cm 189,6 Wh/kg
Typ varné desky Vestavěný
POČET INDUKČNÍCH ZÓN
2
EE
ELEKTRICKÁ VARNÁ DESK
A
189,6 Wh/kg
Princip indukce
Princip indukce je založen na elektromagnetické energii, která se vytváří mezi
feromagnetickým dnem nádoby položené na varné desce a měděnou cívkou, která je
umístěna pod povrchem desky. Elektrický proud prochází indukční cívkou a vytváří tím
magnetické pole. Pomocí magnetického pole vzniká ve dně varné nádoby indukovaný,
neboli vířivý proud, jímž se nádoba zahřívá. Jídlo se ohřívá vodivým teplem z pláště
varné nádoby.
Indukce je velmi efektivní, protože teplo se vytváří pouze tam, kde deska zaznamená
kontakt s dnem nádoby. Veškeré teplo se koncentruje uvnitř varné nádoby a okolí varné
zóny zůstává chladné, což zajištuje rychlý výsledek s optimálním využitím energie.
Vhodné nádoby pro
indukční desky
• Indukční varná deska bude správně fungovat pouze pokud budete používat vhodné
nádobí.
• Přenos tepla je nejlepší, když dno nádoby a varné zóny jsou stejného průměru a
nádoba je umístěna na středu varné zóny.
• Vhodné nádoby pro indukční vaření jsou např. nádoby z oceli, smaltované oceli,
nerezové oceli.Naopak nevhodné jsou nádoby z hliníku, mědi, mosazi, skla, keramiky
nebo porcelánu.
• Pokud používáte tlakový hrnec, nenechávejte ho bez dozoru, dokud není dosaženo
požadovaného tlaku.Varná zóna by měla být zpočátku nastavena na maximální výkon,
po dosažení požadovaného tlaku, nastavte varnou zónu na výkon dle pokynů výrobce
tlakového hrnce.
• Při nákupu nádobí se ujistěte, že je vhodné pro indukční varné desky.
VARNÁ ZÓNA MIN. PRŮMĚR NÁDOBY MAX. PRŮMĚR NÁDOBY
184x220 mm
(JEDNODUCHÁ)
Ø 115 mm Ø 180 mm
184x220 mm
(JEDNODUCHÁ) S
FUNKCÍ BRIDGE
Ø 135 mm Ø 180 mm
184x220 mm
(DVOJITÁ) S
FUNKCÍ BRIDGE
2 ZONES - 380x220 mm
4 ZONES Ø 330 mm Ø 400 mm
Poznámka:
Pokud je vybrána funkce Bridge, můžete použít vytvořenou zónu různými způsoby, s
jednou nebo dvěma nádobami.
Pokud používáte nádoby s větším rozměrem, než je doporučený maximální rozměr,
Page 98

22
doba ohřevu bude delší, protože teplo se bude šířit indukcí od středu k okraji nádoby. V
tomto případě bude také teplota velmi nerovnoměrná.
Magnetický test
Použijte malý magnet A, abyste zjistili, je-li dno nádoby magnetické. Pouze nádoby, kde
magnet na dnu drží, jsou vhodné pro indukční vaření.
Rozpoznání přítomnosti nádoby
Jednou z velkých výhod indukční zóny je rozpoznání přítomnosti nádoby na zóně. I v
případě, že na indukční zóně není umístěna žádná nádoba, nebo nádoba má menší
průměr než je doporučeno, nejsou zde žádné tepelné ztráty. Pokud je zóna zapnutá,
indikátor napájení ukazuje písmeno "U". Pokud na ni umístíte do 10 minut nějakou
nádobu, zóna automaticky rozpozná přítomnost nádoby a zapne se na nastavený výkon.
V okamžiku, kdy nádobu sejmete ze zóny, tepelný výkon je pozastaven. Pokud umístíte
menší nádobu, než je doporučeno, varná zóna bude automaticky používat pouze takové
množství energie, které bude potřeba pro danou velikost nádoby.
Varná zóna může být poškozena pokud:
• je zapnuta a ponechána prázdná bez nádoby.
• budete používat nádoby, které nemají hladké dno ( může dojít k poškrábání povrchu
desky).
• nebudou dna nádob suchá a čistá (princip indukce nebude fungovat na 100%).
• nebudete používat vhodné nádoby určené pro indukční varné desky.
• dojde k vyvaření obsahu smaltované nádoby.
Regulace výkonu
Topný výkon varné zóny může nastaven až na devět úrovní.
Následující tabulka ukazuje ilustrativní použití každého nastavení výkonu.
Stupeň výkonu Doporučení
0
Vypnuto,využití zbytkového tepla
1-2
Ohřívání jídla, pomalé dušení menšího množství
3
Pomalé dušení (pokračování vaření po “Heat up”)
4-5
Pomalé vaření většího množství, pečení větších kusů
6
Pečení do zlatova
7-8
Pečení
9
Začátek vaření, pečení
A
Automatické počáteční nastavení
0
Vypnuto,využití zbytkového tepla
P
Velmi vysoký výkon pro velké množství potravin
Jak šetřit energii
• Dno nádoby by mělo odpovídat průměru varné zóny. Je-li nádoba příliš malá, hodně
tepla uniká zbytečně a kromě toho může dojít i k poškození varné zóny.
• Pokud je to možné s ohledem na proces vaření, používejte pokličku.
• Velikost nádoby by měla odpovídat množství připravovaných potravin. Příprava malého
množství jídla ve velké nádobě způsobuje plýtvání energie.
• Jídla, která vyžadují dlouhou dobu vaření, by měla být připravována v tlakovém hrnci.
• Různou zeleninu, brambory apod. můžete vařit v malém množství vody, ale nádoba by
měla být uzavřena pokličkou. Když je dosaženo bodu varu, snižte výkon varné zóny
tak, aby udržoval teplotu vody teplotu těsně nad bodem varu.
Page 99

23
PROVOZ
• Po zapnutí sklokeramické desky se na chvíli všechny senzory rozsvítí. Varná deska je
připravena k provozu.
• Deska je vybavena elektronickými senzory, které se aktivují, pokud se jich dotknete
alespoň na dobu jedné vteřiny.
• Aktivace každého senzoru je následována zvukovým signálem.
• Nepokládejte žádné předměty na povrchu senzorů (signalizace chyby provozu_ ).
• Udržujte povrch ovládacích senzorů čistý.
Senzorové ovládání
A. Zapnuto/Vypnuto ON/OFF
B. Pauza
C. Zámek zapnuto/vypnuto
D. Časovače (-)
E. Časovače (+)
F. “Slide” senzor
G. Ohřívání
H. Extra výkon
Slide (dotykový/posuvný)
senzor
0
Střední výkon
Plný výkon
Zapnutí varné desky
Stiskněte senzor na dobu nejméně 1 vteřiny.
Nyní je deska zapnutá a všechny displeje ukazují
Nyní musíte provést další nastavení do 10 vteřin, jinak se deska automaticky
vypne.
Zapnutí varné zóny
Poté co jste desku zapnuli senzorem , můžete do 10 vteřin aktivovat jednu z varných
zón. Pomocí senzoru nastavte topný výkon od1 do 9
Při prvním dotyku se stupeň výkonu nastaví podle toho, kde se senzoru
dotknete. Nad senzorem se rozsvítí kontrolní LED diody podle úrovně nastavení.
Posunováním prstu po senzoru, dojde ke změně nastavení výkonu. Směrem
vpravo se výkon zvyšuje, zatímco směrem vlevo se snižuje.
Když dáte prst pryč ze senzoru, varné pole se zapne na nastavený stupeň
výkonu.
Pokud podržíte stisknutý stupeň výkonu po dobu 3 vteřin, zapne se funkce “Heat-up”).
(viz. kapitola Funkce “Heat-up”).
Vypnutí varné zóny
• Vybraná varná zóna musí být aktivní.
• Stlačte senzor na jeho začatku, stupeň výkonu se přepne na . Krátký zvukový signál
potvrdí vypnutí zóny.
Page 100

24
Vypnutí varné desky
• Celou desku můžete vypnout kdykoliv stlačením senzoru .
•
Když desku vypnete, ozve se zvukový signál a displeje zhasnou, pokud se nerozsvítí
písmeno , což indikuje zbytkové teplo na příslušné varné zóně.
Můžete také vypnout varnou zónu těsně před koncem vaření a využít tak zbytkové
teplo. Takto lze ušetřit energii.
Uzamknutí ovládacího
panelu
Aby se předešlo nechtěnému použití, lze celou desku uzamknout/odemknout. Tato
funkce také slouží pro ochranu dětí.
Aktivace
• Deska musí být zapnutá.
• Stiskněte senzor na dobu 1 vteřiny, příslušná LED kontrolka se rozsvítí, zámek je
aktivován.
• Uzamknutí platí pro všechny senzory kromě a .
• Pokud je varná deska vypnuta, když je aktivována funkce zámku, tak tato informace
zůstává v paměti až do dalšího zapnutí varné desky.
• Když skončí doba vaření a ozve se alarm, lze ho vypnout pomocí senzorů nebo
bez nutnosti zrušení zámku.
Zrušení
• Deska musí být zapnutá.
• Stiskněte senzor na dobu 1 vteřiny. Zrušení uzamknutí bude potvrzeno zvukovým
signálem.
Dětský zámek Tuto funkci lze zapnout/vypnout pouze po stisknutí senzoru
Aktivace
• Stiskněte současně a , poté stiskněte znovu .
• Funkce je zapnutá a displej zobrazuje
• Ovládání varné desky zůstává zamčené a automaticky se vypne po 10 vteřinách.
Dětský zámek deaktivuje všechny klávesy kromě . Jakmile dojde k aktivaci,
elektronika zůstává blokována i v případě vypnutí a opětovného zapnutí.
Zrušení
• V rozmezí 10 vteřin stiskněte současně a , poté stiskněte opět .
Funkce není aktivní.
Jednorázové odemčení (pro jednu činnost vaření)
• Stiskněte současně a .
• Dětský zámek je na období činnosti vaření vypnutý.
• Po vypnutí varné desky je Dětský zámek v reaktivním módu a po zapnutí varné desky
je opět aktivní.
Pauza
Když je jedna nebo více varných zón zapnuto, je možno proces vaření přerušit.
Pauza může být také automaticky aktivována pokud dojde na varné zóně k nějaké
poruše, chybový displej je skrytý. Také je skrytý ukazatel zbytkového tepla,
speciální ukazatele jako je , nebo nepřitomnost nádoby; displej pauzy má
vždy přednost. Pokud dojde k nějaké poruše (chybě) v pruběhu pauzy, ovládání se
vypne a ukončí probíhající režim.
Aktivace
• Stiskněte senzor na dobu 1 vteřiny, příslušná LED kontrolka se rozsvítí. Všechny
displeje ukazují symbol .
Když je funkce „Pauza“ aktivní
• Pokud je před aktivací pauzy nastaven jakýkoliv časovač /minutka, tak se tento čas
zastaví a bude pokračovat až po zrušení pauzy.
• Funkce “Extra výkon” nebo “Heat-up” jsou ukončeny.
• Výpočet zbytkové tepla a čas bezpečnostního vypnutí nebude přerušen a bude v
činnosti na pozadí.
• Další funkční LED kontrolky (např. časovač, multi-zóna, ... atd.), i nadále svítí v
závislosti na režimu nastavení.
Přerušení procesu vaření je možné na dobu max. 10 minut. Jestliže není pauza do
 Loading...