

Page 1

MANUALE D’ISTRUZIONE
user’s manual
notice d’utilisation
Bedienungsanleitung
Page 2

Gentile Cliente,
Grazie per avere scelto nostro il nostro piano di cottura a induzione.
Per ottenere il meglio dal Suo piano cottura, La preghiamo di leggere con attenzione le presenti
istruzioni, e di conservarle per un’eventuale consultazione futura.
INDICE
SICUREZZA .................................................................................................................................. 3
PRECAUZIONI PRIMA DEL PRIMO UTILIZZO ....................................................................................... 3
UTILIZZO DELL’APPARECCHIO ........................................................................................................ 4
PRECAUZIONI ONDE NON DANNEGGIARE L’APPARECCHIO ................................................................. 5
PRECAUZIONI IN CASO DI MALFUNZIONAMENTO DELL’APPARECCHIO .................................................. 6
ALTRE PRECAUZIONI ..................................................................................................................... 6
DESCRIZIONE DELL’APPARECCHIO ......................................................................................... 7
DATI TECNICI ................................................................................................................................ 7
PANNELLO DI CONTROLLO ............................................................................................................. 8
USO DELL’APPARECCHIO ......................................................................................................... 9
INDICAZIONI ................................................................................................................................. 9
VENTILAZIONE .............................................................................................................................. 9
PRIMA ACCENSIONE E UTILIZZO DELL’APPARECCHIO ........................................................ 9
PRIMA DEL PRIMO UTILIZZO............................................................................................................ 9
PRINCIPIO DELL’INDUZIONE............................................................................................................ 9
LE FUNZIONI DEI SENSORI .............................................................................................................. 9
ACCENDERE E SPEGNERE IL PIANO DI COTTURA ............................................................................ 10
RICONOSCIMENTO DEL RECIPIENTE DI COTTURA ............................................................................ 10
INDICATORE CALORE RESIDUO ..................................................................................................... 10
FUNZIONE BOOSTER ................................................................................................................... 11
TIMER ....................................................................................................................................... 11
COTTURA PRELIMINARE AUTOMATICA ........................................................................................... 12
BLOCCO FUNZIONI / PIANO DI COTTURA ......................................................................................... 12
CONSIGLI PER LA COTTURA ................................................................................................... 13
RECIPIENTI DI COTTURA .............................................................................................................. 13
DIMENSIONI RECIPIENTI DI COTTURA ............................................................................................. 14
ESEMPI DI REGOLAZIONE DELLA POTENZA ..................................................................................... 14
MANUTENZIONE E PULIZIA ...................................................................................................... 14
IN CASO DI ANOMALIE ............................................................................................................. 15
TUTELA AMBIENTALE .............................................................................................................. 15
ISTRUZIONI DI INSTALLAZIONE .............................................................................................. 16
CONNESSIONE ELETTRICA ..................................................................................................... 17
Page 3

SICUREZZA
Precauzioni prima del primo utilizzo
Sballare eliminando tutti i materiali di imballo.
L’installazione e connessione dell’apparecchio devono essere
effettuate da personale specializzato. Il Fabbricante declina ogni
responsabilità civile e penale per danni causati da installazione e/o
connessione non realizzate a regola d’arte.
Per essere utilizzato, l’apparecchio deve essere correttamente
installato in una cucina e su una superficie di lavoro idonea.
Questo elettrodomestico è progettato esclusivamente per la
cottura di cibo, con l’espressa esclusione di ogni altro uso
domestico, commerciale o industriale.
Rimuovere tutte le etichette adesive dal vetro.
Non apportare alcuna modifica o alterazione all’apparecchio.
La superficie in vetro dell’apparecchio non può essere utilizzata
come zona di appoggio o di lavoro.
L’apparecchio deve essere opportunamente messo a terra e
collegato alla rete elettrica secondo la normativa in vigore
localmente.
Non usare nessuna prolunga elettrica per collegare il cavo di
alimentazione.
L’apparecchio non può essere utilizzato sopra una lavastoviglie o
una asciugatrice: il vapour potrebbe danneggiare le componenti
elettroniche dell’apparecchio.
Questo apparecchio non è da utilizzare con un timer esterno o un
telecomando separato.
3
Page 4

Utilizzo dell’apparecchio
Spegnere le piastre riscaldanti dopo l’uso.
Controllare le cotture che utilizzano grasso o olio: potrebbero
incendiarsi con facilità.
Fare attenzione a non ustionarsi durante o dopo l’uso
dell’apparecchio.
Verificare che nessun cablaggio di apparecchi fissi o mobili venga
in conatto con il vetro dell’apparecchio o con pentole bollenti.
Gli oggetti magnetici (carte di credito, floppy discs, calcolatrici) non
devono essere piazzati vicino all’apparecchio quando questo è
acceso.
Non piazzare alcun oggetto metallico, tranne le pentole,
sull’apparecchio. In caso di accensione involontaria, o di presenza
di calore residuo dopo la cottura, questi potrebbero sciogliersi o
anche incendiarsi.
Non coprire mai l’apparecchio con un panno o telo protettivo,
perché potrebbe surriscaldarsi e bruciare.
Questo apparecchio può essere usato da bambini con una età
minima di otto anni e da persone le cui capacità fisiche, sensoriali
o mentali sono ridotte, o le cui esperienze e conoscenze sono
inadatte, unicamente se sotto sorveglianza e dietro formazione
sull’uso dell’apparecchio, in condizioni di sicurezza e dopo essere
state informate sui rischi in cui potrebbero incorrere.
I bambini non devono giocare con l’apparecchio.
La pulizia e la manutenzione non possono essere affidate a
bambini senza la sorveglianza di un adulto.
Gli oggetti metallici quali coltelli, forchette, cucchiai e coperchi non
devono essere piazzati sull’apparecchio perché potrebbero
diventare incandescenti.
4
Page 5

Precauzioni onde non danneggiare l’apparecchio
Pentole con fondo graffiato o danneggiato (non di ghisa smaltata)
possono danneggiare il vetro ceramico.
Sabbia o altre sostanze abrasive possono danneggiare il vetro
ceramico.
Evitare di far cadere oggetti, anche piccoli, sul vetro ceramico.
Assicurarsi che la ventilazione dell’apparecchio funzioni secondo
quanto previsto dalle istruzioni del fabbricante.
Non colpire i bordi del vetro con le pentole.
Non mettere o lasciare pentole vuote sul vetro ceramico.
Lo zucchero, i materiali sintetici e i fogli di alluminio non devono
venire a contatto con le piastre riscaldanti, perché possono
causare rotture o altre alterazioni del vetro ceramico durante il
raffreddamento. Nel caso, accendere immediatamente
l’apparecchio e rimuovere l’oggetto dalla piastra, prendendo le
opportune precauzioni per non ustionarsi.
Pericolo di incendio! Non appoggiare alcun oggetto sul piano di
cottura.
Non piazzare mai un contenitore bollente sul pannello di controllo.
Se sotto il piano cottura incassato c’è un cassetto, assicurarsi che
lo spazio tra il contenuto dello stesso e la parte inferiore
dell’apparecchio sia sufficiente (almeno 2 cm). Questo è
essenziale per garantire una corretta ventilazione.
Non mettere mai oggetti infiammabili (ad es. spray) nel cassetto
situato sotto l’apparecchio. Gli eventuali contenitori per posate
posti in cassetti sotto l’apparecchio devono essere resistenti al
calore.
5
Page 6

Precauzioni in caso di malfunzionamento dell’apparecchio
L’UTILIZZO DI PENTOLE NON IDONEE OPPURE DI
ACCESSORI RIMUOVIBILI POSTI TRA LA PENTOLA E
LA PIASTRA PER RISCALDARE PENTOLE NON
IDONEE ALL’INDUZIONE FA DECADERE LA
GARANZIA.
IL COSTRUTTORE NON PUÒ ESSERE CONSIDERATO
RESPONSABILE PER QUALSIASI DANNO AL PIANO
DI COTTURA OR DANNI CORRELATI.
Se si nota un difetto di funzionamento, spegnere l’apparecchio e
disconnetterlo dalla rete elettrica.
Se il vetro ceramico è rotto o crepato, disconnettere
immediatamente l’apparecchio dalla rete elettrica e chiamare
l’assistenza tecnica.
Qualsiasi riparazione deve essere compiuta esclusivamente da
personale qualificato. Non aprire l’apparecchio per nessun motivo.
ATTENZIONE: Se la superficie del vetro è crepata o rotta,
spegnere immediatamente l’apparecchio per evitare il rischio di
scosse elettriche.
Altre precauzioni
Assicurarsi che la pentola o padella sia sempre centrata sulla
piastra di cottura. Il fondo dell’utensile deve coprire il più possibile
la piastra di cottura.
Per gli utilizzatori di pace-makers: il campo magnetico
dell’apparecchio potrebbe influenzare il funzionamento del pace-
maker. Si raccomanda di richiedere preventivamente informazioni
al venditore dell’apparecchio e/o al medico curante.
Non utilizzare contenitori di alluminio o di materiali sintetici:
potrebbero fondere se appoggiati alle piastre accese o ancora
calde dopo l’uso.
Non utilizzare mai acqua per spegnere il fuoco. Disattivare la zona
di cottura. Soffocare le fiamme con un coperchio, una coperta
ignifuga o qualcosa di simile.
6
Page 7
DESCRIZIONE DELL’APPARECCHIO
Typo
7334240
Potenza totale
7400 W
Consumo di energia del piano cottura EC
hob
**
168.4 Wh/kg
Posizione sinistra
Ø 185 mm
Identificazione minimo
Ø 110 mm
Potenza nominale *
2050 W
Booster *
2500 W
Doppio Booster *
3700 W
Categoria standard di pentola **
B
Consumo di energia ECcw**
167.3 Wh/kg
Posizione centro sinistra
Ø 220 mm
Identificazione minimo
Ø 110 mm
Potenza nominale *
2050 W
Booster *
2500 W
Doppio Booster *
3700 W
Categoria standard di pentola **
C
Consumo di energia ECcw**
164.8 Wh/kg
Posizione centro destra
Ø 185 mm
Identificazione minimo
Ø 100 mm
Potenza nominale *
1850 W
Booster *
2300 W
Doppio Booster *
3000 W
Categoria standard di pentola **
B
Consumo di energia ECcw**
175.4 Wh/kg
Posizione destra
Ø 140 mm
Identificazione minimo
Ø 100 mm
Potenza nominale *
1850 W
Booster *
2300 W
Doppio Booster *
3000 W
Categoria standard di pentola **
A
Consumo di energia ECcw**
166 Wh/kg
Dati tecnici
* La Potenza dichiarata può cambiare a seconda delle dimensioni e del material della pentola.
** metodo di misura delle prestazioni secondo la norma (EN60350-2)
7
Page 8
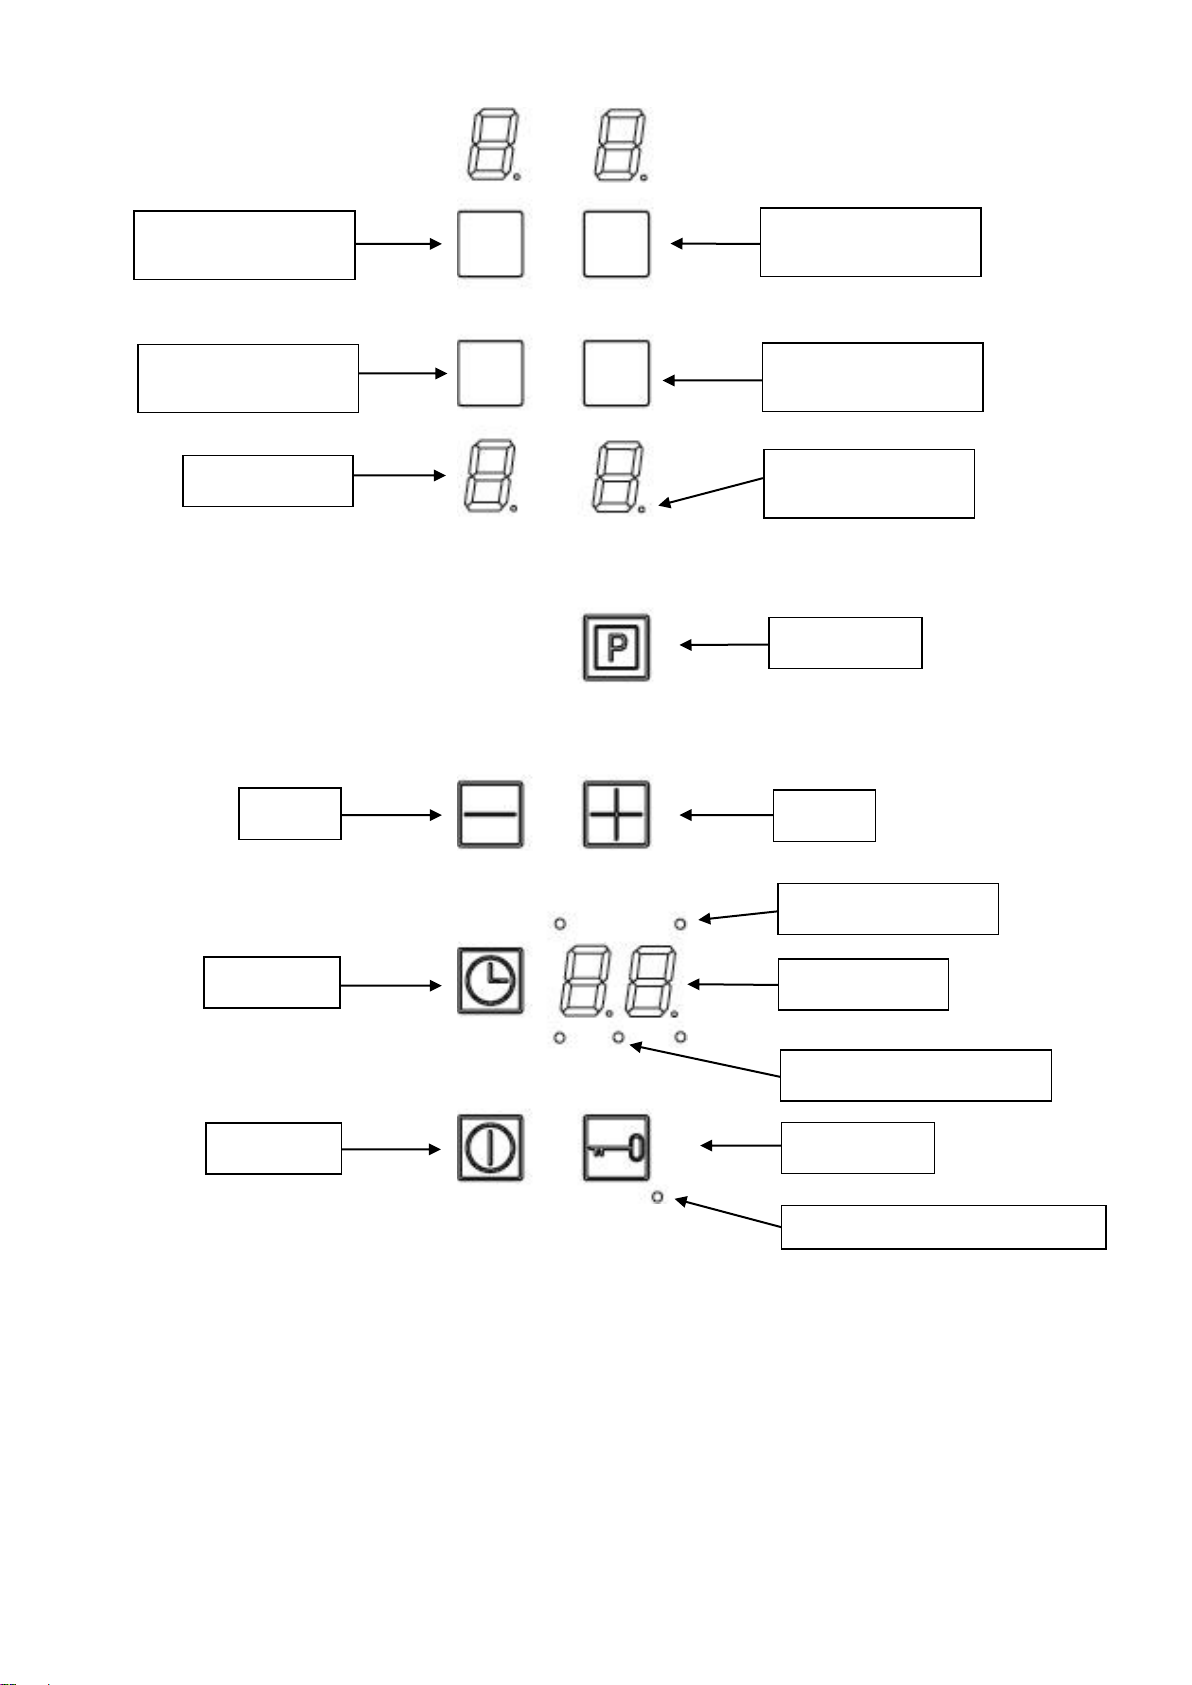
Pannello di controllo
Tasto[ + ]
Selettore piastra
sinistra
Tasto On/Off
Tasto [ - ]
Tasto Timer
Timer display
Tasto Booster
Tasto blocco
Spia controllo blocco
Spia controllo timer
Spia controllo Egg Timer
Selettore piastra
centrale sinistra
Selettore piastra
destra
Selettore piastra
centrale destra
Spia controllo
piastra cottura
Potenza
8
Page 9

USO DELL’APPARECCHIO
Indicazioni
Indicazione Definizione Descrizione
0 zero zona di cottura attivata
1 … 9 gradazioni impostazione livello potenza
U recipiente non rilevato manca recipiente o non adatto
A cottura iniziale automatica potenza massima + cottura preliminare
E indicazione guasto anomalia dei dispositivi elettronici
H calore residuo la zona di cottura è ancora calda
P booster funzione booster attivata
doppio booster doppio booster attivato
Ventilazione
La ventola si attiva automaticamente. Si avvia a bassa velocità appena i valori dei dispositivi
elettronici superano una determinata soglia. Quando il piano ad induzione viene usato
intensamente, la ventola funziona ad alta velocità. La ventola funziona più lentamente appena i
dispositivi elettronici si sono sufficientemente raffreddati.
PRIMA ACCENSIONE E UTILIZZO DELL’APPARECCHIO
Prima del primo utilizzo
Pulire l’apparecchio con uno straccio umido, indi asciugarlo accuratamente. Non utilizzare
detergenti che possano causare colorazioni anomale del vetro.
Principio dell’induzione
Sotto ogni piastra riscaldante si trova un magnete induttore. Quanto viene attivato, questo
produce un campo elettromagnetico che genera una corrente induttiva nel fondo ferromagnetico
della pentola. Il risultato è il riscaldamento della pentola posizionata sulla piastra.
Naturalmente, la pentola deve essere adatta:
Tutte le pentole in materiale ferromagnetico sono consigliate (verificare utilizzando una
calamita): pentole in ghisa, acciaio, smaltate e di acciaio inossidabile con fondo
ferromagnetico…
Da escludere: pentole in rame, acciaio inossidabile senza fondo ferromagnetico, alluminio,
vetro, legno, ceramica, terracotta…
La piastra a induzione si adatta automaticamente alla dimensione della pentola: se il diametro di
quest’ultima è troppo piccolo tuttavia, la piastra non funziona. Il diametro minimo varia in funzione
del diametro della piastra.
Se la pentola non è adatta al piano di cottura a induzione, il display mostrerà la lettera [ U ].
Le funzioni dei sensori
Il piano di cottura viene comandato con sensori che reagiscono sfiorando il vetro col dito. Se si
sfiorano i sensori per un secondo circa, le funzioni selezionate si attivano. Ogni reazione dei
sensori viene confermata da un segnale acustico e/o visivo.
Per gli usi convenzionali, sfiorare un sensore alla volta.
9
Page 10

Accendere e spegnere il piano di cottura
Accendere prima il piano di cottura e successivamente la zona di cottura desiderata.
Accendere / spegnere il piano di cottura
operazione sensore di comando indicazione
accendere premere [ 0/I ] [ 0 ]
spegnere premere [ 0/I ] nessuna o [ H ]
Accendere / spegnere la zona di cottura
operazione sensore di comando indicazione
selezionare premere tasto della zona [ 0 ]
aumentare premere [ + ] [ 1 ] fino a [ 9 ]
diminuire premere [ - ] [ 9 ] fino a [ 1 ]
arrestare premere simultaneamente [ + ] e [ - ] [ 0 ] o [ H ]
Se non si effettuato altre impostazioni, per motivi di sicurezza il piano di cottura si spegne
automaticamente dopo 20 secondi unitamente all’indicazione.
Riconoscimento del recipiente di cottura
Il dispositivo di riconoscimento del recipiente di cottura garantisce una sicurezza completa.
L’induzione non funziona se sulla zona di cottura non si trova una pentola o se la
pentola non è adatta per l’induzione. In questi casi non è possibile aumentare la
gradazione e nell’indicatore viene visualizzato il simbolo [ U ]. Il simbolo [ U ] si spegne
se sulla zona di cottura si pone il recipiente di cottura.
Se durante la cottura si toglie il recipiente dalla zona di cottura, la zona di cottura si
spegne subito e nell'indicatore appare il simbolo [ U ]. Appena si colloca il recipiente di
cottura sulla zona, il simbolo [ U ] si spegne e la zona di cottura si attiva nuovamente
con la gradazione precedentemente impostata.
A cottura ultimata, spegnere la zona di cottura per evitare che venga visualizzato il simbolo [ U ].
Indicatore calore residuo
Dopo aver spento la zona di cottura o il piano di cottura, per le zone di cottura ancora calde viene
visualizzato il simbolo [ H ] per il calore residuo. Il simbolo [ H ] si spegne quando si possono
toccare le zone di cottura senza scottarsi. Fintanto che il simbolo del calore residuo rimane
visualizzato, evitare di toccare le zone calde e di mettervi oggetti non resistenti al calore. Pericolo
di ustionarsi!
10
Page 11
Funzione Booster
Tutte le zone di cottura sono dotate di funzioni booster edoppio booster , ossia con una potenza
maggiorata. La funzione booster viene visualizzata col simbolo [ P ]; la funzione doppio booster
con [ P ] e inoltre con [ ] lampeggiante.
Se le funzioni booster sono attivate, le zone di cottura interessate si riscaldano per 10 minuti con
una potenza maggiorata. Tale funzione potenziata è pratica per portare ad ebollizione in poco
tempo una notevole quantità d’acqua per cuocere, ad esempio, la pasta.
Attivare / disattivare la funzione booster
operazione sensore di comando indicazione
selezionare una zona premere il tasto corrispondente [ 0 ]
attivare booster premere una volta tasto [ P ] [ P ]
arrestare booster premere tasto [ - ] [ 9 ]
o premere tre volte tasto [ P ] [ 9 ]
Attivare / disattivare doppio booster
operazione sensore di comando indicazione
selezionare una zona premere il tasto corrispondente [ 0 ]
attivare booster premere una volta tasto [ P ] [ P ]
attivare doppio booster premere due volte tasto [ P ] [ e P]
arrestare booster premere tasto [ - ] [ 9 ]
o premere tre volte tasto [ P ] [ 9 ]
Regolazione automatica della funzione booster
Il piano di cottura è dotato di una potenza complessiva. Per non superare questa potenza limite, i
dispositivi elettronici riducono automaticamente la potenza di un’altra zona di cottura quando
viene attivata la funzione booster. La potenza ridotta di questa zona di cottura viene visualizzata
con [ 9 ] lampeggiante.
Zona di cottura selezionata altra zona di cottura (ad es. con potenza 9)
[ P ] acceso [ 9 ] ridotto a [ 6 ] oppure a [ 8 ] e lampeggiante
Timer
Con il timer integrato si può impostare per tutte le quattro zone una durata di cottura da 1 a 99
minuti. Per ogni zona di cottura è possibile impostare una durata diversa.
Impostare o modificare la durata del timer
operazione sensore di comando indicazione
Selezionare una zona Premere il tasto della zona [ 0. ]
Selezionare il livello potenza Premere tasto [ + ] o [ - ] [ 1 ] … [ 9 ]
Selezionare il “Timer” Premere tasto [ ] La spia di controllo
Timer della zona
desiderata si
accende
Diminuire la durata Premere [ - ] [ 30 ] passa a 29,…
Aumentare la durata Premere [ + ] Il tempo aumenta
Quando il tempo arriva a [ 00 ] il timer lampeggia e produce un suono.
11
Page 12
Disattivare la durata del timer
operazione sensore di comando indicazione
Selezionare una zona Premere il tasto della zona [ 0 ] a [ 9 ]
Selezionare il “Timer” Premere tasto [ ] La spia di controllo
Timer della zona
desiderata si
accende
Arrestare il “Timer” Premere [ - ] Si accende [ 00 ]
Se sono state attivate più durate col timer, ripetere l’operazione.
Uso del timer come contaminuti
Il contaminuti funziona indipendentemente dalle zone di cottura e rimane invisibile appena si
accende una zona di cottura. La durata impostata continua a trascorrere anche se il piano di
cottura è spento.
operazione sensore di comando indicazione
Selezionare il “Timer” Premere [ ] Timer [ 00 ] minuti
Diminuire la durata Premere [ - ] [ 30 ] passa a 29,…
Aumentare la durata Premere [ + ] Il tempo aumenta
Quando il tempo arriva a [ 00 ] il timer lampeggia e produce un suono.
Spegnimento automatico
Quando il tempo di cottura selezionato è scaduto, il timer indica [ 00 ] lampeggiando, ed emette
un segnale acustico. Per arrestare il suono e il lampeggio è sufficiente premere il tasto [ - ] o [ + ].
Cottura preliminare automatica
Tutte le zone di cottura sono dotate di cottura preliminare automatica. Attivando questa funzione,
la zona si riscalda con la massima intensità e successivamente si attiva la gradazione
selezionata per continuare la cottura. La durata della cottura preliminare dipende dalla
gradazione selezionata per continuare la cottura.
Attivare la cottura preliminare automatica
operazione sensore di comando indicazione
Selezionare la zona Premere tasto della zona [ 0 ]
Attivare la piena potenza Premere [ + ] Passa da [ 1 ] a [ 9 ]
Attivare l’automatismo Ri-premere [ + ] [ 9 ] lampeggia con [ A ]
Selezionare livello Premere su [ - ] [ 9 ] a [ 1 ]
(ad esempio « 7 ») [ 7 ] lampeggia con [ A ]
Disattivare la cottura preliminare automatica
operazione sensore di comando indicazione
Selezionare la zona Premere sul tasto della zona Potenca livello
Arrestare l’automatismo Premere su [ - ] [ 9 ] a [ 1 ]
Selezione livello potenza Premere su [ + ] Livello selezionato
Blocco funzioni / piano di cottura
Per evitare di apportare involontariamente modifiche alle impostazioni selezionate per le zone di
cottura, ad es. se si pulisce la superficie in vetroceramica, si possono bloccare le funzioni dei
sensori, tranne il sensore [ 0/I ].
Attivare il dispositivo di blocco
operazione sensore di comando indicazione
attivare il dispositivo premere per 2 secondi [ ] spia di blocco accesa
disattivare il dispositivo premere per 2 secondi [ ] spia di blocco spenta
12
Page 13

CONSIGLI PER LA COTTURA
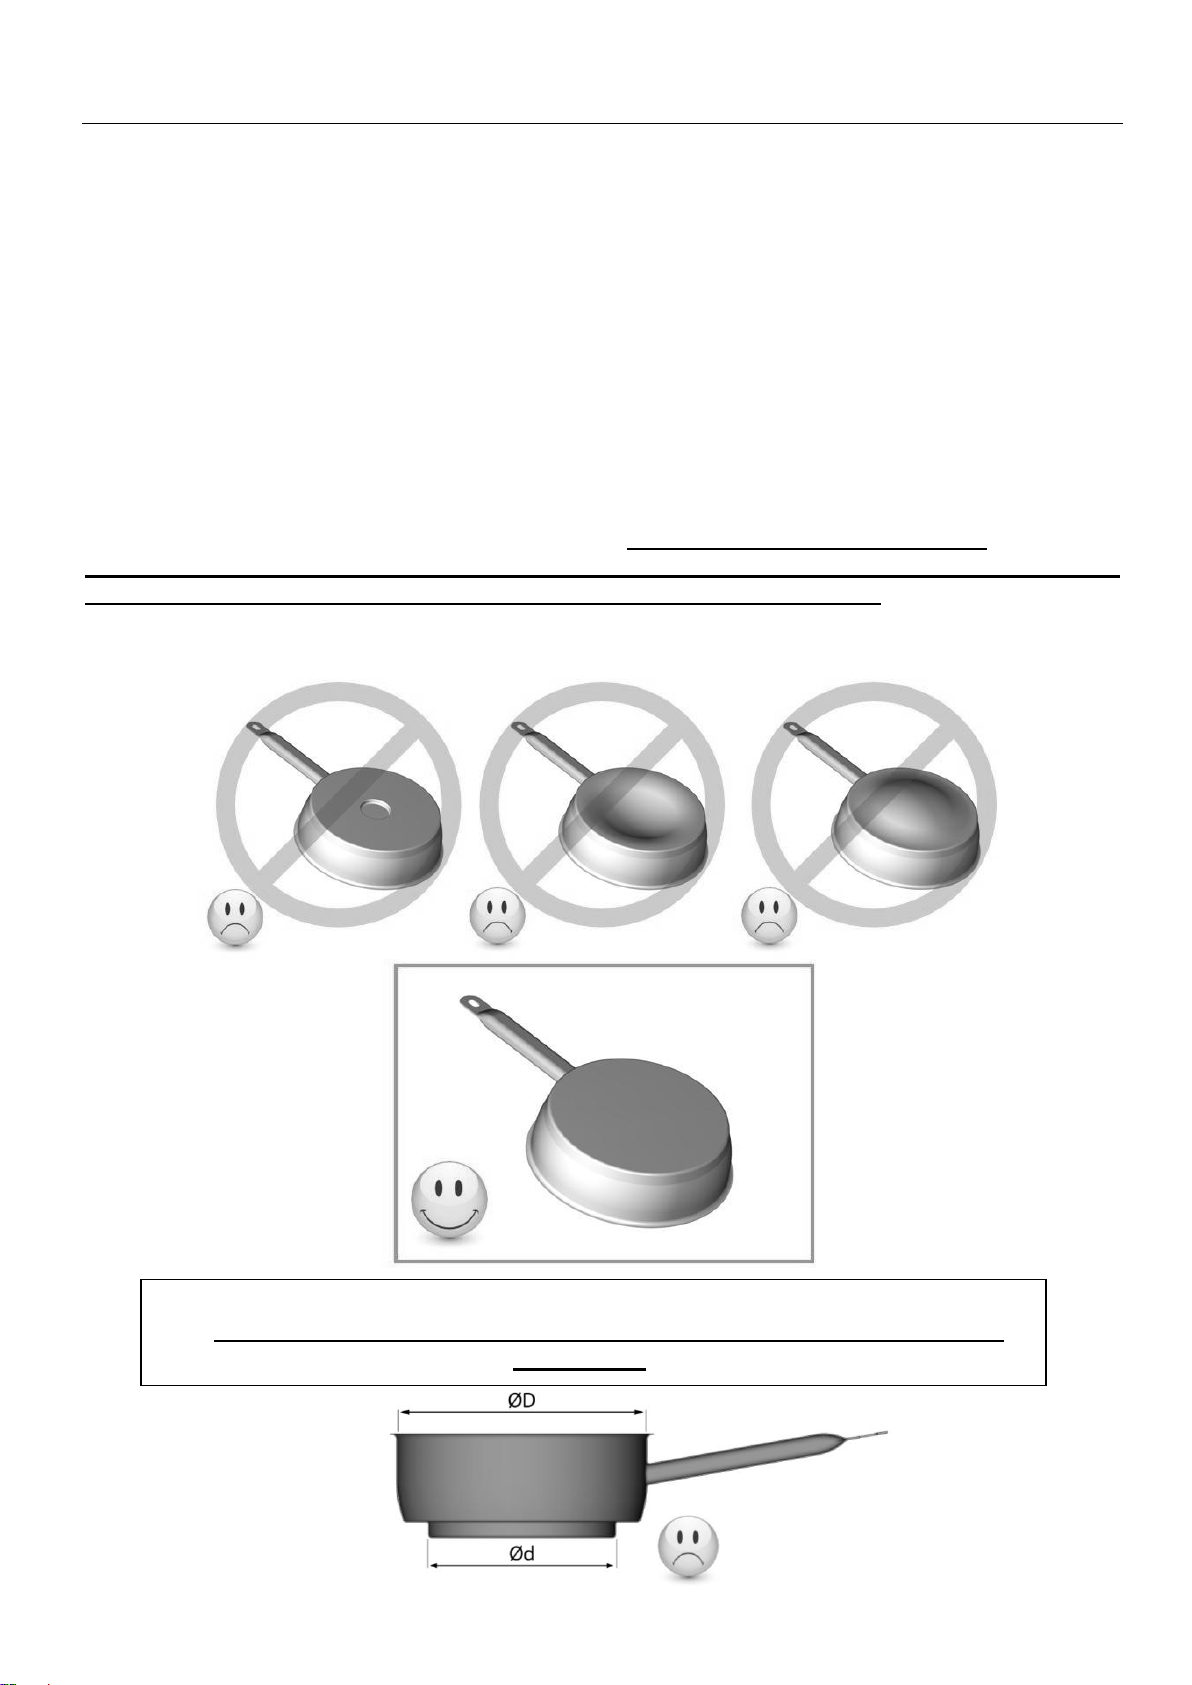
Se il fondo della pentola (Ød) è significativamente più piccolo del diametro del
corpo (ØD) il rendimento ne è penalizzato e la pentola rischia di non essere
identificata dalla piastra
Recipienti di cottura
Materiali adatti: acciaio, acciaio smaltato, ghisa, acciaio con fondo magnetizzabile,
alluminio con fondo magnetizzabile
Materiali non adatti: alluminio e acciaio con fondo non magnetizzabile, rame, ottone, coccio,
porcellana
In via di massima, i fabbricanti indicano se i recipienti di cottura sono adatti per i piani ad induzione.
Per verificare se i recipienti di cottura sono indicati per il piano ad induzione.
Versare nella pentola un po’ d’acqua e collocarlo sulla zona di cottura ad induzione. Accendere
la zona e selezionare la gradazione [ 9 ]. L’acqua deve riscaldarsi in pochi secondi.
Toccare con una calamita il fondo della pentola. Se la calamita rimane attaccata, la
pentola è indicata per il piano ad induzione.
Alcuni recipienti possono generare rumori se vengono posti su una zona di cottura ad induzione.
Ciò non significa che il piano ad induzione sia difettoso o che funzioni in modo anomalo.
Le pentole devono essere certificate dal fabbricante come compatibili con l’induzione.
E’ tuttavia possibile che certe pentole, seppur dichiarate come compatibili, abbiano in
realtà caratteristiche inadatte all’uso con i piani a induzione.
Raccomandiamo di verificare al momento dell’acquisto che le pentole rispettino almeno le
seguenti condizioni:
13
Page 14
Dimensioni recipienti di cottura
da 1 a 2
far sciogliere,
stemperare, riscaldare
salsine, burro, cioccolato, gelatina, piatti
già pronti
da 2 a 3
mettere in ammollo
scongelare
riso, budino, verdura precotta, pesce,
prodotti congelati
da 3 a 4
cuocere al vapore,
rosolare
pesce, carne, verdura
da 4 a 5
cuocere con acqua
patate lesse, minestre, pasta, verdura
fresca
da 6 a 7
cuocere a calore
moderato
carne, fegato, uova, salsiccia, spezzatino,
arrosto arrotolato, interiora
da 7 a 8
cuocere, arrostire
patate, involtini, frittate
9
arrostire,
portare ad ebollizione
bistecche, frittate
acqua
P e
arrostire, portare ad
ebollizione
notevoli quantità d’acqua
Entro certi limiti, le zone di cottura si adattano automaticamente al diametro del recipiente di
cottura. Il diametro del recipiente non dovrebbe essere inferiore a una determinata misura in
quanto l’induzione non si attiverebbe.
Per sfruttare la massimo la potenza della zona di cottura, collocare il recipiente al centro della
zona.
Esempi di regolazione della potenza
(I valori sotto sono indicativi)
MANUTENZIONE E PULIZIA
Prima di pulire il piano di cottura aspettare che si raffreddi. Pericolo di ustionarsi!
Eliminare lo sporco regolarmente con uno straccio umido e poco detersivo o un prodotto
specifico per vetroceramica.
Spegnere il piano di cottura prima di pulirlo.
Per motivi di sicurezza non usare la pulitrice a vapore o ad alta pressione.
Evitare assolutamente di usare prodotti abrasivi o aggressivi, ad esempio spray per forno
o grill, smacchiatori o prodotti antiruggine, pomice o spugnette abrasive.
Asciugare alla fine il piano con uno straccio pulito.
Eliminare subito residui di zucchero o di sostanze zuccherine.
14
Page 15
IN CASO DI ANOMALIE
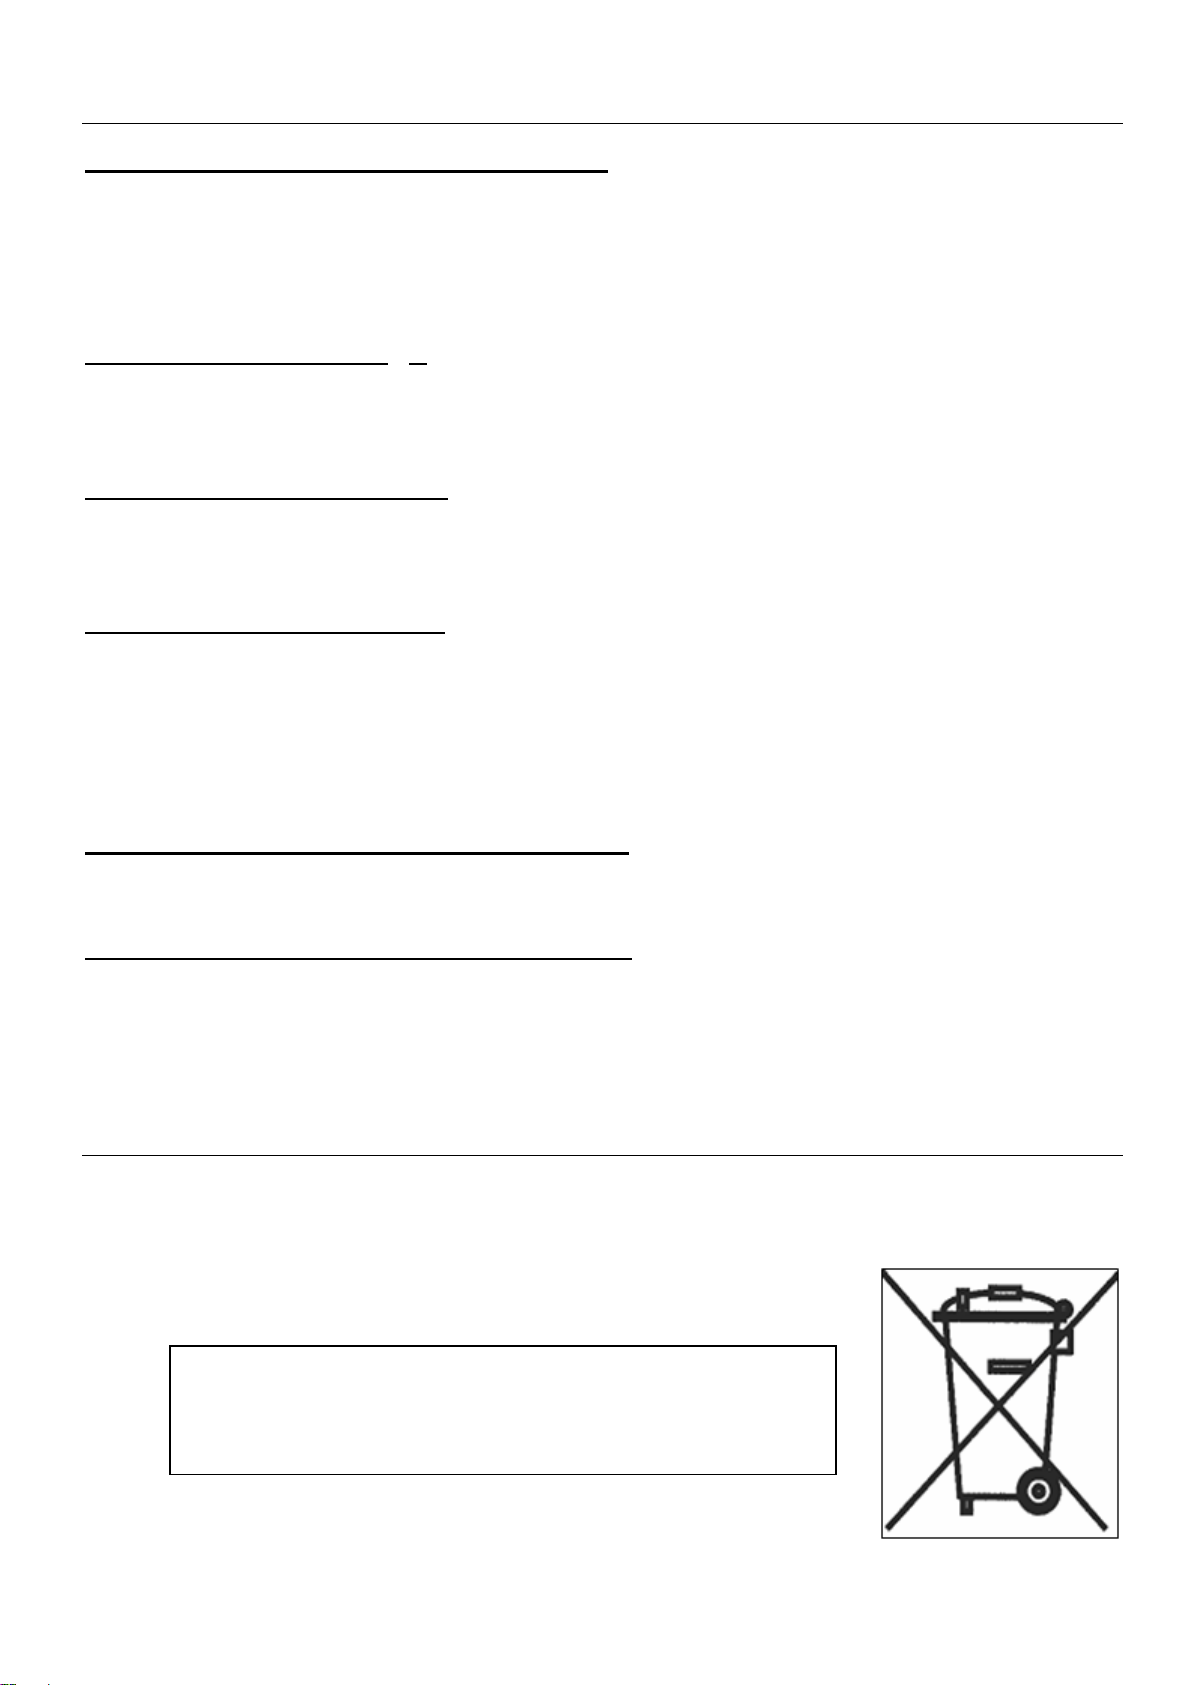
Non gettare l’apparecchio nei rifiuti.
Contattare l’organizzazione del vostro comune
preposta al riciclaggio degli elettrodomestici.
Il piano o le zone di cottura non si accendono
Il piano di cottura non è collegato correttamente alla rete elettrica.
Il fusibile non è correttamente in sede o è difettoso.
È stato attivato il dispositivo di blocco del piano.
I sensori sono umidi o unti.
I sensori sono coperti da una pentola o da altri oggetti.
Nell’indicatore viene visualizzato [ U ]
Il recipiente di cottura non è sistemato correttamente sulla zona di cottura.
Il recipiente di cottura non è adatto per il funzionamento ad induzione.
Il diametro del fondo del recipiente di cottura è troppo piccolo per la zona di cottura.
Nell’indicatore viene visualizzato [ E ]
Staccare il piano di cottura dalla rete elettrica e collegarlo di nuovo.
Contattare il servizio assistenza.
Una zona di cottura o il piano di cottura si spengono
È scattato il dispositivo di disinserimento di sicurezza.
Il disinserimento si attiva se si dimentica di spegnere una zona di cottura.
Il distacco di sicurezza si attiva anche se uno o più sensori sono coperti.
Un recipiente di cottura vuoto si è surriscaldato.
A causa del surriscaldamento, i dispositivi elettronici hanno ridotto la potenza o spento il
piano.
Dopo aver spento il piano, il ventilatore rimane in funzione
Non si tratta di un guasto. Il ventilatore continua a funzionare fino a quando il piano si è
raffreddato.
Il ventilatore si spegne automaticamente.
La cottura preliminare automatica non si attiva
La zona di cottura è ancora calda [ H ].
È stata selezionata la gradazione più alta [ 9 ].
TUTELA AMBIENTALE
I materiali dell'imballaggio sono consoni alla tutela della natura e riciclabili.
Gli apparecchi elettrici ed elettronici fuori uso contengono spesso materiali riutilizzabili.
Contengono pure sostanze nocive per l’ambiente ma necessarie per il corretto
funzionamento e la sicurezza dell’apparecchio.
15
Page 16
ISTRUZIONI DI INSTALLAZIONE
Articolo
Foro incasso
7334240
1065 x 325 mm
Incollare la guarnizione a (2) due mm
dal bordo inferior esterno del vetro,
dopo aver rimosso la protezione della
stessa (3).
L’installazione è di esclusiva responsabilità dell’installatore specializzato.
L’installatore è tenuto a rispettare la legislazione locale e le normative in vigore nel Paese in cui
viene installato l’apparecchio.
Come fissare la guarnizione
La guarnizione fornita con l’apparecchio serve a evitare le infiltrazioni di acqua o altri liquidi nel
mobile sottostante l’apparecchio.
La sua installazione deve essere fatta attentamente, seguendo il disegno qui sotto.
Inserimento – installazione
Le misure di incasso sono:
Assicurarsi che ci sia una distanza di almeno 50 mm tra l’apparecchio e il muro o le
pareti o paratie laterali.
L’apparecchio è classificato come classe “Y” di protezione dal calore. Idealmente
l’apparecchio dovrebbe essere installato con un ampio spazio da entrambi i lati. Ci può
essere un muro posteriormente e mobili alti o un muro su un lato. Sull’altro lato tuttavia,
non deve esserci un divisorio o un mobile più alto della posizione dell’apparecchio.
Il mobile o piano di lavoro sul quale l’apparecchio è installato, nonché i bordi dei mobili e/o
unità pensili, i rivestimenti laminati che li rivestono e la colla di assemblaggio, devono
essere in grado di resistere a temperature fino a 100 °C.
I supporti a muro devono essere resistenti al calore.
I materiali utilizzati per i piani di lavoro spesso tendono a gonfiarsi con l’umidità. Per proteggere il
foro di incasso dell’apparecchio, applicare uno strato di vernice o sigillante apposito. Una
particolare cura deve essere dedicata alla corretta applicazione della guarnizione fornita con
l’apparecchio, onde evitare qualsiasi infiltrazione nel mobile sottostante. La guarnizione garantisce
una corretta tenuta se utilizzata su superfici lisce.
Non installare l’apparecchio al di sopra di un forno non opportunamente ventilato, o di una
lavastoviglie.
Garantire la presenza di uno spazio di almeno 20 mm al di sotto della cassetta
dell’apparecchio, onde permettere una corretta areazione dell’apparecchio.
Se sotto l’apparecchio c’è un cassette, non riporvi oggetti infiammabili, come bombolette di
spray, od oggetti non resistenti al calore.
La distanza di sicurezza tra l’apparecchio e una eventuale cappa di aspirazione
sovrastante deve essere quello previsto dal fabbricante della cappa. In caso di mancanza
di indiazioni in merito, rispettare una distanza minima di 760 mm.
Il cavo di alimentazione, dopo l’installazione dell’apparecchio, non deve essere soggetto a
sollecitazioni meccaniche, come ad esempio schiacciamento a causa del movimento di
cassetti o altro.
ATTENZIONE: Usare soltanto protezioni per il piano di cottura realizzate dal produttore
dell'apparecchio o indicate dal produttore nelle istruzioni come idonee per l'utilizzo con
l'apparecchio o incorporate in esso. L'utilizzo di protezioni inappropriate può causare
incidenti.
16
Page 17

CONNESSIONE ELETTRICA
Rete
Connessione
Diametro cavo
Cavo
Fusibile di
protezione
220-240V~ 50/60Hz
1 Phase + N
3 x 2.5 mm²
H 05 VV - F
H 05 RR - F
25 A *
380-415V~ 50/60Hz
2 Phases + N
4 x 1.5 mm²
H 05 VV - F
H 05 RR - F
16 A *
Il fabbricante declina qualsiasi responsabilità per ogni incidente risultante da
connessione sbagliata dell’apparecchio, incluso l’utilizzo di un apparecchio non
correttamente messo a terra, o connesso con una messa a terra difettosa.
L’installazione di questo apparecchio e la connessione alla rete elettrica devono essere
affidate esclusivamente a personale qualificato e autorizzato, nel rispetto della normativa
in vigore.
Dopo l’installazione, una adeguata protezione delle parti sotto tensione deve essere
garantita.
I necessari dati di connessione si trovano sull’etichetta posta sulla cassetta
dell’apparecchio, in prossimità della morsettiera.
La connessione alla rete elettrica deve essere fatta utilizzando una presa con messa a
terra, o tramite un circuito omnipolare con fusibile di interruzione con un’apertura di
almeno 3 mm.
Il circuito elettrico dell’apparecchio deve essere separato dalla rete tramite opportuni
apparecchi, quali fusibili, interruttori di apertura circuito o capacitatori.
Se l’apparecchio non viene installato con una spina accessibile, un dispositivo di
disconnessione conforme alle norme di installazione deve essere previsto
nell’installazione.
Il cavo di alimentazione deve essere posizionato in modo che non venga a contatto con
alcuna delle parti calde del piano.
Se il cavo di alimentazione è danneggiato deve essere sostituito dal fabbricante o dal
servizio tecnico post-vendita autorizzato dal fabbricante, o in ogni caso da parte di un
tecnico qualificato e autorizzato, al fine di prevenire ogni rischio
Attenzione!
Questo apparecchio può solo essere collegato ad una rete elettrica a 220-240 V~ 50/60 Hz
Collegare sempre il cavo di terra.
Rispettare il diagramma di connessione.
* Calcolato con il fattore di simultaneità secondo la norma EN 60 335-2-6
Connessione del piano cottura
Monofase 220-240V~1P+N :
Usare il filo verde/giallo come terra, il filo blu e filo marrone come neutro e il filo nero e il filo grigio
come fase.
Bifase 380-415V~2P+N :
Usare il filo verde/giallo come terra, il filo blu e filo marrone come neutro, il filo grigio come fase
L1 e il filo nero come fase L2.
Prima di effettuare le connessioni, raccomandiamo vivamente di localizzare la fase, il neutron e
la terra sulla rete. In caso di dubbi, contattare un elettricista.
Attenzione! Assicurarsi di aver fissato correttamente i cavi e i ponticelli e di aver serrato
correttamente le viti.
Il fab
17
Page 18

Dear customer,
Thank you for having chosen our induction ceramic hob.
In order to make the best use of your appliance, we would advise you to read carefully the
following notes and to keep them for a later consulting.
SUMMARY
SAFETY ....................................................................................................................................... 19
PRECAUTIONS BEFORE USING ...................................................................................................... 19
USING THE APPLIANCE ................................................................................................................ 19
PRECAUTIONS NOT TO DAMAGE THE APPLIANCE ............................................................................ 20
PRECAUTIONS IN CASE OF APPLIANCE FAILURE .............................................................................. 21
OTHER PROTECTIONS ................................................................................................................. 21
DESCRIPTION OF THE APPLIANCE ......................................................................................... 22
TECHNICAL CHARACTERISTICS ..................................................................................................... 22
CONTROL PANEL ........................................................................................................................ 23
USE OF THE APPLIANCE .......................................................................................................... 24
DISPLAY .................................................................................................................................... 24
VENTILATION .............................................................................................................................. 24
STARTING-UP AND APPLIANCE MANAGEMENT ................................................................... 24
BEFORE THE FIRST USE ............................................................................................................... 24
INDUCTION PRINCIPLE ................................................................................................................. 24
SENSITIVE TOUCH ....................................................................................................................... 24
STARTING-UP ............................................................................................................................. 25
PAN DETECTION ......................................................................................................................... 25
RESIDUAL HEAT INDICATION......................................................................................................... 25
BOOSTER AND DOUBLE BOOSTER FUNCTION ................................................................................. 25
TIMER ....................................................................................................................................... 26
AUTOMATIC COOKING ................................................................................................................. 27
CONTROL PANEL LOCKING ................................................................ ................................ ........... 27
COOKING ADVICES ................................................................................................................... 28
PAN QUALITY ............................................................................................................................. 28
PAN DIMENSION .......................................................................................................................... 29
EXAMPLES OF COOKING POWER SETTING ...................................................................................... 29
MAINTENANCE AND CLEANING .............................................................................................. 29
WHAT TO DO IN CASE OF A PROBLEM .................................................................................. 30
ENVIRONMENT PRESERVATION ............................................................................................. 30
INSTALLATION INSTRUCTIONS ............................................................................................... 31
ELECTRICAL CONNECTION ..................................................................................................... 32
18
Page 19

SAFETY
Precautions before using
Unpack all the materials.
The installation and connecting of the appliance have to be
done by approved specialists. The manufacturer can not be
responsible for damage caused by building-in or connecting
errors.
To be used, the appliance must be well-equipped and installed
in a kitchen unit and an adapted and approved work surface.
This domestic appliance is exclusively for the cooking of food,
to the exclusion of any other domestic, commercial or industrial
use.
Remove all labels and self-adhesives from the ceramic glass.
Do not change or alter the appliance.
The cooking plate can not be used as freestanding or as
working surface.
The appliance must be grounded and connected conforming to
local standards.
Do not use any extension cable to connect it.
The appliance can not be used above a dishwasher or a
tumble-dryer: steam may damage the electronic appliances.
The appliance is not intended to be operated by means of
external timer or separate remote control system.
Using the appliance
Switch the heating zones off after using.
Keep an eye on the cooking using grease or oils: that may
quickly ignite.
Be careful not to burn yourself while or after using the
appliance.
Make sure no cable of any fixed or moving appliance contacts
with the glass or the hot saucepan.
Magnetically objects (credit cards, floppy disks, calculators)
should not be placed near to the engaged appliance.
Metallic objects such as knives, forks, spoons and lids should
not be placed on the hob surface since they can get hot.
19
Page 20

In general do not place any metallic object except heating
containers on the glass surface. In case of untimely engaging or
residual heat, this one may heat, melt or even burn.
Never cover the appliance with a cloth or a protection sheet.
This is supposed to become very hot and catch fire.
This appliance can be used by children aged from 8 years and
above and persons with reduced physical, sensory or mental
capabilities or lack of experience and knowledge if they have
been given supervision or instruction concerning use of the
appliance in a safe way and understand the hazards involved.
Children shall not play with the appliance.
Cleaning and user maintenance shall not be made by children
without supervision.
Precautions not to damage the appliance
Raw pan bottoms or damaged saucepans (not enamelled cast
iron pots,) may damage the ceramic glass.
Sand or other abrasive materials may damage ceramic glass.
Avoid dropping objects, even little ones, on the vitroceramic.
Do not hit the edges of the glass with saucepans.
Make sure that the ventilation of the appliance works according
to the manufacturer’s instructions.
Do not put or leave empty saucepans on the vitroceramic hobs.
Sugar, synthetic materials or aluminium sheets must not
contact with the heating zones. These may cause breaks or
other alterations of the vitroceramic glass by cooling: switch on
the appliance and take them immediately out of the hot heating
zone (be careful: do not burn yourself).
WARNING: Danger of fire: do not store items on the cooking
surface.
Never place any hot container over the control panel.
If a drawer is situated under the embedded appliance, make
sure the space between the content of the drawer and the
inferior part of the appliance is large enough (2 cm). This is
essential to guaranty a correct ventilation.
Never put any inflammable object (ex. sprays) into the drawer
situated under the vitroceramic hob. The eventual cutlery
drawers must be resistant to heat.
20
Page 21
Precautions in case of appliance failure
THE USE OF EITHER POOR QUALITY POT OR ANY
INDUCTION ADAPTOR PLATE FOR NON-MAGNETIC
COOKWARE RESULTS IN A WARRANTY BREACH.
IN THIS CASE, THE MANUFACTURER CANNOT BE
HELD RESPONSIBLE FOR ANY DAMAGE CAUSED TO
THE HOB AND/OR ITS ENVIRONMENT.
If a defect is noticed, switch on the appliance and turn off the
electrical supplying.
If the ceramic glass is cracked or fissured, you must unplug the
appliance and contact the after sales service.
Repairing has to be done by specialists. Do not open the
appliance by yourself.
WARNING: If the surface is cracked, switch off the appliance to
avoid the possibility of electric shock.
Other protections
Note sure that the container pan is always centred on the
cooking zone. The bottom of the pan must have to cover as
much as possible the cooking zone.
For the users of pacemaker, the magnetic field could influence
its operating. We recommend getting information to the retailer
or of the doctor.
Do not to use aluminium or synthetic material containers: they
could melt on still hot cooking zones.
NEVER try to extinguish a fire with water, but switch off the
appliance and then cover flame e.g. with a lid or a fire blanket.
21
Page 22

DESCRIPTION OF THE APPLIANCE
Type
7334240
Total power
7400 W
Energy consumption for the hob EC
hob
**
168.4 Wh/kg
Left heating zone
Ø 185 mm
Minimum detection
Ø 110 mm
Nominal power*
2050 W
Booster*
2500 W
Doubble Booster *
3700 W
Standardised cookware category**
B
Energy consumption ECcw**
167.3 Wh/kg
Center left heating zone
Ø 220 mm
Minimum detection
Ø 110 mm
Nominal power*
2050 W
Booster*
2500 W
Doubble Booster *
3700 W
Standardised cookware category**
C
Energy consumption ECcw**
164.8 Wh/kg
Center right heating zone
Ø 185 mm
Minimum detection
Ø 100 mm
Nominal power*
1850 W
Booster*
2300 W
Doubble Booster *
3000 W
Standardised cookware category**
B
Energy consumption ECcw**
175.4 Wh/kg
Right destra
Ø 140 mm
Minimum detection
Ø 100 mm
Nominal power*
1850 W
Booster*
2300 W
Doubble Booster *
3000 W
Standardised cookware category**
A
Energy consumption ECcw**
166 Wh/kg
Technical characteristics
* The given power may change according to the dimensions and material of the pan.
** calculated according to the method of measuring performance (EN 60350-2).
22
Page 23
Control panel
[ + ] key
Left heating zone
selection
On/Off key
[ - ] key
Timer key
Timer display
Booster key
Locking key
Locking key control light
Timer control light
Egg Timer control light
Center left heating
zone selection
Right heating
zone selection
Center right
heating zone
Control light
cooking zone
Power display
23
Page 24

USE OF THE APPLIANCE
Display
Display Designation Description
0 Zero The heating zone is activated.
1…9 Power level Selection of the cooking level.
U No pan detection No pan or inadequate pan.
A Heat accelerator Automatic cooking.
E Error message Electronic failure.
H Residual heat The heating zone is hot.
P Booster The Booster is activated.
Double Booster The double Booster is activated.
Ventilation
The cooling system is fully automatic. The cooling fan starts with a low speed when the calories
brought out by the electronic system reach a certain level. The ventilation starts his high speed
when the hob is intensively used. The cooling fan reduces his speed and stops automatically
when the electronic circuit is cooled enough.
STARTING-UP AND APPLIANCE MANAGEMENT
Before the first use
Clean your hob with a damp cloth, and then dry the surface thoroughly. Do not use detergent
which risks causing blue-tinted colour on the glass surface.
Induction principle
An induction coil is located under each heating zone. When it is engaged, it produces a variable
electromagnetic field which produces inductive currents in the ferromagnetic bottom plate of the
pan. The result is a heating-up of the pan located on the heating zone.
Of course the pan has to be adapted:
All ferromagnetic pans are recommended (please verify it thanks a little magnet): cast iron
and steel pans, enamelled pans, stainless-steel pans with ferromagnetic bottoms…
Are excluded: cupper, pure stainless-steel, aluminium, glass, wood, ceramic, stoneware,…
The induction heating zone adapts automatically the size of the pan. With a too small diameter
the pan doesn’t work. This diameter is varying in function of the heating zone diameter.
If the pan is not adapted to the induction hob the display will show [ U ].
Sensitive touch
Your ceramic hob is equipped with electronic controls with sensitive touch keys. When your finger
presses the key, the corresponding command is activated. This activation is validated by a
control light, a letter or a number in the display and/or a “beep” sound.
In the case of a general use press only one key at the same time.
24
Page 25

Starting-up
Start up / switch off the hob:
Action Control panel Display
To start press key [ 0/I ] [ 0 ]
To stop press key [ 0/I ] nothing or [ H ]
Start up / switch off a heating zone:
Action Control panel Display
Select a heating zone press selection zone key [ 0 ]
Increase power press key [ + ] [ 1 ] to [ 9 ]
Decrease power press key [ - ] [ 9 ] to [ 1 ]
To stop press simultaneous [ + ] and [ - ] [ 0 ] or [ H ]
If no action is made within 20 second the electronics returns in waiting position.
Pan detection
The pan detection ensures a perfect safety. The induction doesn’t work:
If there is no pan on the heating zone or if this pan is not adapted to the induction. In this
case it is impossible to increase the power and the display shows [ U ]. This symbol
disappears when a pan is put on the heating zone.
If the pan is removed from the heating zone the operation is stopped. The display shows
[ U ]. The symbol [ U ] disappears when the pan is put back to the heating zone. The
cooking continues with the power level set before.
After use, switch the heat element off: don’t let the pan detection [ U ] active.
Residual heat indication
After the switch off of a heating zone or the complete stop of the hob, the heating zones are still
hot and indicates [ H ] on the display.
The symbol [ H ] disappears when the heating zones may be touched without danger.
As far as the residual heat indicators are on light, don’t touch the heating zones and don’t put any
heat sensitive object on them. There are risks of burn and fire.
Booster and double Booster function
Booster [ P ] and double Booster [ ] grant a boost of Power to the selected heating zone.
If this function is activated the heating zones work during 10 minutes with an ultra high Power.
This is foreseen for example to heat up rapidly big quantities of water, like nuddles
Start up / Stop the Booster:
Action Control panel Display
Select a heating zone press selection zone key [ 0 ]
Start up the booster press once on key [ P ] [ P ]
Stop the booster press key [ - ] [ 9 ]
or press 3 times on key [ P ] [ 9 ]
Start up / Stop double Power
Action Control panel Display
Select a heating zone press selection zone key [ 0 ]
Start up the booster press once on key [ P ] [ P ]
Start up the double booster press twice on key [ P ] [ and P ]
Stop the booster press key [ - ] [ 9 ]
or press 3 times key [ P ] [ 9 ]
25
Page 26
Power management:
The hole cooking hob is equipped with a maximum of Power. When the Booster function is
activated, and in order to exceed the maximum Booster, the electronic system orders to reduce
automatically the power level of an other heating zone. The display is blinking on [ 9 ] during a
few seconds and then shows the maximum of power allowed:
Heating zone selected The other heating zone: (example: Booster level 9)
[ P ] is displayed [ 9 ] goes to [ 6 ] or [ 8 ] depending the type of zone
Timer
The timer is able to be used simultaneous with all heating zones and this with different time
settings (from 0 to 99 minutes) for each heating zone.
Setting and modification of the cooking time :
Action Control panel Display
Select a heating zone Press selection zone key [ 0 ]
Select the power level Press key [ + ] or [ - ] [ 1 ] … [ 9 ]
Select the “Timer” Press key [ ] Timer control light
from the desired
heating zone is on
Decrease the time Press key [ - ] [ 30 ] wents to 29,28,…
Increase the time Press key [ + ] The time increases…
The time is configured and the cooking starts until the time reaches [ 00 ].
To stop the cooking time:
Action Control panel Display
Select a heating zone Press selection zone key [ 0 ] to [ 9 ]
Select the “Timer” Press key [ ] Timer control light
from the desired
heating zone is on
Stop the “Timer” Press key [ - ] Displays [ 00 ]
If several timers are activated repeat the process.
Egg timer function:
Egg timer is an independent function. It stops as soon as a heating zone starts up.
If the egg timer is on and the hob is switched off, the timer continues until time runs out.
Action Control panel Display
Select the “Timer” Press key [ ] The time displays
Decrease the time Press key [ - ] [ 30 ] wents to 29, 28,…
Increase the time Press key [ + ] The time increase
When the time reaches [ 00 ] it is blinking and beeping.
Automatic stop at the end of the cooking time:
As soon as the selected cooking time is finished the timer displays blinking [ 00 ] and a sound
rings.
To stop the sound and the blinking, press the key [ - ] and [ + ].
26
Page 27
Automatic cooking
All the cooking zones are equipped with an automatic cooking device. The cooking zone starts at
full power during a certain time, and then reduces automatically its power on the pre-selected
level.
Start-up:
Action Control panel Display
Select the zone Press selection zone key [ 0. ]
Full power setting Press key [ + ] [ 1 ] to [ 9 ]
Automatic cooking Press key [ + ] [ 9 ] is blinking with [ A ]
Power level selection Press key [ - ] [ 9 ] … [ 1 ]
(for example « 7 ») [ 7 ] is blinking with [ A ]
Switching off the automatic cooking :
Action Control panel Display
Select the zone Press selection zone key Power level
Stop automatic cooking Press key [ - ] [ 9 ] … [ 1 ]
Power level selection Press key [ + ] Level selected
Control panel locking
To avoid modification of the setting of the cooking zones, in particular during cleaning, the control
panel can be locked (with exception to the On/Off key [ 0/I ]).
Action Control panel Display
Locking the hob Press [ ] during 2s locking light on
Unlock the hob Press [ ] during 2s locking light off
27
Page 28
COOKING ADVICES
If the bottom of the pan (Ød) is significantly smaller than the diemeter of the body
(ØD) the performance will not be good, and the pan might not be identified
by the plate
Pan quality
Adapted materials: steel, enamelled steel, cast iron, ferromagnetic stainless-steel,
aluminium with ferromagnetic bottom.
Not adapted materials: aluminium and stainless-steel without ferromagnetic bottom,
cupper, brass, glass, ceramic, porcelain.
The manufacturers specify if their products are compatible induction.
To check if pans are compatibles:
Put a little water in a pan placed on an induction heating zone set at level [ 9 ].This water
must heat in a few seconds.
A magnet stucks on the bottom of the pan.
Certain pans can make noise when they are placed on an induction cooking zone. This noise
doesn’t mean any failure on the appliance and doesn’t influence the cooking operating.
The pans must be certified by the manufacturer as compatible with induction hobs.
However, it is possible that certain pans, even though declared compatible, may have
characteristics which are not adapted to be used with induction hobs.
We recommend to verify, when purchasing the pans, that they respect at least the following
conditions:
28
Page 29
Pan dimension
1 to 2
Melting
Reheating
Sauces, butter, chocolate, gelatine
Dishes prepared beforehand
2 to 3
Simmering
Defrosting
Rice, pudding, sugar syrup
Dried vegetables, fish, frozen products
3 to 4
Steam
Vegetables, fish, meat
4 to 5
Water
Steamed potatoes, soups, pasta,
fresh vegetables
6 to 7
Medium cooking
Simmering
Meat, lever, eggs, sausages
Goulash, roulade, tripe
7 to 8
Cooking
Potatoes, fritters, wafers
9
Frying, roosting
Boiling water
Steaks, omelettes, fried dishes
Water
P and
Frying, roosting
Boiling water
scallops, steaks
Boiling significant quantities of water
The cooking zones are, until a certain limit, automatically adapted to the diameter of the pan.
However the bottom of this pan must have a minimum of diameter according to the
corresponding cooking zone.
To obtain the best efficiency of your hob, please place the pan well in the centre of the cooking
zone.
Examples of cooking power setting
(the values below are indicative)
MAINTENANCE AND CLEANING
Switch-off the appliance before cleaning.
Do not clean the hob if the glass is too hot because they are risk of burn.
Remove light marks with a damp cloth with washing up liquid diluted in a little water. Then
rinse with cold water and dry the surface thoroughly.
Highly corrosive or abrasive detergents and cleaning equipment likely to cause scratches
must be absolutely avoided.
Do not ever use any steam-driven or pressure appliance.
Do not use any object that may scratch the ceramic glass.
Ensure that the pan is dry and clean. Ensure that there are no grains of dust on your
ceramic hob or on the pan. Sliding rough saucepans will scratch the surface.
Spillages of sugar, jam, jelly, etc. must be removed immediately. You will thus prevent the
surface being damaged.
29
Page 30
WHAT TO DO IN CASE OF A PROBLEM
Don't throw your appliance with the household refuses
Get in touch with the waste collection centre of your
commune that is adapted to the recycling of
the household appliances.
The hob or the cooking zone doesn’t start-up:
The hob is badly connected on the electrical network.
The protection fuse cut-off.
The looking function is activated.
The sensitive keys are covered of grease or water.
An object is put on a key.
The control panel displays [ U ]:
There is no pan on the cooking zone.
The pan is not compatible with induction.
The bottom diameter of the pan is too small.
The control panel displays [ E ]:
The electronic system is defective.
Disconnect and replug the hob.
Call after sales
One or all cooking zone cut-off:
The safety system functioned.
You forgot to cut-off the cooking zone for a long time.
One or more sensitive keys are covered.
The pan is empty and its bottom overheated.
The hob also has an automatic reduction of Booster level and breaking Automatic
overheating
Continuous ventilation after cutting off the hob:
This is not a failure, the fan continuous to protect the electronic device.
The fan cooling stops automatically.
The automatic cooking system doesn’t start-up:
The cooking zone is still hot [ H ].
The highest Booster level is set [ 9 ].
ENVIRONMENT PRESERVATION
The materials of packing are ecological and recyclable.
The electronic appliances are composed of recyclable, and sometimes harmful materials
for the environment, but necessary to the good running and the safety of the appliance.
30
Page 31

Reference
Cut-size
7334240
1065 x 325 mm
Stick the gasket (2) two millimeters
from the external edge of the glass,
after removing the protection sheet (3).
INSTALLATION INSTRUCTIONS
The installation comes under the exclusive responsibility of specialists.
The installer is held to respect the legislation and the standards enforce in his home country.
How to stick the gasket:
The gasket supplied with the hob avoids all infiltration of liquids in the cabinet.
His installation has to be done carefully, in conformity of the following drawing.
Fitting - installing:
The cut out sizes are:
Ensure that there is a distance of 50 mm between the hob and the wall or sides.
The hobs are classified as “Y” class for heat protection. Ideally the hob should be installed
with plenty of space on either side. There may be a wall at the rear and tall units or a wall
at one side. On the other side, however, no unit or divider must stand higher than
the hob.
The piece of furniture or the support in which the hob is to be fitted, as well as the edges of
furniture, the laminate coatings and the glue used to fix them, must be able to resist
temperatures of up to 100 °C.
The mural rods of edge must be heat-resisting.
Not to install the hob to the top of a not ventilated oven or a dishwasher.
To guarantee under the bottom of the hob casing a space of 20 mm to ensure a good air
circulation of the electronic device.
If a drawer is placed under the work, avoid to put into this drawer flammable objects (for
example: sprays) or not heat-resistant objects.
Materials which are often used to make worktops expand on contact with water. To protect
the cut out edge, apply a coat of varnish or special sealant. Particular care must be given
to applying the adhesive joint supplied with the hob to prevent any leakage into the
supporting furniture. This gasket guaranties a correct seal when used in conjunction with
smooth work top surfaces.
The safety gap between the hob and the cooker hood placed above must respect the
indications of the hood manufacturer. In case of absence of instructions respect a distance
minimum of 760 mm.
The connection cord should be subjected, after building, with no mechanical constraint,
such for example of the fact of the drawer.
WARNING: Use only hob guards designed by the manufacturer of the cooking appliance
or indicated by the manufacturer of the appliance in the instructions for use as suitable or
hob guards incorporated in the appliance. The use of inappropriate guards can cause
accidents.
31
Page 32

ELECTRICAL CONNECTION
Mains
Connection
Cable diameter
Cable
Protection calibre
220-240V~ 50/60Hz
1 Phase + N
3 x 2.5 mm²
H 05 VV - F
H 05 RR - F
25 A *
380-415V~ 50/60Hz
2 Phases + N
4 x 1.5 mm²
H 05 VV - F
H 05 RR - F
16 A *
We cannot be held responsible for any incident resulting from incorrect connection or
which could arise from the use of an appliance which has not been earthed or has been
equipped with a faulty earth connection.
The installation of this appliance and the connection to the electrical network should be
entrusted only to an electrician perfectly to the fact of the normative regulations and which
respects them scrupulously.
Protection against the parts under tension must be ensured after the building-in.
The data of connection necessary are on the stickers place on the hob casing near the
connection box.
The connection to the main must be made using an earthed plug or via an omnipolar
circuit breaking device with a contact opening of at least 3 mm.
The electrical circuit must be separated from the network by adapted devices, for example:
circuit breakers, fuses or contactors.
If the appliance is not fitted with an accessible plug, disconnecting means must be
incorporated in the fixed installation, in accordance with the installation regulations.
The inlet hose must be positioned so that it does not touch any of the hot parts of the hob
or oven.
If the connection cable is damaged, it must be replaced by the manufacturer or the after
sale service authorized by the manufacturer, or anyway by someone with similar
competence, in order to prevent any risk.
Caution!
This appliance has only to be connected to a network 220-240 V~ 50/60 Hz.
Connect always the earth wire.
Respect the connection diagram.
* calculated with the simultaneous factor following the standard EN 60 335-2-6
Connection of the hob
Monophase 220-240V~1P+N:
Use the green/yellow cable as heart cable, the blue and the brown cable as neutral N and the
black and the grey cable as phase L.
Biphase 380-415V~2P+N:
Use the green/yellow cable as heart cable, the blue and the brown cable as neutral N, the grey
cable as phase L1 and the black cable as phase L2.
Before making the connection, we strongly advise you to locate the phase(s), neutral and earth
on the mains. If you have any doubts, call your electrician.
Caution! Be careful that the cables are correctly engaged and tightened.
32
Page 33

Chère cliente, cher client,
Nous vous remercions de la confiance que vous nous avez accordée en choisissant notre table
de cuisson vitrocéramique à induction.
Afin de bien connaître cet appareil, nous vous recommandons de lire attentivement cette notice
d’utilisation dans son intégralité et de la conserver pour une consultation ultérieure.
SOMMAIRE
SECURITE ................................................................................................................................... 34
PRECAUTIONS AVANT UTILISATION EN CUISSON ............................................................................. 34
UTILISATION DE L’APPAREIL ......................................................................................................... 35
PRECAUTIONS POUR NE PAS DETERIORER L’APPAREIL ................................................................... 36
PRECAUTIONS EN CAS DE DEFAILLANCE DE L’APPAREIL .................................................................. 37
AUTRES PROTECTIONS ............................................................................................................... 37
DESCRIPTION DE L’APPAREIL ................................................................................................ 38
CARACTERISTIQUES TECHNIQUES ................................................................................................ 38
BANDEAU DE COMMANDE ............................................................................................................ 39
UTILISATION DE L’APPAREIL .................................................................................................. 40
AFFICHAGE ................................................................................................................................ 40
VENTILATION .............................................................................................................................. 40
MISE EN ROUTE ET GESTION DE L’APPAREIL ...................................................................... 40
AVANT LA PREMIERE UTILISATION ................................................................ ................................. 40
PRINCIPE DE L’INDUCTION ........................................................................................................... 40
TOUCHES SENSITIVES ................................................................................................................. 40
MISE EN ROUTE .......................................................................................................................... 41
DETECTION DE RECIPIENT ........................................................................................................... 41
INDICATEUR DE CHALEUR RESIDUELLE .......................................................................................... 41
FONCTION BOOSTER ET DOUBLE BOOSTER .................................................................................. 41
FONCTION MINUTERIE ................................................................................................................. 42
PROGRAMMATION D’AUTOMATISME DE CUISSON ............................................................................ 43
VERROUILLAGE DU BANDEAU DE COMMANDE ................................................................................. 43
CONSEILS DE CUISSON ........................................................................................................... 44
QUALITE DES CASSEROLES ......................................................................................................... 44
DIMENSION DES CASSEROLES ...................................................................................................... 45
EXEMPLES DE REGLAGE DES PUISSANCES DE CUISSON .................................................................. 45
ENTRETIEN ET NETTOYAGE ................................................................ ................................ .... 45
QUE FAIRE EN CAS DE PROBLEME ........................................................................................ 46
PROTECTION DE L’ENVIRONNEMENT .................................................................................... 46
INSTRUCTIONS D’INSTALLATION ........................................................................................... 47
CONNEXION ELECTRIQUE ....................................................................................................... 48
33
Page 34

SECURITE
Précautions avant utilisation en cuisson
Retirez toutes les parties de l’emballage.
L’installation et le branchement électrique de l’appareil sont à
confier à des spécialistes agrées. Le fabricant ne saurait être
tenu responsable des dommages résultant d’une erreur
d’encastrement ou de raccordement.
L’appareil ne doit être utilisé que s’il est monté et installé dans
un meuble et un plan de travail homologué et adapté.
Son utilisation est uniquement destinée à l’usage domestique
habituel (préparation des aliments), à l’exclusion de toute autre
utilisation domestique, commerciale ou industrielle.
Enlevez toutes les étiquettes et autocollants du verre
vitrocéramique.
Ne pas transformer ou modifier l’appareil.
La table de cuisson ne doit pas servir de support ou de plan de
travail.
La sécurité n’est assurée que si l’appareil est raccordé à une
terre de protection conforme aux prescriptions en vigueur.
Pour le raccordement au réseau électrique n’utilisez pas de
rallonge.
L’appareil ne doit pas être utilisé au-dessus d’un lave-vaisselle
ou d’un sèche-linge : les vapeurs d’eau dégagées pourraient
détériorer l’électronique.
Ne faites pas fonctionner l'appareil avec un minuteur externe ou
un système de commande à distance.
34
Page 35

Utilisation de l’appareil
Coupez toujours les foyers après utilisation.
Surveillez constamment les cuissons qui utilisent des graisses
et des huiles, car elles sont susceptibles de s’enflammer
rapidement.
Prenez garde aux risques de brûlures pendant et après
l’utilisation de l’appareil.
Assurez-vous qu’aucun câble électrique d’appareil fixe ou
mobile ne vienne en contact avec la vitre ou la casserole
chaude.
Les objets magnétisables (cartes de crédits, disquettes
informatiques, calculatrices) ne doivent pas se trouver à
proximité immédiate de l’appareil en fonction.
Les objets métalliques tels que des couteaux, des fourchettes,
des cuillères et des couvercles ne devraient pas être placés sur
la surface vitrée puisqu'ils peuvent devenir chauds.
De façon générale ne placez aucun objet métallique autre que
les récipients de chauffe sur la surface vitrée. En cas
d’enclenchement intempestif ou de chaleur résiduelle, celui-ci
risquerait selon le matériau de chauffer, de fondre ou de
commencer à brûler.
Ne jamais couvrir l’appareil d’un chiffon ou d’une feuille de
protection. Il pourrait devenir très chaud et prendre feu.
Cet appareil peut être utilisé par des enfants âgés de 8 ans et
plus et des personnes dont les capacités physiques,
sensorielles ou mentales sont réduites ou dont les expériences
et les connaissances sont inadaptées, uniquement si elles sont
surveillées, formées à l’utilisation de l’appareil en conditions de
sécurité et informées des risques susceptibles de se présenter.
Les enfants ne doivent pas jouer avec l’appareil.
Le nettoyage et l’entretien ne doivent pas être confiés à des
enfants sans surveillance d’adultes.
35
Page 36

Précautions pour ne pas détériorer l’appareil
Les casseroles à semelles brutes (fonte non émaillée,…) ou
abîmées peuvent endommager la vitrocéramique.
La présence de sable ou d’autres matériaux abrasifs peut
endommager la vitrocéramique.
Evitez de faire chuter des objets, mêmes petits, sur la
vitrocéramique.
Ne heurtez pas les bords de la vitre avec les casseroles.
S’assurer que la ventilation de l’appareil se fasse suivant les
instructions du constructeur.
Ne posez pas ou ne pas laisser de casseroles vides sur la table
de cuisson.
Eviter que le sucre, les matières synthétiques ou une feuille
d’aluminium ne touchent les zones chaudes. Ces substances
peuvent au refroidissement provoquer des cassures ou d’autres
modifications de la surface vitrocéramique: Eteindre l’appareil
et enlevez-les immédiatement de la zone de cuisson encore
chaude (attention : risque de brûlures).
MISE EN GARDE: Risque d’incendie : ne pas entreposer
d’objets sur la surface de cuisson.
Ne placez jamais de récipients chauds au dessus de la zone de
commande.
Si un tiroir est situé sous l’appareil encastré, assurer un écart
suffisant (2 cm) entre le contenu de ce tiroir et la partie
inférieure de l’appareil afin d’assurer une bonne ventilation.
Ne déposez pas d’objets inflammables (ex. sprays) dans le
tiroir placé sous la table de cuisson. Les éventuels casiers à
couverts doivent être en matériau résistant à la chaleur.
36
Page 37

Précautions en cas de défaillance de l’appareil
L’UTILISATION DE CASSEROLES NON ADAPTÉES,
OU D’ACCESOIRES AMOVIBLES INTERMÉDIAIRES
POUR FAIRE CHAUFFER DES CASSEROLES NON
INDUCTIVES ENTRAÎNE UNE RUPTURE DE LA
GARANTIE.
LE FABRICANT NE SAURAIT ÊTRE TENU POUR
RESPONSABLE DES DÉTERIORATIONS DE LA TABLE
OU DE SON ENVIRONNEMENT.
Si un défaut est constaté, il faut débrancher l’appareil et couper
l’alimentation électrique.
En cas de fêlure ou de fissure de la vitrocéramique il faut
impérativement débrancher l’appareil du réseau électrique et
prévenir le service après-vente.
Les réparations doivent être entreprises exclusivement par un
personnel spécialisé. N’ouvrez en aucun cas l’appareil vousmême.
ATTENTION : Si la surface vitrée est fissurée, coupez
l’alimentation de l’appareil pour éviter une éventuelle décharge
électrique.
Autres protections
Assurez-vous que le récipient de cuisson soit toujours centré
sur la zone de cuisson. Le fond de la casserole doit autant que
possible couvrir la zone de cuisson.
Pour les utilisateurs portant un régulateur de rythme cardiaque,
le champ magnétique pourrait influencer son fonctionnement.
Nous recommandons de se renseigner auprès du revendeur ou
du médecin.
N’utilisez pas de récipients en matière synthétique ou en
aluminium : ils pourraient fondre sur des foyers encore chauds.
NE JAMAIS essayer d’éteindre un incendie avec de l’eau, mais
arrêter l’appareil puis couvrir les flammes par exemple avec un
couvercle ou une couverture anti-feu.
37
Page 38

DESCRIPTION DE L’APPAREIL
Type
7334240
Puissance Totale
7400 W
Consommation d’énergie de la table de cuisson EC
hob
**
168.4 Wh/kg
Foyer gauche
Ø 185 mm
Détection minimum
Ø 110 mm
Puissance nominale*
2050 W
Booster*
2500 W
Doubble Booster *
3700 W
Catégorie de la casserole standard**
B
Consommation d’énergie EC
cw
**
167.3 Wh/kg
Foyer centre gauche
Ø 220 mm
Détection minimum
Ø 110 mm
Puissance nominale*
2050 W
Booster*
2500 W
Doubble Booster *
3700 W
Catégorie de la casserole standard**
C
Consommation d’énergie EC
cw
**
164.8 Wh/kg
Foyer centre droit
Ø 185 mm
Détection minimum
Ø 100 mm
Puissance nominale*
1850 W
Booster*
2300 W
Doubble Booster *
3000 W
Catégorie de la casserole standard**
B
Consommation d’énergie EC
cw
**
175.4 Wh/kg
Foyer droit
Ø 140 mm
Détection minimum
Ø 100 mm
Puissance nominale*
1850 W
Booster*
2300 W
Doubble Booster *
3000 W
Catégorie de la casserole standard**
A
Consommation d’énergie EC
cw
**
166 Wh/kg
Caractéristiques techniques
* la puissance peut varier en fonction des dimensions et des matériaux des casseroles.
** calculé selon la méthode de mesure de l’aptitude à la fonction (EN 60350-2).
38
Page 39

Bandeau de commande
Touche[ + ]
Sélecteur foyer
gauche
Touche On/Off
Touche[ - ]
Touche
minuterie
Minuterie-affichage
Touche Booster
Touche verrouillage
Voyant verrouillage
Voyant de contrôle
minuterie
Voyant de contrôle
‘Egg Timer’
Sélecteur foyer
central gauche
Sélecteur foyer
droit
Sélecteur foyer
central droit
Voyant de
contrôle foyer
Puissance
39
Page 40

UTILISATION DE L’APPAREIL
Affichage
Affichage Désignation Description
0. Zéro La zone de chauffe est activée.
1…9 Niveau de puissance Choix du niveau de cuisson.
U Non détection de casserole Récipient manquant ou inapproprié.
A Accélérateur de chauffe Cuisson automatique.
E Message d’erreur Défaut de circuit électronique.
H Chaleur résiduelle La zone de cuisson est chaude.
P Booster Le Booster est activé.
Double Booster Le Double Booster est activé.
Ventilation
Le ventilateur de refroidissement a un fonctionnement entièrement automatique. Il se met en
route à petite vitesse dès que les calories dégagées par l’électronique dépassent un certain seuil.
La ventilation enclenche sa seconde vitesse lorsque la table de cuisson est utilisée
intensivement. Le ventilateur réduit sa vitesse et s’arrête automatiquement dès que le circuit
électronique est suffisamment refroidi.
MISE EN ROUTE ET GESTION DE L’APPAREIL
Avant la première utilisation
Nettoyez votre appareil avec un chiffon humide, puis séchez-le. N’utilisez pas de détergent qui
risquerait de provoquer une coloration bleutée sur les surfaces vitrées.
Principe de l’induction
Une bobine d’induction se trouve sous chaque foyer de cuisson. Lorsque celle-ci est enclenchée,
elle produit un champ électromagnétique variable qui, à son tour produit des courants induits
dans le fond ferro-magnétique du récipient. Il en résulte un échauffement du récipient placé sur la
zone de chauffe.
Bien entendu le récipient doit être adapté :
Sont recommandés tous les récipients métalliques ferro-magnétiques (à vérifier
éventuellement avec un petit aimant) tels que : cocotte en fonte, poêle en fer noir,
casseroles métalliques émaillées, en inox à semelle ferro-magnétique…
Sont exclus les récipients en cuivre, inox, aluminium, verre, bois, céramique, grès, terre
cuite, inox non ferro-magnétique…
La zone de cuisson à induction prend automatiquement en compte la taille du récipient utilisé.
Avec un diamètre trop petit, le récipient ne fonctionne pas. Ce diamètre varie en fonction du
diamètre de la zone de cuisson.
Lorsque le récipient n’est pas adapté à la table de cuisson le symbole [ U ] reste affiché.
Touches sensitives
Votre appareil est équipé de touches sensitives permettant de commander les différentes
fonctions. Un effleurage de la touche active leur fonctionnement. Cette activation est validée par
un voyant, un affichage et/ou par un signal sonore.
Dans le cas d’une utilisation générale n’appuyez que sur une seule touche à la fois.
40
Page 41

Mise en route
Enclencher / arrêter la table de cuisson :
Action Bandeau de commande Afficheur
Enclencher appuyer sur [ 0/I ] [ 0 ]
Arrêter appuyer sur [ 0/I ] aucun ou [ H ]
Réglage de la zone de chauffe :
Action Bandeau de commande Afficheur
Sélectionner appuyer sur une touche de la zone [ 0 ]
Augmenter appuyer sur [ + ] [ 1 ] jusqu’à [ 9 ]
Diminuer appuyer sur [ - ] [ 9 ] jusqu’à [ 1 ]
Arrêter appuyer en même temps sur [ + ] et [ - ] [ 0 ] ou [ H ]
Si aucun réglage n’est fait dans un délai de 20 secondes, l’électronique revient en position
d’attente.
Détection de récipient
La détection de récipient assure une sécurité parfaite. L’induction ne fonctionne pas :
Lorsqu’il n’y a pas de récipient sur la zone de cuisson ou lorsque ce récipient est inadapté
à l’induction. Dans ce cas il est impossible d’augmenter la puissance et dans l’afficheur le
symbole [ U ] apparaît. Le [ U ] disparaît lorsqu’une casserole est posée sur le foyer de
cuisson.
Si en cours de cuisson le récipient est enlevé de la zone de cuisson, le fonctionnement est
interrompu. Dans l’afficheur le symbole [ U ] apparaît. Le [ U ] disparaît lorsque le récipient
est remis sur le foyer de cuisson. La cuisson reprend au niveau de puissance sélectionnée
au préalable.
Après utilisation, éteignez la zone de chauffe. Ne laissez pas la détection de casserole [ U ]
active.
Indicateur de chaleur résiduelle
Après l’arrêt des zones de cuisson ou l’arrêt complet de la table, les zones de cuissons sont
encore chaudes et sont signalées par le symbole [ H ].
Le symbole [ H ] s’éteint lorsque les zones de cuisson peuvent être touchées sans danger.
Tant que les témoins de chaleur résiduelle sont allumés, ne touchez pas les zones de cuisson et
ne posez aucun objet sensible à la chaleur. Risque de brûlure et d’incendie !
Fonction Booster et Double Booster
La fonction Booster [ P ] et Double Booster [ ] octroie un renforcement de puissance à la
zone de cuisson sélectionnée.
Si ces fonctions sont activées, les zones de cuisson fonctionnent pendant 10 minutes avec une
puissance nettement plus élevée.
Le Booster et le Double Booster sont conçus par exemple pour faire chauffer rapidement de
grandes quantités d’eau, comme pour la cuisson des pâtes.
Enclencher / arrêter le Booster:
Action Bandeau de commande Afficheur
Sélectionner une zone appuyer sur la touche correspondante [ 0 ]
Activer le booster appuyer 1 fois sur la touche [ P ] [ P ]
Arrêter le booster appuyer sur la touche [ - ] [ 9 ]
ou appuyer 3 fois sur [ P ] [ 9 ]
41
Page 42

Enclencher / arrêter le Double Booster:
Action Bandeau de commande Afficheur
Sélectionner une zone appuyer sur la touche correspondante [ 0 ]
Activer le booster appuyer 1 fois sur la touche [ P ] [ P ]
Activer le double booster appuyer 2 fois sur la touche [ P ] [ clignote avec P ]
Arrêter le booster appuyer sur la touche [ - ] [ 9 ]
ou appuyer 3 fois sur [ P ] [ 9 ]
Gestion de la puissance maximale :
L’ensemble de la table de cuisson est doté d’une puissance maximale. Lorsque la fonction
Booster est activée, et pour ne pas excéder cette puissance maximale, la commande
électronique réduit automatiquement le niveau de cuisson d’une autre zone de chauffe.
Durant quelques secondes, l’afficheur de cette zone de cuisson en clignotant [ 9 ] puis affiche le
niveau de cuisson maximum possible :
Zone de cuisson sélectionnée Autre zone de cuisson ( exemple : puissance niveau 9 )
[ P ] est affiché [ 9 ] passe à [ 6 ] ou [ 8 ] suivant le type de foyer
Fonction minuterie
La minuterie peut être affectée simultanément à tous les foyers de cuisson et ceci avec des
réglages de temps de minuterie différents (de 0 à 99 minutes) pour chacune des zones.
Réglage ou modification de la durée de cuisson :
Action Bandeau de commande Afficheur
Sélectionner une zone Appuyer sur la touche de la zone [ 0. ]
Régler le niveau de puissance Appuyer sur la touche [ + ] ou [ - ] [ 1 ] … [ 9 ]
Sélectionner la « Minuterie » Appuyer sur la touche [ ] Le voyant de contrôle de
la zone choisie s’allume
Diminuer le temps Appuyer sur la touche [ - ] [ 30 ] passe à 29,28,…
Augmenter le temps Appuyer sur la touche [ + ] Le temps augmente…
Le temps est affiché et la cuisson démarre jusqu’à ce que le temps arrive à [ 00 ].
Arrêter la fonction minuterie cuisson :
Action Bandeau de commande Afficheur
Sélectionner une zone Appuyer sur la touche de la zone [ 0 ] à [ 9 ]
Sélectionner « Minuterie » Appuyer sur la touche [ ] Le voyant de contrôle de
la zone choisie s’allume
Arrêter « Minuterie » Appuyer sur [ - ] Il affiche [ 00 ]
Lorsque plusieurs minuteries sont activées, il est nécessaire de répéter l’opération.
Minuterie utilisée hors cuisson :
La minuterie fonctionne indépendamment des foyers et se désactive dès la mise en route d’une
zone de chauffe. Si elle est activée et que la table de cuisson est arrêtée, la minuterie continue
jusqu’à ce que le temps imparti soit écoulé.
Action Bandeau de commande Afficheur
Sélectionner « Minuterie » Appuyer sur [ ] Minuterie [ 00 ] minutes
Diminuer la durée Appuyer sur [ - ] [ 30 ] passe à 29,28,…
Augmenter la durée Appuyer sur [ + ] Le temps augmente …
Lorsque le temps arrive à [ 00 ] la minuterie clignote et produit un son.
Arrêt automatique en fin de cuisson :
Dès que le temps de cuisson sélectionné est écoulé la minuterie affiche en clignotant [ 00 ] et un
signal sonore retentit.
Pour stopper le son et le clignotement, il suffit d’appuyer sur la touche [ - ] ou [ + ] de la minuterie.
42
Page 43

Programmation d’automatisme de cuisson
Toutes les zones de cuisson sont équipées d’un dispositif de cuisson automatique. La zone de
cuisson se met en marche à pleine puissance pendant un certain temps, puis réduit
automatiquement sa puissance sur le niveau présélectionné.
Enclencher l’automatisme :
Action Bandeau de commande Afficheur
Sélectionner la zone Appuyer sur la touche de la zone [ 0 ]
Activer la pleine puissance Appuyer sur [ + ] Passe de [ 1 ] à [ 9 ]
Activer l’automatisme Appuyer encore sur [ + ] [ 9 ] clignote avec [ A ]
Sélectionner le niveau Appuyer sur [ - ] [ 9 ] à [ 1 ]
(par exemple « 7 ») [ 7 ] clignote avec [ A ]
Arrêter l’automatisme :
Action Bandeau de commande Afficheur
Sélectionner la zone Appuyer sur la touche de la zone [ 0 ]
Arrêter l’automatisme Appuyer sur [ - ] [ 9 ] à [ 1 ]
Sélection du niveau de puissance Appuyer sur [ + ] Niveau sélectionné
Verrouillage du bandeau de commande
Pour éviter de modifier une sélection de la table de cuisson, notamment dans le cadre du
nettoyage de la vitre, le bandeau de commande (à l’exception de la touche marche/arrêt [ 0/I ])
peut être verrouillé.
Action Bandeau de commande Afficheur
Verrouiller la table maintenir un doigt sur [ ] voyant verrouillage allumé
pendant 2s
Déverrouiller la table maintenir un doigt sur [ ] voyant verrouillage éteint
pendant 2s
43
Page 44

CONSEILS DE CUISSON
Si le fond de la casserole (Ød) est significativement plus petit que son corps (ØD)
le rendement en est affecté et la casserole risque de ne pas être détectée.
Qualité des casseroles
Matériaux appropriés : acier, acier émaillé, fonte, inox à fond ferro-magnétique,
aluminium à fond ferro-magnétique.
Matériaux pas appropriés : aluminium et inox à fond non ferro-magnétique, cuivre,
laiton, verre, céramique, porcelaine.
Les fabricants spécifient si leurs produits sont compatibles avec l’induction.
Pour vérifier s’ils sont compatibles :
Mettez un peu d’eau dans une casserole, en la plaçant sur une zone de cuisson à
induction réglée au niveau [ 9 ]. Cette eau doit chauffer en quelques secondes.
Placez un aimant sur le fond externe de la casserole: il doit rester collé.
Certaines casseroles peuvent faire du bruit lorsqu’elles sont placées sur un foyer de cuisson à
induction. Ces bruits n’indiquent, en aucun cas, un défaut de l’appareil et ils ne compromettent
pas son fonctionnement.
Les casseroles doivent être certifiées par le fabricant comme compatible avec l’induction.
Il est toutefois possible que certaines casseroles certifiées aient en réalité des
caractéristiques non adaptées.
Nous recommandons de vérifier au moment de l’achat que les casseroles respectent les
conditions suivantes :
44
Page 45

Dimension des casseroles
1 à 2
Faire fondre
Réchauffer
Sauces, beurre, chocolat, gélatine
Plats pré-cuisinés
2 à 3
Gonfler
Décongélation
Riz, pudding et plats cuisinés
Légumes, poisson, produits congelés
3 à 4
Vapeur
Légumes, poissons, viande
4 à 5
Eau
Pommes de terre à l’eau, soupes, pâtes
Légumes frais
6 à 7
Cuire à feu doux
Viandes, foie, œufs, saucisses
Goulasch, roulades, tripes
7 à 8
Cuire
Frire
Pommes de terre, beignets, galettes
9
Frire,
Porter à ébullition
Steaks, omelettes
eau
P et
Frire, Porter à ébullition
Porter à ébullition des quantités importantes
d’eau
Les zones de cuisson s’adaptent automatiquement à la dimension du fond de la casserole
jusqu’à une certaine limite. Le fond de cette casserole doit cependant avoir un diamètre minimum
en fonction du diamètre de la zone de cuisson correspondante.
Afin d’obtenir le rendement maximum de votre table de cuisson, veuillez placer la casserole bien
au centre de la zone de cuisson.
Exemples de réglage des puissances de cuisson
(Les valeurs ci-dessous sont indicatives)
ENTRETIEN ET NETTOYAGE
Pour nettoyer, il faut mettre l’appareil hors fonctionnement.
Laissez refroidir l’appareil, car risques de brûlures.
Nettoyez les restes de cuisson avec de l’eau additionnée de produit vaisselle ou un
produit du commerce conseillé pour la vitrocéramique.
N’utilisez en aucun cas d’appareils « à vapeur » ou « à pression ».
Ne pas utiliser d’objets qui risqueraient de rayer la vitrocéramique (tel que tampon abrasifs
ou pointe de couteau…).
N’utilisez pas de produits de nettoyage abrasifs qui pourraient endommager l’appareil.
Séchez l’appareil avec un chiffon propre.
Enlevez immédiatement le sucre et les mets contenant du sucre.
45
Page 46

QUE FAIRE EN CAS DE PROBLEME
Ne jetez en aucun cas votre appareil avec les déchets
ménagers.
Faites appel au service d’enlèvement ou aux sites de
dépôt mis en place par votre commune et adaptés au
recyclage des appareils électroménagers.
La table de cuisson ou les zones de cuisson ne s’enclenchent pas :
La table est mal connectée au réseau électrique.
Le fusible de protection a sauté.
Vérifiez si le verrouillage n’est pas activé.
Les touches sensitives sont couvertes d’eau ou de graisse.
Un objet est posé sur les touches sensitives.
Le symbole [ U ] s’affiche :
Il n’y a pas de casserole sur la zone de cuisson.
Le récipient utilisé n’est pas compatible avec l’induction.
Le diamètre du fond de casserole est trop petit par rapport à la zone de cuisson.
Le symbole [ E ] s’affiche :
Le système électronique est défectueux.
Débranchez et rebranchez l’appareil.
Appelez le Service Après-ventes.
L’une des zones ou l’ensemble du plan de cuisson se déclenche :
Le déclenchement de sécurité a fonctionné.
Celui-ci s’actionne dans le cas ou vous avez oublié de couper une des zones de chauffe.
Il s’enclenche également lorsqu’une ou plusieurs touches sensitives sont couvertes.
Une des casseroles est vide et son fond a surchauffé.
La table dispose également d’un dispositif de réduction automatique de niveau de
puissance et de coupure automatique en cas de surchauffe.
La soufflerie de ventilation continue de tourner après l’arrêt de la table :
Ce n’est pas un défaut, le ventilateur continue de protéger l’électronique de l’appareil.
La soufflerie s’arrête automatiquement.
La commande de cuisson automatique ne s’enclenche pas :
La zone de cuisson est encore chaude [ H ].
Le niveau de cuisson maximum est enclenché [ 9 ].
PROTECTION DE L’ENVIRONNEMENT
Les matériaux d’emballage sont écologiques et recyclables.
Les appareils électroniques sont composés de matériaux recyclables et parfois de
matériaux nocifs pour l’environnement, mais nécessaires au bon fonctionnement et à la
sécurité de l’appareil.
46
Page 47

INSTRUCTIONS D’INSTALLATION
Appareil
Découpe
7334240
1065 x 325 mm
Coller le joint (2) sur le rebord de la
table à 2mm du bord externe, après
avoir ôté la feuille de protection (3).
Le montage relève de la compétence exclusive de spécialistes.
L’utilisateur est tenu de respecter la législation et les normes en vigueur dans son pays de
résidence.
Mise en place du joint d’étanchéité
Le joint adhésif fourni avec l’appareil permet d’éviter toute infiltration dans le meuble.
Sa mise en place doit être effectuée avec un grand soin suivant le croquis ci-dessous.
Encastrement
La découpe du plan de travail sera suivant le modèle de table de :
La distance entre la table de cuisson et le mur doit être au minimum de 50mm.
La table de cuisson est un appareil qui appartient à la classe de protection « Y ». Lors de
son encastrement, une paroi d’armoire haute ou un mur peut se trouver sur l’un des côtés
et sur la face arrière. Mais de l’autre côté, aucun meuble ni aucun appareil ne doit
être plus haut que le plan de cuisson.
Les placages et revêtements des plans de travail doivent être réalisés en matériaux
résistant à la chaleur (100°C).
Les baguettes de bord murales doivent être thermo résistantes.
Les matériaux des plans de travail peuvent gonfler au contact de l’humidité. Pour protéger
le chant de la découpe, appliquer un vernis ou une colle spéciale.
N’installer pas la table au dessus d’un four non ventilé ou d’un lave-vaisselle.
Garantir entre le fond du caisson de l’appareil un espace de 20 mm pour assurer une
bonne circulation de l’air de refroidissement de l’électronique.
Si un tiroir se trouve sous le plan de cuisson, éviter d’y ranger des objets inflammables
(par exemple : spray) et des objets non résistants à la chaleur.
L’écart de sécurité entre la table de cuisson et la hotte aspirante placée au-dessus d’elle
doit respecter les indications du fabricant de hottes. En cas d’absence d’instructions
respecter une distance minimum de 760 mm.
Le câble de raccordement ne doit être soumis, après encastrement, à aucune contrainte
mécanique, comme par exemple du fait d’un tiroir.
MISE EN GARDE: Utiliser uniquement les dispositifs de protection de table de cuisson
conçus par le fabricant de l’appareil de cuisson ou indiqués par le fabricant de l’appareil
dans les instructions d’utilisation comme adaptés ou les dispositifs de protection de table
de cuisson intégrés à l’appareil. L’utilisation de dispositifs de protection non appropriés
peut entrainer des accidents.
47
Page 48

CONNEXION ÉLECTRIQUE
Réseau
Raccordement
Diamètre câble
Câble
Calibre de protection
220-240 V~ 50/60Hz
1 Phase +N
3 x 2.5 mm2
H 05 VV - F
H 05 RR - F
25 A *
380-415 V~ 50/60Hz
2 Phases + N
4 x 1.5 mm2
H 05 VV - F
H 05 RR - F
16 A *
Notre responsabilité ne saurait être engagée pour tout incident résultant d’un mauvais
branchement, ou qui pourrait survenir à l’usage d’un appareil non relié à la terre ou équipé
d’une terre défectueuse.
L’installation de cet appareil et son branchement au réseau électrique ne doit être confiés
qu’à un électricien parfaitement au fait des prescriptions normatives.
La protection contre les pièces sous tension doit être assurée après le montage.
Les données de raccordement nécessaires se trouvent sur la plaque signalétique et la
plaque de branchement placées sous l’appareil.
Cet appareil doit être séparé du secteur par un dispositif de sectionnement omnipôles.
Lorsque celui-ci est ouvert (déclenché), un écartement de 3mm doit être assuré.
Le circuit électrique doit être séparé du réseau par des dispositifs appropriés, par exemple
les disjoncteurs, les fusibles, les disjoncteurs différentiels et les contacteurs.
Si l’appareil n’est pas muni d’une fiche accessible, des moyens de déconnection doivent
être incorporé à l’installation fixe conformément aux réglementations de l’installation.
Le câble d’alimentation doit être placé de sorte à ce qu’il ne touche pas de parties
chaudes de la table de cuisson.
Si le câble d’alimentation est endommagé, il doit être remplacé par le fabricant ou le
service après-vente autorisé par le fabricant, ou de toute façon par quelqu’un avec une
qualification similaire, de façon à prévenir tout risque.
Attention !
Cet appareil n’est conçu que pour une alimentation en 220-240 V~ 50 / 60 Hz.
Raccordez toujours le fil de terre de protection.
Respectez le schéma de raccordement.
* calculé avec le coefficient de simultanéité suivant standard EN 60 335-2-6
Branchement de la table:
Monophasé 220-240V~1P+N :
Utiliser le fil vert/jaune comme terre, le bleu et le brun comme neutre et le noir et le gris comme
phase.
Biphasé 380-415V~2P+N :
Utiliser le fil vert/jaune comme terre, le bleu et le brun comme neutre, le gris comme phase L1 et
le noir comme phase L2.
Avant d’effectuer le raccordement, nous vous recommandons vivement de localiser la phase, le
neutre et la terre sur le réseau. En cas de doutes, contacter un électricien.
Attention ! Veillez à bien engager les fils et à bien serrer les vis.
48
Page 49

Sehr geehrte Kundin, sehr geehrter Kunde.
Wir danken Ihnen für das Vertrauen, das Sie uns gewährt haben, indem Sie unser
lnduktionskochfeld gewählt haben. Um dieses Gerät kennen zu lernen, empfehlen wir Ihnen, die
Gebrauchsanweisung vollständig und aufmerksam zu lesen.
Wir wünschen Ihnen viel Spaß mit diesem Gerät.
INHALTSVERZEICHNIS
SICHERHEIT ............................................................................................................................... 50
VORSICHTSMAßNAHME VOR DER INBETRIEBNAHME ........................................................................ 50
ALLGEMEINE SICHERHEITS-HINWEISE .......................................................................................... 51
SCHÜTZ VOR BESCHÄDIGUNG ...................................................................................................... 52
VORSICHTSMAßNAHMEN BEI GERÄTEAUSFALL ............................................................................... 53
SCHUTZ VOR WEITEREN GEFAHREN ............................................................................................. 53
GERÄTEBESCHREIBUNG ......................................................................................................... 54
TECHNISCHE BESCHREIBUNG ...................................................................................................... 54
BEDIENFELD .............................................................................................................................. 55
BEDIENUNG DES KOCHFELDES ............................................................................................. 56
ANZEIGE .................................................................................................................................... 56
BELÜFTUNG ............................................................................................................................... 56
INBETRIEBNAHME DES KOCHFELDES ................................................................................... 56
VOR DEM ERSTEN AUFHEIZEN ..................................................................................................... 56
INDUKTIONSPRINZIP .................................................................................................................... 56
FUNKTION DER SENSORSCHALTFELDER ....................................................................................... 56
KOCHFELD EIN- UND AUSSCHALTEN ............................................................................................. 57
TOPFERKENNUNG ....................................................................................................................... 57
RESTWÄRMEANZEIGE ................................................................................................................. 57
BOOSTER UND DOPPEL POWER FUNKTION ................................................................................... 57
ZEITSCHALTUHR ......................................................................................................................... 58
ANKOCHAUTOMATIK .................................................................................................................... 59
KINDERSICHERUNG / VERRIEGELUNG DER KOCHMULDE ................................................................. 59
KOCHEMPFEHLUNGEN ............................................................................................................ 60
KOCHGESCHIRR ......................................................................................................................... 60
GESCHIRRGRÖßE ....................................................................................................................... 61
EINSTELLBEREICHE .................................................................................................................... 61
REINIGUNG UND PFLEGE ......................................................................................................... 61
WAS TUN WENN… ..................................................................................................................... 62
UMWELTSCHUTZ ....................................................................................................................... 62
MONTAGEHINWEISE ................................................................................................................. 63
ELEKTROANSCHLUSS .............................................................................................................. 64
49
Page 50

SICHERHEIT
Vorsichtsmaßnahme vor der Inbetriebnahme
Alle Teile der Verpackung abnehmen.
Das Gerät darf nur von einem Elektrofachmann eingebaut und
angeschlossen werden. Der Hersteller kann nicht verantwortlich
gemacht werden für Schäden, die durch Fehler beim einbauen oder
anschließen verursacht werden. Benutzen Sie das Gerät nur im
eingebauten Zustand.
Das Gerät darf benutzt werden nur, wenn er aufgerichtet und in
einem Möbel installiert wird und ein bestätigter und angepaßter
Arbeitsplan benutzt wird.
Dieses Gerät darf nur für das haushaltübliche Kochen und Braten
von Speisen verwendet werden und ist nicht für gewerbliche
Zwecke bestimmt.
Alle Etiketten und Aufkleber des Glases wegnehmen.
Das Gerät darf nicht abgeändert werden.
Verwenden Sie das Kochfeld nicht als Arbeits- oder Abstellfläche.
Die Sicherheit ist nur gewährleistet, wenn das Gerät mit einem
Schutzleiter verbunden ist, der den gültigen Vorschriften entspricht.
Der Anschluß des Gerätes an das Elektronetz darf nicht über ein
Verlängerungskabel erfolgen.
Das Gerät darf nicht über einem Geschirrspüler oder einem
Wäschetrockner benutzt werden: die freigesetzten Wasserdämpfe
könnten die Elektronik beschädigen.
Schalten Sie das Gerät nicht über eine externe Zeitschaltuhr oder
eine separate Fernsteuerung ein.
50
Page 51

Allgemeine Sicherheits-Hinweise
Schalten Sie nach jedem Gebrauch die Kochzonen aus.
Überhitzte Fette und Öle entzünden sich schnell. Wenn Sie
Speisen in Fett oder Öl (z.B. Pommes Frites) zubereiten, sollten Sie
den Kochvorgang beobachten.
Wenn Sie kochen und braten, werden die Kochzonen heiß. Hüten
Sie sich deshalb vor Verbrennungen während und nach der
Benutzung des Geräts.
Achten Sie darauf, daß kein elektrisches Kabel von einem
freistehenden oder eingebautem Gerät in Kontakt mit der Scheibe
oder der heißen Kochzone kommt.
Magnetische Gegenstände wie z. B. Kreditkarten, Disketten,
Taschenrechner, dürfen sich nicht in unmittelbarer Nähe des
eingeschalteten Gerätes befinden. Ihre Funktion könnte
beeinträchtigt werden.
Allgemein legen Sie keine metallischen Gegenstände (z. B. Löffel,
Topfdeckel usw.) auf die Induktionsfläche, da sich diese bei Betrieb
unter Umständen erwärmen können.
Bedecken Sie nie die Kochfläche mit einem Lappen oder einer
Schutzfolie; diese könnten sehr heiß werden und Feuer fangen.
Dieses Gerät kann von Kindern ab 8 Jahren und darüber sowie von
Personen mit verringerten physischen, sensorischen oder mentalen
Fähigkeiten oder Mangel an Erfahrung und Wissen benutzt werden,
wenn sie beaufsichtigt oder bezüglich des sicheren Gebrauchs des
Gerätes unterwiesen wurden und die daraus resultierenden
Gefahren verstehen.
Kinder dürfen nicht mit dem Gerät spielen.
Reinigung und Benutzer-Wartung dürfen nicht von Kindern ohne
Beaufsichtigung durchgeführt werden.
Metallische Gegenstände wie Messer, Gabeln, Löffel und
Topfdeckel sollen nicht auf dem Kochfeld abgelegt werden, denn
sie könnten heiß werden.
51
Page 52

Schütz vor Beschädigung
Verwenden Sie keine Töpfe oder Pfannen mit ungeschliffenem
oder beschädigtem Boden (z.B. aus Guß). Diese können die
Glaskeramikscheiben verkratzen.
Beachten Sie, daß auch Sandkörner Kratzer verursachen können.
Glaskeramik ist unempfindlich gegen Temperaturschocks und sehr
widerstandsfähig, jedoch nicht unzerbrechlich. Besonders spitze
und harte Gegenstände, die auf die Kochfläche fallen, können sie
beschädigen.
Töpfe und Ränder nicht an der Scheibe anstoßen.
Die Kochzonen nicht mit leerem Kochgeschirr benützen.
Vermeiden Sie Zucker, Kunstoff, oder Alufolie auf den heißen
Kochzonen. Diese Stoffe schmelzen, kleben fest und können
dadurch beim Abkühlen Risse, Brüche oder andere bleibende
Veränderungen in der Scheibe verursachen. Falls Sie trotzdem auf
die heißen Kochzonen gelangen, schalten Sie das Gerät bitte aus,
und entfernen Sie diese Stoffe noch im heißen Zustand. Da die
Kochzonen heiß sind, besteht Verbrennungsgefahr.
Legen Sie keine Gegenstände auf dem Kochfeld ab.
Stellen Sie in keinem Fall heißes Kochgeschirr auf der Steuerung
ab. Die Elektronik unter dem Glas könnte beschädigt werden.
Befindet sich unter dem eingebauten Gerät eine Schublade, muß
auf einen Mindestabstand von 2 cm zwischen der Unterseite des
Gerätes und dem Schubladeninhalt geachtet werden, da sonst
die Belüftung des Gerätes nicht gewährleistet ist.
Es dürfen keine brennbaren Gegenstände (z.B. Spraydosen) in
dieser Schublade aufbewahrt werden. Die möglichen
Besteckkästen in der Schublade müssen aus hitzebeständigem
Material sein.
Erhitzen Sie keine geschlossenen Behälter (z.B. Konservendosen)
auf den Kochzonen. Durch den entsprechenden Überdruck können
die Behälter bzw. Dosen platzen, und es besteht
Verletzungsgefahr !
52
Page 53

Vorsichtsmaßnahmen bei Geräteausfall
DIE VERWENDUNG VON SCHLECHTEN TÖPFEN BZW.
VON ADAPTERSCHEIBE FÜR INDUKTION FÜHRT ZU
EINER VORZEITIGEN BEENDUNG DER GARANTIE.
DER HERSTELLER ÜBERNIMMT KEINE HAFTUNG
FÜR SCHÄDEN, DIE AUF DEM KOCHFELD ODER
SEINER UMGEBUNG AUFTRETEN KÖNNEN.
Sollte ein Fehler festgestellt werden, muß das Gerät
ausgeschaltet und vom Netz getrennt werden.
Wenn Brüche, Sprünge oder Risse auf dem Glas auftreten:
schalten Sie das Kochfeld sofort aus, schrauben Sie die
Sicherung für das Kochfeld ab bzw. nehmen Sie diese heraus,
und wenden Sie sich an unseren Kundendienst oder an Ihren
Fachhändler.
Reparaturen am Gerät dürfen nur von Fachkräften durchgeführt
werden.
WARNUNG: Wenn die Glasoberfläche gesprungen ist, ist das
Gerät auszuschalten um die Gefahr eines elektrischen Schlages
zu vermeiden.
Schutz vor weiteren Gefahren
Achten Sie darauf, daß das Kochgeschirr immer zentriert auf der
Kochzone plaziert ist. Der Pfannenboden, muß möglichst viel von
der Kochzone abdecken.
Für Personen mit einem Herzschrittmacher: in der Nähe des
eingeschalteten Gerätes entsteht ein elektromagnetisches Feld,
das eventuell den Herzschrittmacher beeinträchtigen würde.
Wenden Sie sich bitte im Zweifelsfall an den Hersteller des
Herzschrittmachers oder an Ihren Arzt.
Benutzen sie keinen syntetique oder aluminum Bereich: Sie
könnten auf der kochzone verschmelzen.
Versuchen Sie nicht einen Brand mit Wasser zu löschen, sondern
schalten Sie das Gerät aus und bedecken Sie die Flamme mit
einem Deckel oder einer Feuerlöschdecke.
53
Page 54

GERÄTEBESCHREIBUNG
Typ
7334240
Gesamt Leistung
7400 W
Energieverbrauch der Kochmulde EC
hob
**
168.4 Wh/kg
Kochzone links
Ø 185 mm
Minimal Topfboden Durchmesser
Ø 110 mm
Nominal Leistung*
2050 W
Booster*
2500 W
Doppel Booster *
3700 W
Standardisiertes Kochgeschirr Kategorie**
B
Energieverbrauch ECcw**
167.3 Wh/kg
Kochzone central links
Ø 220 mm
Minimal Topfboden Durchmesser
Ø 110 mm
Nominal Leistung*
2050 W
Booster*
2500 W
Doppel Booster *
3700 W
Standardisiertes Kochgeschirr Kategorie**
C
Energieverbrauch ECcw**
164.8 Wh/kg
Kochzone central rechts
Ø 185 mm
Minimal Topfboden Durchmesser
Ø 100 mm
Nominal Leistung*
1850 W
Booster*
2300 W
Doppel Booster *
3000 W
Standardisiertes Kochgeschirr Kategorie**
B
Energieverbrauch ECcw**
175.4 Wh/kg
Kochzone rechts
Ø 140 mm
Minimal Topfboden Durchmesser
Ø 100 mm
Nominal Leistung*
1850 W
Booster*
2300 W
Doppel Booster *
3000 W
Standardisiertes Kochgeschirr Kategorie**
A
Energieverbrauch ECcw**
166 Wh/kg
Technische Beschreibung
* Diese Leistungen können je nach Form, Größe und Qualität der Töpfe abweichen.
** nach der Methode zur Messung der Gebrauchseigenschaften (EN 60350-2) berechnet.
54
Page 55

Bedienfeld
[+] Taste
Wähler Kochzone
links
Ein/Aus
[-] Taste
Timer Taste
Timer Display
PowerTaste
Verriegelung
Kontrollleuchte
Verriegelung
Kontrollleuchte Timer
Kontrollleuchte Eieruhr
Wähler mittlere
Kochzone links
Wähler Kochzone
rechts
Wähler mittlere
Kochzone rechts
Kontrollleuchte
Kochzone
Leistung
55
Page 56

BEDIENUNG DES KOCHFELDES
Anzeige
Anzeige Benennung Beschreibung
0 Null Die Kochzone ist aktiviert
1…9 Leistungsstufe Einstellung der Leistung
U Nicht Topferkennung Topf nicht aufgesetzt oder nicht geeignet
A Ankochautomatik Höchste Leistung + Ankochen
E Fehleranzeige Fehler der Elektronik
H Restwärme Kochzone ist heiß
P Booster Die Booster Leistung ist aktiviert.
Doppel Power Die Doppel Power Leistung ist aktiviert.
Belüftung
Der Lüfter funktioniert automatisch. Er startet mit kleiner Geschwindigkeit, sobald die durch die
Elektronik freigesetzten Werte eine gewisse Schwelle überschreiten.
Die höhere Geschwindigkeit wird eingelegt, wenn die Induktionskochmulde intensiv benutzt wird.
Der Lüfter reduziert seine Geschwindigkeit und schaltet sich automatisch ab, sobald die
Elektronik genügend abgekühlt ist.
INBETRIEBNAHME DES KOCHFELDES
Vor dem ersten Aufheizen
Zuerst Ihr Gerät mit einem feuchten Lappen reinigen, dann trockenreiben. Benutzen Sie kein
Reinigungsmittel, das eine bläuliche Färbung auf der verglasten Oberfläche verursachen könnte.
Induktionsprinzip
Unter jeder Kochzone befindet sich eine Induktionsspule. Wenn die Kochzone eingeschaltet wird,
erzeugt diese Spule ein Magnetfeld. Das Magnetfeld induziert im Topfboden, der magnetisch
sein muss, Wirbelströme. Dadurch erhitzt sich der Topfboden. Die Kochzone erwärmt sich nur
indirekt durch die vom Topf abgegebene Wärme.
Die Induktionskochzonen funktionieren nur, mit magnetischem Kochgeschirr:
Geeignetes Induktionskochgeschirr mit magnetischem Boden wie z.B. : Guß, Stahl,
emailliertem Stahl, Edelstahl mit magnetischem Boden.
Nicht geeignetes Induktionskochgeschirr: Kupfer, Aluminium, Glas, Holz, Steingut,
Keramik, nicht magnetisches Edelstahl.
Die Induktionskochzone wird automatisch an die Grösse des Kochgeschirrs angepasst. Das
Kochgeschirr darf einen bestimmten Bodendurchmesser nicht unterschreiten, da sich die
Induktion sonst nicht einschaltet. Jeder Topfboden-Durchmesser muss je nach Kochzonengröße
eine Mindestgröße haben.
Wenn das Kochgeschirr der Induktion nicht geeignet ist, erscheint die Anzeige [ U ].
Funktion der Sensorschaltfelder
Das Kochfeld wird über Sensortasten gesteuert. Diese reagieren auf leichte Berührungen des
Glases mit dem Finger. Wenn Sie die Tasten etwa eine Sekunde lang berühren, werden die
Steuerbefehle ausgeführt. Jede Reaktion der Schaltfelder wird mit einem akustischen und/oder
visuellen Signal quittiert.
Im Falle eines allgemeinen Gebrauchs drücken Sie nur eine Taste zur gleichen Zeit.
56
Page 57

Kochfeld ein- und ausschalten
Zuerst das Kochfeld und dann die Kochzone einschalten.
Kochfeld: einschalten/ ausschalten:
Betätigung Bedienfeld Anzeige
Einschalten Auf [ 0/I ] drücken [ 0 ]
Ausschalten Auf [ 0/I ] drücken Keine oder [ H ]
Kochzone: einschalten/ ausschalten:
Betätigung Bedienfeld Anzeige
Auswählen Die Kochzonentaste drücken [ 0 ]
Erhöhen Auf [ + ] drücken [ 1 ] bis [ 9 ]
Verringern Auf [ - ] drücken [ 9 ] bis [ 1 ]
Ausschalten gleichzeitig [ + ] und [ - ] drücken [ 0 ] oder [ H ]
Erfolgt keine weitere Eingabe, schaltet sich das Kochfeld aus Sicherheitsgründen nach ca. 20
Sekunden aus, und die Nullen erlöschen.
Topferkennung
Die Topferkennung gewährleistet eine vollkommene Sicherheit. Die Induktion funktioniert nicht:
Wenn sich kein Kochgeschirr auf der Kochzone befindet oder wenn ein nicht für die
Induktion geeigneter Topf benutzt wird. In diesem Fall kann die Leistungsstufe nicht erhöht
werden und das [ U ] Symbol erscheint in der Anzeige. Das [ U ] verschwindet wenn ein
Topf auf die Kochzone gesetzt wird.
Wird der Topf während des Kochens von der Kochzone genommen, schaltet sich die
Kochzone sofort aus und in der Anzeige erscheint das Zeichen [ U ]. Das [ U ]
verschwindet wenn ein Topf wieder auf die Kochzone gesetzt wird. Die Kochzone fährt mit
der vorher eingestellten Leistungsstufe weiter.
Nach Benutzung, schalten Sie die Kochzone aus: damit die Topferkennung [ U ] nicht mehr
erscheint.
Restwärmeanzeige
Nach dem Ausschalten der Kochzonen bzw. des Kochfeldes wird die Restwärme der noch
heißen Kochzonen mit einem [ H ] angezeigt. Das [ H ] erlischt, wenn die Kochzonen ohne
Gefahr berührt werden können. Solange die Restwärmeanzeige leuchtet, sollten die Kochzonen
nicht berührt und keine hitzeempfindlichen Gegenstände darauf abgelegt werden:
Verbrennungsgefahr!
Booster und Doppel Power funktion
Alle Kochzonen sind mit einer Boosterfunktion und Doppel Powerfunktion, d.h. mit einer
Leistungsverstärkung ausgestattet. Die Boosterfunktion wird mit [ P ] angezeigt. Die Doppel
Boosterfunktion wird mit [ P ] blinkend [ ] angezeigt.
Sind sie zugeschaltet, arbeiten diese Kochzonen für einen Zeitraum von 10 Minuten. Diese hohe
Leistung ist dafür gedacht, dass Sie z.B., große Mengen Wasser schnell erhitzen können, wie
etwa zum Kochen von Nudelwasser.
Booster einschalten/ ausschalten:
Betätigung Bedienfeld Anzeige
Die Kochzone auswählen Die Kochzonentaste drücken [ 0 ]
Booster einschalten Auf [ P ] einmal drücken [ P ]
Booster ausschalten Auf [ - ] drücken [ 9 ]
Oder auf [ P ] dreimal drücken [ 9 ]
57
Page 58

Doppel Booster einschalten/ ausschalten:
Betätigung Bedienfeld Anzeige
Die Kochzone auswählen Die Kochzonentaste drücken [ 0 ]
Booster einschalten Auf [ P ] einmal drücken [ P ]
Doppel Booster einschalten Auf [ P ] zweimal drücken [ blink mit P ]
Booster ausschalten Auf [ - ] drücken [ 9 ]
Oder auf [ P ] dreimal drücken [ 9 ]
Automatische Steuerung der “ Boosterfunktion “ :
Die Kochmulde ist mit einer Höchstleistung ausgestattet. Um diese Höchstleistung nicht zu
überschreiten, reduziert die Elektronik automatisch das Kochniveau einer anderen Kochzone
wenn die Power-Funktion aktiviert ist. Diese Kochzone wird dann blinkend die reduzierte
Leistung [ 9 ] anzeigen.
Ausgewählte Kochzone Andere Kochzone (z.B. : Leistungsstufe 9)
[ P ] leuchtet [ 9 ] wird auf [ 6 ] oder [ 8 ] reduziert und blinkt
Zeitschaltuhr
Mit der integrierten Zeitschaltuhr kann auf allen vier Kochzonen eine Gardauer von 1 bis 99
Minuten eingestellt werden. Jede Kochzone kann eine andere Einstellung haben.
Einschalten oder Veränderung der Dauer:
Betätigung Bedienfeld Anzeige
Die Kochzone auswählen Die Kochzonentaste drücken [ 0 ]
Leistungsstufe auswählen Die Taste [ + ] oder [ - ] drücken [ 1 ] … [ 9 ]
“Timer” auswählen Die Taste [ ] drücken Die Timerleuchte der
Kochzone ist eingeschaltet
Zeit verkürzen Die Taste [ - ] drücken [ 30 ] geht auf 29,28,…
Zeit verlängern Die Taste [ + ] drücken Die Zeit wird verlängert
Die Dauer ist eingestellt. Der Zeitablauf beginnt und hält so lange an, bis der Timer [ 00 ] erreicht hat.
Zeitschaltuhr ausschalten:
Betätigung Bedienfeld Anzeige
Die Kochzone auswählen Die Kochzonentaste drücken [ 0 ] bis [ 9 ]
“Timer” auswählen Die Taste [ ] drücken Die Timerleuchte der
Kochzone ist eingeschaltet
“Timer” abschalten Die Taste [ - ] drücken [ 00 ] leuchtet auf
Falls mehrere Timer aktiviert sind, muss der Vorgang wiederholt werden.
Zeitschaltuhr als Eieruhr:
Die Zeitschaltuhr funktioniert unabhängig von den Kochzonen und schaltet sich aus sobald eine
Kochzone in Betrieb ist. Der Ablauf erfolg selbst wenn das Kochfeld ausgeschaltet ist.
Betätigung Bedienfeld Anzeige
«Timer» auswählen Auf [ ] drücken Timer [ 00 ] Minuten
Zeit verkürzen Auf [ - ] drücken [ 30 ] geht über auf 29,…
Zeit verlängern Auf [ + ] drücken Die Zeit wird verlängert …
Nach Ablauf der eingestellten Zeit [ 00 ] erfolgt ein akustisches Signal und die Timerleuchte blinkt.
Automatisches Ausschalten:
Nach Ablauf der programmierten Kochdauer wird [ 00 ] blinkend angezeigt und ein akustisches
Signal wird erfolgen.
Um den Signalton und das Blinken abzuschalten, brauchen Sie nur Taste [ - ] oder [ + ] zu
betätigen.
58
Page 59

Ankochautomatik
Alle Kochzonen sind mit einer Ankochautomatik bestückt. Bei aktivierter Ankochautomatik heizt
die Kochzone automatisch mit höchster Leistung an und schaltet dann auf die von Ihnen
gewählte Fortkochstufe zurück. Die Ankochzeit hängt von der gewählten Fortkochstufe ab.
Aktivierung der Ankochautomatik:
Betätigung Bedienfeld Anzeige
Kochzone auswählen Die Kochzonentaste drücken [ 0 ]
Volle Leistung aktivieren Auf [ + ] drücken Geht von [ 1 ] auf [ 9 ] über
Ankochautomatik aktivieren Auf [ + ] erneut drücken [ 9 ] blinkt mit [ A ]
Leistungsstufe wählen Auf [ - ] drücken [ 9 ] bis [ 1 ]
(z. B. « 7 ») [ 7 ] blinkt mit [ A ]
Abschalten der Ankochautomatik:
Betätigung Bedienfeld Anzeige
Kochzone auswählen Die Kochzonentaste drücken [ 0 ]
Ankochautomatik ausschalten Auf [ - ] drücken [ 9 ] bis [ 1 ]
Leistungsstufe auswählen Auf [ + ] drücken Leistungsstufe gewählt
Kindersicherung / Verriegelung der Kochmulde
Um eine Veränderung der Kochzoneneinstellung zu vermeiden, z.B. bei der Reinigung des
Glases, können die Bedienungstasten (außer der Taste [ 0/I ]) verriegelt werden.
Verriegelung aktivieren:
Betätigung Bedienfeld Anzeige
Verriegelung einschalten Auf [ ] 2s drücken Leuchte ein
Verriegelung abschalten Auf [ ] 2s drücken Leuchte aus
59
Page 60

KOCHEMPFEHLUNGEN
Kochgeschirr
Geeignete Materialien: Stahl, emaillierter Stahl, Gusseisen, Edelstahl mit
ferromagnetischem Boden, Aluminium mit ferromagnetischem Boden.
Ungeeignete Materialien: Aluminium und Edelstahl ohne ferromagnetischen Boden,
Kupfer, Messing, Glas, Steingut, Porzellan.
Die Topfhersteller geben an, ob ihre Produkte induktionsgeeignet sind.
So können Sie die Induktions-Kompatibilität der Töpfe überprüfen:
Füllen Sie das Kochgeschirr mit etwas Wasser und setzen Sie es auf die Induktions-
Kochzone. Schalten Sie die Kochzone auf Leistungsstufe [ 9 ] ein. Das Wasser muss sich
in wenigen Sekunden erwärmen.
Halten Sie einen Magneten an den Geschirrboden: Wenn der Magnet haften bleibt, ist das
Geschirr induktionsgeeignet.
Manche Töpfe erzeugen Geräusche, wenn sie auf eine Induktions-Kochzone gesetzt werden,
diese Geräusche sind weder ein Anzeichen für eine Störung des Gerätes, noch haben sie einen
negativen Einfluss auf seine Arbeitsweise.
Einige Behälter können Geräusche verursachen, wenn sie auf einem Induktionskochfeld
abgestellt werden. Dies ist kein Hinweis darauf, dass das Induktionskochfeld defekt ist oder nicht
korrekt arbeitet.
Die Töpfe müssen vom Hersteller als für Induktionsgaren geeignet bescheinigt sein.
Es kann dennoch vorkommen, dass einige Töpfe, auch wenn ihre Eignung bescheinigt
wurde, tatsächlich Eigenschaften besitzen, die nicht für den Gebrauch mit
Induktionskochfeldern geeignet sind.
Wir empfehlen Ihnen, beim Kauf der Töpfe zu prüfen, dass zumindest die folgenden
Bedingungen erfüllt werden:
60
Page 61

1 bis 2
Schmelzen, Auflösen, Zubereitung
Saucen, Butter, Schokolade
GelatineYoghurt ,
2 bis 3
Quellen, Auftauen, Warmhalten
Reis, Gefrorene Gerichte,
Fisch, Gemüse
3 bis 4
Dampfgaren, Dünsten
Fisch, Gemüse, Obst
4 bis 5
Dünsten, Quellen, Auftauen
Fisch, Gemüse, Teigwaren,
Getreide, Hülsenfrüchte,
Tiefkühlkost
6 bis 7
Ankochen, Fortkochen
Fleisch, Leber , Eier, Wurst
Gulasch, Rouladen
7 bis 8
Schonendes Braten
Fisch, Schnitzel, Bratwurst,
Spiegeleier
9
Backen, Ankochen
Steaks, Omelett
Pfannkuchen, Linsen
P bis
Kochen
Große Wassermengen
Sollte der Boden des Topfes (Ød) bedeutend kleiner als der Durchmesser des
Körpers (ØD) sein, führt dies zu einer Leistungsminderung, und der Topf
könnte möglicherweise nicht vom Kochfeld erkannt werden
Geschirrgröße
Die Kochzonen passen sich automatisch an das Topfbodenmaß bis zu einer gewissen Grenze
an. Das Kochgeschirr darf einen bestimmten Bodendurchmesser nicht unterschreiten, da sich die
Induktion sonst nicht einschaltet.
Zentrieren Sie immer den Topf in die Mitte der Kochzone, um den besten Wirkungsgrad zu
erzielen.
Einstellbereiche
(diese Angaben sind Richtwerte)
REINIGUNG UND PFLEGE
Lassen Sie das Gerät abkühlen, es könnte Verbrennungsgefahr bestehen.
Reinigen Sie das verschmutzte Kochfeld immer regelmäßig. Benutzen Sie dazu ein feuchtes
Tuch und ein wenig Putzmittel.
Um das Gerät zu reinigen, muss es ausgeschaltet sein.
Die Reinigung des Gerätes mit einem Dampfreiniger oder Hochdruckreiniger ist aus
Sicherheitsgründen nicht zugelassen.
Verwenden Sie in keinem Fall scheuernde oder aggressive Reinigungsmittel, wie z.B. Grill
und Backofensprays, Fleck oder Rostentferner, Scheuersande oder Schwämme mit
kratzenden Oberflächen
Reiben Sie das Kochfeld danach mit einem sauberen Tuch trocken.
Entfernen Sie sofort Zucker, Kunststoff oder Alufolien, nach Abschalten der Kochzonen.
61
Page 62

WAS TUN WENN…
Geben Sie Ihr Altgerät deshalb auf keinen Fall in den
Restmüll.
Nutzen Sie stattdessen die von Ihrer Kommune
eingerichtete Sammelstelle zur Rückgabe und
Verwertung elektrischer und elektronischer Altgeräte.
Das Kochfeld oder die Kochzonen lassen sich nicht einschalten:
Das Kochfeld ist falsch am Stromnetz angeschlossen.
Die Sicherung der Hausinstallation ist nicht korrekt eingesetzt oder defekt.
Das Kochfeld ist verriegelt.
Die Sensortasten sind mit Wasser oder Schmutz bedeckt.
Ein Kochtopf oder Gegenstände bedecken die Tasten.
In der Anzeige erscheint [ U ]:
Das Kochgeschirr ist nicht auf der Kochzone.
Das Kochgeschirr ist nicht Induktionsgeeignet
Der Topfboden-Durchmesser ist zu klein für diese Kochzone.
In der Anzeige erscheint [ E ]:
Das Gerät vom Netz trennen und wieder anschliessen.
Den Kundendienst anrufen.
Eine Kochzone oder das gesamte Kochfeld schaltet ab:
Die Sicherheits-Abschaltung hat ausgelöst.
Es ist vergessen worden, eine Kochzone abzuschalten.
Es sind mehrere Sensortasten bedeckt.
Der Topf ist leer und überhitzt.
Durch eine Überhitzung hat die Elektronik automatisch die Leistung reduziert bzw.
automatisch abgeschaltet.
Das Kühlgebläse läuft nach dem Ausschalten weiter:
Das ist keine Störung, das Gebläse läuft so lange, bis das Gerät abgekühlt ist.
Das Gebläse schaltet automatisch ab.
Die Ankochautomatik schaltet nicht ein:
Die Kochzone ist noch heiß [ H ]
Die höchste Leistungsstufe ist eingeschaltet [ 9 ]
UMWELTSCHUTZ
Die Verpackungsmaterialen sind umweltfreundlich und recyclierbar.
Elektrische und elektronische Geräte enthalten noch wertvolle Materialien. Sie erhalten
aber auch noch schädliche Stoffe, die für ihrer Funktion und Sicherheit notwendig sind
62
Page 63

MONTAGEHINWEISE
Typ
Einbaumasse
7334240
1065 x 325 mm
Die Dichtung (2) nach Abnehmen der Schutzfolie
(3) mit 2 mm Abstand der Außenkannte des
Glases aufkleben.
Montage und Anschluß dürfen nur durch einen autorisierten Fachmann vorgenommen werden.
Der Benutzer muss darauf achten, dass die in seinem Wohnsitz geltenden Normen eingehalten
werden.
Dichtung Einbau :
Einbau:
Einfügdimensionen:
Der Abstand vom Ausschnitt bis zu einer Mauer und/oder einem Möbelstück muss
mindestens 50 mm betragen.
Dieses Gerät entspricht bezüglich des Schutzes gegen Feuergefahr dem Typ Y. Nur
Geräte dieses Typs dürfen einseitig an nebenstehende Hochschränke oder Wände
eingebaut werden. Aber von der anderen Seite dürfen keine Möbel oder Geräte höher
sein als die Kochmulde.
Die Arbeitsplatte soll mit hitzebeständigem Kleber (100 °C) verarbeitet sein.
Die Wandabschlussleisten müssen hitzebeständig sein
Das Kochfeld darf nicht über Herde ohne Lüfter, Geschirrspülern, Wasch- oder
Trockengeräten eingebaut werden.
Um eine ausreichende Belüftung der Elektronik im Kochfeld zu erzielen, ist unter der
Mulde ein Luftraum von 20 mm notwendig.
Befindet sich unter dem Kochfeld eine Schublade, dürfen in der Schublade keine
brennbaren Gegenstände, z.B. Spraydosen, aufbewahrt werden.
Zwischen dem Gerät und einer Dunstabzugshaube muss der vom Hersteller angegebene
Sicherheitsabstand eingehalten werden. Bei fehlenden Angaben muss dieser Abstand
mindestens 760 mm sein.
Es muss sichergestellt werden, dass das Anschlusskabel des Kochfeldes nach dem
Einbau keine mechanische Belastungen, z.B. durch Schublade, ausgesetzt ist.
Die Schnittflächen sollen mit speziellem Lack, Silikonkautschuk oder Giesharz versiegelt
werden, um ein Aufquellen durch Feuchtigkeit zu verhindern. Beachten Sie, das
mitgelieferte Dichtungsband sorgfältig aufzukleben.
ACHTUNG: Benutzen Sie nur Schutzgitter, die vom Hersteller angeboten werden oder
von diesem für den Einsatz mit dem Kochfeld freigeben sind.
63
Page 64

ELEKTROANSCHLUSS
Netz
Anschluss ( * )
Durchmesser
Kabel
Sicherung
220-240V~ 50/60Hz
1 Faser + N
3 x 2.5 mm²
H 05 VV - F
H 05 RR - F
25 A *
380-415V~ 50/60Hz
2 Faser + N
4 x 1.5 mm²
H 05 VV - F
H 05 RR - F
16 A *
Zum Anschluss des Gerätes an das Elektronetz beauftragen Sie einen Elektrofachmann,
der die landesüblichen Vorschriften der örtlichen Elektroversorgungsunternehmen genau
kennt und sorgfältig beachtet.
Der Berührungsschutz betriebsisolierter Teile muss nach der Montage sichergestellt sein.
Ob die erforderlichen Anschlussdaten mit denen des Netzes übereinstimmen, finden Sie
auf dem Typenschild.
Das Gerät muss durch Trenneinrichtungen allpolig vom Netz abgeschaltet werden
können. Im abgeschalteten Zustand muss ein Kontaktabstand von 3 mm vorhanden sein.
Als geeignete Trennvorrichtungen gelten LS-Schalter, Sicherungen und Schütze.
Die Installation muss durch Sicherungen geschützt sein. Elektrische Kabeln müssen
perfekt durch das Einbauen gedeckt sein.
Wenn das Gerät nicht mit einem zugänglichen Stecker ausgestattet ist, müssen beim
festen Einbau gemäß den Montageanweisungen andere Trennungsmöglichkeiten
berücksichtigt werden.
Das Zuleitungskabel muss so angebracht werden, dass die heißen Teile des Kochfelds
nicht berührt werden.
Wenn der Anschlusskabel beschädigt ist, muss er ersetzt werden von dem Hersteller oder
der Kundendienst der Hersteller empfehlt, oder jedenfalls jemand mit änliche
Qualifizierung, um alle Risiken zu vermeiden.
Achtung !
Dieses Gerät ist nur für eine Strom-Versorgung von 220-240 V~ 50/60 Hz ausgelegt.
Schließen Sie immer die Erde mit an.
Beachten Sie das Anschlußschema.
( * ) laut EN 60 335-2-6 Norm
Anschluß des Kochfelds:
Einphasig 220-240V~1P+N:
Den grün/gelben Draht für die Erdung, den blauen und den braunen als Nullleiter und den
schwarzen und den grauen Draht für die Phase verwenden.
Zweiphasig 380-415V~2P+N:
Den grün/gelben Draht für die Erdung, den blauen und den braunen als Nullleiter, den grauen als
Phase L1 und den schwarzen Draht für die Phase L2 verwenden.
Bevor die Verbindungen vorgenommen werden, empfiehlt es sich ausdrücklich, Phase, Nullleiter
und Erde am Netzstromanschluss zu lokalisieren. Im Zweifelsfall einen Fachmann zu Rate
ziehen.
Achtung ! Die Drähte korrekt hineinstecken und die Schrauben fest anziehen.
Wir sind nicht verantwortlich für Zwischenfälle die durch falschen Anschluss, oder nicht
vorhandenen bzw. unrichtigem Erdungsanschluss entstehen.
64
Page 65

Page 66

Page 67

Page 68

Foster spa
42041 Brescello (RE) - Italy
tel. +39.0522.687425 - tel. Servizio Assistenza +39.0522.684450
fax +39.0522.686019 - fax Servizio Ricambi +39.0522.962166
e-mail: service@fosterspa.com
www.fosterspa.com
16246/2
Page 69

gebruikshandleiding
manual de intrucciones
instrukcja obslugi
Page 70

Geachte Klant,
We danken U hartelijk voor het in ons gestelde vertrouwen bij uw keuze van de vitrokeramische
inductiekookplaat.
Teneinde dit apparaat goed te kennen raden we U aan deze gebruiksaanwijzing volledig en
aandachtig door te lezen en ze te bewaren om ten gepaste tijde te kunnen raadplegen.
INHOUD
VEILIGHEID ................................................................................................................................... 3
VOORZORGSMAATREGELEN VOOR GEBRUIK VAN HET TOESTEL ......................................................... 3
GEBRUIK VAN HET APPARAAT ........................................................................................................ 3
VOORZORGSMAATREGELEN TEGEN BESCHADIGING ......................................................................... 4
VOORZORGSMAATREGELEN BIJ DEFECT VAN HET APPARAAT ............................................................. 5
ANDERE VOORZORGSMAATREGELEN .............................................................................................. 5
BESCHRIJVING VAN HET APPARAAT ....................................................................................... 6
TECHNISCHE KENMERKEN ............................................................................................................. 6
BEDIENINGSPANEEL ...................................................................................................................... 7
GEBRUIK VAN HET APPARAAT ................................................................................................. 8
DISPLAY ...................................................................................................................................... 8
VENTILATIE .................................................................................................................................. 8
IN WERKING STELLEN ................................................................................................................ 8
VOOR HET EERSTE GEBRUIK .......................................................................................................... 8
PRINCIPE VAN INDUCTIE ................................................................................................................ 8
TIPTOETSEN ................................................................................................................................ 8
INWERKINGSTELLING .................................................................................................................... 9
DETECTIE VAN DE PAN .................................................................................................................. 9
AANDUIDING RESTWARMTE............................................................................................................ 9
BOOSTER FUNCTIE EN DUBBELE BOOSTER FUNCTIE ........................................................................ 9
TIMER FUNCTIE .......................................................................................................................... 10
PROGRAMMEREN VAN DE AANKOOKAUTOMAAT .............................................................................. 11
VERGRENDELING VAN HET BEDIENINGSPANEEL ............................................................................. 11
BEPERKING VAN DE WERKINGSTIJD .............................................................................................. 11
KOOKADVIES ............................................................................................................................. 12
KWALITEIT VAN DE PANNEN ......................................................................................................... 12
AFMETINGEN VAN DE PANNEN ...................................................................................................... 13
VOORBEELDEN VAN VERMOGENREGELING .................................................................................... 13
ONDERHOUD EN REINIGING .................................................................................................... 13
KLEINE STORINGEN VERHELPEN ........................................................................................... 14
MILIEUBESCHERMING .............................................................................................................. 14
INSTALLATIEVOORSCHRIFTEN ............................................................................................... 15
ELEKTRISCHE AANSLUITING .................................................................................................. 16
Page 71

VEILIGHEID
Voorzorgsmaatregelen voor gebruik van het toestel
pak alle materialen uit
de installatie en het aansluiten van de apparatuur dient door een
erkend vakman te worden gedaan. De fabrikant is niet
verantwoordelijk voor beschadigingen of anderzijds die veroorzaakt
zijn door installatiefouten
de apparatuur moet op de juiste manier worden geïnstalleerd en op
een degelijke ondergrond geplaatst
dit apparaat is exclusief ontworpen voor het bereiden van voedsel en
mag niet toegepast worden voor commercieel en/of industrieel
gebruik
verwijder alle stickers en labels van het keramische glas
wijzig niets aan de apparatuur
de kookplaat kan niet gebruikt worden als vrijstaande unit of als werk
oppervlak
de apparatuur moet geaard en aangesloten worden conform de
lokale voorschriften
gebruik geen verlengde kabels voor de aansluiting
de apparatuur kan niet gebruikt worden boven een afwasmachine, of
een wasdroger; stoom kan de elektronica beschadigen
Dit apparaat is niet bestemd voor gebruik met een externe
tijdschakelklok of een afstandsbediening.
Gebruik van het apparaat
schakel de kookzones uit na gebruik
houd het koken in de gaten indien gebruik wordt gemaakt van oliën
en vetten; deze kunnen snel vlam vatten
wees voorzichtig jezelf niet te branden tijdens of na het gebruik van
de apparatuur
overtuig jezelf dat er geen kabels of andere materialen in contact
komen met het glas of hete pannen
magnetische voorwerpen (credit cards, floppy discs, rekenmachines)
moeten niet in de nabijheid van de apparatuur worden geplaatst
gebruik geen metalen voorwerpen, behalve daarvoor geschikte
schalen. In het geval van oververhitting kunnen deze smelten of zelfs
verbranden
3
Page 72

bedek het apparaat nooit met kleding of een beschermingsdeken.
Deze kunnen erg heet worden en in brand vliegen
Kinderen jonger dan 8 jaar, personen van wie de psychische en of
mentale capaciteit vermindert zijn en personen van wie de kennis
onaangepast is, kunnen dit toestel enkel onder toezicht gebruiken of
indien zij opgeleid zijn om dit toestel te gebruiken in veilige
omstandigheden.
Zij dienen daarbij op de hoogte te zijn van de mogelijke risico’s die
zich kunnen voordoen. Kinderen mogen niet met dit toestel spelen.
Zonder toezicht van een volwassene kan het reinigen en onderhoud
van dit toestel niet aan kinderen toevertrouwd worden.
metalen voorwerpen zoals messen, vorken, lepels en deksels mogen
niet op het oppervlak worden geplaatst omdat deze heel heet kunnen
worden
Voorzorgsmaatregelen tegen beschadiging
Gebruik geen pannen met een ongepolijste of beschadigde bodem
(bijv. gietijzer). Ze kunnen krassen op de keramische plaat maken.
Denk eraan dat ook zandkorrels krassen kunnen veroorzaken.
Vitrokeramiek is ongevoelig voor temperatuurschokken en zeer
duurzaam, maar niet onbreekbaar. Vooral puntige en harde
voorwerpen die op de kookplaat vallen kunnen deze beschadigen.
Stoot met de pan of de randen van de pan niet tegen het glas.
Gebruik de kookzones niet met lege pannen.
Vermijd suiker, kunststof of aluminiumfolie op de hete kookzones.
Deze materialen smelten, plakken vast en kunnen daardoor bij het
afkoelen barsten, breuken of blijvende veranderingen in het glas
veroorzaken. Als ze toch op de hete kookzones terechtkomen,
schakel dan het apparaat uit en verwijder deze materialen zolang ze
nog heet zijn. Omdat de kookzones heet zijn bestaat er gevaar van
verbranding.
Risico van brand! Geen voorwerpen op de kookplaat leggen.
Plaats in geen geval hete pannen op de besturing. De elektronica
onder het glas kan beschadigd raken.
Als er zich onder het ingebouwde apparaat een lade bevindt, moet op
een minimumafstand van 2 cm tussen de onderkant van het apparaat
en de inhoud van de lade worden gelet, omdat anders de ventilatie
van het apparaat niet gegarandeerd is.
4
Page 73

Er mogen geen ontvlambare voorwerpen (bijv. spuitbussen) in deze
HET GEBRUIK VAN NIET GESCHIKTE POTTEN EN
PANNEN OF VAN VERWIJDERBARE ACCESSOIRES OM
POTTEN, NIET GESCHIKT VOOR INDUCTIE, OP TE
WARMEN, VALT NIET ONDER DE
GARANTIEVOORWAARDEN.
DE FABRIKANT KAN NIET VERANTWOORDELIJK
GEHOUDEN WORDEN VOOR BESCHADIGINGEN AAN
DE KOOKPLAAT EN HAAR OMGEVING DIE HIERVAN
HET GEVOLG KUNNEN ZIJN.
lade worden bewaard. Eventuele bestekbakken dienen in
warmtebestendig materiaal te zijn uitgevoerd.
Maak geen gesloten recipiënten (bijv. conservenblikken) op de
kookzones warm. Door de overdruk kunnen de recipiënten of blikken
barsten en er bestaat gevaar van verwondingen.
Voorzorgsmaatregelen bij defect van het apparaat
Bij het vaststellen van een defect, het apparaat uitzetten en de
elektrische toevoer uitschakelen.
Schakel onmiddellijk de elektrische stroom van het apparaat uit indien
er een barst of spleet in de vitrokeramiek is en verwittig de dienst na
verkoop.
De herstellingen dienen enkel door gespecialiseerd personeel te
worden uitgevoerd. In geen geval het apparaat zelf openen.
WAARSCHUWING: Als het glazen kookoppervlak gebroken is,
schakel het toestel uit om een mogelijke elektrische schok te
voorkomen. lk
Andere voorzorgsmaatregelen
Zorg ervoor dat de kookpan altijd in het midden van de kookzone
staat. De panbodem moet de kookzone zoveel mogelijk bedekken.
Voor personen met een pacemaker ontstaat in de buurt van het
ingeschakelde apparaat een magnetisch veld, dat eventueel de
pacemaker kan storen. Neem in geval van twijfel contact op met de
fabrikant van de pacemaker of met uw arts.
Gebruik geen pannen van kunststof of aluminium: deze kunnen op de
kookzone smelten.
Vuur nooit blussen met water. Schakel de kookzone uit. Vlammen
voorzichtig met een deksel, smoordeksel of iets dergelijks verstikken.
5
Page 74

BESCHRIJVING VAN HET APPARAAT
Type
7334240
Total vermogen
7400 W
Energieverbruik van de kookplaat EC
hob
**
168.4 Wh/kg
Links zone
Ø 185 mm
Detectie kookpan
Ø 110 mm
Normaal*
2050 W
Met Booster*
2500 W
Dubbele Booster*
3700 W
Gestandaardiseerde categorie van het kookgerei**
B
Energieverbruik ECcw**
167.3 Wh/kg
Midden links zone
Ø 220 mm
Detectie kookpan
Ø 110 mm
Normaal*
2050 W
Met Booster*
2500 W
Dubbele Booster*
3700 W
Gestandaardiseerde categorie van het kookgerei**
C
Energieverbruik ECcw**
164.8 Wh/kg
Midden rechts zone
Ø 185 mm
Detectie kookpan
Ø 100 mm
Normaal*
1850 W
Met Booster*
2300 W
Dubbele Booster*
3000 W
Gestandaardiseerde categorie van het kookgerei**
B
Energieverbruik ECcw**
175.4 Wh/kg
Rechts zone
Ø 140 mm
Detectie kookpan
Ø 100 mm
Normaal*
1850 W
Met Booster*
2300 W
Dubbele Booster*
3000 W
Gestandaardiseerde categorie van het kookgerei**
A
Energieverbruik ECcw**
166 Wh/kg
Technische kenmerken
* het vermogen kan variëren in functie van de afmetingen en het materiaal van de kookpotten
** berekend volgens de methoden voor het meten van de gebruikseigenschappen (EN 60350-2)
6
Page 75

Bedieningspaneel
[ + ] toets
Selectie toets
zone links
Aan/Uit toets
[ - ] toets
Timer toets
Aanduiding van de Timer
Booster toets
Vergrendeling toets
Vergrendeling lampje
Lampje voor keuze
van timer
Lampje voor keuze
van ‘Egg Timer’
Selectie toets
zone midden links
Selectie toets
zone rechts
Selectie toets zone
midden rechts
Lampje voor
keuze van zone
Aanduiding
van de Power
7
Page 76

GEBRUIK VAN HET APPARAAT
Display
Display Aanduiding Functie
0. Nul Kookzone geactiveerd
1…9 Vermogenniveau Keuze kookniveau
U Detectie kookpan Geen of onaangepaste kookpan
A Onmiddellijke opwarming Aankookautomaat
E Foutmelding Defect elektronisch circuit
H Restwarmte De kookzone is warm
P Booster Het turbovermogen is geactiveerd
Dubbele Booster Dubbele Power is geactiveerd
Ventilatie
De koelingsventilator functioneert helemaal automatisch. Hij komt langzaam op gang zodra de door
de elektronica vrijgekomen calorieën een bepaalde hoeveelheid overschrijden. De ventilatie
schakelt naar de tweede snelheid over wanneer het kookvlak intensief gebruikt wordt. De ventilator
vermindert snelheid en stopt automatisch zodra het elektronisch circuit voldoende is afgekoeld.
IN WERKING STELLEN
Voor het eerste gebruik
Poets uw toestel met een vochtige doek en droog het af. Gebruik geen zeep, deze kan op het
glas een blauwachtige waas doen verschijnen.
Principe van inductie
Onder elke kookzone bevindt zich een inductie bobine. Wanneer deze in werking is produceert
ze een variabel elektromagnetisch veld dat op zijn beurt inductiestroom produceert in de
magnetische bodem van de pan. Hierdoor verwarmt de pan die op de kookzone staat.
Uiteraard zijn aangepaste pannen vereist:
Aanbevolen zijn alle metalen pannen met magnetische basis (eventueel met een magneet
te controleren) zoals: gietijzeren ketel, zwarte ijzeren pan, geëmailleerde metalen pannen,
in inox met magnetische bodem, …
Uitgesloten zijn alle pannen in koper, inox, aluminium, glas, hout, keramiek, aardewerk,
inox zonder magneet…
De inductie kookzone houdt onmiddellijk rekening met de afmeting van de gebruikte pan. Is de
diameter te klein dan werkt de pan niet. De diameter varieert in functie van de diameter van de
kookzone.Wanneer de pan niet aan de kookplaat aangepast is, blijft het symbool [ U ] branden.
Tiptoetsen
Uw apparaat is uitgerust met tiptoetsen waarmee u de verschillende functies kan instellen. Het
aanraken van de toets zet de functie in werking. Deze activering wordt weergegeven door een
lichtje, een aflezing en/of een geluidssignaal.
Druk niet op meerdere toetsen tegelijk.
8
Page 77

Inwerkingstelling
In- en uitschakelen van de kookplaat:
Actie Bedieningspaneel Display
Inschakelen Druk op [ 0/I ] 4 x [ 0 ]
Uitschakelen Druk op [ 0/I ] geen of [ H ]
In- en uitschakelen van een kookzone:
Actie Bedieningspaneel Display
Kiezen Druk op selectie toets van de zone [ 0 ]
Instellen Druk op [ + ] [ 1 ] tot [ 9 ]
Daling Druk op [ - ] [ 9 ] tot [ 1 ]
Uitschakelen Druk gelijktijdig op [ + ] en [ - ] [ 0 ] of [ H ]
Indien binnen de 20 seconden geen regeling is uitgevoerd, valt de elektronica terug op de
wachtpositie.
Detectie van de pan
De detectie van de pan verzekert een optimale veiligheid. De inductie functioneert niet:
indien er geen pan op de kookzone staat of wanneer de pan ongeschikt is voor inductie. In
dit geval is het onmogelijk het vermogen op te voeren en het symbool [ U ] verschijnt op
de display. Wanneer een pan op de kookzone wordt geplaatst verdwijnt de [ U ].
De werking wordt onderbroken wanneer tijdens het koken de pan van de kookzone wordt
genomen. Het symbool [ U ] verschijnt op de display. De [ U ] verdwijnt wanneer de pan terug
op het kookvlak wordt geplaatst. Het koken gaat door op het voordien gekozen vermogen.
Schakel de kookzone uit na gebruick. De pantedectie [ U ] blijft dan niet actief.
Aanduiding restwarmte
Als na het uitzetten van de kookzones of het volledig uitzetten van de kookplaat, de kookzones
nog warm zijn, wordt dit aangegeven door [ H ].
Het symbool [ H ] gaat uit wanneer de kookzones zonder gevaar kunnen aangeraakt worden.
Zolang het lampje van de restwarmte blijft branden, de kookzones niet aanraken en geen enkel
warmtegevoelig voorwerp op de kookzones plaatsen. Gevaar voor brand of brandwonden!
Booster functie en Dubbele Booster functie
De Booster functie [ P ] en Dubbele Booster [ ] verlenenaan de gekozen kookzone een
opgevoerd vermogen. Indien deze functie geactiveerd is, werken deze kookzones gedurende 10
minuten met een aanmerkelijk hoger vermogen.
Power is ontworpen om bijvoorbeeld snel grote hoeveelheden water te verwarmen, zoals bij de
bereiding van pasta.
In- en uitschakelen van Booster:
Actie Bedieningspaneel Display
De zone kiezen Druk op selectie toets van de zone [ 0 ]
De booster inschakelen Druk 1 maal op [ P ] [ P ]
De booster uitschakelen Druk op [ - ] [ 9 ]
Of druk 3 maal op [ P ] [ 9 ]
9
Page 78

In- en uitschakelen van Dubbele Booster:
Actie Bedieningspaneel Display
De zone kiezen Druk op selectie toets van de zone [ 0 ]
De booster inschakelen Druk 1 maal op [ P ] [ P ]
De dubbele booster inschakelen Druk 2 maal op [ P ] [ en P ]
De booster uitschakelen Druk op [ - ] [ 9 ]
Of druk 3 maal op [ P ] [ 9 ]
Beheer van het maximaal vermogen:
Het geheel van de kookplaat is voorzien van een maximaal vermogen. Wanneer de Power
functie geactiveerd is – en om dit maximaal vermogen niet te overschrijden – vermindert de
elektronische bediening automatisch het kookniveau van een andere kookzone.
Gedurende enkele seconden geeft de display van deze kookzone al knipperend [ 9 ] weer,
vervolgens wordt het hoogst mogelijke kookniveau weergegeven:
Gekozen kookzone Andere kookzone (bijvoorbeeld: kookniveau 9 )
[ P ] wordt weergegeven [ 9 ] wordt [ 6 ] of [ 8 ] naargelang de kookzone
Timer functie
De timerfunctie kan voor alle kookzones tegelijk gebruikt worden met verschillende
tijdsaanduidingen ( van 0 tot 99 minuten ) voor iedere zone.
Regeling of wijziging van de kooktijd:
Actie Bedieningspaneel Display
De zone kiezen Druk op selectie toets van de zone [ 0 ]
Het vermogen kiezen Druk op [ + ] [ 1 ] tot [ 9 ]
« Timer » kiezen Druk op [ ] Timer [ 00 ]
Verminder de tijd Druk op [ - ] [ 30 ] tot 29,28,…
Vermeerder de tijd Druk op [ + ] de tijd vermeerderd
De tijdsduur is ingesteld en begint te verlopen.
Uitschakelen van de timerfunctie:
Actie Bedieningspaneel Display
De zone kiezen Druk op selectie toets van de zone [ 0 ] … [ 9 ]
« Timer » kiezen Druk op [ ] lampje van de zone aan
Uitschakelen Druk op [ - ] Timer [ 00 ] dan uit
Indien verschillende timers geactiveerd zijn, volstaat het deze actie te herhalen.
Gebruik van de timer zonder koken:
Actie Bedieningspaneel Display
« Timer » kiezen Druk op [ ] [ 00 ]
Verminder de tijd Druk op [ - ] [ 30 ] tot 29,28…
Vermeerder de tijd Druk op [ + ] de tijd vermeerderd
Wanneer de gekozen tijd verlopen is, geeft het lampje van de timer al knipperend [ 00 ] weer en
een geluidssignaal weerklinkt.
Druk op een toets om het geluid en het knipperen te beëindigen.
Automatisch uitschakelen op het einde van de kooktijd:
Wanneer de gekozen tijd verlopen is, geeft het lampje van de timer al knipperend [ 00 ] weer en
een geluidssignaal weerklinkt.
Druk op een toets om het geluid en het knipperen te beëindigen.
10
Page 79

Programmeren van de aankookautomaat
Vermogensniveau
geselecteerd
Maximale tijd
voor de werking
(U : min)
1
6:00
2
5:00
3
5:00
4
5:00
5
4:00
6
1:30
7
1:30
8
1:30
9
1:30
Alle kookzones zijn uitgerust met een aankookautomaat. De kookzone functioneert eerst een
zekere tijd op volle kracht en vermindert dan automatisch tot het gekozen vermogen.
Programmeren van de aankookautomaat:
Actie Bedieningspaneel Display
De zone kiezen Druk op selectie toets van de zone [ 0 ]
Vol vermogen instelling Druk op [ + ] [ 1 ] tot [ 9 ]
Automatisch koken Herdruk op [ + ] [ 9 ] knippert met [ A ]
Vermogensniveau keuze Druk op [ - ] [ 9 ] ga van [ 8 ] [ 7 ]
(bijvoorbeeld « 7 ») [ 7 ] knippert met [ A ]
Stopzetten van de aankookautomaat:
Actie Bedieningspaneel Display
De zone kiezen Druk op selectie toets van de zone [ 7 ]
Vermogensniveau keuze Druk op [ - ] of [ + ] [ 1 ] naar [ 9 ]
Vergrendeling van het bedieningspaneel
Om te vermijden dat een selectie van de kookplaat wordt gewijzigd, bijvoorbeeld bij het poetsen
van het glas, kan het bedieningspaneel worden vergrendeld (behalve de toets aan/uit [ 0/I ]).
Actie Bedieningspaneel Display
Kookplaat vergrendelen vinger gedurende 2s op [ ] licht op
Houden led vergrendeling
Kookplaat ontgrendelen vinger gedurende 2s op [ ] gaat uit
houden led vergrendeling
Beperking van de werkingstijd
Het toestel is uitgerust mete een mechanisme om de werkingstijd te beperken De maximale
gebruikstijd van iedere kookplaat hangt af van het geselecteerde vermogensniveau.
De aangeduide tijd komt overeen met een werkingsduur zonder onderbreking of wijziging van de
instellingen van de kookplaat. Wanneer deze tijdslimiet wordt bereikt, gaat de kookplaat
automatisch uit.
11
Page 80

KOOKADVIES
Se il fondo della pentola (Ød) è significativamente più piccolo del diametro del
corpo (ØD) il rendimento ne è penalizzato e la pentola rischia di non essere
identificata dalla piastra
Kwaliteit van de pannen
Materiali adatti: acciaio, acciaio smaltato, ghisa, acciaio con fondo magnetizzabile,
alluminio con fondo magnetizzabile
Materiali non adatti: alluminio e acciaio con fondo non magnetizzabile, rame, ottone, coccio,
porcellana
In via di massima, i fabbricanti indicano se i recipienti di cottura sono adatti per i piani ad induzione.
Per verificare se i recipienti di cottura sono indicati per il piano ad induzione.
Versare nella pentola un po’ d’acqua e collocarlo sulla zona di cottura ad induzione. Accendere
la zona e selezionare la gradazione [ 9 ]. L’acqua deve riscaldarsi in pochi secondi.
Toccare con una calamita il fondo della pentola. Se la calamita rimane attaccata, la
pentola è indicata per il piano ad induzione.
Alcuni recipienti possono generare rumori se vengono posti su una zona di cottura ad induzione.
Ciò non significa che il piano ad induzione sia difettoso o che funzioni in modo anomalo.
Le pentole devono essere certificate dal fabbricante come compatibili con l’induzione.
E’ tuttavia possibile che certe pentole, seppur dichiarate come compatibili, abbiano in
realtà caratteristiche inadatte all’uso con i piani a induzione.
Raccomandiamo di verificare al momento dell’acquisto che le pentole rispettino almeno le
seguenti condizioni:
12
Page 81

Afmetingen van de pannen
1 tot 2
Smelten
Opwarmen
Sauzen, boter, chocolade, gelatine
Kant- en klaargerechten
2 tot 3
Opzwellen
Ontdooien
Rijst, pudding en bereidde gerechten
Groenten, vis, diepgevroren producten
3 tot 4
Stoom
Groenten, vis, vlees
4 tot 5
Water
Gekookte aardappelen, soep, pasta
Verse groenten
6 tot 7
Zachtjes koken
Vlees, lever, eieren, braadworsten
Goulash, rollade, pens
7 tot 8
Koken, braden
Aardappelen, beignets, platte koeken
9
Braden
Op kooktemperatuur brengen
Steaks, omeletten
water
P en
Braden
Op kooktemperatuur brengen
Water
De kookzones passen zich tot op zekere hoogte automatisch aan de diameter van de pan aan.
De bodem van deze pan dient wel een minimum diameter te hebben in functie van de diameter
van de gekozen kookzone.
Plaats de pan goed in het midden van de kookzone teneinde een optimaal rendement van uw
kooktafel te verkrijgen.
Voorbeelden van vermogenregeling
(de hieronder vermelde waarden zijn enkel richtgevend)
ONDERHOUD EN REINIGING
Laat het apparaat eerst afkoelen, anders is er risico voor brandwonden.
Verwijder de kookresten met een beetje water met afwasproduct of een in de handel
aanbevolen product voor vitrokeramiek.
Gebruikt in geen enkel geval apparaten “aan stoom“ of “druk“.
Geen voorwerpen gebruiken die het gevaar zouden lopen vitrokeramiek te strepen.
Gebruik geen schuurproducten, deze kunnen het apparaat beschadigen.
Droog het apparaat met een goede doek.
Verwijder onmiddellijk suiker of spijzen die suiker bevatten.
13
Page 82

KLEINE STORINGEN VERHELPEN
Werp het apparaat niet weg met het huisvuil
Doe beroep op de daartoe voorziene ophaaldienst of
breng uw elektrisch apparaat naar het containerpark
van uw gemeente
De kookplaat of de kookzone werkt niet:
De kookplaat is verkeerd op het elektrisch net aangesloten
De zekering is gesprongen --> controleer de zekering in de meterkast
Kijk na of de vergrendeling niet is ingeschakeld
De tiptoetsen zijn met water of vet bespat
Er staat een voorwerp op de tiptoetsen
Het symbool [ U ] licht op:
Er staat geen pan op de kookzone
De pan is niet geschikt voor inductie
De diameter van de bodem van de pan is te klein in vergelijking met de kookzone
Het symbool [ E ] licht op:
Bel de Dienst na Verkoop.
Een enkele zone of alle zones vallen uit:
De veiligheid is in werking getreden
Deze treedt in werking wanneer u vergeten heeft een kookzone uit te schakelen
De veiligheid treedt eveneens in werking wanneer één of meerdere tiptoetsen bedekt zijn
Een kookpan is leeg en de bodem is oververhit
De kookplaat beschikt eveneens over een automatische vermindering van het vermogen
en van een automatische uitschakeling bij oververhitting
De ventilator blijft doorwerken na het uitzetten van de kooktafel:
Dit is geen defect, de ventilator beveiligt zo de elektronische apparatuur
De ventilator stopt vanzelf
De bediening van automatisch koken treedt niet in werking:
De kookzone is nog warm [ H ]
Het maximum kookniveau staat aan [ 9 ]
Het kookniveau werd aangezet met de toets [ - ].
MILIEUBESCHERMING
De verpakkingsmaterialen zijn ecologisch en recycleerbaar.
De elektronische apparaten bevatten edele metalen. Informeer u bij uw administratie over
de recycle-mogelijkheden.
14
Page 83

INSTALLATIEVOORSCHRIFTEN
Type
Uitsparing voor vlakbouw
7334240
1065 x 325 mm
De beschermfolie (3) verwijderen en
de dichtingstrip (2) op de rand van de
kookplaat plakken op 2 mm van de
buitenrand
De montage dient enkel door erkende specialisten te worden uitgevoerd.
De gebruiker dient de wetgeving en de normen van het land van zijn verblijfplaats na te leven.
Plaatsen van de waterdichte strip
De zelfklevende strip geleverd met het apparaat vermijdt infiltratie in het meubel.
Het plaatsen dient met grote zorg volgens onderstaande tekening te worden uitgevoerd.
Inbouw
De uitsparing in het tablet volgens model kookplaat:
De afstand tussen de kookplaat en de muur dient minstens 50 mm te bedragen.
De kookplaat is een apparaat toebehorend aan de beschermingsklasse « Y ». Ingebouwd
mag zich een hoge kastwand of een muur aan een zijde en aan de achterzijde bevinden.
Aan de andere zijde mag geen enkel meubel of apparaat hoger zijn dan het
kookvlak.
De bekledingen van de werkbladen dienen te worden uitgevoerd in warmtebestendige
materialen (100°C)
De materialen van het werkblad kunnen opzwellen bij contact van vocht. Om de uitsnijding
te beschermen, bestrijk deze met een vernis of een speciale lijm.
De strippen aan de muurranden dienen hittebestendig te zijn.
Installeer de kookplaat niet boven een niet-geventileerde oven of een vaatwasmachine.
Onder de omkasting van het apparaat dient men een afstand van 20 mm te voorzien om
een goede ventilatie van de elektronische apparatuur te verzekeren
Indien er zich een lade onder de kookplaat bevindt, vermijd er ontvlambare voorwerpen in
op te bergen (bv. spray) en voorwerpen die niet warmtebestendig zijn.
Voor de afstand tussen de kookplaat er de erboven geplaatste dampkap, dient u de
instructies van de fabrikant van de dampkap te volgen. Bij gebrek aan instructies, dient u
een afstand van minimum 760 mm te respecteren.
De verbindingskabel mag na aansluiting aan geen enkele mechanische spanning
onderhevig zijn, zoals bijvoorbeeld een lade.
Waarschuwing: Gebruik alleen kookplaat beschermrekken ontworpen door de fabrikant
van de kookplaat, rekken die door de fabrikant aangeduid zijn als geschikt of
beschermrekken geïntegreerd in het apparaat. Het gebruik van ongeschikte rekken kan
ongelukken veroorzaken.
15
Page 84

ELEKTRISCHE AANSLUITING
Netwerk
Aansluiting
Kabeldiameter
Kabel
Beschermingskaliber
230 V~ 50/60 Hz
1 fase +N
3 x 2.5 mm2
H 05 VV - F
H 05 RR - F
25 A *
400 V~ 50/60Hz
2 fasen + N
4 x 1.5 mm2
H 05 VV - F
H 05 RR - F
16 A *
We kunnen niet verantwoordelijk gesteld worden voor ongevallen voortkomend uit een
slechte aansluiting of ongevallen die gebeuren door toestellen zonder of met een defecte
aarding.
De installatie en de aansluiting op het elektrische net mag enkel toevertrouwd worden aan
een vakman (elektricien) die op de hoogte is van de voorgeschreven normen.
Na het monteren moeten de stukken die onder spanning staan beschermd blijven.
De nodige aansluitgegevens staan op het kenplaatje en het aansluitingsplaatje aan de
onderkant van het apparaat.
Het apparaat dient door middel van een meerpolige stroomonderbreker van het net
gescheiden te zijn. Staat deze open (niet aangesloten), dan moet de contactopening
minstens 3mm bedragen.
Het elektrische circuit dient van het net gescheiden te zijn door middel van de nodige
voorzieningen zoals bijvoorbeeld beveiligingsschakelaars, zekeringen, differentiële
schakelaars en contacten.
Indien het toestel niet voorzien is van een bereikbaar stopcontact, dan moeten middelen
voor uitschakeling aan de vaste installatie toegevoegd worden inovereenstemming met de
installatieregeling.
De voedingsslang moet zo geplaatst worden zodat deze de hete delen van de kookplaat
of de oven niet raakt.
Let op!
Dit apparaat is voorzien voor een aansluiting op een netspanning van 230V~ 50 / 60 HZ
Verbind steeds de aarding. Respecteer het aansluitingsschema.
De aansluitdoos bevindt zich onder de kookplaat.
* berekend met de coëfficiënt van gelijktijdigheid volgens de standaard EN 60 335-2-6
Aansluiten van de kookplaat
Monofase 230V~1P+N
Gebruik de groen/geel draad als aarde, de blau/bruin draad als neutrale N en de zwart/grijs
draad als fase L
Bifase 400V~2P+N
Gebruik de groen/geel draad als aarde, de blau/bruin draad als neutrale N, de grijs draad als fase
L1 en de zwart draad als fase L2.
Voordat u de verbinding maakt, raden wij u aan de fase (n), neutrale en aarde te vinden. Als u
twijfels hebt, raadpleeg dan uw elektricien.
Let op! De draden goed doorsteken en de schroeven goed aanspannen.
16
Page 85

Apreciado cliente,
Le agradecemos la confianza que nos ha otorgado al elegir nuestra placa de cocción
vitrocerámica a inducción.
Con el fin de conocer bien este aparato, le recomendamos lea atentamente estas instrucciones
de utilización en su totalidad y las conserve para consultas posteriores.
RESUMEN
SEGURIDAD ............................................................................................................................... 18
PRECAUCIONES ANTES DE UTILIZARLA PARA COCINAR ................................................................... 18
UTILIZACION DEL APARATO .......................................................................................................... 19
PRECAUCIONES PARA NO DETERIORAR EL APARATO ...................................................................... 20
PRECAUCIONES EN CASO DE FALLO DEL APARATO ......................................................................... 21
OTRAS PRECAUCIONES ............................................................................................................... 21
DESCRIPCIÓN DEL APARATO ................................................................................................. 22
CARACTERÍSTICAS TÉCNICAS ...................................................................................................... 22
ZONA DE MANDOS ...................................................................................................................... 23
UTILIZACIÓN DEL APARATO ................................................................................................... 24
INDICACIONES ............................................................................................................................ 24
VENTILACIÓN ............................................................................................................................. 24
PUESTA EN MARCHA Y USO DEL APARATO ......................................................................... 24
ANTES DE LA PRIMERA UTILIZACIÓN .............................................................................................. 24
PRINCIPIO DE LA INDUCCIÓN ........................................................................................................ 24
TECLAS TÁCTILES ....................................................................................................................... 24
PUESTA EN MARCHA ................................................................................................................... 25
DETECCIÓN DEL RECIPIENTE ....................................................................................................... 25
INDICADOR DE CALOR RESIDUAL .................................................................................................. 25
FUNCIÓN BOOSTER .................................................................................................................... 25
FUNCIÓN TEMPORIZADOR ........................................................................................................... 26
PROGRAMACIÓN DE LA COCCIÓN AUTOMÁTICA .............................................................................. 27
BLOQUEO DE LA ZONA DE MANDOS ............................................................................................... 27
LIMITACION DEL TIEMPO DE FUNCIONAMIENTO ............................................................................... 27
CONSEJOS DE COCCIÓN ......................................................................................................... 28
CALIDAD DE LAS CACEROLAS ....................................................................................................... 28
DIMENSIÓN DE LAS CACEROLAS ................................................................ ................................ ... 29
EJEMPLOS DE AJUSTE DE LAS POTENCIAS DE COCCIÓN .................................................................. 29
CONSERVACIÓN Y LIMPIEZA ................................................................................................... 29
QUÉ HACER EN CASO DE PROBLEMA ................................................................................... 30
PROTECCIÓN DEL MEDIO AMBIENTE..................................................................................... 30
INSTRUCCIONES DE INSTALACIÓN ........................................................................................ 31
CONEXIÓN ELÉCTRICA ............................................................................................................ 32
17
Page 86

SEGURIDAD
Precauciones antes de utilizarla para cocinar
Retire todos los elementos del embalaje.
La instalación y el conexionado eléctrico del aparato deben
encargarse a un especialista autorizado. El fabricante no será
responsable de los daños resultantes de un error de
empotramiento o de conexionado.
El aparato sólo debe utilizarse si está montado e instalado en
un mueble y una superficie de trabajo homologados y
adaptados.
Su utilización va únicamente destinada a los usos domésticos
habituales (preparación de alimentos), con exclusión de
cualquier otra utilización doméstica, comercial o industrial.
Arranque todas las etiquetas y autoadhesivos del cristal
vitrocerámico.
No transforme ni modifique el aparato.
La placa de cocción no debe servir como soporte ni como
superficie de trabajo.
La seguridad sólo está asegurada si el aparato está conectado
a una toma de tierra de protección conforme a los reglamentos
vigentes.
No utilice alargaderas para la conexión a la red eléctrica.
El aparato no debe utilizarse encima de un lavavajillas o de una
secadora de ropa: los vapores de agua desprendidos podrían
deteriorar la electrónica.
Este aparato no está previsto para el funcionamiento con un
reloj temporizador externo o un mando a distancia.
18
Page 87

Utilización del aparato
Apague siempre los fogones después de utilizarlos.
Vigile constantemente los guisos que utilizan grasas y aceites,
ya que son susceptibles de inflamarse rápidamente.
Tenga cuidado del riesgo de quemaduras durante y después
de la utilización del aparato.
Los niños no deben manipular el aparato.
Asegúrese de que ningún cable eléctrico, fijo o móvil, del
aparato toca el cristal o el recipiente caliente.
Los objetos magnetizables (tarjetas de crédito, disquetes
informáticos, calculadoras) no deben estar cerca del aparato en
funcionamiento.
No coloque ningún objeto metálico, excepto los recipientes a
calentar. En caso de conexión accidental o de calor residual,
este objeto, según el material, tiene el riesgo de fundirse o de
empezar a arder.
No cubra nunca el aparato con un trapo o con una hoja de
protección. Podría calentarse mucho y encenderse.
Este aparato electrodoméstico puede ser usado por niños a
partir de 8 años e igualmente por personas con capacidades
físicas, sensoriales o mentales reducidas o que carezcan falta
de experiencia y conocimiento del producto si se les ha dado
la supervisión instrucción adecuada para el uso del mismo de
un modo seguro y entienden de igual manera los peligros que
puedan implicar.
Los niños no deben usar éste electrodoméstico para jugar.
La limpieza o el uso de éste aparato no debe realizarse por
niños sin supervisión.
19
Page 88

Precauciones para no deteriorar el aparato
Las cacerolas con suelas sin pulir (fundición no esmaltada,…) o
estropeadas pueden dañar la vitrocerámica.
La presencia de arena u otros materiales abrasivos puede
dañar la vitrocerámica.
Evite dejar caer objetos, aunque sean pequeños, sobre la
vitrocerámica.
No dé golpes a los bordes del cristal con las cacerolas.
Asegúrese de que la ventilación del aparato se haga según las
instrucciones del fabricante.
No coloque ni deje cacerolas vacías sobre la placa de cocción.
Evite que azúcar, materiales sintéticos o papel de aluminio
toquen las zonas calientes. Estas substancias pueden, al
enfriarse, provocar roturas u otras modificaciones en la
superficie vitrocerámica: desconecte al aparato y retírelas
inmediatamente de la zona de cocción cuando aún está
caliente (atención: peligro de quemaduras).
No almacenar objetos sobre la placa de cocción
No coloque nunca recipientes calientes sobre la zona de los
mandos.
Si hay un cajón situado bajo el aparato empotrado, asegúrese
que hay distancia suficiente (2 cm) entre el contenido de este
cajón y la parte inferior del aparato con el fin de asegurar una
buena ventilación.
No deposite objetos inflamables (por ejemplo sprays) en el
cajón situado bajo la placa de cocción. Las eventuales
bandejas para cubiertos deben ser de material resistente al
calor.
20
Page 89

Precauciones en caso de fallo del aparato
EL USO DE OLLAS INADECUADAS O DE UN CRISTAL
ADAPTADOR PARA INDUCCIÓN ORIGINA LA
CONCLUSIÓN PREMATURA DE LA GARANTÍA.
EL FABRICANTE NO ASUME NINGUNA
RESPONSABILIDAD POR DAÑOS QUE PUEDAN
PRODUCIRSE EN LA PLACA DE COCINA O EN SU
ENTORNO.
Si se constata una avería, es necesario desconectar el aparato
y desenchufar la línea de alimentación eléctrica.
En caso de desconchados o fisuras en la vitrocerámica es
imperativo desconectar el aparato de la red eléctrica y avisar al
servicio posventa.
Las reparaciones sólo pueden ser realizadas por personal
especializado. En ningún caso abra el aparato usted mismo.
ADVERTENCIA : Si la superficie está agrietada, apagar el
aparato para evitar la posibilidad de descargas eléctricas.
Otras precauciones
Asegúrese siempre de que el recipiente de cocción esté
centrado en la zona de cocción. El fondo de la cacerola debe
cubrir, tanto como sea posible, la zona de cocción.
Para usuarios que lleven un marcapasos, el campo magnético
puede influir en su funcionamiento. Le recomendamos se
asesore con el proveedor o el médico.
No utilice recipientes de material sintético o de aluminio:
podrían fundirse sobre los fogones aún calientes.
Los aparatos usados contienen metales preciosos. Consulte
con la administración de recuperación sobre las posibilidades
de reciclaje.
No apagar nunca con agua un fuego. Apagar la zona de
cocción. Sofocar con cuidado las llamas con una tapa, una tapa
extintora u otro medio similar.
21
Page 90

DESCRIPCIÓN DEL APARATO
Modelo
7334240
Potencia total
7400 W
Consumo energético para placas EC
hob
**
168.4 Wh/kg
Fogón izquierda
Ø 185 mm
Diámetro mínimo
Ø 110 mm
Potencia nominal *
2050 W
Booster*
2500 W
Doble Booster*
3700 W
Categoría estandarizada de utensilios de cocina**
B
Consumo energetico ECcw**
167.3 Wh/kg
Fogón centro izquierda
Ø 220 mm
Diámetro mínimo
Ø 110 mm
Potencia nominal *
2050 W
Booster*
2500 W
Doble Booster*
3700 W
Categoría estandarizada de utensilios de cocina**
C
Consumo energetico ECcw**
164.8 Wh/kg
Fogón centro derecha
Ø 185 mm
Diámetro mínimo
Ø 100 mm
Potencia nominal *
1850 W
Booster*
2300 W
Doble Booster*
3000 W
Categoría estandarizada de utensilios de cocina**
B
Consumo energetico ECcw**
175.4 Wh/kg
Fogón derecha
Ø 140 mm
Diámetro mínimo
Ø 100 mm
Potencia nominal *
1850 W
Booster*
2300 W
Doble Booster*
3000 W
Categoría estandarizada de utensilios de cocina**
A
Consumo energetico ECcw**
166 Wh/kg
Características técnicas
* la potencia puede variar en función de las dimensiones y de los materiales de las cacerolas.
** calculado según método de medida (EN 60350-2)
22
Page 91

Zona de mandos
Tecla [ + ]
Tecla de selección
fogón izquierda
Tecla
Marcha/Parada
Tecla [ - ]
Tecla timer
Indicador de tempo
Tecla Booster
Tecla bloqueo
Indicator bloqueo
Indicator de selección del
fogón para el minutero
Indicator ‘Egg Timer’
Tecla de selección
fogón centro izquierda
Tecla de selección
fogón derecha
Tecla de selección
fogón centro derecha
Indicador de
zona activa
Indicador
de potencia
23
Page 92

UTILIZACIÓN DEL APARATO
Indicaciones
Indicación Designación Función
0 Cero Zona de cocción activada
1…9 Nivel de potencia Elección nivel de cocción
U Detección de cacerola Falta recipiente o es inadecuado
A Acelerador de calor Cocción automática
E Mensaje de error Fallo electrónico
H Calor residual La zona de cocción aún caliente
P Booster Activada la potencia Booster
Doble Booster Activada la potencia Doble Booster
Ventilación
El ventilador de enfriamiento tiene un funcionamiento totalmente automático. Se pone en marcha
a velocidad baja a partir del momento en que el calor desprendido por el sistema electrónico
sobrepasa un cierto umbral. La ventilación activa su velocidad más alta cuando la placa de
cocción se usa de forma intensiva. El ventilador reduce su velocidad y se para automáticamente
cuando el circuito electrónico está suficientemente frío.
PUESTA EN MARCHA Y USO DEL APARATO
Antes de la primera utilización
Limpie el aparato con un trapo húmedo y séquelo. No utilice detergente ya que podría provocar
una coloración azulada en las superficies vitrificadas.
Principio de la inducción
Debajo de cada placa de cocción hay una bobina de inducción. Cuando ésta está conectada,
produce un campo electromagnético variable el cual produce a su vez corrientes inducidas en el
fondo ferromagnético del recipiente. De ello resulta un calentamiento del recipiente colocado
sobre la zona de calentamiento.
Como es lógico, el recipiente debe ser adecuado:
Se recomiendan todos los recipientes metálicos ferro-magnéticos (a verificar eventualmente
con un pequeño imán) tales como: cazuelas de fundición, sartenes de hierro negro,
cacerolas metálicas esmaltadas, en acero inoxidable con base ferro-magnética…
Quedan excluidos los recipientes de cobre, inoxidable, aluminio, cristal, madera,
cerámica, gres, barro cocido, inoxidable no ferro-magnético…
La zona de cocción por inducción tiene automáticamente en cuenta el tamaño del recipiente
utilizado. Con un diámetro demasiado pequeño, el recipiente no funciona. Este diámetro varía en
función del diámetro de la zona de cocción.
Cuando el recipiente no es adecuado para la placa de cocción, queda encendido el símbolo [ U ].
Teclas táctiles
Su aparato está provisto de teclas táctiles que permiten controlar las distintas funciones. Un
pequeño roce con la tecla activa su funcionamiento. Esta activación queda confirmada por un
piloto, un indicador y/o por una señal sonora. No toque una tecla más de una vez.
24
Page 93

Puesta en marcha
En primer lugar debe conectar la placa de cocción y después la zona de calentamiento:
Conectar / Apagar a placa de cocción:
Acción Zona de mandos Indicador
Conectar Pulsar [ 0/I ] [ 0 ]
Apagar Pulsar [ 0/I ] ninguno o [ H ]
Conectar / Apagar una zona de calentamiento:
Acción Zona de mandos Indicador
Seleccionar Pulsar tecla de selección de la zona [ 0 ]
Aumentar Pulsar [ + ] de la zona [ 1 ] hasta [ 9 ]
Disminuir Pulsar [ - ] [ 9 ] hasta [ 1 ]
Apagar Presionar al mismo tiempo [ + ] y [ - ] [ 0 ] o [ H ]
Si no se hace ningún ajuste en el plazo de 20 segundos, el sistema vuelve a la posición de espera.
Detección del recipiente
La detección del recipiente asegura una seguridad perfecta. La inducción no funciona:
Cuando no hay recipiente sobre la zona de cocción o cuando este recipiente no es adecuado
para la inducción. En este caso es imposible aumentar la potencia y aparece el símbolo [ U ]
en el indicador. La [ U ] desaparece cuando se coloca una cacerola en la zona de cocción.
Si en el curso de la cocción se retira el recipiente de la zona de cocción, el funcionamiento
se interrumpe. Aparece el símbolo [ U ] en el indicador. La [ U ] desaparece cuando se
coloca de nuevo el recipiente en la zona de cocción. La cocción se reemprende en el nivel
de potencia seleccionado anteriormente.
Después la utilización de la placa, es necesario apagar la zona de cocción. No dejan activa la
detección de la cacerola.
Indicador de calor residual
Después de apagar las zonas de cocción o de apagar por completo la placa, las zonas de
cocción están aún calientes lo que se indica con el símbolo [ H ]. El símbolo [ H ] se apaga
cuando las zonas de cocción se pueden tocar sin peligro. Mientras los testigos de calor residual
estén encendidos, no toque las zonas de cocción ni ponga encima ningún objeto sensible al
calor ¡Peligro de quemadura y de incendio!
Función Booster
Todas las zonas están provistas de una función booster y una función de potencia doble, esto
es, de una amplificación de potencia. La función booster se visualiza con [ P ]. La función
booster doble se visualiza parpadeando [ ] con [ P ].
Si están conectadas, dichas zonas de cocción trabajan durante 10 minutos. Esa alta potencia
está concebida p. ej. para que pueda calentar rápidamente grandes cantidades de agua, como
para cocer agua de fideos.
Conectar/ desconectar booster:
Accionamiento Panel de control Indicación
Seleccionar Pulsar tecla de selección de la zona [ 0 ]
Conectar booster Pulsar [ P ] una vez [ P ]
Apagar booster Pulsar [ - ] [ 9 ]
O pulsar [ P ] tres veces [ 9 ]
25
Page 94

Conectar/ desconectar booster doble:
Accionamiento Panel de control Indicación
Seleccionar Pulsar tecla de selección de la zona [ 0 ]
Conectar booster Pulsar [ P ] una vez [ P ]
Conectar booster doble Pulsar [ P ] dos veces [ parpadea
con [ P ]
Desconectar booster Pulsar [ - ] [ 9 ]
O pulsar [ P ] tres veces [ 9 ]
Control automático de la “función booster“:
La cubeta de cocción puede ofrecer un rendimiento máximo. Para no superar esta potencia
máxima, la electrónica reduce automáticamente el nivel de cocción de otra zona de cocción si la
función de potencia está activada. Esta zona de cocción mostrará después la potencia reducida
[ 9 ] mediante parpadeo.
Zona de cocción seleccionada Otra zona de cocción (p. ej: etapa de potencia 9)
[ P ] luce [ 9 ] se reduce a [ 6 ] o [ 8 ] y parpadea
Función Temporizador
El temporizador puede asignarse simultáneamente a varias placas de cocción y con ajustes
diferentes de tiempo en minutos (de 0 a 99 minutos) para cada una de las placas.
Ajuste o modificación de la duración de la cocción:
Acción Zona de mandos Indicador
Seleccionar la zona Pulsar tecla de selección de la zona [ 0 ]
Seleccionar la potencia Pulsar [ + ] o [ - ] [ 1 ] … [ 9 ]
Seleccionar "Temporizador" Pulsar [ ] Minutero [ 00 ] minutos
Disminuir la duración Pulsar [ - ] [ 30 ] pasa a 29, 28, ...
Aumentar la duración Pulsar [ + ] El tiempo aumenta…
Después de algunos segundos, el piloto de control pasa de "centelleo" a "fijo".
La duración queda seleccionada y se inicia la cuenta atrás.
Detener la función Temporizador:
Acción Zona de mandos Indicador
Seleccionar la zona Pulsar tecla de selección de la zona [ 1 ] … [ 9 ]
Seleccionar "Temporizador" Pulsar [ ] Tiempo restante
Desactivar "Temporizador" Pulsar [ - ] Pasa a [ 00 ] y después
se apaga
Cuando hay varios temporizadores activados, basta repetir la operación.
Temporizador utilizado sin cocción:
Acción Zona de mandos Indicador
Seleccionar "Temporizador" Pulsar [ ] Minutero [ 00 ] minutos
Disminuir la duración Pulsar [ - ] [ 30 ] pasa a 29, 28, ...
Aumentar la duración Pulsar [ + ] El tiempo aumenta…
El piloto de control centellea y pasados algunos segundos se apaga.
Cuando ha transcurrido el tiempo seleccionado, el minutero lo indica centelleando [ 00 ] y
produciendo una señal sonora.
Para parar el sonido y el centelleo, basta pulsar una tecla.
Paro automático al final de la cocción:
Cuando ha transcurrido el tiempo de cocción seleccionado, el temporizador lo indica
centelleando [ 00 ] y produciendo una señal sonora.
Para parar el sonido y el centelleo, basta pulsar una tecla.
26
Page 95

Programación de la cocción automática
Nivel de potencia
seleccionado
Tiempo máximo
de funcionamiento
(H: min)
1
6:00
2
5:00
3
5:00
4
5:00
5
4:00
6
1:30
7
1:30
8
1:30
9
1:30
Todas las zonas de cocción están provistas de un sistema automático de cocción. Si el sistema
automático de cocción está activado, la zona de cocción calienta automáticamente con máxima
potencia y retorna después a la siguiente etapa de cocción que haya seleccionado. El tiempo de
cocción depende de la siguiente etapa de cocción que haya seleccionado.
Activación del sistema automático de cocción:
Accionamiento Panel de control Indicación
Seleccionar la zona Pulsar tecla de selección de la zona [ 0 ]
Activar la potencia total Pulsar [ + ] pasa de [ 0 ] a [ 9 ]
Activar el automatismo Pulsar de nuevo [ + ] [ 9 ] parpadear con [ A ]
Seleccionar nivel Pulsar [ - ] [ 9 ] pasa a [ 8 ] [ 7 ] …
(por ejemplo "7") [ 7 ] parpadear con [ A ]
Desconexión del sistema automático de cocción:
Accionamiento Panel de control Indicación
Seleccionar la zona Pulsar tecla de selección de la zona [ 7 ]
Seleccionar nivel Pulsar [ - ] o [ + ] [ 1 ] … [ 9 ]
Bloqueo de la zona de mandos
Para evitar una modificación del ajuste de las zonas de cocción, p. ej. en la limpieza del cristal, es
posible bloquear las teclas de control (excepto la tecla [ 0/I ]).
Activar bloqueo:
Accionamiento Panel de control Indicación
Conectar bloqueo Presionar [ ] durante 2s Piloto encendido
Desconectar bloqueo Presionar [ ] durante 2s Piloto apagado
Limitación del tiempo de funcionamiento
El aparato está equipado con un mecanismo que limita el tiempo de funcionamiento. El tiempo
máximo de uso de cada placa de cocción depende del nivel de potencia seleccionado.
El tiempo indicado se refiere a una duración de funcionamiento sin interrupción o modificación de
las regulaciones de la placa de cocción. Cuando el tiempo límite se alcanza, la placa de cocción
se apaga automáticamente.
27
Page 96

CONSEJOS DE COCCIÓN
Si el fondo de la cacerola (Ød) es significativamente más pequeño que el diámetro
del cuerpo (ØD) el rendimiento se verá perjudicado y la cacerola podría no ser
identificada por la placa.
Calidad de las cacerolas
Materiales adecuados: acero, acero esmaltado, fundición, inoxidable con fondo ferro-magnético,
aluminio con fondo ferro-magnético
Materiales no adecuados: aluminio e inoxidable con fondo no ferro-magnético, cobre, latón,
vidrio, cerámica, porcelana
Los fabricantes especifican si sus productos son compatibles con la inducción.
Para verificar si las cacerolas son compatibles:
Ponga un poco de agua en una cacerola colocada sobre una zona de cocción por
inducción regulada a nivel [ 9 ]. Este agua debe calentarse en algunos segundos.
Ponga un imán sobre el fondo externo de la cacerola; debe quedarse pegado.
Algunas cacerolas pueden hacer ruido al colocarlas sobre una zona de cocción por inducción.
Estos ruidos no representan en ningún caso un defecto en el aparato ni tienen influencia en su
funcionamiento.
Las cacerolas tienen que ser certificadas por el fabricante como adecuadas para la
inducción. Sin embargo es posible que algunas cacerolas, aunque indiquen que son
adecuadas, en realidad sean inadecuadas para utilizarlas con placas de inducción.
Os recomendamos que, en el momento de comprar las cacerolas, éstas respeten las siguientes
condiciones:
28
Page 97

Dimensión de las cacerolas
1 a 2
Hacer fundir
Recalentar
Salsas, mantequilla, chocolate, gelatina
Platos precocinados
2 a 3
Inflar
Descongelar
Arroz, puddings y platos cocinados
Legumbres, pescados, productos congelados
3 a 4
Vapor
Legumbres, pescados, carne
4 a 5
Agua
Patatas hervidas, sopas, pastas
Legumbres frescas
6 a 7
Cocer a fuego suave
Carnes, hígado, huevos, salchichas
Goulasch, filetes rellenos, callos
7 a 8
Cocer, Freír
Patatas, buñuelos, tortas
9
Freír, llevar a ebullición
Filetes, tortillas, agua
P a
Freír,
Llevar a ebullición
Llevar a ebullición cantidades importantes de
agua
Las zonas de cocción se adaptan automáticamente a la dimensión del fondo de la cacerola,
hasta un cierto límite. Por ello, el fondo de esta cacerola debe tener un diámetro mínimo en
función del diámetro de la zona de cocción correspondiente.
Para obtener el máximo rendimiento de la placa de cocción, coloque la cacerola bien centrada
en la zona de cocción.
Ejemplos de ajuste de las potencias de cocción
(los siguientes valores son indicativos)
CONSERVACIÓN Y LIMPIEZA
Es necesario apagar completamente el aparato para limpiarlo.
Deje enfriar el aparato, ya que hay riesgo de quemaduras.
Limpie los restos de cocción con agua a la que haya añadido un producto lavavajillas o un
producto comercial aconsejado para vitrocerámica.
No utilice productos de limpieza abrasivos que podrían dañar el aparato.
Seque el aparato con un trapo limpio.
Retire inmediatamente el azúcar o materiales que contengan azúcar.
No utilice en ningún caso aparatos "a vapor" o "a presión".
No utilice objetos que comporten riesgo de rayar la vitrocerámica (como estropajos
abrasivos o puntas de cuchillo…).
29
Page 98

QUÉ HACER EN CASO DE PROBLEMA
No tirar nunca su aparato con los residuos
domésticos
Llame al servicio de retirada de electrodomésticos o
déjelo en los lugares de depósito establecidos por
su municipio y adaptados al reciclaje de los
aparatos electrodomésticos
La placa de cocción o las zonas de cocción no se encienden:
La placa está mal conectada a la red eléctrica
El fusible de protección ha saltado
Verifique que no esté activado el bloqueo
Las teclas táctiles están cubiertas de agua o de grasa
Hay un objeto encima de las teclas táctiles
El símbolo [ U ] se enciende:
No hay cacerola en la zona de cocción
El recipiente utilizado no es compatible con la inducción
El diámetro del fondo de la cacerola es demasiado pequeño respecto a la zona de
cocción
El símbolo [ E ] se enciende:
Hay un fallo en el sistema electrónico
Desconecte y vuelva a conectar el aparato
Una de las zonas o el conjunto de la placa de cocción se desconecta:
Ha saltado la desconexión de seguridad
Ésta se acciona en caso que haya olvidado de apagar una de las zonas de calentamiento
Se conecta igualmente cuando una o varias teclas táctiles están tapadas
Una de las cacerolas está vacía y su fondo se ha sobrecalentado
La placa dispone igualmente de un dispositivo de reducción automática del nivel de
potencia y de corte automático en caso de sobrecalentamiento
La ventilación continúa funcionando después de parar la placa:
Esto no es un fallo, el ventilador continúa protegiendo la electrónica del aparato
La ventilación se parará automáticamente
El mando de cocción automática no se conecta:
La zona de cocción está aún caliente [ H ]
Está conectado el nivel máximo de cocción [ 9 ]
El nivel de cocción se ha conectado con la tecla [ - ]
PROTECCIÓN DEL MEDIO AMBIENTE
Los materiales de embalaje son ecológicos y reciclables
Los aparatos electrónicos están formados por materiales reciclables y a veces de
materiales nocivos para el medio ambiente, pero necesarios para el buen funcionamiento
y la seguridad del aparato
30
Page 99

INSTRUCCIONES DE INSTALACIÓN
Modelo
Abertura
7334240
1065 x 325 mm
Pegar la junta (2) sobre el reborde de la placa,
a 2 mm del borde exterior, después de haber
quitado la lámina de protección (3).
El montaje es competencia exclusiva de especialistas.
El usuario está obligado a respetar la legislación y las normas en vigor en su país de residencia.
Colocación de la junta de estanqueidad
La junta adhesiva suministrada con el aparato permite evitar cualquier filtración en el mueble.
Su colocación debe efectuarse con gran cuidado según el croquis adjunto.
Encaje:
La abertura en la superficie de trabajo será, según el modelo, de:
La distancia entre la placa de cocción y la pared debe ser de 50 mm. como mínimo.
La placa de cocción es un aparato perteneciente a la clase de protección "Y". Cuando se
empotre, en la parte posterior y en uno de los lados puede haber una pared o un armario
alto. Pero en el otro lado no debe haber ningún mueble ni aparato que sea más alto
que la superficie de cocción
Las placas y revestimientos de las superficies de trabajo deben ser de materiales
resistentes al calor (100°C)
Las juntas de los bordes de la pared deben ser termo-resistentes
Los materiales de las superficies de trabajo pueden hincharse en contacto con la
humedad. Para los cantos del corte, aplique un barniz o una cola especial.
No instale la placa encima de un horno sin ventilación ni de un lavavajillas
Asegure un espacio de 20 mm entre el fondo de la caja del aparato y la pared para
asegurar una buena circulación de aire para la refrigeración de la electrónica
Si hay un cajón debajo de la superficie de cocción, evite guardar en él objetos inflamables
(por ejemplo: sprays) y objetos que no resistan el calor
La distancia de seguridad entre la placa de cocción y la campana de aspiración situada
encima debe respetar las indicaciones del fabricante de la campana. En caso de falta de
instrucciones, respete una distancia mínima de 760 mm.
El cable de conexión no debe estar sometido, después de la colocación, a ninguna
tensión mecánica, como la causada por un cajón
ADVERTENCIA: Use sólo protectores de las placas fabricados por el fabricante del
electrodoméstico de cocción o en su defecto los que el mismo indique en su manual de
uso y que sean compatibles con los protectores incorporados en el aparato
electrodoméstico. El uso de protecciones inadecuadas puede causar accidentes.
31
Page 100

CONEXIÓN ELÉCTRICA
Red
Conexión
Diámetro del
cable
Cable
Calibre de protección
230 V~ 50/60 Hz
1 Fase + N
3 x 2,5 mm²
H 05 VV - F
H 05 RR - F
25 A *
400 V~ 50/60 Hz
2 Fases + N
4 x 1,5 mm²
H 05 VV - F
H 05 RR - F
16 A *
La instalación de este aparato y su conexión a la red eléctrica sólo deben confiarse a un
electricista que esté al día de las prescripciones reglamentarias.
La protección contra las piezas bajo tensión eléctrica debe asegurarse después del
montaje.
Los datos necesarios para la conexión se encuentran en la placa de características y en
la placa de conexión situadas debajo del aparato.
Este aparato debe poderse aislar del sector por medio de un dispositivo de
seccionamiento omnipolar. Cuando esté abierto (desconectado) debe asegurarse una
separación de 3 mm.
El circuito eléctrico debe estar separado de la red por dispositivos adecuados, por ejemplo
disyuntores, fusibles, interruptores diferenciales y contactores.
Si el aparato no esta provisto de una fiche accesible, otros medios de desconexión deben
incorporarse a la instalación fija segun las reglamentaciones de la instalación.
El cable de alimentación debe colocarse de manera que no toca las partes calientes de la
placa de cocción.
Atención!
Este aparato está diseñado sólo para una alimentación de 230 V~ 50/60 Hz
Conecte siempre la toma de tierra de protección.
Siga el esquema de conexión.
La caja de conexión se encuentra debajo de la placa de cocción. Para abrir la tapa, utilice un
destornillador medio. Colóquelo en las 2 ranuras situadas en la parte anterior de las 2 flechas.
* calculado con el coeficiente de simultaneidad según la norma EN 60 335-2-6
Conexión de la encimera:
Monofásico 230 V~ 1 P+N:
Utilice el hilo verde/Amarillo como tierra, el hilo azul/marrón como neutro N y el negro/gris como
fase L.
Bifásico 400 V~ 2 P+N:
Utilice el hilo verde/Amarillo como tierra, el hilo azul/marrón como neutro N y el gris como fase
L1 y el hilo negro como fase L2.
Antes de realizar la conexión, le recomendamos que identifique la fase (s), neutro y tierra en la
red. Si usted tiene alguna duda, llame a su electricista.
Atención! Introduzca bien los cables y apriete bien los tornillos.
No somos responsables de ningún incidente debido a una conexión incorrecta o que
pudiere ocurrir a causa del uso de un aparato no conectado a tierra o equipado con una
tierra defectuosa.
32
 Loading...