

Page 1

Table of contents
Introduction 2
Rear seat entertainment system 3
Overhead console 28
Cargo organizer 32
All rights reserved. Reproduction by any means, electronic or mechanical
including photocopying, recording or by any information storage and retrieval
system or translation in whole or part is not permitted without written
authorization from Ford Motor Company. Ford may change the contents without
notice and without incurring obligation.
Copyright © 2000 Ford Motor Company
1
Page 2

Introduction
ABOUT THIS SUPPLEMENT
This booklet supplements your Owner’s Guide and is part of the owner’s
portfolio. It describes the operation of your rear seat entertainment
system, overhead console and cargo organizer.
It is important that you read this guide carefully and completely, and
thoroughly familiarize yourself with this information. Refer to the
Owner’s Guide for complete vehicle information.
2
Page 3

Rear seat entertainment system
QUICK START — HOW TO GET GOING
To operate the system:
1. Your AutoVisiont system is automatically activated when the vehicle
ignition and the audio system are ON.
2. If a movie is desired, insert a VHS cassette into the VCP and the video
should start playing.
3. Press the MEDIA control to toggle to any other desired media source.
3
Page 4

Rear seat entertainment system
To play a video game:
1. Connect the video line from your game device to the VIDEO jack.
2. Connect the left and right audio cables to the left (L) and right (R)
audio jacks.
3. Ensure that the system is in AUX mode. The LCD screen will turn on
and the AUX indicator will illuminate.
4. If desired, press the
into the headphone jack. With the headphones ON, the rear speakers will
not operate.
Your AutoVisiont System allows you to watch movie rentals and your
favorite home videocassettes. It also allows you to plug in and play a
variety of standard video games. Please review this user manual to
become familiar with the AutoVisiont features and controls as well as
the very important safety information.
Should you have any questions regarding your AutoVisiont System,
please feel free to call the toll free assistance hotline at 1 (877)
848–6434.
/ control and plug a 3.5mm headphone
4
Page 5

Rear seat entertainment system
SAFETY INFORMATION
Read all of the safety and operating instructions before operating the
system and retain for future reference.
Do not attempt to service, repair or modify the AutoVisiont System. See
your Ford or Lincoln Mercury dealer.
Do not insert foreign objects into the videocassette player (VCP) tape
cassette compartment.
The front glass on the liquid crystal display may break when hit
with a hard surface. If the glass breaks, do not touch the liquid
crystalline material. In case of contact with skin, wash immediately
with soap and water.
The driver must not attempt to operate any function of the floor
console mounted VCP while the vehicle is in motion. Give full
attention to driving and to the road. Pull off the road and park in a
safe place before inserting or extracting video tapes from the VCP. A
remote control is included in the system to allow the rear seat
occupants to operate the VCP functions without distracting the driver.
Be sure to review User Manuals for video games and video game
equipment when used as auxiliary inputs for your AutoVisiont System.
Do not operate video games or video equipment if the power cords
and/or cables are broken, split or damaged. Carefully place cords and/or
cables where they will not be stepped on or interfere with the operation
of seats and/or compartments.
Disconnect video games and video equipment power cords and/or cables
when not in use.
Avoid touching auxiliary input jacks with your fingers. Do not blow on
them or allow them to get wet or dirty.
Do not clean any part of the AutoVisiont system with benzene, paint
thinner or any other solvent.
5
Page 6

Rear seat entertainment system
FEDERAL COMMUNICATION COMMISSION (FCC) COMPLIANCE
Changes or modifications not approved by Ford Lincoln Mercury could
void user’s authority to operate the equipment. This equipment has been
tested and found to comply with the limits for a Class B digital device,
pursuant to Part 15 of the FCC Rules. These limits are designed to
provide reasonable protection against harmful interference in a
residential installation. This equipment generates, uses and can radiate
radio frequency energy and, if not installed and used in accordance with
the instructions, may cause harmful interference and radio
communications.
However, there is no guarantee that interference will not occur in a
particular installation. If this equipment does cause harmful interference
to radio or television reception, which can be determined by turning the
equipment off and on, the user is encouraged to consult the dealer or an
experienced radio/TV technician for help.
6
Page 7

Rear seat entertainment system
CARE OF THE VIDEOCASSETTE PLAYER (VCP)
Environmental extremes
Videocassette players subjected to harsh environmental conditions may
be damaged or perform at less than maximum capability. To avoid these
outcomes, avoid leaving the VCP:
• in extremely hot or cold temperatures.
• in direct sunlight.
• in high humidity.
• in a dusty environment.
• in locations where strong magnetic fields are generated.
• on a surface that is instable or subject to vibrations.
Temperature extremes
When the vehicle is parked under direct sunlight or in an extremely cold
place for a long period of time, wait until the cabin temperature of the
vehicle is at normal temperature before operating the system.
High/low temperature sensor circuit
• Excessively high or low temperatures may cause damage to the VCP.
• When the temperature of the VCP becomes too high or low, the
temperature sensor circuit stops machine operation, ejects the
cassette and the WAIT indicator illuminates. The lamp will remain
illuminated until the system has returned to a safe operating
temperature.
7
Page 8

Rear seat entertainment system
Humidity and moisture condensation
Moisture in the air will condense in the VCP under extremely humid
conditions or when moving from a cold place to a warm one. Moisture
condensation on the tape playback head drum may damage the
videocassette and/or drum. If moisture condensation occurs, do not
insert a videocassette into the player. If a videocassette is already in the
player, remove it. Turn the VCP power ON to dry the moisture before
inserting a videocassette. This could take an hour or more.
Dew sensor circuit
• Under high moisture (dewed) conditions, the tape heads and cassette
tape may be damaged if the VCP is operated.
• When the vehicle’s cabin temperature is very low and then is heated
quickly, or the humidity is very high within the vehicle, the inside of
the windows most likely will be fogged. Under these conditions, the
inside of the VCP most likely is dewed.
• When a dewed condition exists, the dew sensor circuit stops machine
operation, ejects the cassette and the WAIT indicator illuminates. The
lamp will remain illuminated until the system is dry enough to operate
safely.
Cleaning video heads
Magnetic video heads convert the videocassette into pictures on the
screen during playback. Over a period of time, particles rub off the tape
and are left on the heads. Using an old or poor quality tape together with
dust and air particles, high temperature and humidity cause dirty heads.
Dirty heads generally cause “snowy” pictures and, in some severe cases,
blurred or interrupted pictures. A variety of products are available at
video stores to clean tape heads. Use these products sparingly, because
some are abrasive to the video heads. If normal head cleaning
procedures do not resolve the problem, have the system checked by a
service technician.
Foreign substances
Exercise care to prevent dirt and foreign objects from entering the VCP
compartment. Be especially careful not to spill liquids of any kind onto
the media controls or into the videocassette player. If liquid is
accidentally spilled onto the system, immediately turn the system OFF
and consult a qualified service technician.
8
Page 9

Rear seat entertainment system
AUTOVISIONT SYSTEM
Features
• 2–head hi-fi playback
• AutoPlay feature
• Digital auto tracking
• Dual stereo headphone with electric volume control
• Self docking connection for easy mobile installation
• Latching system for secure safety
• Carrying handle for portability
• Water resistant tape door
• On screen display
• Protection circuits
Playback and format
• The videocassette player of your AutoVisiont system can only be used
in the “playback” mode. You are not able to record with your system.
• The system plays standard videocassettes marked “VHS” (or “S-VHS).
VCP PROTECTION CIRCUITS
Tape protection circuit
• When the system is in PAUSE mode, the tape mechanism will
continue to create tension on the tape.
• When the VCP is in still playback, FFWD (fast forward) or REW
(reverse) mode for more than five minutes, the tape protection circuit
automatically returns the system to PLAY mode to avoid damage to
the tape.
Your AutoVision System is also equipped with a Dew sensor circuit and a
High/low temperature sensor circuit. For more information on these
circuits, please refer to Humidity and moisture condensation and
Temperature extremes in the Introduction chapter.
9
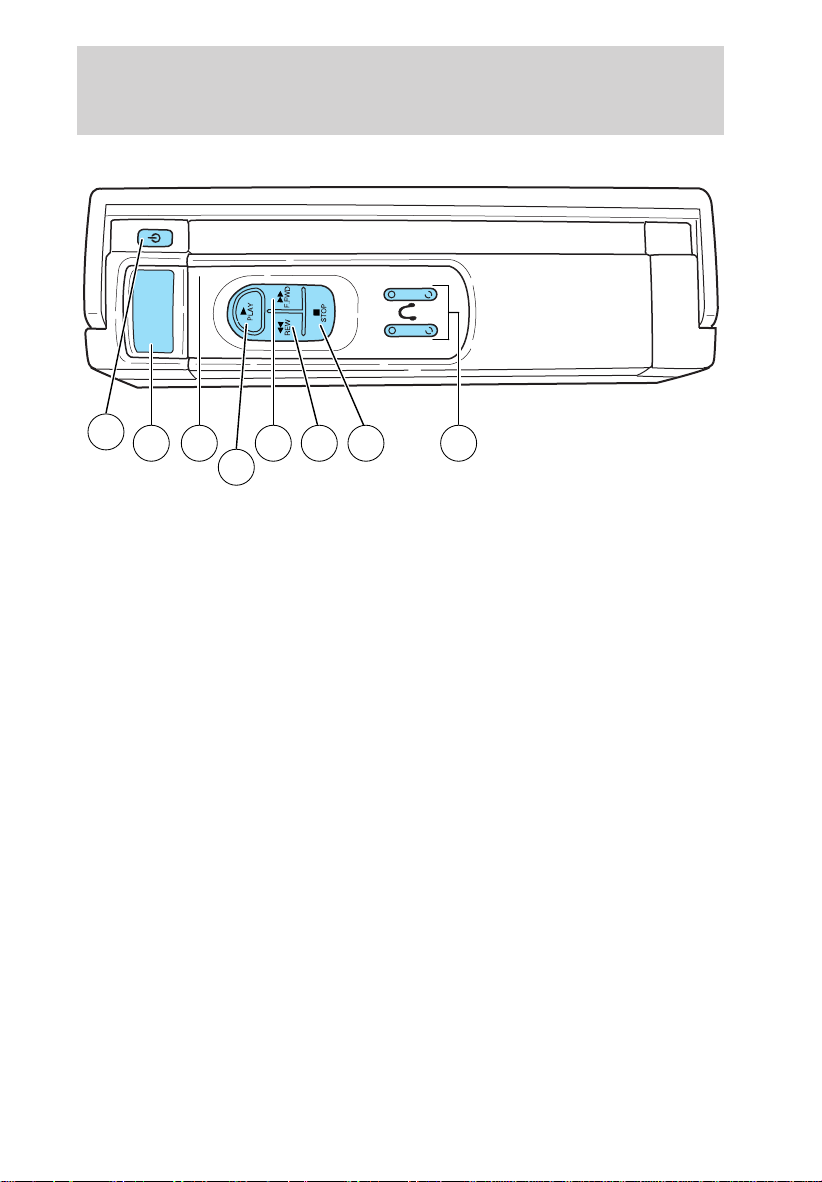
Page 10
Rear seat entertainment system
VCP CONTROLS
2
1 8
1. LED display
The display lamp will light up in green when power is supplied to the
videocassette player.
2. POWER key
Press to toggle between ON/OFF. When the power is ON, other keys
(PLAY, FF, REW, STOP) will illuminate.
3. PLAY key
Press to playback a videocassette tape.
4. REWIND/REVIEW button
Press to enter the reverse picture mode when in PLAYBACK mode. If in
STOP mode, the tape will rewind at a high speed.
5. FAST FORWARD/CUE button
Press to enter forward picture search mode when in PLAYBACK mode. If
in STOP mode, the tape will fast-forward at a high speed.
6. STOP button
Press to stop the tape.
7. HEADPHONE VOLUME UP/DOWN KEYS button
For home use only, please refer to the In-Home Use section.
8. EJECT button
Located inside the videocassette cover. Press to eject the tape.
5 4 6 7
3
10
Page 11

REMOTE CONTROL
Rear seat entertainment system
1
3
5
8
10
1. POWER button
Press to turn the videocassette player (VCP) ON or OFF.
2. ENCORE button
Press to reverse the casssette for 5 seconds. Normal playback will then
resume when in PLAYBACK mode.
3. STILL/ADVANCE (frame advance button)
Press to temporarily suspend playback. Press again to make the tape
advance one frame at a time.
4. RETRACKING button
Press to activate Auto Tracking in the playback mode.
5. TRACKING + button
Press for manual tape tracking.
6. TRACKING — button
Press for manual tape tracking.
7. PLAY button
Press to play the tape.
2
4
6
7
9
11
Page 12

Rear seat entertainment system
8. REW button
Press to rewind the tape.
9. FF button
Press to fast forward the tape.
10. STOP button
Press to stop the tape.
BATTERY REPLACEMENT
Batteries are supplied with the remote control unit. However, they are
simply for operation check and will only work for a short time.
Slide battery cover off as shown on remote control to access the batteries.
The remote control unit uses two AAA batteries.
The need for battery replacement is usually indicated if the remote
control only functions at extremely close distances to the entertainment
center or not at all.
When replacing batteries, use two new batteries (alkaline recommended)
and install with correct orientation (+ and − polarities). Ensure that you
use only new batteries of the same brand.
If you will not be using the remote control for a considerably long time,
remove the batteries.
12
Page 13

Rear seat entertainment system
AUTOVISIONT CONTROLS
The AutoVisiont controls allow the rear seat passengers to operate the
radio, tape, CD or CD DJ(if equipped).
PARENTAL CONTROL
Your AutoVisiont system allows you to have control over the rear seat
controls. The system is automatically activated when the ignition is ON.
This enables rear seat passengers to play a videocassette or listen to any
of the available media sources. Once the headphone mode is activated,
the
Press the memory preset controls 3
and 5 simultaneously on the front
audio controls to disable the
AutoVisiont controls. They will
remain disabled until the front seat
passengers “enable” them again by
simultaneously pressing the 3 and 5 preset controls. The settings of the
front seat controls will always override those of the rear seat controls.
symbol will appear in the radio display.
1 2 3 4 5 6
13
Page 14

Rear seat entertainment system
ADJUSTING THE VOLUME
This control allows the rear seat
passengers to adjust the volume
level of the audio system.
Press the + control to increase the
volume.
Press the — control to decrease the
volume.
From the AutoVisiont controls, the speaker volume cannot be set higher
than the current volume radio setting. When in headphone mode, the
AutoVisiont controls can change the volume setting to any desired level.
14
Page 15

Rear seat entertainment system
USING HEADPHONES/PERSONAL AUDIO FEATURE
The Personal Audio Feature allows
the rear seat passengers to listen to
one media source (radio, TAPE, CD,
CDDJ, VCP, or AUX) while the front
seat passengers listen to another.
To activate, press the
control and plug a 3.5mm
headphone into the headphone jack.
With the headphones ON, the rear
speakers will not operate.
Press the MEDIA control to toggle
to the desired media source.
Use the SEEK, VOLUME and MEM
controls to make any desired
adjustments.
Press the
deactivate the Personal Audio Feature.
SPEAKERS ON/OFF MODE
With the speakers ON, you can adjust the audio output to all system
speakers — front and rear together (headphones are disabled in this
mode). The rear seat passengers can not raise the volume of the system
above the level on the front radio bezel.
With the speakers OFF, the headphones are enabled. The rear seat
passengers have control over the desired volume levels.
/ control again to engage the rear speakers and
/
15
Page 16

Rear seat entertainment system
MEDIA SELECT
Press the MEDIA control to toggle
between AM, FM1, FM2, TAPE, CD,
CDDJ, VCP and AUX modes. When
selected, the media source will
illuminate.
• AM
AM radio frequency band
• FM1, FM2
FM radio frequency bands
• TAPE
cassette tape (if equipped)
• CD
single cd player (if equipped)
• CDDJ
compact disc changer (if equipped)
• VCP
video cassette player
• AUX
auxiliary jack input
16
Page 17

Rear seat entertainment system
MEMORY PRESET CONTROL
In radio mode, press the MEM
(Memory) control successively to
scroll through the memory presets
in AM, FM1 or FM2.
In CDDJ mode, press the MEM
(Memory) control to select the next
disc in the compact disc changer.
Play will begin with the first track.
SEEK FUNCTION
The SEEK control has varying
functions depending on which mode
is enabled.
In radio mode (AM, FM1, FM2):
Press the
next listenable station down the
frequency band.
Press the
next listenable station up the
frequency band.
In tape mode, press the SEEK
control to access the previous
) or the next ( ) selection.
(
In CD mode, press the SEEK control to access the previous (
the next (
In CDDJ mode, press the SEEK control to access the previous (
the next (
control to find the
control to find the
) track.
) track of the currently selected disc.
)or
)or
17
Page 18

Rear seat entertainment system
FLIP-DOWN SCREENS
The screens rotate down to view and up into the housing to store when
not in use. Ensure that the screens are latched into the housing when
being stored.
1 3
2
1. 6.4” (diagonal) color liquid crystal display (LCD) screen.
2. Screen housing.
3. Dimmer switch. Rotate to increase/decrease the brightness of the
screen.
18
Page 19

Rear seat entertainment system
GENERAL OPERATION
• When the engine is not running, use the system sparingly otherwise it
will run the battery down.
• Do not leave the videocassette in the VCP overnight or for long
periods of time.
• When the ignition is turned ON, audio is through the headphones as
LOW volume. Press the (+) control to increase volume. To listen
through the vehicle’s speaker system, press the speaker button (
on the media control panel.
Inserting/removing cassette
Inserting cassette
• Open the AutoVisiont console cover.
• Insert the videocassette into the cassette compartment.
Inserting a videocassette into the VCP automatically turns the power ON
(the indicator lamp will illuminate) and the tape will begin playback.
If the vehicle is traveling over rough terrain, it may be difficult to insert
the cassette because the machine attempts to hold the cassette firmly to
prevent vibration. If this condition is encountered, either press firmly or
remove the cassette and insert it again.
The system will not allow a cassette to be inserted in the wrong position.
• Once the cassette is completely inserted, close the VCP and console
covers.
Removing cassette
1. Open the console cover, open the VCP cover and press the STOP
button.
2. Press the EJECT button.
Do not insert any foreign substances into the cassette compartment.
After removing the cassette from the VCP, close the door.
When the engine is turned OFF, the cassette is ejected from the
compartment.
)
19
Page 20

Rear seat entertainment system
To play a video game
1. Connect the video line from your video game device to the YELLOW
jack.
2. Connect the left and right audio cables to the WHITE and RED jacks
respectively.
3. Ensure that the system is in AUX mode. The LCD screen will turn on
and the AUX indicator will illuminate.
On-screen indicators
Playback operation
1. Press the POWER control on the VCP.
2. Insert a videocassette into the VCP.
3. The videocassette should automatically begin playback, and the
picture will appear within approximately nine seconds.
4. Press the STOP control to stop playback or press EJECT to remove
the cassette.
Fast-forward or rewind (no picture)
1. Press the FF/REW control on the VCP.
2. Press the STOP control to stop or press EJECT to remove the
cassette.
The tape will fast forward or rewind until it has reached the end or the
beginning.
Fast-forward or rewind (with picture)
1. While in playback mode, momentarily press the FF/REW key. The VCP
will search the playback direction five times faster than normal playback
mode.
2. Press the PLAY key to resume normal playback.
20
Page 21

Rear seat entertainment system
Special effects playback
Still playback/ Frame-to-frame playback (on remote control)
1. Press the STILL/F.ADV key while in playback mode. The playback
picture becomes still.
2. Press the STILL/F.ADV key again. Each time the control is pressed,
the pictures are played back one frame at a time.
The still playback feature can also be used in REW (reverse) mode.
If still playback/or frame-to-frame playback is engaged for five minutes or
longer, the VCP will automatically begin playback to protect the tape.
Automatic tracking is automatically activated the moment the VCP is
turned ON or a cassette is inserted.
If a videocassette is in poor shape (i.e., badly recorded), any tracking
adjustment may result in failure. The VCP will eject the videocassette.
Encore (on remote control)
• Press the ENCORE control while in playback mode.
The VCP will reverse to the previous five seconds of the selection and
then operate at normal playback mode.
21
Page 22

Rear seat entertainment system
AUXILIARY INPUT JACKS
The auxiliary input jacks on the
AutoVisiont control panel accepts
video and audio connectors for all
standard video games (Nintendot,
PlayStationt, etc.) Other compatible
devices such as DVD players,
camcorders and portable CD players
can also be connected to the
auxiliary jacks.
The auxiliary jack is color-coded for
identification purposes. They are as
follows:
• YELLOW (1)— video input
• WHITE (2)— left channel audio
input
• RED (3)— right channel audio
input
Press the MEDIA control until AUX is illuminated in the control panel.
This will allow you to view the video and listen to the audio from the
auxiliary input.
To listen to another audio source while viewing video from the auxiliary
input, press the MEDIA control until the desired media source is
illuminated.
321
22
Page 23

Rear seat entertainment system
Video source selection
The MEDIA control determines
which video (VCP or Auxiliary
input) is seen on the AutoVisiont
screen.
When the vehicle ignition is ON and
the system is not in VCP mode, the
AutoVisiont selects the Auxiliary
input as the video source. (If there
is not a video source connected to
the Auxiliary input jack, the screen
will be blank.)
AutoPlay feature
Your AutoVisiont system is equipped with an AutoPlay Feature. When a
video cassette is inserted into the player, video and audio sources are
automatically switched to VCP. This will override any other selections
currently made.
INDICATIONS ON THE VCP
The operation and status of the VCP can be checked by the indications
appearing on the LED display.
1. The Power indicator flashes on
during POWER ON and will blink
when in emergency mode.
2. The HI-FI indicator illuminates
when a HI-FI tape is loaded.
3. The HP1 inciator illuminates
when the headphone jack 1 is
plugged in.
4. The HP2 indicator illuminates
when the headphone jack 2 is
plugged in.
5. The Operation indicators illuminate when the system is powered
ON, a HIFI tape is being played, or headphones are being used.
21 5
43
23
Page 24

Rear seat entertainment system
The following are some possible messages that may illuminate on your
LED display and their meanings.
Illuminates when there is a
videocassestte in the system during
power off.
Illuminates when there is a
videocassette in the system during
power on.
Illuminates when a videocassette is
ejected from the system.
Flashes during emergency mode.
Illuminates during power on when
there is not a videocassette present
in the system.
Illuminates during power off when
there is not a cassette present in
the system.
Illuminates when the videocassette
is in REW (rewind) mode.
Illuminates when the videocassette
is in FF (fast forward) mode.
24
Page 25

Rear seat entertainment system
Illuminates when the videocassette
is in STIL (pause) mode.
Illuminates when the videocassette
is in PLAY mode.
Illuminates when the videocassette
is in REV (review) mode.
Illuminates when the videocassette
is in CUE mode.
Flashes separately when the
videocassette is in ENCORE mode.
Displays when:
• the thermistor detects an
extremely high or low
temperature
• the dew sensor is activated for high humidity
25
Page 26

Rear seat entertainment system
IN-HOME USE
Your AutoVisiont system is UL registered for in-home use. This system
has the unique feature of also being a completely portable and able to be
used in your home.
To remove your AutoVisiont system from your vehicle, depress the lever
on the center console labeled VCP RELEASE. This will release the VCP
and enable you to remove the system from the vehicle. If pressing the
lever does not release your system, please contact your dealer.
To re-install the VCP in your vehicle, insert the VCP into the console and
push lightly until the VCP clicks into place.
To use the AutoVisiont system in your home, you will need:
• 12 V DC power converter rated for 1.5 amps/min
• Patch cords with RCA style connectors
These parts are available in your local electronics store or call toll free
1 (877) 848–6434 for assistance.
AUXILIARY JACKS FOR HOME USE
1. VIDEO OUT
Connect this terminal to the VIDEO
IN terminal of your display (LCD,
TV).
2. DC jack in
Connect this jack to the DC source
(DC 12V).
3. AUDIO OUT LR
Connect these terminal(s) to the
AUDIO IN terminals of your display
(LCD, TV).
1
3
26
2
Page 27

Rear seat entertainment system
1. VIDEO IN
Connect this terminal to the AUDIO
OUT terminal of your other
apparatus (DVD, game machine,
etc.).
2. AUDIO IN LR
Connect these terminal(s) to the
AUDIO OUT terminals of your other
apparatus (DVD, game machine,
etc.).
3.
Plug headphones into these jacks.
3
1
2
27
Page 28

Overhead console
OVERHEAD CONSOLE
The appearance of your vehicle’s overhead console will vary according to
your option package.
Storage compartment
Press the OPEN control to open the
storage compartment. The door will
open slightly and can be moved to
full open.
Installing a garage door opener
The storage compartment can be converted to accommodate a variety of
aftermarket garage door openers:
• Remove the storage clip from the
door.
• Place Velcroy hook onto side of
aftermarket transmitter opposite
of actuator control.
• Place the transmitter into storage
compartment, control down.
28
Page 29

• Place the provided height
adaptors onto the back of the
GARAGE control as needed.
• Press the GARAGE control to
activate the transmitter.
Electronic compass/temperature display
Outside air temperature
The outside temperature display is
contained in the overhead console.
The temperature display can be
turned off and on by pressing the
SELECT control on the overhead
console. The temperature can be
displayed in Centigrade or
Fahrenheit by pressing the SELECT
control.
If the outside temperature falls
below 3°C (38°F), the display will
alternate from “ICE” to the outside
temperature at a two second rate
for one minute.
Overhead console
73˚ NW
Compass
The compass display is contained in the overhead console. The vehicle
heading is displayed as one of N, NE, E, SE, S, SW, W and NW.
29
Page 30

Overhead console
The compass reading may be affected when you drive near large
buildings, bridges, power lines and powerful broadcast antenna. Magnetic
or metallic objects placed in or on the vehicle may also affect compass
accuracy. Adjustments may need to be made to the zone and calibration
of the compass.
Compass zone adjustment
1. Determine which magnetic zone
you are in by referring to the zone
map.
2. Turn the ignition to the ON
position.
1
2
3
4
5
6
78
15
13
12
11
10
9
14
3. Press and hold the SELECT
control until VAR appears in the
display, then release. The display
should show the current zone
number.
4. Press the SELECT control until
the desired zone number appears.
The display will flash and then
return to normal operation. The
zone is now updated.
30
9 VAR
Page 31

Compass calibration adjustment
Perform this adjustment in an open
area free from steel structures and
high voltage lines:
• Press and hold the SELECT
control until CAL appears in the
display (approximately eight
seconds) and release.
• Drive the vehicle slowly (less
than 5 km/h [3 mph]) in circles
until CAL indicator turns off in
about 2–3 complete circles.
• The compass is now calibrated.
Overhead console
CAL
31
Page 32

Cargo organizer
CARGO ORGANIZER (IF EQUIPPED)
Your vehicle comes equipped with a cargo organizer located on the floor
of the cargo area.
• To open, lift the cargo organizer up to the upright position, pull the
front panel away from the rear panel sliding it to the right until it
locks.
• To close, press the release button, slide the front panel towards the
rear panel and fold down to the stowed position.
• To remove, lift the cargo organizer up to the upright position, unscrew
the screw caps on each side of the organizer and remove.
32
 Loading...