

FoodSaver V4825 User Manual & Recipe Book
www.foodsaver.ca 1 877 804-5383
For important safety information and helpful tips, please visit us at www.foodsaver.ca
to get tips on vacuum sealing and order FoodSaver® brand accessories, bags and rolls,
or call 1-877-804-5383(Canada).
Pour obtenir d’autres renseignements de sécurité importants, des conseils pratiques relatifs à
l’emballage sous vide, ainsi que pour commander des accessoires, sacs et rouleaux de marque
FoodSaverMD, visitez au www.foodsaver.ca ou bien appelez le 1 877 804-5383 au Canada.
Printed in China / Imprimé en Chine P.N. 165590
FSFSSL4825-033-13EFM1 GCDS-FSV29645-JC
©2013 Sunbeam Products, Inc. doing business as Jarden Consumer Solutions. All rights reserved. In Canada, imported
and distributed by Sunbeam Corporation (Canada) Limited doing business as Jarden Consumer Solutions, 20 B Hereford
Street, Brampton, Ontario L6Y 0M1.
©2013 Sunbeam Products, Inc., faisant affaire sous le nom de Jarden Consumer Solutions. Tous droits réservés. Au
Canada, importé et distribué par Sunbeam Corporation (Canada) Limited faisant affaire sous le nom de Jarden Consumer
Solutions, 20B Hereford Street, Brampton (Ontario) L6Y 0M1.
User Manual & RecipeBook
Notice d’emploi et recettes
for V4825 series appliances
pour appareils de la série V4825
FSFSSL4825-033_13EFM1.indd 1-2 7/23/13 10:07 AM

www.foodsaver.ca 1-877-804-5383
4
www.foodsaver.ca 1-877-804-5383
3
Table of Contents
Important Safeguards ............................................................................................................2
Welcome to FoodSaver® Vacuum Sealing System .................................................................... 4
Features of Your FoodSaver® Appliance ................................................................................. 4
How to Make a Bag from a FoodSaver® Vacuum Sealing Roll .................................................8
How to Vacuum Seal with FoodSaver® Vacuum Sealing Bags .................................................9
Removing Air from a Bag ..................................................................................................... 10
Using FoodSaver® Vacuum Sealing Accessories ................................................................... 10
Emptying Drip Tray .................................................................................................................... 11
Marinating with your FoodSaver® Appliance ........................................................................ 12
Care and Cleaning ................................................................................................................13
Trouble-Shooting ................................................................................................................. 14
Guidelines for Vacuum Packaging .........................................................................................15
Storage Guide - Meat, Cheese, Vegetables, Fruits .................................................................17
Storage Guide - Baked Goods, Coffee, Snacks and Liquids .................................................. 18
Recipes for your FoodSaver® Appliance ............................................................................... 19
Warranty.............................................................................................................................. 23
Important Tips
1. Vacuum packaging is NOT a substitute for the
heat process of canning. Perishables still need
to be refrigerated or frozen.
2. For best results, use only with FoodSaver® Bags,
Containers and Accessories.
3. During the vacuum packaging process, small
amounts of liquids, crumbs or food particles can
be inadvertently pulled into the Vacuum Channel.
Empty the Drip Tray after each use.
4. Avoid overfilling, always leave at least 4 inches
(10.16 centimeters) of bag material between bag
contents and top of bag. This allows room for the
bag material to cinch tightly against the food and
prevents the bag from pulling out of the vacuum
channel during the sealing process. Then leave at
least one additional inch of bag material for each
time you plan to reuse bag.
5. Do not create your own side seams for a
FoodSaver® Bag. These bags are manufactured
with a special side seam, which is sealed all the
way to the outer edge.
6. To prevent wrinkles in the seal when vacuum
packaging bulky items, gently stretch bag flat
while inserting bag into vacuum channel and
continue to hold bag until vacuum pump starts.
7.
When you are vacuum packaging items with sharp
edges (dry spaghetti, silverware, etc.), protect bag
from punctures by wrapping item in soft cushioning
material, such as a paper towel. You may want to
use a canister or Mason jar instead of a bag.
8. When using accessories, remember to leave one
inch of space at top of canister or container.
9. Pre-freeze fruits and blanch vegetables before
vacuum packaging for best results. See
“Guidelines for Vacuum Packaging” section.
10. 120v Appliances Only: The FoodSaver® appliance
has a polarized plug (one blade is wider than the
other). To reduce risk of electrical shock, this plug
is intended to fit in a polarized outlet only one
way. If plug does not fit fully in the outlet, reverse
plug. If it still does not fit, contact a qualified
electrician. Do not modify plug in any way.
11. Caution: A short power cord is provided to
reduce risks from entanglement or tripping over
a longer cord. An extension cord may be used
when marked electrical rating is no less than
electrical rating of this appliance. All cords should
not drape over counter or tabletop where cords
can be tripped over or pulled on unintentionally,
especially by children.
Important Safeguards
For your own safety, always follow these basic precautions when using a
FoodSaver® appliance:
1. Read the User Manual carefully for operating instructions.
Read all instructions in this manual before use.
2. Do not use appliance on wet or hot surfaces,
or near a heat source.
3. To protect against electric shock, do not immerse any part
of appliance, power cord or plug in water or other liquid.
Unplug from outlet when not in use and before cleaning.
4. To disconnect, unplug power cord from electrical outlet.
Do not disconnect by pulling on cord.
5. Do not operate appliance with a damaged power cord or plug.
Do not operate appliance if it malfunctions or is in any way damaged.
For details, contact Consumer Services at number listed below.
6. Use appliance only for its intended use.
7. Closely supervise children when using any electrical appliance.
Do not allow appliance to be used as a toy.
8. Do not place on or near a hot gas or electric burner, or heated oven.
Extreme caution must be used when moving products containing hot liquids.
9. Wait 20 seconds between seals to allow appliance to cool.
For Household Use Only
SAVE THESE INSTRUCTIONS
WELCOME
FSFSSL4825-033_13EFM1.indd 3-4 7/23/13 10:07 AM
www.foodsaver.ca 1-877-804-5383
6
www.foodsaver.ca 1-877-804-5383
5
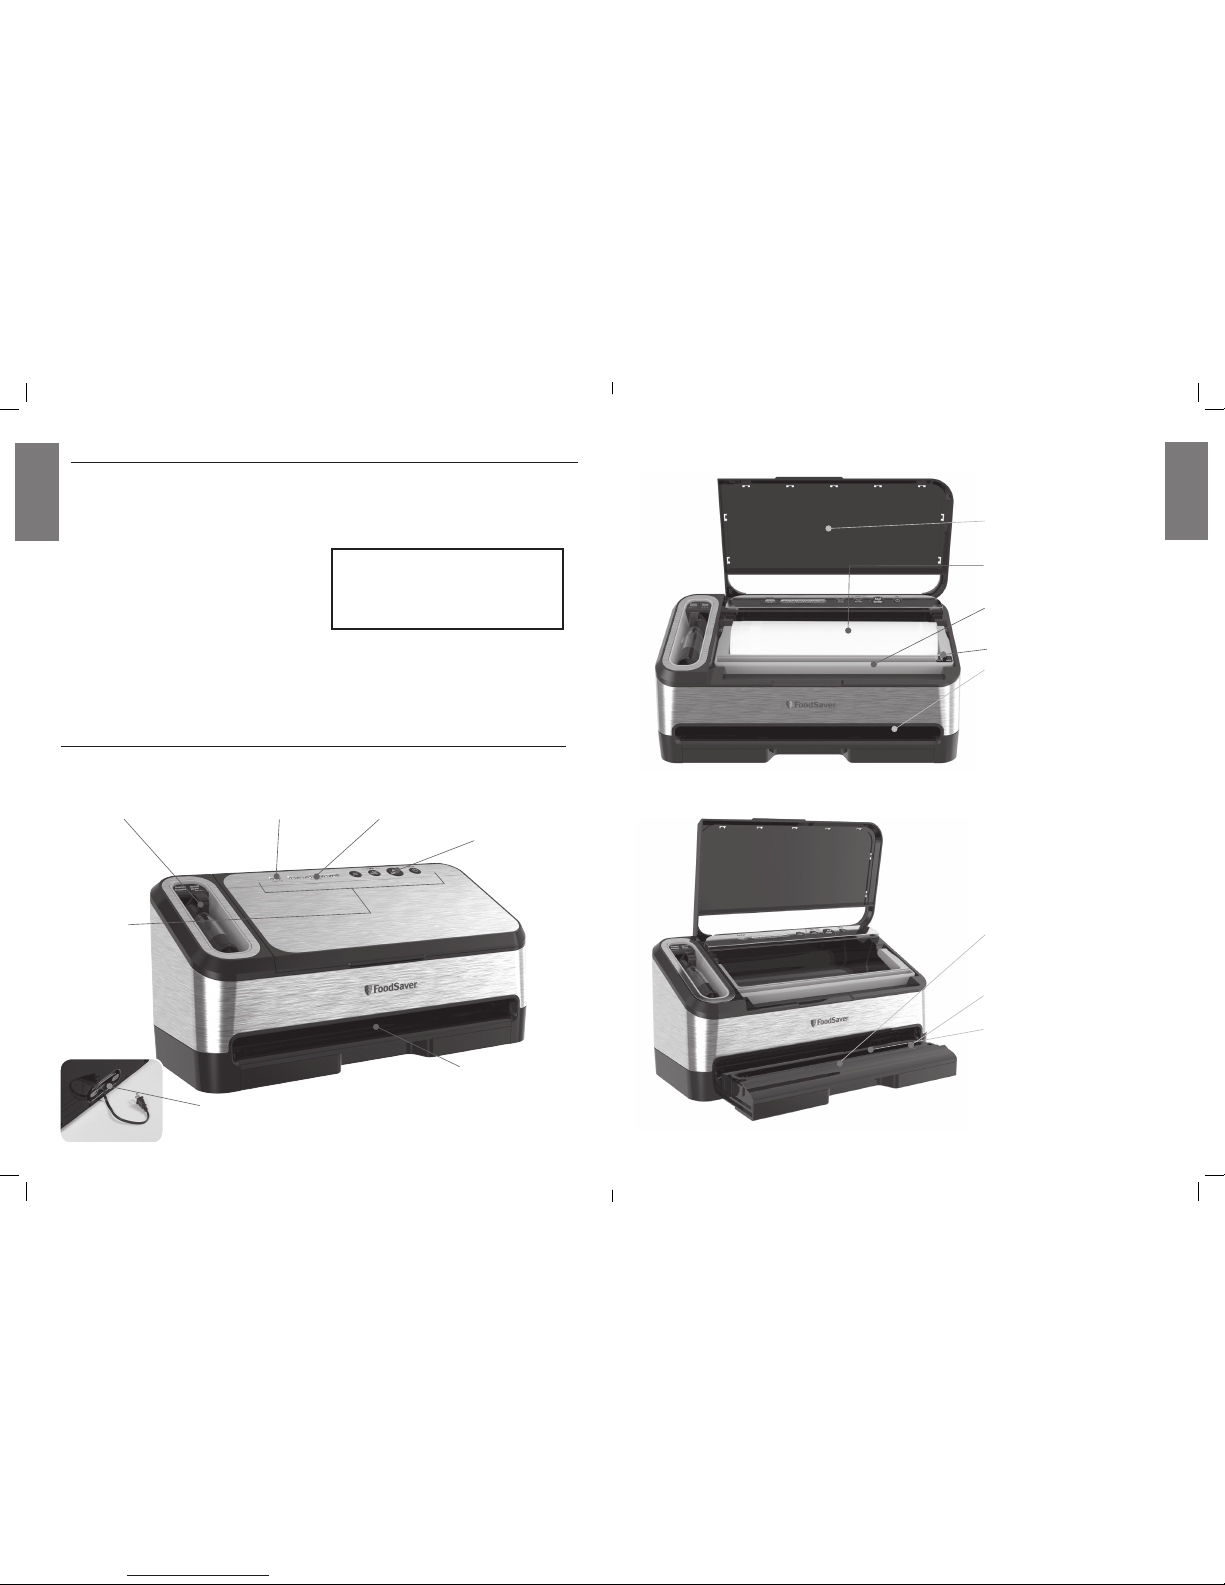
H. Appliance Door
Opens to access Built-in
Roll Holder and Cutter.
I. Built-in Roll Holder
For storage of FoodSaver®
Vacuum Sealing Rolls.
J. Roll Cutter Bar
Simplifies making
custom-sized bags.
K. Bag Cutter
L. Auto Bag Sensing
Simply insert open end of bag
into the vacuum channel and the
machine will sense and grasp the
bag, vacuum, seal and shut-off
automatically.
M. Extra-wide Sealing Strip
with Non-stick Coating
Provides extra secure, air-tight
seal that’s two times wider.
N. Lower Gasket
(non-removable)
O. Removable Drip Tray
Catches overflow liquids
and contains Food Sensors
to detect liquid.
FEATURES
Features of Your FoodSaver® Appliance
FEATURES
F. Vacuum Channel
Simply insert bag
and the FoodSaver®
appliance does the rest.
G. Power Cord Storage
At bottom of unit.
A. Controls and
Indicator Lights
Indicate current
setting and
vacuum progress
for added control.
B. Retractable Handheld Sealer
Can be used with all
FoodSaver® Brand
Accessories including
FreshSaver® Zipper Bags.
E. Seal Button
CrushFree™
Instant Seal feature.
Stops vacuum cycle
and seals to prevent
crushing delicate items.
D. Vacuum Progress Display
Green lights signal progression of
vacuuming and sealing process.
All lights extinguish when the full
process is finished.
C. Tray Full Indicator
Indicates when drip
tray is full. Empty
to resume usage of
appliance.
Welcome to FoodSaver® Vacuum Sealing System
Congratulations…
You are about to enjoy the freshness benefits
of FoodSaver®, The #1 Selling Brand of
Vacuum Sealing Systems. For years, the
FoodSaver® Vacuum Sealing System has
helped millions of households keep food
fresh longer in the refrigerator, freezer and
pantry.
The FoodSaver® system is designed to
remove air and extend freshness up to five
times longer than conventional storage
methods. Keep your FoodSaver® appliance
on your countertop, and you’ll soon discover
its convenience and versatility.
Questions?
Contact customer service at
1-877-804-5383
or visit www.foodsaver.ca.
Do not return this product to place of purchase.
FSFSSL4825-033_13EFM1.indd 5-6 7/23/13 10:07 AM
www.foodsaver.ca 1-877-804-5383
8
www.foodsaver.ca 1-877-804-5383
7
7
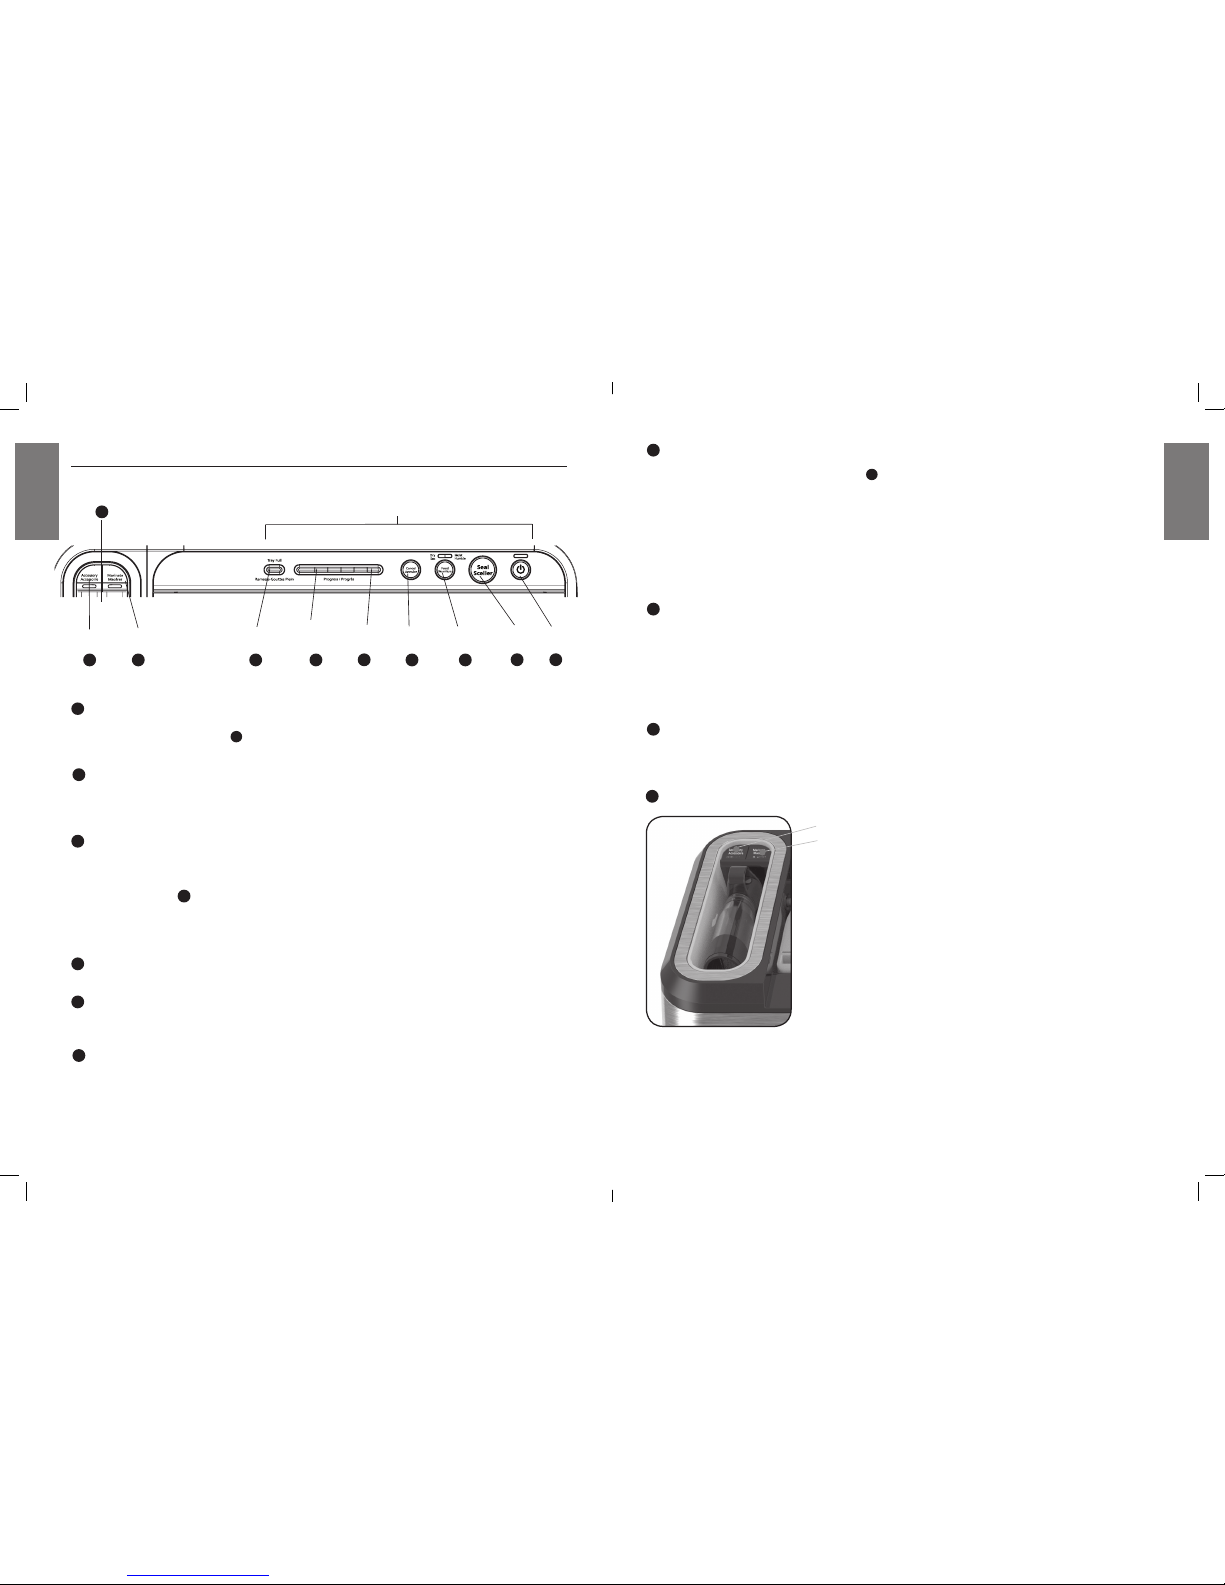
ADJUSTABLE FOOD SETTINGS BUTTON
For optimal vacuuming and sealing of moist or juicy foods,
press the Adjustable Food Settings Button
7
until the
Moist Indicator Light is illuminated. Choose the dry food setting
for foods without liquid.
The Moist Food Indicator light will flash when Food Sealing Sensors
automatically detect any moisture or liquid in the drip tray (O).
Note: Appliance will default to Dry setting upon pressing the Power Button
or when power has been interrupted, unless liquid is detected in the
Drip Tray. (See “Care and Cleaning” section on page 14.)
8
SEAL BUTTON
This button has three uses:
1. CrushFree™ Instant Seal feature-
Press to immediately stop the vacuum process and begin sealing the bag.
This prevents crushing delicate items such as bread, cookies and pastries.
2. Press to create a seal when making bags from a FoodSaver® Roll.
3. Press to create a seal on mylar type bags (such as a potato chip bag)
to keep food sealed air-tight.
9
POWER BUTTON
Press the power button to begin. The Power Indicator and Food Indicator lights will
become illuminated. After Vacuum Sealing, press Power Button to turn appliance Off.
Note: After 12 minutes of non-use, the appliance will turn Off automatically.
10
RETRACTABLE HANDHELD SEALER
1
ACCESSORY MODE BUTTON
Press to achieve best vacuum for canisters and accessories.
Push Accessory Mode Button
1
to begin vacuum process.
Motor will run until Vacuum Sealing Process is complete.
2
MARINATE MODE BUTTON
A ten minute predetermined sequence of vacuum pulse to rest ratio
allowing foods to get optimum flavor infusion in the least amount of time.
(See “Marinating with your FoodSaver® Appliance” section on page 13.)
3
TRAY FULL INDICATOR LIGHT
During the vacuum sealing process, small amounts of liquids, crumbs or
food particles can be inadvertently pulled into the Drip Tray (O).
When excess liquid fills the Drip Tray, the unit will turn off and the
Tray Full Indicator 3 will activate. To resume normal operation, remove
the Drip Tray, empty liquid, wash in warm soapy water or place in top rack
of dishwasher. Dry completely and place Drip Tray back into appliance.
(See “Care and Cleaning” on page 14.)
4
VACUUM PROGRESS DISPLAY
Displays vacuum levels as the bag or canister is evacuated.
5
SEAL INDICATOR LIGHT
Constant Red light indicates sealing process is engaged.
(Flashing light indicates error. See “Trouble-Shooting” Section on page 15 for more information.)
6
CANCEL BUTTON
Immediately halts the current function and opens the Vacuum Channel.
Power
Button
Marinate
Mode
Accessory
Mode
Retractable
Handheld Sealer
Indicator
LEDs
10
1
6
8 9
3
FEATURES
Vacuum
Progress
Display
5
4
Tray Full
Indicator
Seal Indicator
Light
2
Seal
Button
Cancel
Button
7
Adjustable
Food Settings
FEATURES
Control Panel of Your FoodSaver® Appliance
1. Accessory Button
2. Marinate Button
FSFSSL4825-033_13EFM1.indd 7-8 7/23/13 10:07 AM

www.foodsaver.ca 1-877-804-5383
10
www.foodsaver.ca 1-877-804-5383
9
SEALED END
BOUT SCELLÉ
OPEN END
BOUT OUVERT
4 inches
1. Beg in with a FoodSaver® Vacuum Sealing System Bag
(or create a bag as described in the “How to Make a Bag
from a Roll” sec tion on page 9).
2. Place item(s) in bag, allowing at least 4 inches (10.16cm)
of space between bag contents and top of bag (F ig. 1).
The ext ra space is required to allow the bag to seal tight ly
around contents.
3. OP TIONAL: If you wish to cus tomize the vacuum sealing
process you may selec t Food Setting 7 (Fig . 2).
Default set ting is Dry Food.
See page 6 for more inf ormation.
4. Your new Fo odSaver® System Automatically Vacuums
and Seals. To Vacuum: DO NOT PRESS T HE SEAL BUTTON.
Using two hands, slow ly insert open end of bag, curl dow n,
into Vacuum Channel (F) (Fig. 3/4).
5. Cont inue to hold bag until vacuum pump start s.
You may now release bag. The Vacuum Progress lights 4
will illuminate.
Note: To prevent crushing delicate items, you may press
Seal Button 8 at any time to begin automatic
sealing process.
6. When red Seal Indicator Light 5 turns of f, remove
bag (Fig. 5). Ref rigerate or freeze if needed.
Note: Wait at least 20 se conds between seals to
allow appliance to properl y cool.
Go to www.foodsaver.com for additional hint s,
tips, instruc tional videos and information about
how to purchase FoodSaver® parts and accessories.
Fig. 1
Fig. 5
Fig. 2
Fig. 4
7
HOW TO
How to Make a Bag from a
FoodSaver® Vacuum Sealing Roll
How to Vacuum Seal with FoodSaver®
Vacuum Sealing Bags
Fig. 1
Fig. 4
Fig. 5
Fig. 2
Fig. 3
1. Open appliance door (H) and place roll into Roll Holder
(Fig. 1). For best results, insert roll with material flap down.
2. Lift up Roll Cutter Bar (J) and place bag material
beneath the cutter bar (Fig. 2).
3. Pull out enough bag material to hold item being
vacuum sealed, plus 4 inches (10.16 centimeters).
Lower the Roll Cutter Bar and slide Bag Cutter (K)
across the Cutter Bar (Fig. 3).
4. Press Seal Button (E). Red Seal Indicator Light 5
will illuminate (Fig. 4).
5. Using two hands, slowly insert open end of bag, curl down,
into Vacuum Channel (F) until clamp motor starts.
6. When red Seal Indicator Light 5 turns off,
sealing is complete. You may remove bag from
the Vacuum Channel (F).
7. You now have one sealed end (Fig. 5).
8. Now you are ready to vacuum seal with your new bag
(see next page).
K
Insert Bag
Curl Downward
AUTOMATICALLY
SEALS!
Do Not Press Button!
J
OPEN END
BOUT OUVERT
BOUT SCELLÉ
SEALED END
OPEN END
BOUT OUVERT
BOUT SCELLÉ
SEALED END
BOUT SCELLÉ
SEALED END
OPEN END
BOUT OUVERT
BOUT SCELLÉ
SEALED END
BOUT SCELLÉ
SEALED END
BOUT SCELLÉ
SEALED END
SEALED END
BOUT SCELLÉ
H
E
5
F
BOUT SCELLÉ
SEALED END
OPEN END
BOUT OUVERT
Insert Bag
Curl Downward
Fig. 3
HOW TO
FSFSSL4825-033_13EFM1.indd 9-10 7/23/13 10:07 AM
www.foodsaver.ca 1-877-804-5383
12
www.foodsaver.ca 1-877-804-5383
11
Using FoodSaver® Vacuum Sealing Accessories
Avoid wrinkles when inserting the bag into the
Vacuum Channel (F).
Wrinkles in seal may cause leakage and allow
air to return into bag. To eliminate any wrinkles
while inserting bag, gently slide bag cur l down
into the Vacuum Channel (F), and hold bag
with two hands gently stretching bag flat until
vacuum pump begins. If you find wrinkles after
sealing bag, simply cut bag open and vacuum
seal again.
If motor runs for more than 30 se conds without
stopping, consider the following:
If you are vacuum sealing with a bag,
make sure one end of the bag is properly sealed.
(See “How to Make a Bag From a Vacuum Sealing
Roll” on page 9.)
If vacuum sealing with an accessory, check
Handheld Sealer connections to ensure a
tight fit .
Removing Air from a Bag
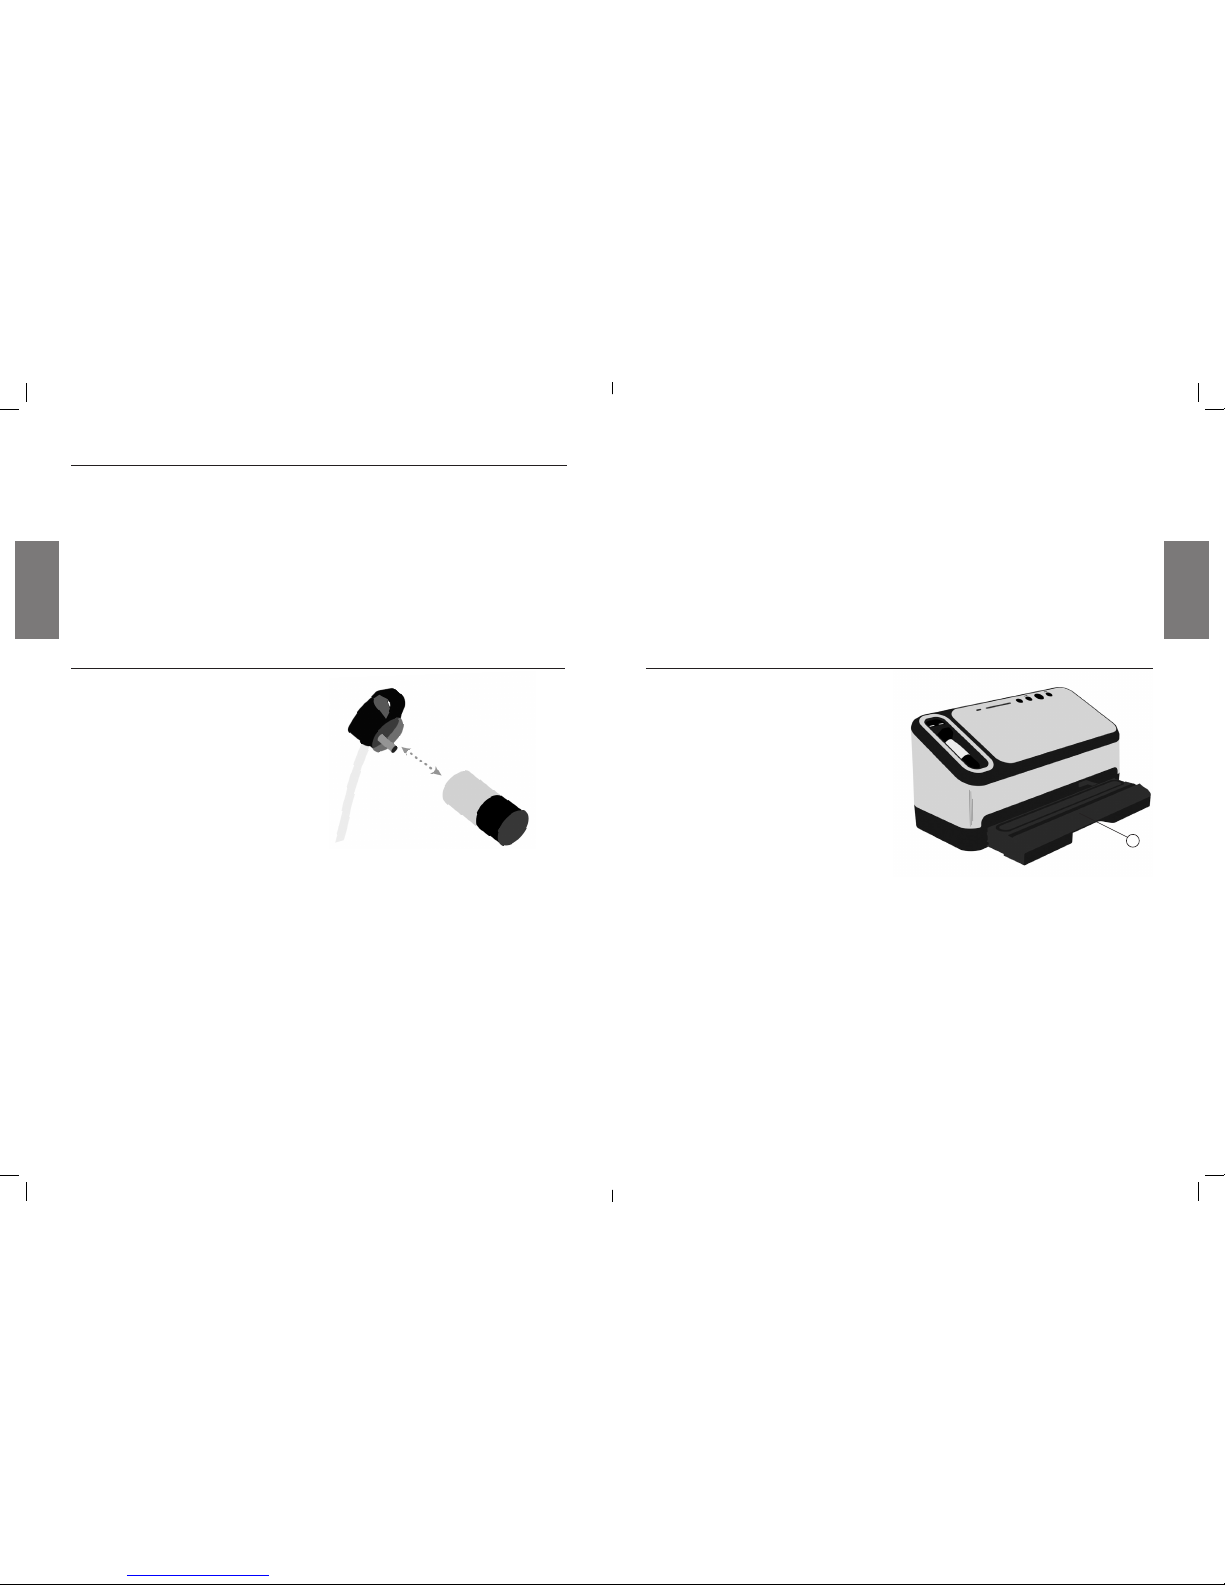
This FoodSaver® model comes with a convenient,
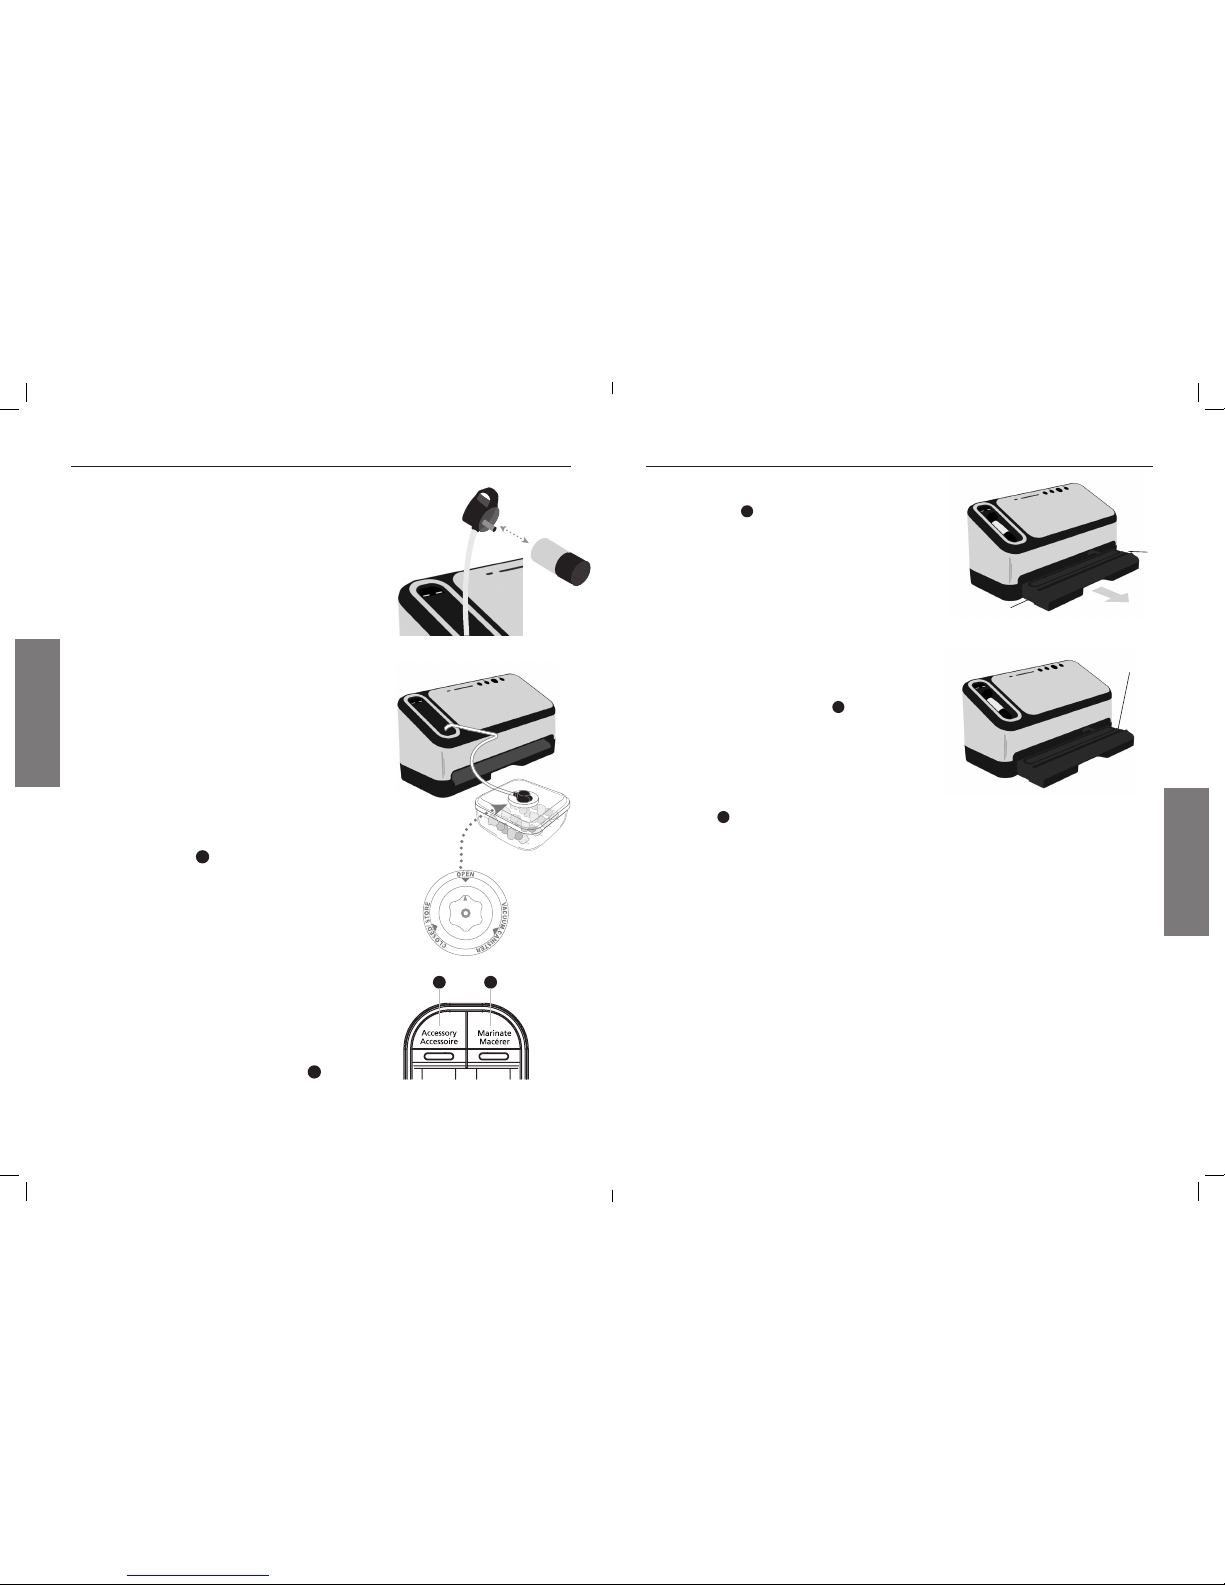
pull-out drawer to access the Drip Tray (O).
1. Simply slide it out, then pull up on side handles
of Drip Tray to remove.
2. Drip Tray can be emptied and washed with
warm, soapy water or in the dishwasher on
the top rack.
FreshSaver® Zipper Bags
1. Place food into Zipper Bag. Make sure not to
put any food under valve. Press zipper closed
with finger while bag is lying down on a f lat
surface.
2. Pull Retractable Handheld Sealer from appli-
ance. Place end over the gr ay valve on bag.
3. Push accessory but ton to begin vacuum
process. Motor will r un until vacuum process
is complete.
Containers
1. Prepare container according to FoodSaver®
Accessory Guidelines, which are included
with accessor y purchases.
2. Pull Retractable Handheld Sealer from
appliance. Place end over gr ay valve
on container.
3. Push accessory but ton to begin vacuum
process. Motor will r un until vacuum process
is complete.
Canisters
1. Prepare canister according to FoodSaver®
Accessory Guidelines, which are included with
accessory purchases.
2. Pull Retractable Handheld Sealer from
appliance and remove clear bot tom portion of
Retractable Handheld Sealer from top handle.
Insert the end into the port on accessory. Twist
tab while inserting to ensure a tight f it.
3. Push Accessory Button to begin v acuum
process. Motor will r un until vacuum process
is complete. (To Marinate, follow instruc tions
found in Marinating with your FoodSaver®
Appliance section of this Guide on page 13.)
4. When motor turns of f, gently t wist and remove
Retractable Handheld Sealer from accessory.
Emptying Drip Tray
Fig. 1
HOW TO
HOW TO
O
Note: if you are using a canister with large white
knob, rotate knob clockwise to
the “Closed” position, then gently t wist
and remove Retractable Handheld Sealer
from accessory.
5. To test vacuum, simply tug on accessor y lid.
It should not move.
6. To retract Handheld Sealer, while holding
unit, gently pull to allow hose to retract into
appliance. Do not release f reely as it may
damage the Retractable Handheld Sealer.
Important: When pulling hose Do N ot extend
beyond green line marked on hose.
Note: App liance should be used in vertical
orientation and not laid on i ts back.
Note: App liance will time out after a couple of
minutes if vacuum cannot be re ached.
FSFSSL4825-033_13EFM1.indd 11-12 7/23/13 10:07 AM
www.foodsaver.ca 1-877-804-5383
14
www.foodsaver.ca 1-877-804-5383
13
To Clean Appliance:
Press Power Button
9
and remove Power Cord
from electrical outlet. Do not immerse in liquid.
Slide out Drip Tray Drawer (O). Remove Drip Tray
for cleaning by pulling up on the two side tabs.
Check Lower Gasket (N) around Drip Tray (O)
to make sure it is free from food materials.
Do not attempt to remove gaskets.
Antibacterial Drip Tray:
Empty Drip Tray after each use. Wash in warm soapy
water or place in top rack of dishwasher. The Adjustable
Food Sensors in the Drip Tray (O) will not function correctly
if liquid is allowed to remain in Drip Tray.
This appliance has a Tray Full indicator
3
. When excess
liquid fills the Drip Tray, the unit will turn off and the
Tray Full Indicator light will activate. To resume normal
operation, slide out Drip Tray Drawer. Remove Drip Tray
for cleaning by pulling up on the two side tabs. When
replacing drip tray, set the right end of the drip tray into
place, then firmly snap both sides down. Appliance can
be used without Drip Tray, however the Adjustable Food
Sensor setting
7
will not function without the Drip Tray.
Care and Cleaning
CARE & CLEANING
Remove All Food
Around Gaskets
Push In
Tabs
Push In
Tabs
DO NOT
REMOVE
GASKETS
Your FoodSaver® Vacuum Sealing System has a special
Quick Marinate Cycle which will last about ten minutes.
The FoodSaver® Quick Marinating Canister is the perfect
FoodSaver® accessory for marinating foods.
During the Marinate Cycle, the vacuum pump will “hold”
the vacuum for several minutes then release the vacuum,
allowing the food to “rest” for 30 seconds. This process then
repeats. This “pulsing” action of “vacuuming and resting”
will allow for quicker more flavorful marinating.
Important Note: During the Quick Marinate Cycle,
make sure knob on lid of the Quick Marinating Canister
is set to OPEN. Do not set knob to Vacuum during the
Marinate Cycle.
1. P repare enough of your favorite mar inade to fully
cover food inside a marinat ing canister.
Always le ave at least one inch (2.54 centimeters)
of space between contents and top of rim.
2. Make sure rubber gasket under neath lids as well as rim
of marinating canister is f ree from food materials.
3. Pull out Ret ractable Handheld Sealer from your
FoodSaver® appliance. Remove clear bot tom portion of
Retractable Handheld Sealer fr om top handle (Fig. 1).
4. Insert the end into the port on the canister. Make sure
knob on accessor y lid is set to OPEN (Fig. 2).
5. Make sure lid is firmly at tached to marinator base.
6. Press Marinate button
2
on the control panel (Fig. 3).
7. Your FoodSaver® Vacuum Sealing System will now
begin the Quick Marinate Cycle. The Marinate Indicator
Light will f lash to indicate the marinating process has beg un.
8. During the initial vacuum cycle the Marinate Mode Indic ator
will illuminate. While Marinating, the Vacuum Prog ress
Display will blink during the Vacuum H old or Rest Cycle.
9. To preser ve food safely, after completing t he marinating
cycle, the appliance will sig nal with short beeps to indicate
your Quick Marinate Cycle is completed. Press any but ton
to silence the signal. You may now cook or refriger ate your
marinated food.
10. To use the Quick Marinat ing Canister for extended vacuum
storage (beyond the shor t Marinate Cycle): Rotate knob to
Vacuum/Canister position, connect the Retract able Handheld
Sealer (as above) and select Accessory M ode
1
from the
control panel. When motor turns of f, rotate knob clockwise
to the “Closed” posit ion, then gently twist and remove
Retractable Handheld Sealer fr om accessory.
Marinating with your FoodSaver® Appliance
Fig. 3
2
Fig. 2
HOW TO MARINATE
Fig. 1
1
Slide out drawer to
access Drip Tray
FSFSSL4825-033_13EFM1.indd 13-14 7/23/13 10:07 AM
 Loading...