

FoodSaver V3800 series User Manual
Quick Start Guide
& User Manual
for V3800 series appliances
Registering your appliance is quick and easy at www.prodregister.com/foodsaver. If you register on our website,
you will have the opportunity to receive special bag and accessory introductory offers. Refer to the registration card
in the box.
For more usage tips and safety information, please refer to the FoodSaver
www.foodsaver.com.
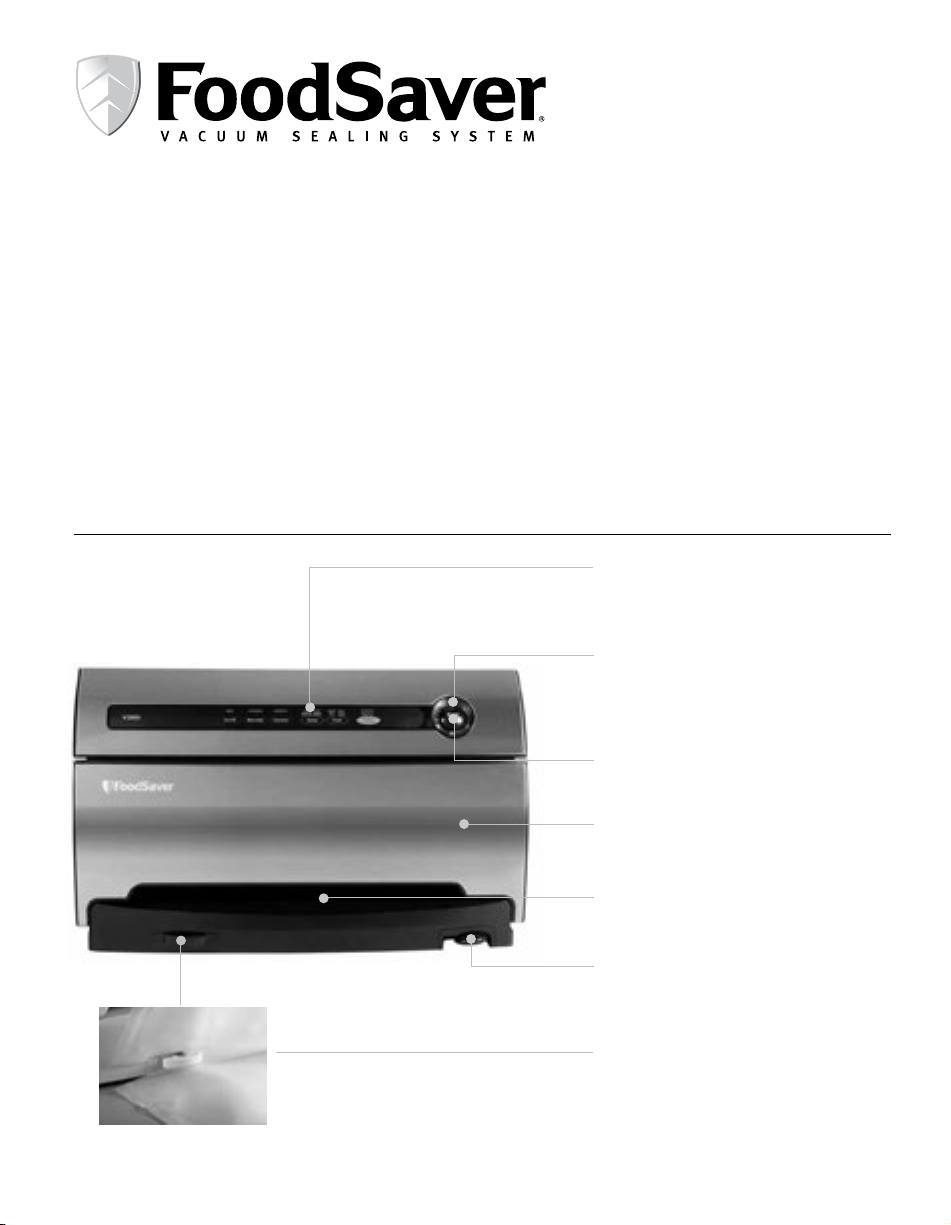
Features of Your FoodSaver® Appliance
®
Reference Guide or visit our website at
A. Controls and Indicator Lights
To indicate current setting, vacuum
progress and for added control.
B. Vacuum Progress Display
Blue lights signal progression of
vacuuming and sealing process.
All lights extinguish when the full
process is finished.
C. Seal Button
CrushFree™ Instant Seal feature.
Prevents crushing delicate items.
D. Appliance Door
Opens to access Built-in Roll Holder
and Cutter.
E. Vacuum Channel
Simply insert bag and the FoodSaver®
appliance does the rest.
F. Retractable Accessory Hose/
Accessory Port
Accessory hose can be used with all
FoodSaver® Brand Accessories.
G. Integrated Bag Opener
Quick and convenient, opens sealed
bags with ease.
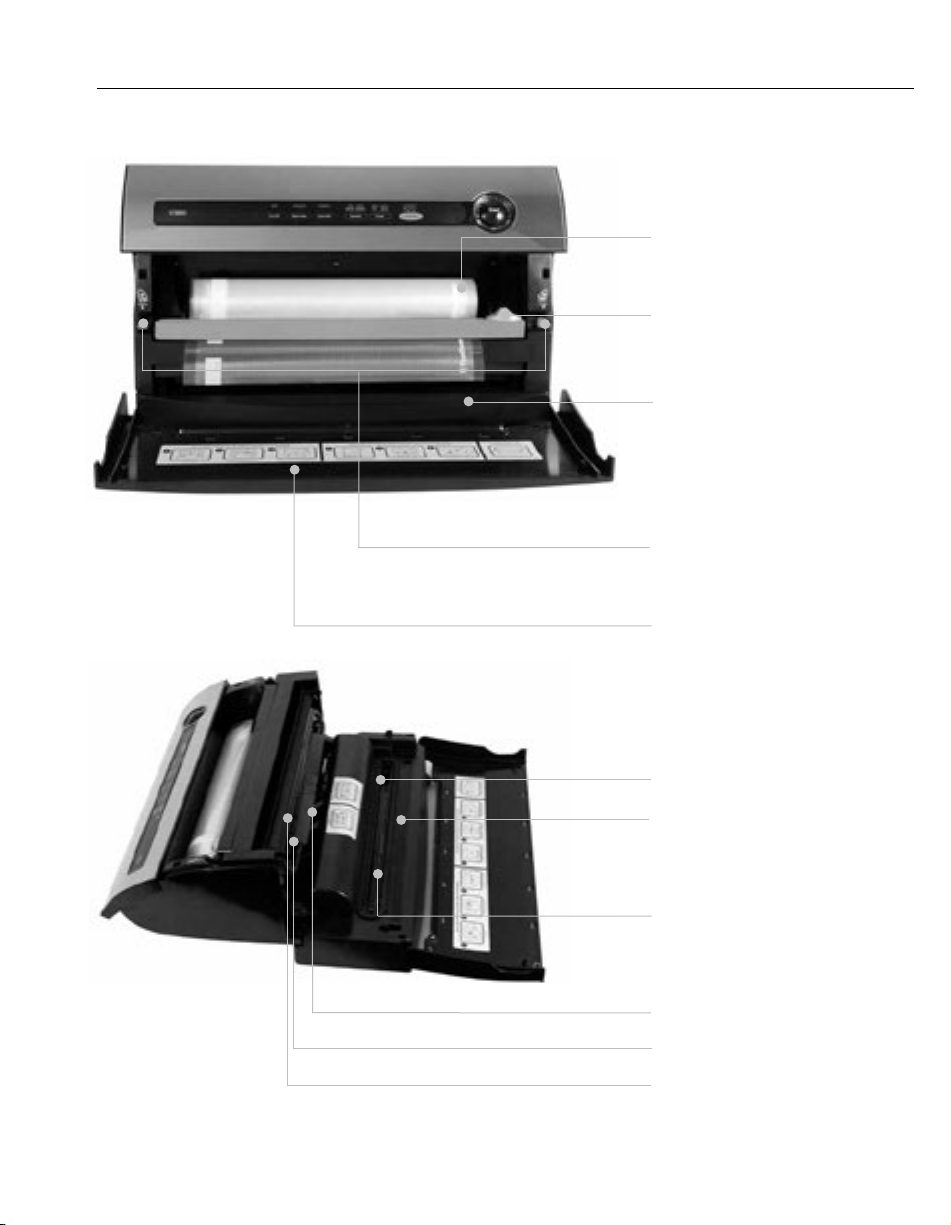
Features of Your FoodSaver® Appliance
H. Built-in Roll Holder
For storage of FoodSaver
Vacuum Sealing Rolls.
I. Roll Cutter
Simplifies making
custom-sized bags.
J. Auto Bag Sensing
Simply insert open end of bag
into the vacuum channel and the
machine will sense and grasp the
bag, vacuum, seal and shut-off
automatically.
K. Release Buttons
To open appliance
for cleaning.
L. Appliance Door
Opens to access Built-in
Roll Holder and Cutter.
M. Foam Gasket
®
N. Extra-wide Sealing Strip with
Non-stick Coating
Provides extra secure, airtight
seal that’s two times wider.
O. Drip Tray
Catches overflow liquids
and contains Food Sensors
to detect liquid.
P. Upper Bag Detection Tray
Q. Upper Gasket
R. Rubber Seal Profile
2

Features of Your FoodSaver® Appliance
Indicator
LEDs
NORMAL
GENTLE
DRY
V3860
ON/OFF
MARCHE/ARRÊT
MARINATE
MACÉRER
ACCESSORY
ACCESSOIRE
NORMALE
SPEED
VITESSE
DÉLICATE
SEC
FOOD
NOURRITURE
MOIST
HUMIDE
2
Tray Full
Indicator
TRAY FULL
RAMASSE-GOUTTES PLEIN
CANCEL
ANNULER
PulseVac
LED*
PULSEVAC™
9
Seal
™
/MC
Button
SEAL
SCELLER
10
Vacuum
Progress
Display
Marinate
Mode
3
1
POWER BUTTON:
Power Button
1
Press the power button to begin. The Power Indicator,
Speed Indicator and Food Indicator lights will become
illuminated. After Vacuum Sealing, press Power Button to
turn appliance Off. Note: After 12 minutes, the
appliance will turn Off automatically.
2
TRAY FULL INDICATOR LIGHT:
During the vacuum sealing process, small amounts of liquids, crumbs or food particles can be inadvertently pulled
into the Drip Tray (O). When excess liquid fills the Drip
Tray, the unit will turn off and the Tray Full Indicator 2
will activate. To resume normal operation, remove the Drip
Tray, empty liquid, wash in warm soapy water or place
in top rack of dishwasher. Dry and replace Drip Tray in
trough. (See Care and Cleaning)
3
MARINATE MODE BUTTON
A ten minute predetermined sequence of vacuum pulse to
rest ratio allowing foods to get optimum flavor
infusion in the least amount of time. See “Marinating with
your FoodSaver®” section on page 5.
4
CANISTER MODE BUTTON
Press to achieve best vacuum for canisters and
accessories. Push Canister Vacuum Button 4 to begin
vacuum process. Motor will run until Vacuum Sealing
Process is complete.
5
SPEED SETTINGS BUTTON
When vacuum sealing delicate items, press Speed Setting
Button 5 so that the gentle speed indicator light is illuminated. For more control you may press Seal Button 9
at any time to stop vacuum and begin automatic sealing
process. Note: Appliance will default to Normal speed
upon pressing the Power On Button or when power has
been interrupted.
6
ADJUSTABLE FOOD SETTINGS BUTTON
For optimal vacuuming and sealing of moist or juicy foods,
press the Adjustable Food Setting Button 6 until the
Moist Indicator Light is illuminated. Choose the dry food
setting for foods without liquid.
Canister
Mode
4
Speed
Settings
Adjustable
Food Settings
5 6
Cancel
Button
7
PulseVac
Button*
8
™
Seal Indicator
11
The Moist Food Indicator light will flash when Food
Sealing Sensors automatically detect any moisture or
liquid in the drip tray (O). Note: Appliance will default
to Dry setting upon pressing the Power Button or when
power has been interrupted, unless liquid is detected in
the Drip Tray. (See Care and Cleaning section of this Quick
Start Guide).
7
CANCEL BUTTON
Immediately halts the current function opening the
Vacuum Channel.
8
PAUSE OR PulseVac™ CONTROL BUTTON
(*not available on all models)
Use to manually control the vacuum process and avoid
crushing delicate items. See tips section for
further information.
SEAL BUTTON
9
CrushFree
™
Instant Seal feature-
This button has four uses:
1. Press to immediately stop the vacuum process
and begin sealing the bag. This prevents crushing
delicate items such as bread, cookies and pastries.
2. Press to create a seal when making bags from a
FoodSaver® Roll.
3. Press to create a seal on Mylar bags (such as a
potato chip bag) to keep food sealed airtight.
4. Press during PulseVac™ mode to seal bag.
10
VACUUM PROGRESS DISPLAY
Displays vacuum levels as the bag/canister is
evacuated.
11
SEAL INDICATOR LIGHT
Constant Red light indicates sealing process is engaged.
(Flashing light indicates error)
3
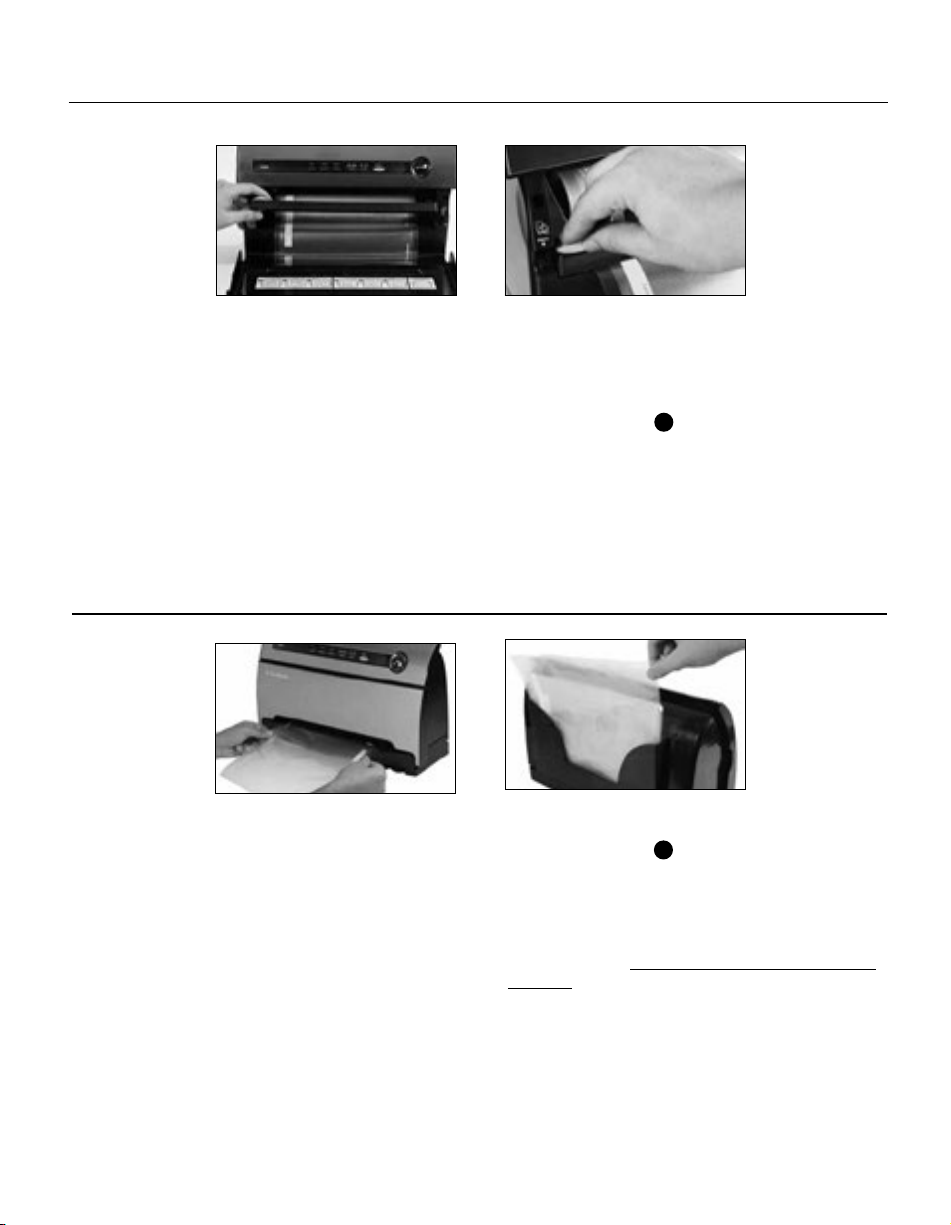
How to Make a Bag from a FoodSaver® Vacuum Sealing Roll
Lift Roll Cutter
Fig. 1 Fig. 2
1. Open appliance door and place roll into Roll Storage
Compartment (H). For Best results, insert roll with
material flap down. Note: Bags can be sealed with
appliance door either open or closed.
2. Lift up Bag Cutter Bar (i) and place bag material
beneath the cutter bar (See Fig.1).
3. Pull out enough bag material to hold item being
vacuum packed, plus 4 inches (10.16 centimeters).
Lower the Cutter Bar and slide Bag Cutter (i) across
the Cutter Bar (See Fig.2).
4. Press Seal Button (C). Red seal light will illuminate.
5. Using two hands, insert open end of bag into Vacuum
6. When red seal light 11 turns off, sealing is
7. You now have one sealed end.
8. Now you are ready to vacuum seal with your new bag
Slide Cutter
Channel (E) until clamp motor starts. Bag must be
centered between arrows.
complete. You may remove bag from the
Vacuum Channel (E).
(See below).
How to Vacuum Seal with FoodSaver® Vacuum Sealing Bags
Insert Bag
Optional Bag Storage
Fig. 3 Fig. 4
1. Begin with a FoodSaver
(or create a bag as described in the “How to Make a
Bag from a Roll” section above).
2. Place item(s) in bag, allowing at least 3 inches of
space between bag contents and top of bag.
3. Using two hands, insert open end of bag into Vacuum
Channel (E) until clamp motor starts (See Fig.3). The
vacuum progress lights will illuminate.
4. Continue to hold bag until vacuum pump starts. You
may now release bag. Note: To prevent crushing
delicate items, you may press Seal Button (C) at any
time to begin automatic sealing process.
®
Vacuum Sealing System Bag
5. When red Seal Light 11 turns off, remove bag.
Refrigerate or freeze if needed. (See FoodSaver
Reference Guide for food safety tips.) Note: Wait at
least 20 seconds between seals to allow appliance
to properly cool.
6. See page 7 for information on the Pre-cut Bag Storage
(Shown in Fig. 4). This accessory is not included with
all units.
®
4

Marinating with your FoodSaver® Appliance
Your FoodSaver® Vacuum Sealing System has a special
Quick Marinate Cycle which will last about ten minutes.
The vacuum motor will “hold” the vacuum for several
minutes then release the vacuum allowing the food to
“rest” for 30 seconds. This process will then repeat
two more times. This “Pulsing” action of “vacuuming
and resting” will allow for quicker marinating. When the
Quick Marinate Cycle is completed the appliance will
beep to signal marinating is complete.
The FoodSaver
FoodSaver
®
Quick Marinator Canister is the perfect
®
Accessory for marinating foods. Foods will
marinate in minutes when vacuum sealed because the
vacuum process opens the pores of the food and absorbs
the marinade more quickly.
®
Important Note: Use the FoodSaver
Quick Marinating
Canister with clear lid and large white knob. During the
Quick Marinate Cycle, make sure knob on accessory lid
is set to OPEN. Do not set knob to Vacuum. The Vacuum
position on the knob will allow the Quick Marinating
Canister to be used for extending
vacuum storage.
1. Prepare enough of your favorite marinade to fully
cover food inside a marinating canister.
Always leave at least one inch (2.54 centimeters) of
space between contents and top of rim.
2. Make sure rubber gasket underneath lids as well as
rim of marinating canister is free from food materials.
3. Make sure Accessory Hose is securely inserted into
port on the FoodSaver
4. Make sure knob on accessory lid is set to OPEN.
5. Make sure lid is firmly attached to marinator base.
6. Press Marinate button 3 on the control panel.
7. Your FoodSaver
begin the Quick Marinate Cycle. The Marinate
Indicator Light will flash to indicate the marinating
process has begun.
8. During the initial vacuum cycle the Marinate Mode
Indicator will illuminate. While Marinating, the
Vacuum Progress Display will blink during the Vacuum
Hold or Rest Cycle.
9. To preserve food safely, after completing the
marinating cycle, the appliance will signal with
short beeps to indicate your Quick Marinate Cycle is
completed. Press any button to silence the signal. You
may now cook or refrigerate your marinated food.
Tips for Successful Vacuum Sealing
General Tips
®
Quick Marinator lid.
®
Vacuum Sealing System will now
Tips for Successful Vacuum Sealing
1. Vacuum sealing is NOT a substitute for the heat process of
canning. Perishables still need to be refrigerated or frozen.
2. For best results, use FoodSaver
and Accessories.
3. During the vacuum sealing process, small amounts of
liquids, crumbs or food particles can be inadvertently
pulled into Drip Tray (O), clogging the pump and
damaging your appliance.
To prevent this, follow these tips:
a. For moist and juicy foods: Freeze first and avoid
overfilling bags. You can also place a folded paper
towel inside top of bag, and below seal area, before
vacuum sealing.
b. For soups, sauces and liquids: Freeze first and avoid
overfilling bags. Or, use a canister in refrigerator.
c. For powdery or fine-grained foods: Avoid overfilling bags
or use a canister. You can also place a coffee filter or
paper towel inside before vacuum packaging.
d. Empty drip tray (O) after each use.
®
brand Bags, Canisters
4. To avoid overfilling, always leave at least 3 inches
(7.62 centimeters) of bag material between bag contents
and top of bag. Then leave at least one additional inch
(2.54 centimeters) of bag material for each time you plan
to reuse bag.
5. Do not create your own side seams for a FoodSaver
Bag. Our bags are manufactured with a special side seam,
which is sealed all the way to the outer edge.
6. To prevent wrinkles in a seal when vacuum sealing bulky
items, gently stretch bag flat while inserting into the
vacuum channel and hold until pump begins.
7. If you are unsure your bag was sealed properly, simply
reseal bag.
8. When you are vacuum sealing items with sharp edges
(dry spaghetti, silverware, etc.), protect bag from punctures
by wrapping item in soft cushioning material, such as a
paper towel. You may want to use a canister or Mason jar
instead of a bag.
9. When using accessories, remember to leave one inch
(2.54 centimeters) of space at top of canister or container.
10. Pre-freeze fruits and blanch vegetables before vacuum
sealing for best results. See FoodSaver
included with your appliance for more information.
(continued on next page)
®
Reference Guide
®
brand
5
 Loading...