

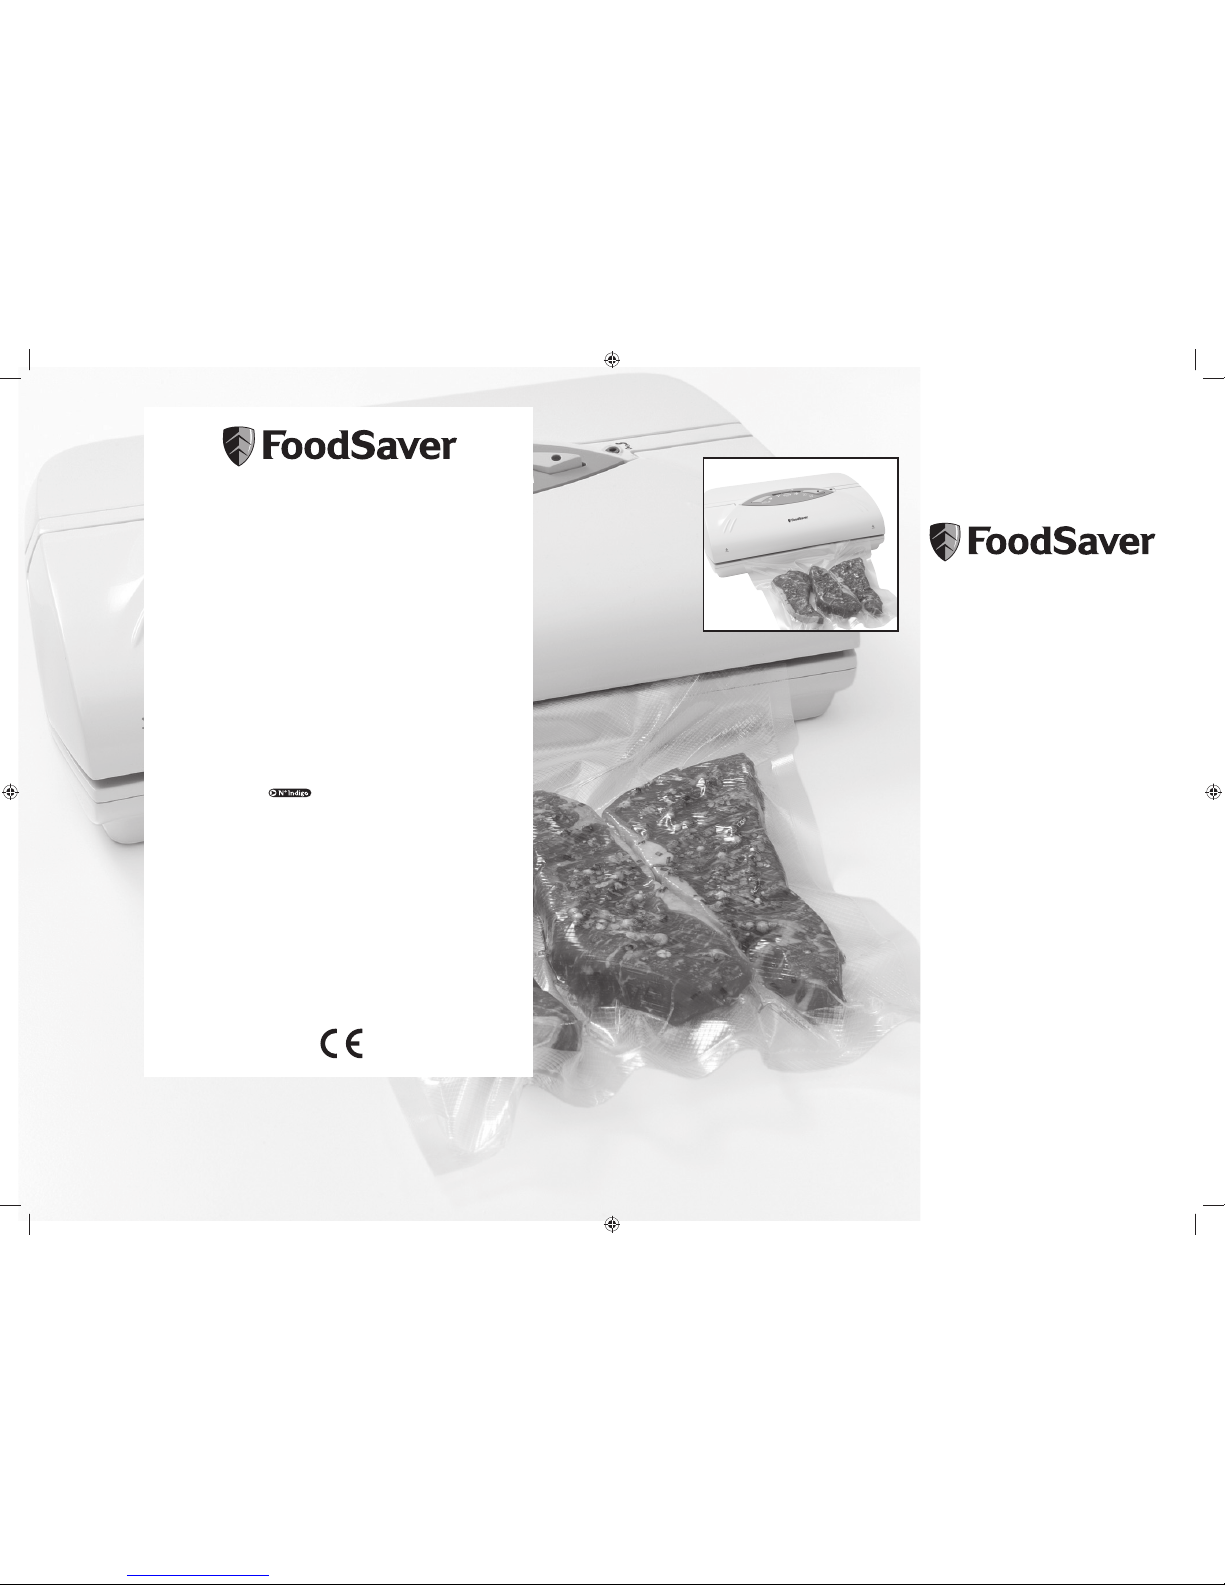
FoodSaver V1040-I Owner's Manual
139754/9100060001933 V1040I10MLM1
GCDS-FSV15834-JC
V1040-I
VACUUM FOOD SEALER
Owner’s Guide
Guida del proprietario
Guía del propietario
Bedienungsanleitung
Notice d'utilisation
LEGGERE E CONSERVARE QUESTE ISTRUZIONI
READ AND SAVE THESE INSTRUCTIONS
LEA Y CONSERVE ESTAS INSTRUCCIONES
LESEN SIE DIESE ANLEITUNG
AUFMERKSAM DURCH, UND
BEWAHREN SIE SIE AUF
LIRE ET CONSERVER CES INSTRUCTIONS
ENGLISH 2
FRANÇAIS/FRENCH 12
DEUTSCH/GERMAN 21
ESPAÑOL/SPANISH 30
ITALIANO/ITALIAN 39
TABLE OF CONTENTS
Distributed by
Holmes Products (Europe) Limited
1 Francis Grove
London SW19 4DT
England
Fax: +44 (0)20 8947 8272
Email: enquiriesEurope@jardencs.com
UK - Free phone Customer Service Helpline
– 0800 052 3615
For replacement bags and rolls please call
– 0870 060 1855
Holmes Products France
1015, Rue du Maréchal Juin
Z.I Vaux - Le - Pénil
77000 Melun – France
Phone: +33 1 64 10 45 80
Fax: +33 1 64 10 02 32
France
MACOM srl
Via G. da Procida, 10
20149 Milano
Italia
Tel. 02 33 10 76 56
Fax 02 33 10 45 23
Email: info@macomsrl.it
www.macomsrl.it
Elras GmbH
Schleißheimer Straße 93 a
85748 Garching bei München, Deutschland
Tel.: 089 / 5480195 – 0
Fax: 089 / 5480195 – 600
0 800 82 08 17
© 2010 Sunbeam Products, Inc. doing business as Jarden Consumer Solutions. All rights reserved. Imported and
distributed by Holmes Products (Europe) Ltd., 1 Francis Grove, London SW19 4DT, United Kingdom. Printed in PRC
© 2010 Sunbeam Products, Inc. faisant affaires sous le nom de Jarden Consumer Solutions. Tous droits réservés.
Importé et distribué par Holmes Products (Europe) Ltd., 1 Francis Grove, London SW19 4DT, United Kingdom.
Imprimé en RPC
TM
TM
V1040-I_10MLM1.indd 1-2V1040-I_10MLM1.indd 1-2 3/8/10 2:07:37 PM3/8/10 2:07:37 PM
-3--2-
IMPORTANT SAFEGUARDS
START ENJOYING THE BENEFITS OF YOUR FOODSAVERTM VACUUM
FOOD STORAGE SYSTEM
With the new Press/Hold and Release system, you firmly press down on the lid and when the HandsFree Indicator Light illuminates you can remove your hands and let your vacuum sealer do the rest!
The machine continues to vacuum and then seals the bag.
Your unit includes the following:
• Food Sealer
• Starter Bags and Roll
• Accessory Hose
By preparing foods and meals in advance and storing with the FoodSaver
TM
Vacuum Storage
System, you save time and money.
This appliance is for HOUSEHOLD USE ONLY.
Do not attempt to service this product. Service should be performed by an authorised service
representative.
A short power-supply cord is provided to reduce the risk resulting from becoming entangled in or
tripping over a longer cord. Extension cords are available and are not prohibited from being used
when care is exercised in their use. When an extension cord is used the marked electrical rating of
the extension cord shall be no less than the marked electrical rating of the appliance. The longer
cord shall be arranged so that it does not drape over the counter-top or tabletop where it is capable
of being tripped over, snagged, or pulled on unintentionally, especially by children.
Please read this manual carefully before using this appliance, as correct use will give the best
possible performance.
Retain these instructions for future reference.
When using electrical appliances, basic safety precautions should always be followed, including the
following:
• Read the instructions carefully.
• Do not use the Vacuum Food Sealer on wet or hot surfaces, or near a heat source.
• Always use the Vacuum Food Sealer on a level flat surface.
• Do not immerse any part of the Vacuum Food Sealer, power cord or plug into water or other liquid.
• To disconnect, unplug the power cord from the electrical outlet. Do not disconnect by pulling on
the cord. Always unplug the Vacuum Food Sealer before cleaning.
• Do not operate the Vacuum Food Sealer with a damaged power cord or plug.
• Do not operate the Vacuum Food Sealer if it malfunctions or is in any way damaged. If the cord
or the machine is damaged, it must be returned to an authorised service center. See warranty for
more information.
• Use the Vacuum Food Sealer only for its intended use.
• Close supervision is required when this product is used near children.
• This appliance is not intended for use by persons (including children) with reduced physical,
sensory or mental capabilities, or lack of experience and knowledge, unless they have been
given supervision or instruction concerning use of the appliance by a person responsible for
their safety. Children should be supervised to ensure that they do not play with the appliance.
• Do not allow the Vacuum Food Sealer to be used as a toy.
• The Vacuum Food Sealer is not for commercial use. If sealing more than 30 bags in a row, wait
at least 25 minutes before continuing to use your vacuum food sealer.
CAUTION: This Vacuum Sealer is equipped with a technologically-advanced, safety system that will
auto-reset the Vacuum Sealer in case of a potential overheat situation. After having sealed a few bags,
the system will automatically shut the unit off for about one minute.
IMPORTANT SAFEGUARDS
V1040-I_10MLM1.indd 3-4V1040-I_10MLM1.indd 3-4 3/8/10 2:07:38 PM3/8/10 2:07:38 PM

HOW TO MAKE CUSTOM SIZED BAGS WITH THE INTEGRATED BAG ROLL
-4-
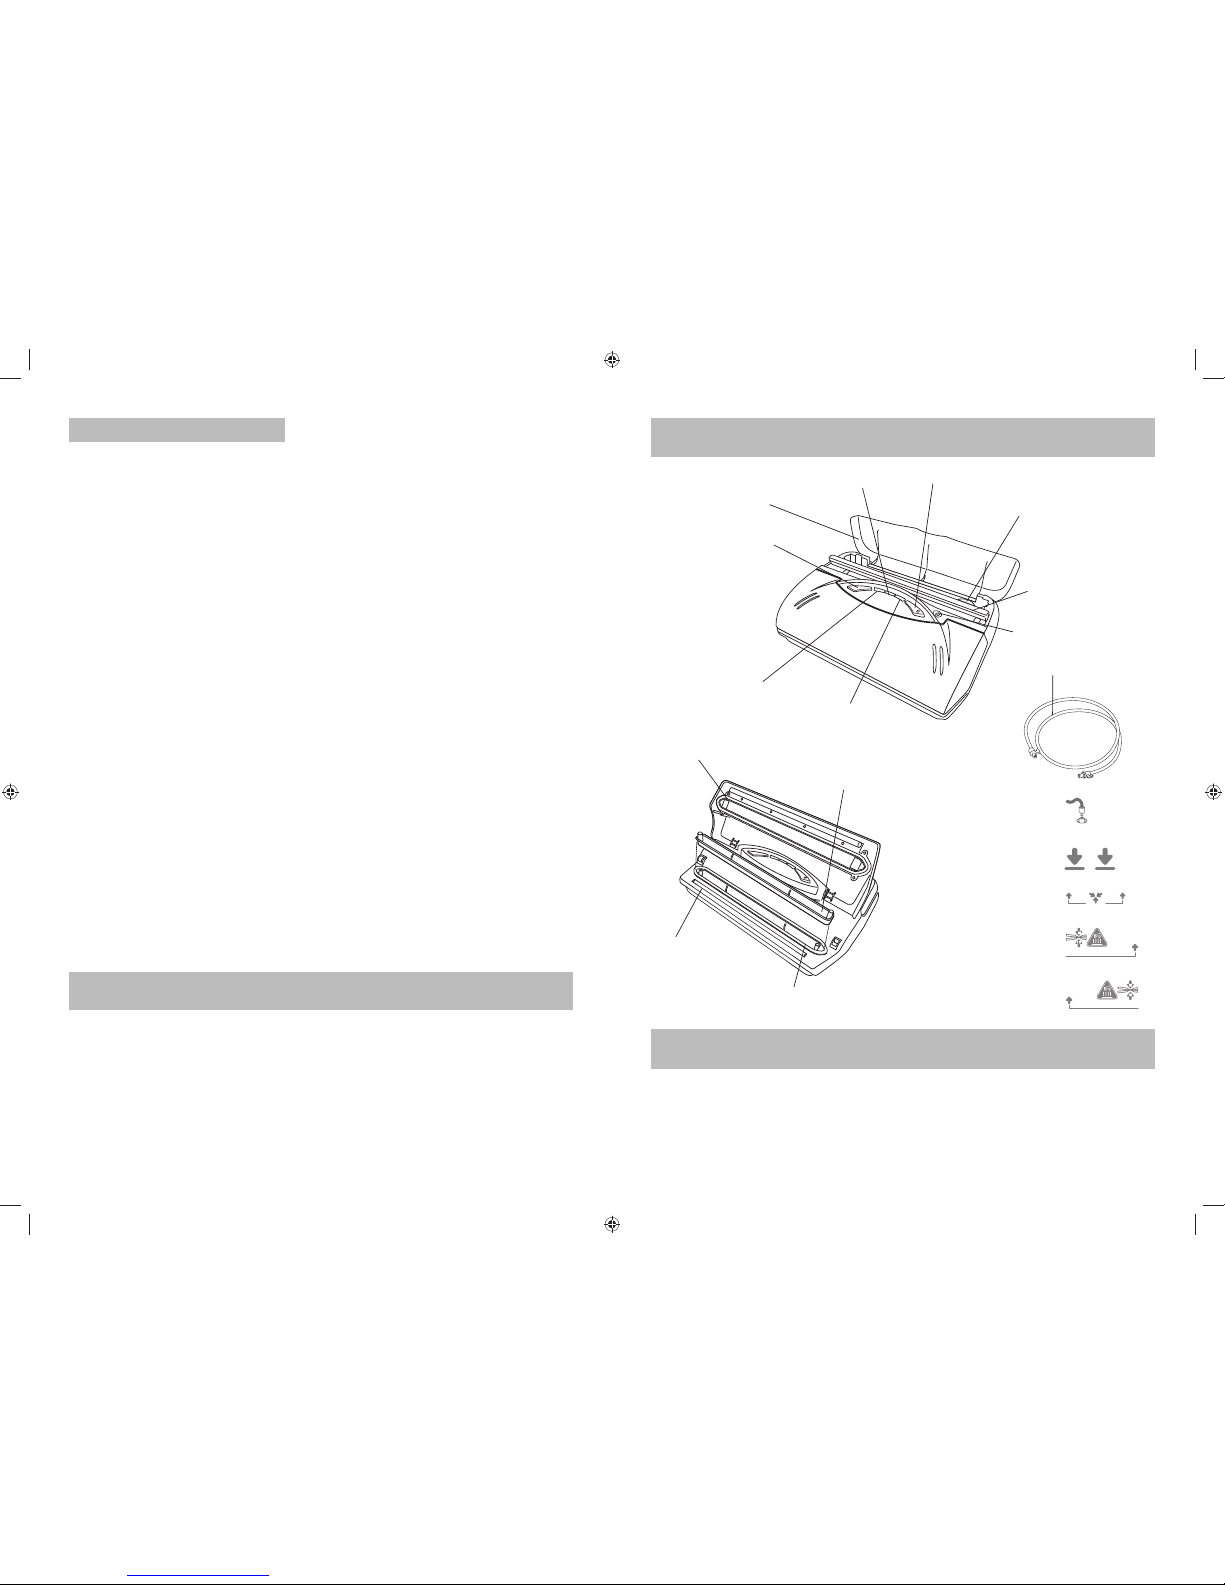
KNOW YOUR FOODSAVERTM VACUUM FOOD STORAGE SYSTEM
PREPARING YOUR FOODSAVERTM VACUUM FOOD
STORAGE SYSTEM FOR USE
Carefully unpack your FoodSaverTM Vacuum Sealer and place it on a level surface. Be sure to
remove all packing materials from the inside of the machine.
Clean all parts according to the CARE AND CLEANING section in this manual before first use.
BAG COVER
OPEN/CANCEL BUTTON
HANDS-FREE INDICATOR LIGHT
SEALING INDICATOR
LIGHT
ACCESSORY PORT
ACCESSORY HOSE
SEALING STRIP
LOWER SEALING
GASKET
REMOVABLE
DRIP TRAY
VACUUM INDICATOR
LIGHT
SEAL LEVEL SWITCH
BAG CUTTER BAR
BAG CUTTER
UPPER SEALING
GASKET
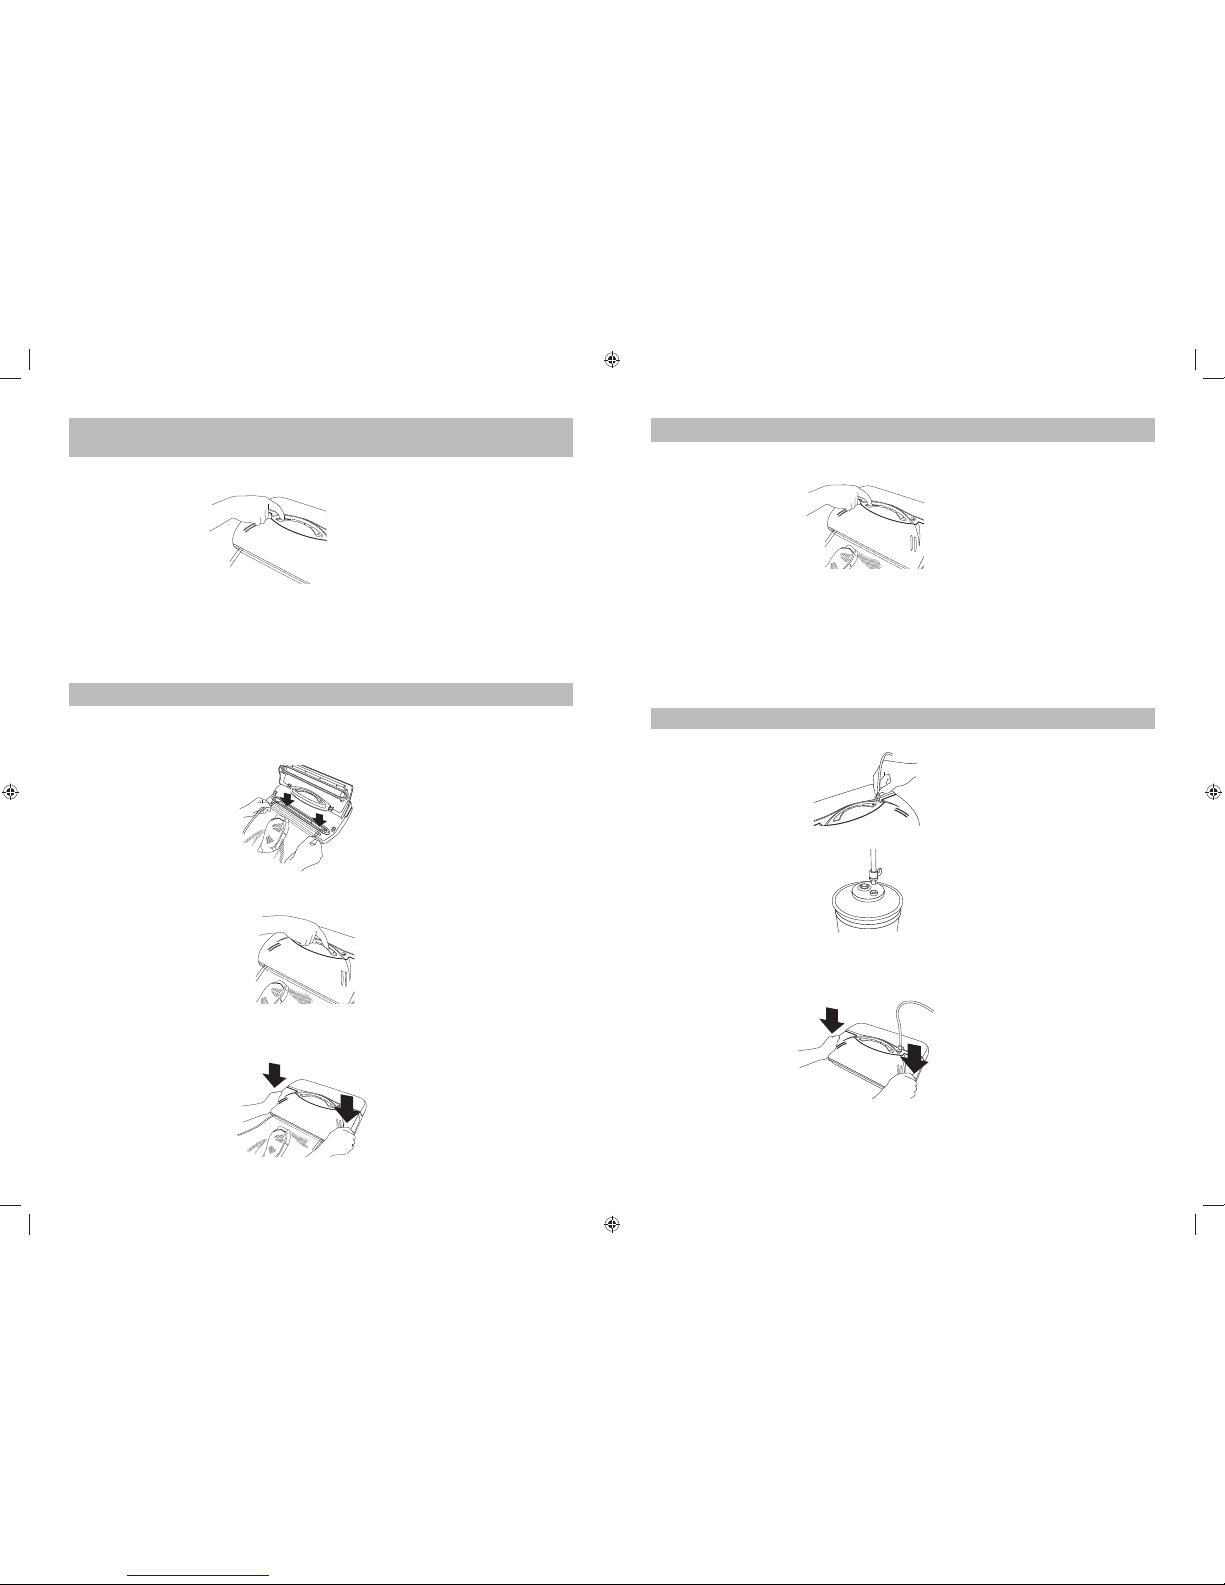
1. Open Lid and place bag roll into roll storage compartment.
2. Lift up Bag Cutter Bar.
3. Pull enough bag material from roll to hold item to be vacuum packaged, plus 7.5 cm. Lower the
Bag Cutter Bar.
4. Cut desired bag length from Bag Roll. Make sure to cut a straight line. Plug in Power Cord.
5. Open the Lid. Place one end of the cut bag between the Sealing Strip and the Lower Sealing
Gasket. DO NOT place open end of bag in the Drip Tray.
6. Close Lid. Position hands on both sides of the Lid. Press firmly on both sides of the Lid and hold
until the motor starts.
NOTE: Sealer will not operate if Lid is not properly closed.
7. Continue to hold the Lid. When the Hands-free Indicator Light illuminates, it is safe to remove
your hands from the Lid. The Sealing Indicator Light illuminates when the unit starts sealing
the bag.
-5-
ACCESSORY PORT
HANDS PRESS DOWN
HERE(PRESSURE)
VACUUM CHANNEL
CAUTION / SEALING
STRIP(LEFT)
CAUTION / SEALING
STRIP(RIGHT)
V1040-I_10MLM1.indd 5-6V1040-I_10MLM1.indd 5-6 3/8/10 2:07:38 PM3/8/10 2:07:38 PM
-7-
HOW TO VACUUM SEAL WITH FOODSAVERTM BAGS (CONT.)
-6-
HOW TO MAKE CUSTOM SIZED BAGS WITH THE
INTEGRATED BAG ROLL (CONT.)
8. When the motor stops and the Progress Indicator Lights shut off, sealing is complete.
9. Press the Open/Cancel button.
10. The custom sized bag is ready for vacuum sealing.
NOTE: The Open/Cancel button can be used to cancel the process mid-cycle and open the Lid. The
bag will not be sealed when doing this.
CAUTION: This sealer is not for commercial use. If sealing more than 30 bags in a row wait at least
25 minutes before continuing to use your vacuum food sealer.
CAUTION: The unit has a cool down period between cycles. Wait 20 seconds before using again.
1. Place the items to be sealed into a pre-cut or custom sized bag. Leave at least 7.5 cm between
the contents and the top of the bag to allow for bag contraction.
2. Open the Lid and place the open end of the bag into the Drip Tray.
3. Close Lid.
4. Change Press to Select the appropriate Seal Level – Choose Moist for foods with high liquid
content or Regular for dry foods.
5. To begin the vacuum process, press down firmly on Lid with both hands and hold until the motor
starts. Continue to hold the Lid. When the Hands-free Indicator Light illuminates, it is safe to
remove hands from the Lid. The unit continues to vacuum and seal the bag.
HOW TO VACUUM SEAL WITH FOODSAVERTM BAGS
6. When the motor stops and the Progress Indicator Lights shut off, sealing is complete.
7. Press the Open/Cancel button.
8. Lift the Lid and remove the bag.
NOTE: The Open/Cancel button can be used to cancel the process mid-cycle and open the lid. The
bag will not be sealed when doing this.
CAUTION: This sealer is not for commercial use. If sealing more than 30 bags in a row wait at least
25 minutes before continuing to use your vacuum food sealer.
CAUTION: The unit has a cool down period between cycles. Wait 20 seconds before using again.
HOW TO VACUUM SEAL WITH OTHER BRAND ACCESSORIES
1. Firmly insert one end of the Accessory Hose that came with your machine into the Accessory
Port.
2. Attach the other end of the Accessory Hose to the accessory.
3. To begin the vacuum process, press down firmly on Lid with both hands and hold until the motor
starts. Continue to hold the Lid. When the Hands-free Indicator Light illuminates, it is safe to
remove hands from the Lid. The unit continues to vacuum. Once all of the air is removed, the
motor and indicator lights will automatically turn off.
NOTE: Sealer will not operate if Lid is not properly closed.
NOTE: The Open/Cancel button can also be used to cancel the process mid-cycle and open the Lid.
V1040-I_10MLM1.indd 7-8V1040-I_10MLM1.indd 7-8 3/8/10 2:07:38 PM3/8/10 2:07:38 PM

-9--8-
HINTS AND TIPS
• Save Money: Buy in bulk, separate food into meal size portions, vacuum seal, and freeze. Just
remove the sealed bag, thaw in the refrigerator, and prepare your meal.
• Save Time: Prepare meals in advance, vacuum seal, store in the refrigerator or freezer, and
reheat for a quick, no-hassle meal.
• Save Food: Vacuum seal leftovers to eliminate waste.
• Save Flavour: Wash, vacuum, seal, and freeze seasonal fruits and vegetables to enjoy any
time of the year.
• Save clothing, valuable documents, photographs, craft supplies, and much more.
• Portion Control: Separate food into individual portions, write nutritional information on the
bag, vacuum seal, and store.
• Keep Food Fresh Longer.
*FoodSaver
TM
vacuum food storage time estimates may vary depending upon preparation, quality of
food, and storage conditions.
1. Always unplug the unit before cleaning.
2. Do not immerse in water.
3. Do not use abrasives to clean the unit.
4. Wipe the outer surfaces with a soft, damp cloth and soap.
5. To clean the inside of the unit, wipe away any food or liquid with a paper towel.
6. Dry all parts thoroughly before you plug in and operate the unit again.
Cleaning the Removable Drip Tray
The FoodSaver
TM
Vacuum Food Sealer is equipped with a Removable Drip Tray to trap any liquid
that may be drawn from the bag. Normal cleaning practices should be maintained.
1. Lift the lid and carefully remove the Drip Tray as to not spill any contents.
2. Wash the Drip Tray in warm, soapy water or on the top rack of the dishwasher.
3. Allow to dry completely.
4. Replace Drip Tray.
Cleaning the Bags
1. Wash bags in warm, soapy water.
2. Bags can be washed in the dishwasher if desired. Turn bags inside out and spread them over
the top rack only.
3. Allow bags to dry completely before using.
Note: Do not reuse bags if they have been used to store raw meats, fish, oily foods or have been
boiled or microwaved.
CARE AND CLEANING
FOODSAVER
TM
VACUUM FOOD STORAGE SYSTEM
OUTPERFORMS CONVENTIONAL BAGS & WRAPS
Beef (Steaks, Roasts) 6 -12 months 2 - 3 years
Beef (Mince, Stew Meat) 3 - 4 months 1 year
Lean Fish (Cod, Haddock) 4 - 6 months 2 years
Fatty Fish (Salmon, Trout) 2 - 3 months 1 year
Pork Chops 4 - 6 months 2 - 3 years
Poultry 6 - 12 months 2 - 3 years
Soups and Sauces 2 - 4 months 1 - 2 years
Vegetables 6 - 9 months 2 - 3 years
Cheese 2 - 4 weeks 4 - 8 months
Deli Meats 3 - 4 days 7 - 10 days
Fruits (Berries) 1 - 5 days 7 - 10 days
Vegetables 2 - 7 days 7 - 14 days
Cereal 2 - 3 months 6 - 12 months
Coffee (Ground) 2 weeks 1 - 2 years
Cookies (Homemade) 1 - 2 weeks 3 - 6 weeks
Flour 6 - 8 months 1 - 2 years
Nuts 6 - 8 months 1 - 2 years
FREEZER
REFRIGERATOR
PANTRY
Storage Time with
Conventional Bags
& Wraps
Storage Time with
FoodSaverTM Vacuum
Food Storage System*
V1040-I_10MLM1.indd 9-10V1040-I_10MLM1.indd 9-10 3/8/10 2:07:38 PM3/8/10 2:07:38 PM

-11--10-
TROUBLESHOOTING
PROBLEM
SOLUTION
Nothing happens
when I press
down on the lid
• Make sure the power cord is correctly plugged into the electrical outlet.
• Make sure the power cord is not damaged in any way.
• Make sure the electrical outlet is operative by plugging in another
appliance. If it is not, please check the circuit breakers or fuses in your
home.
• Make sure the bag is positioned correctly in the vacuum channel.
(See Figures on previous pages)
• Press down firmly on both sides of lid.
• Wait 20 minutes to allow appliance to cool off, and then try using again.
Air is not
vacuumed from
the bag
• Check that there are not gaps, folds, wrinkles or holes in the pre-sealed
bags.
• Verify that the Drip Tray is inserted properly into the unit.
• Make sure the Accessory Hose is not inserted into the Accessory Port.
• Check for loose, worn or cracked Upper and Lower Sealing Gaskets.
• Foods with high liquid contents may prevent the bag from sealing
properly. Cut bag open and wipe top inside of bag and reseal.
• Check to see if bag is properly inserted into the Drip Tray.
• Make sure you've placed the bag in the proper place. When making a
bag from a roll, make sure end of cut piece is on Sealing Strip, NOT
over Lower Sealing Gasket or in Drip Tray.
Air has seeped
back into the
vacuumed bag
• Check the seal of the bag. There may be a hole or wrinkle that is
allowing air to re-enter the bag. Carefully cut the bag open and re-seal it,
or use an entirely new bag.
• Make sure there is no moisture or liquid from the food present within the
bag. You may need to cut open the bag and re-seal it in moist setting, or
use an entirely new bag. Partially freeze foods with excess liquids, prior
to vacuum sealing.
• Make sure there were no food items with sharp edges that may have
punctured the bag. If you find a puncture hole seal the item in an entirely
new bag.
• Make sure no liquids were drawn to the sealing strip area.
• Check for loose, worn or cracked Upper and Lower Sealing Gaskets.
• Moisture of foods with high liquid content will prevent the bag from
sealing properly. Cut bag open and wipe top inside of bag and reseal.
Bag melts
• The sealing strip may have been too hot during the sealing process.
Allow the unit to cool for 20 seconds between uses. If the bag continues
to melt, allow the unit to cool with the lid in the upright position for 25
minutes before using.
Bag will not seal
• Check that there aren’t any gaps, folds, wrinkles or holes in pre-sealed
edges.
• Moisture of foods with high liquid content will prevent the bag from
sealing properly. Cut bag open and wipe top inside of bag and reseal.
• Make sure you've placed the bag in the proper place. When making a
bag from a roll, make sure end of cut piece is on Sealing Strip, NOT
over Lower Sealing Gasket or in Drip Tray.
• Make sure you give the appliance time to cool down. Wait at least 20
seconds between seals.
Please keep your receipt as this will be required for any claims under this guarantee.
This appliance is guaranteed for 2 years after your purchase as described in this document.
During this guaranteed period, if in the unlikely event the appliance no longer functions due to a
design or manufacturing fault, please take it back to the place of purchase, with your till receipt and a
copy of this guarantee.
The rights and benefits under this guarantee are additional to your statutory rights, which are not
affected by this guarantee. Only Holmes Products (Europe) Ltd. (“Holmes”) has the right to change
these terms.
Holmes undertakes within the guarantee period to repair or replace the appliance, or any part of
appliance found to be not working properly free of charge provided that:
• you promptly notify the place of purchase or Holmes of the problem; and
• the appliance has not been altered in any way or subjected to damage, misuse, abuse, repair
or alteration by a person other than a person authorised by Holmes.
Faults that occur through, improper use, damage, abuse, use with incorrect voltage, acts of nature,
events beyond the control of Holmes, repair or alteration by a person other than a person authorised
by Holmes or failure to follow instructions for use are not covered by this guarantee. Additionally,
normal wear and tear, including, but not limited to, minor discoloration and scratches are not covered
by this guarantee.
The rights under this guarantee shall only apply to the original purchaser and shall not extend to
commercial or communal use.
If your appliance includes a country-specific guarantee or warranty insert please refer
to the terms and conditions of such guarantee or warranty in place of this guarantee or
contact your local authorized dealer for more information.
This marking indicates that this product should not be disposed with other household
wastes throughout the EU. To prevent possible harm to the environment or human
health from uncontrolled waste disposal, recycle it responsibly to promote the
sustainable reuse of material resources. To return your used device, please use the
return and collection systems or contact the retailer where the product was purchased.
They can take this product for environmental safe recycling.
Holmes Products (Europe) Limited
1 Francis Grove
London
SW19 4DT
UK
GUARANTEE
V1040-I_10MLM1.indd 11-12V1040-I_10MLM1.indd 11-12 3/8/10 2:07:38 PM3/8/10 2:07:38 PM
-12-
-13-
Veuillez lire ce manuel attentivement avant d'utiliser cet appareil, car une utilisation correcte vous
assure la meilleure performance.
Conservez ces instructions pour les consulter ultérieurement.
Lorsque vous utilisez des appareils électriques, prenez toujours des précautions de sécurité de base,
en particulier les suivantes :
• Lisez attentivement toutes les instructions.
• Ne vous servez du soude-sac ni sur une surface mouillée ou chaude, ni près d’une source de
chaleur.
• Posez toujours le soude-sac sur une surface plane et d’aplomb.
• N’immergez aucune pièce du soude-sac, y compris la fiche et le cordon d’alimentation, dans
l’eau ou dans tout autre liquide.
• Tirez délicatement la fiche hors de la prise de courant pour débrancher le soude-sac – ne tirez
surtout pas brusquement sur le cordon. Débranchez toujours le soude-sac avant de le nettoyer.
• N’employez pas le soude-sac si son cordon ou sa fiche est abîmé(e).
• Ne vous servez pas du soude-sac s’il a mal fonctionné ou bien s’il a été endommagé de quelque
façon que ce soit. Quand l’appareil (ou son cordon) est abîmé, il doit être retourné à un centre
de service agréé. Voyez la garantie pour obtenir de plus amples renseignements.
• N’employez le soude-sac qu’aux fins auxquelles il est destiné.
• Soyez très vigilant quand l’appareil est utilisé à proximité d’enfants.
• Cet appareil n'est pas conçu pour être utilisé par des personnes (y compris des enfants) aux
capacités physiques, sensorielles ou mentales réduites, ou dépourvues de l'expérience et du savoir
nécessaires, à moins qu'elles ne soient encadrées par une personne responsable de leur sécurité qui
leur explique comment utiliser l'appareil. Les enfants devraient être surveillés pour éviter qu'ils ne
jouent avec l'appareil.
• Le soude-sac n’est pas un jouet – veillez à ce qu’il ne soit pas employé comme tel.
• Ce soude-sac ne convient pas à l’utilisation commerciale. Si vous scellez plus de 30 sacs à la
fois, laissez écouler au moins 25 minutes entres les séances d’utilisation.
ATTENTION : Cette machine à emballer sous vide est équipée d'un système de sécurité de pointe
qui la réinitialise automatiquement en cas de surchauffe. Le système arrête automatiquement l'appareil
pendant une minute environ, après avoir scellé quelques sacs.
Cet appareil est conçu pour une UTILISATION DOMESTIQUE SEULEMENT.
Il ne contient aucune pièce que puisse réparer l’utilisateur. N’essayez pas de réparer ce produit.
Cet appareil est équipé d’un cordon court qui ne devrait ni s’emmêler ni risquer de faire trébucher,
comme pourrait le faire un cordon plus long. Se servir d’un cordon prolongateur est permis à
condition d’observer les précautions d’usage, et que sa tension assignée soit au moins égale à celle
du soude-sac. Une telle rallonge ne doit pas pendre du plan de travail ou du plateau de table, afin
que les enfants ne puissent pas la tirer et qu’elle ne risque pas de faire accidentellement trébucher.
CONSIGNES IMPORTANTES
COMMENCEZ VITE À PROFITER DES AVANTAGES QU’OFFRE LE
SYSTÈME D’ENSACHAGE DES DENRÉES SOUS VIDE FOODSAVER
TM
Avec le nouveau système «appuyer longuement et relâcher», vous appuyez fermement sur le
couvercle jusqu’à ce que le voyant lumineux «mains libres» s’allume, le soude-sac prend soin du reste!
Il continue à faire le vide puis scelle hermétiquement la poche.
Composition de l’ensemble:
• Soude-sac
• Sacs et rouleau de départ
• Tuyau accessoire
Vous économisez temps et argent en préparant les repas à l’avance et en les ensachant
hermétiquement sous vide avec votre soude-sac FoodSaver
TM
.
Déballez soigneusement votre soude-sac FoodSaver
TM
puis posez-le sur une surface plane et
d’aplomb. Assurez-vous qu’il ne reste pas de matières d’emballage à l’intérieur de l’appareil.
Nettoyez les pièces tel qu’indiqué sous la rubrique SOINS ET ENTRETIEN de cette notice
d’emploi, avant la toute première utilisation.
FAMILIARISEZ-VOUS AVEC LE SYSTÈME
D’ENSACHAGE SOUS VIDE FOODSAVERTM
PRÉPARATIFS POUR L’EMPLOI DU SYSTÈME
D’ENSACHAGE SOUS VIDE FOODSAVERTM
COUVERCLE DU ROULEAU
BOUTON
D’OUVERTURE
ET D’ANNULATION
TÉMOIN «MAINS LIBRES»
TÉMOIN DE SOUDURE
PORT ACCESSOIRE
TUYAU ACCESSOIRE
BANDE DE
SOUDURE
GARNITURE D’ÉTANCHÉITÉ
INFÉRIEURE
RAMASSE-GOUTTES
AMOVIBLE
TÉMOIN DE VIDE
COMMANDE DE NIVEAU DE SOUDURE
BARRE DE DÉCOUPE
DE SAC
COUPE-SAC
GARNITURE D’ÉTANCHÉITÉ
SUPÉRIEURE
PORT ACCESSOIRE
POINT D’APPUI DES
MAINS (PRESSION)
CANAL D’ASPIRATION
ATTENTION / BANDE DE
SOUDURE(GAUCHE)
ATTENTION /BANDE DE
SOUDURE(DROITE)
V1040-I_10MLM1.indd 13-14V1040-I_10MLM1.indd 13-14 3/8/10 2:07:38 PM3/8/10 2:07:38 PM

-14- -15-
1. Ouvrez le couvercle et posez le rouleau dans le porte-rouleau intégré.
2. Levez la barre de découpe des sacs.
3. Tirez la longueur requise pour contenir l’article, plus un supplément d’au moins 7,5 cm.
Abaissez la barre de découpe.
4. Coupez la longueur de sac nécessaire. Veillez à couper bien droit. Branchez l’appareil.
5. Ouvrez le couvercle. Placez un bout du sac que vous venez de couper entre la bande de
soudure et la garniture d’étanchéité inférieure. Ne placez PAS le bout du sac dans le
ramasse-gouttes.
6. Fermez le couvercle. Placez une main à chaque bout du couvercle et appuyez fermement. Le
moteur démarrera.
REMARQUE: Le soude-sac ne fonctionne que si le couvercle est convenablement fermé.
7. Continuez à appuyer sur le couvercle jusqu’à ce que le témoin «mains libres» s’allume, signe
que vous pouvez cesser d’appuyer. Le témoin de soudure luira quand l’appareil commencera à
souder le bout.
FABRICATION DES SACS SUR MESURE AVEC
LE ROULEAU INTÉGRÉ
8. Le bout est soudé lorsque le moteur s’arrête et que les témoins lumineux d’état s’éteignent.
9. Appuyez sur le bouton d’ouverture et d’annulation.
10. Le sac sur mesure est prêt à remplir.
REMARQUE: Le bouton d’ouverture et d’annulation sert également à interrompre le processus
avant la fin du cycle et à ouvrir le couvercle. Le bout du sac ne sera cependant pas soudé.
ATTENTION: Ce soude-sac ne convient pas à l’usage commercial. Si vous scellez plus de 30
sacs à la fois laissez écouler au moins 25 minutes entres les séances d’utilisation.
ATTENTION: Cet appareil requiert une période de refroidissement de 20 secondes entre les
cycles. Laissez écouler 20 secondes avant de l’employer de nouveau.
1. Placez l’article à emballer dans un sac précoupé ou sur mesure, en prévoyant au moins 7,5 cm
entre le contenu et le haut du sac, pour la contraction que subira le sac.
2. Ouvrez le couvercle et placez le bout ouvert du sac dans le ramasse-gouttes.
3. Fermez le couvercle.
4. Choisissez alors le niveau de soudure nécessaire – Le réglage humide est préférable pour les
denrées plutôt liquides alors que le réglage ordinaire est parfait pour les aliments secs.
5. Pour faire débuter le processus, appuyez sur le couvercle des deux mains; le moteur se mettra
en marche. Vous pourrez cesser d’appuyer quand le témoin «mains libres» s’allumera.
L’appareil continuera à faire le vide puis scellera hermétiquement le sac.
ENSACHAGE SOUS VIDE AVEC LES SACS FOODSAVER
TM
FABRICATION DES SACS SUR MESURE AVEC
LE ROULEAU INTÉGRÉ (SUITE)
V1040-I_10MLM1.indd 15-16V1040-I_10MLM1.indd 15-16 3/8/10 2:07:38 PM3/8/10 2:07:38 PM
 Loading...