


FULL HD SPORTS CAMERA
User Manual
Contents
Precaution
Product Accessories
DVR Interface
Button function
DVR Operation
turn on and off
Battery Charging
Video Mode
Normal recording
Loop recording
Picture Mode
Playback Mode
Menu Setting
Remote Control Description
Install and use WiFi
connected TV
Playback on PC
Technical specification
Precaution
Pls be well look through the following guidelines before you use this DVR.
Pls refer to manual instruction to operate the camera correctly. Illegal operation may
cause damage to internal components.
Do not fall or hit the DVR, it may damage the internal components.
Do not alter or dismantle the DVR, to avoid the damage to the DVR.
The temperature rise is normal when DVR in use for a long time
Do not touch the lens when recording which will affect the video quality.
DVR Special Features:
Inversion Mode
If need to invert dvr while using,you can choose an option named "inversion
mode" in the menu, then the machine can rotate 180 degrees,but characters
and images on the screen can be normal as a positive direction.
WiFi Function

Open WiFi button within the menu,it will be more convenient to operate the machine
at a distance of 30 meters using a mobile phone.
2.4G wireless remote control
waterproof watch remote control
Mount Method
The mount accessories are the same as Gopro.
Product Accessories
Accessory 1 Accessory 2 Accessory 3
USB Cable Charger Accessory 4
HDMI cable Accessory 5 Accessory 6
Waterproof Case Wrist Remote Controller 3M Pads
User Manual Accessory 7 Battery
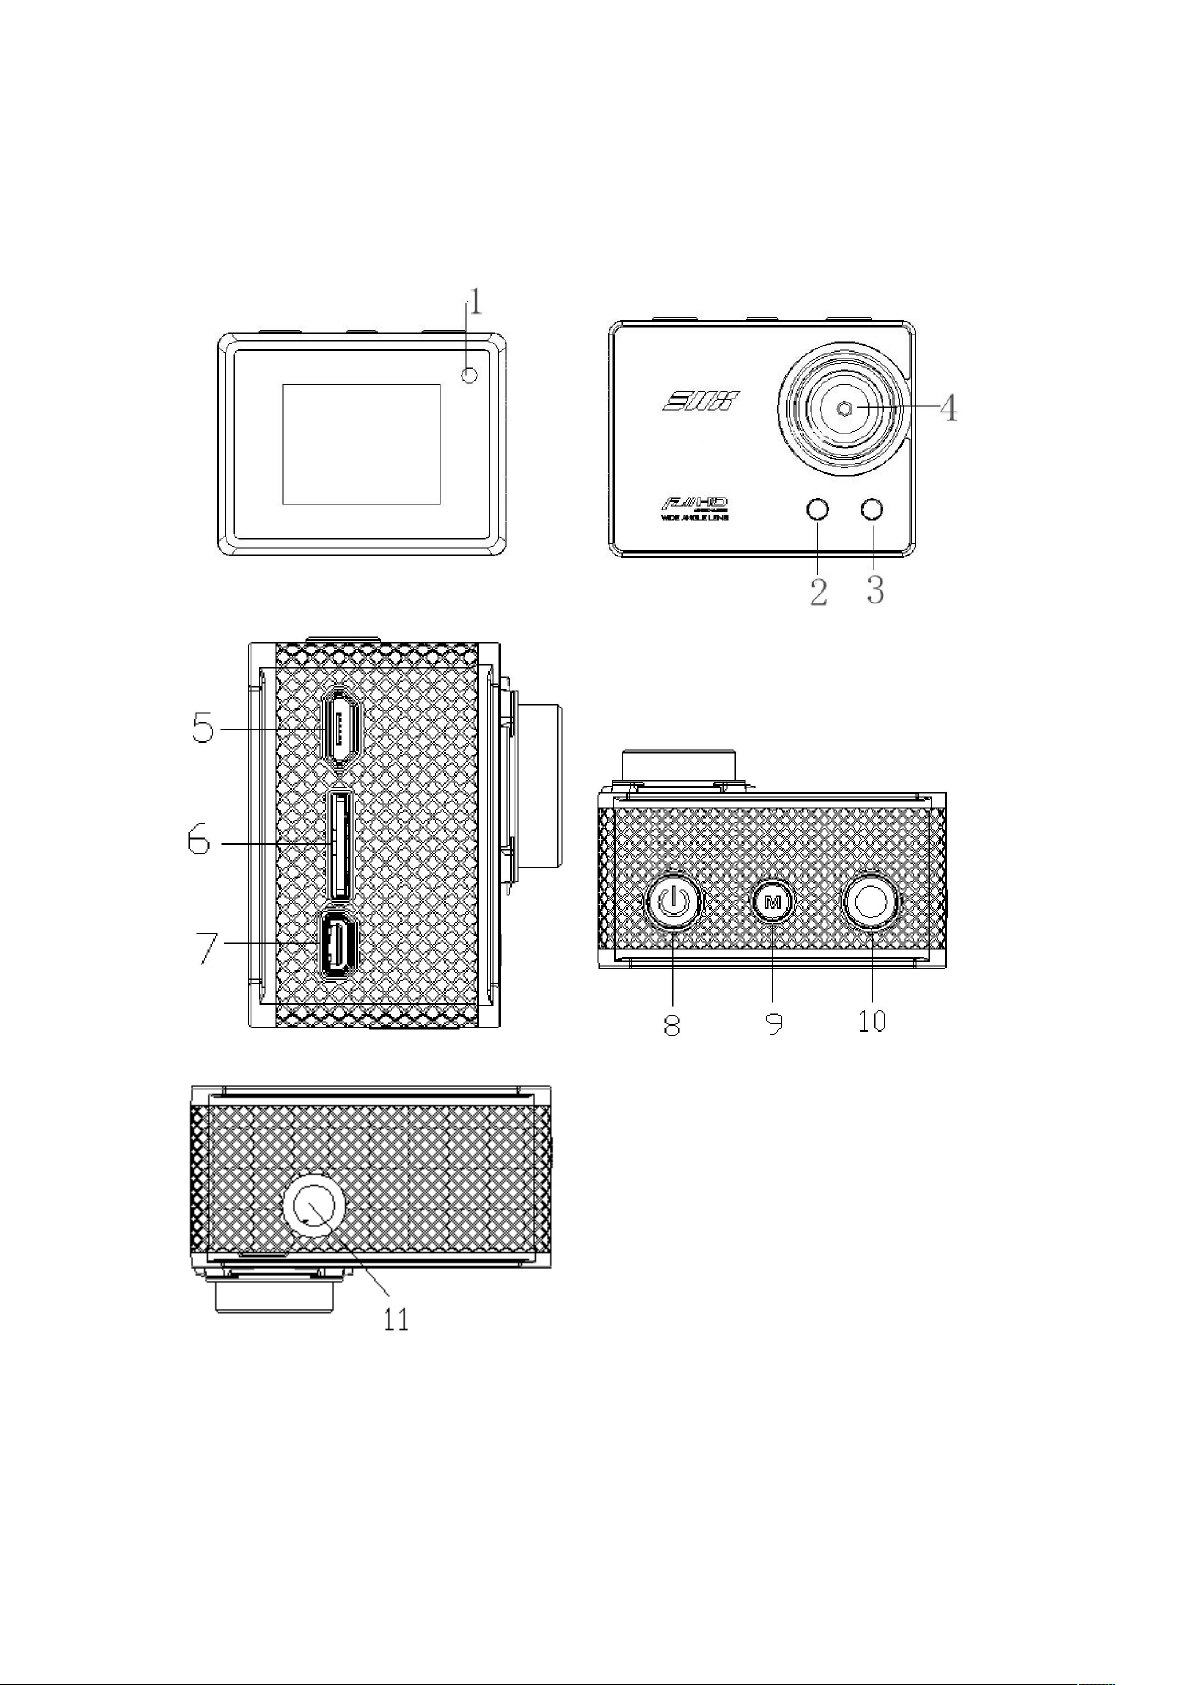
DVR Interface
1.working indicator
2.Charge indicator
3.working indicator
4.Camera lens
5.USB port

6.TF card slot
7.HDMI port
8.Power button
9.menu button
10.Ok button
11.Screw hole
Button function
Power button
playback mode,page up when setting menu.
Menu button:
exit menu.page down when playback.support capture under video mode.
Ok button:
pictures,Start/pause playback.Page down when setting menu.
:Long press to turn on and off DVR,short press to swith video/picture
Short press to enter menu and confirm the menu option, long press to
Start/stop recording when under the video mode,take pictures,start
DVR Operation
Power on/off
Power on:Long press Power button,the lcd screen shows the startup
picture,two blue working indicators will light up, DVR enters standby mode.
Power off:When camera is on,long press Power button,the lcd screen shows
the shutdown picture,two blue working indicators will be off,DVR powers off.
When connected to Car Charger, DVR will turn on automatically when the car
ignites; will turn off when the car stalls.
Battery Charging
Connect DVR with power charger via USB cable,the red light will light up.if you want
to charge faster,turn off the machine when charging.
Video mode
Video interface:
record icon 2.exposure Compensation 3.white balance 4.frame rate
1.
5.resolution 6.cards remaining time 7.battery icon 8.Year /Month / Day
9.time

Normal recording
Closing "seamless"in the video mode menu,Press OK button,DVR starts
recording till the card is full.Press OK button again to stop recording.
Loop recording(refer to menu setting)
Press ok button to start recording Under standby mode, DVR will segment
automatically and store the recorded files when the video recorded up to the
time you set.When card is full, DVR will overwrite the first footage by time
sequence and continue recording.
Picture Mode
Picture interface:
1.picture icon 2.exposure Compensation 3.white balance 4.picture size
5.Remain photos 6.battery icon 7.Year /Month / Day 8.time

The DVR default setting is Video mode.Under standby mode, long press ok button
to enter picture mode, aim at the object you want to shoot and press ok button, DVR
will save the picture automatically.
Playback Mode
1.playback icon 2.file number / total number of files
3.select the file you want to play
4.file Preview 5.file length 6.7.date stamp
In standby mode, press the OK button to switch to playback mode, press the Menu
button and select the video / picture you need,press the OK button to Preview /
playback.Press the OK button to stop playing.
Menu Setting
In standby mode,press the Menu button to enter the menu mode,then press the
menu key can switch mode menu and System menu.Press the OK button to page
down,press the power button to page up,press the Menu button to confirm. Long
press the menu button to exit the menu.
Video mode/Picture mode/Playback mode each has two menus: Mode menu and
System menu.
Video Menu:
Movie Size: 1920 * 1080P 30/1280 * 720P 60/1280 * 720P 30
Video quality: super fine / fine / normal
Seamless : OFF / 1 minute / 3 minutes / 5 minutes
White Balance: Auto / Daylight / Cloudy / Tungsten / Fluor
Exposure:
Motion detect: OFF / ON
-2.0 -1.0 +0.0 +1.0 +2.0

Date stamp: Off / Date / Date & Time
picture menu:
Resolution: VGA/2M/3M / 6M/8M/10M
White Balance: Auto / Daylight / Cloudy / Tungsten / Fluor
Exposure:
-2.0 -1.0 +0.0 +1.0 +2.0
Driver Mode: Off / 2S / 10s / Double
Photo Burst: off / 10fps/20fps/30fps
Playback mode menu:
Please select File type!
VIDEO
JPG
System menu:
Sounds: Beep (on / off) / Volume (0/1/2/3) Voice Rec (on / off)
Power Save: Off / 1 min / 3 min / 5 min
Date & Time: 02/06/2012 19:17 Year / Month / Day
Language: English / Traditional Chinese / Simplified Chinese / German / French
/ Spanish / Russian/Italian
Stabilizer: OFF / ON
Invert Mode: OFF / ON
Time Zones: -12-11-10-9-8 -7-6-5-4-3-2-1 +0 +1 +2 +3 +4 +5 +6 +7 +8 +9 +10
+11 +12
USB: MSDC / PC CAM
Remote Pair: Off/On
WiFi: Off / On
WiFi password: rtwap_evb 1 2 3 4 5 6 7 8
Format: Yes / No
FW Update: Yes / No
System: Factory Reset / System Info / Card Info
Remote Control Description
There are two buttons on the remote control, press the video button to start/stop
the recording.Press the picture button to take pictures.press the picture button to
capture under video mode.
Matching the remote control:
Set "Remote Pair" in the menu to On,keep pressing the two buttons on the remote
control,you can see blue light of Remote control flashing,release the two buttons after
3 seconds. press the power button of the DVR to exit the Remote Pair and return to
preview mode,take video or pictures via the remote control.If you can operate it is
successful, if not, please repeat above operation. Please keep the camera and
remote control within one meter when matching.

Install and use WiFi
1.search ismart dv or icatch on Google or Apple Store,then download and install this
software on your phone.
2.open simultaneously “WiFi” of the phone and DVR
3.find the "rtwap-evb" in the phone "WiFi", open and enter the password (the default
password is 12345678), the DVR and phone WiFi password should be same.
4.when the DVR screen displays "Connected" ,it indicates that the phone has
successfully connected to the machine.
5.find"ismart DV" software on the phone,then you can operate the DVR and
download the files..
connected TV
Connect the DVR to the TV via our HDMI cable, all operations can be displayed in
high-definition TV screen.
Playback on PC
Connect DVR to a PC via the USB cable, DVR will turn on automatically.Then you
can open My Computer and the removable disk.It has two folders,you can open the
file you need or copy.
Technical specification
Product specifications 57*44*28.5mm
weight About 85g(include battery)
Sensor 5 Mega CMOS
Lens
View angle 170 degree
Resolution
Image size 10M 8M 6M 3M 2M VGA
video file formats MOV H.264
picture file formats JPG
Memory card 4GB to 32GB.(Micro SD Card Class6 above)
Audio Built-in microphone / speaker
USB port USB 2.0 high-speed interface for charging and data transfer
6G+IR F=1.6
1920*1080@30fps,1280*720@60fps,1280*720@30fps
screen HD 1.5"TFT
Seamless loop recording Optional 1/3/5 minutes

HDMI output Real-time transmission
White balance support
Exposure compensation support
Capture Support by DVR and remote control
Continuous support
PC CAM support
Image Invert support
WiFi distance 30m
WiFi frequency 2.4GHz-2.4835GHz
WiFi support phone system IOS6.1 and above, Android 4.0 and above
WiFi function Image transmission, remote control, settings, sync and sharing albums
Wireless mode direct
Wireless transmission IEEE 802.11b/g/n
Battery capacity Lithium-ion batteries can be changed.1050mAh,recording for over 3 hrs
Simplified Chinese / Traditional Chinese / English / Russian / French /
Language
Spanish / Italian / German
Waterproof 50 meters
Remote control frequency 2.4GHz
Remote control waterproof 6m
Remote control distance 15m
 Loading...