


1
UserManual
2
ThankyouforbuyingourWi-FiDV .Beforestartusingthisproduct,
pleasereadthismanualcarefullytomaximizeitsperformanceandextend
thelifeoftheproduct.
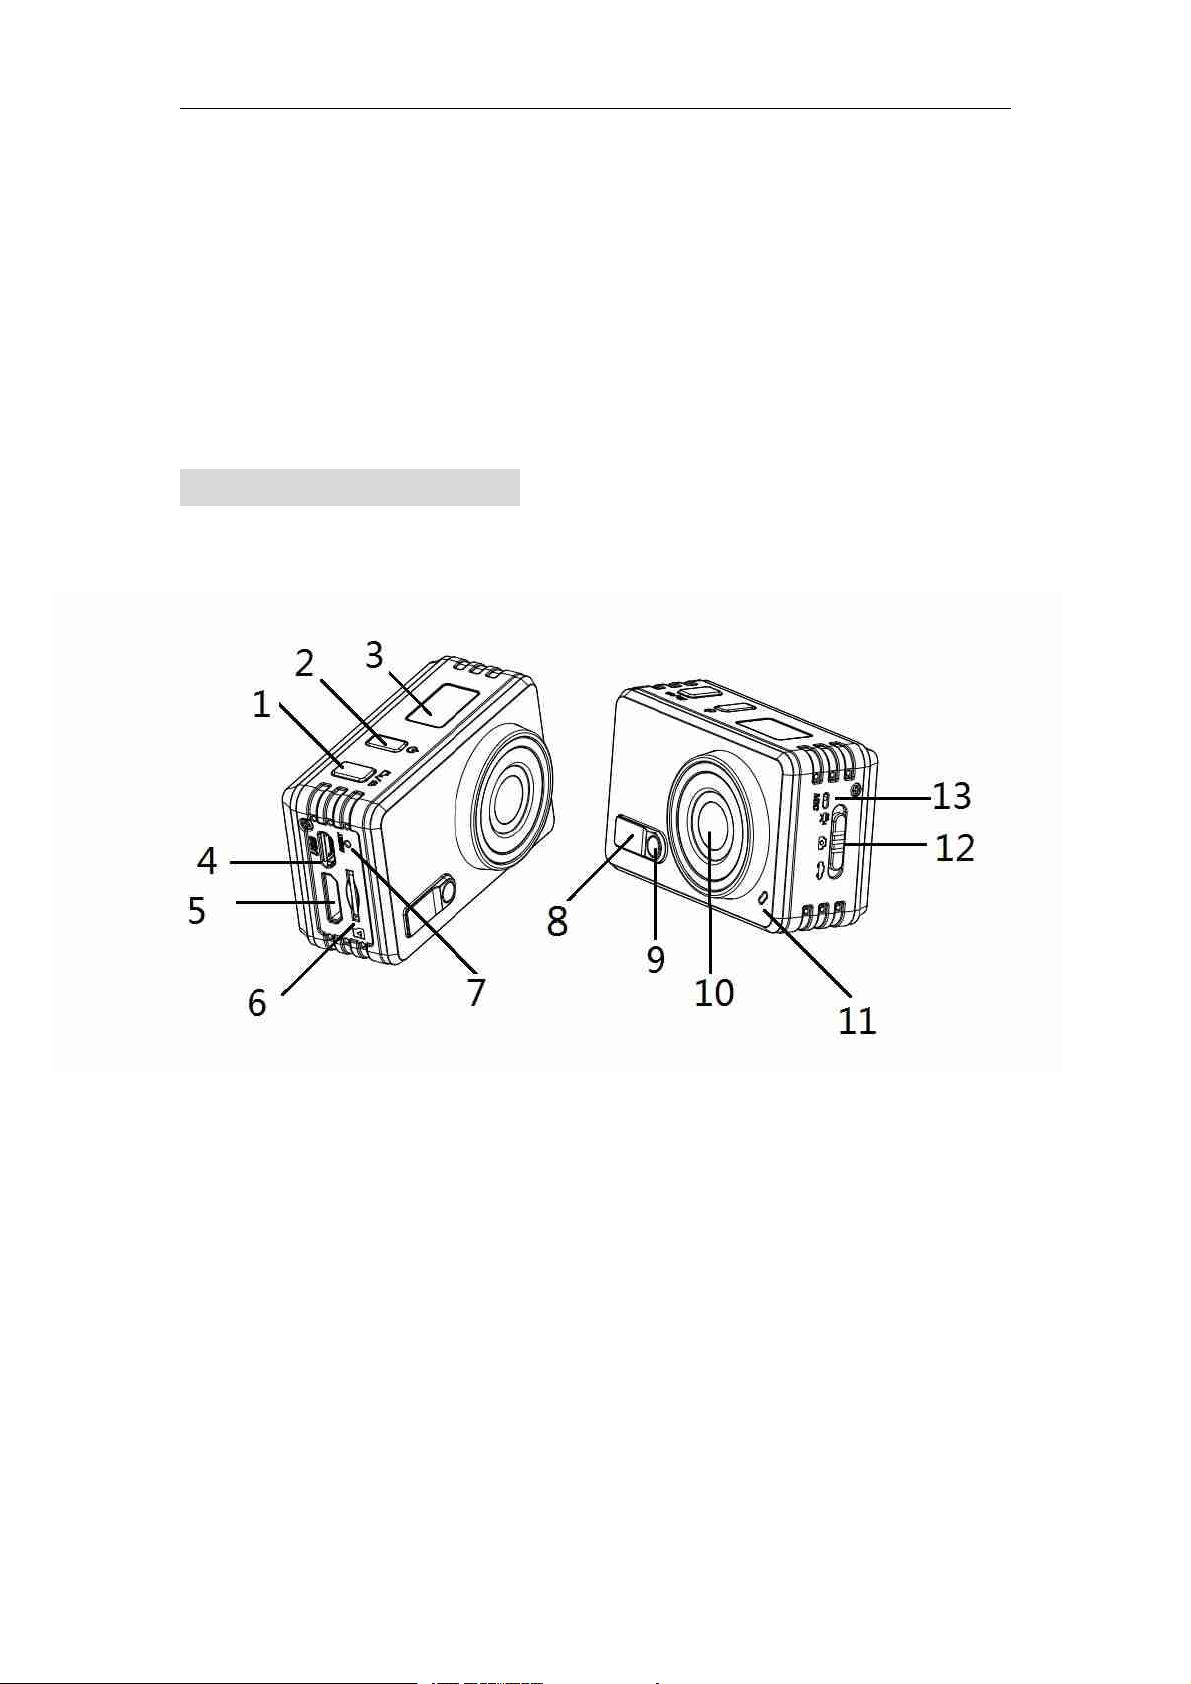
AppearanceandButtons
1.Shutterbutton8.WiFiswitch
2.Powerbutton9.WiFistatusindicator(orange)and
3.LCDdisplayWorkingIndicatorLight(blue)
4.MicroUSBport10.Lens
5.MiniHDMIport11.IndicatorLightforcharging(Red)
6.MicroSDcardslot12.ModeSwitch
7.Resetbutton13.Microphone

3
LCDDisplayIllustration
TurnontheWi-FiDV ,theLCDwilldisplaythefollowingstatusand
settings:
1.Cameramode
2.Videorecordingmode
3.vehicle-mountedmode
4.TFcardicon(displaywhenloaded)
5.Resolutionicon:
Incameramode,HIstandsfor8MegaPixels(3264x2448),andin
videorecordingandvehicle-mountedmode,itstandsforFHD
(1920x1080,30fps);
Incameramode,LOstandsfor5MegaPixels(2592x1944),andin
videorecordingandvehicle-mountedmode,itstandsfor720P
(1280x720,60fps);
6.Batteryicon:currentbatterylevelofthecamera
7.Counter,displaysupto9999.
8.Timer,displaysminutesandseconds.
9.Wi-Fiicon(displaywhenenabled)
Note:theaboveiconsmayvaryaccordingtothestatusoftheDV .
4
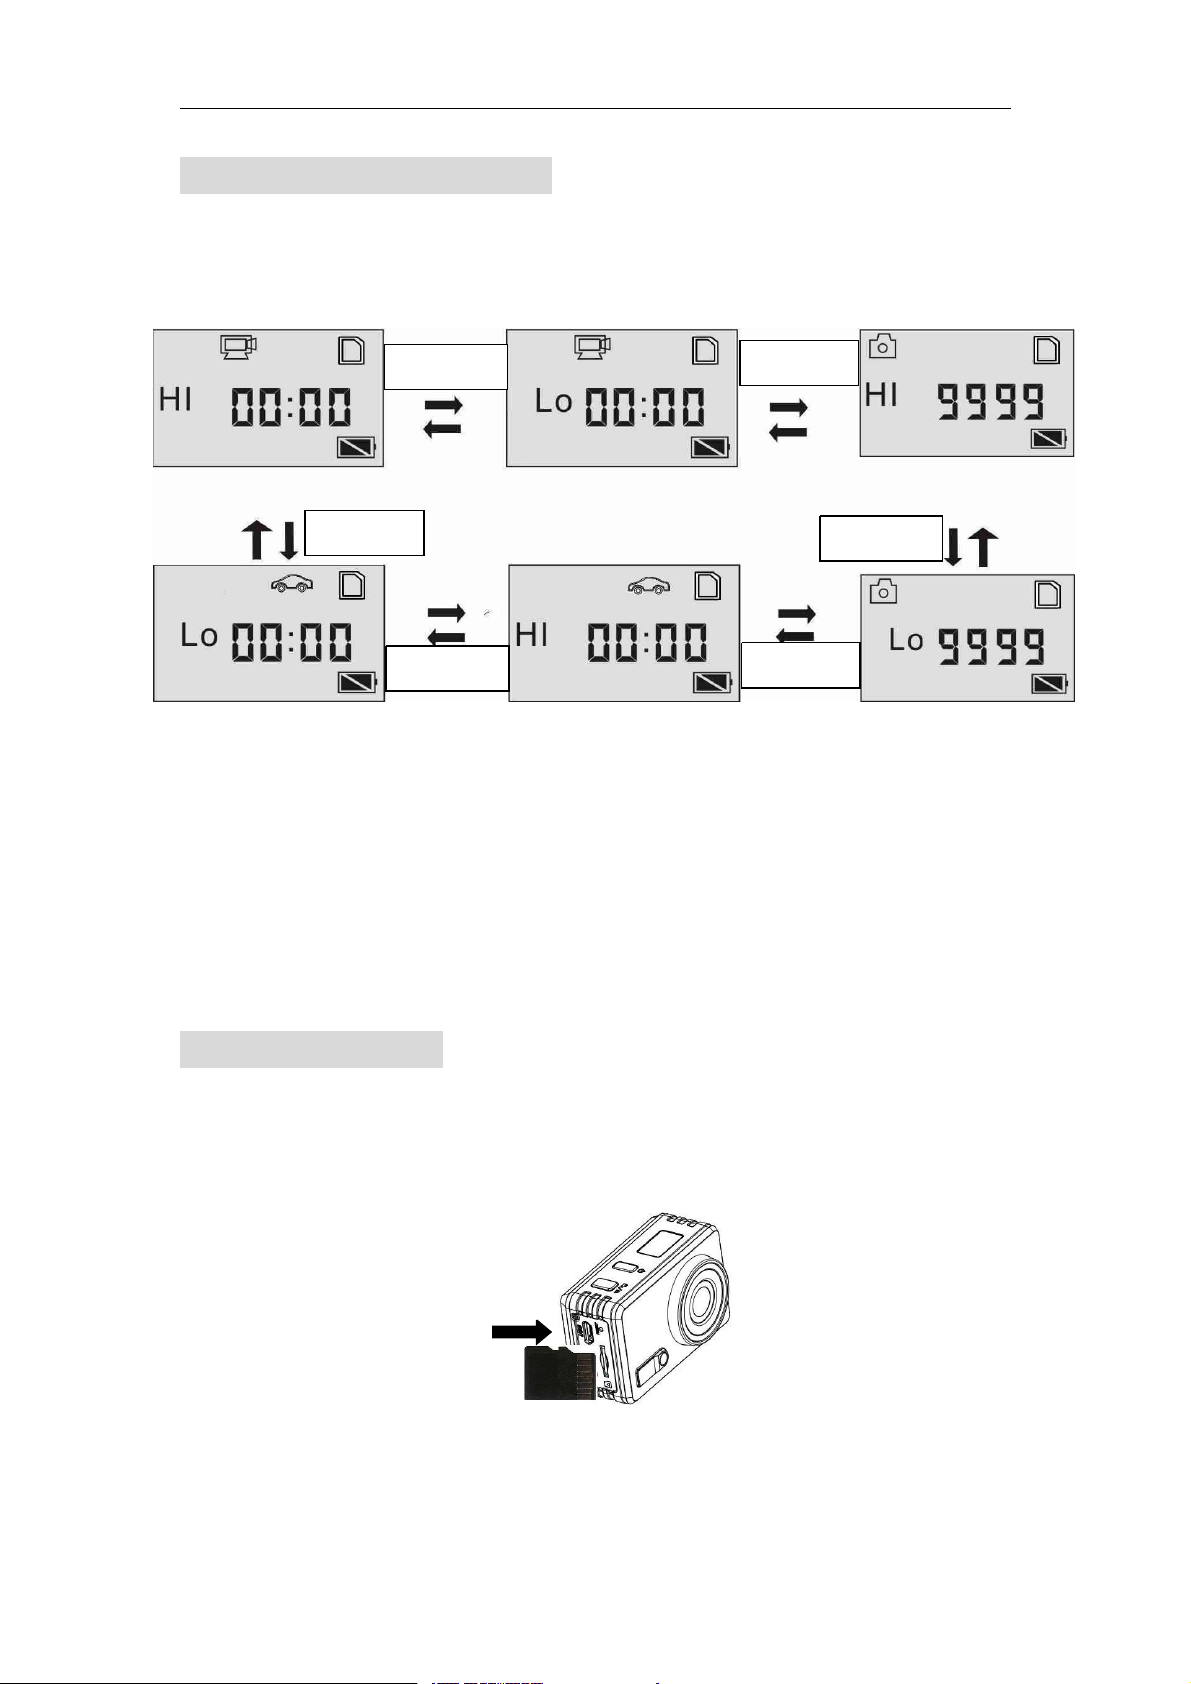
WorkingModeFlowChart
Video
preview
mode
(1080P
30fps)Camera
mode
(5MP)
Camera
mode
(8MP)
Video
mode
(720P,
6
0fps)
Video
preview
mode
(1080P
30fps)
Video
mode
(720P,
6
0fps)
AfterturnontheDV,youcanpressthePowerbutton/Modeswitch
toswitchthefollowingmodesinturn:
Powerbutton
Modeswitch
Powerbutton
Modeswitch
Powerbutton
Modeswitch
Invideorecordingandvehicle-mountedmode,presstheShutter
buttontostartrecording,WorkingIndicatorLightflash,andpressit
againtostop;Incameramode,presstheShutterbuttontotake
photos.
UseyourWi-FiDV
WhenyouusetheDVforthefirsttime,please:
1.InsertamicroSDormicroSDHCcard,asshowninthefollowing
picture.
`
HighspeedcardatleastClass4isrecommended;TurnofftheDV
beforeinsertingorremovingthecard.
5
2.Chargingthebattery.TheDVusesbuilt-inrechargeablelithium
battery.WhentheDVisoff,connectittothePCviaUSBcable,and
theDVwillon.PleaseturnofftheDV,theindicatorlightforcharging
willlighton.Duringcharging,IndicatorLightforchargingwill
lighton,andIndicatorLightforchargingoffwhencharging
completes.
Note:WhentheDVison,connectingittothePCwillnotcharge.
ItwillnotchargeuntiltheDVturnoff.
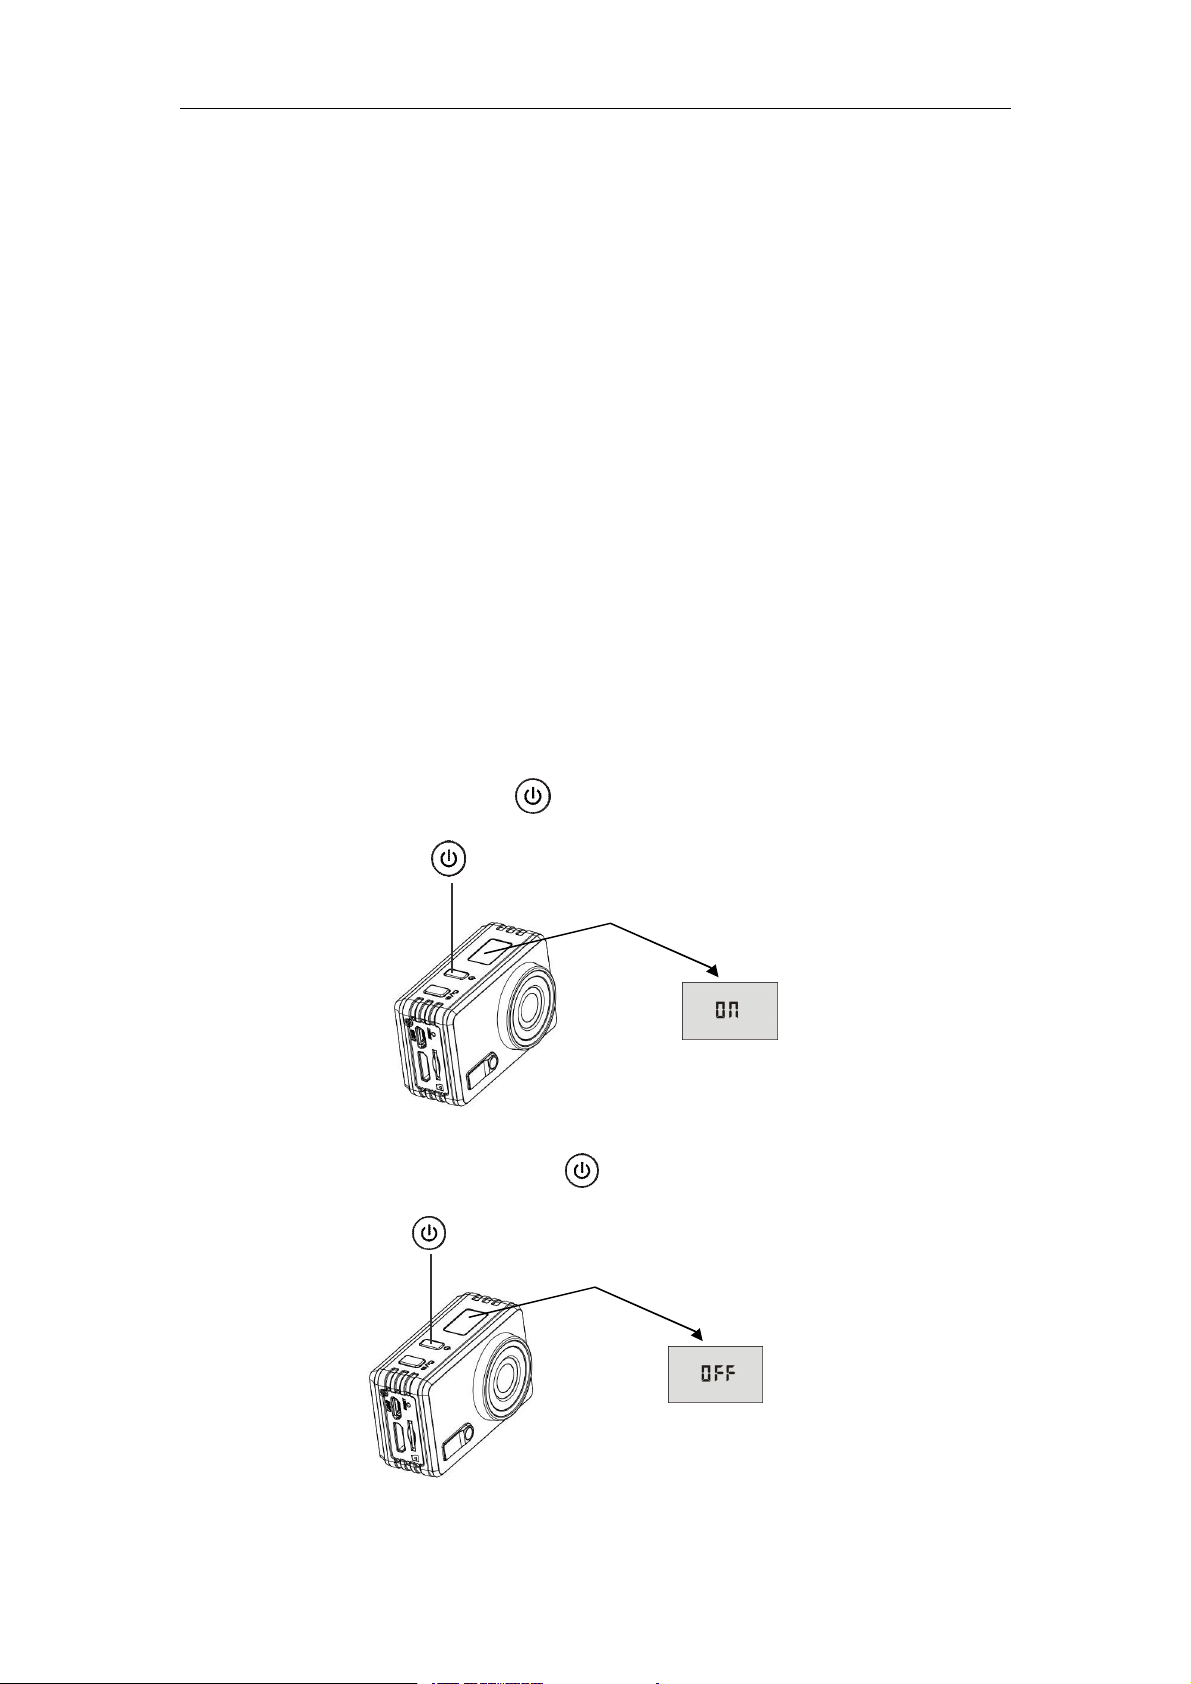
Turnon/off
1.Turnon:pressandholdthebuttonforabout3seconds,LCD
displays“ON”.
2.Turnoff:pressandholdthebuttonforabout3seconds,LCD
displays“OFF”.

6
Note:TheDVwillturnoffautomaticallyifitisidlefor5minutes.
StarttoUse
Defaultsetting:AfterturnontheDV,thedefaultsettingisasbelow:
Videorecording
modeicon
HI
VideoresolutionFHD:1080p@30fps
RecordingtimeStandsfor00minuterand00second.
TFcardiconDisplaywhenaTFcardisinserted,otherwisenodisplay.
BatterylevelBatteryisfull
Wi-FiiconDisplaywhenactivated.
TheDVisinvideorecordingmode.
TheDVprovidesdifferentshootingmodes.Conversionis
availableviathemodeswitchafterstartup:
video
recording
mode
picture
takingmode
vehicle-mou
ntedmode
HIstandsforFHD(1920x1080,30fps)video
Lostandsfor720P(1280x720,60fps)video
HIstandsfor8M(3264x2448)resolution
Lostandsfor5M(2592x1944)resolution
HIstandsforFHD(1920x1080,30fps)video
Lostandsfor720P(1280x720,60fps)video

7
1.videorecordingmode
Torecordavideo,pleasecheckwhethertheDVisunderVideomode.
theiconisplayedonthescreen
Startrecording:Pressandreleasethebutton,theiconand[:]
displayedinLCDwillflash.AtthesametimeTheblueindicatorLight
willflashtoo,meaningtherecordingisinprocess.
Stoprecording:Pressandreleasethebutton,theiconand[:]
displayedinLCDwillstopflashing.Atthesametimetheblueindicator
willstopflashingeither,meaningtherecordingisstopped.
WhentheTFcardisfull,orthebatteryrunsout,therecordingwill
stopautomatically,andtherecordedvideowillbesavedbeforethe
DVturnsoff.
2.Cameramode
Totakeaphoto,pleasecheckwhethertheDVisunderCameramode.
theiconisplayedonthescreen
Pressandreleasethebutton,Theblueindicatorwillflash,meaninga
photoistaken.(Ifyoutakephotosmorethan9999copies,theLCDscreen
displayonly9999)
3.vehicle-mountedrecordingmode
Torecordavideo,pleasecheckwhethertheDVisunder
Vehicle-mountedmode.
theiconisplayedonthescreen
8
Startrecording:Pressandreleasethebutton,theiconand[:]
displayedinLCDwillflash.Atthesametimetheblueindicatorwillflash
too,meaningtherecordingisinprocess.
Stoprecording:Pressandreleasethebutton,theiconand[:]
displayedinLCDwillstopflashing.Atthesametimetheblueindicator
willstopflashingeither,meaningtherecordingisstopped.
Presstheshutterbuttononceunderthepreviewstatetobegin
recording,saveasegmentforrecordingevery3minutes,thenstartto
recordthenextsegmentofvideo.Whenthestoragecardisfull,the
earliestsegmentofvideowillbedeletedtoreleasethecorresponding
spaceforcontinuousrecording.
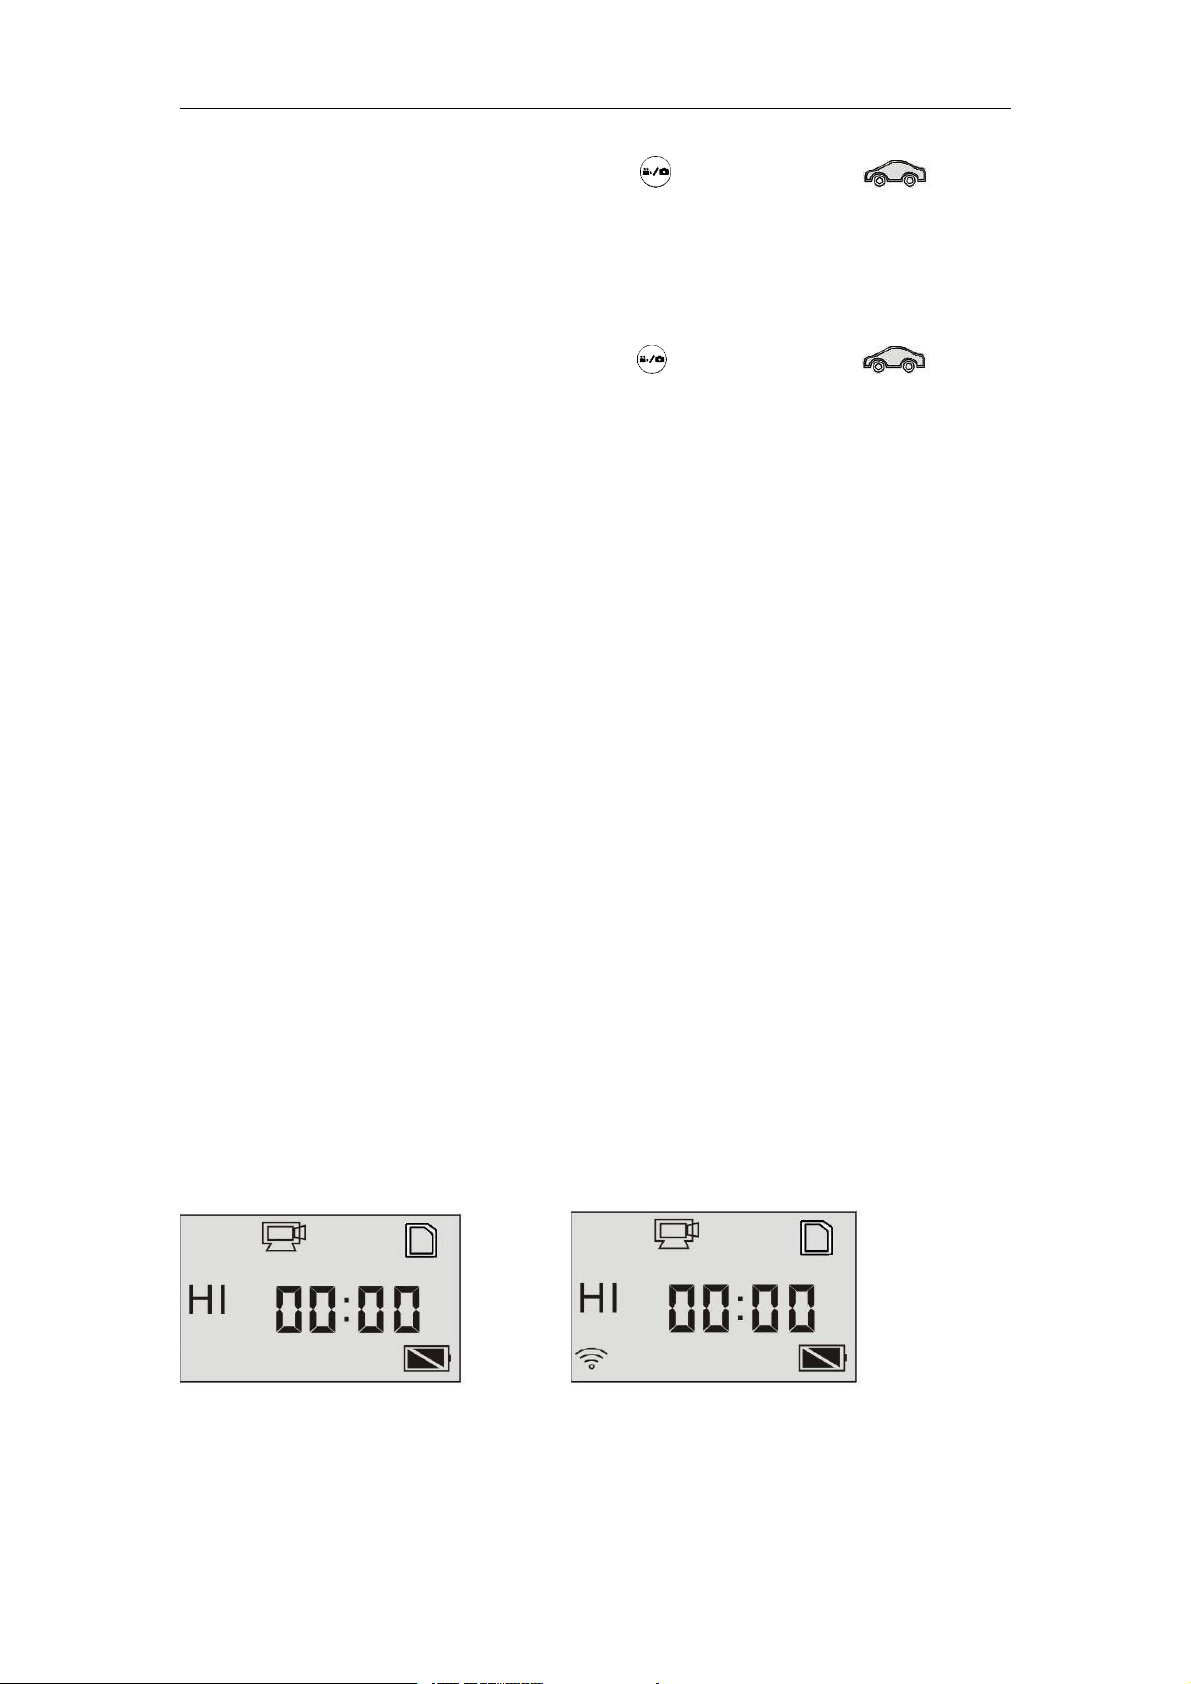
4.Enable/disableWi-Fi
TheWi-Fiisdisabledbydefault.PresstheWi-Fibuttontoenableit.the
orangeindicatorwillflashabout5secondsandtheWi-Fiiconwill
displayonLCDscreen.
4.1Invideorecordingmodeandvehicle-mountedrecordingmode,the
LCDwilldisplayasbelowafterturnonthewifi
Wi-FiisdisabledbydefaultWhenWi-Fiisenabled,the
Wi-FiiconwilldisplayonLCD

9
4.2InCameramode,theLCDwilldisplayasbelowafterturnonthewifi
Wi-FiisdisabledbydefaultWhenWi-Fiisenabled,the
Wi-FiiconwilldisplayonLCD
Inordertosavepower,Wi-Fiwillbeautomaticallydisabledifno
terminalisconnectedafter30seconds.
5.ConnectingtoHDTV
5.1ConnecttheDVtoHDTVviaHDMIcable(optional)
IfyouneedtotransfertheimageandaudiotoanHDTVforplayback,
inserttheComendoftheHDMIcabletotheDV,andtheotherend
(output)totheHDinputoftheHDTV,asshowninthefollowingfigure:
Note:BeforeconnectingorremovingtheHDMIcable,pleasestop
videorecording,playbackanddisconnectWi-Fifirst.
10
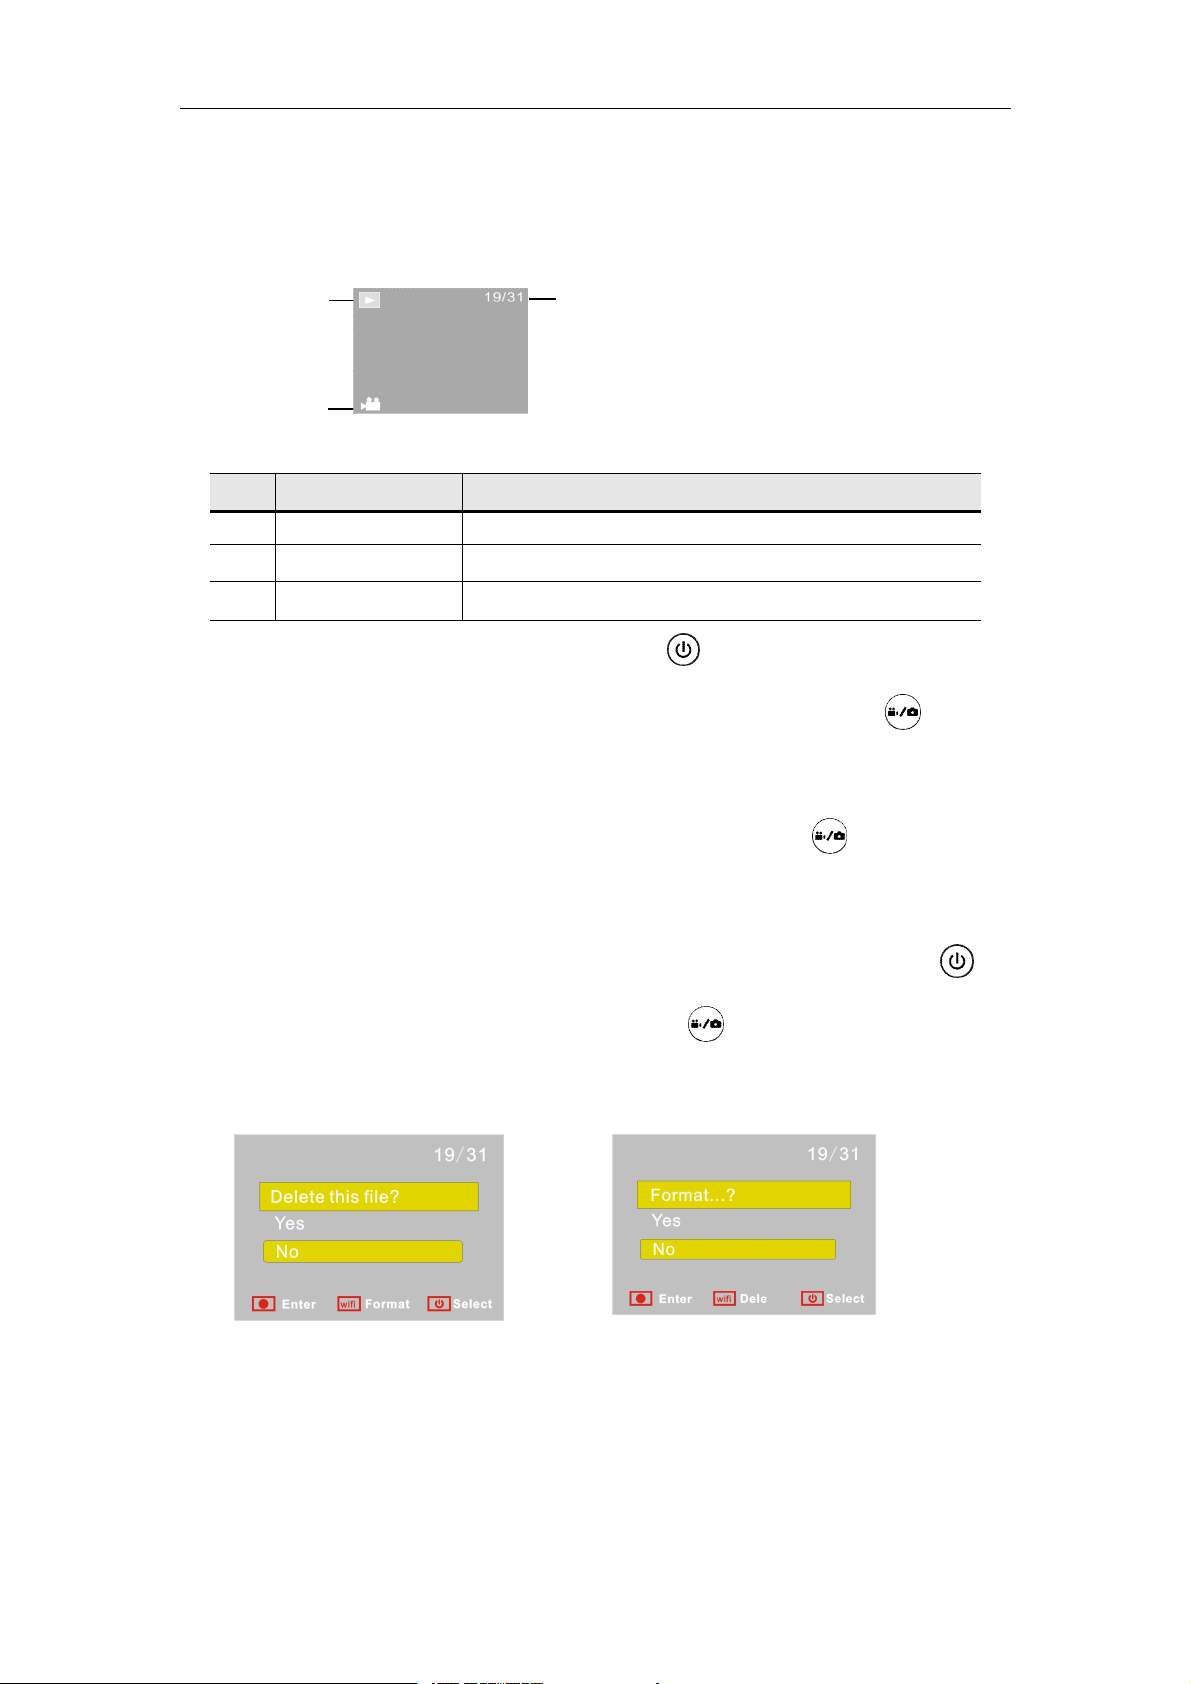
5.2WhenHDTVisconnected,itentersPlaybackmode,theLCD
S/N
Icon
name
Description
1
Playback
mode
Under
Playback
mode
currently.
2
File
number
There
are31files
and
you
are
viewing
the
19thone.3Video
icon
The
fileisa
video.
displaysasbelow:
1
3
2
InPlaybackmode,pressthePowerbuttontoswitchtothenextphoto
orvideo.Whenavideofileisselected,presstheShutterbuttontoplay
it,andpresstheShutterbuttonagaintostopplaying.
InPlaybackmode,pressandholdtheShutterbutton,apromptof
deletingthefileorformattingwillappear.PresstheWi-Fibuttonto
switchbetweendeletingorformatting,thenPressthePowerbuttonto
selectYesorNo,andpresstheShutterbuttontoconfirmandexit.
11
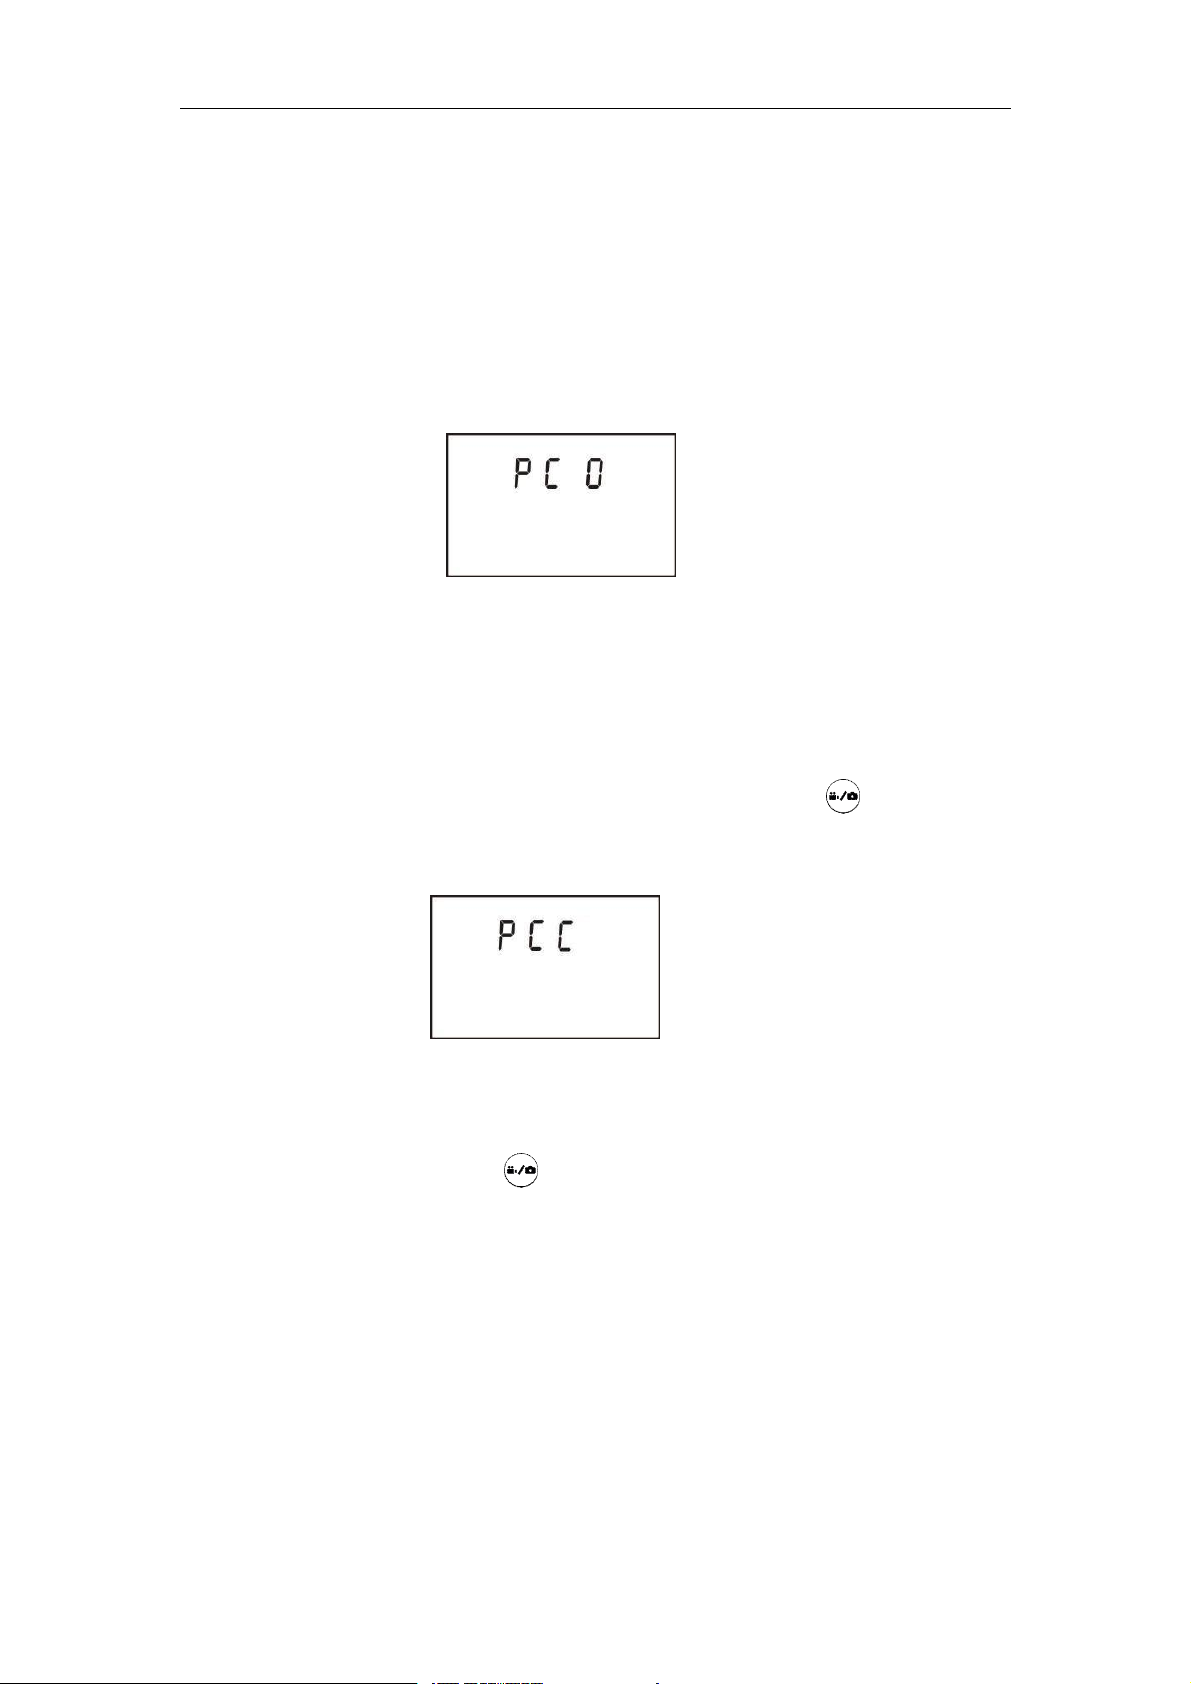
6.ConnectingtoPC
6.1TurnontheDVandconnectittotheUSBportofthePCviathe
attachedUSBcable.TheDVwillenterU-diskmodeandtheLCDwill
displayasbelowafterconnection:
NowyoucanviewthephotosorvideostakenbyDVonPC.
6.2InU-diskmode(PCOmode),presstheShutterbuttontoswitchto
webcammode(PCCmode),andtheLCDwilldisplayasbelow:
Nowyoucanstartthewebcamthroughapplication.ToreturntoU-disk
mode(PCOmode),pressthebuttonagain
Note:Driverisnotrequiredforwebcammode(PCCmode)on
WindowsXP(SP3)versionorabove.

12
APP(supportAndroidandiOS)
1.HowtoinstallanAPP
1.1Searchfor”iSmartDV”inGooglePlay(forAndroidOS)tofindthe
APPandinstallitaccordingtotheinstruction.
1.2Searchfor”iSmartDV”inAPPStore(foriOS)tofindtheAPPand
installitaccordingtotheinstruction.
2.AndroidAPP
2.1InstalliSmartDVAPP(providedbydealerorviainternet)on
smartphoneortablet.Wheninstallationcompletes,theLCDwilldisplay
icon.
2.2InserttheTFcardandturnontheDV,thenpresstheWi-Fibuttonto
enableit.NowyoucanseetheWi-FiiconontheLCD.
2.3EnableWi-FionsmartphoneortabletandsearchforwirelessAP
signalrtwap_default,thenconnectittoDV,untilthesystemdisplays
“Connectedsuccessfully”.
Note:ThefirsttimeconnectingtoDV,youneedtoenterpassword
“1234567890”.
13
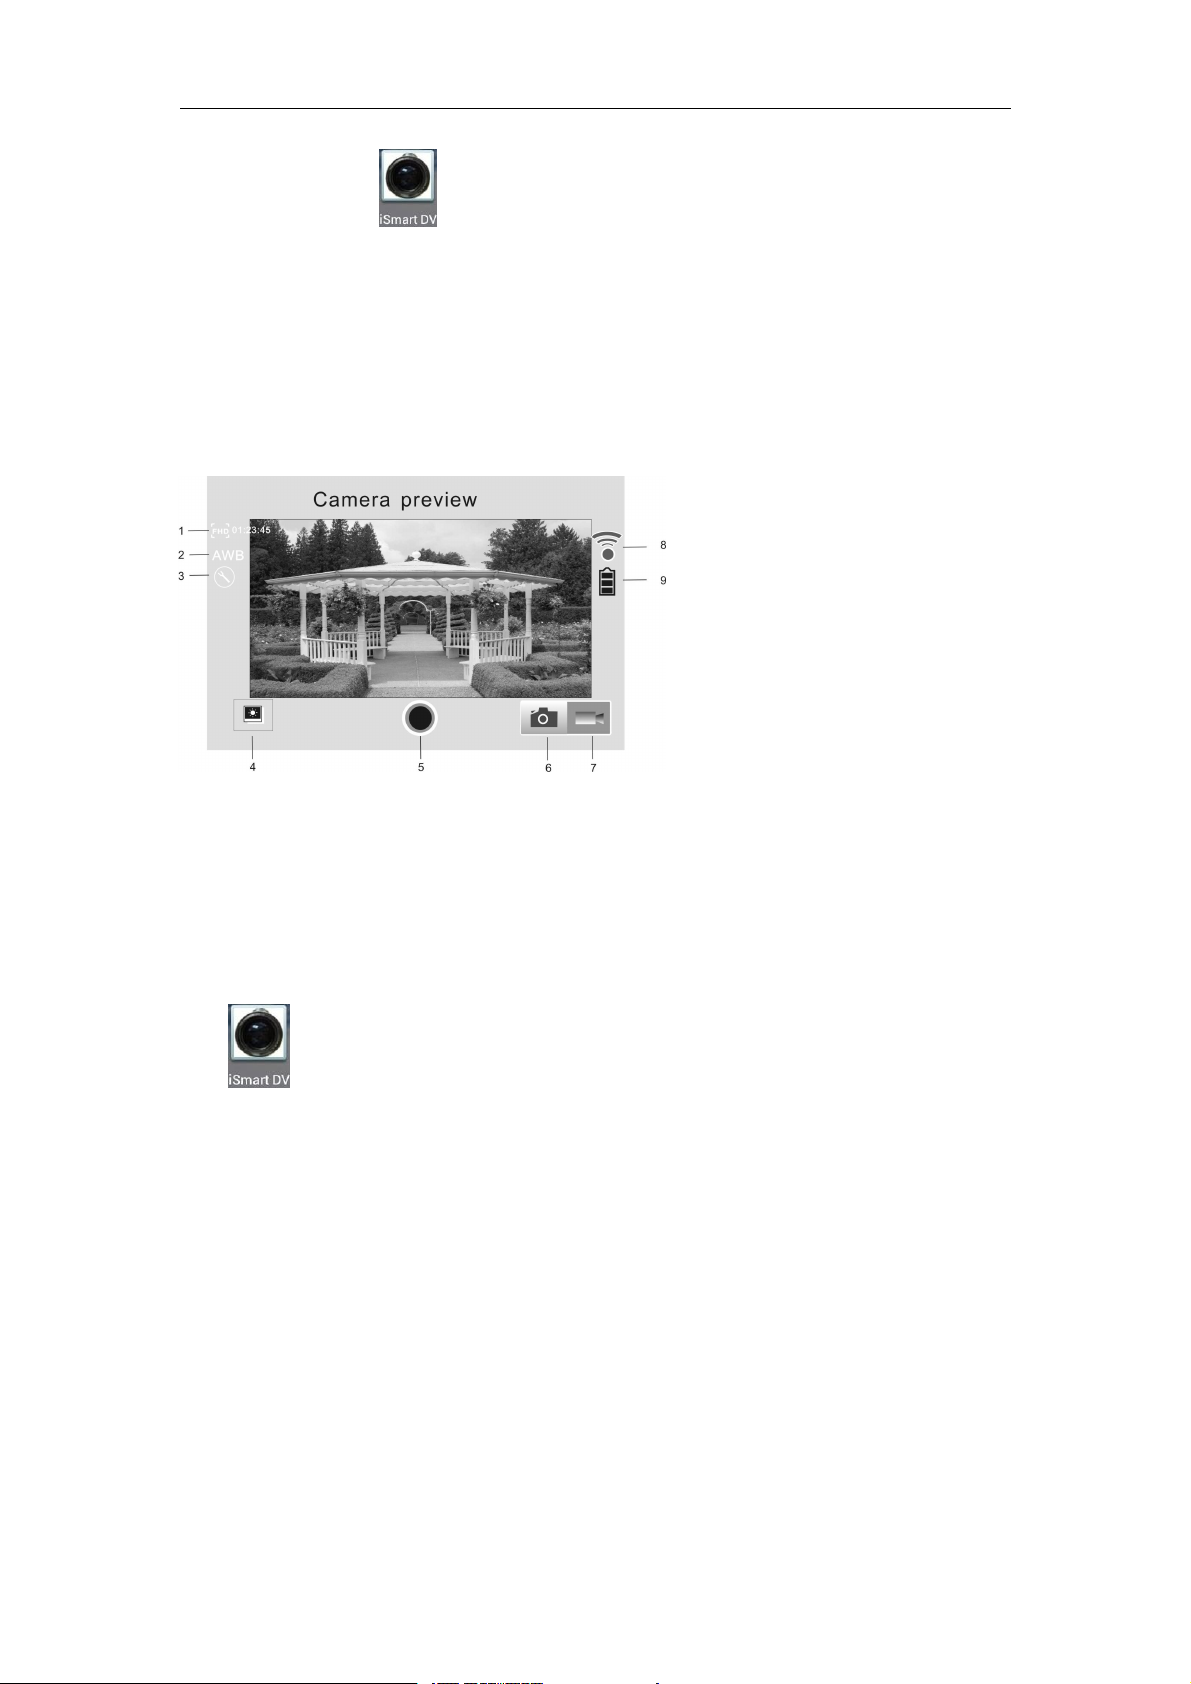
2.4ClicktheiconintheApplistofthesmartphoneortablettoopen
it.NowyoucanpreviewtheimagesentbytheDVonthephoneortablet
andstartsomeoperating.Theoperationinterfaceonterminalisshownin
thefollowingfigure.
1.Videoresolution
2.Whitebalance
3.Setup(entersetupmenu)
4.EnterPlaybackmode
5.Shutterbutton
6.Photomode
7.Videomode
8.Wi-Fisignalicon
9.DVbatteryicon
3.iOSAPP
3.1InstalliSmartDVAPP(providedbydealerorviainternet)oniOS
phoneortablet.Wheninstallationcompletes,theLCDwilldisplay
icon.
3.2InserttheTFcardandturnontheDV,thenpresstheWi-Fibuttonto
enableit.NowyoucanseetheWi-FiiconontheLCD.
3.3EnableWi-FioniOSphoneortabletandsearchforwirelessAP
signalrtwap_default,thenconnectittoDV,untilthesystemdisplays
“Connectedsuccessfully”.
14
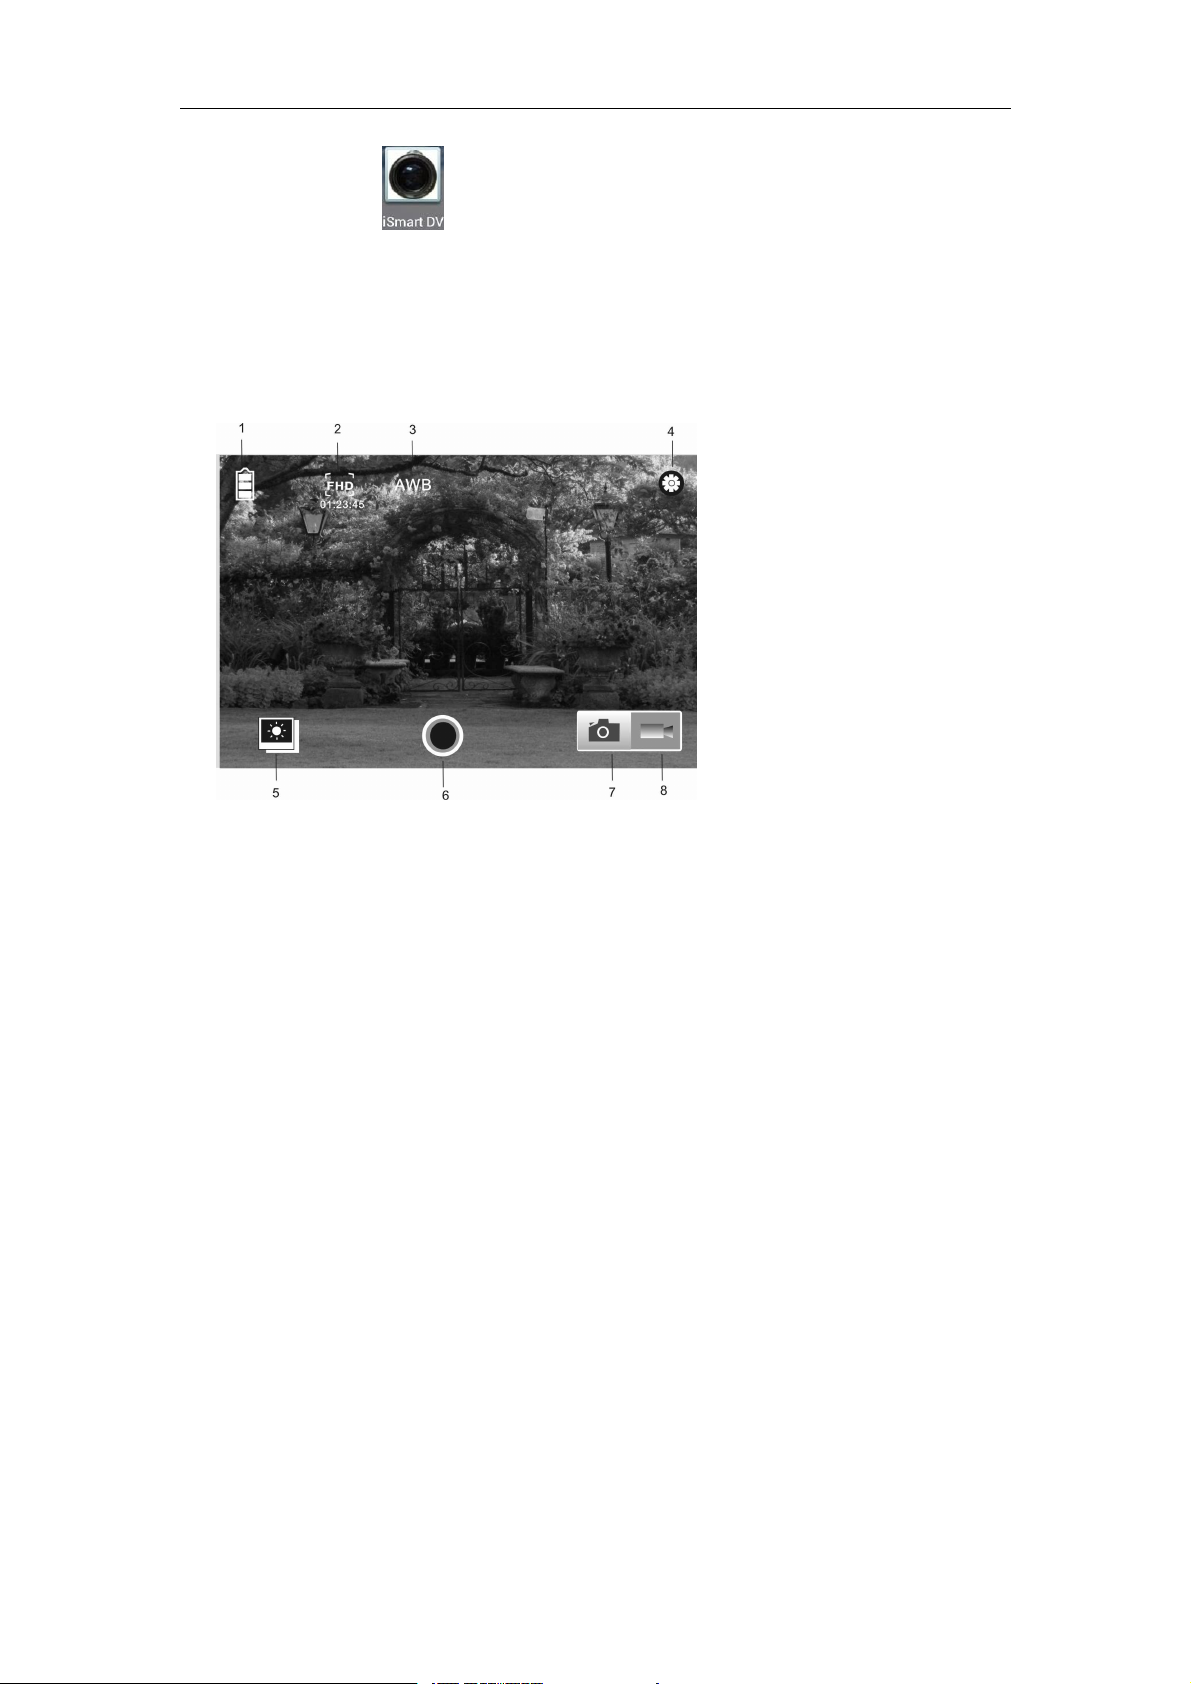
3.4ClicktheiconintheApplistoftheiOSphoneortablettoopen
Note:
it.NowyoucanpreviewtheimagesentbytheDVonthephoneortablet
andstartsomeoperating.Theoperationinterfaceonterminalisshownin
thefollowingfigure.
1.DVbatteryicon
2.Videoresolution
3.Whitebalance
4.Setup(entersetupmenu)
5.EnterPlaybackmode
6.Shutterbutton
7.Photomode
8.Videomode
1.ATFcardmustbeinsertedifyouneedtotakeaphoto,record
avideo,ordownloadfilesontheterminal;
 Loading...