

Page 1

80 Series III
®
Multimeters
Service Information
PN 688645 April 1998 Rev.2, 6/02
© 1998-2002 Fluke Corporation, All rights reserved. Printed in U.S.A.
All product names are trademarks of their respective companies.
Page 2

Lifetime Limited Warranty
Each Fluke 20, 70, 80, 170 and 180 Series DMM will be free from defects in material and
workmanship for its lifetime. As used herein, “lifetime” is defined as seven years after Fluke
discontinues manufacturing the product, but the warranty period shall be at least ten years from the
date of purchase. This warranty does not cover fuses, disposable batteries, damage from neglect,
misuse, contamination, alteration, accident or abnormal conditions of operation or handling,
including failures caused by use outside of the product’s specifications, or normal wear and tear of
mechanical components. This warranty covers the original purchaser only and is not transferable.
For ten years from the date of purchase, this warranty also covers the LCD. Thereafter, for the
lifetime of the DMM, Fluke will replace the LCD for a fee based on then current component
acquisition costs.
To establish original ownership and prove date of purchase, please complete and return the
registration card accompanying the product, or register your product on http://www.fluke.com.
Fluke will, at its option, repair at no charge, replace or refund the purchase price of a defective
product purchased through a Fluke authorized sales outlet and at the applicable international
price. Fluke reserves the right to charge for importation costs of repair/replacement parts if the
product purchased in one country is sent for repair elsewhere.
If the product is defective, contact your nearest Fluke authorized service center to obtain return
authorization information, then send the product to that service center, with a description of the
difficulty, postage and insurance prepaid (FOB Destination). Fluke assumes no risk for damage
in transit. Fluke will pay return transportation for product repaired or replaced in-warranty.
Before making any non-warranty repair, Fluke will estimate cost and obtain authorization, then
invoice you for repair and return transportation.
THIS WARRANTY IS YOUR ONLY REMEDY. NO OTHER WARRANTIES, SUCH AS
FITNESS FOR A PARTICULAR PURPOSE, ARE EXPRESSED OR IMPLIED. FLUKE
SHALL NOT BE LIABLE FOR ANY SPECIAL, INDIRECT, INCIDENTAL OR
CONSEQUENTIAL DAMAGES OR LOSSES, INCLUDING LOSS OF DATA, ARISING
FROM ANY CAUSE OR THEORY. AUTHORIZED RESELLERS ARE NOT AUTHORIZED
TO EXTEND ANY DIFFERENT WARRANTY ON FLUKE’S BEHALF. Since some states do
not allow the exclusion or limitation of an implied warranty or of incidental or consequential
damages, this limitation of liability may not apply to you. If any provision of this warranty is
held invalid or unenforceable by a court or other decision-maker of competent jurisdiction, such
holding will not affect the validity or enforceability of any other provision.
2/02
Page 3

Table of Contents
Title Page
Introduction....................................................................................................... 1
Precautions and Safety Information.................................................................. 2
International Symbols........................................................................................ 2
Safety Information............................................................................................. 3
Specifications .................................................................................................... 4
Accuracy ....................................................................................................... 4
General.......................................................................................................... 4
AC Voltage Specifications (Models 85 and 87)........................................... 5
AC Voltage Specifications (Model 83)......................................................... 5
DC Voltage, Resistance, and Conductance Specifications........................... 5
Current Specifications................................................................................... 6
Capacitance and Diode Function Specifications .......................................... 6
Frequency Counter Specifications................................................................ 6
Frequency Counter Sensitivity and Trigger Levels ...................................... 7
MIN MAX Recording Specifications........................................................... 7
Electrical Characteristics of the Terminals................................................... 8
Required Equipment.......................................................................................... 8
Basic Maintenance ............................................................................................ 9
Opening the Meter Case................................................................................ 9
Removing and Reinserting the Circuit Board Assembly.............................. 10
Reassembling the Meter Case....................................................................... 11
Replacing the Battery.................................................................................... 11
Testing Fuses (F1 and F2)............................................................................. 12
Replacing Fuses ............................................................................................ 13
Cleaning........................................................................................................ 13
Input Terminals......................................................................................... 13
Rotary Switch ........................................................................................... 14
Performance Tests............................................................................................. 14
A Basic Operability Test............................................................................... 14
Testing the Display ....................................................................................... 15
Testing the Rotary Switch............................................................................. 15
Testing the AC Voltage Function................................................................. 16
Testing the Frequency Function.................................................................... 17
Testing the Frequency Sensitivity and Trigger Level................................... 17
Testing DC Voltage ...................................................................................... 18
Testing the PEAK MIN MAX Function (Model 87 only)............................ 18
i
Page 4

80 Series III
Service Manual
Testing the mV DC Function........................................................................ 19
Testing the Resistance Function ................................................................... 19
Testing the Capacitance Function................................................................. 20
Checking the Diode Test Function................................................................ 20
Testing the Milliamp (mA) Function............................................................ 21
Testing the Microamp (µA) Function........................................................... 21
Testing the Amp (A) Function...................................................................... 22
Calibration......................................................................................................... 23
Calibrating the Model 85 and 87 III.............................................................. 23
Calibrating the Model 83 III......................................................................... 25
Parts and Accessories........................................................................................ 25
ii
Page 5

List of Tables
Table Title Page
1. International Symbols............................................................................................ 2
2. Required Tools and Equipment............................................................................. 9
3. Rotary Switch Test ................................................................................................ 16
4. AC Voltage Test .................................................................................................... 16
5. Frequency Test....................................................................................................... 17
6. Frequency Counter Sensitivity and Trigger Level Tests....................................... 18
7. DC Voltage Test .................................................................................................... 18
8. Peak MIN MAX Test............................................................................................. 19
9. Ohms Tests ............................................................................................................ 20
10. Capacitance Tests .................................................................................................. 20
11. mA Tests................................................................................................................ 21
12. µA Tests................................................................................................................. 22
13. Current Tests.......................................................................................................... 22
14. Replacement Parts ................................................................................................. 25
15. Accessories............................................................................................................ 26
iii
Page 6

80 Series III
Service Manual
iv
Page 7

List of Figures
Figure Title Page
1. Disassembly Details............................................................................................... 10
2. Battery and Fuse Replacement .............................................................................. 11
3. Testing the Current Input Fuses............................................................................. 12
4. Display Test........................................................................................................... 15
5. Calibration Adjustment Points............................................................................... 24
6. Replaceable Parts................................................................................................... 26
v
Page 8

80 Series III
Service Manual
vi
Page 9

Introduction
To avoid shock or injury, do not perform the verificati on t est s
or calibration procedures described in this manual unless you
are qualified to do so.
The information provided in this document is for the use of
qualified personnel only.
The 80 III Multimeter contains parts that can be damaged by
static discharge.
Follow the standard practices for handling static sensitive
devices.
The 80 Series III Service Information provides the following information:
• Precautions and safety information
• Specifications
• Basic maintenance (cleaning, replacing the battery and fuses)
• Performance test procedures
• Calibration and calibration adjustment procedures
• Accessories and replaceable parts
W Warning
Caution
For complete operating instructions, refer to the 80 Series III Users Manual.
To contact Fluke, call:
USA: 1-888-99-FLUKE (1-888-993-5853)
Canada: 1-800-36-FLUKE (1-800-363-5853)
Europe: +31 402-678-200
Japan: +81-3-3434-0181
Singapore: +65-738-5655
Anywhere in the world: +1-425-446-5500
For additional information about Fluke, its products, and services, visit Fluke’s web site
at:
www.fluke.com
1
Page 10
80 Series III
Service Information
Precautions and Safety Information
International Symbols
Symbol Meaning Symbol Meaning
Use the Meter only as described in the Users Manual. If you do not do so, the protection
provided by the Meter may be impaired.
Read the “Safety Information” page before servicing this product.
In this manual, a Warning identifies conditions and actions that pose hazard(s) to the
user; a Caution identifies conditions and actions that may damage the Meter or the test
instruments.
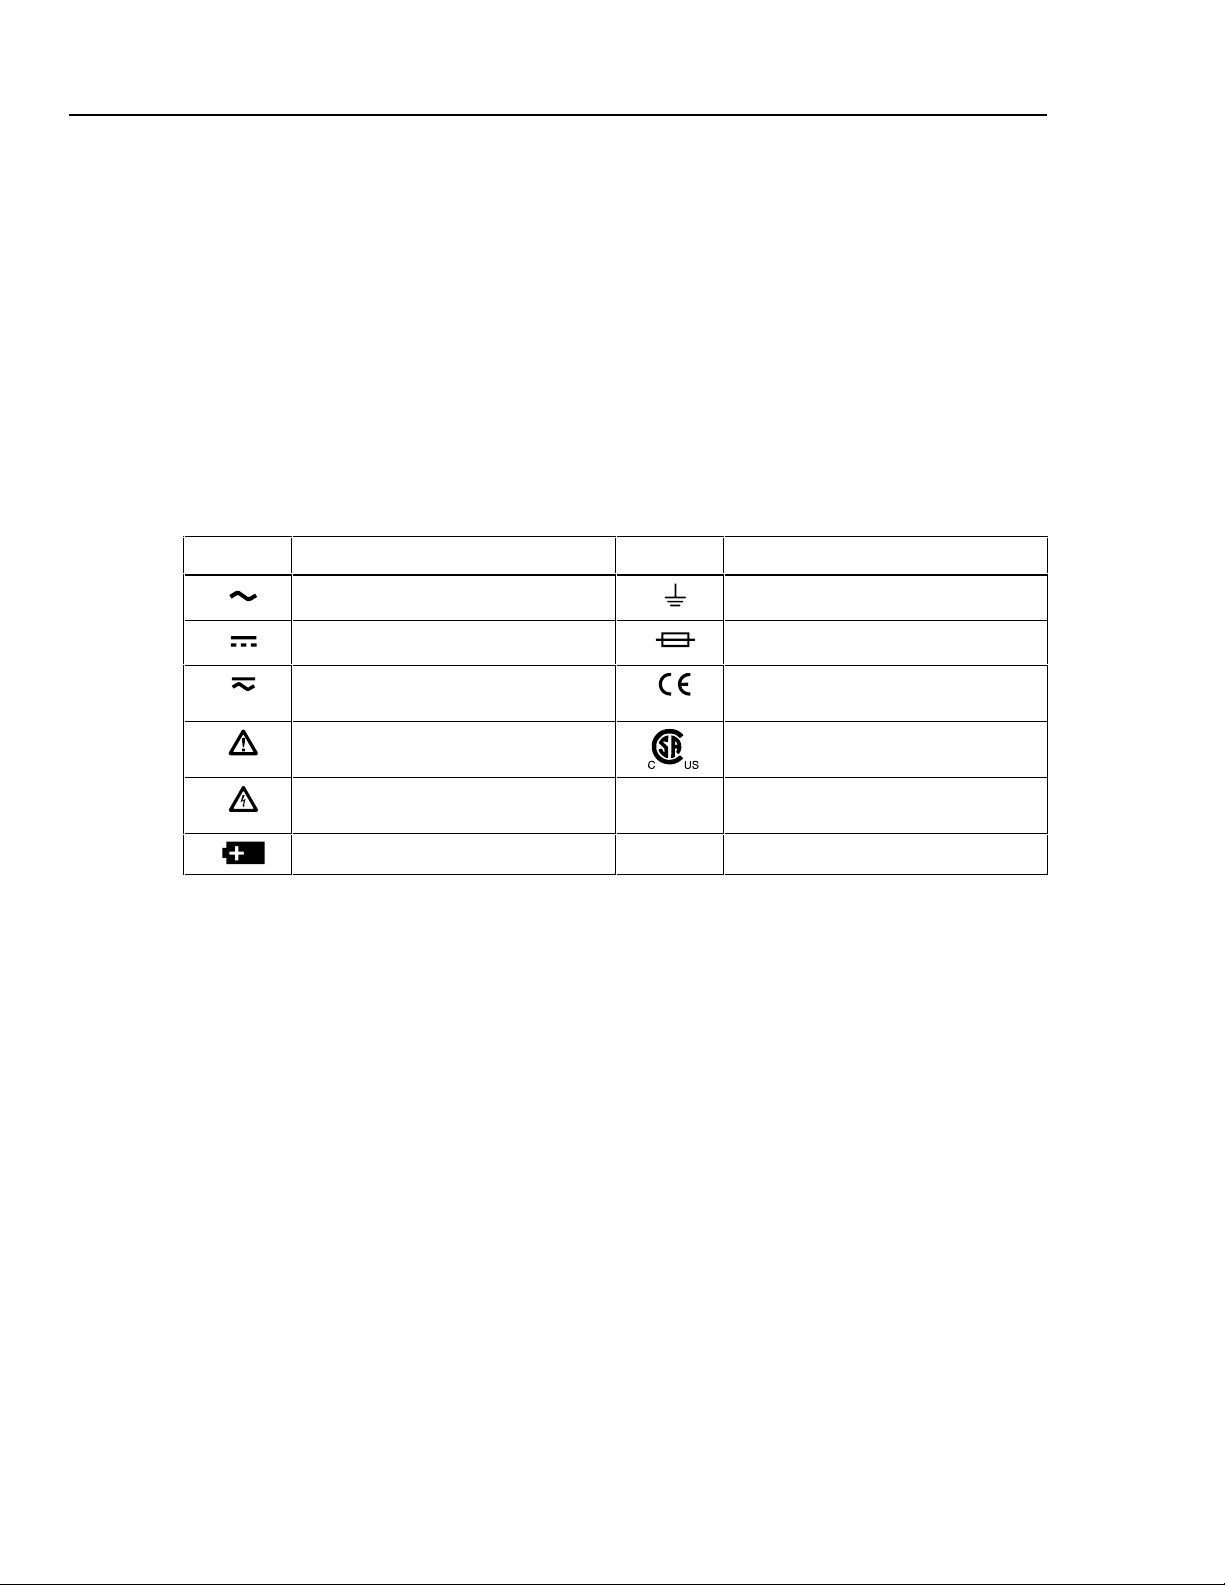
International symbols used on the Meter and in this manual are explained in Table 1.
Table 1. International Symbols
Alternating current Earth ground
Direct current Fuse
Alternating or direct current Conforms to European Union
directives
Refer to the manual. Important
information.
Take appropriate precautions.
Hazardous voltage may be present
Battery
T
O
Conforms to relevant Canadian
Standards Association directives
Double insulated
IEC overvoltage category III
2
Page 11

Safety Information
Safety Information
WWarnings and Precautions
To avoid possible electric shock or personal injury, and to avoid possible damage to
the Meter or to the equipment under test, follow these guidelines:
Before using the Meter inspect the case. Do not use the Meter if it is damaged.
•
Look for cracks or missing plastic. Pay particular attention to the insulation
around the connectors.
Inspect the test leads for damaged insulation or exposed metal. Check the test
•
leads for continuity. Replace damaged test leads before using the Meter.
Verify the Meter’s operation by measuring a known voltage. Do not use the Meter
•
if it operates abnormally. Protection may be impaired. When in doubt, have the
Meter serviced.
Do not apply more than the rated voltage, as marked on the Meter, between the
•
terminals or between any terminal and earth ground.
Use caution when working with voltages above 30 V ac rms, 42 V ac peak, or 60 V
•
dc. These voltages pose a shock hazard.
Multimeters
Use the proper terminals, function, and range for your measurements.
•
Do not operate the Meter around explosive gas, vapor, or dust.
•
When using the probes, keep your fingers behind the finger guards.
•
When making connections, connect the common test lead before connecting the
•
live test lead; when disconnecting, disconnect the live test lead before
disconnecting the common test lead.
Disconnect circuit power and discharge all high-voltage capacitors before testing
•
resistance, continuity, diodes, or capacitance.
Before measuring current, check the Meter's fuses (see “Testing Fuses”) and
•
turn OFF power to the circuit before connecting the Meter to the circuit.
Do not operate the Meter with the case (or part of the case) removed.
•
Use only a single 9 V battery, properly installed in the battery receptacle, to
•
power the Meter.
Replace the battery as soon as the battery indicator (M) appears. With a low
•
battery, the Meter might produce false readings that can lead to electric shock
and personal injury,
• Remove test leads from the Meter before opening the Meter case.
• When servicing the Meter, use only specified replacement parts.
3
Page 12

80 Series III
Service Information
Specifications
Accuracy
General
Accuracy is given for a period of one year after calibration, at 18 °C to 28 °C, with
relative humidity up to 90 % as:
±([% of reading] + [number of least significant digits])
For Model 87 in the 4 ½-digit mode, multiply the number of least significant digits
(counts) by 10. AC conversions are ac-coupled and valid from 5 % to 100 % of range.
Models 85 and 87 are true rms responding. AC crest factor can be up to 3 at full scale, 6
at half scale. For non-sinusoidal wave forms add −(2 % reading + 2 % full scale) typical,
for a crest factor up to 3.
Maximum Voltage between any Terminal
and Earth Ground
WFuse Protection for mA or µA inputs
WFuse Protection for A input
Display Digital: 4000 counts updates 4/sec; (Model 87 also has
Temperature Operating: -20 °C to +55 °C;
Altitude Operating: 2000 m; Storage: 10,000 m
Temperature Coefficient 0.05 x (specified accuracy)/ °C (<18 °C or >28 °C)
Electromagnetic Compatibility In an RF field of 1 V/m on all ranges and functions except
Relative Humidity 0 % to 90 % (0 °C to 35 °C);
1000 V rms
44/100 A, 1000 V FAST Fuse
11 A, 1000 V FAST Fuse
19,999 counts in 4½-digit mode, updates 1/sec.).
Analog: updates 40/sec.
Frequency: 19,999 counts, updates 3/sec at >10 Hz. Model
87: 4 x 32 segments (equivalent to 128);
Models 83, 85: 43 segments.
Storage: -40 °C to +60 °C
capacitance: Models 85 and 87 Total Accuracy = Specified
Accuracy + 2.5 % of range. Model 83 Total Accuracy =
Specified Accuracy + 0.3 % of range. Capacitance not
specified in RF fields. Above 1 V/m is not specified.
0 % to 70 % (35 °C to 55 °C)
Battery Type 9 V zinc, NEDA 1604 or 6F22 or 006P
Battery Life 400 hrs typical with alk al i ne (wi th backlight off)
Shock Vibration
Size (H x W x L) 1.25 in x 3.41 in x 7.35 in (3.1 cm x 8.6 cm x 18.6 c m )
Size with Holster and Flex-Stand 2.06 in x 3.86 in x 7.93 in (5.2 cm x 9.8 cm x 20.1 c m )
Weight 12.5 oz (355 g)
Weight with Holster and Flex-Stand 22.0 oz (624 g)
Safety Complies with ANSI/ISA S82.01-1994, CSA 22. 2 No. 1010.1:1992
Per MIL-T-28800 for a Class 2 instrument
to 1000 V Overvoltage Category III. UL listed to UL3111-1.
Licensed by TÜV to EN61010-1.
4
Page 13

AC Voltage Specifications (Models 85 and 87)
Function Range Resolution Accuracy
50-60 Hz 45 Hz - 1 kHz 1-5 kHz 5-20 kHz
K
3
400.0 mV
4.000 V
40.00 V
400.0 V
1000 V
1. For extended use at high RH, change the 400 m V and 4.0 V ac accuracy specification to ± (1.5 % + 4 counts) for 45
Hz to 1 kHz and ± (3.0 % + 25 c ounts) for 5 kHz to 20 kHz.
2. Below 10 % of range, add 6 counts.
3. Models 85 and 87 are true rms responding Met ers. When the input leads are shorted together in the ac functions,
the Meters display a reading (t ypically <25 counts) caused by internal amplifi er noi se. The accuracy on Models 85
and 87 is not significant l y affected by this i nternal offset when measuring i nput s that are within 5 % to 100 % of the
selected range. When the rms v al ue of the two values (5 % of range and internal offset) is cal culated, the effect i s
minimal as shown in the fol l owi ng example where 20.0 = 5 % of 400 mV range, and 2. 5 i s the internal offset: RMS =
SQRT[(20.0)
constant error that is equal to t he int ernal of fset will result.
4. Frequency range: 1 kHz to 2.5 k Hz .
5. Below 10 % of range, add 16 counts.
2
+ (2.5)2] = 20.16. If you use the REL function to zero the display when using the ac func t i ons, a
0.1 mV
0.001 V
0.01 V
0.1 V
1 V
±(0.7 % + 4)
±(0.7 % + 2)
±(0.7 % + 2)
±(0.7 % + 2)
±(0.7 % + 2)
±(1.0 % + 4)
±(1.0 % + 4)
±(1.0 % + 4)
±(1.0 % + 4)
±(1.0 % + 4)
5
1
±(2.0 % + 4)
±(2.0 % + 4)
±(2.0 % + 4)
±(2.0 % + 4)
unspecified
±(2.0 % + 20)
±(2.0 % + 20)
±(2.0 % + 20)
4
unspecified
unspecified
AC Voltage Specifications (Model 83)
Function Range Resolution Accuracy
50 Hz - 60 Hz 45 Hz - 1 kHz 1 kHz - 5 kHz
K
2
400.0 mV
4.000 V
40.00 V
400.0 V
1000 V
1. For extended use at high RH, change the 400 m V and 4.0 V ac accuracy specification to ± (1.5 % + 4 counts) for
45 Hz to 1 kHz and ± (3.0 % + 25 count s) for 5 kHz to 20 kHz.
2. Below a reading of 200 counts, add 10 c ount s.
3. Frequency range: 1 kHz to 2.5 k Hz .
0.1 mV
0.001 V
0.01 V
0.1 V
1 V
±(0.5 % + 4)
±(0.5 % + 2)
±(0.5 % + 2)
±(0.5 % + 2)
±(0.5 % + 2)
±(1.0 % + 4)
±(1.0 % + 4)
±(1.0 % + 4)
±(1.0 % + 4)
±(1.0 % + 4)
1
±(2.0 % + 4)
±(2.0 % + 4)
±(2.0 % + 4)
±(2.0 % + 4)
unspecified
3
Multimeters
Specifications
2
DC Voltage, Resistance, and Conductance Specifications
Accuracy
Function Range Resolution Model 83 Model 85 Model 87
L
4.000 V
40.00 V
400.0 V
1000 V
F
mV
e
400.0 mV 0.1 mV ±(0.3 % + 1) ±(0.1 % + 1) ±(0.1 % + 1)
400.0 Ω
4.000 kΩ
40.00 kΩ
400.0 kΩ
4.000 MΩ
40.00 MΩ
nS
1. For extended use at high RH, change the 400 m V and 4.0 V ac accuracy specification to ± (1.5 % + 4 counts) for
45 Hz to 1 kHz and ± (3.0 % + 25 count s) for 5 kHz to 20 kHz.
2. When using the REL ∆ function to compensate for offset s.
40.00 nS
0.001 V
0.01 V
0.1 V
1 V
0.1 Ω
0.001 kΩ
0.01 kΩ
0.1 kΩ
0.001 MΩ
0.01 MΩ
0.01 nS
±(0.1 % + 1)
±(0.1 % + 1)
±(0.1 % + 1)
±(0.1 % + 1)
±(0.4 % + 2)
±(0.4 % + 1)
±(0.4 % + 1)
±(0.7 % + 1)
±(0.7 % + 1)
±(1.0 % + 3)
±(1.0 % + 10)
±(0.08 % + 1)
±(0.08 % + 1)
±(0.08 % + 1)
±(0.08 % + 1)
2
±(0.2 % + 2)
±(0.2 % + 1)
±(0.2 % + 1)
±(0.6 % + 1)
±(0.6 % + 1)
±(1.0 % + 3)
±(1.0 % + 10)
1
2
±(0.05 % + 1)
±(0.05 % + 1)
±(0.05 % + 1)
±(0.05 % + 1)
±(0.2 % + 2)
±(0.2 % + 1)
±(0.2 % + 1)
±(0.6 % + 1)
±(0.6 % + 1)
±(1.0 % + 3)
±(1.0 % + 10)
2
5
Page 14

80 Series III
Service Information
Current Specifications
Accuracy
1
Burden
Voltage
Function Range Resolution
Model 83
2
Model 85
3,4
Model 87
3,4
(typical)
mA \
(45 Hz to
2 kHz)
mA [ 40.00 mA
A B
µ
(45 Hz to
2 kHz)
AF
µ
1. For extended use at high RH, change the 400 m V and 4.0 V ac accuracy specification to ± (1.5 % + 4 counts) for
45 Hz to 1 kHz and ± (3.0 % + 25 count s) for 5 kHz to 20 kHz.
2. AC conversion for Model 83 is ac coupled and calibrated to the rm s value of a sinewave input.
3. AC conversions for Models 85 and 87 are ac coupled, true rms res pondi ng, and valid from 5 % to 100 % of
range.
4. See note 2 in under “
5. 10 A continuous; 20 A for 30 s econds maximum: Ac curacy unspecified ov er 10 A .
6. Below a reading of 200 counts, add 10 c ount s.
40.00 mA
400.0 mA
4000 mA
10.00 A
400.0 mA
4000 mA
10.00 A
400.0 µA
4000 µA
400.0 µA
4000 µA
0.01 mA
0.1 mA
1 mA
5
0.01 A
0.01 mA
0.1 mA
1 mA
5
0.01 A
0.1 µA
1 µA
0.1 µA
1 µA
AC Voltage Specifications (Models 85 and 87).”
±(1.2 % + 2)
±(1.2 % + 2)
±(1.2 % + 2)
±(1.2 % + 2)
±(0.4 % + 4)
±(0.4 % + 2)
±(0.4 % + 4)
±(0.4 % + 2)
±(1.2 % + 2)
±(1.2 % + 2)
±(0.4 % + 4)
±(0.4 % + 2)
6
6
6
6
6
6
±(1.0 % + 2)
±(1.0 % + 2)
±(1.0 % + 2)
±(1.0 % + 2)
±(0.2 % + 4)
±(0.2 % + 2)
±(0.2 % + 4)
±(0.2 % + 2)
±(1.0 % + 2)
±(1.0 % + 2)
±(0.2 % + 4)
±(0.2 % + 2)
6
6
6
6
6
6
±(1.0 % + 2)
±(1.0 % + 2)
±(1.0 % + 2)
±(1.0 % + 2)
±(0.2 % + 4)
±(0.2 % + 2)
±(0.2 % + 4)
±(0.2 % + 2)
±(1.0 % + 2)
±(1.0 % + 2)
±(0.2 % + 4)
±(0.2 % + 2)
1.8 mV/mA
1.8 mV/mA
0.03 V/A
0.03 V/A
1.8 mV/mA
1.8 mV/mA
0.03 V/A
0.03 V/A
100 µV/µA
100 µV/µA
100 µV/µA
100 µV/µA
Capacitance and Diode Function Specifications
Function Range Resolution Accuracy
E 5.00 nF
0.0500 µF
0.500 µF
5.00 µF
0.01 nF
0.0001 µF
0.001 µF
0.01 µF
±(1 % + 3)
±(1 % + 3)
±(1 % + 3)
±(1.9 % + 3)
1
G 3.000 V 0.001 V ±(2 % + 1)
1. With a film capaci t or or better, using Relative m ode to zero residual. See “Accuracy” earlier in the specifications
for a complete explanation.
Frequency Counter Specifications
Function Range Resolution Accuracy
Frequency
(0.5 Hz to 200 kHz,
pulse width >2 µs)
199.99
1999.9
19.999 kHz
199.99 kHz
>200 kHz
1. See “Accuracy” earlier i n the specifications for a complete explanation.
0.01 Hz
0.1 Hz
0.001 kHz
0.01 kHz
0.1 kHz
±(0.005 % + 1)
±(0.005 % + 1)
±(0.005 % + 1)
±(0.005 % + 1)
unspecified
1
6
Page 15

Frequency Counter Sensitivity and Trigger Levels
Multimeters
Specifications
Minimum Sensitivity (RMS Sinewave)
Input Range
400 mV dc
400 mV dc
4 V
40 V
400 V
1000 V
Duty Cycle Range Accuracy
0.0 to 99.9 % Within ±(0.05 % per kHz + 0.1 %) of full scale for a 5 V logic family input on
1. Maximum input for spec i fied accuracy = 10X Range or 1000 V.
1
5 Hz - 20 kHz 0.5 Hz - 200 kHz
70 mV (to 400 Hz)
150 mV
0.3 V
3 V
30 V
300 V
the 4 V dc range.
Within ±((0.06 x Voltage Range/Input Voltage) x 100 %) of full scale for sine
wave inputs on ac voltage ranges.
70 mV (to 400 Hz)
150 mV
0.7 V
7 V (≤140 kHz)
70 V (≤14.0 kHz)
700 V (≤1.4 kHz)
Approximate Trigger Level
(DC Voltage Function)
40 mV
1.7 V
4 V
40 V
400 V
MIN MAX Recording Specifications
Model Nominal
Response
83 100 ms to 80 %
1 s
Specified accuracy ±12 counts for changes >200 ms in duration
(±40 counts in ac with beeper on).
Same as specified accuracy for changes >2 seconds in duration
(±40 counts in ac with beeper on).
Accuracy
85, 87 100 ms to 80 %
(DC functions)
120 ms to 80 %
(AC functions)
1 s
250 µs
(Model 87 only)
Specified accuracy ±12 counts for changes >200 ms in duration.
Specified accuracy ±40 counts for changes >350 ms and inputs
>25 % of range.
Same as specified accuracy for changes >2 seconds in duration.
Specified accuracy ±100 counts for changes >250 µs in duration.
7
Page 16

80 Series III
Service Information
Electrical Characteristics of the Termi nal s
L Overload Protection
Input Impedance (nominal): 10 MΩ<100 pF
Common Mode Rejection Ratio: >120 dB at dc, 50 Hz or 60 Hz
(1 kΩ unbalance)
Normal Mode Rejection: >60 dB at 50 Hz or 60 Hz
mA Overload Protection
Input Impedance (nominal): 10 MΩ<100 pF
Common Mode Rejection Ratio: >120 dB at dc, 50 Hz or 60 Hz
(1 kΩ unbalance)
Normal Mode Rejection: >60 dB at 50 Hz or 60 Hz
K Overload Protection
Input Impedance (nominal): 10 MΩ<100 pF (ac-coupled)
Common Mode Rejection Ratio: >60 dB , dc to 60 Hz
(1 kΩ unbalance)
e Overload Protection
1
: 1000 V rms
1
: 1000 V rms
1
: 1000 V rms
1
: 1000 V rms
Open Circuit Test Voltage: <1.3 V dc
Full Scale Voltage: To 4.0 MΩ: <450 mV dc
Typical Short Circuit Current: 400 Ω: 200 µA
G Overload Protection
Open Circuit Test Voltage: <3.9 V dc
Full Scale Voltage: 3.000 Vdc
Typical Short Circuit Current: 0.6 mA typical
1. 106 V Hz maximum.
Required Equipment
Required equipment is listed in Table 2. If the recommended models are not available,
equipment with equivalent specifications may be used.
Repairs or servicing should be performed only by qualified personnel.
40 MΩ or nS V1.3 V dc
4 kΩ: 80 µA
40 kΩ: 12 µA
400 kΩ: 1.4 µA
4 MΩ: 0.2 µA
40 MΩ: 0.2 µA
1
: 1000 V rms
8
Page 17

Basic Maintenance
Table 2. Required Equipment
Equipment Required Characteristics Recommended Model
Multimeters
Calibrator AC Voltage Range: 0-1000V ac
Accuracy: ±0.12 %
Frequency Range: 60-20000 Hz
Accuracy: ±3 %
DC Voltage Range: 0-1000V dc
Accuracy: ±0.012 %
Current Range: 350 µA-2A
Accuracy: AC (60 Hz to 1 kHz): ±0.25 %
DC: ±0.05 %
Frequency Source: 19.999 kHz - 199.99 kHz
Accuracy: ±0.0025 %
Amplitude: 150 mV to 6V RMS
Accuracy: ±5 %
Range: 1Ω - 100 MΩ
Accuracy: 0.065 %
Basic Maintenance
WWarning
To avoid shock, remove the test leads and any input signals
before opening the case or replacing the battery or fuses.
Fluke 5500A Multi-Product
Calibrator or equivalent
Opening the Meter Case
To avoid unintended circuit shorting, always place the
uncovered Meter assembly on a protective surface. When the
case of the Meter is open, circuit connect ions are exposed.
To open the Meter case, refer to Figures 1 and 2 and do the following:
1. Disconnect test leads from any live source, turn the rotary switch to OFF, and
remove the test leads from the front terminals.
2. Remove the battery door by using a flat-blade screwdriver to the turn the battery
door screws 1/4-turn counterclockwise.
3. The case bottom is secured to the case top by three screws and two internal snaps (at
the LCD end). Using a Phillips-head screwdriver, remove the three screws.
The gasket between the two case halves is sealed to, and must remain
with, the case bottom. The case top lifts away from the gasket easily. Do
not damage the gasket or attempt to separate the case bottom from the
gasket.
4. Hold the Meter display side up.
5. Lifting up on the input terminal end, disengage the case top from the gasket.
Caution
Note
6. Gently unsnap the case top at the display end. (See Figure 2).
9
Page 18

80 Series III
Service Information
Align Tab
to off
10
Figure 1. Disassembly Details
ek7f.eps
Removing and Reinserting the Circuit Board Assembl y
Once the case has been opened, the shields can be disconnected from the circuit board
assembly as follows:
1. Remove the one Phillips-head screw securing the back shield to the circuit assembly.
Then remove the back shield.
2. The front shield can now be disconnected from the circuit assembly by detaching the
four snaps (one at a time) found on the top-front.
Be gentle when detaching or attaching the four snaps. Excessive force can deform or
fracture the snaps.
3. To reinsert the circuit assembly, push the front shield on so that the four clips engage
gently and simultaneously.
4. Turn the assembly over, and replace the Phillips-head screw and back shield.
Ensure that the shields are tightly attached. Properly fitted shields are required for
the Meter to perform to specification.
Page 19

F1
Multimeters
Basic Maintenance
F2
1
Figure 2. Battery and Fuse Replacement
Reassembling the Meter Case
To reassemble the Meter Case, do the following:
1. Verify that the rotary switch and circuit board switch are in the
that the gasket remains secured to the case bottom.
2. Place the case top on the case bottom, ensuring that the gasket is properly seated and
the case halves snap together above the LCD end. (See Figure 2.)
3. Reinstall the three screws and the battery door.
4. Secure the battery door by turning the screw 1/4-turn clockwise.
5. Go to “Performance Tests” later in this document, and perform the procedures
described.
Replacing the Battery
The Meter is powered by a single 9 V battery (NEDA 1604, 6F22, or 006P).
To replace the battery, refer to Figure 2 and do the following:
1. Turn the rotary switch to OFF and remove the test leads from the terminals.
2. Remove the battery door by using a flat-blade screwdriver to the turn the battery
door screws 1/4-turn counterclockwise.
IY12.eps
OFF position, and
3. Remove the battery and replace it with a new one. Dress the battery leads so that
they will not be pinched between the battery door and case bottom.
4. Replace the battery door and secure the door by turning the screws 1/4-turn
clockwise.
11
Page 20

80 Series III
Service Information
Testing Fuses (F1 and F2)
To test the internal fuses of the Meter, refer to Figure 3 and do the following:
1. Turn the rotary selector switch to the ReE position.
2. To test F2, plug a test lead into the Vinput terminal, and touch the probe to
the
A input terminal. (Because the receptacles of the input terminals contain split
contacts, be sure that you touch the probe to the half of the receptacle contact that is
nearest the LCD.)
The display should indicate between 00.0 Ω and 00.5 Ω.
If the display reads OL (overload), replace the fuse and test again. If the display
reads any other value, further servicing is required.
3. To test F1, move the probe from the
A input terminal to the mA µA input terminal.
The display should read between 0.995 kΩ and 1.005 kΩ.
If the display reads a high resistance or
OL (overload), replace the fuse and test
again. If the display reads any other value, further servicing is required.
TRUE RMS MULTIMETER
PEAK MIN MAX
mV
V
V
OFF
A
mA µA
10A MAX
FUSED
PEAK MIN MAX
mV
V
V
OFF
A
mA µA
10A MAX
FUSED
87
MIN MAX RANGE HOLD
COM
400mA MAX
FUSED
1000V MAX
!
TRUE RMS MULTIMETER
87
MIN MAX RANGE HOLD
COM
400mA MAX
FUSED
1000V MAX
!
H
HzREL
mA
A
µA
V
!
!
CAT II
CAT II
1000V MAX
H
HzREL
mA
A
µA
V
!
!
CAT II
CAT II
1000V MAX
Good F2 fuse: 00.0Ω to
00.5Ω
Replace fuse: OL
Touch top half
of input contacts
Good F1 fuse: 0.995 KΩ to
1.005KΩ
Replace fuse: OL
12
Figure 3. Testing the Current Input Fuses
IY5f.eps
Page 21

Replacing Fuses
To avoid electrical shock, remove the test leads and any input
signals before replacing the battery or fuses. To prevent
damage or injury, INSTALL ONLY quick acting fuses w i t h the
following Amp/Volt current interrupt rat i ngs:
F1 Fuse: 0.440 A, 1000 V, FAST. Minimum i nt errupt rat ing 10,000 A
F2 Fuse: 11 A, 1000 V, FAST. Minimum interrupt rating 17,000 A
To replace the Meter’s fuses, refer to Figure 2 and do the following:
Multimeters
Basic Maintenance
WWarning
1. Turn the rotary switch to
2. Remove the battery door by using a flat-blade screwdriver to turn the battery door
3. Remove the three Phillips-head screws from the case bottom and turn the case over.
4. Gently lift the input terminal-end of the case top to separate the two halves of the
5. Remove the fuse by gently prying one end loose, then sliding the fuse out of its
6. Replace the fuse only with one specified above.
7. Verify that the rotary switch and the circuit board switch are in the
8. Place the case top on the case bottom, ensuring that the gasket is properly seated and
9. Reinsert the three case bottom screws and the battery door.
Cleaning
OFF and remove the test leads from the terminals
screws 1/4-turn counterclockwise.
case.
bracket.
OFF position.
the case halves snap together above the LCD end. (See Figure 2.)
WWarning
To avoid electrical shock or damage to the Meter, never all ow
water inside the case. To avoid damaging the Meter’s housing,
never apply solvents to the Meter.
If the Meter requires cleaning, wipe it down with a cloth that is lightly dampened with
water or a mild detergent. Do not use aromatic hydrocarbons, chlorinated solvents, or
methanol-based fluids when wiping down the Meter.
Input Terminals
Water, dirt, or other contamination in the A or mA µA input terminals may activate the
Input Alert beeper even though test leads are not inserted. Such contamination might be
dislodged by turning the Meter over and, with all test leads removed, gently tapping on
the case.
To clean the input terminals more effectively, do the following:
1. Turn the Meter off and remove all test leads from the terminals.
2. Use a clean swab in each of the four terminals to dislodge and clean out the
contamination.
13
Page 22

80 Series III
Service Information
Rotary Switch
3. Moisten a new swab with a cleaning and oiling agent (such as WD40). Work this
swab around in each of the four terminals.
The oiling agent insulates the terminals from moisture-related shorting and ensures
against false Input Alerts.
To clean the rotary switch potentiometer, do the following:
1. Remove the circuit board assembly as described earlier under “Removing and
Reinserting the Circuit Board Assembly”.
2. From the back of the circuit board assembly, push the switch shaft in, and remove
the polymer thick film (ptf) contact assembly.
3. Clean the ptf contact assembly and the potentiometer on the circuit assembly with
alcohol. Blow these parts dry with clean, dry air.
4. Using a Q-tip, apply a thin film of W. F. Nye Gel Lubricant, #813S (Fluke PN
926084), to the entire surface of the ptf pattern and the hole in the center of the
pattern. It is important that the grease be applied in a film of consistent thickness
such that grease does not accumulate on the ptf wiper contacts. Remove excess
grease with a dry Q-tip. No portion of the ptf pattern should be left unlubricated.
5. Push and secure the ptf contact assembly back on to the switch shaft.
6. Reassemble the circuit assembly, the shields, and case halves as described earlier
under “Reassembling the Meter Case”.
7. Perform the procedures under “Performance Tests”.
Performance Tests
The following performance tests verify the complete operability of the Meter and check
the accuracy of each Meter function against the Meter’s specifications.
Accuracy specifications are valid for a period of one year after calibration, when
measured at an operating temperature of 18°C to 28°C and at a maximum of 90 %
relative humidity.
To perform the following tests, it is not necessary to open the case; no adjustments are
necessary. Merely make the required connections, apply the designated inputs, and
determine if the reading on the Meter display falls within the acceptable range indicated.
If the Meter fails any of these tests, it needs calibration adjustment or repair.
A Basic Operability Test
To check the basic operability of an 80 Series III Multimeter, do the following:
1. Turn the rotary switch to
inputs. (If you are using a test probe, touch the half of the input contact nearest the
LCD.)
Ω and connect a test lead from the Vto the mA µA
14
The display should read 1.000 kΩ ± 5 digits.
2. With the rotary switch still at
end of the test lead into the
The beeper emits an Input Alert tone if the fuse is good.
Ω, test the A input fuse (11 A) by inserting the plug
A input.
Page 23

3. Then test the mA µA input fuse (0.440 A) by inserting the plug end of the test lead
into the
The beeper emits an Input Alert tone if the fuse is good.
If the Meter fails to operate properly:
• Check the battery and fuses and replace as needed.
• Verify that you are operating the Meter correctly by reviewing the operating
instructions found in the Users Manual.
To complete a comprehensive performance test and verify the accuracy of each Meter
function and operation, perform the remainder of the tests under “Performance Tests”.
Testing the Display
Turn the Meter on and press any push-button to hold the Meter in Display Test mode.
Compare the display with the appropriate example in Figure 4.
MULTIMETER
III
83
TRUE RMS MULTIMETER
III
85
mA µA input.
87
TRUE RMS MULTIMETER
III
Multimeters
Performance Tests
Testing the Rotary Switch
This test verifies the operation of the rotary switch function selector.
The function selector circuit relies on the interface between a ptf region on the circuit
assembly and a rotating contact assembly on the switch shaft. The rotary switch test
exercises this interface by checking the various range codes and displaying their
representative numbers.
To perform the rotary switch test, do the following:
1. Hold down Kwhile turning the rotary switch from
2. Release K.
Normal Meter functions are now disabled, and a number appears in the display.
3. Compare the number on the display with the number for the V dc (L) function in
Table 3.
The display should read -32 (±12).
4. Repeat this test for each position on the rotary switch.
5. To exit the rotary switch test mode, turn the rotary switch to
function selection.
Figure 4. Display Test
ek9f.eps
OFF to L.
OFF, then back to any
15
Page 24

80 Series III
Service Information
Rotary Switch Position Display (±12) Rotary Switch Position Display (±12)
Table 3. Rotary Switch Test
OFF
V ac
V dc
mV dc
N/A
0
-32
-64
Continuity/Ohms
Diode test
mA/A
µA
Testing the AC Voltage Function
To verify accuracy in the ac voltage ranges, do the following:
1. Connect the Calibrator to the Vand COM inputs on the Meter.
2. Set the Calibrator for the voltage and frequency called for in step 1 of Table 4.
3. Compare the reading on the Meter display with the display reading for your 80
Series III model (83, 85, or 87) shown in Table 4.
If the display reading falls outside of the range shown in Table 4, the Meter does not
meet specification.
4. Repeat this procedure for steps 2 through 17 of Table 4.
Table 4. AC Voltage Test
Input Display Reading
Step Voltage Frequency 83 Series III 85/87 Series III
1 350.0 mV 60 Hz 347.8 to 352.2 347.1 to 352.9
-96
-128
-160
-192
2 350.0 mV 1 kHz 346.1 to 353.9 346.1 to 353.9
3 350.0 mV 5 kHz 342.6 to 357.4 342.6 to 357.4
4 350.0 mV 20 kHz NA 341.0 to 359.0
5 3.500 V 60 Hz 3.480 to 3.520 3.473 to 3.527
6 3.500 V 1 kHz 3.461 to 3.539 3.461 to 3.539
7 3.500 V 5 kHz 3.426 to 3.574 3.426 to 3.574
8 3.500 V 20 kHz NA 3.410 to 3.590
9 35.00 V 60 Hz 34.80 to 35.20 34.73 to 35.27
10 35.00 V 1 kHz 34.61 to 35.39 34.61 to 35.39
11 35.00 V 5 kHz 34.26 to 35.74 34.26 to 35.74
12 35.00 V 20 kHz NA 34.10 to 35.90
13 350.0 V 60 Hz 348.0 to 352.0 347.3 to 352.7
14 350.0 V 1 kHz 346.1 to 353.9 346.1 to 353.9
15 350.0 V 2.5 kHz 342.6 to 357.4 342.6 to 357.4
16 900V 60 Hz 893 to 907 892 to 908
17 900 V 1 kHz 887 to 913 887 to 913
16
Page 25

Testing the Frequency Function
To verify the accuracy of the Meter’s frequency function, do the following:
1. Connect the Calibrator to the Vand COM inputs on the Meter.
The accuracy of the Calibrator’s frequency function must be appropriate
for the specified accuracy of the Meter.
2. With the Meter in the 400 mV ac range, press F to enter the Frequency
Counter mode.
3. Set the Function Generator for the sine wave voltage and frequency called for in step
1 of Table 5.
4. Compare the reading on the Meter display with the display reading shown in Table
5.
5. If the display reading falls outside of the range shown in Table 5, the Meter does not
meet specification.
6. Set the Function Generator for the sine wave voltage and frequency called for in step
2 of Table 5 and compare the reading on the Meter display with the display reading
shown in Table 5.
Multimeters
Performance Tests
Note
Table 5. Frequency Test
Sine Wave Input
Step Voltage Frequency
1
2
150 mV rms
150 mV rms
19.000 kHz
190.00 kHz
Testing the Frequency Sensitivity and Trigger Level
To verify the counter sensitivity and trigger levels for all frequency modes and ranges,
do the following. (For any function and range, the sensitivity and trigger level is the
same in both frequency and duty cycle modes.)
1. Connect the Calibrator to the Vand COM inputs on the Meter.
2. Put the Meter in the 4 V ac range, and press F.
3. Apply the input from step 1 of Table 6, and compare the reading on the Meter
display with the display reading in Table 6.
4. Put the Meter in the 4 V dc range, and press F.
5. Apply the input from steps 2 and 3 of Table 6, and compare the reading on the Meter
display with the display reading in Table 6.
If the display reading falls outside of the range shown in Table 6, the Meter does not
meet specification.
Display Reading
83/85/87
18.998 to 19.002
189.98 to 190.02
6. On the Meter, press Kto enter the 40 V dc range.
7. Apply the input for steps 4 and 5 of Table 6, compare the reading on the Meter
display with the display reading in Table 6.
17
Page 26

80 Series III
Service Information
Testing DC Voltage
Table 6. Frequency Counter Sensitivity and Trigger Level Tests
Step Range Amplitude (RMS) Frequency Display Reading
1 4 V ac 300 mV ac 1 kHz 999.8 - 1000.2
2 4 V dc 1.7 V ac 1 kHz 999.8 - 1000.2
3 4 V dc 1.0 V ac 1 kHz 000.0
4 40 V dc 6.0 V ac 1 kHz 999.8 - 1000.2
5 40 V dc 2.0 V ac 1 kHz 000.0
To verify accuracy of the dc voltage function, do the following. (A separate performance
test procedure for mV dc is provided later in this section).
1. Connect the Calibrator to the Vand COM inputs on the Meter.
2. Turn the rotary switch to L.
3. Apply the input from step 1 of Table 7 for your model 80 Series III.
4. Compare the reading on the Meter display with the display reading in Table 7.
If the display reading falls outside of the range shown in Table 7, the Meter does not
meet specification.
5. Repeat steps 3 and 4 for the remaining inputs shown in Table 7.
Table 7. DC Voltage Test
Display Reading
Step DC Input Voltage 83 III 85 III 87 III
1
2
3
4
5
3.500 V
35.00 V
-35.00 V
350.0 V
1000 V
3.495 to 3.505
34.95 to 35.05
-34.95 to -35.05
349.5 to 350.5
998 to 1002
3.496 to 3.504
34.96 to 35.04
-34.96 to -35.04
349.6 to 350.4
998 to 1002
Testing the PEAK MIN MAX Function ( Model 87 only)
To check minimum/maximum (MIN MAX) feature of the Model 87.
1. Connect the Calibrator to the Vand COM inputs on the Meter.
2. Apply 2.0 V ac at 60 Hz (step 1, Table 8) from the Calibrator to the Vand
COM inputs of the Meter.
3. Turn the rotary switch to L (dc volts for dc-coupling of the input) or K (ac volts for
capacitive-coupling of the input).
3.497 to 3.503
34.97 to 35.03
-34.97 to -35.03
349.7 to 350.3
998 to 1002
18
Note
The rms converter is not used in Peak mode. The digital display
represents the actual peak value of the input.
4. Press M.
5. Press the T(beeper) to enter the
PEAK MIN MAX mode and begin displaying
maximum values.
Page 27

6. Compare the reading on the Meter display to the display reading for step 1 in
Table 8.
If the display reading falls outside of the range shown in Table 8, the Meter does not
meet specification.
7. Press Mto begin displaying minimum values.
8. Compare the reading on the Meter display to the display reading for step 2 in
Table 8.
Table 8. Peak MIN MAX Test
AC Input Display Reading
Step Voltage Frequency 83 III 85 III 87 III
Multimeters
Performance Tests
1
2
2.0 V
2.0 V
60 Hz
60 Hz
Testing the mV DC Function
To test the accuracy of the mV dc function, do the following:
1. Connect the Calibrator to the Vand COM inputs on the Meter.
2. Turn the rotary switch to
3. Apply 350.0 mV.
4. Compare the reading on the Meter display to the display reading for your Model
shown below.
Model 83 III 348.8 to 351.2
Model 85 III 349.5 to 350.5
Model 87 III 349.5 to 350.5
If the display reading falls outside of the range shown, the Meter does not meet
specification.
Testing the Resistance Function
To verify the accuracy of the resistance function, do the following:
1. Connect the Calibrator to Vand COM on the Meter.
mL .
N/A
N/A
N/A
N/A
2.705 to 2.951
-2.705 to -2.951
2. Turn the rotary switch to
.
Ω
3. Apply the inputs for steps 1-5 in Table 9.
Compare the Meter display readings to the display readings for your Model of
Meter.
4. Press Kon the Meter to enter the 40-nanosiemen range used for conductance
tests of high resistances. Then proceed with step 6 of Table 9.
19
Page 28

80 Series III
Service Information
Testing the Capacitance Function
Table 9. Ohms Tests
Display Reading
Step Resistance 83 III 85 III 87 III
1 short To zero resistance in leads, short probes and press REL ∆.
2 190.0Ω 189.0 to 191.0 189.4 to 190.6 189.4 to 190.6
3 19.00 kΩ 18.91 to 19.09 18.95 to 19.05 18.95 to 19.05
4 1.900 MΩ 1.886 to 1.914 1.888 to 1.912 1.888 to 1.912
5 19.00 MΩ 18.78 to 19.22 18.78 to 19.22 18.78 to 19.22
6 100.0 MΩ 9.80 to 10.20 nS 9.80 to 10.20 nS 9.80 to 10.20 nS
The Meter measures capacitance by charging the capacitor with a known direct current,
measuring the resultant voltage, and calculating the capacitance. If the same capacitance
is measured on an impedance bridge, a different reading may result. This variance is
likely to be greater at higher frequencies.
To verify the accuracy of the capacitance measuring function, do the following:
1. Connect the Calibrator to the Vand COM inputs on the Meter.
2. For steps 1 through 3 in Table 10:
a. Turn the rotary switch to ReE.
b. Press the blue button.
c. Connect the test leads to the capacitor.
d. For each input, compare the readings on the Meter display to display readings
for your Model of Meter.
The Meter selects the proper range automatically. Each measurement takes about
one second per range.
3. Before applying the input for step 4 of Table 10, disconnect the test leads from the
calibrator and press the D to zero the display (automatically subtracts the
residual Meter and test lead capacitance). Reconnect the test leads to the calibrator
and apply the input for step 4 of Table 10. Note that the relative mode puts the Meter
into manual Range.
Table 10. Capacitance Tests
Display Reading
Step Capacitance 83 III 85 III 87 III
1
2
3
4
1.0 µF
0.470 µF
0.0470 µF
4.70 nF
0.95 to 1.05
0.462 to 0.478
0.0462 to 0.0478
4.62 to 4.78
0.95 to 1.05
0.462 to 0.478
0.0462 to 0.0478
4.62 to 4.78
0.95 to 1.05
0.462 to 0.478
0.0462 to 0.0478
4.62 to 4.78
20
Checking the Diode Test Function
To check the diode test function, do the following:
1. Connect the Calibrator to the Vand COM inputs on the Meter.
2. Turn the rotary switch to G.
Page 29

If you use a Fluke 5100 Series Calibrator, activate the 50
override.
3. Apply 3.000 V.
The Meter display should read 3.000 V dc +/- 0.061 V dc.
Testing the Milliamp (mA) Function
To verify the accuracy of AC and DC current measurement functions, do the following:
Note
Ω
divider
Multimeters
Performance Tests
1. Connect the Calibrator to the
2. Turn the rotary switch to
The Meter enters the DC measurement function
mA µA and COM inputs on the Meter.
mA/AC.
3. Apply the inputs in steps 1 and 2 in Table 11.
4. For each input, compare the readings on the Meter display to the display readings for
your Model of Meter.
5. Press the blue button on the Meter to toggle to AC measurement function.
6. Apply the inputs in steps 3 through 6 in Table 11.
7. For each input, compare the readings on the Meter display to the display readings for
your Model of Meter.
Table 11. mA Tests
Display Reading
Step
1
2
3
4
5
6
DC Current
35.00 mA
350.0 mA
AC Current Frequency 83 III 85 III 87 III
35.00 mA
35.00 mA
350.0 mA
350.0 mA
60 Hz
1.0 kHz
60 Hz
1.0 kHz
83 III 85 III 87 III
34.82 to 35.18
348.4 to 351.6
34.56 to 35.44
34.56 to 35.44
345.6 to 354.4
345.6 to 354.4
34.89 to 35.11
349.1 to 350.9
34.63 to 35.37
34.63 to 35.37
346.3 to 353.7
346.3 to 353.7
34.89 to 35.11
349.1 to 350.9
34.63 to 35.37
34.63 to 35.37
346.3 to 353.7
346.3 to 353.7
Testing the Microamp (µA) Function
To verify the accuracy of the microamp (µA) measurement function, do the following:
1. Connect the Calibrator to the
2. Turn the rotary switch to
The Meter enters the DC measurement function.
µAC.
3. Apply the inputs in steps 1 and 2 of Table 12.
4. For each input, compare the readings on the Meter display to the display readings for
your Model of Meter.
5. Press the blue button on the Meter to toggle to the AC measurement function.
6. Apply the inputs in steps 3 and 6 of Table 12.
mA µA and COM inputs on the Meter.
21
Page 30

80 Series III
Service Information
Step DC Current 83 III 85 III 87 III
7. For each input, compare the readings on the Meter display to the display readings for
your Model of Meter.
Table 12. µA Tests
Display Reading
1
2
AC Current Frequency 83 III 85 III 87 III
3
4
5
6
350.0 µA
350.0 µA
3500 µA
3500 µA
350.0 µA
3500 µA
60 Hz
1.0 kHz
60 Hz
1.0 kHz
Testing the Amp (A) Function
To verify the accuracy in the ampere (A) measurement function, do the following:.
1. If necessary, set the Calibrator output to 0.
2. Connect the Calibrator to the
3. Turn the rotary switch to
The Meter enters the DC amp measurement function.
4. Apply the inputs in steps 1 and 2 in Table 13.
5. For each input, compare the readings on the Meter display to the display readings for
your Model of Meter.
6. Set the calibrator output to 0.
7. Press the blue button on the Meter to toggle to the AC amp measurement function.
348.2 to 351.8
3484 to 3516
345.6 to 354.4
345.6 to 354.4
3456 to 3544
3456 to 3544
348.9 to 351.1
3491 to 3509
346.3 to 353.7
346.3 to 353.7
3463 to 3537
3463 to 3537
A and COM inputs of the Meter.
mA/AC.
348.9 to 351.1
3491 to 3509
346.3 to 353.7
346.3 to 353.7
3463 to 3537
3463 to 3537
22
8. Apply the inputs in steps 3 through 6 in Table 13.
9. For each input, compare the readings on the Meter display to the display readings for
your Model of Meter.
Table 13. Current Tests
Display Reading
Step DC Current 83 III 85 III 87 III
1
2
AC Current Frequency 83 III 85 III 87 III
3
4
5
6
3500 mA
3500 mA
10.00 A
10.00 A
3500 mA
10.00A
60 Hz
1.0 kHz
60 Hz
1.0 kHz
3482 to 3518
9.94 to 10.06
3456 to 3544
3456 to 3544
9.86 to 10.14
9.86 to 10.14
3489 to 3511
9.96 to 10.04
3463 to 3537
3463 to 3537
9.88 to 10.12
9.88 to 10.12
3489 to 3511
9.96 to 10.04
3463 to 3537
3463 to 3537
9.88 to 10.12
9.88 to 10.12
Page 31

Calibration
Calibrate the Meter once a year to ensure that it performs according to specifications.
Calibration adjustment points are identified in Figure 5.
There is a slightly different calibration procedure for each model of the 80 Series III. Be
sure to follow the correct procedure for your unit.
Calibrating the Model 85 and 87 II I
To calibrate the Meter, perform the following procedure:
1. Set the Calibrator for 0 V dc.
2. Put the Model 85 III or 87 III in the L function.
3. Connect the Calibrator to the Vand COM inputs on the Meter.
4. Output 3.500 V dc from the Calibrator.
Adjust R21 to obtain a Meter display reading of 3.500 ±0.001.
5. Put the Model 85 III or 87 III in the K function.
6. Output 3.513 V at 50 Hz from the Calibrator.
Multimeters
Calibration
Adjust R34 to obtain a Meter display reading 3.500 ±0.002.
Note
The disparity between an input 3.513 and a display reading of 3.500 is
due to compensation for the RMS converter linearity.
7. Output 100 V at 20 kHz from the Calibrator.
Adjust C37 to obtain a Meter display reading of 100.0 ±0.2.
8. Output 3.500 V at 10 kHz from the Calibrator.
Adjust C2 to obtain a Meter display reading of 3.500 ±0.004.
9. Output 35.00 V at 10 kHz from the Calibrator.
Adjust C3 to obtain a Meter display reading of 35.00 ±0.04.
23
Page 32

80 Series III
Service Information
C3 C2 C37 (87 and 85)
R34 R21
24
Figure 5. Calibration Adjustment Points
ek6f.eps
Page 33

Calibrating the Model 83 II I
To calibrate the Model 83 III, perform the following procedure:
1. Set the Calibrator for 0 V dc.
2. Put the Model 83 III in the L function.
3. Connect the source to the Vand COM inputs on the Meter.
4. Output 3.500 V dc from the Calibrator.
Adjust R21 to obtain a Meter display reading of 3.500 +/-0.001.
5. Put the Meter in to the K function.
6. Output 3.500 V at 100 Hz from the Calibrator.
Adjust R34 to obtain a Meter display reading of 3.500 ±0.002.
7. Output 100 V at 20 kHz from the calibrator. Adjust C37 to obtain a meter display
ready of 100.0 ± 0.2.
8. Output 3.500 V at 10 kHz from the Calibrator.
Adjust C2 to obtain a Meter display reading of 3.500 ±0.004.
9. Output 35.00 V at 10 kHz.
Multimeters
Parts and Accessories
Adjust C3 to obtain a Meter display reading of 35.00 ±0.04.
Parts and Accessories
Replacement parts and accessories are listed in Tables 14, 15 and shown in Figure 6.
Table 14. Replacement Parts
Item Description Fluke Part No Qty
BT1 Battery, 9 V 614487 1
F1 W Fuse, 0.440 A, 1000 V, FAST 943121 1
F2 W Fuse, 11 A, 1000 V, FAST 803293 1
H1 Screw, Case 832246 3
H5,H6 Fastener, Access Door 948609
MP1 Foot, Non-Skid 824466 2
MP2 O-Ring, Input Receptacle 831933 1
MP85 Case Top (pad xfer), w/window 616885 (83 III ,85 III)
616877 (87 III)
MP86 Btm Case w/gasket 8x-w/ce/csa 616703
MP92 Battery Door-CE update 609930
TM1 CD-ROM (contains Users Manuals) 1611720 1
TM2 Getting Started Manual 1611712 1
TM3 Quick Reference Guide, Fluke 80 Series III 688168 1
TM4 Service Information Manual 688645 Optional
Backlight Backlight, White 609922
LCD LCD, 4.5 digit, bar graph, multiplexed 686634 (83 III, 85 III)
686391 (87 III)
WTo ensure safety, use exact replacement only.
25
Page 34

80 Series III
Service Information
TL20 Industrial Test Lead Set (Optional) TL20
AC70A Alligator Clips for use with TL75 test lead set AC70A 1
TL75 Test Lead Set TL75 1
TL24 Test Lead Set, Heat-Resistant Silicone TL24
TP1 Test Probes, Flat Blade, Slim Reach TP1
TP4 Test Probes, 4 mm diameter, Slim Reach TP4
AC20 Safety Grip, Wide-Jaw Alligator Clips AC20
C81Y Holster, Yellow C81Y 1
C81G Holster, Gray (Optional) C81G
C25 Carrying Case, Soft (Optional) C25
* Fluke accessories are available from your authorized Fluke distributor.
Table 15. Accessories*
Item Description
Fluke Part
Number Quantity
MP85
MP2
MP86
F2
F1
H1
BT1
H5, 6
S1
MP92
T24 Test
Lead Set
TP1, TP4 Probes
87/E Test Lead Set
MP1
Figure 6. Replaceable Parts
AC20 Alligator
Clip (Black)
TL75
Test Lead Set
C81Y
AC70A
Alligator Clips
IY11F.EPS
26
 Loading...