

Page 1
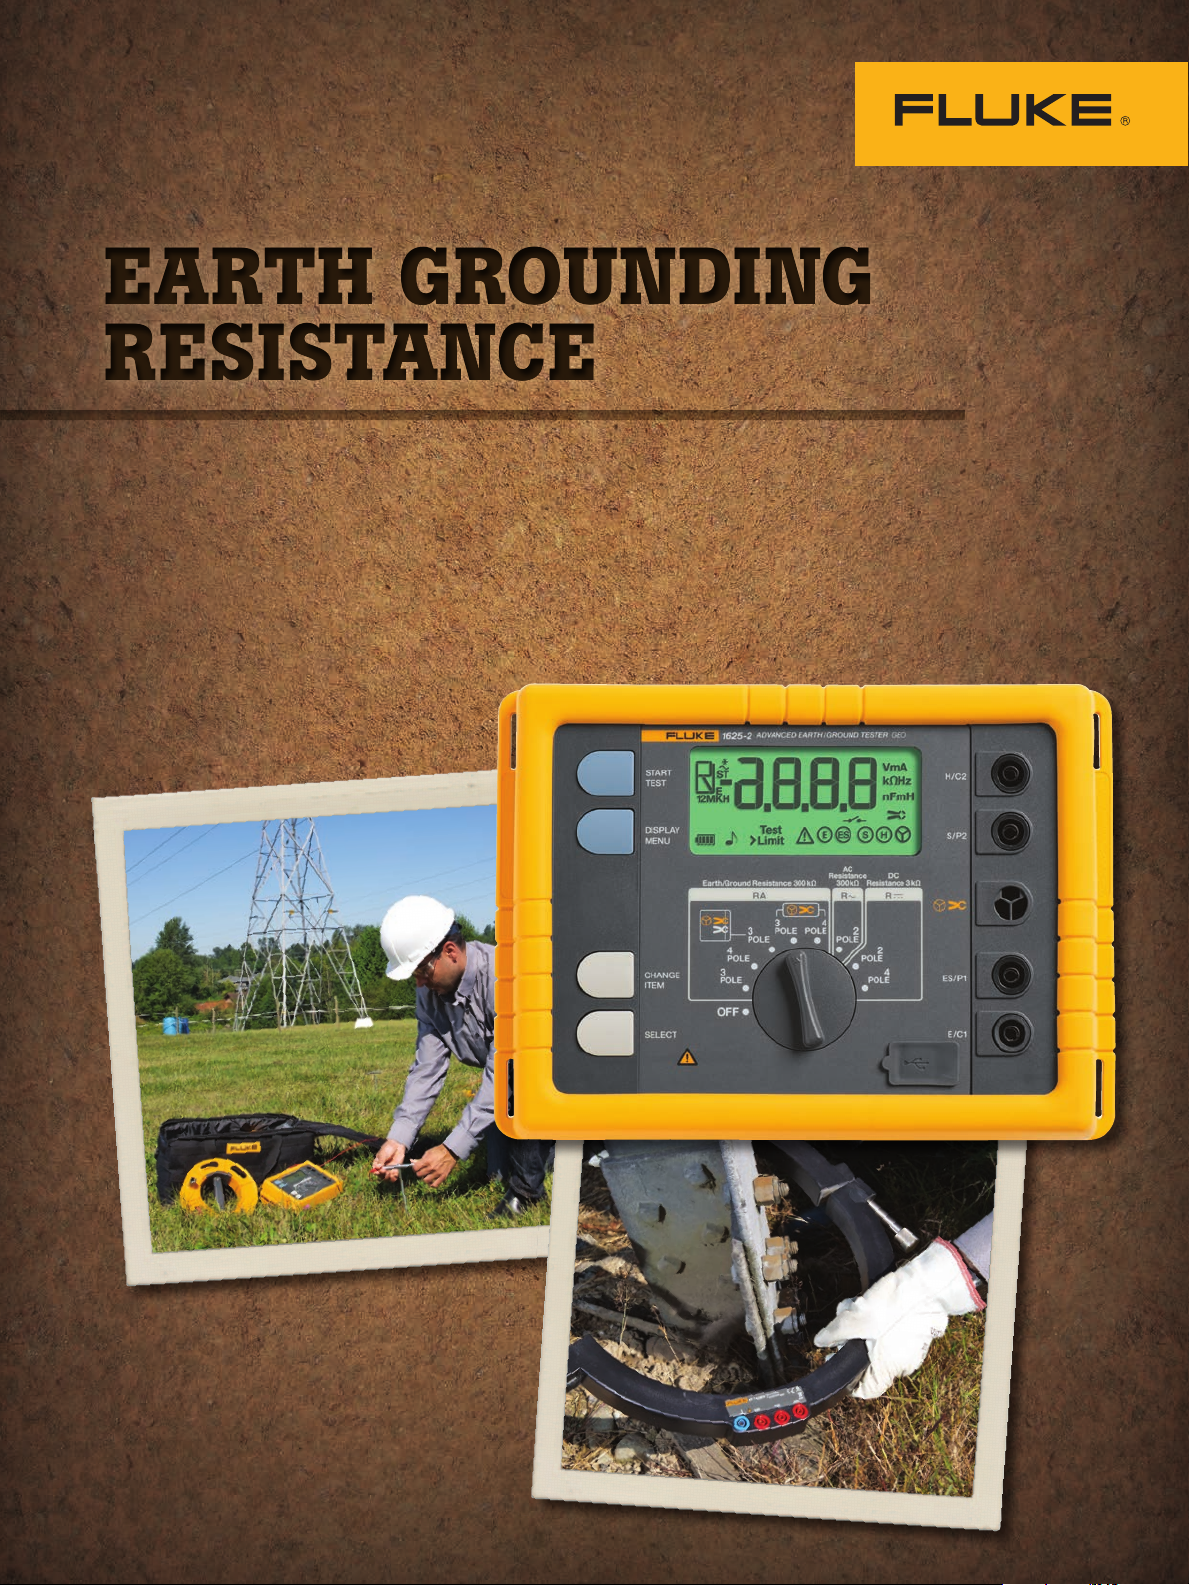
Principles, testing methods and applications
EARTH GROUNDING
RESISTANCE
EARTH GROUNDING
RESISTANCE
EARTH GROUNDING
RESISTANCE
EARTH GROUNDING
RESISTANCE
DIAGNOSE intermittent electrical problems
AVOID unnecessary downtime
LEARN earth ground safety principles
Page 2

Why ground, why test?
Why ground?
Poor grounding not only contributes to
unnecessary downtime, but a lack of good
grounding is also dangerous and increases
the risk of equipment failure.
Without an effective grounding system,
we could be exposed to the risk of electric
shock, not to mention instrumentation errors,
harmonic distortion issues, power factor
problems and a host of possible intermittent
dilemmas. If fault currents have no path to
the ground through a properly designed and
maintained grounding system, they will find
unintended paths that could include people.
The following organizations have recommendations and/or standards for grounding
to ensure safety:
• OSHA (Occupational Safety Health
Administration)
• NFPA (National Fire Protection Association)
• ANSI/ISA (American National Standards
Institute and Instrument Society of America)
• TIA (Telecommunications Industry
Association)
• IEC (International Electrotechnical
Commission)
• CENELEC (European Committee for
Electrotechnical Standardization)
• IEEE (Institute of Electrical and Electronics
Engineers)
However, good grounding isn’t only for
safety; it is also used to prevent damage to
industrial plants and equipment. A good
grounding system will improve the reliability
of equipment and reduce the likelihood of
damage due to lightning or fault currents.
Billions are lost each year in the workplace
due to electrical fires. This does not account
for related litigation costs and loss of personal and corporate productivity.
Why test
grounding systems?
Over time, corrosive soils with high moisture content, high salt content, and high
temperatures can degrade ground rods and
their connections. So although the ground
system, when initially installed, had low earth
ground resistance values, the resistance of the
grounding system can increase if the ground
rods are eaten away.
Grounding testers, like the Fluke 1623-2 and
1625-2, are indispensable troubleshooting tools
to help you maintain uptime. With frustrating,
intermittent electrical problems, the problem
could be related to poor grounding or poor
power quality.
That is why it is highly recommended that all
grounds and ground connections are checked
at least annually as a part of your normal Predictive Maintenance plan. During these periodic
checks, if an increase in resistance of more
than 20 % is measured, the technician should
investigate the source of the problem, and
make the correction to lower the resistance, by
replacing or adding ground rods to the ground
system.
What is a ground
and what does it do?
The NEC, National Electrical Code, Article 100
defines a ground as: “a conducting connection,
whether intentional or accidental between an
electrical circuit or equipment and the earth, or
to some conducting body that serves in place of
the earth.” When talking about grounding, it is
actually two different subjects: earth grounding
and equipment grounding. Earth grounding is an
intentional connection from a circuit conductor,
usually the neutral, to a ground electrode placed
in the earth. Equipment grounding ensures that
operating equipment within a structure is properly grounded. These two grounding systems are
required to be kept separate except for a connection between the two systems. This prevents
differences in voltage potential from a possible
flashover from lightning strikes. The purpose of a
ground besides the protection of people, plants
and equipment is to provide a safe path for the
dissipation of fault currents, lightning strikes,
static discharges, EMI and RFI signals and interference.
2
Page 3

What is a good ground
resistance value?
There is a good deal of confusion as to what
constitutes a good ground and what the ground
resistance value needs to be. Ideally a ground
should be of zero ohms resistance.
There is not one standard ground resistance
threshold that is recognized by all agencies.
However, the NFPA and IEEE have recommended a ground resistance value of 5.0 ohms
or less.
The NEC has stated to “Make sure that system
impedance to ground is less than 25 ohms
specified in NEC 250.56. In facilities with sensitive equipment it should be 5.0 ohms or less.”
The Telecommunications industry has
often used 5.0 ohms or less as their value for
grounding and bonding.
The goal in ground resistance is to achieve
the lowest ground resistance value possible
that makes sense economically and physically.
Table of
contents
2
Why ground?
Why test?
4
Why test? Corrosive soils.
Grounding basics
6
Methods of earth
ground testing
Why ground? Lightning strikes.
Use the Fluke 1625-2 to determine the
health of your earth ground systems.
12
Measuring
ground resistance
3
Page 4
Grounding basics
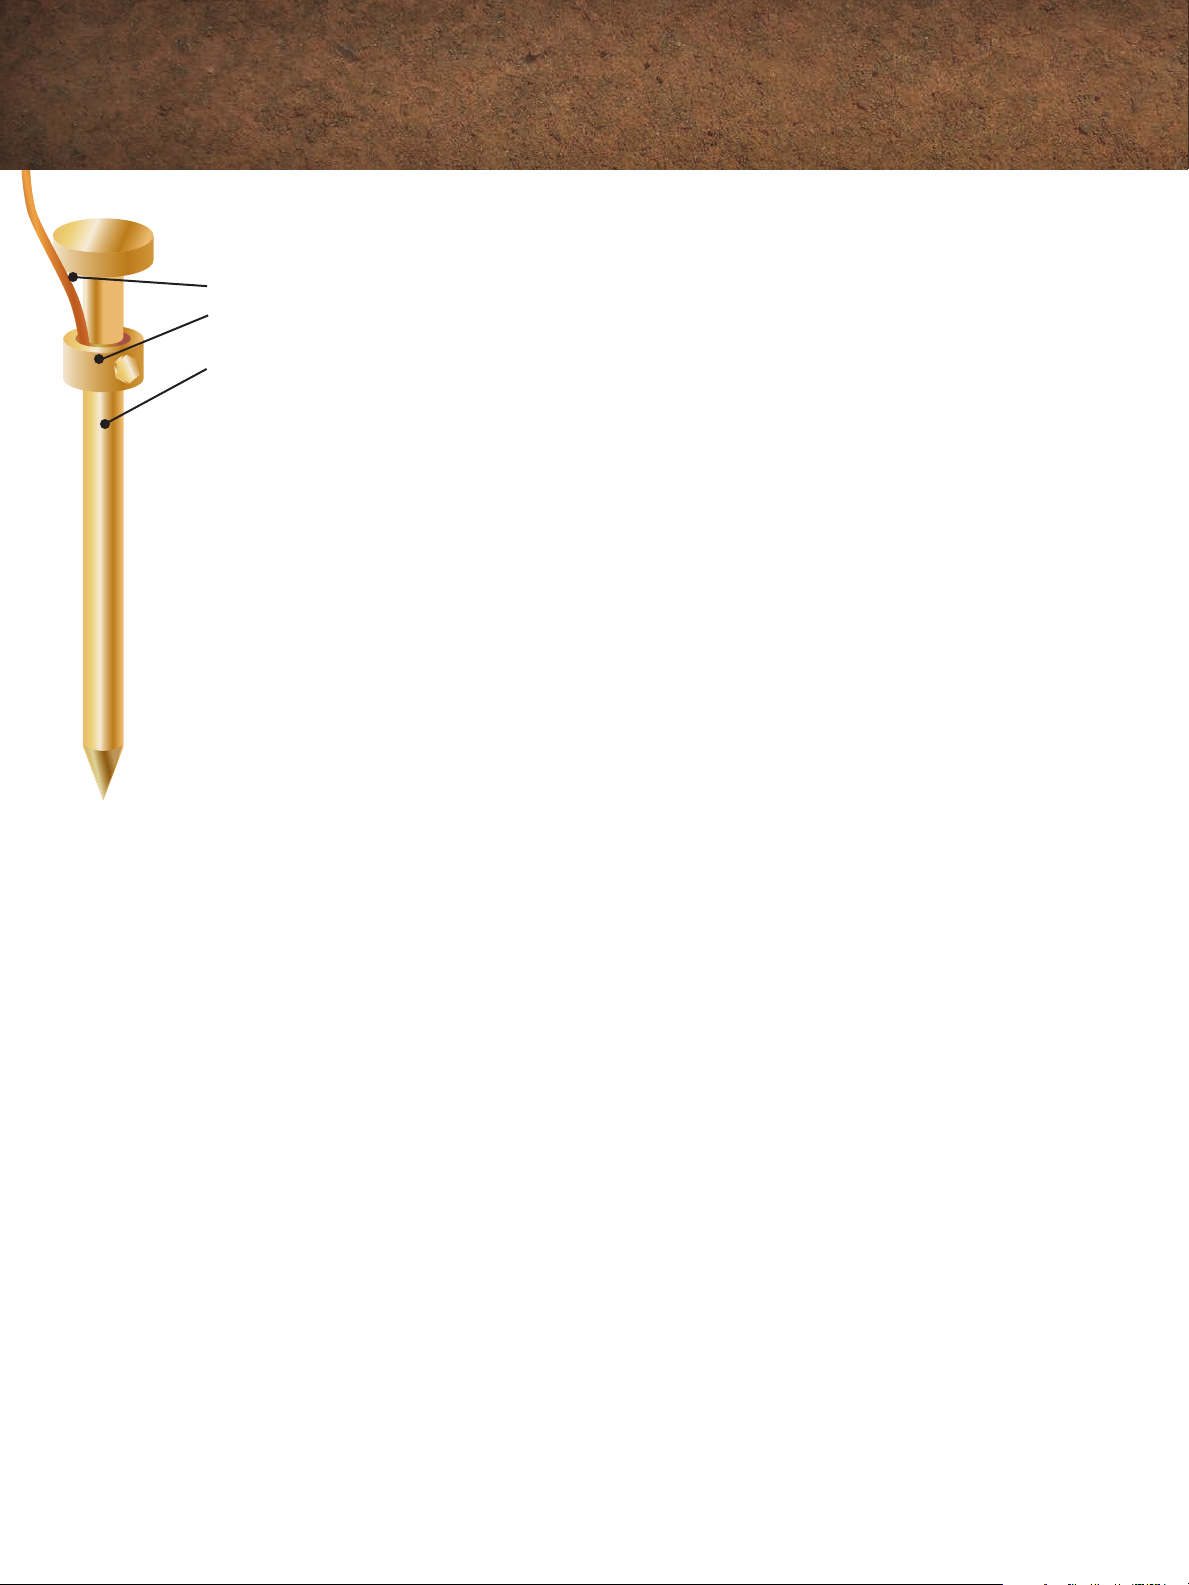
Components of a
ground electrode
• Ground conductor
• Connection between the ground conductor
and the ground electrode
• Ground electrode
Locations of resistances
(a) The ground electrode and its connection
The resistance of the ground electrode and
its connection is generally very low. Ground
rods are generally made of highly conductive/low resistance material such as steel
or copper.
(b) The contact resistance of the surrounding
earth to the electrode
The National Institute of Standards (a gov-
ernmental agency within the US Dept. of
Commerce) has shown this resistance to be
almost negligible provided that the ground
electrode is free of paint, grease, etc. and
that the ground electrode is in firm contact
with the earth.
(c) The resistance of the surrounding
body of earth
The ground electrode is surrounded by earth
which conceptually is made up of concentric shells all having the same thickness.
Those shells closest to the ground electrode
have the smallest amount of area resulting
in the greatest degree of resistance. Each
subsequent shell incorporates a greater area
resulting in lower resistance. This finally
reaches a point where the additional shells
offer little resistance to the ground surrounding the ground electrode.
What affects the
grounding resistance?
First, the NEC code (1987, 250-83-3) requires a
minimum ground electrode length of 2.5 meters
(8.0 feet) to be in contact with soil. But, there are
four variables that affect the ground resistance of
a ground system:
1. Length/depth of the ground electrode
2. Diameter of the ground electrode
3. Number of ground electrodes
4. Ground system design
Length/depth of the ground electrode
One very effective way of lowering ground
resistance is to drive ground electrodes deeper.
Soil is not consistent in its resistivity and can
be highly unpredictable. It is critical when
installing the ground electrode that it is below
the frost line. This is done so that the resistance
to ground will not be greatly influenced by the
freezing of the surrounding soil.
Generally, by doubling the length of the
ground electrode you can reduce the resistance
level by an additional 40 %. There are occasions where it is physically impossible to drive
ground rods deeper—areas that are composed of
rock, granite, etc. In these instances, alternative
methods including grounding cement are viable.
Diameter of the ground electrode
Increasing the diameter of the ground electrode
has very little effect in lowering the resistance.
For example, you could double the diameter of a
ground electrode and your resistance would only
decrease by 10 %.
So based on this information, we should focus
on ways to reduce the ground resistance when
installing grounding systems.
4
Page 5

Number of ground electrodes
Another way to lower ground resistance is to use
multiple ground electrodes. In this design, more
than one electrode is driven into the ground and
connected in parallel to lower the resistance. For
additional electrodes to be effective, the spacing
of additional rods need to be at least equal to
the depth of the driven rod. Without proper
spacing of the ground electrodes, their spheres
of influence will intersect and the resistance will
not be lowered.
To assist you in installing a ground rod that
will meet your specific resistance requirements,
you can use the table of ground resistances,
below. Remember, this is to only be used as a
rule of thumb, because soil is in layers and is
rarely homogenous. The resistance values
will vary greatly.
Ground system design
Simple grounding systems consist of a single
ground electrode driven into the ground. The use
of a single ground electrode is the most common
form of grounding and can be found outside your
home or place of business. Complex grounding
systems consist of multiple ground rods, connected, mesh or grid networks, ground plates,
and ground loops. These systems are typically
installed at power generating substations, central offices, and cell tower sites.
Complex networks dramatically increase the
amount of contact with the surrounding earth
and lower ground resistances.
Each ground electrode has its own
‘sphere of influence’.
Ground
systems
Single ground electrode
Soil
Type
of soil
Very moist soil,
swamplike
Farming soil, loamy
and clay soils
Sandy clay soil 150 50 25 15 60 30 15
Moist sandy soil 300 66 33 20 80 40 20
Concrete 1:5 400 - - - 160 80 40
Moist gravel 500 16 0 80 48 200 100 50
Dry sandy soil 1000 330 165 100 400 200 100
Dry gravel 1000 330 16 5 100 400 200 100
Stoney soil 30,000 1000 500 300 120 0 600 300
Rock 10
resistivity
R
E
ΩM 3 6 10 5 10 20
30 10 5 3 12 6 3
100 33 17 10 40 20 10
7
Ground electrode depth
- - - - - -
Earthing resistance
(meters)
Earthing strip
(meters)
Multiple ground electrodes
connected
Mesh network
Ground plate
5
Page 6

What are the methods of earth ground testing?
There are four types of earth ground testing
methods available:
• Soil Resistivity (using stakes)
• Fall-of-Potential (using stakes)
• Selective (using 1 clamp and stakes)
• Stakeless (using 2 clamps only)
Soil resistivity
measurement
Why determine the soil resistivity?
Soil Resistivity is most necessary when determining the design of the grounding system for
new installations (green field applications) to
meet your ground resistance requirements.
Ideally, you would find a location with the
lowest possible resistance. But as we discussed
before, poor soil conditions can be overcome
with more elaborate grounding systems.
The soil composition, moisture content, and
temperature all impact the soil resistivity. Soil
is rarely homogenous and the resistivity of the
soil will vary geographically and at different
soil depths. Moisture content changes seasonally, varies according to the nature of the sub
layers of earth, and the depth of the permanent
water table. Since soil and water are generally
more stable at deeper strata, it is recommended
that the ground rods be placed as deep as
possible into the earth, at the water table if
possible. Also, ground rods should be installed
where there is a stable temperature, i.e. below
the frost line.
For a grounding system to be effective, it
should be designed to withstand the worst
possible conditions.
How do I calculate soil resistivity?
The measuring procedure described below
uses the universally accepted Wenner method
developed by Dr. Frank Wenner of the US Bureau
of Standards in 1915. (F. Wenner, A Method
of Measuring Earth Resistivity; Bull, National
Bureau of Standards, Bull 12(4) 258, p. 478496; 1915/16.)
The formula is as follows:
r = 2 π A R
(r = the average soil resistivity to depth A in ohm—cm)
π = 3.1416
A = the distance between the electrodes in cm
R = the measured resistance value in ohms from
the test instrument
Note: Divide ohm—centimeters by 100 to
convert to ohm—meters. Just watch
your units.
Example: You have decided to install
three meter long ground rods as part of
your grounding system. To measure the
soil resistivity at a depth of three meters,
we discussed a spacing between the test
electrodes of nine meters.
To measure the soil resistivity start the
Fluke 1625-2 and read the resistance
value in ohms. In this case assume the
resistance reading is 100 ohms. So, in
this case we know:
A = 9 meters, and
R = 100 ohms
Then the soil resistivity would equal:
r = 2 x π x A x R
r = 2 x 3.1416 x 9 meters x 100 ohms
r = 5655 Ωm
6
Page 7

aaa
1/3 a
H/C2
OFF
3
POLE
4
POLE
4
POLE
2
POLE
S/P2
ES/P1
E/C1
START
TEST
DISPLAY
MENU
CHANGE
ITEM
SELECT
1625-2
ADVANCED EARTH / GROUND TESTER GEO
E S HES
AC
Rresistance
300kΩEarth/Ground Resistance 300kΩ
DC
Resistance 3kΩ
RA
R
—
R
~
2
POLE
3
POLE
3
POLE
4
POLE
How do I measure soil resistance?
To test soil resistivity, connect the ground tester
as shown below.
As you can see, four earth ground stakes are
positioned in the soil in a straight line, equidistant from one another. The distance between
earth ground stakes should be at least three
times greater than the stake depth. So if the
depth of each ground stake is one foot (30 centimeters), make sure the distance between stakes
is greater than three feet (91 centimeters).
The Fluke 1625-2 generates a known current
through the two outer ground stakes and the
drop in voltage potential is measured between
the two inner ground stakes. Using Ohm’s Law
(V = IR), the Fluke tester automatically calculates
the soil resistance.
Because measurement results are often distorted and invalidated by underground pieces
of metal, underground aquifers, etc. additional
measurements where the stake’s axis are
turned 90 degrees is always recommended. By
changing the depth and distance several times,
a profile is produced that can determine a suitable ground resistance system.
Soil resistivity measurements are often corrupted by the existence of ground currents and
their harmonics. To prevent this from occurring,
the Fluke 1625-2 uses an Automatic Frequency
Control (AFC) System. This automatically selects
the testing frequency with the least amount of
noise enabling you to get a clear reading.
Setup for soil resistivity testing using the Fluke 1623-2 or
1625-2 .
7
Page 8

What are the methods of earth ground testing?
ADVANCED EARTH / GROUND TESTER GEO
1625-2
Earth
electrode
>20 m (65 ft) >20 m (65 ft)
Inner
stake
START
TEST
DISPLAY
MENU
CHANGE
ITEM
SELECT
H/C2
S/P2
E S H
AC
Rresistance
DC
300kΩEarth/Ground Resistance 300kΩ
Resistance 3kΩ
—
RA
R
~
R
4
3
POLE
POLE
2
3
POLE
POLE
2
4
POLE
POLE
4
3
ES/P1
POLE
POLE
OFF
E/C1
Outer
stake
Fall-of-Potential
measurement
The Fall-of-Potential test method is used to
measure the ability of an earth ground system or
an individual electrode to dissipate energy from
a site.
How does the Fall-of-Potential
test work?
First, the earth electrode of interest must be
disconnected from its connection to the site.
Second, the tester is connected to the earth
electrode. Then, for the 3-pole Fall-of-Potential
test, two earth stakes are placed in the soil in a
direct line—away from the earth electrode. Normally, spacing of 20 meters (65 feet) is sufficient.
For more detail on placing the stakes, see the
next section.
A known current is generated by the Fluke
1625-2 between the outer stake (auxiliary earth
stake) and the earth electrode, while the drop in
voltage potential is measured between the inner
earth stake and the earth electrode. Using Ohm’s
Law (V = IR), the tester automatically calculates
the resistance of the earth electrode.
Connect the ground tester as shown in
the picture. Press START and read out the RE
(resistance) value. This is the actual value of
the ground electrode under test. If this ground
electrode is in parallel or series with other
ground rods, the RE value is the total value of
all resistances.
How do you place the stakes?
To achieve the highest degree of accuracy when
performing a 3–pole ground resistance test,
it is essential that the probe is placed outside
the sphere of influence of the ground electrode
under test and the auxiliary earth.
If you do not get outside the sphere of influence, the effective areas of resistance will
overlap and invalidate any measurements that
you are taking. The table is a guide for appropriately setting the probe (inner stake) and
auxiliary ground (outer stake).
To test the accuracy of the results and to
ensure that the ground stakes are outside the
spheres of influence, reposition the inner stake
(probe) 1 meter (3 feet) in either direction and
take a fresh measurement. If there is a significant change in the reading (30 %), you need
to increase the distance between the ground
rod under test, the inner stake (probe) and the
outer stake (auxiliary ground) until the measured
values remain fairly constant when repositioning
the inner stake (probe).
Depth of
the ground
electrode
2 m 15 m 25 m
3 m 20 m 30 m
6 m 25 m 40 m
10 m 30 m 50 m
Distance
to the
inner stake
Distance
to the
outer stake
8
Page 9

Selective measurement
Selective testing is very similar to the
Fall-of-Potential testing, providing all the same
measurements, but in a much safer and easier
way. This is because with Selective testing, the
earth electrode of interest does not need to be
disconnected from its connection to the site! The
technician does not have to endanger himself
by disconnecting ground, nor endanger other
personnel or electrical equipment inside a nongrounded structure.
Just as with the Fall-of-Potential test, two
earth stakes are placed in the soil in a direct
line, away from the earth electrode. Normally,
spacing of 20 meters (65 feet) is sufficient. The
tester is then connected to the earth electrode
of interest, with the advantage that the connection to the site doesn’t need to be disconnected.
Instead, a special clamp is placed around the
earth electrode, which eliminates the effects of
parallel resistances in a grounded system, so
only the earth electrode of interest is measured.
Just as before, a known current is generated
by the Fluke 1625-2 between the outer stake
(auxiliary earth stake) and the earth electrode,
while the drop in voltage potential is measured
between the inner earth stake and the earth
electrode. Only the current flowing through the
earth electrode of interest is measured using
the clamp. The generated current will also flow
through other parallel resistances, but only
the current through the clamp (i.e. the current
through the earth electrode of interest) is used to
calculate resistance (V = IR).
If the total resistance of the ground system
should be measured, then each earth electrode
resistance must be measured by placing the
clamp around each individual earth electrode.
Then the total resistance of the ground system
can be determined by calculation.
Testing individual ground electrode resistances of high
voltage transmission towers with overhead ground or static
wire, requires that these wires be disconnected. If a tower
has more than one ground at its base, these must also be
disconnected one by one and tested. However, the Fluke
1625-2 has an optional accessory, a 320 mm (12.7 in)
diameter clamp-on current transformer, which can measure
the individual resistances of each leg, without disconnecting any ground leads or overhead static/ground wires.
Connect the ground tester as
shown. Press START and read out
the RE value. This is the actual
resistance value of the ground
electrode under test.
9
Page 10

What are the methods of earth ground testing?
Stakeless measurement
The Fluke 1625-2 earth ground tester is able to
ON
OFF
ON
OFF
ON
OFF
ON
OFF
ON
OFF
ON
OFF
ON
OFF
ON
OFF
ON
OFF
Source
E
IN
TRA
I-1
DUCING CU
NS
62
FO
AC
RM
E
RRE
R
N
T
Measure
EI-1
S
ENS
T
62
RA
I
N
X
N
G
S
CURRE
F
O
RMER
N
ADVANCED EARTH / GROUND TESTER GEO
1625-2
START
H/C2
TEST
DISPLAY
S/P2
E S H
MENU
AC
DC
Rresistance
Resistance 3kΩ
Earth/Ground Resistance 300kΩ
300kΩ
—
RA
R
~
R
4
3
POLE
POLE
2
3
POLE
POLE
2
4
POLE
POLE
4
3
CHANGE
ES/P1
POLE
POLE
ITEM
OFF
E/C1
T
SELEC
T
Test current paths in the stakeless method.
ADVANCED EARTH / GROUND TESTER GEO
1625-2
START
TEST
DISPLAY
MENU
RA
3
POLE
3
POLE
4
POLE
3
CHANGE
POLE
ITEM
OFF
SELECT
POLE
E S H
Rresistance
300kΩEarth/Ground Resistance 300kΩ
R
4
POLE
H/C2
S/P2
AC
DC
Resistance 3kΩ
—
R
~
2
2
POLE
4
ES/P1
POLE
E/C1
TRANSFORMER
INDUCING CURRENT
EI-162AC
TRANSFORMER
SENSING CURRENT
EI-162X
measure earth ground loop resistances for multigrounded systems using only current clamps.
This test technique eliminates the dangerous
and time consuming activity of disconnecting
parallel grounds, as well as the process of
finding suitable locations for auxiliary ground
stakes. You can also perform earth ground tests
in places you have not considered before: inside
buildings, on power pylons or anywhere you
don’t have access to soil.
With this test method, two clamps are placed
around the earth ground rod or the connecting
cable and each are connected to the tester.
Earth ground stakes are not used at all. A known
voltage is induced by one clamp, and the current
is measured using the second clamp. The tester
automatically determines the ground loop resistance at this ground rod. If there is only one path
to ground, like at many residential situations, the
Stakeless method will not provide an acceptable
value and the Fall-of-Potential test method must
be used.
The Fluke 1625-2 works on the principle that
in parallel/multi-grounded systems, the net
resistance of all ground paths will be extremely
low as compared to any single path (the one
under test). So, the net resistance of all the
parallel return path resistances is effectively
zero. Stakeless measurement only measures
individual ground rod resistances in parallel to
earth grounding systems. If the ground system
is not parallel to earth then you will either have
an open circuit, or be measuring ground loop
resistance.
Setup for the stakeless method
using the 1625-2.
10
>10 cm (4 in)
Page 11

Ground impedance measurements
When attempting to calculate possible short
circuit currents in power plants and other high
voltage/current situations, determining the complex grounding impedance is important since
the impedance will be made up of inductive
and capacitive elements. Because inductivity
and resistivity are known in most cases, actual
impedance can be determined using a complex
computation.
Since impedance is frequency dependent,
the Fluke 1625-2 uses a 55 Hz signal for this
calculation to be as close to voltage operating
frequency as possible. This ensures that the
measurement is close to the value at the true
operating frequency. Using this feature of the
Fluke 1625-2, accurate direct measurement of
grounding impedance is possible.
Power utilities technicians, testing high voltage
transmission lines, are interested in two things:
the ground resistance in case of a lightning
strike, and the impedance of the entire system
in case of a short circuit on a specific point in the
line. Short circuit, in this case, means an active
wire breaks loose and touches the metal grid of
a tower.
Two-pole ground resistance
In situations where the driving of ground stakes is neither
practical nor possible, the Fluke 1623-2 and 1625-2 testers give you the ability to do two-pole ground resistance/
continuity measurements, as shown below.
To perform this test, the technician must have access to a
good, known ground such as an all metal water pipe. The
water pipe should be extensive enough and be metallic
throughout without any insulating couplings or flanges.
Unlike many testers, the Fluke 1623-2 and 1625-2 perform the test with a relatively high current (short circuit
current > 250 mA) ensuring stable results.
ADVANCED EARTH / GROUND TESTER GEO
1625-2
START
ST
TEST
DISPLAY
MENU
RA
3
POLE
3
POLE
4
POLE
3
CHANGE
POLE
ITEM
OFF
SELECT
H/C2
S/P2
SES
AC
Rresistance
DC
Resistance 3kΩ
300kΩEarth/Ground Resistance 300kΩ
—
R
~
R
4
POLE
2
POLE
2
POLE
4
ES/P1
POLE
E/C1
Equivalent circuit for
two-point measurement.
11
Page 12

Measuring ground resistance
MGB
MGN
Building
steel
The layout of a typical central office.
At central offices
When conducting a grounding audit of a central
office there are three different measurements
required.
Before testing, locate the MGB (Master Ground
Bar) within the central office to determine the
type of grounding system that exists. As shown
on this page, the MGB will have ground leads
connecting to the:
• MGN (Multi-Grounded Neutral) or incoming
service,
• ground field,
• water pipe, and
• structural or building steel
Ground
field
Water pipe
First, perform the Stakeless test on all the
individual grounds coming off of the MGB. The
purpose is to ensure that all the grounds are
connected, especially the MGN. It is important to
note that you are not measuring the individual
resistance, rather the loop resistance of what
you are clamped around. As shown in Figure 1,
connect the Fluke 1625-2 or 1623-2 and both
the inducing and sensing clamps, which are
placed around each connection to measure the
loop resistance of the MGN, the ground field, the
water pipe, and the building steel.
Second, perform the 3-pole Fall-of-Potential
test of the entire ground system, connecting
to the MGB as illustrated in Figure 2. To get to
remote earth, many phone companies utilize
unused cable pairs going out as much as a mile.
Record the measurement and repeat this test at
least annually.
Third, measure the individual resistances of
the ground system using the Selective test of
the Fluke 1625-2 or 1623-2. Connect the Fluke
tester, as shown in Figure 3. Measure the resistance of the MGN; the value is the resistance of
that particular leg of the MGB. Then measure
the ground field. This reading is the actual
resistance value of the central office ground
field. Now move on to the water pipe, and then
repeat for the resistance of the building steel.
You can easily verify the accuracy of these
measurements through Ohm’s Law. The resistance of the individual legs, when calculated,
should equal the resistance of the entire system
given (allow for reasonable error since all
ground elements may not be measured).
These test methods provide the most accurate
measure of a central office, because it gives
you the individual resistances and their actual
behavior in a ground system. Although accurate, the measurements would not show how
the system behaves as a network, because in
the event of a lightning strike or fault current,
everything is connected.
12
Page 13

To prove this, you need to perform a few
EI-16
2AC
I
NDUC
I
N
G
CURRENT
TRANS
FO
RMER
EI-162AC
IN
DU
CING CURR
ENT
TRANSFORMER
EI-162AC
INDUCING CURRENT
TR
ANSFORMER
additional tests on individual resistances.
First, perform the 3-pole Fall-of-Potential
test on each leg off the MGB and record each
measurement. Using Ohm’s Law again, these
measurements should be equal to the resistance
of the entire system. From the calculations you
will see that you are from 20 % to 30 % off the
total RE value.
Finally, measure the resistances of the
various legs of the MGB using the Selective
Stakeless method. It works like the Stakeless
method, but it differs in the way we use the
two separate clamps. We place the inducing
voltage clamp around the cable going to the
MGB, and since the MGB is connected to the
incoming power, which is parallel to the earth
system, we have achieved that requirement.
Take the sensing clamp and place it around the
ground cable leading out to the ground field.
When we measure the resistance, this is the
actual resistance of the ground field, plus the
parallel path of the MGB. And because it should
be very low ohmically, it should have no real
effect on the measured reading. This process can
be repeated for the other legs of the ground bar
i.e. water pipe and structural steel.
To measure the MGB via the Stakeless Selective method, place the inducing voltage clamp
around the line to the water pipe (since the
copper water pipe should have very low resistance) and your reading will be the resistance
for only the MGN.
ADVANCED EARTH / GROUND TESTER GEO
1625-2
START
TEST
DISPLAY
MENU
RA
3
POLE
POLE
3
POLE
4
POLE
3
CHANGE
POLE
ITEM
OFF
SELECT
Figure 1: Stakeless testing
of a central office.
ADVANCED EARTH / GROUND TESTER GEO
1625-2
MGN
START
TEST
DISPLAY
MENU
CHANGE
ITEM
SELECT
H/C2
S/P2
E S H
AC
Rresistance
DC
300kΩEarth/Ground Resistance 300kΩ
Resistance 3kΩ
—
RA
R
~
R
4
3
POLE
POLE
2
3
POLE
POLE
2
4
POLE
POLE
4
3
ES/P1
POLE
POLE
OFF
E/C1
MGB
E S H
4
H/C2
S/P2
AC
DC
Rresistance
300kΩEarth/Ground Resistance 300kΩ
Resistance 3kΩ
—
R
~
R
2
POLE
2
POLE
4
ES/P1
POLE
E/C1
TRANSFORMER
INDUCING CURRENT
EI-162AC
TRANSFORMER
SENSING CURRENT
EI-162X
MGB
MGN
Figure 2: Perform
the 3-Pole
Fall-of-Potential
test of the entire
ground system.
Figure 3:
START
TEST
DISPLAY
MENU
CHANGE
ITEM
SELECT
ADVANCED EARTH / GROUND TESTER GEO
1625-2
RA
3
POLE
3
POLE
4
POLE
3
POLE
OFF
H/C2
S/P2
E S H
AC
Rresistance
DC
300kΩEarth/Ground Resistance 300kΩ
Resistance 3kΩ
—
R
~
R
4
POLE
2
POLE
2
POLE
4
ES/P1
POLE
E/C1
Measure the
individual
resistances of
the ground
system using the
Selective test.
TRANSFORMER
INDUCING CURRENT
EI-162AC
MGB
MGN
13
Page 14

More ground resistance applications
Electrical substations
A substation is a subsidiary station on a trans-
mission and distribution system where voltage
is normally transformed from a high value to
low value. A typical substation will contain line
termination structures, high-voltage switchgear,
one or more power transformers, low-voltage
switchgear, surge protection, controls, and
metering.
Remote switching sites
Remote switching sites are also known as slick
sites, where digital line concentrators and other
telecommunications equipment is operating.
The remote site is typically grounded at either
end of the cabinet and then will have a series of
ground stakes around the cabinet connected by
copper wire.
A typical setup at a cellular tower installation.
Application sites
There are four other particular applications
where you can use the Fluke 1625-2 to measure
the capability of the earth ground system.
Cellular sites/microwave
and radio towers
At most locations there is a 4-legged tower with
each leg individually grounded. These grounds
are then connected with a copper cable. Next to
the tower is the Cell site building, housing all
the transmission equipment. Inside the building
there is a halo ground and a MGB, with the
halo ground connected to the MGB. The cell site
building is grounded at all 4 corners connected
to the MGB via a copper cable and the 4 corners
are also interconnected via copper wire. There is
also a connection between the building ground
ring and the tower ground ring.
Lightning protection at commercial/
industrial sites
Most lightning fault current protection systems
follow the design of having all four corners of
the building grounded and these are usually
connected via a copper cable. Depending on
the size of the building and the resistance value
that it was designed to achieve, the number of
ground rods will vary.
Recommended tests
End users are required to perform the same
three tests at each application: Stakeless
measurement, 3-pole Fall-of-Potential measure-
ment and Selective measurement.
Stakeless measurement
First, perform a Stakeless measurement on:
• The individual legs of the tower and
the four corners of the building
(cell sites/towers)
• All grounding connections
(electrical substations)
• The lines running to the remote site
(remote switching)
• The ground stakes of the building
(lightning protection)
14
Page 15

For all applications, this is not a true ground
resistance measurement because of the network
ground. This is mainly a continuity test to verify
that the site is grounded, that we have an electrical connection, and that the system can pass
current.
3-pole Fall-of-Potential measurement
Second, we measure the resistance of the entire
system via the 3-pole Fall-of-Potential method.
Keep in mind the rules for stake setting. This
measurement should be recorded and measurements should take place at least twice per year.
This measurement is the resistance value for the
entire site.
Selective measurement
Lastly, we measure the individual grounds with
the Selective test. This will verify the integrity of
the individual grounds, their connections, and
determine whether the grounding potential is
fairly uniform throughout. If any of the measurements show a greater degree of variability than
the other ones, the reason for this should be
determined. The resistances should be measured
on:
• Each leg of the tower and all four corners of
the building (cell sites/towers)
• Individual ground rods and their connections
(electrical substations)
• Both ends of the remote site (remote
switching)
• All four corners of the building (lightning
protection)
A typical setup
at an electrical
substation.
Using Stakeless
testing at a remote
switching site.
ER
CURRENT
EI-162X
SENSING
TRANSFORM
T
EN
R
CING CUR
FORMER
U
S
EI-162AC
ND
AN
I
TR
ADVANCED EARTH / GROUND TESTER GEO
1625-2
START
H/C2
TEST
DISPLAY
S/P2
E S H
MENU
AC
DC
Rresistance
Earth/Ground Resistance 300kΩ
Resistance 3kΩ
300kΩ
—
RA
R
R~
4
3
POLE
POLE
2
3
POLE
POLE
2
4
POLE
POLE
4
3
CHANGE
ES/P1
POLE
POLE
ITEM
OFF
E/C1
SELECT
Using Selective
testing on a lightning protection
system.
ER
CURRENT
EI-162X
SENSING
TRANSFORM
START
TEST
DISPLAY
MENU
CHANGE
ITEM
SELECT
ADVANCED EARTH / GROUND TESTER GEO
1625-2
RA
3
POLE
POLE
3
POLE
4
POLE
3
POLE
OFF
H/C2
S/P2
E S HES
AC
Rresistance
DC
300kΩEarth/Ground Resistance 300kΩ
Resistance 3kΩ
—
R
~
R
4
2
POLE
2
POLE
4
ES/P1
POLE
E/C1
15
Page 16

Earth ground products
Fluke 1625-2 Advanced GEO Earth Ground Tester Fluke 1623-2 Basic GEO Earth Ground Tester
The most complete tester
The Fluke 1623-2 and 1625-2 are distinctive earth ground testers that can
perform all four types of earth ground measurement:
• 3-and 4-pole Fall-of-Potential (using stakes)
• 4-pole soil resistivity testing (using stakes)
• Selective testing (using 1 clamp and stakes)
• Stakeless testing (using 2 clamps only)
The complete model kit comes with the Fluke 1623-2 or 1625-2 tester, a set of
two leads, 4 earth ground stakes, 3 cable reels with wire, 2 clamps, batteries
and manual—all inside a rugged Fluke carrying case.
The complete kit
Fluke 1625-2 advanced features
Advanced features of the Fluke 1625-2 include:
• Automatic Frequency Control (AFC)—identifies existing interference and
chooses a measurement frequency to minimize its effect, providing more
accurate earth ground values
• R* Measurement—calculates earth ground impedance with 55 Hz to more
accurately reflect the earth ground resistance that a fault-to-earth ground
would see
• Adjustable Limits —for quicker testing
Optional accessories
320 mm (12.7 in) Split Core Transformer—for performing selective testing on
individual legs of towers.
Comparing earth ground testers
Product Fall of Potential Selective Stakeless 2-Pole method
3-Pole 4-Pole/Soil 1 Clamp 2 Clamp 2 Pole
Fluke 1621
Fluke 1623-2
Fluke 1625-2
Fluke 1630
Product
Fluke 1630 kit
Fluke. The Most Trusted Tools
in the World.
Fluke Corporation
PO Box 9090, Everett, WA 98206 U.S.A.
Fluke Europe B.V.
PO Box 1186, 5602 BD
Eindhoven, The Netherlands
For more information call:
In the U.S.A. (800) 443-5853 or
Fax (425) 446-5116
In Europe/M-East/Africa +31 (0) 40 2675 200 or
Fax +31 (0) 40 2675 222
In Canada (800)-36-FLUKE or
Fax (905) 890-6866
From other countries +1 (425) 446-5500 or
Fax +1 (425) 446-5116
Web access: http://www.fluke.com
©2013-2014 Fluke Corporation.
Specifications subject to change without notice.
Printed in U.S.A. 3/2014 4346628B_EN
Modification of this document is not permitted
without written permission from Fluke Corporation.
 Loading...