


187/189
®
True RMS Multimeter
Calibration Manual
PN 1584337
November 2000 Rev.1, 6/02
© 2000-2002 Fluke Corporation. All rights reserved. Printed in U.S.A.
All product names are trademarks of their respective companies.

LIFETIME L IMITED WARRANTY
Each Fluke 20, 70, 80, 170 and 180 Series DMM will be free from defec t s in material and workmanship for its lifetime. As
used herein, “lifetime” is defined as seven years after Fluke discontinues m anuf acturing the product, but the warranty period
shall be at least ten years from the date of purchase. Thi s warranty does not cover fuses, disposable batteri es, damage
from neglect, misus e, contamination, alteration, accident or abnormal condi tions of operation or handling, inc l udi ng failures
caused by use outside of the product’s specifi cations, or normal wear and tear of mechanical components. This warranty
covers the original purchas er onl y and i s not transferable.
For ten years from the date of purchase, this warranty als o covers the LCD. Thereafter, f or the lifetime of the DMM, Fluke
will replace the LCD for a fee based on then current c omponent acquisition costs.
To establish original ownership and prove date of purchase, please complete and return the registration card
accompanying the product, or register your product on http://www.fluke.com. Fluke will, at its option, repair at no charge,
replace or refund the purchase price of a defective product purchas ed t hrough a Fl uke authorized sales outlet and at the
applicable international pric e. Fl uke reserves the right to c harge for importation costs of repai r/replacement parts if t he
product purchased in one country i s sent for repair elsewhere.
If the product is defective, contact your nearest Fluke authorized service center to obtain return aut hori zation information,
then send the product to that service center, with a description of the diffi culty, postage and insurance prepaid (FOB
Destination). Fluke assumes no ris k for damage in transit. Fluke will pay return transportation for product repaired or
replaced in-warranty. Before making any non-warrant y repair, Fluke will estimate cost and obtain authorization, then
invoice you for repair and return transportation.
THIS WARRANTY IS Y O UR ONLY REMEDY. NO OTHER WARRANT IES, SUCH AS FIT NESS FOR A PARTICULAR
PURPOSE, ARE EXPRESSED OR IMPLIED. FLUKE SHALL NOT BE LIABLE FOR ANY SPECIAL, INDIRECT,
INCIDENTAL OR CONSEQUENTIAL DAMAGES OR LOSSES, INCLUDING LOSS OF DATA, ARISING FROM ANY
CAUSE OR THEORY. AUTHORIZED RESELLERS ARE NOT AUTHORIZED TO EXTEND ANY DIFFERENT
WARRANTY ON FLUKE’S BEHA LF. Since some states do not allow the exclusion or li m i t ation of an implied warranty or
of incidental or consequential damages, this limitation of liability may not apply to you. I f any provision of this warranty is
held invalid or unenforceable by a court or other decis ion-maker of competent jurisdiction, such holding will not affect the
validity or enforceability of any other provision.
2/02
Fluke Corporation Fluke Europe B.V.
P.O. Box 9090 P.O. Box 1186
Everett, WA 98206-9090 5602 BD Eindhoven
U.S.A. The Netherlands

Table of Contents
Title Page
Introduction....................................................................................................... 1
Contacting Fluke ............................................................................................... 1
Precautions and Safety Information.................................................................. 2
International Symbols........................................................................................ 2
Safety Information............................................................................................. 3
Specifications .................................................................................................... 4
Accuracy ....................................................................................................... 4
Feature Summary.......................................................................................... 4
Basic Specifications .......................................................................................... 5
Detailed Accuracy Specifications ..................................................................... 6
Frequency Counter Sensitivity.......................................................................... 9
Burden Voltage (A, mA, µA)............................................................................ 9
Input Characteristics.......................................................................................... 9
Required Equipment.......................................................................................... 10
Basic Maintenance ............................................................................................ 11
Opening the Meter Case................................................................................ 11
Removing and Reinserting the Circuit Board Assembly.............................. 11
Replacing the LCD........................................................................................ 12
Reassembling the Meter Case....................................................................... 13
Testing Fuses (F1 and F2)............................................................................. 13
Replacing Fuses ............................................................................................ 14
Replacing the Batteries................................................................................. 14
Cleaning........................................................................................................ 15
Performance Tests............................................................................................. 16
Testing the Display ....................................................................................... 16
Backlight Test............................................................................................... 16
Current Terminal Sensing Test..................................................................... 16
Keypad Test .................................................................................................. 17
Verification of the IR Communication Port.................................................. 17
Testing Temperature..................................................................................... 17
Testing Voltage, Current, Resistance, Capacitance and Diode Functions.... 18
Calibration......................................................................................................... 21
Keypad Interface........................................................................................... 21
General Procedure......................................................................................... 22
Special Requirements.................................................................................... 23
Calibration Inputs.......................................................................................... 23
i

187/189
Calibration Manual
Remote Interface........................................................................................... 25
Temperature Calibration............................................................................... 25
Setup......................................................................................................... 25
Procedure.................................................................................................. 26
Re-Programming Serial Number or Model Number..................................... 26
Parts and Accessories........................................................................................ 27
ii

List of Tables
Table Title Page
1. International Symbols............................................................................................ 2
2. Required Tools and Equipment............................................................................. 10
3. Temperature Test Input and Display..................................................................... 17
4. Performance Test Steps ......................................................................................... 18
5. Calibration Inputs .................................................................................................. 23
iii

187/189
Calibration Manual
iv

List of Figures
Figure Title Page
1. Removing LCD Mask to Access LCD................................................................... 12
2. Testing the Current Fuses...................................................................................... 14
3. Battery and Fuse Replacement .............................................................................. 15
4. Display Test........................................................................................................... 16
5. Locating Recessed Calibration Button.................................................................. 21
6. Calibration Display................................................................................................ 22
7. Replacement Parts and Accessories....................................................................... 28
v

187/189
Calibration Manual
vi

Introduction
To avoid shock or injury, do not perform the verificati on t est s
or calibration procedures described in this manual unless you
are qualified to do so.
The information provided in this document is for the use of
qualified personnel only.
The 187 & 189 Multimeters contain parts t hat can be damaged
by static discharge.
Follow the standard practices for handling static sensitive
devices.
The information in this manual deals with the Fluke Models 187 & 189 True RMS
Multimeters, (hereafter referred to as “the meter”). Information provided includes:
• Precautions and safety information
• Specifications
• Basic maintenance (cleaning, replacing the battery and fuses)
• Performance test procedures
• Calibration and calibration adjustment procedures
• Accessories and replaceable parts
W Warning
Caution
For complete operating instructions, refer to the Model 187 & 189 Users Manual located
on the 187/189 CD ROM.
Contacting Fluke
To order accessories, receive assistance, or locate the nearest Fluke distributor or Service
Center, call:
USA: 1-888-99-FLUKE (1-888-993-5853)
Canada: 1-800-36-FLUKE (1-800-363-5853)
Europe: +31 402-678-200
Japan: +81-3-3434-0181
Singapore: +65-738-5655
Anywhere in the world: +1-425-446-5500
Address correspondence to:
Fluke Corporation Fluke Europe B.V.
P.O. Box 9090, P.O. Box 1186,
Everett, WA 98206-9090 5602 BD Eindhoven
USA The Netherlands
Visit us on the World Wide Web at: www.fluke.com
1

187/189
Calibration Manual
Precautions and Safety Information
International Symbols
WWarning
If this product is used in a manner not specif ied by the
manufacturer, the protection provided by the equipment may
be impaired.
Read the “Safety Information” page before servicing this product.
In this manual, a Warning identifies conditions and actions that pose hazard(s) to the
user; a Caution identifies conditions and actions that may damage the Meter or the test
instruments.
International symbols used on the Meter and in this manual are explained in Table 1.
Table 1. International Symbols
Symbol Meaning Symbol Meaning
Alternating current Earth ground
Direct current
Alternating or direct current Conforms to European Union
Refer to the manual. Important
information.
Inspected and licensed by TÜV
Product Services.
Battery
Conforms to VDE Standards
Fuse
directives
Conforms to relevant Canadian
Standards Association directives
Double insulated
Underwriters Laboratories, Inc.
2

Safety Information
WWarnings and Precautions
To avoid possible electric shock or personal injury, follow these guidelines:
Do not use the Meter if it is damaged. Before you use the Meter, inspect the case.
•
Look for cracks or missing plastic. Pay particular attention to the insulation
surrounding the connectors.
Inspect the test leads for damaged insulation or exposed metal. Check the test
•
leads for continuity. Replace damaged test leads before you use the Meter.
Do not use the Meter if it operates abnormally. Protection may be impaired. When
•
in doubt, have the Meter serviced.
Do not operate the Meter around explosive gas, vapor, or dust.
•
Do not apply more than the rated voltage, as marked on the Meter, between
•
terminals or between any terminal and earth ground.
Before use, verify the Meter’s operation by measuring a known voltage.
•
When measuring current, turn off circuit power before connecting the Meter in the
•
circuit. Remember to place the Meter in series with the circuit.
True RMS Multimeter
Safety Information
When servicing the Meter, use only specified replacement parts.
•
Use caution when working above 30 V ac rms, 42 V peak, or 60 V dc. Such
•
voltages pose a shock hazard.
Avoid working alone.
•
When using the probes, keep your fingers behind the finger guards on the probes.
•
Connect the common test lead before you connect the live test lead. When you
•
disconnect test leads, disconnect the live test lead first.
Remove test leads from the Meter before you open the battery door.
•
Do not operate the Meter with the battery door or portions of the cover removed or
•
loosened.
To avoid false readings, which could lead to possible electric shock or personal
•
injury, replace the batteries as soon as the low battery indicator (M) appears.
Use only type AA batteries, properly installed in the Meter case, to power the
•
Meter.
Caution
To avoid possible damage to the Meter or to the equipment under test, follow these
guidelines:
• Disconnect circuit power and discharge all high-voltage capacitors before testing
resistance, continuity, diodes, or capacitance.
• Use the proper terminals, function, and range for your measurements.
• Before measuring current, check the Meter's fuses and turn power OFF to the
circuit before connecting the Meter to the circuit.
3

187/189
Calibration Manual
Specifications
Accuracy
Feature Summary
Dual Digital Displays
Analog Bar Graph
Backlight with 2 brightness levels Bright white backlight for clear readings in poorly lighted areas
Fast Autorange Meter automatically selects best range - instantly
AC+DC true rms, ac rms specified
to 100 kHz
dBm, dBV User selectable impedance references for dBm
AutoHOLD Holds readings on display
Continuity / Open test Beeper sounds for resistance readings below threshold, or to
Fast Bar Graph 51 segments for peaking and nulling
Duty cycle / Pulse width Measure signal on or off time in % or milliseconds
MIN MAX Mode
FAST MN MX with 24-hour time
stamp
Closed-Case Calibration No internal adjustments needed
Battery / Fuse Access Door Battery or fuse replaceable without voiding calibration
Hi-Impact Overmolded Case Protective holster features
Accuracy is specified for a period of one year after calibration, at 18 °C to 28 °C (64 °F
to 82 °F), with relative humidity to 90 %. Accuracy specifications are given as:
± ( [ % of reading ] + [ number of least significant digits ] )
AC mV, AC V, AC µA, AC mA, and AC A specifications are ac-coupled, true rms and are
valid from 5 % of range to 100 % of range. AC crest factor can be up to 3.0 at full-scale, 6.0
at half-scale, except the 3000 mV and 1000 V ranges where it is 1.5 at full scale, 3.0 at halfscale.
Feature Description
Primary: 50,000 counts
Secondary: 5,000 count
Bar graph: 51 segments, updates 40 times/second
Choices for AC only, AC and DC dual display, or AC+DC
readings
indicate a momentary open circuit
Record maximum, minimum, and average values.
24-hour clock for MAX or MIN, elapsed time for AVG.
FAST MN MX captures peaks to 250 µsec.
4

Basic Specifications
Function Ranges/Description
DC Voltage 0 to 1000 V
AC Voltage, true RMS 2.5 mV to 1000 V – 100 kHz bandwidth
Basic Accuracy DC voltage: 0.025 %
AC voltage: 0.4 %
DC Current 0 to 10 A (20 A for 30 seconds)
AC Current, true RMS 25 µA to 10 A (20 A for 30 seconds)
Resistance 0 to 500 MΩ
Conductance 0 to 500 nS
Capacitance 0.001 nF to 50 mF
Diode Test 3.1 V
Temperature −200 °C to 1350 °C (−328 °F to 2462 °F)
Frequency 0.5 Hz to 1000 kHz
LOGGING Intervals
(Model 189 only)
SAVE Readings
(Model 189 only)
At least 288 intervals may be stored. Up to 700 unstable event values (see
AutoHold) are automatically added to LOGGING memory for viewing only
through optional PC software. Additional intervals will be logged up to 995 if
the signal is stable.
Up to 100 readings may be saved by the user in a memory separate from
LOGGING memory. These readings may be viewed using VIEW MEM.
True RMS Multimeter
Basic Specifications
5

187/189
Calibration Manual
Detailed Accuracy Specifications
Function Range Resolution
AC mV
AC V
dBV −52 to −6 0.01 dB 0.1 dB 0.2 dB 0.5 dB 0.5 dB 1.4 dB
1. For the 5,000 count mode, div i de the number of least signifi cant digits (counts) by 10.
2. A residual reading of 8 to 180 digits with leads shorted, will not affect st at ed accuracy above 5 % of range.
Accuracy is specified for a period of one year after calibration, at 18 °C to 28 °C (64 °F
to 82 °F), with relative humidity to 90 %. Accuracy specifications are given as:
± ( [ % of reading ] + [ number of least significant digits ] )
AC mV, AC V, AC µA, AC mA, and AC A specifications are ac coupled, true rms and
are valid from 5 % of range to
100 % of range. AC crest factor can be up to 3.0 at full-scale, 6.0 at half-scale except the
3000 mV and 1000 V ranges where it is 1.5 at full scale, 3.0 at half-scale.
Accuracy
45 Hz-
1 kHz
1, 2
50.000 mV 0.001 mV 0.4 % + 40 2 % + 80 5 % + 40 5.5 % + 40 15 % + 40
500.00 mV 0.01 mV 0.4 % + 40 2 % + 80 5 % + 40 5.5 % + 40 8 % + 40
3000.0 mV 0.1 mV 0.4 % + 40 2 % + 80 0.4 % + 40 1.5 % + 40 8 % + 40
1, 2
5.0000 V 0.0001 V 0.4 % + 40 2 % + 80 0.4 % + 40 1.5 % + 40 8 % + 40
50.000 V 0.001 V 0.4 % + 40 2 % + 80 0.4 % + 40 1.5 % + 40 8 % + 40
500.00 V 0.01 V 0.4 % + 40 2 % + 80 0.4 % + 40 Not
1000.0 V 0.1 V 0.4 % + 40 2 % + 80 0.4 % + 40 Not
−6 to +34 0.01 dB 0.1 dB 0.2 dB 0.1 dB 0.2 dB 0.8 dB
+34 to +60 0.01 dB 0.1 dB 0.2 dB 0.1 dB Not
20 Hz-
45 Hz
1 kHz-
10 kHz
10 kHz-
20 kHz
specified
specified
specified
20 kHz-
100 kHz
Not
specified
Not
specified
Not
specified
Accuracy
45 Hz-
Function Range Resolution
AC µA 500.00 µA 0.01 µA 0.75 % + 20 1 % + 20 0.75 % + 20 6 % + 40
5,000.0 µA0.1 µA 0.75 % + 5 1% + 5 0.75 % + 10 2 % + 40
AC mA 50.000 mA 0.001 mA 0.75 % + 20 1% + 20 0.75 % + 20 9 % + 40
400.00 mA 0.01 mA 0.75 % + 5 1% + 5 1.5 % + 10 4 % + 40
AC A 5.0000 A 0.0001 A 1.5 % + 20 1.5% + 20 6 % + 40 Not specified
10.000 A
1. 10 A continuous up to 35 °C, l ess than 10 minutes 35 °C to 55 °C. 20 A overl oad for 30 seconds maximum.
1
0.001 A 1.5 % + 5 1.5% + 5 5 % + 10 Not specified
1 kHz
20 Hz-
45 Hz
1 kHz-
20 kHz
20 kHz-
100 kHz
6

True RMS Multimeter
Detailed Accuracy Specifications
Accuracy Accuracy Dual Display AC or AC+DC
20 Hz-
Function Range Resolution DC
DC mV 50.000 mV 0.001 mV 0.1% + 20 6 % + 40
45 Hz
2 % + 80 0.5 % + 40
45 Hz -
1 kHz
1 kHz-
20 kHz
500.00 mV 0.01 mV 0.03 % + 2
3000.0 mV 0.1 mV 0.025 % + 5 2 % + 40
DC V 5.0000 V 0.0001 V 0.025 % + 10
50.000 V 0.001 V 0.03 % + 3
500.00 V 0.01 V 0.1 % + 2
1000.0 V 0.1 V 0.1 % + 2
2
2
2
2
Not specified
Not specified
DC µA 500.00 µA 0.01 µA 0.25 % + 20 1 % + 20 1.0 % + 20 2 % + 40
5,000 µA0.1 µA 0.25 % + 2 1 % + 10 0.75 % + 10 2 % + 40
DC mA 50.000 mA 0.001 mA 0.15 % + 10 1 % + 20 0.75 % + 20 2 % + 40
400.00 mA 0.01 mA 0.15 % + 2 1 % + 10 1 % + 10 3 % + 40
DC A 5.0000 A 0.0001 A 0.5 %+ 10 2 % + 20 2 % + 20 6 % + 40
10.000 A
1. 10 A continuous up to 35 °C, l ess than 10 minutes 35 °C to 55 °C. 20 A overload for 30 seconds maximum.
2. 20 counts in dual display DC or AC+DC.
3. See AC conversions not es for AC mV and V
1
0.001 A 0.5 %+ 2 1.5 % + 10 1.5 % + 10 5 % + 10
3
Function Range Resolution Accuracy
Resistance
1
500.00 Ω 0.01 Ω 0.05 % + 10
3
5.0000 kΩ 0.0001 kΩ 0.05 % + 2
50.000 kΩ 0.001 kΩ 0.05 % + 2
500.00 kΩ 0.01 kΩ 0.05 % + 2
5.0000 MΩ 0.0001 MΩ 0.15 % + 4
30.000 MΩ 0.001 MΩ 1 % + 4
100.0 MΩ 0.1 MΩ 3 % + 2
500.0 MΩ 0.1 MΩ 10 % + 2
2
2
4
4
Conductance 50.00 nS 0.01 nS 1 % + 10
1. For the 5,000 count mode, div i de the number of least signifi cant digits (counts) by 10.
2. For relative humidity great er than 70 %, resistance ac curacy is 0.5 % over 1 MΩ and 2.5 % over 10 MΩ.
3. Using relative mode (REL ∆) to zero residual reading.
4. To ensure stated accurac y, switch to conductance mode and verify that the open circuit reading is les s than
0.10 nS.
7

187/189
Calibration Manual
Capacitance
Diode Test
1. For the 5,000 count mode, div i de the number of least signifi cant digits (counts) by 10.
2. For film capacitor or bet ter, using Relative mode (REL ∆) to zero residual on 1.000 nF and 10.00 nF ranges.
3. Least significant digit not active abov e 10 m F .
Function Ranges Resolution Accuracy
2
1.000 nF 0.001 nF 2% + 5
10.00 nF 0.01 nF 1 % + 5
100.0 nF 0.1 nF
1.000 µF 0.001 µF
10.00 µF 0.01 µF
100.0 µF 0.1 µF
1,000 µF 1 µF
10.0 mF 0.01 mF
50.00 mF 0.01 mF
1
3.1000 V 0.0001 V 2 % + 20
3
3 % + 10
Function Range Resolution Accuracy
Frequency 500.00 Hz 0.01 Hz
1
± (0.0050 % + 1)
5.0000 kHz 0.0001 kHz
50.000 kHz 0.001 kHz
999.99 kHz 0.01 kHz
Duty Cycle 10.00% to 90.00 % 0.01 % ± ((voltage range/input voltage) X 300
counts)
Pulse Width 499.99 ms 0.01 ms ± (3 % X (voltage range/input voltage) + 1
count)
5,6
5,6
999.9 ms 0.1 ms
Temperature −200 to +1350 °C0.1 °C ± ( 1% of reading + 1 °C)
−328 to +2462 °F0.1 °F ± ( 1% of reading + 1.8 °F)
MIN MAX
AVG
Response: 100 ms to 80 % Specified accuracy ± 12 counts for
changes > 200 ms in duration. (± 40
2,3
2,3
counts in AC for changes > 350 ms and
inputs > 25 % of range)
FAST MN MX 250 µs
4
Specified accuracy ±100 counts up to
5,000 count (full range) reading. For higher
peak readings (to 20,000 counts),
specified accuracy ± 2% of reading.
1. Reading will be 0.00 for signals below 0.5 Hz.
2. Accuracy spec i fication is relativ e t o the user-adjustable temperature of fset, and assumes ambi ent temperature
stable to ± 1 °C.
3. For ambient temperature changes of ± 5 °C, rated accuracy appl i es after 1 hour.
4. For repetitive peaks; 2.5 ms for single events . Use DC function settings below 20 Hz. 50 mV range not speci f i ed.
5. Frequency greater than 5 Hz, ex cept for VDC, 500 mVDC and 3000 mVDC functions; 0.5 Hz to 1 k Hz . Signals
centered around trigger levels.
6. Range/input ratios also appl y to current functions. 500 counts or 5 % for 10 A ranges.
8

Frequency Counter Sensitivity
Frequency Counter Sensitivity
Approximate VAC
Sensitivity (RMS Sine
Input
Range
15 Hz -
100 kHz
50 mV 5 mV 10 mV 1 MHz -5 mV & 5 mV 1 MHz
500 mV 20 mV 20 mV 1 MHz 5 mV & 65 mV 1 MHz
3000 mV 500 mV 2000 mV 800 kHz 140 mV & 200 mV 90 kHz
5 V 0.5 V 2.0 V 950 kHz 1.4 V & 2.0 V 14 kHz
50 V 5 V 5.0 V 1 MHz 0.5 V & 6.5 V > 400 kHz
500 V 20 V 20 V 1 MHz 5 V & 65 V > 400 kHz
1000 V 100 V 100 V > 400 kHz 5 V & 65 V > 400 kHz
1. Maximum input = 10 x Range (1000 V m ax). Noise at low frequencies and am pl i tudes may affect ac curacy.
2. Useable at reduced sensiti vity to 0.5 Hz and 1000 kHz.
3. Typical frequency bandwidt h wi t h full scale (or maximum 2 X 10
Wave)
2
1
500 kHz
2
VAC
Bandwidth
Approximate
3
VDC Trigger
Levels
7
V-Hz product) RMS sine wave.
1
VDC Bandwidth
True RMS Multimeter
3
Burden Voltage (A, mA, µA)
Function Range Burden Voltage (typical)
mA - µA 500.00 µA
102 µV / µA
5,000 µA 102 µV / µA
50.000 mA 1.8 mV / mA
400.00 mA 1.8 mV / mA
A 5.0000 A 0.04 V / A
10.000 A 0.04 V / A
Input Characterist ics
Function Input Impedance (Nominal)
Volts, mV 10 MΩ, < 100 pF
Common Mode Rejection Ratio Normal Mode Rejection
DC Volts, mV >100 dB at dc, 50 Hz or 60 Hz ±0.1% >90 dB at 50 Hz or 60 Hz ± 0.1%
AC Volts, mV > 90 dB dc to 60 Hz
Full-Scale Voltage
Open Circuit Test Voltage To 5 MΩ 30 MΩ + nS
Ohms < 5 V 500 mV 3.1 V
Diode Test < 5 V 3.1000 V
Typical Short-Circuit Current
500 Ω 5 kΩ 50 kΩ 500 kΩ 5 MΩ 30 MΩ
Ohms 1 mA 100 µA 10 µA 1 µA 0.1 µA 0.1 µA
Diode Test 1 mA typical
9

187/189
Calibration Manual
Required Equipment
Required equipment is listed in Table 2. If the recommended models are not available,
equipment with equivalent specifications may be used.
Repairs or servicing should be performed only by qualified personnel.
Table 2. Required Equipment
Equipment Required Characteristics
Calibrator AC Voltage Range: 0-1000 Vac
Accuracy: + 0. 1 %
Frequency Range: 20 Hz – 100 kHz
Accuracy: +3 %
DC Voltage Range: 0-1000 Vdc
Accuracy: + 0.006 %
Current Range: 0-10A
Accuracy: AC mA - +0.18 %
AC A - + 0.38 %
Frequency range: 1 kHz – 20 kHz
DC mA - + 0.06 %
DC A - + 0.125 %
Frequency Source: 500 Hz-20 kHz
Accuracy: + 0.00125 %
Amplitude: 1 Volt
Accuracy: + 5 %
Ohms Range: 0 Ω - 50 MΩ
Accuracy: + 0.0125 %
Recommended
Model
Fluke 5520A
10
Capacitance Range: 110.0 nF & 11.00
µF
Accuracy: +0. 25%
Temperature Range: -10 to 350 °C
Accuracy: 0.3 %
Thermocouple Adapter
Accessory
K-type Thermocouple K-type, mini-plug on both ends N/A
Serial Cable, Infrared/W IR
Cable Adapter
87/89-IV, 187/189
Service Software
K-type Fluke 80AK
Fluke P/N 1590638
Fluke P/N 676152

Basic Maintenance
To avoid electrical shock or personal injury, remove the t est
leads and any input signals before opening the case or
replacing the battery or fuses. To prevent damage or injury,
install ONLY batteries or fuses specifi ed f or t hi s product.
Opening the Meter Case
To avoid unintended circuit shorting, always place the
uncovered Meter assembly on a protective surface. When the
case of the Meter is open, circuit connect ions are exposed.
To open the Meter case, do the following:
True RMS Multimeter
Basic Maintenance
WWarning
Caution
1. Disconnect test leads from any live source, turn the rotary switch to
remove the test leads from the front terminals.
2. Remove the battery door by using a flat-blade screwdriver to turn the battery door
fasteners 1/4-turn counterclockwise.
3. The case bottom is secured to the case top by four screws, one at each corner.
Remove the screws with a Phillips-head screwdriver.
4. Pull the two halves of the case apart.
Removing and Reinserting the Circuit Board Assembl y
The circuit board assembly must be removed to access and replace the LCD.
Caution
The circuit board is extremely susceptible to contamination.
Handle it by the input receptacle, fuse clips or edges of the
board only. You can use clean surgical gloves to help avoi d
contamination.
1. Open the Meter case and remove the case bottom to access the circuit board.
2. Remove the two Phillips-head screws securing the circuit board to the case top and
lift it out carefully to avoid contamination.
3. To reinsert the circuit board, simply place it into the case top with the LCD display
showing through the window.
OFF, and
4. Carefully replace the two Phillips-head screws that connect the circuit board to the
case top.
Caution
Do not over-torque the two Phillips-head screws when you
reconnect the circuit board to the case top. Doi ng so may
create shielding problems and cause the Meter to give incorrect
readings.
11

187/189
Calibration Manual
Replacing the LCD
If you need to replace the LCD, you will find it easier to leave the LCD assembly
attached to the circuit board and access the LCD by removing the LCD mask from the
front of the LCD assembly.
1. Remove the circuit board as described under “Removing and Reinserting the Circuit
Board Assembly.”
2. Carefully insert the tip of a thin screwdriver under the LCD mask at the top of the
display as shown in Figure 1.
LCD Mask
LCD
Figure 1. Removing LCD Mask to Access LCD
aau05f.eps
3. Lift up the LCD mask gently with the screwdriver blade to loosen the mask from the
assembly. Be careful to press upward, not inward toward the LCD. By hand, tilt the
LCD mask upward to release.
4. Replace the LCD. The LCD must be centered on the platform between the brackets
before you replace the LCD mask. If the LCD is improperly aligned, the display may
show missing segments or meaningless readings.
5. Reattach the LCD mask by pressing it over the LCD until it snaps into place.
12

Reassembling the Meter Case
To reassemble the Meter case, do the following:
True RMS Multimeter
Basic Maintenance
1. Verify that the rotary switch is in the
2. Reinsert the circuit board by placing it into the case top with the LCD showing
through the window. Carefully replace the two Phillips-head screws that connect the
circuit board to the case top.
Do not over-torque the two Phillips-head screws when you
reconnect the circuit board to the case top. Doi ng so may
create shielding problems and cause the Meter to give incorrect
readings.
3. Hold the Meter face down and place the case bottom on the case top. Make sure the
backlight cable located on the back of the LCD assembly is not caught between the
case halves.
4. Reinstall the four screws and the battery door.
5. Secure the battery door by turning the fasteners 1/4-turn clockwise.
6. Go to the “Performance Test” section in this document, and perform the procedures
described.
Testing Fuses (F1 and F2)
Before measuring current, test the appropriate fuse as shown in Figure 2. If the tests give
readings other than those shown, have the Meter serviced.
OFF position.
Caution
WWarning
To avoid electrical shock or personal injury, remove the t est
leads and any input signals before replacing the battery or
fuses. To prevent damage or injury, install ONLY specified
replacement fuses with the amperage, volt age, and speed
ratings shown in the specifications.
13

187/189
Calibration Manual
Replace F2 if " or "
displayed
Replacing Fuses
To avoid electrical shock, remove the test leads and any input
signals before replacing the battery or fuses. To prevent damage or
injury, INSTALL ONLY specified fuses and bat t eri es.
Replace F1 if " or "
displayed
189
LOGGING MULTIMETER
AutoHOLD
HOLD
FAST MN MX
MIN MAX
LOGGING
REL
CANCEL
Hz
%
SETUP
nS
ac+dc
mV
ac+dc
V
dB
mV
dB
V
OFF
A
mA
10A MAX
A
FUSED
400mA
FUSED
A
ac+dc
ac+dc
VIEW
CLEAR MEM
TEMPERATURE
COM
V
CAT
1000V
YES
ms
SAVE
RANGE
NO
F
C
A
mA
A
A
mA
ac+dc
A
mA
OFF
A
mA
10A MAX
A
FUSED
400mA
FUSED
AutoHOLD
HOLD
CANCEL
Hz
%
SETUP
nS
ac+dc
mV
ac+dc
V
dB
mV
dB
V
A
ac+dc
ac+dc
VIEW
CLEAR MEM
TEMPERATURE
COM
V
CAT
1000V
189
LOGGING MULTIMETER
FAST MN MX
MIN MAX
LOGGING
REL
YES
ms
SAVE
RANGE
NO
F
C
A
mA
A
A
mA
ac+dc
A
mA
ach038f.eps
Figure 2. Testing the Current Fuses
WWarning
To replace the fuses, refer to Figure 3 and do the following:
1. Turn the rotary switch to
2. Remove the battery access door by using a standard-blade screwdriver to turn the
battery door fasteners one-quarter turn counterclockwise.
3. Remove either fuse by gently prying one end loose, then lifting the fuse out of the
fuse contacts.
4. Install ONLY specified fuses.
5. Reinstall the battery door. Secure the door by turning the fasteners one-quarter turn
clockwise.
Replacing the Batteries
The Meter is powered by four AA batteries (NEDA 15A or IEC LR6).
Be sure to observe proper polarity when replacing batteries.
Incorrect battery polarity may seriously damage the Met er.
OFF and remove the test leads from the terminals
Caution
14

To replace the batteries, refer to Figure 3 and do the following:
True RMS Multimeter
Basic Maintenance
1. Turn the rotary switch to
OFF and remove the test leads from the terminals.
2. Remove the battery door by using a standard-blade screwdriver to the turn the
battery door fasteners one-quarter turn counterclockwise.
3. Replace the batteries, observing proper polarity. Replace the battery door and secure
it by turning the fasteners one-quarter turn clockwise.
Cleaning
Periodically wipe the case with a damp cloth and mild detergent. Do not use abrasives or
solvents.
Dirt or moisture in the input terminals can affect readings and can falsely activate the
Input Alert™ feature. Clean the terminals as follows:
1. Turn the Meter off and remove all test leads.
2. Shake out any dirt that may be in terminals.
3. Soak a new swab with alcohol. Clean each terminal with the swab.
F2
F1
tc037f.eps
Figure 3. Battery and Fuse Replacement
WWarning
To avoid electrical shock or damage to the Meter, never all ow
water inside the case. To avoid damaging the housing, never
apply solvents to the Meter.
15

187/189
Calibration Manual
Performance Tests
Testing the Display
The following performance tests will ensure that the Meter is in proper operating
condition and will check the accuracy of each meter function against its specifications.
To perform the tests you will need a Fluke 5520A Calibrator or equipment meeting the
minimum specification given in Table 1.
If the Meter fails any of these tests, it needs calibration adjustment or repair.
Push down the Q button and simultaneously turn the Meter on. Compare the display
with the example in Figure 4. Check all segments for clarity and contrast.
Backlight Test
To test the backlight, press the T button twice. Note that the backlight comes on at two
different intensity levels.
Current Terminal Sensing Test
This test determines whether or not the Input Alert™ beeper is functioning properly.
Before conducting this test, make sure the beeper is not disabled in setup.
1. Turn the rotary switch to the AC V function. Press the backlight button twice to turn
the backlight to the highest intensity.
2. Turn the rotary switch to all functions, except current functions. Note that the beeper
does not come on.
3. Turn the rotary switch to the DC mA position. Insert a test lead into the mA
terminal. Note that the beeper does not emit a continuous chirp.
As the test lead is inserted, the Meter may produce a single chirp. This is
acceptable.
Figure 4. Display Test
aau02f.eps
Note
Note
16

Keypad Test
To test the keypad, turn the Meter to AC V and push each button separately. Each button
push should cause the Meter to beep.
True RMS Multimeter
Performance Tests
Reset the Meter by turning it
Off, and then back On.
Verification of the IR Communication Port
Note
If you are using MET/CAL to do performance testing, it is not necessary to
perform this verification test.
1. Connect the Infrared Serial Cable to the com port of a PC.
2. Connect the Infrared Serial Cable to the IR Cable Adapter and insert into the
187/189 accessory mount so that it is flush with the IR adapter window. Turn the
Meter rotary switch to DC V.
3. Install Fluke 87/89-IV, 187/189 Service Software, P/N 676152.
4. Apply 1 V dc to the VeG terminal.
5. The display reading should appear in text box of PC.
Note
If the PC indicates that the Meter is not connected, ensure that the com
port is correct and that the IR Serial Cable and adapter is aligned with the
IR window.
Testing Temperature
Connect K-type thermocouple and Fluke 80Ak to the temperature input on the Meter.
Connect the other end to the 5520A TC output. Allow connections to stabilize for 30
seconds before proceeding.
1. Turn the rotary switch to the temperature function.
2. Set the 5520A for K-type thermocouple and an output of 23 °C.
3. Enter the Meter Setup mode (press yellow button, then backlight button).
4. Adjust the temperature offset until the temperature on the Meter primary display
matches the 5520A output temperature (23 °C). Use the blue shift button and
backlight button to advance digit. Use the up and down arrow keys to edit digit.
5. Enter an offset value by pressing the yellow button, then the backlight button.
6. Exit Setup mode by pressing the yellow button, then the
CANCEL button.
7. Perform the steps in Table 3.
Table 3. Temperature Test Input and Display
Input
Lower Limit Upper Limit
-10.0 °C -11.1 °C -8.9 °C
0.0 °C -1.0 °C1.0 °C
350.0 °C 345.0 °C 355.0 °C
Display
17

187/189
Calibration Manual
Testing Voltage, Current, Resistance, Capacitance and Diode Functions
Step Function Range
1 AC V 5.0000 V 0.25 V 100 kHz 0.2260 0.2740
2 AC V 5.0000 V 5 V 20 kHz 4.9210 5.0790
3 AC V 5.0000 V 5 V 100 kHz 4.5960 5.4040
4 AC V 50.000 V 50 V 700 Hz 49.760 50.240
5 AC V 50.000 V 50 V 20 kHz 49.210 50.790
6 AC V 50.000 V 50 V 100 kHz 45.960 54.040
7 AC V 500.00 V 500 V 65 Hz 497.60 502.40
8 AC V 1000.0 V 500 V 65 Hz 494.0 506.0
9 AC mV 50.000 2.5 mV 100 kHz 2.085 2.915
10 AC mV 50.000 50 mV 20 kHz 47.210 52.790
11 AC mV 50.000 50 mV 100 kHz 42.460 57.540
12 AC mV 500.00 mV 500 mV 10 kHz 474.60 525.40
13 AC mV 3000.0 mV 3 V 20 kHz 2951.0 3049.0
14 AC mV 3000.0 mV 3 V 100 kHz 2756.0 3244.0
15 Frequency 50.000 kHz 1 V 20 kHz 19.998 20.002
16 Duty Cycle 3.0000 V 2.2 Vp-p,
17 DC V 5.0000 V short -0.0010 0.0010
18 DC V 5.0000 V 5 V 4.9977 5.0023
19 DC V 5.0000 V -5 V -4.9977 -5.0023
20 DC V 50.000 V -50 V -49.982 -50.018
21 DC V 500.00 V -500 V -499.48 -500.52
22 DC V 1000.0 V -500 V -499.3 -500.7
1. Do not rely on autoranging for all tests. Some test steps will require manual ranging.
2. Must allow for source and meter settling before recording reading.
3. Wait at least 60 seconds for source and meter to sett l e bef ore recording reading.
4. Using Relative Mode (REL) to z ero residual reading (apply 0 Ω and allow UUT to settle for 45 seconds before
To verify the accuracy of Meter functions, do the following.
1. Connect the Calibrator to the VeG and COM inputs on the Meter.
2. Turn the rotary switch to the function listed in each step.
3. Apply the input from the steps listed in Table 4.
4. Compare the reading on the Meter display with the display reading in Table 4.
5. If the display reading falls outside of the range shown in Table 4, the Meter does not
meet specification.
6. Repeat steps 2 through 4 for the remaining inputs shown in Table 4.
Table 4. Performance Test Steps
2
Upper
Limit
pushing REL).
Display
1
Input Level
@30%
Sq. wave
Frequency or
Model
500 Hz
Lower
Limit
21.82 38.18
18

True RMS Multimeter
Performance Tests
Table 4. Performance Test Steps (cont.)
Display
Step Function Range
1
Input Level Frequency
Lower
Limit
23 AC&DC 50.000 V 50 V 20 kHz 48.960 51.040
24 DC mV 50.000 0 mV
3
-0.020 +0.020
25 DC mV 50.000 50 mV 49.930 50.070
26 DC mV 50.000 -50 mV -49.930 -50.070
27 DC mV 500.00 mV 0 V -0.02 0.02
28 DC mV 500.00 mV 500 mV 499.83 500.17
29 DC mV 3000.0 mV +2 V 1999.0 2001.0
30 DC mV 3000.0 mV -3 V -2998.7 -3001.3
31 AC+DC 3000.0 mV 1 V 20 kHz 976.0 1024.0
Connect 5520A for 2 Wire Comp
32 Ohms 500.00 Ω 0 Ω
4
-0.10 0.10
33 Ohms 500.00 Ω 500 Ω 499.65 500.35
34 Ohms 5.0000 kΩ 5 kΩ 4.9973 5.0027
35 Ohms 50.000 kΩ 50 kΩ 49.973 50.027
36 Ohms 500.00 kΩ 500 kΩ 499.73 500.27
37 Ohms 5.0000 MΩ 5 MΩ 4.9921 5.0079
38 Ohms 30.000 MΩ 30 MΩ 29.696 30.304
39 Ohms 500.0 100 MΩ 89.8 110.2
Remove 2 Wire Comp
40 nS 50.00 nS open -0.10 +0.10
41 nS 50.00 nS 100 MΩ 9.80 10.20
Remove Test Leads from UUT
42 Capacitance 1.100 nF open <0.070
43 Capacitance 110.0 nF 0.1 uF 98.5 101.5
44 Capacitance 11.00 uF 5 uF 4.90 5.10
45 Diode Test 3.1000 V 1 kΩ 0.9000 1.1000
2
Upper
Limit
46 AC mA 50.000 mA 2.5 mA 1 kHz 2.461 2.539
47 AC mA 500.00 mA 329 mA 10 kHz 323.96 334.04
48 AC uA 500.00 uA 500 uA 1 kHz 496.05 503.95
1. Do not rely on autoranging for all tests. Some test steps will require manual ranging.
2. Must allow for source and meter settling before recording reading.
3. Wait at least 60 seconds for source and meter to sett l e bef ore recording reading.
4. Using Relative Mode (REL) to z ero residual reading (apply 0 Ω and allow UUT to settle for 45 seconds before
pushing REL).
19

187/189
Calibration Manual
Step Function Range
49 AC uA 5000.0 uA 1.5 mA 1 kHz 1488.2 1511.8
50 DC mA 50.000 mA 0 A -0.010 0.010
51 DC mA 50.000 mA 50 mA 49.915 50.085
52 DC mA 50.000 mA -50 mA -49.915 -50.085
53 DC mA 500.00 mA -329.00 mA -328.49 -329.51
54 DC uA 500.00 uA 500 uA 498.55 501.45
55 DC uA -500.00 uA -500 uA -498.55 -501.45
56 DC uA 5000 uA -5 mA -4987.3 -5012.7
57 DC uA 500.00 uA 0 A -0.2 0.2
58 AC A 5.0000 A 250 mA 1 kHz 0.2442 0.2558
Table 4. Performance Test Steps (cont.)
1
Input Level
Frequency or
Model
Lower
Limit
Display
2
Upper
Limit
59 AC A 5.0000 A 250 mA 20 kHz 0.2310 0.2690
60 DC A 5.0000 A 0 A -0.0010 0.0010
61 DC A 5.0000 A 5 A 4.9740 5.0260
62 DC A -5.0000 A -5 A -4.9740 -5.0260
63 DC A 10.000 A -6 A -5.968 -6.032
64 AC A 10.000 A 6 A 1 kHz 5.905 6.095
1. Do not rely on autoranging for all tests. Some test steps will require manual ranging.
2. Must allow for source and meter settling before recording reading.
3. Wait at least 60 seconds for source and meter to sett l e bef ore recording reading.
4. Using Relative Mode (REL) to z ero residual reading (apply 0 Ω and allow UUT to settle for 45 seconds before
pushing REL).
20

Calibration
Calibrate the Meter once a year to ensure that it performs to specifications.
Before you begin the calibration procedure, locate the recessed calibration button on the
back of the Meter, underneath the accessory mount. It is inside a small opening covered
by a seal. Carefully puncture the seal with a calibration tool to access the calibration
button. See Figure 5.
True RMS Multimeter
Calibration
Keypad Interface
To start the calibration procedure, turn the rotary switch to the DC mV position, then
press and hold the recessed calibration button on the back of the Meter for one second.
This places the Meter in calibration mode as shown on the display in Figure 6. The unit
will remain in the calibration mode until the rotary switch is moved to the
Calibration Button
aau04f.eps
Figure 5. Locating Recessed Calibration Button
OFF position.
21

187/189
Calibration Manual
Function indicator
UP button
moves to the
next step
Calibration step number Input signal required Calibration mode indicator
Figure 6. Calibration Display
Autoranging
is disabled
for calibration
aau01f.eps
General Procedure
A sequence of signal inputs is required for each function that must be calibrated. The
secondary display shows the required input next to the step number for that function.
The primary display shows the value being measured. The measurement is likely to be
slightly different from the applied signal, because it may be showing an uncalibrated
measurement. The general calibration procedure is as follows:
1. Move the rotary switch to the function that you are calibrating.
2. Apply the input signal indicated by the secondary display.
3. Wait for the measurement on the primary display to settle out to its final value.
4. Press the
5. Repeat steps 2 through 4 until the secondary display shows
the calibration procedure for this function is complete. New constants will not be
recorded until secondary display shows
6. If there are more functions to be calibrated, move the rotary switch to the appropriate
function, and continue from step one. Otherwise, turn the rotary switch to the
position to exit calibration.
DC mV calibration affects the calibration of ALL functions and AC mV
will affect all AC functions.
If the accuracy of the calibration source is more than approximately
15 % from the nominal value required for the cal point, then the factory
default cal constants will automatically be used instead of source value.
In this case, the Meter may not pass the verification test and may
require re-calibration.
UP button to proceed to the next step. The Meter records a new constant.
End. This indicates that
End.
OFF
Note
22

Special Requirements
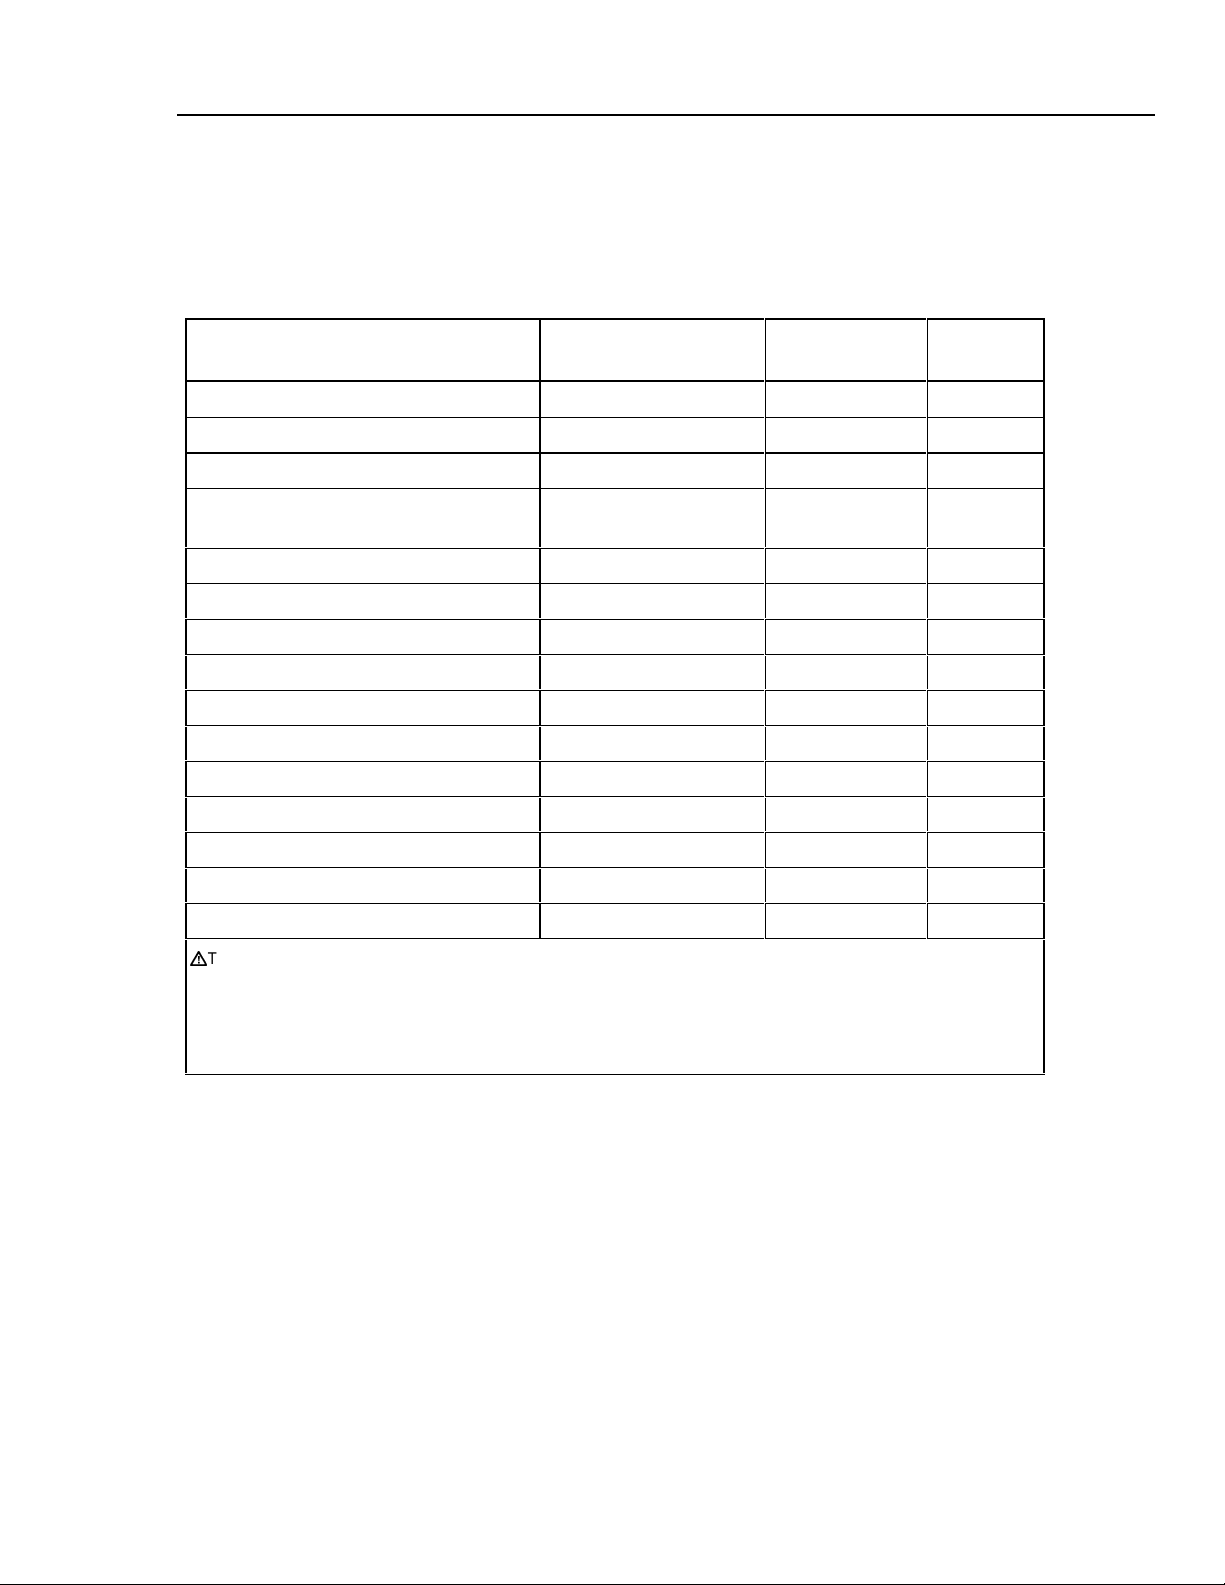
DC mV calibration will affect the calibration of all other functions. Therefore, the DC
mV function must be calibrated before calibrating any other function. Similarly, AC mV
must be calibrated before any AC function, but after DC mV. The remaining functions
may be calibrated in any order.
Temperature calibration need only be performed if one of the following components are
replaced during the course of repair: U4 A/D chip, U10 EEPROM, or U100 Reference
Junction Sensor. Temperature is calibrated by making an external temperature
measurement and entering the result into the instrument for calculation of the calibration
constant. The calibration constant is then stored in calibration memory. This is done
using the serial interface. See “Temperature Calibration” section.
When you replace the U10 EEPROM, you must also re-enter the serial number and
model number for the Meter. See “Reprogramming Meter Serial Number and Model
Number” section.
Calibration Inputs
Table 5 lists the input values required for each calibration step.
The column indicating time to settle does not include calibrator settling
time.
True RMS Multimeter
Calibration
Note
Table 5. Calibration Inputs
Step Value Frequency Time to Settle (In Seconds)
DC mV
10 mV DC 16
2 50 mV DC 16
3 300 mV DC 7
4 500 mV DC 7
5 3000 mV DC 1
Temperature
10 1
AC mV
1 700 mV 700 Hz 7
2 400 mV 700 Hz 7
3 100 mV 700 Hz 7
4 50 mV 700 Hz 7
5 3000 mV 700 Hz 7
1. Use 5520A 2-Wire Comp.
2. Zero ohms must use the sam e calibrator and test leads as al l ot her ohm cal points.
Do not bypass the calibrator with a s horting bar for the zero ohms step.
3. Because of capacitive c oupling, readings will be affected by movement of t he leads or
operator. Put fingers on UP but ton and wait for display reading to s ettle before pushing.
23

187/189
Calibration Manual
Table 5. Calibration Inputs (cont.)
Step Value Frequency Time to Settle (In Seconds)
AC V
1 5 V 700 Hz 7
2 50 V 700 Hz 7
3 500 V 700 Hz 7
4 500 V 700 Hz 7
DC V
15V DC 7
2 50 V DC 7
3 500 V DC 7
4 500 V DC 7
1
Ohms
120 Ohms 16
Ohms
AC uA
DC uA
AC mA
DC mA
2 500 Ohms 16
35k Ohms 7
4 50k Ohms 7
5 500k Ohms 7
6 5M Ohms 7
7 30M ohms 1
3
3
1 500 uA 700 Hz 7
2 5000 uA 700 Hz 7
1 500 uA DC 16
2 5000 uA DC 7
1 50 mA 700 Hz 7
2 400 mA 700 Hz 7
24
1 50 mA DC 16
2 400 mA DC 7
1. Use 5520A 2-Wire Comp.
2. Zero volts and ohms must use the same calibrator and tes t l eads as all other volt and ohm c al
points.
Do not bypass the calibrator with a s horting bar for the zero volts or ohm s step.
3. Because of capacitive c oupling, readings will be affected by movement of t he leads or
operator. Put fingers on UP but ton and wait for display reading to s ettle before pushing.

Step Value Frequency Time to Settle (In Seconds)
AC A
DC A
1. Use 5520A 2-Wire Comp.
2. Zero volts and ohms must use the same calibrator and tes t l eads as all other volt and ohm c al
points.
Do not bypass the calibrator with a s horting bar for the zero volt or ohm s t ep.
3. Because of capacitive c oupling, readings will be affected by movement of t he leads or
operator. Put fingers on UP but ton and wait for display reading to s ettle before pushing.
Remote Interface
You can perform semi-automated calibration with the remote interface using MET/CAL
software.
True RMS Multimeter
Calibration
Table 5. Calibration Inputs (cont.)
1 5 A 700 Hz 7
2 5 A 700 Hz 7
15 A DC 16
25 A DC 7
Temperature Calibration
Required equipment:
• Fluke 87/89-IV, 187/189 Service Software, Fluke P/N 676152
• Infrared Serial Cable Kit, Fluke P/N 1590638
• IBM compatible PC
• Fluke 80T-150U with accuracy certified to +0.2 °C
• Fluke 8060A Digital Multimeter
The following procedure is only required if the Meter has been repaired by
replacing one of the following components: A/D, U4, Reference Junction
Sensor, U100 or EEPROM, U10.
Setup
Prior to beginning the procedure, turn the rotary switch OFF. Let the Meter stabilize in a
constant ambient temperature for 30 minutes. This allows the internal reference junction
sensor and input terminals to stabilize to the same temperature.
Connect the IR Serial Cable to the serial com port of the PC. Install the 87/89-IV,
187/189 Service Software.
Note
25

187/189
Calibration Manual
Procedure
While the rotary switch is in the OFF position, insert the certified 80T-150 probe into the
Meter’s
makes firm contact with the bottom of the terminal. Measure and record the
COM terminal (same temperature as reference junction). Make sure the probe tip
COM
terminal temperature in units of 1/100 °C. Do not convert this number to Fahrenheit,
even if the Meter is using the Fahrenheit scale for its display output.
Turn the rotary switch to the temperature position. It does not matter whether the Meter
is in calibration mode. On the Service Software menu screen, click
Enter the measured temperature value in the text box and click
C Ref. Junction
°
OK. This sends the
.
recorded reference junction temperature to the Meter through the IR Serial Cable.
Although the temperature calibration is not yet complete, it is safe at this point to turn
the Meter off if the need arises. Doing so will not invalidate the previous steps.
To complete the temperature calibration, the DC mV function must be calibrated.
After DC mV calibration is complete:
1. Turn the rotary switch to the temperature position. Put the Meter in calibration mode
by pressing the recessed button on the back of the Meter.
The secondary display, which normally shows the required input, displays zero. In
this case, no input is required.
2. Press the
UP button.
This sends the calculated temperature constants to EEPROM, and completes the
temperature calibration.
3. Continue calibrating the other functions, or turn the rotary switch to the
position to exit calibration.
Re-Programming Serial Number or Model Number
When the U10 EEPROM is replaced, you must also reenter the serial number and model
number for the Meter. Do this as follows:
1. Connect the IR Serial Cable to the serial com port of the PC. Install 87/89-IV,
187/189 Service Software (Fluke P/N 676152).
2. Turn the Meter rotary switch to any function.
3. On the Service Software menu screen, click
EEPROM. Enter the serial number from
the back of the Meter in the text box and click
Yes or No in the model menu box.
OFF
OK. To enter the model number, click
26
Parts and Accessories
Replacement parts and accessories are listed in Table 6 and identified in Figure 7 by the
reference designator.
Table 6. Replacement Parts and Accessories
Reference
Description
Access Door, Battery / Fuse MP14 1589387 1
Tilt-Stand MP8 659026 1
Accessory Mount MP9 658424 1
Designators Part Number Qty
True RMS Multimeter
Parts and Accessories
WFuse, 0.44 A (44/100 A, 440 mA),
F1 943121 1
1000 V, FAST
WFuse, 11 A,1000 V FAST F2 803293 1
Battery, 1.5 V, 0-15 mA, AA Alkaline H8, H9, H10, H11 376756 4
Fasteners, Battery / Fuse Access Door H12, H13 948609 2
Screws, Phillip-Head H4, H5, H6, H7 832246 4
AC70A Alligator Clip (Black) MP38 738047 1
AC70A Alligator Clip (Red) MP39 738120 1
TL71 Right-Angle Test Lead Set MP34 802980 1
LCD 4.5 Digit Multiplexed DS1 688181 1
Connector, Elastomeric, LCD to PWB
Getting Started Manual (TM1-TM5) See Note Below
1
MP30, MP31 690883 2
2
5
CD-ROM (Contains Users Manual) (TM6) 1576992 1
W
To ensure safety, use ex act replacement only.
1. Order replacement connectors separately when ordering a replacement LCD.
2. Getting Started Manual P Ns: English=1547486; French, German, Italian, Dutch=1555282; Dani sh, Finnish,
Norwegian, Swedish=1555307; French, Spani sh, Portuguese=1555294; Simpli fied Chinese, Traditional Chinese,
Korean, Japanese,Thai=1555318
27

187/189
Calibration Manual
MP31
DS1
MP38
MP30
MP39
F1
F2
H5
H4
H7
28
MP34
MP9
H6
H8,9,10,11
MP14
H13
H12
MP8
Figure 7. Replacement Parts and Accessories
aau03f.eps
 Loading...