

Page 1

Original
Manual X-Smart
®
www.fluidman.com
V 1.2
www.fast-fluid.com
Page 2

© Fast & Fluid Management B.V.
This manual or parts thereof may not be reproduced, stored in a retrieval system, or transmitted, in any form or by any means,
electronic, mechanical, photocopying, recording, nor otherwise, without the prior written permission of Fast & Fluid
Management B.V.
This manual could contain technical inaccuracies or typographical errors.
Fast & Fluid Management B.V. reserves the right to revise this manual from time to time in the contents thereof without the
obligation of Fast & Fluid Management B.V. to notify any person of such revision or change.
Details and values given in this manual are average values and have been compiled with care. They are not binding, however,
and Fast & Fluid Management B.V. disclaims any liability for damage or detriments suffered as a result of reliance on the
information given herein or the use of products, processes or equipment to which this manual refers. No warranty is made that
the use of the information or of the products, processes or equipment to which this manual refers will not infringe any third
party’s patents or rights. The information given does not release the user from making their own experiments and tests.
2
Page 3

Table of Contents
Table of Contents
1 About this manual.........................................................................................................5
1.1 How to work with the manual............................................................................................5
1.2 Record of changes............................................................................................................5
2 Safety .............................................................................................................................7
2.1 Intended use .....................................................................................................................7
2.2 Liability..............................................................................................................................7
2.3 User qualification for installation .......................................................................................7
2.4 Certifications .....................................................................................................................8
2.5 Safety symbols on the machine........................................................................................8
2.6 Safety symbols in the manual...........................................................................................9
2.7 Disposal of the machine ...................................................................................................9
3 Operator manual .........................................................................................................11
3.1 Description......................................................................................................................11
3.1.1 Overview of the machine ....................................................................................11
3.1.2 Overview of the available optional parts.............................................................12
3.1.3 Type plate: details...............................................................................................13
3.2 Operation ........................................................................................................................13
3.2.1 General dispensing procedure............................................................................13
3.2.2 Placing a can ......................................................................................................14
3.2.3 Using the emergency stop switch.......................................................................14
3.3 Maintenance ...................................................................................................................15
3.3.1 X-Smart Maintenance Kit....................................................................................15
3.3.2 General cleaning: daily .......................................................................................15
3.3.3 Cleaning the brush unit: daily .............................................................................16
3.3.4 Cleaning the nozzles: daily.................................................................................17
3.3.5 Refilling a canister ..............................................................................................18
4 Installation ...................................................................................................................19
4.1 Turning on the machine ..................................................................................................19
4.2 First use ..........................................................................................................................19
4.3 Flushing the air out of the pump .....................................................................................19
5 Troubleshooting..........................................................................................................21
5.1 Contact service ...............................................................................................................21
5.2 Troubleshooting guide ....................................................................................................21
3
Page 4

Table of Contents
6 Technical data .............................................................................................................23
6.1 General specifications ....................................................................................................23
6.2 Dimensions and mass ....................................................................................................23
6.3 Ambient conditions .........................................................................................................24
6.4 Noise level ......................................................................................................................24
6.5 Safety classifications ......................................................................................................24
6.6 Electrical specifications...................................................................................................24
6.6.1 Power supply ......................................................................................................24
6.6.2 Dispenser............................................................................................................24
6.7 Electrical diagram ...........................................................................................................25
4
Page 5

About this manual X-Smart V 1.2
1 About this manual
The manual shows the information necessary to:
-install the machine
- operate the machine
- perform basic maintenance
- correct small problems.
The X-Smart and all its versions are referred to in the manual as the ’machine’.
This manual contains the original instructions. The original language of the manual is English.
Note
For the unpacking and installation procedures, refer to the separate installation
instruction sheets.
1.1 How to work with the manual
1. Familiarize yourself with the structure and content.
2. Read the safety chapter in detail and make sure you understand all the instructions. See § 2.
3. Carry out the actions completely and in the given sequence.
1.2 Record of changes
/i
Edition Editor Check Date Description
1.0 ET TB 02/2013 First edition
1.1 ET TB 06/2013 X-Smart Maintenance Kit added
1.2 ET TB 06/2014 Certification and other changes
5
Page 6

About this manual X-Smart V 1.2
6
Page 7

Safety X-Smart V 1.2
2 Safety
WARNING
Read the manual before you install or use the machine. Failure to do so can result in personal
injury, death or property damage.
2.1 Intended use
The machine is designed to dispense colorants into a can. Any other use of the machine is strictly forbidden.
2.2 Liability
Our machines and accessories are fully compliant with the CE regulations. Any modification can result in not
fulfilling the CE safety requirements and is therefore not allowed. Fast & Fluid Management B.V. will not accept
any responsibility in case of modifications to machines and/or accessories.
Fast & Fluid Management B.V. is not liable if you do not follow the rules below:
- The machine is for indoors use only.
- This machine may only be used for commercial settings. The machine is not a household appliance.
- Do not use a damaged machine. When you have doubts, contact your supplier. See § 5.1.
- Install and connect the machine according to the instructions on the installation instructions sheets.
- Observe all local safety regulations.
- Place the machine in a well-lit and well-ventilated room.
- Make sure that the load capacity of the floor meets the minimal requirements. Refer to § 6.2.
- Connect the machine to a grounded wall socket.
- Do not use extension cords.
- Make sure that the machine is installed as prescribed in the installation instruction sheets.
- Keep the machine in good condition. Make sure that defective parts are immediately replaced.
- Replace parts only with original Fast & Fluid Management B.V. spare parts.
WARNING
Do not place objects on top of the machine.
All maintenance beyond the scope of this manual must be carried out by a qualified service technician that Fast
& Fluid Management B.V. has trained and certified.
2.3 User qualification for installation
Only install the machine if you have written permission from the supplier of the machine.
7
Page 8

Safety X-Smart V 1.2
2.4 Certifications
For some markets machines need a certification to proove the machine complies with the essential requirements
concerning safety. The directives that have been taken into consideration in the design are available on the
website.
If applicable to your market, the machine contains the logo of the certification either as a seperate sticker or on
the type plate.
/i
Logo Certification Website
CE www.fast-fluid.com
ETL (includes specific UL and CSA directives) www.fluidman.com
2.5 Safety symbols on the machine
/i
Moving parts hazard Pinch hazard
Warning Read the manual
Safety instructions
8
Page 9

Safety X-Smart V 1.2
2.6 Safety symbols in the manual
/i
WARNIN G
Can cause personal injury.
CAUTION
Can cause damage to the machine.
2.7 Disposal of the machine
1. Sort the machine, the accessories and the packaging for
environmentally friendly recycling.
2. Do not dispose of the machine into domestic waste. Dispose
of the machine according to local regulations.
3. Dispose of the canisters as chemical waste, according to the
local regulations.
Note
Shows further information.
9
Page 10

Safety X-Smart V 1.2
10
Page 11
Operator manual X-Smart V 1.2
FG
B
C
D
I
H
J
E
K
A
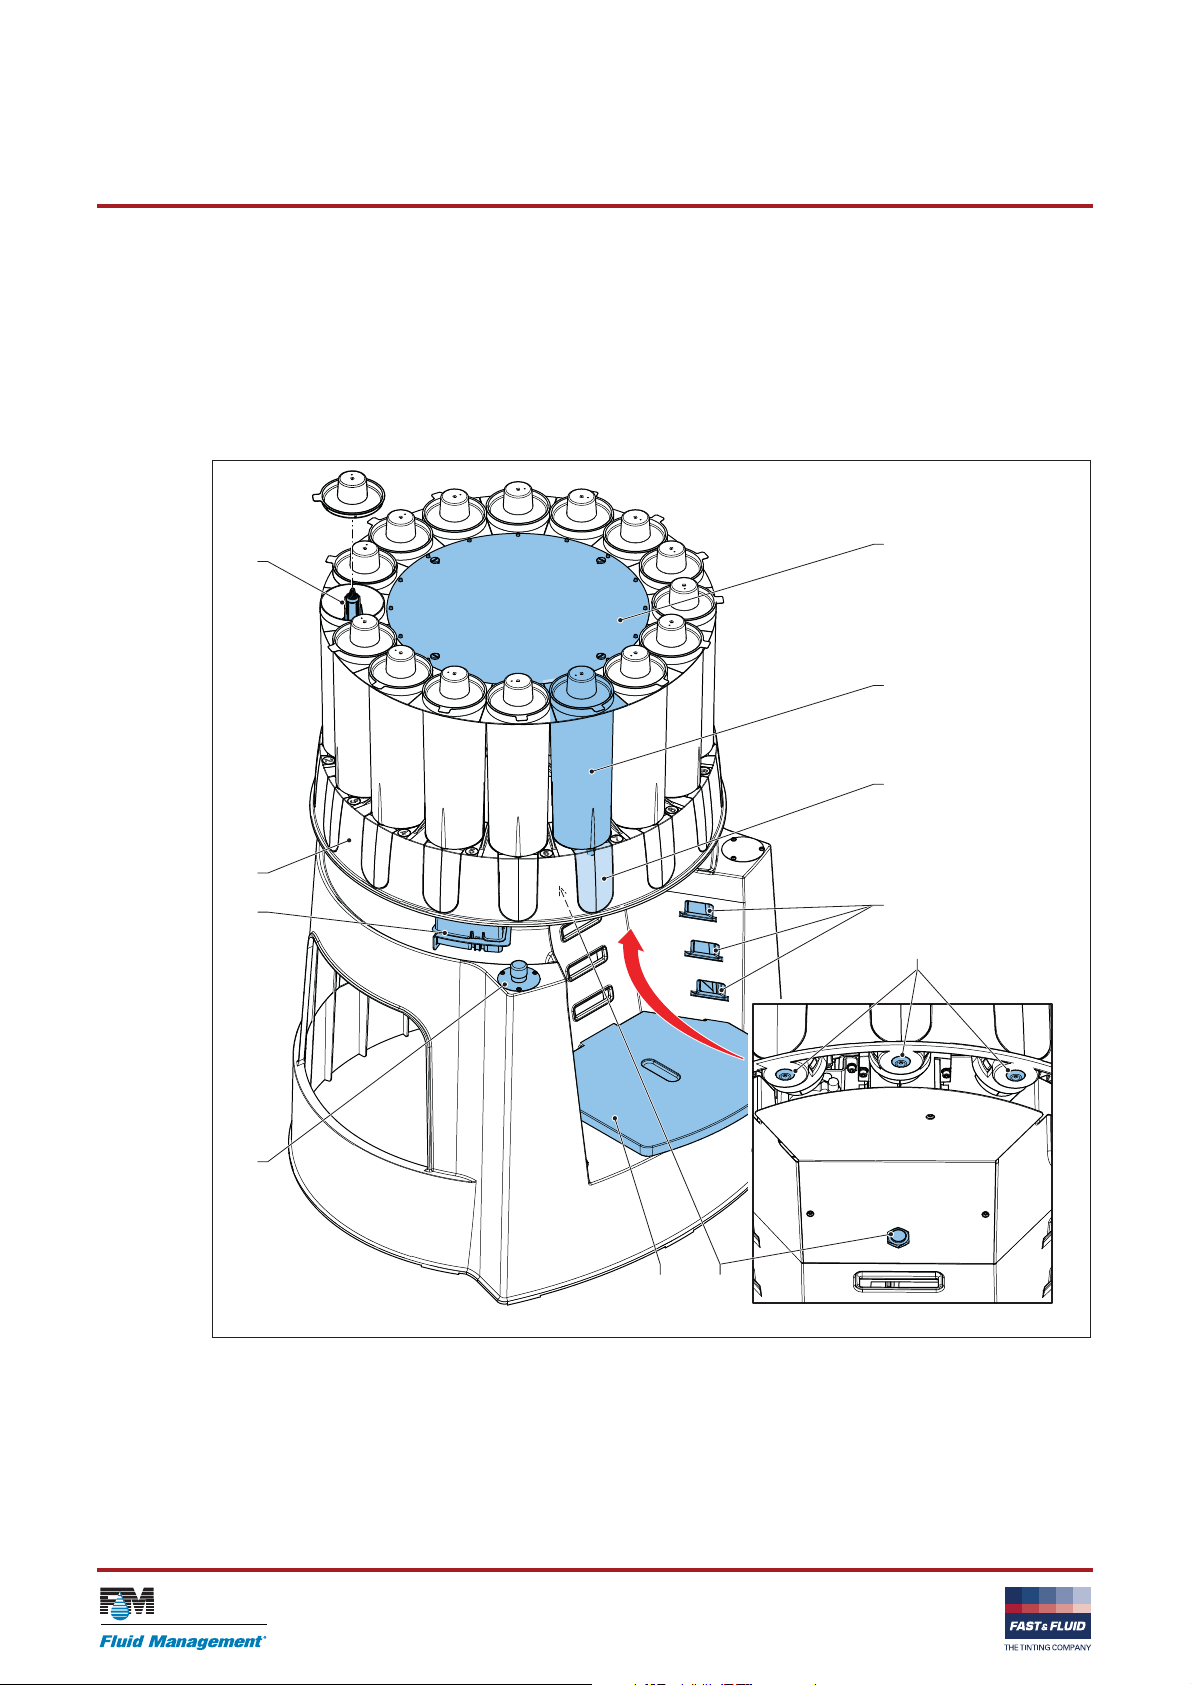
3 Operator manual
3.1 Description
3.1.1 Overview of the machine
A: Top cover
B: Canister
C: Pump
D: Slot (for the can table)
E: Nozzle
F: Can sensor
G: Can table
H: Emergency stop switch
I: Brush unit
J: Turntable
K: Agitator (part of the stirring mechanism)
11
Page 12

Operator manual X-Smart V 1.2
3.1.2 Overview of the available optional parts
A: Monitor Keyboard arm
B: Wrap
A
B
12
Page 13

Operator manual X-Smart V 1.2
www.xxxxxx.com
24VDC 75W
Model X-Smart
Serial no.
Prod.week
Mass xx kg
Made in xxxxx
XXXX
Patented f amilies Des ign ©
xxxxx-xx-xxxxxxxx
xx-xxxx
3.1.3 Type plate: details
3.2 Operation
WARNING
Do not place objects on top of the machine.
CAUTION
Do not remove the power from the machine. See § 4.1. The machine must stir the colorants
periodically.
3.2.1 General dispensing procedure
For all the dispense software instructions: see the dispense
software documentation.
1. Place the can table in the correct slots for the correct height.
See § 3.2.2.
2. Place the can. See § 3.2.2.
3. Choose the recipe and dispense. See the dispense software
documentation.
4. Remove the can.
13
Page 14

Operator manual X-Smart V 1.2
D
E
C
B
A
3.2.2 Placing a can
1. Check the height of the can.
Note
The correct height of the can table depends
on the height of the can.
2. Place the can table (A) in the correct slots for the correct
height.
CAUTION
Make sure that the can table is secure.
3. Place the can (B) at the center of the mark (C) on the can
table.
CAUTION
Make sure that the can does not touch the
turntable (E). Keep enough free space.
Note
Make sure that the can sensor (D) is able to
detect the can.
3.2.3 Using the emergency stop switch
1. Push the emergency stop switch (A). The machine stops
immediately.
CAUTION
Only push the emergency stop switch in the
case of a safety emergency. Do not use the
emergency stop switch as an on/off function!
2. Solve the problem as quickly as possible.
CAUTION
When the machine is shut down, the stirring
mechanism, which is necessary to keep the
colorant in optimal condition, is also shut
down.
3. Reset the emergency stop switch by turning the emergency
stop switch. The machine restarts automatically.
1
A
2
Note
After the reset, the machine is operational
when you hear two 'beeps'.
14
Page 15
Operator manual X-Smart V 1.2
EDCBA
3.3 Maintenance
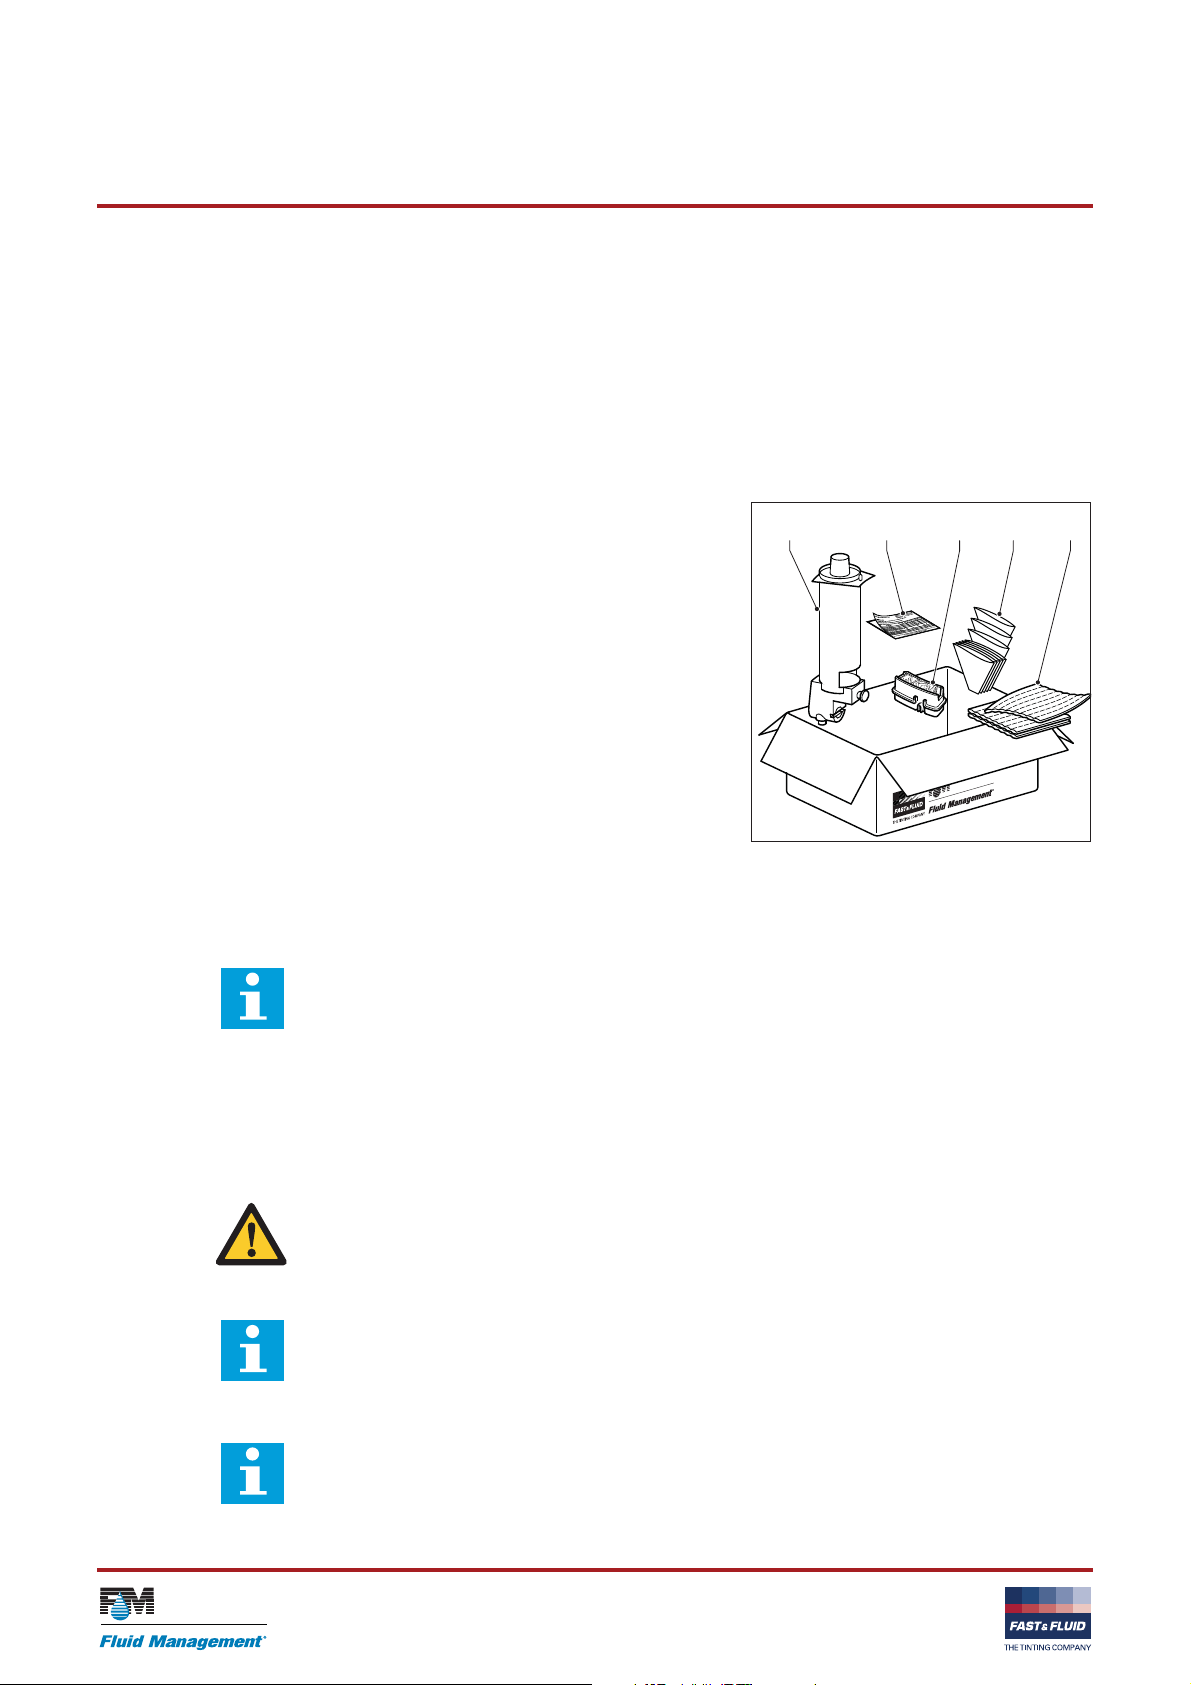
3.3.1 X-Smart Maintenance Kit
To keep your X-Smart in optimal condition, we highly recommend you to use the X-Smart Maintenance Kit. The
X-Smart Maintenance Kit contains everything you need to keep your machine in optimal condition for the period
of 1 year.
A: Replacement canister with pump (1x)
B: X-Smart schedule sticker (1x)
C: Replacement brush unit (3x)
D: Paper funnel (200x)
E: X-Smart cleaning cloth (3x)
- The replacement canister with pump (A) should be used as a
spare part and can be used whenever one of the canisters
needs to be replaced.
- The X-Smart schedule sticker (B) gives you a clear overview of
the maintenance tasks and a reminder to keep your machine in
optimal condition.
- Replace the brush unit (C) every 4 months for optimal
performance.
- Use the X-Smart paper funnels (D) for the clean filling and
refilling of the canisters.
- Use the X-Smart cleaning cloth (E) with a non-organic cleaning liquid to clean the machine and the nozzles.
Note
The X-Smart Maintenance Kit is available through
your machine supplier.
3.3.2 General cleaning: daily
1. Clean the machine with a damp X-Smart cleaning cloth and
remove all spilled colorant or other fluids.
CAUTION
Do not use cleaning agents based on organic
solvents to clean plastic parts of the machine.
Note
Remove spilled colorant and other fluids as
soon as possible.
Note
Do not drain spilled colorant or other fluids in
the sink. Observe the local regulations.
15
Page 16
Operator manual X-Smart V 1.2
A
B
C
D
E
E
2. When the brush is too dirty and does not clean the nozzle of
the canister, rinse and clean the brush. See § 3.3.3.
3. When the nozzles are too dirty, clean the nozzles individually
with a damp cloth. See § 3.3.4.
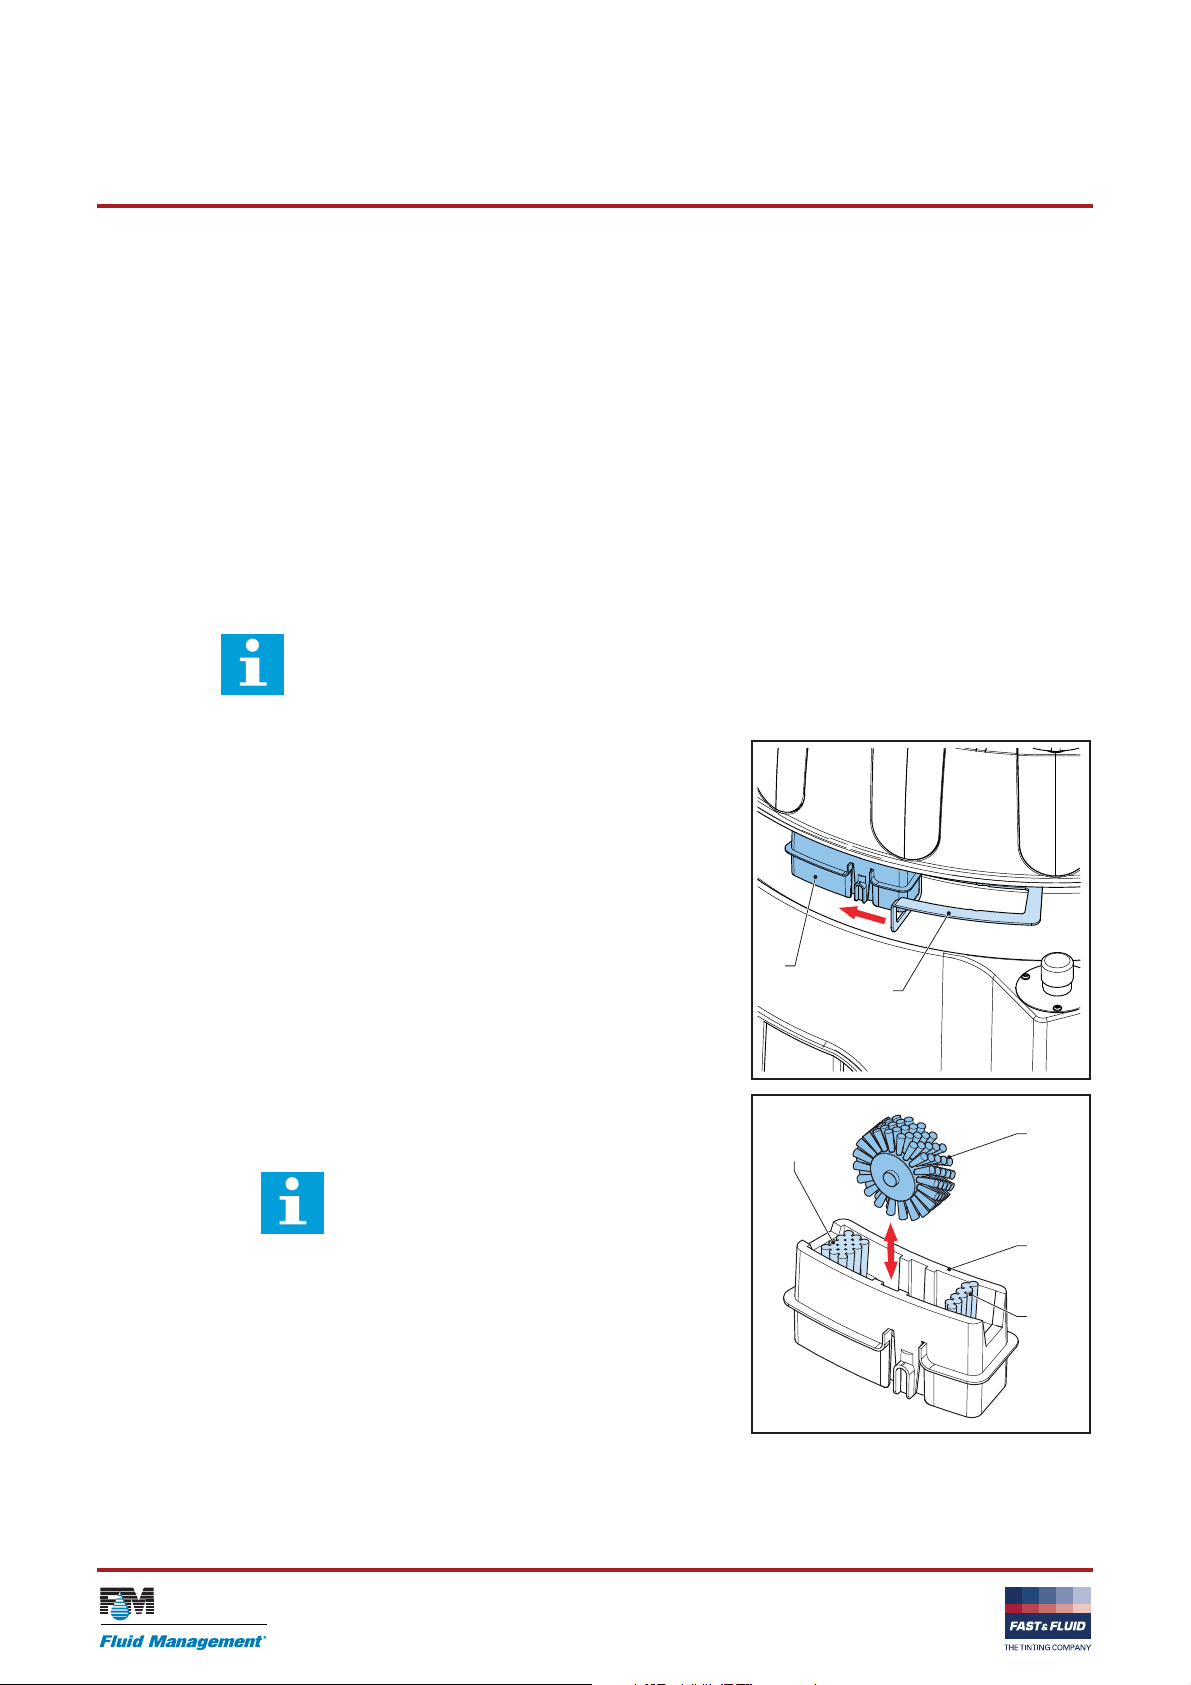
3.3.3 Cleaning the brush unit: daily
The brush unit removes the excess colorant from the nozzles.
The brush unit consists of a brush container and a removable
brush that rotates. The brush unit is installed in a bracket with a
click connection.
It is advised to replace the brush unit every 4 months to ensure
optimal performance. Replacement brush units are provided in
the X-Smart Maintenance Kit.
Note
If you do not clean these items daily, mistinting
might occur.
1. Slide the brush unit (A) out of the bracket (B).
2. Remove the rotary brush (C) from the brush container (D).
3. Remove the fluids from the brush container.
Note
For the disposal of the fluids, follow the local
regulations.
4. Rinse and clean the static brushes (E).
5. Rinse and clean the rotary brush.
6. Place the rotary brush back in the brush container.
16
Page 17
Operator manual X-Smart V 1.2
A
B
A
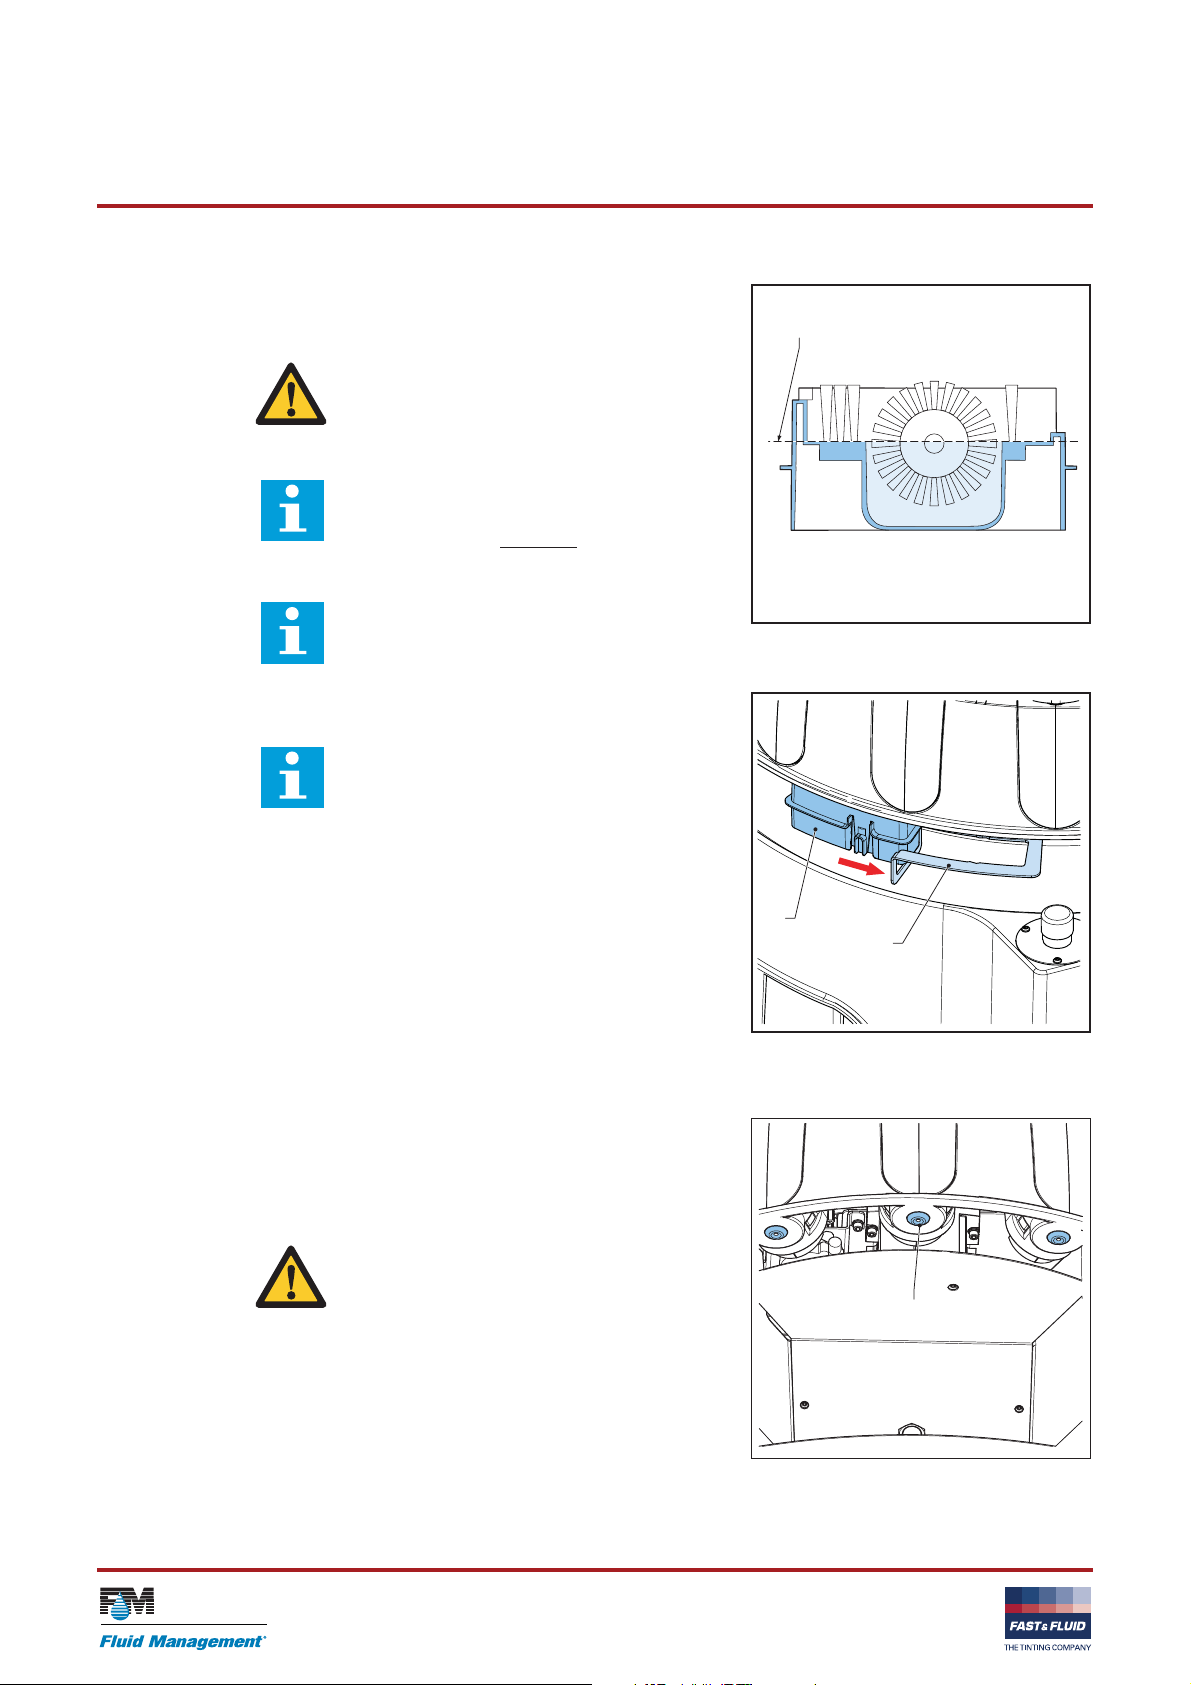
7. Fill the brush container with fluid. This fluid must be a waterbased cleaning agent.
F
WARNING
Do not put flammable liquids in the brush
container.
Note
Do not exceed the maximum
Note
The optimum fluid level depends on the type
of colorant that is used.
8. Slide the brush unit (A) back in the bracket (B).
filling height (F).
Note
The brush unit is properly connected to the
bracket when you feel a snap-fit. Make sure
you hear the click sound.
3.3.4 Cleaning the nozzles: daily
1. Examine the nozzle (A) for contamination.
2. If necessary, clean the nozzle. Use the X-Smart cleaning
cloth, as provided in the X-Smart Maintenance Kit, with a nonorganic cleaning liquid.
WARNING
Do not clean the nozzles when the turntable
moves.
17
Page 18
Operator manual X-Smart V 1.2
A
C
B
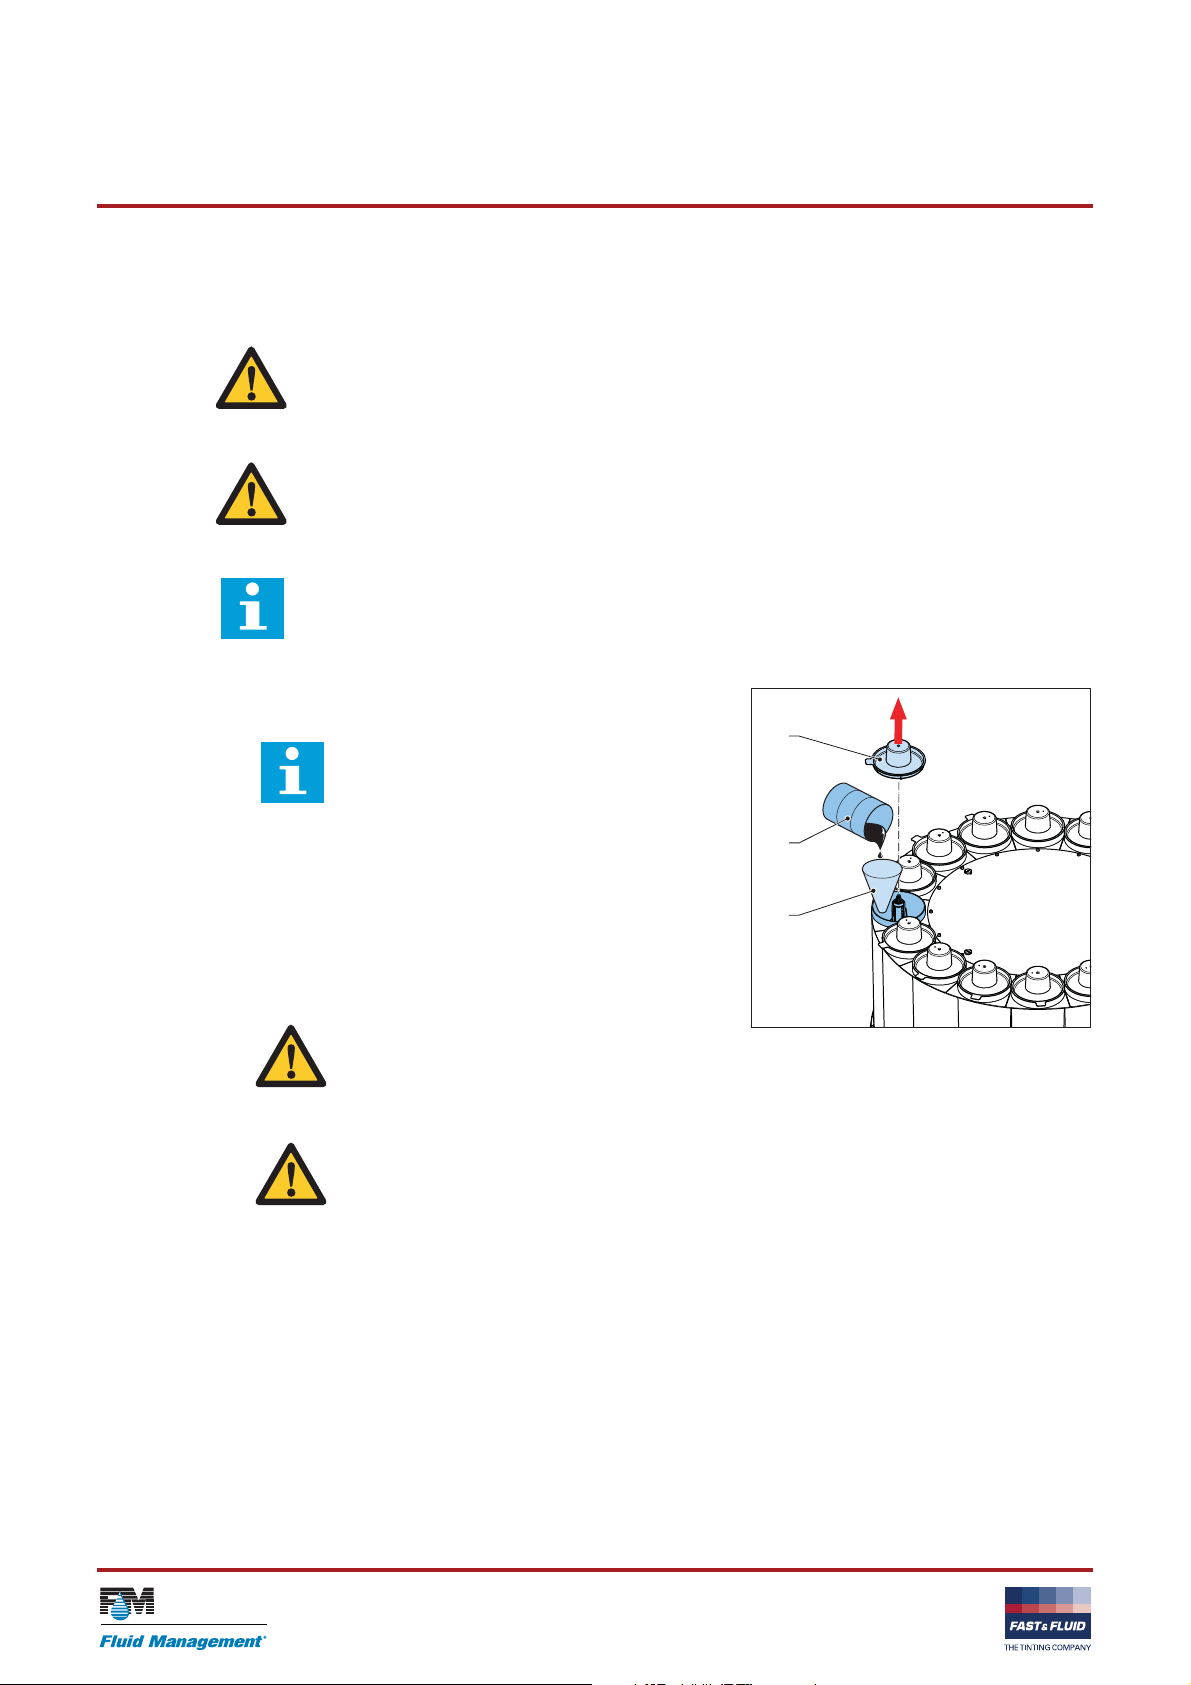
3.3.5 Refilling a canister
WARNING
Check the material safety data sheet (MSDS) of the colorants for the personal protection measures
that are required for handling the colorant.
CAUTION
Make sure that the colorant level in the canister is correct. If a canister is empty, it can cause an
inaccurate dispensing and/or a recipe fault.
Note
The dispense software checks the level of colorant in each canister. The dispense software shows
when you need to refill a canister.
1. In the dispense software, start the fill canister command.
Note
The fill canister command of the dispense
software controls the motor of the turntable.
The turntable turns the empty canister to the
front.
2. Remove the lid (A) from the canister.
3. Follow the instructions on the display.
4. Add the correct colorant (B). Do not spill. Use an X-Smart
paper funnel (C), which is provided in the X-Smart
Maintenance Kit.
CAUTION
Do not fill the canister to the brim. Leave at
least 2.5 cm (1 inch) unfilled.
CAUTION
Do not pour the colorant on the agitator.
5. Place the lid back on the canister.
18
Page 19

Installation X-Smart V 1.2
4 Installation
Note
For the unpacking and installation procedures,
refer to the separate installation instruction sheets.
4.1 Turning on the machine
1. Connect the power cable to the wall socket. When the
machine is operational, you hear two ’beeps’.
2. Make sure that the emergency stop switch is released.
3. Set the computer switch to ‘ON’.
4. Run the dispense software.
4.2 First use
1. Fill and place the brush unit. See § 3.3.3.
2. Fill the canisters correctly. See § 3.3.5.
3. Flush all air out of the pumps. See § 4.3.
4.3 Flushing the air out of the pump
Note
Before the first use it is important that all air is
removed from all individual pumps.
1. Flush the air out of the pump:
- Use the air flushing command in the dispense software.
- If the dispense software does have an air flushing
command option or is not able to flush the air out of the
pump automatically, dispense 120 ml / 3 oz. Repeat the
action until all air is out of the pump.
19
Page 20

Installation X-Smart V 1.2
20
Page 21

Troubleshooting X-Smart V 1.2
5 Troubleshooting
Note
For all error messages on the computer: see the
help topic in the dispense software.
5.1 Contact service
1. Find the type plate on the plate next to the emergency stop
switch. See § 3.1.3.
2. Take a note of the model number and the serial number of the
machine.
3. Contact your supplier or manufacturer.
See www.fast-fluid.com
Asia) or www.fluidman.com
(Fast & Fluid Management Europe and
(Fluid management, U.S.A.).
5.2 Troubleshooting guide
Problem Possible cause Possible solution
Main power supply is
present but the machine
does not work.
The machine has a failure
and does not respond
correctly to the request from
the dispense software.
The emergency stop switch is
active.
The failure could be mechanically
or electronically.
Reset the emergency stop switch.
See § 3.2.3.
Push the emergency stop switch to reset
the machine. Reset the emergency stop
switch. See § 3.2.3.
If the machine still has a failure, contact
service. See § 5.1.
21
Page 22

Troubleshooting X-Smart V 1.2
22
Page 23

Technical data X-Smart V 1.2
6 Technical data
6.1 General specifications
/i
Parameter Specification
Metric standard Imperial standard
Model X-Smart
Number of canisters 16
Dispensing Sequential
Pump type Piston pump
Cleaning system Rotary brush
Suitable for Water and universal colorants
Canister size 2.25 L 0.594 USgal
Resolution ± 0.005 mL/step ± 0.000169 fl oz/step
Maximum flow rate 0.25 L/min. 0.066 USgal/min.
Minimum dispensing 0.077 mL 0.0026 fl oz
Nozzle diameter 4 mm 0.517 in
6.2 Dimensions and mass
/i
Parameter Specification
Dimensions [height x width x depth] 125x83x95 cm 49.2x32.7x37.4 in
Packed dimensions [height x width x depth] 113x88x88 cm 44.5x34.6x34.6 in
Mass incl. packaging 65 kg 143.3 lbs
Mass filled machine (max.) 140 kg 308.6 lbs
Minimum requirement of load capacity of the floor
according to EN 61010-1:2010
Metric standard Imperial standard
560 kg 1234.6 lbs
Filling height of the canister 120 cm 47.2 in
Maximum can height 48 cm 18.9 in
Minimum can height 7 cm 2.8 in
Can table dimensions [width x depth] 38x27 cm 15.0x10.6 in
23
Page 24

Technical data X-Smart V 1.2
6.3 Ambient conditions
/i
Parameter Specification
Metric standard Imperial standard
Temperature +15 to +40 °C +59 to +104 °F
Altitude above sea level, operational -10 to 2000 m -33 to 6562 ft
Altitude above sea level, out of operation -10 to 12000 m -33 to 39370 ft
Maximum Relative Humidity, without condensation 90% RH
6.4 Noise level
/i
Parameter Specification
Maximum noise level < 65 db(A)
6.5 Safety classifications
/i
Parameter Specification
IP (Ingress Protection) classification 32
EMC (ElectroMagnetic Compatibility) classification Class B
6.6 Electrical specifications
6.6.1 Power supply
/i
Parameter Specification
Maximum power consumption 85 W
Voltage 90~264 V AC
Maximum leakage current 3.5 mA
AC inlet IEC320/C14
50/60 Hz
6.6.2 Dispenser
/i
Parameter Specification
Maximum power consumption 75 W
Voltage 24 V DC
24
Page 25

Technical data X-Smart V 1.2
5
5
4
4
3
3
2
2
1
1
D D
C C
6.7 Electrical diagram
0
Sheet
2.02
Version
First production version
Emergency in powerline
Corrected emergency, is now double pole.
M12
VALVE MOTOR
Removed e-switch jumper, is dipsw.setting now.
NvB
NvB
NvB
Cable, Valve
Cable, Valve
RESETDIPSW.
24VDC
Powersu pply
BLUE
ORANGE
YELLOW
S1
MACHINE STOP
RED
BLUE
BROWN
1234
BROWN
BLACK
BLUE
Cansensor
BLUE
BROWN
(OPTION)
S3
CANSENSOR
Cansensor
XSmart
Title
FAST & FLUID
<Filename>
Date Drawn Remarks
21-1-2013
3-4-20132.01
17-4-20142.02
Filename
Revnr.
2.0
1.0 <revdate0> <drawn0>
The Netherlands
2170 AE Sassenheim
PO Box 220
Hub v. Doorneweg 31
© Fast & FLuid
Thursday, April 17, 2014
USB to PC
Cable, Agiation
Cable, Agiation
Cable, Turntable
Cable, Turntable
2
1
3
4
M1
4P-STEPPERMOTOR
M5
AGITATION MOTOR
M6
TURNTABLE MOTOR
B B
A A
25
Page 26

Manufactured by:
IDEX Fluid & Metering Pvt. Ltd.,
Survey no: 256, GIDC Manjusar, Savli,
Dist.: Vadodara 391 770, India
 Loading...