

Page 1
Part No: 30590
06.13
V-Series Mixer
| End
User
Guide
Getting
Maintenance
Trouble
Service
Started
and Care
sh
ooting
Parts
Warranty
Rev. D
Page 2

Yo u r
customers have a
vision, you want to make it
happen, and Fluid M anagement can give
you the answer. Fluid M anagement is a global
leader in dispensing and mixing equipment used i n
the paint industr y, as well as, specialized equipment for
the food and beverage, chemical, health and beaut y, and home
improvement industr ies. Located in the subur bs of Chicago, I llinois,
Fluid M anagement is a United States owned and operated company
with histor ical roots to the paint industr y dating back to 1927. I n 1996,
IDEX Cor poration purchased Fluid M anagement giving the organization the
financial wherewithal and global footpr int of a large organization while still
maintaining its deep values and histor y.
As industr y leaders, Fluid M anagement provides trend-setting creativit y in the design,
produc ts, and ser vices it offers. United with FMDirec t, our nationwide ser vice team,
we provide af ter-sales suppor t around the clock—when you need them. B eing fac to r y-
direc t employees, FMDirec t technicians are exper ts on Fluid M anagement equipment and
understand customer needs from star t to finish.
The combination of leading edge technology, excellent ser vice and suppor t, and a
company prepared for the future’s ever- changing business environment makes Fluid
M anagement an ideal par tner to assist in providing solutions to your business needs.
Thank you for putting your trust in Fluid M anagement produc ts and mak ing us par t of
your customer ’s vision.
Page 3

2 | V-Series
©2011 Fluid Management as published work all rights reserved.
Under the copyright laws, this material may not be copied, in whole or in part,
without the written consent of Fluid Management.
Your rights to the software are governed by the accompanying software license
agreement.
Use of Fluid Management trademarks, service marks, or logos for commercial
purposes without the prior written consent of Fluid Management may constitute
trademark infringement and unfair competition in violation of federal and state
laws. Fluid Management, FMDirect, ColorPro, DVX, Harbil, Blendorama, Accutinter,
Duraflow, Fast & Fluid Management, GyroFlex, GyroMixer, Infina, MicroTint, TintMaster,
V1, and VR1 are trademarks of Fluid Management, registered in the U.S. and/or other
countries.
Every effort has been made to ensure that the information in this guide is accurate.
Fluid Management is not responsible for printing or clerical errors.
Fluid Management
1023 Wheeling Road
Wheeling, Illinois 60090-5776 USA
800-462-2466
http://www.fluidman.com
Published in the United States.
Mention of third-party products is for informational purposes only and constitutes
neither an endorsement nor a recommendation. Fluid Management assumes no
responsibility with regard to the performance or use of these products.
Fluid Management Customer Service 1.800.462.2466
Page 4
Contents
V-Series | 3
O
nce your V-Series Mixer is installed,
what’s next? In this guide, you’ll find
more information to help you get
the most from your new Fluid Management
V-Series Mixer.
About This Guide
4 How to Use this Guide
4 For Your Safety
Important Safety Information
5 Information and Instruction Labels
5 Safety Notice Information
5 General Safety Information
6 Grounding
6 Danger
6 Safety and Regulatory Compliance Information
6 FCC Compliance Statement
Getting to Know Your V-Series Mixer
7 Technical Specifications
7 Environmental Conditions
7 Highlights
7 Features
8 Tips to Improve Operation
Getting Started
9 Installation
Basic Operations
11 Mixing
12 Using the Adapter
Accessories
13 V-Series Mixer Adapters
13 V-Series Mixer Stands
Maintenance, Care, and Use
14 Daily, Weekly, Monthly Maintenance
Frequently Asked Questions
15 Equipment Troubleshooting
Service
V-Series Mixer
16 FM Direct
16 Upgrades and Replacement Parts
16 Obtain Warranty Service
Parts
17 Parts
Warranty
21 Fluid Management Statement of Limited
Warranty
Index
24 A-W
Fluid Management Customer Service 1.800.462.2466
Page 5

4 | V-Series
About this Guide
Safety Precautions
• Read this guide and all
warning labels before using
the machine.
• Keep this guide in a safe
place.
• Read and adhere to all
Warning and Caution labels
on the machine.
• Prepare, level, and clear the
area where the machine will
be installed.
• To avoid risk of fire or
injury, unplug the power
before servicing electrical
components.
• DO NOT use mixer on or near
flammable or combustible
materials
fl
• DO NOT mix
materials.
• Plug into an approved
grounded outlet only. Make
sure the outlet meets all
national and local codes.
• To reduce the risk of electric
shock or injury, use indoors
only.
• This mixer contains moving
parts. Tightly seal the
container before operating.
ammable
How to Use this Guide
This guide is organized into eleven sections. Each section provides detailed
information on V-Series Mixer topics and provides a basic reference that can be used
to help you with specific issues.
Important:
information before you first use your V-Series Mixer.
This guide provides instructions for safely and easily installing your V-Series Mixer
when it arrives. This publication also includes operational instructions, daily and
preventative maintenance procedures, basic troubleshooting suggestions, adapters to
use for various can types, customer service, and warranty information.
If you are an experienced user, you may already know enough to get started. Make
sure you look over the information in Getting to Know Your V-Series Mixer to find
out about the features of this V-Series Mixer.
If you have internet access, the most current information for your V-Series Mixer is
available from the worldwide web at
Carefully read all the installation instructions and the safety
http://www.fluidman.com
For Your Safety
Customer safety is important. Our products are designed to be safe and effective.
However, mixers are electrical equipment. The V-Series Mixer is safe, fast, and
reliable—designed to bring many years of operation. There are precautions you can
take to avoid damage to the equipment or bodily injury before operating. By carefully
following the instructions in this document and the warning and maintenance labels
on the machine, you can help protect yourself from hazards and create a safer work
environment.
Equipment can become damaged due to misuse or neglect. Some product damage is
serious enough that the product should not be used again until it has been inspected
and, if necessary, repaired by a Fluid Management authorized service technician.
As with any electronic device, pay close attention to the mixer when it is turned on.
On very rare occasions, you might notice an odor or see a puff of smoke or sparks
vent from your machine, or you might hear sounds like popping, cracking or hissing.
These conditions might merely mean that an internal electronic component has
failed in a safe and controlled manner. However, it may indicate a potential safety
issue. DO NOT take risks or attempt to diagnose the situation yourself. Contact Fluid
Management at 1-800-462-2466 for assistance.
Fluid Management Customer Service 1.800.462.2466
Page 6
V-Series | 5
Important Safety Information
Information and Instruction Labels
You should become familiar with the information labels affixed to the machine, as
well as the warnings, cautions, and notes which appear throughout this guide. Read
all the warning labels on the exterior and interior of the mixer. If the labels become
damaged or unreadable, you may purchase replacements from Fluid Management
Customer Service.
Safety Notice Information
The two main notices used in this guide and on the V-Series Mixer are Warning and
Caution.
W
ARNIN
HAZARDOUS
ELECTRICAL
COMPONENTS
CAUT
POTENTIAL
SAFETY
HAZARD
IO
G
N
A Warning notice tells you about a hazard that could
cause serious injury to you or extensive damage to the
equipment. This information is featured in the beginning
of the guide to emphasize safety. When you see a
Warning notice in this guide, read it carefully before
continuing with the operation of the machine. Take all
necessary precautions to avoid potential injury.
A Caution notice tells you about a danger that could
cause injury to you or minor damage to the mixer. When
you see a Caution notice in this guide, read it carefully
and be sure you understand it before continuing.
General Safety Information
DO NOT attempt to service a product yourself unless instructed to do so by Fluid
Management Customer Service. Use only a Fluid Management Authorized Service
Technician to repair your equipment. Please note that some parts can be upgraded
or replaced by the customer. Fluid Management identifies those parts as such and
provides documentation with instructions when it is appropriate for customers to
replace those parts. You must closely follow all instructions when performing such
replacements. ALWAYS make sure that the power is turned off and the machine is
unplugged before you attempt the replacement. If
contact Fluid Management Customer Service.
you have any questions or concerns,
WARNING:
Unplug before
servicing
Use a dedicated
15 amp circuit
(US & Latin
America only)
WARNING:
DO NOT use with or
fl
near
ammables
Fluid Management Customer Service 1.800.462.2466
Page 7
6 | V-Series
Important Safety Information
Warnings
• This machine draws
6.0 Amps at 120 ± 10% VAC
3.6 Amps at 220 ± 10% VAC
• DO NOT modify the
provided plug
• Improper use of grounding
plug can result in risk of
electric shock.
Cautions
• Check with a qualified
• DO NOT use an adapter or
• This unit must be plugged
• To reduce the risk of
electrician or service
person if grounding
instructions are not
completely understood or
if in doubt as to whether
product is properly
grounded.
extension cord with this
product.
into a dedicated electrical
line.
electric shock or injury, use
indoors only.
Grounding
This product must be grounded. In the event of an electrical short circuit, grounding
reduces the risk of electrical shock by providing an escape for the electric current.
This product is equipped with a cord that has a grounding wire and an appropriate
grounding plug. The plug must be inserted into an outlet that is properly installed and
grounded in accordance with all local codes and ordi na nc es .
Danger
Improper installation of the grounding plug can result in a risk of electric shock. If
repair or replacement of the cord or plug is necessary, DO NOT connect the
grounding wire to either flat blade terminal. The insulation wire with green or green
and yellow stripes on the outer surface is the grounding wire. Check with a qualified
electrician if the grounding instructions are not completely understood or if in doubt
about whether the product is properly grounded. DO NOT modify the plug provided. If
it will not fit into the outlet, have the proper outlet installed by a qualified electrician.
Note: This product is for use on a dedicated nominal 120 Volt
(US only) or nominal 220 Volt circuit where applicable and has a
grounding plug.
Safety and Regulatory Compliance Information
See the affixed labeling on the machine. ETL Listed, conforms to UL STD 1450.
Certified to CAN/CSA STD C22.2 NO. 68.
FCC Compliance Statement
This device complies with part 15 of the FCC Rules. Operation is subject to the
following two conditions: (1) This device may not cause harmful interference, and (2)
this device must accept any interference received, including interference that may
cause undesired operation.
Fluid Management Customer Service 1.800.462.2466
Page 8

V-Series | 7
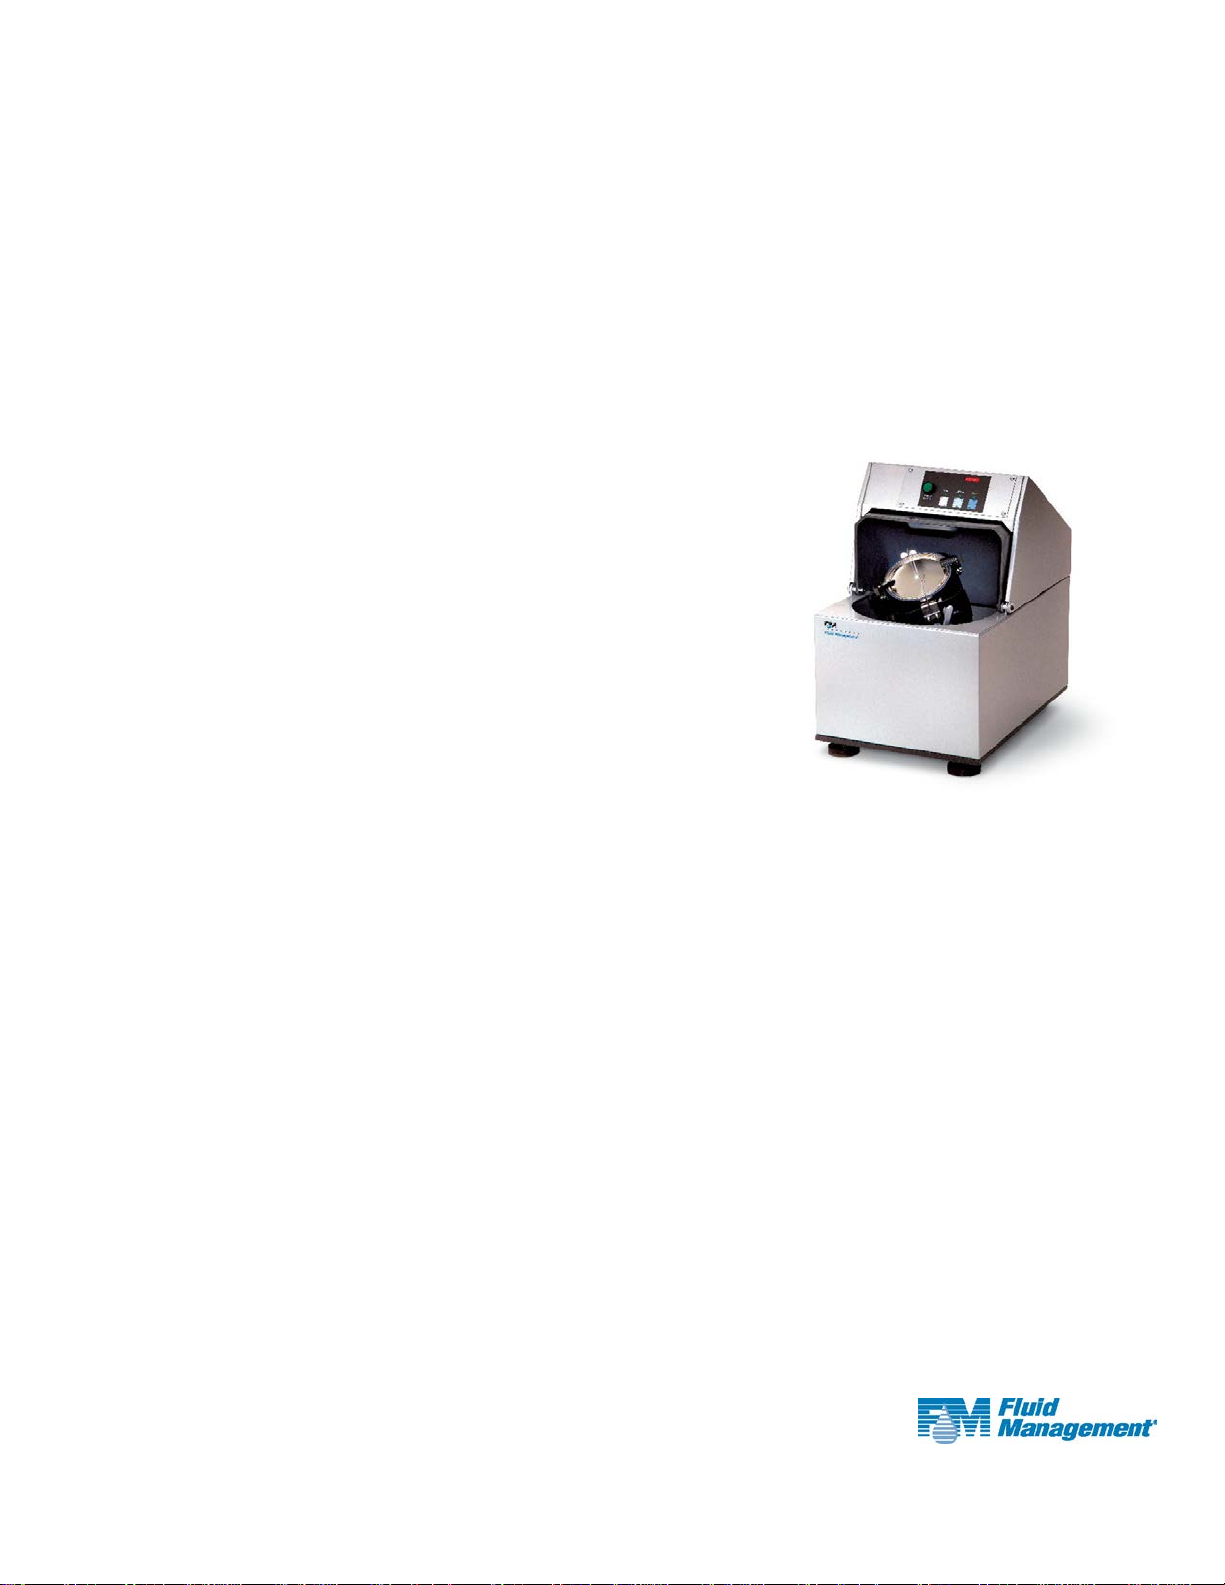
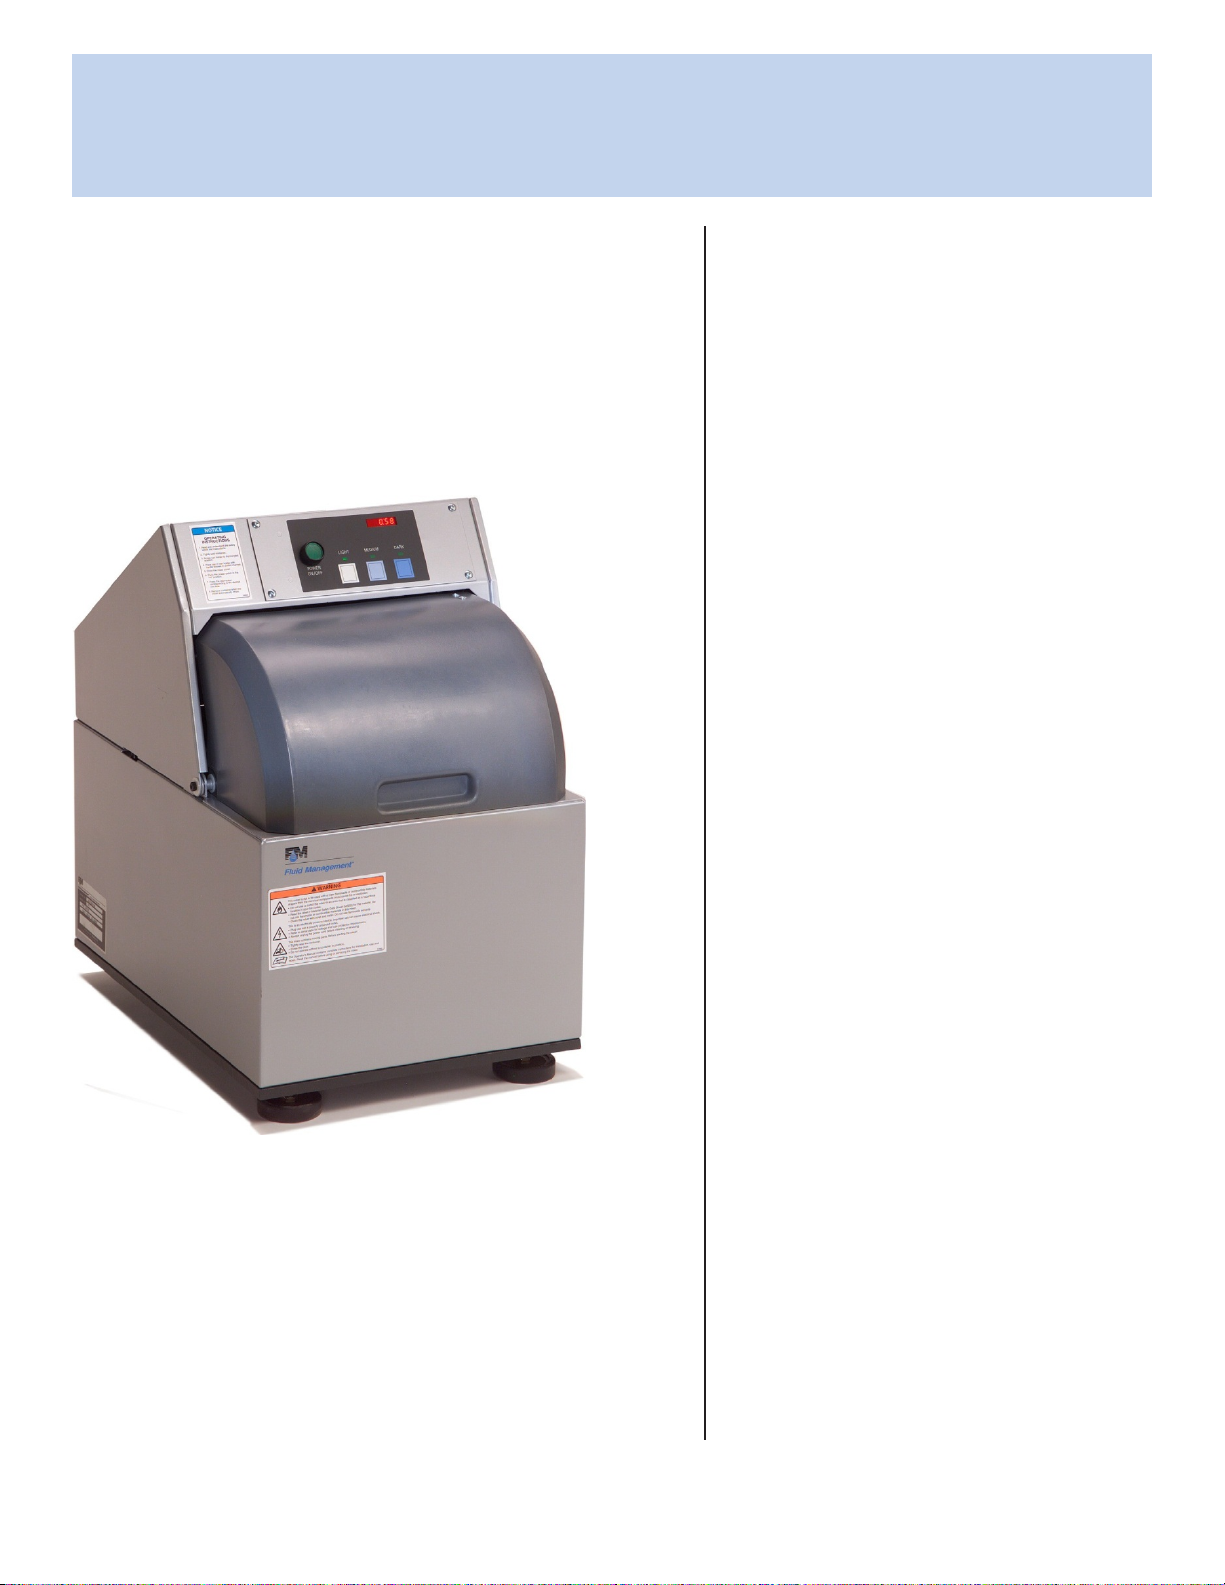
Getting to Know Your V-Series Mixer
Power On/Off Button
Serial
Plate
Mix Time Buttons
LED Display
Control Panel
Lid Retainer
Feet
* VR-1 Digital Model Shown
Features
• One-gallon mixer for round and square containers (V-1 model; VR-1 model mixes round only)
• Durable steel frame
• Three mixing settings- Light, Medium, and Dark (or 1-4 minutes with Mechanical Knob Timer
Model)
• Pint and quart mixing possible with adapter
• Partially enclosed motor for clean, quiet and safe operations
• Easy access for maintenance
• Compact design fits on counter or stacking unit
Technical Specifications
V1 Series
Height: 26” (66 cm)
Width: 17” (43 cm)
Depth: 24” (61 cm)
Weight: 165 pounds (75 kg)
Maximum power:
120 volts, 6.0 Amps +/- 10%, 60 Hz
VR1 Series
Height: 27.9” (71 cm)
Width: 17” (43 cm)
Depth: 24” (61 cm)
Weight: 117 pounds (53 kg)
Maximum power:
120 volts, 6.0 Amps +/- 10%, 60 Hz
220 volts, 3.6 Amps +/- 10%, 50Hz
Environmental Conditions
• Operating temperature: between
50°F (10°C) and 104°F (40°C)
• Relative humidity: between 5%
and 85% without condensation
Highlights
• Mixes round and square cans (V-1
model only; VR-1 model mixes
round only)
• Fast and thorough mixing action
• Fully rotational, dual-axis vortex
motion
• Adapter allows for pint and quart
mixing
• Programmable mix timer up to 5
minutes
• LED display shows mix time
countdown and life cycle counter
• Automatic shut off
• Small and compact to fit on
counter or stacking unit
Fluid Management Customer Service 1.800.462.2466
Page 9

8 | V-Series
Getting to Know Your V-Series Mixer
Tips to improve operations
These tips will help improve the operation of your V-Series Mixer:
• DO NOT mix dented or damaged cans
• DO NOT mix flammable materials or solvent based colorants
• DO NOT run the mix without a container in place
• For optimal performance, DO NOT run mixer on carpet, countertops, or tables
• Seal the paint container tightly before mixing to prevent any spills
• Press the red Emergency Button to stop the machine in an emergency
• When the red LED is lit on the display, the machine has power
• Position the containers correctly to ensure best mixing results
• Make sure the mixer is level and the position where it will be operating
• The mixer will stop running if the door is opened during operation
• Follow the preventative maintenance procedures in this guide.
Your V-Series Mixer has been designed so that you can set it up quickly and
begin using it right away. If you have never used a mixer, read this section for
instructions on getting started and installing your machine.
Warnings
ALWAYS shut off the power
and unplug your machine
from the AC power outlet
before servicing.
This unit must be plugged
into a dedicated electrical
line. This includes: 15 Amp
line for 120 Volt equipment
The surface the mixer sits on
must be strong enough to
support its weight.
Fluid Management Customer Service 1.800.462.2466
Page 10

V-Series | 9
Getting Started
Installation
Unpacking and Set up
Follow the steps on the next two pages to set up your V-Series Mixer
Important: Before you plug the V-Series Mixer into a power
outlet, carefully read all of the following
and the safety information. It is recommen d ed that at least one
other person assist in taking the machine off the pallet.
Make sure these items are available before installing.
1
V-Series Mixer
Surge protector (recommended, not included)
Tools needed for installation:
2
9/16“ socket wrench and extension
Scissors or diagonal cutters
Straight screw driver
installation instructions
3 Unpack the machine while still on the shipping skid.
a. Remove the interior packaging materials
b. While unpacking, inspect the machine for any damage that may have
occurred during shipping.
If any damage is found, notify the carrier immediately. Arrange for
inspection in order to claim recovery. Claims for damage must be
made by the consignee (YOU). The carrier assumes full responsibility
upon acceptance of the shipment and will not entertain any claims by
Verify the contents against the packing slip. Note if any items are missing
or damaged. Call Fluid Management Customer Service at 1-800-462-2466 if
any items are missing.
the consignor.
Warnings
Verify that your mixer is
firmly positioned on the
surface it will sit on.
This machine is not
explosion proof and must
not be used in a flammable
atmosphere or with
flammable materials.
Protect the cords and any
surge protectors from
liquids. Liquids can cause
gradual corrosion of the
power cord which can
result in overheating
To reduce the risk of
electric shock or injury, use
indoors only.
Cautions
DO NOT operate the mixer
until it is in a permanent
location.
ALWAYS route power cords
so they will not be walked
on, tripped over, or pinched
by objects
Avoid using extension
cords with unit.
4 Remove from skid (see unpacking instructions attached to machine).
a. Open upper cabinet by removing the back screw that secures the top
cabinet to the lower cabinet. Do not discard this screw. (See Figure 1.)
b. Carefully flip the top cabinet forward.
c. Remove shipping bolts located through the holes in the inner base. Using
9/16” socket wrench and extension, unbolt the two bolts that secure the
machine to the skid.
d. Using at least two people, remove mixer from skid and lower to floor.
Fluid Management Customer Service 1.800.462.2466
Page 11

10 | V-Series
Getting Started
Installation
5a Remove the packing blocks from inside the mixer
(for V1 models only)
a. Carefully lift up the top cover until it rests on the front of the mixer.
b. Unscrew the wooden block on the interior of the mixer between the
gears and the motor (see Figure 2).
c. Remove the wooden block.
d. Close the top cover and reattach the latch (see Figure 1).
5b Remove the packing blocks from inside the mixer
(for VR1 models only)
a. Close the upper cabinet and secure it to the lower cabinet by
reattaching the back screw (see Figure 1).
b. Carefully lift up the mixer at an angle providing access to the bottom.
c. Remove the three (3) central bolts holding the shipping blocks
(see Figure 3).
d. Carefully set the mixer down and open the top cover.
e. Use the cord that joined together the shipping blocks to pull the
blocks out of the mixer.
Position mixer in permanent location.
6
a. Choose a location for your mixer capable of supporting its weight.
(V-1 = 165 pounds, 75 kilograms, VR-1 = 117 pounds, 53 kilograms).
b. Make sure there is enough room to access the rear of the machine to
perform routine maintenance.
c. Adjust the feet to level the mixer and prevent it from rocking.
Final preparations.
7
Plug in the power cord. Follow Basic Operations for operating
instructions.
Figure
Figure
Figure
1
2
3
Fluid Management Customer Service 1.800.462.2466
Page 12

V-Series | 11
Basic Operations
Mixing
There are three mix cycles to choose from – Light, Medium, and Dark depending on the paint you are mixing. Follow these steps
to begin the mix cycle for your V-Series Mixer:
1 Press the Power On/Off button.
2 Place container.
a. Open the mixer door.
b. Turn the can holder towards you and pl
Note: Make sure the paint container is tightly sealed to prevent
spills. For plastic square paint containers, align the container’s
handle with the metal lever on the side of th e can holder.
(See Figure 4.)
c. Turn both lid retainer levers on the can holder until they firmly snap into place.
Note: If you are mixing a metal paint container, make sure the
handles fit firmly into the slots on the side of the can holder.
(See Figure 5.)
d. Close the mixer door.
3 Select the mix cycle.
a. Press the Light, Medium, or Dark button to start the mixing cycle.
(See Figure 6.) The mix times are factory set at 1.5, 2, and 3 minutes, respectively.
b. To program your timer for alternate mix settings, contact Fluid Management
Customer Service.
Note: For mechanical timer models, turn the timer knob to the
desired mixing time (1 to 4 minutes). (See Figure 7.)
ace the paint container inside the holder.
Figure
Figure
Figure
4
5
6
4 Remove the container from the mixer.
a. Open the door when the mixing cycle is complete.
b. Turn the lid retainer levers to the open position.
c. Remove the paint container.
Fluid Management Customer Service 1.800.462.2466
Figure
7
Page 13

12 | V-Series
Basic Operations
Using the adapter
The adapter is used to mix quarts and pints. Each can shape is molded into the adapter.
1 Open the adapter.
Select the appropriate adapter to match the paint container size.
2 Place the paint container in adapter.
(See Figures 8 and 9.)
Close the adapter and insert into the mixer can holder.
3
Make sure the adapter handles fit against the reinforced side of can holder.
(See Figure 10.)
Clamp both lid retainers over the adapter.
4
(See Figure 11.)
Figure
Figure
8
9
Follow Basic Operation-Mixing steps to begin mixing.
5
Figure
10
Figure
11
Fluid Management Customer Service 1.800.462.2466
Page 14

V-Series | 13
Accessories
V-Series Mixer Adapters
PAR T N UM B E R D E SCR I P T I O N I M AG E
25090
30598
Round Quart Adapter for use with VR-1 Mixer
Square Quart Adapter for use with V-1 Mixer
Contact Fluid Management Customer Service for custom adapters that are available.
V-Series Mixer Stands
PAR T N UM B E R D E SCR I P T I O N I M AG E
30740 Holds two V-Series Mixers
32340 Lifts mixer to conveyor height
Fluid Management Customer Service 1.800.462.2466
Page 15

14 | V-Series
Maintenance, Care, and Use
To ensure safe, dependable operation of your V-Series Mixer follow the maintenance
schedule detailed below:
Clean every day:
• Clean all accessible inside and outside surfaces with a mild cleaning solution.
• Clean control panel surfaces with a mild cleaning solution.
Every six months:
• Level the machine.
• Adjust belt tension as needed.
• Check for dirt accumulations on motor. Remove dirt by vacuuming.
Every year:
• Lubricate the sleeve bearings on the motor with 30-35 drops of SAE 20 oil.
• Change the drive belt.
Unplug from outlet before servicing and cleaning.
Fluid Management Customer Service 1.800.462.2466
Page 16

V-Series | 15
Frequently Asked Questions
Equipment troubleshooting
Most problems with the V-Series Mixer can be easily solved with a quick and easy solution. For instance, follow the
daily cleaning suggestions in the Maintenance, Care, and Use and the Getting to Know Your V-Series Mixer
section. Think about the conditions that led up to the problem. Making a note of things you did before the problem
occurred will help you narrow down possible causes and find the answers you need.
First, make sure:
• The power cords are securely connected to a working dedicated power source.
• The power button is on.
• You have followed the suggestions in the Maintenance, Care, and Use section.
• The machine is situated on a flat, level, and stable surface capable of supporting the weight of the machine.
Use the chart below to locate the problem, check the possible cause, and then take the action recommended.
Contact Fluid Management Customer Service if you are unable to find a resolution.
PR O B LE M FI R S T CH ECK AC T I O N
The mixer does not start.
The mixer will not shut off.
The motor has voltage and hums,
but it will not run.
An excessive amount of vibration
occurs.
The motor starts slowly.
• Is mixer plugged in?
• Does “0” appear on led?
• Is voltage present?
• Is front door closed?
• Is motor overheated?
• Is time shown on led display
showing and counting down?
• Is the line voltage low?
• Is the belt too loose or too tight?
• Is can holder empty?
• Is mixer level?
• Is one of adjustable legs
broken, low, or damaged?
• Is paint can positioned in
the can holder correctly?
• Is the belt tension too tight?
• Connect mixer to power source.
• Connect mixer to power source.
• Contact an electrician.
• Close front door.
• Allow motor to cool for at least
five minutes. Check for an
excessive accumulation of
dirt. Vacuum if necessary.
• Call customer service.
• Let mixer finish mixing cycle.
• Unplug mixer.
• Call customer service.
• Make sure the mixer is
on a dedicated line.
• Check the tension of the belt.
• Call customer service.
• Place container in can holder.
• Adjust legs until balanced.
• Replace or adjust damaged leg.
• Position container in the can holder.
• Adjust the tension of the belt.
Fluid Management Customer Service 1.800.462.2466
Page 17

16 | V-Series
Service
FMDirect
Fluid Management products are backed by FMDirect,
our nationwide team of phone and field service
engineers. Providing you with local, hands-on support,
over 30 factory-direct service technicians deliver
expertise when and where you need it.
•
24/7 multilingual tech support
•
Professional installation and on-site operator training
•
Fully-stocked parts inventory on FMDirect vans
•
Extended warranty and preventive maintenance
programs
Upgrades and Replacement Parts
Some parts can be upgraded or replaced by the
customer. Fluid Management expressly identifies parts
as such, and provides documentation with instructions
when it is appropriate for customers to replace those
parts. You must closely follow all in s tructions when
performing such replacements. ALWAYS make sure
that the power is turned off and that the product is
unplugged from any power source before you attempt
the replacement.
DO NOT attempt to service a product yourself
unless instructed to do so by a Customer Service
Representative. Use only a service provider who is
approved to repair your particular product.
Obtain Warranty Service
First, follow the advice in this guide. If the unit still
does not function, call Customer Service for
information about how to obtain warranty service.
Fluid Management Customer Service
1.800.462.2466
Save time and money. If something should go
wrong, we suggest consulting the Maintenance,
Troubleshooting and Service sections of this
guide. They are designed to solve basic problems
before consulting a service technician.
However, should you need assistance, please
have your model and serial number ready. Be
near your machine when you call and have a
purchase order number if ordering parts.
The serial plate is located on the side pan el of
the machine. It includes the serial and model
numbers for your machine. Please make a note
of these numbers below:
Date of purchase:
Model Number:
Serial Number:
Your Service Technician’s
Name:
Fluid Management Customer Service 1.800.462.2466
Page 18

V-Series | 17
Parts
1
5
7
6
2
4
3
Fluid Management Customer Service 1.800.462.2466
Page 19

18 | V-Series
Parts
ITEM N O. PAR T NUM BE R D ESCR IP TI O N QUANTIT Y
1
1
1
1
2
3
4
5
6
7
27970
35831
30990
35886
35146
35049
32782
26065
F015308025
F0098P06
CONTROL PANEL - DIGITAL TIMER 120V
CONTROL PANEL - MECHANICAL KNOB TIMER 120V
CONTROL PANEL - MECHANICAL KNOB TIMER WITH INTERLOCK
120V
CONTROL PANEL - MECHANICAL KNOB TIMER 220V
PLASTIC DOOR ASSEMBLY
ADJUSTMENT FOOT
SOLENOID ASSEMBLY - INTERLOCK MODEL
CONTROL PANEL SWITCH
SHOULDER SCREW 8X25MM, M6 THREAD
HEX NUT, M6 WITH NYLON PATCH
1
1
1
1
1
1
1
1
2
2
Fluid Management Customer Service 1.800.462.2466
Page 20

V-Series | 19
Fluid Management Statement
of Limted Warranty 2011
15 16 10 14
11
12
17
4 2 1 3 5 6
7
8
9
13
Fluid Management Customer Service 1.800.462.2466
Page 21

20 | V-Series
Parts
ITEM N O. PAR T NUM BE R D ESCR IP TI O N QUANTIT Y
1
2
3
4
5
6
7
7
8
8
9
10
11
12
13
14
15
16
17
35014
24188
3005002
35015
3005014
35019
16429
00630
26004
32449
35021
35026
3005011
3005103
23430
35545
35123
F0145A05B14
F0141P0616
SHAFT, MAIN TRANSARMS
GEAR, BEVEL
BEARING
TRANSARM
PULLEY
BEARING SHAFT
MOTOR, 48 FRAME - MODEL 120V
MOTOR, 1/3 HP ODP 1425 RPM - 220V MODEL
SHEAVE - 120V MODELS
SHEAVE - 220V MODELS
V-BELT
HUB AND SHAFT ASSEMBLY
SQUARE KEY, 3/16 X 7/16 LONG
COUNTERWEIGHT
SHOCK MOUNT
BUCKET ASSEMBLY
LID RETAINER LEVERS
SCREWS, FHCS M5 X 15
HEX NUT, M6 X 15MM
1
2
4
1
1
2
1
1
1
1
1
1
2
2
3
1
2
4
1
Fluid Management Customer Service 1.800.462.2466
Page 22

Fluid Management Statement
24 | V-Series
Index
of Limted Warranty 2011
A
adapters 12, 13
accessories 13
C
cleaning 14
connecting to power source 6
container placement 11, 12
E
environmental conditions 4, 6, 7
F
FCC compliance 6
features 7
feet 7, 10, 15
flammable materials 4, 5, 8, 9
FMDirect 1, 16
G
grounding 6
I
installation 9-10
L
labels 5, 6, 7, 16
leveling the machine 10, 14, 15
M
maintenance 14, 15
mix cycles 7, 11
O
operation 11, 12
P
parts 17-20
power button 7, 11
power cord 4, 5, 6, 8, 10, 15
preventive maintenance 14
R
regulatory compliance information 6
S
safety 4, 5, 6, 8, 9, 14, 15, 16
serial number 7, 16
service 16
specifications 7
stands 13
T
timer 7, 8, 11, 18
troubleshooting 15, 18
U
unpacking 9-10
V
voltage 6-8
W
warnings 5, 6, 8, 9, 14
warranty 21 -23
warranty service 16
Fluid Management Customer Service 1.800.462.2466
Page 23

V-Series | 25
V-Series Mixer
Fluid Management, Inc.
1023 Wheeling
p:
847.462.2466
f: 847.537.3221
www.fluidman.c
Fluid Management Customer Service 1.800.462.2466
Road • Wheeling
om
IL
60090
 Loading...