

Page 1

Fast & Fluid Management
Manual TM300
English
version 11-2014
Page 2

Table of contents
Record of Changes 3
Introduction 4
Warrenty Regulations 4
Explanation of images 5
Safety Instructions 6
Installation 7
Installing the computer and the software 8
Operation 9
Agitation timer 9
Fill the brush tray (nozzle cleaning system) 10
Fill the canisters with colourant 10
Dispensing 11
Punch hole in Lid - Manual (optional) 11
Daily Maintenance 12
Weekly Maintenance 13
Monthly Maintenance 13
Troubleshooting 14
Service and Support 15
Replace fuse behind back panel 15
Specifi cations 16
Electrical wiring diagram 17
WEEE 18
2
Page 3

Record of changes
Rev Editor Date Change description
11-2011 TB 17-11 First release
11-2014 TB 11-11 Add Power consumption and IP value
3
Page 4

Introduction
By selecting a Fast & Fluid Management Color Dispenser you have opted for a product which is the result
of intensive research. Top-quality components, craftsmanship and a modern ergonomic design all serve to
guarantee a long service life and a high degree of user friendliness.
The machine complies with Council Directives on machines, on electromagnetic
compatibility, and on electrical equipment intended for use within given voltage limits, as enacted
by the Council of Ministers of the European Community. The machine is furnished with a CE mark.
Warranty regulations
In these warranty conditions, ‘F&FM’ is understood to mean Fast & Fluid Management. The warranty
conditions incorporated into F&FM’s general conditions of sale are summarized as follows (for free general
conditions you can contact F&FM):
F&FM guarantees the proper operation of any goods which it supplies, for a period of one year, except
where a breakdown is the result of normal wear and tear. The cost of any inspection activities carried
out by F&FM, with the aim of establishing whether or not a breakdown is covered by the warranty will
be reimbursed by the other party if it transpires that the breakdown is not covered by the warranty. If
it transpires that a breakdown is covered by the warranty then F&FM will supply identical or equivalent
goods under the conditions referred to in point 6 of the general conditions of sale. The warranty obligation
described in this article only applies if the goods supplied by F&FM have been used in accordance with the
manual. Time spent on warranty-related activities, including travel time, travel costs and accommodation
costs, are charged at current rates.
In contrast to the above, F&FM will not be held to any warranty obligation if:
1. Repairs have been carried out, or attempted, by the other party or a third party, unless F&FM had
previously declined to repair the goods for a fair price;
2. F&FM demonstrates that the defect did not emerge during testing;
3. The other party fails to inform F&FM of the defect immediately, if possible either by letter and/or by
fax, providing full, accurate details and/or has failed to comply fully with F&FM’s instructions;
4. The other party has failed to use or treat the goods properly or in accordance with F&FM’s instructions;
5. The damage has been caused by incidents, beyond F&FM’s supervision, which have occurred either
during transport or installation.
In the following text, the expression “Software” will be understood to mean the standard computer software supplied by F&FM to the other party, recorded on a computer-readable storage medium, plus the accompanying documentation (Software Manual) and including any improved and/or new versions supplied.
The expression “processing unit” (PU) is understood to mean the machine for which and with which the
Software is supplied, and which is the sole machine on which the Software may be used.
The other party is authorized to copy the Software either in its entirety, or in part, (up to a maximum of 2
copies) for purposes of internal security. These copies will be furnished with the same marks, designations
relating to copyright and other registration numbers as the original version of the Software.
The other party will neither amend, translate, decompile nor adapt the Software, nor convert it into source code, without express written permission from F&FM. If the other party so requests, F&FM will provide
that party with the information required to render the Software interoperable with other software.
In the event that the PU experiences a breakdown, the other party may use the software on another
processing unit until the PU is again operational. The other party will inform F&FM of this within 5 days.
If it is a requirement that the Software be defi nitively transferred from the PU to another processing unit
then the other party shall request permission from F&FM, which will not withhold such permission on unreasonable grounds.
4
Page 5

Explanation of images
1. Top lids
2. PowerBoard
3. Pump/canister assembly
4. Pump gripper spindle & spindle
stepper motor
5. Emergency stop
6. Valve gripper actuator
7. Computer cavity
8. Disc grip
9. Pump tube
10. Nozzle wiper
11. Nozzle
5
Page 6

Safety Instructions
Attention! Before installing the equipment and setting it in operation, please read the
instructions for use carefully. This is safer for yourself and prevents unnecessary
damage to the machine.
The manufacturer accepts no liability if the instructions below are not followed:
1. If a machine has been damaged (during transport, for example), do not attempt to set it in operation.
When in doubt, fi rst contact either your supplier or the F&FM service department.
2. The equipment should be positioned and connected up in strict accordance with the installation
instructions.
3. All local safety regulations and ordinances should be observed.
4. The machine may be connected only to a 230V/16A/50Hz or 110V/25A/60HZ earthed wall socket installed in accordance with the regulations.
5. Users should see to it that the machine is kept in good condition. Defective components should be
replaced.
6. In order to prevent physical injury, the doors should be closed and the paneling fi tted during normal
use.
7. All service activities (other than routine maintenance and adjustments) may only be carried out byqualifi ed technicians. See to it that the mains lead is always kept unplugged while repairs are being
carried out.
8. Because of the design of the valve, a nozzle drill may never be used. Cleaning is done by running thecleaning program.
Specifi c warnings and tips
Attention! Switching off the dispenser with the emergency stop will also
stop colorant agitation.
Attention! MOVING PARTS CAN CAUSE INJURY. Always turn off power
(e.g. by pressing emergency stop) before accessing moving parts.
6
Page 7
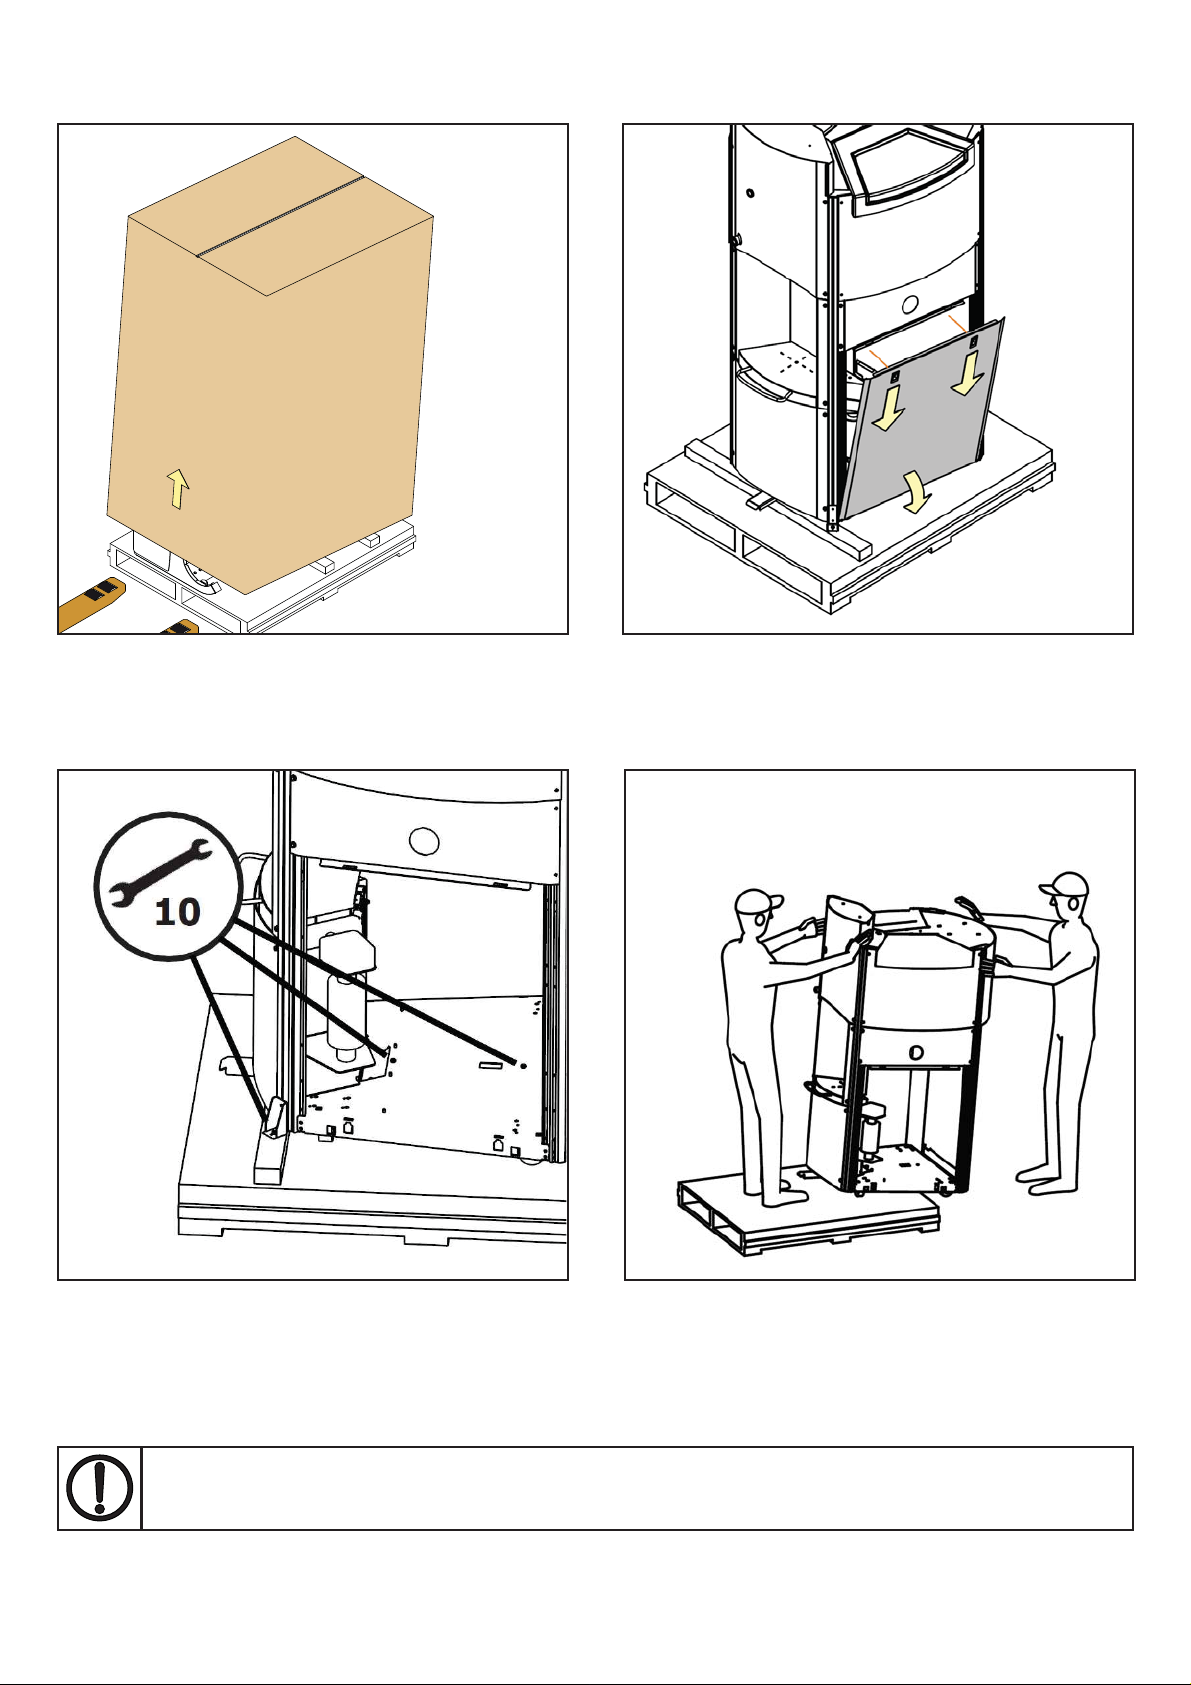
Installation
Step 1 - Detach the dispenser from its transport skid
>
Place the transport pallet near the defi nitive
location of the machine. Remove cardboard box,
plastic wrapping and accessory parts.
Remove one of either side panels.
>
Unscrew transport the transport screws
connecting the machine to the skid from the
inside of the computer cavity.
Detach the supporting wooden blocks.
Keep the fastening bows of the pallet, the two wooden beams and the two foam parts
for possible future transportation.
Move the machine off the pallet.
7
Page 8

Installing the computer and the software
Step 1 - Place the computer
>
Place the computer in cavity.
Connect the dispenser as indicated in the image
above.
Step 2 - Install the dispensing software
Install all necessary software provided by software supplier.
Use software to test basic functions of dispenser before fi lling.
Check software manual for testing procedure.
Consult the software manual for installation instructions.
8
Page 9
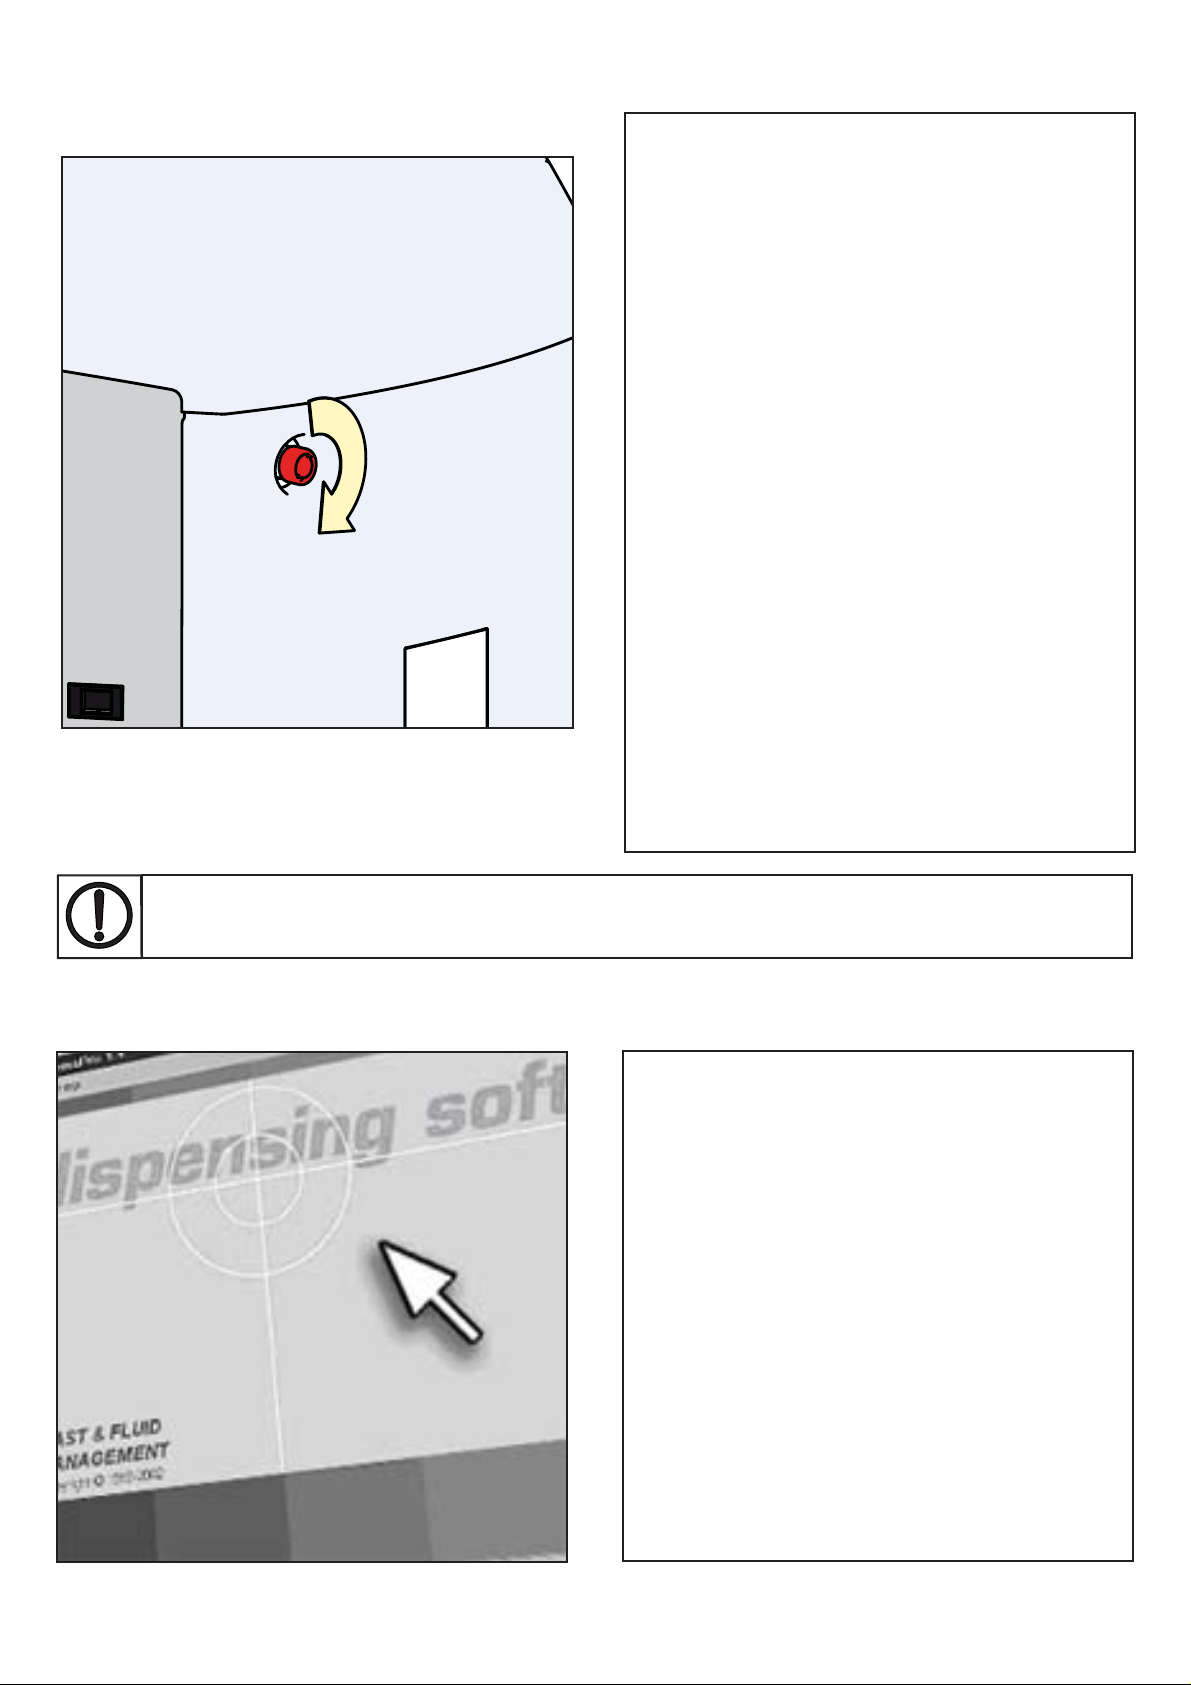
Operation
Switching ON:
Unlock the emergency stop button on the front of
the machine by turning clockwise. The machine is
automatically switched on when the power connector at the back of the dispenser is plugged into
a 220V or 110V wall socket.
Please be aware that the TintMaster series
dispensers are fi tted with sleeping timers as
standard. This means that after approximately 30
minutes the dispenser will enter a power saving
modus in which all secondary units (e.g. sensors)
are switched off automatically.
>
Stirring is not affected by this modus. To awake
the dispenser from its sleeping modus, perform
any command from the dispensing software or
press either of the can table buttons.
Switching OFF
Please note that with normal operation there
should be no reason to take the power off the
dispenser. In case the dispenser must be
switched off, there are several ways of achieving
this:
1. Shut down the computer and unplug the power
connector at the back of the machine.
2. Shut down the computer and switch the
internal power socket behind the bottom service
panel at the front of the machine.
3. Shut down the computer and press the
emergency stop button.
Caution! Switching off the dispenser with the emergency stop switch will also cause
the stirring mechanism to be turned off.
Agitation timer
The stirring time and interval can be altered from
its default settings*. This can be done through
the dispenser software, check your software
manual for instructions.
Please ask your paint supplier for optimal
agitation settings for your specifi c colorant
products.
>
* Default value is 180 seconds of agitation every
3 hours.
9
Page 10

Fill the brush tray (nozzle cleaning system)
>
Remove the brush tray at the left side of the
dispenser.
Use only cleaning fl uids recommended by your paint supplier.
Wrong materials can result in nozzle blockage and reduced accuracy.
Fill the canisters with colourant
Fill the container with water or an alternative
liquid proposed by your paint supplier.
Replace the brush tray in its original position.
Cleaning fl uid must be refreshed daily!
Access the canisters from either side top lid and
remove the canister lids.
>
Check your software manual for fi lling sequence.
Run software purge program twice to remove air
from system.
10
Page 11

Dispensing
Place the can at the center of the can table cross
hair. Lift the can table upward (unlock by pressing
down the foot pedal) *dispensers with optional
can lift only. Bring upward as far as possible. This
is the optimal dispensing position.
Ensure can opening is under the dispenser nozzle
and at its optimal height.
>
Choose desired formula as shown in software
manual. The turntable will subsequently rotate to
correct positions.
Remove can, dispensing is now complete.
Dispensing is mainly a software issue. Please read your software manual
thoroughly for all possible options.
Punch hole in Lid - Manual (optional)
Attention! Punch knife is very sharp. Do not hold while punching
11
Page 12

Daily Maintenance
Clean the brush tray, refi ll canisters and run morning program
>
Remove the brush tray and empty the container.
Clean the brush with water and refi ll the container
with correct fl uid (e.g. water).
Fill canisters if level is low and update levels in
software. Stir colorant beforehand.
Start software morning program to purge valves
and clean nozzles. Check your software manual
>
for details.
Use only cleaning fl uids recommended by your paint supplier.
Wrong materials can result in nozzle blockage and reduced accuracy.
12
Page 13

Weekly Maintenance
Remove spilt paint & colorant and refi ll canisters
>
Clean can table and outside parts with diluted
detergent.
Always close canisters and machine lids after refi lling.
Check canister content and refi ll if necessary.
Monthly Maintenance
Check and clean important functional parts
Remove back panel and check pump valve for
>
possible malfunctions (e.g. leakage or blockage).
Attention! MOVING PARTS CAN CAUSE INJURY. Always turn off power (e.g.
by pressing emergency stop) before accessing moving parts.
13
Page 14

Troubleshooting
Before calling your supplier or the service department, please check if you can solve the problem yourself.
If that does not work, you can call the service department for advice. Have the serial number and
dispenser type ready (these can be found on the silver CE sticker at the behind the service panel at the
front of the machine).
Use the table below to determine whether you can solve a problem yourself or if you need to call the
service department. You should never remove side panels from the dispenser, only certifi ed personnel are
allowed to do this. This table does not contain any error codes from the dispense software; please consult
the software manual for these.
Caution! MOVING PARTS CAN CAUSE INJURY. Always switch off the power (e.g. with
the emergency stop) before approaching moving parts.
Symptom Cause Action
Valve leaks through the outlet
opening
Canister connection leaks around
the suction point
Air is being fed together with
the paste
(New) software is not working Program not correctly booted Reboot computer & software
No power from power unit Not connected to power grid Check power cables
Colours are diffi cult to
reproduce
Poor monitor picture, or no
picture
Keyboard is not working Loose cable(s) Check cables
Air bubble in pump Prime the pump
Valve is defective Replace pump “Service”
Worn O-ring(s) Replace O-ring(s) “Service”
Air bubble in the pump Prime the pump
Canister is empty Refi ll canister
Piston is defective Replace pump “Service”
Software incorrectly installed Reinstall software
Fuse blown Remove plug from socket,
replace fuse
Mechanisms are dirty Clean and oil
Quality fl uctuations in paste
supplied
One or more pastes have
thickened
Turntable in wrong position Reset (press and unlock
Leaks around piston(s) Replace piston(s) “Service”
Monitor is switched off Switch monitor on
Loose cable(s) Check cables
Picture set too dark Adjust picture correctly
Monitor malfunctioning “Service”
Windows Regional setting is
incorrect
Defective cable(s) “Service”
Keyboard is defective “Service”
Contact paste supplier
Replace paste(s)
emergency stop button)
Check Windows software manual
Stirrer is not rotating Timer setting incorrect Set the timer correctly (software)
Loose cable Check cable
Defective cable “Service”
Defective motor “Service”
Turntable is not turning Piston rod positioned too high Set piston in lower position
Cable(s) loose Check cables
Cable or motor defective “Service”
14
Page 15

Service and Support
If necessary, you can get in touch with your supplier or the local service department, or contact the
manufacturer directly. If you contact the manufacturer, make sure that you have the model number and
serial number to hand. They can be found on the nameplate on the machine.
Fast & Fluid Management
P.O. Box 220
2170 AE Sassenheim, the Netherlands
Hub van Doorneweg 31
2171 KZ Sassenheim, the Netherlands
Tel: +31 (0)252 240 800
Fax: +31 (0)252 240 882 (service)
+31 (0)252 240 880 (general)
For more information please visit our website www.fast-fl uid.com
Replace fuse behind back panel
Spare fuse Damaged fuse
15
Page 16

Specifi cations
Number of canisters 12/14/16/18/20/24
Canister content 1.75, 3.5 [L]
EasyClick canister/stirrer (material) molded polymeric
Valves molded polymeric
Pump type piston pump
Pump sizes 1.64 [ounce]
Min. dispense 1/384 [fl .oz]
Accuracy 0.005 [ml/step]
Flow rate 0.4 [L/min]
Nozzle closures integrated
Maximal can height 45 [cm]
Can table depth 25 [cm] on benchtop model
25 [cm]
Cleaning system standard
Can detector standard on fl oor model
Stirring timer standard
Moveable can table option (only for fl oor model)
Heating set option (only for fl oor model with can table)
Manual punch 46 [mm] option (only for fl oor model)
Dimensions (H x W x D) 156 x 80 x 99 [cm]
Width with keyboard 120 [cm]
Power supplies 110 [V] +/- 10%, 50/60 [Hz]
230 [V] +/- 10%, 50/60 [Hz]
Power consumption, maximum 500 [W]
IP (Ingress Protection) classifi cation 32
CE approved & Patent applied.
Specifi cations subject to change without prior notice.
16
Page 17
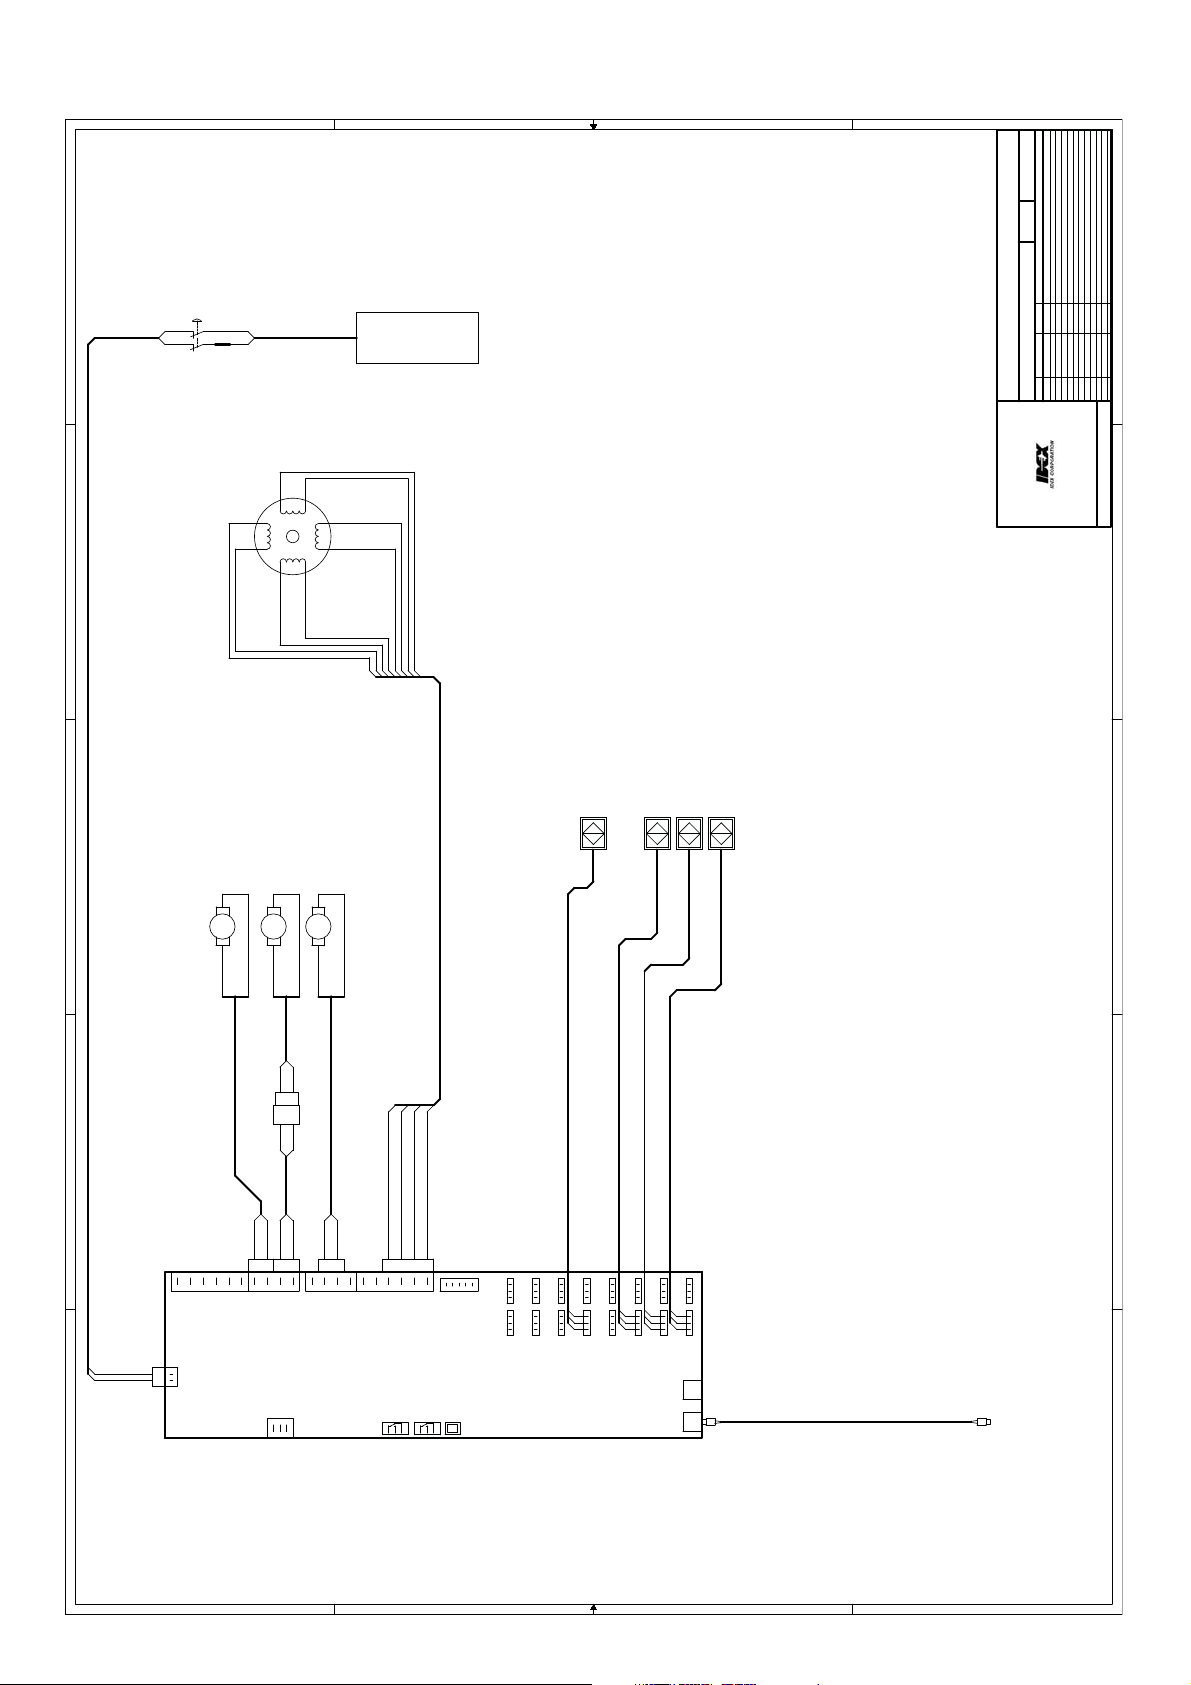
Electrical scheme
of
11
Sheet
1.1
Version
1
3
2
4
8
MO TOR ASSY
11300 71
4
7
POWERSUP PLY ASSY 1862749
5
3
6
MO TOR ASSY
18145 41
WHITE
BROWN
BLUE
CABLE 31 1862742
2
M1
SHIELD
4P-STEPPE RMOTOR
MO TOR ASSY
18145 42
2
1
1
SU PPLY 110/230VAC
POWER SUPPLY 24VDC
MOTOR 1 ( 18 61988)
NEW 1 814540
50-60Hz, 1Am ax
First version
Added agit & ttmotorcable
NvB
1862618.DSN
Date Drawn Remarks
27-6-2008
TM300V1.1
Filename
Title
Revnr.
0.1 10-3-2008 NvB
0.2
FLUID
MANAGEMENT
SENSOR 6 (1 861980)
NEW: 181 4567
S6
TABLE POSITION
SENSOR 4 (1 861978)
NEW: 181 4563
SENSOR 2 (1 861976)
NEW: 181 4568
S1
SENSO R 1 1861975
CAN-PRESEN TS2STEPPER-H OMES4VALVE-CLOS ED
Removed agitmotor ext. cable
Changed name to 1.1, change partnmbrs. turntablemotor.
NvB
NvB
28-11-20081.0
18-11-20131.1
© 2001 Fluid Management
P.O.Box 220
Hub van Doorneweg 31
2170AE SASSENHEIM, The Netherlands
1
Friday, November 28, 2008
2
3
VALVE M OTOR
M32
-+
BLUE
BROWN
4
AGITATIONMOTOR
M35
TURNTABLEMOTOR
M33
-
+-
+
BLUE
BLUE
BROWN
BROWN
GREEN
RED
BLUE
BROWN
3
4
CABLE 33 1862744
BROWN
BROWN
BLUE
MGND3
HHB14
HHB13
MGND3
HHB12
HHB11
HHB10
HHB9
BROWN42=
BLUE0
5
- +
POWERSUPPLY
LK1
BROWN
BLUE
BLUE
HHB7
HHB8
MGND2
MGND2
HHB6
MGND2
MGND1
BLACK & WHITE/ORANGE or ORANGE
ORANGE & WHITE/BLACK or BLUE
YELLOW & WHITE/RED or YELLOW
RED & WHITE/YELLOW or RED
BROWN
BLACK
HHB5
J19
HHB4
HHB3
HHB2
HHB1
1
2
4
6
POWERBOARD 2001
COMMUNICATION
PORT #1 PORT #2
BLUE
BROWN
BLACK
BLUE
-S+ S+-
12722 30
TO RS232 PC
5
D D
C C
B B
A A
17
Page 18
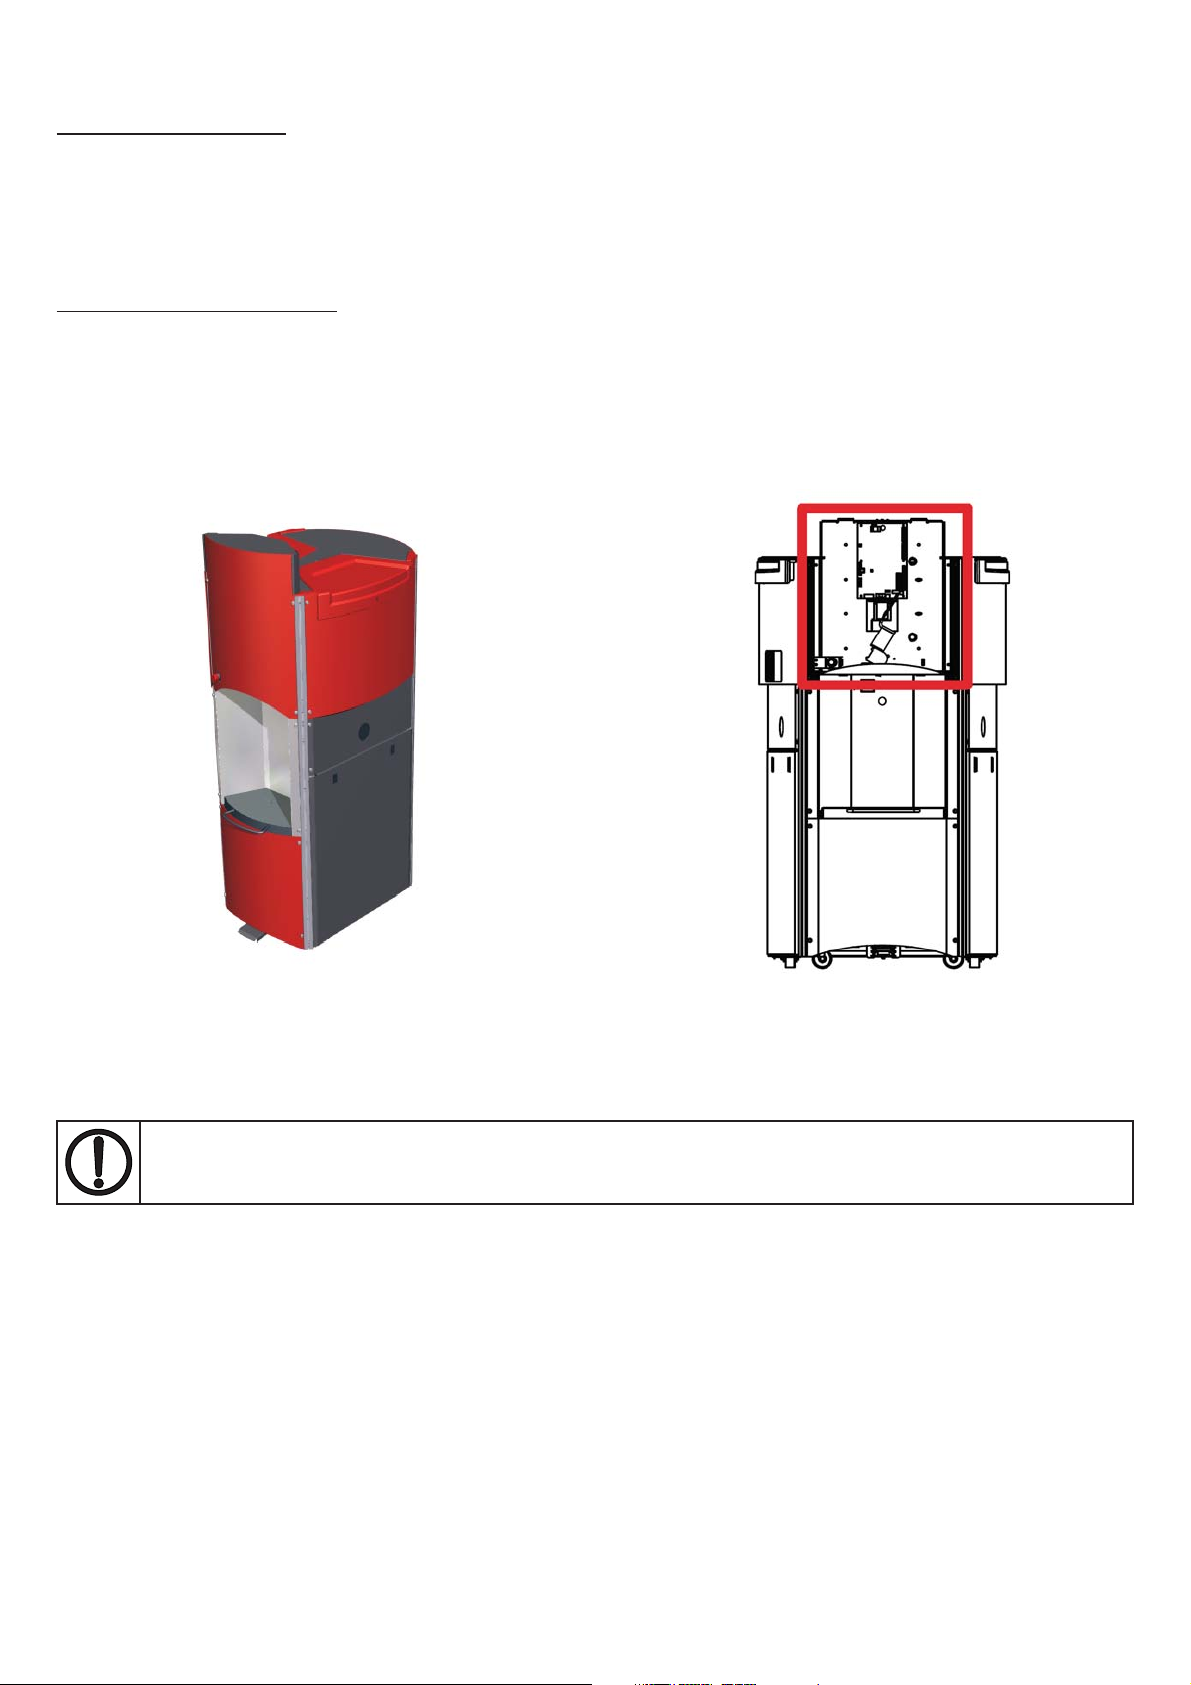
WEEE
Packaging material
The packaging protects the machine against damage during transport. The packaging material was chosen
based on its limited impact on the environment and its inherent possibilities for waste-disposal.
The reuse of packaging material saves raw materials and produces less waste material. Generally
speaking,your supplier will take the packaging off your hands.
Discarding the Machine
Discarded equipment usually still consists of valuable materials. For this reason, do not simply throw your
machine out with the oversized refuse, but ask your supplier whether he will take the machine back.
If he will not, then enquire at your local government offi ces or ask a trader of raw materials what options
thereare for recycling the material (e.g. scrap processing, electrical components and plastic (see below for
additional information).
All red-coloured components are made of ABS.
These components can be recycled.
Caution! The canisters may contain chemical waste; bring this to your chemical depot.
>
Inside the red square pictured above (on the front
of the dispenser) are electrical components that
can be recycled.
18
 Loading...