

Page 1
Accutinter 1500 | Accutinter 1500 HS
End User Guide
Getting Started
Maintenance and Care
Troubleshooting
Warranty
Part No: 33042
Rev. D
08.2013
Page 2

Page 3

Your
customers have a vision,
you want to make it happen, and
Fluid Management can give you the answer.
Fluid Management is a global leader in dispensing and
mixing equipment used in the paint industry, as well as,
specialized equipment for the chemical, and home improvement industries.
Located in the suburbs of Chicago, Illinois, Fluid Management
is a United States owned and operated company with historical roots
to the paint industry dating back to 1927. In 1996, IDEX Corporation
purchased Fluid Management giving the organization the financial
wherewithal and global footprint of a large organization while
still maintaining its deep values and history.
As industry leaders, Fluid Management provides trend-setting creativity
in the design, products, and services it offers. United with FMDirectSM,
our nationwide service team, we provide after-sales support around
the clock—when you need them. Being factory-direct employees,
FMDirect technicians are experts on Fluid Management equipment and
understand customer needs from start to finish.
The combination of leading edge technology, excellent service and
support, and a company prepared for the future’s ever-changing
business environment makes Fluid Management an ideal partner to
assist in providing solutions to your business needs. Thank you for
putting your trust in Fluid Management products
and making us part of your customer’s vision.
Page 4

©2011 Fluid Management as published work all rights reserved.
Under the copyright laws, this material may not be copied, in whole or in part, without
the written consent of Fluid Management.
Your rights to the software are governed by the accompanying software license
agreement.
Use of Fluid Management trademarks, service marks, or logos for commercial purposes
without the prior written consent of Fluid Management may constitute trademark
infringement and unfair competition in violation of federal and state laws.
Fluid Management, FMDirect, ColorPro, DVX, Harbil, Blendorama, Accutinter, Duraflow,
Fast & Fluid Management, GyroFlex, GyroMixer, Infina, MicroTint, TintMaster, V1, and VR1 are
trademarks of Fluid Management, registered in the U.S. and/or other countries.
Every effort has been made to ensure that the information in this guide is accurate.
Fluid Management is not responsible for printing or clerical errors.
Fluid Management
1023 Wheeling Road
Wheeling, Illinois 60090-5776 USA
800-462-2466
http://www.fluidman.com
2 | Accutinter 1500
Published in the United States.
Mention of third-party products is for informational purposes only and constitutes
neither an endorsement nor a recommendation. Fluid Management assumes no
responsibility with regard to the performance or use of these products.
Fluid Management Customer Service 1 . 800 . 462 . 2466
Page 5

Fluid Management Accutinter 1500
nce you’ve installed your Accutinter 1500
O
find more information to help you get the most from
your new Fluid Management Accutinter 1500 .
Dispenser, what’s next? In this booklet, you’ll
Fluid Management Customer Service 1 . 800 . 462 . 2466
Accutinter 1500
Accutinter 1500 | 3
Page 6

Contents
About this Guide
5 How to Use this Guide
5 For Your Safety
Important Safety Information
6 Information and Instruction Labels
6 Safety Notice Information
6 General Safety Information
6 Air Circulation
7 Grounding
7 Danger
7 Caring for Your Computer
7 Communication Regulation Information
Getting to Know Your Accutinter 1500
8 Technical Specifications
8 Environmental Conditions
8 Optional accessories
9 Accutinter 1500 Features
10 Tips to Improve Operation
Getting Started
11 Installation
12 Unpacking and Set Up
14 Connecting the label printer (optional)
14 Connecting the barcode scanner (optional)
17 Preparing and refilling the canisters
19 Preparing the system
20 Using the shelves
Maintenance, Care, and Use
32 Daily, weekly, monthly maintenance
Frequently Asked Questions
34 Equipment troubleshooting
38 ColorPro troubleshooting
Service
40 FMDirect
40 Upgrades and Replacement Parts
40 Obtain Warranty Service
Warranty
41 Fluid Management Statement
of Limited Warranty
Index
42 A - W
Basic Operations
21 Welcome to ColorPro4
22 Main menu
23 Dispensing from Formula Book
25 Manual dispensing
26 Using an external data source
and dispense queuing
27 Adjusting formulas
28 Using color scaling
29 Purging the lines
30 Stirring the colorant
31 Using ColorPro Help
4 | Accutinter 1500
Fluid Management Customer Service 1 . 800 . 462 . 2466
Page 7

About this Guide
How to Use this Guide
This Guide is organized into nine sections. Each section provides detailed
information on Accutinter 1500 topics and provides a basic reference that can be
used to help you with specific issues.
This Guide provides the information for installing your Accutinter 1500,
dispensing for the first time, and using ColorPro. This publication also includes basic
troubleshooting suggestions, customer service, help information, daily and preventative
maintenance procedures, and warranty information.
Your Accutinter 1500 dispenser includes detailed illustrated labels for how to
clean the nozzles located inside the top canister cover of the machine. You can also
find daily maintenance instructions in this guide starting on page 31. Make sure to
follow these directions for the best performance of your machine.
ColorPro has basic information about using your Accutinter and ColorPro in the Help
section of the software.
If you have internet access, the most current information for your Accutinter 1500 is
available from the worldwide web at http://www.fluidman.com.
For Your Safety
Customer safety is important. Our products are designed to be safe and effective.
However, dispensers are electrical equipment. The Accutinter line is safe, fast, and
reliable—designed to bring many years of operation. There are precautions you can
take to avoid damage to the equipment or bodily injury before operating. By carefully
following the instructions in this document and the warning and maintenance labels
on the machine, you can help protect yourself from hazards and create a safer work
environment.
Equipment can become damaged due to misuse or neglect. Some product damage is
serious enough that the product should not be used again until it has been inspected
and, if necessary, repaired by a Fluid Management authorized service technician. As
with any electronic device, pay close attention to the dispenser when it is turned on.
On very rare occasions, you might notice an odor or see a puff of smoke or sparks
vent from your machine, or hear sounds like popping, cracking or hissing. These
conditions might merely mean that an internal electronic component has failed in a
safe and controlled manner. However, it may indicate a potential safety issue. DO NOT
take risks or attempt to diagnose the situation yourself. Contact Fluid Management at
1.800.462.2466 for assistance.
Safety Precautions
• Read this guide and all
warning labels before using
the machine.
• Keep this guide in a safe
place.
• Read and adhere to all
Warning and Caution labels
on the machine.
• Prepare, level, and clear the
area where the machine will
be installed.
• To avoid risk of fire or
injury, unplug the power
before servicing electrical
components.
• DO NOT dispense
flammable materials.
• After installing, complete
a purge and check the
plumbing.
• Check that canisters and
lines are secure and in
place.
• Plug into an approved
grounded outlet only. Make
sure the outlet meets all
national and local codes.
• To reduce the risk of electric
shock or injury, use indoors
only.
• DO NOT push any
objects into the air vents
or openings of your
equipment. Doing so can
cause fire or electric shock
by shorting out interior
components.
• Ensure that nothing rests
on your equipment’s cables
and that the cables are not
located where they can be
stepped on or tripped over.
Fluid Management Customer Service 1 . 800 . 462 . 2466
Accutinter 1500 | 5
Page 8
Important Safety Information
Information and Instruction Labels
You should become familiar with the information labels affixed to the machine,
as well as the warnings, cautions, and notes which appear throughout this guide.
Read all the warning labels on the exterior and interior of the dispenser. If the
WARNING:
Unplug before
servicing
Use a dedicated
15 amp circuit
labels become damaged or unreadable, you may purchase replacements from
Fluid Management Customer Service.
Safety Notice Information
The two main notices used in this Guide and on the
WARNING
•
HAZARDOUS
ELECTRICAL
COMPONENTS
When you see a Warning notice in this guide, read it carefully before continuing with the
operation of the machine. Take all necessary precautions to avoid potential injury.
Accutinter 1500 / Accutinter 1500 HS are Warning and
Caution. A Warning notice tells you about a hazard that
could cause serious injury to you or extensive damage to
the equipment. This information is featured in the beginning
of the guide to emphasize safety.
WARNING:
DO NOT use with or
near flammables
A Caution notice tells you about a danger that could cause
CAUTION:
•
POTENTIAL
SAFETY
HAZARD
injury to you or minor damage to the dispenser. When you
see a Caution notice in this guide, read it carefully and be
sure you understand it before continuing.
General Safety Information
DO NOT attempt to service a product yourself unless instructed to do so by Fluid
Management Customer Service. Use only a Fluid Management Authorized Service
Technician to repair your equipment. Please note that some parts can be upgraded or
replaced by the customer. Fluid Management identifies those parts as such and provides
documentation with instructions when it is appropriate for customers to replace those
parts. You must closely follow all instructions when performing such replacements.
ALWAYS make sure that the power is turned off and that the machine is unplugged
before you attempt the replacement. If you have any questions or concerns, contact
Fluid Management Customer Service.
Air Circulation
Your computer and monitor for your dispenser produce heat. The computer has a fan
that pulls in fresh air and forces out hot air. The monitor lets hot air escape through
vents. Blocking the air vents can cause overheating, which might result in a malfunction
or damage. Place the computer and monitor so that nothing blocks the air vents. Allow 4
inches (101.6 mm) clearance around air vents.
6 | Accutinter 1500
Fluid Management Customer Service 1 . 800 . 462 . 2466
Page 9

Important Safety Information
Grounding
This product must be grounded. In the event of an electrical short circuit, grounding
reduces the risk of electrical shock by providing an escape for the electric current.
This product is equipped with a cord that has a grounding wire and an appropriate
grounding plug. The plug must be inserted into an outlet that is properly installed and
grounded in accordance with all local codes and ordinances.
Danger
Improper installation of the grounding plug can result in a risk of electric shock. If
repair or replacement of the cord or plug is necessary, DO NOT connect the
grounding wire to either flat blade terminal. The insulation wire with green or green
and yellow stripes on the outer surface is the grounding wire.
Check with a qualified electrician if the grounding instructions are not completely
understood, or if in doubt about whether the product is properly grounded. DO NOT
modify the plug provided. If it will not fit into the outlet, have the proper outlet installed
by a qualified electrician.
NOTE: This product is for use on a dedicated nominal 120 Volt or nominal 220 Volt
circuit where applicable and has a grounding plug.
Caring for Your Computer
Disconnect the power plug on the computer (by pulling the plug, not the cord) if
any of the following conditions exists:
• You want to remove any parts.
• The power cord or plug becomes frayed or otherwise damaged.
• You spill something into the case.
• Your computer is exposed to rain, flooding, or any other excess moisture.
Keep the flat panel monitor in room temperature conditions. Excessive cold or hot
conditions can have an adverse effect on the liquid crystal display of the monitor.
NOTE: Review the weight limits referenced in your computer documentation before
placing monitor or other devices on top of your computer.
Warnings
• The AT1500 and AT1500
HS machines draw 5 amps
at 120 or 2.5 amps at
220/230 ± 10% VAC.
• DO NOT modify the
provided plug.
• Improper use of grounding
plug can result in risk of
electric shock.
• Hazardous moving parts.
Keep fingers and other
body parts away.
Cautions
• Check with a qualified
electrician or service person
if grounding instructions
are not completely
understood or if in doubt
as to whether product is
properly grounded.
• DO NOT use an adapter
or extension cord with
this product.
• This unit must be plugged
into a dedicated
electrical line.
• To reduce risk of electric
shock or injury, use
indoors only.
Communication Regulation Information
Safety and regulatory compliance Information
See the affixed labeling on the machine. ETL Listed, conforms to UL STD 1450.
Certified to CAN/CSA STD C22.2 NO. 68.
FCC Compliance Statement
This device complies with part 15 of the FCC Rules. Operation is subject to the
following two conditions: (1) This device may not cause harmful interference, and
(2) this device must accept any interference received, including interference that
may cause undesired operation.
Fluid Management Customer Service 1 . 800 . 462 . 2466
• Never force a connector
into a port. If the connector
and port do not join
with reasonable ease,
they probably do not
match. Make sure that
the connector matches
the port and that you have
positioned the connector
correctly in relation to the
port.
Accutinter 1500 | 7
Page 10
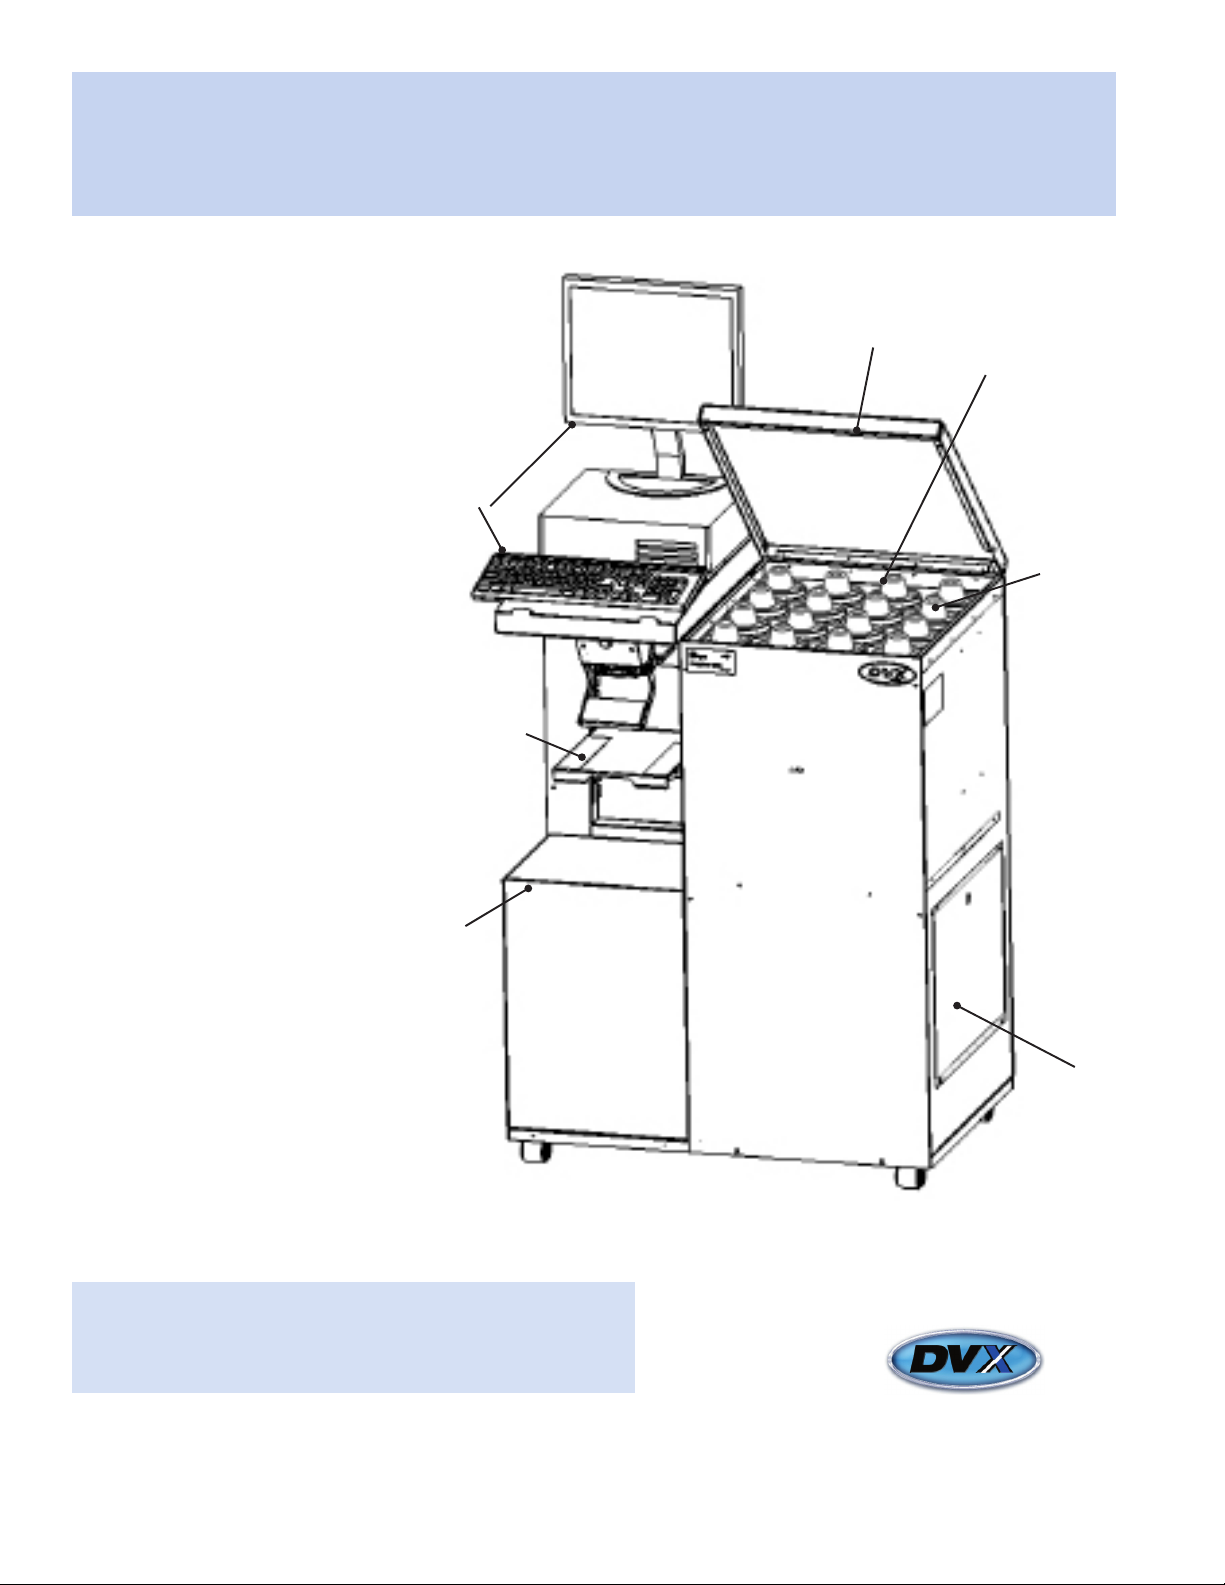
Getting to Know Your Accutinter 1500
Technical Specifications
16 Canisters:
35” W x 24” D x 48” H –
370 lbs. (empty canisters)
Maximum power:
• 120 volts +/- 10%,
60 Hz, 5 amp
• 220/230 volts +/- 10%,
50/60 Hz, 2.5 amp
Environmental
Conditions*
• Operating temperature:
between 50
104o F (40o C)
• Relative humidity:
between 5% and 85%
without condensation
o
F(10
o
C) and
Optional Accessories
Top Cover
Canisters
Monitor/
Keyboard
Stand
Spill Tray
Quart/Pint/
Gallon
Container Shelf
• Computer with Flat Screen
Monitor, Keyboard &
Mouse
• Label Printer
• Barcode Scanner
• Surge Protector
5-gallon
Container
Shelf
*NOTE: Environmental conditions are strictly based on the types
of colorants used (information provided by paint manufacturer).
The specifications shown are for the machine only.
Service
Panel
8 | Accutinter 1500
Fluid Management Customer Service 1 . 800 . 462 . 2466
Page 11
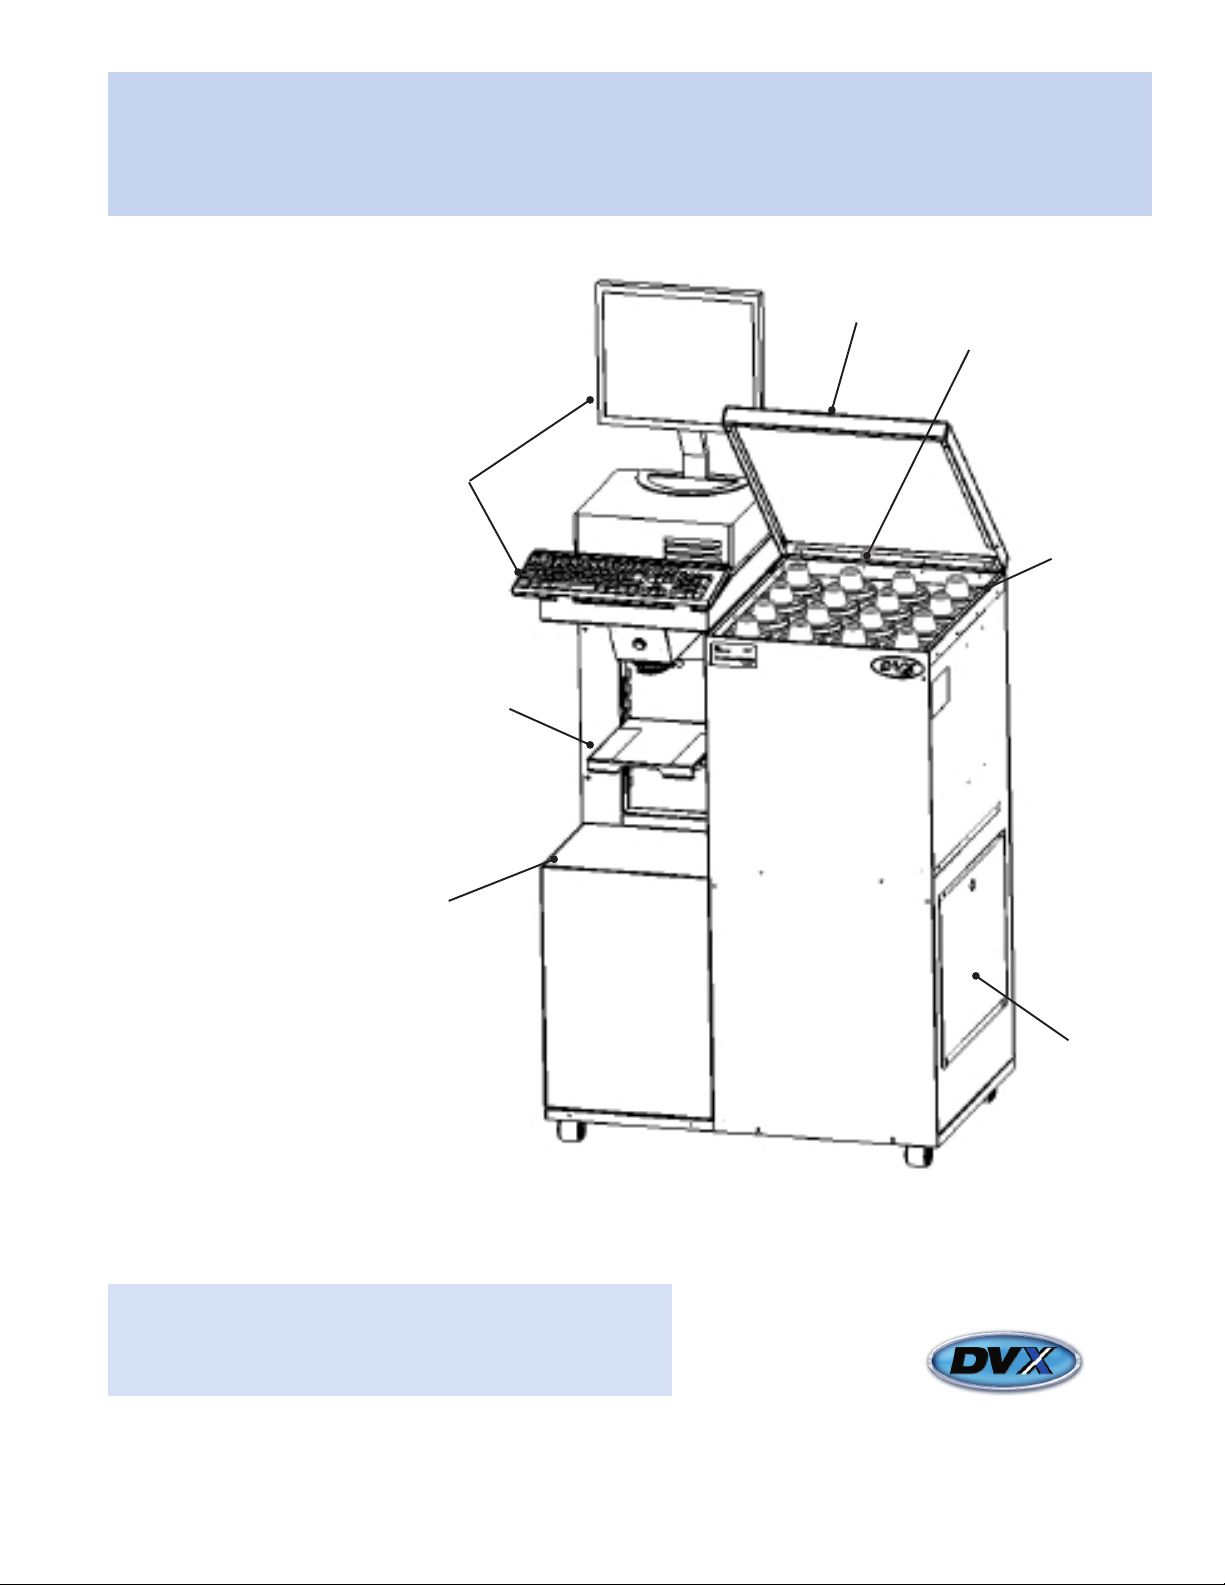
Getting to Know Your Accutinter 1500 HS
Technical Specifications
16 Canisters:
35” W x 24” D x 48” H –
370 lbs. (empty canisters)
Maximum power:
• 120 volts +/- 10%,
60 Hz, 5 amp
• 220/230 volts +/- 10%,
50/60 Hz, 2.5 amp
Environmental
Conditions*
• Operating temperature:
between 50
104o F (40o C)
• Relative humidity:
between 5% and 85%
without condensation
o
F(10
o
C) and
Optional Accessories
Top Cover
Canisters
Monitor/
Keyboard
Stand
Spill Tray
Quart/Pint/
Gallon
Container Shelf
• Computer with Flat Screen
Monitor, Keyboard &
Mouse
• Label Printer
• Barcode Scanner
• Surge Protector
5-gallon
Container
Shelf
*NOTE: Environmental conditions are strictly based on the types
of colorants used (information provided by paint manufacturer).
The specifications shown are for the machine only.
Service
Panel
Fluid Management Customer Service 1 . 800 . 462 . 2466
Accutinter 1500 | 9
Page 12

Getting to Know Your Accutinter 1500
Accutinter 1500 / Accutinter 1500 HS Features
DVX technology drives accurate, consistent and repeatable dispenses
Mechanical spring-loaded nozzle closer (Accutinter 1500) and automatic nozzle closer (Accutinter 1500 HS) keep
low-VOC colorants from drying and causing mis-tints
Small footprint delivers accurate performance
Low profile design makes filling and tinting easy
Intuitive software allows operators to learn tinting fast
Tips to Improve Operation
Clean nozzles daily for consistent and accurate dispense
Purge each colorant once a day
Follow the preventative maintenance schedule for your Accutinter 1500 / Accutinter 1500 HS
DO NOT use solvents in your Accutinter 1500 / Accutinter 1500 HS
Keep ColorPro software current
DO NOT load screen savers onto your Accutinter 1500 / Accutinter 1500 HS computer/monitor. Adding this and
other software may conflict with ColorPro and effect dispense operation
Use the Welcome to ColorPro section of this manual for answers to questions about ColorPro
Use the correct sized labels for your label printer (optional).
10 | Accutinter 1500
Fluid Management Customer Service 1 . 800 . 462 . 2466
Page 13
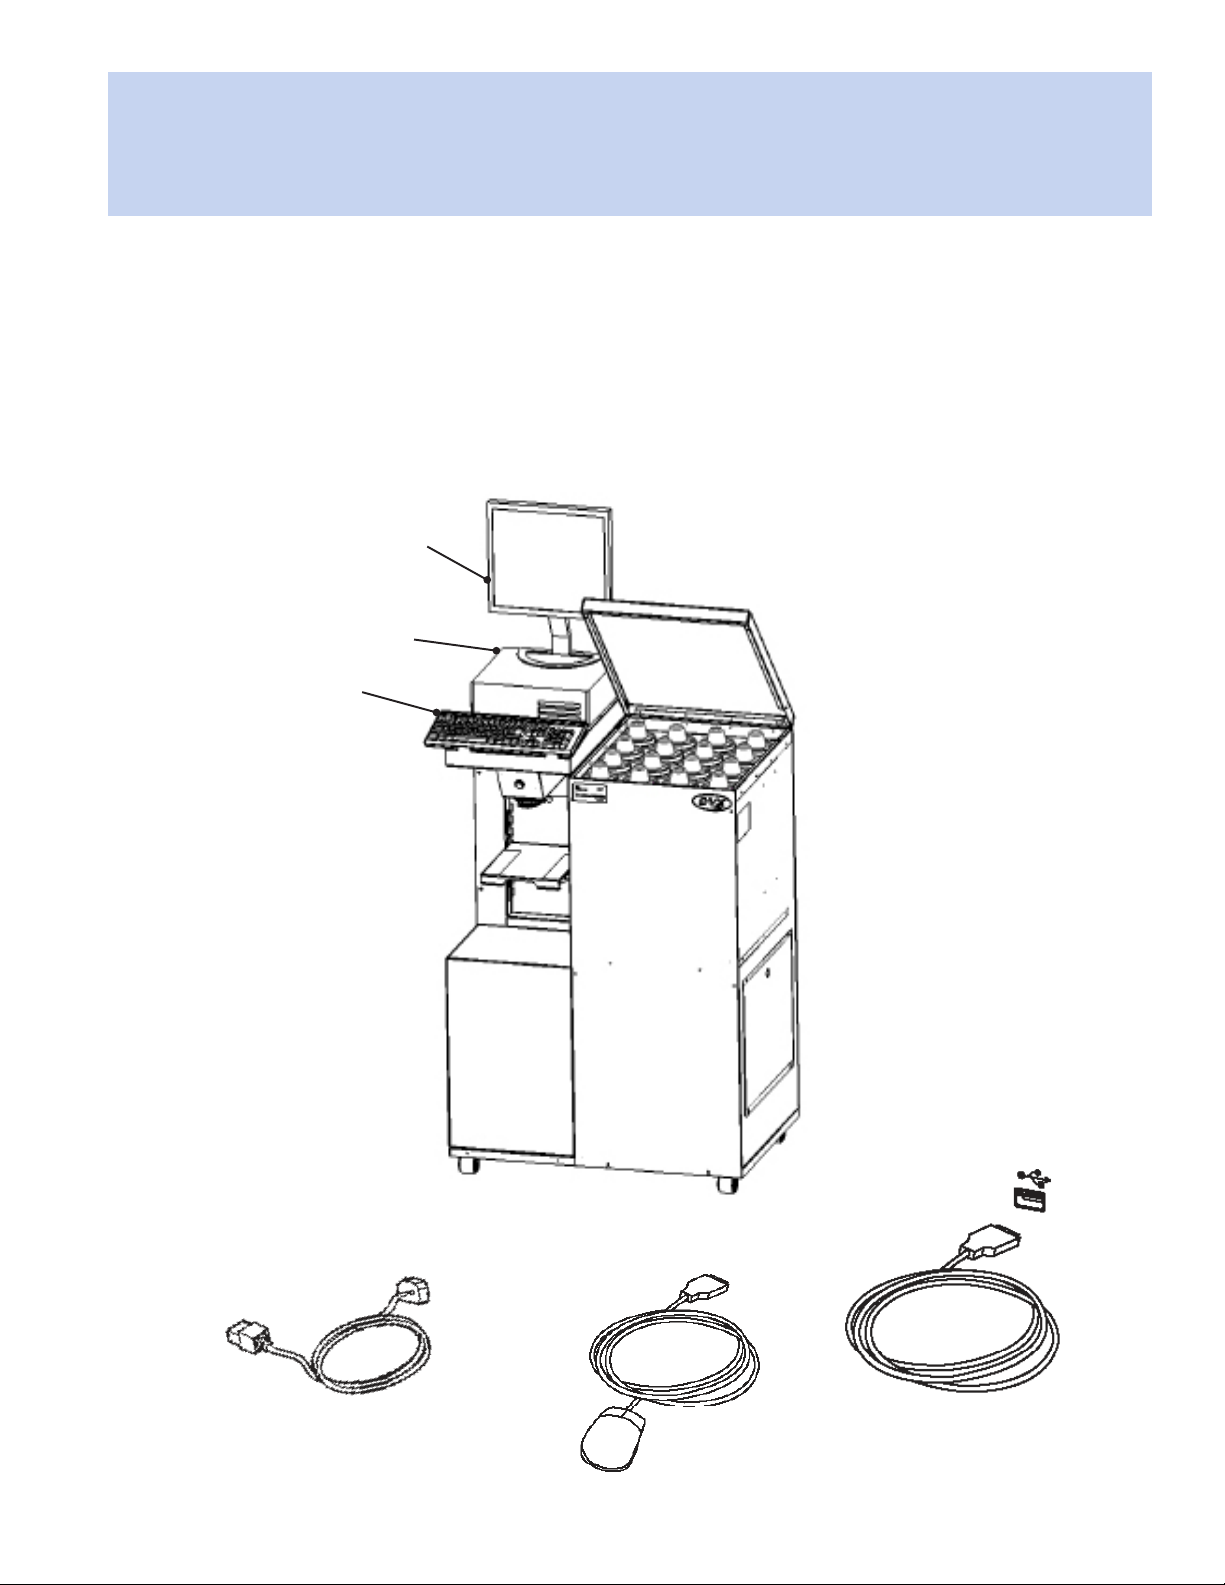
Getting Started
Installation
Your Accutinter 1500 and Accutinter 1500 HS have been designed for quick set up. If you have never
used an Accutinter dispenser or are new to paint dispensers, read this section for instructions on getting
started and installing your machine.
If you are an experienced user, you may already know enough to get started. Be sure to look over the
information in the “Welcome to ColorPro” section of this guide to find out more about the new features and
capabilities in ColorPro.
Monitor
Computer
Keyboard
Power cable
Fluid Management Customer Service 1 . 800 . 462 . 2466
Mouse
USB cable
Accutinter 1500 | 11
Page 14
Getting Started
Installation
Unpacking and Set up
Follow the steps on the next nine pages to set up your Accutinter 1500 or Accutinter
1500 HS.
Warnings
1 Make sure these items are available before installing.
Accutinter 1500 or Accutinter 1500 HS unit
Computer, mouse, and keyboard
Label printer and labels (optional accessory)
Barcode scanner (optional accessory)
Surge protector (not included)
2 Tools needed for installation.
Phillips screwdriver
Scissors or diagonal cutters
3 Unpack the machine.
a. Remove the interior contents of the packaging.
b. While unpacking the machine, inspect the machine for any damage that
may have occurred during shipping.
If any damage is found, notify the carrier immediately. Arrange for
inspection in order to claim recovery. Claims for damage must be made by the
consignee (YOU). The carrier assumes full responsibility upon acceptance
of the shipment and will not entertain any claims by the consignor.
Verify the contents against the packing slip. Note if any items are missing
or damaged. Call Fluid Management Customer Service at 1-800-462-2466
if any items are missing.
ALWAYS shut off the power
and unplug your machine
from the AC power outlet
before servicing.
This unit must be plugged
into a dedicated electrical
line. This includes:
• 15 amp line for 120 Volt
equipment
• 15 amp line for 220 Volt
equipment
The surface the dispenser sits
on must be strong enough to
support its weight of up to
700 pounds (317 kg).
Replace all fuses with the
exact sized replacements.
This machine is not explosion
proof and must not be used
in a flammable atmosphere or
with flammable materials.
To reduce the risk of electric
shock or injury, use indoors only.
4 Position dispenser in permanent location.
Choose a location for your dispenser that is capable of supporting the weight
(700 pounds [317 kg]). Make sure there is enough room for service personnel
to have access to the rear of the machine. If there is not enough room, routine
maintenance may be difficult to perform.
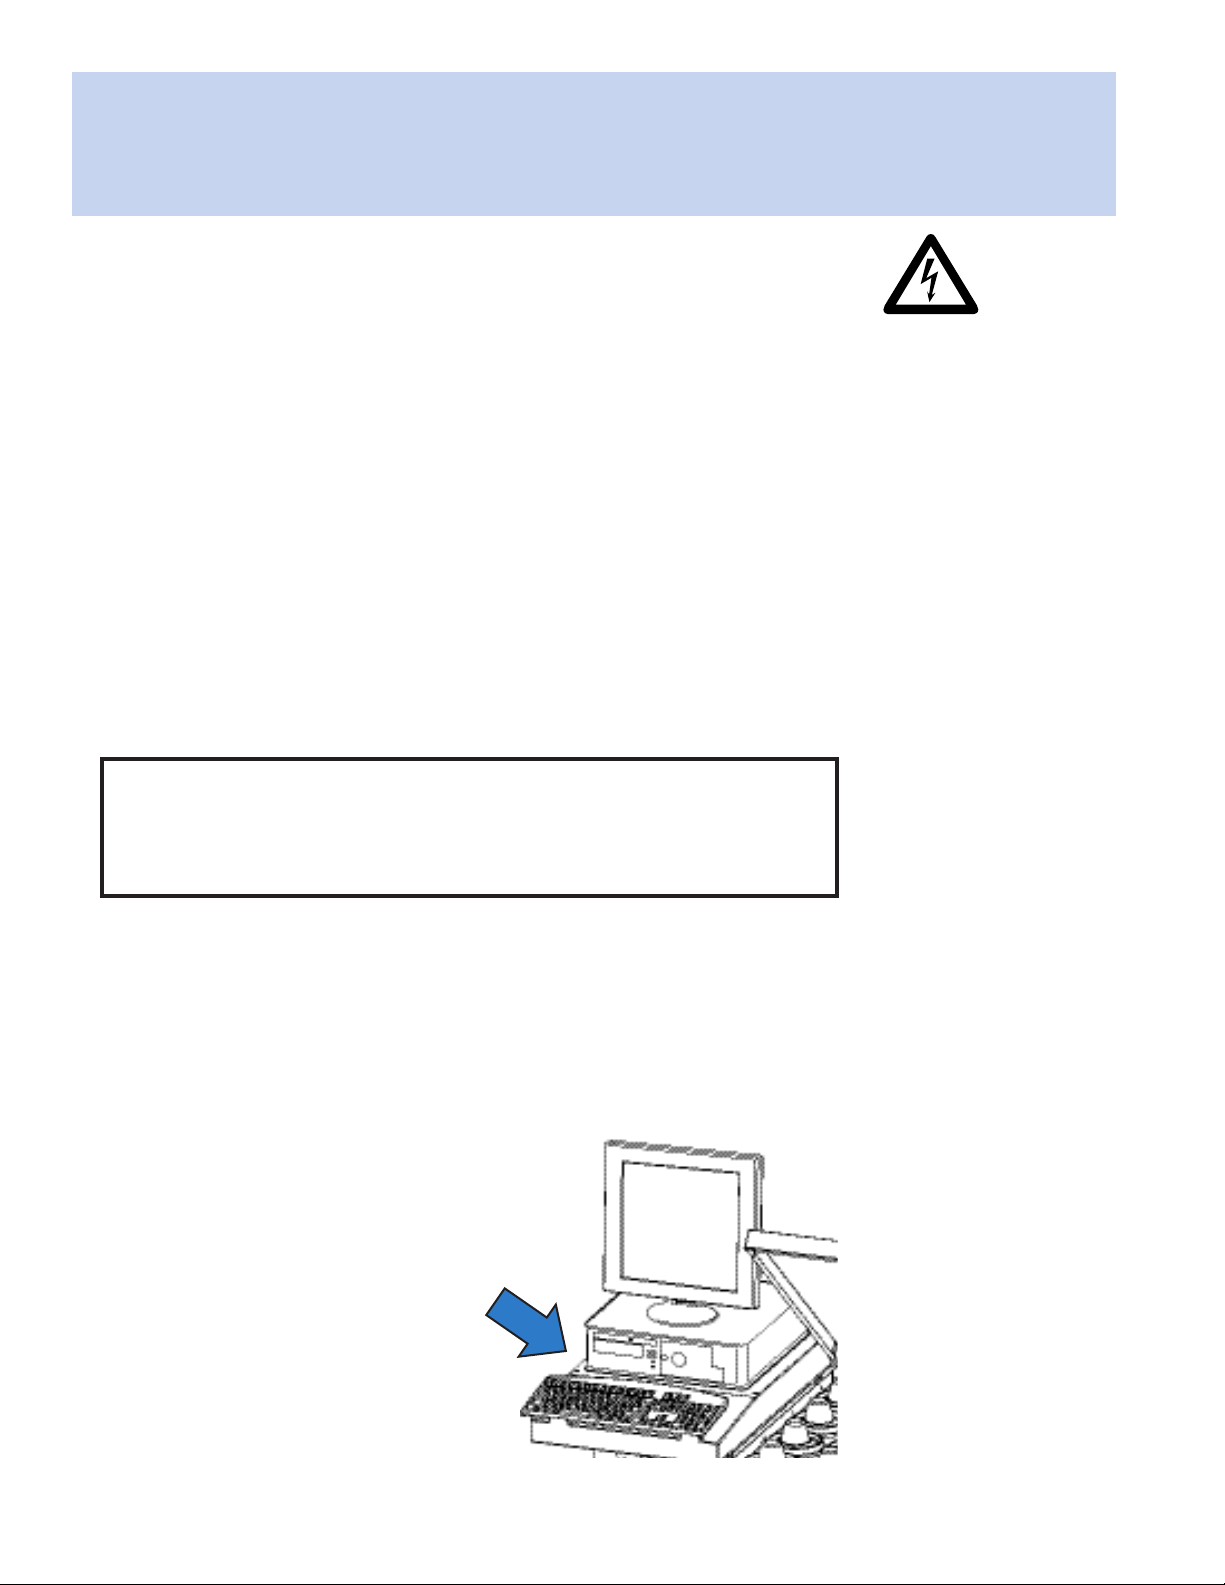
5 Position the monitor, keyboard,
and computer.
Place the monitor and keyboard on the
keyboard support on the left of the
machine. See Figure 1.
12 | Accutinter 1500
Fluid Management Customer Service 1 . 800 . 462 . 2466
FIGURE 1
Page 15

Getting Started
Installation
6 Plug in the power cord and connect all cables.
a. Route the keyboard, monitor, and mouse cables to the rear of the machine where the computer has been
placed. Plug them into the appropriate ports on the back of the computer.
b. If you purchased the optional barcode scanner, label printer or are using a spectrophotometer, route the
cables to the rear of the machine where the computer has been placed. Plug these cables into the
appropriate ports on the back of the computer.
c. Connect the USB cable coming out of the hole of machine where the
computer has been placed. Attach the USB cable to the port labeled
“DISPENSER” on the back of the computer. See Figure 2
d. Plug the power cords from the monitor, computer and Accutinter into
the recommended surge protector.
e. Plug the surge protector into a 15 amp dedicated electrical outlet.
7 Turn on machine.
a. Locate the front panel below the nozzle closer in the center of the
machine.
b. Locate and unscrew the two Phillips head machine screws provided.
c. Open the front panel and locate on the red toggle switch near the
bottom of the compartment.
d. The red toggle switch needs to be in the ‘ON’ position on or ‘RESET’
position for the Accutinter to work properly.
e. Close the front panel and screw in the two Phillips head machine
screws provided.
FIGURE 2
8 Turn on computer and monitor.
Locate the on/off button on your computer and turn it on. Reference the computer’s user manual if you have
difficulty locating.
9 Locate the ColorPro icon on your desktop.
ColorPro and your manufacturer’s database were loaded at Fluid Management’s factory. If you cannot locate
the ColorPro icon, load software using the backup CD provided. Open ColorPro by double clicking on the icon.
10 After the machine is installed, fill the canisters and update ColorPro
Complete an initial manual dispense for each colorant.
(See “Getting Started: Preparing and refilling the canisters” on page 16).
Fluid Management Customer Service 1 . 800 . 462 . 2466
Accutinter 1500 | 13
Page 16

Getting Started
Connecting the label printer (optional)
The label printer software for the label printer is installed on the computer by Fluid Management. All you
need to do is connect the printer cables to the computer and to a dedicated power outlet. The original
packaging from the printer vendor includes the software, a quick start guide with detailed instructions,
and the necessary cables.
Follow these steps to connect the printer:
1
3
a. Unpack the printer.
b. Make sure you have
these items:
-CD - ROM
-Quick Start Guide
-Roll of labels
-USB cable
-Label writer printer
-Power cable
-Power adapter
c. Plug the power cord
into the power adapter.
2
a. Plug the power adapter into the power
connector on the bottom of the printer.
b. Plug the other end of the power cord
into a power outlet.
c. Plug the USB cable into the bottom of
the printer.
4
The blue light on the front of the printer
should be on if the printer is ready.
Plug the USB cable into the available USB
port on the back of the computer.
14 | Accutinter 1500
- Click the Print Label (F5) button to print
labels when dispensing a formula.
Fluid Management Customer Service 1 . 800 . 462 . 2466
Page 17

Getting Started
Connecting the barcode scanner (optional)
The barcode scanner must be connected to the computer and keyboard. The barcode scanner is
pre-programmed by Fluid Management. After the barcode scanner is connected, the scanner must be
enabled to be compatible with ColorPro. The original packaging from the vendor includes the barcode
scanner, the cable, and a quick start guide.
Follow these steps to install the barcode scanner:
1
a. Unpack the barcode scanner.
b. Make sure the barcode scanner and the
cable are included.
c. Turn on the computer.
3
2
Plug the interface cable modular cord into the
port in the bottom of the scanner’s handle.
4
Connect the scanner cable to the keyboard
cable from the Accutinter1500.
NOTE! If the keyboard cable is a USB, add
an adapter and connect the two cables.
Fluid Management Customer Service 1 . 800 . 462 . 2466
Connect the scanner cable to
the purple keyboard connector
on the back of the computer
where the keyboard symbol
is marked.
Accutinter 1500 | 15
Page 18

Getting Started
Connecting the barcode scanner (optional)
After the barcode scanner is connected to the computer and keyboard, it must be enabled in ColorPro.
Follow these steps to enable the barcode scanner:
Locate FM_Customizer from Fluid
Management folder and launch.
5
a. Type in “service” when you are prompted
for the password.
b. Click Check.
a. Check Print Override Base to allow
7
operators to manually override using
scanner.
b. Check Barcode Chip Scanning Enabled
if you are using barcodes to identify
formulas from other color chips.
a. Check the Barcode Scanning Enabled box
6
8
on the Barcoding and Extra Options tab.
b. Click Apply Changes, then click Yes and
OK.
c. Close.
After enabling the barcode scanner, you can
test the scanner by dispensing.
a. Open the Dispense menu.
b. Select a formula.
c. Click the Dispense button. If you receive
a prompt that says, “Please Scan the Base
Barcode”, you have successfully enabled
the bar code scanner.
16 | Accutinter 1500
Fluid Management Customer Service 1 . 800 . 462 . 2466
Page 19

Getting Started
Preparing and refilling the canisters
After your machine is installed in the proper location, you need to fill the canisters with colorant so you
can dispense for the first time. Your machine may be shipped with a small amount of glycol or colorant in
the canisters already, but you need to fill them to capacity with colorant. When re-filling canisters, you will
follow the same process using steps 3-8. Canisters come in varying capacities. Check the label inside
the top cover for capacity and colorant locations. DO NOT overfill the canisters. After the canisters are
filled, ColorPro (or your manufacturer’s software) must be updated (See page 18).
2
1
Raise the top cover of the
Accutinter so you can see
the canisters inside.
Remove the caps from
each canister one at a
time and prepare to fill
them with colorant.
Cautions
• DO NOT operate the
dispenser until it is in a
permanent location.
• DO NOT dispense if
canisters are empty
• Before dispensing colorant
for the first time, you
must complete a manual
dispense.
• DO NOT dispense without a
container in place.
• DO NOT use shelf surface to
seal open cans.
Fluid Management Customer Service 1 . 800 . 462 . 2466
Accutinter 1500 | 17
Page 20

Getting Started
Preparing and refilling the canisters
Fill Menu
Use the Fill Menu to
update the software
after you have filled
all of the canisters for
the first time. When
refilling, select All
(F2) or the correct
individual colorant.
Main Menu
3
4
Update ColorPro with the canister level information
after you have filled all of the canisters.
From the Main Menu, select Maintenance (F3). In the
Fill tab, select All (F2).
18 | Accutinter 1500
5
Select Fill To Top (F2)
button.
*NOTE: When refilling, update the
canisters by entering the amount of colorant
you added in the text box. Press Enter.
6
Fluid Management Customer Service 1 . 800 . 462 . 2466
When prompted, “...are
you sure?”, click Yes.
7
*NOTE: Repeat entire process for each
empty canister.
Select Done (Esc) to
return to the Main Menu.
Page 21

Getting Started
Preparing the system
After you have filled the canisters and updated the software, you must do an initial dispense to make sure
the Accutinter is working properly.
Smart Purge
Use “Smart Purge” for daily Purging.
This will only purge colorants that
have not been recently used.
1
From any screen choose Maintenance (F3 or F11).
3
4
2
Purge (F3) button.
underneath the nozzle
Click on the
Purge tab.
Purge colorants.
Click on the
colorant to be
purged or select
ALL button to
purge entire
system. Click the
Place a container
with nozzle closer
open.
NOTE:
Accutinter 1500
HS, the nozzle will
open automatically
after step 5. At this
point, just place the
container aligned
with the nozzle tip.
In the
5
Click Dispense (F2).
Colorant(s) will dispense.
Prompt will appear
confirming dispense.
6
Click Done (Esc).
Fluid Management Customer Service 1 . 800 . 462 . 2466
Accutinter 1500 | 19
Page 22

Getting Started
Using the shelves
For 5-gallon containers, keep shelf flipped
upright into the Accutinter.
For all other container sizes, flip down the
shelf.
Place the quart/pint can directly onto the
shelf beneath the red LED can locator light.
Lift shelf to the pint, quart, or one-gallon
position labeled. Push shelf in to lock it in place.
Make sure the shelf is sturdy before using.
To move shelf from locked position, lift
shelf upward and outward slightly and slide
shelf to desired container height.
With shelf stored in upright position,
center the five-gallon can directly
beneath the red LED can locator light
before dispensing.
20 | Accutinter 1500
Fluid Management Customer Service 1 . 800 . 462 . 2466
Page 23

Basic Operations
Welcome to ColorPro4
ColorPro and ColorPro Professional puts usability at your fingertips with features that allow you to operate
your Accutinter 1500 dispenser—instantly dispense any formula in your database, perform maintenance,
run usage reports, estimate paint coverage for any room, adjust formulas, and calculate the formulas for
lightening and darkening paint.
ColorPro4 Features:
• Dispense all your database
formulations or manually
create your own colors
• Store customer information
and color requirements so
you can provide consistent
service time and time again
• Integrates with
spectrophotometer
hardware and software
• Customize settings to meet
your business volume needs.
• Easy to use screens will assist
you in routine maintenance
• Run diagnostics on
the machine for quick
troubleshooting
• Track and report colorant,
machine, and formula usage
to assist you in inventory,
maintenance and trend
management
• All functions can be
conducted with mouse or
keyboard
• ColorPro translated into
a variety of operator
languages
Fluid Management Customer Service 1 . 800 . 462 . 2466
Accutinter 1500 | 21
Page 24

Basic Operations
Main menu
The main screen of ColorPro features five selections.
Dispense
Click here to go to the Formula Book, Manual
Dispense, and Dispense Queue menus.
Maintenance
Click here to add
colorant, purge lines,
agitate colorants.
Reports
Click here to run
reports for a selected
date range in csv.file
format.
Help Menu
Click here for training
videos to get answers
to your ColorPro and
Accutinter questions.
About
Click here to see ColorPro
and Accutinter information.
22 | Accutinter 1500
Fluid Management Customer Service 1 . 800 . 462 . 2466
Page 25

Basic Operations
Dispensing from Formula Book
From the Main Menu, choose Dispense (F2) button. The Formula Book tab allows you to select, dispense,
and adjust the formula. You can also estimate paint quantities and enter new formulas.
Clear Formula
To select a new formula or to start
over, choose Clear Formula (F9).
Formula Information
Select the Brand of
formula you are
searching for by using the
drop down menus.
Enter the Formula Name
or use the drop down
menus to search for
the Formula Number
in your database.
Select the desired
Product, Finish, and
Container Size using the
drop down menus.
Dispense
Choose Dispense (F2) to dispense
the formula now. When dispensing,
place container under nozzle. Prompt
will appear confirming dispense.
To dispense another container of the
same formula, choose Dispense (F2).
Fluid Management Customer Service 1 . 800 . 462 . 2466
Accutinter 1500 | 23
Page 26

Basic Operations
Dispensing from Formula Book
Ingredients
The colorant ingredients needed to
dispense your formula will show here.
Print Label
Click here to print labels.
2
Order Queue
This number indicates the
number of jobs queuing.
Adjust
Click here (F6) to adjust
individual formulas
(See page 28).
Save As Custom
Click here (F7) to save as a
custom color or customer
information.
Price
Click here (F3) to estimate
the cost of a job or price for a
specific formula (optional).
Send To Queue
Choose Send to Queue
(F10) to dispense the
formula later.
Coverage Estimator
Click Coverage Estimator (F8)
to estimate how much paint is
needed for a job.
24 | Accutinter 1500
Fluid Management Customer Service 1 . 800 . 462 . 2466
Page 27

Basic Operations
Manual dispensing
From the Main Menu, choose Dispense (F2) button. The Manual Dispense tab allows you to select,
dispense, and adjust the formula. You can also estimate paint quantities, and enter new formulas.
Enter Amounts
The colorants will be displayed under Selected Ingredients. Type in the shot size
of the colorant that you require. Repeat the steps for each colorant in that formula.
Brand
Select the Brand of
paint you are creating a
formula for by using the
drop down menu.
Ingredients
From the ingredient
list, select the first
colorant by double
clicking on the button.
Get Base
After selecting brand
and colorants, click
here to select Base and
size to dispense new
formula info.
Save As Custom
Click here (F7) to save
custom formula information.
Dispense Now
Dispense now by selecting Dispense (F2).
Fluid Management Customer Service 1 . 800 . 462 . 2466
Or
Send to Queue
Choose to dispense the formula later by selecting
Send to Queue (F10).
Accutinter 1500 | 25
Page 28

Basic Operations
Using external data source and dispense queuing
From the Main Menu, choose Dispense (F2). The Dispense Queue tab allows you to enter and dispense
a formula scanned by a spectrophotometer (optional) or from a previous order not yet dispensed.
Order Queue
This number indicates the
number of jobs queuing.
Input List
The Input List (F4)
displays all the formulas
waiting to be dispensed
from an external source
or previously requested.
The number of jobs
queuing is located
in top right corner.
Search for a job by
clicking on any of
the input tabs.
Remove Job
Click here to remove
the highlighted dispense
from the input list.
Dispense
Choose Dispense (F2) after selecting the
formula from the Input List.
26 | Accutinter 1500
Fluid Management Customer Service 1 . 800 . 462 . 2466
Page 29

Basic Operations
Adjusting formulas
Color formulas can be modified to adjust lightness, darkness, and modify existing formulas. From any tab in
the Dispense Menu, click Adjust (F6) after a formula is selected.
Adjust Ingredients
On the Adjust
Ingredients tab, the
original formula colorant
amounts are displayed.
Selected Ingredients
In the Change +/- fields,
type the amount to add
or subtract from the
original formula for
each colorant. The totals
will change based upon
amounts you enter.
Fluid Management Customer Service 1 . 800 . 462 . 2466
Dispense Total
Click Dispense Total
(F3) to dispense the
original formula plus
adjusted amounts.
Dispense Change
Click Dispense
Change (F2) to
dispense the
incremental added
colorant amounts.
Accutinter 1500 | 27
Page 30

Basic Operations
Using color scaling
On the Adjust Scaling tab, the original formula colorant amounts are displayed.
Create a deeper or
lighter formula by
selecting Percent
Change and selecting
a value from drop down
box, or select Container
Size and select a
different paint container
size from drop down box.
28 | Accutinter 1500
Reset
Click here (F9) to
return to original
formula settings.
Dispense Total
Click Dispense Total
(F3) to dispense the
original formula plus
adjusted amounts.
Dispense Change
Click Dispense
Change (F2) to
dispense the
incremental added
colorant amounts.
Fluid Management Customer Service 1 . 800 . 462 . 2466
Page 31

Basic Operations
Purging the lines
It is recommended that you complete a purge daily to ensure optimal Accutinter performance and avoid
possible mis-tints.
Smart Purge
Use “Smart Purge” for daily Purging.
This will only purge colorants that
have not been recently used.
1
From any screen choose Maintenance (F3 or F11).
3
4
2
All button to purge
open automatically
after step 5. At this
point just place the
Click on the
Purge tab.
Purge colorants.
Click on the
colorant to be
purged or select
entire system.
Click the Purge
(F3) button.
Place a container
underneath the
nozzle with nozzle
closer open.
NOTE:
Accutinter 1500
HS the nozzle will
container aligned
with the nozzle tip.
In the
5
Click Dispense (F2).
Colorant(s) will dispense.
Prompt will appear
confirming dispense.
6
Click Done (Esc).
Fluid Management Customer Service 1 . 800 . 462 . 2466
Accutinter 1500 | 29
Page 32

Basic Operations
Stirring the colorants
When adding new colorants or if the colorant has not been used for several days, you may want to
manually stir colors. From any screen, choose Maintenance (F3 or F11). The Agitate tab allows you to
stir colorants in the canister.
1
2
Click on Agitate
tab. In the Duration
in Minutes (F4)
field, type in
the amount of
time colorants
should stir.
Click Agitate (F2)
to begin agitation
cycle. Progress bar
will appear confirming
agitation cycle. Click
Done (Esc).
30 | Accutinter 1500
NOTE: The default cycle is 30 seconds per
hour. Fluid Management recommends 4 minutes
for manual agitation.
Fluid Management Customer Service 1 . 800 . 462 . 2466
Page 33

Basic Operations
Using ColorPro Help
For additional information on how to operate your Accutinter or ColorPro, click Help (F1). The main screen
of ColorPro features six selections.
Accutinter Models
Contains information
regarding shelves,
container sizes, and
dispensing.
ColorPro
Find information
about dispensing
with ColorPro,
maintaining the
machine, and
customization.
Quick Start Guide
Overviews regarding
dispensing, maintaining,
and customizing
your Accutinter.
Maintenance
Includes information
about canister, nozzle, and
preventative maintenance,
and line purging.
Troubleshooting
Contains information
regarding dispensing,
color tinting and other
operational issues.
Safety
Important safety
instructions to note when
operating equipment.
Fluid Management Customer Service 1 . 800 . 462 . 2466
Accutinter 1500 | 31
Page 34

Maintenance, Care and Use - Accutinter 1500
Your Accutinter 1500 depends on clean and well maintained parts. To ensure dispensing accuracy and
increase the operation of your Accutinter 1500, follow the maintenance schedule detailed below:
PERFORM EVERY DAY:
• Clean each of the nozzles with the recommended nozzle cleaning tool and purge (see below).
• Remove all excess colorant and debris from the nozzle and nozzle area.
• Clean all accessible surfaces and cabinet with a mild cleaning solution.
• Empty and clean the drip tray. Replace if necessary.
• Moist sponge daily to keep colorant from drying.
PERFORM EVERY WEEK:
• Clean the spill trays around canisters.
PERFORM EVERY SIX MONTHS:
• Check the calibration and re-calibrate as required.*
*This should be performed by a Fluid Management authorized service technician.
32 | Accutinter 1500
*This should be performed by a Fluid Management authorized service technician.
Fluid Management Customer Service 1 . 800 . 462 . 2466
Page 35

Maintenance, Care and Use - Accutinter 1500 HS
Your Accutinter 1500 HS depends on clean and well maintained parts. To ensure dispensing accuracy and
increase the operation of your Accutinter 1500 HS, follow the maintenance schedule detailed below:
PERFORM EVERY DAY:
• Clean each of the nozzles with the recommended nozzle cleaning tool and purge (see below).
• Remove all excess colorant and debris from the nozzle and nozzle area.
• Clean all accessible surfaces and cabinet with a mild cleaning solution.
• Empty and clean the drip tray. Replace if necessary.
• Moist sponge daily to keep colorant from drying.
PERFORM EVERY WEEK:
• Clean the spill trays around canisters.
PERFORM EVERY SIX MONTHS:
• Check the calibration and re-calibrate as required.*
*This should be performed by a Fluid Management authorized service technician.
Your Accutinter 1500 HS will perform best if the nozzle and colorant lines are purged and cleaned every day. If
you use your machine frequently, Fluid Management recommends cleaning and purging the nozzle at least once
a day. The instructions for daily nozzle cleaning are below. For filling the colorant canisters, go to page 17.
Do not clean the equipment with a water jet.
Open nozzle closer
. Click Maintenance (F11)
. Choose Purge tab
. Click Open/Close (F7)
Replace sponge
. Replace sponge insert
. Moisten sponge with water
. Replace cup holder to closer
bracket
Remove cup holder from
nozzle closer
. Slide black cup holder left
. Remove cup from bracket
and place to the side
Replace cup holder to
nozzlecloser
NOTE: Environmental Conditions: Operating temperature between 50
The A-weighted sound pressure is below 70 dB.
Fluid Management Customer Service 1 . 800 . 462 . 2466
Clean nozzle
. Clean each opening with
included nozzle cleaning pick
. Use a circular motion to make
sure opening is clear
Purge colorants
. Click Maintenance (F11)
. Choose Purge tab
. Click All
. Click Purge (F3)
. Click Dispense (F2)
0
F (100 C) and 1040 F (400 C)
Clean cup
. Remove sponge insert
. Clean inside of cup liner with
water and paper towel
Close nozzle closer
. Click Maintenance (F11)
. Choose Purge tab
. Click Open/Close
Accutinter 1500 | 33
Page 36

Frequently Asked Questions
Equipment troubleshooting
Most of the problems listed in this section can be prevented by daily cleaning and by purging the nozzle.
See the Maintenance, Care and Use section in this manual for instructions.
Use the chart below to locate the problem and perform the recommended actions in the last column.
Contact Fluid Management Customer Service if you are unable to find a resolution.
PROBLEM FIRST CHECK: ACTION
The machine is
dispensing mis-tints.
…Do the fill settings in
ColorPro match what is
inside the canister?
…Have the nozzle openings
been cleaned recently?
…Is the Accutinter dispensing
accurately?
Compare the canister
contents with the fill
settings. Adjust if necessary:
1- Look inside the canister
and compare the contents
with what the fill settings in
ColorPro show.
2- If they do not match, fill
the canister and adjust the
colorant level in ColorPro
(see page 17).
Clean the nozzles:
1- Clean each nozzle opening
with a nozzle cleaning tool.
2- Remove all excess colorant
from around the nozzles
(see page 33/34).
3- Purge the lines with
ColorPro (see page 28).
4- Repeat cleaning and
purging if necessary.
Dispense one ounce of
each colorant into a marked
measuring container. If you
notice any colorants are not
dispensing, call Customer
Service for assistance.
The colorant shoots to the
side during a dispense.
34 | Accutinter 1500
…Have the nozzles been
cleaned recently?
Fluid Management Customer Service 1 . 800 . 462 . 2466
1- Clean the nozzle. Remove
all excess colorant and
dried debris.
2- Purge the colorant line.
3- Repeat if necessary.
Page 37

Frequently Asked Questions
Equipment troubleshooting
PROBLEM FIRST CHECK: ACTION
The nozzle closer is not
opening or closing.
Colorant drips or runs
after dispensing.
…Is the nozzle closer
covered with dried colorant
and debris?
…Is ColorPro prompting you
to fill the canister?
...Do the nozzle openings
need to be cleaned?
…Does the colorant have air
in it?
Clean all dried colorant
and debris from the
nozzle closer area. Make
sure the nozzle arm is clean
so it moves freely.
If the nozzle closer still does
not close, call Customer
Service.
1- If yes, fill the canister with
colorant (see page 16).
2- Agitate for up to three
minutes.
3- Purge the line.
If the canister is full, clean the
nozzle and complete a purge
using ColorPro (see page 28).
Repeat if necessary.
Complete a purge using
ColorPro (see page 28).
Repeat if necessary.
A colorant canister needs
to be filled.
The canister cover and
lids need to be cleaned.
The colorant coming out
of the nozzle is drippy or
clumpy.
Fluid Management Customer Service 1 . 800 . 462 . 2466
...Do the nozzle openings
need to be cleaned?
Follow the “Preparing
and refilling canisters”
instructions on page 16.
Soak the canister covers in
hot water and mild detergent.
Wipe off the excess debris
and dried colorant when the
colorant has loosened.
Scrape the excess colorant
off with a putty knife.
Clean the nozzle openings
and purge the lines (see pages
33/34). The colorant should
come out of the nozzle in a
steady stream.
Accutinter 1500 | 35
Page 38

PROBLEM
FIRST CHECK:
ACTION
Frequently Asked Questions
Equipment troubleshooting
The machine is not
dispensing.
There is no power. …Is the machine turned on
The printer is not printing. …Is the power cord firmly
…Is the machine turned on
and plugged in?
and plugged in?
…Is there power at the
receptacle?
…Is the surge protector
turned on?
connected to the computer
and functioning properly?
…Is the USB cable
connected at both ends?
Make sure the power cord is
plugged in.
Restart the machine:
1- Exit ColorPro.
2- Shut down the computer.
3- Press the reset switch on the
front of the keyboard tray.
4- Wait 30 seconds.
5- Turn the computer back on.
If the problem still persists, call
Customer Service.
Make sure the power cord is
plugged in. Replace the power
cord is damaged.
Check the circuit breaker
Turn on the surge protector;
replace if necessary.
Make sure the printing device
is properly connected.
Unplug the power to the printer
for 30 seconds and then
replug. Try to print again.
The motor is running
erratically or not at all.
36 | Accutinter 1500
…Is the dispenser on a
dedicated line?
Fluid Management Customer Service 1 . 800 . 462 . 2466
Restart the computer. After
restarting, print again.
If you still have problems, after
following these suggestions,
contact the printer manufacturer
at 1.800.426.7827
If no, plug the dispenser into a
dedicated 115 or 220 Volt line.
Page 39

Frequently Asked Questions
Equipment troubleshooting
PROBLEM FIRST CHECK: ACTION
One or two colorants are
not dispensing.
How do I clean the nozzle
openings?
The computer doesn’t
start when you press the
power button.
The monitor screen is
blank.
…Are the nozzles clogged? Follow the daily nozzle
cleaning instructions
(see pages 33/34) for your model.
Follow the daily nozzle
cleaning instructions (see page
33/34).
OR
Follow the “Daily Nozzle
Cleaning Instructions” on
the inside of the top cover of
your machine.
…Is the power cord
plugged in?
…Is the power turned on and
are the cables attached?
Make sure the power cord is
plugged into the rear of the
computer and to a working
electrical outlet.
Make sure the USB cable is
plugged into the back of the
monitor and to the back of
the computer.
Make sure the power cord
is plugged to the back of the
computer and to a working
electrical outlet.
The keyboard isn’t
responding.
Fluid Management Customer Service 1 . 800 . 462 . 2466
…Are all the cables securely
attached between the
computer and the keyboard?
…Are all the cables securely
attached between the
computer and the keyboard?
…Does the keyboard need
replacing?
Make sure the recommended
surge protector is turned on.
If not, firmly attach all cables.
Replace the keyboard.
Accutinter 1500 | 37
Page 40

Frequently Asked Questions
ColorPro Troubleshooting
PROBLEM FIRST CHECK: ACTION
General ColorPro related …Make sure ColorPro is
installed.
…Try re-starting the machine
to see if that solves the
problem.
…Can you find the answer
in the Help section of
ColorPro?
…Make sure your computer
is properly connected.
Turn on the computer.
Does the ColorPro main
screen open up? If yes, then
ColorPro is installed.
Press the restart switch on
the front of the keyboard tray.
Look in Help for
instructions and
troubleshooting information.
Make sure the communication
cable connects the computer
to the dispenser.
If screen savers have been
installed recently, they may
conflict with ColorPro.
Uninstall the screen savers.
Restart the computer.
Press the on/off button of
the computer. Wait thirty
seconds and turn the
computer back on.
A message in ColorPro
says, “Communication
to dispenser has been
severed. Recheck
connections and try
again.”
…Make sure the
communication cable is
connected between the
computer and the machine.
If none of these suggestions
work, call Customer Service.
Exit ColorPro.
Shut down the computer.
Restart the computer. Press
the red button on the right
side of the computer.
30 seconds and turn the
computer back on.
If you still receive the
message, call Customer
Service.
Wait
38 | Accutinter 1500
Fluid Management Customer Service 1 . 800 . 462 . 2466
Page 41

Frequently Asked Questions
ColorPro
Troubleshooting
PROBLEM FIRST CHECK:
A message in ColorPro
says, “Encoder pulse
failure. Motor failed on
canister containing...”
The optional barcode
scanner does not work...
If you suspect a problem
with the label printer...
If you suspect a problem
with the colorants...
Call Customer Service.
You must have ColorPro Professional for barcoding capability;
Make sure the Barcode Scanning Enabled box is checked in
FM_Customizer (see pages 14-15).
Contact the printer manufacturer at 1.800.426.7827
Contact your department manager or store manager.
Fluid Management Customer Service 1 . 800 . 462 . 2466
Accutinter 1500 | 39
Page 42

Service
FMDirect
Fluid Management products are backed by FMDirect,
our nationwide team of phone and field service
engineers. Providing you with local, hands-on support,
over 30 factory-direct service technicians deliver
expertise when and where you need it.
• 24/7 multilingual technical support
• Professional installation and on-site operator training
• Fully-stocked parts inventory on FMDirect vans
• Extended warranty and preventive maintenance
programs
Upgrades and Replacement Parts
Some parts can be upgraded or replaced by the
customer. Fluid Management expressly identifies parts
as such, and provides documentation with instructions
when it is appropriate for customers to replace those
parts. You must closely follow all instructions when
performing such replacements. ALWAYS make sure
that the power is turned off and that the product is
unplugged from any power source before you attempt
the replacement.
Fluid Management Customer Service
1.800.462.2466
Save time and money. If something should go
wrong, we suggest consulting the Maintenance,
Troubleshooting and Service sections of this
guide. They are designed to solve basic problems
before consulting a ser vice technician.
However, should you need assistance, please
have your model and serial number ready. Be
near your machine when you call and have a
purchase order number ready if ordering parts.
DO NOT attempt to service a product yourself
unless instructed to do so by a Customer Service
Representative. Use only a service provider who is
approved to repair your particular product.
Obtain Warranty Service
First, follow the advice in this guide. If the unit still does
not function, call Customer Service for information
about how to obtain warranty service.
The serial plate is located underneath the lid of
the machine. It includes the serial and model
numbers for your machine. Please make a note
of these numbers below:
Date of purchase:
Model Number:
Serial Number:
Your Service Technician’s
Name:
40
40 | Accutinter 1500
Fluid Management Customer Service 1 . 800 . 462 . 2466
Page 43

Index
A
accessories 8
adding colorant 16-17
adjusting formulas 26
B
barcode scanner 8, 11-12, 14-15, 37
C
cabinet, about the 8, 32
canisters 5, 8, 11-12, 16-18, 33
cautions 5-7
cleaning your Accutinter 33
colorant 8-9, 11-12, 16-18, 22-29, 32-33, 35, 37
ColorPro 5, 9, 12, 16, 21-24, 29-31
ColorPro help 30
computer 6, 8, 9, 11, 12
connecting
to a Spectrophotometer 12
to the computer 11, 12
to a monitor 11, 12
coverage estimator 23
custom formula 24, 27
D
database 9, 20, 22, 24
diagnostics 9, 20
dispense 5, 8, 9, 11-12, 16, 20-26, 29
DVX 8
M
maintenance 5, 8-9, 11, 17, 21, 30-31
mis-tints 28, 32
monitor 6, 8-12,
N
nozzle 5, 8, 9, 11, 28, 30-33, 35
nozzle cleaning tool 38
P
preventative maintenance 5, 9
printer 8-9, 11, 13, 34, 36
pumps 9
purge 5, 9, 21, 28, 31
R
replacement parts 6
reports 20-21
reset 27
S
safety 5-7
scaling percentages 27
screen savers 9
service 1, 5-9, 30-31, 38,
shaking colorant 9, 11
spectrophotometer 9, 12, 25
T
F
filling canisters 9, 11, 16-17, 29
formulas 20, 22-26
formula book 21, 22
fuses 11
G
grounding 7
I
installation 7, 10-12
K
keyboard 8, 10-12, 14-15, 35
L
labels 5, 6, 11-13, 23, 37
44 | Accutinter 1500
troubleshooting 5, 9, 32-36
U
upgrading software 17, 21
USB cable 10, 12
usage reports 20
utilities 21, 30
W
WARNINGS 6, 7, 11
warning labels 5, 6
warranty 39
Fluid Management Customer Service 1 . 800 . 462 . 2466
Page 44

Accutinter 1500
Fluid Management, Inc.
1023 Wheeling Road • Wheeling IL 60090
p: 800.462.2466
f: 847.537.3221
www.fluidman.com
 Loading...