


Owner’s
Manual
For Maximum Effectiveness And Safety, Please Review this Owner’s Manual, View the video, and for Healthy Eating Tips refer to the Jump Start Section.

TABLE OF CONTENTS |
|
|
OWNER’S MANUAL |
|
|
Important Safety Information ............................................... |
|
2 |
Equipment Warning & Caution Labels ................................. |
|
3 |
Specifications & Parts .......................................................... |
|
3 |
Introduction .......................................................................... |
|
4 |
Assembly Instructions....................................................... |
|
5-6 |
Folding Instructions .............................................................. |
|
7 |
Parts List & Exploded View .................................................. |
|
8 |
Exercise Guidelines......................................................... |
|
9 -10 |
Warm Up & Cool Down Stretches ................................ |
|
11 -12 |
Ab Lounge™ XL System ..................................................... |
|
13 |
Ab Lounge™ XL Workout .............................................. |
|
13 -14 |
Care & Storage ................................................................... |
|
14 |
Getting Started on Your Ab Lounge® XL Equipment |
.........15 |
|
Ab Lounge® XL Exercises............................................. |
|
16 -18 |
Ab Lounge™ XL Workout Tracking Sheets......................... |
19 |
|
Cardiovascular Conditioning......................................... |
|
19 -20 |
Progressive Cardiovascular Training Program ................... |
21 |
|
Cardio Workout Tracking Sheets........................................ |
|
22 |
JUMP START DIET ...................................................... |
|
23 -28 |
Workout Progress Chart ........................... |
Inside Back Cover |
|
®
©2005 Fitness Quest Inc. All rights reserved.
Ab Lounge® and Fitness Quest® are registered trademarks of Fitness Quest Inc. U.S. Patent #5,681,250. Ab Lounge™ XL System, Ab Lounge™ XL Workout, Focus Strap™ and Iso-Grip™ are trademarks of Fitness Quest Inc.
No part of this booklet may be reproduced or utilized in any form or by any means electronic, mechanical or otherwise without the expressed written consent of the copyright holder.
10/17/05

IMPORTANT SAFETY INFORMATION
 WARNING
YOU AND OTHERS CAN BE SERIOUSLY INJURED OR KILLED IF WARNINGS ON THE EQUIPMENT, IN THIS OWNER’S MANUAL AND VIDEO ARE NOT FOLLOWED.
1)Before starting this or any other exercise program, consult your physician. Your physician should assist you in determining the target heart rate zone appropriate for your age and physical condition. Certain exercise programs or types of equipment may not be appropriate for all people. This is especially important for people over the age of 35, pregnant women, or those with pre-existing health problems
or balance impairments. If you are taking medication which may affect your heart rate, a physician's advice is absolutely essential.
2)Start out slowly and progress sensibly.
Even if you are an experienced exerciser, start with the basic workout and become familiar with all of the exercises before moving on to more advanced workouts or exercises. For best results, perform all of the exercises at the tempo demonstrated in the video.
3)Do not overexert yourself with this or any other exercise program. Listen to your body and respond to any reactions you may be having. You must learn to distinguish “good” pain, like fatigue, from “bad” pain, which hurts. If you experience any pain or tightness in your chest, an irregular heartbeat, dizziness, nausea, or shortness of breath, stop exercising at once and consult your physician immediately.
4)Warm up before any exercise program by doing 5 to 10 minutes of aerobic activity, followed by stretching.
5)Inspect the equipment. Before EACH use, visually inspect the equipment including stitching, fabric, frame and pivot area. Do not use unit if you detect any tearing, fraying or cuts on fabric. Do not use unit if any pivoting assembly is not working properly. NEVER operate the equipment if the equipment is
not functioning properly.
6)USE CARE when getting on and off the equipment. Set up and use your equipment on a solid, level, carpeted surface. Follow the instructions demonstrated in your video and on page 15 in this manual for proper entry and exit techniques.
7)Use this equipment ONLY for the intended use as described in this manual. Do not modify the equipment or use attachments not recommended by the manufacturer.
8)Have plenty of clearance behind and in front of your equipment. It is important to keep children, pets, furniture and other objects out of the way when
using your equipment. You should have a minimum of 3 feet of clearance both in front of and behind your equipment.
9)Wear appropriate clothing when exercising.
Workout clothing should be comfortable and lightweight, and should allow freedom of movement. Wear comfortable athletic shoes made of good support with non-slip soles, such as running or aerobic shoes. Do not use this product with bare feet or when wearing only socks or stockings.
10)THIS EQUIPMENT IS NOT FOR USE BY CHILDREN. To prevent injuries, keep this and all fitness equipment out of the reach of children.
Follow these simple rules:
–Keep children out of rooms where you have your exercise equipment.
–Store exercise equipment in a room that can be locked.
–Know exactly where your children are when you work out.
–If you have small children at home, don’t wear headphones while you work out.
–Talk to your kids about the dangers of exercise equipment.
11)Breathe naturally, never holding your breath during an exercise. Avoid over training, you should be able to carry on a conversation while exercising.
12)Cool down after an exercise session, with 5 to 10 minutes of slow walking, followed by stretching.
13)Handicapped or disabled people must have medical approval before using this equipment and should be under close supervision when using any exercise equipment.
14)Only one person at a time should use this equipment.
15)DO NOT put hands, feet, or any foreign objects on or near this equipment when in use by others.
Use caution not to pinch fingers or hands in moving parts when folding, setting up, or using the equipment.
Go to www.fitnessquest.com or call 1-800-497-5831 for
replacement labels, manuals or video(s).
-------- 2 --------
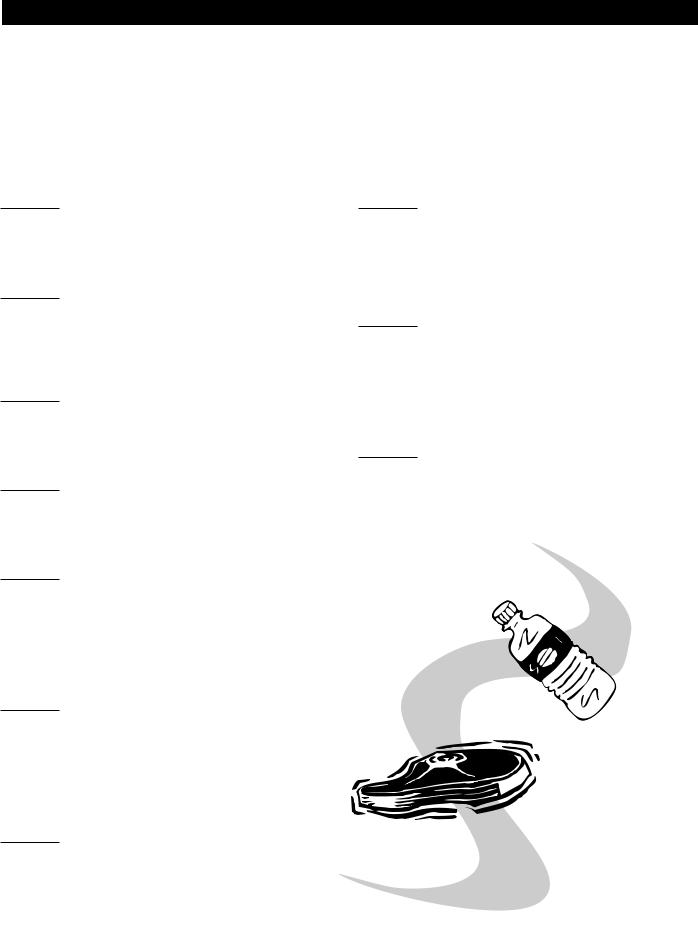
JUMP START DIET
DINNER CONTINUED
8 oz. water
3 oz. pork chop, lean only, baked, broiled or grilled 1 small baked potato
1 tsp. butter
1 cup green beans
1 large salad made with mixed greens
1 tsp. olive oil with flavored vinegar (no need to measure vinegar) or 1 Tbsp. regular dressing
8 oz. water
1 piece (3 oz.) turkey baked, broiled or grilled. Brush lightly with olive oil and favorite seasonings before cooking.
1 small baked potato with 1 tsp. butter
1 cup broccoli
8 oz. water
1 cup vegetable soup
6 crackers
2 oz. lean ham
1/2 large whole grain pita with mustard 2 sliced carrots
8 oz. water
3 oz. lean hamburger, grilled or broiled
1 Tbsp. ketchup
1 hamburger bun, tomato, lettuce, pickle and onion if desired
8 oz. water
2 slices cheese pizza from a medium pie, baked in pizza oven not in pan
1 large mixed green salad
1 Tbsp. reduced fat salad dressing
8 oz. water
1 cup angel hair pasta with 1/2 Tbsp. olive oil with garlic on pasta and topped with 1 tsp. grated cheese
3 oz. grilled chicken with Italian seasonings
1 large salad with mixed greens 1/2 Tbsp. olive oil and vinegar or 1 Tbsp. salad dressing
1/2 cup cooked green beans
8 oz. water
3 oz. pork chop, lean only, broiled or grilled without added fat
1/2 cup rice with 1 tsp. butter 1/2 cup applesauce
1 large mixed green salad
1/2 Tbsp. olive oil and vinegar (no need to measure vinegar) or 1 Tbsp. reduced fat dressing
8 oz. water
3 oz. white fish such as flounder, baked and brushed with olive oil and favorite seasonings
1 small baked potato
1 Tbsp. sour cream and chives
1 cup broccoli or cauliflower
8 oz. water
3 oz. chicken breast, no skin, baked, broiled or grilled 3 to 4 new boiled potatoes tossed with 1 Tbsp. butter
and sprinkled with garlic and parsley 1 cup beets or other vegetable
1 large salad made with mixed greens
1 Tbsp. olive oil with flavored vinegar (no need to measure vinegar)
8 oz. water
1 cup angel hair pasta
3 oz. boiled shrimp, tossed 1/2 Tbsp. olive oil and garlic 1 tsp. grated cheese
1 mixed green salad
1/2 Tbsp. salad dressing
8 oz. water
3 oz. lean pork chop, baked with reduced fat cream of mushroom soup
1/2 cup noodles with 2 Tbsp. gravy from pork chop 1 cup green beans
1 large salad made with mixed greens
2 tsp. olive oil with flavored vinegar (no need to measure vinegar)
8 oz. water
4 oz. fish, baked, broiled or grilled, brushed lightly with olive oil and favorite seasonings
1/2 cup corn 1 tsp. butter 1 cup broccoli
1 small dinner roll
-------- 27 --------
EQUIPMENT WARNING & CAUTION LABELS
IMPORTANT: See below for placement of the following Warning/Caution Labels on your unit.
WARNING LABEL 2 (2 locations)
WARNING LABEL 1
 WARNING
FAILURE TO READ AND FOLLOW THE SAFETY INSTRUCTIONS STATED IN THE OWNER’S MANUAL AND VIDEO MAY RESULT IN POSSIBLE SERIOUS INJURY OR DEATH. KEEP CHILDREN AWAY. MAXIMUM USER WEIGHT 275 LBS. REPLACE THIS LABEL IF DAMAGED, ILLEGIBLE OR REMOVED. CLASS HC.
WARNING LABEL 3 (4 locations) |
CAUTION LABEL 1 (4 locations) |
 WARNING
DETACH THIS END OF BAND FROM FRAME BEFORE FOLDING. FAILURE TO DO SO MAY RESULT IN INJURY.
 WARNING
CRUSH HAZARD. Keep hands clear during folding. Failure to do so, could result in crushed fingers.
 CAUTION
Place hand here when folding. Keep hand outside of tubes to prevent pinched fingers.
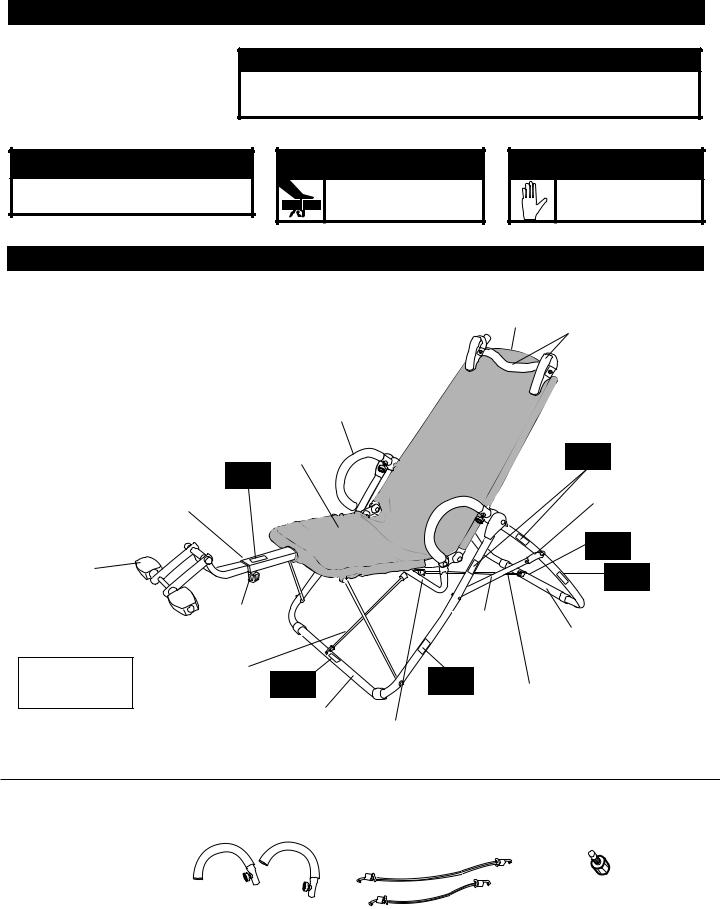
SPECIFICATIONS AND PARTS
Ab Lounge® XL Specifications:
Product Weight: Approx. 35 lbs.
Length: 54”
Width: 31-3/4”
Height: 45-1/2”
Note: Dimensions are based on unit set up for use.
Maximum user weight: 275 lbs.
WARNING
LABEL 1
X15902-1 foot rest receiver
X15906 foot rest assembly
X15908-1 handlebar
X15907 seat
X15905-3 head rest frame
X15905-4
Focus Strap™ with
 Iso-Grip™ handles
LOCATED ON
BOTH SIDES
OF FRAME
WARNING
LABEL 3
X15901-8 locking arm mechanism
WARNING
LABEL 2
CAUTION
LABEL 1
Also Includes a
Workout DVD
|
|
|
LOCATED ON |
X15908-6 |
|
X15901-8 |
BOTH SIDES |
|
OF FRAME |
||
adjustment |
|
||
|
locking |
X15901-2 |
|
knob |
|
||
|
arm |
||
|
|
rear frame |
|
|
|
|
|
X15908-8 |
|
CAUTION |
|
short band |
WARNING |
|
|
|
LABEL 2 |
LABEL 1 |
X15908-7 |
|
|
||
|
|
LOCATED ON BOTH |
|
|
|
long band |
|
|
X15901-1 |
SIDES OF FRAME |
|
|
|
||
|
|
|
|
|
front frame |
X15903-1 |
|
|
|
seat support frame |
|
The following parts are located in the Parts Box. Please make sure you have all of the parts before beginning assembly of your equipment.
1 - long band
X15908
PARTS BOX: |
|
1 - adjustment |
|
2 - handlebars with |
knob |
|
1 - short band |
|
|
locking knobs |
|
|
|
-------- 3 --------

INTRODUCTION
Congratulations on your purchase of the Ab Lounge® XL unit. You have taken an important step toward your fitness goals. Whether that means toning your abs, or strengthening and stretching your core abdominal muscles, the Ab Lounge® XL unit can help you get the results you want.
Working out on comfortable, efficient equipment that allows you to start and progress at the level that’s appropriate for you is a vital element in sticking with a program of regular exercise. With your Ab Lounge® XL unit, you’ll use the abdominal muscles in smooth natural motions. You’ll be able to adjust the equipment to fit your body and begin your workout right away - just what you need to improve your fitness the healthy, easy way!
Just 30 minutes a week – three enjoyable 10 minute sessions – is all it takes to begin experiencing the toning and stretching benefits of your Ab Lounge® XL unit. With regular use of your equipment, consistent aerobic exercise and a proper diet, you may soon notice some important changes in yourself, such as:
•More endurance and stamina
•Less body fat and excess weight
•Improved abdominal muscle tone
•Increased energy for daily tasks
•Less stress and a more positive outlook
With a minimal time commitment, you’ll receive an impressive return on your investment!
We’re so sure that you will be completely satisfied with your Ab Lounge® XL unit that we encourage you to write or call our Customer Service Specialists at the address or phone number listed below or contact us on our website. As always, you have our personal assurance that we want your complete satisfaction. After all, your success is our success too!
Sincerely,
Service
Ab Lounge® XL, Customer Service Department
248 Fitness Quest Plaza, Canton, OH 44750-1001
Call Toll Free: 1-800-321-9236 • Monday – Friday, 8:30am to 8:00pm, EST Email: customersupport@fitnessquest.com • www.fitnessquest.com
Please do not call the above number for Parts. See Ordering Missing or Defective Parts section below.
IMPORTANT: This owner's manual is the authoritative source of information about your Ab Lounge XL unit. Please read it carefully and follow all the instructions.
Ordering Missing or Defective Parts
When ordering parts, please contact our Parts Department, toll free at 1-800-497-5831 Monday through Friday, 8:30am to 8:00pm, Eastern Standard Time.
IMPORTANT: You must have your serial number, date of purchase, and this manual ready when calling for parts.
Serial #: _____________________________
If you would like a FREE VHS* copy of your DVD, simply give us a call. All you have to do is pay $3.95 for shipping and handling.
*Offer valid for a limited time. Limit one video per customer. Additional shipping and handling charges may apply to deliveries outside the continental U.S.
-------- 4 --------
ASSEMBLY INSTRUCTIONS
Occasionally our products contain components that are pre-lubricated at the factory. We recommend that you protect flooring, or anything else the parts may contact, with newspaper or cloth.
NOTE: All location references, such as front, rear, left or right, made in these instructions are from the user sitting on the unit and facing forward.
FIGURE 1
X15908-1
Handlebar with Locking Knob
X15906
Foot Rest Assembly
X15901
Main Assembly
Step 1. Remove the Main Assembly and all parts from packing and place them on floor as shown in Figure 1.
Attaching the Locking Arm Mechanism
X15908-7
Long Band
X15908-8
Short Band
Pin
X15901-8
Locking Arm
X15901-8
 Locking Arm
Mechanism
|
X15901-2 |
X15901-1 |
Rear Frame |
|
|
Front |
|
Frame |
|
FIGURE 2
Step 2. Lift and place the unit on its right side with the left side and Locking Arm facing up as shown in Figure 2. Open the unit by grasping the bottom of the Front and Rear Frames and spread them apart.
Swing the Locking Arm, located on the Left Front Frame, around so the notch lines up with the pin on the Left Rear Frame. Push down on the button on the Locking Arm Mechanism and slide it back while you hook the notch over the pin.
-------- 5 --------

Step 3a. While standing between the two frames, PUSH the Foot Rest Receiver out away from you through the front frame as shown in 3a.
Step 3b. The Seat and Back will start to separate (open up). Continue pushing outward until the Seat and Back are approximately 2 feet apart as shown in 3b.
3a |
|
3b |
|
|
|
Seat and Back will separate (open up). |
|
|
REAR |
Back |
Open to approximately 2 feet apart. |
FRONT |
|
|
|
Back |
Seat |
|
|
|
|
|
|
|
|
|
Seat |
|
Stand Here And |
|
|
|
PUSH Open With |
|
|
X15902-1 |
Your Hands |
|
|
|
|
|
|
Foot Rest Receiver |
|
|
|
|
X15903-1 |
|
|
Seat Support Frame |
|
|
4 |
|
|
Seat |
|
|
5 |
|
|
4 |
|
|
Long Band |
|
|
in Rear |
|
5 |
4 |
|
Short Band |
||
|
||
in Front |
|
|
|
X15901-9 |
|
|
Cable |
|
X15901-1 |
X15901-2 |
|
Front Frame |
Rear Frame |
Step 4. Pull the Seat Support Frame toward you and locate the two holes on the top. Hook the Long Band over and
attach to the lower hole of the Seat Support Frame. Hook the
other end of the Long Band into the hole on the Rear Frame.
Make sure hooks are inserted completely as shown here.
NOTE: The chair will pivot easily at this point. Make sure you hold the Frame firmly in place as you attach the Bands.
Step 5. Place the Short Band Hook into the upper hole on the Seat Support Frame and hook the other end into the hole on the Front Frame.
SET UNIT UPRIGHT
Step 6. Partially screw the Adjustment Knob into the underside of the Foot Rest Receiver at the front of the unit. Pull down the Adjustment Knob and slide the Foot Rest Assembly into the Receiver. Once the Foot Rest Assembly is in the Receiver, let the Adjustment Knob retract making sure it is secure in one of the holes on the Foot Rest Assembly. Screw the Adjustment Knob by turning clockwise until tight.
X15906
X15902-1
Foot Rest Assembly
Foot Rest Receiver
X15908-6
Adjustment Knob
|
|
7. Remove the Locking Knobs from the |
X15908-5 |
|
Handlebars. Slide the Handlebars into the holes |
|
top of the Main Assembly with the curves |
|
Locking |
|
|
Knob |
|
down. Align mounting hole and secure each |
|
|
Handlebar with the Locking Knobs you just removed. |
|
|
Check all bolts and nuts to be sure |
Handlebar |
|
they are tight before using your unit. |
|
|
ASSEMBLY IS NOW COMPLETE. |
-------- |
6 |
-------- |
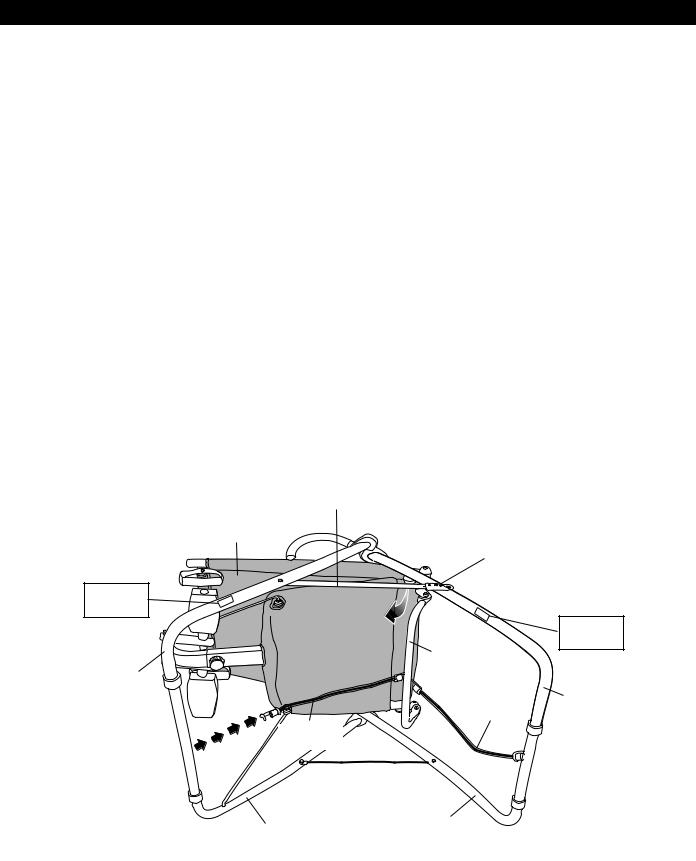
FOLDING INSTRUCTIONS
The Ab Lounge® XL unit has been designed to fold for convenient travel and storage. The Locking Arm Mechanism is removable by hand, no special tools required. For maximum
effectiveness and safety, always review these instructions prior to folding the unit.
Folding the Ab Lounge® XL Unit
a)Lay the unit on its right side as shown. Unhook the Short Band from the Front Frame and the Long Band from the Rear Frame. Leave both Bands connected to the Seat Support Frame for storage.
b)Pull the Back toward the Seat until it aligns with the Front Frame.
c)Unhook the Locking Arm Mechanism by pushing down on the button and sliding it back and unhooking the Left Rear Frames (reverse assembly Step 2).
d)Rotate the Locking Arm towards the Front Frame.
e)Grasp the Front Frame with one hand and the Rear Frame with the other hand and slowly pull them together.
IMPORTANT: Place hands on Caution Labels when folding, and be careful not to pinch your fingers between the Front and Rear Frames.
f)For your unit to store flat you must fold the Handlebars in. To do this, loosen the Handlebar Knobs and turn Handlebars inward toward the unit and tighten Knobs to keep in place.
IMPORTANT: Before using your unit, be sure Handlebars are back in correct position and the Knobs are securely tightened.
X15901-8
Locking Arm
Back |
X15901-8 |
|
Locking Arm |
|
|
|
|
|
|
Mechanism |
|
LOCATED ON BOTH |
|
|
SIDES OF FRAME |
|
|
CAUTION |
|
|
LABEL |
|
|
|
|
CAUTION |
Seat |
X15903-1 |
LABEL |
X15901-1 |
Seat Support |
|
Frame |
|
|
Front Frame |
|
|
|
|
|
|
|
X15901-2 |
|
X15908-7 |
Rear Frame |
|
|
|
|
Long Band |
|
X15908-8 |
|
|
Short Band |
|
|
X15901-1 |
X15901-2 |
|
Rear Frame |
||
Front Frame |
||
|
-------- 7 --------
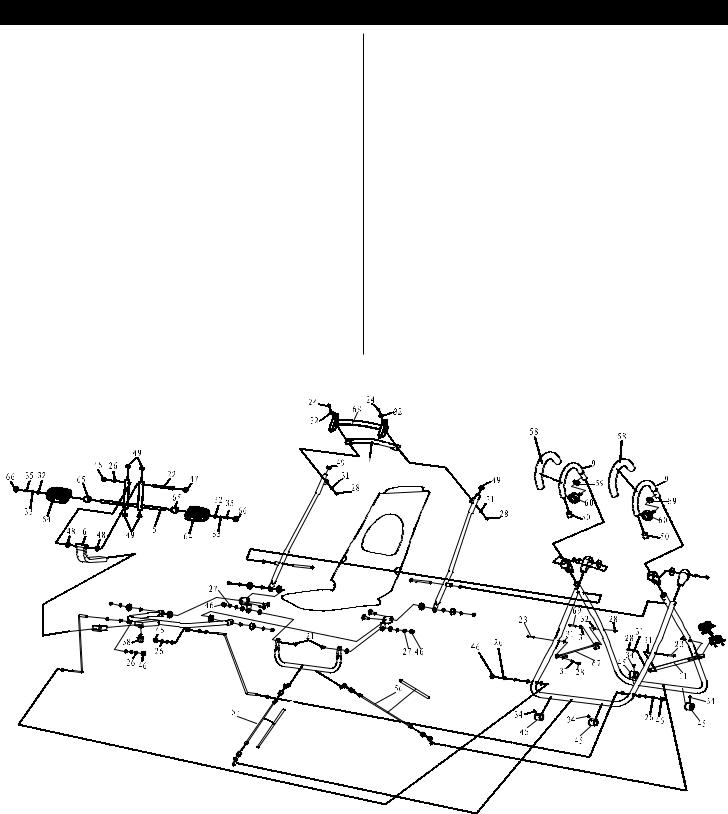
PARTS LIST AND EXPLODED VIEW
PART NO. |
PARTS NAME |
QTY. |
X15906-1 |
foot rest assembly (5) |
1 |
X15906-2 |
foot extension tube (6) |
1 |
X15905-3 |
head rest frame (7) |
1 |
X15908-1 |
handlebars (9) |
2 |
X15901-8 |
locking arm (11) |
1 |
X15901-7 |
M10 x 20mm carriage bolt (21) |
2 |
X15906-4 |
M10 x 145mm hex bolt (22) |
1 |
X15901-10 |
M6 x 43mm phillips bolt (23) |
2 |
X15905-5 |
M6 x 20mm phillips bolt (24) |
2 |
X15902-6 |
M10 large nylon nut (26) |
5 |
X15903-2 |
M10 thin nylon nut (27) |
2 |
X15901-12 |
M6 acorn nut (28) |
5 |
X15901-11 |
M6 small washer (31) |
7 |
X15905-6 |
M6 large washer (32) |
5 |
X15906-9 |
M6 spring washer (33) |
2 |
X15901-4 |
M5 x 19mm phillips screw (34) |
4 |
X15906-8 |
M6 x 15mm phillips bolt (35) |
2 |
X15908-6 |
adjustment knob (38) |
1 |
X15901-3 |
rubber foot (45) |
4 |
X15902-7 |
M10 large nut cap (46) |
7 |
PART NO. |
PARTS NAME |
QTY. |
X15906-5 |
M10 small nut cap (47) |
1 |
X15906-3 |
plastic bushing (48) |
2 |
X15905-2 |
end plug (49) |
6 |
X15908-3 |
plug (50) |
2 |
X15908-8 |
short band (55) |
1 |
X15908-7 |
long band (56) |
1 |
X15908-2 |
grip (58) |
2 |
X15908-4 |
locking washer (59) |
2 |
X15908-5 |
locking knob (60) |
2 |
X15906-7 |
pedal (64) |
2 |
X15906-6 |
spacer (65) |
2 |
X15906-10 |
plug (66) |
2 |
X15901-9 |
cable (67) |
1 |
X15905-4 |
focus strap with Iso-grip handles (68) 1 |
|
X15901-13 |
M6 x 45mm phillips bolt (69) |
1 |
X15910 |
literature pack |
1 |
X15911T |
top box |
1 |
X15911B |
bottom box |
1 |
X15912 |
accessory kit |
1 |
X15909D |
workout video |
1 |
-------- 8 --------
 Loading...