

Page 1

CLEANSMART™ CLOTHES WASHER
WL1068P model
INSTALLATION GUIDE / USER GUIDE
NZ AU
Page 2

Page 3

CONTENTS
Safety and warnings 4
Installation instructions 6
Before your first wash 12
Safety features 13
Control panel 14
Wash cycles 17
The CleanSmart™ wash 19
Wash preparation 20
Getting started quickly 23
Wash options 25
Customising a wash cycle 29
Changing pre-set options 31
Caring for your washer 37
Before you call for service 40
Fault codes 42
Troubleshooting 43
Manufacturer’s warranty 48
Customer care 50
Registration
To register your product visit our website: fisherpaykel.com/register
3
Page 4
SAFETY AND WARNINGS
!
WARNING!
Electrical Shock Hazard
Failure to follow this advice may result in
electrical shock or death.
• If you are using an extension cord or a portable
electrical outlet device (eg multi-socket outlet
box), ensure that it is positioned so that it does
not come into contact with water or moisture.
READ AND SAVE THIS GUIDE
When using your clothes washer, follow basic precautions, including thefollowing:
General
z
This product has been designed for personal, family or household use. This product is
not designed for any commercial use. Any commercial use will terminate this products
manufacturer’s warranty.
z
A damaged power cord must be replaced by a Fisher&Paykel trained and supported
service technician or similarly qualified person in order to avoid a hazard. Do not use
the appliance until it has been repaired to avoid a risk of electric shock.
z
Do not operate this machine if it has been damaged during transport. Contact your
Fisher&Paykel dealer or Fisher&Paykel trained and supported service technician.
z
This clothes washer is not intended for use by persons (including children)
with reduced physical, sensory or mental capabilities, or lack of experience and
knowledge,unless they are supervised or given instructions on how to use the
washerby someone responsible for their safety.
z
Keep children away from the washer while it is in operation.
z
Supervise children to ensure they do not play with the washer or climb inside thedrum.
z
The washer should only be used for washing and rinsing of textiles where this
isindicated on the care label.
z
Do not add petrol, dry-cleaning solvents, or other flammable or explosive substances to
the wash water. These substances give off vapours that could ignite or explode.
z
Do not wash articles that have been previously cleaned in, washed in, soaked in,
or spotted with gasoline, dry-cleaning solvents, or other flammable or explosive
substances as they give off vapours that could ignite or explode.
z
The lid will be locked for some parts of the wash cycle for safety reasons. It is possible
to open the lid during the cycle under certain conditions. Never force the lid open.
z
Do not touch or operate the machine with wet hands or with bare-feet.
z
Ensure the installation provides accessibility to the plug or incorporate a switch in the
fixed wiring in accordance with the wiring rules to allow disconnection of the appliance
from the supply after installation.
z
Read and follow the detergent manufacturers’ instructions carefully. Instructions on
how to use the detergent will be clearly indicated on the pack. Remember to store your
detergents out of the reach of children.
4
Page 5

SAFETY AND WARNINGS
MODEL CODE MAX CAPACITY* (KG)
WL1068P 10
*Capacity refers to the maximum dry weight of items the washer can wash at any one time.
z
Do not overload your washing machine beyond its rated capacity.
z
Do not wash an electric blanket in your washer unless the care label specifically states
it is safe to do so.
z
Do not wash curtains in this washer, as sunlight makes them brittle and they may
disintegrate during washing.
z
The only user-removable parts of the washer are the inlet hose(s) and the dispenser
funnels (tops). No other parts are designed to be removed by anyone other than a
Fisher&Paykel trained and supported service technician.
Installation
z
For guidance on how to install your product, please refer to installation instructions
contained in this document.
Water supply requirements:
z
Inlet water static pressure: Max. 1MPa (145psi), Min. 34kPa (5psi)
z
Inlet water flow rate at tap: Min. 8 litres /min
z
A pressure-reducing valve must be installed if pressure is higher than 1MPa.
z
For optimum wash performance check the supply pressure is within the
recommendedrange.
z
New hose sets provided with the washer should be used to connect the washer to the
water mains. Old hose sets should not be re-used.
z
We recommend the inlet hose(s) are changed every 5 years. WARNING: Failure to do so
may result in a flood and damage to property.
z
The hot water temperature should not exceed 65°C and the cold water temperature
not exceed35°C. Temperatures above these may cause the machine to fault or cause
damage to the machine.
z
Install the machine on a solid and level floor surface ensuring it has at least 20mm
clearance on each side. The washer must not be installed on any textured floor
coverings (eg carpet, rugs).
Disposal
z
When disposing of the washer, it is recommended that the lid is removed to
avoidchildren getting trapped inside, and that the electrical cable is cut off
close to thewasher.
5
Page 6

INSTALLATION INSTRUCTIONS
Accessories
Check if you received the following accessories with your Fisher&Paykel washer. Youwill
find them inside the drum or attached to the packaging.
z
2 x inlet hose(s)
z
1 x drain hose guide
Unpacking
To ensure the best performance from your new washer please follow the instructionsbelow.
Removing the packaging
1 Remove the outer packaging.
2 Tilt the machine backwards and walk it off the base
packer one foot at a time (ensure the lid is still taped
down).
3 Remove the base packer from under the machine
bypulling it out the front.
4 Remove the tape, lift the lid and remove the bowl
packer from the bowl.
5 Remove the hoses and accessories.
6 Keep the base packer and bowl packer in case they
are required for future transit.
Ensure that the base packer has been removed before operating your machine.
6
Page 7
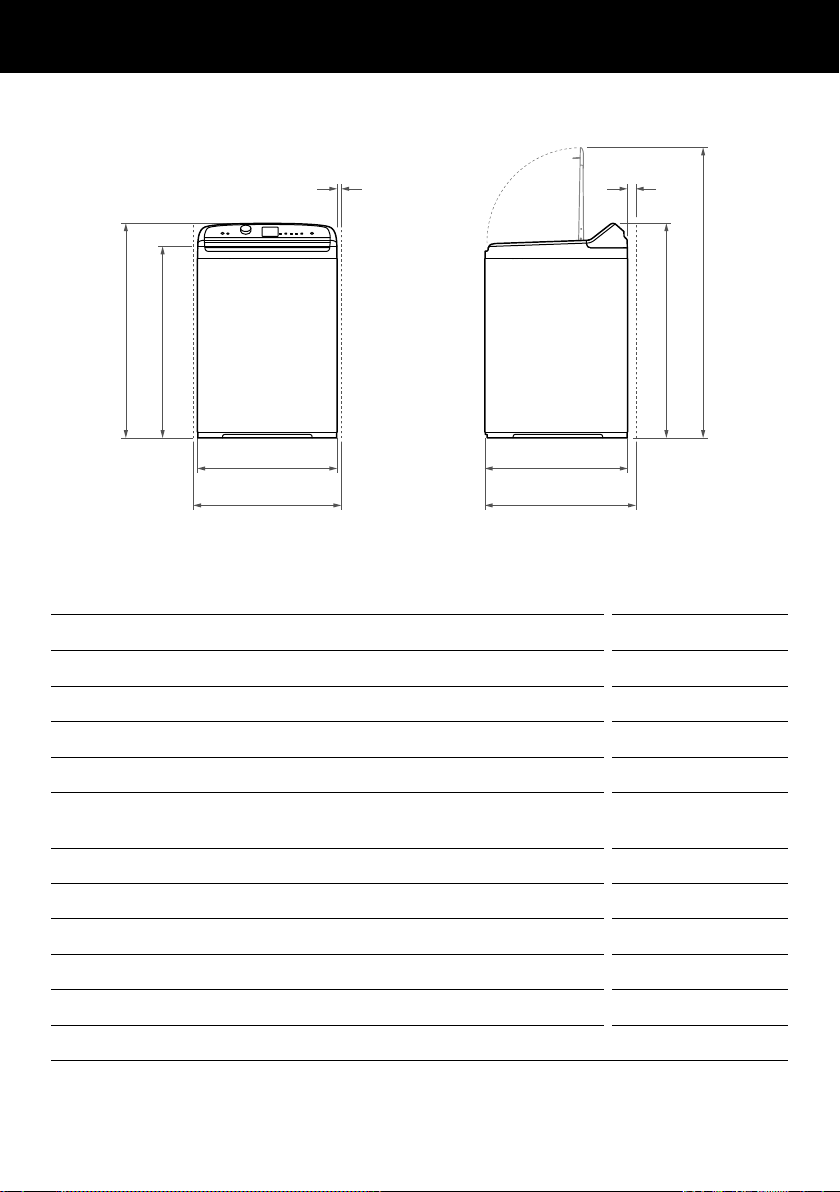
Product dimensions
INSTALLATION INSTRUCTIONS
h I
A
e
C
F
D
g
PROFILE VIEWFRONT VIEW
A B
PRODUCT DIMENSIONS MM
A Overall height of product (to highest point on console) 1060 – 1090
B Overall height of product lid open 1440 – 1470
C Overall width of product 685
D Overall depth of product 700
E Height of product to top of lid closed* (measured at
950-980
front of product)
Standpipe or spigot height 850 – 1200
MINIMUM CLEARANCES MM
F Minimum cavity width 725
G Minimum depth clearance (incl. inlet hoses and drain hose) 750
H Minimum clearance to wall or adjacent product
I Minimum clearance at the rear of the product
*The exact height of your washer is dependent on how far the feet are extended from the base of
the washer.
#
Applies either side.
#
20
50
7
Page 8
INSTALLATION INSTRUCTIONS
Levelling instructions
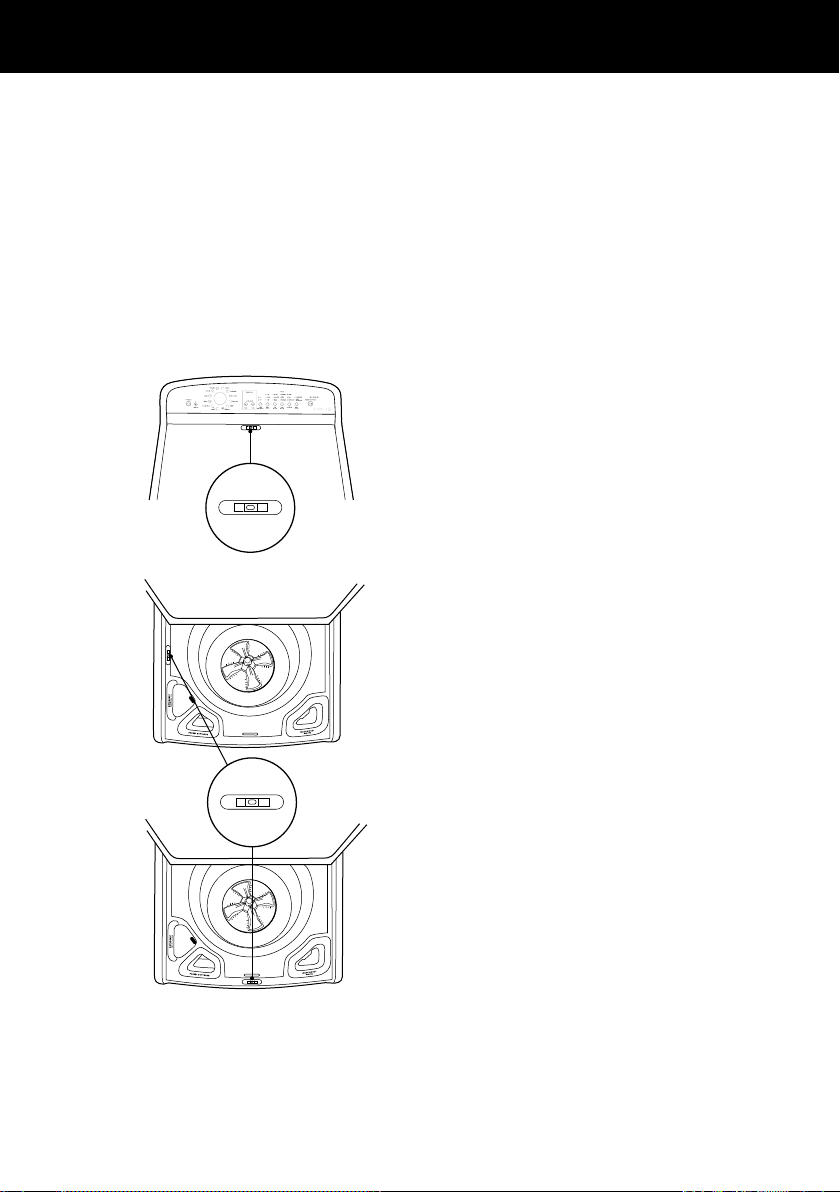
It is IMPORTANT to level the washer to ensure good spin performance.
A level is provided with your washer. The washer is level when the bubble sits in the centre,
within the two lines.
Your washer is equipped with self-locking feet at the front to ensure they do not move once
you have levelled your washer. Move the washer using the top corners, do not push the
centre front of the washer.
After levelling, the corners of the washer should be clear of the floor and the washer must
not rock in any direction.
Level the washer side to side:
Close the lid and place the level at the centre
1
Level
2
back of the lid (near the control panel). Pull
the machine out and adjust the rear feet until
the machine is level side to side.
Level the washer front to back:
z
Open the lid and place the level on the left
side, in line with the centre of the bowl.
z
Adjust the front left foot (wind down).
z
Repeat the above steps for the right
foot. There should be equal weight on
both front feet.
8
3
Level
Re-check the washer is level:
z
Place the level at the centre front of the
topdeck (forward of the lid lock slot)
z
Ensure washer does not rock
in any direction.
z
If washer is not level repeat the above steps
If moving or transporting your washer in the
future, ensure you tape the lid down.
Page 9

INSTALLATION INSTRUCTIONS
Water supply
Inlet hoses
Failure to adhere to the following instructions may result in a flood and
damage to property:
1 Connect the straight ends of the inlet hoses to the taps
(thereare washers fitted in both ends). Connect the
red connector hose to Hot, and the white connector
hose toCold.
2 Connect the elbow ends of the inlet hoses to the
corresponding washer inlet valves. Inlet valves are
marked on the back of the washer. Ensure the Hot
Straight
(tap) end
Inlet hose ends
Elbow
(machine) end
Only use the new hose set provided with your washer.
Water supply requirements:
z
If you have an uncontrolled water heating source (eg a wet back or solar heating
system) you should fit a tempering valve. This will ensure the hot water temperature
remains within safe limits. Contact your registered plumber to select and install the
tempering valve.
z
Your cold water should not exceed 35°C and your hot water should not exceed
65°C. Temperatures above these may cause the machine to fault or cause damage
to the machine.
z
Inlet water static pressure: Max.1MPa(145psi) Min.34KPa (5psi).
z
Inlet water flow rate at tap: Min.8litres/min.
valve is connected to the hot tap and the Cold valve is
connected to the cold tap.
H = Hot C = Cold
This clothes washer should be plumbed into both a hot and cold water supply otherwise
some cycles may not function correctly. Your washer does not have an internal heater to
heat water.
9
Page 10
Draining
INSTALLATION INSTRUCTIONS
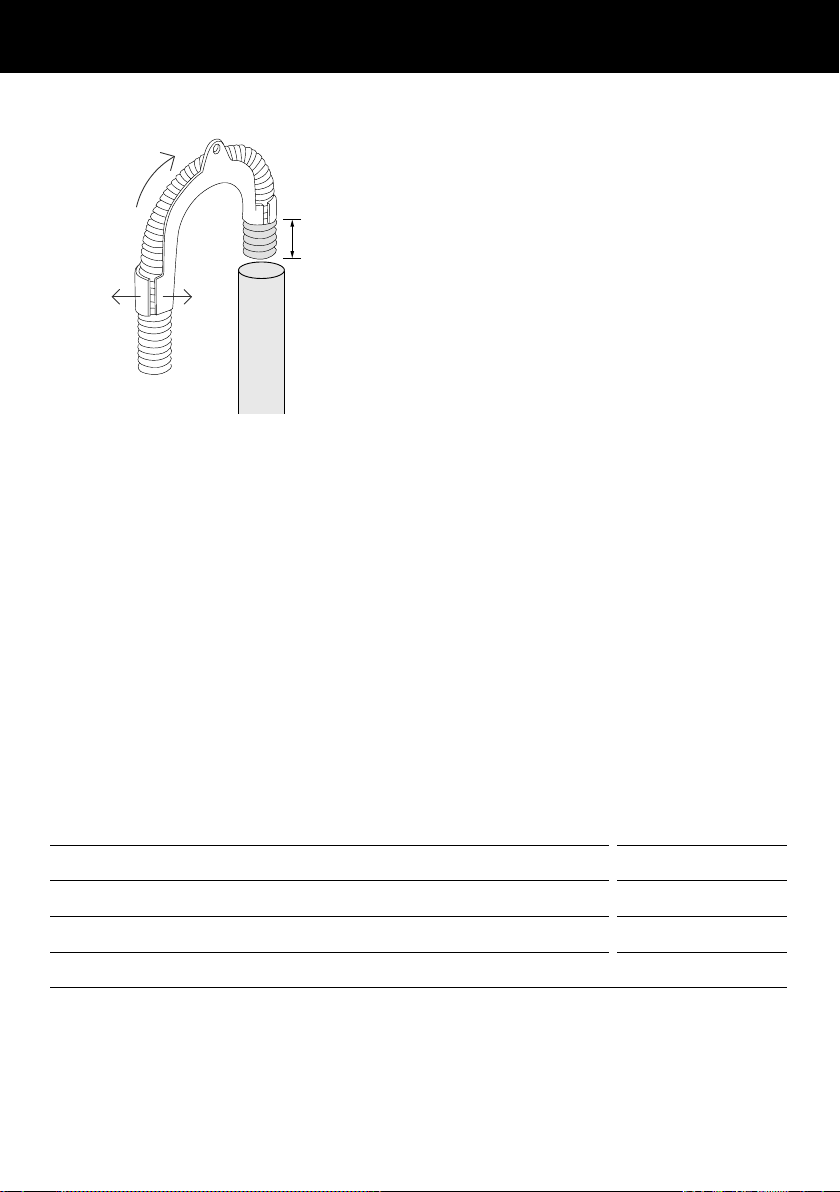
Placing the drain hose in a standpipe or tub:
Pull hose
through
guide
(20 mm)
maximum
1 Carefully pull the drain hose out from the
back of the washer by pulling the exposed
part of the hose downward and outward.
2 To guide the drain hose over the tub or
standpipe the hose guide MUST be fitted to
the drain hose.
3 Place the drain hose in the tub or standpipe.
Do not fit the hose to a drain spigot. Drainage
must not be airtight in order to prevent
Flex hose
guide apart
Standpipe 850 – 1200 mm
siphoning.
Fitting the drain hose guide
To prevent siphoning the drain hose should not extend more than 20mm from the end of
the guide. The height of the standpipe or tub should be between 850 – 1200mm. The drain
hose can be trimmed to length.
z
Regularly check that your standpipe or tub is free from lint or other obstructions, which
may affect how your washer works or may cause flooding.
z
In multi-storey apartments or any upper floor, the washer should be installed on a floor
equipped with a drain.
z
Draining must comply with local by-laws.
z
We recommend replacing the inlet hoses every 5 years. Hoses should be checked from
time to time and replaced if any wear, cuts, bulges, kinks or leaks are found.
Electrical connection
z
This appliance must be supplied with a 220 – 240V, 50Hz, sinusoidal,
10Aelectrical supply.
SPARE PARTS* PART NO.
Hose inlet long (2m) 422680P
Hose inlet large bore 426123P
Drain hose extension (not suitable for attaching to a spigot) 425627P
*Available from your Fisher&Paykel dealer or a Fisher&Paykel trained and supported
service technician.
10
Page 11
INSTALLATION INSTRUCTIONS
Completing the installation
z
Turn on the water and check all hose connections for leaks. Ensure there are no kinks in
the hoses. Check the hose connections for leaks again after 24hours.
z
Uncoil power cord, remove and discard the plastic pin cover, and plug into wall socket.
z
Connect the appliance to an earthed outlet protected by a fuse of suitable capacity.
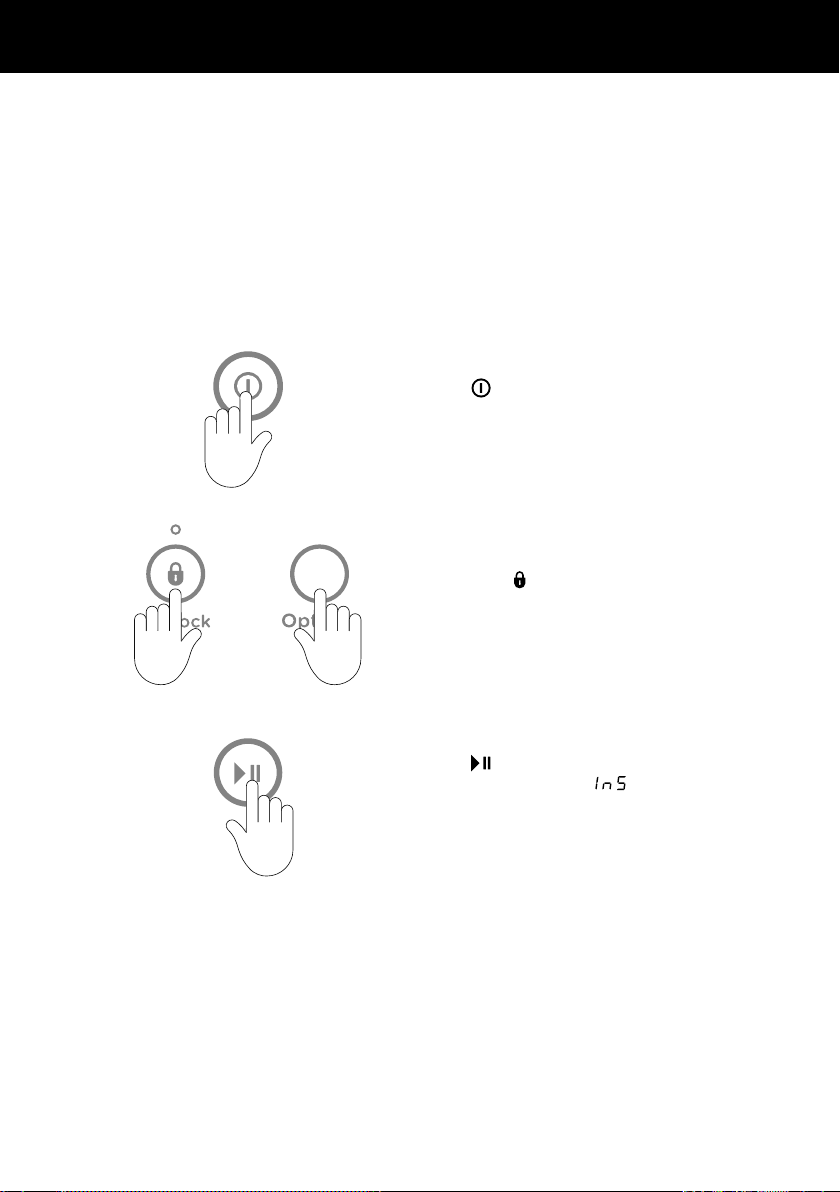
Installation test cycle
Your washer must be correctly installed before use. Check the installation and operation of
the washer using the following procedure:
1
2
+
3
If there are any problems, you must address these before proceeding with normal use.
The washer will automatically turn off at the end of the cycle if there are no problems.
Touch to activate your washer.
Touch both and OPTIONS for 3 seconds.
Touch to start the installation test cycle.
The display will show .
The washer will beep to signal the end of
the installation test cycle. Any faults will be
displayed on the screen, refer to ‘Fault Codes’.
If you need further assistance, please contact a Fisher&Paykel trained and supported
service technician or our Customer Care Centre.
11
Page 12

BEFORE YOUR FIRST WASH
Check you have done everything you need to before you start your first wash:
Has the basepacker been removed?
Is the drain hose threaded through the hose guide ‘Ubend’ (with no more than 20
mm extended) and hooked into your standpipe or tub, or attached toa spigot?
Is the hot hose connected to the hot valve marked ‘H’?
Is the cold hose connected to the cold valve marked ‘C’?
Have the taps been turnedon?
Is the washer correctly levelled, feet are extended and cabinet corners are clear of
the floor?
Has the power cord been connected to an appropriate power supply andthepower
turned on?
Have you performed the installation test cycle (see previous page)?
CleanSmart™ capacity
CleanSmart™ offers a very generous 10 kg capacity. The list below outlines what is included
in a 10kg wash load (in accordance with AS / NZS 2040.1:2005).
WASH LOAD - 10 KG QUANTITY
Sheets (double) 4
Bath towels 8
Tablecloths 3
Shirts 4
T-Shirts 6
Pillowcases 6
Shorts 6
Washcloths 4
Handkerchiefs 2
The above load composition is indicative only. We recommend for everyday use that you
separate out your sheets and towels and wash them separately on the
cycle.
12
SHEETS and TOWELS
Page 13
SAFETY FEATURES
Lid lock
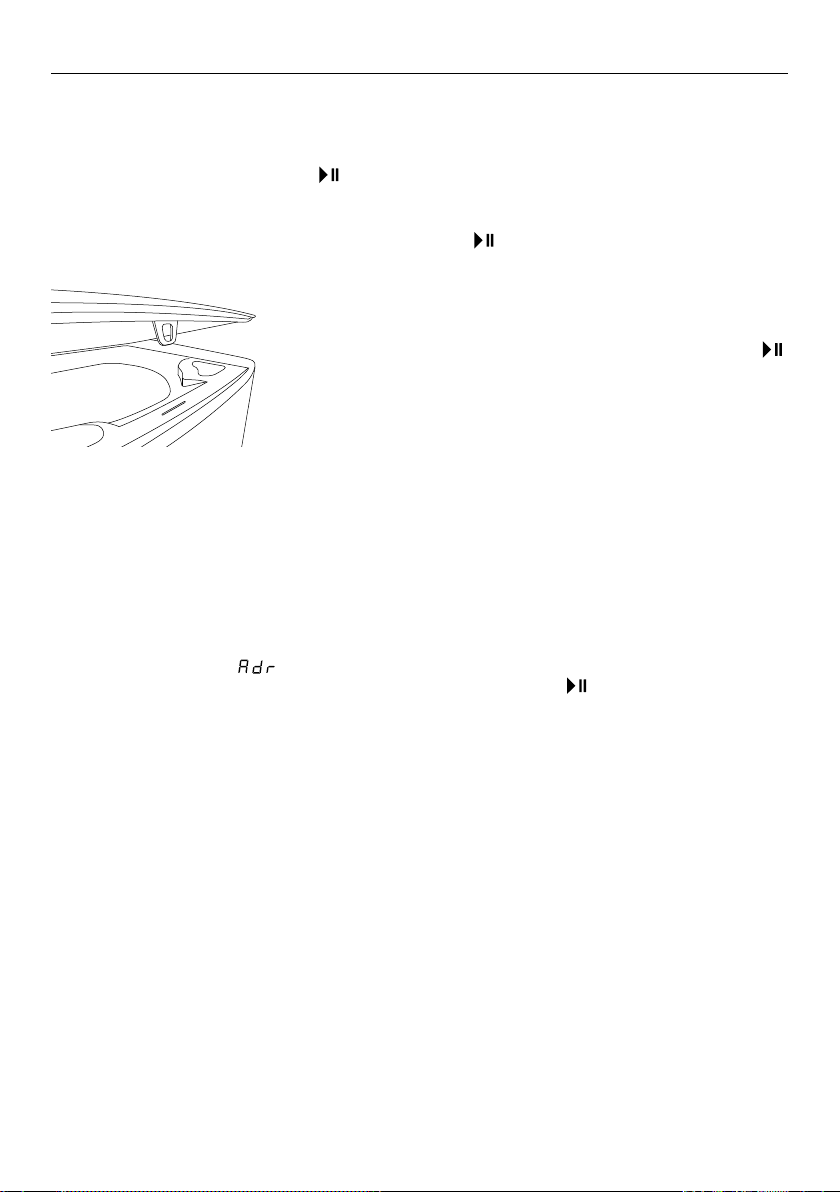
The lid of your CleanSmart™ washer is locked for some parts of the wash cycle, ensuring
safety for you and your family while it is operating.
The
LID LOCKED light (above the button) will illuminate when the lid lock is activated,
letting you know if you can open the lid or not.
To unlock the lid at any time during the cycle touch
.
If the lid is left open, your CleanSmart™ washer will be unable
to lock the lid, and the cycle will be halted. The washer will
beep to alert you and display a warning message on the
screen. If this occurs, ensure that the lid is closed and touch
Do not put anything down the lid lock slot in the top deck of
your washer.
Do not try to disable the lid lock.
Auto drain
z
Unsupervised clothes washers filled with water can present a drowning hazard to small
children. In order to minimise any risk of this type of accident, your CleanSmart™ has
been pre-programmed to know when this potential hazard is created and drains the
wash water to a safe level.
z
If you pause your CleanSmart™ at any time during the wash cycle when there is water
in the bowl, the machine will activate the AUTO DRAIN function after 3 minutes. This will
drain the water in the wash bowl to an acceptable level, minimising any potential hazard.
z
A warning message will be displayed on the digital display while AUTO DRAIN is in
operation. The cycle can be restarted at anytime by touching .
.
13
Page 14
CONTROL PANEL
!1
31 2
5 6 7 8 9
!0 !24
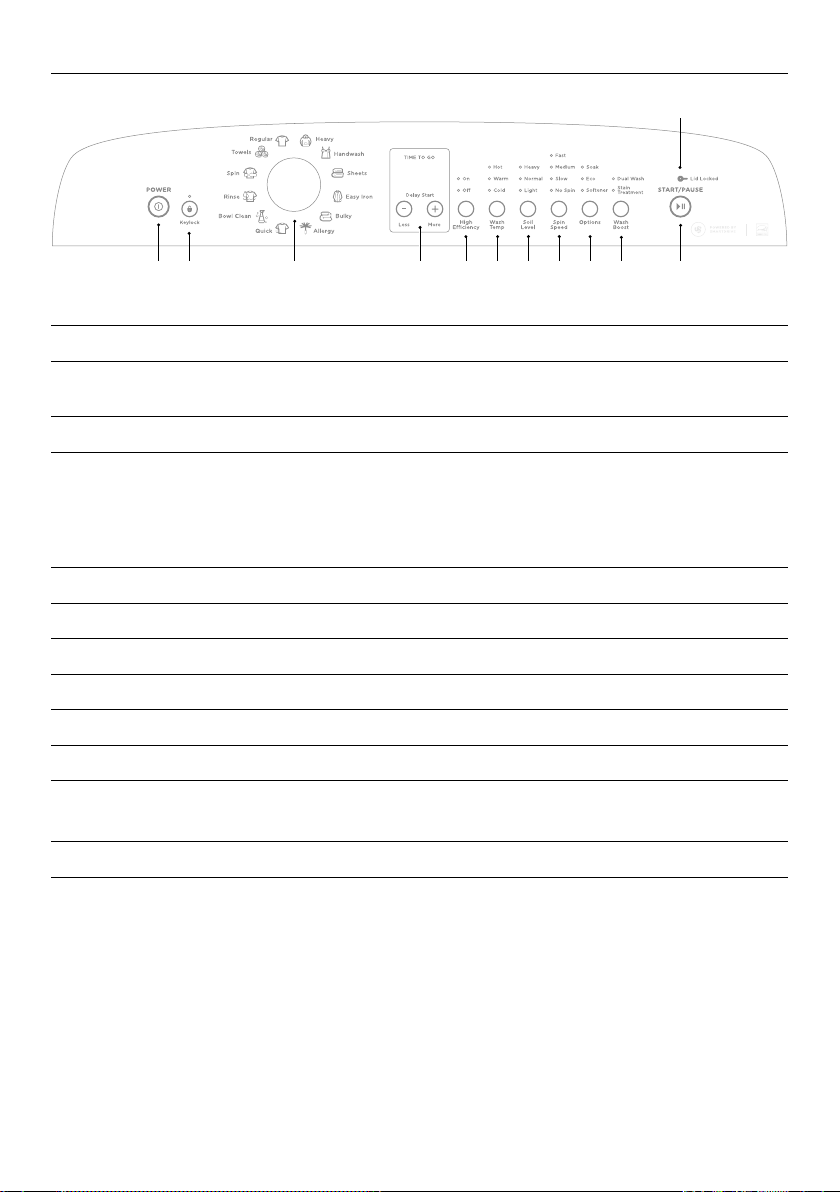
1 POWER Press to turn the washer ON/OFF.
2 Keylock Touch for two seconds to disable all buttons on the display panel,
except
POWER button. This prevents accidental button presses.
3 Wash Cycles Turn the dial to select the desired cycle for your load.
4 Digital display
screen
Shows the following:
z
‘Time to go’ – the remaining time in the cycle that is
currently running.
z
Delayed start time of wash cycle.
z
Notifications if an error is detected or a warning is necessary.
5 High Efficiency Touch to turn High Efficiency On or Off.
6 Wash Temp Touch to increase or decrease water temperature.
7 Soil Level Touch to select the level of soil in your load
8 Spin Speed Touch to increase or decrease washer spin speed.
9 Options Touch to select Softner, Eco Rinse and Soak.
!0 Wash Boost Touch to select Stain Treatment or Dual Wash.
!1 Lid Lock Illuminates to indicate the lid of the washer is locked.
To open the washer pause the cycle.
!2 START/PAUSE Touch to start or pause the selected wash cycle.
14
Page 15
CONTROL PANEL
Time to go
Your CleanSmart™ washer displays approximately how many minutes the cycle has
remaining, so that you can tell at a glance when your washing will be finished. Once you
have selected your wash cycle and options, the time the cycle will take to complete will be
displayed. Please be aware that a number of factors influence the overall cycle time, eg the
water flow rate and load size and cycle selection, therefore times will vary.
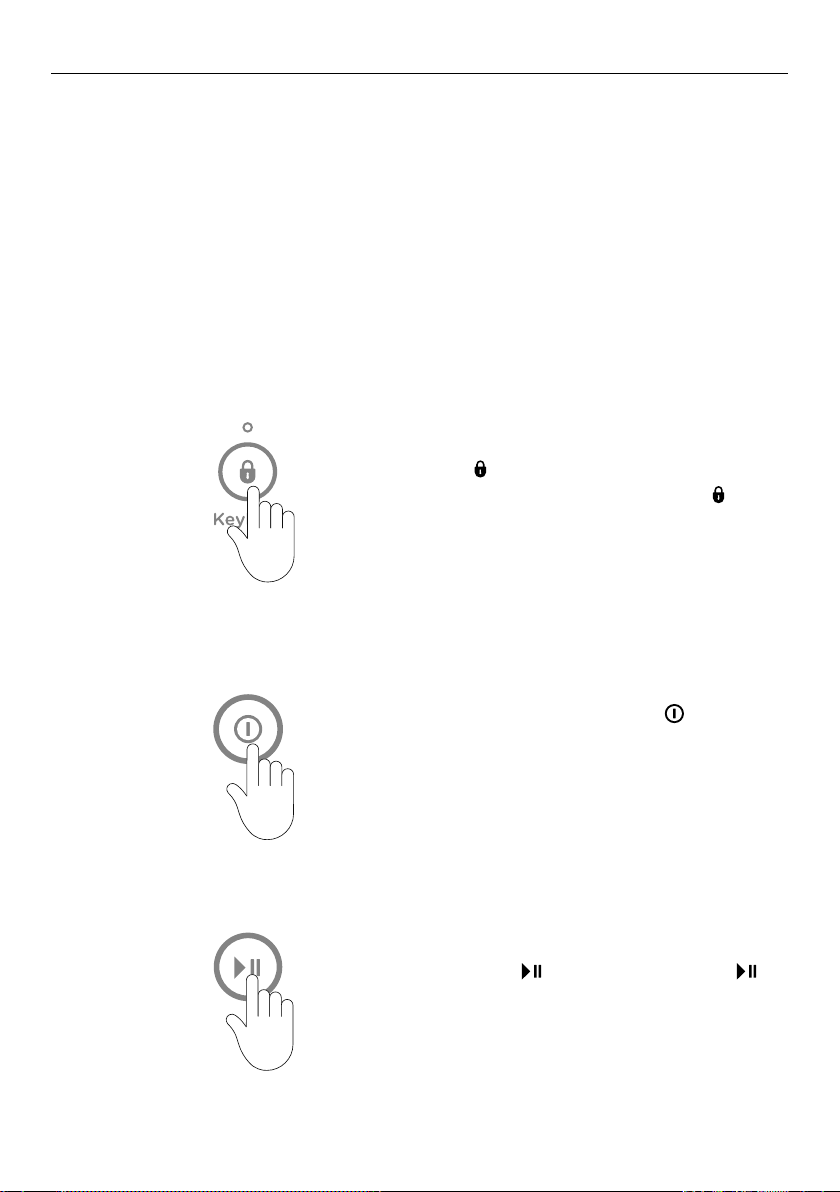
Keylock
Keylock can be used to lock the buttons on your CleanSmart™ when not in use. This will
avoid accidental button pushes.
To turn Keylock
1
If Keylock is ON:
1
ON or OFF:
Touch for 2 seconds.
When activated, the light above the
is illuminated.
To turn your washer on, touch for 2
seconds. This will activate the control panel.
KEYLOCK will remain on but let you select
your wash cycle options and start the cycle.
button
2
To pause your washer at any time during the
cycle, touch
twice in quick succession.
for 2seconds, or touch
15
Page 16

3
CONTROL PANEL
To stop your washer or power off at any
time, touch for 2seconds or touch the
button twice in quick succession.
16
Page 17
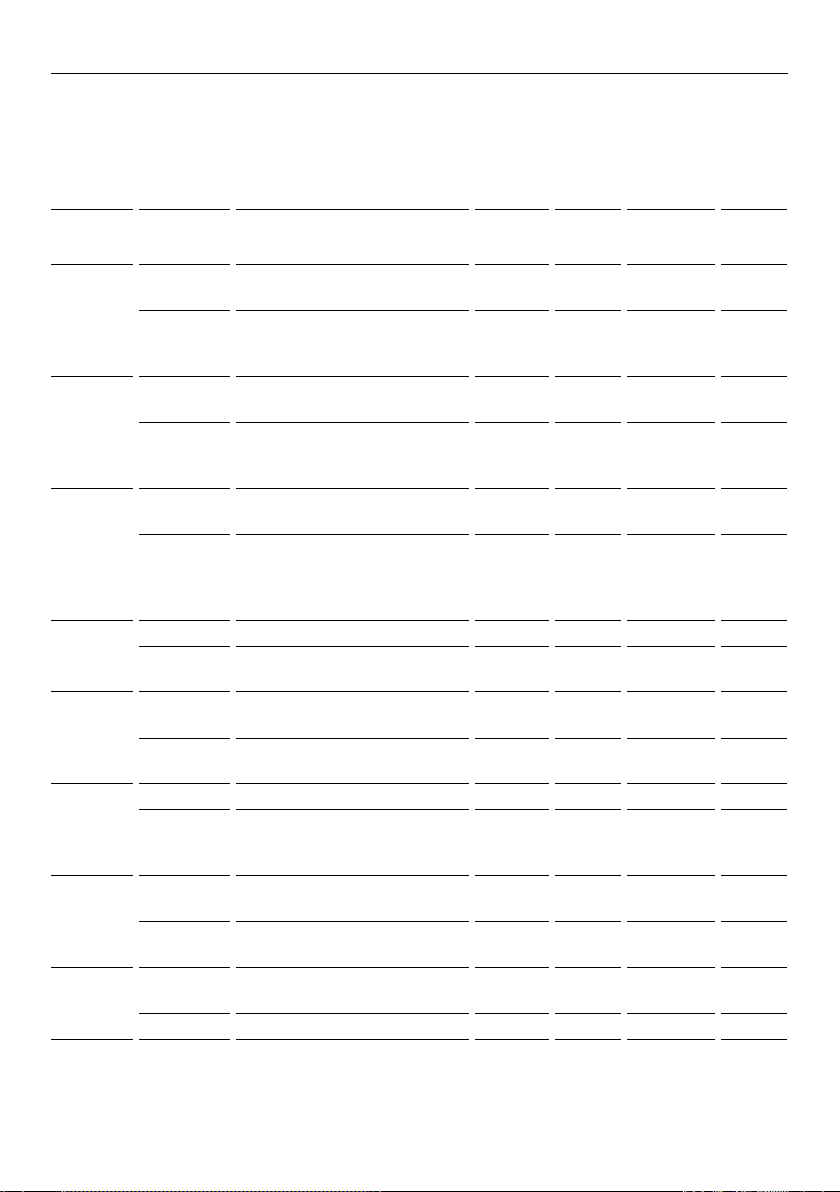
WASH CYCLES
Wash cycle guide
Your washer has a number of wash cycles to suit your laundering needs. Selecting the
most appropriate cycle for each particular wash load will help ensure you get the best
wash result.
CYCLE EFFICIENCY DESIGNED FOR
Regular** HE On Normally soiled everyday cotton
loads eg t-shirts, shorts, shirts.
HE Off Everyday loads where extra
water is an advantage eg linty,
sandy or dye run is possible
Heavy HE On Heavily soiled durable garments
eg tea towels, rugby shorts.
HE Off Heavily soiled durable garments
when you want to use
more water.
Handwash HE On For delicate, lightly
soiled clothes.
HE Off Washing delicates in more
water. Also recommended for
machine and hand washable
woollen items.
Sheets HE On Not available. n / a
HE Off Sheets, tablecloths,
duvet / doona covers.
Easy Iron HE On Not available. n / a Fast
HE Off Minimising creasing in your load. 11 – 16 Warm /
Bulky HE On Not available. n / a
HE Off Bulky items. 8 mins
Allergy HE On Asthma sufferers and people
with skinsensitivities.
HE Off Situations when a little more
water is required.
Quick HE On Lightly soiled garments in a
faster time.
HE Off Not available. n / a
AGITATE
TIME*
(min)
11 – 16 Warm/
11 – 16 Warm/
13 – 18 Warm Spray/HE
13 – 18 Warm Spray/
6 Warm /
6 Warm /
15 Warm Spray /
+30 min
soak
11 – 16 Hot Spray / 2
11 – 16 Hot Spray /
9 –13 Warm /
WAS H
TEMP
Cold
Cold
Cold
Cold
Cold
Warm 2 Deep Slow
Cold
RINSE
SEQUENCE
Spray/HE
Deep
Spray/
Deep
Deep
Deep
Spray / HE
Deep
Spray /
Deep
Deep
Spray /
Deep
HE Deep
2 Deep
Spray / HE
Deep
SPIN
SPEED
(RPM)
Fast
(1100)
Fast
(1100)
Fast
(1100)
Fast
(1100)
Slow
(330)
Slow
(330)
Fast
(1100)
(1100)
Slow
(330)
(330)
Fast
(1100)
Fast
(1100)
Fast
(1100)
17
Page 18
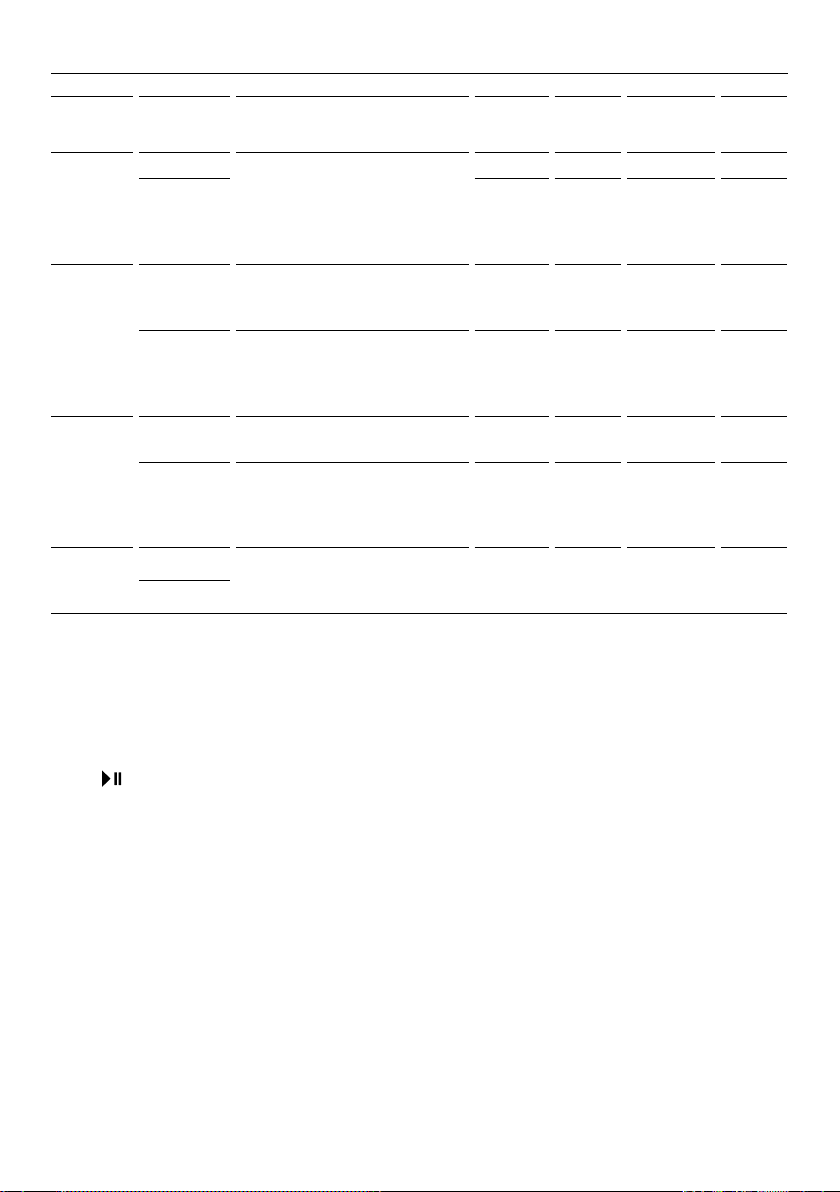
WASH CYCLES
CYCLE EFFICIENCY DESIGNED FOR
Bowl
Clean
Towels HE On Washing lightly soiled towels
Rinse HE On Water efficient Rinse and
Spin n/a Selecting a Spin only. This cycle
n/a For maintaining the cleanliness
n/a Periodic
HE Off Everyday washing of towels,
HE Off Selecting Rinse and Spin only,
n/a
of your washer.
and when you want to
save water.
new towels that may release
dye during the wash, and after
a day at the beach.
Spin only.
using more water in the rinse for
those situations that require it.
also allows you to customise the
spin speed to suit your needs.
AGITATE
TIME*
(min)
n / a
agitation
during a
2hr soak
11 – 16 Warm /
11 – 16 Warm /
None None Spray / HE
None None Spray /
None None None Fast
WAS H
TEMP
Hot Spray /
Cold
Cold
RINSE
SEQUENCE
Deep
Spray / HE
Deep
Spray /
Deep
Deep
Deep
SPIN
SPEED
(RPM)
Medium
(670)
Fast
(1100)
Fast
(1100)
Fast
(1100)
Fast
(1100)
(1100)
*Refers to the agitation time in the ‘wash’ part of the cycle, not the total time taken to complete
a cycle. In addition, the actual wash time depends largely on the size of your wash load, therefore
can vary by a number of minutes.
**The ‘Regular’ cycle, with High Efficiency ON and ‘Eco’ option selected, is the recommended water
and energy saving cycle for normally soiled, everyday washing.
If you wish to change any of the wash options while your CleanSmart™ washer is running,
touch then select the required option.
18
Page 19
THE CLEANSMART™ WASH
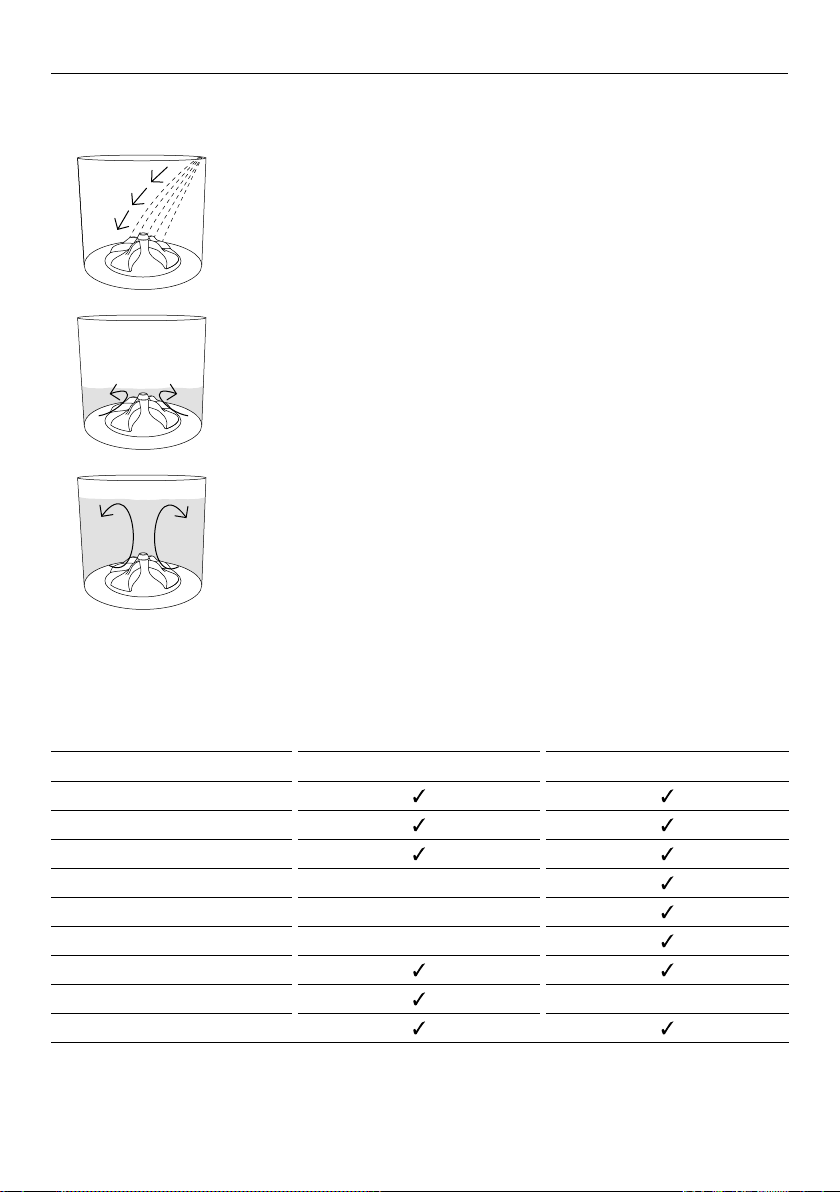
The CleanSmart™ washer has two modes of washing,
(CONVENTIONAL). Both modes start the same way, with a Detergent Activating wash.
HE ON (HIGH EFFICIENCY) and HE OFF
Detergent Activating wash
CleanSmart™ fills the bowl at the selected water temperature,
with just enough water so the clothes are saturated. This small
amount of sudsy water flows through the clothes, up a specially
designed portal and back onto the clothes in a waterfall effect. This
thoroughly dissolves and activates the detergent.
High Efficiency On (High Efficiency mode)
In the High Efficiency mode the CleanSmart™ then fills with just
enough cool water to lift the clothes off the low-profile agitator so
that when it rotates, the clothes gently roll over each other. This
wash gives you the benefit of water savings, using similar quantities
of water to most front loaders.
High Efficiency Off (Conventional mode)
The Conventional mode is the immersion wash all top-load washer
users are familiar with. However, this mode still uses less water than
that of other top loaders which utilise the immersion wash. After
the Detergent Activating wash the CleanSmart™ fills with cold water
until the clothes are submerged, and gently turns the clothes over.
We recommend this mode when the dilution effect of water can
solve or prevent common wash problems. For example, when dye
or colour run can be a problem (ie new, dark-coloured garments),
or when washing sandy towels.
Some cycles can be used in both modes, whilst others are available in only one.
CYCLE HE ON HE OFF
Regular
Heavy
Handwash
Sheets –
Easy Iron –
Bulky –
Allergy
Quick –
Towels
These two wash modes mean that your CleanSmart™ washer gives you the best of both
worlds, accommodating any laundry situation.
19
Page 20
WASH PREPARATION
Sorting
Sort items according to colour, fabric type, and soil type. Wash fine, delicate fabrics
separately from thick, heavy fabrics. Always separate coloured items from whites, especially
when they are new. Colour run could be an issue if you wash items at highertemperatures.
Some soils, like mud and blood are best washed in cold water. Oilysoils (eg some foods
and marks on shirt collars) are best washed in warm water.
The care label will tell you about the fabric of the garment and how it should be washed.
Before you load
z
Check pockets for items that could damage your clothes or get caught in the washer.
z
Close zippers, hooks and eyes, and other fastenings (ie fasten the opening of duvet/
doona covers) and remove loose bra wires. All these can damage both your washer
andyour clothes.
z
Place delicate items, such as lingerie, in a mesh laundry bag before placing in the washer.
z
Pre-treat any stains, taking care not to spray pre-treaters on your washer as they can
cause damage to the plastic surfaces.
Selecting the right detergent
z
Your CleanSmart™ washer is a High Efficiency clothes washer and needs a low sudsing
detergent to prevent over-sudsing problems. This is the same type of detergent Front
Loaders use and is labelled, “Low Suds”, “Front Loader”, “High Efficiency” or “HE”.
z
We recommend the use of liquid detergents in most washing situations to achieve the
best results. This is particularly important when washing dark garments.
z
When washing woollens use a wool detergent but use it sparingly as these are usually
very high foaming.
z
Do not use soap flakes or granulated soap powders.
How much detergent?
Follow the instructions stated on the back of the detergent packet as a guide to the correct
amount to use. The correct amount of detergent will vary depending on the amount of
soil in your clothes and the size of your load. Jeans and work clothes may need more and
towels less.
z
If you have over-foaming problems, reduce your dosage.
z
If your clothes are not clean enough, try using a bit more.
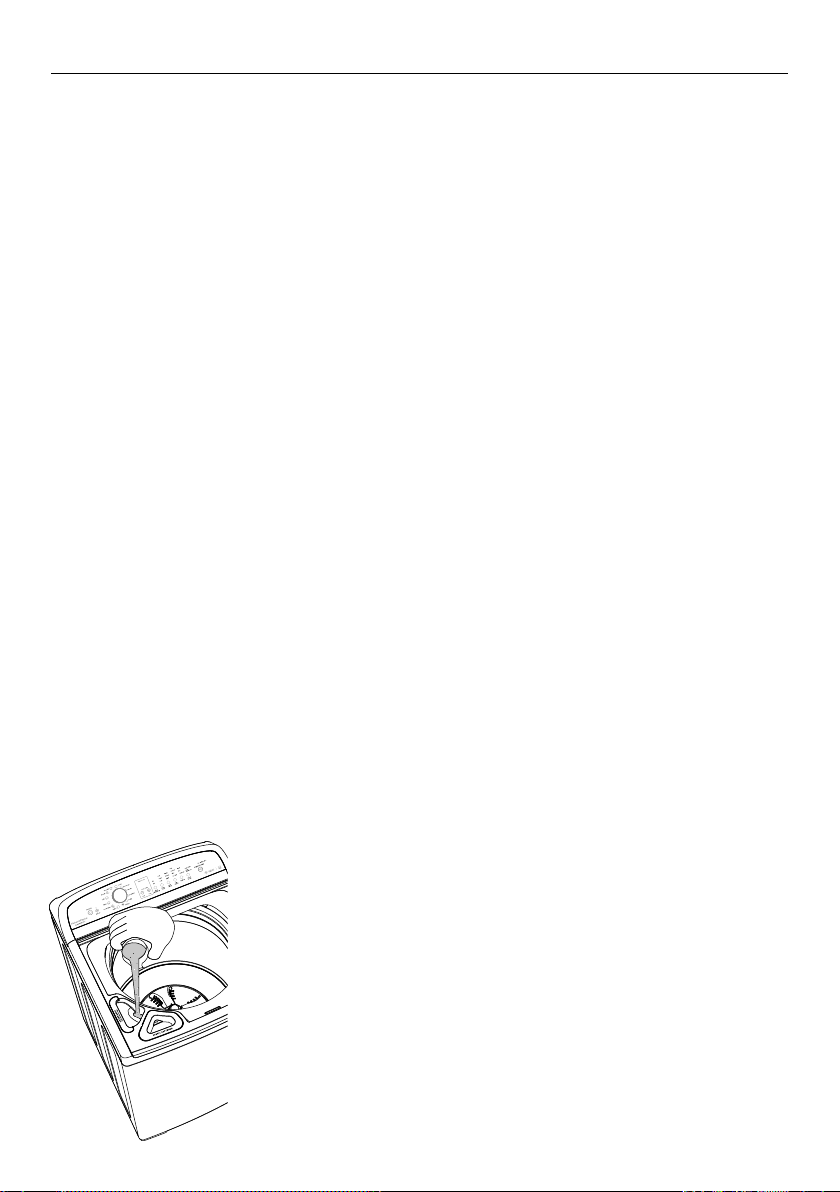
Where do I put my detergent?
Place your detergent into the detergent dispenser, located on the
left side of the washer. We recommend that you measure your
detergent first.
You will notice that most of the detergent placed in the dispenser
will fall into the washer. It will remain in an area separated from
your clothes until the washer begins to fill. As the washer fills, the
dispenser will be flushed of any residue. The detergent is then
mixed with water at the bottom of the washer, dissolving and
activating it to ensure optimum wash performance.
20
Page 21
WASH PREPARATION
Choosing the right cycle
If you wish to use fabric softener you will need to select
OPTIONS button which will give you a deep rinse. If the SOFTENER option is not selected,
the fabric softener will not be dispensed correctly.
A small volume of water remaining in the dispenser at the end of
the cycle is normal.
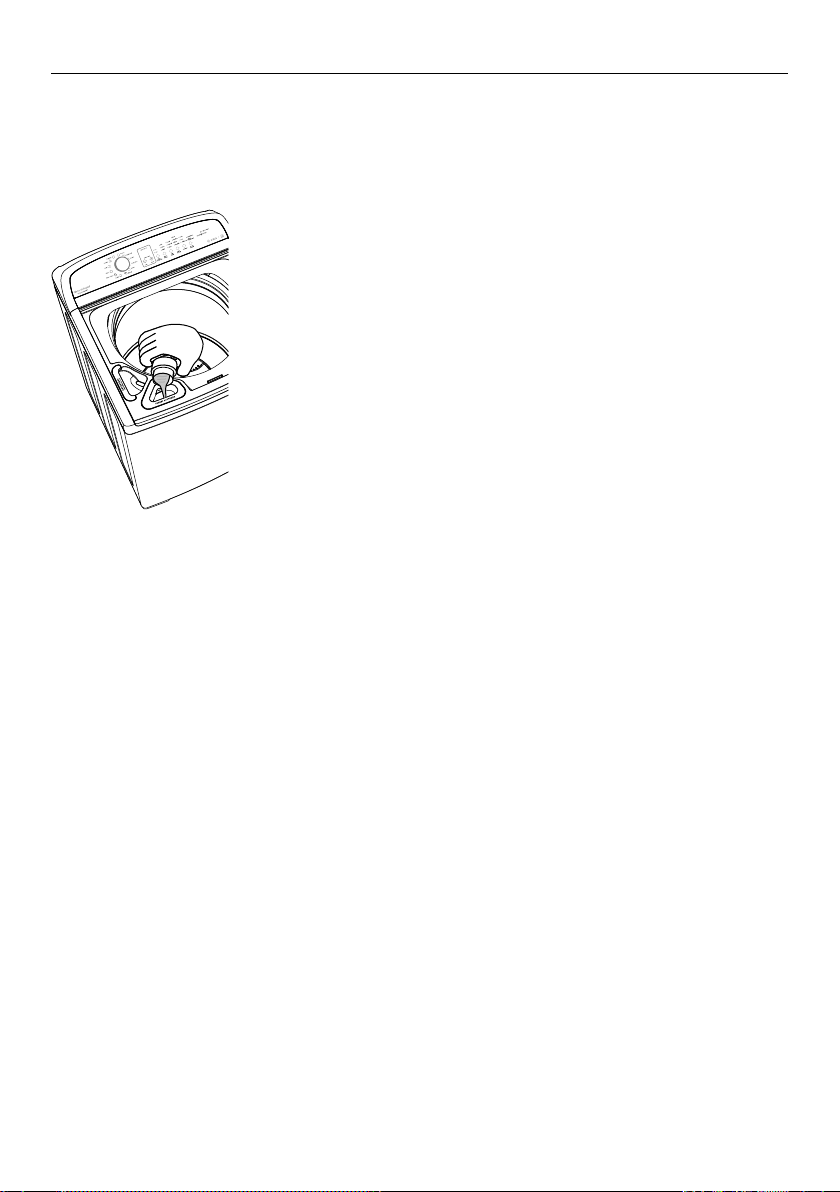
Adding the fabric softener
Always follow the manufacturer’s recommendations on the fabric
softener packaging for the correct dosage. Measure the softener
out into the cap and pour into the fabric softener dispenser. The
softener will remain in the dispenser until the deep rinse where
water flushes it into the bowl.
If you fill beyond the ‘Max’ mark, the fabric softener will dispense
into the bowl prematurely and may stain clothes, and also
contribute to scrud (described below).
If you wish to use fabric softener we recommend:
z
Using it sparingly. Measure it carefully to ensure you do not fill above the ‘Max’ level
of the dispenser.
z
Using a fabric softener that is of a thinner consistency.
z
Clean the dispenser as soon as the cycle has finished.
z
Clean your washer regularly using the BOWL CLEAN cycle, refer to ‘Caring
for your washer’.
z
Cold water washing increases the chance of this build-up occurring. We recommend a
warm or hot wash at regular intervals, eg every 5th wash.
SOFTENER by touching the
Cleaning the dispensers
The dispenser may need cleaning periodically, refer to ‘Caring for your washer’ for advice
about cleaning the dispenser.
Scrud
Scrud is the name of the waxy build-up that can occur within any washer when fabric
softener comes into contact with detergent. This build-up is not brought about by a fault
in the washer. If scrud is allowed to build up in the washer it can result in stains on clothes
and/or an unpleasant smell in your washer. Scrud can be kept under control by using the
BOWL CLEAN cycle regularly, refer to ‘Caring for your washer’ section.
21
Page 22

WASH PREPARATION
Wash Boost options
Your CleanSmart™ washer has an extra dispenser located on the right hand side called
the WashBoost dispenser. You can use this dispenser to boost your wash performance in
two ways:
Stain Treatment
The
STAIN TREATMENT option allows you to add a liquid in-wash fabric stain remover to
help combat tough stains. The liquid treatment is released into your wash at just the right
time to work on any stains present. Short soaks are included in the wash to effectively
boost stain removal. For the stain remover to be dispensed correctly, ensure STAIN
TREATMENT
Pre treatment products, such as concentrated spray-on fabric stain removers must NOT be
used in the Wash Boost dispenser.
Dual Wash
For extra dirty loads you can perform a
complete a double wash; the first is an initial wash to loosen soil and get the wash started
using a cool water temperature to ensure any stains are not “set in”. Detergent for this part
of the wash should be placed in the detergent dispenser. The second part is a complete
wash to remove all traces of dirt. The liquid detergent for this part of the wash should be
placed in the Wash Boost dispenser. When you feel your load requires extra washing, ensure
DUAL WASH is selected from the WASHBOOST options.
Use the manufacturer’s recommended dose of detergent in each of the detergent and Wash
Boost dispensers. However, reduce the amount if you have problems with over-sudsing.
is selected before starting your wash.
DUAL WASH. Your CleanSmart™ washer will
The Wash Boost dispenser is NOT designed to dispense bleach into your wash. The bleach
will not be dispensed correctly and may damage your clothing. Only liquid detergent or
liquid in-wash fabric stain remover must be used (ie no powder).
Adding the liquid in-wash fabric stain remover or liquid detergent
Liquid in-wash fabric stain remover, or liquid detergent only, must be used in the Wash
Boost dispenser. Refer to the manufacturer’s instructions on the package for the correct
dosage. Add the liquid in-wash fabric stain remover or liquid detergent to the dispenser
before starting the wash cycle ensuring you do not exceed the ‘Max Level’ shown on
thedispenser.
22
Page 23
GETTING STARTED QUICKLY
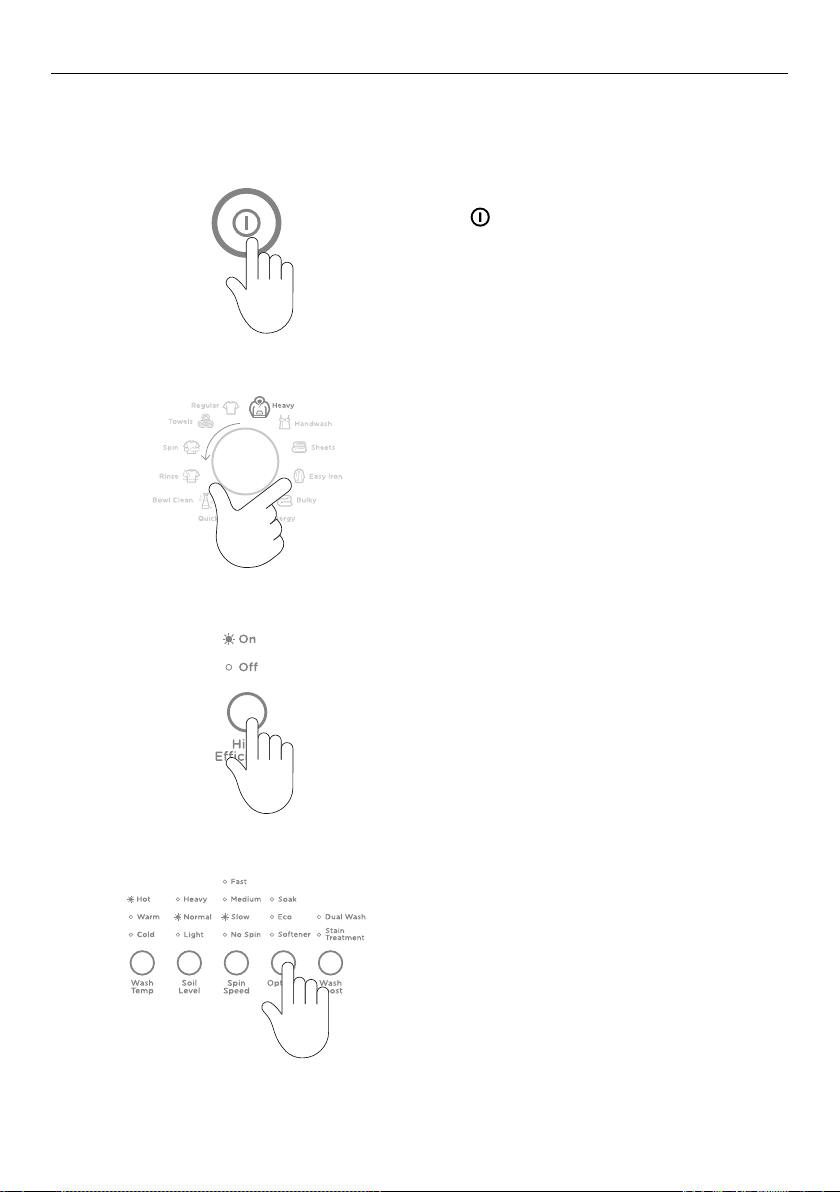
The buttons require only a gentle touch to activate.
1
2
3
Touch to activate your
CleanSmart™ washer.
Select your desired wash cycle by turning the
SmartTouch™ Control Dial.
High Efficiency
This allows you to select either a high
efficiency or conventional cycle.
High Efficiency, On
To save water
High Efficiency, Off (Conventional Cycle)
To use more water when needed, refer to ‘The
CleanSmart™ wash’.
4
Choose your wash options, eg you may want
a WARM wash temperature and a SLOW spin,
refer to the ‘Wash options’ section.
23
Page 24
GETTING STARTED QUICKLY
Constant interruptions to the cycle, such as touching will increase the time taken to
complete the cycle and may result in poorer washperformance.
For best fabric and colour care, remove your clothes as soon as the cycle has finished.
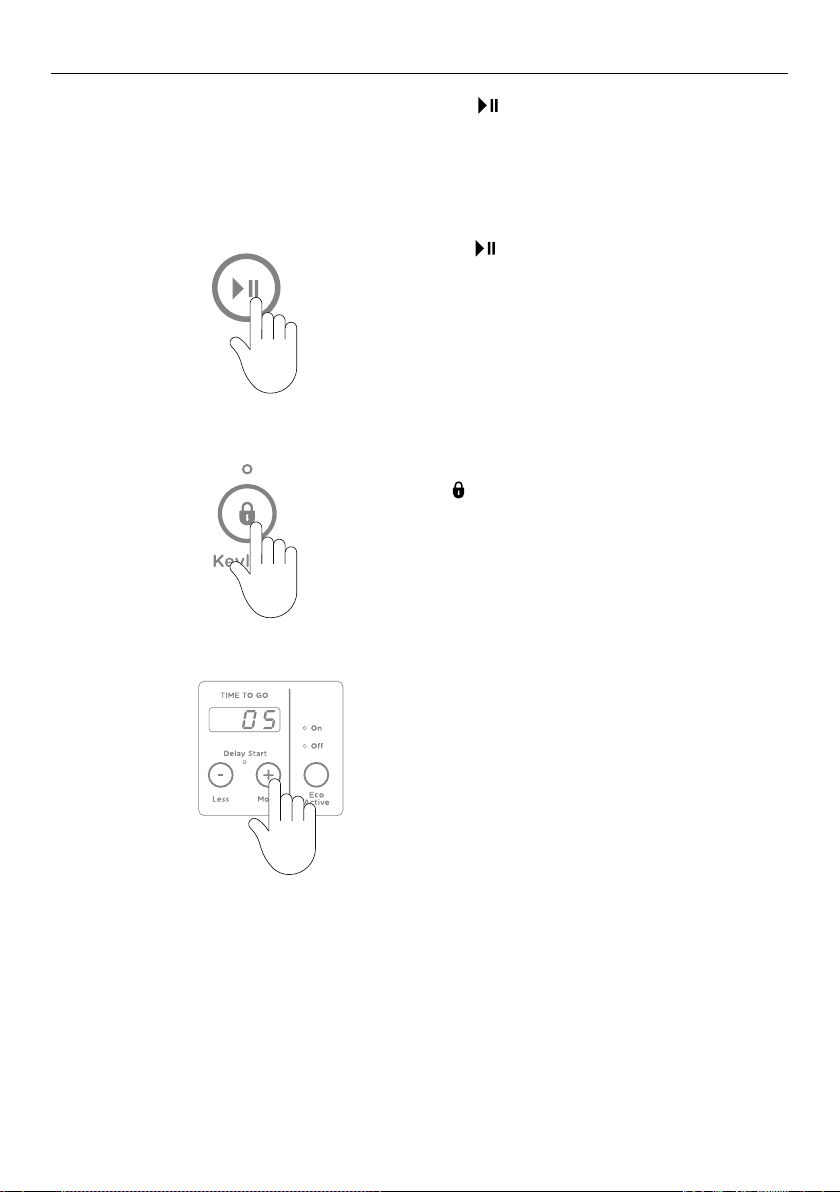
Touch to start the cycle. The washer will
start to fill with water and will automatically
5
6
select the correct water level and wash action
for your load.
Use to lock the buttons on the control
panel, preventing them from being activated
accidently, refer to ’The CleanSmart™ wash’
section.
24
7
DELAY START allows you to delay the start of
your wash by 5 mins up to 18 hours, refer to
the ‘Wash options’ section.
Page 25
WASH OPTIONS
Once you have selected your wash cycle you may wish to change the default wash options.
High Efficiency
This option lets you choose between a High Efficiency (ie High Efficiency On) and
Conventional (ie High Efficiency Off) mode of washing. Some cycles can be used in either
of the modes, or only one, depending on what is best for your clothes.
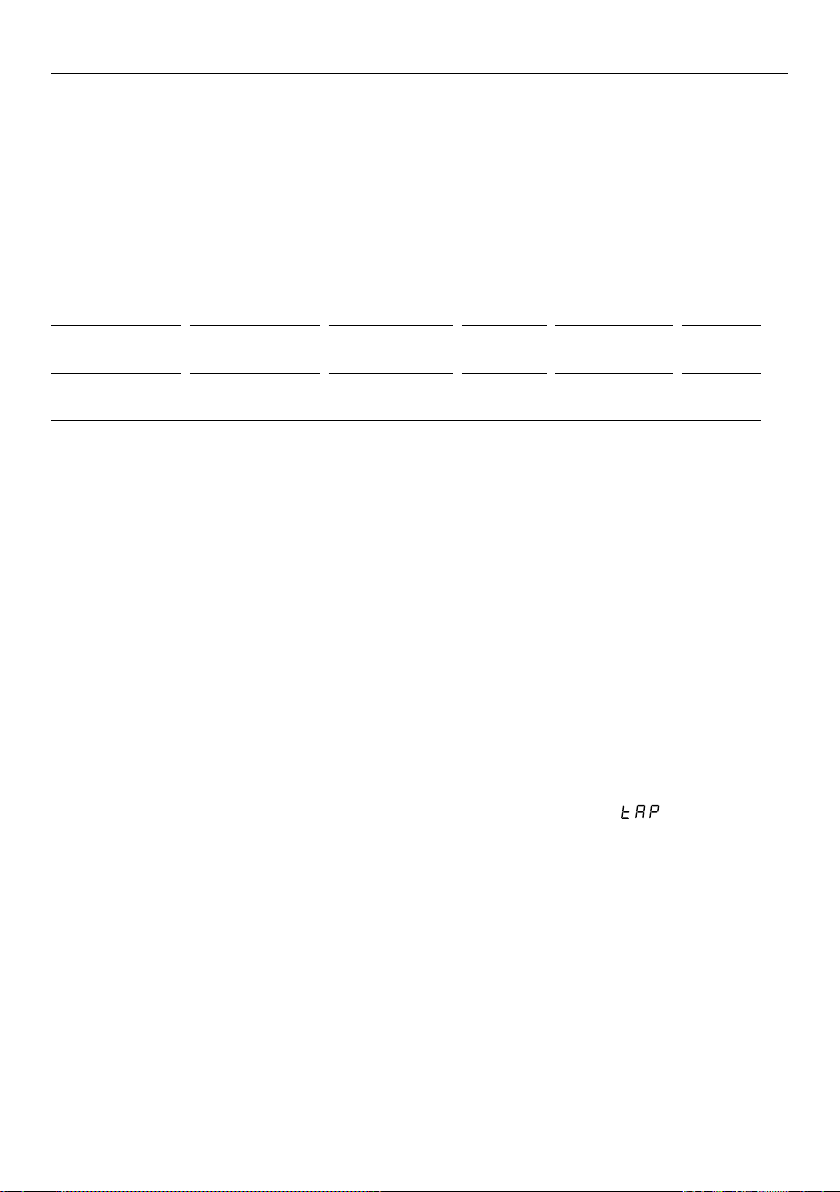
Wash Temp
Your CleanSmart™ washer offers 5 wash temperatures, and an additional setting,
‘Controlled Cold’.
COLD TAP
Incoming water
from tap
CONTROLLED
COLD
20°C 35°C 40°C 50°C 60°C
WARM / COLD WARM WARM / HOT HOT
Simply touch the WASH TEMP button to increase or decrease the wash temperature.
z
The temperature option selected determines the temperature of the detergent activating
wash (with the exception of the ALLERGY cycle where both parts of the wash are hot).
z
Some temperatures are not available on some cycles as a safeguard for your clothes
(egHOT and WARM / HOT on the HANDWASHcycle).
If a hot wash is required, where both phases of the wash system are hot, you must select
the
ALLERGY cycle, or the SHEETS cycle and HOT temperature.
Controlled Cold
The temperature of cold tap water varies widely, depending on your location and the
season. The lower the cold water temperature, the less effective the cold wash becomes. To
help with this issue we have developed
CONTROLLED COLD which adds a small amount of
warm water, when necessary, to raise your cold water wash to approximately 20°C. This will
ensure that you receive a more effective wash in cold water. Cold Tap ( ) is the default
COLD setting on your washer. If you wish to use the CONTROLLED COLD setting as the
default COLD setting, refer to ‘Changing pre-set options’ section to learn how to change the
default setting.
Soil Level
Your clothes and other washable items sometimes need more or less cleaning than others.
The
SOIL LEVEL option lets you adjust the wash to suit the amount of soil in your load. For
example, for dirty clothes, select HEAVY and for items that are only lightly soiled, select
LIGHT. This adjusts the wash time accordingly to give the load the right amount of agitation
in order to remove the soil.
25
Page 26
WASH OPTIONS
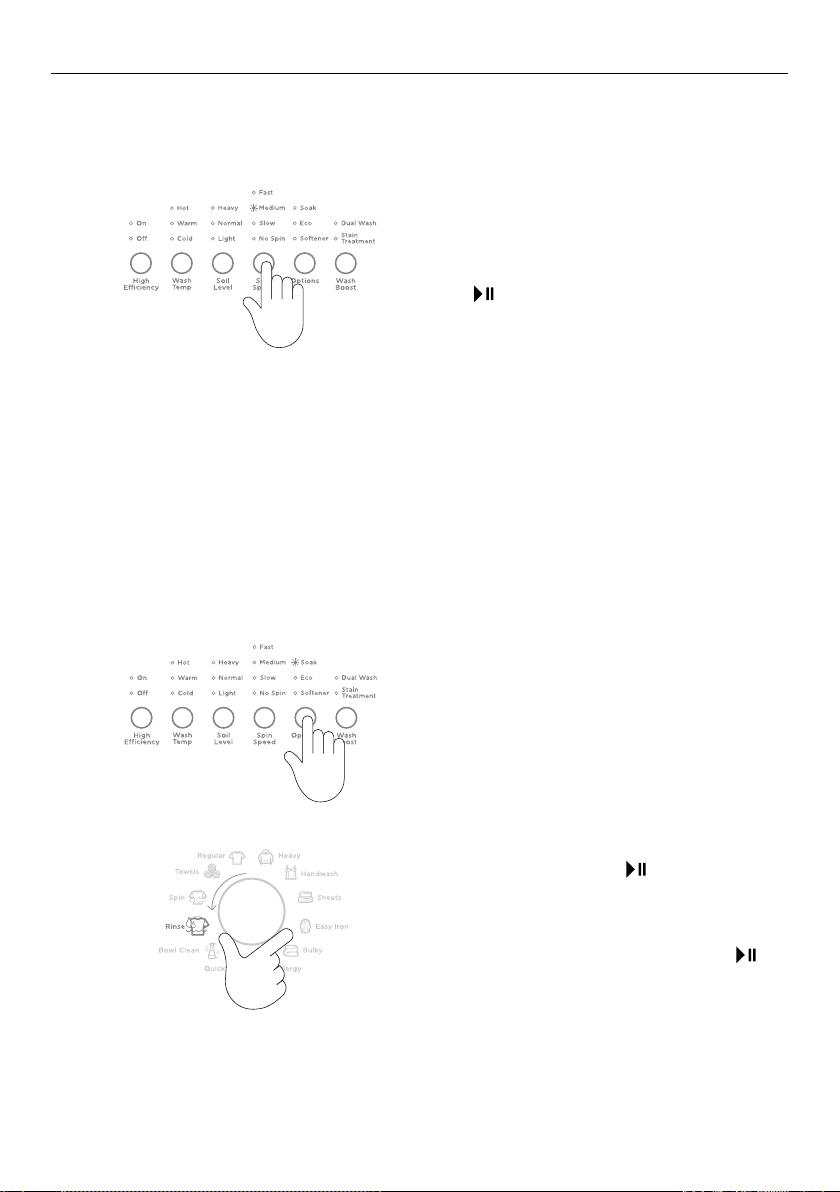
Spin Speed
Your CleanSmart™ washer offers three spin speeds:
and SLOW (330 rpm), plus an additional NO SPIN option.
1
Wash Boost
If you have stains in your wash load that you need to treat or wish to perform a double
wash, select
‘Wash Boost options’ section for detailed information on these options.
Options
Soak
The
SOAK option provides a two hour soak during the middle of the wash phase of the
cycle. The washer will then complete the rest of the cycle. During SOAK, the washer will
agitate for a few seconds every minute.
STAIN TREATMENT or DUAL WASH from the WASH BOOST options. Refer to the
FAS T (1100 rpm), MEDIUM (670 rpm)
Increase or decrease your spin speed by
touching the
will pause the washer at the end of the rinse,
allowing you to remove drip-dry items before
you proceed the washer to its final spin.
Touch to start the spin.
SPIN SPEED button. NO SPIN
Select
1
2
If the soak option is selected on a QUICK cycle, the soak time will only be one hour.
Ensure items are colourfast before using soak.
26
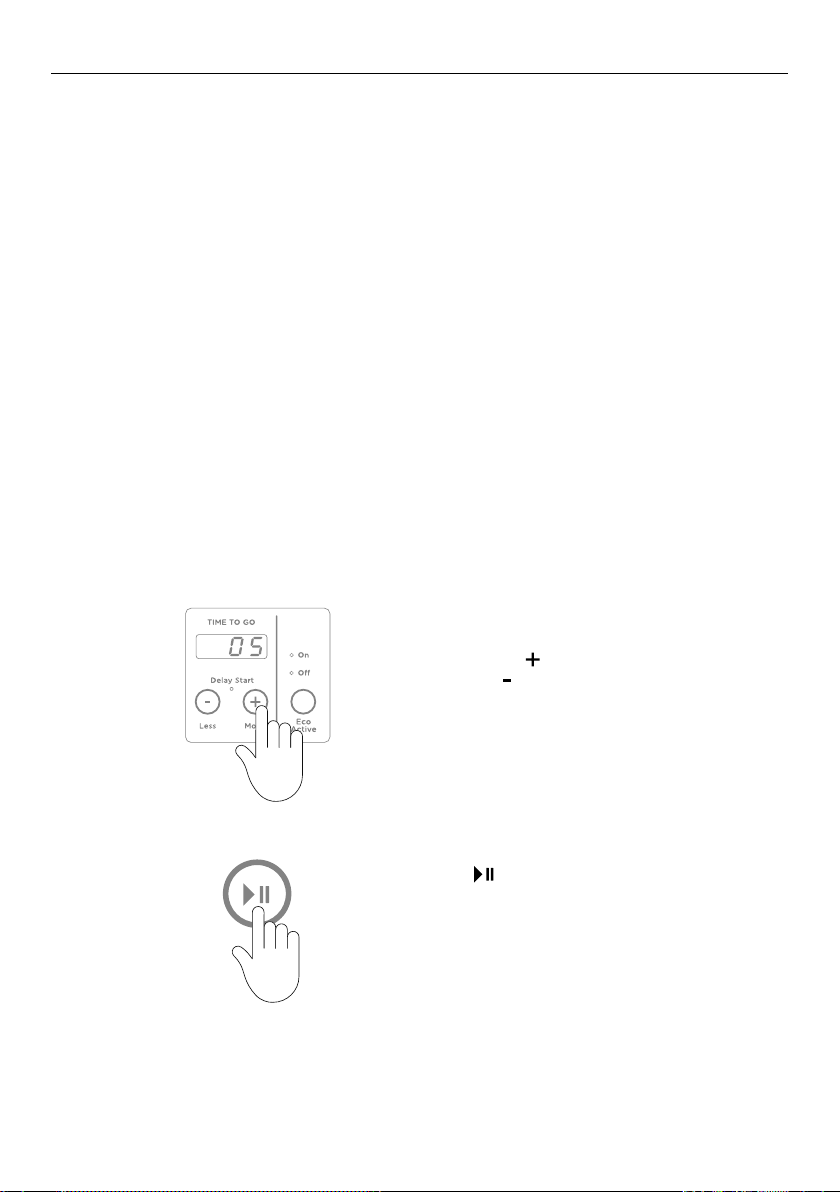
SOAK from the OPTIONS menu.
SOAK early, touch and turn the dial
To exit
to select RINSE.
Change the
select SLOW if washing handwash only,
delicate, or creasable items) and touch .
SPIN SPEED if necessary (eg
Page 27
WASH OPTIONS
DO NOT use your washer to soak items in bleach or sanitiser and if you’ve soaked items in
a bucket, do not tip the contents of the bucket into your washer. The chemicals in these
products are very corrosive to metal surfaces and can damage your washer. Rinse and
wring items out thoroughly before placing them in your washer.
Eco
Use the
specially designed to use at least 25% less water than a traditional rinse. Use this option
when you want to use less detergent and less water. However, if you have low water
pressure or sensitive skin it is better to use a traditional rinse.
ECO option is available on selected cycles only. If ECO is not available for a cycle, your
washer will skip over it in the OPTIONS menu.
Softener
If you wish to use fabric softener, ensure
part of the cycle so that softener is dispensed correctly, refer to ‘Wash preparation’.
Delay Start
The
18hours. This can be useful to time your washing to finish when you arrive home from work,
or to start once you have finished in the shower.
ECO option to save water. The ECO option uses a spray rinse which has been
SOFTENER is selected. This will adjust the rinse
DELAY START option can delay the start of the wash cycle between 5 minutes and
1
2
Avoid using
to occur.
Touch
MORE to increase the delay time,
and LESS to decrease the time, or turn
DELAY START off.
Touch to confirm your selection and start
the countdown. The display screen will show
the time until the cycle is set to begin.
DELAY START for damp, non-colourfast items as this may cause dye run
27
Page 28

WASH OPTIONS
Clothes care safeguards
To avoid accidentally damaging your clothes there are a few options that your washer will
not allow. For example you cannot select a
cycles.
Washing bulky items
The
BULKY cycle takes special care of bulky items. Bulky garments and bedding wash most
effectively when they can move freely. Ensure that there is sufficient room in the bowl for
the load to move during the wash.
When washing a single bulky item add a large beach towel to the wash, to ensure the load
is balanced for an effective spin.
Bowl Clean
Cleaning the inside of your washer regularly is important. Your washer will remind you to
complete a
BOWL CLEAN cycle every 100 cycles (the BOWL CLEAN cycle icon will flash to
alert you) or we recommend you complete this cycle 5 – 6 times a year, refer to the ‘Caring for
your washer’
section.
HOT wash on the HANDWASH or EASY IRON
28
Page 29
CUSTOMISING A WASH CYCLE
To customise a cycle
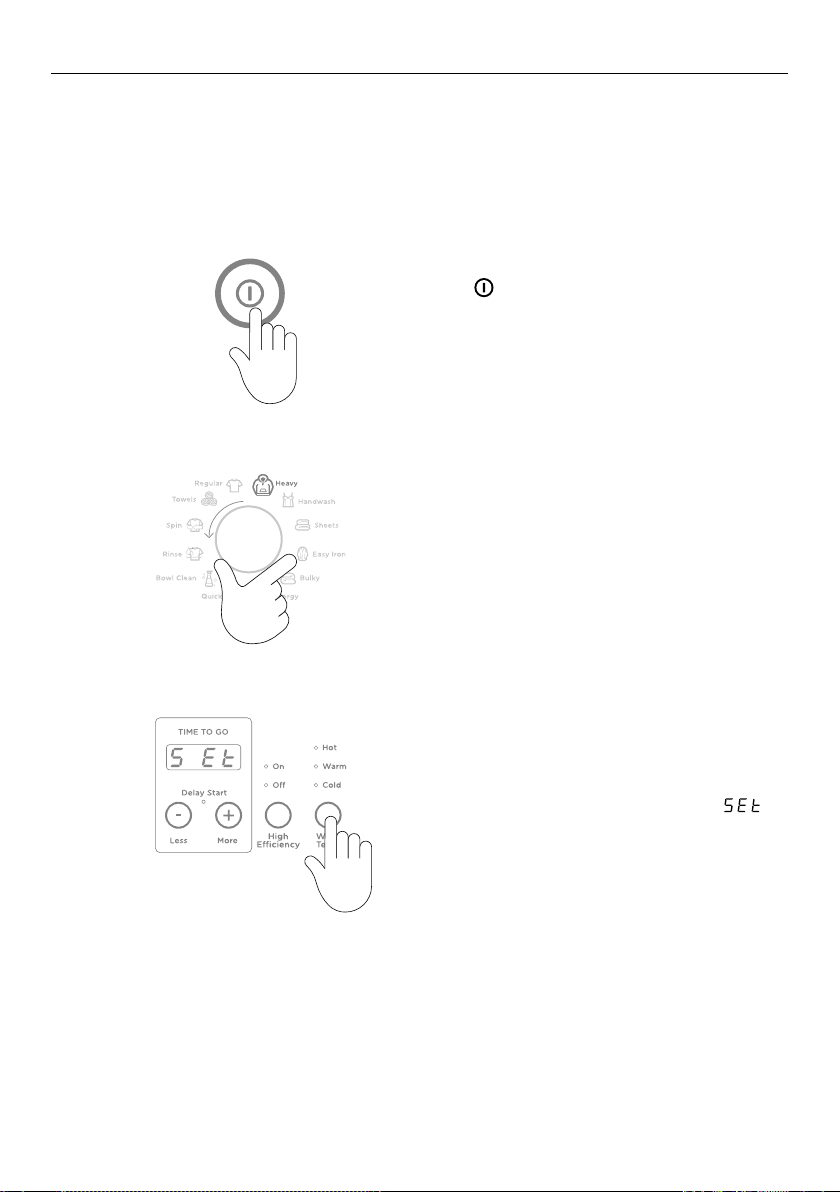
You can program your CleanSmart™ washer to remember the wash options you prefer for
each wash cycle. For instance, you may want to set the
wash or set the HEAVY cycle to include a SOAK.
TOWELS cycle to a WARM / HOT
1
2
3
Touch to activate your
CleanSmart™ washer.
Turn the dial to select the wash cycle you
wish to customise.
Touch the button of the option you want to
customise, eg
will hear 2 quick beeps and the wash cycle
icon will flash. The screen will display .
WASH TEMP for 3seconds. You
29
Page 30
CUSTOMISING A WASH CYCLE
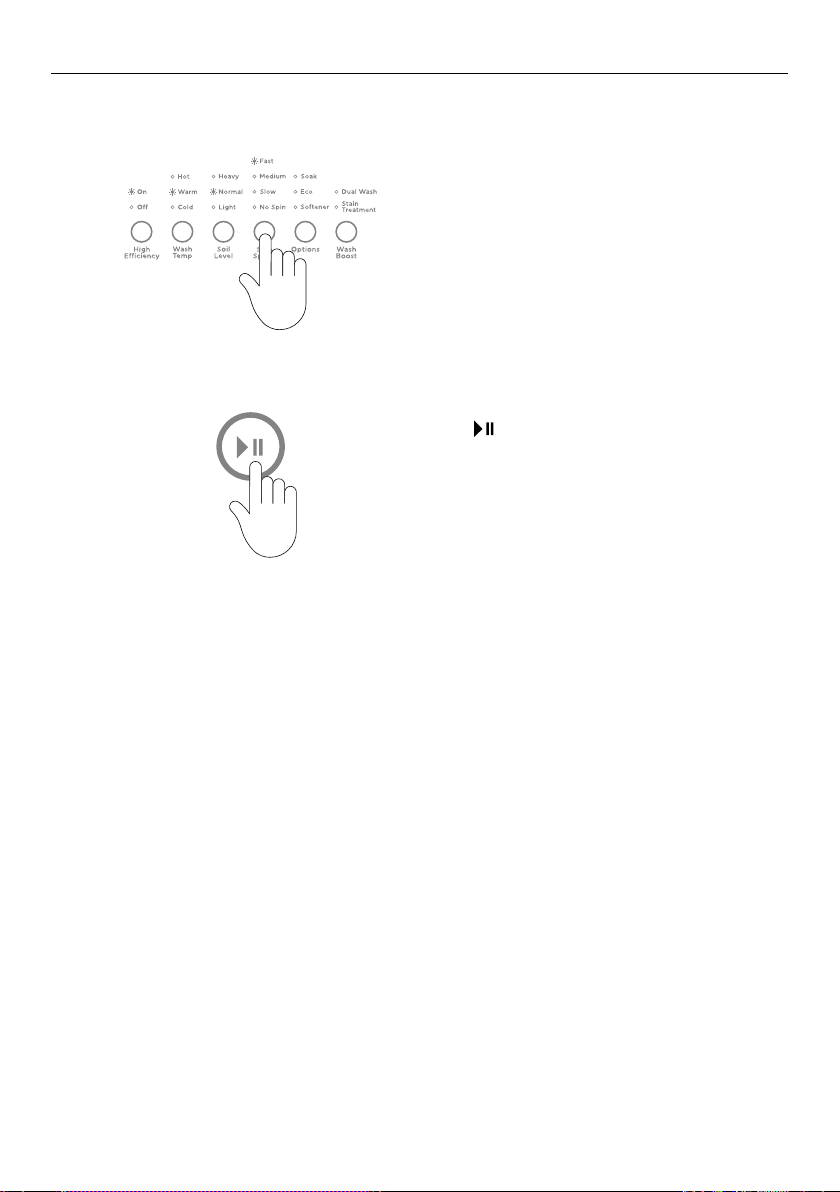
Select your preferred setting for this option,
4
5
To change your customised wash cycle simply repeat these steps.
and any other options you wish to customise
for this cycle.
Touch to store your customised cycle. A
long beep will sound to confirm that your
changes have been saved.
30
Page 31
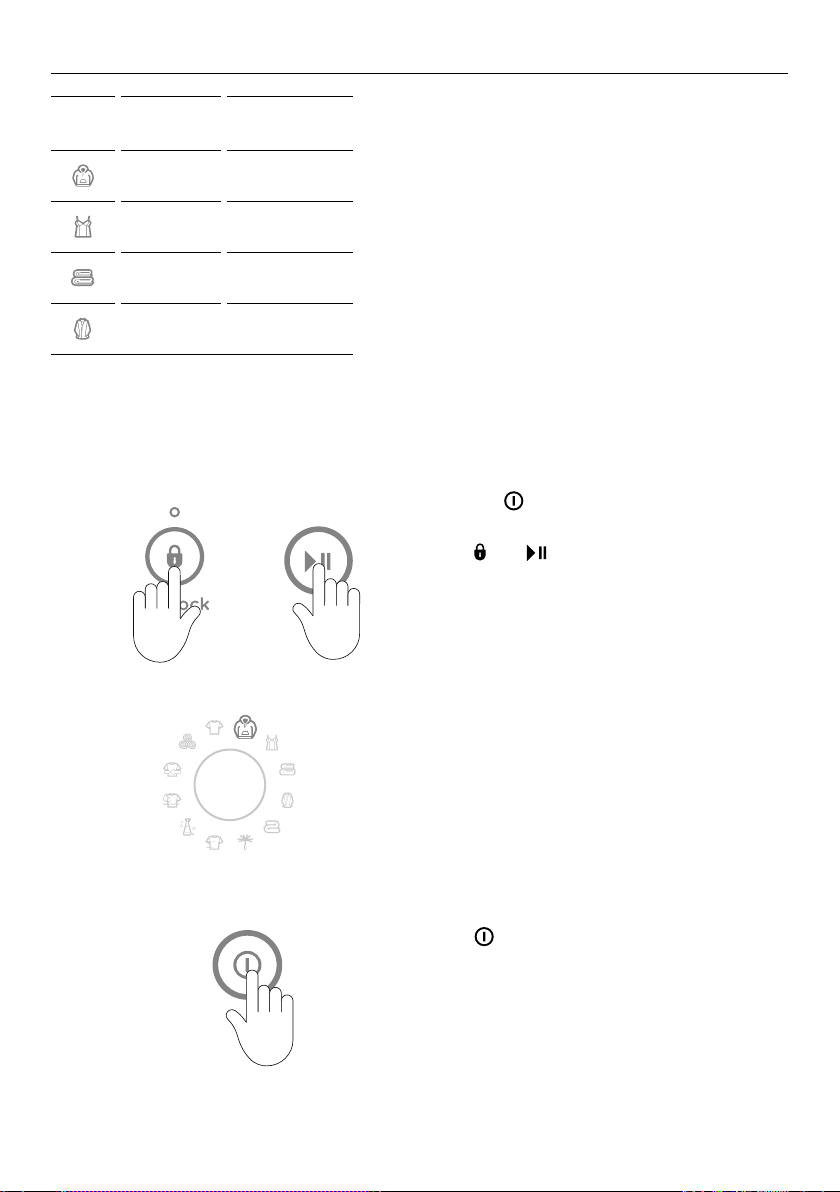
CHANGING PRE-SET OPTIONS
+
Wash Temp
OOB Recovery
Factory Reset
EOC Beeps
Wash Temp
OOB Recovery
Factory Reset
EOC Beeps
Wash Temp
OOB Recovery
OOB Recovery
EOC Beeps
OOB Recovery
Factory Reset
EOC Beeps
ICON DEFAULT
CUSTOMISED
FUNCTION
Heavy Wash Temp
Handwash
OOB
Recovery
Sheets EOC Beeps
Easy Iron Factory Reset
To enter Option Adjustment mode:
1
+
Option Adjustment mode
After using your washer a number of times
you may want to fine tune some of the
options to suit your wash needs.
There are a number of pre-set options,
which can be changed:
1 The wash temperatures, including
changing the
COLD wash temperature to
CONTROLLEDCOLD.
2 The out of balance recovery routine.
3 The number of beeps at the end of the
cycle.
4 Resetting to factory default settings.
Turn the washer on at the wall but do
not touch .
Touch
and together for 3seconds.
You will hear 3quick beeps indicating you
have entered Option Adjustment mode. The
washer will show the default setting for the
cold wash temperature.
Wash Temp
OOB Recovery
2
EOC Beeps
Factory Reset
Use the dial and buttons on the control panel
to make your changes to the pre-set options.
Touch to return to normal mode when
3
To change or reset any of the options, repeat the above steps.
you have finished modifying your options.
Your washer will automatically remember
your changes.
31
Page 32
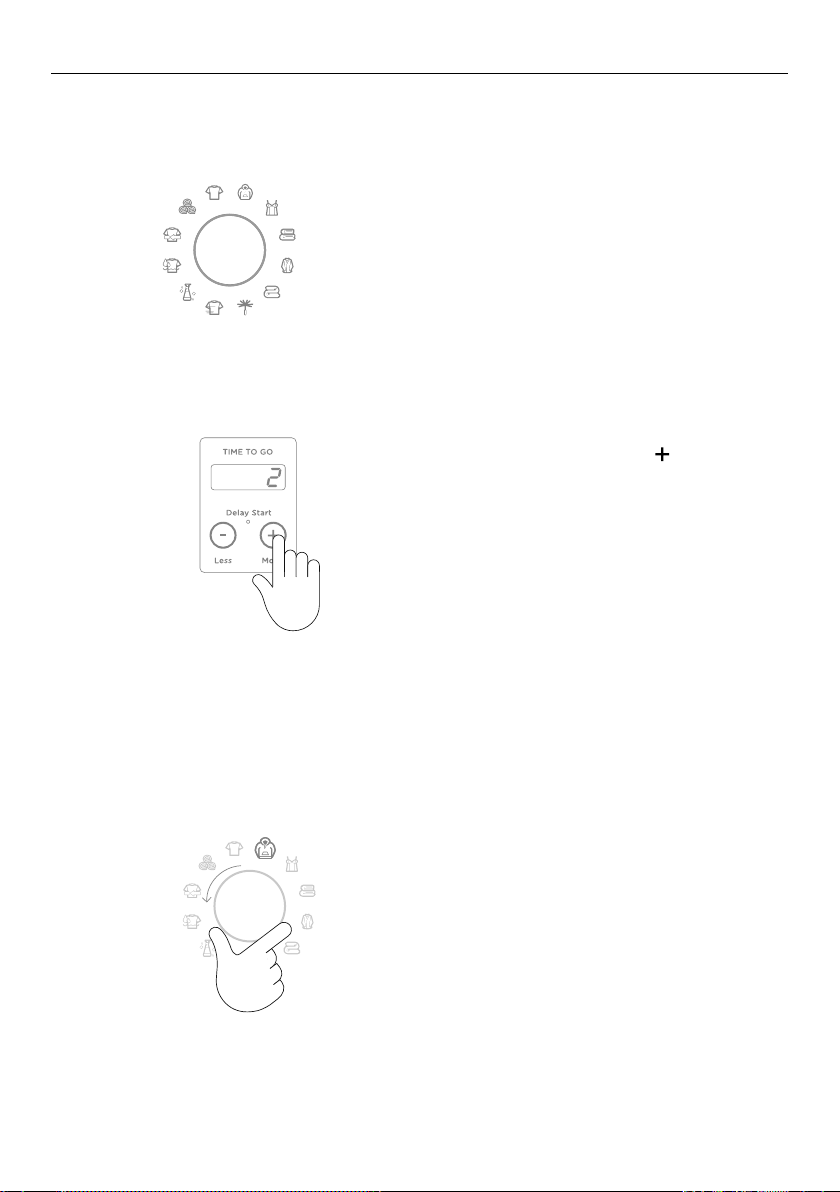
Adjusting your options
1
2
CHANGING PRE-SET OPTIONS
Enter the Option Adjustment mode,
refer to the ‘Option Adjustment mode’
Wash Temp
OOB Recovery
EOC Beeps
Factory Reset
for instructions.
The diagram shows how the wash cycle icons
relate to the pre-set options you can change.
It also shows what will be displayed when you
first enter Option Adjustment mode. Options
you can change are accessible using the
HEAVY, HANDWASH, SHEETS and EASY IRON
cycles only.
Use the DELAY START, MORE button on the
panel to scroll through the available settings
of your selected option, eg to increase or
decrease the temperature of your warm wash
temperature, or to change the number of
beeps at the end of the cycle.
Wash temperatures
All wash temperatures can be individually adjusted if you think they are too hot or too cold.
The hot temperature will be the same as the hot water supply temperature.
To modify the wash temperature:
32
1
Wash Temp
OOB Recovery
EOC Beeps
Factory Reset
Enter the Option Adjustment mode, refer
to the ‘Option Adjustment mode’ for
instructions.
Select the
HEAVY cycle.
Page 33
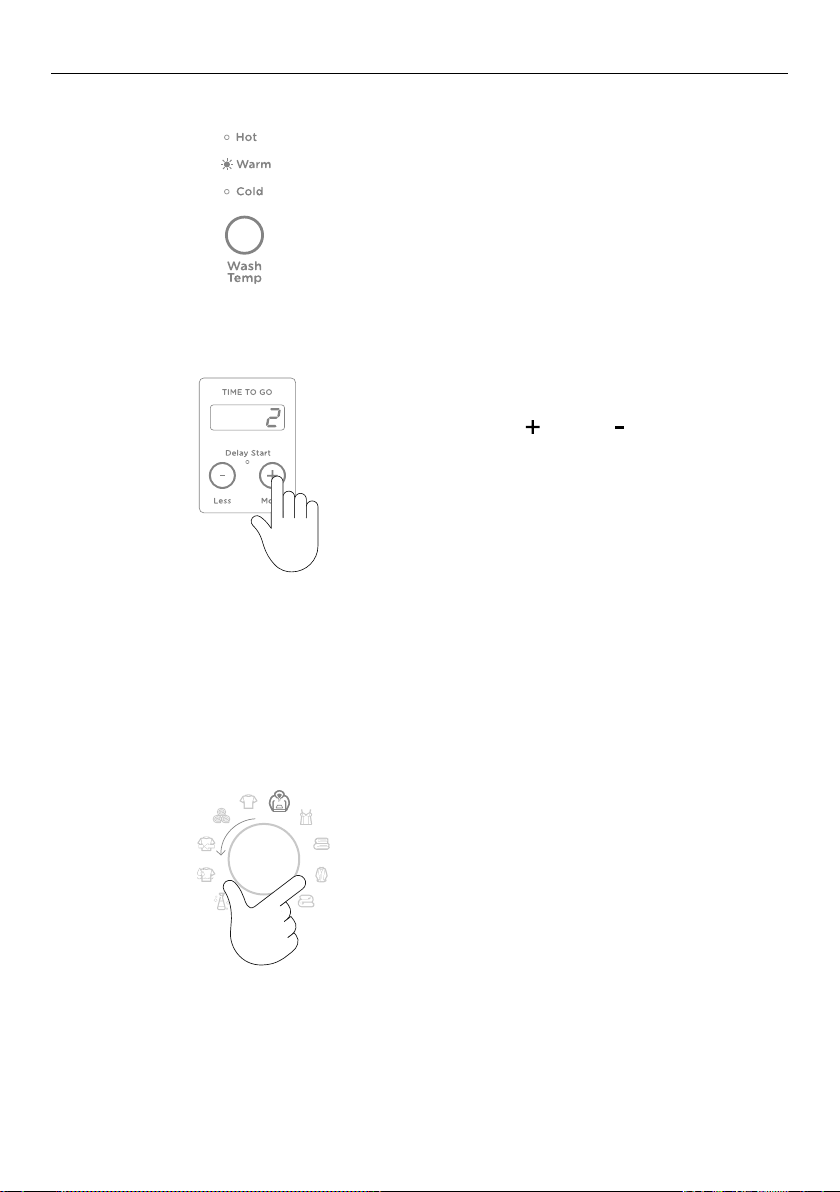
CHANGING PRE-SET OPTIONS
Factory Reset
EOC Beeps
Wash Temp
OOB Recovery
Select the wash temperature you want to
2
3
Controlled Cold
If your incoming cold water temperature is very low you will get a less effective wash. The
CONTROLLED COLD option solves this problem by adding a small amount of hot water to
raise the temperature of the wash to approximately 20°C.
adjust, eg WARM, by touching the WAS H
TEMP button. The digital display screen
shows the current setting.
Touch MORE or LESS to increase or
decrease to the desired temperature. Each
increment is equal to approximately 0.5°C.
To programme the Controlled Cold temperature option:
1
Wash Temp
OOB Recovery
EOC Beeps
Factory Reset
Enter the Option Adjustment mode, refer
to the ‘Option Adjustment mode’ for
instructions.
Select the
HEAVY cycle.
33
Page 34
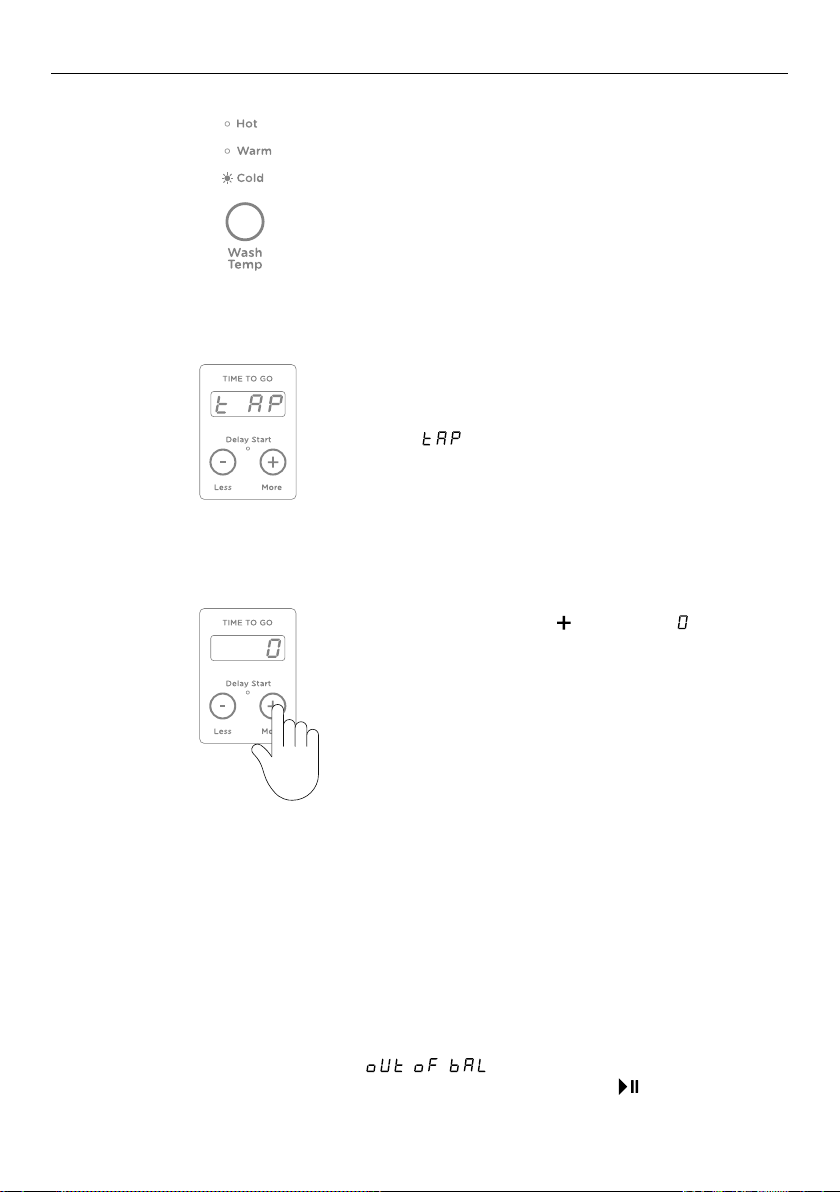
2
Factory Reset
EOC Beeps
Wash Temp
OOB Recovery
3
4
CHANGING PRE-SET OPTIONS
Select COLD wash temperature by touching
the WASH TEMP button (if not already
selected).
The digital display shows the temperature
adjustment possible. The default setting is
, ie the temperature of the incoming
water from the cold water supply.
Touch the MORE button until is displayed.
Your washer will now control the cold
temperature to approximately 20°C.
Note: Each of the remaining settings equals
an approximate 0.5°C temperature increase or
decrease from this point.
If you always use COLD or CONTROLLED COLD water, we recommend that a WARM or HOT
wash be used regularly, eg every 5th wash should be at least a warm one to maintain the
cleanliness of your washer.
Out of balance recovery routine
When your washer is spinning it can sense if the wash load is out of balance. If an out of
balance load is detected, the washer will stop and re-try spinning one more time. If it still
senses an unbalanced load there are two options the washer can take.
Automatic recovery OFF (default setting)
Your washer will stop, beep, and show
screen. You must redistribute the load more evenly yourself and touch to resume the
cycle. Use this option if you wish to conserve water.
34
in three phases on the display
Page 35
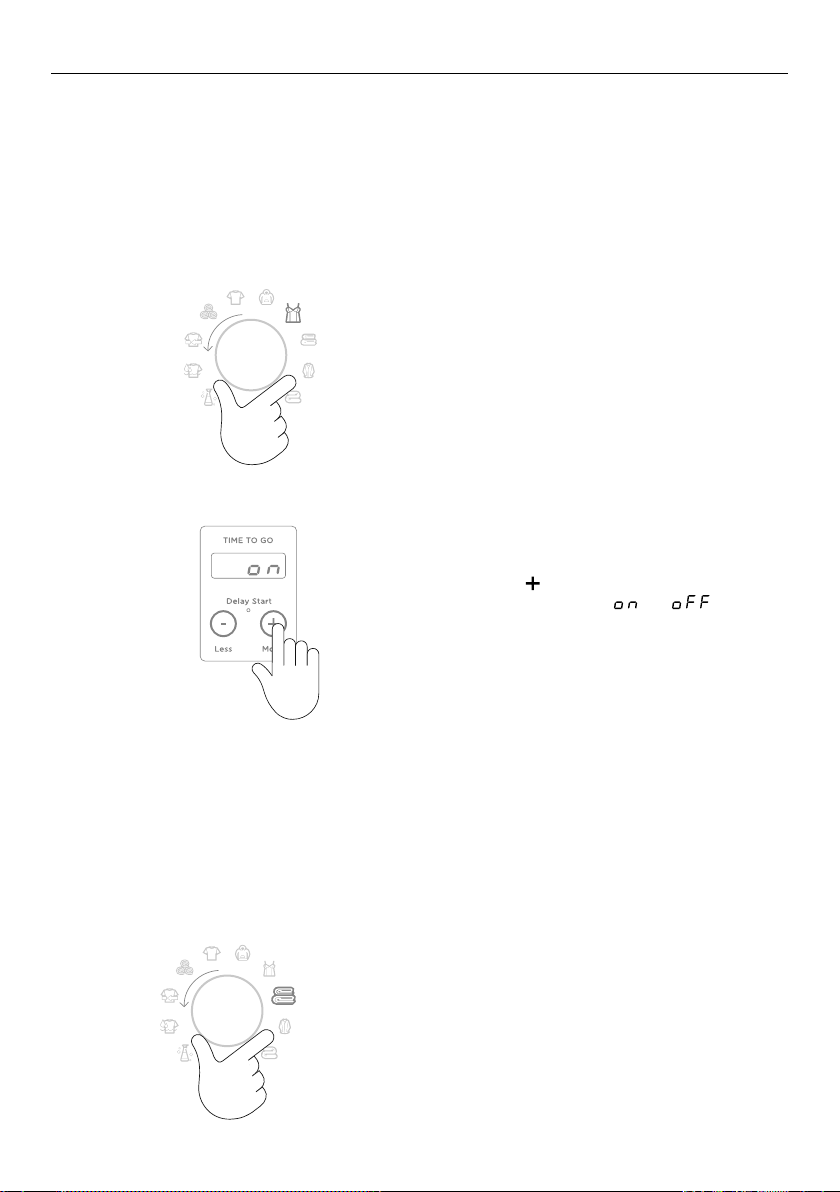
CHANGING PRE-SET OPTIONS
Automatic recovery ON
Your washer will try to automatically correct the out of balance load. It will fill with water
and agitate to redistribute the load before trying to spin up again.
To change the out of balance (OOB) recovery routine:
1
Wash Temp
OOB Recovery
EOC Beeps
Factory Reset
Enter Option Adjustment mode, refer to the
‘Option Adjustment mode’ for instructions.
Select the
HANDWASH cycle.
Touch MORE to turn
2
AUTOMATIC RECOVERY or .
End of cycle beeps
The beeps signalling the end of the cycle can be increased or decreased. The default
setting is 5beeps.
To modify the number of beeps sounding at the end of the cycle:
1
Wash Temp
OOB Recovery
EOC Beeps
Factory Reset
Enter Option Adjustment mode, refer to the
‘Option Adjustment mode’ for instructions.
Select the
SHEETS cycle.
35
Page 36
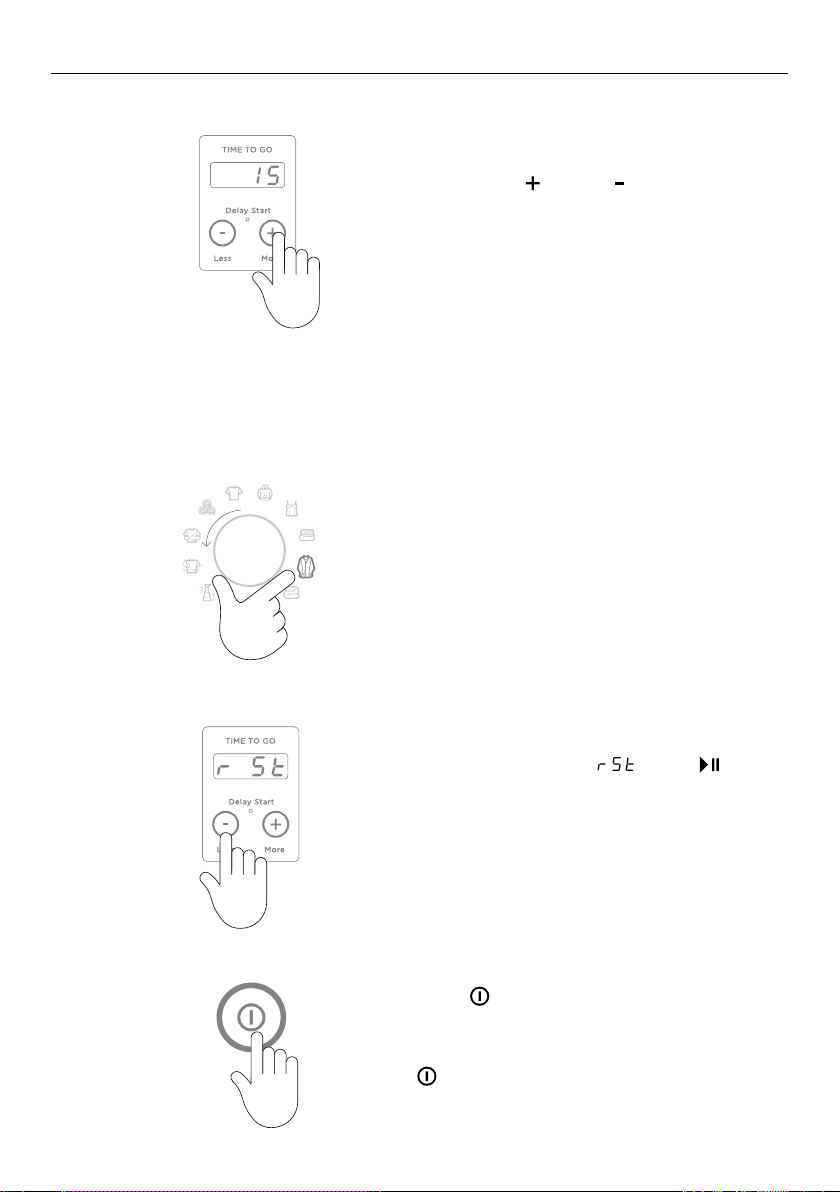
CHANGING PRE-SET OPTIONS
Touch MORE or LESS to increase or
2
Factory reset
You can reset your washer to the default settings it left the factory with following steps.
To reset your washer to its factory settings:
Wash Temp
OOB Recovery
EOC Beeps
1
Factory Reset
decrease the number of beeps, or for no
beeps to sound at the end of the cycle.
Enter Option Adjustment mode, refer to the
‘Option Adjustment mode’ for instructions
Select the
EASY IRON cycle.
36
2
3
The display will show . Touch for
3seconds to reset your washer to its factory
settings.
This action will reset the washer to the
default settings, exit Option Adjustment
mode and restart the washer in normal
operating mode.
Touch
your washer. To save changes and exit from
the Option Adjustment mode at any time (ie
to return to normal operating mode), touch
to exit if you do not wish to reset
.
Page 37
CARING FOR YOUR WASHER
When you have finished using your washer
z
Turn off the taps to prevent the chance of flooding
should a hose burst.
z
Unplug the machine from the power socket.
Cleaning your CleanSmart™
Before you start cleaning your CleanSmart™ washer,
ensure that it is disconnected from the power (ie unplug
the machine from the power socket).
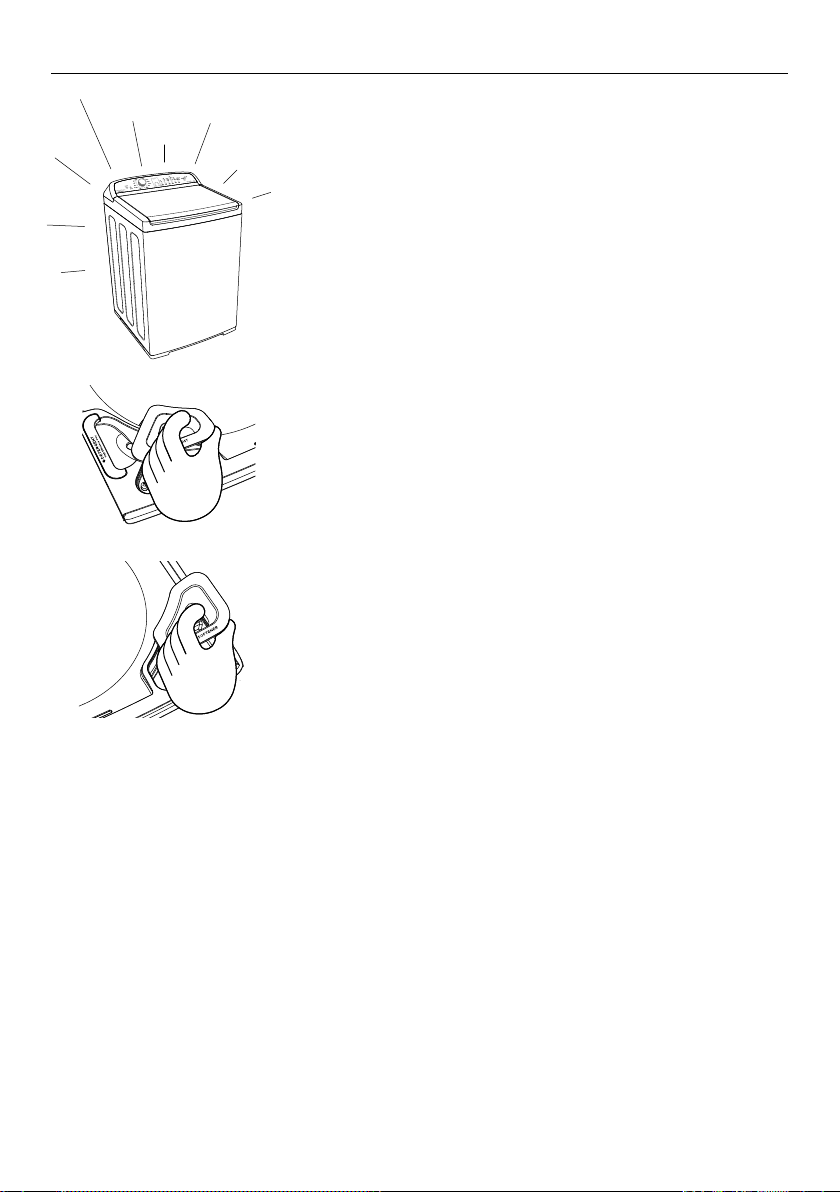
Cleaning the control panel, topdeck and lid
Use a soft damp cloth to wipe all surfaces, and wipe dry.
Avoid using chemical or scouring cleaners, as these will
damage the paint and plastic surfaces of your washer.
The SmartTouch™ Control Dial and soft close lid are not
designed to be removable for cleaning. Do not attempt
to remove the dial or lid.
Cleaning the detergent, fabric softener and
wash boost dispensers
Wipe out the detergent dispenser with a damp cloth.
The funnels (tops) of both the fabric softener and Wash
Boost dispensers click off easily. Simply place a finger
down the centre and lift. The fabric softener and Wash
Boost dispenser compartments are not removable and
need to be wiped clean periodically. If the siphon tube on
either dispenser looks partially blocked use a cotton bud
to clean.
37
Page 38
CARING FOR YOUR WASHER
NEED
IMAGE
Cleaning the inside of your washer
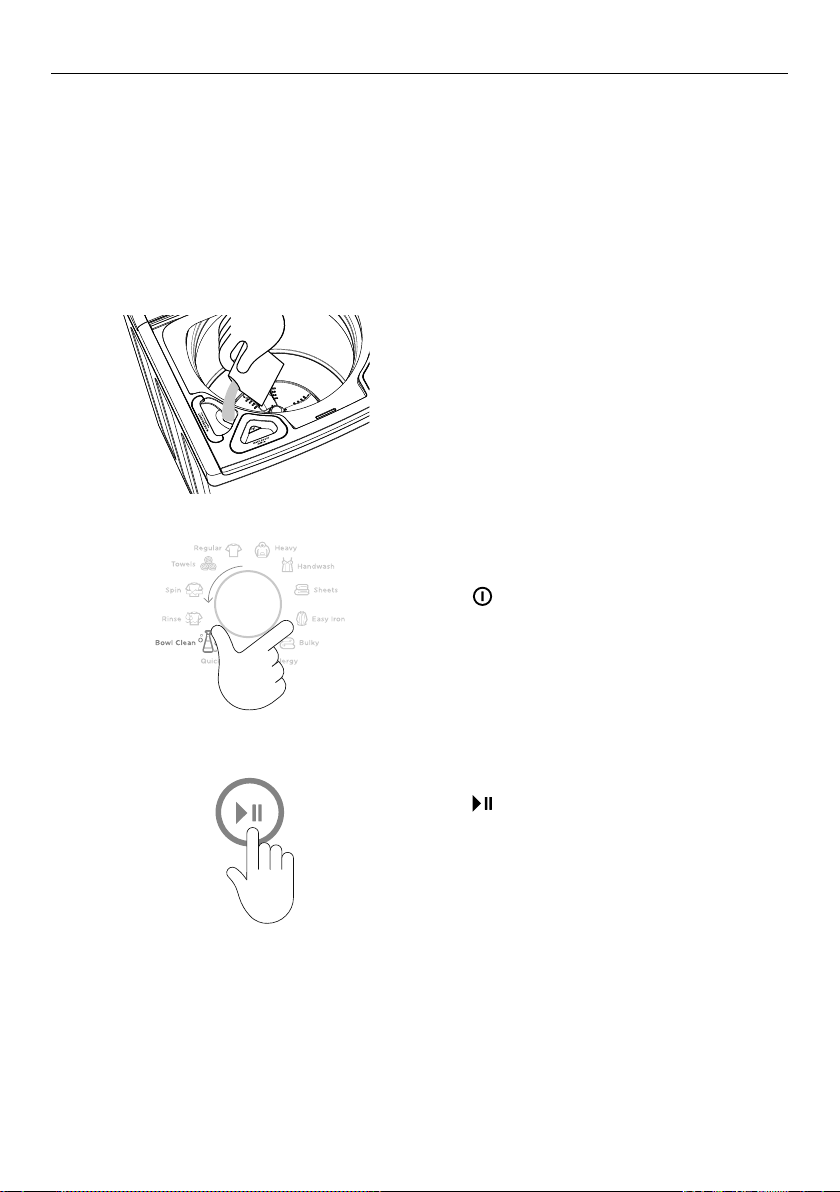
It is important that you occasionally clean the inside of your washer. Your CleanSmart™
washer has a
100 cycles to run this cycle (the BOWL CLEAN cycle icon will flash to alert you), or we
recommend completing this cycle 5 – 6 times a year. We recommend the use of commercial
washing machine cleaners only. Ensure the cleaner used is compatible with your waste
water system, i.e. safe for use if you have a septic tank. Follow the manufacturers
instructions. We suggest that you do not have any items in the washer when you run this
cycle.
1
BOWL CLEAN cycle specifically for this purpose and will remind you every
Add the washing machine cleaner directly
into the detergent dispenser, follow the
manufacturers instructions.
2
3
38
Touch
the BOWL CLEAN cycle.
Touch
‘Wash cycles’ for cycle details.
to turn your washer on and select
to start the cycle, refer to the
Page 39

CARING FOR YOUR WASHER
Cleaning your low-profile agitator
If your low-profile agitator becomes stained we recommend you use household bleach to
clean it. Ensure you wear gloves. Tip a small amount of household bleach onto a soft cloth
and apply to the stain. Be careful to avoid metal surfaces of your washer. Leave it to soak
in for 10 minutes and repeat. Then put your CleanSmart™ washer through the
cycle to remove any residual bleach, refer to the ‘Wash cycles’ section for cycle details.
Automatic lint disposal system
With CleanSmart™ there is no need to remove messy lint filters. Your CleanSmart™ washer
has a self cleaning lint disposal system. It automatically separates the lint from the wash
water as it washes. The lint becomes trapped between the inner and outer bowls and is
flushed out at the end of the wash.
Products that might damage your washer
z
Concentrated bleaches, laundry pre-soakers/sanitisers, stain removers and hydrocarbon
solvents (eg petrol and paint thinners) can cause damage to the surfaces eg control
panel, and components of your washer.
z
Be careful when washing garments stained with solvents as they are flammable. DO NOT
put them in your dryer.
z
Use of dyes in your washer may cause staining of the plastic components. The dye will
not damage the washer but we suggest you thoroughly clean your washer afterwards.
We do not recommend the use of dye strippers in your washer.
Saving water, energy and the environment
Water efficient washing machines will save you money, but it is also worth thinking about
energy use, recycling water and the environment.
z
Turn the washer off at the wall when not in use.
z
Use Eco Rinse option (where available).
z
Follow instructions on the detergent packet – do not overdose.
z
Use concentrated detergent – it costs less per wash.
z
Consider re-using the washing machine’s grey water on the garden or for flushing your
toilet – more information can be found on government websites promoting energy
and water saving.
BOWL CLEAN
39
Page 40
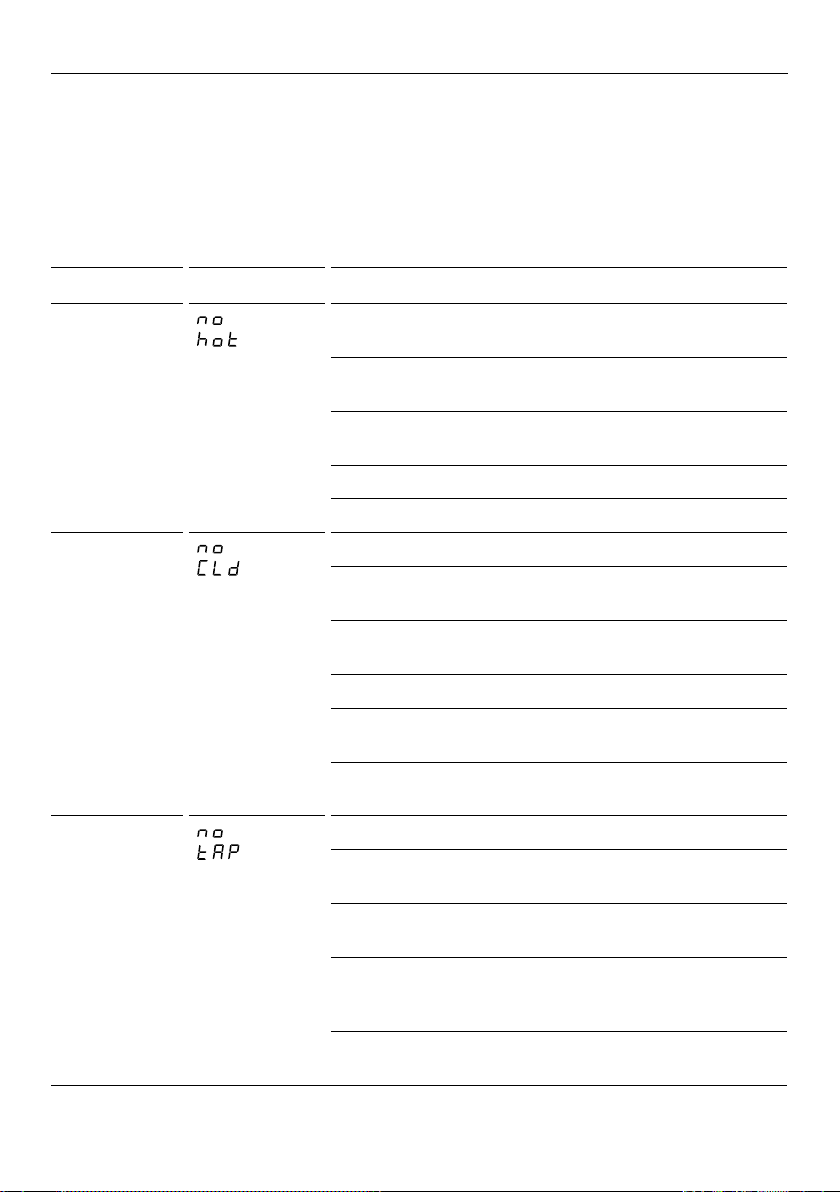
BEFORE YOU CALL FOR SERVICE
User warnings
Please read the following pages before you call for service.
Your washer is capable of diagnosing its own problems. If your washer gives a musical
series of beeps every 5 seconds it is telling you that it has a problem which you can solve
using the checklist below.
Your machine sounds a musical series of beeps* every 5 seconds and displays a user
warning on the screen:
PROBLEM DISPLAYED AS WHAT TO DO
The washer is
not getting any
hot water.
The washer is
not getting any
cold water.
The washer is
not getting any
wa ter.
*The beeps are the same sound your washer makes when you turn it on at the wall.
Hot water supply is not hot enough to maintain the wash
temperature you have selected. Select a lower wash temperature.
Inlet hose filters may be blocked and should be cleaned
or replaced.
There may be a kink in the hose. Undo the hose to remove the
kink, and reattach. Damaged hoses should be replaced.
Ensure hot tap has been turned on.
Check inlet hoses are connected to the correct taps.
Ensure cold tap has been turned on.
Inlet hose filters may be blocked and should be cleaned
or replaced.
There may be a kink in the hose. Undo the hose to remove the
kink, and reattach. Damaged hoses should be replaced.
Check inlet hoses are connected to the correct taps.
Cold water temperature exceeds recommended limits, refer to
‘Installation instructions - Water supply’.
The flow rate of the supply water is too slow. Refer to a
registered plumber for advice.
Ensure taps have been turned on.
Inlet hose filters may be blocked and should be cleaned
or replaced.
There may be a kink in the hose. Undo the hose to remove the
kink, and reattach. Damaged hoses should be replaced.
The drain hose is too low or the drain hose is pushed into the
standpipe too far and the water is siphoning out of the washer,
refer to ‘Installation instructions - Draining’.
The flow rate of the supply water is too slow. Refer to a
registered plumber for advice.
40
Page 41
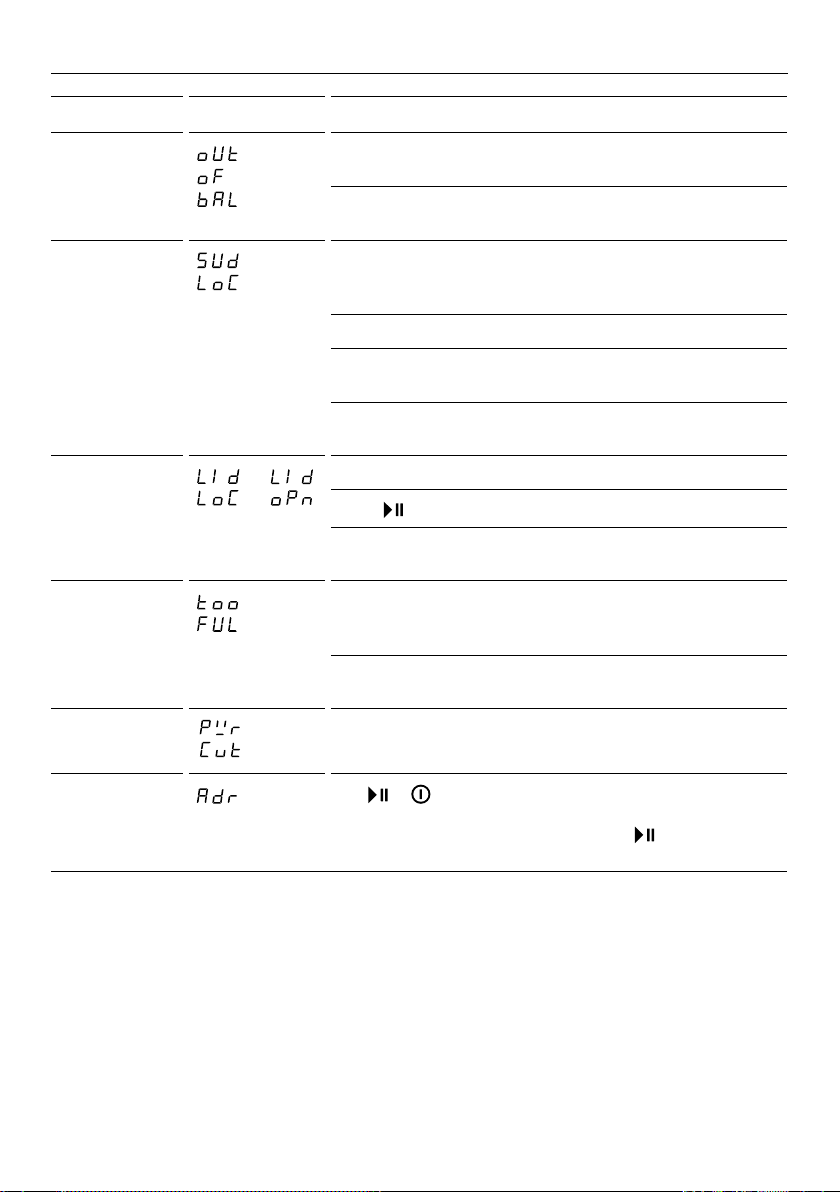
BEFORE YOU CALL FOR SERVICE
PROBLEM DISPLAYED AS WHAT TO DO
The washer is
out of balance.
The washer has
too many suds.
The lid can’t
lock or the lid is
open.
The washer is
overloaded.
The washer has
stopped.
Wash load is out of balance. Ensure the washer is stationary.
Manually redistribute the load.
Check the washer is level, refer to ‘Installation instructions Levelling instructions’.
The washer has a suds build-up (too much detergent may have
been used for the amount of soil in the load). Wait for suds to
dissolve (about 20min). Rinse clothes using a deep rinse.
Check the standpipe height does not exceed 1200mm.
If using the
placed in the detergent dispenser.
If the symptom persists, call your Fisher & Paykel dealer or
Authorised Repairer.
Make sure the lid is closed.
Touch
If the symptom persists call your Fisher & Paykel dealer or
Authorised Repairer.
The washer is overloaded and cannot agitate. Ensure the
washer is stationary. Remove items until the remaining ones can
move freely.
Check that the washer is not siphoning, refer to ‘Installation
instructions - Draining’.
The power was cut to the washer. The washer will restart
automatically. No action is required.
DUAL WASH option, reduce the amount of detergent
. Refer to ‘Lid lock’.
The washer has
stopped.
The or was touched and the washer was inactive for 3
minutes. The washer will automatically drain to a safe level. Touch
any button to stop autodraining then touch
wash cycle.
to resume the
41
Page 42

FAULT CODES
If a continuous series of beeps sounds, all the lights turn off on the control panel and a
number appears on the display, a fault has occurred. The washer automatically enters this
mode when there is a fault. The word FA ULT will be shown in the control panel display
followed by a number (refer to example shown here). To stop the beeps, touch any button
then perform the following steps:
1 Turn your machine off at the wall.
2 Wait for 60 seconds and turn it back on.
3 Check the machine is level, refer to ‘Levelling instructions’.
4 Remove load and retry.
5 Complete a
6 If the fault re-occurs repeat Steps 1 & 2.
If the machine still will not work call your Fisher & Paykel Dealer or Fisher & Payel trained
and supported service teachnician to arrange service.
RINSE and SPIN.
42
Page 43
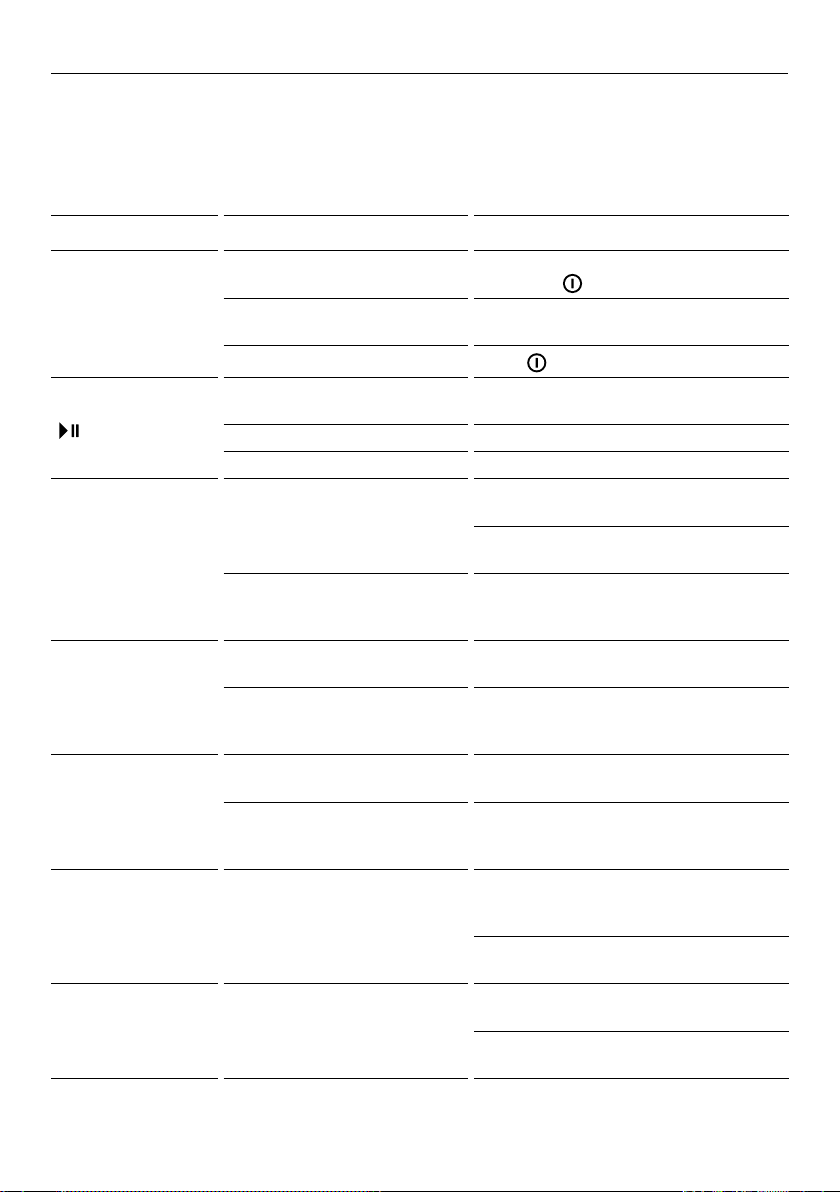
TROUBLESHOOTING
The following is a list of problems you may encounter when using this appliance and some
suggestions that may help to correct the problem. If you still have problems, please contact
your Fisher & Paykel Authorised Repairer.
Operating problems
PROBLEM POSSIBLE CAUSES WHAT TO DO
Washer not
turning on
Washer not filling
with water when
touched
Washer is filling
continuously
Washer is not
spinning properly
Spin speed sounds
slower than normal
Washer is continually
going out of balance
Towels causing out
of balance
Power not switched on at
the wall.
Household power supply
not working.
KEYLOCK may be activated.
Inlet taps not turned on. Check that both the hot and cold taps are
Blocked inlet hose filters. Clear blockages from inlet hose filters.
DELAY START is set. Refer to ‘Delay Start’ for information.
Drain hose is not
installed correctly.
Washer could be siphoning. To prevent siphoning ensure the drain hose
The load could be out of balance. Pause washer and manually redistribute
Washer is not level. Check the washer is level and does
Clothes are unevenly distributed
in the bowl.
The outer wash bowl may still
be hot from being filled with
hot water.
Washer may not be level. Check the washer is level and does
Heavy, wet towels have become
unevenly distributed.
Switch the power on at the wall.
Then touch
Try plugging in another electrical appliance.
Touch
turned on.
Ensure drain hose is located in standpipe
or tub.
Ensure standpipe is at least 850mm high
but no more than 1200mm high.
does not extend more than 20mm from the
end of the hose guide, refer to ‘Draining’.
the load.
not rock in any direction, refer to
‘Levelling instructions’.
Washer has compensated by lowering the
spin speed.
The washer has slowed the spin speed as a
protective measure.
not rock in any direction, refer to
‘Levelling instructions’.
Refer to ‘Changing pre-set options’ to
change the out of balance recovery mode.
Try washing a mixture of large towels and
smaller towels.
Reduce the size of your load with a
minimum of two towels to balance the bowl.
.
for 2 seconds, refer to ‘Keylock’.
43
Page 44
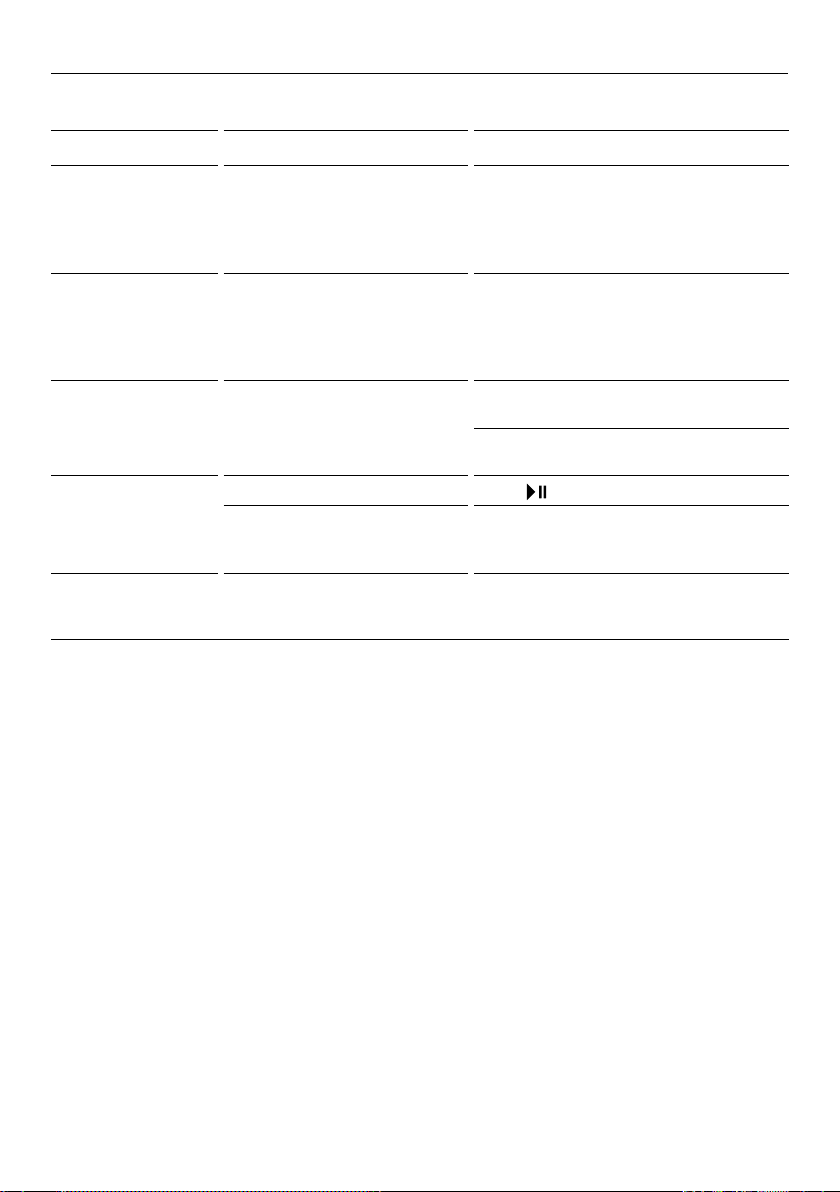
TROUBLESHOOTING
Operating problems
PROBLEM POSSIBLE CAUSES WHAT TO DO
Too much or too little
water when filling
Wash water
temperature is
not warm
Too many soap suds Incorrect detergent being used. Ensure that you are using a Low Suds or
Your washer is
making noises
Small puddle
coming from under
the washer
Your washer is designed to
automatically sense load size and
minimise water use, therefore the
water level may look different to
your previous washer.
The unique high efficiency wash
system uses two wash phases.
The second phase may be
cooler than the first to minimise
energy use.
Load is out of balance.
There is a fault indicated by
continuous beeping or a musical
series of beeps.
A dispenser may be blocked. Refer to ‘Caring for your washer’
This is normal.
This is normal and will not affect
wash performance.
HE detergent.
Try using a little less detergent, especially if
garments are only lightly soiled.
Touch
Refer to ‘Fault codes’.
and redistribute the load.
44
Page 45
TROUBLESHOOTING
Wash problems
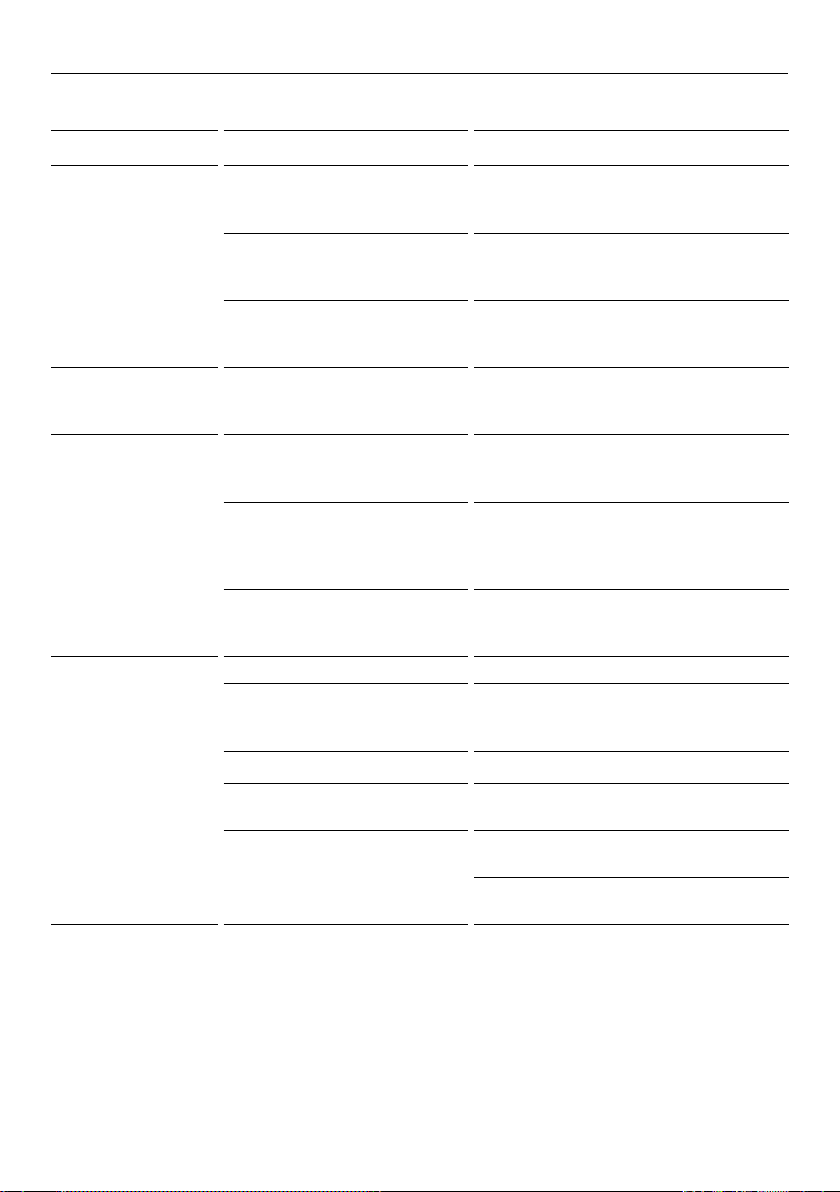
PROBLEM POSSIBLE CAUSES WHAT TO DO
Wash cycle time
longer than usual
Small amount of
water in bowl at end
of cycle
Liquid remaining in
fabric softener and/or
wash boost dispenser
at end of cycle
Creasing Overloading of the washer. Try reducing load size.
If water pressure is low, cycle
time will increase due to longer
fill times.
The out of balance automatic
recovery setting may be selected
(ie Automatic Recovery is ON).
Wash cycle time is approximate
and may be affected by a
number of factors.
A small amount of water may
discharge from the fill nozzle
after wash.
SOFTENER option may not have
been selected.
After flushing of dispensers,
a small amount of water may
remain in the dispenser at the
end of the cycle.
Dispensers may be blocked. Try cleaning your fabric softener and/
Inappropriate cycle selection. Choose
Spin speed too high. Try selecting a lower spin speed.
Wash temperature too high
for items.
Other. Sort your load so that items of similar
Ensure that inlet hose filters are
not blocked.
Refer to ‘Changing pre-set options’.
Refer to ‘Wash cycles’.
This is normal.
Check next time if you wish for softener to
be dispensed that the
is selected.
This is normal.
or wash boost dispenser to remove any
blockages, refer to ‘Caring for your washer’.
EASY IRON or HANDWASH cycle
as these cycles have been designed to
minimise creasing.
Try selecting a lower wash temperature.
weight are washed together.
Do not leave wet clothes to sit in the
washer or laundry basket.
SOFTENER option
45
Page 46
TROUBLESHOOTING
Wash problems
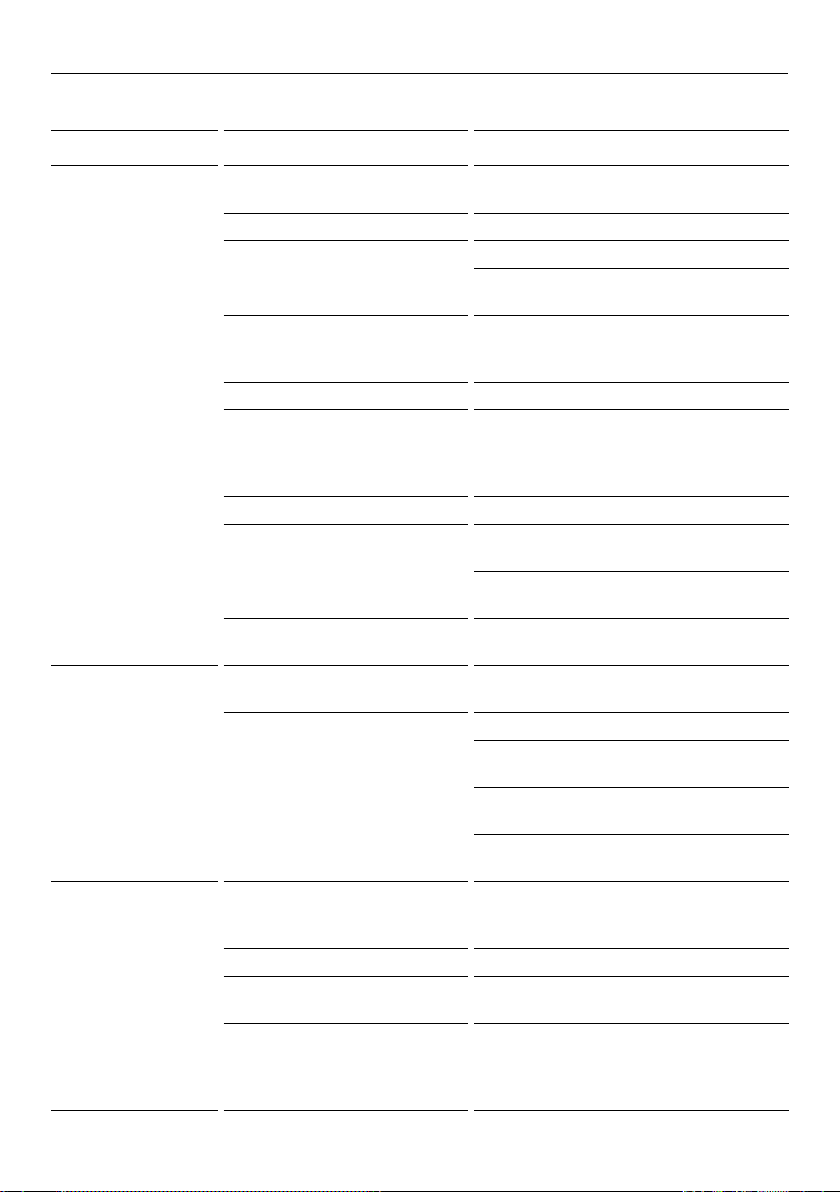
PROBLEM POSSIBLE CAUSES WHAT TO DO
Poor soil removal Wash cycle selected not suited to
soil level in load.
Warm wash water is too cold. Refer to ‘Wash Temp’.
Not enough detergent for load
size or amount of soil.
White clothes are better
washed separately.
Cold water wash is too cold. Refer to ‘Wash Temp’.
Blood and mud are better
washed in cold water, while
oily soils are better washed in
warmer water.
Overloading the washer. Try reducing your load size.
Hard water requires more
detergent than soft water.
Other. Loads made up of articles of varying sizes
Tangling Incorrect loading. Place items, especially sheets, in the bowl as
Wash cycle selected not suited
to load.
Linting Some items in load more likely to
release or pick uplint.
Overloading the washer. Try reducing your load size.
Not enough detergent to hold
the lint in suspension.
Over-drying in a dryer can cause
a build-up of static electricity in
synthetic fabrics and cause them
to attract lint.
Check you are using appropriate soil level
for amount of dirt.
Refer to ‘Wash preparation’.
Try using one of the
refer to ‘Wash Boost’.
Separate light and heavily soiled items,
as clothes can pick up soil from dirty
wash water.
Select the wash temperature according to
soil type.
If you have hard water, try adding
more detergent.
Try selecting
level button.
will wash better.
loose parcels.
Try using
Wash sheets separately using the
SHEETS cycle.
Wash your most valued items using the
HANDWASH cycle.
Try using
‘High Efficiency’.
Wash lint givers (eg towels, flannelette
sheets) separately from lint collectors (eg
synthetic fabrics).
Try using more detergent.
Try not to over dry items when using
your dryer.
EASY IRON cycle to wash shirts.
HIGH EFFICIENCY OFF, refer to
WASH BOOST options,
HEAVY option using the soil
46
Page 47

TROUBLESHOOTING
Wash problems
PROBLEM POSSIBLE CAUSES WHAT TO DO
Detergent residue Overloading the washer. Try reducing your load size.
Incorrect detergent dosage. Try using less detergent.
Check the detergent instructions.
Cold ambient temperatures,
cold washes and/or short
agitation times may not allow the
detergent to dissolve properly.
Wash cycle selected is not the
most appropriate.
Black or grey marks
on clothes
Dye transfer Washing dark coloured and light
Sheets and
duvet / doona covers
tangling or engulfing
each other
A build up caused by the
interaction of fabric softener
and detergent can flake off and
mark clothes.
Insufficient detergent for the
amount of soil on the clothes, can
result in grey marks on clothes.
coloured items together.
Non-colourfast clothes left sitting
in a washer or laundry basket can
transfer dye onto other clothes.
Non-colourfast items washed on
ALLERGY cycle.
Wash cycle selected is not the
most appropriate.
Incorrect loading. Place sheets and duvet / doona covers into
Try pre-dissolving the detergent before
adding it to the washer.
Try using a liquid detergent.
Try using
water in the rinse. Note: adding fabric
softener is not needed in this instance.
Empty washer and put through a
BOWL CLEAN cycle.
Make sure you are using enough detergent
for the amount of dirt in your wash load.
Remember to separate whites and colours.
Wash and dry non-colourfast
clothes separately.
ALLERGY cycle is not appropriate for non-
colourfast items.
Wash sheets and duvet / doona covers on
their own on the
the bowl individually, to the side of the low
profile agitator (ensure each item does not
cover more than half of the bowl area).
Load the items in layers around the bowl
(2 sheets or duvet / doona covers per layer).
Ensure duvet / doona covers are buttoned
or domed closed before washing.
SOFTENER option to give more
SHEETS cycle.
47
Page 48

MANUFACTURER’S WARRANTY
For New Zealand and Australia only. You automatically receive a two-year Manufacturer’s
Warranty with the purchase of this clothes washer covering parts and labour for servicing
within the country ofpurchase.
Fisher&Paykel undertakes to:
Repair or, at its option, replace without cost to the owner either for material or labour any
part of the product, the serial number of which appears on the product, which is found to
be defective within two years of the date of purchase.
You also receive an additional eight-year parts only Manufacturer’s Warranty on your
Direct Drive motor. This additional eight-year Manufacturer’s Warranty commences on the
day following the expiry of the two-year Manufacturer’s Warranty and excludes the motor
controller and labour. Fisher&Paykel will repair (as to parts) or, at its option, replace any
Direct Drive motor (but not the motor controller) which is found to be defective within this
additional Manufacturer’s Warranty period. You will be responsible for any labour costs.
Note: These Manufacturer’s Warranties are an extra benefit and do not affect your
legalrights.
These Manufacturer’s Warranties DO NOT cover
A Service calls which are not related to any defect in the product. The cost
of a servicecallwill be charged if the problem is not found to be a product
fault. Forexample:
1 Correcting the installation, eg removal of bottom packer and transit bolts
(frontloading washers), levelling the washer, adjustment of the drain to correct
siphoning, noises, crossed, kinked or leaking inlet hose connections, turning on
water,noises caused by the waterhammer or power supplies.
2 Providing instruction on use of the product or changing the set-up of the product,
eginstruction on correct use of detergents and fabric softeners.
3 Replacing fuses in, or correcting house wiring or correcting house plumbing,
egunblockingdrains.
4 Correcting fault(s) caused by the user.
5 Noise or vibration that is considered normal, eg spin sounds, user warning beeps.
6 Correcting damage caused by pests, eg rats, cockroaches, etc.
7 Water on the floor due to incorrect loading or excessive suds.
8 Blocked pumps, removal of foreign objects/substances from the washer, including the
pump and inlet hose filters, eg bra wires, bread tags, nails, grit, scrud, etc.
9 Correcting corrosion or discolouration due to chemical attack.
B Defects caused by factors other than:
1 Normal domestic use; or
2 Use in accordance with the product’s user guide.
C Defects to the product caused by accident, neglect, misuse or ‘act of God’.
D The cost of repairs carried out other than by a Fisher&Paykel trained and supported
service technician or the cost of correcting such repairs.
E Normal recommended maintenance as set out in the product’s user guide.
F Repairs when the appliance has been dismantled, repaired or serviced by other than
aFisher&Paykel trained and supported service technician or the selling dealer.
48
Page 49

MANUFACTURER’S WARRANTY
G Pick-up and delivery.
H Transportation or travelling costs involved in the repair when the product is
installed outside the Fisher&Paykel trained and supported service technician’s
normal servicearea.
Nothing in this Manufacturer’s Warranty is intended to, nor limits, any rights you mayhave
under law to recover the costs of inspecting or returning the goods to us.
This product has been designed for use in a normal domestic (residential) environment. This
product is not designed for any commercial use (whatsoever). Any commercial useby a
customer will affect this product’s Manufacturer’s Warranty.
Service under these Manufacturer’s Warranties must be provided by a Fisher&Paykel
trained and supported service technician, refer to ‘Customer care
provided during normal business hours. ThisManufacturer’s Warranty certificate should be
shown when making any claim.
For Australian customers
This Manufacturer’s Warranty is an extra benefit and does not affect your legal rights. Our
goods come with guarantees that cannot be excluded under the Australian Consumer
Law. You are entitled to a replacement or refund for a major failure and compensation for
any other reasonably foreseeable loss or damage. You are also entitled to have the goods
repaired or replaced if the goods fail to be of acceptable quality and the failure does not
amount to a major failure.
Keep this user guide in a safe place.
’. Suchservice shall be
49
Page 50

CUSTOMER CARE
Before you call for service or assistance:
Check our website, fisherpaykel.com, for ‘Product Help’ to see the latest updates, hintsand
tips, and information about your product.
We recommend that you also refer to your User guide to ensure:
1 Your product is correctly installed.
2 You are familiar with its normal operation.
3 You have read the ‘Before you call for service’, ‘Fault codes’ and ‘Troubleshooting’
attheback of the book.
If after checking these points you still need assistance or parts, you can go online to our
website and book a service with your nearest Fisher&Paykel trained and supported service
technician. Our Customer Care team is also available to offer you assistance.
In New Zealand if you need service or assistance:
Go online to our website and book a service or call the Fisher&Paykel Customer Care
Centre and talk to one of our Customer CareConsultants.
Toll Free: 0800 FP CARE or 0800 372 273
Email: [email protected]
Website: fisherpaykel.com
Postal address: Fisher&Paykel Appliances Ltd, PO Box 58546, Botany, Auckland 2163
Fisher&Paykel has a network of Fisher&Paykel trained and supported service technicians
who can carry out any service necessary on your appliance. Visit our website and book a
service with a Fisher&Paykel trained and supported service technician in your area.
In Australia if you need service or assistance:
Go online to our website and book a service or call the Fisher&Paykel Customer Care
Centre and talk to one of our Customer CareConsultants.
Toll Free: 1300 650 590
Email: [email protected]
Website: fisherpaykel.com
Postal address: Fisher&Paykel Appliances Australia Pty Ltd, PO Box 798,
ClevelandQLD4163
Fisher&Paykel has a network of Fisher&Paykel trained and supported service technicians
who can carry out any service necessary on your appliance.
Visit our website and book a service with a Fisher&Paykel trained and supported service
technician in your area.
If you call, write to or contact us via our website, please provide your name and address,
model number, serial number, date of purchase and a complete description of the problem.
This information is needed in order to better respond to your requestforassistance.
Product details can be found on the rear of the washing machine.
50
Page 51

CUSTOMER CARE
Registration
Register your product with us so we can provide you with the best service possible.
To register your product visit our website: fisherpaykel.com
Complete and keep for safe reference:
Model
Serial No.
Purchase Date
Purchaser
Dealer
Suburb
Tow n
Country
51
Page 52

FISHERPAYKEL.COM
© Fisher & Paykel Appliances 2021. All rights reserved.
The models shown in this guide may not be available in all markets
The product specifications in this guide apply to the specific products and
models described at the date of issue. Under our policy of continuous product
improvement, these specifications may change at any time.
For current details about model and specification availability in your country,
please go to our website or contact your local Fisher&Paykel dealer.
and are subject to change at any time.
421752C 05.21
 Loading...