

Page 1

FRONT LOADER
WASHING MACHINE
WH9060P4 & WH1060P4
USER GUIDE
NZ AU SG
Page 2

Page 3

CONTENTS
Safety and warnings 5
Before your first wash 7
Safety features 8
control panel 10
Wi-Fi 13
Wash cycles 14
Detergent and softener 15
Where to put the detergent 16
Wash preparation 18
Getting started quickly 19
Wash cycle options 21
Customising a wash cycle 27
Changing pre-set options 29
Caring for your washer 31
Before you call for service 36
Fault codes 38
Troubleshooting 39
Manufacturer’s warranty 45
Customer care 47
Registration
To register your product visit our website: fisherpaykel.com/register
3
Page 4

Page 5
SAFETY AND WARNINGS
!
WARNING!
Electric Shock Hazard
Failure to follow this advice may result in
electric shock or death.
• If you are using an extension cord or a portable
electrical outlet device (eg multi-socket outlet
box), ensure that it is positioned so that it does
not come into contact with water or moisture.
READ AND SAVE THIS GUIDE
When using your clothes washer, follow basic precautions, including thefollowing:
General
z
This product has been designed for personal, family or household use. This product is
not designed for any commercial use. Any commercial use will terminate this product’s
manufacturer’s warranty.
z
A damaged power cord must be replaced by a Fisher & Paykel trained and supported
service technician or similarly qualified person in order to avoid a hazard. Do not use
the appliance until it has been repaired to avoid a risk of electric shock.
z
Do not operate this machine if it has been damaged during transport. Contact your
Fisher & Paykel dealer or Fisher & Paykel trained and supported service technician.
z
This clothes washer is not intended for use by persons (including children)
with reduced physical, sensory or mental capabilities, or lack of experience and
knowledge,unless they are supervised or given instructions on how to use the
washerby someone responsible for their safety.
z
Keep children away from the washer while it is in operation.
z
Supervise children to ensure they do not play with the washer or climb inside thedrum.
z
The washer should only be used for washing and rinsing of textiles where this
isindicated on the care label.
z
Do not add petrol, dry-cleaning solvents, or other flammable or explosive substances to
the wash water. These substances give off vapours that could ignite or explode.
z
Do not wash articles that have been previously cleaned in, washed in, soaked in,
or spotted with gasoline, dry-cleaning solvents, or other flammable or explosive
substances as they give off vapours that could ignite or explode.
z
The door will be locked from the start of the cycle until the cycle is complete for safety
reasons. It is possible to open the door during the cycle under certain conditions. Never
force the door open.
z
Do not touch the door during a cycle as the door can become hot.
z
When 90°C temperature is selected, the door glass will become hot. Do not touch the
glass part of the door. Keep children away from the washer.
z
Do not touch or operate the machine with wet hands or with bare-feet.
z
Do not open the detergent dispenser during the cycle as hot water may come outofit.
z
Ensure the installation provides accessibility to the plug or incorporate a switch in the
fixed wiring in accordance with the wiring rules to allow disconnection of the appliance
from the supply after installation.
5
Page 6

SAFETY AND WARNINGS
z
Read and follow the detergent manufacturers’ instructions carefully. Instructions on
how to use the detergent will be clearly indicated on the pack. Remember to store your
detergents out of the reach of children.
z
Do not wash an electric blanket in your washer unless the care label specifically states
it is safe to do so.
z
Do not wash curtains in this washer, as sunlight makes them brittle and they may
disintegrate during washing.
z
The only user-removable parts of the washer are the inlet hose(s), dispenser and
pump filter. No other parts are designed to be removed by anyone other than a
Fisher&Paykel trained and supported service technician.
z
Do not overload your washing machine beyond its rated capacity.
MODEL CODE MAXIMUM CAPACITY* (KG)
WH9060P4 9.0
WH1060P4 10.0
*Capacity refers to the maximum dry weight of items the washer can wash at any one time
Disposal
z
When disposing of the washer, it is recommended that the door is removed to
avoidchildren getting trapped inside, and that the electrical cable is cut off close to
thewasher.
6
Page 7

BEFORE YOUR FIRST WASH
Check you have done everything you need to before you start your first wash:
Have the packaging and transit bolts been removed?
Is the washer correctly levelled, feet are extended and cabinet corners are clear of
the floor?
Is the drain hose threaded through the hose guide ‘U bend’ (with no more than
20mm extended) and hooked into your standpipe or tub, or attached to a spigot?
Have the taps been turned on?
Is the hot hose connected to the hot valve marked ‘H’?
Is the cold hose connected to the cold valve marked ‘C’?
Have you performed the test cycle? Refer to your installation guide.
Has the power cord been connected to an appropriate power supply and the power
turned on?
Complete a Drum Clean cycle with half-load amount of detergent and without a load
in order to remove any residues remaining in the machine from the manufacturing
process.
7
Page 8
SAFETY FEATURES
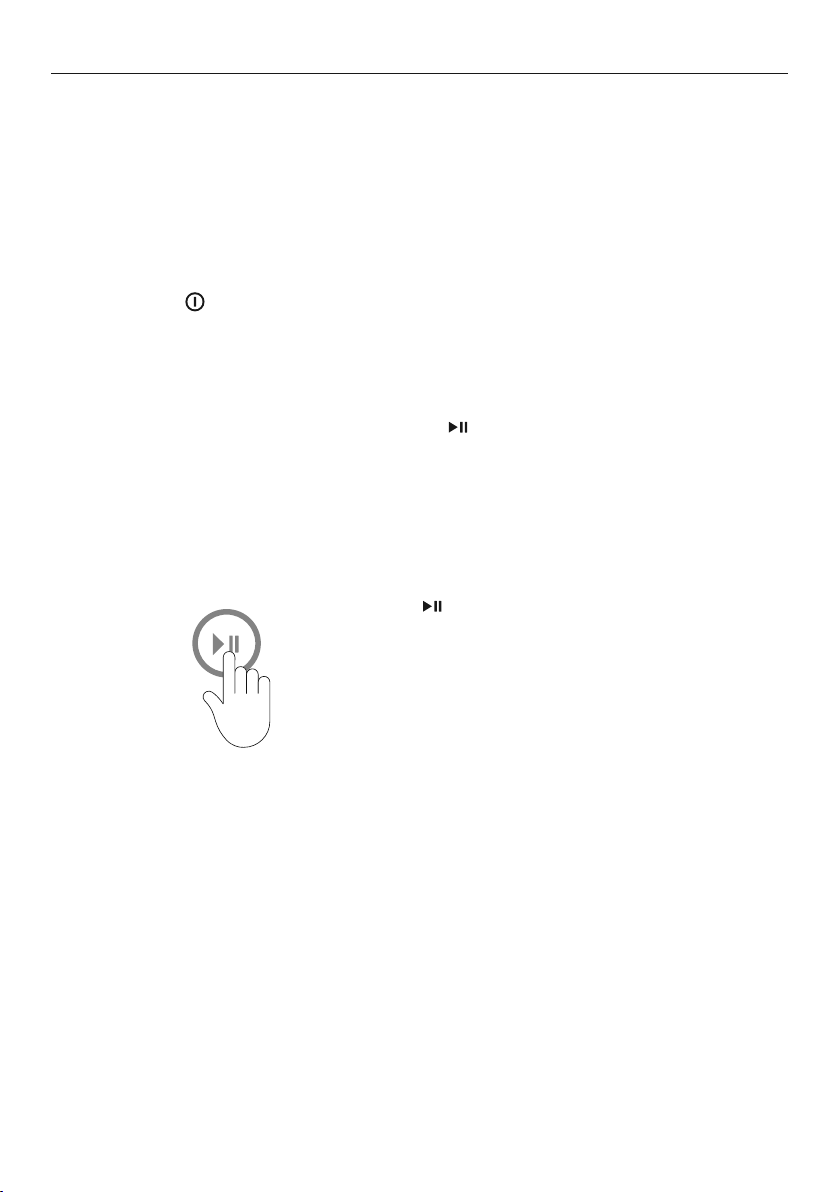
Add a Garment
The
ADD A GARMENT function can be used to interrupt the cycle to add or remove a
garment at any time during the wash part of the cycle (provided the wash temperature
selected is lower than 60°C). If necessary the water in the washer will be drained to a level
where the door can be opened. Refer to ‘Wash cycle options’ for more information.
Drum light
Your washer has a drum light to help assist you when loading and unloading your washer.
When you press
automatically turn off. At the end of the cycle, the drum light will turn on again for five
minutes to help facilitate unloading.
Door lock
The door of your washer will lock once you press
beeps at the end of the cycle, ensuring safety for you and your family while yourwasher is
operating.
To unlock the door during a cycle
1
, the LED light in the drum will turn on, aftertwo minutes it will
and will stay locked until the washer
You can open the door to add or remove
items during thewash simply by pressing the
button.
The door will remain locked if the
temperature insidethe washer is above 60°C
and/or the waterlevelis above the bottom
of the door seal (awarning will be displayed
inthese circumstances).
Your washer also has the following protective measures:
z
Flood protection – turns off valves and turns pump on if a flood condition is detected.
z
Out-of-balance protection – stops and redistributes the load if an unbalanced load
condition is sensed, and/or slows the spin speed to compensate.
z
Excess suds protection – pauses to allow suds to break down before continuing the cycle.
8
Page 9
SAFETY FEATURES
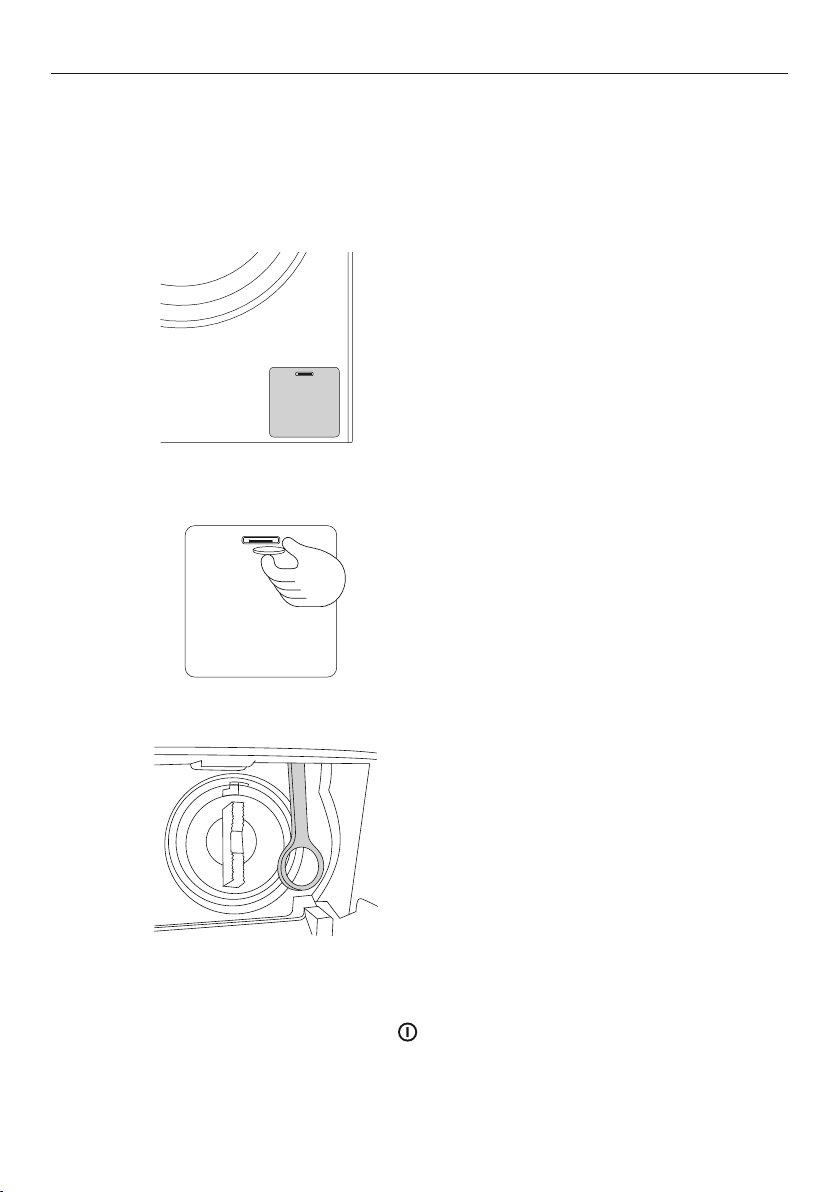
Opening the door during a power failure
Do not attempt to do this if the water level inthewasher is above the bottom of thedoor.
If there is a power failure during a wash cycle your washer will stop and the door will
remain locked.
1
2
3
Locate thepump filter cover at the bottom
right of your washer.
Place a coin or key in the slot and tilt it
upwards to lever the cover open.
Pull the door release tab down from the ring.
Use a screwdriver tip, pen or key to get a
good grip.
When power is restored, your washer will resume the interrupted wash cycle. If the cycle
doesn’t resume automatically, simply press to restart your washer.
9
Page 10
CONTROL PANEL
4 6
5
7 8 9
!0 !1 !2
1
3
2
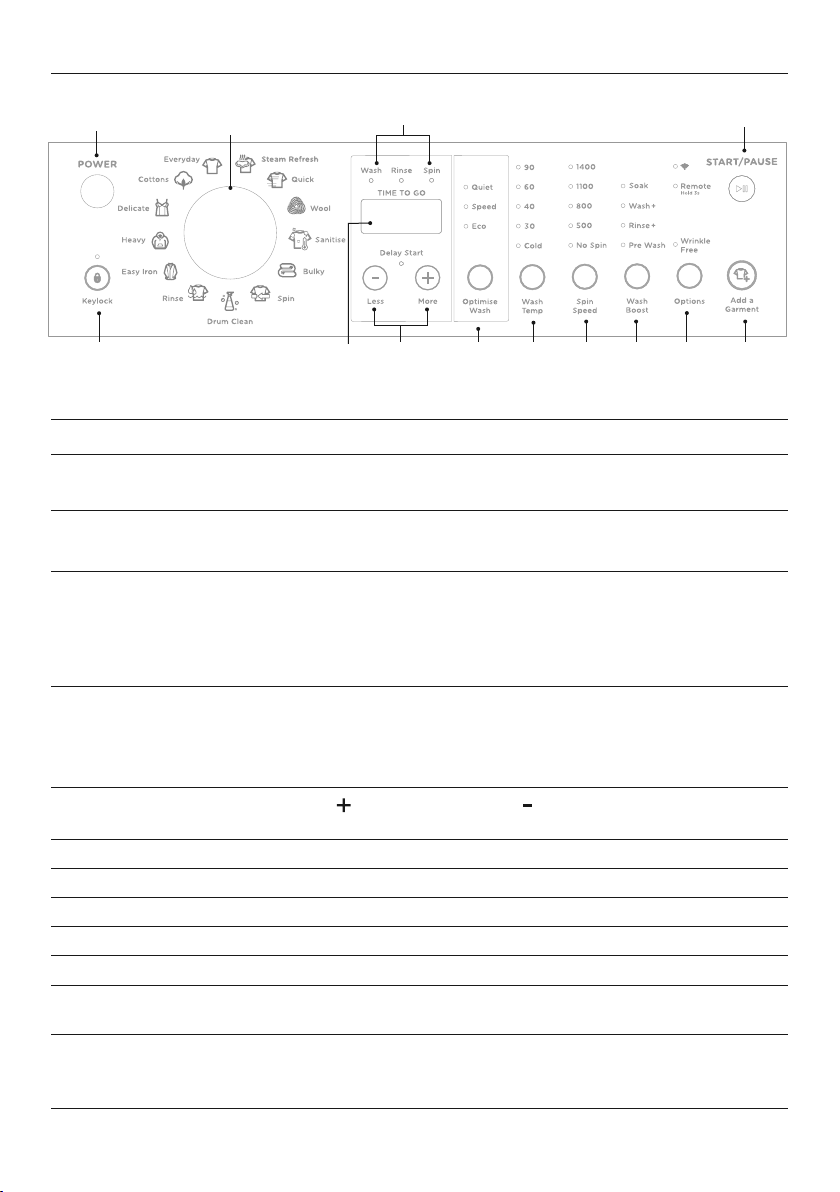
1 Power Press to turn the washer ON/OFF.
2 Keylock Press to disable all buttons on the control panel, except the
button. This prevents accidental button presses.
3 SmartTouch™
Control Dial
4 Digital display
screen
Rotate to select your desired wash cycle.
z
Red LED illuminates to indicate the selected wash cycle.
Shows the following:
z
TIME TO GO – the remaining time in the cycle that is
currently running.
z
Delayed start time of wash cycle.
z
Notifications if an error is detected or a warning is necessary.
!3
POWER
5 Progess lights Indicate the current status of the wash cycle.
z
All lights are illuminated at the start of the wash cycle.
z
The light of the current status flashes, and then turns off
oncecompleted.
6 Delay Start
Less/More
7 Optimise Wash Press to select
MORE to increase andLESS to decrease the delay start
Press
time.
ECO, QUIET or SPEED.
8 Wash Temp Press to increase or decrease wash water temperature.
9 Spin Speed Press to increase or decrease spin speed.
!0 Wash Boost Press to select
!1 Options
Press to select
PRE WASH, RINSE+, SOAK or WASH+.
WRINKLE FREE.
!2 Add a Garment Press to interrupt the wash part of the cycle to add or remove
agarment.
!3 Start/Pause Press to start or pause the selected wash cycle.
Press and hold this and
ADD A GARMENT for three seconds to
enable REMOTE (Wi-Fi) mode.
10
Page 11
CONTROL PANEL
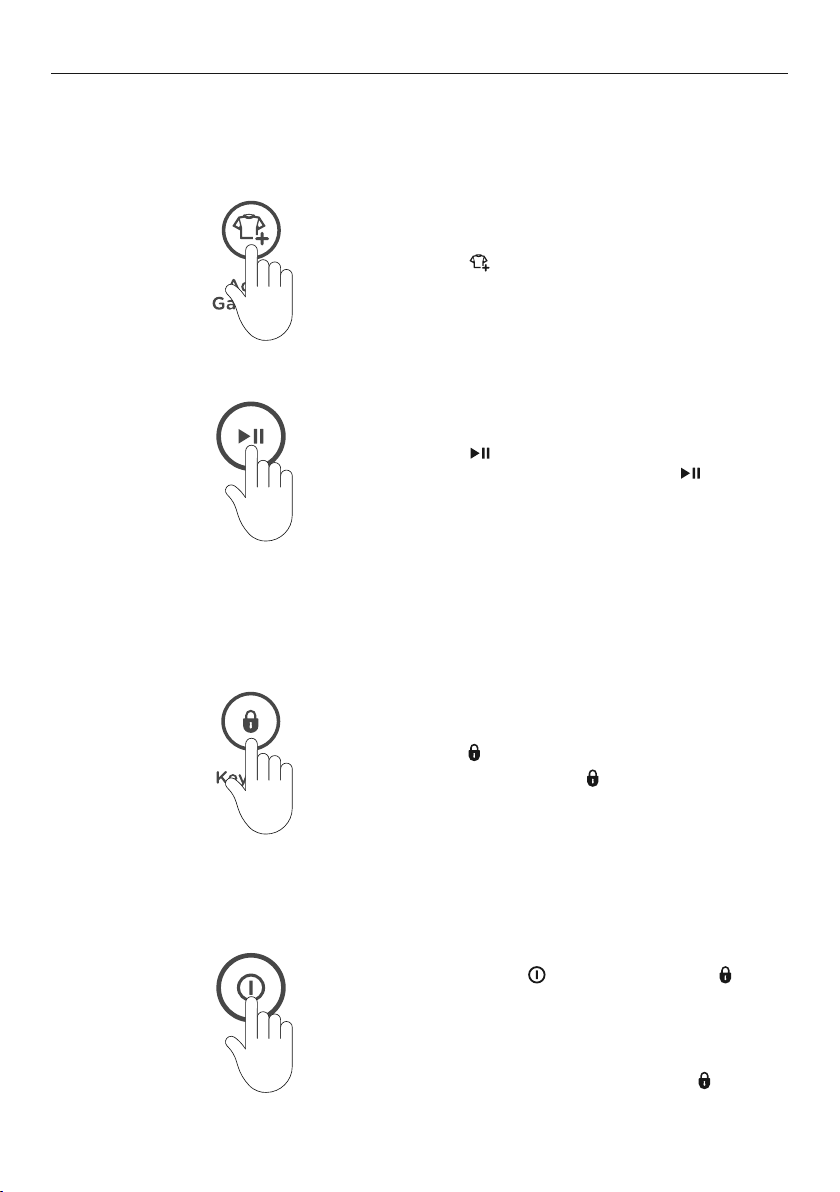
Add a Garment
Enables you to add or remove items during the wash stage of the cycle, under
certain conditions.
Press
1
2
Keylock
To turn
KEYLOCK ON or OFF when the washer is powered on:
ADD A GARMENT, wait until you hear
the door unlock.
Press . Open the door and add or remove
items. Close the door and press to restart
the cycle.
Press for three seconds.
When activated, the
To turn your washer on if KEYLOCK is ON and the washer is powered OFF:
Press POWER , then press and hold
for three seconds. This will activate the
control panel. Wash cycles and options can
now be selected.
If a button is pressed while
activated, beeps will be heard and
will flash.
is illuminated.
KEYLOCK is
11
Page 12
CONTROL PANEL
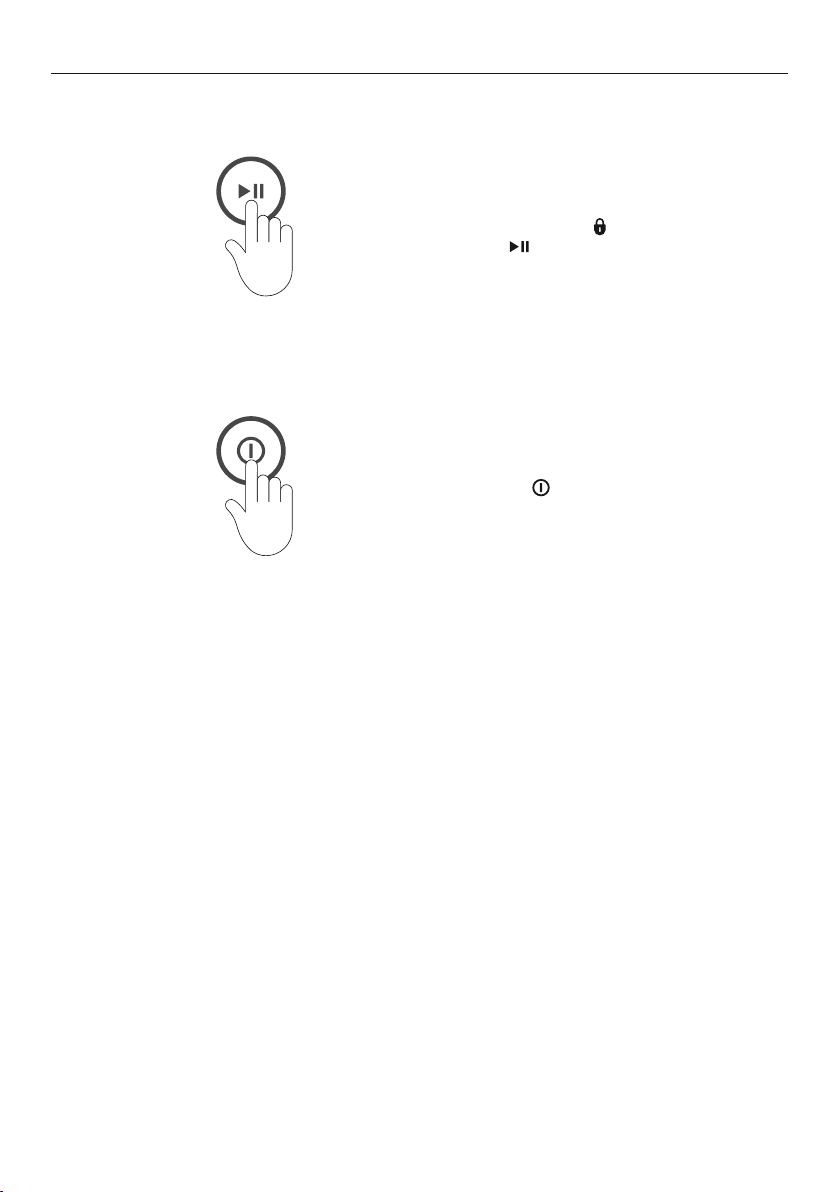
If KEYLOCK is ON and you want to pause your washer:
To pause your washer at any time during the
cycle, press and hold
then press .
If
KEYLOCK is ON and you want to power OFF your washer at any time:
Press POWER .
for threeseconds
12
Page 13
WI-FI
Your appliance can be connected to your home wireless network and operated remotely
using the app.
Getting started
z
Ensure your home Wi-Fi network is turned on.
z
You will be given step by step guidance on both your appliance and mobile device.
z
It may take up to 10 minutes to connect your appliance.
On your mobile device:
1 Download the app from www.fisherpaykel.com/connect
2 Register and create an account.
3 Add your appliance and set up the Wi-Fi connection.
Connecting to your home Wi-Fi
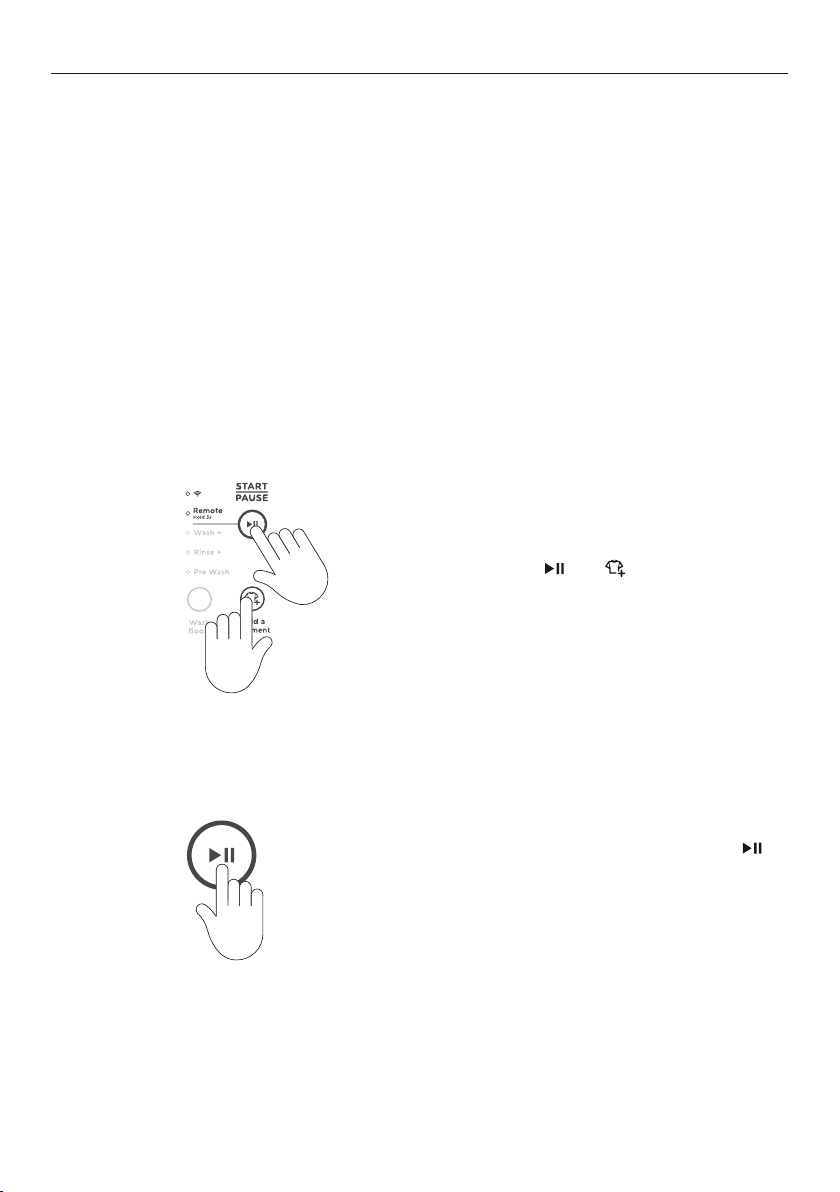
Press and hold
and ADD A GARMENT
buttons for three seconds, this will start the
setup process.
Enabling remote mode
Once setup is complete, press and hold
for three seconds.
REMOTE MODE is now enabled. Certain
functions of your washer can now be
accessed via the app.
For safety reasons, when REMOTE MODE is enabled the washer door will be locked. To open
the door disable REMOTE MODE.
13
Page 14
WASH CYCLES
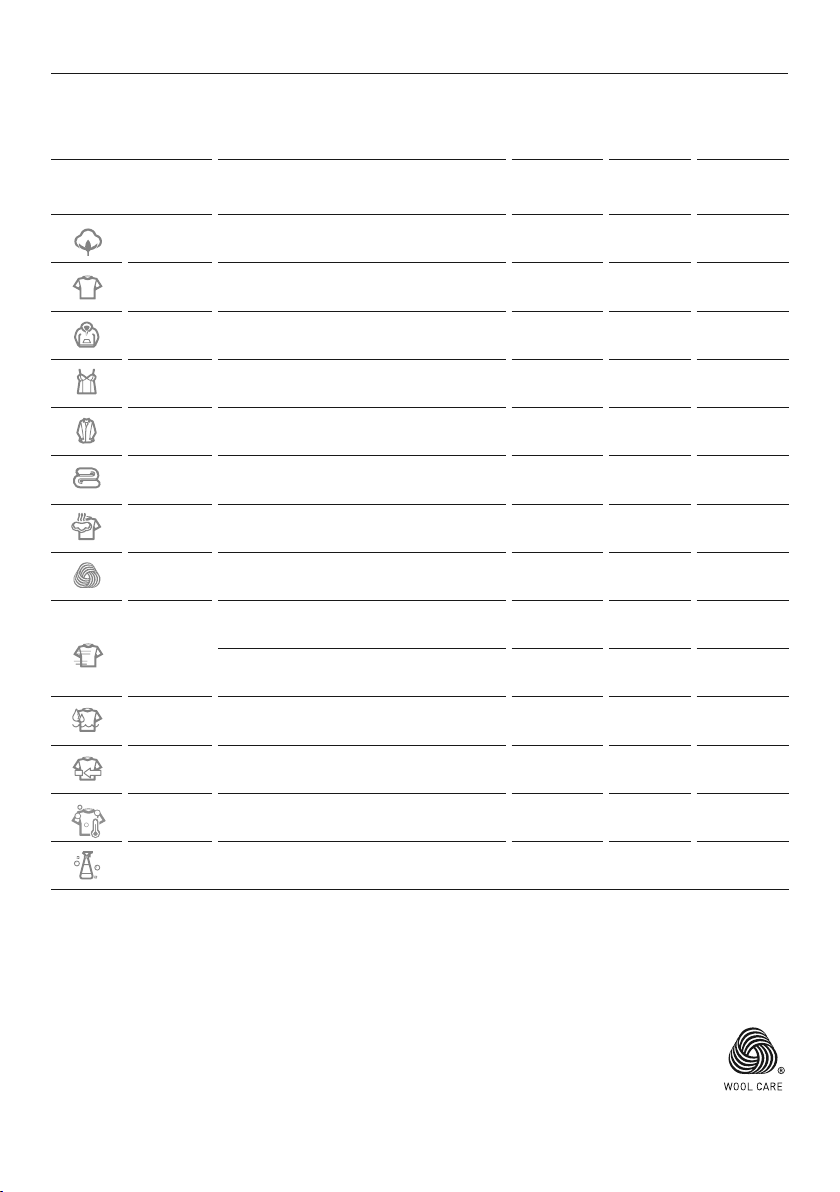
Your washer has a number of wash cycles to suit your laundering needs. Selecting the
most appropriate cycle for each particular wash load will help ensure you get the best
wash result.
CYCLE DESIGNED FOR
Cottons*
Everyday
Heavy
Delicate
Easy Iron
Bulky
Steam
Refresh
Wool***
Quick
Rinse Items that require rinsing and spinning 9.0/10.0 Cold
Spin Spinning wet items
Sanitise
Drum
Clean
*’COTTONS’, ‘40°C’, ‘1400 rpm’, ECO selected is the recommended water and energy saving cycle for normally
soiled, everyday washing
**Depends on model
A comprehensive cycle specifically for
normally soiled cotton garments
A faster cycle designed for mixed loads
with normal soil level
A longer, hotter wash for heavy soiled
durable garments
A gentle wash with more water to care
for lightly soiled delicate garments
A cycle for normally soiled garments
with lower spin speeds to reduce ironing
A warm gentle wash and slow spin for
special care of bulky items
A quick cycle for de-wrinkling and
removing light odours
An extra gentle wash action for machine
washable woollen items
30 (default): Freshening up of new or
very lightly soiled garments
15 (with ‘Speed’ option selected):
Cleaning lightly soiled loads quickly
An extra hot concentrated wash with
multiple rinses
An extra hot cycle designed to clean
your washer
MAX.
LOAD SIZE
(KG)**
9.0/10.0 40
9.0/10.0 30
9.0/10.0 60
4.0
4.0
4.0
2 clothing
items
2.0
4.0
2.0
9.0/10.0
9.0 75
n/a 90 1400
WAS H
TEMP.
(°C)
(Cold-90)
(Cold-60)
(Cold-90)
30
(Cold-40)
30
(Cold-60)
40
(Cold-90)
n/a n/a
40
(Cold-40)
30
(Cold-30)
30
(Cold-30)
n/a
SPIN
SPEED
(RPM)
1400
(0-1400)
1100
(0-1400)
1100
(0-1400)
500
(0-800)
800
(0-800)
800
(0-800)
800
(0-800)
800
(0-1400)
800
(0-1400)
1100
(0-1400)
1100
(500-1400)
1100
(0-1400)
***Woolmark Wool Care
The wool wash cycle of this machine has been approved by The Woolmark
Company for the washing of machinewashable wool products provided that the
products are washed according to the instructions on the garment label and those
issued by the manufacturer of these washing machines.
M1528: WH1060P, WH9060P
14
Page 15

DETERGENT AND SOFTENER
Detergent type
Your washer requires low-sudsing detergent to prevent oversudsing problems. Low sudsing
detergent comes in powder, liquid or pod form and is labelled front loading, low suds,
high efficiency or HE. Using top loader detergent in your front loader washer may lead to
excessive suds formation, which will lengthen the cycle time as the washer waits for the suds
to dissolve.
z
If using liquid detergent ensure the liquid detergent compartment is installed.
z
If using powder ensure the liquid detergent compartment has been removed.
z
Ensure the detergent drawer is completely closed before starting the cycle.
How much detergent?
Follow the instructions on the back of the detergent packet or bottle as a guide to the
correct amount of detergent to use. The correct amount of detergent will vary, depending
on level of soiling and size of load. Jeans and work clothes may need more detergent, while
towels usually need less. The larger your load, the more detergent you may have to add.
Detergent advice
Add the detergent BEFORE starting the cycle, close the dispenser and do not open it while the
cycle is running. If you find foam leaking from your washer, check you are using a low sudsing
or front loader type detergent and check the quantity you are using against the detergent
manufacturers recommendation. You may need to reduce the amount you are using.
Fabric softener
Add fabric softener to the middle compartment of the dispenser marked with a
softener should not be used if you have selected the STEAM REFRESH or any QUICK cycle.
The washer will automatically flush the fabric softener during the rinse part of the cycle.
If you wish to use fabric softener we recommend to:
z
Use it sparingly. Measure it carefully and do not use more than 25ml (1/2cap), some
thicker varieties may need diluting.
z
Clean your dispenser regularly.
z
Clean your washer regularly using the DRUM CLEAN cycle.
z
Complete wash cycles at a wash temperature of 40°C or above at regular intervals
(eg every fifthwash) as washing in cold water increases the chance of scrud
occurring (see below).
z
If you fill beyond the MAX mark, the fabric softener will be dispensed into the drum
prematurely and contribute to scrud.
. Fabric
Scrud
Scrud is the name of the waxy build-up that can occur within any washer when fabric
softener comes in contact with detergent. This build-up is not brought about by a fault in
the washer. If scrud is allowed to build up in the washer it can result in stains on clothes and
an unpleasant smell in your washer. If you wash a particularly dirty load, we recommend
putting the washer through a
RINSE cycle once the cycle has finished and the load has been
removed, to clean outany residue from that cycle.
15
Page 16
WHERE TO PUT THE DETERGENT
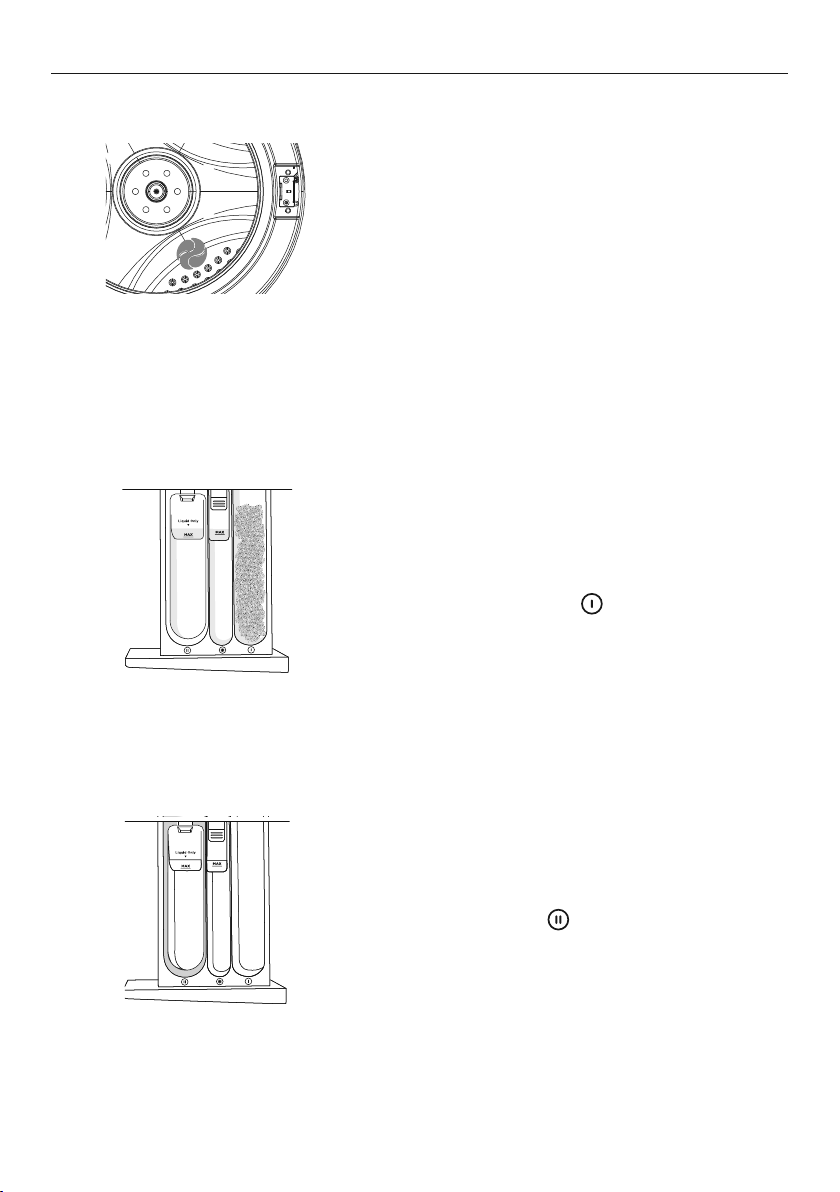
Pods
Detergent pods are a no mess alternative to
powdered or liquid detergent. They must be placed
at the back of the drum prior to loading your
clothes. This will ensure they are activated quickly
in the wash. Do not place pods in the detergent
dispenser drawer or on top of your clothes.
Pre Wash
When you select
For more information refer to ‘Wash cycle options’. PRE WASH will not be available if the
ECO option has been selected.
PRE WASH, the pre wash compartment is flushed at the start of the cycle.
If you wish to use the
PRE WASH option, liquid or
powdered detergent only must be placed in the pre
wash detergent compartment on the right side of
the drawer, marked with a .
Liquid detergent
Detergent is added to the main wash
compartment on the left side of the dispenser
drawer marked with a .
As the washer fills, water is flushed into this compartment and is mixed with the detergent,
the detergent solution is then delivered into the drum. There may be a small volume of
water left in the liquid detergent dispenser at the end of the cycle. This is normal.
16
Page 17
WHERE TO PUT THE DETERGENT
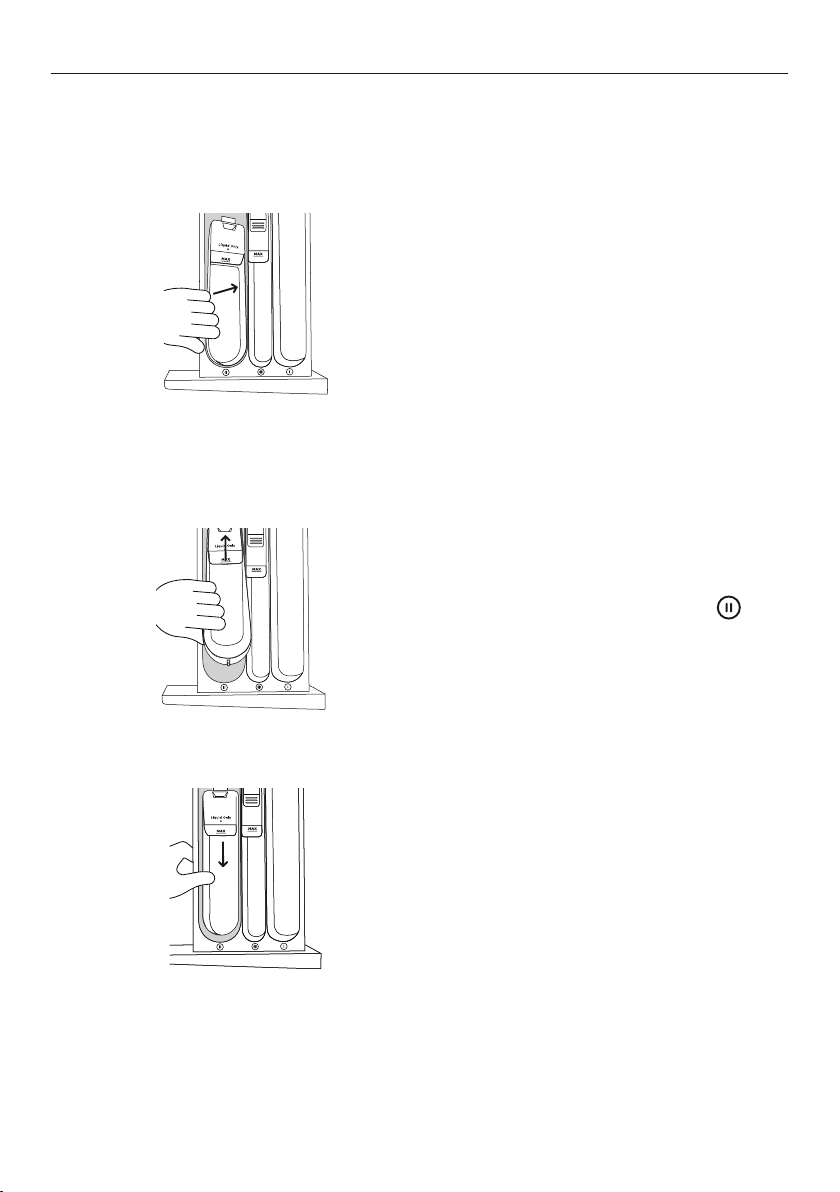
Powdered detergent
If you wish to use powdered detergent, the liquid detergent compartment MUSTbe
removed from the dispenser drawer.
To remove the liquid detergent
1
To replace the liquid detergent compartment
compartment, firmly grasp and twist the left
hand side of the internal compartment and
pull upwards.
1
2
Slide it back into the drawer marked .
Press down in the middle until it clicks back
into place.
17
Page 18
WASH PREPARATION
Sorting
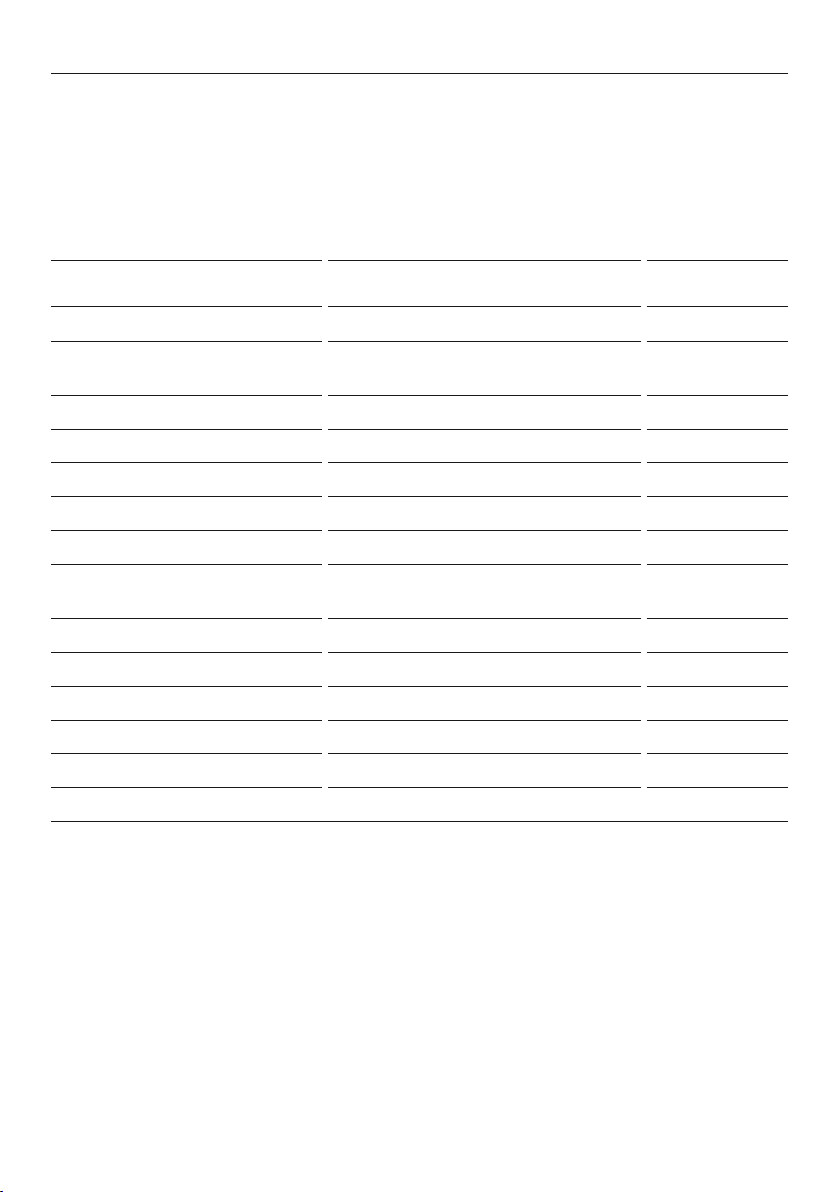
Sort items according to colour, fabric type, and soil type. Wash fine, delicate fabrics
separately from thick, heavy fabrics. Always separate coloured items from whites, especially
when they are new. Colour run could be an issue if you wash items at highertemperatures.
Some soils, like mud and blood are best washed in cold water. Oilysoils (eg some foods
and marks on shirt collars) are best washed in warm water. The care label will advise on
how the garment should be washed.
ITEMS/WASH
REQUIREMENTS
Towels, sheets, pillowcases Everyday, 1100 or 1400 rpm 30°C or 40°C
Bulky items – doonas, duvets,
sleepingbags
Shirts, pants, other creasables Easy Iron or Steam Refresh, 800 rpm 30°C or 40°C
Woollens, silks Wool, Handwash, 500 rpm 30°C or 40°C
Delicates, fine fabrics Delicate, Wool or Handwash 30°C
Jeans Everyday or Heavy Cold or 30°C
Highly coloured items Everyday Cold or 30°C
Handkerchiefs, nappies, bedding and
facemasks
Whites, cotton items Cottons, 1100 or 1400 rpm 40°C or 60°C
Sensitive skin or extra rinsing Sanitise, Cottons, Rinse+, 1400 rpm 40°C
Asthma/allergies Sanitise, Cottons, Rinse+ 60°C
Lightly soiled items Quick 30, Quick 15, Speed 30°C
Muddy, sandy or linty items Everyday with Pre Wash and Rinse+ Cold
Unpleasant odour in washer Drum Clean 90°C
*Cycles and spin speeds available will depend on your washer model
SUGGESTED CYCLE
AND OPTIONS*
Bulky 30°C or 40°C
Sanitise 75°C
SUGGESTED
TEMPERATURE
Before you load
z
Check pockets for items that could damage your clothes or get caught in the washer.
z
Close zippers, hooks and eyes, and other fastenings (ie fasten the opening of duvet/
doona covers), and remove loose bra wires. All these can damage both your washer
and your clothes.
z
Place delicate items, such as lingerie, in a mesh laundry bag before placing in the washer.
z
Pre-treat any stains, taking care not to spray pre-treaters on your washer as they can
cause damage to the plastic surfaces.
Loading
Your washer will be more efficient when washing larger loads, so try to collect enough
items to loosely fill the drum when the items are dry.
18
Page 19
1
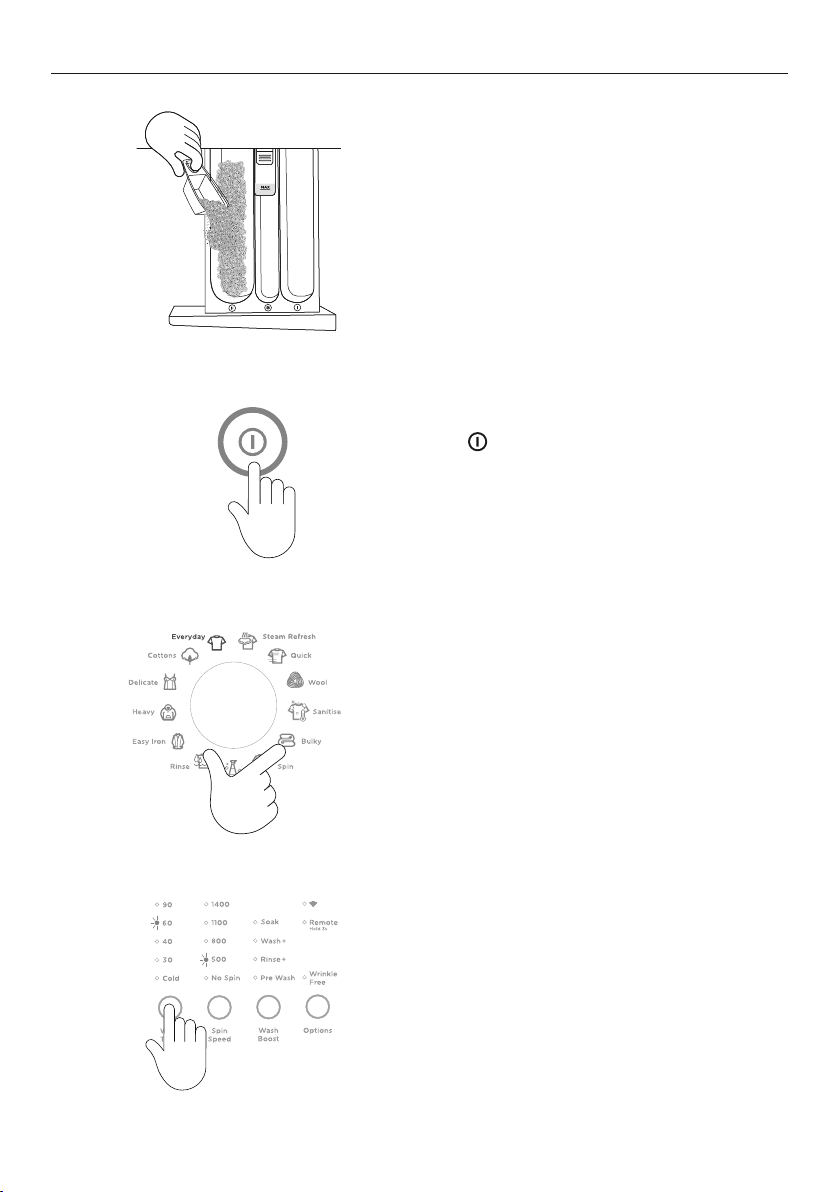
GETTING STARTED QUICKLY
Open the detergent drawer.
Pour liquid or powder detergent in the draw
or place the pod in the drum.
Pre-dissolving detergent in warm water when
washing can improve the performance of the
liquid and powder detergent.
2
3
4
Press to activate your washer.
Select your desired wash cycle by turning
the Control Dial. The wash cycle icons will
illuminate as you turn the dial showing which
cycle is selected, along with the default
wash cycle settings.
Customise your wash as needed by selecting
specific temperature and spin speeds. Refer
to ‘Wash cycle options’ for more information.
19
Page 20
GETTING STARTED QUICKLY
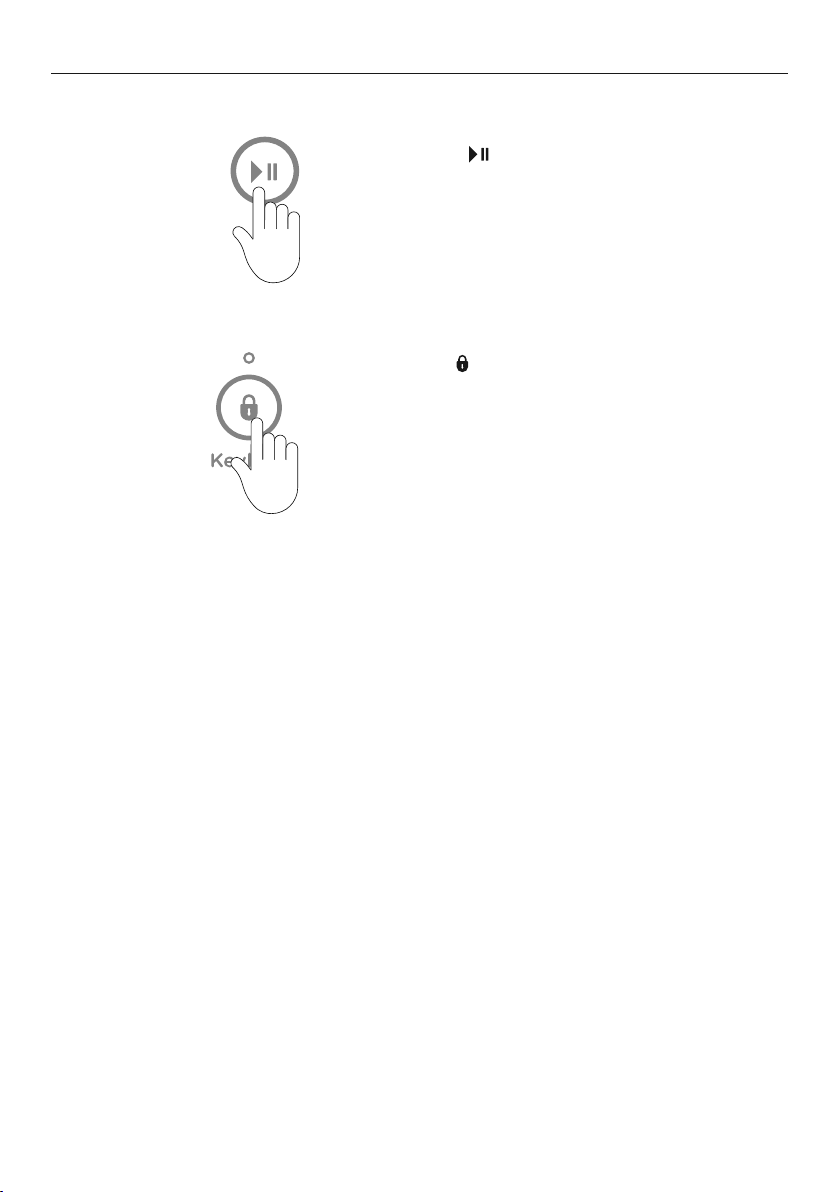
Press to start the cycle. The washer will
5
6
For best fabric and colour care, remove your clothes as soon as the cycle has finished.
Failure to follow the advice in this guide may result in damage to your garments and your
expectations of wash performance may not be met.
start to fill with water and select the correct
wash action for your load.
Use to lock the buttons on the control
panel, preventing them from being
activated accidently by a washing basket
or little fingers, refer to the ‘Wash cycle
options’ section.
20
Page 21
WASH CYCLE OPTIONS
Once you have selected your wash cycle you may wish to change the default wash options.
Wash cycle options
All wash cycles default to the recommended options for that cycle based on the average
expected load to be washed. You can vary the options (eg
create your desired cycle. Some options are not available on some cycles, for clothes care
reasons, or because the option is not appropriate for the cycle.
To change a wash option or options you have selected after a cycle has started
WASH TEMP, SPIN SPEED) to
Press
1
Wash Temp
Your washer offers these wash temperatures:
COLD TAP
Incoming water
from tap
Simply press the WASH TEMP button to increase or decrease the wash temperature.
Some temperatures are not available on some cycles as a safeguard for your clothes
(egtemperatures above 40°C on the DELICATEcycle).
For cold connection only, the washer will heat the water to the selected temperature.
If you do not wish to heat the water to 20°C using the internal heater, refer to the ‘Changing
pre-set options’ section for detail on how to set
your cold water wash.
CONTROLLED
COLD
20°C 30°C 40°C 60°C 90°C
WARM / COLD WARM HOT EXTRA HOT
then press again to resume the cycle with
the new setting(s).
and select your new setting(s),
COLD TAP as the default temperature for
21
Page 22
WASH CYCLE OPTIONS
Spin Speed
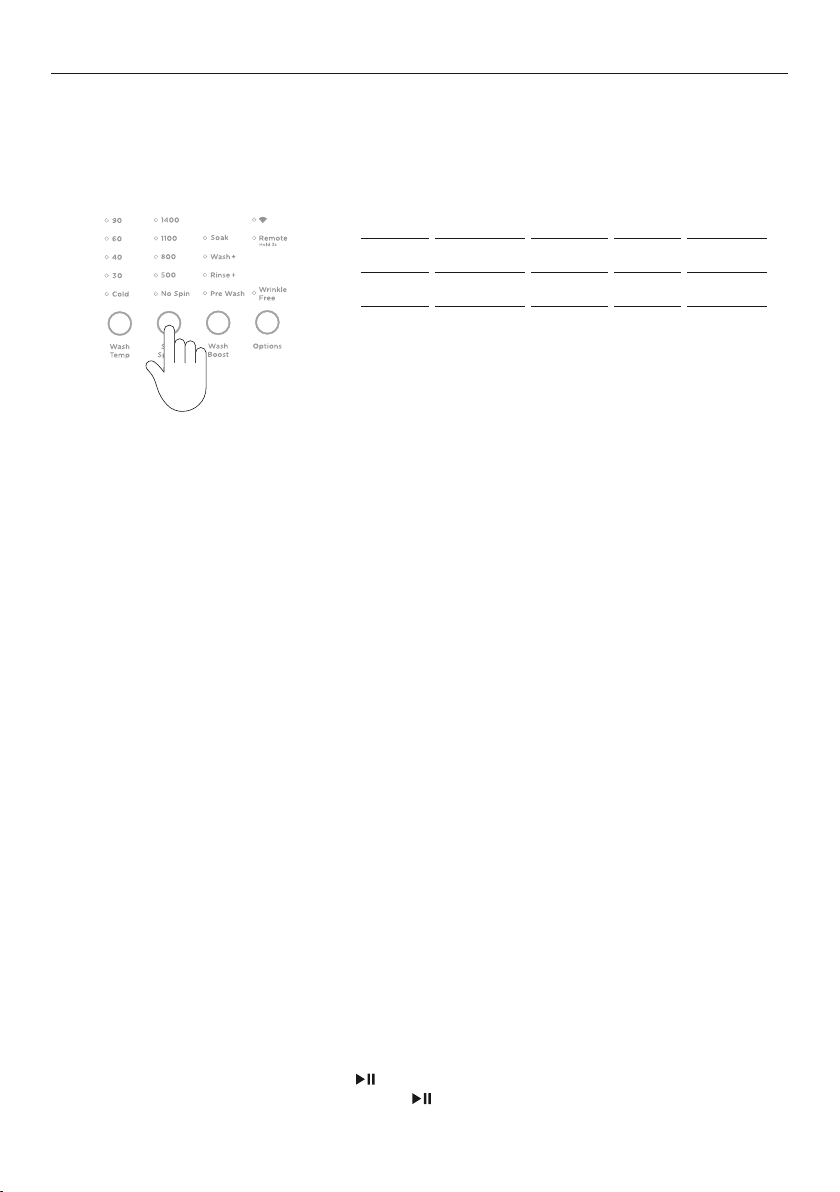
Your washer offers multiple spin speeds. To best care for your load, to select the speed you
want, press the SPIN SPEED button repeatedly until the desired spin speed illuminates.
RPM RPM RPM RPM NO SPIN
500 800 1100 1400
No Spin
Selecting
NO SPIN will end the cycle after the rinse, allowing you to remove items you wish
to drip dry.
The washer will complete the default wash and rinse spins for the cycle; only the final spin
will not be completed. Remove the items you wish to drip dry and then select
SPIN SPEED to spin out the remaining items.
Optimise Wash
Your washer offers you two optimise wash options –
SPEED and ECO – allowing you to save
time, or water and energy.
-
SPIN and a
Speed
A special feature designed to offer a shorter cycle whilst providing good wash performance.
This option can be selected on the
Choosing
SPEED for the QUICK cycle selects the QUICK 15 cycle.
COTTONS, HEAVY and EASY IRON cycles.
Eco
Use the
ECO option to save water and energy. Selecting ECO will reduce the wash
temperature slightly and alter the wash and rinse programming.
This option can be selected on the
z
ECO and SPEED cannot be selected together.
z
ECO will not be available if PRE WASH or RINSE+ has been selected.
EVERYDAY, COTTONS, HEAVY, EASY IRON and BULKY cycles.
Quiet
Use
QUIET mode when washing at night, if your washer is installed on a wooden floor,
and/or when noise is a concern. This mode reduces the spin speed to limit the level of
noise emitted, but may increase the level of moisture remaining in the load. This mode
includes WRINKLE FREE, the washer will tumble the clothes once every 15minutes after the
cycle has finished. The cycle icon and will flash indicating WRINKLE FREE is operating, to
remove the load during WRINKLE FREE, press .
22
Page 23

WASH CYCLE OPTIONS
Wash Boost
Pre wash
For extra dirty loads you can perform a
short wash in cool water to remove excess soil. After this the washer will drain and then fill
at the selected temperature for the main wash.
Simply press the
WASH BOOST button and select PRE WASH when choosing your wash
options. PRE WASH cannot be selected after a wash cycle has been started.
If you use the
PRE WASH option, liquid or powdered detergent needs to be placed in the
correct detergent compartment. The pre wash compartment is on the right hand side of the
drawer, marked . When you select PRE WASH, the compartment is flushed at the start of
the cycle.
PRE WASH will not be available if the ECO option has been selected.
Rinse+
If you have a particularly dirty load, or you have sensitive skin and wish to give your clothes
an extra rinse, select RINSE+ from the WASH BOOST options. Your load will undergo an extra
rinse to get rid of any residual detergent or soil in the items.
RINSE+ will not be available if the ECO option has been selected.
Wash+
WASH+ allows you to increase the wash time for heavy soiled items. The increase in wash
time gives the load the right amount of tumbling to remove the soil from items that might
need it.
PRE WASH. Your washer will start the wash with a
Soak
The SOAK option is available on selected wash cycles. When this option is chosen, the
washer will complete a 30 minute soak sequence in the middle of the wash, which
combines periods of tumbling and soaking to help lift stubborn stains.
SOAK is not available if the ECO or SPEED option has been selected.
Options
Wrinkle Free
We recommend you remove the clothes from the washer immediately after the completion
of the cycle to minimise wrinkling and creasing of items and to prevent dye run. However, if
you will not be present at the end of the wash you can select
WRINKLE FREE.
When WRINKLE FREE is selected, the washer will tumble the clothes once every 15minutes
for up to 12 hours after the cycle has finished. The WRINKLE FREE light and button will
flash, and the washer will beep at regular intervals to remind you to remove your load. To
remove the load during this phase, simply press the button.
23
Page 24
WASH CYCLE OPTIONS
Add a Garment
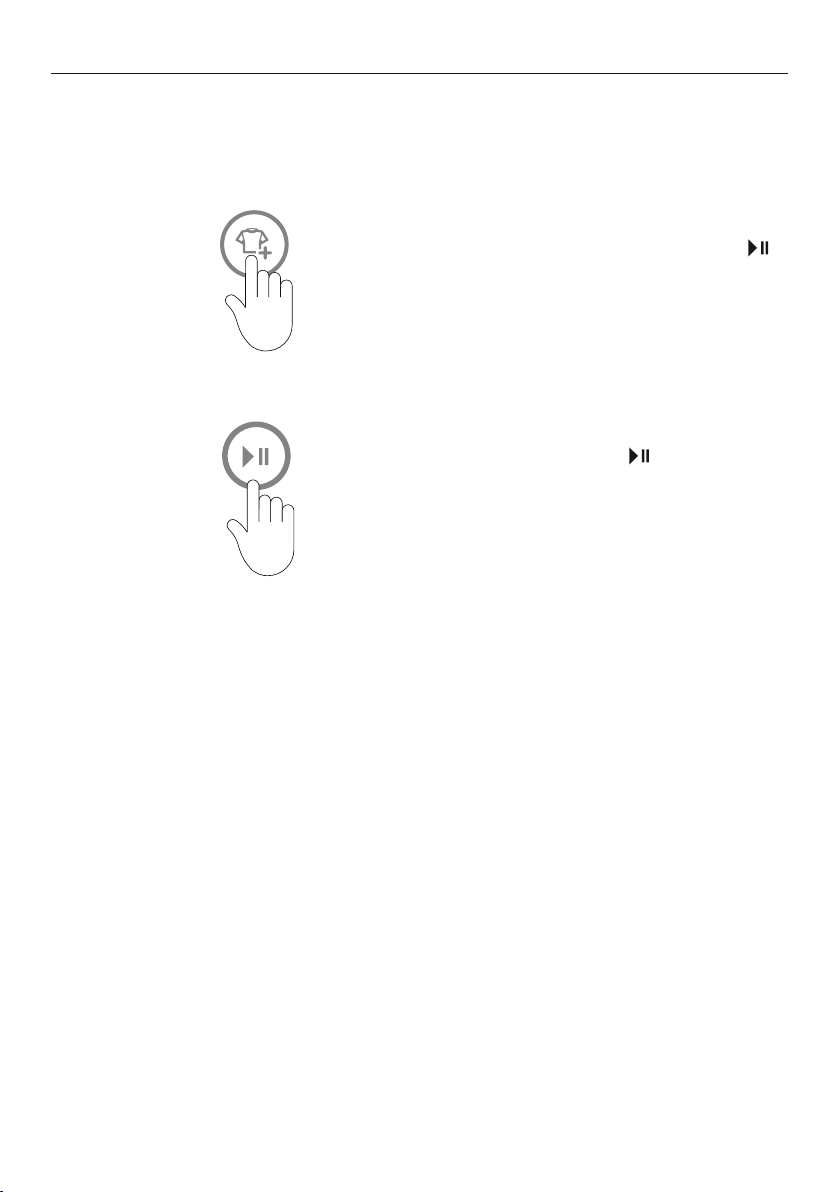
The ADD A GARMENT option enables you to add or remove items during the wash stage of
the cycle, under certain conditions.
1
2
Press the
Wait until you hear the door unlock. The
button will flash.
Open the door and add or remove items.
Close the door and press
the cycle.
ADD A GARMENT button.
to restart
24
Page 25
WASH CYCLE OPTIONS
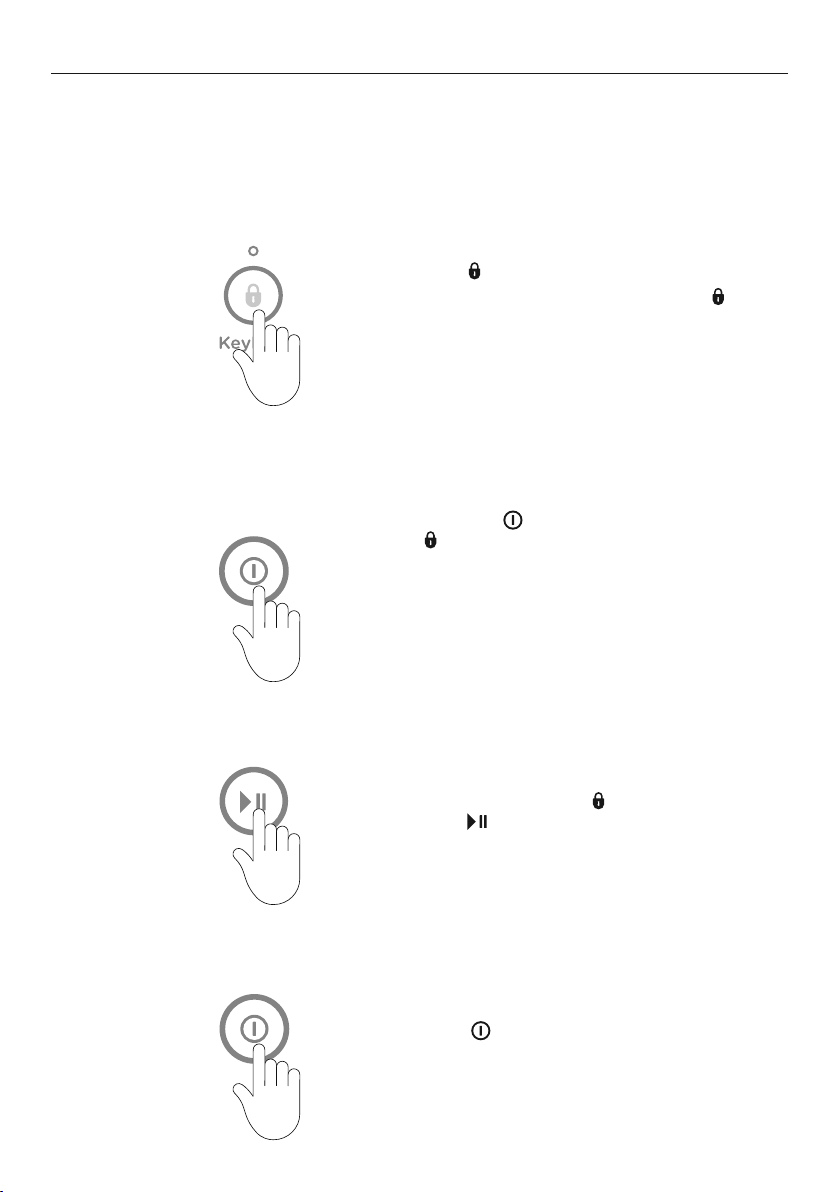
Keylock
KEYLOCK can be used to lock the buttons on your washer. This will avoid accidental button
pushes during the wash cycle.
To turn
1
To turn your washer on if KEYLOCK is on and the washer is powered off:
1
If
KEYLOCK on or off when the washer is powered on:
Press for three seconds.
When activated, the light above the
is illuminated.
Press the button, then press and hold
for three seconds. This will activate the
control panel. Wash cycles and options can
now be selected.
If a button is pressed while
activated, the LED above KEYLOCK will flash.
KEYLOCK is on and you want to pause your washer:
button
KEYLOCK is
To pause your washer at any time during the
1
KEYLOCK is on and you want to power off your washer at any time:
If
1
cycle, press and hold for threeseconds then
press .
Press .
25
Page 26
WASH CYCLE OPTIONS
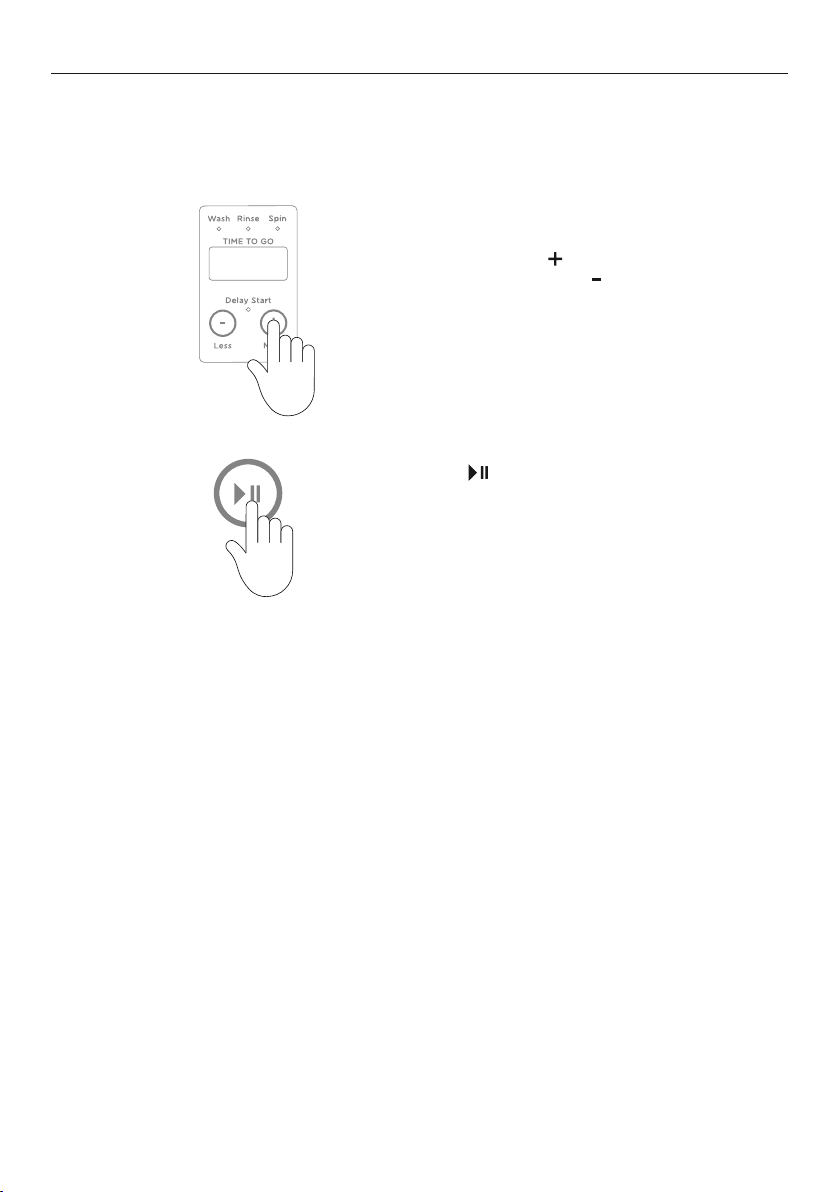
Delay Start
The
DELAY START option can delay the start of the wash cycle between 15 minutes and
12hours. This can be useful to time your washing to finish when you arrive home from work,
or to start once you have finished in the shower.
MORE button to increase the
to confirm your selection and start
1
2
Avoid using
Press the
delay time, and LESS button to decrease
the time, or turn DELAY START off.
Press
the countdown. The display screen will show
the time until the cycle is set to begin.
DELAY START for damp, non-colourfast items as this may cause dye run to occur.
Washing bulky items
The
BULKY cycle takes special care of bulky items. Bulky garments and bedding wash most
effectively when they can move freely. Ensure that there is sufficient room in the drum for
the load to move during the wash.
When washing a single bulky item add a large beach towel to the wash, to ensure the load
is balanced for an effective spin.
Washing woollens
Many woollen items carry a machine washable care claim. The fibres of these woollens have
been treated to prevent felting when they are machine washed.
z
Check the care label.
z
Use a wool detergent.
z
Use the specially designed WOOL cycle.
z
To dry woollens lie them flat on a towel and pat into shape. Dry out of direct sunlight.
Most handcrafted garments are not made of machine washable wool and we recommend
that you wash them by hand only. Hand washed woollens may be spun in your washer
(select SPIN SPEED, 500).
Washing underlays and sheepskins is not recommended because they could produce
excessive amounts of lint that may cause pump blockages.
26
Page 27
CUSTOMISING A WASH CYCLE
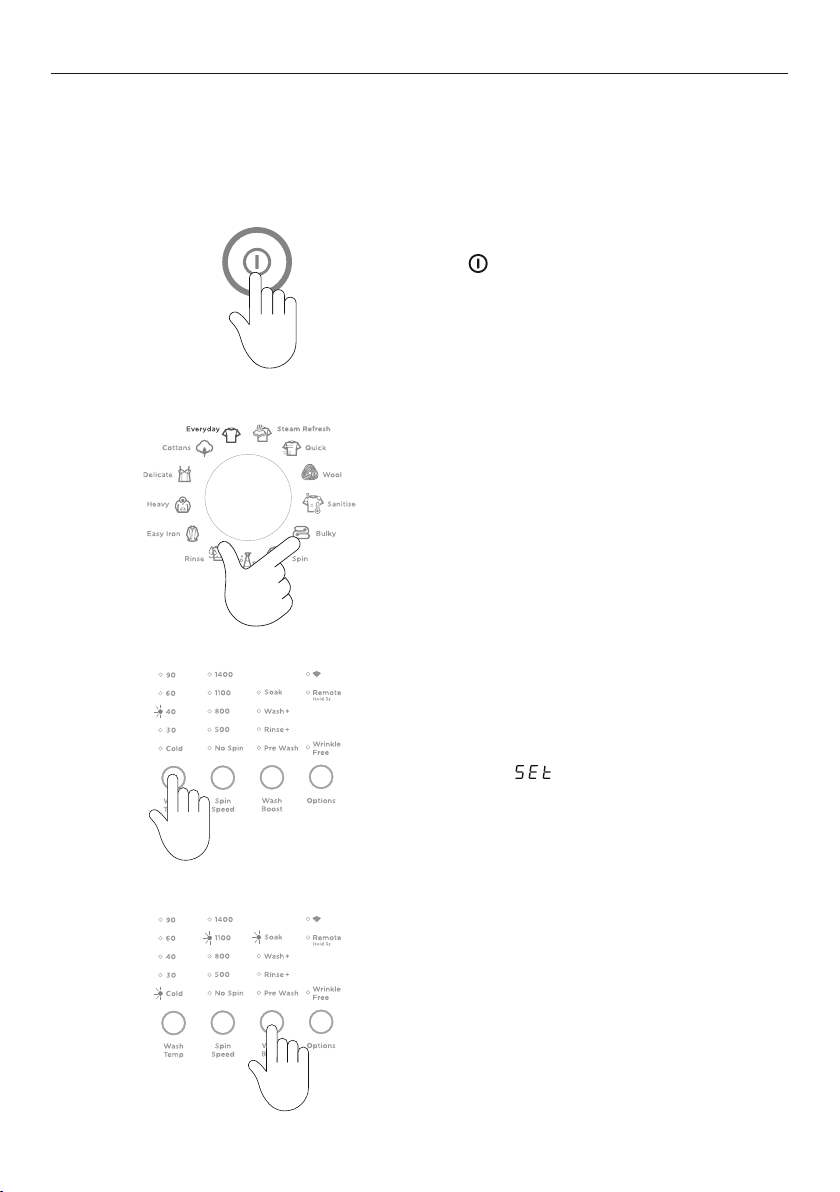
To customise a cycle
You can program your washer to remember the wash options you prefer for each wash
cycle. For instance, you may want to set the
set HEAVY cycle to include a SOAK.
EVERYDAY cycle to default to a COLD wash or
1
2
3
Press to activate your washer.
Turn the dial to select the wash cycle you
wish to customise, eg EVERYDAY.
Press and hold the button of the option
you want to customise, eg
threeseconds. You will hear two quick beeps
and the wash cycle icon will flash. The screen
will display .
WASH TEMP for
4
Continue to select any other options you wish
to customise for this cycle.
27
Page 28

CUSTOMISING A WASH CYCLE
Press to store your customised cycle.
5
To change your customised wash cycle simply repeat these steps.
A long beep will sound to confirm that your
changes have been saved.
28
Page 29
CHANGING PRE-SET OPTIONS
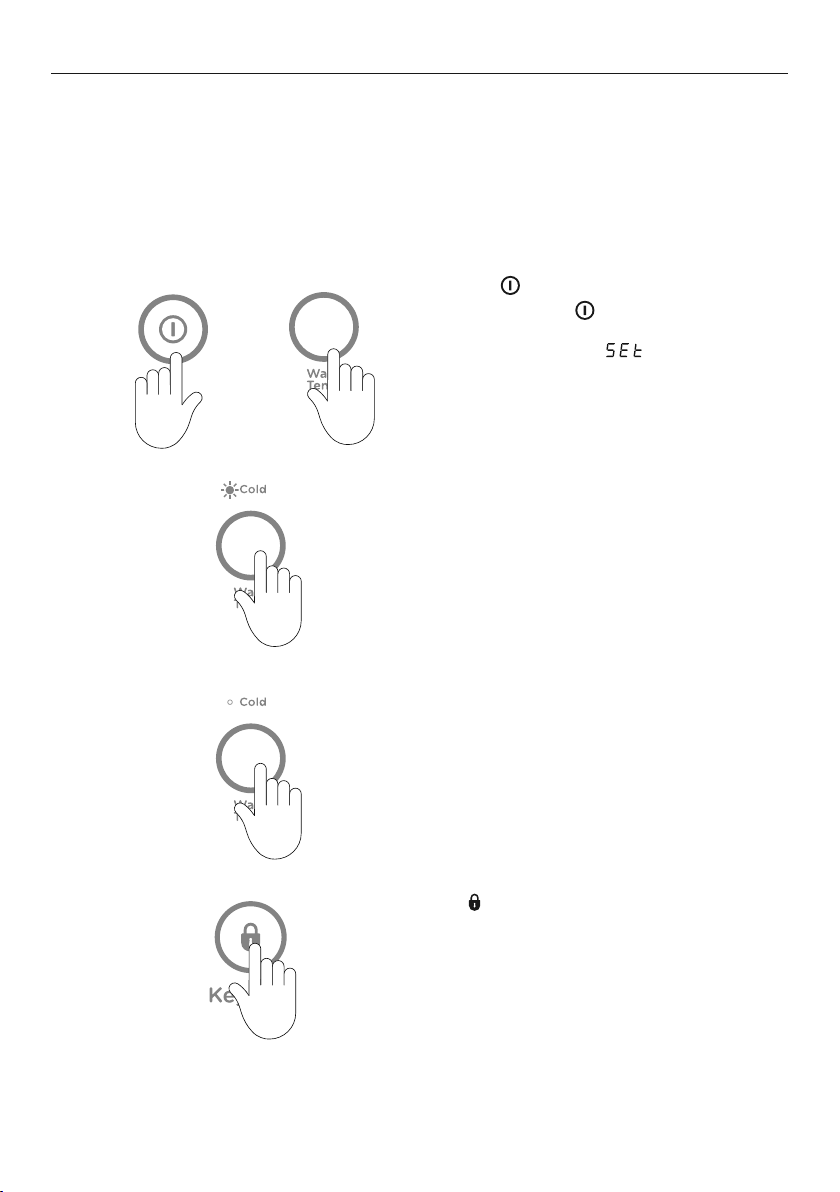
Option adjustment mode
This allows you to change the
COLD TAP. If your incoming cold water temperature is very low and you choose to do
a COLD TA P wash, the wash may be less effective.
To enter Option Adjustment mode:
1
CONTROLLED COLD default setting wash temperature to
Turn your washer on at the wall but do
not press .
Press and hold the
+
buttons together for three seconds. You will
hear a quick beep and will appear on
the screen indicating you have entered option
adjustment mode.
and WASH TEMP
The cold
2
3
4
If you always use
wash be used regularly, eg every fifth wash should be at least 40°C or above. Warm water
is needed to help maintain the cleanliness of your washer.
COLD or CONTROLLED COLD water, we recommend that a warm or hot
This is the default setting, where the machine
uses the internal heater to heat the water
to 20°C.
Press the
cold icon will stop flashing, indicating that
the temperature of the water will now be
the same as the incoming water from the
cold supply.
Press
Your washer will automatically remember
your changes for all future washes you do on
this cycle.
WASH TEMP icon will flash on and off.
WASH TEMP button once, the
to save the setting.
29
Page 30
CHANGING PRE-SET OPTIONS
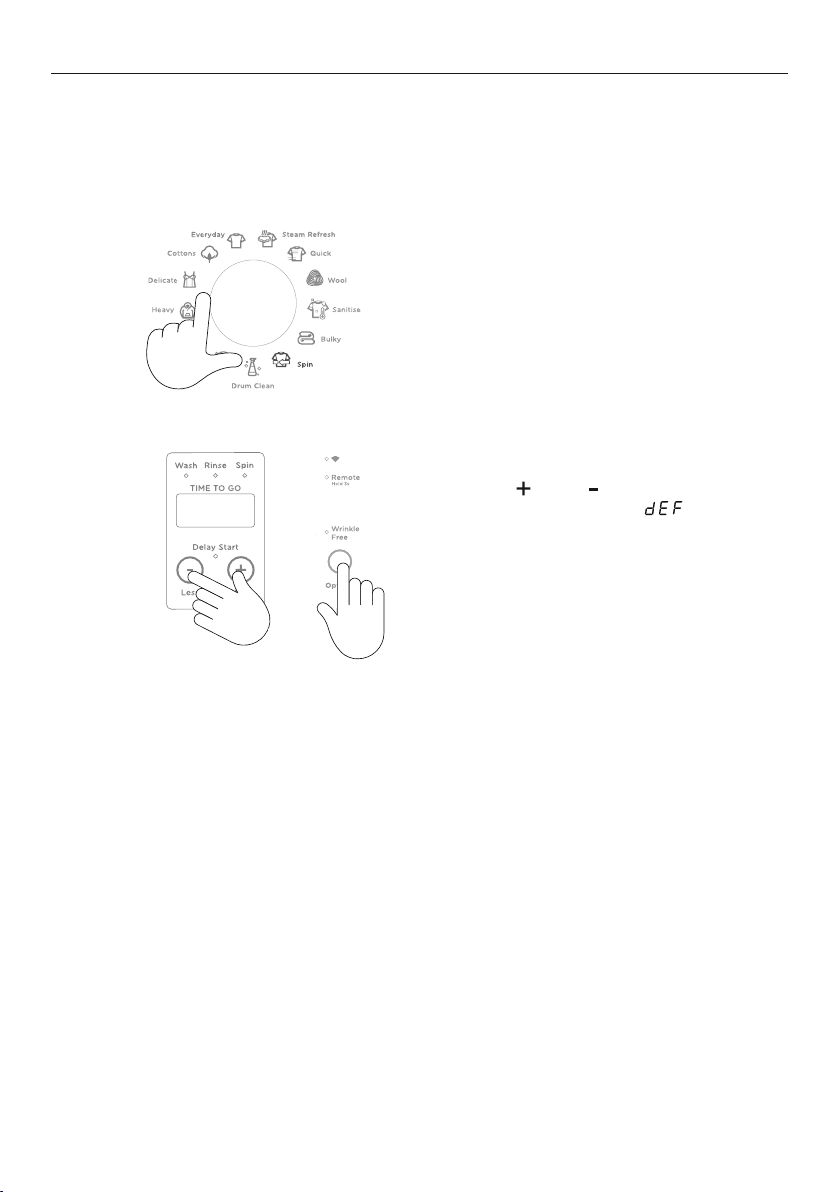
Factory reset
You can reset your washer to factory default settings by following the steps below.
To reset your washer to factory default settings:
1
2
Select the SPIN cycle.
Press MORE , LESS and OPTIONS buttons
+
together for threeseconds, will appear
on the screen and the washer will beep.
Your washer will now be reset to factory
default settings.
30
Page 31
CARING FOR YOUR WASHER
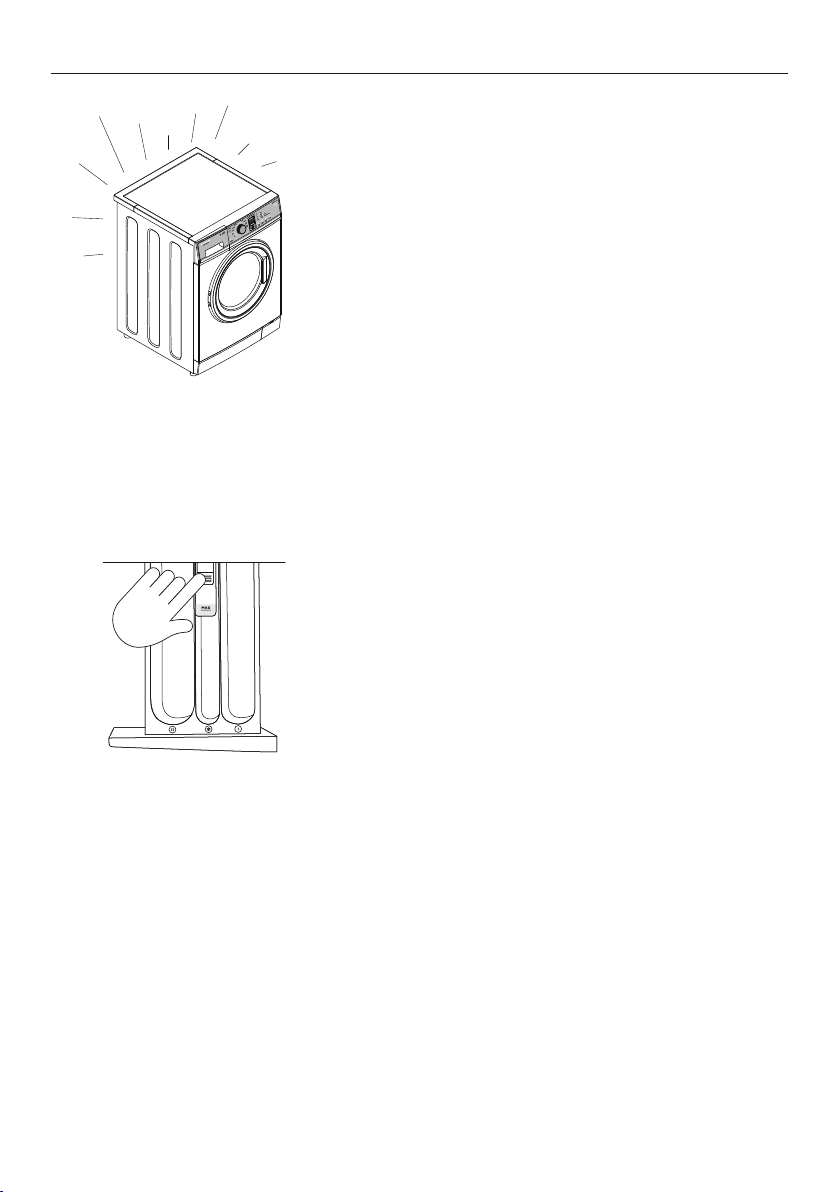
Cleaning the detergent dispenser drawer
When you have finished using your washer
z
Turn off the taps to prevent the chance of
flooding should a hose burst.
z
Unplug the washer from the power socket.
Cleaning your washer
Before you start cleaning your washer, ensure that
it is disconnected from the power (ie unplug the
washer from the power socket).
Cleaning the control panel and outer surfaces of
the washer
Use a soft damp cloth to wipe all surfaces, and wipe
dry. Avoid using chemical or scouring cleaners, as
these will damage the paint and plastic surfaces of
your washer.
1 To remove the drawer, pull it open, push down
on the tab in the fabric softener compartment
and pull out.
2 Wipe out the detergent dispenser drawer with a
damp cloth.
3 Rinse it under warm water and re-insert.
Clean the drawer regularly, especially if you use
fabric softener.
31
Page 32
NEED
IMAGE
CARING FOR YOUR WASHER
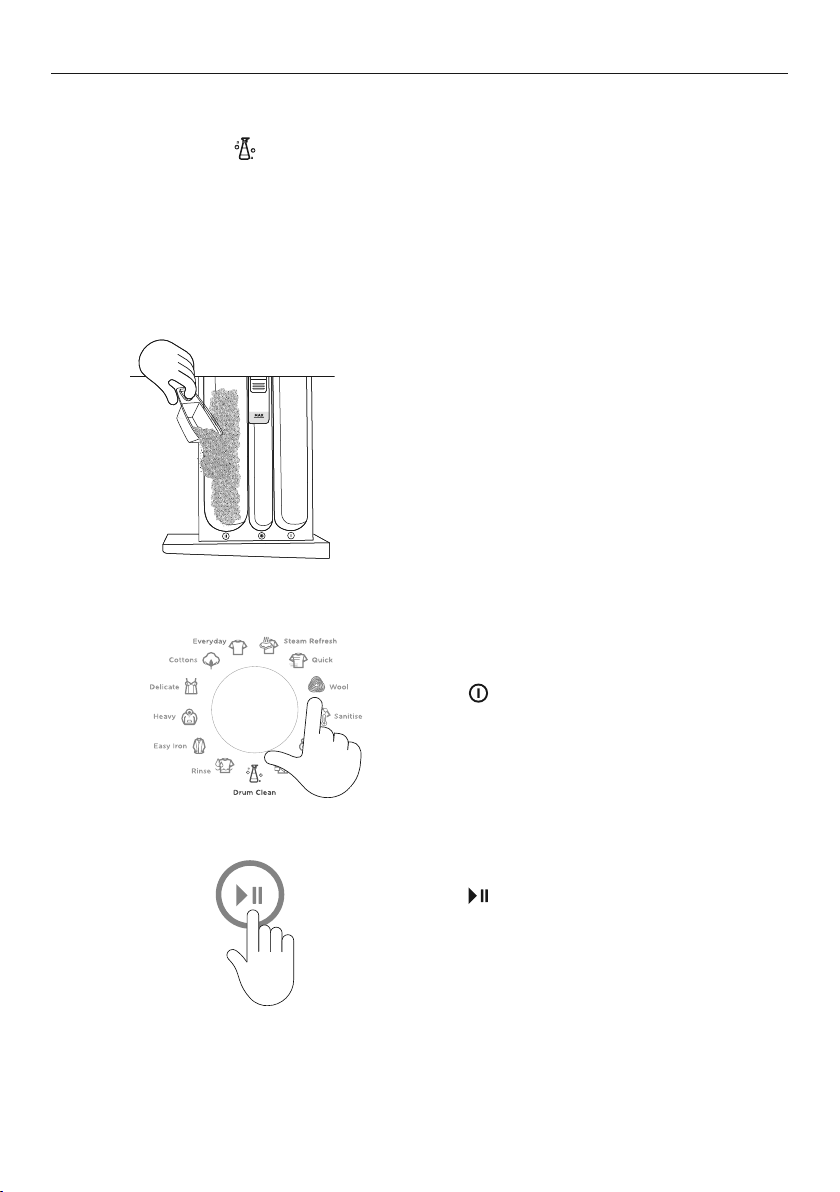
Cleaning the inside of your washer
It is important that you regularly clean the inside of your washer using the
cycle. After 100cycles icon will flash every time you turn your washer on to remind
you to do this. If your washer starts to smell this is a sign that you should complete a
DRUM CLEAN cycle. We recommend that you do not have any items in the washer when
you run this cycle. Use commercial washing machine cleaners only. Ensure the cleaner
used is compatible with your waste water system, i.e. safe for use if you have a septic tank.
Follow the manufacturers’ instructions.
Add the washing machine cleaner
1
directly into the main wash detergent
compartment of the dispenser drawer.
Follow manufacturers’ instructions.
DRUM CLEAN
2
3
32
Press
the DRUM CLEAN cycle.
Press
to turn your washer on and select
to start the cycle.
Page 33

CARING FOR YOUR WASHER
Aside from the detergent dispenser, water hose(s), and the pump filter, no other parts
are designed to be removed from the washer for cleaning. Do not attempt to remove any
other part of the washer.
Cleaning the drum and the door
z
Use a soft damp cloth to wipe the door, cleaning any water marks or residue off it.
z
Wipe the rubber seal around the door. Remove any items or lint accumulating in the
bottom of the seal catchment and wipe out any water accumulated here. If this is not
cleaned out, unpleasant odours will develop.
z
If the drum has any residual dirt or lint stuck to it, remove this and wipe the drum clean.
Do not leave any metal objects in the drum as these may rust and cause staining.
Cleaning the hose(s)
Each hose has a filter in it, preventing any solid contaminants in the water entering your
washing machine. Occasionally you should disconnect the water inlet hose(s) where they
connect to the tap(s), check these for any build up of dirt and wash this out.
Detergent advice
z
If unpleasant odours are noticeable from your washer, it is possible that not enough
detergent is being used for the soil level of your loads. Run a DRUM CLEAN cycle and
either buy better quality detergent or use a higher dose. Different detergents have
different cleaning chemicals. Consider alternating detergents to help remove odour.
z
Add the detergent BEFORE starting the cycle, close the dispenser and do not open it
while the cycle is running.
Leave the door to your washer open when it is not in use to allow the washer to dry out,
otherwise it will develop unpleasant odours. When leaving the door open like this, it is
extremely important that children and pets are kept away from the washer so they cannot
be accidentally trapped inside it.
33
Page 34
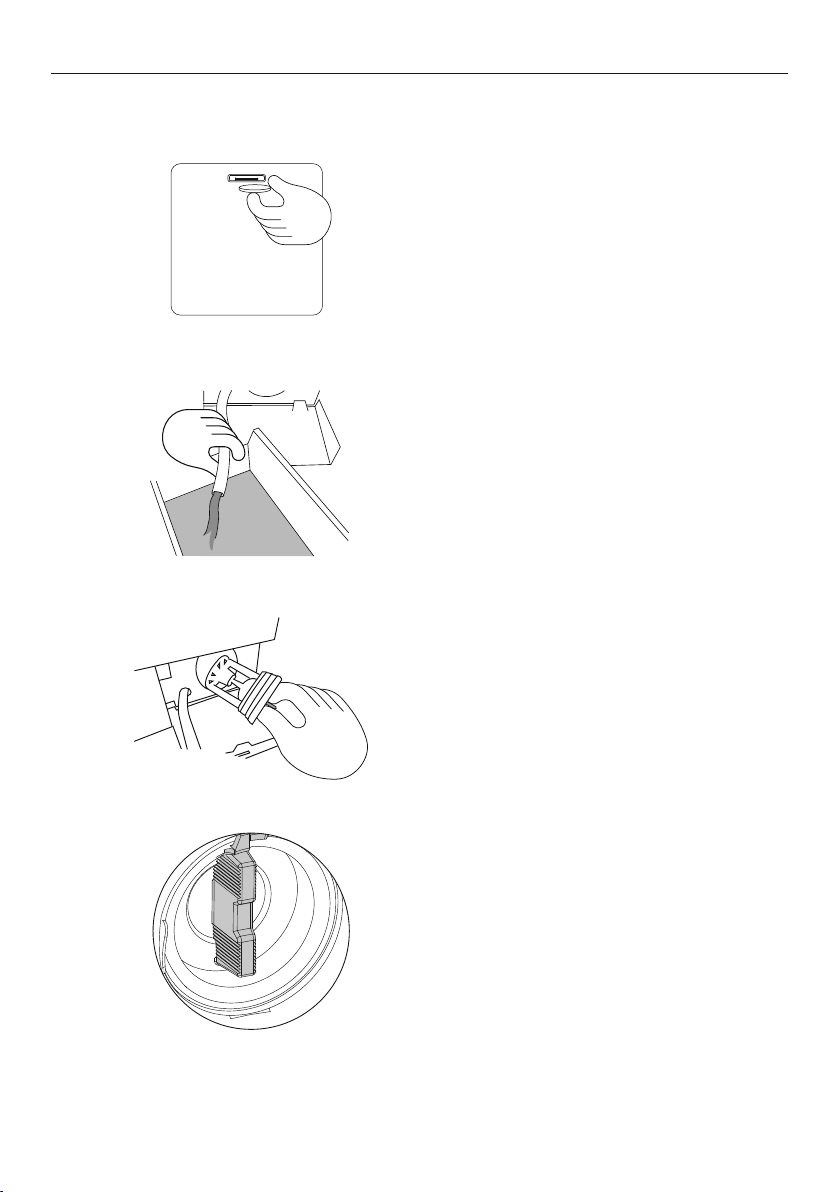
Cleaning the pump filter
1
2
CARING FOR YOUR WASHER
Turn the power off and unplug the washer.
Use a coin to open the filter cover. Place the
edge of the coin into the slot and tilt upwards
whilst levering the cover open.
Unhook the pump outlet hose and pull it out
(about 150mm). Remove the plug and allow
any water (approximately 250ml) to drain
into a shallow dish.
After the draining process is complete,
replace the plug intothe hose and refit the
hose back into the housing.
34
3
4
Remove the filter by turning anti-clockwise.
Clean and rinseunder a tap. Check the pump
filter cavity for any further obstruction.
Replace the filter by turning clockwise until
the turning handle stops in the vertical
position, and cannot be turned further.
Page 35

CARING FOR YOUR WASHER
Products that might damage your washer
z
Concentrated bleaches, laundry pre-soakers/sanitisers, stain removers and hydrocarbon
solvents (eg petrol and paint thinners) can cause damage to the surfaces eg control
panel, and components of your washer.
z
Be careful when washing garments stained with solvents as they are flammable. DO NOT
put them in your dryer.
z
Use of dyes in your washer may cause staining of the plastic components. The dye will
not damage the washer but we suggest you thoroughly clean your washer afterwards.
We do not recommend the use of dye strippers in your washer.
z
Nappy sanitisers and bleach are very corrosive to metal surfaces. DO NOT tip the
contents of a nappy bucket into your washer. Rinse and wring items out thoroughly
before placing them in the washer.
Moving your washer
Make sure any water in the washer is drained out. This can be done by cleaning out the
pump filter, refer to ‘Cleaning the pump filter’.
If you have the transit rods and you need to move your washer, replace them before
moving. This will protect the internal components of your washing machine from damage.
To replace the transit bolts, pull out the white plastic covers in the back of the washer. Refer
to your installation guide. Push the transit bolt rubber grommets and plastic spacers into
the hole and tighten with the spanner provided with the product.
Saving water, energy and the environment
Water-efficient washing machines will save you money, but it is also worth thinking about
energy use, recycling water and the environment. Some options to consider include
the following:
z
Turn the washer off at the wall when not in use.
z
Turn off the taps when not in use.
z
Select cooler wash temperatures.
z
Wash full loads rather than several smaller loads.
z
Use the ECO wash option/functions (where available).
z
Follow instructions on the detergent packet or bottle – do not overdose.
z
Use concentrated detergent – it costs less per wash.
z
Consider re-using the washing machines grey water on the garden or for flushing your
toilet – more information can be found on government websites promoting energy
and water saving.
35
Page 36
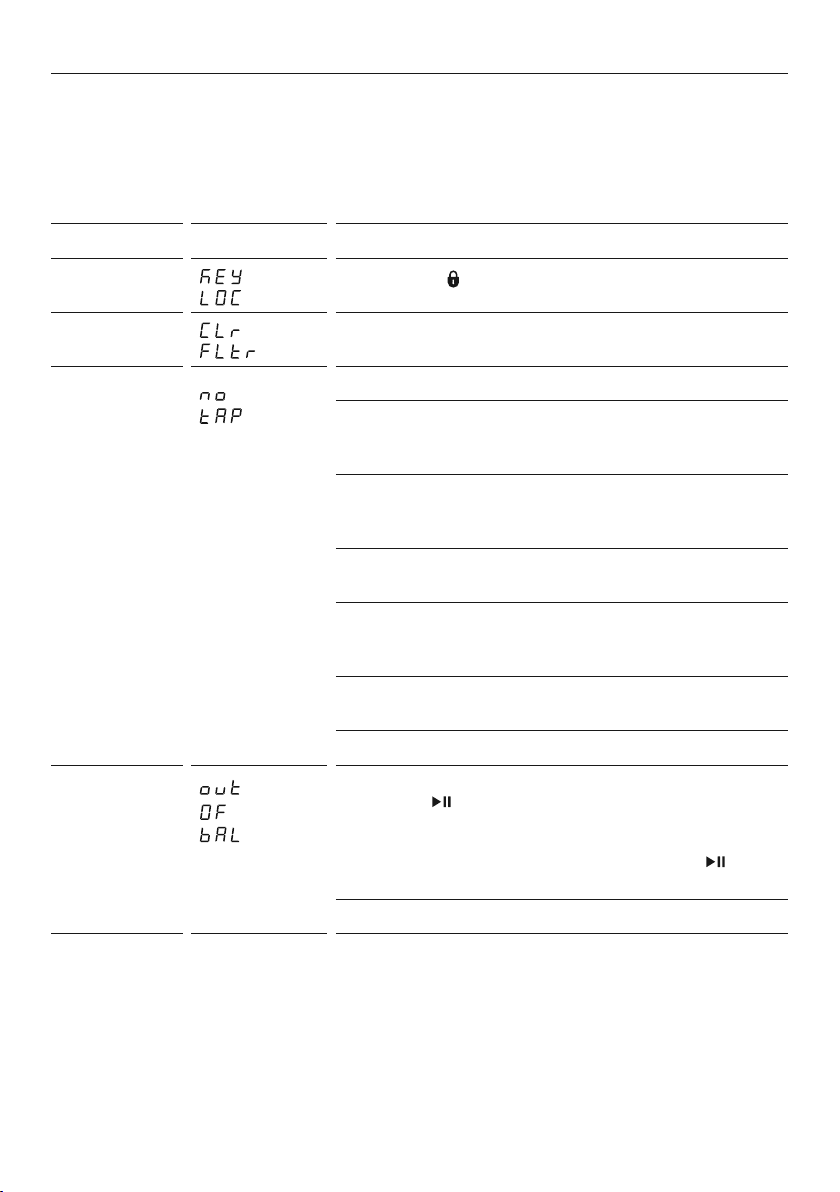
BEFORE YOU CALL FOR SERVICE
User warnings
Your washer is capable of self diagnosis and may sound a series of beeps and display
anotification or warning to inform you when there is aproblem. In most cases you will be
able to address the problem the washer is alerting you to. Check this chart before you call
for service.
PROBLEM DISPLAYED AS WHAT TO DO
Keylock
is activated
Pump filter
is blocked
The washer
is not getting
any water
Press and hold
Clean the pump filter
Check the taps have been turned on
If there is no hot water connection the washer will heat the
water itself, but there must be a cold water connection to the
cold valve.
Check the hose connections. If the cold water supply is
connected to the hot valve and there is no connection to the
coldvalve the washer will not fill.
Check the inlet hose filters are not blocked, the hose(s) are not
kinked and are attached correctly.
Check that the drain hose is not too low or pushed into the
standpipe too far. This will cause the water to siphon out of
thewasher.
Check that the cold water temperature does not exceed the
35°Ctemperature requirement.
Check the water flow rate. It maybe too low.
button for threeseconds.
The washer is
out of balance
36
The wash load has gone out of balance at some point during the
cycle. Touch
dryness of the load, manually re-distribute the load and remove
items if necessary. Close the door and select the
the dial, adjust the spin speed if necessary and touch
the washer.
Check the washer is level.
to stop message. If you want to improve the
SPIN cycle on
to start
Page 37
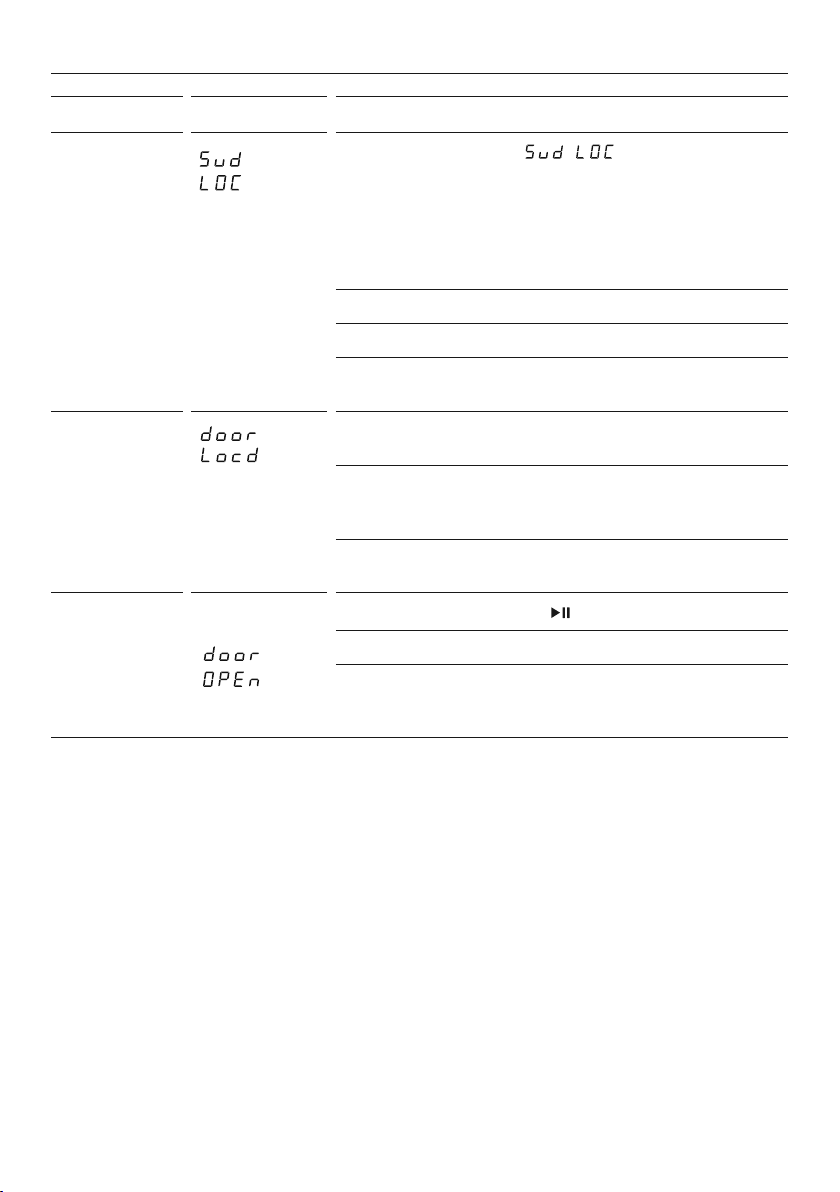
BEFORE YOU CALL FOR SERVICE
PROBLEM DISPLAYED AS WHAT TO DO
The washer has
too many suds
Door is locked The temperature in the drum is over 60°C therefore it is not safe
Door is open
Washer will stop and flash while waiting for suds
todissipate. The washer will not beep during this time.
When the suds have dissipated the washer will automatically
restart. If a suds event has occurred during a cycle the washer
will also display this warning at the end of the cycle, to alert you
that this has occurred. This may help to explain any reduction
inperformance.
Check you are using a detergent suitable for front loaders.
Check you are not overdosing the detergent.
Check the standpipe height for the drain is a minimum
of 600mm.
to open the door. Wait until the temperature drops below 60°C.
Check the water level in the drum. If the level is above the
bottomof the door seal, the door cannot be opened. Use the
ADD A GARMENT button if you wish to add or remove items.
If the drum is still moving, wait for it to stop before attempting
toopen the door.
Close the door fully and press
Try opening and closing the door again.
Reposition the load, make sure the load is correctly in the
drum and that protruding items are not stopping the door
from closing.
.
37
Page 38

FAULT CODES
When a continuous series of beeps is sounded, all the lights turn off on the control panel
and a number appears on the display, a fault has occurred. The washer will automatically
enter this mode if a fault occurs. The fault code will be displayed as followed by
a number on the digital display. To stop the sound, press any button and perform the
following steps:
1 Turn your washer off at the power point.
2 Wait oneminute and turn it back on.
3 Check your washer is correctly levelled.
4 Remove your wash load.
5 Perform a
6 If the fault re-occurs repeat steps
7 If the washer will still not work you will be required to call a Fisher & Paykel Authorised
Repairer to arrange service, refer to the ‘Customer care’ section. Record the fault code
number displayed and the serial number of your washer (located above the drum
opening when the door is open) before calling. The fault code will indicate to the
repairer what the problem could potentially be.
RINSE cycle.
and 2.
1
If a fault code is being displayed, you can still turn your washer off by pressing
.
38
Page 39
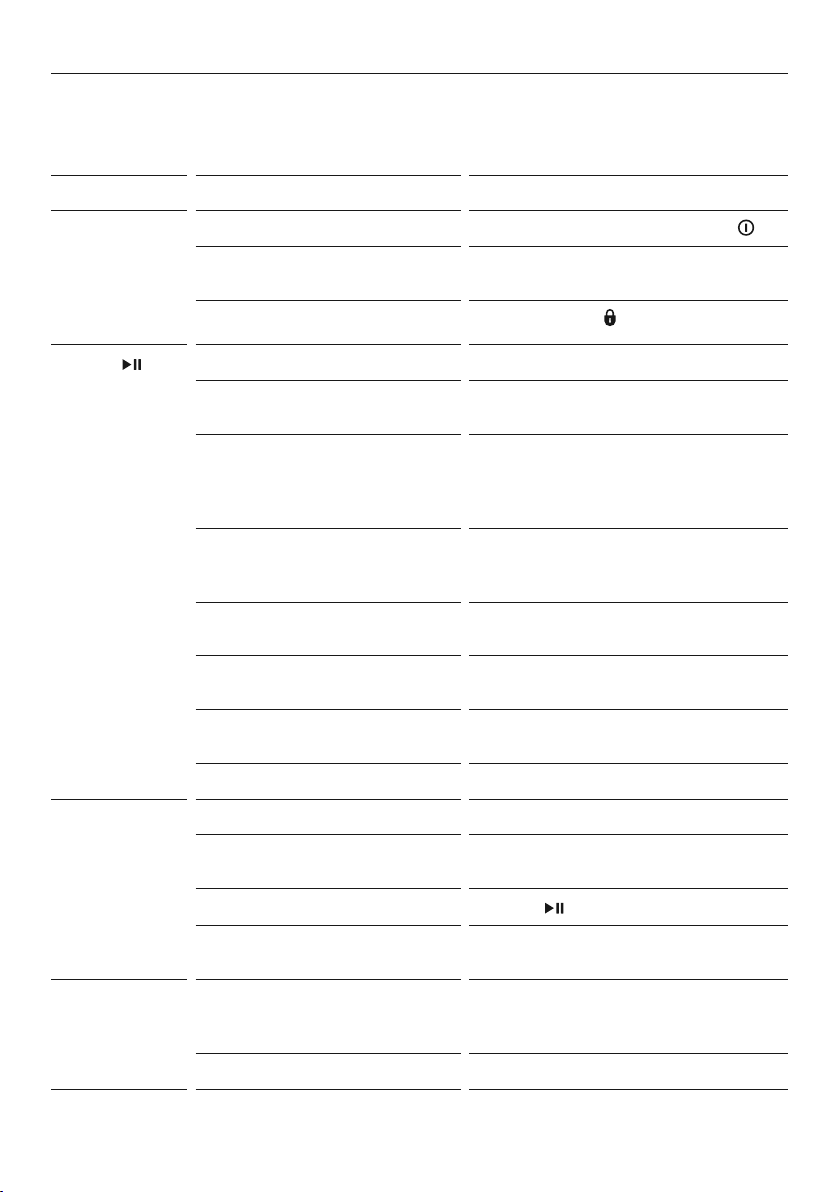
TROUBLESHOOTING
The following is a list of problems you may encounter when using this appliance and some
suggestions that may help to correct the problem. If you still have problems, contact your
Fisher & Paykel trained and supported service technician.
PROBLEM POSSIBLE CAUSES WHAT TO DO
Washer not
turning on
Power not switched on at thewall.
Household power supply
notworking.
Keylock may be activated.
Switch the power on at the wall. Press
Try plugging in another electrical appliance.
Press and hold the
button for three seconds.
.
Pressing
does not start
the fill
Washer stops
working mid
cycle
Washer drains
while filling
Washer door not closed properly. Open and reclose door.
The washer has detected afault. Check if a code is being displayed onthe
control panel, refer to ‘Fault codes’.
Hot and cold taps not turnedon. Check that both hot and cold taps are
turned on (if using cold inlet only ensure
inlet valve cap is installed on the hot valve
on the washer).
Hot and cold taps not connected
to the corresponding valve on
the washer.
Blocked hose filters. Check the tap end of the inlet hose(s)
Inlet hose leaking, twisted
ordamaged.
Faulty water supply. Check taps that aren’t connected
Delay start maybe set. Refer to
The washer has detected afault. Refer to ‘User warnings’ or ‘Fault codes’.
Power or water failure. Check the power and/or water is
Washer has been paused.
Oversudsing. Washer is waiting for suds to dissolve before
Drain hose too low. Ensure the height of the drain hose is atleast
Drain hose sitting in water. Clear the drain.
Check the cold tap is connected to the
cold valve on the washer and the hot tap is
connected to the hot valve.
for blockages.
Check the inlet hose(s) for leaks or damage.
Check that the inlet hose(s) are not twisted.
to the washer are working.
‘DELAY START’.
working correctly.
Press the
continuing the cycle.
600mm from the floor level, ‘Draining’ in your
installation guide.
button to continue.
39
Page 40

TROUBLESHOOTING
PROBLEM POSSIBLE CAUSES WHAT TO DO
Washer is
not draining
Filling
continuously
Poor rinsing Incorrect detergent used. Use low sudsing, front loader detergent only.
Not spinning
properly
Too many
soap suds
Small puddle of
water from under
the washer
Drain hose blocked. Clear the drain hose.
Pump filter blocked. Clear the pump filter, refer to ‘Cleaning the
pump filter’.
Drain hose guide higher than
1200mm above floor level.
Drain hose not connected to
standpipe, tub or spigot.
Washer is siphoning. Ensure standpipe or tub is at least 600mm
Too much detergent used. Ensure the correct dose of detergent is used
Load has gone out of balance. Open the door and redistribute the load.
Suds build up. Check the amount of detergent used, reduce
Incorrect type of detergentused. Use low sudsing, front loader detergent only.
Too much detergent used. Ensure the correct dose of detergent isused
Inlet water pressure/flowrate too low. Ensure correct inlet water pressure and flow
Inlet hose(s) or drain hose leaking. Check inlet hose(s) and the drain hose are
Lots of suds. Suds may have leaked and then dissolved.
Lower the level of the drain hose guide.
Refer to ‘Draining’ in your installation guide.
Connect drain hose correctly.
Refer to ‘Draining’ in your installation guide.
from the floor level.
for the load size and soil level.
Refer to ‘Where to put the detergent’.
Restart the washer.
if necessary.
Refer to ‘Where to put the detergent’.
for the load size and soil level. Refer to
‘Where to put the detergent’.
rate as per installation instructions.
correctly attached and not damaged.
40
Dispenser compartments blocked. Refer to ‘Cleaning the detergent
dispenser drawer’.
Dispenser drawer not fullyclosed. Close dispenser drawer fully and ensure
itremains closed during the cycle.
Damage to door seal. Check seal inside door for damage.
If it sustains any damage it will need to
be replaced.
Page 41
TROUBLESHOOTING
PROBLEM POSSIBLE CAUSES WHAT TO DO
Cycle time
longer than usual
/ inaccurate
adjustment of
time remaining
during cycle
Detergent or
fabric softener
remaining in
dispenser at the
end of the cycle
Washing very
wet at the end of
the cycle
Cycle time is approximate. Cycle time is influenced by a number of
factors. Refer to ‘Wash cycles’.
Low water pressure or flowrate. Ensure that inlet hose filters are notblocked.
Out of balance or oversudsing. Recovery from out of balance or oversudsing
will extend cycle time. Refer to ‘Caring for
your washer’.
Washing a large load. Be aware that it will take longer for the
machne to fill.
Selecting various options. Be aware that some options will extend
cycle time.
Dispenser drawer not properly closed
or was opened part way through
the cycle.
Dirty or blocked dispenser. Clean the dispenser drawer. Refer to ‘Cleaning
Liquid sitting at the ‘Max’ level
at the end of the cycle indicates
a blockage.
Dispenser over loaded
with detergent.
Composition of the powder
detergent makes it difficult
to dispense.
Cycle selected not appropriate. Particularly short or delicate cycles have
Incorrect spin speed for load selected. Select a faster spin speed.
Ensure the dispenser drawer is fully closed
at the start of the cycle and remains closed
throughout the cycle.
the detergent dispenser drawer’.
Clean the fabric softener dispenser
compartment. Refer to ‘Cleaning the
detergent dispenser drawer’.
Clean out remaining detergent. Refer to
‘Detergent and softener’.
Dissolve detergent with water to aid
with dispensing.
shorter spins which can result in wetter
washing at the end of the cycle.
An out of balance load hasoccurred. The washer compensates for the out of
balance by using a lower spin speed, to
reduce noise and potential damage to
the product.
41
Page 42
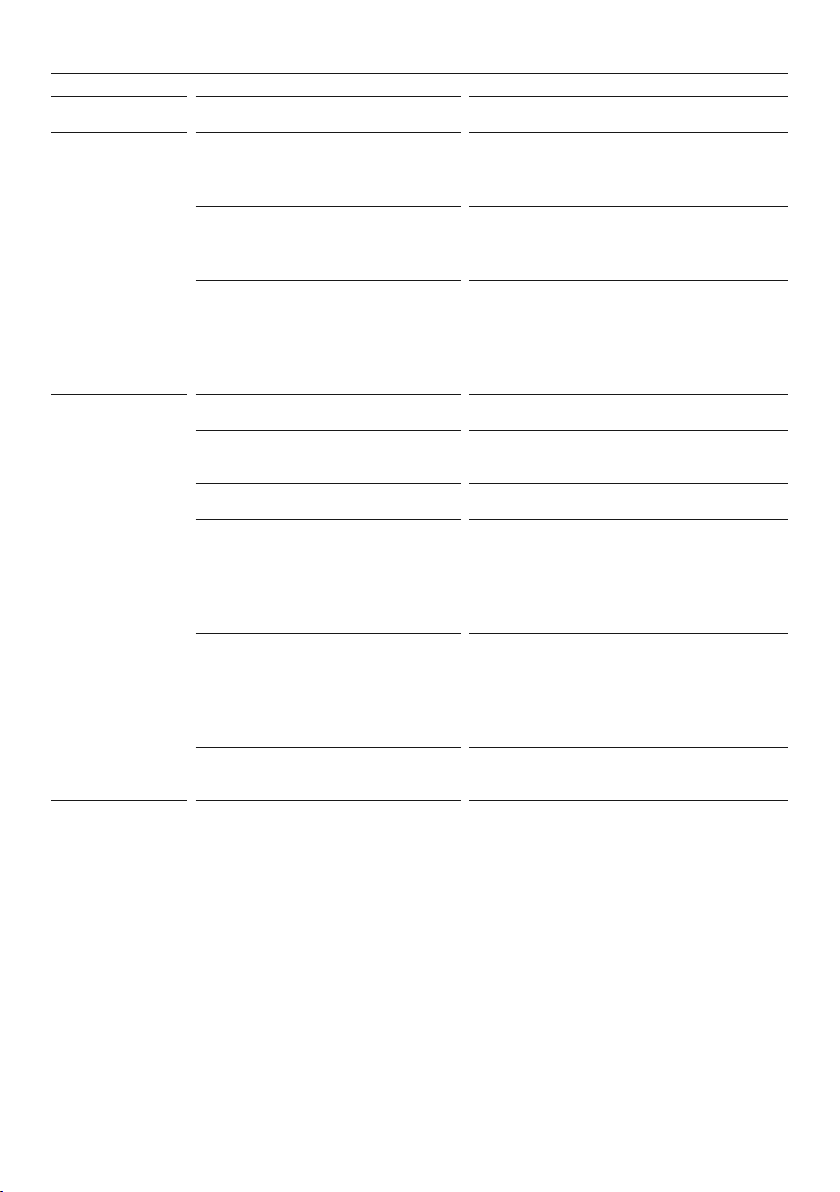
TROUBLESHOOTING
PROBLEM POSSIBLE CAUSES WHAT TO DO
Vibrating Transit bolts left in place. Ensure transit bolts are removed prior
touse of the washer. Refer to ‘Removing the
transit bolts’ in your installation guide.
Washer may not be level. Ensure washer is installed on an appropriate
surface and levelled correctly. Refer to ‘Levelling
the washer’ in your installation guide.
Load is out of balance. Wash an average sized load rather than
asmaller load or a single item. Washingone
item at a time is not recommended as it is
difficult for the washer to balance a single
item duringspin.
Creasing Washer overloaded. Do not overload the washer.
Incorrect cycle for loadtype. Use the
Spin speed too fast. Select a slower spin speed.
Wet clothes left in washer or
laundry basket.
Wash temperature too hot for
load type.
Items not sorted correctly. Sort load so that items of similar weight are
EASY IRON, DELICATE or
STEAM REFRESH cycle for creasable items.
Laundry left sitting wet is more likely to
crease. If not removing clothes from washer
immediately at end of cycle, select the
WRINKLE FREE option. Do not leave wet
washing sitting in a washing basket.
Select a lower wash temperature.
Check items care label for correct care.
Check the hot and cold taps are connected
to the correct valves. Refer to ‘Water supply’
in your installation guide.
washed together.
42
Page 43
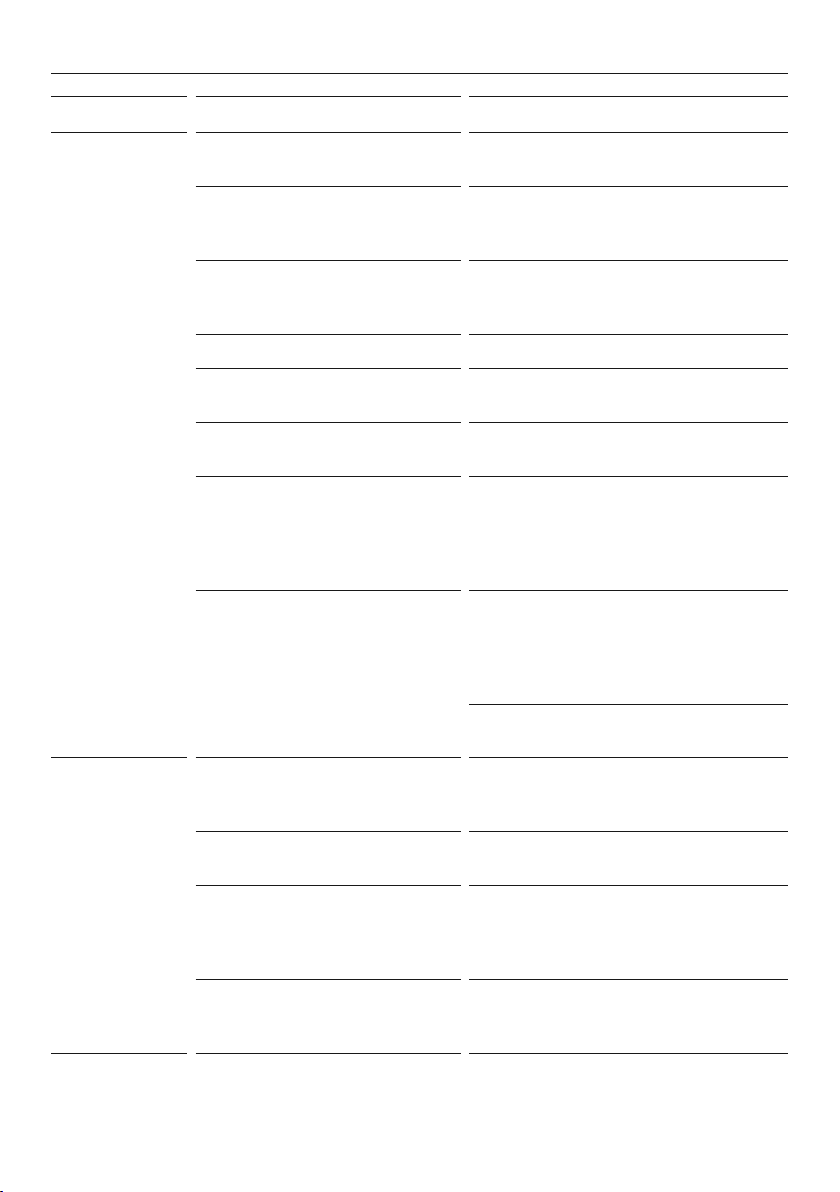
TROUBLESHOOTING
PROBLEM POSSIBLE CAUSES WHAT TO DO
Poor soil removal Incorrect wash cycle selected. Select a wash cycle that is appropriate for
the amount of dirt. Refer to ‘Wash cycles’.
Insufficient detergent. Ensure the correct dose of detergent isused
for the load size and soil level. Refer to
‘Detergent and softener’.
Washer overloaded. Ensure the washer is not overloaded interms
of its capacity or the cycle selected. Refer
to ‘Loading’.
Items require a longer wash time. Select the
Load was particularly dirty. Select
Items not sorted correctly. Wash heavily and lightly soiled
Washer dirty from previouswash. After washing particularly dirty clothing, we
Incorrect wash temperature selected
in relation to the type of soil.
Dye transfer Coloured items not washed
separately from white/light
coloured items.
New or non-colourfast items not
washed separately.
Wet items have been left sitting for
too long.
Wash temperature. Consider the wash temperature you
Refer to ‘Wash cycle options’.
garments seperately.
recommend putting the washer through a
RINSE cycle once the load has been removed.
This washes away any remnants of dirt that
could affect future wash performance.
Select a wash temperature suitable for
the type of soil, eg warm for greasy soils,
cold for muddy soils. Increasing the wash
temperature generally improves soil removal
and overall wash performance.
Ensure garments can be washed at the
increased temperature.
Remember to separate whites andcolours.
Wash non-colourfast items separately and
select
Remove items from washer as soon as the
cycle is finished, or if items are not to be
removed from the washer immediately
select
select for your coloured items. Lower the
temperature if you are concerned.
WASH + option.
PRE WASH for particularly dirty loads.
COLD wash temperature.
WRINKLE FREE.
43
Page 44
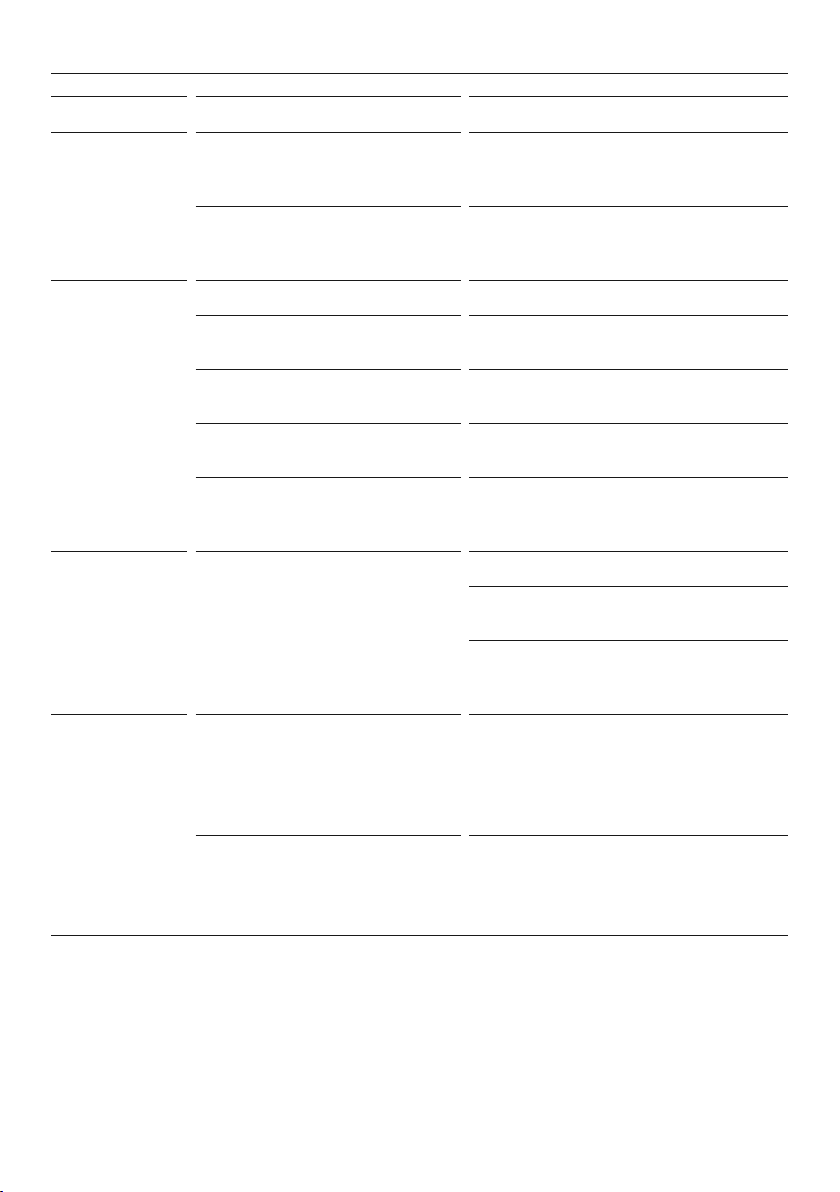
TROUBLESHOOTING
PROBLEM POSSIBLE CAUSES WHAT TO DO
Black or grey
marks on clothes
Tangling Items not sorted correctly. Separate larger items from smalleritems.
Washer Smells Not using enough detergent for the
Wet patches
on clothes
Correct amount of detergent. Ensure the correct dose of detergent is
used for the load size and soil level. Refer to
‘Detergent and softener’.
Washer needs to be cleaned. Empty the machine and complete a
Washer loaded incorrectly. Load items loosely and individually into the
Incorrect cycle for load
type selected.
Overloaded in terms of its capacity
or the cycle selected.
Delicate items. Wash pantyhose, bras and any
soil level in your loads.
Clothes are slightly damp from
the steam.
DRUM CLEANcycle. Refer to ‘Cleaning the
drum and the door’.
washer (ie not folded).
EASY IRON or STEAM REFRESH cycle
Use the
for items that crease easily
Refer to ‘Wash cycles’ for recommended
maximum load size.
otherdelicate items prone to tangling in a
mesh laundry bag.
DRUM CLEAN cycle.
Run a
Buy a better quality detergent or use a
higher dose.
Different detergents have different cleaning
chemicals, consider alternating detergents
to help remove odour.
It is normal for items to be damp after using
STEAM REFRESH, this helps remove the
the
wrinkles. Remove the item from the washer
immediately at the end of the cycle and
hang up to dry.
Inside surfaces of the washer wet. If there is residual water on internal surfaces
of the washer (i,e inside the door, door
gasket, drum) wipe this with a soft towel
before completing a
STEAM REFRESH cycle.
Contact a Fisher & Paykel trained and supported service technician if a problem persists.
44
Page 45

MANUFACTURER’S WARRANTY
For New Zealand and Australia only. You automatically receive a two-year Manufacturer’s
Warranty with the purchase of this clothes washer covering parts and labour for servicing
within the country ofpurchase.
Fisher&Paykel undertakes to:
Repair or, at its option, replace without cost to the owner either for material or labour any
part of the product, the serial number of which appears on the product, which is found to
be defective within two years of the date of purchase.
You also receive an additional eight-year parts only Manufacturer’s Warranty on your
Direct Drive motor. This additional eight-year Manufacturer’s Warranty commences on the
day following the expiry of the two-year Manufacturer’s Warranty and excludes the motor
controller and labour. Fisher&Paykel will repair (as to parts) or, at its option, replace any
Direct Drive motor (but not the motor controller) which is found to be defective within this
additional Manufacturer’s Warranty period. You will be responsible for any labour costs.
Note: These Manufacturer’s Warranties are an extra benefit and do not affect your legalrights.
These Manufacturer’s Warranties DO NOT cover
A Service calls which are not related to any defect in the product. The cost
of a servicecallwill be charged if the problem is not found to be a product
fault. Forexample:
1 Correcting the installation, eg removal of bottom packer and transit bolts
(frontloading washers), levelling the washer, adjustment of the drain to correct
siphoning, noises, crossed, kinked or leaking inlet hose connections, turning on
water,noises caused by the waterhammer or power supplies.
2 Providing instruction on use of the product or changing the set-up of the product,
eginstruction on correct use of detergents and fabric softeners.
3 Replacing fuses in, or correcting house wiring or correcting house plumbing,
egunblockingdrains.
4 Correcting fault(s) caused by the user.
5 Noise or vibration that is considered normal, eg spin sounds, user warning beeps.
6 Correcting damage caused by pests, eg rats, cockroaches, etc.
7 Water on the floor due to incorrect loading or excessive suds.
8 Blocked pumps, removal of foreign objects/substances from the washer, including the
pump and inlet hose filters, eg bra wires, bread tags, nails, grit, scrud, etc.
9 Correcting corrosion or discolouration due to chemical attack.
B Defects caused by factors other than:
1 Normal domestic use; or
2 Use in accordance with the product’s User guide.
C Defects to the product caused by accident, neglect, misuse or ‘act of God’.
D The cost of repairs carried out other than by a Fisher&Paykel trained and supported
service technician or the cost of correcting such repairs.
E Normal recommended maintenance as set out in the product’s User guide.
F Repairs when the appliance has been dismantled, repaired or serviced by other than
aFisher&Paykel trained and supported service technician or the selling dealer.
G Pick-up and delivery.
H Transportation or travelling costs involved in the repair when the product is
installed outside the Fisher&Paykel trained and supported service technician’s
normal servicearea.
45
Page 46

MANUFACTURER’S WARRANTY
Nothing in this Manufacturer’s Warranty is intended to, nor limits, any rights you mayhave
under law to recover the costs of inspecting or returning the goods to us.
This product has been designed for use in a normal domestic (residential) environment. This
product is not designed for any commercial use (whatsoever). Any commercial useby a
customer will affect this product’s Manufacturer’s Warranty.
Service under these Manufacturer’s Warranties must be provided by a Fisher&Paykel
trained and supported service technician. Suchservice shall be provided during normal
business hours. ThisManufacturer’s Warranty certificate should be shown when making
any claim.
For Australian customers
This Manufacturer’s Warranty is an extra benefit and does not affect your legal rights. Our
goods come with guarantees that cannot be excluded under the Australian Consumer
Law. You are entitled to a replacement or refund for a major failure and compensation for
any other reasonably foreseeable loss or damage. You are also entitled to have the goods
repaired or replaced if the goods fail to be of acceptable quality and the failure does not
amount to a major failure.
Keep this user guide in a safe place.
46
Page 47

CUSTOMER CARE
Before you call for service or assistance:
Check our website, fisherpaykel.com, for ‘Product Help’ to see the latest updates, hintsand
tips, and information about your product.
We recommend that you also refer to your user guide to ensure:
1 Your product is correctly installed.
2 You are familiar with its normal operation.
3 You have read the ‘Before you call for service’, ‘Fault codes’ and ‘Troubleshooting’
attheback of the book.
If after checking these points you still need assistance or parts, you can go online to our
website and book a service with your nearest Fisher&Paykel trained and supported service
technician. Our Customer Care team is also available to offer you assistance.
In New Zealand if you need service or assistance:
Go online to our website and book a service or call the Fisher&Paykel Customer Care
Centre and talk to one of our Customer CareConsultants.
Toll Free: 0800 FP CARE or 0800 372 273
Email: [email protected]
Website: fisherpaykel.com
Postal address: Fisher&Paykel Appliances Ltd, PO Box 58550, Botany, Auckland 2163
Fisher&Paykel has a network of Fisher&Paykel trained and supported service technicians
who can carry out any service necessary on your appliance. Visit our website and book a
service with a Fisher&Paykel trained and supported service technician in your area.
In Australia if you need service or assistance:
Go online to our website and book a service or call the Fisher&Paykel Customer Care
Centre and talk to one of our Customer CareConsultants.
Toll Free: 1300 650 590
Email: [email protected]
Website: fisherpaykel.com
Postal address: Fisher&Paykel Appliances Australia Pty Ltd, PO Box 798,
ClevelandQLD4163
Fisher&Paykel has a network of Fisher&Paykel trained and supported service technicians
who can carry out any service necessary on your appliance.
Visit our website and book a service with a Fisher&Paykel trained and supported service
technician in your area.
If you call, write to or contact us via our website, please provide your name and address,
model number, serial number, date of purchase and a complete description of the problem.
This information is needed in order to better respond to your requestforassistance.
Product details can be found on the rear of the washing machine, and/or above the drum
opening (when the door is open).
47
Page 48

CUSTOMER CARE
Registration
Register your product with us so we can provide you with the best service possible.
To register your product visit our website: fisherpaykel.com
Complete and keep for safe reference:
Model
Serial No.
Purchase Date
Purchaser
Dealer
Suburb
Tow n
Country
48
Page 49

Page 50

Page 51

Page 52

FISHERPAYKEL.COM
© Fisher & Paykel Appliances 2022. All rights reserved.
The models shown in this guide may not be available in all markets
The product specifications in this guide apply to the specific products and
models described at the date of issue. Under our policy of continuous product
improvement, these specifications may change at any time.
For current details about model and specification availability in your country,
please go to our website or contact your local Fisher&Paykel dealer.
and are subject to change at any time.
592887A 05.22
 Loading...