

Page 1

DISHWASHER
DW24U2I and DW24U6I
models
LAVE-VAISSELLE
Modèles DW24U2I et
DW24U6I
USER GUIDE
GUIDE D’UTILISATION
US CA
Page 2

English Page 1 – 32
Français
Page 35 – 68
Page 3

CONTENTS
Introduction 3
Safety and warnings 4
Operating instructions 7
Caring for your dinnerware 15
Loading advice 16
Water hardness and dishwashing 18
Wash programmes and detergent quantities 19
Adding detergent 20
Using rinse aid 21
After the wash 22
Care and cleaning 23
Fault codes 26
Troubleshooting 28
Wash programme data 31
loading the dishwasher 33
EN
Warranty and Service 34
loading the dishwasher 71
IMPORTANT!
SAVE THESE INSTRUCTIONS
The models shown in this user guide may not be available in all markets and are subject to
change at any time. For current details about model and specification availability in your
country, go to our website fisherpaykel.com or contact your local Fisher&Paykel dealer.
1
Page 4

Page 5

INTRODUCTION
This user guide is an accompaniment to your ‘Quick start guide’ which is included
with your dishwasher.
For operating instructions, see your ‘Quick start guide’. If you no longer have your
‘Quick start guide’, you can download it from our local website, listed on the backcover.
Refer to your ‘Quick start guide’ for information on:
Starting a wash
Wash programs and when to use them
Controls
Racking features.
EN
3
Page 6

SAFETY AND WARNINGS
!
WARNING!
Electric Shock Hazard
Read and follow the safety and warnings outlined in this user guide
before operating this appliance.
Failure to do so can result in death, electric shock, fire or injury to persons.
Use this appliance only for the intended purpose as described in the user guide.
IMPORTANT SAFETY INSTRUCTIONS
WARNING!
When using your dishwasher, follow basic precautions, including the following:
Read all instructions before using the dishwasher.
The information in this manual must be followed to minimise the risk of fire or
explosion or to prevent property damage, personal injury or loss of life.
Use the dishwasher only for its intended function as described in this user guide.
This appliance is intended to be used in household and similar applications such as:
– staff kitchen areas in shops, offices and other working environments;
– farm houses;
– by clients in hotels, motels and other residential type environments;
– bed and breakfast type environments.
NSF 184-Certified residential dishwashers are not intended for licensed food
establishments.
Use only detergents or rinse aid recommended for use in a domestic dishwasher
andkeep them out of reach of children.
Check that the detergent dispenser is empty after the completion of each
washprogram.
When loading items to be washed, locate sharp items so that they are not likely
todamage the dishwasher and load sharp knives with the handle up to reduce the
riskofcut-type injuries.
Do not wash plastic items unless they are marked “dishwasher safe” or the equivalent.
For plastic items not so marked, check the manufacturer’s recommendations.
Do not touch the filter plate (the metal disc in the dishwasher base) during or
immediately after use, as it may be hot from the heater plate underneath.
Do not tamper with the controls.
Do not abuse, sit in, stand on the door or dish rack of the dishwasher.
Do not lean on the adjustable racks or use them to support your body weight.
To reduce the risk of injury, do not allow children to play in or on the dishwasher.
Under certain conditions, hydrogen gas may be produced in a hot water heater system
that has not been used for two weeks or more. HYDROGEN GAS IS EXPLOSIVE.
If thehot water system has not been used for such a period, before using the
dishwasher, turn on all hot water taps and let the water flow from each for several
minutes. Thiswill release any accumulated hydrogen gas. As the gas is flammable,
donot smoke or use an open flame during this time.
Remove the door to the washing compartment when removing an old dishwasher
from service or discarding it.
4
Page 7

SAFETY AND WARNINGS
Some dishwasher detergents are strongly alkaline. They can be extremely dangerous
if swallowed. Avoid contact with the skin and eyes and keep children away from the
dishwasher when the door is open. Check that the detergent receptacle is empty
aftercompletion of the wash cycle.
INSTALLATION
This dishwasher must be installed and located in accordance with the Installation
instructions before it is used. If you did not receive Installation instructions with your
dishwasher, you can order them by calling your Authorised Repairer or download
them from our local Fisher&Paykel website, listed on the back cover.
Installation and service must be performed by a qualified technician.
If the power supply cord is damaged, it must be replaced by a dealer or Authorised
Repairer or a similar qualified trades person in order to avoid a hazard.
Ensure the dishwasher is secured to adjacent cabinetry using the brackets provided.
Failure to do so may result in an unstable product, which may cause damage or injury.
Do not operate this appliance if it is damaged, malfunctioning, partially disassembled
or has missing or broken parts, including a damaged power supply cord or plug.
Do not store or use petrol, or other flammable vapours and liquids in the vicinity of
the dishwasher.
Connect to a properly rated, protected and sized power supply circuit to avoid
electrical overload.
Make sure that the power supply cord is located so that it will not be stepped on,
tripped over or otherwise subject to damage or stress.
Do not install or store the dishwasher where it will be exposed to temperatures below
freezing or exposed to weather.
Do not use an extension cord or a portable electrical outlet device (eg multi-socket
outlet box) to connect the dishwasher to the power supply.
EN
WARNING!
Improper connection of the equipment-grounding conductor can result in a risk
ofelectric shock.
Check with a qualified electrician or service representative if you are in doubt as
towhether the appliance is properly grounded.
Do not modify the plug provided with the appliance; if it will not fit the outlet,
haveaproper outlet installed by a qualified technician.
GROUNDING
This appliance must be grounded. In the event of a malfunction or breakdown,
grounding will reduce the risk of electric shock by providing a path of least resistance
for electric current.
Thisappliance is equipped with a cord having an equipment-grounding conductor and a
grounding plug. The plug must be plugged into an appropriate outlet that is installed
and grounded in accordance with all local codes and ordinances.
If the dishwasher is installed as a permanently connected appliance:
This appliance must be connected to a grounded metal, permanentwiring system,
or an equipment-grounding conductor must be run with the circuit conductors and
connected to the equipment-grounding terminal or lead on theappliance.
5
Page 8

SAFETY AND WARNINGS
MAINTENANCE
Disconnect the appliance from the power supply before any cleaning or maintenance.
When disconnecting the appliance pull the plug rather than the power supply cord or
junction of cord to avoid damage.
Do not repair or replace any part of the appliance or attempt any servicing unless
specifically recommended in this user guide.
We recommend that you contact Customer Care to arrange service.
See your ‘Serviceand warranty’ booklet for contact details.
Keep the floor around your appliance clean and dry to reduce the possibility
ofslipping.
Keep the area around/underneath your appliance free from the accumulation
ofcombustible materials, such as lint, paper, rags and chemicals.
OPERATION
Do not open the dishwasher while it is in operation. There is a risk of being sprayed
with hot water. Do not open the door fully until the spray arms have stopped rotating.
The door should not be left in the open position as this could present a
trippinghazard.
The water inside the dishwasher is not suitable for drinking.
The dishwasher must be used with the filter plate, drain filter and spray arm(s)
inplace. To identify what these parts are, see drawings in section ‘Care and Cleaning’
of this user guide.
Do not operate this dishwasher if it is damaged, malfunctioning, partially
disassembled or has missing or broken parts, including a damaged power supply cord
or plug.
Household appliances are not intended to be played with by children. Children of
less than 8 years old must be kept away from the appliance unless continuously
supervised. This appliance can be used by children aged from 8 years and above,
andpersons with reduced physical, sensory or mental capabilities or lack of
experience and knowledge, if they have been given supervision or instruction
concerning the use of the appliance in a safe way and they understand the
hazardsinvolved.
Cleaning and user maintenance shall not be done by children without supervision.
Do not allow children to play inside, on or with this appliance or any
discardedappliance.
If a dishwasher cleaner is used, we would strongly recommend a wash program
with detergent should be run immediately afterward, to prevent any damage to
thedishwasher.
The dishwasher is designed for washing normal household utensils. Items that are
contaminated by petrol, paint, steel or iron debris, corrosive, acidic or alkaline
chemicals are not to be washed in the dishwasher.
If the dishwasher is not being used for long periods of time, turn the electricity
andwater supply to the dishwasher off.
6
Page 9

OPERATING INSTRUCTIONS
Controls and starting a wash
Start a wash programme
Open the door to turn ON the dishwasher.
1
– The display will show the wash programme time.
Select desired wash programme on the dishwasher control panel.
2
– The default cycle when you first turn the dishwasher on is Eco.
– After the first wash the dishwasher will remember the last programme used.
Select a wash modifier (for DW24U6I models only). The selected wash modifier
3
indicator will be lit. (see ‘Selecting wash modifiers’).
Press and close the door to start the wash programme
4
Pause and restart a wash programme
Open the door carefully to pause the programme. The time remaining will flash
1
andthepause beep will sound while the dishwasher is paused.
IMPORTANT!
There is a risk of being sprayed with hot water. Do not fully open the door until
thespray arms have stopped rotating.
Load, remove, or rearrange any dishes if needed.
2
Touch button and close the door in 4 seconds to restart the programme.
3
If the dishwasher is not restarted within 7 minutes, it will then beep until the cycle
isrestarted.
EN
Cancel or change a wash programme
Open the door carefully to pause the programme.
1
Touch and hold to cancel the programme.
2
Touch any button to turn the dishwasher back on, and follow the steps
3
above ‘To start a wash programme’.
7
Page 10
OPERATING INSTRUCTIONS
Setting delay start
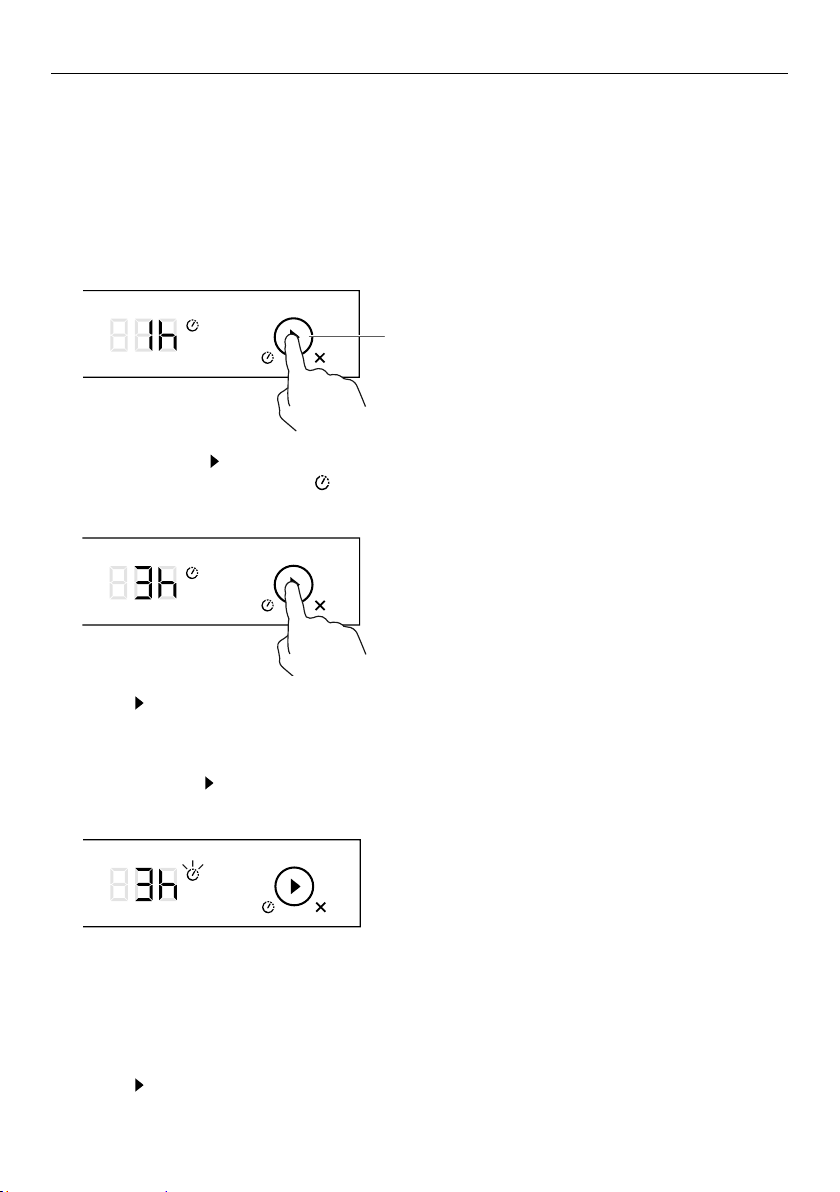
This feature can delay the start of a wash programme by 1 to 12 hours.
Load the dishes, add detergent and close the door.
1
Open the door to turn the dishwasher on.
2
Check that the display shows the wash programme you require.
3
If not, see instructions for ‘Changing the wash programme’.
touch and hold
Touch and hold
4
– The ‘Delay start’ indicator will light up and the display will show the
delay time (hours).
Touch again to increase the number of hours you wish to delay the wash by
5
(1hr – 12hr in hour steps).
Note: Scrolling past 12 hours will exit ‘Delay start’.
Press and hold to start delay. The display will countdown in hours.
6
The wash programme will automatically start when the delay time is over.
– The ‘Delay start’ indicator will be on when ‘Delay start’ begins its countdown.
– If the door is open when the countdown is finished, the dishwasher will beep
andthedisplay will flash. After 7 seconds the dishwasher will turn off.
Cancel Delay start
Touch
8
until the delay hour is 12h, then press start button again to cancel delay.
Page 11
OPERATING INSTRUCTIONS
Setting wash modifiers (DW24U6I models only)
Along with setting the wash programme, you may select one of the following the
additional options:
Extra dry: Increases the wash temperature and the length of the drying phase for
improved drying performance. This is especially useful for plastic items.
Quick: Uses additional water and energy for a faster wash time, while maintaining
washperformance.
Sanitize: Raises the water temperature during the rinse phase to sanitize dishes.
Idealfor washing items such as baby bottles and preserving jars.
Set a wash modifier
After selecting your wash programme, touch to select desired wash modifier.
1
Thewashmodifier indicator will light up.
Touch once to start the wash.
2
Close the door.
3
EN
Note: multiple modifiers can be selected depending on the cycle selected.
WASH PROGRAMME MODIFIER AVAILABLE
Auto – – –
Medium Extra Dry Quick Sanitize
Eco – – –
Fast Extra Dry – Sanitize
Heavy Extra Dry Quick Sanitize
Delicate Extra Dry Quick –
Rinse – – –
Cancel Wash modifier
Touch modifier again. The wash modifier indicator will go out.
9
Page 12

OPERATING INSTRUCTIONS
Setting wash modifiers (DW24U6I models only)
Using sanitize
The sanitize wash modifier adjusts the wash programme to meet the conditions
requiredby Section 6, NSF 184 for sanitization to occur.
While sanitize is running, the wash programme is monitored to ensure that these
conditions are met.
IMPORTANT!
For sanitization to occur, the temperature of the water needs to reach 700C/1580F.
Check that all items in the dishwasher are dishwasher safe before running the
sanitize modifier.
If the wash is interrupted or the water supply is turned off during the cycle, then
the heating conditions for sanitization may not be met. You may need to run the
cycle again to ensure sanitization of your dishes.
Only cycles utilising the sanitize wash modifier are designed to meet the
conditions required by Section 6, NSF 184. Other wash programs may not reach
the temperatures required for sanitization to occur. See table on previous page
for wash programs that have sanitize available
At the end of a wash programme with sanitize, always check the display to make
sure that sanitization has been successful.
If sanitization has been successful:
The dishwasher will beep
will show in the display
0
After 30 seconds the display will turn off.
If sanitization has not been successful:
An alert will sound
An alert code will show in the display
The sanitize indicator will not be lit.
10
Page 13
OPERATING INSTRUCTIONS
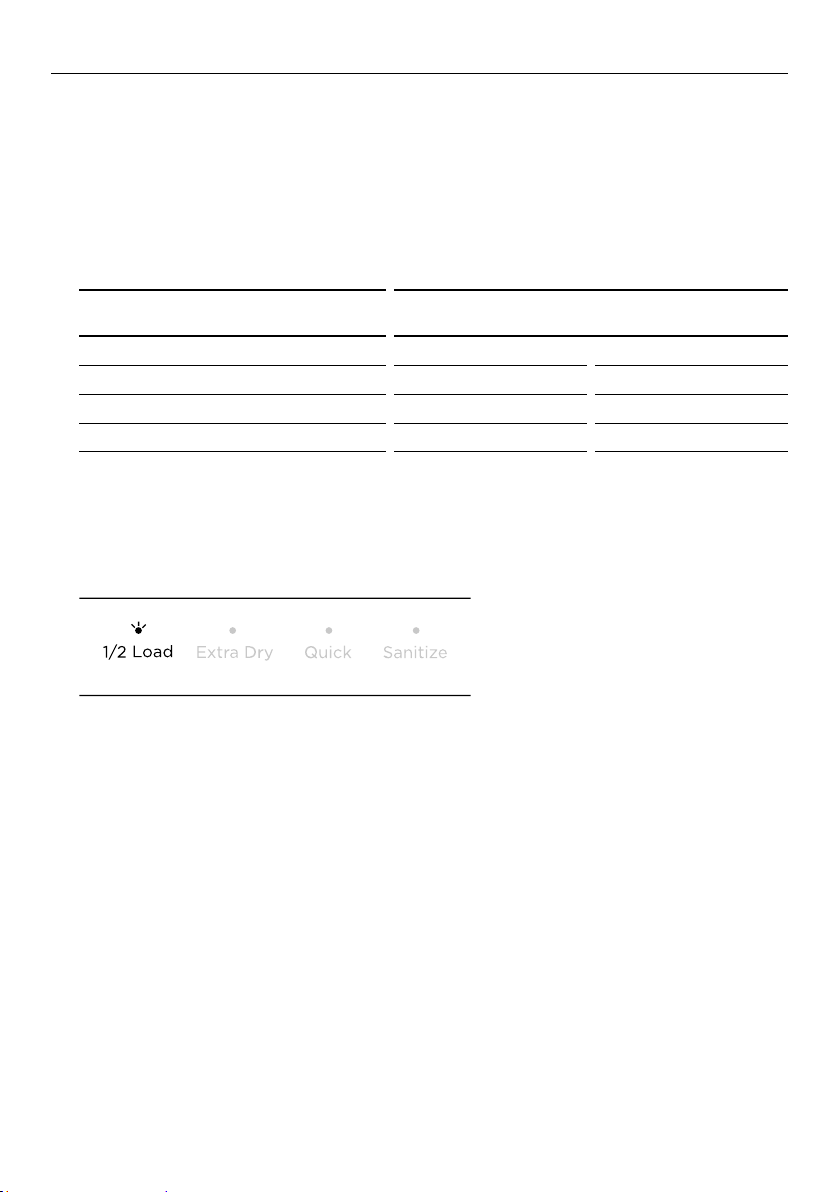
Setting a 1/2 load (DW24U6I models only)
Half load option
If you don’t have a full load of dishes to wash, you can choose to use the 1/2
load option. This may be useful if, eg you only wish to wash the breakfast dishes.
Thedishesshould fill only half the dishwasher, but may be placed in both upper
andlower baskets.
This option is available with the following wash programmes and modifiers:
WASH PROGRAMME
AVAILABLE WITH 1/2 LOAD
Medium Extra Dry Sanitize
Eco
Heavy
Delicate Extra Dry –
Select 1/2 load
Open the door to turn the dishwasher on.
Select a wash programme, and select a wash modifier (if required).
1
Touch half load. The half load indicator will light up.
2
MODIFIER AVAILABLE WITH 1/2 LOAD
– –
Extra Dry Sanitize
EN
Cancel 1/2 load
Touch half load
1
– The half load indicator will go out.
Note: 1/2 load cannot be cancelled while a wash programme is running.
11
Page 14
OPERATING INSTRUCTIONS
User preference settings
These allow you to:
Change the rinse aid setting or turn rinse aid on or off.
Turn the beeps on or off.
Turn the cavity light on or off (DW24U6I models only)
Turn the floor light on or off (DW24U6I models only)
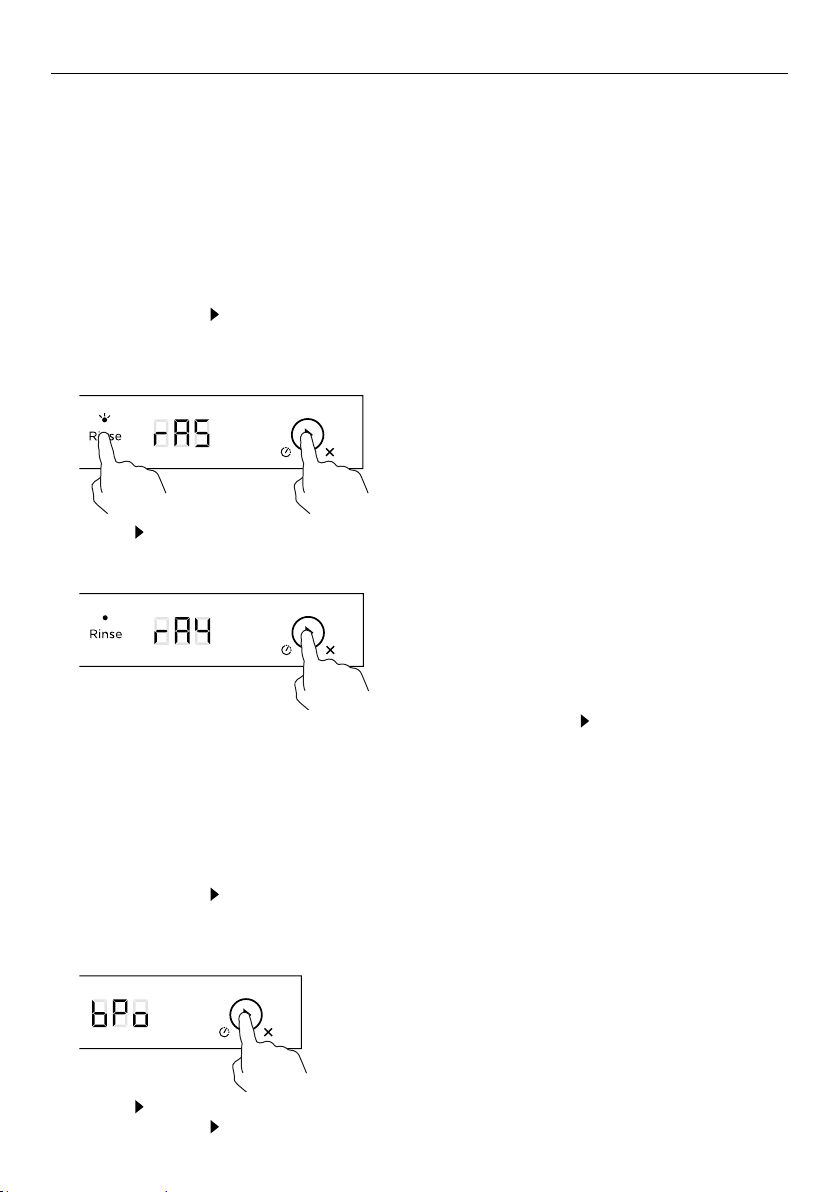
Change the rinse aid setting
Open the door to turn the dishwasher on.
1
Touch and hold and Rinse until a beep sounds to enter the user preference menu.
2
Thedisplay will show the current Rinse Aid setting.
– Rinse flashes when in preference option mode.
Touch to scroll between rA1 (minimum dispense) to rA6 (maximum dispense) or
3
rA- (rinse aid off).
Touch Rinse to move on to the next setting or touch and hold until a beep sounds
4
toexit the user preference menu.
Turn the Beeps on or off
This turns off all sounds on the dishwasher (except for fault alerts).
Make sure the dishwasher is on.
1
Touch and hold and Rinse together until a beep sounds to enter the user preference
2
menu. The display will show the current Rinse Aid setting.
Touch Rinse to scroll to the Beeps menu.
3
Touch to toggle between bPo (Beeps On) and bP- (Beeps Off)
4
Touch and hold until a beep sounds to exit the user preference menu.
5
12
Page 15

OPERATING INSTRUCTIONS
User preference settings (DW24U6I models only)
Turn the Cavity Light on or off
Make sure dishwasher is on.
1
Touch and hold and Rinse until a beep sounds to enter the user preference menu.
2
Thedisplay will show the current Rinse Aid setting.
– Rinse flashes when in preference option mode.
Touch Rinse to scroll to the Cavity Light menu.
3
EN
Touch to toggle between CLo (Cavity Light On) and CL- (Cavity Light Off).
4
Touch and hold until a beep sounds to exit the user preference menu.
5
13
Page 16

OPERATING INSTRUCTIONS
User preference settings (DW24U6I models only)
Turn the Floor Light on or off
Make sure the dishwasher is on.
1
Touch and hold and Rinse together until a beep sounds to enter the user preference
2
menu. The display will show the current Rinse Aid setting.
Touch Rinse to scroll to the Floor Light menu.
3
Touch to toggle between FLo (Floor light On) and FL- (Floor light Off)
4
Touch and hold until a beep sounds to exit the user preference menu.
5
FLOOR LIGHT LOGIC
No light No wash cycle running
Solid light Wash cycle is running
Slow flashing Wash cycle is paused
Fast flashing Washer has a fault
14
Page 17

CARING FOR YOUR DINNERWARE
The combination of high temperatures and dishwasher detergent may cause damage
to some items if they are washed in the dishwasher. Remember, if in any doubt about
any aspect concerning items washed in the dishwasher, follow the instructions from the
manufacturer of the items, or wash the item by hand.
EN
IMPORTANT!
Never put highly absorbent materials, such as sponges and towels in your dishwasher.
Do not put dishes or cutlery that have been soiled by tobacco ash, wax, lubricating
grease or paint in your dishwasher.
Cutlery and silverware
All cutlery and silverware should be rinsed immediately after use to prevent tarnishing
caused by some foods. Silver items should not come into contact with stainless steel,
eg other cutlery. Mixing these items can cause staining. Remove silver cutlery from the
dishwasher and hand dry immediately after the programme has finished.
Aluminium
Aluminium can be dulled by dishwasher detergent. The degree of change depends on
the quality of the item.
Other metals
Iron and cast iron objects can rust and stain other items. Copper, pewter and brass tend
to stain. Wash these items by hand.
Woodware
Wooden items are generally sensitive to heat and water. Regular use in the dishwasher
may cause deterioration over time. If in doubt, wash by hand.
Glassware
Most everyday glassware is dishwasher safe. Crystal, very fine and antique glassware
may etch that is, become opaque. You may prefer to wash these items by hand.
Plastic
Some plastic may change shape or colour with hot water. Check the manufacturer’s
instructions about washing plastic items. Washable plastic items should be weighted
down so they do not flip over and fill with water or fall through the basket during
the wash.
Decorated items
Most modern china patterns are dishwasher safe. Antique items, those with a pattern
painted over the glaze, gold rims or hand-painted china may be more sensitive to
machine washing. If in doubt, wash by hand.
Glued items
Certain adhesives are softened or dissolved in machine washing. If in doubt, wash
by hand.
15
Page 18
LOADING ADVICE
Loading your dishwasher
Place items so that water coming from the rotating spray arms below can reach all
areas. Especially items on the foldaway cup racks. Wash performance will be reduced
ifit can’t.
Ensure glass and other fragile items are stable, so that they do not accidentally topple
and break during the wash.
Any flimsy or light plastic items should be either weighted down or placed on the cup
racks or in the cutlery tray.
Ensure there are no dishware items that will stop the spray arms from rotating.
Overcrowded loading which can result
to wash water not reaching some of the
dinnerware.
Cups, glasses and bowls must have
their openings facing down.
The plates are nesting together and wash
water may not get through.
Ensure cutlery and utensils are not
nesting or stuck together. Theyneed to
be evenly spread out.
Ensure large utensils are not jammed
against the door as this may stop the
detergent dispenser from opening.
16
Page 19
LOADING ADVICE
The large mug below is blocking
wash water reaching the mug on the
cuprack.
Handle of knife is blocking the
dispenser door from opening.
Locate sharp items so that they are not
likely to injure the user or damage the
door seal.
Sharp or pointed items must be placed
horizontally or with sharp edges/points
facing down to avoid risk of injury.
Maximum plate height is 260mm.
Ensure cutlery has not fallen through
the base rack and stopped the spray
arms from rotating.
Large utensils should be placed on
the foldaway cup racks so they do not
become dislodged and stop the spray
arms from rotating.
Check the bottom of the cutlery basket
to ensure sharp or pointed items have
not come through as they may stop
spray arm rotation.
EN
17
Page 20

WATER HARDNESS AND DISHWASHING
What is water hardness?
Hard water is water with a high concentration of minerals such as calcium and
magnesium. In soft water, this concentration is low. Water hardness varies by
geographical location.
How does water hardness affect dishwashing?
Hard water can be detrimental to the performance of your dishwasher.
Overtime,glassware washed in hard water will become opaque and dishes will
becomespotted or covered in a white film. Using very hard water can cause dishwasher
parts to fail over time.
Naturally soft or softened water has no detrimental effects if used with the correct
amount of detergent. However, excess detergent combined with hot, soft water may
cause irreversible etching on glassware. Etching first appears as a rainbow-coloured film
and—if allowed to continue—can make glassware permanently opaque.
What can I do to minimise any detrimental effects?
Contact your local water company to find out about water hardness in your area.
If your home has hard water …
Increase the amount of detergent used.
Use a detergent with high phosphate content. Phosphate softens the water and
thisimproves wash results. You could also try using multi-purpose tablets.
Use rinse aid. We recommend you turn the rinse aid on and to at least setting 5
tohelpimprove wash performance.
Use a dishwasher cleaner/descaler regularly, or whenever you notice a build-up
oflimescale deposits in your dishwasher.
IMPORTANT!
We recommend fitting a water softener to the household water supply.
If the water hardness in your home is above 250 ppm/14.6 gpg, a water softener
hasto be fitted to maintain the performance of your dishwasher.
If your home has naturally soft water or a water softener fitted
Avoid using too much detergent. Follow the quantity recommendations on the
following page.
Ensure the dishwasher is not overloaded and water can reach all the dishes.
18
Page 21
WASH PROGRAMMES AND DETERGENT QUANTITIES
The quantities in the table below are for powdered detergent and typical levels of
soiling. If your home has softer or harder water, or to suit the particular load, you may
need to adjust these quantities.
If you are using tablets, follow the tablet manufacturer’s recommendations.
The indicator light will show which option has been selected.
For pre-wash place detergent in recess on top of the closed dispenser.
QUANTITY OF POWDERED DETERGENT
FOR EACH COMPARTMENT (GRAMS)
Main Wash Pre-Wash
PROGRAMME RECOMMENDED LOAD
Auto Thedishwasher
automatically selects the
optimum washprogramme
Heavy Heavily soiled pots, pans,
baking dishes
Medium Dishes that are quite
heavily soiled or food soils
that have been left to dry
overnight
Eco Normally soiled dishes
for optimum energy and
waterusage
Note: Eco was used to rate
energy efficiency of this
diswasher.
Fast Very lightly soiled
mixeddishes
Delicate Lightly soiled delicate
(egheat-sensitive) items
Rinse Prevents odours and soils
drying on dishes before
they are washed
20 – 35 g
depending
on soils
35 g 5 g
35 g 5 g
25 – 30 g 5 g
20 g none
20 g none
none none
none
EN
19
Page 22
ADDING DETERGENT
IMPORTANT!
Only use detergents recommended for automatic dishwashers.
Dishwasher detergents are strongly alkaline. They can be extremely dangerous
ifswallowed. Avoid contact with the skin and eyes and keep children and infirm
persons away from the dishwasher when it is open. Check that the detergent
dispenser is empty after completion of each wash programme.
Never sprinkle or pour detergent directly onto any item in the dishwasher.
Detergentand dishwasher tablets should not be in direct contact with dishes
orcutlery.
Do not use hand washing liquids, soap, laundry detergents or disinfectants,
asthesewill damage the dishwasher.
Filling the detergent dispenser
Add detergent or tablet into the detergent dispenser. If you are using powdered
1
detergent, see the recommended quantities on the previous page. The ‘15’ and ‘25’
markings in the main wash compartment correspond to grams of powdered detergent.
Remove any excess detergent from the edges of the dispenser.
2
Slide the cover to shut. It will click into place. The detergent will automatically be
3
released into the dishwasher during the wash programme.
IMPORTANT!
Take care when opening the dispenser to prevent the cover snapping open on
your fingers.
Rinse aid compartment
Pre-wash compartment
Main wash compartment
20
Open the cover here
Page 23

USING RINSE AID
C6 Dishwasher
We highly recommend using liquid rinse aid regularly to get the best drying results.
Rinse aid gives a streak-free, sparkling clean look to glass and chinaware. In addition,
it prevents metal from tarnishing.
When to refill the rinse aid dispenser
When rinse aid level becomes low, the rinse aid
indicator on the control panel will light up to remind
you to refill the dispenser.
Adjusting the rinse aid dosage
The normal, factory-set dosage level is 5, but you
may need to adjust this to suit your water conditions.
If there is excessive foaming at the end of the wash,
reduce the dosage.
If you live in a hard water area or if dishes are wet or
streaky after drying, increase the dosage.
To adjust the rinse aid setting: see ‘User preference
settings’ for how to do this.
If you are using tablets with built-in rinse aid, we
recommend setting the rinse aid dosage level to
off(rA-).
EN
How to refill the rinse aid dispenser
Pull the rinse aid dispenser cover open using the endtab.
1
Pour rinse aid into the rectangular opening, making sure
2
Rinse aid indicator
(on control panel)
not to fill beyond theMAXmarking.
IMPORTANT!
Take care not to spill rinse aid into the dishwasher. Any spills must be wiped up to
prevent excess foaming. Failure to do so may result in a service call, which will not be
covered by warranty.
Close the cover, making sure it clicks shut.
3
Fill opening
End tab
21
Page 24

AFTER THE WASH
When the wash programme is over, the dishwasher will beep six times, then
automatically turn off in a few seconds.
Open the door slightly and leave it ajar (about 100mm) to help the drying process.
1
Once the dishes are cool to touch, they can be removed.
2
IMPORTANT!
Never leave the dishwasher door in the fully open position, as this could present
a tripping hazard.
Check that the detergent dispenser is completely empty. If it isn’t, wipe out with
3
a damp cloth.
Inspect your dishwasher regularly to see if it needs any cleaning or maintenance:
4
– Check that no grease or limescale deposits have accumulated on the inside.
– If there are food particles in the filters, these need to be cleaned as well.
– See section ‘Care and cleaning’ for cleaning and maintenance instructions.
Holiday time
If the dishwasher is not going to be used for some time:
Ensure the baskets are empty.
Leave the inside of the dishwasher clean.
Leave the dishwasher door ajar to allow air to circulate.
Turn off both the power and water supply to the dishwasher.
Winterizing (cold climates only)
Disconnect the dishwasher from the power supply,
1
Turn off the water supply and disconnect the water inlet pipe from the water valve.
2
Drain water from the inlet pipe and water valve, using a bucket or pan to collect
3
the water.
Reconnnect the water inlet pipe to the water valve.
4
Remove the drain filter and the filter plate from the bottom of the dishwasher and
5
useasponge to remove any remaining water in the drain.
Replace the drain filter and the filter plate, and completely dry all water from inside
6
the dishwasher.
Disconnect the drain hose from the sink drain pipe and completely drain all remaining
7
water from the hose. Reconnect the drain hose to the sink drain pipe.
22
Page 25

CARE AND CLEANING
Over time, food residue or limescale deposits may accumulate inside your dishwasher.
These may reduce efficiency, and food residue may produce a bad odour. Inspect and
clean your dishwasher regularly.
IMPORTANT!
Before any cleaning or maintenance, always disconnect the dishwasher from the
power supply, turn off the water supply, and wait until all parts of the dishwasher
have cooled.
Do not use the following cleaning aids, as they may damage the surfaces:
– plastic or stainless steel scouring pads
– abrasive, solvent, household cleaners
– acid or alkaline cleaners
– laundry detergents or disinfectants
– stainless steel cleaners or polishes
– hand-washing liquids or soap
Where there is broken crockery or glass in the dishwasher, it must be carefully
removed to prevent personal injury or damage to the appliance.
After cleaning, always check that the spray arms and filters are all correctly in place.
EN
23
Page 26

CARE AND CLEANING
Cleaning the dishwasher exterior
To clean exterior surfaces of the dishwasher, wipe with a clean, soft damp cloth and dry
with a clean, lint-free cloth.
For non-flush surfaces wipe along or around the surface, eg to wipe down the exterior
control buttons, use a circular wiping motion around the button.
Take care not to cause excessive wetting of the control panel area.
Note: before cleaning the control panel, it is useful to disable the buttons by
activatingKeylock.
Cleaning the door seal and dishwasher interior
Clean thoroughly with warm water on a soft, lint-free cloth. If the interior is heavily
soiled, use a dishwasher cleaner/descaler following the manufacturer’s instructions.
Cleaning the filters
The filters prevent larger food particles in the wash water from reaching the pump.
These particles may occasionally block the filters. We recommend cleaning the filters
whenever there is evidence of food particles.
To remove the drain filter, turn the filter anti-clockwise to release, then lift out.
Once the drain filter has been removed you can lift the filter plate out.
Rinse them thoroughly under running water and then replace.
IMPORTANT!
When cleaning the underside of the filter plate, take care handling its sharp outer edge.
Replace the filters correctly after cleaning, making sure the filter plate is flush with the
dishwasher base.
Drain filter
Filter plate
24
Page 27

CARE AND CLEANING
Cleaning the spray arms
Limescale and food particles in the wash water can block the holes in the spray arms
and the arm mountings. Clean these parts about once a month, or more often should
the need arise.
Cleaning the upper spray arm/head
Do not remove the upper spray arm for cleaning. Clean with a small plastic-bristled
brush, or if heavily soiled or blocked use a dishwasher cleaner/descaler following the
manufacturer’s instructions.
Cleaning the centre spray arm
To remove the centre spray arm, carefully unscrew its locking nut.
Rinse the spray arm thoroughly under running water, then refit.
IMPORTANT!
Make sure you twist the locking nut on the centre spray arm firmly back on the water
supply tube.
Check that the centre spray arm is firmly locked in place and rotates freely.
EN
Water supply tube
Locking nut
Centre spray arm
Cleaning the lower spray arm
To remove the lower spray arm, simply lift the spray arm off its mounting.
Rinse the spray arm thoroughly under running water, then refit it on its mounting.
Lower spray arm
25
Page 28

FAULT CODES
If the dishwasher malfunctions, it will display a fault code and beep.
Check the following table below to see if you can correct the fault yourself.
FAULT
CODES AND
DESCRIPTIONS
A20
Drain fault
POSSIBLE CAUSES WHAT TO DO
Drain hose is crimped
or bent.
The waste water is
notdraining out.
The turbidity
sensor is dirty and
requirescleaning.
Check the drain hose and straighten
ifneeded.
Ensure that the drain hose is connected in
accordance with the installation instructions.
Gently clean the turbidity sensor with a soft
brush (ie toothbrush) to remove any buildup.
Turbidity sensor
A10
No water
26
Water tap not
turnedon.
Insufficient water
supply pressure.
Water inlet hose is
crimped or bent, sono
or not enough water
gets to the dishwasher.
Drain hose is not
connected correctly.
Ensure the water is connected and turned on.
Touch to restart the dishwasher.
Check household water pressure.
Check the water inlet hose and straighten if
needed. Touch
Ensure that the drain hose is connected in
accordance with the installation instructions.
to restart the dishwasher.
Page 29

FAULT
CODES AND
DESCRIPTIONS
F30
Flooding
FAULT CODES
POSSIBLE CAUSES WHAT TO DO
Flood switch activated Turn the dishwasher OFF and ON again.
Iffault persists, turn water off and
disconnect the dishwasher from the power
supply. CallCustomer Care.
EN
F40
F50
A60
A70
Temperature sensing
A80
Turbidity sensing
F90
(DW24U6I only)
FA0
FCO
(DW24U6I only)
If the dishwasher still will not work, or if it displays a fault code not listed here
Touch twice to clear the fault.
1
Touch and hold again to turn the dishwasher off and wait a few minutes.
2
Open door to turn the dishwasher back on.
3
Water flow error Switch dishwasher OFF and ON again.
Iffault persists call Customer Care.
Electronics error Switch dishwasher OFF and ON again.
Iffault persists call Customer Care.
Water temperature
error
Alarm error Switch OFF and ON again.
Alarm error Switch OFF and ON again.
Data/electronics error Switch dishwasher OFF and ON again.
Electronics/power
supply error
Motor fault Switch dishwasher OFF at the power supply.
Switch dishwasher OFF and ON again.
Iffault persists call Customer Care.
If fault persists call Customer Care.
If fault persists call Customer Care.
Iffault persists call Customer Care.
Switch dishwasher OFF and ON again.
Iffault persists call Customer Care.
Wait a few moments and switch ON again.
If fault persists, turn water off and disconnect
from the power supply. CallCustomer Care.
If the dishwasher still does not function and/or the problem persists, disconnect
the dishwasher from the power supply, turn the water supply off, then contact
Fisher&Paykel Customer Care with the fault code information.
27
Page 30

TROUBLESHOOTING
PROBLEM POSSIBLE CAUSE WHAT TO DO
Dishwasher will
not start
Lower spray
arm rotates
with difficulty
Cover of
detergent
dispenser
cannot be
closed
Remnants
of detergent
stuck inside
dispenser
Water
remains inside
dishwasher
after wash
hasended
Foaming Incorrect amount or type of
No power. Ensure the dishwasher is plugged in
and the power supply is turned on at
the wall.
The door is not properly closed.
Water tap not turned on. Ensure water is connected and
Blocked strainer in water
inlethose.
Spray arm holes are blocked by
small items or food particles.
Detergent compartment has
been overfilled.
Detergent dispenser is clogged
with remnants of detergent.
Compartment was damp when
filled with detergent.
Utensils are blocking the
detergent dispenser
from opening.
Drain hose is crimped, bent, or
blocked.
Pump is jammed. Call your Fisher&Paykel Authorised
Filter(s) blocked. Clean the filter(s). See ‘Care and
detergent used.
Too much egg in the wash load. Increase the amount of detergent.
Close the door.
turned on.
Check the strainer and clean if
necessary—it is located where the
water inlet hose screws into the tap.
Clean the spray arm. See ‘Care and
cleaning’ for instructions.
Remove detergent until the cover
can be closed.
Wipe dispenser out with a damp
cloth. Dry the dispenser before
adding detergent.
Wipe dispenser out with a damp
cloth. Dry the dispenser before
adding detergent.
Ensure there are no large utensils
positioned in a way that will stop the
dispenser cover from opening when
the dishwasher door is closed.
Check the drain hose and straighten
if needed.
Service Centre or Customer Care.
cleaning’ for instructions.
See section ‘Adding detergent’ or
consult the detergent manufacturer’s
instructions.
Display shows
the letters F, L,
P, C or S
28
Rinse aid dosage level too high. Decrease the rinse aid dosage.
Rinse aid spills not wiped up. Ensure that all rinse aid spills are
wiped up when they occur.
Dishwasher is in
TechnicianMode.
Touch and hold
If the Dishwasher remains in
Technician Mode call Customer Care.
to exit.
Page 31

TROUBLESHOOTING
PROBLEM POSSIBLE CAUSE WHAT TO DO
The dishwasher
stops suddenly
during the wash
Knocking or
rattling sound
during wash
Unclean dishes Wash programme
Plastic items
are discoloured
(eg stain left by
tomato sauce)
Power or water supply
has been interrupted.
Spray arm knocking
against dishes.
Dishes have been
stackedincorrectly.
unsuitable for load.
Soils were too heavily
baked on.
Spray arm(s) unable
torotate.
Dishwasher overloaded or
incorrectly loaded.
The filters are incorrectly
inserted.
Detergent put in the
wrong compartment.
Excessive food not
removed from dishes
before loading.
Unsuitable detergent. Only use powdered or tablet detergent
Not enough detergent. See ‘Wash programmes and detergent
Spray arm holes are
blocked.
The filters are blocked. Clean the filters. See ‘Care and cleaning’
Not enough detergent,
not pre-rinsed.
Check the power and water supplies.
Pause the wash and rearrange dishes.
See sections ‘Controls and starting a
wash’ and ‘Loading’.
See section ‘Wash programmes and
detergent quantities’ and select a
suitable programme.
Dishes may need soaking.
Ensure no items are obstructing the
spray arm path.
See the ‘Loading’ section.
See section ‘Care and cleaning’.
See sections ‘Wash programmes and
detergent quantities’ and ‘Adding
detergent’.
Scrape all food scraps off dishes before
loading.
designed for domestic dishwashers.
quantities’ for recommended quantities.
You may need to adjust these to suit
your particular load and the hardness of
your water supply.
Clean the spray arm(s). See ‘Care and
cleaning’ for instructions.
for instructions.
Pre-rinse plastic dishes before placing in
the dishwasher and/or add moredetergent.
Alternatively, using the Rinse programme
after adding dishes may minimisestaining.
EN
29
Page 32

TROUBLESHOOTING
PROBLEM POSSIBLE CAUSE WHAT TO DO
White stains are
left on dishes;
glasses have a
milky appearance
Dishes, cutlery
have not dried
Glasses have dull
appearance
Tea stains or
traces of lipstick
have not been
completely
removed
Not enough detergent. See section ‘Wash programmes and
detergent quantities’ for recommended
quantities. You may need to adjust these
to suit the hardness of your watersupply.
Rinse aid dosage
toolow.
Rinse aid dosage
toolow.
Items removed
toosoon.
Rinse aid dispenser
empty. (The rinse aid
indicators are lit.)
Rinse aid dosage
toolow.
Not enough detergent. See section ‘Wash programmes and
Wash temperature
toolow.
Increase rinse aid dosage.
See ‘Using rinse aid’.
Increase rinse aid dosage.
See ‘Using rinse aid’.
After the end of the wash programme,
leave the door ajar and wait for several
minutes to help drying.
Add rinse aid.
See section ‘Using rinse aid’ for instructions.
Increase rinse aid dosage.
See ‘Using rinse aid’.
detergent quantities’ for recommended
quantities. You may need to adjust these
to suit your particular load.
Select a wash programme with a
higher temperature. See section ‘Wash
programme data’ for information.
Traces of rust on
cutlery
Glasses clouded
and discoloured;
milky coating
Water marks left
on glasses and
cutlery
Hard water Increase the rinse aid setting and the
30
Cutlery is not
sufficiently rustproof
Hard water situation. Increase detergent quantities.
Glasses are not
dishwasher proof.
Rinse aid level or
dosage setting is
toolow.
Wash by hand.
Wash by hand.
Ensure there is rinse aid in dispenser.
Ifnecessary, increase the rinse aid setting
or try using a wash programme with a
higher temperature. See sections ‘Using
rinse aid’ and ‘Wash programme data’.
amount of detergent. See section ‘Water
hardness and dishwashing’.
If living in an area with very hard
water, consult a plumber on installing a
household water softener.
Page 33

WASH PROGRAMME DATA
DW24U2I1
AUTO MEDIUM ECO* FA ST HEAVY DELICATE RINSE
pre-wash pre-wash pre-wash pre-wash
main wash
113 – 154°F
post-rinse post-rinse post-rinse post-rinse post-rinse post-rinse
Stages
final rinse
158°F
drying drying drying drying drying drying
DW24U6I1
AUTO MEDIUM ECO* FAST HEAVY DELICATE RINSE
pre-wash pre-wash pre-wash rinse
main wash
113 – 154°F
post-rinse post-rinse post-rinse post-rinse post-rinse post-rinse
Stages
final rinse
158°F
drying drying drying drying drying drying
main wash
140°F
final rinse
158°F
main wash
140°F
final rinse
158°F
main wash
111°F
final rinse
124°F
main wash
111°F
main wash
124°F
main wash
113°F
final rinse
131°F
main wash
113°F
final rinse
122°F
main wash
154°F
final rinse
158°F
main wash
154°F
final rinse
158°F
main wash
113°F
final rinse
131°F
main wash
113°F
final rinse
122°F
EN
113°F
113°F
* Reference program for energy label compliance with IO CFR part 430 and CAN/CSA-C373 Regulations. The
entering water should be 120°F.
31
Page 34

LOADING THE DISHWASHER
Loading examples
Loading for 14 standard place settings with cutlery tray.
Middle basket
Lower basket
Cutlery tray
32
Page 35

LOADING THE DISHWASHER
Loading examples
Loading for 12 standard place settings with cutlery basket.
Middle basket
Lower basket
Cutlery basket
33
Page 36

WARRANTY AND SERVICE
Before you call for service or assistance:
Check the things you can do yourself. Refer to the Installation guide and your
Userguide and check that:
Your product is correctly installed.
1
You are familiar with its normal operation.
2
If after checking these points you still need assistance or parts, refer to the
Service&Warranty book for warranty details and your nearest Authorised Service
Centre, Customer Care, or contact us through our website fisherpaykel.com.
Complete and keep for safe reference:
Model _____________________________________________________________
Serial No. _____________________________________________________________
Purchase Date _____________________________________________________________
Purchaser _____________________________________________________________
Dealer _____________________________________________________________
Suburb _____________________________________________________________
Town _____________________________________________________________
Country
34
______________________________________________________
Page 37

Page 38

Page 39

TABLE DES MATIÈRES
Introduction 39
Consignes de sécurité et mises en garde 40
Instructions d’utilisation 43
Entretien de votre vaisselle 51
Conseils de chargement 52
Dureté de l’eau et lavage de la vaisselle 54
Programmes de lavage et quantités de détergent 55
Ajout de détergent 56
Utilisation d’un produit de rinçage 57
Après le lavage 58
Entretien et nettoyage 59
Codes d’erreur 62
Dépannage 64
Données de programme de lavage 69
Garantie et Service 72
FR
IMPORTANT!
CONSERVEZ CES INSTRUCTIONS
Les modèles illustrés dans ce guide d’utilisation peuvent ne pas être disponibles dans tous
les pays et sont sujets à modifications sans préavis. Pour les plus récentes informations sur
la disponibilité des modèles et des caractéristiques dans votre pays, visitez notre site Web
fisherpaykel.com ou contactez votre détaillant Fisher&Paykel local.
37
Page 40

Page 41

INTRODUCTION
Ce guide d’utilisation accompagne le ‘Guide de démarrage rapide’ fourni avec
votre lave-vaisselle.
Pour les instructions d’utilisation, consultez votre ‘Guide de démarrage rapide’.
En cas de perte de votre ‘Guide de démarrage rapide’, vous pouvez le télécharger
àpartir de notre site Web local, à l’adresse indiquée sur la couverture arrière.
Reportez-vous au ‘Guide de démarrage rapide’ pour obtenir des informations sur:
Le démarrage d’un lavage
Les programmes de lavage et les situations dans lesquelles vous devez les utiliser
Les commandes
Les caractéristiques de la grille.
FR
39
Page 42

CONSIGNES DE SÉCURITÉ ET MISES EN GARDE
!
MISE EN GARDE!
Risque de choc électrique
Lisez et observez les consignes de sécurité et mises en garde contenues
dans ce guide d’utilisation avant d’utiliser cet appareil.
Le fait de ne pas respecter ces consignes peut causer la mort, un choc
électrique, un incendie ou des blessures.
Utilisez uniquement cet appareil aux fins pour lesquelles il a été conçu, comme le
stipule le guide d’utilisation.
CONSIGNES DE SÉCURITÉ IMPORTANTES
MISE EN GARDE!
Lors de l’utilisation de votre lave-vaisselle, veuillez suivre les consignes de sécurité
debase, notamment:
Lisez toutes les instructions avant d’utiliser le lave-vaisselle.
Il importe de suivre les directives comprises dans le présent manuel afin de réduire
lerisque d’incendie ou d’explosion, ou prévenir tout dommage matériel, toute
blessure ou toute perte de vie.
Utilisez le lave-vaisselle uniquement aux fins prévues dans ce guide d’utilisation.
Cet appareil est conçu pour une utilisation domestique et d’autres applications
semblables, telles que:
– espace de cuisine pour le personnel dans les ateliers, bureaux et autres
environnements de travail;
– maisons de ferme;
– utilisation par les clients dans les hôtels, motels et autres environnements
detype résidentiel;
– environnements de type gîte touristique (‘bed and breakfast’).
Les lave-vaisselle résidentiels certifiés NSF 184 ne sont pas conçus pour les
établissements alimentaires titulaires d’une licence.
Utilisez uniquement des détergents ou produits de rinçage recommandés pour
leslave-vaisselle domestiques et veillez à les garder hors de la portée des enfants.
Veillez à ce que le distributeur de détergent soit vide à la fin de chaque programme
de lavage.
Lors du chargement des articles à laver, placez les articles tranchants de manière à ce
qu’ils ne risquent pas d’endommager le lave-vaisselle et placez les couteaux tranchants
avec le manche vers le haut pour réduire le risque de blessure ou de coupure.
Ne lavez pas d’articles en plastique qui ne comportent pas une mention « lavable
au lave-vaisselle » ou l’équivalent. Pour les articles en plastique sans cette mention,
vérifiez les recommandations du fabricant.
Ne touchez pas à la plaque de filtration (le disque métallique dans la base du lave-vaisselle)
pendant l’utilisation ou immédiatement après, car elle peut conduire la chaleur du
plateau chauffant situé en dessous.
Ne modifiez pas les commandes de réglage.
Ne vous assoyez ou ne montez pas sur la porte ou la grille à vaisselle du lave-vaisselle
et ne les utilisez jamais de façon abusive.
N’utilisez pas les grilles ajustables pour vous appuyer ou soutenir votre poids corporel.
Pour réduire le risque de blessure, ne permettez pas aux enfants de jouer à l’intérieur
du lave-vaisselle, ni sur celui-ci.
Dans certaines conditions, il est possible qu’un système de chauffe-eau produise de
l’hydrogène s’il n’est pas utilisé pendant deux semaines ou plus. L’HYDROGÈNE EST UN
40
Page 43

CONSIGNES DE SÉCURITÉ ET MISES EN GARDE
GAZ EXPLOSIF. Si le système d’eau chaude n’a pas été utilisé durant deux semaines
ou plus, ouvrez tous les robinets d’eau chaude et laissez l’eau s’écouler de chacun
d’eux pendant plusieurs minutes avant d’utiliser le lave-vaisselle. Ceci permettra de
libérer tout l’hydrogène accumulé. Comme le gaz est inflammable, veillez à ne pas
fumer ni utiliser une flamme nue pendant ce temps.
Retirez la porte du compartiment de lavage au moment de vous départir de votre
ancien lave-vaisselle ou de mettre celui-ci au rebut.
Certains détergents pour lave-vaisselle sont très alcalins. Il peut être extrêmement
dangereux de les avaler. Évitez tout contact avec la peau et les yeux et éloignez
lesenfants du lave-vaisselle lorsque la porte est ouverte. Veillez à ce que le récipient
à détergent soit vide à la fin du cycle de lavage.
INSTALLATION
Ce lave-vaisselle doit être installé et positionné conformément aux instructions
d’installation avant d’être utilisé. Si vous n’avez pas reçu les instructions
d’installationavec votre lave-vaisselle, vous pouvez les commander en appelant un
réparateur autorisé ou les télécharger à partir de notre site Web Fisher&Paykel local,
à l’adresse indiquée sur la couverture arrière.
L’installation et l’entretien doivent être effectués par un technicien qualifié.
Si le cordon d’alimentation est endommagé, vous devez le faire remplacer par
un détaillant, un réparateur autorisé ou une personne de métier possédant des
compétences similaires afin d’éviter tout danger.
Veillez à ce que le lave-vaisselle soit solidement fixé aux armoires adjacentes à l’aide
des pièces de fixation fournies pour éviter qu’il soit instable et puisse causer des
dommages ou des blessures.
Ne faites pas fonctionner cet appareil s’il est endommagé, s’il ne fonctionne pas
correctement, s’il est partiellement démonté, si des pièces sont brisées ou détachées
ou si la fiche ou le cordon d’alimentation est endommagé.
N’entreposez ou n’utilisez pas d’essence ou d’autres liquides ou vapeurs inflammables
à proximité du lave-vaisselle.
Branchez l’appareil à un circuit d’alimentation électrique correctement homologué,
protégé et calibré pour éviter toute surcharge électrique.
Installez le cordon d’alimentation de façon à ce qu’il ne puisse pas se faire écraser,
causer une chute ou subir des tensions ou dommages.
N’installez ou n’entreposez pas le lave-vaisselle à un endroit où il serait exposé à des
températures sous le point de congélation ou des intempéries.
N’utilisez pas de rallonge électrique ou d’appareil avec prise électrique portatif (comme
un boîtier à prises multiples) pour brancher le lave-vaisselle à l’alimentation électrique.
FR
MISE EN GARDE!
Le raccordement inadéquat du conducteur de mise à la terre de cet appareil peut
entraîner un risque de choc électrique.
Contactez un électricien ou un représentant de service qualifié si vous n’êtes pas
certain que l’appareil est correctement mis à la terre.
Ne modifiez pas la fiche fournie avec l’appareil; si vous ne parvenez pas à l’insérer
dans la prise électrique, faites installer une prise adéquate par un technicien qualifié.
MISE À LA TERRE
Cet appareil doit être mis à la terre. En cas de bris ou de problème de
fonctionnement, la mise à la terre réduit les risques d’électrocution en offrant un
trajetde moindre résistance au courant électrique.
Cet appareil est équipé d’un cordon d’alimentation muni d’un conducteur et d’une
fiche avec mise à la terre. Cette fiche doit être branchée dans une prise correctement
installée et mise à la terre en respectant tous les codes et règlements locaux.
41
Page 44

CONSIGNES DE SÉCURITÉ ET MISES EN GARDE
Si le lave-vaisselle est installé pour être branché en permanence:
Cet appareil doit être relié à un système de câblage métallique permanent mis
à la terre, ou un conducteur de mise à la terre d’équipement doit accompagner
les conducteurs de circuit et être raccordé à la borne ou au fil de mise à la terre
d’équipement sur l’appareil.
ENTRETIEN
Débranchez l’appareil de la prise de courant avant de procéder au nettoyage ou
àl’entretien.
Lors du débranchement de l’appareil, tirez sur la fiche plutôt que sur le cordon
d’alimentation ou la jonction du cordon pour éviter de l’endommager.
Ne réparez ou ne remplacez aucune des pièces de l’appareil et n’effectuez aucun
entretien qui n’est pas recommandé expressément dans ce guide d’utilisation.
Nous vous conseillons de contacter le service à la clientèle pour prévoir une réparation.
Consultez le manuel d’entretien et de garantie pour obtenir les coordonnées.
Veillez à ce que le plancher autour de votre appareil soit propre et sec pour réduire
les risques de chute.
Évitez l’accumulation de matières combustibles telles que la mousse, le papier,
leschiffons et les produits chimiques autour de l’appareil et sous celui-ci.
FONCTIONNEMENT
N’ouvrez pas le lave-vaisselle pendant qu’il fonctionne. Il y a un risque d’être aspergé
d’eau chaude. N’ouvrez pas entièrement la porte avant que les bras gicleurs aient
cessé de tourner.
Ne laissez pas la porte ouverte, car elle pourrait vous faire trébucher.
L’eau à l’intérieur du lave-vaisselle n’est pas potable.
Le lave-vaisselle doit être utilisé avec la plaque de filtration, le filtre de vidange
etle(s) bras gicleur(s) installés. Pour identifier ces pièces, reportez-vous aux
illustrations de la section ‘Entretien et nettoyage’ de ce guide d’utilisation.
Ne faites pas fonctionner ce lave-vaisselle s’il est endommagé, s’il ne fonctionne
pascorrectement, s’il est partiellement démonté, si des pièces sont brisées ou
détachées ou si la fiche ou le cordon d’alimentation est endommagé.
Les appareils électroménagers ne sont pas conçus pour servir de jouets.
Les enfants de moins de 8ans doivent être tenus à distance de l’appareil, à moins
qu’ils ne soient continuellement supervisés. Cet appareil peut être utilisé par des
enfants d’au moins 8ans et des personnes aux capacités physiques, sensorielles ou
mentales réduites, ou encore ne possédant pas l’expérience et les connaissances
requises, s’ils sont supervisés ou ont reçu des instructions concernant l’utilisation de
l’appareil d’une manière sécuritaire et s’ils comprennent bien les dangers potentiels.
Le nettoyage et l’entretien par l’utilisateur ne doivent pas être effectués par des
enfants sans supervision.
Ne permettez pas aux enfants de jouer sur, dans ou avec l’appareil, ni avec un
quelconque appareil mis au rebut.
Pour éviter de causer des dommages au lave-vaisselle, nous vous recommandons
vivement d’exécuter un programme de lavage avec détergent immédiatement
aprèschaque utilisation d’un agent nettoyant pour lave-vaisselle.
Le lave-vaisselle est conçu pour laver des ustensiles de cuisine normaux.
Les articles contaminés par de l’essence, de la peinture, des débris de fer ou d’acier,
de la corrosion ou des produits chimiques acides ou alcalins ne doivent pas être
lavésdans le lave-vaisselle.
Lorsque le lave-vaisselle n’est pas utilisé pendant de longues périodes, coupez
l’alimentation en eau et en électricité de l’appareil.
42
Page 45

INSTRUCTIONS D’UTILISATION
Commandes et démarrage d’un lavage
Démarrer un programme de lavage
Ouvrez la porte pour mettre en MARCHE le lave-vaisselle.
1
– L’afficheur indiquera la durée du programme de lavage.
Sélectionnez le programme de lavage souhaité sur le panneau de commande
2
du lave-vaisselle.
– Le cycle Eco est sélectionné par défaut lors de la mise en marche initiale
du lave-vaisselle.
– Après le premier lavage, le lave-vaisselle mémorisera le dernier programme utilisé.
Sélectionnez une option de modification de lavage (pour modèles DW24U6I uniquement).
3
Le voyant de l’option de modification de lavage sélectionnée s’allumera (consultez
‘Sélection des options de modification de lavage’).
Appuyez et fermez la porte pour démarrer le programme de lavage.
4
Mettre en pause et redémarrer un programme de lavage
Ouvrez doucement la porte pour mettre en pause le programme. La durée restante
1
clignote et le bip de mise en pause retentit pendant que le lave-vaisselle est mis
enpause.
IMPORTANT!
Il y a un risque d’être aspergé d’eau chaude. N’ouvrez pas entièrement la porte
avantque les bras gicleurs aient cessé de tourner.
Chargez, retirez ou redisposez des articles de vaisselle, si nécessaire.
2
Appuyez sur la touche de démarrage et fermez la porte dans un délai de 4 secondes
3
pour redémarrer le programme.
Appuyez sur la touche de démarrage et fermez la porte dans un délai de 4 secondes
4
pour redémarrer le programme.
Si le lave-vaisselle n’est pas redémarré dans les 7minutes, il émettra un bip jusqu’à
ceque le cycle soit redémarré.
FR
Annuler ou modifier un programme de lavage
Ouvrez doucement la porte pour mettre en pause le programme.
1
Touchez de manière prolongée à pour annuler le programme.
2
Touchez à n’importe quelle touche pour remettre en marche le lave-vaisselle,
3
puissuivezles étapes de la section ‘Démarrer un programme de lavage’ ci-dessus.
43
Page 46

INSTRUCTIONS D’UTILISATION
Réglage de la mise en marche différée
Cette fonction permet de retarder le démarrage d’un programme de lavage de 1 à
12heures.
Chargez la vaisselle, ajoutez le détergent et fermez la porte.
1
Ouvrez la porte pour mettre en marche le lave-vaisselle.
2
Vérifiez que l’afficheur indique le programme de lavage requis.
3
Si ce n’est pas le cas, consultez les instructions de la section ‘Modifier un programme
delavage’.
touchez de manière prolongée
Touchez de manière prolongée à
4
– Le voyant de ‘Mise en marche différée’ s’allumera et l’afficheur indiquera
ledélai(heures).
Touchez de nouveau à pour augmenter le nombre d’heures souhaité pour la mise
5
enmarche différée (1 à 12h, par intervalles d’une heure).
Remarque: Faites défiler au-delà de 12heures pour quitter la ‘Mise en marche différée’.
Maintenez enfoncée pour démarrer la mise en marche différée. L’afficheur effectuera
6
le compte àrebours en heures.
Le programme de lavage démarrera automatiquement lorsque le délai sera écoulé.
– Le voyant de ‘Mise en marche différée’ s’allume lorsque la ‘Mise en marche différée’
commence le compte à rebours.
– Si la porte est ouverte lorsque le compte à rebours est terminé, le lave-vaisselle
émetun bip et l’afficheur clignote. Après 7secondes, le lave-vaisselle s’éteindra.
Annuler la mise en marche différée
Touchez
nouveau sur la touche de démarrage pour annuler la mise en marche différée.
44
jusqu’à ce que l’heure de mise en marche différée soit 12 h, puis appuyez de
Page 47

INSTRUCTIONS D’UTILISATION
Réglage des options de modification de lavage (modèles DW24U6I uniquement)
En plus du réglage de programme de lavage, vous pouvez sélectionner l’une des
options supplémentaires suivantes:
Extra dry (Extra sec): Augmente la température de lavage et la durée de la phase
deséchage pour améliorer l’efficacité du séchage. Cette option s’avère particulièrement
utile pour les articles en plastique.
Quick (Rapide): Utilise une plus grande quantité d’eau et d’énergie afin de permettre
untemps de lavage plus rapide, sans nuire à la qualité du lavage.
Sanitize (Désinfection): Augmente la température de l’eau pendant la phase de
rinçageafin de désinfecter la vaisselle. Option idéale pour le lavage d’articles tels
queles biberons et les bocaux à conserves.
Régler une option de modification de lavage
Après la sélection de votre programme de lavage, touchez à l’option de modification
1
delavage souhaitée pour la sélectionner. Le voyant de l’option de modification
delavage s’allumera.
Touchez une fois à pour démarrer le lavage.
2
Fermez la porte.
3
FR
Remarque: plusieurs options de modification peuvent être sélectionnées, selon
lecyclesélectionné.
PROGRAMME DE LAVAGE OPTION DE MODIFICATION DISPONIBLE
Auto – – –
Medium (Moyen) Extra Dry
(Extra sec)
Quick
(Rapide)
Sanitize
(Désinfection)
Eco – – –
Fast (Rapide) Extra Dry
(Extra sec)
Heavy (Intensif) Extra Dry
(Extra sec)
Delicate (Délicat) Extra Dry
(Extra sec)
–
Quick
(Rapide)
Quick
(Rapide)
Sanitize
(Désinfection)
Sanitize
(Désinfection)
–
Rinse (Rinçage) – – –
Annuler l’option de modification de lavage
Touchez de nouveau à l’option de modification. Le voyant de l’option de modification
delavage s’éteindra.
45
Page 48

INSTRUCTIONS D’UTILISATION
Réglage des options de modification de lavage (modèles DW24U6I uniquement)
Utilisation de l’option de désinfection
L’option de désinfection permet au programme de lavage de répondre aux
conditions requises par la Section6, NSF184 pour effectuer la désinfection.
Pendant la désinfection, le programme de lavage est contrôlé afin d’assurer la
conformité à ces conditions.
IMPORTANT!
Pour effectuer la désinfection, la température de l’eau doit atteindre 700C/1580F.
Vérifiez que tous les articles sont lavables au lave-vaisselle avant d’utiliser
l’option de désinfection.
Si le lavage est interrompu ou l’alimentation en eau est fermée pendant le
cycle, les conditions de chauffage requises pour la désinfection pourraient ne
pas êtrerespectées. Vous pourriez avoir à exécuter de nouveau le cycle pour
assurerla désinfection de votre vaisselle.
Seuls les cycles utilisant l’option de modification de lavage de désinfection
sont conçus pour répondre aux conditions requises par la Section6,
NSF184. Les autres programmes de lavage pourraient ne pas atteindre les
températures requises pour effectuer la désinfection. Consultez le tableau
à la page précédentepour connaître les programmes de lavage avec option
dedésinfection.
À la fin d’un programme de lavage avec désinfection, vérifiez toujours l’afficheur
pour vous assurer que la désinfection s’est effectuée correctement.
Si la désinfection s’est effectuée correctement:
Le lave-vaisselle émettra des bips
apparaîtra dans l’afficheur
0
Après 30secondes, l’afficheur s’éteindra.
Si la désinfection ne s’est pas effectuée correctement:
Une alerte sera émise
Un code d’erreur apparaîtra dans l’afficheur
Le voyant de désinfection ne s’allumera pas.
46
Page 49

INSTRUCTIONS D’UTILISATION
Réglage de 1/2 charge (modèlesDW24U6Iuniquement)
Option de demi-charge
Si vous n’avez pas une charge complète de vaisselle à laver, vous pouvez choisir
l’option de 1/2charge. Cette option peut s’avérer utile si, par exemple, vous souhaitez
uniquement laver la vaisselle utilisée pour le déjeuner. La vaisselle ne doit alors
remplirque la moitié du lave-vaisselle, mais vous pouvez la placer dans les paniers
supérieur etinférieur.
Cette option est disponible avec ces programmes et options de modification de lavage:
PROGRAMME DE LAVAGE
DISPONIBLE AVEC 1/2CHARGE
Medium (Moyen) Extra Dry
Eco – –
Heavy (Intensif) Extra Dry
Delicate (Délicat) Extra Dry
Sélectionner la 1/2charge
Ouvrez la porte pour mettre en marche le lave-vaisselle.
1
Sélectionnez un programme de lavage, ainsi qu’une option de modification de lavage
2
(sinécessaire).
Touchez à l’option de demi-charge. Le voyant de demi-charge s’allumera.
3
OPTION DE MODIFICATION
DISPONIBLE AVEC 1/2CHARGE
Sanitize
(Extra sec)
(Désinfection)
Sanitize
(Extra sec)
(Désinfection)
(Extra sec)
–
FR
Annuler la 1/2charge
Touchez à l’option de demi-charge.
1
– Le voyant de demi-charge s’éteindra.
Remarque: Il n’est pas possible d’annuler l’option de 1/2charge pendant qu’un
programme de lavage est en cours.
47
Page 50

INSTRUCTIONS D’UTILISATION
Réglages de préférence de l’utilisateur
Ces réglages vous permettent de définir vos préférences:
Modifier le réglage du produit de rinçage et activer ou désactiver l’utilisation
duproduitde rinçage.
Activer ou désactiver les bips.
Allumer ou éteindre l’éclairage de la cavité (modèles DW24U6I uniquement)
Allumer ou éteindre l’éclairage au sol (modèles DW24U6I uniquement)
Modifier le réglage du produit de rinçage
Ouvrez la porte pour mettre en marche le lave-vaisselle.
1
Touchez de manière prolongée à et Rinse (Rinçage) jusqu’à ce qu’un bip soit
2
émispour accéder au menu de préférences de l’utilisateur. L’afficheur indiquera
leréglage duproduit de rinçage actuel.
– Rinse (Rinçage) clignote en mode d’options de préférence.
Touchez à pour faire défiler de rA1 (distribution minimale) à rA6
3
(distributionmaximale) ou à rA- (produit de rinçage désactivé).
Touchez à Rinse (Rinçage) pour passer au réglage suivant ou touchez de manière
4
prolongée à jusqu’à ce qu’un bip soit émis pour quitter le menu de préférences
del’utilisateur.
Activer ou désactiver les bips
Cette option désactive tous les sons du lave-vaisselle (à l’exception des alertes de défaillance).
Assurez-vous que le lave-vaisselle est en marche.
1
Touchez de manière prolongée à et Rinse (Rinçage) simultanément jusqu’à
2
ce qu’un bip soit émis pour accéder au menu de préférences de l’utilisateur.
L’afficheurindiquerale réglage du produit de rinçage actuel.
Touchez à Rinse (Rinçage) pour faire défiler jusqu’au menu Beeps (Bips).
3
Touchez à pour alterner entre bPo (Bips activés) et bP- (Bips désactivés)
4
Touchez de manière prolongée à jusqu’à ce qu’un bip soit émis pour quitter
5
lemenude préférences de l’utilisateur.
48
Page 51

INSTRUCTIONS D’UTILISATION
Réglages de préférence de l’utilisateur (modèlesDW24U6I uniquement)
Allumer ou éteindre l’éclairage de la cavité
Assurez-vous que le lave-vaisselle est en marche.
1
Touchez de manière prolongée à et Rinse (Rinçage) jusqu’à ce qu’un bip soit
2
émispour accéder au menu de préférences de l’utilisateur. L’afficheur indiquera
leréglage duproduit de rinçage actuel.
– Rinse (Rinçage) clignote en mode d’options de préférence.
Touchez à Rinse (Rinçage) pour faire défiler jusqu’au menu Cavity Light
3
(Éclairage de cavité).
FR
Touchez à pour alterner entre CLo (Éclairage de cavité allumé) et CL-
4
(Éclairage de cavité éteint).
Touchez de manière prolongée à jusqu’à ce qu’un bip soit émis pour quitter
5
le menu de préférences de l’utilisateur.
49
Page 52

INSTRUCTIONS D’UTILISATION
Réglages de préférence de l’utilisateur (modèlesDW24U6I uniquement)
Allumer ou éteindre l’éclairage au sol
Assurez-vous que le lave-vaisselle est en marche.
1
Touchez de manière prolongée à et Rinse (Rinçage) simultanément
2
jusqu’à ce qu’un bip soit émis pour accéder au menu de préférences de
l’utilisateur. L’afficheur indiquera le réglage du produit de rinçage actuel.
Touchez à Rinse (Rinçage) pour faire défiler jusqu’au menu Floor Light
3
(Éclairage ausol).
Touchez à pour alterner entre FLo (Éclairage au sol allumé) et FL-
4
(Éclairage au sol éteint).
Touchez de manière prolongée à jusqu’à ce qu’un bip soit émis pour quitter
5
le menu de préférences de l’utilisateur.
SIGNIFICATION DE L’ÉCLAIRAGE AU SOL
Aucun éclairage Aucun cycle de lavage en cours
Éclairage constant Cycle de lavage en cours
Clignotement lent Cycle de lavage en pause
Clignotement rapide Défaillance du lave-vaisselle
50
Page 53

ENTRETIEN DE VOTRE VAISSELLE
L’action combinée des températures élevées et du détergent de lave-vaisselle peut
endommager certains articles lavés dans le lave-vaisselle. En cas de doute concernant
un aspect quelconque de tout article lavé dans le lave-vaisselle, consultez les
instructions fournies par le fabricant de l’article en question ou lavez l’article à la main.
FR
IMPORTANT!
Ne placez jamais de matériaux très absorbants, comme des éponges et des serviettes,
dans votre lave-vaisselle. Ne placez pas de vaisselle ou d’ustensiles tachés de cendre
de tabac, de cire, de graisse lubrifiante ou de peinture dans votre lave-vaisselle.
Coutellerie et argenterie
Vous devez rincer la coutellerie et l’argenterie immédiatement après chaque utilisation
pour prévenir le ternissement causé par certains aliments. Les articles en argent ne
doivent pas entrer en contact avec l’acier inoxydable des autres ustensiles. Le fait de
mélanger ces articles peut causer un ternissement. Retirez la coutellerie en argent du
lave-vaisselle et séchez-la à la main immédiatement après le programme de lavage.
Aluminium
Le détergent pour lave-vaisselle peut ternir l’aluminium. Le degré de ternissement
dépend de la qualité de l’article.
Autres métaux
Les objets en fer et en fonte peuvent rouiller et tacher d’autres articles. Le cuivre,
l’étainet le laiton ont aussi tendance à causer des taches. Lavez ces articles à la main.
Vaisselle en bois
Les articles en bois sont normalement sensibles à l’eau et la chaleur. Le fait de les
laver régulièrement dans le lave-vaisselle peut finir par les endommager avec le temps.
Encasde doute, lavez-les à la main.
Verrerie
La plupart des articles de verre à usage quotidien peuvent être lavés au lave-vaisselle.
Le cristal et les articles anciens ou en verre très fin peuvent toutefois se détériorer
(c.-à-d. devenir opaques). Il peut être préférable de laver ces articles à la main.
Plastique
Certains plastiques peuvent changer de forme ou de couleur dans l’eau chaude.
Consultez les instructions du fabricant au sujet du lavage des articles en plastique.
Vous devez appliquer un poids sur les articles en plastique lavables pour éviter qu’ils ne
puissent se renverser, se remplir d’eau ou tomber au travers du panier pendant le lavage.
Articles décorés
La plupart des articles en porcelaine modernes peuvent être lavés au lave-vaisselle.
Lesarticles anciens, les articles dont le motif est peint sur le glacis, les articles ornés
d’or ou les articles en porcelaine peints à la main peuvent être plus sensibles au lavage
dans le lave-vaisselle. En cas de doute, lavez-les à la main.
Articles collés
Le lavage dans le lave-vaisselle peut adoucir ou dissoudre certains produits adhésifs.
Encas de doute, lavez-les à la main.
51
Page 54

CONSEILS DE CHARGEMENT
Chargement de votre lave-vaisselle
Placez la vaisselle de façon à ce que l’eau des bras gicleurs rotatifs (situés en dessous)
puisse atteindre tous les articles, plus particulièrement les articles sur les grilles pour
tasses rabattables. Sinon, l’efficacité du lavage sera réduite.
Assurez-vous les verres et les autres articles fragiles sont stables pour éviter qu’ils se
renversent et soient endommagés pendant le lavage.
Vous devez appliquer un poids sur les articles en plastique légers et semi-rigides,
ouencore les placer sur les grilles pour tasses ou dans le plateau à ustensiles.
Assurez-vous qu’aucun article de vaisselle n’empêchera les bras gicleurs de tourner.
Surcharge pouvant faire en sorte
que l’eau de lavage n’atteigne
pas toute la vaisselle.
Les tasses, les verres et les
bols doivent être placés avec
leur ouverture vers le bas.
Les assiettes sont collées les unes
contre les autres, ce qui peut
empêcher l’eau de lavage de circuler.
Assurez-vous que la coutellerie et
les ustensiles ne sont pas emmêlés
ou pris ensemble. Ils doivent
être étalés uniformément.
52
Assurez-vous que les grands ustensiles
ne sont pas coincés contre la porte,
car cela pourrait empêcher l’ouverture
du distributeur de détergent.
Page 55

CONSEILS DE CHARGEMENT
La grande tasse dans le bas
empêche l’eau de lavage
d’atteindre la tasse sur la grille.
La poignée du couteau empêche
l’ouverture de la porte du distributeur.
Placez les articles tranchants de
manière à ce qu’ils ne risquent
pas de blesser l’utilisateur ou
d’endommager le joint de porte.
Pour réduire le risque de blessure,
placez les articles tranchants ou
pointus à l’horizontale, ou avec le
manche pointant vers le haut.
La hauteur d’assiette
maximale est 260mm.
Assurez-vous que la coutellerie
ne puisse pas tomber à travers la
grille à la base pour interrompre
la rotation des bras gicleurs.
Vous devez ranger les grands
ustensiles sur les grilles pour tasses
rabattables afin d’éviter qu’ils
puissent se déplacer et interrompre
la rotation des bras gicleurs.
Inspectez le fond du panier à
ustensiles pour vous assurer qu’aucun
article tranchant ou pointu ne puisse
passer au travers et interrompre
la rotation du bras gicleur.
FR
53
Page 56

DURETÉ DE L’EAU ET LAVAGE DE LA VAISSELLE
Qu’est-ce que la dureté de l’eau?
L’eau dure est une eau à concentration élevée en minéraux tels que le calcium et le
magnésium. Cette concentration est faible dans l’eau douce. La dureté de l’eau varie
enfonction de l’emplacement géographique.
Comment la dureté de l’eau affecte-t-elle le lavage de la vaisselle?
L’eau dure peut nuire au rendement de votre lave-vaisselle. Avec le temps, la
verrerie lavée avec de l’eau dure devient opaque et les assiettes deviennent tachées
ou couvertes d’une pellicule blanche. L’utilisation d’une eau très dure peut même
endommager les pièces du lave-vaisselle après un certain temps.
L’eau naturellement douce ou adoucie n’a aucun effet néfaste lorsque vous l’utilisez
avec une quantité de détergent adéquate. Toutefois, l’utilisation d’une quantité
excessive de détergent combinée à une eau douce très chaude peut causer une
détérioration irréversible de la verrerie. Cette détérioration se présente d’abord sous
la forme d’une pellicule multicolore. Suite aux lavages répétés, la verrerie devient
définitivementopaque.
Que puis-je faire pour minimiser les effets néfastes?
Contactez votre service d’aqueduc local pour déterminer la dureté de l’eau dans
votrerégion.
Si l’eau de votre maison est dure…
Augmentez la quantité de détergent.
Utilisez un détergent à haute teneur en phosphate. Le phosphate aide à adoucir
l’eaupour permettre de meilleurs résultats lors du lavage. Vous pouvez également
essayer des pastilles à usages multiples.
Utilisez un produit de rinçage. Pour améliorer le rendement de l’appareil, nous
vousrecommandons d’activer le réglage du produit de rinçage et d’utiliser le
niveau5ou supérieur.
Utilisez un détartrant/nettoyant pour lave-vaisselle régulièrement ou lorsque vous
remarquez une accumulation de dépôts calcaires dans votre lave-vaisselle.
IMPORTANT!
Nous vous recommandons d’installer un adoucisseur d’eau sur l’alimentation
eneaudevotre maison.
Si la dureté de l’eau de votre maison est supérieure à 250ppm/14,6 gpg,
vousdevezinstaller un adoucisseur d’eau pour assurer le rendement optimal
devotrelave-vaisselle.
Si l’eau de votre maison est naturellement douce ou traitée par un adoucisseur d’eau
Évitez d’utiliser trop de détergent. Respectez les quantités recommandées à la
pagesuivante.
Assurez-vous de ne pas surcharger le lave-vaisselle pour permettre à l’eau
d’atteindretous les articles.
54
Page 57

PROGRAMMES DE LAVAGE ET QUANTITÉS DE DÉTERGENT
Le tableau ci-dessous présente les quantités de détergent en poudre requises pour
desniveaux de saleté normaux. Si l’eau de votre maison est plus douce ou plus dure,
ouselon la vaisselle chargée, vous pourriez avoir à ajuster ces quantités.
Si vous utilisez des pastilles, suivez les recommandations du fabricant.
Le témoin indique l’option sélectionnée.
Pour le prélavage, placez le détergent dans la cavité sur le dessus du distributeur fermé.
QUANTITÉ DE DÉTERGENT
EN POUDRE POUR CHAQUE
COMPARTIMENT (GRAMMES)
Lavage principal Prélavage
PROGRAMME CHARGE RECOMMANDÉE
Auto N’importe quel type de charge.
Le lave-vaisselle sélectionne
automatiquement le
programme de lavageoptimal
Heavy
(Intensif)
Medium
(Moyen)
Casseroles, poêles et plats de
cuisson très sales.
Vaisselle plutôt sale ou restes
d’aliments ayant séché pendant
la nuit.
Eco Vaisselle normalement sale
pour une utilisation d’énergie
et d’eau optimale.
Remarque : Eco a été utilisé pour
évaluer l’efficacité énergétique de ce
lave-vaisselle.
Fast
Articles mixtes très peu sales
(Rapide)
Delicate
(Délicat)
Articles délicats (parexemple,
sensibles à la chaleur)
légèrement sales
Rinse
(Rinçage)
Prévient les odeurs et le
séchage de restes d’aliments
sur la vaisselle avant le lavage
20 – 35 g
selon le niveau
de saleté
35 g 5 g
35 g 5 g
25 – 30 g 5 g
20 g aucun
20 g aucun
aucun aucun
aucun
FR
55
Page 58

AJOUT DE DÉTERGENT
IMPORTANT!
Utilisez uniquement des détergents recommandés pour les lave-vaisselle automatiques.
Les détergents pour lave-vaisselle sont très alcalins. Il peut être extrêmement
dangereux de les avaler. Évitez tout contact avec la peau et les yeux et éloignez les
enfants et les personnes à capacités réduites du lave-vaisselle lorsqu’il est ouvert.
Veillez à ce que le distributeur de détergent soit vide à la fin de chaque programme
de lavage.
Ne saupoudrez ou versez jamais de détergent directement sur des articles dans
lelave-vaisselle. Les détergents et pastilles pour lave-vaisselle ne doivent jamais
êtreencontact direct avec la vaisselle ou la coutellerie.
N’utilisez jamais de liquides pour laver la vaisselle à la main, de savon, de détergents
à lessive ou de désinfectants, car ils pourraient endommager le lave-vaisselle.
Remplissage du distributeur de détergent
Ajoutez le détergent ou la pastille dans le distributeur de détergent. Si vous utilisez
1
un détergent en poudre, consultez les quantités recommandées à la page précédente.
Lesrepères ‘15’ et ‘25’ dans le compartiment de lavage principal correspondent à
laquantité en grammes de détergent en poudre.
Enlevez tout excédent de détergent des rebords du distributeur.
2
Glissez le couvercle pour le fermer. Il s’enclenchera. Le détergent sera automatiquement
3
distribué dans le lave-vaisselle pendant le programme de lavage.
IMPORTANT!
Lors de l’ouverture du distributeur, veillez à ce que le couvercle ne heurte pas vos
doigts.
Compartiment du produit
Compartiment de
Compartiment de lavage
56
de rinçage
prélavage
principal
Ouvrez le couvercle ici
Page 59

UTILISATION D’UN PRODUIT DE RINÇAGE
C6 Dishwasher
Nous vous recommandons vivement d’utiliser régulièrement un produit de rinçage
liquide pour optimiser le séchage. Les produits de rinçage confèrent un aspect clair et
un éclat brillant au verre et à la porcelaine, En plus de prévenir le ternissement du métal.
À quel moment remplir le distributeur de produit derinçage
Lorsque le niveau de produit de rinçage est bas, le
voyant de produit de rinçage s’allume sur le panneau de
commande pour vous rappeler de remplir le distributeur.
Ajustement de la quantité de produit de rinçage
Le niveau habituel réglé en usine est 5, mais vous pourriez
avoir à l’ajuster en fonction des conditions de votre eau.
Réduisez la quantité s’il y a un excès de mousse à la fin
du lavage.
Augmentez la quantité si vous habitez dans une région
où l’eau est dure ou si les assiettes sont mouillées ou
marquées de coulées d’eau après le séchage.
Pour ajuster le réglage du produit de rinçage:
consultez‘Réglages de préférence de l’utilisateur’
poursavoir comment procéder.
Si vous utilisez des pastilles avec produit de rinçage
intégré, nous vous recommandons de désactiver
l’optionde produit de rinçage (rA-).
Voyant du produit de rinçage
(sur le panneau de commande)
FR
Comment remplir le distributeur de produit de rinçage
Ouvrez le couvercle du distributeur de produit de
1
rinçage en utilisant la languette à l’extrémité.
Versez le produit de rinçage dans l’ouverture
2
rectangulaire, en vous assurant de ne pas dépasser le
repère MAX.
IMPORTANT!
Veillez à ne pas renverser le produit de rinçage
dans le lave-vaisselle. Ilest important d’essuyer
tout déversement afin de prévenir la production
excessive de mousse. Lenon-respect de cette
consigne pourrait entraîner des réparations
qui ne sont pas couvertes par la garantie.
Fermez le couvercle, en vous
3
assurant qu’il s’enclenche.
Languette à
l’extrémité
Ouverture de
remplissage
57
Page 60

APRÈS LE LAVAGE
Une fois le programme de lavage terminé, le lave-vaisselle émet six bips, puis il s’éteint
automatiquement pendant quelques secondes.
Ouvrez légèrement la porte et laissez-la entrouverte (environ 100mm) pour favoriser
1
leséchage.
Une fois la vaisselle froide au toucher, vous pouvez la retirer.
2
IMPORTANT!
Ne laissez jamais la porte du lave-vaisselle en position entièrement ouverte, car elle
pourrait vous faire trébucher.
Vérifiez que le distributeur de détergent est complètement vide. Si ce n’est pas le cas,
3
essuyez-le avec un chiffon humide.
Inspectez régulièrement votre lave-vaisselle pour vérifier s’il nécessite un nettoyage
4
ouun entretien:
– Vérifiez qu’aucun dépôt graisseux ou calcaire ne s’est accumulé à l’intérieur.
– Si des particules de nourriture se trouvent dans les filtres, vous devez également
lesnettoyer.
– Consultez la section ‘Entretien et nettoyage’ pour les instructions de nettoyage
etd’entretien.
Vacances et congés
Si vous prévoyez de ne pas utiliser le lave-vaisselle pendant un certain temps:
– Assurez-vous que les paniers sont vides.
– Laissez l’intérieur du lave-vaisselle propre.
– Laissez la porte du lave-vaisselle entrouverte pour permettre à l’air de circuler.
– Coupez l’alimentation en eau et en électricité du lave-vaisselle.
Préparation pour l’hiver (climats froids uniquement)
Déconnectez le lave-vaisselle de l’alimentation électrique.
1
Fermez l’alimentation en eau et déconnectez le tuyau d’alimentation en eau de l’orifice
2
d’entrée d’eau.
Videz l’eau du tuyau d’alimentation en eau et de l’orifice d’entrée d’eau, en utilisant
3
unseau ou un bac pour recueillir l’eau.
Reconnectez le tuyau d’alimentation en eau à l’orifice d’entrée d’eau.
4
Retirez le filtre de vidange et la plaque de filtration dans le bas du lave-vaisselle,
5
puisutilisez une éponge pour enlever toute eau restante dans le drain.
Réinstallez le filtre de vidange et la plaque de filtration, puis asséchez complètement
6
toute l’eau dans le lave-vaisselle.
Déconnectez le tuyau d’évacuation du conduit d’évacuation de l’évier, puis videz
7
complètement toute l’eau restante du tuyau. Raccordez de nouveau le tuyau
d’évacuation au conduit d’évacuation de l’évier.
58
Page 61

ENTRETIEN ET NETTOYAGE
Avec le temps, des résidus d’aliments ou des dépôts calcaires peuvent s’accumuler à
l’intérieur de votre lave-vaisselle. Cela peut réduire l’efficacité de l’appareil et les résidus
d’aliments peuvent produire une odeur désagréable. Inspectez et nettoyez régulièrement
votre lave-vaisselle.
IMPORTANT!
Avant de procéder au nettoyage ou à l’entretien, déconnectez toujours le
lave-vaisselle de l’alimentation électrique, fermez l’alimentation en eau et attendez
quetoutes les pièces du lave-vaisselle soient refroidies.
N’utilisez pas les produits de nettoyage suivants, car ils pourraient endommager les
surfaces:
– tampons à récurer en plastique ou en acier inoxydable
– nettoyants domestiques abrasifs et solvants
– nettoyants acides ou alcalins
– désinfectants ou détergents à lessive
– produits nettoyants ou à polir pour acier inoxydable
– liquides pour laver la vaisselle à la main ou savon
Lorsque des articles de vaisselle ou des verres se cassent dans le lave-vaisselle,
retirez-les avec soin pour éviter de vous blesser ou d’endommager l’appareil.
Après le nettoyage, vérifiez toujours que les bras gicleurs et les filtres sont tous
correctement installés.
FR
59
Page 62

ENTRETIEN ET NETTOYAGE
Nettoyage de l’extérieur du lave-vaisselle
Pour nettoyer les surfaces extérieures du lave-vaisselle, essuyez avec un chiffon propre,
doux et humide, puis séchez avec un chiffon propre non pelucheux.
Pour les surfaces qui ne sont pas planes, essuyez le long de la surface ou autour
de celle-ci; par exemple, pour le nettoyage des touches de commande extérieures,
effectuez un mouvement d’essuyage circulaire autour des touches.
Veillez à ne pas causer de mouillage excessif dans la zone du panneau de commande.
Remarque: avant de nettoyer le panneau de commande, il est utile de désactiver les
touches à l’aide de la fonction de verrou des touches.
Nettoyage du joint de porte et de l’intérieur du lave-vaisselle
Nettoyez soigneusement avec de l’eau tiède sur un chiffon doux non pelucheux.
Sil’intérieur est très sale, utilisez un détartrant/nettoyant pour lave-vaisselle en suivant
les instructions du fabricant.
Nettoyage des filtres
Les filtres empêchent les grandes particules de nourriture dans l’eau de lavage
d’atteindre la pompe. Ces particules peuvent occasionnellement bloquer les filtres.
Nous vous recommandons de nettoyer les filtres lorsque vous remarquez la présence
departicules de nourriture.
Pour retirer le filtre de vidange, tournez le filtre dans le sens inverse des aiguilles
d’unemontre pour le déloger, puis soulevez-le.
Une fois le filtre de vidange retiré, vous pouvez soulever la plaque de filtration pour
lasortir.
Rincez-les bien à l’eau courante, puis réinstallez-les.
IMPORTANT!
Lors du nettoyage du dessous de la plaque de filtration, manipulez avec précaution
son rebord externe tranchant.
Réinstallez les filtres correctement après le nettoyage, en vous assurant que la plaque
defiltration soit au même niveau que la base du lave-vaisselle.
Filtre de vidange
Plaque de filtration
60
Page 63

ENTRETIEN ET NETTOYAGE
Nettoyage des bras gicleurs
Le calcaire et les particules de nourriture dans l’eau de lavage peuvent obstruer les
ouvertures dans les bras gicleurs et leur socle. Nettoyez ces pièces environ une fois
parmois, ou plus souvent si nécessaire.
Nettoyage du bras gicleur supérieur/de la tête
Ne retirez pas le bras gicleur supérieur lors du nettoyage. Nettoyez-le avec une petite
brosse en plastique, ou s’il est très sale ou obstrué, utilisez un détartrant/nettoyant
pourlave-vaisselle en suivant les instructions du fabricant.
Nettoyage du bras gicleur central
Pour retirer le bras gicleur central, dévissez avec soin l’écrou de blocage.
Rincez bien le bras gicleur à l’eau courante, puis réinstallez-le.
IMPORTANT!
Assurez-vous de bien tourner l’écrou de blocage sur le bras gicleur central pour
leréinstaller fermement sur le tuyau d’alimentation en eau.
Vérifiez que le bras gicleur central est bien verrouillé en place et qu’il tourne librement.
FR
Tuyau d’alimentation
en eau
Écrou de blocage
Bras gicleur central
Nettoyage du bras gicleur inférieur
Pour retirer le bras gicleur inférieur, soulevez-le simplement hors de son socle.
Rincez bien le bras gicleur à l’eau courante, puis réinstallez-le sur son socle.
Bras gicleur inférieur
61
Page 64

CODES D’ERREUR
Si le lave-vaisselle ne fonctionne pas correctement, il affichera un code d’erreur et
émettra un bip. Consultez le tableau suivant pour tenter de résoudre le problème.
CODES
D’ERREUR ET
DESCRIPTIONS
A20
Défaillance de
l’évacuation
CAUSES POSSIBLES SOLUTION
Le tuyau d’évacuation
est entortillé ou courbé.
L’eau usée n’est pas
évacuée.
Le capteur de turbidité
est sale et nécessite un
nettoyage.
Vérifiez le tuyau d’évacuation et
redressez-le si nécessaire.
Assurez-vous que le tuyau d’évacuation
soit raccordé conformément aux
instructions d’installation.
Nettoyez délicatement le capteur de turbidité
avec une brosse douce (par ex.: une brosse
à dents) pour éliminer toute accumulation.
Capteur de
turbidité
A10
Aucune eau
62
L’alimentation en eau
n’est pas ouverte.
Pression insuffisante de
l’alimentation en eau.
Le tuyau d’alimentation
en eau est entortillé
ou courbé; par
conséquent, la quantité
d’eau acheminée
au lave-vaisselle est
insuffisante.
Le tuyau d’évacuation
n’est pas raccordé
correctement.
Assurez-vous que la conduite d’alimentation
en eau est raccordée et ouverte.
Touchez à pour redémarrer le lave-vaisselle.
Vérifiez la pression d’eau domestique.
Vérifiez le tuyau d’alimentation en eau
et redressez-le si nécessaire. Touchez à
pour redémarrer le lave-vaisselle.
Assurez-vous que le tuyau d’évacuation
soit raccordé conformément aux
instructions d’installation.
Page 65

CODES
D’ERREUR ET
DESCRIPTIONS
F30
Inondation
F40
F50
A60
A70
Détection de
température
A80
Détection
de turbidité
F90
(DW24U6I
uniquement)
FA0
FCO
(DW24U6I
uniquement)
CODES D’ERREUR
CAUSES POSSIBLES SOLUTION
Commutateur
d’inondation activé.
Erreur de
débit d’eau.
Erreur de circuit
électronique.
Erreur de
température d’eau.
Erreur d’alarme Mettez en ARRÊT, puis remettez en MARCHE.
Erreur d’alarme Mettez en ARRÊT, puis remettez en MARCHE.
Erreur de données/
circuit électronique.
Erreur de circuit
électronique/
d’alimentation
électrique.
Défaillance
du moteur.
Mettez en ARRÊT le lave-vaisselle, puis
remettez-le en MARCHE. Si le problème persiste,
coupez l’alimentation en eau et déconnectez
le lave-vaisselle de l’alimentation électrique.
Appelez l’assistance à la clientèle.
Mettez en ARRÊT le lave-vaisselle, puis
remettez-le en MARCHE. Si le problème persiste,
appelez l’assistance à la clientèle.
Mettez en ARRÊT le lave-vaisselle, puis
remettez-le en MARCHE. Si le problème persiste,
appelez l’assistance à la clientèle.
Mettez en ARRÊT le lave-vaisselle, puis
remettez-le en MARCHE. Si le problème persiste,
appelez l’assistance à la clientèle.
Si le problème persiste, appelez l’assistance
àlaclientèle.
Si le problème persiste, appelez l’assistance
àlaclientèle.
Mettez en ARRÊT le lave-vaisselle, puis
remettez-le en MARCHE. Si le problème persiste,
appelez l’assistance à la clientèle.
Mettez en ARRÊT le lave-vaisselle, puis
remettez-le en MARCHE. Si le problème persiste,
appelez l’assistance à la clientèle.
Mettez en ARRÊT le lave-vaisselle à
l’alimentation électrique. Attendez quelques
instants, puis remettez-le en MARCHE.
Si le problème persiste, coupez l’alimentation en
eau et déconnectez l’appareil de l’alimentation
électrique. Appelez l’assistance à la clientèle.
FR
Si le lave-vaisselle ne fonctionne toujours pas ou s’il affiche
un code d’erreur qui n’est pas indiqué dans cette section
Touchez deux fois pour effacer le code d’erreur.
1
Touchez de nouveau de manière prolongée à pour éteindre le lave-vaisselle et
2
attendez quelques minutes.
Ouvrez la porte pour remettre en marche le lave-vaisselle.
3
Si le lave-vaisselle ne fonctionne toujours pas et/ou si le problème persiste, déconnectez
le lave-vaisselle de l’alimentation électrique, fermez l’alimentation en eau, puis contactez
le service à la clientèle de Fisher&Paykel pour fournir les informations du code d’erreur.
63
Page 66

DÉPANNAGE
PROBLÈME CAUSE POSSIBLE SOLUTION
Le lave-vaisselle
ne démarre pas
Absence d’alimentation. Assurez-vous que le
lave-vaisselle est branché et
que l’alimentation électrique est
activée à la prise de courant.
Le bras gicleur
inférieur tourne
avec difficulté
Le couvercle
du distributeur
de détergent
ne peut pas se
fermer
Restes de
détergent
coincés à
l’intérieur du
distributeur
La porte n’est pas fermée
correctement.
L’alimentation en eau
n’est pas ouverte.
Crépine obstruée dans le
tuyau d’alimentation en eau.
Les ouvertures du bras
gicleur sont obstruées par
de petits articles ou des
particules de nourriture.
Le compartiment de détergent
est rempli de façon excessive.
Le distributeur de détergent
est bouché par des
restes de détergent.
Le compartiment était
humide lors du remplissage
de détergent.
Des ustensiles empêchent
l’ouverture du distributeur
de détergent.
Fermez la porte.
Assurez-vous que la conduite
d’alimentation en eau est
raccordée et ouverte.
Vérifiez la crépine et nettoyez-la
si nécessaire— elle se trouve à
l’endroit où le tuyau d’alimentation
en eau est vissé au robinet.
Nettoyez le bras gicleur.
Voir‘Entretien et nettoyage’
pour les instructions.
Enlevez du détergent afin de
pouvoir fermer le couvercle.
Essuyez le distributeur
avec un chiffon humide.
Asséchez le distributeur avant
d’ajouter du détergent.
Essuyez le distributeur
avec un chiffon humide.
Asséchez le distributeur avant
d’ajouter du détergent.
Assurez-vous de ne pas positionner
les grands ustensiles d’une manière
qui pourrait empêcher l’ouverture du
couvercle de distributeur lorsque la
porte du lave-vaisselle est fermée.
64
Page 67

DÉPANNAGE
PROBLÈME CAUSE POSSIBLE SOLUTION
Eau demeurant
à l’intérieur du
lave-vaisselle à
la fin du lavage
Le tuyau d’évacuation est
entortillé, courbé ou obstrué.
La pompe est bloquée. Appelez un centre de service
Filtre(s) obstrué(s). Nettoyez le(s) filtre(s). Voir ‘Entretien
Vérifiez le tuyau d’évacuation
et redressez-le si nécessaire.
autorisé Fisher&Paykel ou
le service à la clientèle.
et nettoyage’ pour les instructions.
FR
Formation de
mousse
L’afficheur
indique la lettre
F, L, P, C ou S
Le lave-vaisselle
s’arrête
soudainement
pendant le
lavage
Bruit de
cognement
ou cliquetis
pendant le
lavage
Utilisation d’une
quantité ou d’un type de
détergentincorrect.
Il y a trop de particules d’œufs
dans la charge de lavage.
Le réglage de quantité
du produit de rinçage
est tropélevé.
Déversements de produit de
rinçage n’ayant pas été essuyés.
Le lave-vaisselle est en
modeTechnicien.
L’alimentation électrique
ou l’alimentation en eau
est interrompue.
Le bras gicleur percute
la vaisselle.
La vaisselle n’est pas
placée correctement.
Consultez la section ‘Ajout de
détergent’ ou les instructions
du fabricant du détergent.
Augmentez la quantité de détergent.
Réduisez la quantité du
produit de rinçage.
Assurez-vous d’essuyer tous les
déversements de produit de
rinçage lorsqu’ils se produisent.
Touchez de manière prolongée à
pour quitter. Si le lave-vaisselle
demeure en mode Technicien,
appelez le service à la clientèle.
Vérifiez l’alimentation électrique
et l’alimentation en eau.
Mettez en pause le lavage et
redisposez la vaisselle. Consultez les
sections ‘Commandes et démarrage
d’un lavage’ et ‘Chargement’.
65
Page 68

DÉPANNAGE
PROBLÈME CAUSE POSSIBLE SOLUTION
Vaisselle sale Le programme de
lavage ne convient pas
à la vaisselle chargée.
Des saletés tenaces
sont incrustées.
Le(s) bras gicleur(s)
ne tourne(nt) pas.
Le lave-vaisselle est
chargé de manière
excessive ou incorrecte.
Les filtres sont
incorrectement
insérés.
Le détergent se trouve
dans le mauvais
compartiment.
Quantité de nourriture
excessive demeurant
sur la vaisselle avant
le chargement.
Le détergent est
inadéquat.
Consultez la section ‘Programmes de
lavage et quantités de détergent’ et
sélectionnez un programme adéquat.
Il peut être nécessaire de
faire tremper la vaisselle.
Assurez-vous qu’aucun article ne
bloque la trajectoire du bras gicleur.
Consultez la section ‘Chargement’.
Consultez la section ‘Entretien
et nettoyage’.
Consultez les sections ‘Programmes
de lavage et quantités de détergent’
et ‘Ajout de détergent’.
Délogez tous les morceaux de nourriture
avant de charger la vaisselle.
Utilisez uniquement un détergent
en poudre ou en pastille conçu pour
un lave-vaisselle domestique.
Des articles
en plastique
sont décolorés
(parex.: taches
laissées par de
lasauce tomate)
66
La quantité de détergent
est insuffisante.
Les ouvertures du bras
gicleur sont bloquées.
Les filtres sont obstrués. Nettoyez les filtres. Voir ‘Entretien et
Quantité insuffisante
de détergent, aucun
prérinçage.
Voir ‘Programmes de lavage et
quantités de détergent’ pour les
quantités recommandées.
Vous pourriez avoir à apporter des
ajustements en fonction de la vaisselle
chargée et de la dureté de l’eau.
Nettoyez le(s) bras gicleur(s).
Voir ‘Entretien et nettoyage’
pour les instructions.
nettoyage’ pour les instructions.
Rincez les articles en plastique avant
deles placer dans le lave-vaisselle
et/ou ajoutez plus de détergent.
Vous pouvez également utiliser le
programme de rinçage après l’ajout
de la vaisselle pour réduire les taches.
Page 69

DÉPANNAGE
PROBLÈME CAUSE POSSIBLE SOLUTION
FR
Taches blanches
demeurant sur la
vaisselle; verres
ayant un aspect
laiteux
La vaisselle et les
ustensiles n’ont
pas séché
Les verres ont un
aspect terni
Les taches de thé
ou les marques de
rouge à lèvres ne
disparaissent pas
complètement
La quantité de
détergent est
insuffisante.
Le réglage de quantité
du produit de rinçage
est trop bas.
Le réglage de quantité
du produit de rinçage
est trop bas.
Les articles sont retirés
trop rapidement.
Le distributeur de
produit de rinçage
est vide. (Les voyants
de produit de rinçage
s’allument.)
Le réglage de quantité
du produit de rinçage
est trop bas.
La quantité de
détergent est
insuffisante.
Consultez la section ‘Programmes
de lavage et quantités de
détergent’ pour les quantités
recommandées. Vouspourriez avoir
à apporter des ajustements en
fonction de la dureté de l’eau.
Augmentez la quantité du produit
de rinçage. Voir ‘Utilisation
d’un produit de rinçage’.
Augmentez la quantité du produit
de rinçage. Voir ‘Utilisation
d’un produit de rinçage’.
À la fin du programme de lavage, laissez
la porte entrouverte et attendez plusieurs
minutes pour favoriser le séchage.
Ajoutez du produit de rinçage.
Consultez la section ‘Utilisation d’un
produit de rinçage’ pour les instructions.
Augmentez la quantité du produit
de rinçage. Voir ‘Utilisation
d’un produit de rinçage’.
Consultez la section ‘Programmes
de lavage et quantités de détergent’
pour les quantités recommandées.
Vouspourriez avoir à apporter
des ajustements en fonction
de la vaisselle chargée.
Traces de rouille
sur la coutellerie
La température de
lavage est trop basse.
La coutellerie n’est
pas suffisamment
résistante à la rouille
Sélectionnez un programme de
lavage avec une température
plus élevée. Consultez la section
‘Données de programme de
lavage’ pour des informations.
Lavez à la main.
67
Page 70

DÉPANNAGE
PROBLÈME CAUSE POSSIBLE SOLUTION
Verres obscurcis
et décolorés;
revêtement laiteux
Marques d’eau sur
les verres et les
ustensiles
Eau dure Augmentez le réglage du produit de
Utilisation d’une
eau dure.
Les verres ne sont
pas lavables au
lave-vaisselle.
Le niveau de produit de
rinçage ou le réglage
de quantité est trop
bas.
Augmentez les quantités de détergent.
Lavez à la main.
Assurez-vous qu’il y ait du produit
de rinçage dans le distributeur.
Sinécessaire, augmentez le réglage
du produit de rinçage ou essayez
d’utiliser un programme de lavage
avec une température plus élevée.
Consultez les sections ‘Utilisation
d’un produit de rinçage’ et ‘Données
de programme de lavage’.
rinçage et la quantité de détergent.
Consultez la section ‘Dureté de l’eau
et lavage de la vaisselle’. Sivous
habitez dans une région où l’eau
est très dure, consultez un plombier
au sujet de l’installation d’un
adoucisseur d’eau domestique.
68
Page 71

DW24U2I1
DONNÉES DE PROGRAMME DE LAVAGE
FR
AUTO
prélavage prélavage prélavage prélavage
lavage
principal
113 – 154°F
post-rinçage post-rinçage post-rinçage post-rinçage post-rinçage post-rinçage
MEDIUM
(MOYEN)
lavage
principal
140°F
ECO
lavage
principal
111°F
*
FAST
(RAPIDE)
lavage
principal
113°F
HEAVY
(INTENSIF)
lavage
principal
154°F
DELICATE
(DÉLICAT)
lavage
principal
113°F
Étapes
rinçage final
158°F
séchage séchage séchage séchage séchage séchage
rinçage final
158°F
rinçage final
124°F
rinçage final
131°F
rinçage final
158°F
rinçage final
131°F
DW24U6I1
AUTO
prélavage prélavage prélavage rinçage
lavage
principal
113 – 154°F
post-
rinçage
Étapes
rinçage
final
158°F
séchage séchage séchage séchage séchage séchage
MEDIUM
(MOYEN)
lavage
principal
140°F
post-
rinçage
rinçage
final
158°F
ECO*
lavage
principal
111°F
post-
rinçage
lavage
principal
124°F
FAST
(RAPIDE)
lavage
principal
113°F
post-
rinçage
rinçage
final
122°F
HEAVY
(INTENSIF)
lavage
principal
154°F
post-
rinçage
rinçage
final
158°F
DELICATE
(DÉLICAT)
lavage
principal
113°F
post-
rinçage
rinçage
final
122°F
RINSE
(RINÇAGE)
113°F
RINSE
(RINÇAGE)
113°F
* Programme de référence pour l’étiquette énergétique en conformité avec les réglementations 10CFR
partie430et CAN/CSA-C373. L’eau entrante doit être à 120 °F.
69
Page 72

CHARGEMENT DU LAVE-VAISSELLE
Exemples de chargement
Chargement pour 14 couverts standard avec plateau à ustensiles
Panier central
Lower basket
Plateau à ustensiles
70
Page 73

CHARGEMENT DU LAVE-VAISSELLE
Exemples de chargement
Chargement pour 12 couverts standard avec panier à ustensiles.
Panier central
Lower basket
Panier à ustensiles
71
Page 74

GARANTIE ET SERVICE
Avant d’effectuer un appel de service ou une demande d’assistance:
Vérifiez les points que vous pouvez contrôler vous-même. Consultez le Guide
d’installation et le Guide d’utilisation pour vous assurer que:
Votre produit est installé correctement.
1
Vous êtes familier avec son fonctionnement normal.
2
Si après la vérification de ces points, vous avez toujours besoin d’assistance ou de
pièces, reportez-vous au manuel d’entretien et de garantie pour obtenir des informations
sur la garantie et les coordonnées d’un centre de service autorisé ou de l’assistance à la
clientèle, ou contactez-nous par l’entremise de notre site Web www.fisherpaykel.com.
Remplir et conserver pour référence ultérieure:
Modèle ____________________________________________________________
N° de série ____________________________________________________________
Date d’achat ____________________________________________________________
Acheteur ____________________________________________________________
Détaillant ____________________________________________________________
Banlieue ____________________________________________________________
Ville ____________________________________________________________
_____________________________________________________
Pays
72
Page 75

Page 76

FISHERPAYKEL.COM
© Fisher & Paykel Appliances 2019. All rights reserved.
The product specifications in this booklet apply to the specific products
and models described at the date of issue. Under our policy of continuous
product improvement, these specifications may change at any time. You
should therefore check with your Dealer to ensure this booklet correctly
Les caractéristiques de produit présentées dans ce livret s’appliquent aux
modèles et produits spécifiques qui y sont décrits à la date de publication.
Dans le cadre de notre politique d’amélioration en permanence de nos
produits, ces caractéristiques peuvent être modifiées à tout moment.
Nous vous recommandons de vérifier auprès de votre détaillant que ce
describes the product currently available.
© Fisher & Paykel Appliances 2019. Tous droits réservés.
livret décrit le produit actuellement disponible.
US CA
591917A 5.19
 Loading...