

Fisher & Paykel DCS RF24R, DCS RF24T Use And Care And Installation Manual
OUTDOOR REFRIGERATOR AND
BEER DISPENSER
Use and Care and Installation Guide
MODELS:
RF24R
RF24T


A MESSAGE TO OUR CUSTOMERS
Thank you for selecting this DCS Outdoor Refrigerator/Beer Dispenser. Because of these appliances’ unique
features we have developed this Use and Care and Installation Guide. It contains valuable information on how to
properly install, operate and maintain your new appliance for years of safe and enjoyable operation.
To help serve you better, please fill out and submit your Product Registration by vi siting our website at
www.dcsapp liances. com and selecting “Customer Care” on the home page and then select “Product
Registration”. In addition, keep this guide handy, as it will help answer questions that may arise as you use your
new appliance.
For your convenience, product questions can be answered by a DCS Customer Care Representative at
1-888-936-7872, or email:
NOTE: Please write the M odel, Code, and Serial Number on this page for references (the serial plate is located on
the upper lef t side, inner wall).
MODEL NUMBER CODE SERIAL NUMBER
NOTE: Inspect the product to ver ify that there is no shipping damage. If any damage is detected, call the shipper
and initiate a damage claim. DCS by Fisher & Paykel is not responsible for shipping damage.
customer.care@fisherpaykel.com
.
DO NOT discard any packing material (box, pallet, straps) until the unit has been inspected.
PLEASE RETAIN THIS MANUAL FOR FUTURE REFERENCE.
1

TABLE OF CONTENTS
SAFETY PRACTICES AND PRECAUTIONS 3
INSTALLATION - ESSENTIAL REQUIREMENTS 4
INSTALLATION
Electrical connection 5
How to install your outdoor refrigerator/beer dispenser 6-7
How to install your outdoor beer dispenser components 8-11
Tapping procedures 12
USING THE REFRIGERATOR/BEER DISPENSER 13-16
CARE AND MAINTENANCE
How to clean and maintain your unit 17
Replace interior light bulb 18
Things to remember 18
Energy saving tips 18
MOVING OR STORING YOUR REFRIGERATOR 19
TROUBLESHOOTING 20-21
SERVICE 22
WARRANT Y 23-24
2

SAFETY PRACTICES & PRECAUTIONS
To reduce the risk of fire, elec tric shock, or injur y to persons read these SAFE T Y PRAC TICES AND PREC AUTIONS
before operating this appliance. Use this appliance only for its intended purpose as described in this User Guide.
WARNING
When using this appliance always exercise basic safety precautions including the following:
DANGER!
■ This appliance is not intended for use by young children or infirm persons without super vision. Young children
should be super vised to ensure they do not play with the appliance.
■ Risk of child entrapment. Before you throw away your old refrigerator/beer dispenser:
1. Take off the doors.
2. Leave the shelves in place so that children may not easily climb inside.
ELECTRICAL
■ This appliance must be properly installed in accordance with the installation instruc tion before it is used.
■ Never unplug your refrigerator by pulling on the power cord. Always grip the plug firmly and pull straight out
from the outlet.
■ Repair or replace immediately all electric service cords that have become frayed or otherwise damaged. Do not
use a cord that shows cracks or abrasion along its length or at either the plug or appliance end. If the power
supply cord is damaged, it must only be replaced by your Fisher & Paykel Appliances Authorized Service Center
because special purpose tools are required.
■ Unplug your refrigerator before cleaning, or replacing the light bulb.
STORING FOOD AND DRINKS
■ Never store volatile or flammable materials in your refrigerator as they may explode.
■ Never freeze liquids in glass containers. Liquid expands during freezing which may cause the container to
explode.
■ Do not consume food if it is too cold. Food removed from the freezer compartment may be cold enough to cause
damage when brought into contact with bare skin, e.g. frozen ice cubes.
POWER FAILURE – FOOD SAFETY
■ Do not refreeze foods that have thawed completely. Follow the recommendations below if you discover food
that has thawed:
1. Ice crystals still visible – food may be refrozen but should be stored for a shorter period than recommended.
2. Thawed but refrigerator cold – refreezing generally not recommended. Fruits and some cooked food can be
refrozen but use as soon as possible.
Meat, fish, poultry – use immediately or cook, then refreeze.
Vegetables – discard as they usually go limp and soggy.
3. Thawed but warmer than 4ºC/40ºF – red meat can be cooked immediately and refrozen but use as soon as
possible. Discard all other frozen foods.
■ Do not refreeze frozen foods that have thawed completely. The food may be dangerous to eat.
CLEANING
■ Many commercially available cleaning products contain solvents which may attack plastic components of your
refrigerator/beer dispenser and cause them to crack . Please refer to the Care and Maintenance section of this
booklet for fur ther advice (see pages 15-16).
DISPOSAL
■ Extreme care must be taken when disposing of your old appliance to avoid hazards. The refrigerant gas must be
safely removed.
■ Your Fisher & Paykel Appliances Authorized S ervice Center will be able to give advice on environmentally friendly
methods of disposing of your old refrigerator/beer dispenser.
3
INSTALLATION – ESSENTIAL REQUIREMENTS
POWER
■ The appliance must be installed so the power plug is accessible.
■ To ensure that the appliance is not accidentally switched off, connect your refrigerator/beer dispenser to its
own power point. Do not plug in any other appliance at this power point or use extension cords, or double
adapters, as the combined weight of both power cords can pull the double adapter from a wall outlet socket.
■ For power requirements, refer to the infor mation on the serial plate located at the front bottom right-hand side
of the refrigerator when the door is open.
■ It is essential that the appliance be properly grounded (earthed) with a three prong receptacle. Never cut or
break off the grounding prong to fit a two-prong outlet.
LOCATION
■ Your refr igerator/beer dispenser should not be located in direc t sunlight.
STABILITY
■ It is important that all four corners of the refrigerator/beer dispenser base are supported firmly on a solid level
surface to eliminate any cabinet movement.
■ Installing the appliance on a sof t or uneven or unlevel floor may result in twisting of the cabinet and poor
sealing of the doors. If the doors do not seal properly, warm air will enter the food storage areas causing the
temperature to increase, resulting in food spoilage and food loss.
■ Before moving your refrigerator/beer dispenser into its position, ensure that the
adjustable front feet are fully retracted.
■ Position your refrigerator/beer dispenser. Turn to lower the front leveling leg. Raise the
front of the appliance until it is stable and doors move towards the closed position, on
their own, when open.
■ The front leveling leg on the hinge side should take the majorit y of the weight of the
cabinet and the cabinet should be stable, i.e. cabinet should not rock or wobble.
BEFORE PLACING FOOD IN THE FRESH FOOD COMPARTMENTS
■ Remove all packaging. Ensure that all transit tape is removed from the refrigerator.
■ Clean the inside of the appliance with warm water and a little liquid detergent to remove manufac turing and
transportation dust.
■ Allow the refrigerator/beer dispenser to run empty for 2 - 3 hours to allow each compar tment to cool to the
appropriate temperature.
■ The appliance may have an odor on its initial operation, but this will go away when the refrigerator/beer
dispenser have cooled sufficiently.
Fig. 01 LEVELING LEG
4
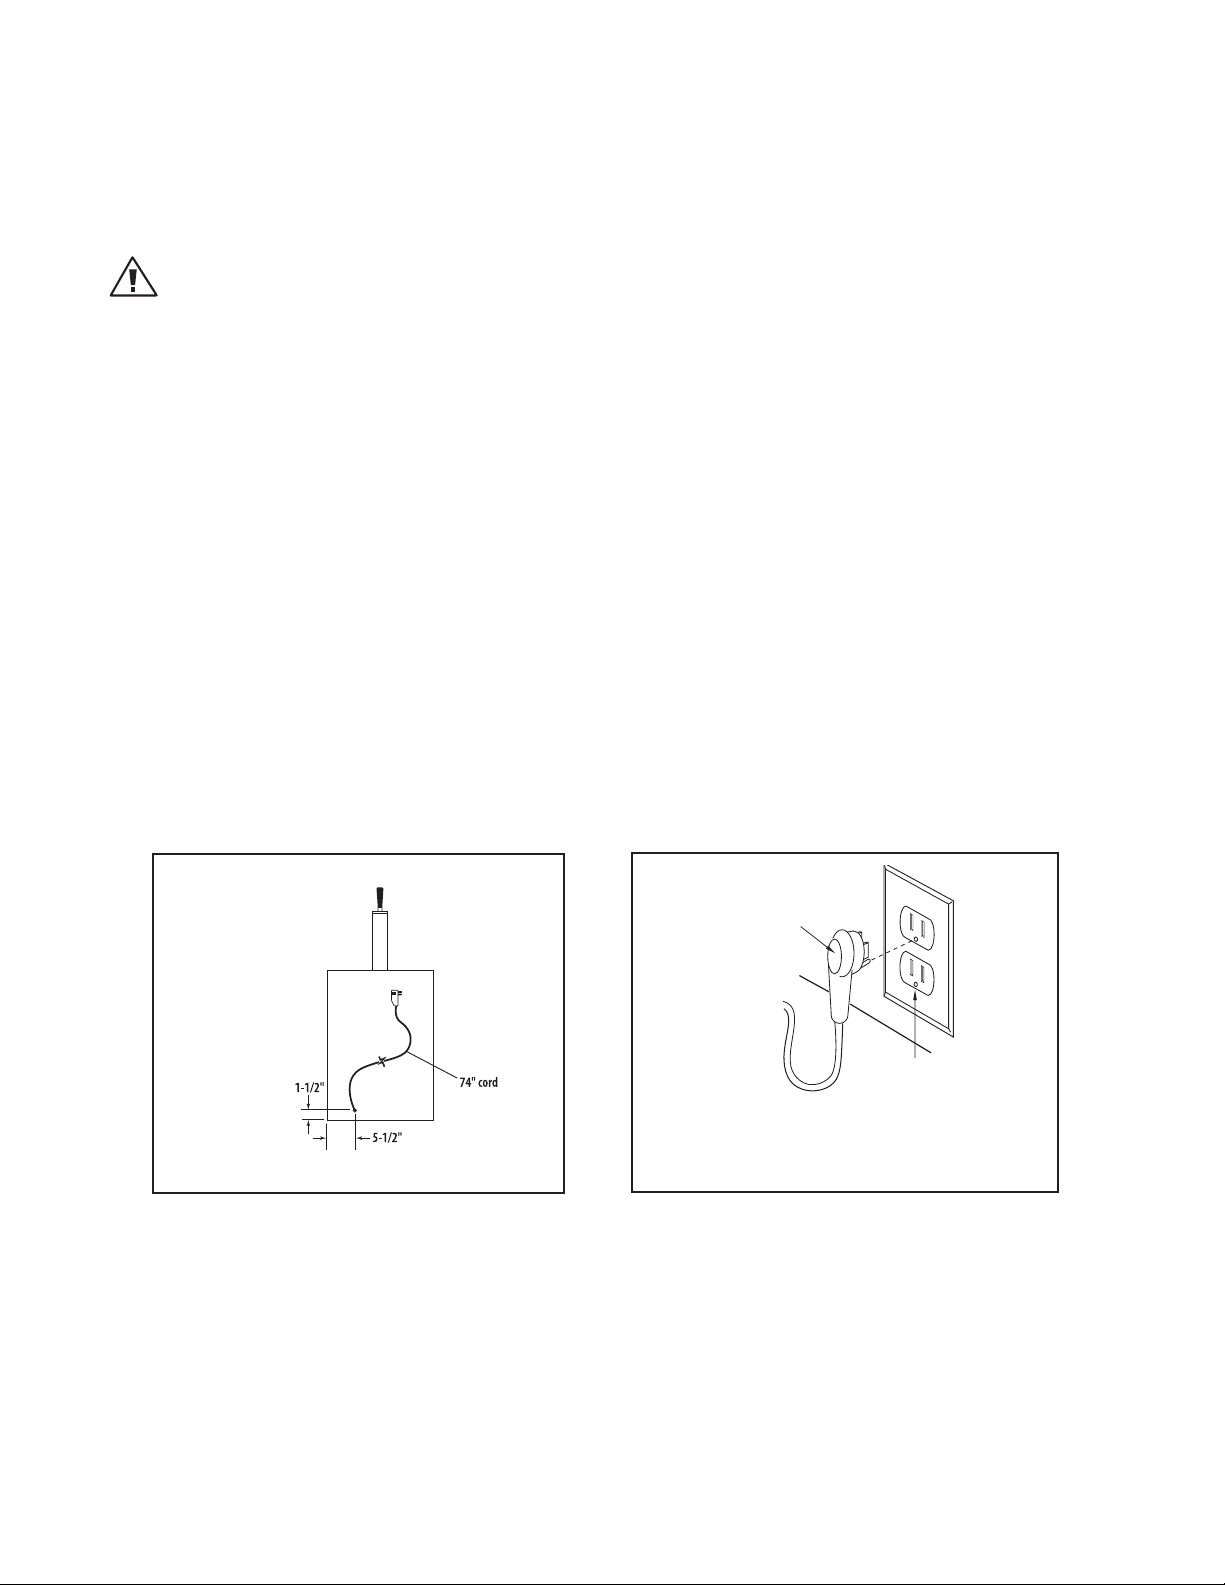
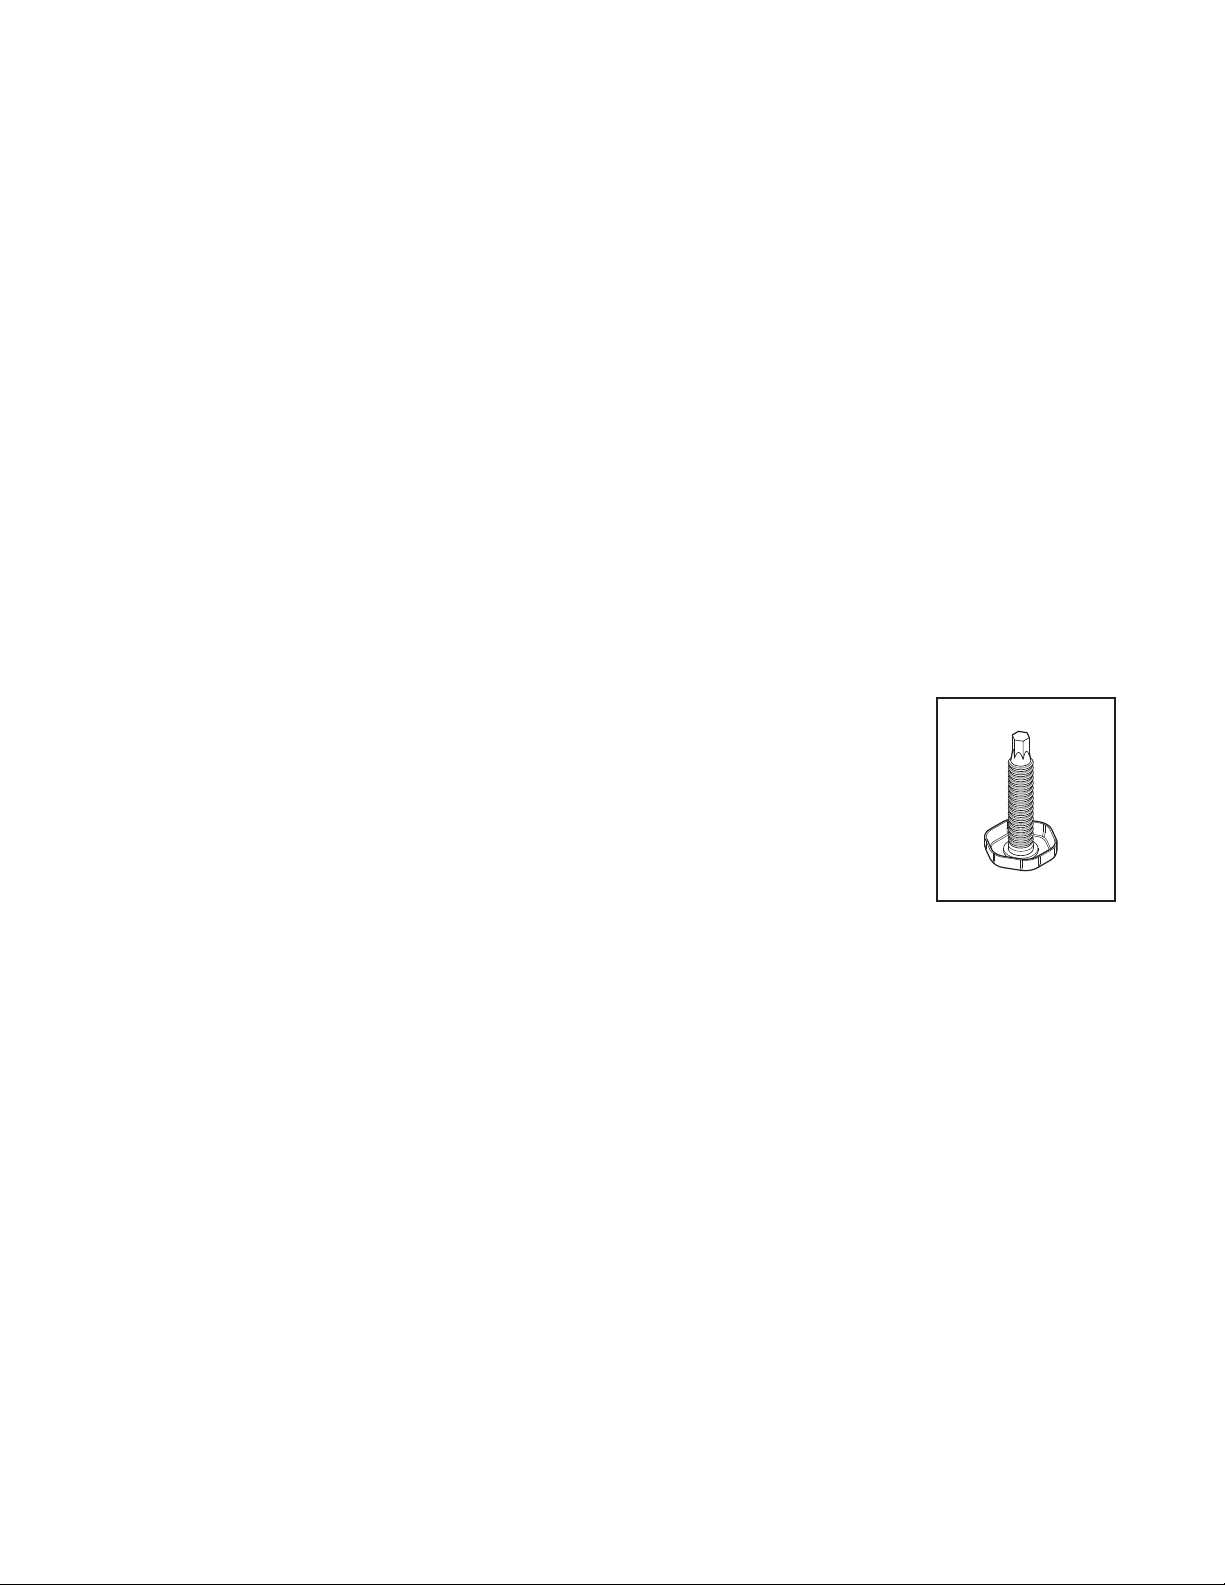
INSTALLATION
Grounding Type
Wall Receptacle
Power Supply Cord
with 3-Prong
Grounding
Plug
HOW TO INSTALL YOUR OUTDOOR REFRIGERATOR/BEER DISPENSER
ELECTRICAL CONNECTION:
Check serial plate for correct power supply. Use only electrical power supply as specified on your appliance
serial nameplate. Do not use an extension cord!
WARNING!
Do not splash or spray water from a hose onto the refrigerator! Doing so may cause an electrical shock, which may
result in severe injury or death.
GROUNDING METHOD
This product is factory equipped with a power supply cord that has a three -pronged grounded plug. I t must be
plugged into a mating grounding type receptacle in accordance with the National Electrical Code and applicable
local codes and ordinances. If the circuit does not have a grounding type receptacle, it is the responsibility and
obligation of the customer to exchange the existing receptacle in accordance with the National Electrical Code
and applicable local codes and ordinances. The third ground prong should not, under any circumstances, be cut
or removed. All UL listed refrigerated produc ts are equipped with this type of plug.
A ground fault circuit inter rupter (GFI) electrical receptacle is to be used to supply electrical power to the refrigerator for outdoor applications. Contact an electrician if you need to install one to supply electrical power to
your outdoor refr igerator.
POWER REQUIREMENTS:
■ 120V 60Hz
■ 1800 watt
■ 3 wire outlet
■ 15 amp circuit
AC Interface
Fig. 02
Note:
The plug shown is for 120V units.
Fig. 03
5
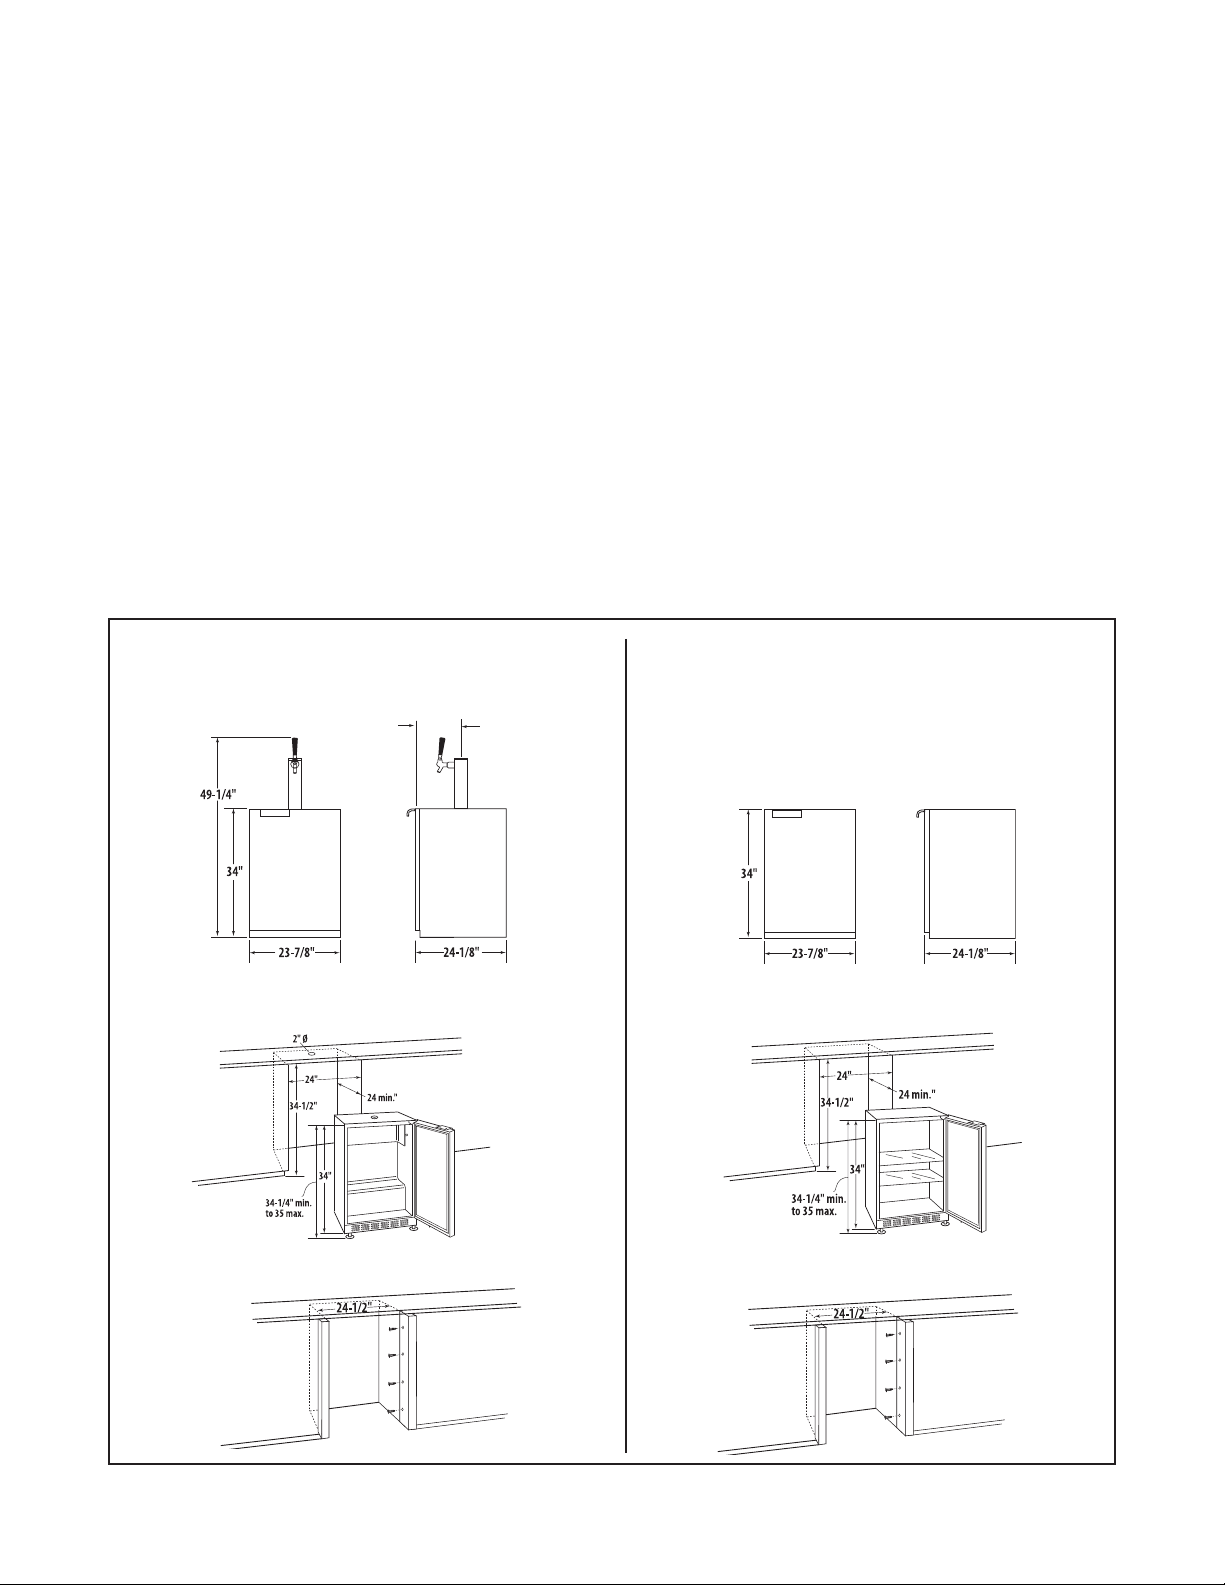
INSTALLATION
13-3/4”
HOW TO INSTALL YOUR OUTDOOR REFRIGERATOR/BEER DISPENSER
SELECT LOCATION:
The proper location will ensure peak per formance of your appliance. Choose a location where the unit will be
out of direct sunlight, away from heat sources and moisture. Units with fan cooled condensers can be built in.
Unit should be operated in a properly ventilated area with ambient temperatures above 40 degrees and below
100 degrees Fahrenheit.
Installation should be such that the cabinet can be moved for servicing if necessary.
CABINET CLEARANCE:
Ventilation is required from the bottom front sec tion of the unit. Keep this area open and clear of any
obstructions.
The adjacent cabinets and counter top can be built around the unit as long as no top trim or counter top is
installed lower than the top of the hinge.
SIDE TRIM INSTALLATION:
Attach side tr im to the inner side of the cabinet so that the trim faces out ward (away from the appliance’s door)
and fasten with appropriate screws suitable for the type of cabinet material.
24” Outdoor Beer Dispenser
Dimensions
Island Preparation with No Side Trim
24” Outdoor Refrigerator
Dimensions
Island Preparation with No Side Trim
Island Preparation with Side Trim Installation
Mounting
screws not
provided
Island Preparation with Side Trim Installation
Mounting
screws not
provided
Fig. 04
6
 Loading...