

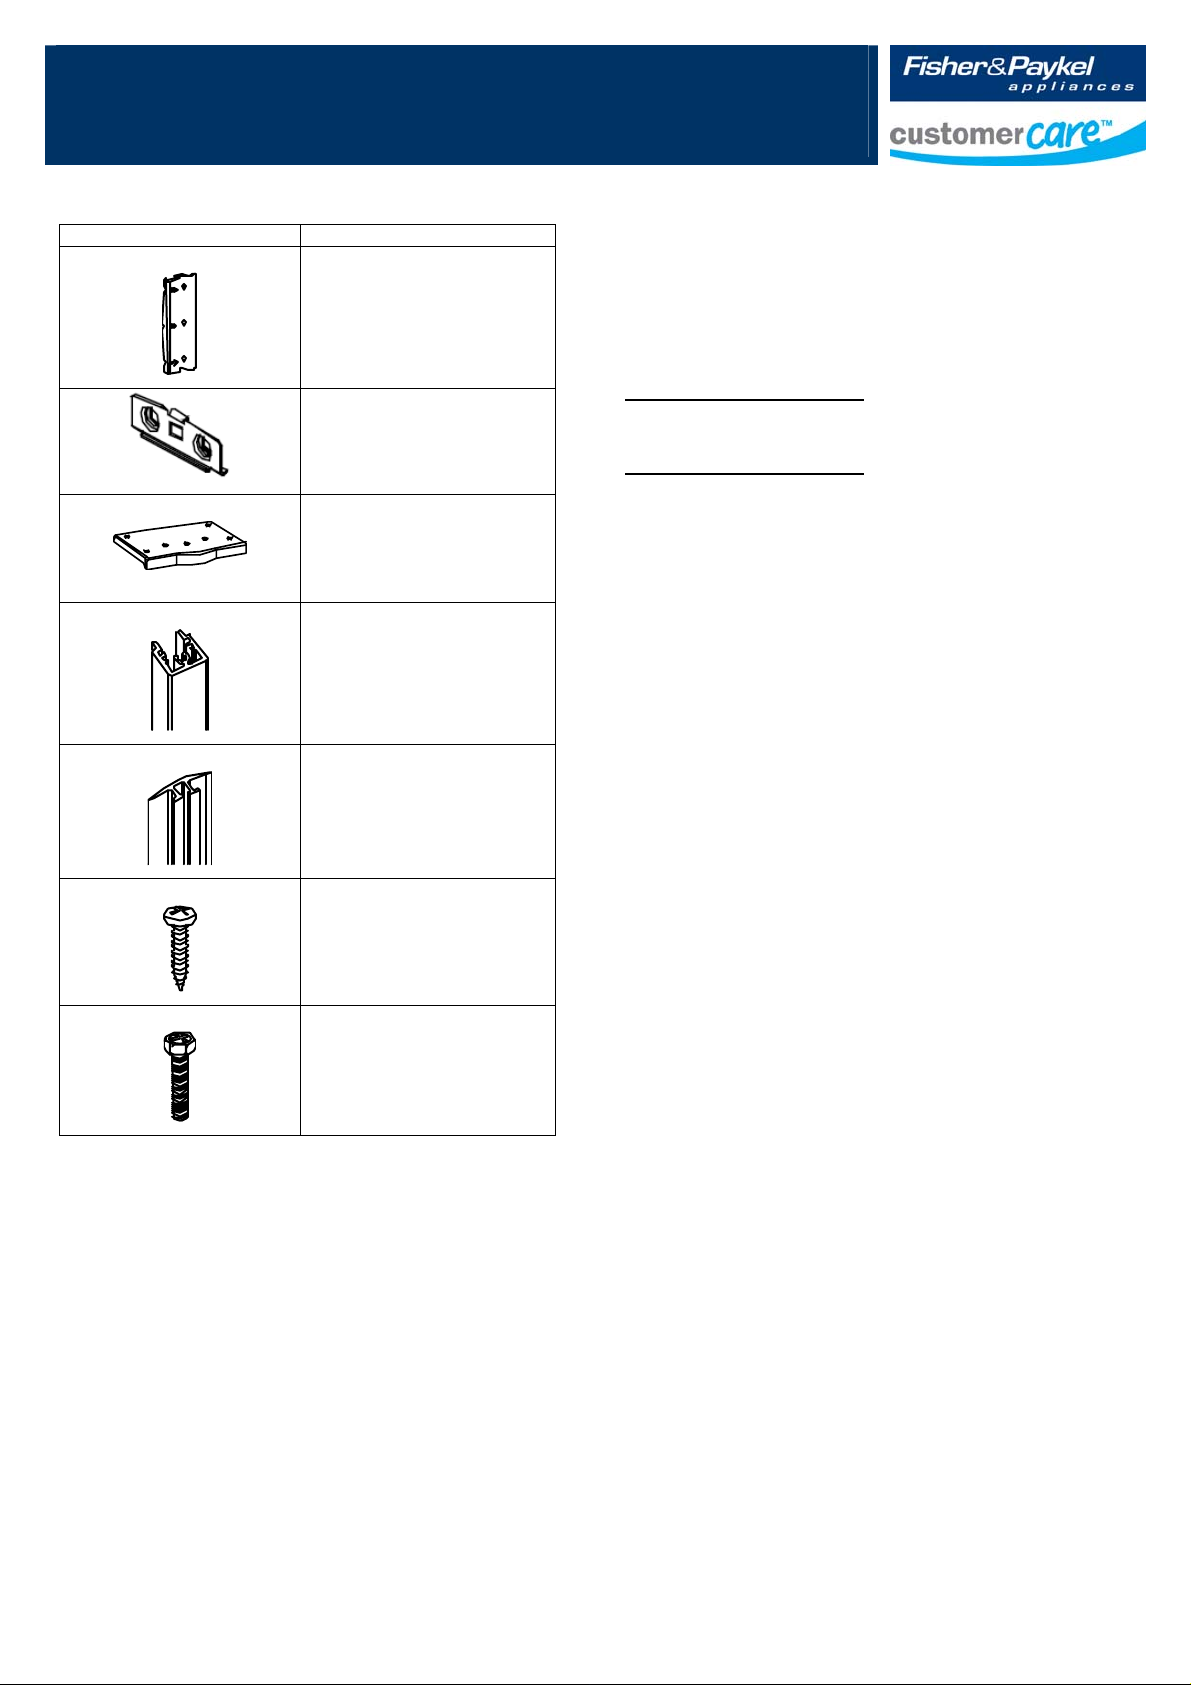
Joiner Kit
For Fisher & Paykel Models: C270, E249T, E240B, E210, E381T, E372B, N388, E388,
C450, E450, E402B, E411T, E415H, E413T, E406B, E440T, E442B, E521T & E522B
KIT COMPONENTS
Part Illustration Description
Rear Bracket
Front Lower Bracket
Front Upper Bracket
Extrusion Support
Extrusion Cover
Screw Type A:
#8x16 PAN PHIL (7)
Screw Type B:
#5x20 HEX PHIL (6)
KIT APPLICATION
This kit is designed for use on 1595mm / 62” & 1695mm / 66”
high cabinet models, incorporating the “B, C, D & G” series
refrigerator or freezer having curved or flat door styling.
Note: This kit can be used for combining any of the following
products of the same height:
1695mm / 66” Tall Cabinets:
N388, E388, C450, E450, E402B, E411T, E415H, E440T,
E442B, E521T, E522B
1595mm / 62” Tall Cabinets:
C270, E249T, E240B, E210, E381, E372B, E413T, E406B
TOOLS REQUIRED
1. Philips type screwdriver
2. Flat blade screwdriver
3. 19mm Socket
JOINER KIT PART NUMBERS
Silver – F&P Part Number 819264
White – F&P Part Number 819263
Introduction Date: October 2007 Pt No.819265 INSTRUCTION KIT JOINER RF
1

Joiner Kit
For Fisher & Paykel Models: C270, E249T, E240B, E210, E381T, E372B, N388, E388, C450, E450, E402B, E411T, E415H, E413T, E406B,
E440T, E442B, E521T & E522B
Models C270 / E249T / E240B / E210
Product Dimensions (mm)
A Width
Combined Models (mm/inches) 525+525 Model 525+635 Model 525+680 Model 635+635 Model 635+680 Model 635+790 Model 680+680 Model 680+790 Model 790+790 Model
B Height
C Width
D Depth of curved door not including
handle
E Depth of flat door not including
handle
Cabinetry Dimensions - including minimum clearances
F Inside height
1. Flush with refrigerator chassis – full door rotation
G Inside width
H Inside depth flush to chassis
2. Flush with refrigerator door – 90° door rotation
I Inside width
J Inside depth flush to curved door
K Inside depth flush to flat door
3. Flush with refrigerator door – full door rotation
L Inside width
M Inside depth flush to curved door
N Inside depth flush to flat door
Minimum clearances
O Side clearance flush with
refrigerator chassis
P Side clearance flush with door 90
rotation
Q Side clearance flush with door full
rotation
R Rear including evaporator tray
S Vent
1595 / 62 ¾ 1595 / 62 ¾ 1595 / 62 ¾ 1695 / 66 ¾ 1695 / 66 ¾ 1695 / 66 ¾ 1695 / 66 ¾ 1695 / 66 ¾ 1695 / 66 ¾
1075 / 42 3/8 1185 / 46 5/8 1230 / 48 ½ 1295 / 51 1340 / 52 ¾ 1450 / 57 1385 / 54 ½ 1495 / 58 7/8 1605 / 63 1/8
572 / 22 ½ 696 / 27 3/8 696 / 27 3/8 696 / 27 3/8 696 / 27 3/8 696 / 27 3/8 696 / 27 3/8 696 / 27 3/8 696 / 27 3/8
N/A 685 / 27 685 / 27 685 / 27 685 / 27 685 / 27 685 / 27 685 / 27 685 / 27
1645 / 64 ¾ 1645 / 64 ¾ 1645 / 64 ¾ 1745 / 68 ¾ 1745 / 68 ¾ 1745 / 68 ¾ 1745 / 68 ¾ 1745 / 68 ¾ 1745 / 68 ¾
1115 / 44 1205 / 47 ½ 1270 / 50 1335 / 51 ½ 1380 / 54 3/8 1490 / 58 5/8 1425 / 56 1/8 1535 / 60 ½ 1645 / 64 ¾
502 / 19 ¾ 620 / 24 3/8 620 / 24 3/8 620 / 24 3/8 620 / 24 3/8 620 / 24 3/8 620 / 24 3/8 620 / 24 3/8 620 / 24 3/8
1125 / 44 3/8 1235/48 5/8 1280/ 50 ½ 1345 / 53 1390/54 ¾ 1500/59 1435/56 ½ 1545/60 7/8 1655/65 1/8
575 / 22 5/8 724 / 28 ½ 724 / 28 ½ 724 / 28 ½ 724 / 28 ½ 724 / 28 ½ 724 / 28 ½ 724 / 28 ½ 724 / 28 ½
N/A 696 / 27 3/8 696 / 27 3/8 696 / 27 3/8 696 / 27 3/8 696 / 27 3/8 696 / 27 3/8 696 / 27 3/8 696 / 27 3/8
1355 / 53 3/8 1465 / 57 ¾ 1510 / 59 ½ 1575 / 62 1620 / 63 ¾ 1730 / 68 1/8 1665 / 65 ½ 1775 / 69 7/8 1885 / 74 ¼
575 / 22 5/8 724 / 28 ½ 724 / 28 ½ 724 / 28 ½ 724 / 28 ½ 724 / 28 ½ 724 / 28 ½ 724 / 28 ½ 724 / 28 ½
N/A 696 / 27 3/8 696 / 27 3/8 696 / 27 3/8 696 / 27 3/8 696 / 27 3/8 696 / 27 3/8 696 / 27 3/8 696 / 27 3/8
20 / ¾ 20 / ¾ 20 / ¾ 20 / ¾ 20 / ¾ 20 / ¾ 20 / ¾ 20 / ¾ 20 / ¾
25 / 1 25 / 1 25 / 1 25 / 1 25 / 1 25 / 1 25 / 1 25 / 1 25 / 1
140 / 5 ½ 140 / 5 ½ 140 / 5 ½ 140 / 5 ½ 140 / 5 ½ 140 / 5 ½ 140 / 5 ½ 140 / 5 ½
30 / 1 1/8 30 / 1 1/8 30 / 1 1/8 30 / 1 1/8 30 / 1 1/8 30 / 1 1/8 30 / 1 1/8 30 / 1 1/8 30 / 1 1/8
50 / 2 50 / 2 50 / 2 50 / 2 50 / 2 50 / 2 50 / 2 50 / 2 50 / 2
525 635 680 790
E381T / E372B / E402B / E411T/ E415H / C450 /
E450 / N388 / E388
E413T / E406B / E440T / E442B E521T / E522B
Introduction Date: October 2007 Pt No.819265 INSTRUCTION KIT JOINER RF
2

Joiner Kit
For Fisher & Paykel Models: C270, E249T, E240B, E210, E381T, E372B, N388, E388, C450, E450, E402B, E411T, E415H, E413T, E406B,
E440T, E442B, E521T & E522B
CAVITY / VENTILATION REQUIREMENTS
Note: For full draw/shelf access the
doors need to open past 90°
Surround Kits are available, please contact Fisher & Paykel Customer Care 0800 FP CARE or 0800 37 2273 for further information on kit sizes and finishes.
Introduction Date: October 2007 Pt No.819265 INSTRUCTION KIT JOINER RF
3

Joiner Kit
For Fisher & Paykel Models: C270, E249T, E240B, E210, E381T, E372B, N388, E388,
C450, E450, E402B, E411T, E415H, E413T, E406B, E440T, E442B, E521T & E522B
PREPARE FOR INSTALLATION
Step1.
1. Check that the internal cupboard cavity dimensions are
correct for the type of installation you require.
2. Unpack the refrigerator and freezer cabinets from their
separate delivery cartons (see individual cartons for
unpacking procedures).
3. Ensure the floor and/or the cupboards are protected from
damage during the unpacking and assembly of the
cabinets.
4. Check the refrigerator and freezer doors are hinged on the
desired side.
5. Check that the Kit is complet e (refer to Joiner Kit parts list
on page 1).
Note: due to the size of the refrigerator cabinets, it is essential
that any assembly of the kit be undertaken with a minimum of
two able-bodied persons.
INSTALLATION PROCEDURE
Step 2.
If your refrigerator has a unit compartment cover at the back,
remove using a Phillips type screw driver (USA market only).
This will be re-attached later.
Looking at the back of the two products, locate the Rear
Bracket onto the rear bottom left hand edge of the right hand
side product. Care must be taken to line up the top edge of the
Rear Bracket with the bottom edge of the white back panel.
Secure the Rear Bracket with 3 of the screws (Type A, self
tapping, silver). These 3 screws are mounted from the side.
Please note there are no pre-drilled holes for these screws
which hold the rear bracket onto the side of the cabinet.
Right hand side cabinet
Do not secure with screws (see page 4).
Left hand side cabinet
Step 4.
Locate the front adjustable feet. One can be found at each of
the cabinet’s front lower corners.
Adjust the two feet by turning either clockwise or anti-clockwise
until the two cabinets are level.
Step 5.
Remove the three screw hole caps from the top surface of each
of the cabinets with a small flat bladed screwdriver by gently
prising them loose. The caps can be found on the front edge of
the top surface of the cabinets, opposite side to the hinge.
Ensure that the top panel is not scratched or deformed during
this process. The total of six screw hole caps are not required
to be used with the kit.
Right hand side cabinet
Step 3
Step 4
Step 2
Step 3.
Locate the left hand side cabinet’s bottom right rear wall within
the open “U” section in the rear bracket. Ensure that the cabinet
sits firmly with the rear bracket.
Introduction Date: October 2007 Pt No.819265 INSTRUCTION KIT JOINER RF
Step 5
4

Joiner Kit
For Fisher & Paykel Models: C270, E249T, E240B, E210, E381T, E372B, N388, E388,
C450, E450, E402B, E411T, E415H, E413T, E406B, E440T, E442B, E521T & E522B
Step 6.
Locate the front upper bracket on the top surface of the two
cabinets, taking care to line up the bosses on the Front Upper
Bracket, with the six screw points.
Note that the large centered rectangular section on the
underside of the front upper bracket acts as a spacer between
the two cabinets. Partially engage all of the screws (Type B,
hex head, silver) prior to their final tightening.
Step 8
To access the adjustable feet and to locate the front lower
bracket, the joined cabinets must be tilted backwards
approximately 60 degrees. This is a two person operation.
The person at the rear of the cabinets must acknowledge that
they have a secure grip of the cabinets prior to any work being
undertaken by the second installer.
Care must be taken not to damage either the cabinets/floor or
the surrounding cupboards during this operation.
Step 6
Step 7.
Ensure the left cabinet is properly located within the rear
bracket and that the cabinets are level. Secure the left cabinet
to the rear bracket using 3 of the screws (Type A, self tapping,
silver).
Now replace the unit compartment cover at the back using a
Phillips type screw driver (USA market only
Left hand
side cabinet
Step 7
)
Right hand
side cabinet
60
Step 8
Step 9
Remove the two Levelling Feet by rotating them anti-clockwise
then remove the two bolts.
Note: C450, E450, E440T, E442B, E521T and E522B may
have an extra component as part of the levelling foot assembly,
this being a stepped plastic washer. If this part is located, it is to
be removed as it is not required to be used with this kit.
Step 9
Introduction Date: October 2007 Pt No.819265 INSTRUCTION KIT JOINER RF
5

Joiner Kit
For Fisher & Paykel Models: C270, E249T, E240B, E210, E381T, E372B, N388, E388,
C450, E450, E402B, E411T, E415H, E413T, E406B, E440T, E442B, E521T & E522B
The Front Lower Bracket is now located on the underside o f the
Cabinets. Care must be taken to orient the bracket so that the
two small tabs are located with the slots on the underside of the
Cabinet.
Step 10
The two Leveling Feet Mounting Bolts are firmly located back
onto the cabinet, securing the Front Lower Bracket.
The two Leveling Feet are now screwed back into their existing
position. Once assembled, lower the Refrigerator assembly
back to a standing position, taking care not to damage it or the
surrounding cupboards/floor.
Step 12
Open both the cabinet doors for easy access to the center join
of the two Cabinets.
Step 10
Step 11
Before loading the Trim Panel Assembly, The six Type B
Screws must be loosened from the Front Top Bracket, so that
the bracket can be freely moved up and down (approximately
5mm/1/8”).
Step 12
Step 13
If using kit on shorter models, cut Trim Panel Assembly
(Extrusion cover & Extrusion support) to length shown in table
below.
Model Trim Height
(mm / inches)
C270, E249T, E240B, E210, E381T,
E372B, E413T, E406B
N388, E388, C450, E450, E402B,
E411T, E415H, E440T, E442B,
E521T, E522B
Locate the Trim Panel Assembly on the upright tab that
protrudes from the Front Lower Bracket.
1562 / 61 ½
1662 / 65 ½
(Standard
Height)
Step 11
Introduction Date: October 2007 Pt No.819265 INSTRUCTION KIT JOINER RF
Step 13
6

Joiner Kit
For Fisher & Paykel Models: C270, E249T, E240B, E210, E381T, E372B, N388, E388,
C450, E450, E402B, E411T, E415H, E413T, E406B, E440T, E442B, E521T & E522B
Step 14
Locate the Trim Panel Assembly under the Front Upper
Bracket. The Front Upper Bracket should be free to move up
and down to aid installation (see diagram 13).
Step 17
Complete the installation by locating the assembled combined
cabinets within the Cupboard Cavity (refer to page 2 for
Cupboard Cavity dimensions).
Step 14
Step 15
Tighten the 6 Type B Screws to locate the Front Upper Bracket.
Secure the Trim Panel Assembly with one screw (Type A, Self
Tapping, Silver).
Step 15
COMPLETE THE INSTALLATION PROCEDURE
Step 16
Close the Refrigerator doors, ensuring that all door seals sit
flush against the front walls of the Cabinets.
Step 17
Step 18
If doors are out of line after installation is complete, undo top
door hinge bracket of the un-aligned door by unscrewing all 3
screws halfway. Align by moving the door left or right. Once
aligned, re-screw the hinge bracket.
Ensure the front leveling feet are adjusted to take the load of
the combined cabinets. Note: Adjusting the leveling feet can
also affect the door alignment.
Step 18
Introduction Date: October 2007 Pt No.819265 INSTRUCTION KIT JOINER RF
7
 Loading...