


CONTENTS
Introduction 2
Accessories 2
Setting Timers & Clocks 3
Controls 7
Cooking Functions 7
Oven Function Cooking Guide 10
Grill Guide 11
Baking Guide 12
Roasting Guide 14
Automatic Cooking 15
Other Features 20
Meat Probe 20
Fat Filter 22
Shelf Positions 22
Cavity Ventilation Fan 22
One Touch Cooking (OTC) 23
Keylock 23
Ceramic Cooktop 24
Cleaning 26
1

INTRODUCTION
Congratulations on the purchase of your new
Built-In Oven.
We strongly recommend that you read these Use
and Care Instructions carefully to take full
advantage of the features offered by this product.
ACCESSORIES
Your Built-In Oven is supplied with:
1 Shallow Tray (Baking)
1 Deep Tray (Grilling/Roasting/Baking)
1 Oven/Grill Rack
1 Meat Probe (Probe/Soft-Touch Model)
1 Fat Filter (Probe/Soft-Touch Model)
1 Pizza Stone (Probe/Soft-Touch Model)
1 Pizza Paddle (Probe/Soft-Touch Model)
2
SETTING TIMERS & CLOCKS
Timer Model
This has a manual timer which can be set for up to
55 minutes.
Timer
The timer can be used at any time, even when the
oven is not in use.
To use the timer, turn the Timer knob clockwise to
the 55 minute mark, then turn back to show the
number of minutes you want. The timer will count
down and will ring when the set time is reached.
The timer does not turn the oven off.
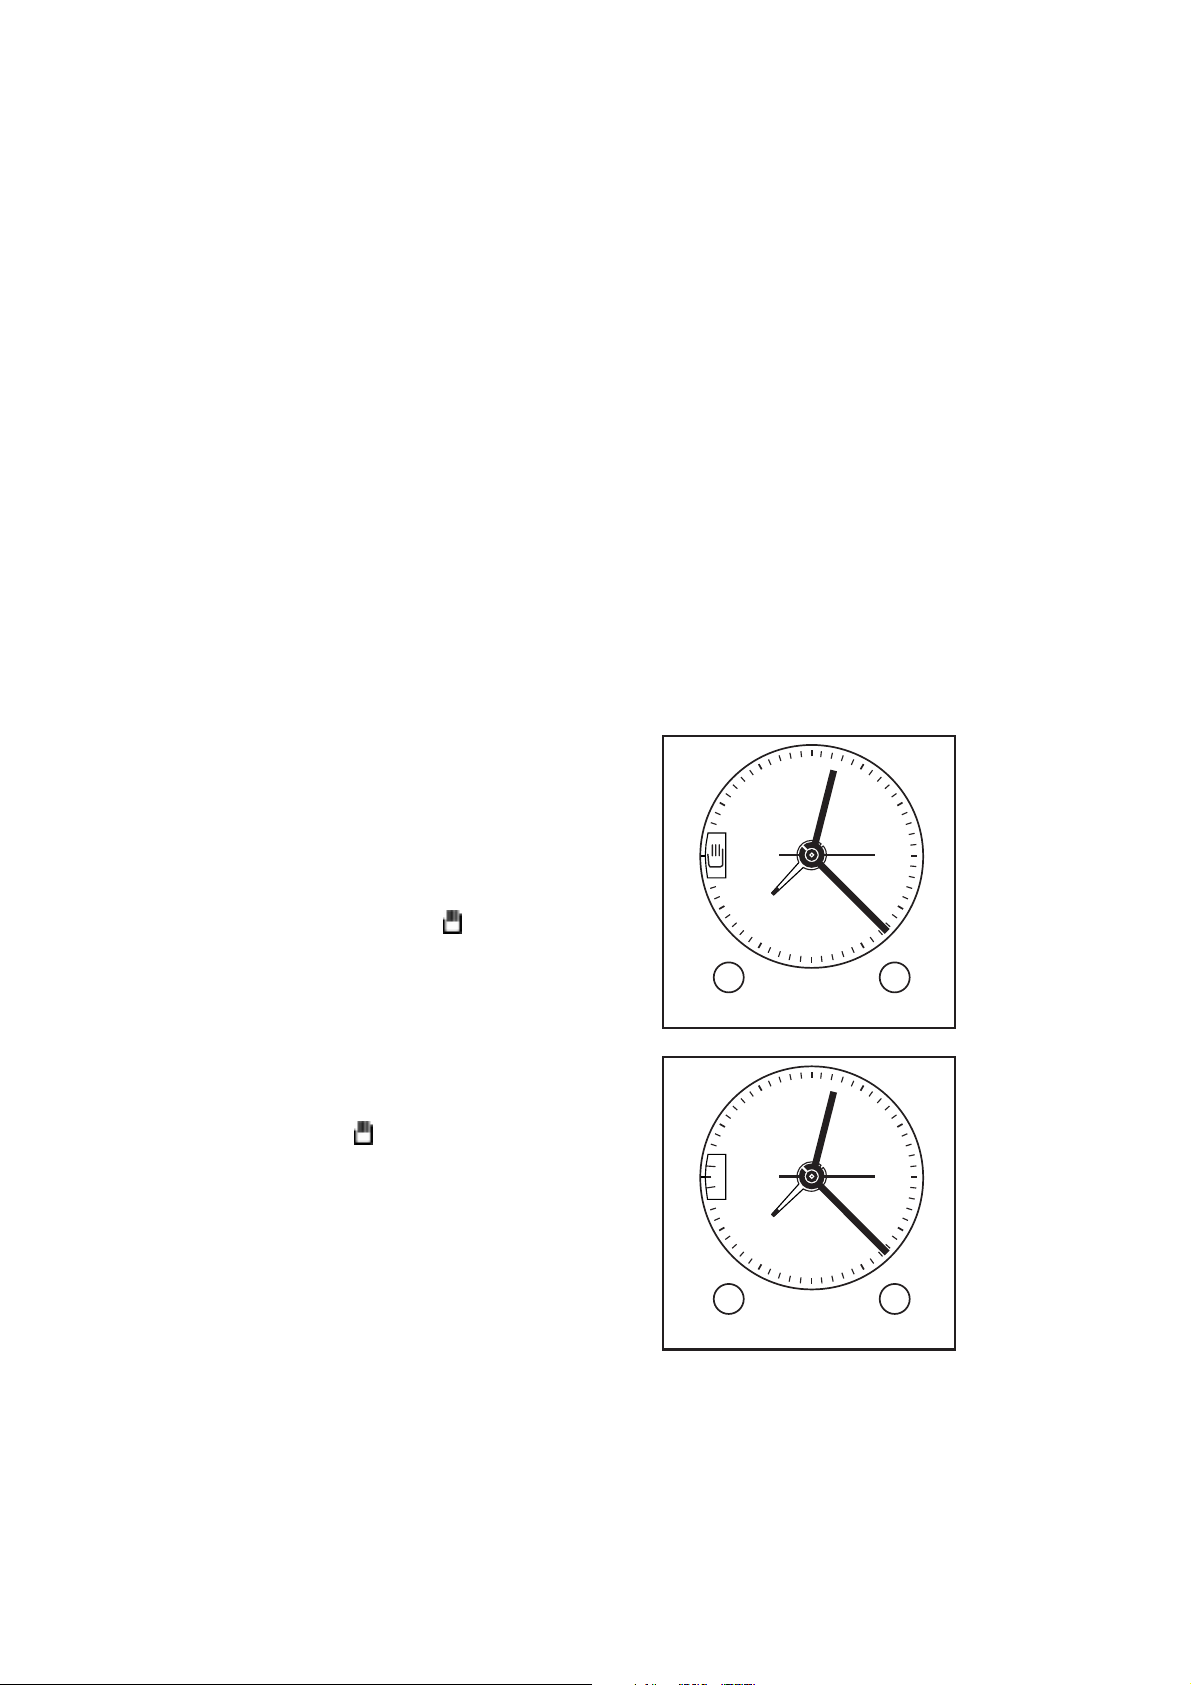
Analogue Clock Model
Setting The Clock
Pull out Cook Time knob and turn in either
direction until the correct time shows on
the clock.
Ensure manual sign shows in window.
Timer
Turn Cook Time knob clockwise to show
number of minutes you want in the centre
of the display window.
12
11
10
1
2
3
8
7
6
COOK TIME START TIME
4
5
When the set time is up a buzzer will sound
until Cook Time knob is turned clockwise
to show in the display window.
If the Timer is used when the oven is
operating, the oven will turn off when the
buzzer sounds.
3
12
11
10
30
8
7
COOK TIME START TIME
1
2
3
4
5
6

Electronic Clock Model
This clock has a 24 hour display and a minute
timer function. It will flash 0.00 alternatively with
'Auto', when it has been turned on at the wall.
Setting The Clock
Press and hold and buttons.
Set the correct time using - / + buttons.
If you make a mistake, press
and start again.
The display will dim between the hours of 22:00
and 06:00.
Minute Timer
The Minute Timer may be used at any time even
when the oven is not in use or when it is set
automatically.
and buttons
Press button briefly.
Set the required time using - / + buttons.
The display will show the time of day with
the timer symbol
Timer is set.
indicating that the
To check remaining time press button
and the remaining time will be displayed
for four seconds before showing time of
day.
TIMER
TIMER
STOP
STOP
When the set time elapses, the timer will
beep. To turn beeps off, press any function
button.
The timer does not turn the oven off.
4

Probe Model
This clock has a 24 hour display and a minute
timer function. It will flash 0.00 alternatively with
and symbols when it has been turned on
at the wall.
Setting The Clock
Press and hold the and stop
buttons and rotate the right hand knob until
the correct time of day is set.
Minute Timer
The Minute Timer may be used at any time even
when the oven is not in use, or when it is set
automatically.
Press the button. The left hand side
display will show 0.00 and symbol.
To set the required time rotate the knob.
The left hand display will show the set time
and symbol .
The timer will count down in one second
steps under one minute.
When the set time elapses, the timer will
beep. To turn beeps off, press any function
button.
The timer does not turn the oven off.
5

Soft Touch Model
This clock has a 12 hour display and a minute
timer function. The dot will flash when it has been
turned on at the wall.
Setting The Clock
Press CLOCK.
Select the time of day using HOURS and
MINUTES buttons.
After a few seconds the dot will stop
flashing. this means the time is set.
Minute Timer
The Minute Timer can be used at any time after the
clock has been set, even when the oven is not in
use.
Press MINUTE TIMER button. 'TIMER' will
flash.
Use HOURS and MINUTES buttons to enter
length of time you need.
The TIMER will automatically begin to
count down.
When the set time elapses, the TIMER will
flash and the beeper will sound. Press any
button to stop beeping and clear timer.
6

CONTROLS
Select required function using Function knob, then select the temperature you want with the
Temperature knob. The oven light will come on automatically when a function is selected.
The oven indicator light will glow until the oven has reached the set temperature.
When you have finished cooking turn the oven off.
Soft-Touch Models Only
Press ON/OFF button. Your oven has been pre-set to Fan Bake 160°C.
Press FUNCTION
or ¿to select required function.
¾
Modify TEMPERATURE as required. The temeprature display moves in 5°C steps.
The oven indicator light will glow until the oven has reached the set temperature.
When you have finished cooking, turn your oven off by pressing the ON/OFF button.
COOKING FUNCTIONS
There are a variety of cooking functions depending on the model of Built-In Oven you have.
Fan Cooking
Your Built-In Oven may have some of the following fan functions. A fan circulates air giving
more even distribution of temperatures throughout the oven. Fan functions allow you to cook
individual foods or several foods on different shelves and can be successfully used for most
foods.
Fan Bake
A separate fan at the back of the oven circulates hot air from the top and bottom elements
around the oven. Fan Bake is suitable for baked products, slices and pastries.
Fan/Multi Fan
Multi level fan forced cooking circulates heat from an element around the fan throughout the
oven. This function is particularly good for multi tray cooking, reheating cooked foods and
complete oven meals.
Fan Grill
The fan circulates heat from the grill element around the oven. This style of grilling takes the
place of a rotisserie. Fan Grill is suitable for foods you would normally fry e.g. sausages and
meatballs.
7

Grill
To use the grill, select Grill or Eco Grill on the Function knob. The grill can be set to the
required heat by using the Temperature knob. The hottest temperature is achieved at Hi. We
recommend that this temperature is used for grilling meats.
Soft-Touch Models
To use the grill, select Grill on the Function button. The grill can be set to E Eco Grill or H
Full Grill. Both modes have 9 selectable steps which vary the time the elements are on. The
hottest temperature is achieved at Step 9. We recommend that this temperature is used for
grilling meats.
For best results when grilling, leave the oven door open at the first stop position. Foods to be
grilled are placed on the grill rack in the deep tray so they can be positioned in the oven
together.
Eco Grill (E) Full Grill (H)
High E9 H9
E8 H8
E7 H7
E6 H6
Medium E5 H5
E4 H4
E3 H3
E2 H2
Low E1 H1
8

Grill
Grill cooks a larger area of food by using heat from an upper element and is suitable for
family meals or larger amounts of food.
Eco Grill
Eco Grill is suitable for single servings or small pieces of food. By using it, you save energy
by heating a smaller grill area.
When using Eco Grill place your food in the middle of the grill rack.
Bake
Heat comes from the top and bottom of the oven. The bottom element is concealed beneath
the liner cover.
For baked products you will achieve a better result if the oven is pre-heated first.
Bake is suitable for cooking one tray of food at a time.
Classic Bake
With Classic Bake the heat comes from the bottom of the oven only, making it particularly
good for quiches and pies. Preheat on Bake or Fan Bake and when the oven has reached the
required cooking temperature, switch to Classic Bake.
Defrost
The Defrost function uses low temperature air that is circulated by the fan. The temperature
should be set at 50°C at all times. This enables food to be thawed without cooking. Defrost is
also suitable for rising yeast dough and drying fruit, vegetables and herbs.
Warm
Warm is a cosntant low heat. It is useful for keeping hot food warm or for warming plates and
serving dishes.
Warm should not be used to reheat foods, as the food will not reach a temperature high
enough to kill harmful bacteria which may be present.
Warning
We do not advise placing aluminium foil or dishes with reflective qualities on the oven
bottom. This will cause a heat build up which will reuslt in irreversible damage to the
enamel.
9

OVEN FUNCTION COOKING GUIDE
Food Bake Fan/ Fan Classic Grill Fan
Multi Bake Bake Grill
Fan
Baked Products
Biscuits Single Tray mm
2-3 Trays m l m
Slices m
Cake Butter
Cake Fruit
Sponge
Meringues mm
Scones mm l
Muffins mm l
Pastry & Pies
Bacon & Egg Pie m
Lemon Meringue Pie m
Quiche mm
Meats
Beef Roast l mm
Steak
Lamb Roast m l
Chops m l
Pork Roast m l
Chops m l
l m
l mm
l m
l
l m
l
l m
l m
l
l
Poultry
Chicken Whole mm l
Pieces m l
Casseroles m l
Complete Oven Meals l m
Reheating
l
l Recommended Method
m Alternative Methods
10

GRILL GUIDE
Food Shelf Grill Time Shelf Fan Grill Time
Temp (Min) Temp°C (Min)
Beef
Steak Rare 4 Hi / 9 8-10
Medium 5 Hi / 9 10-15
Well Done 5 Hi / 9 15-20
Hamburgers Well Done 5 Hi / 9 12-15 5 220-225 15-20
Meatballs Well Done 5 Hi / 9 12-15 5 190-210 10-15
Lamb
Chops Medium 5 Hi / 8 15-20 5 200-225 15-20
Well Done 5 Hi / 9 20-25 5 200-225 20-25
Rack Medium 7 190-210 20-30
Pork
Chops Well Done 4 Hi / 9 15-20 5 190-210 20-25
Ham Steak Well Done 5 Hi / 8 15-20 5 220-225 15-20
Bacon 3 Hi / 8 4-6 4 220-225 10-15
Sausages 3 Hi / 7 10-15 5 200-225 10-15
Chicken
Pieces Well Done 5 160-175 30-45
Whole Well Done 7 175 30-35
per 500g
Shelf positions are numbered from the top down.
Grill is carried out with the door open to the first stop position and preheated until the grill
element is hot and has turned red. The grill element does not cycle on and off.
Fan Grilling is carried out with the door closed and the oven does not need to be preheated.
The grill element cycles on and off and the hot air is circulated by the oven fan. The
thermostat maintains the set temperature. Fan Grill is suitable for products that you would
normally pan fry, barbecue or rotisserie and for larger cuts of meat.
Foods to be Grilled or Fan Grilled are placed on the grill rack in the deep tray so they can be
positioned in the oven together. For Grill, the rack and tray are slotted into the upper runners
depending on the thickness of the food and how well cooked the food is required. Fan Grill
may require the food to be placed lower in the oven.
The times given are a guide only and will be affected by the thickness of the food being
cooked.
11

BAKING GUIDE
Shelf Bake Time Shelf Fan Bake
Temp °C (Min) Temp °C
Baked Products
Biscuits 6 170-180 10-20 5&6 160-175
Slices 7 170-180 20-30 7 150-175
Shortbread 6 150-160 25-35 6 140-150
Cake Butter/Choc 8 150-175 55-75 8 150-160
Fruit Light 8 150-170 1-1
Fruit Rich 8 135-150 4-6hrs 8 125-150
Sponge 7 170-190 20-40 7 160-175
Muffins 6 200-220 15-20 6 190-210
Meringues 7 110-130 50-70 6 105-120
Scones 6 215-230 10-15 6 200-215
Bread/Rolls 7 190-220 10-15 7 175-200
Pizza 8 225-250 15-20 6&8 200-230
Quickbread 8 140-160 1-1
Pastry
Phyllo 7 175-190 30-35 7 150-160
Flaky/Puff 6 225-250 10-20 6 200-220
Choux 6 185-210 35-45 6 175-200
Quiche 7 200-220 20-30 7 180-200
Bacon & Egg Pie 7 180-190 30-50 7 170-180
Custard Tart 7 220/180 30-50 7 200/160
Lemon Meringue Pie 7 170-180 15/20 7 165-175
1
/2 hrs 8 145-160
1
/4 hrs 8 130-150
Family Favourites
Lasagne 7 170-180 25-35 7 150-160
Macaroni Cheese 7 190-200 20-30 7 170-180
Shepherds Pie 7 190-200 20-30 7 170-180
Meat Loaf 7 175-190 50-60 7 170-180
Chicken Pieces 6 175-180 45-50 7 155-170
Chicken Casserole 7 175-190 50-65 7 150-165
Fish Pie 7 180-195 25-30 7 170-180
Baking Guide
The times, temperatures and shelf positions shown are given as a guide only.
The results achieved may be affected by a large number of factors.
To achieve the result you require adjust times, temperatures and shelf positions.
12

Shelf Fan Bake Time Shelf Fan/Multi Fan Time
Temp °C (Min) Temp °C (Min)
5&6 160-175 8-15 5&7 170-180 8-15
7 150-175 20-30 6 170-190 20-30
6 140-150 20-30 6 150-160 20-30
8 150-160 55-75 8 150-170 55-75
8 145-160 1-1
8 125-150 4-6 hrs 7 130-150 4-6 hrs
7 160-175 20-30 7 170-190 25-35
6 190-210 15-20 6 200-220 20-30
6 105-120 50-70 7 110-130 50-70
6 200-215 10-15 6 210-225 10-15
7 175-200 10-15 7 180-210 10-15
6&8 200-230 15-20 6&7 225-250 15-20
8 130-150 1-1
7 150-160 25-30 7 160-175 30-35
6 200-220 10-20 6 210-225 10-20
6 175-200 30-40 6&7 180-200 35-45
7 180-200 20-30 7 190-210 20-30
7 170-180 30-50 7 170-190 30-50
7 200/160 30-50 7 220/180 30-50
7 165-175 10/20 7 170-180 10/10
1
/2 hrs 8 150-170 11/2-13/4 hrs
1
/4 hrs 8 140-160 1-11/4 hrs
7 150-160 25-35 7 150-160 25-35
7 170-180 20-30 7 180-190 25-35
7 170-180 25-35 7 175-190 25-35
7 170-180 40-55 7 175-190 45-50
7 155-170 45-50 7 170-180 45-50
7 150-165 45-60 7 170-180 45-60
7 170-180 20-30 7 180-190 25-35
13

ROASTING GUIDE
Meat Temp Minutes
Internal
°C per 500g Temp °C
Beef Rare 160-170 30-35 60-65
Medium 160-170 35-45 65-75
Well Done 160-170 45-60 75-80
Mutton Well Done 160-170 45-60 80-85
Hogget / Lamb Medium 160-170 30-40 79-82
Well Done 160-170 45-60 82-85
Pork Well Done 180-185 40-45 78
Chicken Well Done 160-180 25-30
Cervena * Rare 220 3
* Brown prior to roasting in an oiled frypan on high heat.
These temperatures and times are a guide only and you may need to increase or decrease
these depending on your preferences.
A large piece of meat requires fewer minutes per 500g than a smaller piece. Roasting times
will be affected by the shape and size of the meat being roasted. Meat with a bone will cook
more quickly than a rolled roast.
Do not add water to your roast as this has a steaming affect.
Use a meat thermometer or meat probe to ensure an accurate result. As the internal
temperature of the meat will continue to rise during standing, please allow for this in your
calculation. This is particularly important if you want a rare or medium rare roast.
1
/2 per cm 65-70
thickness
14

AUTOMATIC COOKING
Use automatic cooking if you want your oven to
automatically turn on, cook, then turn off.
To set automatic cooking you must first decide
how long you want your food to cook for and the
time you want it to be finish cooking.
Analogue Clock Model
To Set Automatic Cooking
Check the clock shows correct time. Select
Function and Temperature that you need. The
oven indicator light will glow and the elements will
come on. Decide how long the food will take to
cook allowing time for preheating if necessary.
Turn COOK TIME knob clockwise to show
the cook time. The minutes set will show in
the display window.
Decide time that oven must come on. This
is the time you wish the oven to turn off
minus the length of cooking time set.
12
11
10
1
2
3
8
7
6
COOK TIME START TIME
4
5
Push START knob in firmly to engage , then
turn until shortest or coloured hand shows
the time oven is to turn on. The indicator
light will go out.
The oven is now set for automatic cooking.
Automatic Stop Cooking
Use Automatic Stop Cooking if you are at home
to start cooking but want the oven to turn off
automatically.
To set for Automatic Stop Cooking follow the first
four steps for automatic cooking.
15

After Use
Turn COOK TIME knob clockwise until appears
in the display window.
To Cancel Automatic Cooking
Turn COOK TIME knob clockwise until the manual
sign shows in the display window. Turn START
knob until shortest hand shows the same time as
the time of day and a click is heard.
Turn Temperature and Function Off.
Electronic Clock Models
You do not have to set a start time for electronic
clocks. The clock will automatically deduct the
cook time from the stop time to start.
To Set Automatic Cooking
Check that the clock shows the correct time.
Select Function and Temperature that you need.
The oven indicator light will glow and the element
will come on. Decide how long the food will take
to cook allowing time for preheating if needed.
Press button, 0.00 will show, then
using - / + buttons, set the cooking time.
To set oven to turn off, press . Enter the
time at which you would like the food to
finish cooking using - / + buttons.
TIMER
STOP
A
U
T
O
If there is time to wait before the Cook Time
starts, the time of day and 'Auto' are shown
on the clock display and the clock display
dims. The oven element turns off when the
setting is complete.
During the automatic cooking, the cook
symbol and 'Auto' are shown in the
clock display.
When the cook time is finished, the oven
will beep, the cook symbol goes out and
the oven turns off, 'Auto' flashes.
Turn Temperature and Function to OFF and
press button to return to manual.
16

Automatic Stop Cooking
This can be used if you are home to start cooking
but want the oven to turn off automatically.
To set for Automatic Stop Cooking, follow the first
four steps for Automatic Cooking.
To Cancel Automatic Cooking
Press button and press - / + button to 0.00.
'Auto' will flash. Press the
Temperature and Function off.
button. Turn
To Check Automatic Cooking
Press button and set Cook Time will show.
Press
button and set Stop Time will show.
Probe Model
You do not have to set a start time for electronic
clocks. The clock will automatically deduct the
cook time from the stop time to start.
To Set Automatic Cooking
Check that your clock shows the correct time.
Select the Function and Temperature that you
need. The oven indicator light will glow and the
elements will come on. Decide how long the food
will take to cook allowing time for preheating if
needed.
TIMER
AUTO
STOP
Press and hold the button, 0.00 and
will show in the display. Rotate the
➔
knob to set the cooking time needed.
Press and hold the button and rotate
the knob to choose the time you would like
the food to finish cooking.
If there is time to wait before the food starts
cooking, the clock shows the time of day
and 'Auto'
➔
and
When cooking starts the
goes out.
in the display.
➔
➔
symbol
17

When the cook time is finished the oven
will beep, 'Auto' and
➔
will flash.
Turn the oven off and press twice to
return to manual.
Automatic Stop Cooking
Check that the clock shows the correct time of day.
Select Function and Temperature that you need.
The oven indicator light will glow and the element
will come on.
➔
➔
will
Press and hold the button. 0.00 and
show in the display. Rotate the knob to set the
cooking time needed.
When cooking is finished 'Auto' and
flash. Press
twice to return to manual.
To Cancel Automatic Cooking
Press and rotate right hand knob so 0.00
shows in the display. Press to return to
manual.
Turn Function and Temperature Off.
To Check Automatic Cooking
Press button and set Cook Time will show.
Press
and set Stop Time will show.
will
18

Soft-Touch Model
You do not have to set a start time for Soft Touch
Clocks
To Set Automatic Cooking
Check the clock shows correct time. Select
Function and Temperature that you need. The
oven indicator light will glow and the elements will
come on. Decide how long the food will take to
cook allowing time for preheating if necessary.
· Press COOK TIME then using HOURS and
MINUTES buttons, set the cooking time.
'Auto' will show in the clock display.
· To set the oven to turn off, press STOP
TIME. 'Stop Time' will flash. Enter the the
time you would like the food to finish
cooking using the HOURS and MINUTES
buttons.
· If there is time to wait before the Cook Time
starts, the time of day and 'Auto' are
shown in the clock display. The oven
element turns off when the setting is
complete.
· When the cook time is finished, the oven
will beep and turn off and 'Auto' flashes.
Press any button to stop beeping and clear
'Auto'.
Automatic Stop Cooking
Use Automatic Stop Cooking if you are at home to
start cooking but want the oven to turn off
automatically.
To set for Automatic Stop Cooking follow the first
step for Automatic Cooking.
To Cancel Automatic Cooking
Press CLEAR to cancel automatic function. If the
oven is On press On/Off to turn Off.
To Check Automatic Cooking
· Press COOK TIME button and Set Cook
Time will show for a few seconds.
· Press STOP TIME button and Set Stop Time
will show for a few seconds.
· Press ON/OFF buttons to show set
temperature and function for a few seconds.
19

OTHER FEATURES
MEAT PROBE
Probe Model
The meat probe will record the internal temperature of large portions of meat automatically
turning the oven off when the set temperature is reached. This allows you to achieve a more
accurate result. It will work equally well on Bake, Fan Bake or Fan Grill.
To Use
Make an insertion into the thickest part of the meat with a sharp knife. Insert the probe
into the meat.
Place the meat in a pan and place in the oven. Lift up socket cover and plug probe
into socket. 60°C will light up in the display. The probe symbol will flash.
Select Function and Temperature.
Press and hold button and rotate the right hand knob to set the required internal
meat temperature.
The display will show the internal temperature of the meat as it cooks.
When the set internal temperature is reached a beeper sounds and the display flashes.
The oven will automatically turn off. Press the button to turn the beeps off. The
display will stop flashing when you unplug the probe. Refer to the roast chart for
suggested internal temperatures.
20

Soft-Touch Model
To Use
· Make an insertion into the thickest part of the meat with a sharp knife. Insert the probe
into the meat.
· Place the meat in a pan and place in the oven. Select the Function and Temperature.
· Lift up the socket cover and plug probe into socket. The last used probe temperature
and 'PROBE' will show in the display. If the meat is frozen or near frozen 'PROBE'
may not light immediately.
· To modify the probe temperature, press TEMPERATURE button. The temperature
changes in 1°C steps. To check oven temperature, press PROBE button. The display
will automatically go back to the set probe temperature.
· The probe display will alternate between the actual meat temperature and the set
probe temperature.
· When the set internal temperature is reached, the beeper sounds and 'AUTO' flashes.
The oven will automatically turn off. Press any button to stop beeping and clear
'AUTO'. Refer to the roast chart for suggested internal temperatures.
21

FAT FILTER
The fat filter protects the fan against fat build up.
The filter should be in place when fan functions
are being used for roasting. Do not use when
cooking baked products on fan functions.
To Use
Hold the fat filter by the handle.
Insert the two tabs into the oval holes in the
fan cover.
The fat filter must cover the opening
completely.
SHELF POSITIONS
Shelf positions are numbered from the top down.
The top positions are for grill functions.
The cooking table gives you suggested shelf
positions, however you may wish to change these
to suit yourself.
The rack can be used to support cake tins but is
also used as a rack for grill and roast functions.
The rack sits inside the deep tray so they can be
placed in the oven together.
The shallow tray is a baking tray for biscuits and
baked products. It can also be used to support
dishes for multi level cooking.
1
2
3
4
5
6
7
8
The deep tray can be used with the rack for grilling
and roasting or as an additional tray for baking.
CAVITY VENTILATION FAN
A cavity ventilation fan is included in Built-In
Ovens. This will come on whenever the oven is in
use. It will blow warm air out above the door. The
cavity ventilation fan will automatically turn off
when the oven is turned off.
On Soft-Touch models, the fan will stay on until
the oven cools down.
22

ONE TOUCH COOKING (OTC)
Soft-Touch Models
One Touch Cooking enables you to store a programme in the ovens memory. This may be a
simple set of instructions or may include automatic steps as well.
To Save OTC
· Turn oven on; set the required function and temperature.
· If Automatic Cooking is required set COOK TIME and STOP TIME.
· Press OTC button while COOK TIME or STOP TIME is still flashing. 'OTC' lights up.
· Turn oven off if OTC is not required immediately. 'OTC' will remain lit.
· 'OTC' remains lit whenever an OTC is stored in memory. If the power is turned off,
the OTC memory will be cleared.
To Recall OTC
Press OTC button. The oven will display the programme you have stored and start
automatically. The oven function and temperature can be altered while the oven is on, but
your original setting will remain unchanged in the ovens memory unless it is changed using
the above steps.
To Clear OTC
Press OTC twice within two seconds. The 'OTC' light goes out and the memory is cleared.
KEYLOCK
The keylock prevents your oven being turned on accidentally. For safety reasons your
Built-In Oven can still be turned off when the keylock is on.
To Turn Keylock On
· Press and hold KEYLOCK button for two seconds. 'KEYLOCK' will flash. A beep will
sound at the beginning and end of the two-second period. 'KEYLOCK' will remain lit.
· All buttons are now locked.
To Unlock Keylock
Press and hold KEYLOCK for two seconds. 'Keylock' will go out.
23

CERAMIC COOKTOP
The Ceramic Cooktop is made from glass ceramic, a tough material which is not affected by
changes in temperature. If cared for, it will continue to function well and look attractive for
many years.
Elements
Your cooktop has four individual elements, one of which is a dual circuit element. The
diameters of the cooking area are clearly marked.
The elements become red when turned on full and corresponding indicator lights glow on the
control area.
Temperature limiters are fitted to the element to prevent the glass from overheating. The
limiters may turn the elements on and off during cooking.
Surface Hot Indicator Lights
The surface hot indicator lights are marked on the ceramic glass. The indicator lights will
glow when the element is above a safe touch temperature. After the element control has
been turned off they will continue to glow until the element surface has cooled down to a
temperature that is safe to touch.
Controls
The controls on the underbench oven are push and turn as a safety feature to deter children
from turning the Cooktop on.
As the control knob is turned clockwise, the heat output is increased.
24

Dual Element Controls
To heat the entire element, push and turn control anti-clockwise to Hi.
To heat inner part only, push and turn control clockwise to Hi.
Utensils
To get the best use out of your Cooktop, you may need to look at the following points when
selecting utensils:
The bottom of your cookware should match the size of the cooking area. The
saucepan bottom should be at the most 5mm smaller to 10mm larger than the heated
surface.
When cold, the saucepan bottom must be bowed slightly away from the Cooktop so
that it is flat when heated.
The saucepan bottom must be of sufficient thickness to give even temperature
distribution.
Cookware with uneven bottoms should be smooth with no jagged edges as these will
scratch your Cooktop.
Aluminium and copper cookware can cause a metallic residue to remain on the
Cooktop. This should be removed immediately after use. If this is left it will no longer
be removable from the Ceramic Cooktop.
Saucepan bottoms should always be dry as prolonged use of wet bottomed saucepans
will cause staining to the Cooktop.
25

CLEANING
Before cleaning we recommend turning the oven
off at the wall. Wipe the outside surfaces
frequently using warm water and a household
detergent or a spray on, wipe off cleaner.
Oven Door
To remove the oven door for easier cleaning:
Open the door fully.
Lift the clips back towards you onto the
hooks.
Raise door slightly, holding on either side
near the handle, making sure that the clips
stay on the hooks.
Lift the door out.
To put door back on, place upper hinge
arm in upper slot and lower hinge arm in
the lower slot. Push the hinges in as far as
they will go until the slot in the lower arm
locates the hinge support.
Hook
Door
Hinge
Lower door gently. The clips will be
released from the hooks.
Raise the door slightly and ensure the clips
are released from the hooks.
Close the door.
Oven Fan Cover
To remove the fan cover:
Place your hands on the sides of the fan
cover.
Lift up and out to unclip the locating hook
and tongues on the cover from the oven
rear.
To replace, fit in the reverse order.
26
Clip

Oven and Oven Runners
Clean the inside of the oven while still warm, using household detergents or an ammonia
based cleaner, e.g. Handy Andy. "Off the shelf" oven cleaners may be used providing the
instructions supplied by the manufacturer are followed carefully. Do not use oven cleaner on
self cleaning liners. The wire side runners may be removed to make cleaning easier.
To remove the runners:
Gently push the retaining wire underneath the stud down then lift the runners up and
towards the centre of the oven. The prongs at the top will slide out.
To replace the runners, hold the runner and push prongs fully into small slots at top of
oven cavity.
Lower runners and gently place retaining wire underneath the stud.
Warning
Do not lower runners until prongs are fully inserted.
Self Cleaning Liners
Self cleaning liners are fitted in some models of Built-In ovens. They help reduce manual
oven cleaning.
Self cleaning liners are fitted to the side walls and back of the oven. The liners are coated
with a special enamel which is porous and contains oxidising catalysts.
Any grease and dirt coming into contact with the liner is absorbed by the enamel and is
broken down with the help of the oxidising catalysts at normal cooking temperatures.
As cleaning is improved by using a high temperature, it may be necessary to run the oven at
Fan Grill, maximum temperature for one or two hours if needed.
The oven roof is self cleaning as the heat from the grill element will break down grease and
dirt which may be deposited.
Warning
Do not use any detergent, abrasives or oven cleaners on self cleaning liners.
Fat Filter
The fat filter should be cleaned after every use. For normal soiling, place in a dishwasher on
normal wash. If the fat filter is very dirty, place in a saucepan with either 2 tablespoons of
washing powder, or 1 tablespoon of dishwasher powder. Bring to the boil and leave to soak
for at least 30 minutes. Rinse the filter in clean water and dry.
27

Ceramic Cooktop
To keep your Cooktop looking attractive, it is important to clean it regularly.
Normal wear and tear will occur but this will not affect the performance of your Cooktop.
Prior to cleaning your Cooktop, remove any food, spillovers, grease or staining with the razor
blade scraper supplied. Clean the Cooktop while it is still warm to touch. Rinse and wipe dry
with a clean cloth or paper towel. The Cooktop may become stained if cleaning residue
remains.
Cleaners
Mica, Cera-clean, Steel Fix and Hillmark Ceram-X are the recommended cleaners for Ceramic
Cooktop. Do not use abrasive sponges of any type.
Corrosive cleaners such as oven sprays and stain removers should not be used.
Spillovers
Clean the following spillover immediately using the razor blade scraper provided. Do not
let these cool on the cooktop. If allowed to cool, pitting will occur on the surface.
Sugar and sugar syrup
Jam
Melted plastics and plastic wrap
Melted aluminium foil
Anything that MELTS on the ceramic surface may cause pitting if it is left to cool before
removing.
Pitting may also occur when a food with a high sugar content is spilt on the cooktop and not
cleaned up immediately.
Remember that some vegetables, e.g. peas and swedes have a naturally high sugar content.
The use of a conditioner will help prevent molten material bonding with the glass ceramic
causing pitting. The spill must still be removed immediately. The conditioner will only
protect the cooktop for one use and must be re-applied after every use.
Wipe up splashes and spills using a clean damp cloth or damp paper towels.
Metallic Stains
These show as a metallic sheen on the smoothtop. They may be caused by copper-based or
aluminium saucepans. For regular use in removing metallic stains, use Mica, Cera-clean,
Steel Fix and Hillmark Ceram-X.
If the stain is allowed to burn onto the surface, it may react with the glass ceramic and will no
longer be removable.
28

NOTES
29


 Loading...