


®
argusX1
Quick Start Manual
BIOTEC-FISCHER GmbH * Daimlerstrasse 6 * 35447 Reiskirchen
Tel.: +49-6408-6072 * Fax: +49-6408-64165
e-mail: info@biotec-fischer.de

Short operating instruction for
Bio-Imaging-Control-Software
argus X1
To this means of work:
Version 4/5
This short operating instruction is meant for first and re-users to enable them a faster start with the
argusX1 software made by biostep.
Page 1 of 25
Start of the program/ Image creation
After having installed the software properly (see separate installation instructions), press the button
argus X1
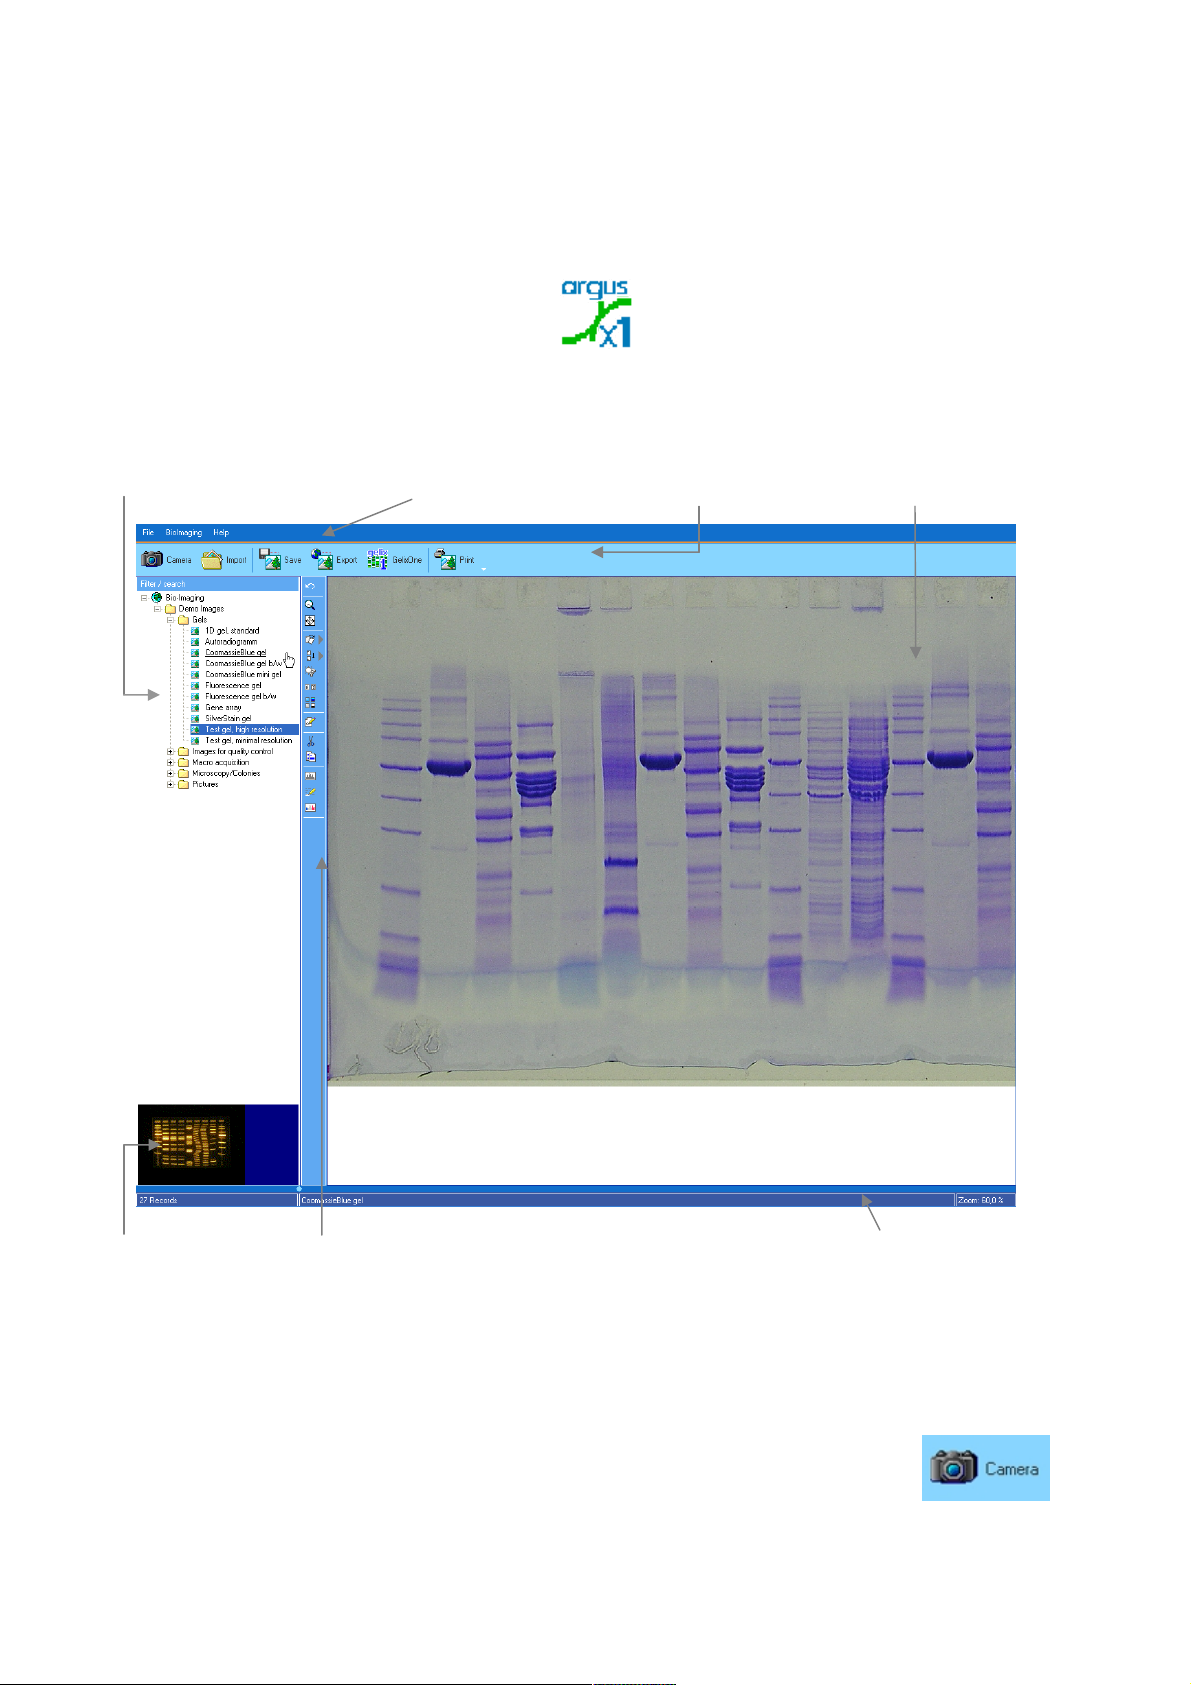
After that, the program window of argusX1 appears on the monitor.
Window Database Menu bar Symbol bar of the Image Processing window
main functions (current loaded image)
on the desktop or go over the program menu of Windows for starting the software.
Preview window Symbol bar Image processing Status bar
The following cameras can be controlled with argusX1, if their internal controller
software has been modified by biostep:
Olympus C-2040, C-3040, C-4040, C-4000, C-750, C-5050, C-5060, C-7070, C-8080
For activating the camera, put the choice switch of the camera on exposure
amera
mode (e.g. A/S/M etc) and click on the button C
Page 2 of 25
in the software.
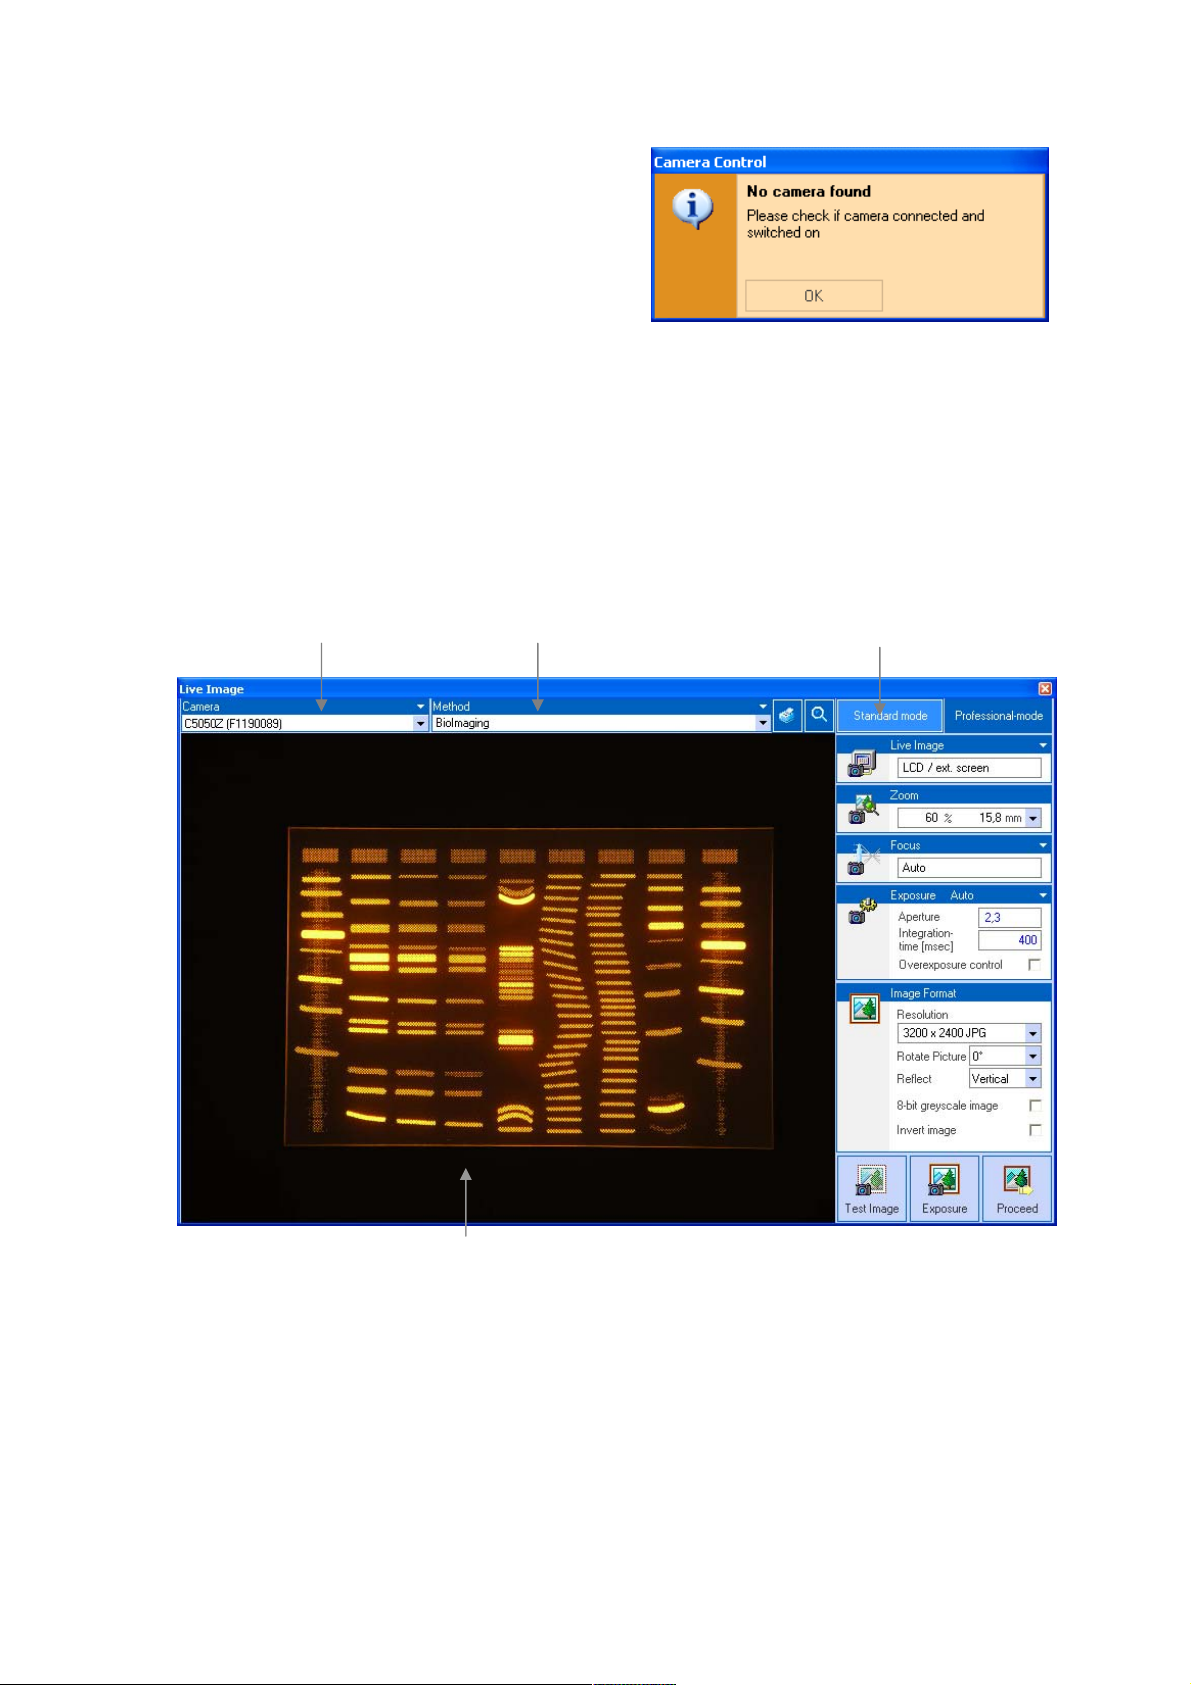
You are shown the following error message if the
camera is not switched on.
In this case, please close the software, switch on the
camera and restart argusX1.
The exposure window is divided into 4 ranges:
- Camera
- Method
- Operating functions for the camera control
- Image window
Camera Method Operating functions
for the camera control
Image window
The camera now is in an operational condition. Dependent on the preset mode in the field
Live Image
you are now able to see a preview of your image.
Preview image
With
, you are shown kind of a Live image, which is represented with a low
resolution, 320 x 240 pixels. Due to the restricted speed of transfer, you get a new image only
every other second. This function primarily serves for the orientation of the gels/blots on
the transilluminator and the setting of the zoom range.
Page 3 of 25
Beside the possibility to control the zoom in the live image mode, the following functions have a direct
influence on the image acquisition:
• Rotate image
• Reflect image
• 8 Bit greyscale image
• Invert image
In the image on the right, the movement of your
gels/blots into the middle of the image is shown.
If you work with a tripod, you can move the position of
your camera, too. This is also valid for users who work
with a set-top dark hood that is simply placed on a
transilluminator.
In case you see no image at all, please check the
lighting conditions first – switch on the
transilluminator! (At this point it is sufficient to
recognise the outlines of the gels.)
Adjust the zoom now. With this function, the image area is resized
to the sample which has to be exposed. As all cameras controllable
by argusX1 are equipped with motor zoom lenses, the zoom value
can be set in the software.
With the function
the camera (socket
the PC is deactivated than.
If the live image function
Test image
Should the light intensity be insufficient, please shift from the live image mode into the test
image mode.
Therefore, use the button
which the optimal integration time is designated by the camera, i.e. the camera
integrates the light information to a representable image – also under unfavourable light
circumstances (prerequisite: Exposure automatic). Now, you can also move the gel/blot
however, the test image has to be repeated until the perfect position for the image is
found.
Nevertheless, the Test Image is no live image function – it is used as control if the chosen
settings guarantee a high-quality image acquisition.
A resolution of 640 x 480 pixels is preset for the Test Image in order to transfer the image without a
noticeable time delay that is caused at high-resolution image through the transfer process from the
camera to the PC.
you can create a preview image.
LCD / ext. Monitor,
A/V – Out
) is activated. This enables a clearly faster live image. The display at
Preview off
Test Image
the LCD monitor of the camera or a monitor connected with
is activated, the live image is switched off and with the button
. Afterwards, a single image is generated, in
Page 4 of 25
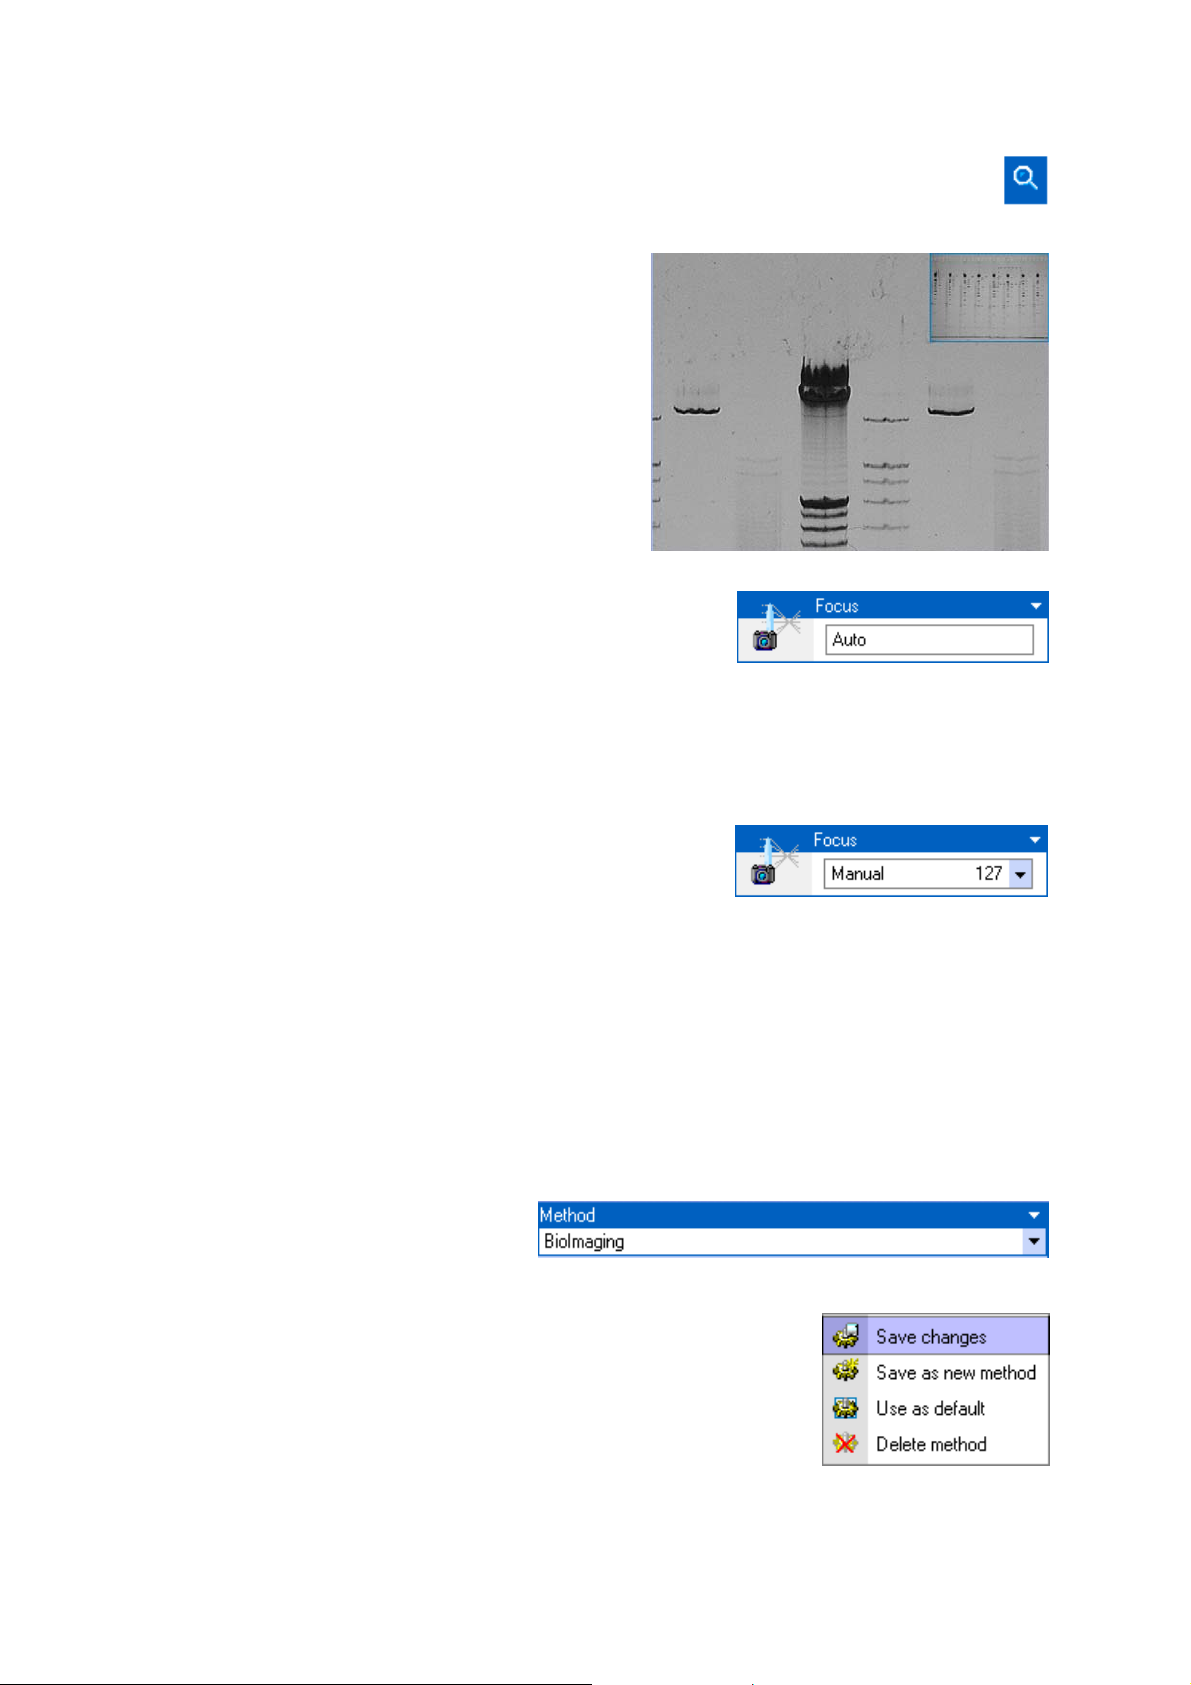
Focusing
As mentioned above, the function
offers an average image quality according to the
limited speed – however, after this you can already
judge whether the image will be keenly portrayed at
the following exposure or not (one criterion is e.g. the
separation of the bands). You can also zoom in an
area with rectangle in the preview image and view the
edge sharpness at a selected structure.
Depending on your way of working, the result of this first
attempt will be different. When working with a tripod and
sufficient lighting conditions in a darkroom hood, the
of the camera will provide the correct settings and you can work
on immediately.
The activation of the autofocus will be carried out in the field Focus.
When using a dark hood it can happen (depending on the
lighting conditions within the hood) that the autofocus does not
provide any usable results so that you have to correct it
manually.
In this case choose the option
settings with the button Test Image. Repeat this process until the result is satisfying.
Due to the fact that the focus value depends on the zoom, you can not use the manual focus value for
all applications. Should your further gels/blots have almost the same size, you can use the
determined focus value as a reference value.
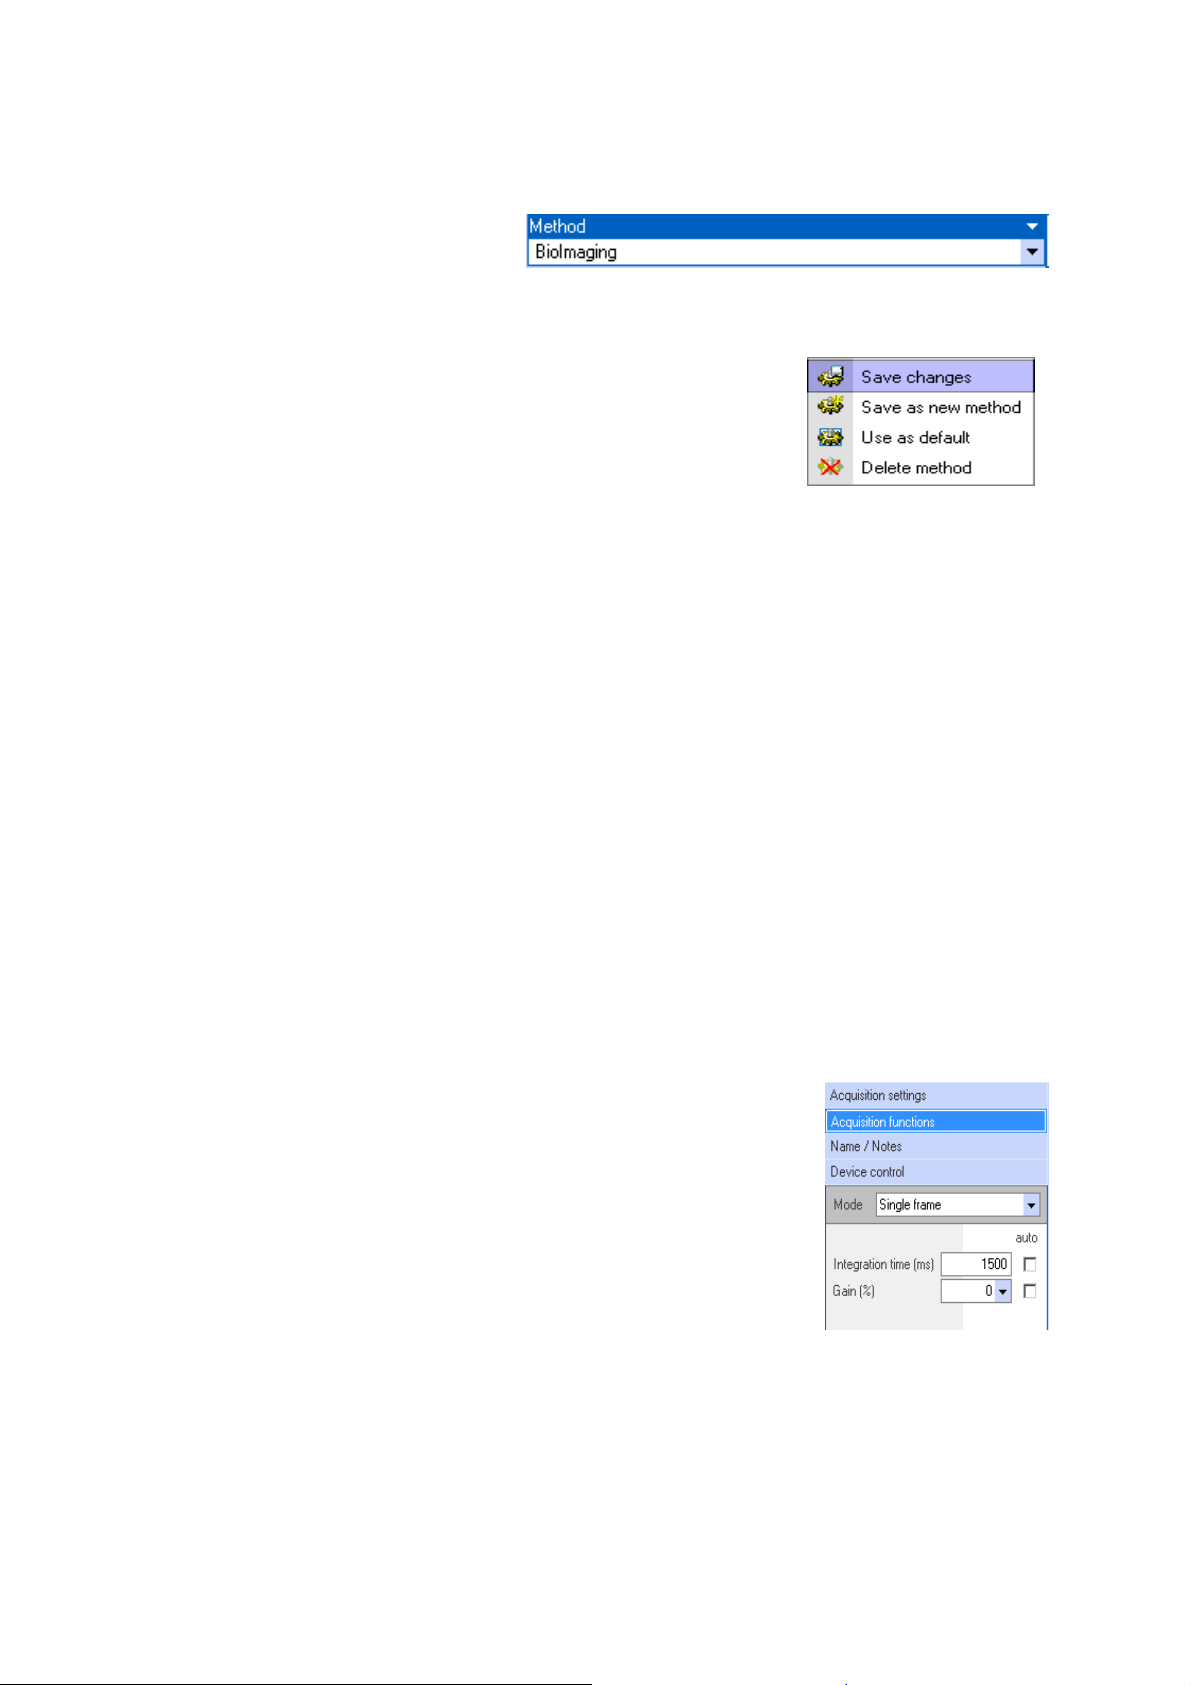
This reference value and all other settings in the operating functions can be saved as a method. In
this way, you can recall this method at the next gel of the same type and all optimal settings are
immediately at your disposal.
Open the menu window
the white triangle and choose the function
The current chosen parameters and settings are applied as new method
and a standardised basic name (structure: new method, date, time) is
assigned to this method. You can change this basic name. Please note
that you must confirm the new name with the function
otherwise, the old method name remains.
Methods
Test Image
Manual
and a new value in the field Focus and then confirm your
with a click of the left mouse button on
Save as new method
only
Autofocus
.
Save changes
Page 5 of 25
One of your created methods can be defined as standard method. This definition can be changed
anytime by appointing another method as standard. You should always us the most frequently used
method as standard as this will be automatically loaded with the start of the exposure window.
The function
and integration time (exposure time).
4 options are available:
The exposure automatic (function
“cooperation” of aperture and integration time basing on the results of the
exposure measurement. This means that a combination of both is set which
is applicable with the measured light circumstances. These values are
indicated as blue numerical values in the function range
Integration time.
The semi-automatic functions
each, the other value is calculated by the system, based on the exposure measurement.
With the function
automatically determined in dependence on the manual set value
of the aperture and it is shown as blue information value
Conversely, with the function
automatically determined in dependence on the manual set value
of the time and it is shown as blue information value.
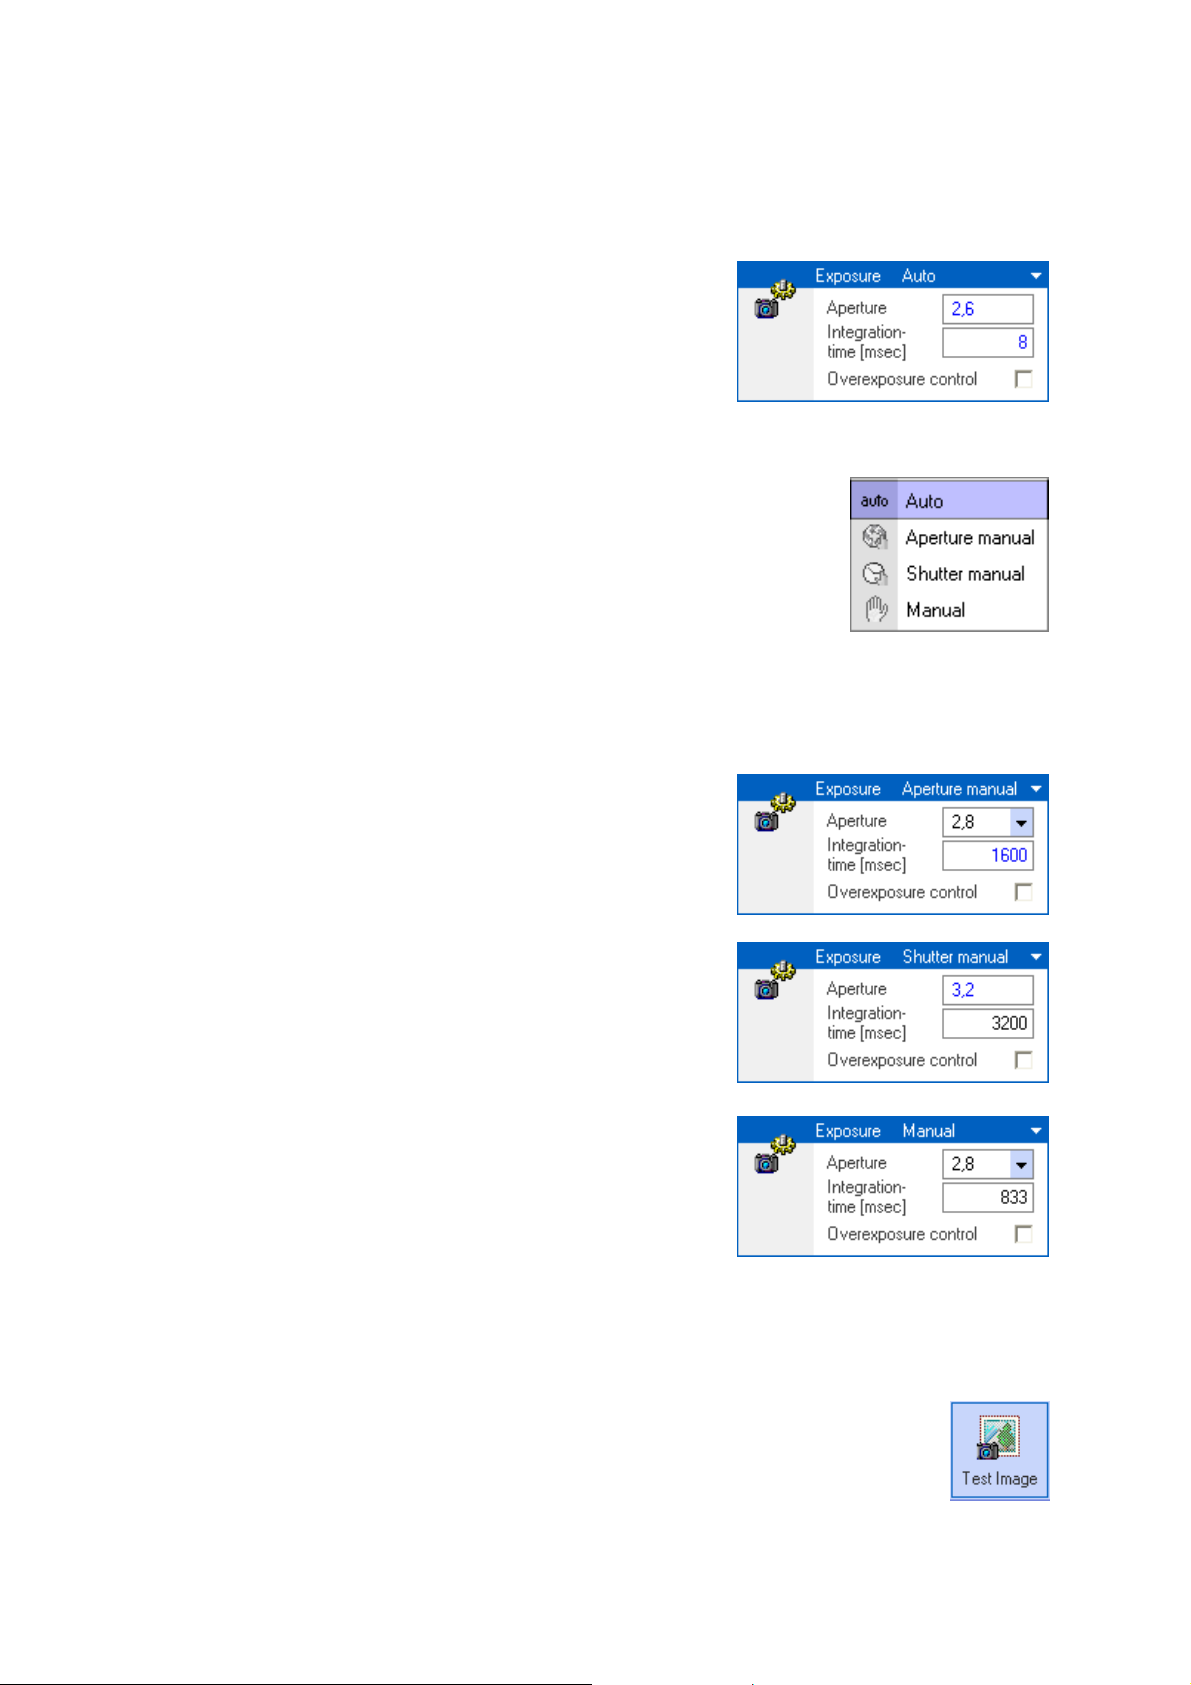
Exposure
contains the settings for the aperture
Auto
) automatically controls the
Aperture manual
Aperture manual
Shutter manual
the integration time is
and
Shutter manual
the aperture is
Aperture
and
require one manual value
The completely manual control of the aperture and integration
time can be realised by the function
you can insert values in dependence on the value range of the
used camera, optimise them step-by-step and save them in a
method. Due to this, the manual values are also reproducibly
available for further exposures.
With this function you can reach the maximum of the detection sensitivity at light-weak gels (fully
opened aperture, longest integration time)
In order to look at the effects of the setting changes, it is necessary to generate a new
image with the new parameters. Therefore, use the function
Manual
. In this function,
Test Image
.
Page 6 of 25
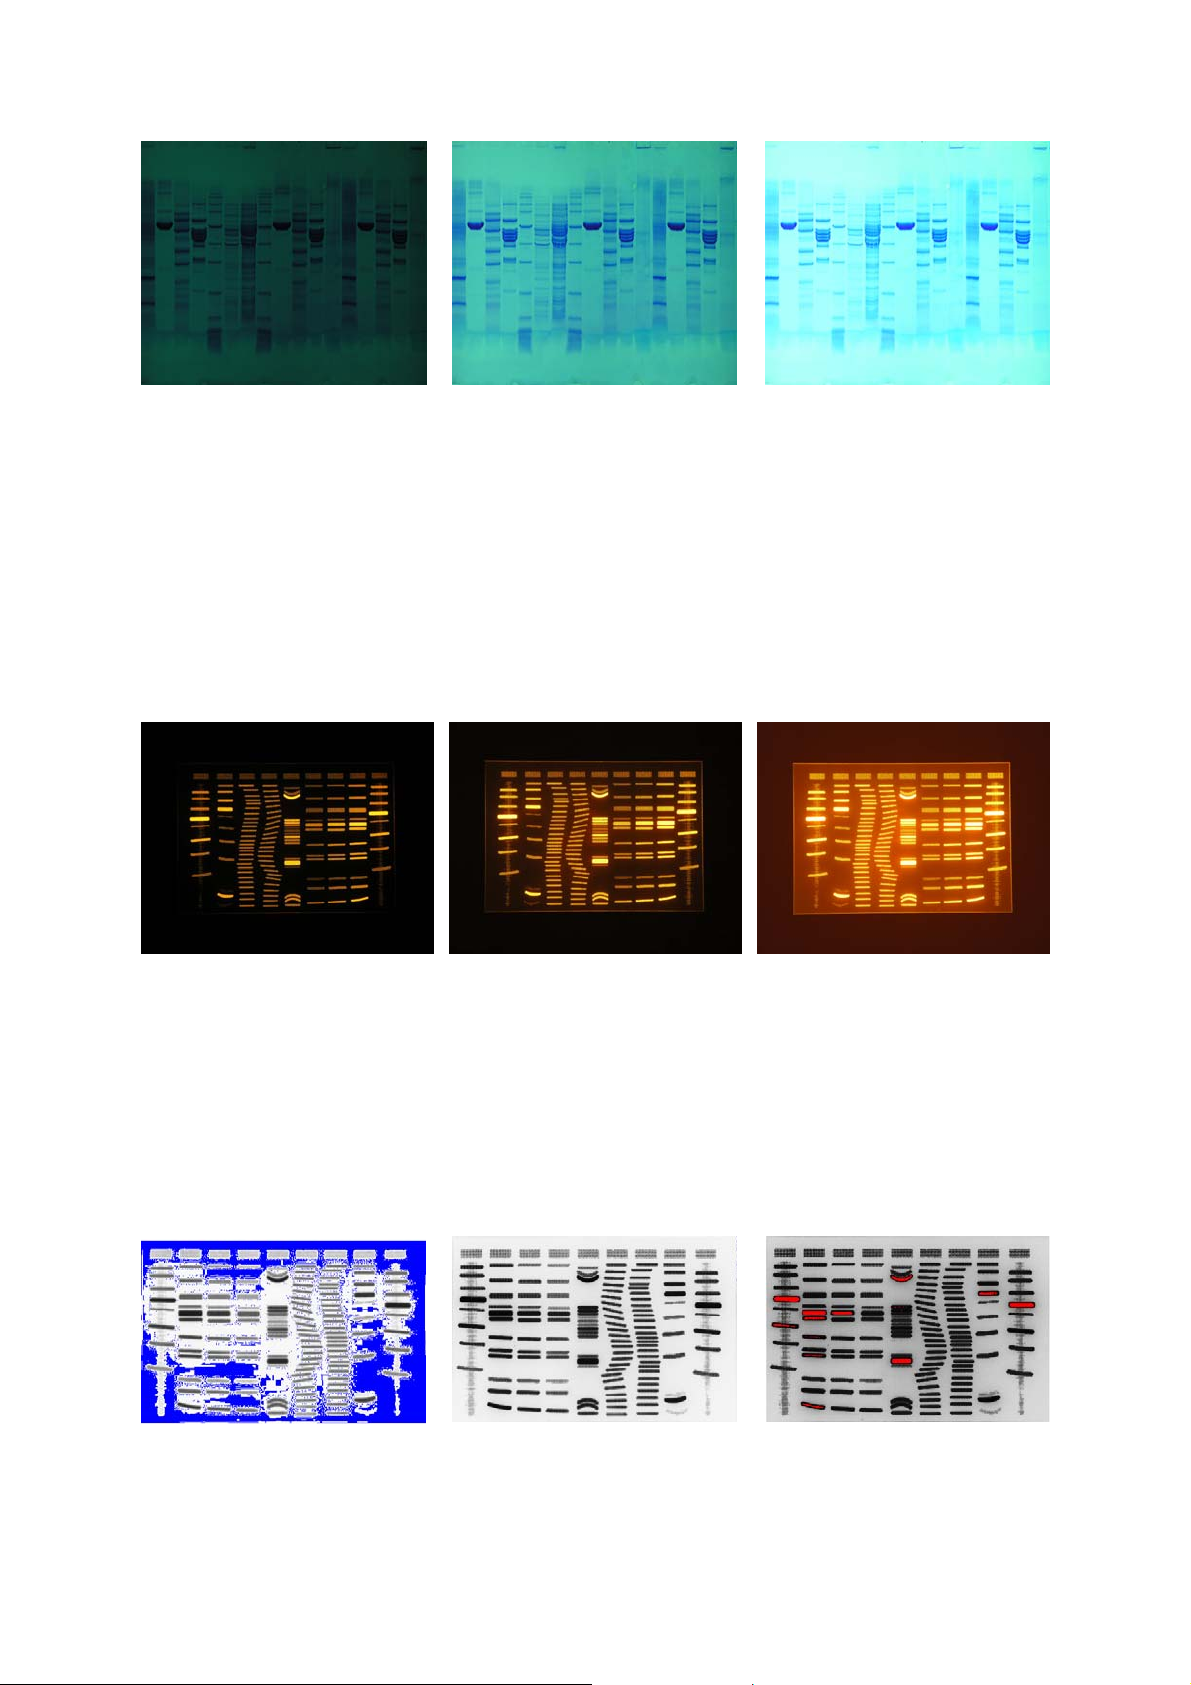
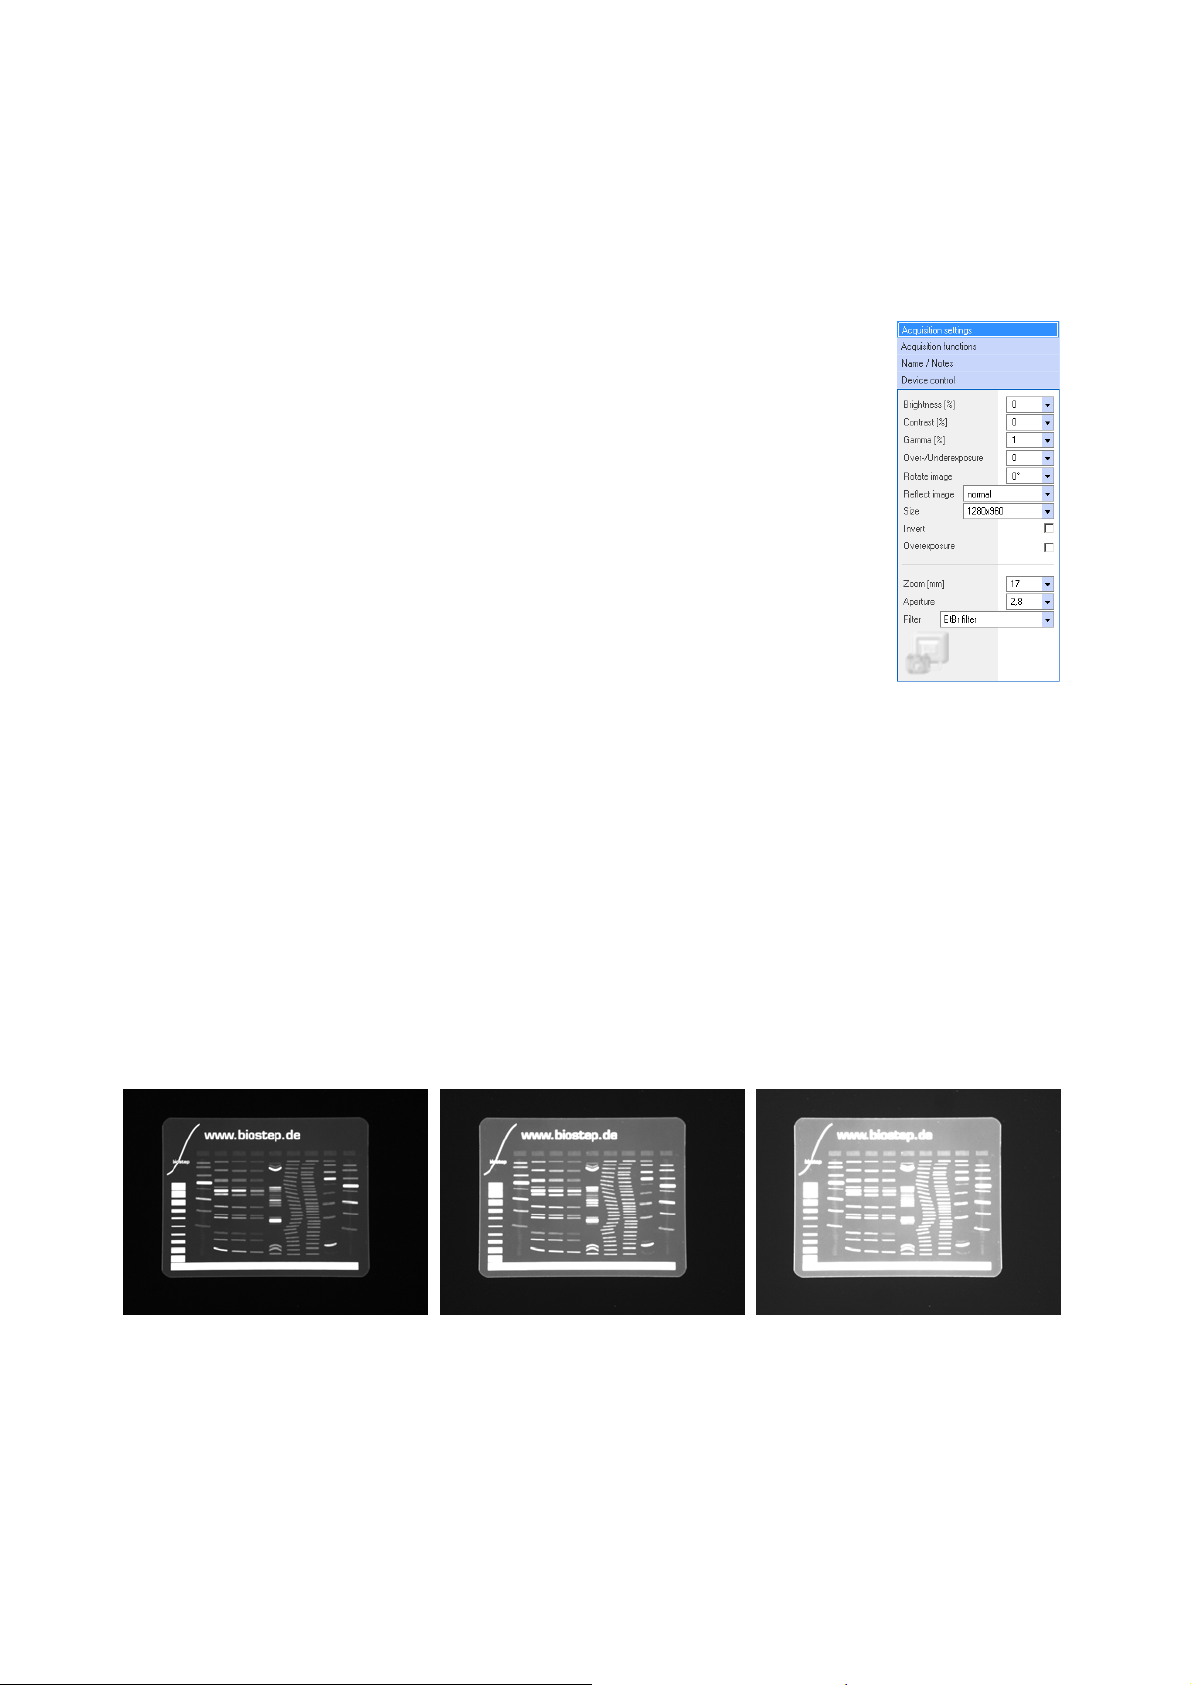
The presented sample (CoomassieBlue gel) was taken with different integration times 50ms, 250ms, 769ms (left
to right), all other parameters were constant.
Except the modification of the direct exposure settings, argusX1 offers you the function
Over-/Underexposure
influence on the acquisition in the context of the exposure functions
Shutter manual.
The function
levels. Set the values in the direction in which the camera should change the exposure. Use the
values > 0 should the exposure become lighter; use the values < 0 should it become darker.
The sample (test gel) was taken with the exposure levels -2, 0 and +2 (left to right). All other parameters were
constant.
Using the function
do not want to use any manual settings for
With the function Exposure control, areas in the image can be determined and displayed which are
over- or underexposed. The parameters for this function can be changed in the menu
Over-/Underexposure
Image processing/Exposure control
for the improvement of the image acquisition. This function has only
Auto, Aperture manual
is a manual exposure control with a value range of ±2 exposure
Over-/Underexposure
only makes sense if your work with exposure automatic and
Aperture
and
Integration time
.
Settings
.
und
under
The sample (test gel) is represented as underexposed, normal and overexposed acquisition (left to right).
Page 7 of 25

The function
applications in order to take influence on the image quality.
The White Adjustment provides a colour rendition true to life at different light
sources (e.g. white light in the dark hood, room light). Should the automatic
function can not realise a satisfying colour rendition, 4 other functions for the
White Adjustment are available.
After the creation of a
resolution of 640 x 480, however, here you can already judge
the image quality (e.g. Exposure, Focus). The function
Test Image
All settings in the
have influence on the acquisition of the Test Image – except the
resolution.
In order to finally generate the image in the desired format, use
the function
the required image format in the function
Image Format
The transfer time of the image data from the camera to the exposure window
via USB port do not only depend on the resolution but also on the chosen
format. The transfer of a JPG image in the format 3200 x 2400 takes approx.
15 seconds at a Standard PC. In contrast, a TIF image in the format 2288 x
1712 takes approx. 90 seconds. Therefore, it is more meaningful to generate
a high-resolution JPG image with a transfer time x, as an essentially more
badly resoluted TIF image with the same transfer time.
White Adjustment
Test Image
is made for the quick testing of your settings.
Standard Mode
Exposure.
.
Previously, select the resolution and
is an interesting function for light field
you see the image in a
and
Professional Mode
Both acquisitions clearly show the difference between a Test Image (left) and an acquisition with high resolution
(right), with a chosen image area in the zoom window (sell right upper corner).
Page 8 of 25
After the creation of a
Zoom
button
the right upper corner of the
fixed and cannot be changed.
In the
go with the mouse pointer into the Zoom window and draw a rectangle over the corresponding area.
The selected area is represented in the
With the activation of the button
transferred into the database of argusX1. Please note that the transfer of
not supported! Now, close the camera control window.
. By activating the function
Zoom window
Test Image
, the currently processed image is completely shown. For selecting an excerpt,
or an
Exposure
Zoom window,
Image window
Processing window.
Proceed
, the image in the exposure window will be
you can enlarge any range desired with the
an additional window is opened in
. The size and position of the zoom window is
Test images
is
Page 9 of 25

Module FireWire camera:
You can use CCD FireWire cameras type Felix 5000, 6000, 6020 and 7000 equipped with argus X1
software for the image acquisition.
The control and the power supply of the cameras effect from a FireWire lead connecting camera and
PC.
¾ External provision of electricity is not necessary.
For activating the camera please press the button FireWire camera in the software.
If no camera type 5000, 6000, 6020, 7000 is connected to the PC or no driver unit had been installed,
you will receive the following error message:
In this case please exit argusX1 and check the installation
of the leads as well as the driver unit.
The exposure window is divided into 4 ranges:
¾ camera
¾ method
¾ operating functions for the camera control
¾ image window
camera method operating functions for the camera control
image window
Page 10 of 25
The camera is in an operational condition if the image could be opened without receiving an error
message.
All settings of the image acquisition
described in the following can be saved
as a method. In this way, you can
recall this method at the next gel of the same type and all optimal settings are immediately at your
disposal.
Open the menu window Methods with a click on the left mouse button
on the white triangle and choose the function Save as new method.
The current chosen parameters and settings are applied as new method
and a standardised basic name (structure: new method, date, time) is
assigned to this method. You can change this basic name. Please note
that you must confirm the new name with the function Save changes
otherwise, the old method name remains.
One of your created methods can be defined as standard method. This definition can be changed by
appointing another method as standard anytime. You should always use the most frequently used
method as standard as this will be automatically loaded with the start of the exposure window.
The first step of the exposure of an image is the activation of the button
This mode is mainly used for the adjustment of the samples (e.g. gels, blots) on the transilluminator
and the setting of the zoom. The
resolution i.e. the scrolling of the sample on the transilluminator is displayed without delay on the PC
monitor.
Depending on the lighting conditions the camera tries to display an optimal image in the live image
mode. For that purpose the camera changes step-by-step the exposure time within the control cycle.
The control comprises an exposure time range from 1 ms up to 1000 ms.
The maximal exposure time of the camera is 60 sec. To receive a contemporary, optimal image, the
exposure time had been reduced to 1000 ms in the automatic control cycle. The exposure conditions
are another reason as the mode
white top-light. No exposure time above 1000 ms is expected with opened aperture.
There is the possibility to register manually a higher exposure time (e.g.
1500 ms) under exposure functions and to use it for Live Image display.
Aperture, zoom and focus are adjusted manually with the objective. Once
the focus has been optimal set you can use this data in the whole zoom
range. We recommend fixing the optimal focus with the setscrew at the
objective.
Live image
Live image
is displayed without any delay and with full camera
is only applied for the adjustment of the sample with
Live image
.
Page 11 of 25
After adjusting the sample on the transilluminator and adapting the zoom range with activated white
top-light in the dark hood only the fluorescent light (e.g. UV or blue light) can be used for the
excitation of the sample structure.
Please note that in connection with the activation of the fluorescent light source the white top-light
has to be necessarily switched off. The camera is still in the mode
Live image
and shows you the
fluorescent sample structure.
This image can be optimized and adjusted with several functions:
¾ Intensity [range -25 up to +75], [basic setting 0]
values > 0 produce a lighter image, values < 0 produce a darker image
¾ Contrast [range -50 up to +50], [basic setting 0]
values > 0 produce images richer in contrast, values < 0 produce images
lower in contrast
With the functions intensity and contrast the tone range of an image can
be changed. Compared to the gamma correction the pixels are modified in the
same way with those 2 functions.
¾ Gamma [range 0.4 up to 2.5], [basic setting 1.0]
The gamma value shows the allocation of the greyscales in the image. The linear allocation of
the greyscales is changed with the gamma correction in the way that single ranges (e.g. weak
bands) are more strengthened than others. The adjustments can be used for documentations
and publications but only with a gamma value of 1.0 an exact quantification of the samples is
possible.
¾ Over-/Underexposure [range -50 up to +50], [basic setting 0]
This function has only influence on the acquisition in the context of the exposure functions
and corresponds a manual lighting time. Please set values > 0 to expose the samples a longer
time to get a lighter exposure. Please set values < 0 to expose the samples a shorter time to get
a darker exposure. Using the function
Over-/Underexposure
only makes sense if you work with
exposure automatic and do not want to use any manual settings for Aperture and Integration
time.
The samples (test gels) have been taken with the exposure level – 30, 0, + 30 (left to right). All other parameters has
been constant.
Page 12 of 25

¾ Rotating image [range 0 °, 180 °],[basic setting 0 °]
Corresponding to the chosen option the image is turned in the exposure window.
¾ Reflecting image [range normal, vertical, horizontal]
Corresponding to the chosen option the image is reflected in the exposure window.
¾ Size [range depends on the resolution of the camera]
¾ Reverse [range switch on/ switch off]
Use this function if you favour dark information on light background when watching
fluorescent exposures.
¾ Overexposure [range switch on/switch off]
This function helps to mark areas in the images overexposed/underexposed.
The parameters (colour, fast value) can be set in the menu under
processing/ light control.
This function is recommended when checking areas of the
settings / image
sample which have to be quantified for over/underexposure.
The sample (test gel) has been taken as underexposed/normal/overexposed (left to right).
The functions
Zoom, Aperture and Filter
are normal memo fields. With these fields you can set the
optimal value determined for a special sample type. With the saving of these values also other values
are saved and can be set manually and can related to for further exposures.
Is the sample based on the settings of the objective and the lighting time optimal displayed, this
lighting time can be used for the real exposure in taking over this time with a click on the triangle on
the right-hand side of the indicated time.
This value is now registered under
exposure settings / exposure time
and the automatic
readjustment of the exposure time is finished in the same step. For further acquisitions of the live
image only the registered exposure value will be used. Now you can finally trim the aperture for the
optimisation of the exposure and adjust the registered exposure time correspondingly the
requirements.
Afterwards, please press the button
exposure.
The live image generation will be finished and triggers
the generation of the image as well as whose display in the exposure window corresponding to the
selected settings.
Page 13 of 25

If the image corresponds to your requirements you can switch off the fluorescent light sources
switched on for the exposure of the image.
Another approach to the exposure of an image proved of value in practice is the fixed adjustment of
the exposure time that can be defined for a special type of sample.
This value will be saved and be available for further exposures.
Selecting the method Activation of live image mode Deactivation automatic Exposure of the image
After selecting the method already containing a set exposure time, the mode
Live image
will be
started and the sample will be adjusted on the transilluminator and irradiated with white light (toplight). Furthermore, the settings for aperture and zoom saved in the method will be adjusted manually
with the objective and checked whether the information of the filter correspond to the actual
conditions.
Page 14 of 25

After adjusting the sample the white top-light is switched off and the fluorescent light switched on.
The value of the exposure time saved in the method is ideal for exposures e.g. with fluorescent light.
In order that the exposure time is effective please deactivate the function
you can view the image based on this exposure time. The fine adjustment (optimisation of the image
regarding overexposed areas) can be quickly realized with the adjustment of the apertures values.
Please turn the aperture slightly rightwards (increasing the sensitivity = lighter image) or leftwards
(decreasing the sensitivity = darker image).
If the optimal settings are reached, please press the button
displayed you can switch off the fluorescent light.
You can not only take single images but also add up several images
frame add )
The function
are required as present e.g. 12 bit cameras.
By the addition of several images a gradual larger range is available for the
linear acquisition of strong and weak bands.
Without this function strong fluorescent bands can already be overexposed
before weak fluorescent bands can even be acquired.
Important information:
exposure time can be add up. Because 0 + 0 + 0 + 0 = 0!
For the use of this function please enter an exposure time as well as the
number of the exposures [range 1 – 99] to be added.
or average of several images
Multi-frame add
Only band structures being acquired within the set
is useful if dynamic ranges with max 16 bit
(Multi-frame average).
Exposure
(Multi-
auto (automatic)
and after the image has been
. Now
Page 15 of 25

Pressing the button
already added images on the bottom of the left angle. With pressing the button
exposure
starts the activation of the operation. You can see the numbers of the
Stop,
the operation
will be finished. The images being added up until break are used for the final exposure displayed in
the exposure window.
The left picture shows the exposure of an
image with an exposure time of 100 ms - no
images have been added.
In the picture below-mentioned 19 images with
an exposure time of 100 ms each has been
added up. Although being exposed 1900 ms
only a small area is overexposed – the other
areas are completely quantifiable. This is the
result of the bit deepness of 15 bit effecting
form the addition of 19 images.
Exposure of an image with 100 ms (no addition)
Addition of 19 images with 100 ms each;
Achieved bit deepness 15 bit
Please compare the exposure of an image with an identical entire exposure time of 1900 ms without
addition. The achieved dynamic range comprises the already existing bit deepness of 12 bit of the
camera. Due to this reason the image is overexposed and not suitable anymore for the quantitative
analysis.
Exposure of an image with 1900 ms (no addition);
Achieved bit deepness 12 bit
Page 16 of 25

The second function available (
Multi-frame average
) is used for exposures with a force background
or image noise.
A high image noise can occur e.g. if there is a set short exposure time with a gain of the camera more
than 50 to reach a high exposure sensitivity.
By averaging several images the image noise is nearly eliminated and the resulting image appears
considerably “silent”.
The upper image shows a single exposure with 150 ms and is characterized by a strong image noise. The second image is
based on the averaging of 20 images with 150 ms each and is characterized by a low-noise background.
Page 17 of 25
Please press the button zoom image to blow up a special area of an image.
By activating the function
the image window. Size and position of the window corner are fixed and cannot be changed. The
zoom window displays the active processed image. For selecting a special area please go with the
mouse pointer into the zoom window and draw a rectangle over the corresponding area. The area will
be displayed in the processing window.
Furthermore, the image shown in the exposure window can be directly printed with the
function
photomaster generally used with the function
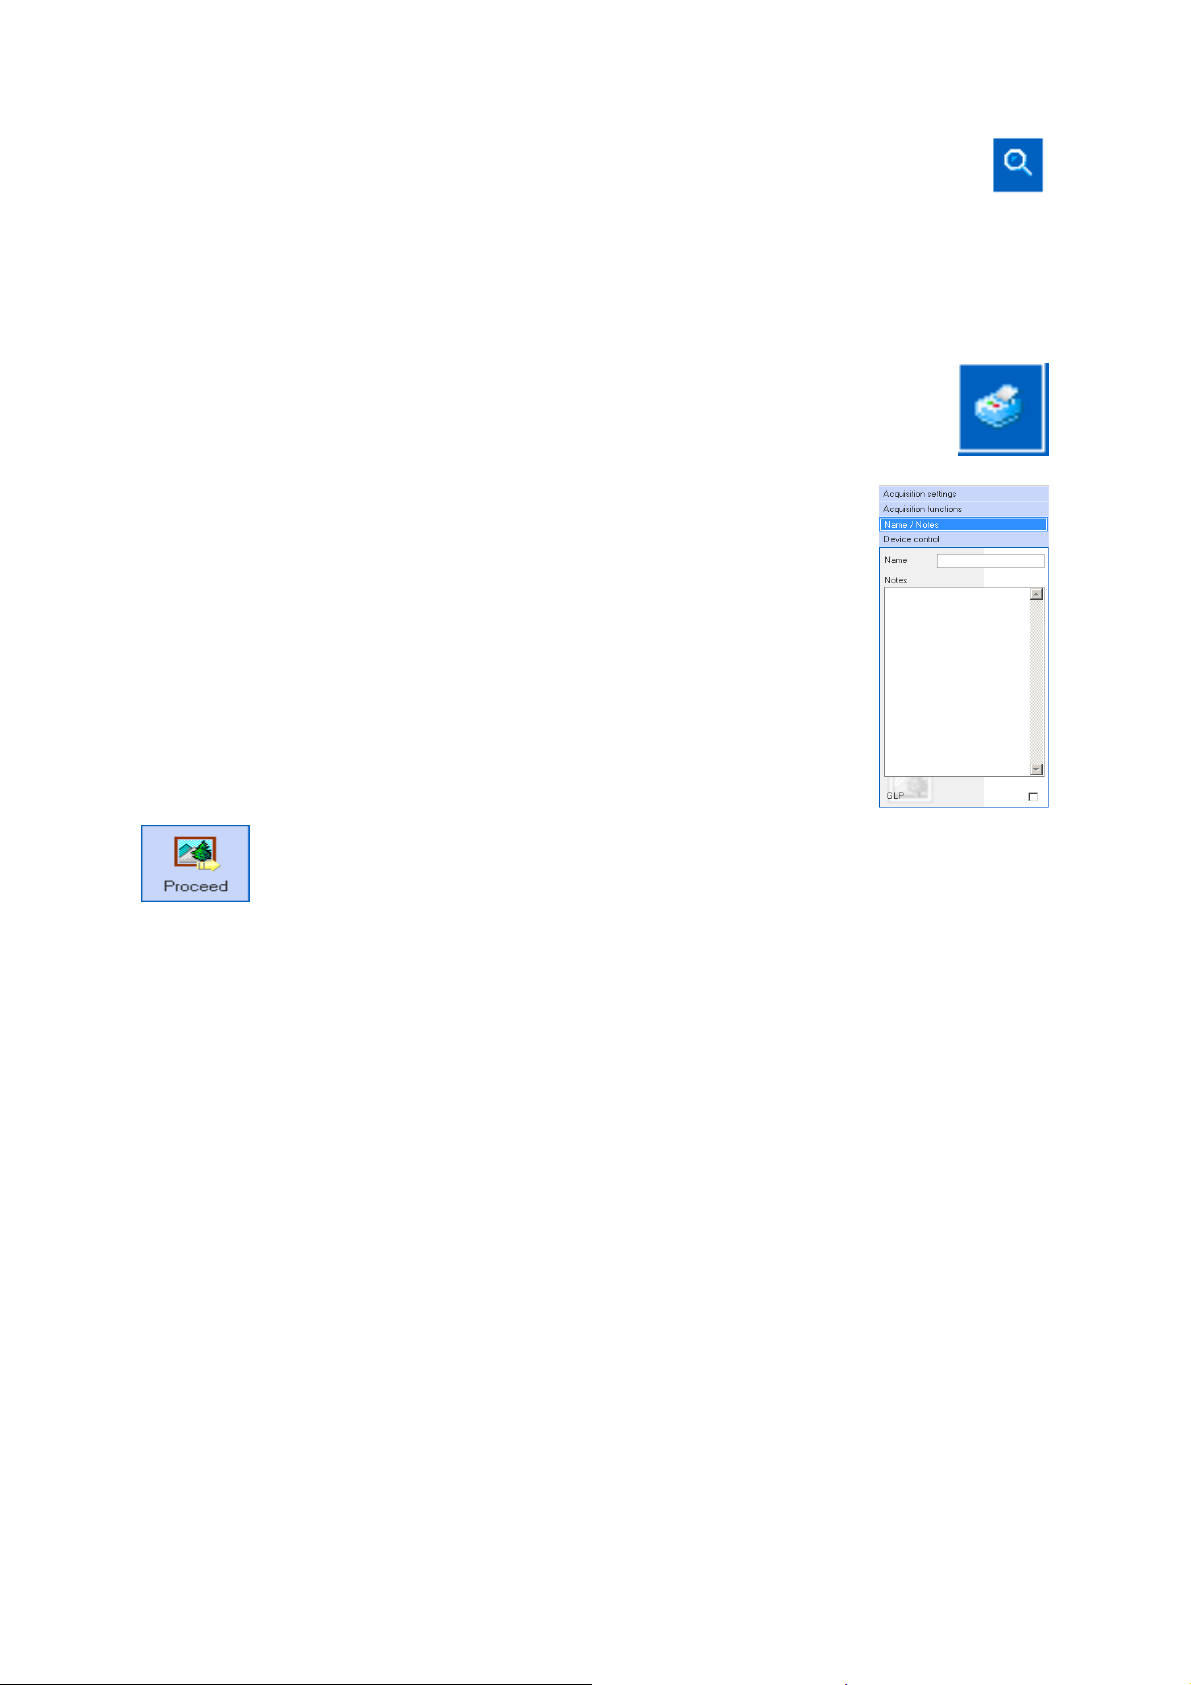
Before printing or taking over the image in the argus database you can register a
special sample name and detailed information of the sample in the category
Name/Notes
These notes will be saved to the image in the argus X1 database and be
searched by full text search within. If no name is registered argus X1 is
generating automatically a name. You can assign a basic name for the automatic
generation with the function
The function
Now, close the camera control window.
Fast print
.
GLP
is only available with the additional activated module GLP.
With pressing the button
transferred into the database. Only images taken with the function Exposure can be
transferred. Please note that the transfer of test images is not supported!
Zoom image
. Before using this function for the first time please select the
Settings
an extra window will be opened in the right upper corner of
Settings
.
Proceed
, the image in the exposure window will be
Page 18 of 25

Post-processing and display modes
The database window contains all images taken and imported
with argusX1. These images and all their proper information are
saved in the argusX1 database. Formulated in another way, the
database window is the representation of the saved image data
in the database. The design is similar to the Windows Explorer
in order to use the functions without a long training.
A name is automatically generated for images, which were not
named in the
Time (e.g. “Img 2004.10.05 13:03:23”).
By clicking on a selected image, it will be shown in the
Processing window
exported and/or printed.
Exposure window,
and can consequently be processed,
All necessary functions for the post-processing of the image are available in the vertical middle bar of
the program surface:
using the segments Date and
• Undo
• Zoom window
• Adjust image size to window
• Rotate
• Reflect
• Functions for image processing (Filter)
• Invert
• Convert into 8 bit greyscale
• Notes
• Crop
• Copy into clipboard
• Histogram
• Image parameters and notes
• Exposure control
Page 19 of 25

Undo
Undo
The function
processing steps after open the image or after the last save.
Generally valid for the post-processing and display modes:
If modifications should be cancelled, simply use the function
steps should be disregarded, just reload the image!
enables a step-wise reverse of the image processing. Maximum are the last 5
Zoom Window
By activating the function
window is opened. The size of the zoom window can
be changed if necessary. For selecting an excerpt, go
with the mouse pointer into the Zoom window and
draw a rectangle over the corresponding area. The
selected area is represented in the
Zoom window,
Processing window.
an additional
Adjust to Window
With this function the size of the image in the
processing window is adjusted to the size of this
window.
Rotate
Undo
; or if all processing
Rotate
The function
functions
icon).
By activating the button
button, you can set the determination of a spin axis and an arbitrary angle.
Rotate by 90°
consists of the
and
Rotate
Rotate by free angle
Rotate by 180°
you can turn the image in an arbitrary angle. With the left mouse
(active with the triangle on the right of the
Page 20 of 25
and the both selectable, fixed

Reflect
The function
Reflect
serves for the reflection of your image by the horizontal or vertical axis.
Functions of Image Processing
This function serves for the post-processing of an
image with different filters and image corrections. Test
these functions, however, only use them for the
improvement of the optical quality – not for images
which should be quantified!
Invert
This function serves for the inversion of the
colour/greyscales in the image.
Convert into 8 bit greyscale
This function serves for the transformation of a
coloured image into a greyscale image.
The report about information loss is necessary as the
colour channels of the images are deleted. Therefore
Yes
confirm with
as greyscale image.
if you really want to save the image
Page 21 of 25
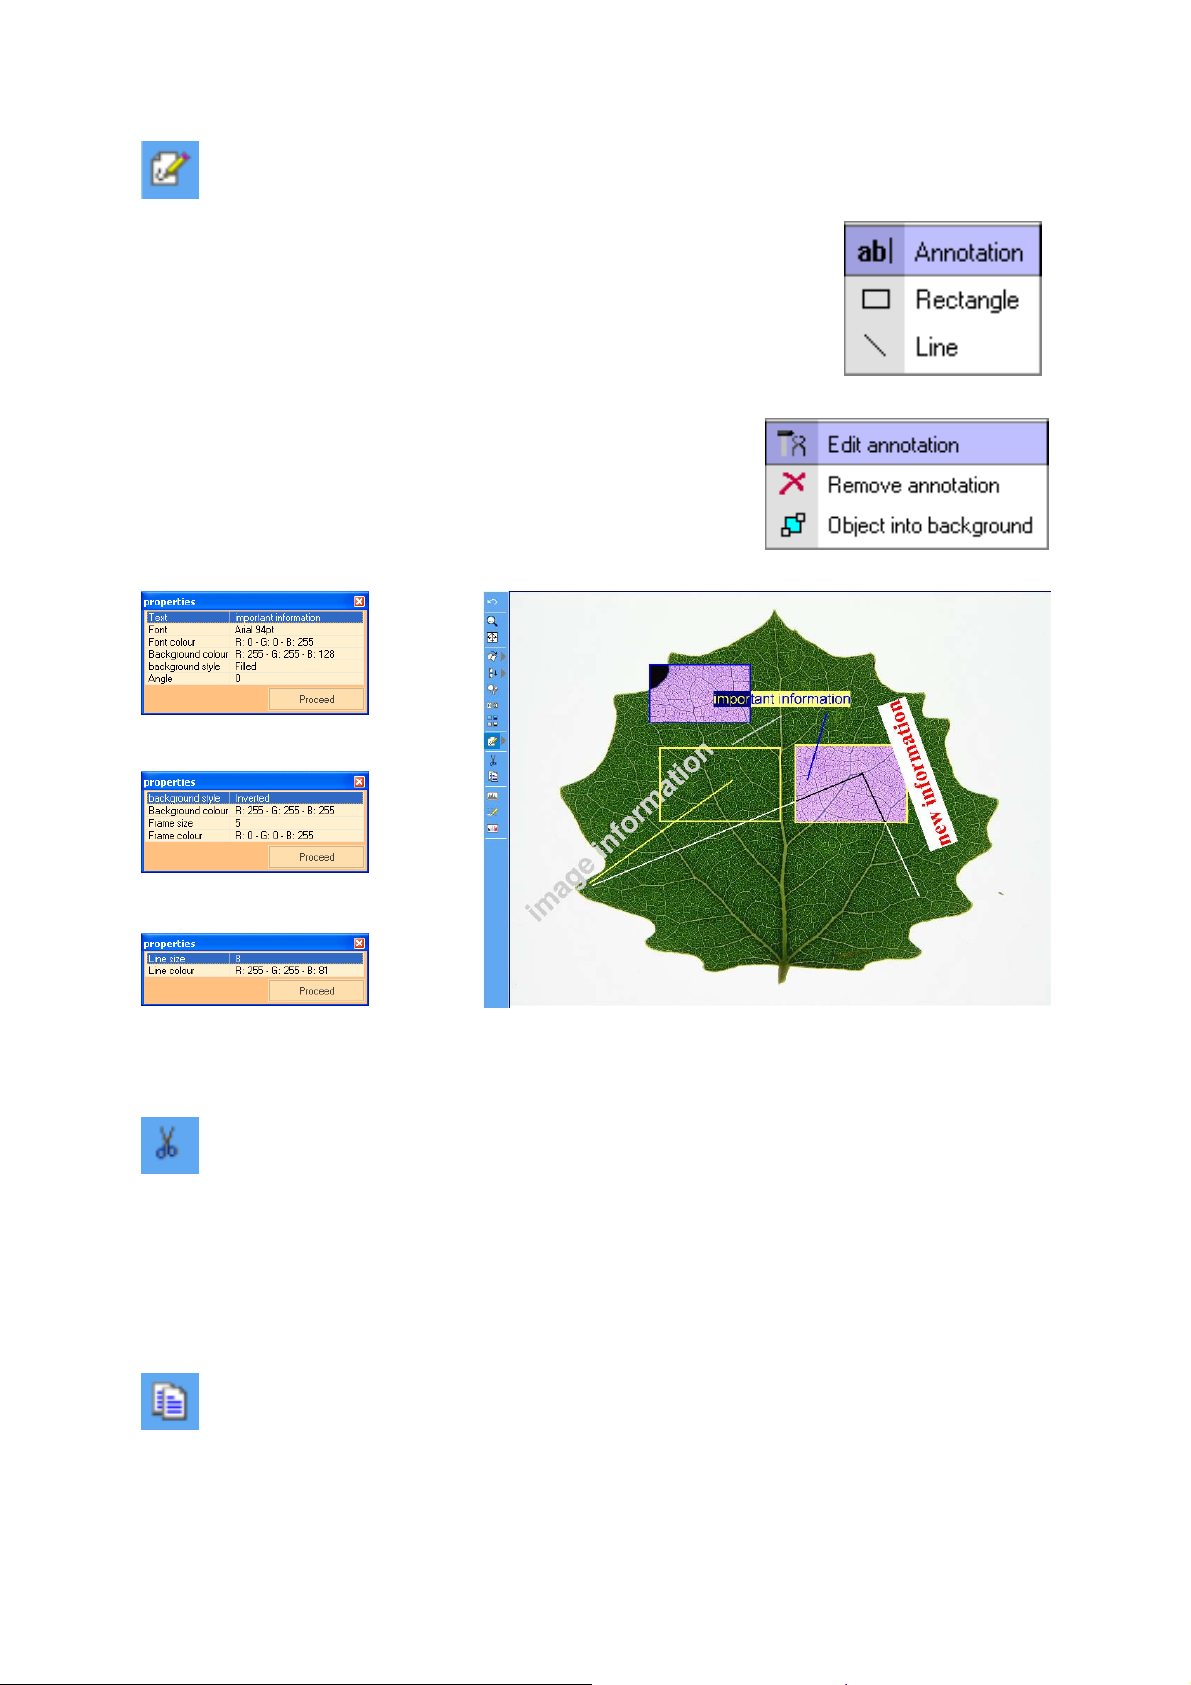
Notes
Notes
The function
Rectangle
activated with a click on the left mouse button on the triangle right to the
icon.
Inserting the position of the annotation, rectangle as well as the line is made
with the left mouse button in the Image window.
For changing the formatting you can open the continuing functions
with a double click on the respective object.
and
consists of the 3 following functions
Line
. The menu for the selection of these functions can be
Annotation
,
Crop
Crop
The function
you first have to choose a rectangular area which shall furthermore be at your disposal and be saved.
The rest of the image will be eliminated after using the button
unnecessary saving capacity on your PC.
serves for the deletion of the image area outside a selected rectangle. Due to that
Crop.
So it will not take up
Copy into clipboard
With the function
greater inter steps. Select a rectangular image area that should be exported with the function
use the button
Clipboard,
Clipboard
it is possible to copy your image into other Windows applications without
Zoom
and load your data from the clipboard into your application (e.g. WORD).
,
Page 22 of 25

Histogram
In the histogram the pixel quantity for each brightness
step is represented. It enables a statement about the
tonal value range of the image
Image parameters and notes
The function image parameters and notes informs
about all parameters documented at the image
exposure. All important acquisition conditions are
saved to each image and are available for a future
classification and quality evaluation. You can judge the
reproducibility or comparability of the images.
Exposure control
Areas in the image that are over- or underexposed can be determined and indicated with the function
Exposure control
category
Image processing/Exposure control
. The parameters for this function can be changed in the menu
.
Settings
under the
Page 23 of 25

Load a new image
For creating or importing a new image, you have 2 possibilities:
Of course, you can produce another image with the camera. Please follow therefore
the procedure described in the short operating instruction.
You can also load other image data using the button
image (TIFF-, JPEG-, PCX-, PC Paintbrush and Bitmap graphics) and insert it into the
database of argusX1. This is also valid for images made via scanner.
In argusX1, you can subject these images to the post-processing, archiving and export if required.
Import.
Select the corresponding
Page 24 of 25

Save, export and print images
serves for the saving of the processing steps made at the loaded
The function
image. The former version will be overwritten. The save process even takes place
without further queries because of the database structure of argusX1.
By saving the current processing conditions, the data saved in the function
deleted.
With the function
conditions in a foreign format supported by argusX1 on a data carrier.
argusX1 automatically generates a file name when exporting the image using the name of the image
in the database. If the name in the database contains signs that are not admissible for Windows file
names (e.g / \ ? *), argusX1 will automatically replace them with an underscore “_“.
argusX1 uses the values determined in the settings [
] for the export format and the storage space. You might change all proposed settings or just
format
accept them.
The function
The function
The function
image is based on print templates. These are adjusted to a specific format (e.g. A6, A4), contain the
image that has to be printed as well as corresponding information (e.g. name, date of creation,
acquisition parameter, notes). Each template has its own specific layout and information structure.
Before using the function
please select the standard print template in the menu
Settings [File|Settings|Standard print template
will use most frequently. When activating this function,
the image in the processing window will be printed
immediately on the selected template.
square
With the activation of the function
asked to select a print template from the list of the
available ones. In the following window you can decide
whether the print-out should be made on the chosen
printer as preview or in another file.
Save
Export,
consists of 2 sub-functions:
Print
Quick print
Choice print
the loaded image can be saved in its actual processing
is realised with the button
is activated by the triangle right to the button
Quick print
File|Settings|Image processing|Standard export
Print
for the first time,
] which you
Choice print
are automatically
Undo
.
. The print-out of the
Print
In independence of the present printer (A4 / A6 or any format) it can come to faulty print outs. This also
depends on the available report formats and can individually be adjusted (Edition mode).
You might design your individual print template. Should you face any difficulties, please do not
hesitate to contact us. Please phone us +49-6408-6072 or e-mail us to info@biotec-fischer.de – we will
be glad to be of assistance. In the sense of short operating instructions, an exhausting explanation is
unfortunately impossible due to the multiplicity of variations of printers, formats and customer wishes.
Page 25 of 25
 Loading...