

Page 1
Page 2

CONTENTS
CHAPTER 1 •
3-4
GETTING STARTED
Viewing the User Guide in the Internet
Terminal Included Accessories
Included Printed Materials
Activating Terminal
Registering Terminal
5-8 CHAPTER 2 • BASICS
Introduction to Terminal
Terminal Overview
Main Menu
Power On/Off Button
Battery
Date/Time
Voice Control
Security Features
Cleaning Terminal
Restarting and Resetting Terminal
9-12 CHAPTER 3 • USER
Enrolling User
Verifying User
Adding User Information
Deleting User
Access Level/Privilege
Defining Work Codes
RFID Card Function
13-17 CHAPTER 4 •
INSTALLATIONS &
CONNECTION
Installations
Communications
Security
Ingress Online Activation
Installation and Setup of Ingress
Connecting Terminals to Ingress
Using USB to Download/Upload Data
Communication Key
18-21 Chapter 5 • SYSTEM
System Settings
Data Management
Data Update Using USB Flash Disk
Keyboard
Display Settings
Reset
Misc Settings
22 CHAPTER 6 • DATE/TIME
Setting Date/Time
Daylight Saving Time
23 CHAPTER 7 • USB
Understanding the Need for USB
CHAPTER 8 • AUTO TEST
24
Who should do the Auto Test?
25 CHAPTER 9 • RECORD
Checking Records of Users in the
Terminal
25 CHAPTER 10 •
SYSTEM INFORMATION
Records
Device
26-27 TROUBLESHOOTING
Page 3

1• GETTING STARTED
Viewing the User Guide in the Internet
The User Guide is available in the package when you purchased the terminal. The User
Guide is also available online at
fingertec.com and user.fingertec.com. Choose the lan-
guage that you prefer for your User Guide.
Terminal Included Accessories
Do not abuse the fingerprint sensor by scratching the surface, contacting the sensor’s surface with heat, pressing hard during placement of fingerprint for verification. Clean the sensor occasionally with microfiber cloth to maintain the performance of the sensor.
Q2i
DC 12V Power Adaptor
Connect the power adapter to the terminal
and plug it into a standard power outlet to
charge the terminal.
USB Extension
To connect to the USB port
of a computer for uploading
and downloading of data.
RFID Cards (5 pieces)
For card enrollment and
veri cation.
Cat 5 Cable
Connect the CAT5 to the terminal and
another end for LAN connection.
Screwdriver
Use the screwdriver to open
the back plate of ngerprint
terminal and to install the back
plate against a wall.
A Packet of Bolts
Use the screws to hold the
back plate of the terminal
against a wall.
CONTENTS
3
Page 4

Included Printed Materials
• FingerTec Comprehensive DVD
• Quick Start Guide
• Pamphlet
• User Enrollment Template Form
• Warranty Card
Activating Terminal
Every FingerTec access control model comes bundled with a unique license key. To
start using the terminal with Ingress, you must connect the terminal to Ingress and
perform online activation. Ingress reads the serial number of your terminal and sends
it for verification at the FingerTec server via Internet.
In case you do not have an Internet connection, you would need to do offline activation. Please send the serial number and models of your terminals to your local resel-
[email protected] to request for a product key and activation key.
lers or
Registering Terminal
Make sure that you register your terminal’s warranty with us at fingertec.com/ver2/
english/e_warranty.htm
.
CONTENTS
4
Page 5
2 • BASICS
Introduction to Terminal
FingerTec is a renowned brand name for commercial products for door access and time attendance systems. FingerTec offers a wide range of products to cater to the growing needs
for biometrics products in office/home automation as well as in security industry.
FingerTec terminals are loaded with powerful microprocessor that can process biometrics authentication methods for accurate personal identifications and for collection of
precise data for time attendance. In addition, some fingerprint terminals are made to
accept card verification as an added security measure.
This manual covers color time attendance models of FingerTec products from AC100C,
TA100 and TA200 Plus model. The terminal acts as a tool to collect attendance data.
For a processing of attendance data, FingerTec is providing a powerful time management software, Software to process data and provide accurate and reliable attendance
reports.
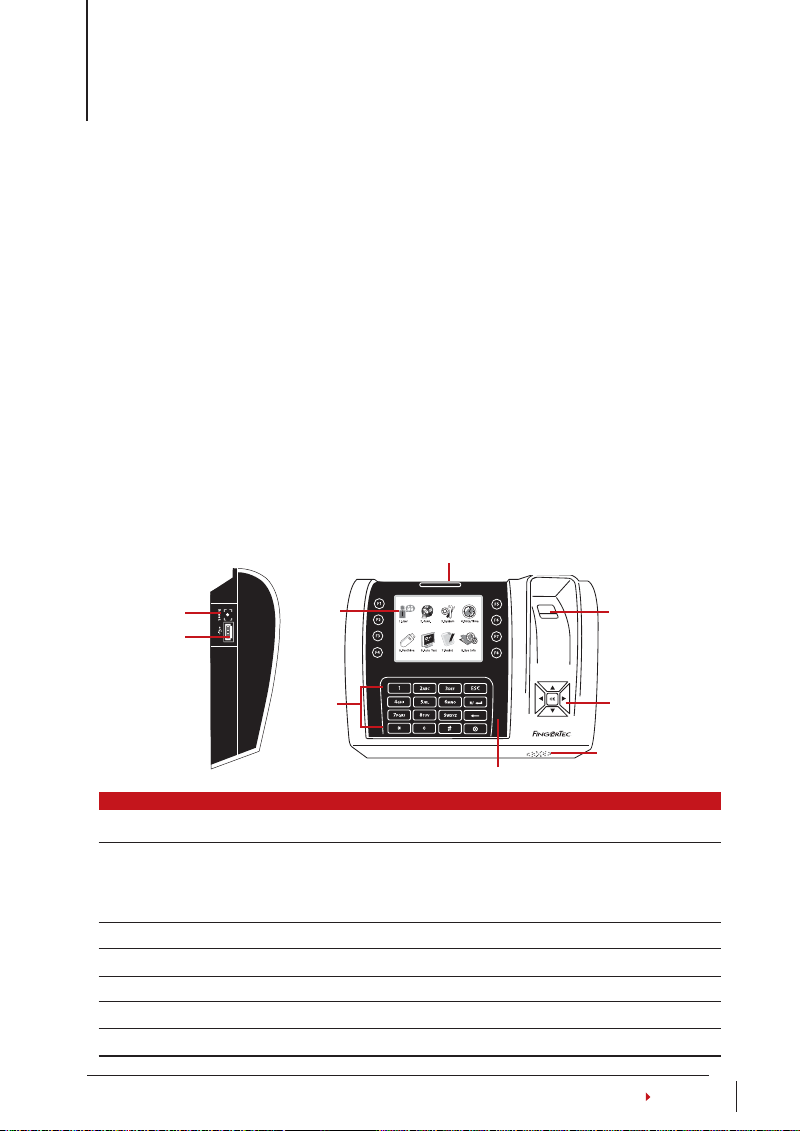
Terminal Overview
L.E.D Display
Reset Button
USB Port
LCD
Screen
Keypad
Q2i
RFID Card Induction Area
Fingerprint
Sensor
Navigation
Keys
Speaker
ITEM FUNCTION
LCD Screen Displaying status of terminal, day, date and time.
LED Display Green LED – The terminal is working fine and it is in standby mode.
Red LED – There is an error at the terminal that requires checking. For
Keypad To input instructions into the terminal and to allow configuration.
Navigation Keys To navigatien and input command to terminal.
RFID Card Induction Area Area that reads RFID cards.
Speaker For terminal voice emission.
Reset Button To restart the terminal as and when required.
first time use, the terminals need to be charged fully to avoid having the
red light blinking.
CONTENTS
5
Page 6

Main Menu
Enroll users, manage user data
and input workcode.
Upload and download data and
information to and from the
FingerTec terminal using a USB
flash disk.
Setup FingerTec terminal communication with computer
through LAN, RS232 and RS485.
Set security password of the device for a secure data transfer.
Configure the settings of the FingerTec terminals from general
to display setting to fingerprint.
Data management, update via
USB flash disk, keyboard functions, reset and other terminal
settings can be done here.
Adjust the date and time settings of the terminal.
Run tests on the FingerTec terminal to diagnose the terminal
on various aspects.
Check user attendance and
transaction logs that are available in FingerTec terminals and
perform housekeeping of the
machine.
View free and used memory of
the terminal as well as the terminal’s details in system infor-
mation.
Power On/O Button
Use the power on/off button to turn the terminal on or off. You can disable the button to avoid accidental shut off of the terminal.
Battery
Terminals operate using power supply from a standard power outlet. Inside the terminal, there is an RTC battery for the running of the clock. Charge the terminal for at
least 3 hours straight before you start using it. When there is a serious delay in time
or the clock keeps on restarting, the RTC needs to be replaced.
Mini UPS (uninterrupted power supply) 5V and mini UPS 12V provide mobile power
supply to the terminals. Charge the mini UPS sufficiently for optimum performance.
accessory.fingertec.com for more information about accessories.
Refer to
External power supply:
Date/Time
The terminals display the date and time at the home screen. Choose the date and
time format based on your preference. Press Menu > Date/Time > Select Value > OK
to save.
CONTENTS
6
Page 7

Voice Control
Voice Control lets you control the level of volume emitted by the terminal.
TURN ON/OFF
The system lets you to turn on/off the voice based on your preference. Press Menu >
System > System > Voice > On/Off > Determine value in percentage (default is 67%)
> OK to save.
ADJUST VOLUME
The default volume of the terminal’s voice is 67. The volume can go as high as 100 and
as low as 0. To sustain the performance of speaker, it’s recommended to stay within
the range of 60-70. To adjust the volume Press Menu > System Icon > System > Vol >
input value > OK to save
Security Features
Security features help protect the information in the terminal from being accessed by
unauthorized individuals.
ADMIN AFFIRM
Register an administrator to the system by enrolling a fingerprint or a password to
a user ID. Press Menu > User Mgmt > New User > Privilege: Admin > Choose enrollment method > OK to Save. After enrolling an administrator, the main menu can only
be accessed by the administrator. The terminal will display “Admin Affirm” when an
anauthorized individual tries to access the Menu.
COM KEY
Create password for a specific terminal here. Press Menu > Comm. Icon > Security >
Insert Terminal ID No and Password > Ok to save. The security password known as
COM Key is intended for extra security. To connect the terminal with the software, the
COM key inserted in the Software must be the same as the one inserted in the terminal or else the connection will not be established even though the activation key and
product key are correctly inserted.
Cleaning Terminal
CLEANING THE BODY
Use a dry cloth to clean the terminal’s body. Do not use any liquids, household cleaners, aerosol spray, solvents, alcohol, ammonia and abrasive solutions to clean the body
of the terminal because it could damage it.
CLEANING THE FINGERPRINT PRISM
Clean the fingerprint prism with a cellophane tape for (silicon coated prism). View the
video on how to clean the fingerprint prism at this link
duser/cleanfinger.html
. For the non-coated prism, please use microfiber cloth.
fingertec.com/newsletter/en-
CONTENTS
7
Page 8

Restarting and Resetting Terminal
If a feature isn’t functioning as it should, try restarting or resetting the terminals
RESTARTING THE TERMINAL
Push the On/Off button on the terminal to restart the terminal. If you can’t restart the
terminal, or if the problem persists, you might want to reset.
RESETTING THE TERMINAL
Go to Menu, press the System icon and click on Reset. Choose to Reset All Default Settings, Reset Keyboard Settings or Reset Other Parameters. Resetting the terminal will
cause all your settings to return to the original factory settings.
CONTENTS
8
Page 9

3 • USER
Enrolling User
The FingerTec terminals can enroll fingerprint templates, passwords and card information. This chapter covers all possible user enrollments in the terminals.
FINGERPRINT ENROLLMENT
It is recommended to enroll two fingers for one user ID. One template is the default
and another one is used for backup. You need to check the quality of the fingerprint
before doing any fingerprint enrollment. It is important to locate the center points of
the finger because the center points has to be placed in the middle of the scanner during enrollment to get a good reading. You also have to make sure that the fingers are
not too wet or too dry for enrollment. To enroll ngerprint: Press Menu > User Mgmt
icon > New User > ID. No: (insert value) > Select “Enroll FP” > Select Privilege > Place
your fingerprint 3 times following instructions given by the terminal > OK to save.
CARD ENROLLMENT
For terminals that are using card system, default card for the terminal is RFID. MiFare
and HID card systems are available upon request. To enroll card:
Mgmt icon > New User > ID No: > Insert User ID > Select “Enroll Card” > Wave the card
at the scanning area until the screen displays the Card ID > OK to save.
PASSWORD ENROLLMENT
The terminal offers different enrolment methods, and passwords can be used alone or
in combination with other verification methods. The maximum length of a password is
8 digits. To enroll password: Press Menu > User Mgmt icon > New User > ID No: (insert
value) > Select “Enroll Pwd” > Input password using the keypad > Reconfirm password
> OK > OK to save.
Press Menu > User
Verifying User
1:1 ONE TO ONE / 1:N ONE TO MANY
VERIFICATION METHOD PROCESS
1:1 (One to One)
1:N (One to Many) You don’t need to identify your User ID before inputting any bio-
You have to identify your User ID before inputting any biometrics
feature for verification. For example, your user ID is 1008. One to
one method requires you to key in user ID followed by your fingerprint to get verified.
metrics feature for verification. Simply place your finger on the
scanner for verification.
CONTENTS
9
Page 10
VOICE MESSAGE
VOICE / MESSAGE WHAT DOES IT MEAN?
“Verified”
“Try again please” Identity verification is failed because the finger is not properly posi-
“Admin Affirm” You are not an administrator of the system and you cannot access
“Duplicate Finger” This message only appears during registration when the finger that
“Invalid ID” For 1:1 verification, User ID entered does not match with fingerprint.
Identity verification is successful, the terminal stores the transaction
logs and opens the door (if connected to door access)
tioned, the template is not available in the terminal or the password
is incorrect.
Menu page
you want to enroll has been enrolled before. “FP Enrolled Alrd” will be
displayed on the LCD screen.
FINGERPRINT VERIFICATION
1:N – 1:N verification does not require any input of your user ID. Place your finger properly on
the scanner and the terminal will take a second to verify your identity.
1:1 – 1:1 requires input of User ID before the terminal reads and verifies your identity. Press
1:1/1:N > Input ID on the screen > Press fingerprint icon > terminal will read and verify.
Some precautions have to be taken to get a good read every time.
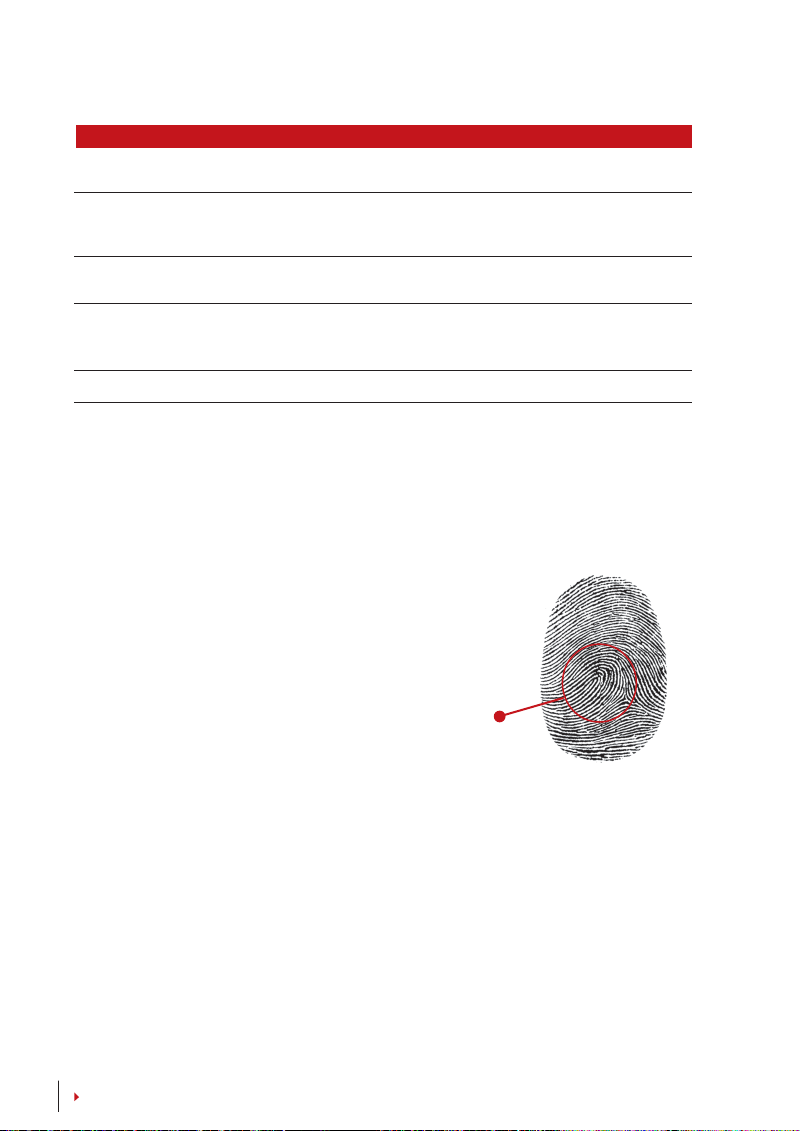
Make sure the center point of your finger is
·
placed in the middle of the scanner for a good read.
Recommended to use index finger. The terminal
·
accepts other fingers but index is the most convenient.
Make sure the finger is not wet, too dry, injured or dirty
·
Do not press hard on the sensor, just place it
·
comfortably
Avoid direct sunlight or bright light
·
Center point
PASSWORD VERIFICATION
Password can be an option for those who do not prefer to use other verification methods. To
verify using password, press 1:1/1:N > insert User ID and press key button > insert password
and press OK.
CARD VERIFICATION
Place the card on the card scanning area and the terminal will read and verify the card.
CONTENTS
10
Page 11
Adding User Information
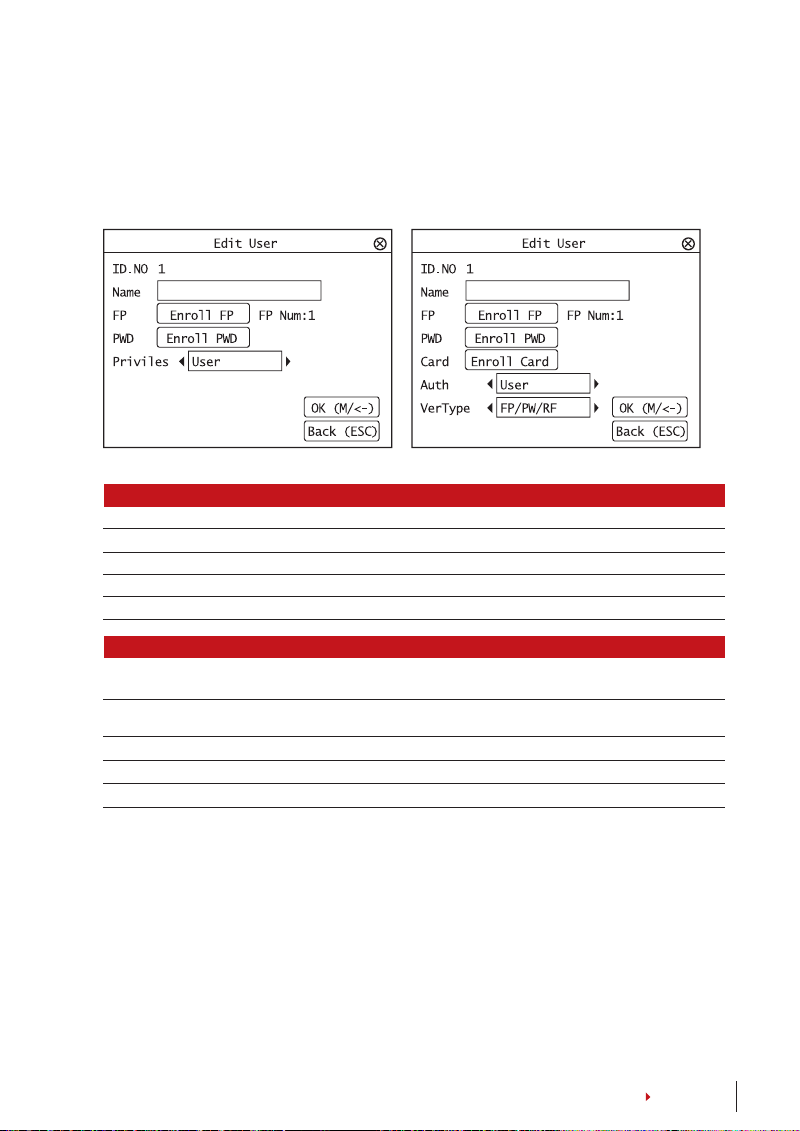
User information can be added into the terminal through two ways. One is through the
FingerTec terminal and the other through the Software. To add/change user information
via the terminal, press Menu > User Mgmt icon > Manage User > OK > Select Instruction
> Edit/Add > OK to Save.
Instruction Function
Search User Insert User ID in the column and press OK
Record Press to view available user records
Edit User Delete/Add Verification Methods and change Privilege
Del User Delete User, Fingerprint or Password
New User Enrolment of New User
Field Function
ID No. Edit user ID based on your company’s employee numbering system. Maximum length of
Name Add name of the user in this field (Can only be done via TCMS). Maximum number of char-
FP Quantity of Fingerprint
PWD Quantity of Password
CARD Quantity of Card
user ID is 9 digit
acters is 24
It is recommended that the updating of user information be done through the Software
software. After the information is updated, sync the Software and the terminal to display
the information.
Deleting User
Only an administrator can perform user deletion at the FingerTec terminal. To delete
certain user(s), press Menu > User Mgmt > Manage User > OK > Select Del User > Choose
“Delete User” > OK
Please be extra careful when performing this task to avoid any unauthorized deletion.
CONTENTS
11
Page 12

Access Level/Privilege
FingerTec terminals offer two types of access level or privilege.
PRIVILEGE USER ROLES
Normal User
Administrator You are allowed to access into menu to enroll users and edit settings
Only use the terminal to verify your identity. You cannot access into
Menu and make changes into settings and system
and system
De ning Work Codes
The terminal provides a work code feature
which allows users to key in predefined
numbers after verification. The work code
numbers are predefined in the Software.
The following table shows examples of
work codes.
Press Menu > User Mgmt > WorkCode >
Press ok to activate the menu > Select to
Create New workcode, Edit Workcode or
to Delete Workcode > Choose your preference > Ok to save.
To add work code through the terminal,
Press Menu > User Mgmt > Workcode >
Menu > New > Enter Code Number eg: 02
> Enter Code Name eg: Emergency Leave
> OK to save.
REASONS WORK CODE
Check In 00
Check Out 01
OT start 04
Done 05
Sick Leave 10
Half-day Leave 12
Emergency Leave 11
Meeting Client 20
Outstation 21
Workcode Mode 1: Verification followed by work code
Workcode Mode 2: Work code followed by verification
RFID Card Function
The fingerprint terminals are versatile and some can accept card verifications. This chapter covers the Radio Frequency Identification or better known as RFID system. The terminals accept RFID card with specifications of 64-bit, 125kHz.
ENROLLMENT OF RFID CARD
RFID can be enrolled alone, with fingerprint or with password. Each RFID card comes with
a unique ID and the terminals will read from the numbers and match it with the card.
Enrollment of RFID is easy. Press Menu > User Mgmt > New User > Enroll Card > ware card
at the induction area > OK.
CHANGING CARD ID
Press Menu > User Mgmt > Manage User > OK > Change Card > OK > Show a different
.
12
card > OK
CONTENTS
Page 13
4 • INSTALLATIONS & COMMUNICATION
Installations
FingerTec terminals offer several connections for power and communications. Installations
of FingerTec time attendance terminals are simple.
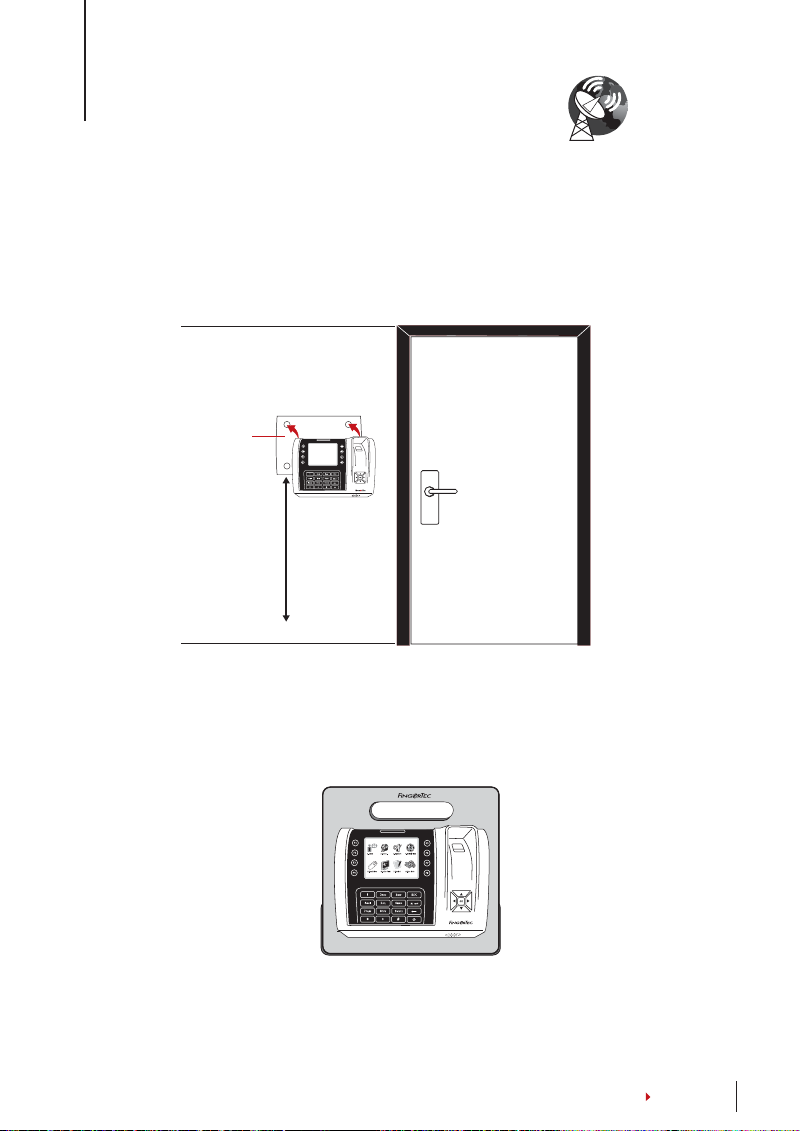
MOUNT ON WALL
Back Plate
4 feet / 1.2 meter
(recommended)
After determining the height of the terminal from the ground level and have made the
relevant marks on the wall, drill the screws into the wall to hang the back plate.
FLEXIKIT
Q2i
FingerTec offers flexi-kit for all its time attendance models. Attach the terminal on the flexikit for convenience and cosmetic purposes. View flexi-kit at
accessory.fingertec.com
CONTENTS
13
Page 14
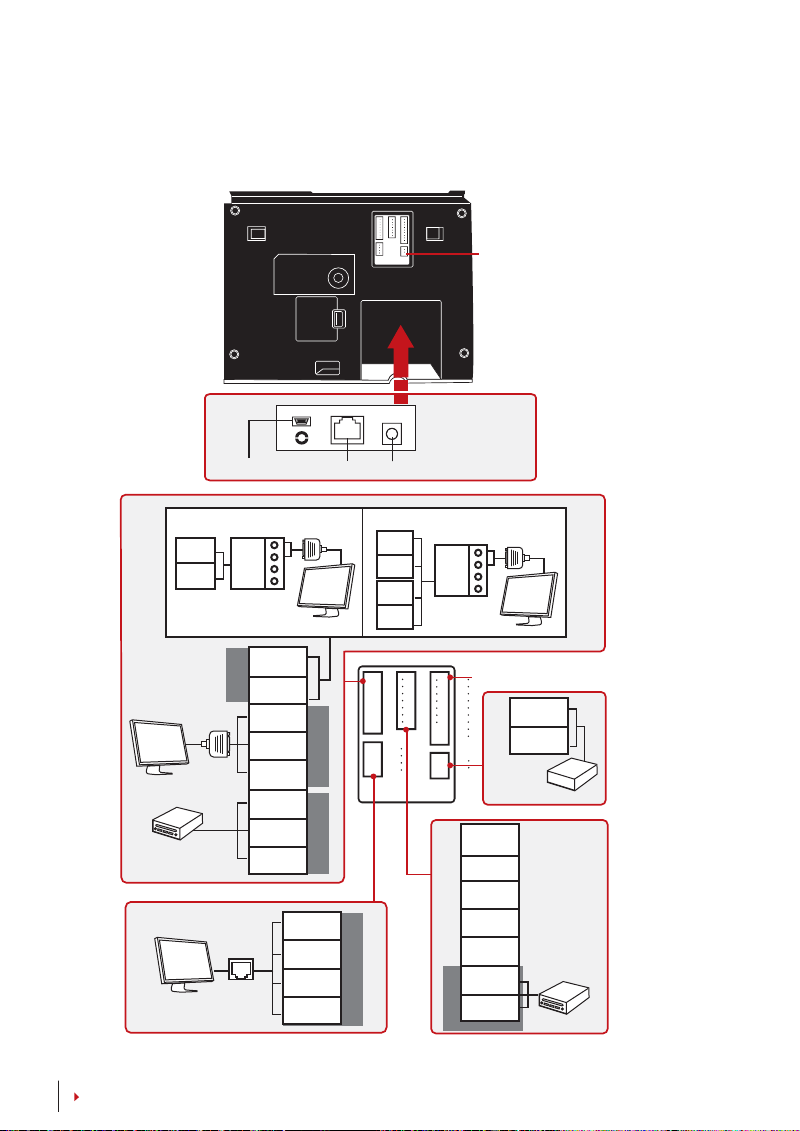
Communications
Connection points for power and communication are available on top of the terminals. Refer to the following diagrams for the terminals you require.
POWER CABLE PORT (B)
1. RS485 Single Connection
485B
485A
RS232/RS485
Data Converter
RS232
cable
3rd party controller
with 26 bits wiegand
input
USB PORT
RX+
RX-
RS485
TCP/IP
TCP/IP PORT (LAN)
485B
485A
GND
TXD
RXD
GND
WD1
WD2
RJ-6
RJ-3
RJ-2
RJ-1
2. RS485 Network Connection
485B
485A
485B
485A
Wiegand OUT RS232
TCP / IP
POWER ADAPTER PORT (A)
RX+
RX-
RS232/RS485
Data
Converter
Door Lock connector.
Refer to Appendix I
DC12V 3A
Power Supply
* Use either power input
BEL+
BEL-
BEEP
GLED
RLED
INWD0
INWD1
Wiegand IN
GND
+12V
3rd party
controller with
26 bit swiegand
output
14
CONTENTS
Page 15
1 8
USB PORT
TOP
Linking with USB flash disk for remote data transfer.
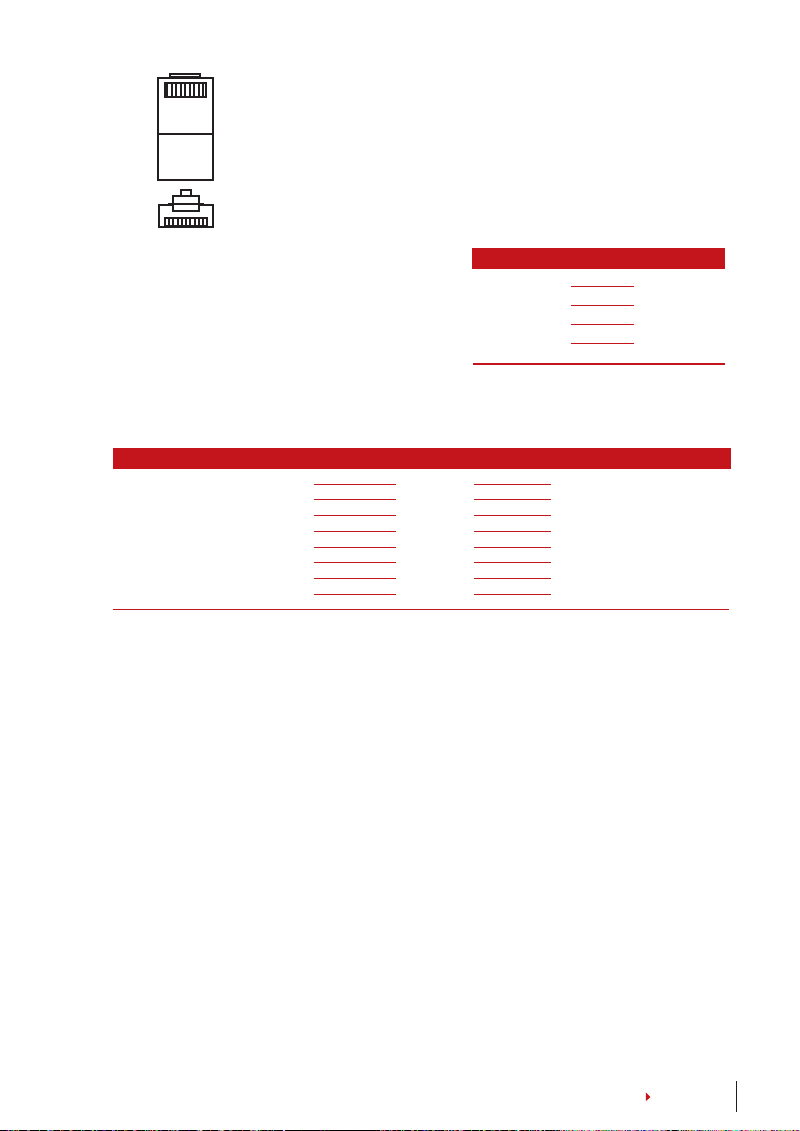
TCP/IP PORT
FRONT
1 8
TCP/IP for Single Connection – Linking the ter-
minal to a single computer using TCP/IP requires Ethernet 10/100Base-T Crossover Cable. The cable can
be used to cascade hubs or to connect Ethernet stations back-to-back without a hub. It works with both
10Base-T and 100Base-TX.
TCP/IP for Network Connection – Linking the terminals to multiple computers using TCP/IP
requires Ethernet 10/100Base-T Straight Thru Cable or “whips”. The cable works with both 10Base-T
and 100Base-TX, connecting a network interface card to a hub or network outlet.
Connect with CAT 5 cable for LAN connection, one end to this port
and another end to the computer’s TCP/IP Port.
JOINT 1 PIN JOINT 2 PIN
TX+ 1
TX- 2
RX+ 3
RX- 6
CONNECTOR PIN CABLE COLOR CONNECTOR
TX+ 1• White/Orange •1 TX+
TX- 2
RX+ 3
4
5
RX- 6
7
8
Orange •2 TX-
•
White/Green •3 RX+
•
Blue •4
•
White/Blue •5
•
Green •6 RX-
•
White/Brown •7
•
Brown •8
•
• •
• •
• •
• •
3 RX+
6 RX-
1 TX+
2 TX-
POWER SUPPLY PORT
Insert the Power Adapter point to this port for power.
RS232/RS485/WIEGAND CONNECTION PORT
RS232 – Connection to a computer using RS232 cable.
RS485 Single Connection - Connection to a single computer using RS485 wire.
RS485 Network Connection - Connection to multiple computers using Daisy Chain connec-
tion.
Wiegand Output – Connecting with third party connector or terminal(s).
Security
Create password for a specific terminal here. Press Menu > Comm. > Security > Insert
Terminal ID No and Password > Ok to save. The security password known as COM Key
is intended for extra security. To connect the terminal with the software, the COM key
inserted in the Software must be the same as the one inserted in the terminal or else
connection cannot be established even though the activation key and product key are
correctly inserted.
CONTENTS
15
Page 16

Ingress Online Activation
Ingress is a genuine software by FingerTec. Every FingerTec access control model
comes bundled with a unique license key. To start using the terminal with Ingress, you
must connect the terminal to Ingress and perform online activation. Ingress reads the
serial number of your terminal and sends it for verification at the FingerTec server via
Internet.
In case you do not have an Internet connection, you would need to do offline activation. Please send the serial number and models of your terminals to your local resellers
[email protected] to request for a product key and activation key.
or
Installation and Setup of Ingress
Install Ingress in a PC that fulifills Ingress’ minimum requirements. Refer to http://
www.fingertec.com/customer/download/postsales/SUM-Ingress-E.pdf
gress user guide online. Setup Wizard will require you to do online activation before
connection establish between Ingress and terminals.
for the In-
Connecting the Terminals to Ingress
DETERMINING TERMINAL NUMBER
Identify the number of your terminals to differentiate them between one another. Ingress can connect up to 999 units of terminal. Press Menu > Options > Comm Opt >
Dev Num > Select the number.
USING TCP/IP
IP address is important, as it is a unique address of the terminal in LAN. Without the IP
address, locating the specific terminal is not possible. To input the IP address of the
terminal: Press Menu > Options > Comm Opt > IP Addr > Key in IP address.
USING TCP/IP
It is important to setup the Ethernet to connect the terminals using TCP/IP connection.
Setting up the Ethernet is done by enabling the Ethernet function: Press Menu >
Options > Comm Opt > Ethernet > Yes.
Turn off the terminal after you have set the Ethernet setting to Yes. Now, plug-in the
network plug to the Ethernet interface and turn the power on.
Determining the Netmask, Gateway and NetSpeed: For TCP/IP connection, please
configure the netmask, gateway and netspeed for the terminal.
Press Menu > Options > Comm Opt > NetMask > Insert the numbers.
Press Menu > Options > Comm Opt > Gateway > Insert the numbers.
Press Menu > Options > Comm Opt > NetSpeed > Choose the speed of your Ethernet
connection.
CONTENTS
16
Page 17

USING RS232 CONNECTION
For connection via RS232,baudrate is the determinant of communication speed between the terminal and the software. The higher the baudrate, the faster the speed is.
To turn on RS232 connection and set the baudrate: Press Menu > Options > Comm
Opt > RS232 > Change the RS232 connection to Y.
To change baudrate: Press Menu > Options > Comm Opt > Baudrate > Change the
Baudrate accordingly.
USING RS485 CONNECTION
For connection via RS485, baudrate is also the determinant of communication speed
between the terminal and the software but the speed must be according to the speed
of the converter. Check your converter for the speed.
To turn on RS485 connection and set the baudrate: Press Menu > Options > Comm
Opt > RS232 > Change the RS485 connection to Y.
To change baudrate: Press Menu > Options > Comm Opt > Baudrate > Change the
Baudrate accordingly.
Using USB to Download/Upload Data
A USB flash disk is useful in cases where the terminal is installed far from a PC or there
is a connection problem. To determine the type of USB flash disks compatible with the
terminal, please refer to this link at fingertec.com/newsletter/HL_74.html using USB
Press Menu > PenDrive Mgmt > Choose the operation that you want to carry out via
USB flash disk.
Communication Key
Since the software is controlled by an activation code and a product key, set the COMM
key to zero. Press Menu > Options > Comm Opt > COMM Key > Set to 0.
CONTENTS
17
Page 18

5 • SYSTEM
System Settings
THRESHOLD
Threshold is the level of the fingerprint scanner’s sensitivity. Threshold determines how
many percent of minutiae points on a fingerprint template will be read by the system.
The higher the threshold level, more points are being read, more restricted the system.
Configure the threshold for 1:1 and 1:N methods.
For 1:1, the range is from 0-50 and the recommended value is 15.
For 1:N, the range is from 0-50 and the recommended value is 35.
Press Menu > System > System > Threshold (1:1) or Threshold (1:N) > Determine the
Level > OK to Save
DATE FORMAT
The date format can differ based on countries for example in Malaysia, the date-monthyear format is used while in America, the month comes first. Choose your date format
according to your preference. The default format is dd-mm-yy. Press Menu > System >
Date Format > Select Format > Ok to Save
SOUND OF KEYBOARD
The terminals emit sound when you press any of its buttons. To turn on/o the keypad
Press Menu > System > Keybeep > On/Off >Ok to Save
sound:
FINGER SENSITIVITY
Determine the sensitivity of the sensor to fingerprint. Choose Low, Mid or High sensitivity. It is recommended to be set at Mid. Press Menu > System > Finger Sensitivity >
Select your preference >Ok to Save
VOICE
The terminal has certain voice commands to guide users during enrolment and to notify users during verification. Press Menu > System > Voice > On/Off > OK to save
VOLUME %
Voice Control lets you control the level of volume emitted by the terminal.
Adjust Volume: The default volume of the terminal is 60. The volume can go as high as
100 and as low as 0. To sustain the performance of speaker in the terminal, it’s recommended to stay at the range of 60-70. To adjust the volume. Press Menu > System >
Volume 1:100% > Set your number > Ok to Save.
ALGORITHM VERSION
Get the terminal’s algorithm version here. Press Menu > System icon > System > Alg
Version > View the Version > Ok to Save.
CONTENTS
18
Page 19

RECHECK MIN
Once you have inserted a value, eg: 1, when a user checks in at 10:01, his time will be
adjusted to 10:00. The maximum value is 99. When you enter 5, a user is given 5 minutes
leeway time in his attendance.
LOG ALERT
When the log storage is at a certain level, the user/administrator needs to be alerted to
avoid underperformance of terminal. The recommended value is 99. Menu > System >
System Settings> Log Alert > Input your value > Save
Data Management
Every time an enrolment is performed or a
verification is done, a transaction log is stored
inside the terminal. The data contains the terminal ID, date, time, user ID and transaction
activity. For example, 0105021009000000000
010000:
These logs need to be managed to maintain
DESCRIPTION CODE
Terminal ID 01
Date (ddmmyy) 050210
Time (hhmm) 0900
User ID 000000001
Transaction Code 00
Terminal Activity 00
the effectiveness of the terminal.
It is recommended to do the housekeeping of data from the Software software. There
are 4 functions available in the Data icon to enable you to manage your data in the
FingerTec terminal.
In the data management icon, you can choose from four instructions. Press Menu >
System > Data Mgmt > Select your instruction > Ok to save
DELETING ATTLOG
Please make sure that you are certain when you want to do this operation. The logs
that are stored inside the terminal are the ones that have not been downloaded into
Software. Deleting the logs means that no backup data is available.
DELETING ALL DATA
This function allows you to delete all attendance data and user information in the terminal. Make sure that all user information has been backed up in the Software before
performing this task.
CLEARING ADMIN
There are three user privileges in the terminals, administrator, supervisor and normal
user. You can delete administrator privilege; but without an administrator, normal user
can access the menu easily and interrupt the settings.
DELETING PICTURE
You can advertise your product and company corporate message in the terminal using screen saver
function.
Please be extra careful when
performing this task to avoid
unauthorized deletion of
NOTE
important data
CONTENTS
19
Page 20

Data Update Using USB Flash Disk
To update the terminal using a USB flash disk, press Menu > System > Update > Make
sure that you have the USB Flash Disk plugged into the terminal before you proceed.
Keyboard
Define the function keys in your terminal here. Press Menu > System> Keyboard > Select the function > Determine the Key Number > Name The function (To activate the
alphanumeric keyboard, press the right arrow button) > You can also set to auto switch
this function on a certain time of days > Ok to Save
Display Settings
NUMBER OF TRIES
1:1 Match Retry Times: You can set the limit to the number of tries for the 1:1 verification
mode. The range is from 1-9. If a user’s number of tries exceeds the limit, the terminal
could trigger the alarm system to alert security that somebody is meddling with the
terminal. Press Menu > System > Display> 1:1 Match Retry Times > Determine the Value
> ok to Save
Password Retry Times: You can set the limit to the number of tries for password verifica-
tion. The range is from 1-9. If a user’s number of try exceeds the limit, the terminal could
trigger the alarm system to alert security that somebody is meddling with the terminal.
Menu > System > Display> 1:1 Match Retry Times > Determine the Value > Ok to Save
Clock Mode: There are two clock modes available in FingerTec terminals. Choose the
one your prefer. Press Menu > System > Display> Clock Mode > Choose 1 or 2 > Ok to
Save
PICTURE DELAY
Picture delay refers to the idle period before the screen displays your loaded advertisement. It ranges from 0-999 seconds. Press Menu > System > Display > Picture Delay >
Determine your time > Ok to Save
CLOCK DELAY
Clock delay is an idle period before the screen displays your chosen clock picture. It
ranges from 0-999 seconds. Menu > System > Display > Clock Delay > Determine your
time > Ok to Save
Reset
Reset allows you to perform 3 tasks:
1. Reset All Default Settings
2. Reset Keyboard Settings
3. Reset Other Parameters
Please make sure that you are certain of performing any of the tasks before proceeding
to avoid loss of crucial data.
CONTENTS
20
Page 21

Misc Settings
SLEEP TIME
Sleep time is a period before the terminal goes to sleep mode. This setting is available
as a power saving feature of the terminal. The time range is from 0-999 seconds. Menu
> System > Misc Set > Sleep Time > Determine your time > Ok to Save
EXT BELL
FingerTec colour time attendance terminal models allow you to link an external bell
such as siren to the system. Press Menu > System > Misc Set > Ext Bell > On/Off > Ok
to Save
DISPLAY THE FINGERPRINT IMAGE ONSCREEN
The terminal offers to display a fingerprint image when doing scanning for users to understand how to place the finger properly. You can opt to show the fingerprint image.
Press Menu > System > Misc Set > Fp Image > Choose Your Preference > Save
Options available include:
Fingerprint Image Function
Display
Both show The fingerprint image is displayed on the screen during both enrollment
Neither show The fingerprint image is neither displayed on the screen during enrollment
Enrol show The fingerprint image is displayed on the screen only during enrollment.
Match show The fingerprint image is displayed on the screen only during verification.
POWER KEY
You can disable or enable the power on/off button to avoid accidental shutdown of
FingerTec terminals. Disable/Enable: Press Menu > System > Misc Set> LockPwrKey
> On/Off > Ok to save.
and verification.
nor during verification.
SYSTEM LANGUAGE
FingerTec terminals offer various languages to match your local requirements. Maximum of 3 language packs are available in the terminal and it’s set according to your
request during purchase. The default language is English. Press Menu > System > Misc
Set > Language > Choose your language > Save
CONTENTS
21
Page 22

6 • DATE/TIME
Adjusting Date/Time
FingerTec time attendance terminal functions to record time attendance activities of
employees. Precision in time and date cannot be compromised for the system to work
efficiently. Adjust Date/Time according to your time zone. Press Menu > Date / Time >
Select Value > Ok to Save
Daylight Savings Time
Daylight savings time (DLST) is the practice of temporarily advancing clocks so that
afternoons have more daylight and mornings have less. Adjust your DLST if necessary.
Press Menu > Date / Time > DLST to On and adjust the time accordingly > Ok to Save
22
CONTENTS
Page 23

7 • USB
Understanding the Need for USB
FLASH DISK
Communication between FingerTec terminals and a PC is very important to upload and
download transaction data for time attendance and door access reports. The terminals
offer a few communication options such as LAN and serial cable connections but sometimes there are scenarios that require USB (Universal Serial Bus) connectivity. USB can
connect terminals with a computer for download and upload of user information and
transaction logs.
TYPES OF USB
There is various type of USB available in the market. FingerTec terminals can only work
with USB flash disks that support minimum Linux Kernel 2.4.x, working ideally with
Imation, Transcend and Pen Drive (minimum support Linux Kernel 2.4.x) To determine
the type of USB compatible with the FingerTec terminal, please refer to this link at
gertec.com/newsletter/HL_74.html
DOWNLOADING DATA INTO USB
A FingerTec terminal is able to download data i.e. transaction logs, user information,
and short messaging system into the USB Pen Drive.
PenDrive icon > Download Data. After the download process is complete, eject the USB
flask disk from the terminal and connect it to your PC that has been installed with the
Software software. Upload the data from the USB into Software for further processing.
To download the data: Press Menu >
UPLOADING DATA FROM USB
A FingerTec terminal is able to upload data i.e. user information, short messaging system, picture screensaver and themes into the USB Pen Drive.
Menu > USB icon > Upload Data. After the upload process is complete, eject the USB
flask disk from the terminal.
To download the data: Press
fin-
UPLOADING PICTURES TO THE TERMINAL
The FingerTec terminals are able to display advertisements or pictures on the screen
during an idle period. The size of the displayed picture must be 320 x 240 resolution.
CONTENTS
23
Page 24

8 • AUTO TEST
Who Should do the Auto Test?
Auto Test page is to diagnose or analyze the conditions in the terminal. There are several tests available in the Auto Test page and only an administrator is allowed to perform
the test. Before running any tests, kindly contact your reseller for advice or you could
email
TFT TEST
Test Screen determines the quality and sensitivity of the terminal’s touch screen panel.
You will see lines of different colours; click the screen to continue testing. If there’s a
broken line or distorted colors on the screen, kindly send your FingerTec Terminal for
To run test : Press Menu > Auto Test icon > TFT Test
repair.
AUDIO TEST
Audio Test determines the quality of the terminal’s audio. Every click on the screen will
emit different voice message. If you find any distorted sound in any of the voice messages or instructions, kindly send your terminal for checking and repair.
Menu > Auto Test icon > Audio Test.
KEYBOARD TEST
The Keyboard Test is for you to check the condition of the keyboard. Press Menu > Auto
Test icon > Keyboard Test
SENSOR TEST
This test is to determine the condition of the fingerprint optical scanner you need to run
fingerprint test. Once you run the sensor test, the terminal will display a white square on
the screen. Place your finger on the scanner. If you can see your fingerprint on the white
square, the optical scanner works fine. Otherwise, kindly send your terminal for checking and repair.
To run test : Press Menu > Auto Test icon > Sensor Test
To run test :Press
RTC TEST
Time is an essence in any FingerTec terminal and it should not be compromised. The
RTC Test will display date, time, 0 (s): 0 (ms)
Click the screen to start the test. The 0 (s): 0 (ms) will start to run and every 10ms change
the second to 1. If it doesn’t run as it should, kindly send your terminal for checking and
To run test : Press Menu > Auto Test icon > RTC Test
repair.
CONTENTS
24
Page 25

9 • RECORD
Checking Records of Users in the Terminal
To view a particular user’s records in the terminal, Press Menu > Record > Insert ID No:
> Select start and end range date > Ok to view
10 • SYSTEM INFORMATION
This option under System allows the installer to check the information of the terminal
including storage, firmware, algorithm, etc. To retrieve the System Information of the
terminal Press Menu > Sys Info.
Records
Shows free storage and used storage of the terminal, and details of user counts, admin
counts and password users. It also displays other information such as FP templates and
logs templates that have been used and are available.
Device
Pressing “Device” displays the terminal name, serial number, MAC Address, fingerprint
algorithm, firmware version, manufacturer and manufactured date and time.
CONTENTS
25
Page 26

TROUBLESHOOTING
“UNABLE TO CONNECT” APPEARS
When this message appears, it means that the settings for the terminal and the computer are not properly done. Find out which method you are using to connect. The
terminal offers LAN, RS232, RS485 and USB communication methods. Refer to Chapter
4 to further understand the topic.
“ADMIN AFFIRM” APPEARS
You are not the administrator of this terminal. Only an authorized administrator of the
system is allowed to access the Menu. Any attempt of normal user to access the Menu
will prompt “Admin Affirm” message on the screen. In case the administrator or he/she
has resigned from the company, kindly contact your FingerTec authorized reseller to
access the terminal.
DIFFICULT TO READ FINGER
Five things could be the cause of this:
Enrolment is not properly done: Enrolment is the most important process to ensure
that the terminal captures the best quality of your fingerprints. Refer to chapter 4 for
how to do a good enrollment.
The location of the terminal is not conducive: The scanner does not work well in
bright-lighted area. Cover the scanner a little if this is the cause of the difficulty. Shift
the location area for a better performance.
Finger is not properly placed: To get a good read, make sure that your finger’s center
points are located at the middle of the scanner. Adjust the position of your fingerprint
as you see it onscreen.
The scanner is not cleaned or it is scratched: Check the quality of the scanner. If the
scanner is dirty, please clean it with a microfiber cloth. If it is scratched, contact your
local reseller for a replacement.
Did anything happen to your finger lately? Make sure that the finger is not injured, cut
or bruised which could cause it difficulty to read. The algorithm reads the minutiae
points of your fingerprint, the more it can read, the better the result.
THE LED IS BLINKING ALL THE TIME
You have nothing to worry about unless the blinking light is red. The green blinking
light is indicating that the terminal is under its standby mode. Red blinking light may
signal problem in the terminal. Contact your reseller for consultation.
CONTENTS
26
Page 27

“DUPLICATE FINGER” APPEARS
FingerTec terminals are intelligent. It will not accept the same fingerprint twice into its
system. If you have registered a finger into the terminal, the system would prompt “duplicate finger” when you try to enroll that finger for another time. Choose a different
finger to proceed.
RFID CARD DOESN’T RESPOND
Two possibilities for this problem
Have you registered the card to the terminal?
The card must be registered to the terminal before it can read the information in the
card. Refer to chapter 3 User for card enrolment.
Have you assigned the user ID to the verification group that supports RFID card?
Without setting the terminal to show that you are under a group that supports RFID card,
the terminal wouldn’t read your card.
NO SOUND
A few things could cause this problem:
The terminal voice mode is silent
Perhaps someone has turned off the voice in your terminal or reduced its volume to 0%.
Refer to Chapter 5 System under Voice to rectify.
Speaker is damaged
Once you have rectified the voice mode, if the problem persists, proceed to test the
voice. Go to Chapter 8 to do the test. If no voice is being emitted, contact your local
reseller for support.
For more troubleshooting, go to
user.fingertec.com
CONTENTS
27
Page 28

OTHER RESOURCES
Information About FingerTec
TO LEARN ABOUT GO TO?
Company and the products www.fingertec.com
The latest updates Facebook Fan Page: FingerTec Worldwide
Twitter:
To subscribe for FingerTec newsletter:
info.fingertec.com/subscribenewsletter
Technical Tips and Latest user.fingertec.com
Product Updates and
Upgrades
Register for Warranty info.fingertec.com/productwarranty
FingerTec Accessory accessory.fingertec.com
FingerTec
Copyright Notice & Disclaimer
COPYRIGHT NOTICE
All rights reserved. No part of this book may be reproduced or transmitted in any form or
by any means, electronic or mechanical, including photocopying, recording, or by any
information storage and retrieval system, without written permission from FingerTec
Worldwide Sdn Bhd. Every precaution has been made to supply complete and accurate
information. Information in this document is subject to change without prior notice.
DISCLAIMER
No person should rely on the contents of this publication without first obtaining advice
from a qualified professional person. The company expressly disclaims all and any liability and responsibility to any terminal or user of this book, in respect of anything, and of
the consequences of anything, done by any such person in reliance, whether wholly or
partially, upon the whole or any part of the contents of this book.
FINGERTEC WORLDWIDE SDN BHD
Page 29

© 2013 FingerTec Worldwide Sdn. Bhd. All rights reserved. • 062013
 Loading...