

Page 1

Keylock 8800
User Guide
We Make Things Easy
Page 2

2-3 CHAPTER 1 • GETTING STARTED
Viewing the User Guide In the Internet
Included Accessories
Included Printed Materials
Installing Keylock 8800
Activating Keylock 8800
Registering Warranty
35 CHAPTER 2 • BASICS
Introduction
Overview
Reactivating Keylock 8800
Keypad
How To Access Main Menu
Setting of Date And Time
Setting Language
Cleaning
Restarting And Resetting Keylock 8800
58 CHAPTER 3 • MAIN MENUMANAGING USERS
Enrolling User
Verifying User
Deleting User
Access Level/Privilege
89 CHAPTER 4 • DOOR ACCESS OPTIONS
Enabling Alarm
Number of Tries Allowed
Lock (Period of Door Opening)
Verification Mode Setting
Type of Visitor Mode
Card Only Option
Resetting to Original Factory Settings
Deleting Logs
Clearing All Data
Clearing Admin Privilege
Delete S Logs
10 CHAPTER 5 • MANAGING USB FLASH DISK
Using USB To Download/Upload Data
Using USB To Download Logs
Using USB To Download Users
Using USB To Upload Users
Using USB To Update Firmware
Checking The Genuide TCMS V2
Installation And Setup of TCMS V2
1112 CHAPTER 6 • SYSTEM INFORMATION
Browsing Attendance Logs
Device Information
12 CHAPTER 7 • OTHER RESOURCES
CONTENTS
Page 3

2
CONTENTS CONTENTS
Rubber Cushion
Keys
Keyhole Blocker
Latch Receiver Door Frame Panel
Screws
RFID Keychain (5pcs)
AA Batteries
Back Plate (Front & Back)
Key LatchShaft
1 • Getting Started
VIEWING THE USER GUIDE IN THE INTERNET
The Keylock 8800 User Guide is available in the package when you purchased the
FingerTec Keylock 8800. The User Guide is also available online at fingertec.com and
user.fingertec.com. Choose the language you prefer for your User Guide.
INCLUDED ACCESSORIES
INCLUDED PRINTED MATERIALS
• FingerTec Comprehensive DVD (with Product Code and Activation Key)
• Quick Start Guide
• Pamphlet
• User Enrollment Template Form
• Warranty Card
INSTALLING KEYLOCK 8800
View the video guide of Keylock 8800 installation from this link.
http://user.fingertec.com/user-vd-KEYLOCK8800.htm
Page 4

3
LCD Screen
Keypad and
Card Induction
Area
Fingerprint Scanner
Handle
Keyhole
Backup Battery Connector
Battery Slots
USB Port
ACTIVATING KEYLOCK 8800
Insert four AA batteries to the back of Keylock 8800 and push the
OK/Menu button to activate the Keylock 8800. 4 AA Batteries can
last up to approximately 4000 standard operations.
REGISTERING WARRANTY
Make sure that you register your Keylock 8800’s warranty with us at fingertec.com/ver2/
english/e_main.html#.
2 • Basics
INTRODUCTION
FingerTec® Keylock 8800 is a breakthrough in mechanical doorlock design featuring superior attributes. Keylock 8800 offers fingerprint verification method, password and card
system, all in one machine for a convenient operation process. Enrollment and management of users are made easy by an LCD screen and simple buttons. An administrator can
do enrolment, deletion and amendment of user(s) at Keylock 8800 easily. Keylock 8800
is also designed to allow data transmission through USB Flash Disk. Keylock 8800 comes
with a mortise lock for better security.
OVERVIEW
Page 5

4
CONTENTS CONTENTS
LCD Screen Displaying status of battery, status of Keylock 8800, date and time.
Keypad To input instructions to Keylock 8800 and perform configuration.
Card Induction Area Read the card information based on the card system of Keylock
8800.
Fingerprint Scanner To scan fingerprint for confirmation of identity.
Battery Slots To insert four pieces of standard AA batteries for power
USB Port To connect the USB extension provided to download/upload data from/to Key-
lock 8800
Battery Indicating the life of the batteries in the Keylock 8800.
Time / Date Showing the time and date set for the Keylock 8800
Status Displaying Status of the Keylock 8800. “Keylock 8800” gives
an indication that the Keylock is ready for use.
REACTIVATING KEYLOCK 8800
Keylock 8800 is an energy-saving devise. Right after every use, the Keylock 8800 will return
to its idle status. Press the OK/Menu button to reactivate Keylock 8800.
KEYPAD
To return to the previous instruction / To input number 1
To go up and to change the number ascendingly / To input number 2
To go down and to change the number descendingly/ To input number
3
To input number 4
To access to main menu and to confirm a certain instruction
HOW TO ACCESS MAIN MENU
Administrator is required before any fingerprint users are enrolled inside the Keylock
8800. When administrator’s fingerprint templates are deleted, no new user enrollment
could be performed without doing a new supervisor’s enrollment. However, a normal user
could assign himself as an administrator to access the system menu.
To register as an administrator:
Keep on pressing OK/Menu button (approximately 5-8s) until you can view the Main
Menu. Only enrolment of administrator is allowed when you access it the first time.
Press
OK/Menu (long) > User Manage > Enroll Admin > Choose between these 3 enrolment types: Enroll FP/ Enroll PWD / Reg RFID > Follow the instructions given on the screen
> Press OK(Save) to save to Main Menu
Page 6
5
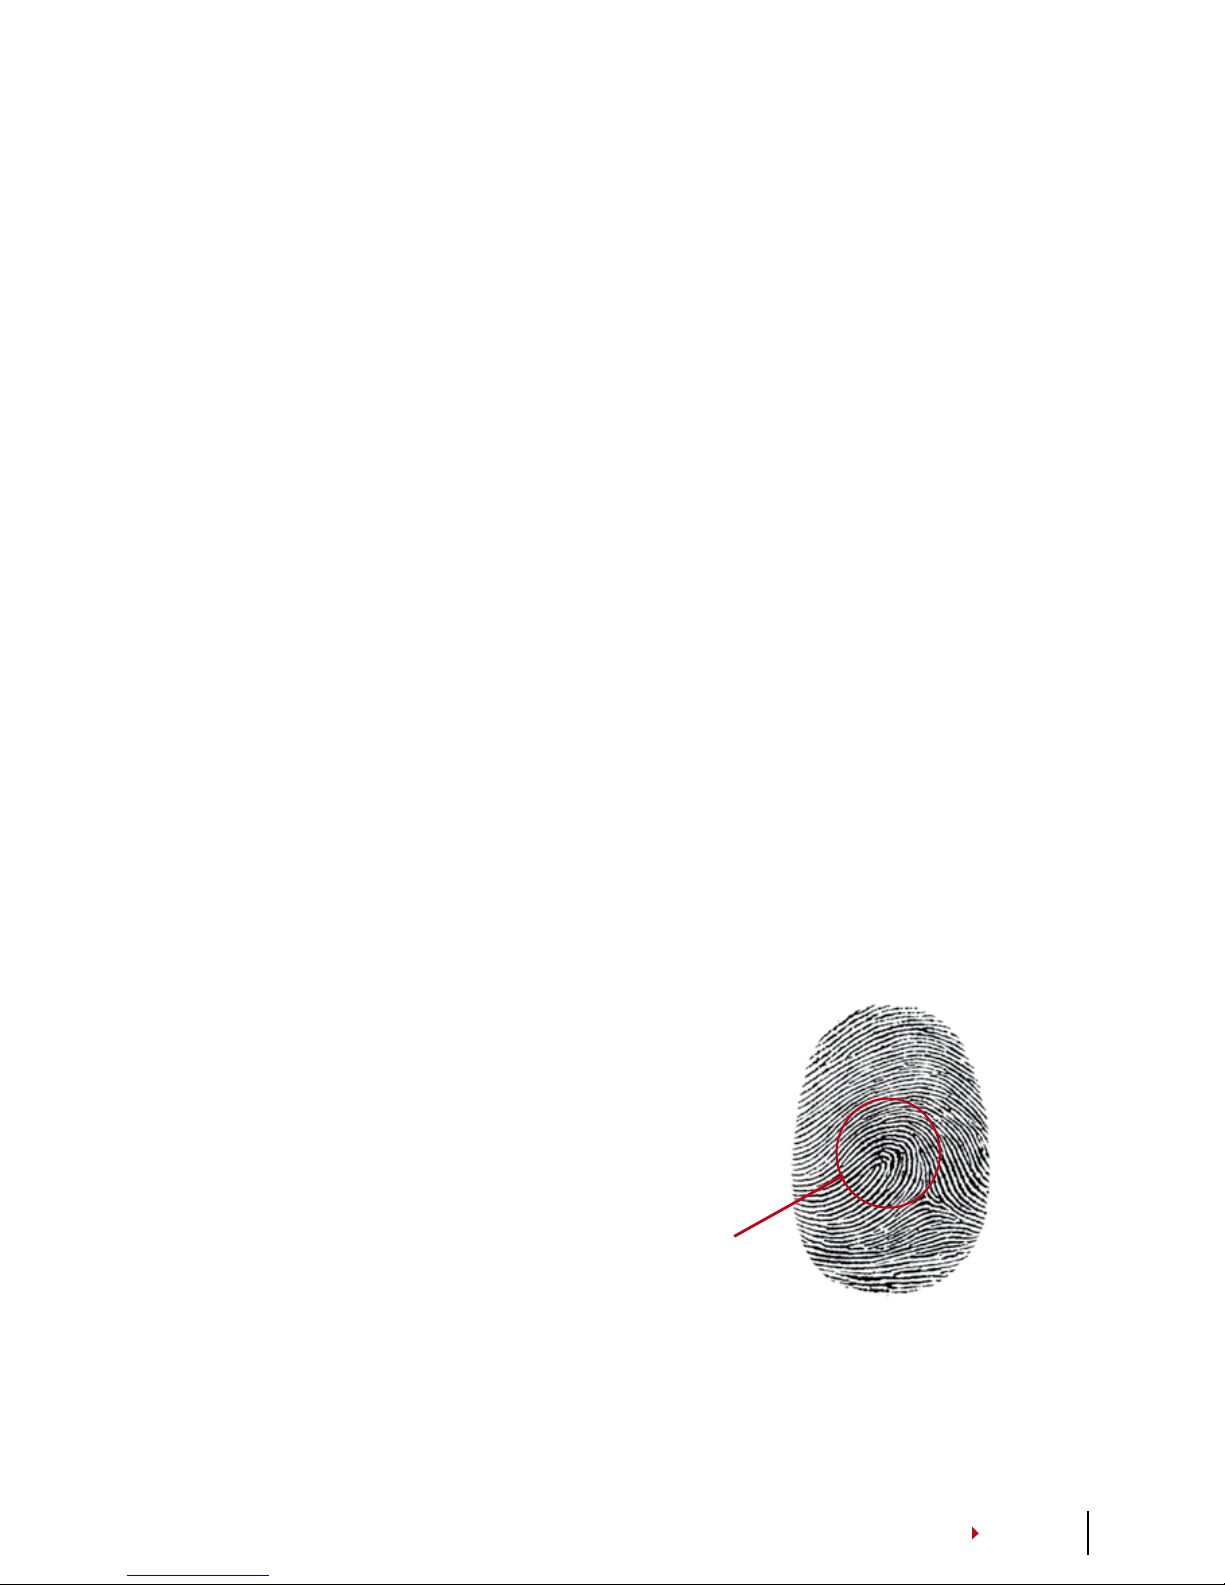
Center point
Once an administrator is enrolled in the Keylock 8800, any attempt to access into the
Main Menu will prompt the terminal to display “Admin Affirm”. The administrator’s fingerprint or password is required to access to other features.
SETTING OF DATE AND TIME
Keylock 8800 is useful for time attendance and door access control. To make sure that
the device is capturing the correct date and time of an access. Main Menu > Options >
System Option > Set Date Time > OK
SETTING LANGUAGE
Select language for Keylock 8800 according to your preference. Menu > Options > System Option > Select Language > OK
CLEANING
Wipe Keylock 8800 with a dry piece of cloth to maintain the shine of the terminal.
Clean Fingerprint Clean the fingerprint scanner with a microfiber cloth.
RESTARTING AND RESETTING KEYLOCK 8800
If something isn’t working right, try restarting or resetting Keylock 8800.
Restart Every Keylock 8800 comes with two sets of mechanical keys for emergency. To
restart the unit, you need to access using mechanical key. Open the back plate and remove one of the batteries. Put it again and press OK/Menu button to turn on Keylock
8800.
Reset Make sure that you have confirmed to reset all the settings back to factory settings
because once you press the OK button. To reset to factory setting, press Menu > Options
> System Options > Adv Options > Reset Opts > OK
Please contact [email protected] in cases where you need to bypass the administrator’s privilege and reset the unit. FingerTec Worldwide would require some verifications from you before any information is released.
3 • Main Menu – Managing Users
ENROLLING USER
Keylock 8800 can contain up to 500 fingerprints,
100 passwords and 500 RFID cards.
Fingerprint Enrollment It is recommended to enroll two fingers for one user ID. One
template is default and another one is used for backup. You need to check the quality
of the fingerprint before doing any fingerprint enrollment. It is important to locate the
center points of the finger because the center points has to be placed in the middle of
the scanner during enrollment to get a good reading. You also have to make sure that
the fingers are not too wet or too dry for enrollment.
Page 7

6
CONTENTS CONTENTS
To enroll fingerprint Menu > User Manage > Enroll User > Enroll FP (Follow the in-
structions given onscreen) > OK(Save)
Card Enrollment Default card for Keylock 8800 is RFID. MiFare and HID card systems
are available upon request.
To enroll RFID card You have to know the card system of your Keylock 8800. For
default Keylock 8800, the card system is RFID. To enroll RFID cards: Menu > User
Manage > Reg RFID (Follow the instructions given onscreen to proceed)
To enroll MiFare card You need to make a special order for Keylock 8800 Mifare sys-
tem. The Main Menu for the mifare system is different in comparison to the standard
default menu.
Menu > User Manage > FPCard Mng
Create PINcard This feature is to create identification card without storing any fin-
gerprint.
Menu > User Manage > FP Card Mng > Create FPcard (Follow the instructions onscreen)
Enroll FP Card Before enrolment of FPCard can be done, administrator needs to Cre-
ate fingerprint card first. This enrolment needs fingerprint template to enroll into
the card.
Menu > User Manage > FP Card Mng > Enroll PINcard (Follow the instructions onscreen)
Create FP Card Use this function to create a card that is ready to accept fingerprint
before you move to the Enroll FP card function.
Menu > User Manage > FP Card Mng > Create FP Card (Follow the instructons onscreen)
Empty Card Use this function to empty the contents in a card. To delete the contents
in the card: Menu > User Manage > FP Card Mng > Empty Card
When you see “Write Suc”, the card has been emptied and can be reused
Password Enrollment Keylock 8800 offers different enrolment methods and pass-
word can be used alone or in combination with fingerprint verification method.
Password consists of combination of number 1-4 and maximum length of password
is 10 digit.
To enroll password Menu > User Manage > Enroll User > Enroll Pwd (Follow the in-
strucstions given onscreen) > OK(Save)
To enroll fingerprint and password Menu > User Manage > Enroll User >
Enroll FP & PW (Follow the instructions given onscreen) > OK(Save)
(MiFare model only)
Page 8

7
VERIFYING USER
Verification Method What Is It For
1:N (One to Many) 1
:N verification does not require any input of your user ID. Place your
finger properly on the scanner and Keylock 8800 takes second to verify
your identity. Press OK/Menu button to get the terminal to reactivate.
You don’t need to identify your User ID before inputting any biometrics feature for verification. Place your finger for verification.
Password Press OK/Menu button to get the terminal to reactivate. Key in
Verification your password to get verified.
Card Verification Press OK/Menu button to get the terminal to reactivate. Wave your
card in front of the terminal to get verified
Some precautions have to be taken to get a good read every time.
· Make sure the center points of your finger are placed in the middle of the scanner for a
good read.
·
Recommended to use index finger. Keylock 8800 accepts other fingers but index is the
most convenient.
·
Make sure the finger is not wet, too dry, injured or dirty
· Do not press hard on the sensor, just place it comfortably
· Avoid direct sunlight or very bright light
Voice / Message What does it mean?
“User ID XXXXX” Identity
verification is successful, Keylock 8800 stores the transaction
logs and opens the door.
“Please Try Agn” Identity verification is failed because the finger is not properly posi-
tioned or the template is not available in Keylock 8800.
“Admin Affirm”
You are not the administrator of the system and you cannot access
Menu page
“Error Pwd”
Identity verification is failed because you have entered the wrong pass-
word into Keylock 8800.
“Invalid Card”
The card you are using is not enrolled or the card is damaged.
DELETING USER
Only an administrator can do user deletion at Keylock 8800. To delete certain user(s), press
Menu > User Manage > Delete User > Enter the user ID of the person you want to delete.
The Keylock 8800 would delete fingerprint or password first before prompting you to delete the user. If you are sure you want to delete the user, press OK.
Page 9

8
CONTENTS CONTENTS
ACCESS LEVEL/PRIVILEGE
Keylock 8800 offers two types of access level or privilege.
Privilege What can you do?
Supervisor You are allowed to access into menu to enroll users and edit settings and system
Admin
You are allowed to access into menu but not allowed to access Adv Settings.
Advance Settings allows deletion of logs, data and users.
Normal User
Only use Keylock 8800 to verify your identity. You cannot access into Menu
and make changes into settings and system
4 • Door Access Options
ENABLING ALARM
Keylock 8800 is equipped with a buzzer to alert users when unauthorized user is trying to
access the Main Menu. This function works in sync with setting of Illegal Times in Keylock
8800. When an unauthorized person tries more than the allowed number of tries, Keylock
8800 will trigger the buzzer if the buzzer is enabled. Menu > Options > Operate Opt >
Alarm > Y/N
NUMBER OF TRIES ALLOWED
You can set the number of tries allowed in Keylock 8800 as a security measure. When
a user exceeds the number of tries; buzzer would be triggered if the buzzer is enabled.
Default is 10 but the range is 0-99. Menu > Options > Operate Opt > Illegal Times > Insert
the number
If
a user tried more than allowed times, the buzzer will trigger a long beep at 30s. No
operation can be performed on this unit during the 30s and the machine will shut down
right after the period. To activate, push the ok/menu button and an authorised user must
be verified in
30s or the buzzer will be triggered again.
LOCK PERIOD OF DOOR OPENING
The door would allow you to open the door at a certain period following verification. You
can determine the period for the door to open after verification. Default is 5s and the
range is between 0-99s. Once the period is finished, the lock will be locked and would not
respond when you turn the handle. Menu > Options > Operate Opt > Lock > Insert the
number.
VERIFICATION MODE SETTING
Verification Mode is setting of security level of verification to gain access. There are 3 verification modes available to choose from.
0 - Only allowing administrator to access
1 - Allowing all users to access
2 - All users must be verified by 2 different types of verification to gain access for example fingerprint and password, Mifare card with fingerprint and fingerprint, RFID card and
password, RFID card and fingerprint etc. All users must enroll with 2 different methods.
NOTE: The above settings only take eects when the Card Only feature is set to N. Refer to page 9.
Page 10

9
TYPE OF VISITOR MODE
You can set the visitor mode according to your own requirements. Some people might
want the door to close all the time and access only through verification of identity. This
mode is called Normally Close or NC.
There are rooms that require the door to be opened at all times after initial verification.
This mode is known as Normally Open or NO.
Determine your visitor mode: Menu > Options > Operate Opt > Normal Open > Yes/No
CARD ONLY OPTION
Should you want to use Card Only for Keylock 8800 without applying any other verification methods, set it here: Menu > Options > Operate Opt > Card Only > Y/N
(MiFare model only)
RESETTING TO ORIGINAL FACTORY SETTINGS
There are some instances, which require you to restore Keylock 8800 to original factory settings. Upon completion of this task, your previous settings would no longer be available.
You need to do all the settings to suit to your requirements. Menu > Options > System Opt
> Adv Options > Reset Opts
DELETING LOGS
Logs are the data stored by Keylock 8800 after enrolment and verification. Once you deleted the logs in Keylock 8800, data could not be retrieved again. Please be sure before you
carry out this function, as the function cannot be undone. Menu > Options > System Opt
> Adv Options > Del Logs > OK
CLEARING ALL DATA
To clear all data in Keylock 8800, not only the transaction logs but also user information.
Please be sure before you carry out this function, as the function cannot be undone. Menu
> Options > System Opt > Adv Options > Clear All Data > OK
CLEARING ADMIN PRIVILEGE
Keylock 8800 offers two user privileges, Supervisor and Normal User. Clearing the admin
privilege is deleting supervisor from the system making the system vulnerable for access.
Be sure before you perform this function. Menu > Options > System Opt > Adv Options >
Clr Admin Privilege > OK
NOTE: When administrator’s ngerprint templates are deleted, no new user enrollment could be per-
formed without doing a new supervisor’s enrollment. However, a normal user could assign himself as
an administrator to access the system menu.
DELETE S LOGS
S logs stands for scanner logs, which means the number of times the scanner has been
used for verification, regardless of successful or not. To delete the scanner logs: Menu >
Options > System Opt > Adv Options > Del SLogs > OK
(MiFare model only)
Page 11
10
CONTENTS CONTENTS
Certificate of Authenticity
2008-2009 HRM System All right reserved.
c
FingerTec TCMS v2
Product Key:
YTR1-4AWE-9899
S/N: 8203602 Activation Key: K2EWF5SZ
001010
5 • Managing USB Flash Disk
USING USB TO DOWNLOAD/UPLOAD DATA
USB flash disk is useful to download and upload data from Keylock 8800. The only way
Keylock could communicate with the PC is through data transfer via USB. To determine
the type of USB compatible by FingerTec® terminal, please refer to this link at fingertec.
c
om/newsletter/HL_74.html
You have to insert a USB flash disk at the USB port located inside the back of the Keylock
8800
terminal. Refer to page3. Once the USB flash disk is ready, run this function: Menu >
PenDrive Mng
USING USB TO DOWNLOAD LOGS
Logs for verification done at Keylock 8800 can be downloaded to TCMS via USB. Menu >
PenDrive Mng > Download Lg
USING USB TO DOWNLOAD USERS
To download users from keylock 8800 to TCMS v2: Menu > PenDrive Mng > Download
User
USING USB TO UPLOAD USERS
To upload users from TCMS v2 to Keylock 8800: Menu > PenDrive Mng > Upload User
USING USB TO UPDATE FIRMWARE
To upload firmware to Keylock 8800: Menu > PenDrive Mng > Upd FW
CHECKING THE GENUINE TCMS V2
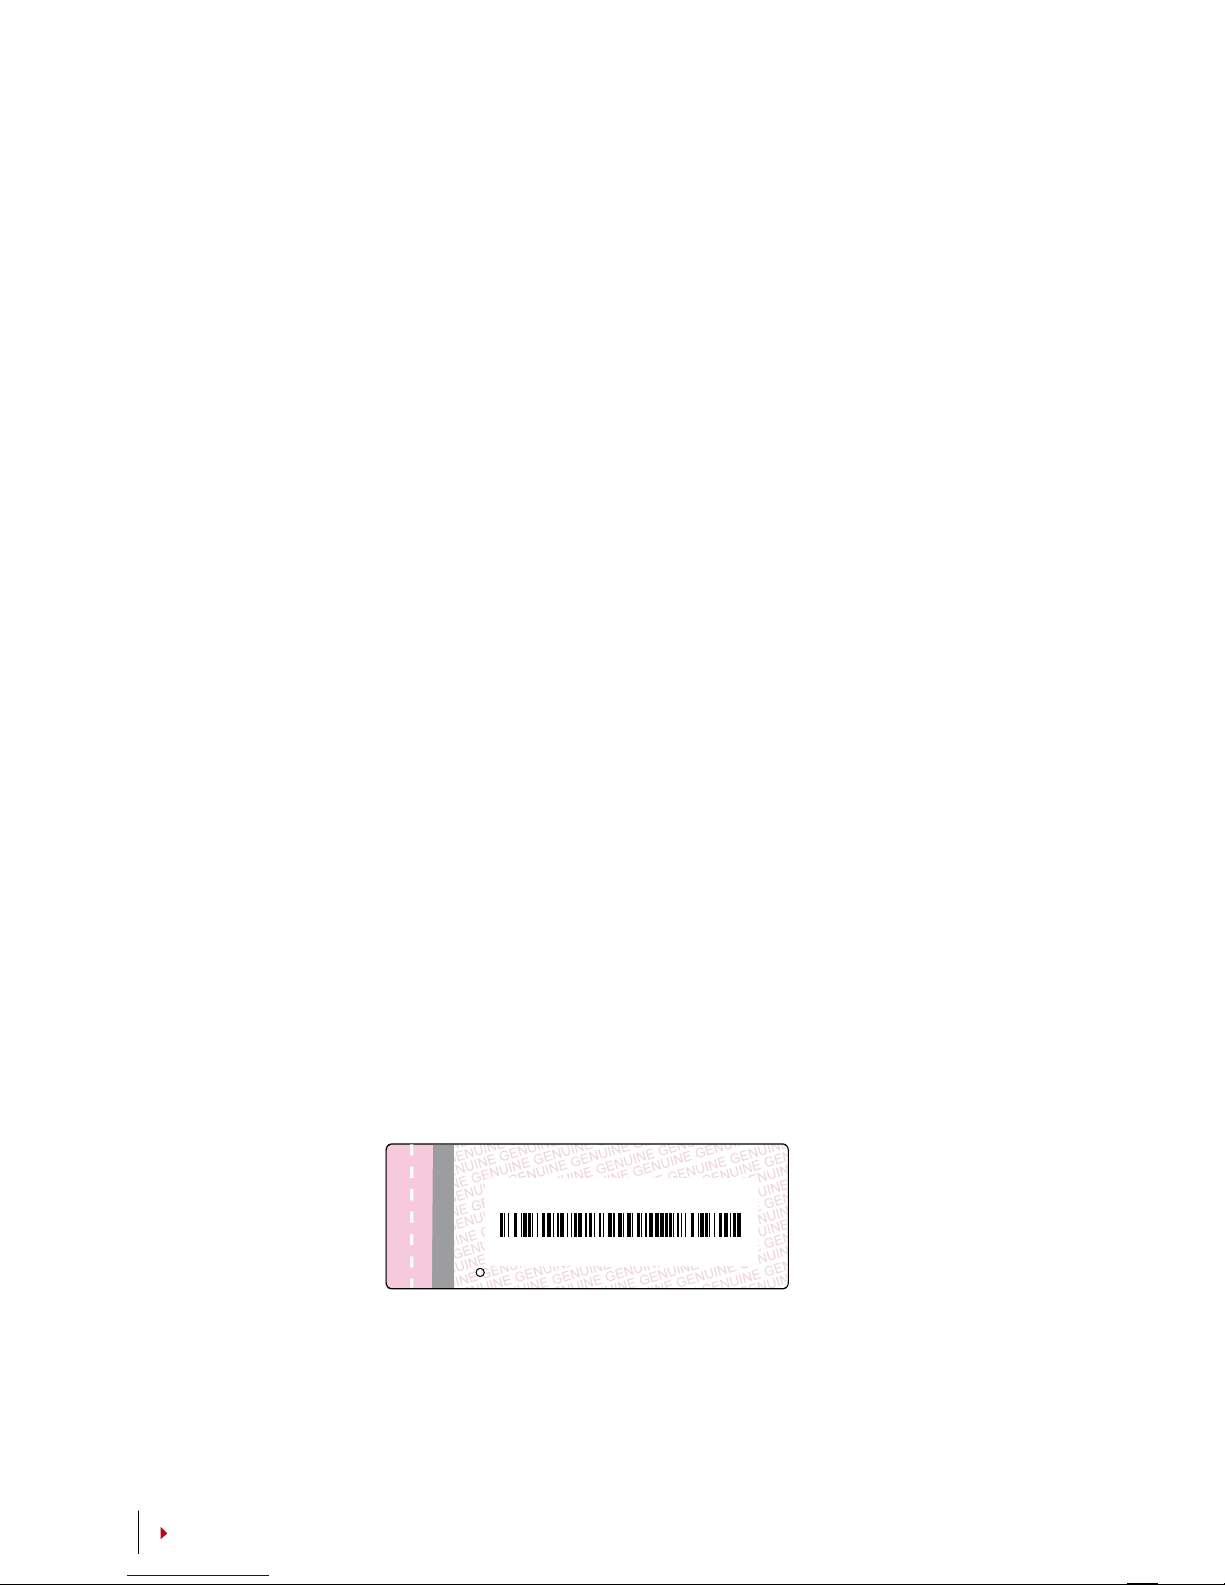
TCMS V2 is genuine software by FingerTec®. Check the genuine sticker pasted on the
TCMS V2 User Manual, TCMS V2 software & video guide CD to retrieve product and activation code. The serial number of the FingerTec® terminal must match with the serial
number printed on the software CD in order to activate the system.
INSTALLATION AND SETUP OF TCMS V2
Install TCMS in a PC with sufficient minimum requirements. Refer to user.fingertec.com/
user-promanual.htm for TCMS V2 Manual online. Setup Wizard will require the product
key and activation code to activate the system. In case you lose TCMS V2 product key and
activation code, go to user.fingertec.com/retrieve_key_user.php for retrieval.
Page 12

11
6 • System Information
BROWSING ATTENDANCE LOGS
You can get the attendance data of any user through this function. Key in the user ID and
the terminal will display the appropriate data. Menu > Sys Info > Browse AttLogs.
Information About Used Space
Information What does it stand for?
User Cnt The quantity of the fingerprint templates that have been sto
red in Keylock
FP Cnt The quantity of fingerprints that have been stored in Keylock 8800
Log The quantity of transaction logs that have been stored in Keylock 8800
Admin Cnt The number of administrators you have in the Keylock 8800
Pwd User The number of password users you have in the Keylock 8800
S Logs The number of times the scanner have been touched for enrollment and verifica-
tion.
Reg RFID
The number of RFID card users that have been stored in Keylock 8800
(RFID model only)
Information About Free Space
Information What does it stand for?
FPCnt(100) The quantity of the fingerprint templates that are left in Keyl
ock 8800
Log The quantity of transaction logs that are left in Keylock 8800
S Logs The quantity of times the scanner can be used.
Page 13

12
CONTENTS CONTENTS
DEVICE INFORMATION
You can view the information of your Keylock 8800 from this function and the information
is not editable.
Information What does it stand for?
FPCnt(100) The
total quantity of the fingerprint templates that can be
stored in Keylock 8800
Log The total quantity of transaction logs that can be stored in
Keylock 8800
S Logs
The total quantity of times the scanner can be used.
Manu Time Manufacturing Time of Keylock 8800
S/N Serial Number of the Keylock 8800
Manufacturer FingerTec
Device Name Keylock 8800
Alg Version Algorithm version of Keylock 8800
FW Version Firmware version of Keylock 8800
7 • Other Resources
Information About FingerTec
To learn about Go to?
Company and the products www.fingertec.com
The latest updates Facebook Fan Page: FingerTec Worldwide
Twitter: FingerTec Worldwide
To subscribe for FingerTec newsletter:
www.fingertec.com/subscribe-R/newsletter.html
Technical Tips and Latest user.fingertec.com
Product Updates and
Upgrades
Email
[email protected] (Sales)
[email protected] (Technical)
Register for Warranty www.fingertec.com/GPW/warranty.htm
FingerTec Accessory accessory.fingertec.com
Page 14

www.fingertec.com
For technical tips and manuals in other languages, refer to htt p://user.finger tec.com
© 2011 FingerTec Worldwide Sdn. Bhd. All rights reserved. • 0511
 Loading...