

Page 1

Page 2
Page 3

AF PTY
EON
CLARION PU2312
Owner’s manual
RDS-EON/FM/MPX/MW/MW RADIO CD
COMBINATION WITH CD/MD CHANGER
CONTROL
Mode d’emploi
COMBINÉ RADIO RDS-EON/FM-MPX/PO/GO
LECTEUR DE CD AVEC CONTRÔLEUR DE
CD/MD CHANGER
Bedienungsanleitung
UKW-MPX/MW/LW-RADIO-CD-KOMBINATION MIT
CD/MD/CHANGER-STEUERUNG MIT RDS-EON
Istruzioni per l’uso
SINTOLETTORE CD RDS-EON/FM-MPX/MW/LW
CON CONTROLLO DEL CD/MD CHANGER
Gebruiksaanwijzing
RDS-EON/FM-MPX/MW/LW TUNER MET
CD-SPELER EN BEDIENINGSEENHEID
VOOR CD/MD-CHANGER
Manual de instrucciones
COMBINACIÓN DE RADIO DE RDS-EON/FM-MPX/
MW/LW Y REPRODUCTOR DE DISCOS
COMPACTOS CON CONTROL DE CD/MD CHANGER
Bruksanvisning
KOMBINERAD RDS-EON/FM-MPX/MV/LV-RADIO
OCH CD-SPELARE MED CD/MD-
CHANGERKONTROLL
Manual de instruções
COMBINAÇÃO DE AUTO-RÁDIO DE RDS-EON/
FM-MPX/OM/OC E LEITOR DE CDs COM
CONTROLO DE CDs/MDs CHANGER
Page 4

Thank you for purchasing the Clarion PU2312.
* Please read this owner’s manual in its entirety before operating this equipment.
* After reading this manual, be sure to keep it in a handy place (e.g., glove compartment).
* Check the contents of the enclosed warranty card and keep it carefully with this manual.
* This manual includes the operating procedures of the CD/MD CHANGER that is connected via the C-
BUS cable. Refer to the CD/MD CHANGER handbook. The handbook does not contain explanations on
the functions.
Contents
1. PRECAUTIONS ....................................................................................................................... 3
2. HANDLING COMPACT DISCS ............................................................................................... 4
3. CONTROLS ............................................................................................................................. 5
4. DCP ......................................................................................................................................... 6
5. NOMENCLATURE ................................................................................................................... 7
Names of Buttons .................................................................................................................... 7
Display Items ........................................................................................................................... 7
6. OPERATION ............................................................................................................................ 8
Basic Operations ...................................................................................................................... 8
Radio Operations ...................................................................................................................... 10
RDS Operations ....................................................................................................................... 12
CD Operations ......................................................................................................................... 16
CD CHANGER Operations ........................................................................................................... 18
7. IN CASE OF DIFFICULTY ....................................................................................................... 20
8. ERROR DISPLAYS .................................................................................................................. 21
9. SPECIFICATIONS ................................................................................................................... 148
English
1. PRECAUTIONS
1. When the inside of the car is very cold and
the player is used soon after switching on the
heater, dew may form on the disc or the optical parts of the player and proper playback
may not be possible.If dew forms on the disc,
wipe it with a soft cloth. If dew forms on the
optical parts of the player, do not use the
player for about one hour and the condensation will disappear naturally to allow normal
operation.
2. Driving on bumpy roads which cause severe
vibration may cause the sound skip.
3
Page 5
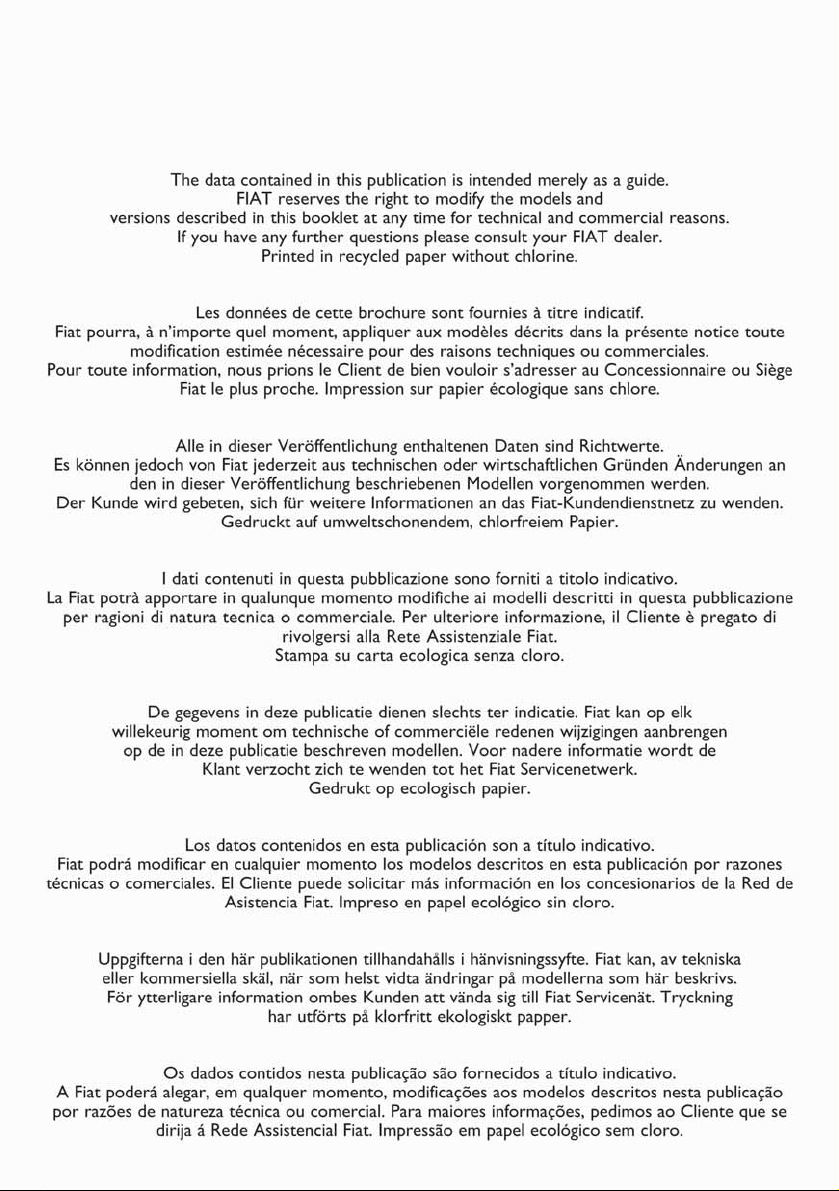
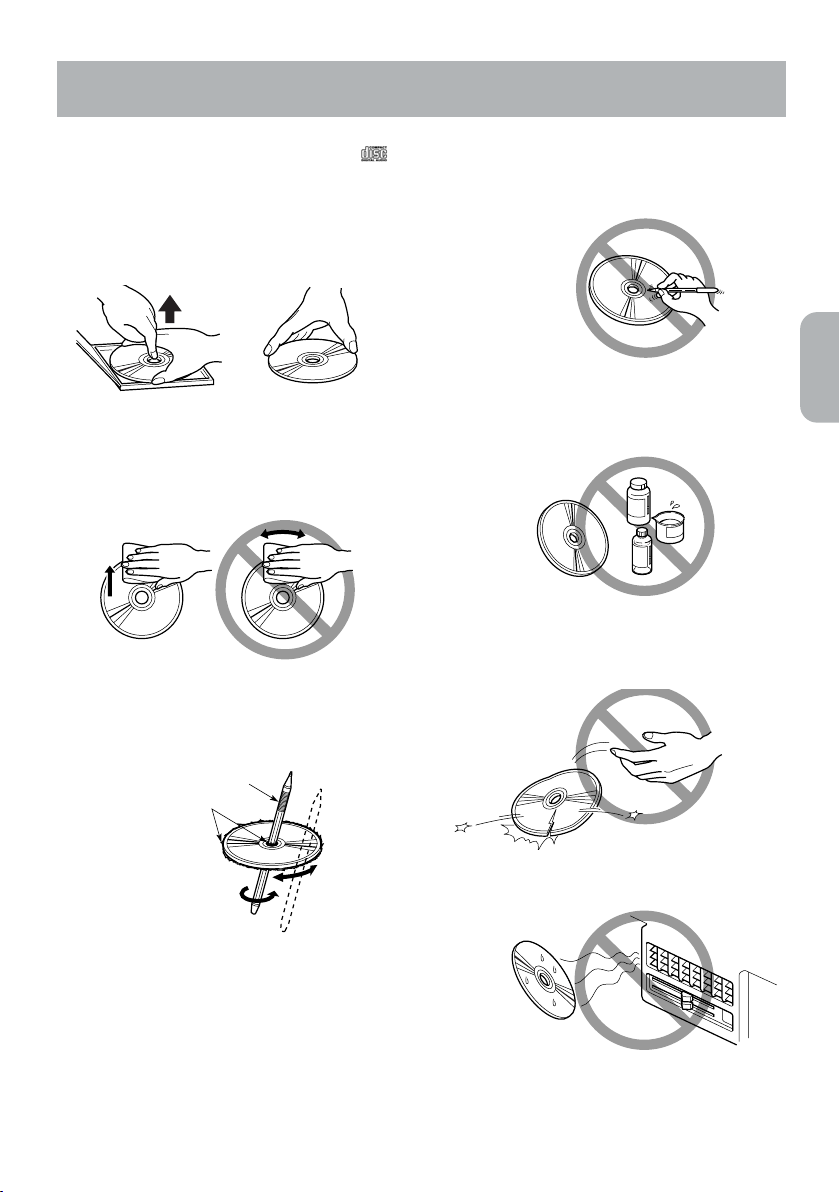
2. HANDLING COMPACT DISCS
Proper way to hold
the compact disc
Removing the disc
This unit has been designed specifically for
playback of compact discs bearing the
mark. No other discs can be played.
To remove the compact disc from its storage
case, press down on the centre of the case
English
and lift the disc out, holding it carefully by the
edges.
Always handle the compact disc by the
edges. Never touch the surface.
To remove fingermarks and dust, use a soft
cloth, and wipe in a straight line from the centre of the compact disc to the circumference.
New discs may have some roughness around
the edges. The unit may not work or the
sound may skip if such discs are used. Use a
ball-point pen, etc. to remove roughness from
the edge of the disc.
Note on Compact Disc
Never stick labels on the surface of the compact disc or mark the surface with a pencil or
pen.
No
Do not use any solvents such as commercially available cleaners, anti-static spray, or thinner to clean compact discs.
No
No
Do not use compact discs that have large
scratches, are misshapen, or cracked, etc.
Use of such discs will cause misoperation or
damage.
No
Ball-point pen
Roughness
Note:
.• Do not use commercially available CD protection sheets or discs equipped with stabilizers, etc. These may
get caught in the internal mechanism and damage the disc.
Be sure to unfold and read the next page. / Veuillez déplier et vous référer à la page suivante.
Bitte ausbreiten und die nächste Seite lesen. / Assicurarsi di aprire e leggere la pagina successiva.
Volgende pagina uitvouwen en doorlezen a.u.b. / Cerciórese de desplegar y de leer la página siguiente.
Glöm inte att vika ut och läsa nästa sida. / Não deixe de abrir e ler a próxima página.
Do not expose compact discs to direct sunlight or any heat source.
No
4
˙
Page 6
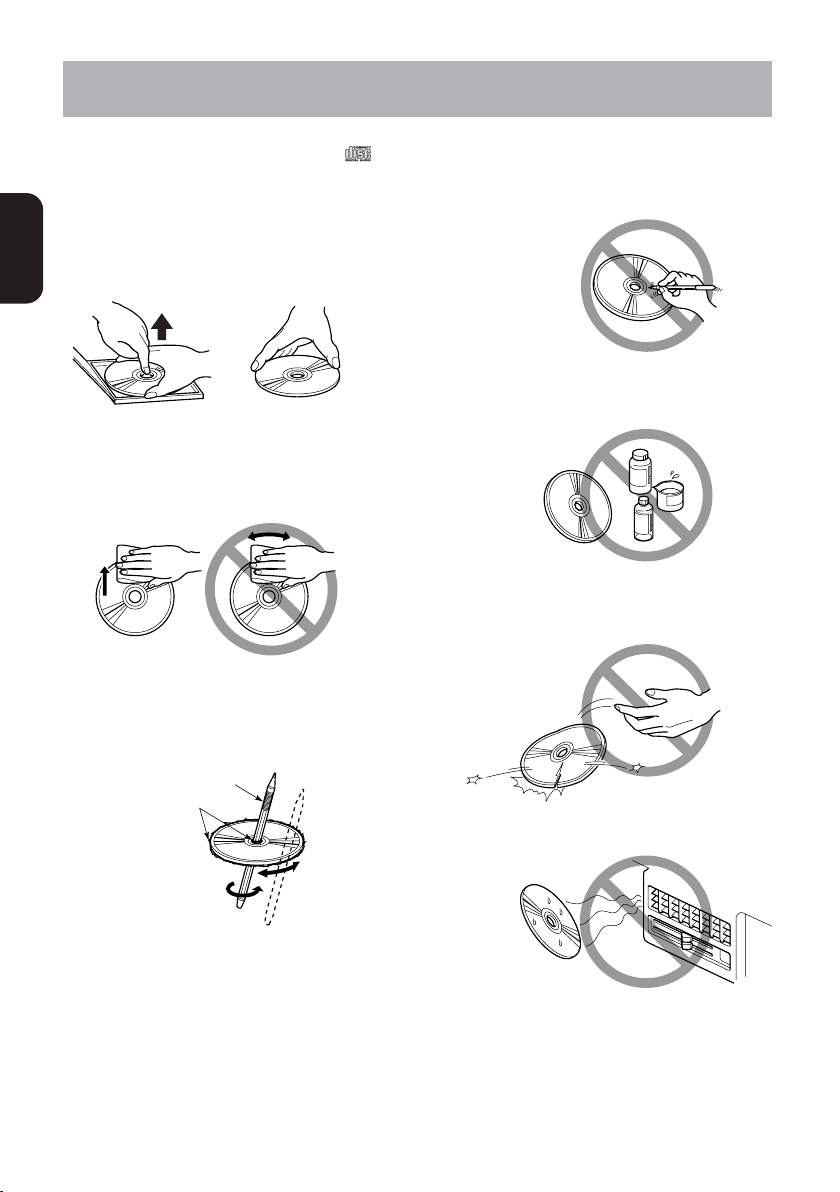
CONTROLS / LES COMMANDES / REGLER / CONTROLLI
3.
REGELAARS / CONTROLES / KONTROLLER / CONTROLOS
Main unit / Appareil principal / Hauptgerät / Apparecchio principale
Hoofdtoestel / Unidad principal / Huvudenhet / Aparelho principal
3
2
45671
English
¥
!@#$%98
0
Display / Afficheur / Display / Display
Uitleesvenster / Visualizador / Teckenfönster / Mostrador
3
2
¥&*()
Note: Be sure to unfold this page and refer to the front diagrams as you read each chapter.
Remarque: Veuillez déplier cette page et vous référer aux schémas quand vous lisez chaque chapitre.
Hinweis: Bitte diese Seite ausfalten und beim Lesen der einzelnen Kapitel die Frontdiagramme
beachten.
Nota: Aprire questa pagina e fare riferimento a questi schemi quando si legge ciascun capitolo.
Opmerking: Vouw deze pagina uit en zie tevens de afbeeldingen van het voorpaneel tijdens het
doorlezen van de volgende hoofdstukken.
Nota: Cuando lea los capítulos, despliegue esta página y consulte los diagramas de la parte fretal.
Observera: Vik ut denna sida för att kunna se figurerna över bilstereons framsida medan du läser de
olika kapitlen.
Nota: Lembre-se de abrir esta página e consultar os diagramas frontais durante a leitura de cada
capítulo.
45671
$%
#
!@
0
8
9
ItalianoDeutschFrançais
Nederlands
PortuguêsSvenskaEspañol
5
Page 7
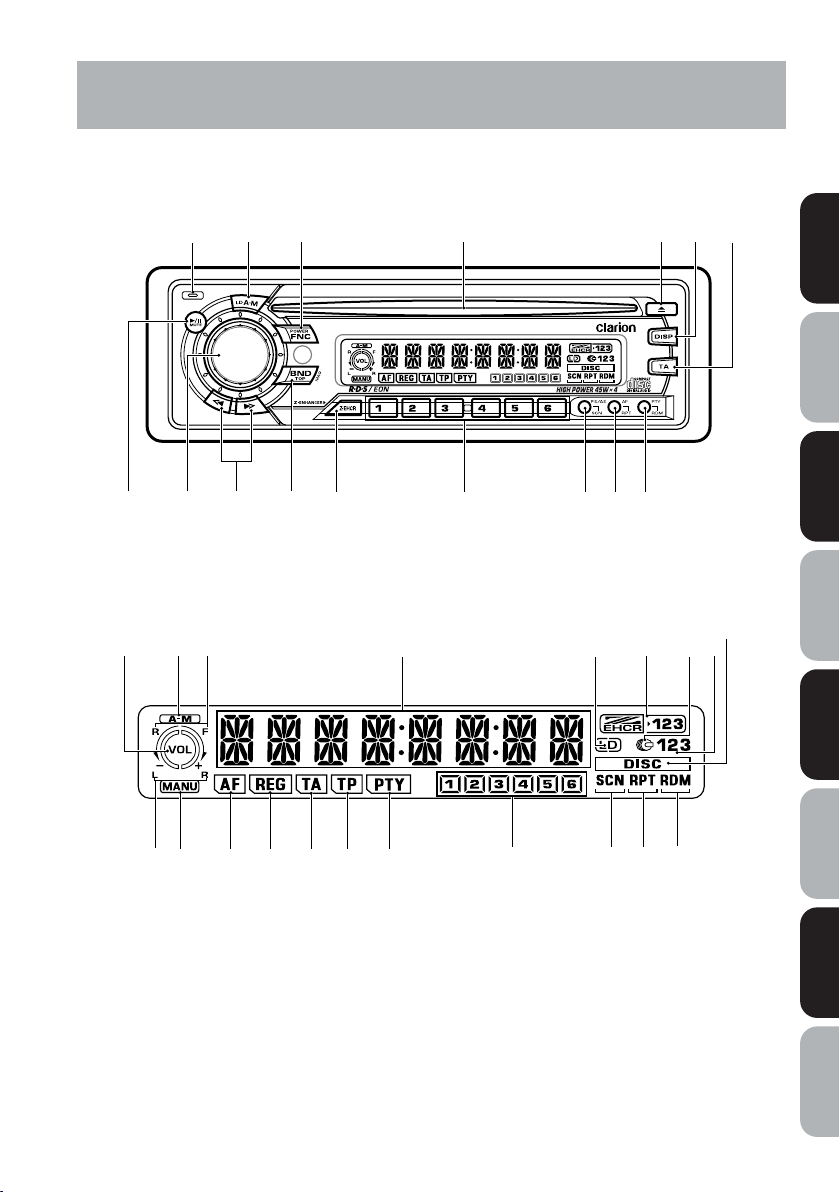
4. DCP
The control panel can be detached to prevent theft. When detaching the control
panel, store it in the DCP (DETACHABLE
CONTROL PANEL) case to prevent
English
scratches.
We recommend taking the DCP with you
when leaving the car.
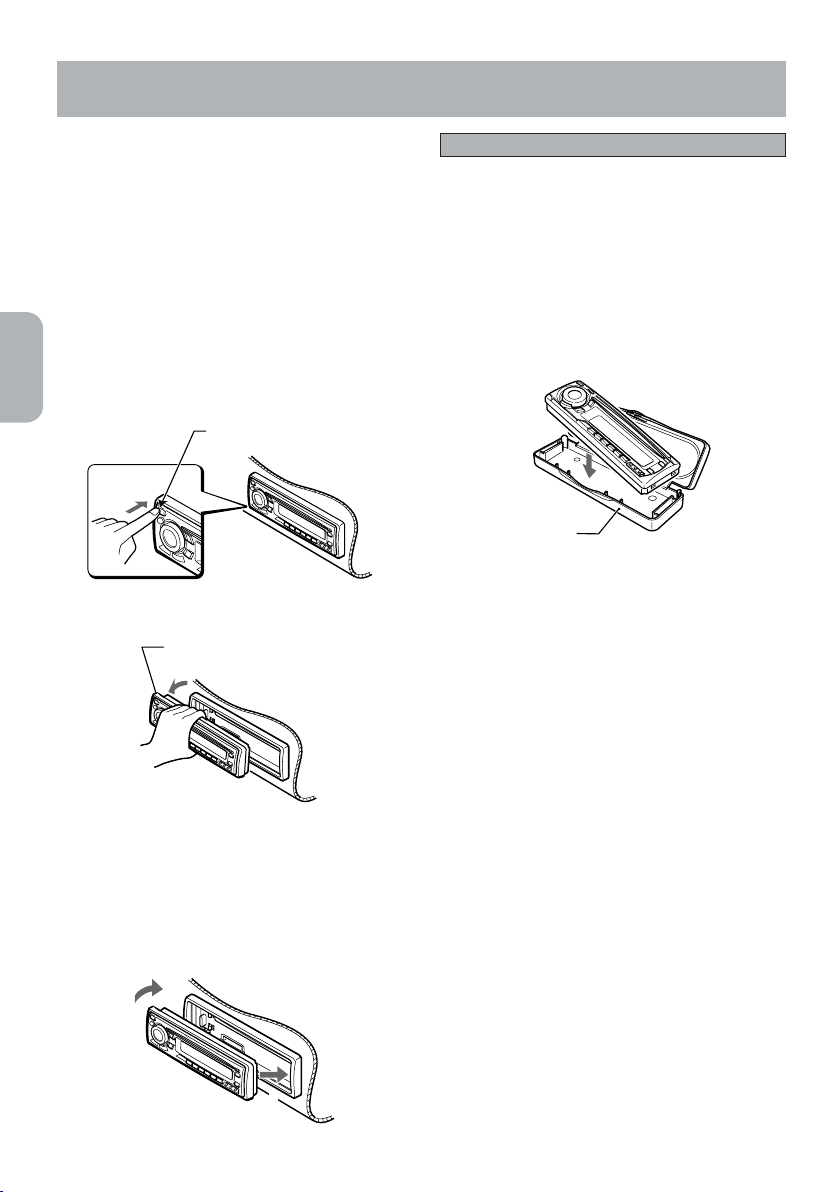
Removing the DCP
1. Hold down POWER button 3 for 1 second or longer to switch off the power.
2. Deeply push in the DCP Release button
1.
DCP Release button 1
3. Remove the DCP.
DCP
éCAUTION
• The DCP can easily be damaged by
shocks. After removing it, be careful
not to drop it or subject it to strong
shocks.
• When the Release button is pressed
and the DCP is unlocked, the car’s
vibrations may cause it to fall. To prevent damage to the DCP, always store
it in its case after detaching it. (See figure below).
DCP case
• The connector connecting the main unit
and the DCP is an extremely important
part. Be careful not to damage it by
pressing on it with fingernails, screwdrivers, etc.
Note:
• If the DCP is dirty, wipe off the dirt with a soft,
dry cloth only.
Attaching the DCP
1. Insert the right side of the DCP into the
main unit.
2. Insert the left side of the DCP into the
main unit.
2.
1.
6
Page 8

5. NOMENCLATURE
Note: Be sure to read this chapter referring to the front diagrams of chapter “3. CONTROLS” on page
5 (unfold).
Names of Buttons
1 DCP Release button
2 A-M (audio mode) button
LD (loudness) button
3 POWER button
FNC (function) button
4 CD insertion slot
5 Eject (Q) button
6 DISP (display) button
7 TA (traffic announcement) button
8 PTY (programme type) button
RDM (random) button
9 AF (alternative frequencies) button
RPT (repeat) button
Display Items
1 Volume indication (VOL)
2 Audio mode indication (A-M)
3 Rear speaker indication (R)
Front speaker indication (F)
4 Operation status indication
* The frequency, PTY, play time, clock (CT),
etc. are displayed.
5 Loudness indication (LD)
6 Z-enhancer indication (Z-EHCR)
7 CD/MD CHANGER mode indication
8 Magazine number indication
9 Disc indication (DISC)
0 Random indication (RDM)
! Repeat indication (RPT)
English
0 PS/AS (preset scan/auto store) button
SCN (scan) button
! Preset buttons (1 to 6)
Direct buttons (1 to 6)
@ Z-EHCR (z-enhancer) button
# BND (band) button
TOP button
MAG (magazine) button
$ SRCH (search) buttons (Left a and Right
d)
% Rotary knob
¥ Play/pause (s) button
MUTE button
@ Scan indication (SCN)
# Preset channel indication (1 to 6)
Disc number indication (1 to 6)
* The disc numbers corresponding to the
discs in the CD/MD changer light.
$ Programme type indication (PTY)
% Traffic programme indication (TP)
¥ Traffic announcement indication (TA)
& Regional indication (REG)
* Alternative frequency indication (AF)
( Manual indication (MANU)
) Left speaker indication (L)
Right speaker indication (R)
7
Page 9

6. OPERATION
Note: Be sure to read this chapter referring to the front diagrams of chapter “3. CONTROLS” on page
5 (unfold).
English
Basic Operation
éCAUTION
Be sure to set the volume to the minimum level
before turning off the power to the unit.
Loud sounds when turning on the power may
impair your hearings or cause damage to the
unit.
Turning on/off the power
Note:
• Do not use the sound system for a long time when
the engine is off. You may have problems in starting the engine or shorten the life of the battery.
1. Press POWER button 3.
2. The illumination and display on the unit light up.
The unit automatically remembers its last operation mode and will automatically switch to display that mode.
3. Press and hold POWER button 3 for 1 second
or longer to turn off the power for the unit.
Selecting a mode
1. Press FNC button 3 to select a function mode.
2. The function mode changes in the following
order:
Radio ➜ CD ➜ CD/MD
* If the CD/MD CHANGER is not connected, the CD/
MD
CHANGER mode cannot be selected.
CHANGER ➜ Radio …
Adjusting the volume
Turning the rotary knob % clockwise increases
the volume; turning it counterclockwise decreases
the volume.
* The volume level is from 0 (minimum) to 33
(maximum).
Setting the Z-enhancer
This unit comes with 3 types of sound tone effects
stored in memory. Select the one you prefer.
* The factory default setting is “OFF”.
Each time you press Z-EHCR button @, the tone
effect changes in the following order:
“Z-ENHANCER 1” ➜ “Z-ENHANCER 2” ➜
“Z-ENHANCER 3” ➜ “OFF” ➜ “Z-ENHANCER 1”...
• Z-ENHANCER 1 : bass emphasized
• Z-ENHANCER 2 : treble emphasized
• Z-ENHANCER 3 : bass and treble emphasized
• OFF : no sound effect
Adjusting the tone
Press A-M button 2 and select the item to adjust.
Each time you press A-M button 2, the item
changes in the following order:
“BASS” ➜ “TREB” ➜ “BAL” ➜ “FAD” ➜
Function mode...
Adjusting the bass
1. Press A-M button 2 and select “BASS”.
2. Turning the Rotary knob % clockwise emphasizes the bass; turning it counterclockwise
attenuates the bass.
* The factory default setting is “0”.
(Adjustment range: –6 to +6)
3. When the adjustment is complete, press A-M
button 2 several times until the function mode
is reached.
Adjusting the treble
1. Press A-M button 2 and select “TREB”.
2. Turning the rotary knob % clockwise emphasizes the treble; turning it counterclockwise
attenuates the treble.
* The factory default setting is “0”
(Adjustment range: –6 to +6)
3. When the adjustment is complete, press A-M
button 2 several times until the function mode
is reached.
8
Page 10
Basic Operations
Adjusting the balance
1. Press A-M button 2 and select “BAL”.
2. Turning the Rotary knob % clockwise emphasizes the sound from the right speaker; turning it
counterclockwise emphasizes the sound from the
left speaker.
* The factory default setting is “0”
(Adjustment range: L9 to R9)
3. When the adjustment is complete, press A-M
button 2 several times until the function mode
is reached.
Adjusting the fader
1. Press A-M button 2 and select “FAD”.
2. Turning the Rotary knob % clockwise emphasizes the sound from the front speakers; turning
it counterclockwise emphasizes the sound from
the rear speakers.
* The factory default setting is “0”.
(Adjustment range: F9 to R9)
3. When the adjustment is complete, press A-M
button 2 several times until the function mode
is reached.
Loudness
The loudness effect emphasizes the bass and treble to create a natural sound tone.
When you are listening to music at a low volume,
it is recommended to use the loudness effect.
● Turning on and off the Loudness Effect
Pressing and holding LD button 2 for 2 seconds
or longer turns the loudness effect on and off.
When the loudness effect is turned on, “LD”
appears in the display.
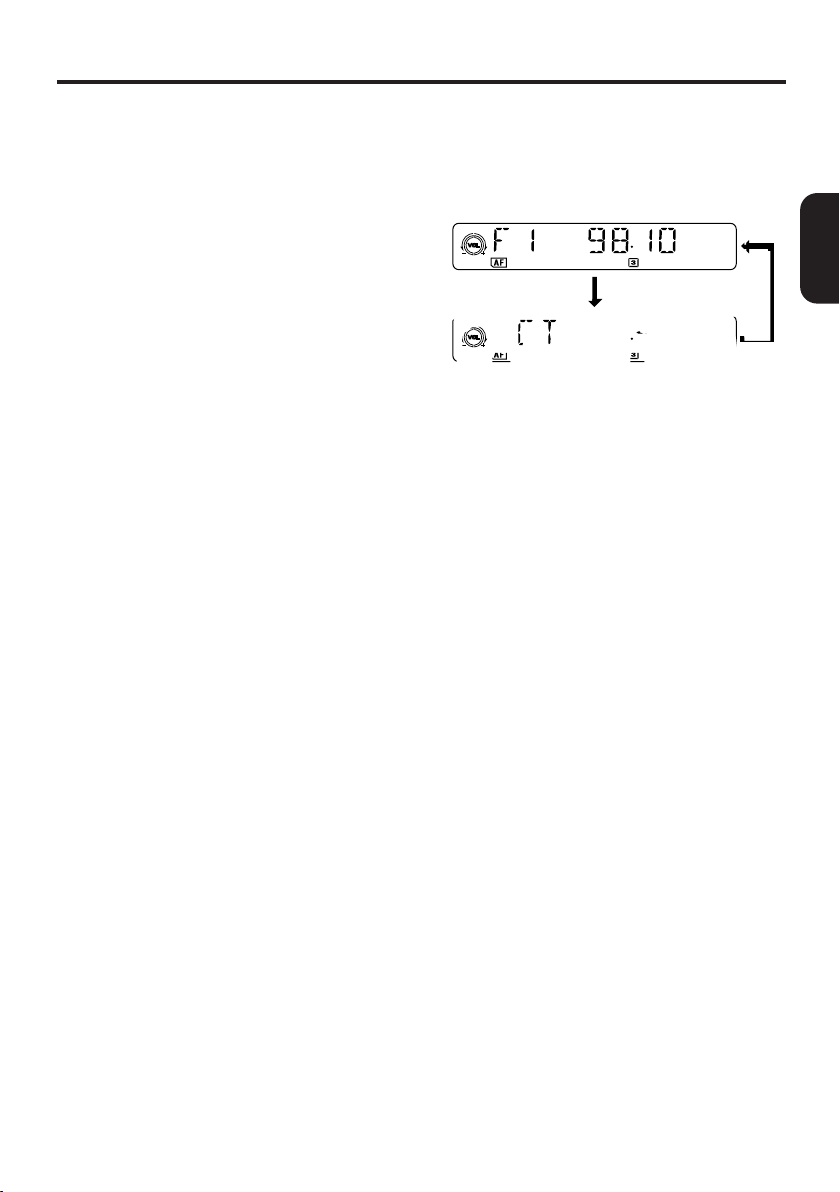
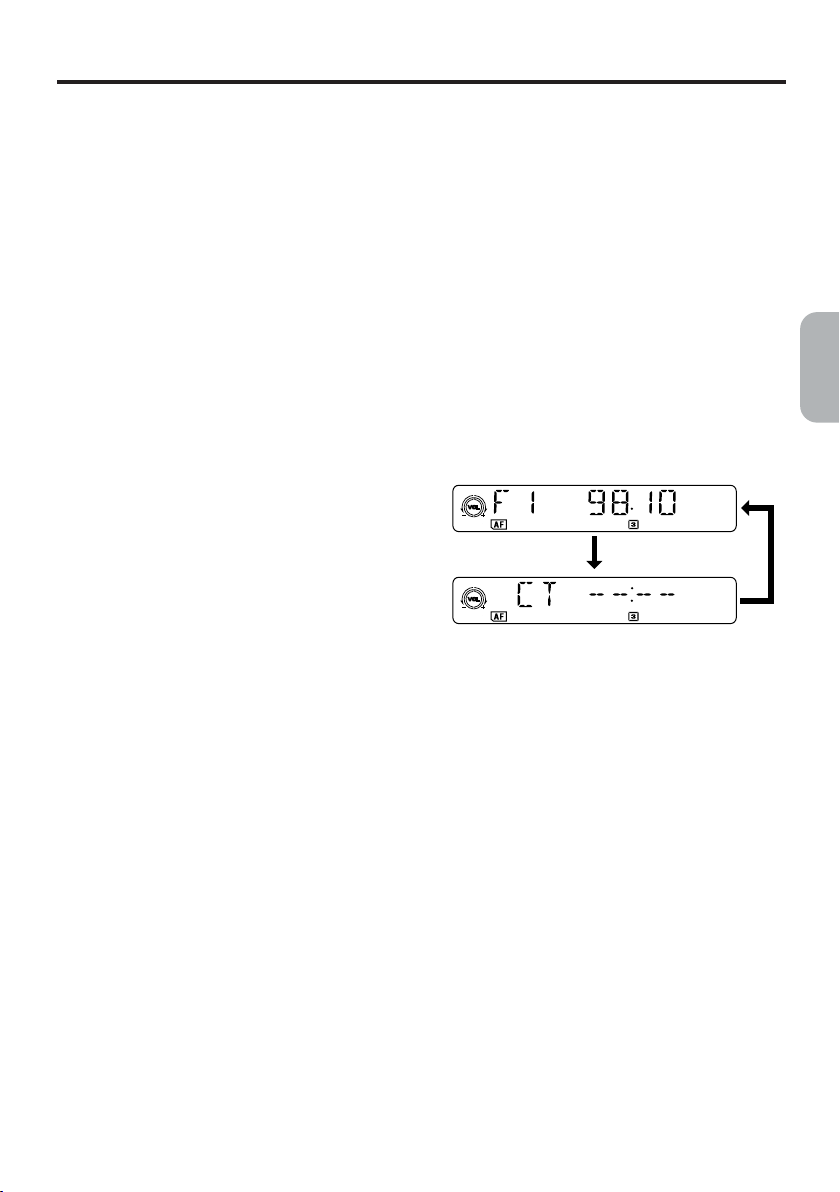
Switching display
Press DISP button 6 to select the desired display.
The display switches in the following order:
English
Main ➜ Clock (CT) ➜ Main …
* If the display is changed by other button oper-
ation when the clock (CT) is displayed, the
clock display returns automatically after the
operation.
* The example shows the display in radio mode.
CT (Clock Time) function
The CT function enables you to display clock time
only when CT data is received.
Press DISP button 6, the display switches to CT
(Clock Time).
* When no CT data is received, “CT--:--”
appears in the display.
Note:
• There are some countries and stations where
clock time data are not transmitted. In some areas,
the CT may not be displayed correctly.
Automatic muting during
a phone call
If a cellular telephone is fitted, the volume of the
selected source will be automatically muted during telephone calls and the message TEL MUTE
will appear on the display.
Press button # and pre-set station button 5 ! at
the same time to switch the function on.
9
Page 11
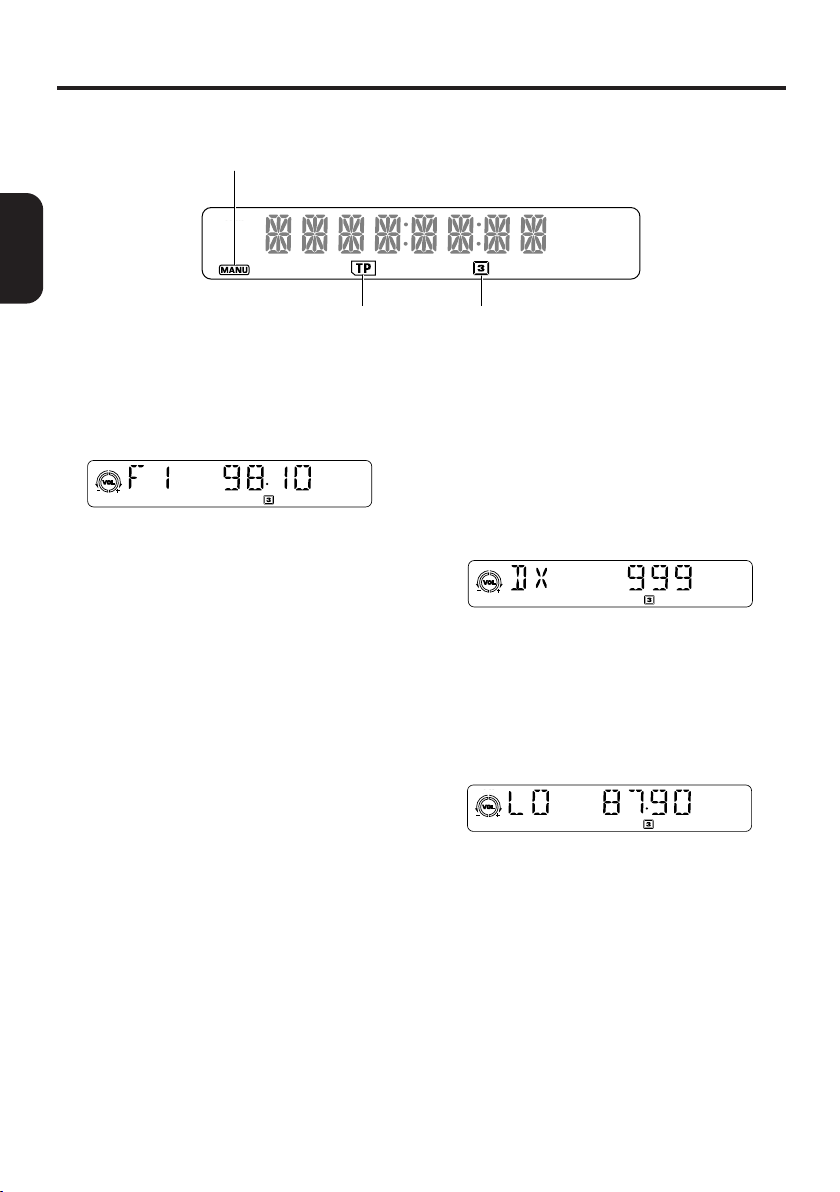
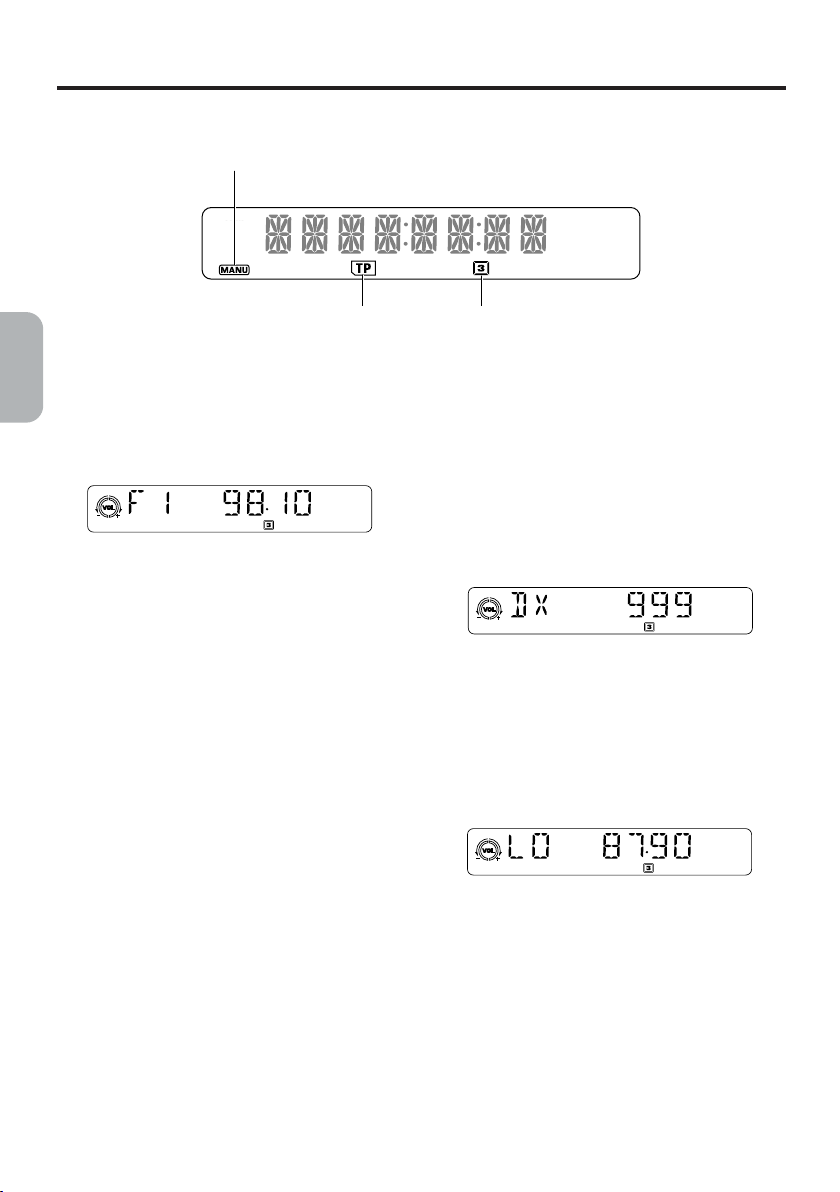
Radio Operations
Radio mode
Seek tuning indication
English
TP indicazion Preset channel indication
Listening to the radio
1. Press FNC button 3 to select radio mode. The
frequency or PS appears in the display.
* PS: Programme Service Name
2. Press BND button # to select a band. The
band changes in the following order:
FM1 ➜ FM2 ➜ FM3 ➜ AM (OM/OL) ➜ FM1 …
3. Select left or right to tune in to a desired station
using SRCH buttons $.
Tuning
Three tuning modes are available: seek tuning,
manual tuning and preset tuning.
Seek tuning
There are 2 types of seek tuning: DX SEEK and
LOCAL SEEK.
DX SEEK can automatically tune in to receivable
broadcast stations; LOCAL SEEK can tune in to
only broadcast stations with a good reception
sensitivity.
1. Press BND button # and select the desired
band (FM or AM (MW, LW)).
2. Tune into a station.
* If “MANU” is lit in the display, press and hold
BND button # for 1 second or longer. “MANU”
in the display goes off and seek tuning is now
available.
* If “TA” is lit in the display, TP stations are auto-
matically sought.
● DX SEEK
Press the SRCH Left/Right button $ to auto-matically seek a station.
When the SRCH Right button $ is pressed, the
station is sought in the direction of higher frequencies; if the SRCH Left button $ is pressed,
the station is sought in the direction of lower frequencies.
* When seek tuning starts, “DX” appears in the
display.
● LOCAL SEEK
If you press and hold the SRCH Left/Right button
$ for 1 second or longer, local seek tuning is carried out. Broadcast stations with good reception
sensitivity are selected.
* When local seeking starts, “LO” appears in the
display.
Manual tuning
1. Press the BND button # to select the band.
2. Press the BND button # for at least 2 seconds.
3. “MANU” disappears on the display, and manu-
al tuning is possible.
4. Use the SRCH Left/Right button $ to tune in
stations.
* The mode automatically switches back to the
seek tuning mode after 7 seconds.
10
Page 12

Radio Operations
Recalling a preset station
Up to 24 stations (6 each for the FM1, FM2, FM3
and AM (MW/LW) stations) can be preset in the
Preset buttons.
Preset tuning is a function for storing stations to
Preset buttons (1 to 6) which enables you to
select a station by pressing the corresponding
preset button.
1. Press BND button# to select a band.
2. Press one of Preset buttons ! to select a
stored station.
Note:
• Press and hold Preset button ! for 2 seconds or
longer to store the station currently being received
(preset memory).
Manual memory
1. Press BND button # to select a band.
2. Select left or right to tune in to a desired station
using SRCH buttons $.
3. Press and hold one of Preset buttons ! for 2
seconds or longer to store the station currently
being received.
Auto store
Auto store is a function for storing up to 6 stations
that are automatically tuned in sequentially.
Notes:
• The only FM band that can store stations is FM3.
If you try to store stations in FM1 or FM2, the stations will automatically be stored in FM3.
• When the auto store is performed, the station pre-
viously stored in the memory at that position is
overwritten.
• If there are fewer than 6 stations with good recep-
tion, the stations previously stored at the remaining Preset buttons are not overwritten.
• A station already stored in one of Preset buttons
cannot be stored in another Preset buttons.
1. Press BND button # to select a band (FM3 or
AM) of the desired station.
2. Press and hold AS button 0 for 2 seconds or
longer. The stations with good reception are
stored automatically to Preset buttons !.
Preset scan
This function scans through each preset station
for 7 seconds sequentially.
This is useful when you want to search for a
desired station.
Note:
• Take note that if you press and hold PS button 0
for 2 seconds or longer, the auto store function
goes into effect and the unit starts storing stations.
1. Press PS button 0
2. When a station that you want to listen to is
tuned in, press PS button 0 again or the corresponding Preset button ! to stop preset
scan.
* A station that cannot be tuned in to is skipped
and the next preset station is tuned in.
Mute
Use this function to turn off the sound immediately.
Press the MUTE button ¥. The sound turns off
and “MUTE” appears on the display. Press the
MUTE button again to cancel the mute mode.
English
11
Page 13
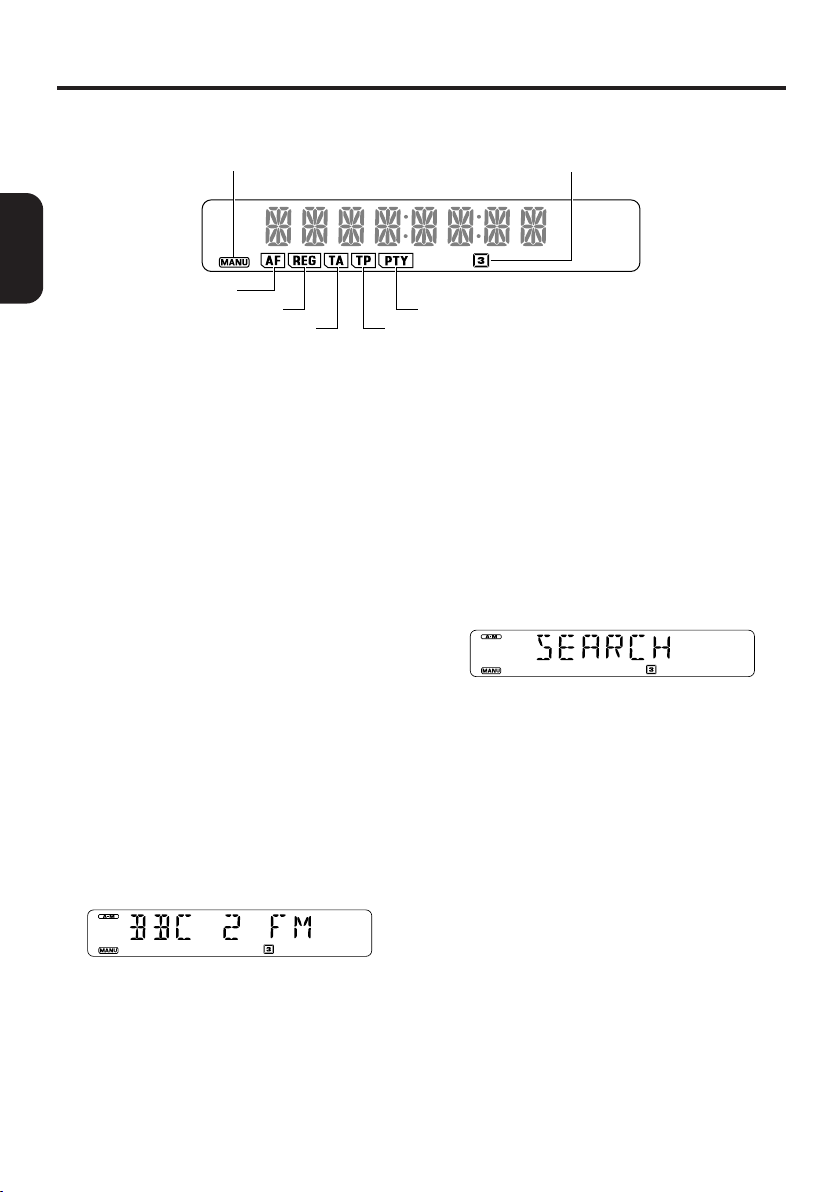
RDS Operations
RDS mode
Seek tuning indication
English
AF indication
REG indication
TA indication
RDS (Radio Data System)
This unit incorporates an RDS system decoder for
use with stations broadcasting RDS data.
This system enables the radio to display the name
of the station being received (PS), and also to
automatically switch to a better frequency when
one is available while you are traveling great distances (AF switching).
It can also interrupt a CD or tape with traffic information or the programme type broadcast by an
RDS station.
Additionally, if EON information is received, this
information enables automatic switching of other
preset stations on the same network and interruption of the station being received with traffic
information from other stations (TP). This function
may not work in some regions.
To use the RDS function, be sure to set the radio
to FM mode.
• AF: Alternative Frequencies
• PS: Programme Service Name
• PTY: Programme Type
• EON: Enhanced Other Network
• TP: Traffic Programme
* If an RDS station can no longer be received
clearly (at the current location), “AF” flashes in
the display. When reception is restored, “AF”
stops flashing.
AF function
The AF function enables the unit to maintain optimum reception by switching to different frequencies on the same network.
* The factory setting is “on”.
Preset channel indication
PTY indication
TP indication
● Turning AF function off
When “AF” is lit or flashing in the display, press
AF button 9. “AF” in the display goes off and AF
turns off.
● Turning AF function on
When “AF” is not lit in the display, press AF button 9 again. “AF” lights in the display and AF
turns on.
If the receiving condition of a station being tuned
is getting worse, “AF” starts flashing and the unit
tries to switch to an alternative frequency. If
switching cannot be performed, the display
switches to “SEARCH” and the unit searches for
the same programme.
REG (Regional Programme) function
When REG function is on, regional station reception is optimized.
If this function is off, the unit switches in to the
regional station in the next local area when you
enter the next area while receiving the regional
station in the previous local area.
* The factory setting is “off”.
Notes:
• This function is ineffective when a national station
such as BBC 2 FM is being received.
• The on/off setting of REG is effective when AF is
on.
● Turning REG function on
When “REG” is not lit in the display, pressing and
holding AF button 9 for 2 seconds or longer.
“REG” lights in the display.
● Turning REG function off
Pressing and holding AF button 9 for 2 seconds
or longer again, “REG” in the display goes off.
12
Page 14
RDS Operations
Manual tuning of related regional
stations
1. This function works when AF is on and REG is
off.
Note:
• This function is effective when related regional
stations are received.
2. Press one of Preset buttons ! to recall a
regional station.
3. If the receiving condition of a recalled station is
bad, press the same Preset button !. The unit
switches to a related regional station.
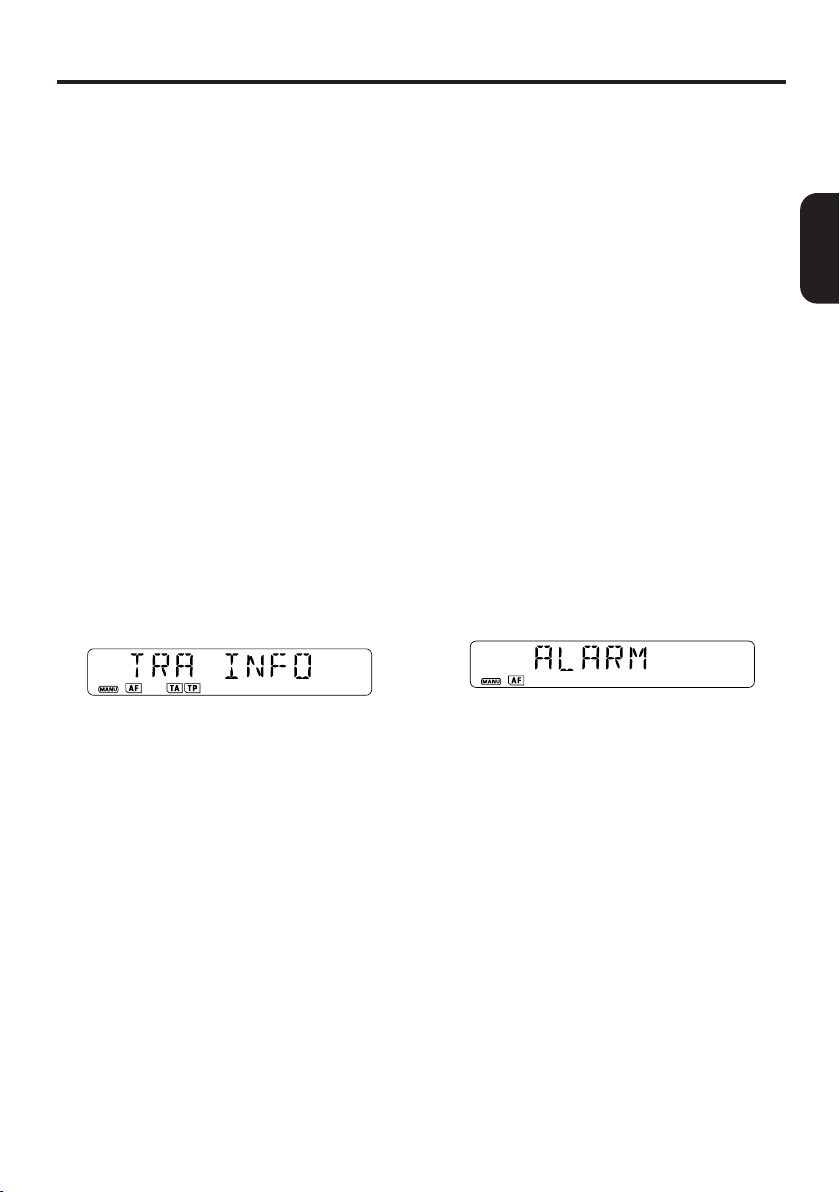
TA (Traffic Announcement)
When the unit is in the TA standby mode, you can
listen to traffic announcements preferentially
when they start, irrespective of the function mode.
You can also tune in to TP (traffic programme) stations automatically.
● To set the TA standby mode
If you press TA button 7 when only “TP” is lit in
the display, “TP” and “TA” light in the display and
the unit is set to the TA standby mode until traffic
announcements start.
When traffic announcements start, “TRA INFO”
appears in the display, and then PS (Programme
Service Name) appears.
● Setting the auto tuning mode for TP stations
If you press TA button 7 when only “TP” is lit or
“TP” and “TA” are not lit in the display, “TA” lights
and the unit automatically tunes in to TP stations.
Note:
• The unit continues to tune in automatically if no TP
station is received. Press TA button 7 again to
stop auto tuning.
Auto store function for TP stations
● Auto storing while “TA” is lit:
Only TP stations are auto stored.
* Refer to PS/AS function in radio mode.
PTY function
This function enables you to listen to selected programme type, irrespective of the function mode.
• PTY broadcasts are not yet available in all countries.
In TA standby mode, TP stations have priority over
PTY broadcasting stations.
* Emergency messages interrupt all modes of oper-
ation. They can only be received from RDS stations. “ALARM” appears in the display and message can be heard.
* Press AF button 9 to cancel the ALARM broad-
English
If you press TA button 7 while traffic announcements are being broadcast, they are cancelled
and the unit enters TA standby mode.
● Cancelling the TA standby mode
If you press TA button 7 when “TP” and
“TA””are lit in the display, “TA” in the display
goes off and the TA standby mode is cancelled.
casts.
13
Page 15
RDS Operations
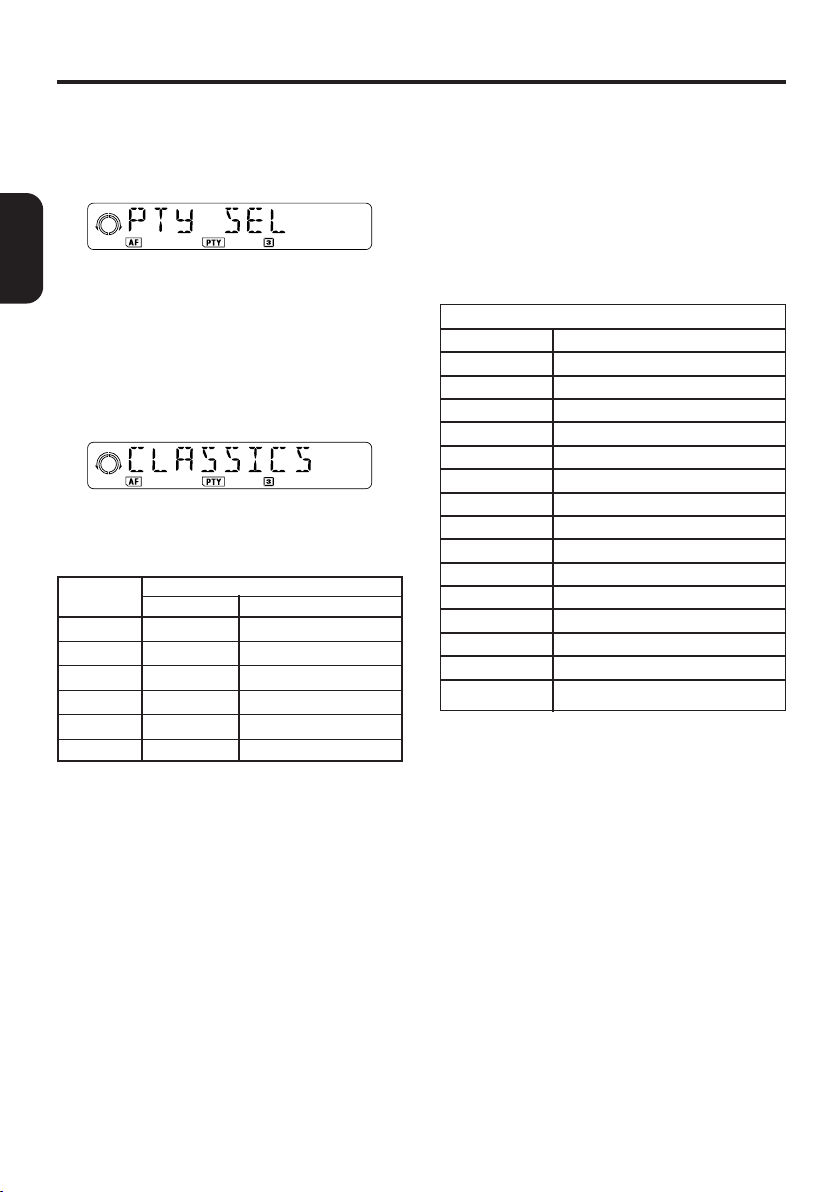
Selecting PTY
1. When you press PTY button 8, “PTY” lights
and PTY appears in the display. The unit enters
PTY select mode.
English
If the control is idle for 7 seconds after the PTY
select mode has been entered, the display
automatically returns to radio mode display and
the unit enters the PTY standby mode.
2. Select a PTY.
Press one of Preset buttons ! to select the
desired PTY or select up or down to obtain a
desired PTY using Rotary knob %.
* The following stored already into the Preset
buttons ! for your convenience.
Preset
No.
1
2
3
4
5
6
ENGLISH
NEWS
INFO
CLASSICS
SPORT
POP M
M, O, R, M
3. Press PTY button 8 again to enter standby
mode for the selected PTY.
When a selected PTY broadcast starts, the
selected PTY appears in the display.
If you press PTY button 8 during PTY broad-
casts, PTY broadcasts are temporarily cancelled and the unit enters PTY standby mode.
● Cancelling PTY standby mode
Press and hold PTY button 8 for 2 seconds or
longer to turn off “PTY” in the display.
PTY
(English)
(News)
(Information)
(Classic music)
(Sports)
(Popular music)
Middle of the Road Music
Preset memory of PTYs
1. Press PTY button 8 to enter PTY select mode.
If the control is idle for 7 seconds after the PTY
select mode has been entered, the display
automatically returns to radio mode display and
the unit enters the PTY standby mode.
2. Select up or down to obtain a desired PTY
using Rotary knob %.
The following 15 PTYs are selectable.
PTY Display
ENGLISH
NEWS
AFFAIRS
INFO
SPORT
EDUCATE
DRAMA
CULTURE
SCIENCE
VARIED
POP M
ROCK M
M, O, R, M
LIGHT M
CLASSICS
OTHER M
(News)
(Affairs)
(Information)
(Sports)
(Education)
(Drama)
(Culture)
(Science)
(Variety)
(Popular music)
(Rock music)
Middle of the Road Music
(Light music)
(Classic music)
(Other music)
3. Press and hold one of the Preset buttons !
1 to 6 for 2 seconds or longer to put it into memory. After PTY is stored in memory, “PTY
MEMO” appears in the display.
(English)
14
Page 16

Seek tuning of PTYs
1. Press PTY button 8 to enter PTY select mode.
2. Select a PTY.
3. Select the SRCH Left/Right button $, when a
receivable and desired PTY is found. It is automatically tuned in. If you select left or right, the
PTY is sought in the direction of a higher or
lower frequency channel.
If no stations broadcasting selected a PTY,
seek tuning stops at the previous station and
the unit stays in PTY standby mode.
Volume setting of TA, emergency
broadcast (ALARM) and PTY
The volume for TA,ALARM and PTY interrupts
can be set during TA,ALARM or PTY interrupt.
The factory default is “15”
During a TA,ALARM or PTY interrupt, turn the
Rotary knob # clockwise or counterclockwise to
set the volume to the desired level ( 0 to 33)
* When the TA,ALARM or PTY interrupt ends, the
volume returns to the level it had before the interrupt.
RDS Operations
English
15
Page 17
CD Operations
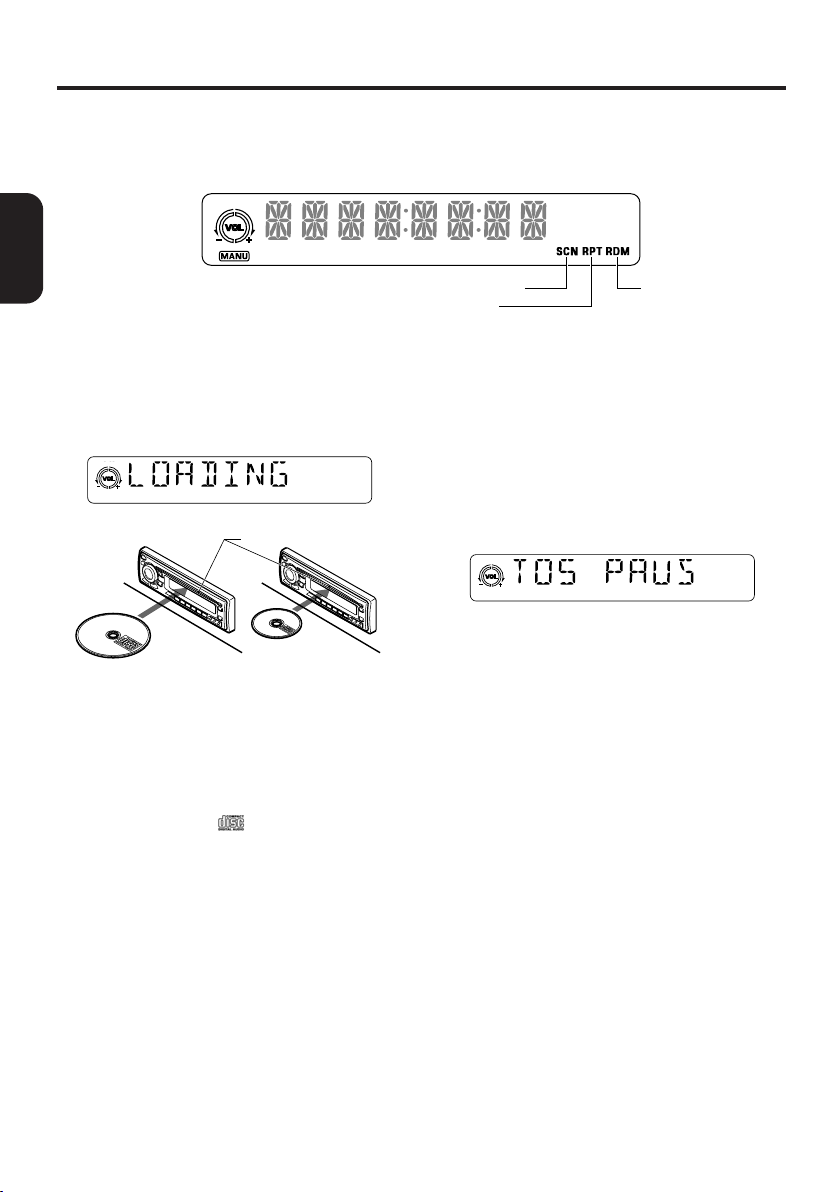
CD mode
English
Reperat indication
Loading a CD
Insert a CD into the centre of the CD insertion slot
4 with the labeled side facing up. “LOADING”
appears in the display, the CD enters into the slot,
and the play starts.
For CD (12 cm)
Notes:
• Do not put your hand, fingers, or foreign objects
into the CD insertion slot 4.
• If a CD has already been loaded, another CD can-
not be inserted. Do not insert another one forcefully.
• Discs not bearing the mark cannot be played
with the unit. CD-ROMs cannot be played.
• Some CDs recorded in CD-R mode may not be
usable. Even when recorded in CD-R/W mode,
some CDs not be usable.
• Single CDs (8 cm) shall be loaded without adapter
into the right side of the slot.
For single CD (8 cm)
CD insertion slot 4
Scan indication
Random indication
Listening to a CD already loaded
Press FNC button 3 and select CD mode. Play
starts automatically.
If no CD is loaded, “NO DISC” appears in the display.
Pausing play
1. Press Play/pause button ¥ to pause play.
“PAUS” appears in the display.
2. To resume play, press Play/pause button ¥
again.
Ejecting a CD
1. Press Eject button 5 to eject CD. “EJECT”
appears in the display.
* If a CD is left in the ejected position for 15 sec-
onds, the CD is automatically reloaded (auto
reload).
* The radio mode is set automatically 4 seconds
after Eject button 5 is pressed.
Note:
• Single CDs (8 cm) are not reloaded. Be sure to
remove them when ejected.
16
Page 18

CD Operations
Selecting a track
● Next track:
Select the SRCH Right button $.
● Current track:
Select the SRCH Left button $.
● Previous track:
Select the SRCH Left button $, do the same
again.
* Each time you select left or right using SRCH but-
tons
$, the track is skipped accordingly.
Fast-forward/fast-backward (FF/FB)
● Fast-forward:
Press right and hold for 1 second or longer using
button $.
● Fast-backward:
Press left and hold for 1 second or longer using
button $.
* Press left or right buttons $ for 3 seconds or
longer to increase the speed.
Top function
The top function allows the first track of the current CD to be played.
Press TOP button # to play the first track (track
No. 1) of CD.
Scan play
The scan play allows the first 10 seconds of all the
tracks on the CD to be played.
* The scan play is useful when you want to select a
desired track.
1. Press SCN button 0. “SCN” lights in the dis-
play.
2. To cancel the scan play, press SCN button 0
again. “SCN” goes off from the display and the
normal play resumes.
Repeat play
The repeat play allows the selected track to be
played repeatedly.
1. Press RPT button 9. “RPT” lights in the dis-
play.
2. To cancel the repeat play, press RPT button 9
again. “RPT” goes off from the display and the
normal play resumes.
Random play
The random play allows all the tracks on the current CD to be played randomly.
1. Press RDM button 8. “RDM” lights in the dis-
play.
2. To cancel the random play, press RDM button
8 again. “RDM” goes off from the display and
the normal play resumes.
English
17
Page 19
CD CHANGER Operations
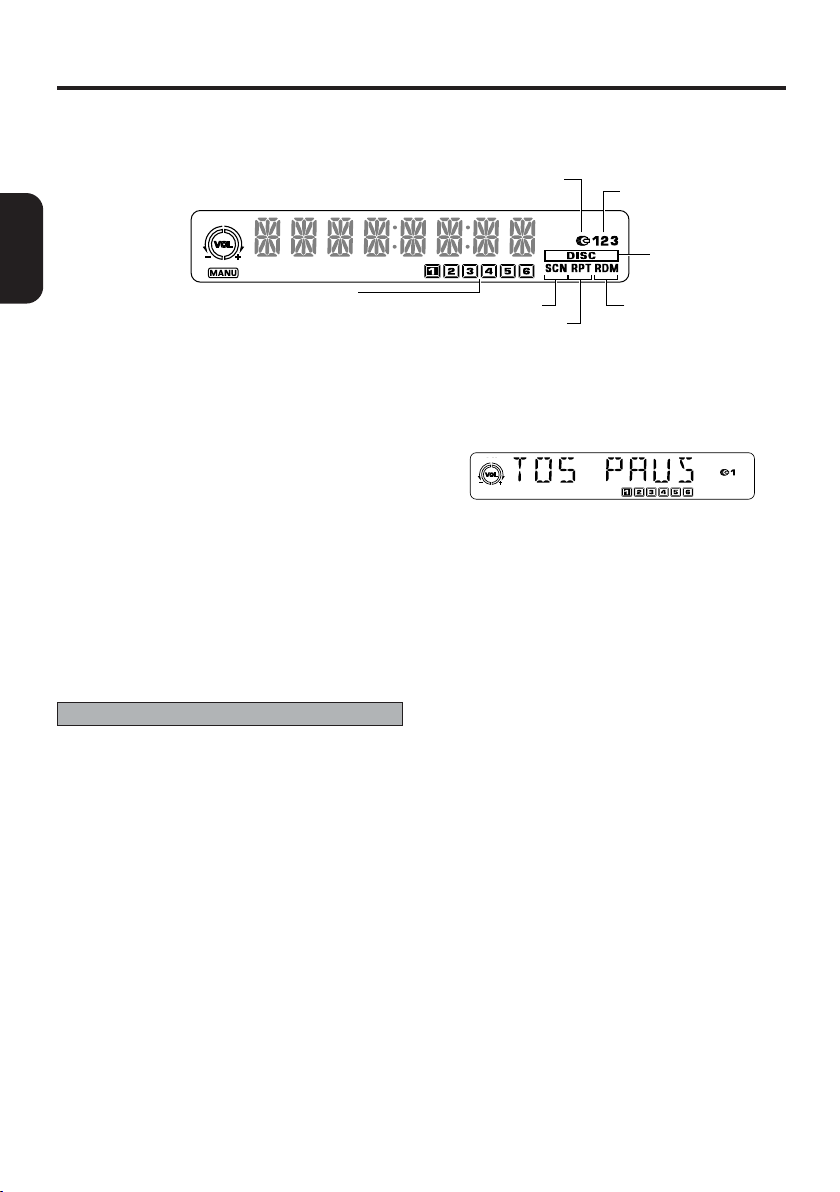
CD CHANGER mode (where fitted)
English
Disc number indication
Listening to a CD in the CD CHANGER
When a separately sold CD CHANGER is connected to the sound system, you can listen to CD.
1. Press FNC button 3 and select CD
mode to start play.
* The CD No. of magazine where CDs are loaded
light in the display.
2. When a magazine is not set in the CD CHANG-
ER, “NO MAGA” appears in the display.
* If a magazine is set while “NO MAGA” is being
displayed, “LOADING” appears in the display
for a moment, “PAUS” appears in the display,
and the operation pauses.
3. When a CD is not set in the magazine, “NO
DISC” appears in the display.
* Insert a CD into the magazine and set the mag-
azine in the CD
CD-ROMs cannot be played with CD CHANGER.
Note:
• When a CD CHANGER is connected, be sure to turn
off the main unit and turn it again.
CHANGER.
éCAUTION
CD CHANGER mode indication
Scan indication
Repeat indication
Pausing play
1. Press Play/pause button ¥ to pause play.
CHANGER
“PAUS” appears in the display.
2. To resume play, press Play/pause button ¥
again.
Selecting a CD
Each of the Direct buttons ! corresponds to a
disc loaded into the magazine.
● Selecting a disc from 1 to 6
Press the corresponding Direct button ! (1 to 6)
to select the desired disc.
● Selecting a magazine from 1 to 3
(only when there is disc in the magazine)
Press BND button # to select the desired magazine.
* If a CD is not loaded in a slot of the magazine,
pressing the Direct button ! corresponding to its
disc number is invalid.
Magazine number
indication
Disc indication
Random indication
18
Selecting a track
● Next track:
Select the SRCH Right button $.
● Current track:
Select the SRCH Left button $.
● Previous track:
Select the SRCH Left button $, do the same
again.
* Each time you select the SRCH Left/Right button
$, the track is skipped accordingly.
Page 20

CD CHANGER Operations
Fast-forward/fast-backward (FF/FB)
● Fast-forward:
Press and hold the SRCH Right button $ for 1
second or longer.
● Fast-backward:
Press and hold the SRCH Left button $ for 1 second or longer.
* Press and hold the SRCH Left/Right button $
for 3 seconds or longer to increase the speed of
fast-forwarding or fast-backwarding.
Selecting a magazine
This function can be used only when the connected CD CHANGER can store a multiple number of
magazines.
Every time the MAG button # is pressed, the next
magazine will be selected.
Top function
The top function allows the first track of the current CD to be played.
Press TOP button # to play the first track (track
No. 1) of CD.
Scan play
The scan play allows the first 10 seconds of all the
tracks on the CD to be played.
* The scan play is useful when you want to select a
desired track.
1. Press SCN button 0 “SCN” lights in the dis-
play.
2. To cancel the scan play, press SCN button 0
again. “SCN” goes off from the display and the
normal play resumes.
Disc scan play
The disc scan play allows the first 10 seconds of
the first tracks on all the CDs in the CD CHANGER
to be played.
* The disc scan play is useful when you want to
select a desirable CD.
1. Press and hold SCN button 0 for 2 seconds or
longer. “DISC” and “SCN” light in the display.
2. To cancel the disc scan play, press SCN button
0 again. “DISC” and “SCN” go off from the
display and the normal play resumes.
Repeat play
The repeat play allows the selected track to be
played repeatedly.
1. Press RPT button 9. “RPT” lights in the display.
2. To cancel the repeat play, press RPT button 9
again. “RPT” goes off from the display and the
normal play resumes.
Disc repeat play
The disc repeat play allows the current CD to be
played repeatedly.
1. Press and hold RPT button 9 for 2 seconds or
longer. “DISC” and “RPT” light in the display.
2. To cancel the disc repeat play, press RPT button 9 again. “DISC” and “RPT” go off from
the display and the normal play resumes.
Random play
The random play allows all the tracks on the current CD to be played randomly.
1. Press RDM button 8. “RDM” lights in the dis-
play.
2. To cancel the random play, press RDM button
8 again. “RDM” goes off from the display and
the normal play resumes.
Disc random play
The disc random play allows all the tracks on all
the CDs in the CD CHANGER to be played randomly.
1. Press and hold RDM button 8 for 2 seconds or
longer. “DISC” and “RDM” light in the display.
2. To cancel the disc random play, press RDM button 8 again. “DISC” and “RDM” go off from
the display and the normal play resumes.
Note:
• Regarding MD CHANGERS
When a MD CHANGER is used with this unit, set the
mode on the CHANGER to “A” (CD-Mode). The MD
CHANGER can then be used in the CD CHANGER
mode. When used in this way, however, titles cannot be displayed. Also, a CD CHANGER cannot be
connected concurrently with a MD CHANGER.
English
19
Page 21
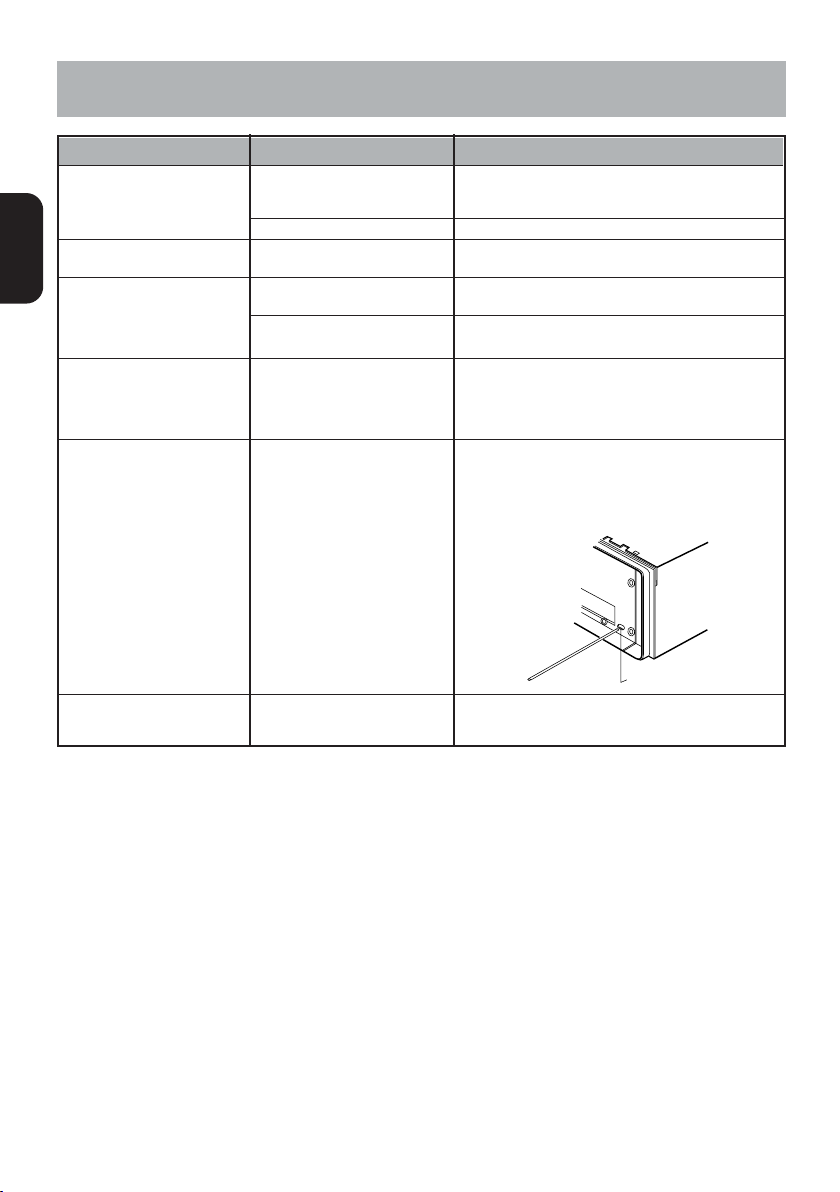
7. IN CASE OF DIFFICULTY
Problems Cause Solution
Power does not turn on.
(No sound is produced).
English
Ccompact disc cannot be
loaded.
Sound skips or is noisy.
Fuse is blown.
Incorrect wiring.
Another compact disc is already
loaded.
Compact disc is dirty.
Replace with a fuse of the same amperage.
If the fuse blows again, consult your store
of purchase.
Consult your store of purchase.
Eject the compact disc before loading the new one.
Clean the compact disc with a soft cloth.
Sound is bad directly after
powwer is turned on.
Nothing happens when
buttons are pressed
Display is not accurate.
Compact disc is heaviiy
scratched or warped.
Water droplets may form on the
internal lens when the car is
parked in a humid place.
The microprocessor has malfunctioned due to noise, etc.
DCP or main unit connectors
are dirty.
Replace with a compact disc with no scratches.
Let dry for about 1 hour with the power on.
Turn off the power, then press the Release button 1
and remove the DCP.
Press the reset button for about 2 seconds with a thin
rod.
Reset button
Wipe the dirt off with a soft cloth moistened
with cleaning alcohol.
20
Page 22

8. ERROR DISPLAYS
If an error occurs, one of the following displays is displayed.Take the measures described below to eliminate the problem.
Error Display Cause Measure
CD ER2
CD ER3
CD ER6
If an error display other than the ones described above appears, press the reset button. If the problem
persists, turn off the power and consult your store of purchase.
A CD is caught inside the CD deck and is not
ejected.
A CD cannot be played due to scratches, etc.
A CD is loaded upside-down inside the CD deck
and does not play.
This is a failure of CD deck’s mechanism and
consult your store of purchase.
Replace with a non-scratched, non-warped disc.
Eject the disc then reload it properly
English
21
Page 23

Nous vous remercions d’avoir acheté ce modèle PU2312.
* Lisez tout le mode d’emploi avant de mettre l’appareil en service.
* Après avoir lu ce manuel, conservez-le dans un endroit pratique (par ex. dans la boîte à gants).
* Lisez le contenu de la carte de garantie jointe et conservez-la précieusement avec ce manuel.
* Ce manuel comprend les procédures de fonctionnement du changeur de CD/MD raccordé via le câble
C-BUS. Pour le CD/MD CHANGER, consultez la notice spécifique qui toutefois ne comprend pas les explications concernant les fonctions.
Tables des matières
Français
1. PRECAUTIONS ....................................................................................................................... 22
2. MANIEMENT DES DISQUES COMPACTS .......................................................................... 23
3. LES COMMANDES ................................................................................................................ 5
4. CLAVIER DE COMMANDE AMOVIBLE (DCP) ..................................................................... 24
5. NOMENCLATURE DES TOUCHES ....................................................................................... 25
Noms des touches ................................................................................................................... 25
Rubriques d’affichage .............................................................................................................. 25
6. FONCTIONNEMENT .............................................................................................................. 26
Fonctionnement de base ..........................................................................................................26
Fonctionnement de la radio ...................................................................................................... 28
Fonctionnement RDS................................................................................................................ 30
Fonctionnement des disques compacts.................................................................................... 34
Fonctionnement du CD CHANGER ............................................................................................. 36
7. EN CAS DE DIFFICULTE ....................................................................................................... 38
8. AFFICHAGE DES ERREURS ................................................................................................ 39
9. CARACTERISTIQUES TECHNIQUES ................................................................................... 148
1. PRECAUTIONS
1. Lorsque l’habitacle de la voiture est très froid et
que le lecteur est utilisé juste après la mise en
route du chauffage, de la condensation risque
de se former sur le disque ou sur les pièces optiques du lecteur et d’empêcher le bon déroulement de la lecture. Si de la condensation s’est
formée sur le disque, essuyez le disque avec un
chiffon doux. Si de la condensation s’est formée
sur les pièces optiques du lecteur, attendez environ une heure avant d’utiliser le lecteur pour
que la condensation puisse s’évaporer naturellement et permettre un fonctionnement normal.
22
2. Une conduite sur routes mauvaises qui provoque de fortes vibrations peut entraîner des interruptions du son.
Page 24
2. MANIEMENT DES DISQUES COMPACTS
Façon correcte de tenir
le disque
Retrait du disque
N
L’appareil a été conçu spécifiquement pour la lecture des disques compacts portant le label Il
ne permet de lire aucun autre disque.
Pour sortir le disque de son étui, appuyez sur la partie centrale de l’étui et soulevez le disque en le tenant délicatement par les bords.
Tenez toujours le disque compact par les bords. Ne
touchez jamais sa surface.
Pour enlever les marques de doigt et la poussière,
utilisez un chiffon doux, et essuyez le disque en ligne
droite, du centre du disque vers la périphérie.
Non
Les disques neufs présenteront certaines aspérités
sur les bords. Avec ces disques, l’appareil peut ne
pas fonctionner ou le son s’interrompre.A l’aide d’un
stylo-bille, etc. retirez les aspérités sur le pourtour
du disque.
Remarques sur les disques compacts
Ne collez jamais d’étiquettes sur la surface du
disque compact et n’y écrivez rien avec un stylo ou
un crayon.
Non
Français
N’utilisez pas de solvants, par exemple produits de
nettoyage, vaporisateurs anti-électricité statique, ou
diluants vendus dans le commerce pour nettoyer les
disques compacts.
Non
N’utilisez pas de disques compacts fortement rayés,
gondolés ou fendillés, etc. Cela provoquerait des
anomalies de fonctionnement ou des dommages.
on
Stylo-bille
Aspérités
N’exposez pas les disques compacts en plein soleil
ni à une source de chaleur.
Non
Remarque:
• N’utilisez pas de feuilles de protection pour CD disponibles dans le commerce ni de disques dotés de stabilisateur, etc. Ils pourraient se coincer dans le mécanisme interne et endommager le disque.
23
Page 25
4. CLAVIER DE COMMANDE AMOVIBLE (DCP)
Le clavier de commande se retire, de façon à éviter le vol. Quand vous l’enlevez, rangez-le dans le
boîtier clavier de commande amovible (DCP) pour
le protéger des rayures.
Nous vous recommandons d’emporter le clavier de
commande avec vous quand vous quittez votre voiture.
Retrait du clavier de commande
amovible (DCP)
Français
1. Maintenez la touche POWER 3 enfoncée pen-
dant 1 seconde ou plus pour mettre l’appareil
hors tension.
2. Appuyez à fond sur la touche de dégagement du
DCP 1.
Touche de dégagement du
(DCP) 1
3. Retirez le clavier de commande amovible.
(DCP)
é PRECAUTION
• Le clavier de commande amovible est très
sensible aux chocs. Quand vous l’enlevez,
faites attention de ne pas le faire tomber ni le
heurter violemment.
• Si vous appuyez sur la touche de dégagement
et que le clavier de commande amovible est
déverrouillé, il risque de tomber sous l’effet
des vibrations de la voiture. Quand vous avez
retiré le clavier de commande amovible, rangez-le toujours dans son boîtier pour éviter de
l’endommager. (Voir la figure ci-dessous.)
Boîtier du DCP
• Le connecteur qui raccorde l’appareil principal au clavier de commande amovible est une
pièce extrêmement importante. Faites attention de ne pas l’abîmer en appuyant dessus
avec les ongles, un tournevis, etc.
Remarque:
• Si le clavier de commande amovible est sale, enlevez la saleté avec un chiffon doux et sec.
Fixation du clavier de commande
amovible
1. Insérez le côté droit du clavier de commande
amovible dans l’appareil principal.
2. Insérez le côté gauche du clavier de commande
amovible dans l’appareil principal.
2.
1.
24
Page 26

5. NOMENCLATURE DES TOUCHES
Remarque: Veuillez lire ce chapitre en vous référant aux schémas du chapitre “3. LES COMMANDES”, à la
page 5 (dépliée).
Nom des touches
1 Touche de dégagement du DCP
2 Touche de mode audio (A-M)
Touche de compensation physiologique (LD)
3 Interrupteur d’alimentation (POWER)
Touche de fonction (FNC)
4 Fente d’insertion du CD
5 Touche d’éjection (Q)
6 Touche d’affichage (DISP)
7 Touche d’annonces sur la circulation routière
(TA)
8 Touche de type de programme (PTY)
Touche de lecture aléatoire (RDM)
9 Touche de fréquence alternative (AF)
Touche de répétition (RPT)
Rubriques d’affichage
1 Indication du volume (VOL)
2 Indication de mode audio (A-M)
3 Indication du haut-parleur arrière (R)
Indication du haut-parleur avant (F)
4 Indication d’état de fonctionnement
* La fréquence, le PTY, le temps de lecture,
l’horloge (CT), etc. s’affichent.
5 Indication de compensation physiologique
(LD)
6 Indication du renforceur-Z (Z-EHCR)
7 Indication du mode de CD/MD CHANGER
8 Indication du numéro de magasin
9 Indication de disque (DISC)
0 Indication de lecture aléatoire (RDM)
! Indication de lecture répétée (RPT)
0 Touche de balayage des stations préré-
glées/mémorisation automatique (PS/AS)
Touche de balayage (SCN)
! Touches de stations préréglées (1 à 6)
Touches d’accès direct (1 à 6)
@ Touche de renforceur-Z (Z-EHCR)
# Touche de gamme (BND)
Touche de lecture de la première plage (TOP)
Touche de magasin (MAG)
$ Touches de recherche (gauche a et droite
d)
% Bouton rotatif
¥ Touche de lecture/pause (s)
Touche de silencieux (MUTE)
@ Indication de balayage (SCN)
# Indication de canal préréglé (1 à 6)
Indication de numéro de disque (1 à 6)
* Les numéros de disque correspondant aux
disques du CD/MD CHANGER
$ Indication de type de programme (PTY)
% Indication de programme d’informations rou-
tières (TP)
¥ Indication d’annonces sur la circulation routière
(TA)
& Indication d’annonces régionale (REG)
* Indication de fréquence alternative (AF)
( Indication manuelle (MANU)
) Indication du haut-parleur gauche (L)
Indication du haut-parleur droit (R)
Français
25
Page 27

6. FONCTIONNEMENT
Remarque: Veuillez lire ce chapitre en vous référant aux schémas du chapitre “3. LES COMMANDES”, à la
page 5 (dépliée).
Fonctionnement de base
é PRECAUTION
Réglez bien le volume au minimum avant de
mettre l’appareil hors tension. Un son puissant
Français
au moment de la mise sous tension risque
d’abîmer les tympans et d’endommager l’appareil.
Mise sous/hors tension
Remarque:
• Ne pas utiliser l’autoradio trop longtemps lorsque
le moteur est coupé; cela pourrait provoquer des
difficultés au démarrage de la voiture et réduire la
durée de la batterie.
1. Appuyez sur l’interrupteur POWER 3.
2. L’éclairage et l’afficheur de l’appareil s’allument.
L’appareil se souvient du dernier mode de fonctionnement et il commute automatiquement sur
ce mode.
3. Maintenez l’interrupteur POWER 3 enfoncé
pendant 1 seconde ou plus pour mettre l’appareil hors tension.
Sélection du mode
1. Appuyez sur la touche FNC 3 pour sélectionner
le mode de fonctionnement.
2. Le mode de fonctionnement change dans l’ordre
suivant:
Radio ➜ CD ➜ CD/MD
* Si le changeur de CD/MD CHANGER n’est pas rac-
cordé, vous ne pourrez pas sélectionner le mode
changeur de CD/MD
CHANGER ➜ Radio …
CHANGER.
Réglage du volume
Tournez le bouton rotatif % dans le sens des aiguilles d‘une montre pour augmenter le volume;
tournez-le dans le sens inverse pour diminuer le volume.
* Le volume se règle de 0 (minimum) à 33 (maxi-
mum).
Réglage du renforceur-Z
L’appareil possède 3 types d’effets de tonalité enregistrés en mémoire. Sélectionnez celui de votre
choix.
* Le réglage usine est “OFF”.
Chaque fois que vous appuyez sur la touche ZEHCR @, l’effet de tonalité change dans l’ordre sui-
vant:
“Z-ENHANCER 1” ➜ “Z-ENHANCER 2” ➜
“Z-ENHANCER 3” ➜ “OFF” ➜ “Z-ENHANCER 1”...
• Z-ENHANCER 1 : Les graves sont accentués.
• Z-ENHANCER 2 : Les aigus sont accentués.
• Z-ENHANCER 3 : Les graves et les aigus sont
accentués.
• OFF : Pas d’effet sonore
Réglage de la tonalité
Appuyez sur la touche A-M 2 et sélectionnez la rubrique à régler. Chaque fois que vous appuyez sur
la touche A-M 2 , la rubrique change dans l’ordre
suivant:
“BASS” ➜ “TREB” ➜ “BAL” ➜ “FAD” ➜ Mode
de fonction...
Réglage des graves
1. Appuyez sur la touche A-M 2 et sélectionnez
“BASS”.
2. Tournez le bouton rotatif % dans le sens des aiguilles d’une montre pour accentuer les graves,
ou dans le sens inverse pour atténuer les graves.
* Le réglage par défaut est “0”. (Plage de régla-
ge: –6 à +6)
3. Quand le réglage est terminé, appuyez plusieurs
fois de suite sur la touche A-M 2 jusqu’à ce que
vous obteniez le mode de fonctionnement voulu.
26
Page 28
Fonctionnement de base
Réglage des aigus
1. Appuyez sur la touche A-M 2 et sélectionnez
“TREB”.
2. Tournez le bouton rotatif % dans le sens des aiguilles d’une montre pour accentuer les aigus, ou
dans le sens inverse pour atténuer les aigus.
* Le réglage par défaut est “0”. (Plage de régla-
ge: –6 à +6)
3. Quand le réglage est terminé, appuyez plusieurs
fois de suite sur la touche A-M 2 jusqu’à ce que
vous obteniez le mode de fonctionnement voulu.
Réglage de la balance gauche-droite
1. Appuyez sur la touche A-M 2 et sélectionnez
“BAL”.
2. Tournez le bouton rotatif % dans le sens des aiguilles d’une montre pour augmenter le son de
l’enceinte droite; et tournez-le dans le sens inverse pour accentuer le son de l’enceinte
gauche.
* Le réglage par défaut est “0”. (Plage de régla-
ge: L9 à R9)
3 Quand le réglage est terminé, appuyez plusieurs
fois de suite sur la touche A-M 2 jusqu’à ce que
vous obteniez le mode de fonctionnement voulu.
Réglage de la balance avant-arrière
1. Appuyez sur la touche A-M 2 et sélectionnez
“FAD”.
2. Tournez le bouton rotatif % dans le sens des
aiguilles d’une montre pour accentuer le son des
enceintes avant, et tournez-le dans le sens inverse pour accentuer le son des enceintes arrière.
* Le réglage par défaut est “0”. (Plage de régla-
ge: F9 à R9)
3. Quand le réglage est terminé, appuyez plusieurs
fois de suite sur la touche A-M 2 jusqu’à ce que
vous obteniez le mode de fonctionnement voulu.
Compensation physiologique
La compensation physiologique augmente les
graves et les aigus de façon à donner une tonalité
naturelle.
Lors d’une écoute à faible volume, il est recommandé d’utiliser la compensation physiologique.
● Mise en/hors service de la compensation
physiologique
Maintenez la touche LD 2 enfoncée pendant 2 secondes ou plus pour mettre la compensation physiologique en et hors service. Lorsque la compensation physiologique est en service, “LD” apparaît
sur l’afficheur.
Commutation de l’affichage
Appuyez sur la touche DISP 6 pour sélectionner
l’affichage.
L’affichage commute dans l’ordre suivant:
Principal ➜ Heure (CT) ➜ Principal …
* Si l’affichage commute sous l’action d’une autre
touche de fonction lorsque l’heure (CT) est affichée, il reviendra automatiquement à l’heure
après l’opération.
* L’exemple montre l’affichage du mode radio.
Fonction CT (Heure)
Cette fonction vous permet d’afficher l’heure uniquement lors de la réception des données CT.
Appuyez sur la touche DISP 6 de manière à
commuter l’afficheur en mode CT (affichage horaire).
* En dehors de la réception des données CT,
“CT --:--” s’affiche.
Remarque:
• Il y a des pays et des stations qui n’émettent pas
de données d’heure. Par ailleurs, dans certaines
régions, les données CT peuvent ne pas s’afficher
correctement.
Mise à zéro automatique du volume
pendant les communications téléphoniques
En cas de présence du téléphone portable, au
cours des conversations téléphoniques le volume
du mode sélectionné est annulé automati-quement
et l’indication TEL MUTE apparaît à l’écran. Pour
habiliter la fonction, garder enfoncées en même
temps la touche # et le numéro 5 des touches de
présélection !.
Français
27
Page 29
Fonctionnement de la radio
Mode radio
Indication de syntonisation automatique
Français
Indication TP
Ecoute de la radio
1. Appuyez sur la touche FNC 3 pour sélectionner
le mode radio.La fréquence ou PS apparaissent
sur l’afficheur.
* Programme Service Name (Nom du service de
programme)
2. Appuyez sur la touche BND # pour sélectionner
la gamme. La gamme change dans l’ordre suivant:
FM1 ➜ FM2 ➜ FM3 ➜ AM (OM/OL) ➜ FM1 …
3. À l’aide des touches de recherche $, sélectionnez la touche gauche ou la touche droite pour
accorder la station désirée.
Syntonisation
Il existe trois modes de syntonisation au choix: la
syntonisation automatique, la syntonisation manuelle, et la syntonisation des stations préréglées.
Syntonisation automatique
Il existe 2 modes de syntonisation automatique au
choix: la RECHERCHE AUTOMATIQUE (DX SEEK)
et la RECHERCHE LOCALE (LOCAL SEEK).
DX SEEK permet de syntoniser automatiquement
toutes les stations recevables; LOCAL SEEK permet de syntoniser uniquement les stations offrant
une bonne sensibilité de réception.
1. Appuyez sur la touche BND # et sélectionnez
la gamme (FM ou AM (PO/GO).
2. Syntonisez la station.
* Si “MANU” est allumé sur l’afficheur, maintenez
la touche BND # enfoncée pendant 1 seconde
ou plus. “MANU” s’éteint sur l’afficheur et la
syntonisation automatique est possible.
* Si “TA” est allumé sur l’afficheur, les stations
TP sont automatiquement syntonisées.
Indication de canal préréglé
● Recherche automatique (DX SEEK)
Appuyez sur le côté droit ou sur le côté gauche de
la touche de recherche $ pour syntoniser automatiquement la station.
Si vous appuyez sur le côté droit de la touche de
recherche $, la station est recherchée vers le haut
de la plage de fréquence; si vous appuyez sur le
côté gauche de la touche de recherche $, elle est
recherchée vers le bas de la plage de fréquence.
* Quand la syntonisation automatique débute, “DX”
s’allume sur l’afficheur.
● Recherche locale (LOCAL SEEK)
Si vous maintenez le côté droit ou le côté gauche
de la touche de recherche $ enfoncée pendant 1
seconde ou plus, la syntonisation automatique locale s’effectue.Les stations offrant une bonne sensibilité de réception sont captées.
* Quand la recherche locale débute, “LO” s’allume
sur l’afficheur.
Syntonisation manuelle
1. Appuyer sur la touche BND # pour sélec-tionner la gamme.
2. Appuyer sur la touche BND # pendant au moins
2 secondes.
3. “MANU” disparaît de l’affichage, et la syntoni-
sation manuelle est possible.
4. Utiliser la touche de recherche gauche ou droite
# pour syntoniser des stations.
* Le mode commute automatiquement au mode
de syntonisation automatique après 7
secondes.
28
Page 30

Fonctionnement de la radio
Rappel d’une station préréglée
Vous pouvez prérégler jusqu’à 24 stations (6 stations pour chaque gamme FM1, FM2, FM3 et AM
(PO/GO)) sur les touches de préréglage.
La syntonisation des stations préréglées est une
fonction qui permet de mémoriser les stations sur
des touches de préréglage (1 à 6) et de les sélectionner en appuyant sur la touche de préréglage
correspondante.
1. Appuyez sur la touche BND # pour sélectionner
la gamme.
2. Appuyez sur l’une des touches de préréglage !
pour sélectionner la station mémorisée.
Remarque:
• Maintenez la touche de préréglage ! enfoncée
pendant 2 secondes ou plus pour mémoriser la
station en cours de réception (mémoire de préréglage).
Mémorisation manuelle
1. Appuyez sur la touche BND # pour sélectionner
la gamme.
2. À l’aide des touches de recherche $, sélectionnez la touche gauche ou la touche droite pour
accorder la station désirée.
3. Maintenez l’une des touches de préréglage !
enfoncée pendant 2 secondes ou plus pour mémoriser la station en cours de réception.
Mémorisation automatique
La mémorisation automatique est une fonction qui
permet de mémoriser automatiquement un maximum de 6 stations les unes après les autres.
Remarques:
• La seule gamme FM qui puisse mémoriser des
stations est la gamme FM3. Si vous essayez de
mémoriser des stations sur la gamme FM1 ou
FM2, les stations seront automatiquement mémorisées sur la gamme FM3.
• Lors de la mémorisation automatique, la station
préalablement mémorisée sur la mémoire à cette
position est recouverte.
• S’il y a moins de 6 stations dont la réception soit
satisfaisante, les stations préalablement mémorisées sur les touches de préréglage restantes ne
sont pas recouvertes.
• Il n’est pas possible de mémoriser sur une autre
touche de préréglage une station déjà mémorisée
sur une touche.
1. Appuyez sur la touche BND # pour sélectionner
la gamme (FM3 ou AM) de la station voulue.
2. Maintenez la touche AS 0 enfoncée pendant 2
secondes ou plus. Les stations dont la réception
est satisfaisante sont automatiquement mémorisées sur les touches de préréglage !.
Balayage préréglé
Cette fonction permet de balayer chacune des stations préréglées pendant 7 secondes l’une après
l’autre.
Ceci est pratique pour rechercher la station de votre
choix.
Remarque:
• Notez que si vous maintenez la touche PS 0
enfoncée pendant 2 secondes ou plus, la fonction
de mémorisation automatique entre en service et
l’appareil commence à mémoriser les stations.
1. Appuyez sur la touche PS 0.
2. Lorsque la station voulue est syntonisée, appuyez à nouveau sur la touche PS 0 ou appuyez sur la touche de préréglage ! correspondante pour arrêter le balayage préréglé.
* Si l’appareil ne parvient pas à syntoniser une
station, il saute à la station préréglée suivante.
Silencieux (MUTE)
Utilisez cette fonction pour coupez instantanément
le son. Appuyez sur la touche MUTE ¥. Le son est
coupé tandis que “MUTE” apparaît dans l’afficheur.
Appuyez encore une fois sur la touche MUTE pour
annuler le mode de silencieux.
Français
29
Page 31

Fonctionnement RDS
Mode RDS
Indication de syntonisation automatique
Indication AF
Français
Indication REG
Indication TA
RDS (Radio Data System)
L’appareil comprend un décodeur de système RDS
pour les stations qui diffusent des données RDS.
Ce système permet à la radio d’afficher le nom de
la station en cours de réception (PS), ainsi que de
commuter automatiquement sur une meilleure fréquence s’il en existe une dans la région lors de
longs trajets (commutation AF).
Il permet également d’interrompre la lecture du
disque ou de la cassette pour recevoir les annonces
sur la circulation routière (TA) ou une émission du
type de programme spécifié diffusée par une station RDS.
En outre, lors de la réception d’une information
EON, cette information permet de commuter automatiquement sur les autres stations préréglées du
même réseau et d’interrompre la station en cours
de réception par la diffusion des annonces sur la
circulation routière des autres stations (TP). Cette
fonction n’est pas disponible dans toutes les régions.
Pour pouvoir utiliser la fonction RDS, réglez la radio en mode FM.
• AF: Alternative Frequencies (Fréquences
• PS: Programme Service Name (Nom du ser-
• PTY: Programme Type (Type de programme)
• EON: Enhanced Other Network (Autre réseau
• TP: Traffic Programme (Programme d’an-
* Si vous ne parvenez plus à recevoir la station RDS
alternatives)
vice de programme)
renforcé)
nonces sur la circulation routière)
clairement (là où vous vous trouvez), “AF” cligno-
te sur l’afficheur. Lorsque la réception est rétablie,
“AF” cesse de clignoter.
Indication de canal préréglé
Indication PTY
Indication TP
Fonction AF
La fonction AF permet à l’appareil de conserver une
réception optimale en commutant sur une autre fréquence du même réseau.
* Le réglage usine est “activé”.
● Mise hors service de la fonction AF
Lorsque “AF” est allumé ou qu’il clignote sur l’afficheur, appuyez sur la touche AF 9. “AF” disparaît
de l’afficheur et la fonction AF est désactivée.
● Mise en service de la fonction AF
Si “AF” n’est pas allumé sur l’afficheur, appuyez à
nouveau sur la touche AF 9.“AF” apparaît sur l’af-
ficheur et la fonction AF est activée.
Si les conditions de réception de la station se détériorent, “AF” se met à clignoter et l’appareil essaie de commuter sur une fréquence alternative. Si
la commutation n’est pas possible, l’affichage commute sur “SEARCH” (recherche) et l’appareil recherche le même programme.
Fonction REG (Programme Régional)
Quand la fonction REG est activée, la réception des
stations régionales est optimisée.
Lorsque la fonction est désactivée, l’appareil commute sur la station régionale de la zone suivante
quand vous pénétrez dans une autre région pendant la réception de la station régionale de la zone
précédente.
* Le réglage usine est “désactivé”.
Remarques:
• Cette fonction est sans effet lors de la réception
des stations nationales comme la FM BBC 2.
• La mise en/hors service de la fonction REG est
effective lorsque la fonction AF est activée.
30
Page 32

Fonctionnement RDS
● Mise en service de la fonction REG
Si “REG” n’est pas allumé sur l’afficheur, maintenez la touche AF 9 enfoncée pendant 2 secondes
ou plus. “REG” s’allume sur l’afficheur.
● Mise hors service de la fonction REG
Maintenez la touche AF 9 enfoncée pendant 2 secondes ou plus. “REG” disparaît de l’afficheur.
Syntonisation manuelle des stations
régionales apparentées
1. Cette fonction est effective lorsque la fonction AF
est activée et la fonction REG désactivée.
Remarque:
• Cette fonction est effective lors de la réception de
stations régionales apparentées.
2. Appuyez sur l’une des touches de préréglage !
pour rappeler une station régionale.
3. Si les conditions de réception de la station rappelée sont mauvaises, appuyez sur la même
touche de préréglage !. L’appareil commute sur
la station régionale correspondante.
Fonction TA
(Annonces sur la Circulation Routière)
Lorsque l’appareil est en mode d’attente TA, vous
recevez les annonces sur la circulation routière en
priorité lorsqu’elles sont diffusées, indépendamment du mode de fonctionnement.
Vous pourrez également syntoniser automatiquement les stations TP (Programme d’annonces sur
la circulation routière).
● Pour activer le mode d’attente TA
Si vous appuyez sur la touche TA 7 lorsque seul
“TP” est allumé sur l’afficheur, “TP” et “TA” s’allument sur l’afficheur et l’appareil passe en mode
d’attente TA jusqu’à ce que les annonces sur la circulation routière soient diffusées.
Lorsque la diffusion des annonces sur la circulation
routière commence, “TRA INFO” apparaît sur l’afficheur, puis le PS (Nom du service de programme)
apparaît.
● Annulation du mode d’attente TA
Si vous appuyez sur la touche TA 7 lorsque “TP”
et “TA” sont allumés sur l’afficheur, “TA” disparaît
de l’afficheur et le mode d’attente TA est annulé.
● Réglage du mode de syntonisation
automatique des stations TP
Si vous appuyez sur la touche TA 7 lorsque seul
“TP” est allumé ou que “TP” et “TA” sont tous
deux éteints sur l’afficheur, “TA” s’allume et l’ap-
pareil syntonise automatiquement les stations TP.
Remarque:
• L’appareil poursuit la syntonisation automatique si
aucune station TP n’est reçue. Appuyez à nouveau sur la touche TA 7 pour arrêter la syntonisation automatique.
Mémorisation automatique
des stations TP
● Mémorisation automatique lorsque “TA”
est allumé:
Seules les stations TP sont mémorisées automatiquement.
* Voir la fonction PS/AS en mode radio.
Fonction PTY (Type de programme)
Cette fonction vous permet d’écouter le type de programme sélectionné, indépendamment du mode
de fonctionnement.
Remarque:
• Les émissions PTY ne sont pas encore disponibles dans tous les pays.
En mode d’attente TA, les stations TP ont priorité
sur les stations diffusant les émissions PTY.
* Les messages d’urgence interrompent tous les
modes de fonctionnement. Ils ne peuvent être
reçus que par les stations RDS. “ALARM” appa-
raît sur l’afficheur et le message est diffusé.
* Appuyez sur la touche AF 9 pour annuler les dif-
fusions d’urgence (ALARM).
Français
Si vous appuyez sur la touche TA 7 pendant la
diffusion des annonces sur la circulation routière,
la diffusion s’annule et l’appareil revient au mode
d’attente TA.
31
Page 33

Fonctionnement RDS
Sélection PTY
1. Quand vous appuyez sur la touche PTY 8,
“PTY” s’allume et PTY apparaît sur l’afficheur.
L’appareil passe au mode de sélection PTY.
Si vous restez 7 secondes sans actionner de
touche après le passage au mode de sélection
PTY, l’afficheur revient automatiquement à l’affi-
Français
chage de la radio et l’appareil passe au mode
d’attente PTY.
2. Sélectionnez le PTY.
Appuyez sur l'une des touches de préréglage !
pour sélectionner le PTY désiré ou sélectionnez
sur le haut ou le bas du bouton rotatif % pour obtenir le PTY désiré.
* Pour votre commodité, les types de programme
suivants sont déjà mémorisés sur les touches de
préréglage !.
No. de
préréglage
1
2
3
4
5
6
3. Appuyez à nouveau sur la touche PTY 8 pour
passer au mode d’attente du PTY sélectionné.
Lorsque la diffusion de l’émission PTY sélectionnée commence, ce PTY apparaît sur l’afficheur et
le PS s’affiche.
Si vous appuyez sur la touche PTY 8 pendant la
diffusion d’une émission PTY, la diffusion PTY
s’annule provisoirement et l’appareil passe au
mode d’attente PTY.
ENGLISH
NEWS
INFO
CLASSICS
SPORT
POP M
M, O, R, M
● Annulation du mode d’attente PTY
Maintenez la touche PTY 8 enfoncée pendant 2
secondes ou plus de façon que “PTY” disparaisse
de l’afficheur.
PTY
(Français)
(Actualités)
(Informations)
(Musique classique)
(Sports)
(Musique pop)
Middle of the Road Music
(Musique pour la route)
Préréglage des stations PTY
1. Appuyez sur la touche PTY 8 pour passer au
mode de sélection PTY.
Si vous restez 7 secondes sans actionner de
touche après le passage au mode de sélection
PTY, l’afficheur revient automatiquement à l’affichage de la radio et l’appareil passe au mode
d’attente PTY.
2. Sélectionnez le haut ou le bas du bouton rotatif
% pour obtenir le PTY désiré.
Vous pouvez choisir l’un des 15 types de programme ci-dessous.
Affichage PTY
ENGLISH
NEWS
AFFAIRS
INFO
SPORT
EDUCATE
DRAMA
CULTURE
SCIENCE
VARIED
POP M
ROCK M
M, O, R, M
LIGHT M
CLASSICS
OTHER M
(Actualités)
(Magazines)
(Informations diverses)
(Sports)
(Emissions éducatives)
(Feuilletons radiophoniques)
(Culture)
(Sciences)
(Variétés)
(Musique pop)
(Musique rock)
Middle of the Road Music
(Musique de fonde)
(Musique légère)
(Musique classique)
(Autres musiques)
3. Maintenez l’une des touches de préréglage ! 1
à 6 enfoncée pendant 2 secondes ou plus pour
le mémoriser. Lorsque les PTY sont mémorisés,
“PTY MEMO” apparaît sur l’afficheur.
(Français)
32
Page 34

Recherche automatique
des stations PTY
1. Appuyez sur la touche PTY 8 pour passer au
mode de sélection PTY.
2. Sélectionnez un PTY.
3. Sélectionnez la touche gauche ou la touche
droite des touches de recherche $ lorsque le
PTY désiré pouvant être capté dans de bonnes
conditions est capté. Il se syntonise automatiquement. Si vous cliquez sur la gauche ou sur la
droite, le PTY est recherché dans le sens des fréquences ascendantes ou descendantes.
Si l’appareil ne trouve aucune station diffusant
un PTY du type recherché, la recherche automatique s’arrête à la station précédente et l’appareil reste en mode d’attente PTY.
Sélection du volume de TA, ALARM
(diffusion d'urgence) et PTY
Le volume utilisé dans les interruptions TA, ALARM
et PTY peut être défini pendant ces interruptions.
La sélection par défaut adoptée à la production
est "15"
Pendant une interruption TA, ALARM ou PTY,
tourner la manette # de droite à gauche ou de
gauche à droite jusqu'au volume voulu (de 0 à 33)
* A la fin de l'interruption TA, ALARM ou PTY, le
niveau du volume retourne à la valeur précédente.
Fonctionnement RDS
Français
33
Page 35

Fonctionnement des disques compacts
Mode CD
Indication de lecture des introductions
Français
Chargement d’un disque
Insérez un disque au centre de la fente d’insertion
du CD 4, son étiquette tournée vers le haut.“LOA-
DING” apparaît sur l’afficheur, le disque rentre dans
la fente et la lecture commence.
Pour CD de
12 cm
Remarques:
• Ne mettez pas la main, les doigts ni aucun corps
étranger dans la fente d’insertion du CD 4.
• S’il y a déjà un disque dans la fente, vous ne pour-
rez pas en mettre un second. N’en insérez pas un
autre de force.
• Les disques qui ne portent pas le label ne
pourront pas être lus sur l’appareil. Les CD-ROM
ne pourront pas être lus non plus.
• Certains modèles de CD enregistrés en mode CD-
R risquent de ne pas être utilisables.
Même lorsqu’ils ont été enregistrés en mode CDR/W, certains modèles de CD risquent de ne pas
être utilisables.
• Les disques de 8 cm se chargent sans adaptateur,
sur le côté droit de la fente.
Pour CD de 8 cm.
Fente d’insertion du
Indication de lecture répétee
Lecture d’un disque déjà chargé
Appuyez sur la touche FNC 3 et sélectionnez le
mode CD.La lecture commence automatiquement.
S’il n’y a pas de disque dans l’appareil, “NO DISC”
(pas de disque) apparaît sur l’afficheur.
Pause de la lecture
1. Appuyez sur la touche de lecture/pause ¥ pour
interrompre la lecture. “PAUS” apparaît sur l’af-
ficheur.
4
CD
2. Pour reprendre la lecture, appuyez à nouveau sur
la touche de lecture/pause ¥.
Ejection du disque
1. Appuyez sur la touche d’éjection 5 pour éjecter
le disque. “EJECT” apparaît sur l’afficheur.
* Si le disque reste en position éjectée pendant
15 secondes, le disque est automatiquement
rechargé (rechargement automatique).
* Le mode radio se règle automatiquement 4
secondes après la pression sur la touche
d’éjection 5.
Remarque:
• Les disques de 8 cm ne sont pas rechargés.
Retirez-les bien après l’éjection.
Indication de lecture
aléatoire
34
Page 36

Fonctionnement des disques compacts
Sélection d’une plage
● Plage suivante:
Sélectionnez la droite de la touche de recherche
$.
● Plage en cours:
Sélectionnez la gauche de la touche de recherche
$.
● Plage précédente:
Sélectionnez la gauche de la touche de recherche
$, puis recommencez.
* À chaque fois que la touche gauche ou la touche
droite des touches de recherche $ est sélectionnée, une plage est sautée en conséquence.
Avance rapide/retour rapide (FF/FB)
● Avance rapide:
Appuyez sur la droite et maintenez enfoncé pendant 1 seconde ou plus à l’aide de la touche de recherche $.
● Retour rapide:
Appuyez sur la gauche et maintenez enfoncé pendant 1 seconde ou plus à l’aide de la touche de recherche $.
* Appuyez sur la touche gauche ou la touche droi-
te des touches de recherche $ pendant au
moins 3 secondes pour augmenter la vitesse.
Fonction Top
La fonction Top permet de lire la première plage du
disque en cours.
Appuyez sur la touche TOP # pour lire la première
plage (plage No. 1) du disque.
Lecture répétée
La lecture répétée permet de lire la plage sélectionnée de façon répétée.
1. Appuyez sur la touche RPT 9. “RPT” s’allume
sur l’afficheur.
2. Pour annuler la lecture répétée, appuyez à nouveau sur la touche RPT 9. “RPT” disparaît de
l’afficheur et la lecture normale reprend.
Lecture aléatoire
La lecture aléatoire permet de lire toutes les plages
du disque en cours dans un ordre au hasard.
1. Appuyez sur la touche RDM 8.“RDM” s’allume
sur l’afficheur.
2. Pour annuler la lecture aléatoire, appuyez à nouveau sur la touche RDM 8.“RDM” disparaît de
l’afficheur et la lecture normale reprend.
Français
Lecture des introductions
La lecture des introductions permet de lire les 10
premières secondes de chacune des plages du
disque.
* La lecture des introductions est très utile pour
rechercher la plage de son choix.
1. Appuyez sur la touche SCN 0. “SCN” s’allume
sur l’afficheur.
2. Pour annuler la lecture des introductions, ap-
puyez à nouveau sur la touche SCN 0. “SCN”
disparaît de l’afficheur et la lecture normale reprend.
35
Page 37

Fonctionnement du CD CHANGER
Mode CD CHANGER (lorsqu’il est prévu)
Indication du mode CD CHANGER
Français
Indication de numéro de disque
Indication de lecture des introductions
Lecture d’un disque dans le
CD CHANGER
Vous pouvez écouter un CD si un CD CHANGER est
raccordé à l’autoradio.
1. Appuyez sur la touche FNC3 et sélectionnez le
mode CD
* Les No. de disque du magasin dans lequel les
2. S’il n’y a pas de magasin dans le CD CHANGER,
“NO MAGA” (pas de magasin) apparaît sur l’afficheur.
* Si vous mettez un magasin pendant que “NO
3. S’il n’y a pas de disque dans le magasin, “NO
DISC” (pas de disque) apparaît sur l’afficheur.
* Insérez un disque dans le magasin et réglez le
Vous ne pourrez pas lire de CD-ROM avec ce
CD CHANGER.
Remarque:
• Si vous avez raccordé un CD CHANGER, pensez
bien à éteindre puis à rallumer l’appareil principal.
CHANGER pour commencer la lecture.
disques sont chargés s’allument sur l’afficheur.
MAGA” est affiché, “LOADING” (chargement
en cours) apparaît pendant quelques instants
sur l’afficheur, puis “PAUS” apparaît sur l’afficheur, et le fonctionnement s’interrompt.
magasin en mode CD
CHANGER.
é PRECAUTION
Indication de lecture répétée
Pause de la lecture
1. Appuyez sur la touche de lecture/pause ¥ pour
interrompre la lecture. “PAUS” apparaît sur l’af-
ficheur.
2. Pour reprendre la lecture, appuyez à nouveau sur
la touche de lecture/pause ¥.
Sélection d’un CD
Chaque touche d’accès direct ! correspond à
un disque chargé dans le chargeur.
● Sélection d'un disque de 1 à 6
Appuyez sur la touche d’accès direct correspondante ! (1 à 6) pour sélectionner le disque désiré.
● Sélection d'un magasin de 1 à 3 (unique-ment
à condition qu'il y ait des disques dans le magasin)
Appuyez sur la touche BND # pour sélectionner
le magasin désiré.
* Si un disque n’a pas été chargé dans un fente du
chargeur, la pression sur la touche directe ! correspondant au numéro de disque est sans effet.
Sélection d’une plage
● Plage suivante:
Cliquez sur la droite de la touche de recherche $.
● Plage en cours:
Cliquez sur la gauche de la touche de recherche $.
● Plage précédente:
Cliquez sur la gauche de la touche de recherche
$, puis recommencez.
* À chaque fois que la touche gauche ou la touche
droite des touches de recherche $ est sélectionnée, une plage est sautée en conséquence.
Indication de numéro
de magasin
Indication
de disque
Indication de lecture
aléatorie
36
Page 38

Fonctionnement du CD CHANGER
Avance rapide/retour rapide (FF/FB)
● Avance rapide:
Cliquez et maintenez pendant 1 seconde ou plus
sur la droite de la touche de recherche $ .
● Retour rapide:
Cliquez et maintenez pendant 1 seconde ou plus
sur la gauche de la touche de recherche $ .
* Appuyez sur la touche gauche ou la touche droite
des touches de recherche $ pendant au moins 3
secondes pour augmenter la vitesse du mode
d'avance rapide ou de retour rapide.
Sélection d’un magasin
Cette fonction est disponible seulement si le CD
CHANGER raccordé peut contenir plusieurs char-
geurs.
Chaque fois que vous appuyez sur la touche MAG
#, le chargeur suivant est sélectionné.
Fonction Top
La fonction Top permet de lire la première plage du
disque en cours.
Appuyez sur la touche TOP # pour lire la première
plage (plage No. 1) du disque.
Lecture des introductions
La lecture des introductions permet de lire les 10
premières secondes de chacune des plages du
disque.
* La lecture des introductions est très utile pour
rechercher la plage de son choix.
1. Appuyez sur la touche SCN 0. “SCN” s’allume
sur l’afficheur.
2. Pour annuler la lecture des introductions, ap-
puyez à nouveau sur la touche SCN 0. “SCN”
disparaît de l’afficheur et la lecture normale reprend.
Balayage de tous les disques
Le balayage de tous les disques vous permet de
lire les 10 premières secondes de la première plage
de chacun des disques du CD CHANGER.
* Le balayage de tous les disques est très utile pour
rechercher le disque de son choix.
1. Maintenez la touche SCN 0 enfoncée pendant
2 secondes ou plus. “DISC” et “SCN” s’allument
sur l’afficheur.
2. Pour annuler le balayage de tous les disques, ap-
puyez à nouveau sur la touche SCN 0.“DISC”
et “SCN” disparaissent de l’afficheur et la lecture
normale reprend.
Lecture répétée
La lecture répétée vous permet de lire la plage sélectionnée de façon répétée.
1. Appuyez sur la touche RPT 9. “RPT” s’allume
sur l’afficheur.
2. Pour annuler la lecture répétée, appuyez à nouveau sur la touche RPT 9. “RPT”disparaît de
l’afficheur et la lecture normale reprend.
Lecture répétée d’un disque
La lecture répétée d’un disque vous permet de lire
le disque en cours de façon répétée.
1. Maintenez la touche RPT 9 enfoncée pendant
2 secondes ou plus. “DISC” et “RPT” s’allument
sur l’afficheur.
2. Pour annuler la lecture répétée d’un disque, appuyez à nouveau sur la touche RPT 9.“DISC”
et “RPT” disparaissent de l’afficheur et la lecture
normale reprend.
Lecture aléatoire
La lecture aléatoire vous permet de lire toutes les
plages du disque en cours dans un ordre au hasard.
1. Appuyez sur la touche RDM 8.“RDM” s’allume
sur l’afficheur.
2. Pour annuler la lecture aléatoire, appuyez à nouveau sur la touche RDM 8.“RDM” disparaît de
l’afficheur et la lecture normale reprend.
Lecture aléatoire de tous
les disques
La lecture aléatoire de tous les disques vous permet de lire toutes les plages de tous les disques du
CHANGER dans un ordre au hasard.
CD
1. Maintenez la touche RDM 8 enfoncée pendant
2 secondes ou plus. “DISC” et “RDM” s’allu-
ment sur l’afficheur.
2. Pour annuler la lecture aléatoire de tous les
disques, appuyez à nouveau sur la touche RDM
8.“DISC” et “RDM” disparaissent de l’afficheur
et la lecture normale reprend.
Remarque:
• À propos des MD CHANGER
Lorsqu’un MD CHANGER est utilisé avec cet appareil, réglez le mode sur le changeur sur la position
“A” (mode CD). Le MD CHANGER peut alors être utilisé en mode de CD CHANGER. Cependant, il faut
savoir que lorsque l’appareil est utilisé de cette
façon, les titres ne peuvent pas être affichés. En
outre, il n’est pas possible de raccorder un CD
CHANGER en même temps qu’un MD CHANGER.
Français
37
Page 39

7. EN CAS DE DIFFICULTE
Problème Cause Solution
Pas d’alimentation.
(Pas de son.)
Impossible de charger
le disque.
Interruptions du son
ou parasites.
Français
Le son se détériore tout
de suite après la mise
sous tension.
Rien ne se passe quand
on appuie sur les touches.
La visualisation n’est
pas correcte
Fusible sauté.
Raccordement incorrect.
Il y a déjà un disque dans le
tiroir.
Le disque est sale.
Le disque est fortement rayé ou
gondolé.
Des gouttelettes d’eau risquent
de se former sur la lentille interne si la voiture a été garée dans
un lieu humide.
Mauvais fonctionnement du
microprocesseur à cause du
bruit, etc.
Les connecteurs du clavier de
commande amovible (DCP) ou
de l’appareil principal sont
Remplacez le fusible par un autre de même ampérage. Si le fusible saute à nouveau, consultez votre
magasin.
Consultez votre magasin.
Ejectez le disque avant d’en mettre un autre.
Nettoyez le disque avec un chiffon doux.
Remplacez-le par un disque sans rayures.
Allumez l’appareil et laissez-le sécher pendant
environ 1 heure.
Eteignez l’appareil, appuyez sur la touche de dégagement 1 du clavier de commande amovible (DCP)
et retirez le clavier.
Appuyez sur la touche de réinitialisation pendant
environ 2 secondes avec une petite tige.
Touche de
réinitialisation
Enlevez la saleté avec un chiffon doux humecté
d’alcool de nettoyage.
38
Page 40

8. AFFICHAGE DES ERREURS
S’il se produit une erreur, l’un des affichages suivants apparaît. Prenez les mesures expliquées ci-dessous
pour résoudre le problème.
Affichage d’erreur
CD ER2
CD ER3
CD ER6
Si un affichage d’erreur autre que ceux décrits ci-dessus apparaît, appuyez sur la touche de réinitialisation.
Si le problème persiste, mettez l’appareil hors tension et consultez votre magasin.
Le disque est coincé à l’intérieur du lecteur de
CD et il ne s’éjecte pas.
La lecture du disque est impossible parce qu’il
est rayé, etc.
Le disque est chargé à l’envers dans le lecteur
de CD et; la lecture est impossible.
Cause Mesure
Ceci est une anomalie du mécanisme du lecteur
de CD. Consultez votre magasin.
Remplacez-le par un disque non rayé et non
gondolé.
Ejectez le disque et rechargez-le correctement.
Français
39
Page 41

Wir danken Ihnen für den Kauf des Clarion PU2312
* Bitte lesen diese Bedienungsanleitung vor Inbetriebnahme dieses Geräts vollständig durch.
* Nach Durchlesung der Anleitung sollte es an einem schnell zugäng lichen Ort aufbewahrt werden
(d. h. im Handschuhfach).
* Überprüfen Sie den Inhalt der beigefügten Garantiekarte und bewahren Sie sie sorgfältig mit dieser
Anleitung auf.
* Dieser Anleitung beschreibt ebenfalls die Bedienverfahren für den mittels des C-BUS-Kabels ange-
schlossenen CD/MD-CHANGER. Für den CD/MD CHANGER in der entsprechenden Anleitung nachschlagen die allerdings nicht die Erläuterungen für die Funktionen enthält .
Inhalt
1. VORSICHTSMASSNAHMEN .................................................................................................. 40
2. HANDHABUNG DER CDs ...................................................................................................... 41
3. REGLER ................................................................................................................................5
4. ABNEHMBARES BEDIENTEIL (DCP) .................................................................................. 42
Deutsch
5. BENENNUNG .......................................................................................................................... 43
Bezeichnungen der Tasten........................................................................................................43
Anzeigen .................................................................................................................................. 43
6. BETRIEB ................................................................................................................................44
Grundbetrieb ............................................................................................................................. 44
Radio-Betrieb ............................................................................................................................ 46
RDS-Betrieb.............................................................................................................................. 48
CD-Betrieb ................................................................................................................................ 52
CD-CHANGER-Betrieb ................................................................................................................. 54
7. FEHLERSUCHE ..................................................................................................................... 56
8. FEHLERANZEIGEN ................................................................................................................ 57
9. TECHNISCHE DATEN ........................................................................................................... 149
1. VORSICHTSMASSNAHMEN
1. Wenn das Fahrzeuginnere sehr kalt ist und der
CD-Spieler sofort nach Einschaltung der
Heizung benutzt wird, könnte sich auf der CD
und den optischen Teilen des CD-Spielers
Kondensation bilden und eine korrekte
Wiedergabe nicht möglich sein. Sollte sich auf
der CD Kondensation gebildet haben, mit einem
weichen Tuch abwischen. Hat sich Kondensation
bei den optischen Teilen des CD-Spielers gebildet, den CD-Spieler für ca. eine Stunde nicht benutzen. Während dieser Zeit verschwindet die
Kondensation auf natürliche Weise und eine normale Wiedergabe ist möglich.
40
2. Während der Fahrt auf unebenen Fahrbahnen
könnten aufgrund der starken Erschütterungen
Titel übersprungen werden.
Page 42

2. HANDHABUNG DER CDs
Korrektes Anfassen
der CD
Entnahme der CD
Nei
Dieses Gerät wurde speziell für die Wiedergabe von
CDs mit der Markierung entwickelt. Andere
CDs können nicht wiedergegeben werden.
Für Entnahme der CD aus deren
Aufbewahrungsgehäuse, die Mitte des Gehäuses
runterdrücken und die CD entnehmen, indem sie
vorsichtig an deren Rändern gehalten wird.
Die CD sollte immer an deren Rändern angefaßt
werden. Niemals die Oberfläche berühren.
Für die Entfernung von Fingerabdrücken und Staub,
mit einem weichen Tuch in einer geraden Linie von
der CD-Mitte nach außen wischen.
Nein
Die Ränder neuer CDs könnten etwas zu rauh
sein.Wenn solche CDs verwendet werden,könnte
das Gerät nicht funktionieren oder Titel übersprungen werden.Mit einem Kugelschreiber,usw. die
Rauheit an den Rändern der CD glätten.
Hinweise für die CDs
Niemals Aufkleber auf die CD-Oberfläche kleben
oder diese mit einem Schreiber markieren.
Nein
Niemals für Reinigung der CDs Lösungsmittel verwenden, wie z.B. im Handel erhältliche Reiniger,
Antistatiksprays oder Verdünner.
Nein
Niemals CDs verwenden, die große Kratzer,
Verformungen oder Risse, usw. aufweisen. Durch
solche CDs kann es zu einem Fehlbetrieb kommen
oder Beschädigungen verursacht werden.
n
Deutsch
Kugelschreiber
Rauheit
Die CDs sollten nicht direktem Sonnenlicht oder einer Wärmequelle ausgesetzt werden.
Nein
Hinweis:
• Keine im Handel erhältlichen CD-Schutzhüllen oder CDs mit Stabilisatoren verwenden. Diese könnten sich
im internen Mechanismus verfangen und die CD beschädigen.
41
Page 43

4. ABNEHMBARES BEDIENTEIL (DCP)
Der Bedienteil kann zur Verhinderung von Diebstahl
abgenommen werden. Nach Abnahme des
Bedienteils sollte es im DCP-Gehäuse (abnehmbares Bedientel) aufbewahrt werden, um
Beschädigungen zu vermeiden. Wir empfehlen, daß
Sie das Bedienteil beim Verlassen Ihres Fahrzeugs
mitnehmen.
Abnahme des DCP
1. Die POWER-Taste 3 für Auschaltung für 1
Sekunde oder länger gedrückt halten.
2. Die Bedienteil-Entriegelungstaste (DCP) 1 tief
eindrücken.
Bedienteil-Entriegelungstate
(DCP) 1
Deutsch
3. Das DCP (abnehmbares Bedienteil) abnehmen.
(DCP)
éVORSICHT
• Das DCP kann durch Stoßeinwirkung leicht
beschädigt werden. Deshalb nach Abnahme
darauf achten, daß es nicht fallen gelassen
oder starken Stößen ausgesetzt wird.
• Wenn die Freigabetaste betätigt und das DCP
entriegelt wird, könnte es durch die
Vibrationen des Fahrzeugs herunterfallen. Um
eine Beschädigung des DCP zu verhindern,
sollte es immer nach Abnahme in dessen
Gehäuse aufbewahrt werden.
(Siehe untere Abbildung)
(DCP)-Gehäuse
• Der Anschluß für die Verbindung des
Hauptgeräts und des DCP ist ein äußerst
wichtiges Bauteil. Darauf achten, daß es nicht
durch Druckeinwirkung von Fingernägeln,
Schraubenziehern, usw. beschädigt wird.
Hinweis:
• Wenn das DCP verschmutzt ist, sollte es mit
einem weichen, trockenen Tuch abgewischt werden.
Anbringung des DCP
1. Die rechte Seite des DCP in das Hauptgerät einsetzen.
2. Die linke Seite des DCP in das Hauptgerät einsetzen.
2.
1.
42
Page 44

5. BENENNUNG
Hinweis: Diesen Abschnitt unter Bezug des Frontdiagramms des Kapitels “3. REGLER” auf Seite 5 lesen
(Ausfaltteil).
Bezeichnungen der Tasten
1 Bedienteil-Entriegelungstaste (DCP)
2 A-M-Taste (Audio-Modus)
LD-Taste (Loudness)
3 POWER-Taste (Ein/Aus)
FNC-Taste (Funktion)
4 CD-Einführschlitz
5 Auswurftaste (Q)
6 DISP-Taste (Display)
7 TA-Taste (Verkehrsdurchsage)
8 PTY-Taste (Programmart)
RDM-Taste (zufällige Reihenfolge)
9 AF-Taste (alternative Frequenz)
RPT-Taste (Wiederholung)
Anzeigen
1 Lautstärke-Anzeige (VOL)
2 Audiomodus-Anzeige (A-M)
3 Anzeige für hintere Lautsprecher (R)
Anzeige für vordere Lautsprecher (F)
4 Betriebsstatus-Anzeige
* Anzeige von Frequenz, PTY, Spielzeit, CT
(Uhr), usw.
5 Loudness-Anzeige (LD)
6 Z-Enhancer-Anzeige (Z-EHCR)
7 Anzeige für CD/MD-CHANGER-Betrieb
8 Magazinnummern-Anzeige
9 CD-Anzeige (DISC)
0 Zufallswiedergabe-Anzeige (RDM)
0 PS/AS-Taste (Senderanspielung/Speiche-
rung)
SCN-Taste (Anspielung)
! Festsendertasten (1 bis 6)
Festsender-Tasten (1 bis 6)
@ Z-EHCR-Taste (Z-Enhancer)
# BND-Taste (Wellenbereich)
TOP-Taste
MAG-Taste (Magazin)
$ Suchfunktionstasten (links a und rechts d)
% Drehknopf
¥ Wiedergabe/Pausen-Taste (s)
MUTE-Taste (Stummschaltung)
! Wiederholungsanzeige (RPT)
@ Anspielanzeige (SCN)
# Festsenderkanal-Anzeige (1 bis 6)
CD-Nummer-Anzeige (1 bis 6)
* Es leuchten die CD-Nummern auf, die den
CDs im CD/MD-changer entsprechen.
$ Programmart-Anzeige (PTY)
% Verkehrsprogrammß-Anzeige (TP)
¥ Verkehrsdurchsage-Anzeige (TA)
& Regionalprogramm-Anzeige (REG)
* Alternativfrequenz-Anzeige (AF)
( Anzeige für manuellen Betrieb (MANU)
) Anzeige für linken Lautsprecher (L)
Anzeige für rechten Lautsprecher (R)
Deutsch
43
Page 45

6. BETRIEB
Hinweis: Diesen Abschnitt in Bezug auf die Frontdiagramme des Kapitels “3. REGLER” auf Seite 5 lesen
(Ausfaltteil).
Grundbetrieb
é VORSICHT
Unbedingt vor Ausschaltung des Geräts die
Lautstärke auf den Mindestpegel einstellen.
Hohe Lautstärken bei Einschaltung könnten zu
Gehörschäden oder Beschädigung des Geräts
führen.
Deutsch
Ein/Auschaltung
Hinweis:
• Das Autoradio nicht zu lange bei stehendem Motor
benutzen. Dadurchkönnten Anlaßschwierigkeiten
entstehen und die Lebensdauer der Batterie verkürzt
werden.
1. Die POWER-Taste 3 betätigen.
2. Die Beleuchtung sowie das Display des Geräts
leuchten auf. Das Gerät speichert automatisch
die zuletzt eingestellte Betriebsart und stellt automatisch diese Betriebsart beim Display ein.
3. Die POWER-Taste 3 betätigen und für 1
Sekunde oder länger gedrückt halten, um das
Gerät auszuschalten.
Betriebsartwahl
1. Die FNC-Taste 3 für Einstellung einer
Funktionsbetriebsart betätigen.
2. Die Funktionsbetriebsart ändert sich in folgender
Reihenfolge:
Radio ➜ CD ➜ CD/MD
* Wenn der CD/MD-CHANGER nicht angeschlossen
ist, kann CD/MDstellt werden.
CHANGER ➜ Radio …
CHANGER-Betrieb nicht einge-
Lautstärkeeinstellung
Durch Drehen des Drehknopfs % im Uhrzeigersinn
wird die Lautstärke erhöht; durch Drehen im
Gegenuhrzeigersinn wird sie verringert.
* Der Lautstärkepegel reicht von 0 (Minimum) bis 33
(Maximum).
Einstellung de Z-Enhancers
Das Gerät besitzt 3 Arten von Klangeffekten, die im
SPeicher registriert sind. Jeweils den gewünschten
einstellen.
* Die werkseitige Ausgangseinstellung ist “OFF”.
Jedesmal wenn die Z-EHCR-Taste @ betätigt wird,
wird der Klanmgeffekt in folgender Reihenfolge
geändert:
“Z-ENHANCER 1” ➜ “Z-ENHANCER 2” ➜
“Z-ENHANCER 3” ➜ “OFF” ➜ “Z-ENHANCER 1”...
• Z-ENHANCER 1 : Anhebung der Tiefen
• Z-ENHANCER 2 : Anhebung der Höhen
• Z-ENHANCER 3 :Anhebung von Tiefen und
Höhen
• OFF : Kein Klangeffekt
Klangeinstellung
Die A-M-Taste 2 betätigen und die gewünschte
Einstellung wählen. Jedesmal bei Betätigung der AM-Taste 2 ändert sich der Einstellposten in folgender Reihenfolge:
“BASS” ➜ “TREB” ➜ “BAL” ➜ “FAD” ➜
Funktions-modus...
Tiefeneinstellung
1. A-M-Taste 2 betätigen und “BASS” einstelen.
2. Durch Drehen des Drehknopfs % im
Uhrzeigersinn werden Tiefen angehoben; durch
Drehen im Gegenuhrzeigersinn werden Tiefen
gedämpft.
* Die werkseitige Ausgangseinstellung ist “0”.
(Einstellbereich: –6 bis +6)
3. Wenn die Einstellung beendet ist, die A-M-Taste
2 mehrmals betätigen, bis der Funktionsmodus
eingestellt wird.
44
Page 46

Grundbetrieb
Höheneinstellung
1. Die A-M-Taste 2 betätigen und “TREB” ein-
stellen.
2. Durch Drehen des Drehknopfs % im
Uhrzeigersinn werden die Höhen angehoben;
durch Drehen im Gegenuhrzeigersinn werden sie
gedämpft.
* Die werkseitige Ausgangseinstellung ist “0”.
(Einstellbereich: –6 bis +6 )
3. Wenn die Einstellung beendet ist, die A-M-Taste
2 mehrmals betätigen, bis der Funktionsmodus
eingestellt ist.
Balance-Einstellung
1. Die A-M-Taste 2 betätigen und “BAL” einstellen.
2. Durch Drehen des Drehknopfs % im
Uhrzeigersinn wird der Ton vom rechten
Lautsprecher angehoben; durch Drehen im
Gegenuhrzeigersinn wird der Ton vom linken
Lautsprecher angehoben.
* Die werkseitige Ausgangseinstelling ist “0”.
(Einstellbereich: L9 bis R9)
3. Wenn die Einstellung beendet ist, die A-M-Taste
2 mehrmals betätigen, bis der Funktionsmodus
eingestellt ist.
Fader-Einstellung
1. Die A-M-Taste 2 betätigen und “FAD” einstel-
len.
2. Durch Drehen des Drehknopfs % im
Uhrzeigersinn wird der Ton von den vorderen
Lautsprechern angehoben; durch Drehen im
Gegenuhrzeigersinn wird der Ton von den hinteren Lautsprechern angehoben.
* Die werkseitige Ausgangseinstellung ist “0”.
(Einstellbereich: F9 bis R9)
3. Wenn die EInstellung beendet ist, die A-M-Taste
mehrmals 2 betätigen, bis der Funktionsmodus
eingestellt ist.
Loudness
Der Loudnesseffekt hebt die Tiefen und Höhen hervor, um einen natürlichen Klang zu erzeugen.Wenn
Sie Musik bei niedriger Lautstärke hören, empfiehlt
sich die Anwendung des Loudness-Effekts.
● Ein- und Abschaltung des Loudness-Effekts
Wenn die LD-Taste 2 betätigt und für 2 Sekunden
oder länger gedrückt gehalten wird, dann wird der
Loudness-Effekt ein- und abgeschaltet. Wenn der
Loudness-Effekt eingeschaltet ist, wird im Display
“LD” angezeigt.
Einstellung des Display
Für Einstellung des gewünschten Display die DISPTaste 6 betätigen.
Das Display ändert sich in folgender Reihenfolge:
Haupt ➜ Uhr (CT) ➜ Haupt …
Deutsch
* Wird das Display durch eine andere
Tastenbedienung geändert, wenn die Uhr (CT)
angezeigt wird, dann wird die Uhranzeige automatisch nach Bedienung wieder eingestellt.
* Dieses Beispiel zeigt das Display bei Radio-Modus.
Uhrzeit-Funktion (CT)
Durch CT-Funktion kann die Uhrzeit nur beim
Empfang von CT-Daten angezeigt werden.
Die DISP-Taste 6 betätigen, bis das Uhrzeit-display (CT) erscheint.
* Wenn keine CT-Daten empfangen werden, wird
“CT--:--” angezeigt.
Hinweis:
• In einigen Ländern sowie von einigen Sendern werden keine Uhrzeitdaten übertragen. In bestimmten
Regionen könnte die Uhrzeit nicht korrekt angezeigt
werden.
Automatische Nullstellung der
Lautstärke beim Telefongespräch
Falls ein Handy vorhanden ist, wird die Lautstärke
der gewählten Betriebsart beim Telefongespräch
automatisch auf Null gestellt und am Display erscheint der Schriftzug TEL MUTE.
Zur Aktivierung der Funktion, die Taste # zusammen mit der Nummer 5 der Vorwahltasten ! gedrückt halten.
45
Page 47

Radio-Betrieb
Radio-Modus
Sendeersuchlaufanzeige
TP-Anzeige
Radiohören
1. Die FNC-Taste 3 für Einstellung des Radio-
Deutsch
Modus betätigen. Im Display wird die Frequenz
oder Senderkennung angezeigt.
* PS: Programmdienstname
2. Die BND-Taste # für Einstellung des
Wellenbereichs betätigen. Der Wellenbereich ändert sich in folgender Reihenfolge:
➜
FM1(UKW1)
➜
AM (MW (MW/LW) ➜FM1 (UKW1) …
3. Die Suchfunktionstaste $ links oder rechts
betätigen, um den gewünschten Sender abzustimmen.
FM2 (UKW2)➜FM3 (UKW3)
Sendereinstellung
Es gibt drei Sendereinstellarten: Sendersuchlauf,
manuelle Einstellung und Festsendereinstellung.
Sendersuchlauf
Es gibt 2 Arten des Sendersuchlaufs: DX-SUCHLAUF und LOKAL-SUCHLAUF. DX-SUCHLAUF
kann automatisch empfangbare Sender einstellen;
LOKAL-SUCHLAUF. kann nur Sender mit guter
Empfangsempfindlichkeit einstellen.
1. Die BND-Taste # betätigen und den gewünschten Wellenbereich einstellen (UKW oder AM
(MW/LW)).
2. Einen Sender einstellen.
* Wenn im Display “MANU” aufleuchtet, die
BND-Taste # betätigen und für 1 Sekunde
oder länger gedrückt halten. Dann erlischt
“MANU” im Display und Sendersuchlauf ist
möglich.
* Wenn “TA” im Display aufleuchtet, werden
automatisch TA-Sender gesucht.
Festsenderanzeige
● DX-SUCHLAUF
Für automatische Sendersuche die Suchfunk-tionstaste $ rechts oder links betätigen.
Wenn die Suchfunktionstaste $ rechts betätigt
wird, werden Sender mit höheren Frequenzen gesucht; wird die Suchfunktionstaste $ links betätigt,
werden Sender mit niedrigeren Frequenzen gesucht.
* Wenn der Sendersuchlauf beginnt, wird “DX”
im Display angezeigt.
● LOKAL-SUCHLAUF
Wenn die Suchfunktionstaste $ betätigt und für 1
Sekunde oder länger gedrückt gehalten wird, dann
wird lokaler Sendersuchlauf ausgeführt. Es werden
nur Sender mit guter Empfangsempfindlichkeit eingestellt.
* Wenn der lokale Sendersuchlauf beginnt, wird
“LO” im Display angezeigt.
Manuelle Senderabstimmung
1. Die BND-Taste # drücken, um den Frequenzbereich zu wählen.
2. Die BND-Taste # mindestens 2 Sekunden
drücken.
3. “MANU” erlischt im Display, und danach ist manuelle Senderabstimmung möglich.
4. Mit Hilfe der Suchfunktionstaste links/rechts $
Sender abstimmen.
* Nach 7 Sekunden wird automatisch wieder
der Modus für den Sendersuchlauf aktiviert.
46
Page 48

Radio-Betrieb
Abruf/Vorspeicherung eines Senders
Bei den Feststendertasten können bis zu 24
Sender (jeweils 6 für UKW1, UKW2, UKW3 und
MW (MW/LW) -Sender) vorgespeichert werden.
Festsendereinstellung ist eine Funktion für die
Speicherung von Sendern für die Festsendertasten
(1 bis 6), wodurch ein Sender durch Betätigung der
entsprechenden Festsendertaste eingestellt werden kann.
1. Die BND-Taste # für Einstellung eines
Wellenbereichs betätigen.
2. Eine der Festsendertasten ! betätigen, num ei-
nen gespeicherten Sender einzustellen.
Hinweis:
• Die Festsendertaste ! für 2 Sekunden oder länger
gedrückt halten um den derzeitig empfangenen
Sender zu speichern (Festsenderspeicher).
Manuelle Speicherung
1. Die BND-Taste # für Einstellung eines
Wellenbereichs betätigen.
2. Die Suchfunktionstaste $ links oder rechts
betätigen, um den gewünschten Sender abzustimmen.
3. Eine der Festsendertasten ! für 2 Sekunden
oder länger gedrückt halten, um den derzeitig
empfangenen Sender zu speichern.
Automatische Speicherung
Bei der automatischen Speicherung werden bis zu
6 Sender gespeichert, die automatisch aufeinanderfolgend eingestellt werden.
Hinweise:
• Der einzige UKW-Wellenbereich, bei dem Sender
gespeichert werden können, ist UKW3. Wenn versucht wird Sender beim UKW1- oder UKW2Wellenbereich zu speichern, dann werden die
Sender automatisch bei UKW3 gespeichert.
• Bei automatischer Speicherung wird der früher
gespeicherte Sender der jeweiligen
Speicherposition überschrieben.
• Wenn weniger als 6 Sender mit gutem Empfang
vorhanden sind, werden die früher bei den verbleibenden Festsendertasten gespeicherten
Sender nicht überschrieben.
• Ein schon bei einer der Feststendertasten gespei-
cherter Sender kann nicht bei einer anderen
Festsendertaste gespeichert werden.
1. Die BND-Taste # betätigen, um den
Wellenbereich des gewünschten Senders einzustellen.
2. Die AS-Taste 0 für 2 Sekunden oder länger gedrückt halten. Sender mit gutem Empfang werden automatisch bei den Festsendertasten !
gespeichert.
Festsenderanspielung
Durch diese Funktion werden die einzelnen vorgespeicherten Sender für 7 Sekunden aufeinanderfolgend angespielt.
Dies ist besonders zweckmäßig, wenn Suchlauf für
einen gewünschten Sender ausgeführt werden soll.
Hinweis:
• Beachten, daß, wenn die PS-Taste 0 für 2
Sekunden oder länger gedrückt gehalten wird, die
automatische Speicherfunktion wirksam wird und
im Gerät Sender gespeichert werden.
1. Die PS-Taste 0 betätigen.
2. Wenn ein Sender eingestellt ist, den Sie hören
möchten, erneut die PS-Taste 0 oder die entsprechende Festsendertaste ! betätigen, um
die Senderanspielung zu stoppen.
* Ein Sender der nicht eingestellt werden kann,
wird übersprungen und der nächste vorgespeicherte Sender wird eingestellt.
Stummschaltung (MUTE)
Diese Funktion verwenden, um den Ton sofort
stummzuschalten.
Die MUTE-Taste ¥ betätigen. Danach wird der Ton
stummgeschaltet, und “MUTE” wird im Display angezeigt. Um den Stummschaltungs–modus aufzuheben, die MUTE-Taste erneut betätigen.
Deutsch
47
Page 49

RDS-betrieb
RDS-Modus
Sendersuchlaufanzeige
Festsenderanzeige
AF-Anzeige
REG-Anzeige
TA-Anzeige
RDS (Radio Data System)
Diese Gerät enthält einen RDS-System-Dekoder
Deutsch
für Sender die RDS-Daten senden.
Dieses System ermöglicht, daß das Radio den
Namen des empfangenen Senders (PS) anzeigt
und ebenfalls automatisch auf eine bessere
Frequenz umschaltet, wenn vorhanden, wenn Sie
lange Strecken zurücklegen (AF-Umschaltung).
Ebenfalls wird eine CD oder Kassette durch
Verkehrsinformationen oder der Programmsender
durch einen RDS-Sender unterbrochen.
Darüberhinaus, wenn EON-Informationen empfangen werden, ermöglichen diese Informationen eine
automatische Umschaltung auf andere vorgespeicherte Sender des selben Sendernetzes und
Unterbrechung des empfangenen Senders durch
Verkehrsinformationen von anderen Sendern (TP).
Diese Funktion könnte in einigen Regionen nicht
anwendbar sein.
Um die RDS-Funktion anwenden zu können, muß
das Radio auf UKW-Betrieb eingestellt werden.
• AF: Alternative Frequenz
• PS: Programmdienstname
• PTY: Programmtyp
• EON: Erweitertes Sendernetz
• TP: Verkehrsprogramm
* Wenn ein RDS-Sender nicht länger klar empfan-
gen werden kann (beim derzeitigen Ort), dann
blinkt “AF” im Display. Wenn der Empfang wieder
gut ist, hört “AF” auf zu blinken.
AF-Funktion
Durch die AF-Funktion kann das Gerät einen optimalen Empfang beibehalten, indem es auf verschiedene Frequenzen des gleichen Sendernetzes
umschaltet.
* Wurde werkseitig auf “on” eingestellt.
48
Stereoanzeige (UKW)
PTY-Anzeige
● Ausschaltung der AF-Funktion
Wenn “AF” im Display aufleuchtet oder blinkt, die
AF-Taste 9 betätigen. Dann erlischt “AF” im
Display und die AF-Funktion wird ausgeschaltet.
● Einschaltung der AF-Funktion
Wenn “AF” nicht im Display aufleuchtet, erneut die
AF-Taste 9 betätigen. Dann leuchtet “AF” im
Display auf und die AF-Funktion wird eingeschaltet.
Wenn sich der Empfang eines eingestellten
Senders verschlechtert, dann beginnt “AF” zu blinken und das Gerät versucht auf eine alternative
Frequenz umzuschalten. Wenn die Umschaltung
nicht erfolgt reich ist, dann wird im Display “SE-
ARCH” eingestellt und das Gerät führt Suche für
das gleiche Programm aus.
REG-Funktion (Regionalprogramm)
Wenn die REG-Funktion eingestellt ist, wird der
Empfang von Regionalsendern optimiert.
Wenn diese Funktion ausgeschaltet ist, dann schaltet das Gerät auf den Regionalsender im nächsten
regionalen Bereich, wenn Sie in den nächsten
Bereich gelangen, während der Regionalsender
des vorherigen regionalen Bereichs empfangen
wird.
* Wurde werkseitig auf “off” eingestellt.
Hinweise:
• Diese Funktion ist nicht wirksam, wenn ein natio-
naler Sender, wie z. B. BBC 2 UKW, empfangen
wird.
• Die EIN/AUS-Einstellung von REG ist wirksam,
wenn AF eingeschaltet ist.
● Einschaltung der REG-Funktion
Wenn “REG” nicht im Display aufleuchtet, dann die
AF-Taste 9 für 2 Sekunden oder länger gedrückt
halten, wodurch “REG” im Display aufleuchtet.
Page 50

RDS-Betrieb
● Ausschaltung der REG-Funktion
Erneut die AF-Taste 9 für 2 Sekunden oder länger gedrückt halten. Dann erlischt “REG” im
Display.
Manuelle Einstellung bezogener
Regionalsender
1. Diese Funktion ist wirksam, wenn AF ein- und
REG ausgeschaltet ist.
Hinweis:
• Diese Funktion ist wirksam, wenn bezogene
Regionalsender empfangen werden.
2. Eine der Festsendertasten ! für Abruf eines
Regionalsenders betätigen.
3. Wenn der Empfang eines abgerufenen Senders
schlecht ist, die gleiche Festsendertaste !
betätigen. Das Gerät schaltet dann auf einen bezogenen Regionalsender.
TA (Verkehrsdurchsage)
Wenn das Gerät auf TA-Bereitschaftsmodus eingestellt ist, dann können Sie die Verkehrsdurchsagen
bei deren Beginn vorzugsweise hören ungeachtet
von dem Funktion-Modus.
Ebenfalls können Sie TP-Sender (Verkehrsprogramme) automatisch einstellen.
● Einstellung auf TA-Bereitschaftsmodus
Wenn nur “TP” im Display aufleuchtet und die TATaste 7 betätigt wird, dann leuchten im Display
“TP” und “TA” auf und das Gerät ist auf TABereitschaftsmodus eingestellt, bis die
Verkehrsdurchsagen beginnen.
Bei Beginn der Verkehrsdurchsage wird “TRA
INFO” im Display angezeigt und danach PS
(Programmdienstname).
● Aufhebung des TA-Bereitschaftmodus
Wenn im Display “TP” und “TA” aufleuchten und
die TA-Taste 7 betätigt wird, dann erlischt “TA” im
Display und der TA-Bereitschaftsmodus wird aufgehoben.
● Einstellung der automatischen
Sendereinstellung für TP-Sender
Wenn die TA-Taste 7 betätigt wird, wenn nur “TP”
aufleuchtet oder “TP” und “TA” nicht im Display an-
gezeigt werden, dann leuchtet “TA” auf und das
Gerät stellt automatisch TP-Sender ein.
Hinweis:
• Wenn kein TP-Sender empfangen wird, setzt das
Gerät die automatische Einstellung fort. Erneut die TATaste 7 betätigen, um die automatische Einstellung
zu stoppen.
PS/AS-Funktion für TP-Sender
● Automatische Speicherung währender “TA”
aufleuchtet:
Nur TP-Sender werden automatisch gespeichert.
* Siehe PS/AS-Funktion bei Radiobetrieb.
PTY
Diese Funktion ermöglich das Hören einer eingestellten Programmart ungeachtet des Funktionmodus.
Hinweis:
• PTY-Sender sich noch nicht in allen Ländern vor-
handen. Bei TA-Bereitschaftsmodus haben TPSender gegenüber PTY-Sendern Vorrang.
* Notrufmeldungen unterbrechen alle
Betriebsarten. Sie können nur von RDS-Sendern
empfangen werden. Im Display wird “ALARM”
angezeigt und die Notrufmeldung kann dann
gehört werden.
* Für Aufhebung der ALARM Sendungen die AFTaste 9 betätigen.
Deutsch
Wenn die TA-Taste 7 betätigt wird, während
Verkehrsdurchsagen gesendet werden, dann werden diese gestoppt und das Gerät schaltet auf TABereitschaftsmodus.
49
Page 51

RDS-Betrieb
PTY-Einstellung
1. Bei Betätigung der PTY-Taste 8 leuchtet “PTY”
auf und erscheint im Display. Das Gerät schaltet
dann auf PTY-Einstellmodus.
Wenn die Schaltsteuerung für 7 Sekunden nach
Eingabe des PTY Einstellmodus keine
Einstellung ausführt, dann das Display automatisch auf die Radiobetriebanzeige zurück und das
Gerät schaltet auf PTY-Bereitschaftsmodus.
2. PTY-Einstellung vornehmen.
Eine der Festsendertasten ! betätigen, um den
Deutsch
gewünschten PTY-Sender einzustellen oder
Taste für oben oder unten wählen, um den jeweiligen PTY-Sender mittels dem Drehknopf %
abzustimmen.
* Folgende Speicherung wurden schon für Sie bei
den Feststendertasten ! vorgenommen.
FestsenderNr.
1
2
3
4
5
6
ENGLISH
NEWS
INFO
CLASSICS
SPORT
POP M
M, O, R, M
3. Erneut die PTY-Taste 8 betätigen, um den
Bereitschaftsmodus für den eingestellten PTYSender einzugeben.
Wenn ein eingestellter PTY-Sender beginnt, wird
der eingestellte PTY-Sender sowie die
Senderkennung im Display angezeigt.
Wird die PTY-Taste 8 während Empfang eines
PTY-Senders betätigt, dann wird der PTY-Sender
zeitweilig gestoppt und das Gerät schaltet auf
PTY-Bereitsschaftsmodus.
● Aufhebung des PTY-Bereitschaftsmodus
Die PTY-Taste 8 für 2 Sekunden oder länger gedrückt halten, um “PTY” im Display auszuschalten.
PTY
(Deutsch)
(NACHRICHTEN)
(INFORMATIONEN)
(KLASSIK)
(SPORT)
(POPMUSIK)
Middle of the Road Music
(Unterhaltungsmusik)
Feststenderspeicher für PTY-Sender
1. Die PTY-Taste 8 für Eingabe des PTYEinstellmodus betätigen.
Wenn die Schaltsteuerung für 7 Sekunden nach
Eingabe des PTY-Einstellmodus keine
Einstellung ausführt, dann kehrt das Display automatisch auf Radiobetriebanzeige zurück und
das Gerät schaltet auf PTY-Bereitschaftsmodus.
2. Die Taste für oben oder unten wählen, um den
gewünschten PTY-Sender mittels dem Drehknopf
% abzustimmen
Die folgenden 15 PTY-Sender sin einstellbar.
PTY-Display
ENGLISH
(
NEWS
AFFAIRS
INFO
SPORT
EDUCATE
DRAMA
CULTURE
SCIENCE
VARIED
POP M
ROCK M
M, O, R, M
LIGHT M
CLASSICS
OTHER M
NACHRICHTEN
(AKTUELLES)
(INFORMATIONEN)
(SPORT)
(ERZIEHUNG)
(DRAMA)
(KULTUR)
(WIESSENSCHAFT)
(VERSCHIEDENES)
(POPMUSIK)
(ROCKMUSIK)
Middle of the Road Music
(
Unterhaltungsmusik
(LEICHTE MUSIK)
(KLASSIK)
(ANDERE MUSIK)
3. Eine der Festsendertasten ! von 1 bis 6 für die
Speicherung für 2 Sekunden oder länger gedrückt halten. Nach Speicherung der PTY-Sender
wird “PTY MEMO” im Display angezeigt.
(Deutsch)
)
)
50
Page 52

Sendersuchlauf für PTY-Sender
1. Die PTY-Taste 8 für Eingabe des PTYEinstellmodus betätigen.
2. Einen PTY-Sender einstellen.
3. Die Suchfunktionstase $ links oder rechts
drücken, sobald der gewünschte empfangbare
PTY-Sender lokalisiert worden ist, wonach dieser automatisch abgestimmt wird. Nach Drücken
der Suchfunktionstaste links werden PTY-Sender
auf höheren Frequenzkanälen, nach Drücken der
Suchfunktionstaste rechts werden sie auf niedrigeren Frequenzkanälen gesucht.
Wenn keine Sender eine eingestellte PTY-Wahl
übertragen, dann stoppt der Sendersuchlauf
beim vorherigen Sender und das Gerät bleibt auf
PTY-Bereitschaftsmodus eingestellt.
RDS-Betrieb
Einstellung der Lautstärke für TA,
ALARM (Notdiffusion) und PTY
Lautstärke, Verwendung bei den Unterbrechungen
von TA, ALARM und PTY, kann während diesen
Unterbrechungen festgelegt werden.
Die bei der Fertigung verwendete Grundeinstellung
ist “15“
Bei einer Unterbrechung von TA, ALARM oder PTY,
den Drehknopf # im Uhrzeigersinn oder gegen
den Uhrzeigersinn drehen bis die gewünschte
Lautstärke erreicht ist (von 0 bis 33)
* Am Ende der Unterbrechung von TA, ALARM
oder PTY, erfolgt die Rückkehr zur vorhergehenden Lautstärke.
Deutsch
51
Page 53

CD-Betrieb
CD-Modus
Einlegen einer CD
Eine CD bei der Mitte des CD-Einlegschlitzes 4 mit
Deutsch
dessen Aufkleber nach oben weisend einlegen.
Dann wird im Display “LOADING” angezeigt, die CD
in den Schlitz gezogen und die Wiedergabe beginnt.
Für CDs (12 cm)
Hinweise:
• Darauf achten, daß Ihre Hand oder Finger sowie
Fremgegenstände nicht in den CD-Einlegeschlitz
4 gelangen.
• Wenn schon eine CD eingelegt wurde, kann keine
andere CD eingelegt werden. Niemals eine andere CD mit Gewalt einführen.
• CDs, die nicht die Markierung besitzen, kön-
nen mit diesem Gerät nicht wiedergegeben werden. CD-ROMs können ebenfalls nicht wiedergegeben werden.
• Es ist möglich, daß CDs, die in der CD-R-
Betriebsart aufgezeichnet wurde, nicht verwendet
werden können. Selbst bei Aufzeichnung in der
CD-R/W-Betriebsart kann es vorkommen, daß
CDs nicht verwendet werden können.
• Einzel-CDs (8 cm) sollten mit einem Adapter bei
der rechten Seite des Schlitzes eingegeben werden.
Für Einfach-CDs (8 cm)
CD-einlegeöffnung 4
Anspielanzeige
Wiederholung-Anzeige
Hören von schon eingelegten CDs
Die FNC-Taste 3 betätigen und CD-Modus einstellen. Die Wiedergabe beginnt dann automatisch.
Wenn keine CD eingelegt ist, wird im Display “NO
DISC” angezeigt.
Pausenwiedergabe
1. Für Pausenwiedergabe die Wiedergabe/Pause-
Taste ¥ betätigen.Dann wird “PAUS” im Display
angezeigt.
2. Für Fortsetzung der Wiedergabe erneut die
Wiedergabe/Pause-Taste ¥ betätigen.
CD-Auswurf
1. Für den Auswurf der CD die Auswurftaste 5
betätigen. Im Display wird “EJECT” angezeigt.
* Wenn eine CD 15 Sekunden lang in der
Auswurfposition verbleibt, wird sie automatisch
erneut geladen (automatische Neuladung).
* Der Radiobetrieb wird automatisch 4 Sekunden
nach Betätigung der Auswurftaste 5 eingestellt.
Hinweis:
• Einzel-CDs (8 cm) werden nicht erneut geladen.
Deshalb diese nachdem Auswurf entfernen.
ZufallswiedergabeAnzeige
52
Page 54

CD-Betrieb
Titelwahl
● Nächster Titel:
Die Suchfunktionstaste $ rechts drücken.
● Laufender Titel:
Die Suchfunktionstaste $ links drücken.
● Voriger Titel:
Die Suchfunktionstaste $ links so oft wie erforderlich betätigen.
* Jedesmal wenn mit dem SRCH-tasten links oder
rechts eingestellt wird, wird der Titel entsprechend übersprungen.
Vorlauf/Rücklauf (FF/FB)
● Vorlauf:
Die Suchfunktionstaste $ rechts betätigen und für
1 Sekunde oder länger gedrückt halten.
● Rücklauf:
Die Suchfunktionstaste $ links betätigen und für
1 Sekunde oder länger gedrückt halten.
* Zur Erhöhung der Geschwindigkeit die Such-
funktionstaste $ links oder rechts mindestens 3
Sekunden lang gedrückt halten.
TOP-Funktion
Durch die TOP-Funktion kann der erste Titel der
derzeitigen CD wie dergegeben werden.
Die TOP-Taste # betätigen, um den ersten Titel
(Titel-Nr.1) der CD wiederzugeben.
Wiederholte Wiedergabe
Durch die Wiederholungswiedergabe kann der eingestellte Titel wiederholt wiedergegeben werden.
1. Die RPT-Taste 9 betätigen, wodurch “RPT” im
Display aufleuchtet.
2. Für Aufhebung der Wiederholungswiedergabe,
erneut die RPT-Taste 9 betätigen. “RPT” erlischt im Display und die normale Wiedergabe
wird fortgesetzt.
Zufallswiedergabe
Durch die Zufallswiedergabe können alle Titel der
derzeitigen CD in zufälliger Reihenfolge wiedergegeben werden.
1. Die RDM-Taste 8 betätigen, wodurch “RDM”
im Display aufleuchtet.
2. Für Aufhebung der Zufallswiedergabe erneut die
RDM-Taste 8 betätigen. “RDM” erlischt dann
im Display und die normale Wiedergabe wird fortgesetzt.
Deutsch
Anspielwiedergabe
Durch die Anspielwiedergabe können die ersten 10
Sekunden aller.
Titel auf der CD wiedergegeben werden.
* Die Anspielwiedergabe ist besonders zweckmäßig,
wenn Sie einen gewünschten Titel einstellen möchten.
1. Die SCN-Taste 0 betätigen, wodurch “SCN” im
Display aufleuchtet.
2. Für Aufhebung der Anspielwiedergabe, erneut
die SCN-Taste 0 betätigen. “SCN” erlischt dann
im Display und die normale Wiedergabe wird fortgesetzt.
53
Page 55

CD-CHANGER-Betrieb
CD-CHANGER-Modus (wo vorgesehen)
CD-Nummer-Anzeige
Hören einer CD des CD-
Deutsch
Es kann eine CD abgespielt werden, wenn ein CD
CHANGER am Autoradio angeschlossen ist..
1. Die FNC-Taste 3 betätigen und CDModus für Start der Wiedergabe einstellen.
* Die CD-Nummern des Magazins, wo sich die
CDs befinden, leuchten im Display auf.
2. Wenn im CD-CHANGER kein Magazin eingestellt
ist, wird im Display “NO MAGA” angezeigt.
* Wenn ein Magazin eingestellt wird, während
“NO MAGA” angezeigt wird, wird kurz “LOADING” im Display angezeigt und danach
“PAUS” und der Betrieb stoppt.
3. Wenn keine CD im Magazin eingestellt ist, wird
“NO DISC” im Display angezeigt.
* Eine CD in das Magazin einlegen und das
Magazin im CD-Wechsler einstellen.
CHANGER
éVORSICHT
CD-ROMS können nicht mit dem CD-CHANGER
wiedergegeben werden.
Hinweis:
• Bei Anschluß eines CD-CHANGER, das Hauptgerät
ausschalten und dann wieder einschalten.
Anzeige für CD-CHANGER-Betrieb
Anspielanzeige
Wiederholung-Anzeige
Pausenwiedergabe
1. Für Pausenwiedergabe die Wiedergabe/Pause-
CHANGER-
Taste ¥ betätigen.Dann wird “PAUS” im Display
angezeigt.
2. Für Fortsetzung der Wiedergabe erneut die
Wiedergabe/Pause-Taste ¥ betätigen.
Wahl einer CD
Jede Festsender-Taste ! entspricht einer im
Magazin befindlichen CD.
● Wahl einer Disc von 1 bis 6
Zur Wahl der gewünschten Disc die entsprechende
Festsender-Taste ! (1 bis 6) drücken.
● Wahl eines Magazins von 1 bis 3 (nur wenn
eine Disc in das Magazin eingelegt ist)
Die BND-Taste # zur Wahl des gewünschten
Magazins betätigen.
* Wenn sich keine CD im Magazinschlitz befindet,
dann ist die Betätigung der Festsender-Taste !,
die dieser CD-Nummer entspricht, nicht wirksam.
MagazinnummerAnzeige
CD-Anzeige
ZufallswiedergabeAnzeige
54
Wahl eines Titels
● Nächster Titel:
Die Suchfunktionstaste $ rechts drücken.
● Laufender Titel:
Die Suchfunktionstaste $ links drücken.
● Voriger Titel:
Die Suchfunktionstaste $ links so oft wie erforderlich betätigen.
* Bei jeder Betätigung der Suchfunktionstaste $
links oder rechts wird ein Titel in der entsprechenden Richtung übersprungen.
Page 56

CD CHANGER-Betrieb
Vorlauf/Rücklauf (FF/FB)
● Vorlauf:
Die Suchfunktionstaste $ rechts betätigen und für
1 Sekunde oder länger gedrückt halten.
● Rücklauf:
Die Suchfunktionstaste $ links betätigen und für 1
Sekunde oder länger gedrückt halten.
* Zur Erhöhung der Geschwindigkeit des Vorlaufs
oder Rücklaufs die Suchfunktionstaste $ links
bzw. rechts mindestens 3 Sekunden lang
gedrückt halten.
Wahl eines Magazins
Diese Funktion kann nur eingesetzt werden, wenn
der angeschlossene CD-CHANGER mehrere
Magazine aufnehmen kann.
Bei jedem Drücken der MAG-Taste # wird das
nächste Magazin gewählt.
TOP-Funktion
Durch die TOP-Funktion kann der erste Titel der
derzeitigen CD wiedergegeben werden.
Für Wiedergabe des ersten Titels (Titel-Nr.1) einer
CD die TOP-Taste # betätigen.
Anspielwiedergabe
Durch die Anspielwiedergabe können die ersten 10
Sekunden aller Titel auf der CD wiedergegeben
werden.
* Die Anspielwiedergabe ist besonders zweckmäßig,
wenn ein bestimmter Titel eingestellt werden soll.
1. Die SCN-Taste 0 betätigen, wodurch “SCN” im
Display aufleuchtet.
2. Für Aufhebung der Anspielwiedergabe erneut die
SCN-Taste 0 betätigen. Dann erlischt “SCN” im
Display und die normale Wiedergabe wird fortgesetzt.
CD-Anspielwiedergabe
Durch die CD-Anspielwiedergabe können die ersten 10 Sekunden der ersten Titel auf allen CDs im
CD-Wechsler wiedergegeben werden.
* Die CD-Anspielwiedergabe ist zweckmäßig wenn
eine bestimmte CD eingestellt werden soll.
1. Die SCN-Taste 0 für 2 Sekunden oder länger
gedrückt halten. Dann werden im Display “DISC”
und “SCN” angezeigt.
2. Für Aufhebung der CD-Anspielwiedergabe,
erneut die SCN-Taste 0 betätigen. Dann erlöschen “DISC” und “SCN” im Display und die
normale Wiedergabe wird fortgesetzt.
Wiederholungswiedergabe
Durch die Wiederholungswiedergabe kann ein gewählter Ttiel wiederholt wiedergegeben werden.
1. Die RPT-Taste 9 betätigen, wodurch “RPT” im
Display aufleuchtet.
2. Für Aufhebung der Wiederholungswiedergabe,
erneut die RPT-Taste 9 betätigen. Dann erlischt
“RPT” im Display und die normale Wiedergabe
wird fortgesetzt.
CD-Wiederholungswiedergabe
Durch die CD-Wiederholungswiedergabe kann
die derzeitig gewählte CD wiederholt wiedergegeben werden.
1. Die RPT-Taste 9für 2 Sekunden oder länger gedrückt halten. Dann wird im Display “DISC” und
“RPT” angezeigt.
2. Für Aufhebung der CD-Wiederholungswiedergabe,
erneut die RPT-Taste 9betätigen.Dann erlöschen
“DISC” und “RPT” im Display und die normale
Wiedergabe wird fortgesetzt.
Zufallswiedergabe
Durch die Zufallswiedergabe können alle Titel der
derzeitig eingestellten CD in zufälliger Reihenfolge
wiedergegeben werden.
1. Die RDM-Taste 8 betätigen, wodurch “RDM”
im Display aufleuchtet.
2. Für Aufhebung der Zufallswiedergabe, erneut die
RDM-Taste 8 betätigen. Dann erlischt “RDM”
im Display und die normale Wiedergabe wird
fortgesetzt.
CD-Zufallswiedergabe
Durch die CD-Zufallswiedergabe können alle Titel auf
allen CDs im CD-CHANGER in zufälliger Reihenfolge
wiedergegeben werden.
1. Die RDM-Taste 8 für 2 Sekunden oder länger
gedrückt halten. Dann wird im Display “DISC”
und “RDM” angezeigt.
2. Für Aufhebung der CD-Zufallswiedergabe, er-
neut die RDM-Taste 8 betätigen. Dann erlöschen “DISC” und “RDM” im Display und die
normale Wiedergabe wird fortgesetzt.
Hinweis: MD-
• Wenn MD-CHANGER an dieses Gerät angeschlos-
sen ist, den Modus am MD-CHANGER auf “A” (CDModus) einstellen. Der MD-CHANGER kann dann im
CD-CHANGER betrieben werden. In einem solchen
Fall können jedoch keine Titel angezeigt werden.
Es ist nicht möglich, einen CDtig mit einem MD-CHANGER an dieses Gerät anzuschließen.
CHANGER
CHANGER gleichzei-
Deutsch
55
Page 57

7. FEHERLERSUCHE
Störung Ursache Behebung
Keine Stromzufuhr.
(Keine Wiedergabe.)
CD kann nicht
eingelegt werden.
Titel wird übersprungen
oder starkes Rauschen.
Schlechte Klangwiedergabe,
besonders nach
Einschaltung.
Deutsch
Kein Betrieb bei
Tastenbetätigung.
Sicherung durchgebrannt.
Falsche Verdrahtung.
Es wurde schon eine andere
CD eingelegt.
CD ist verschmutzt.
CD ist stark zerkratzt oder
verformt.
Auf der internen Linse können
sich Wassertropfen geformt
haben nachdem das Fahrzeug
an einem feuchten Ort geparkt
wurde.
Störung beim Mikroprozessor
aufgrund Rauschen, usw.
Gegen eine Sicherung mit gleicher Amperezahl austauschen. Sollte die Sicherung erneut durchbrennen,
dann wenden Sie sich bitte an das Geschäft, wo sie
gekauft wurde.
Wenden Sie sich bitte an das Geschäft, wo das
Gerät gekauft wurde.
Die CD vor Einlegen der neuen auswerfen.
Die CD mit einem weichen Tuch reinigen.
Gegen eine CD ohne Kratzer austauschen.
Ca. für 1 Stunden bei eingeschaltetem Gerät trocknen lassen.
Das Gerät auschalten und dann die BedienteilEntriegelungstaste 1 für Entfernung des DCP
(abnehmbares Bedienteil) betätigen.
Die Neueinstellungstaste mittels eines kleinen
Stabs für ca. 2 Sekunden drücken.
Die Anzeige ist nicht korrekt.
56
Die Anschlüsse des DCP
oder der Haupteinheit sind
verschmutzt.
Neueinstellungstaste
Mit einem weichen Tuch sauberwischen, das mit
Reinigungsalkohol angefeuchtet ist.
Page 58

8. FEHLERANZEIGEN
Bei Auftreten eines Fehlers werden folgende Anzeigen gemacht. Für Behebung der Störung die unten beschriebenen Maßnahmen ausführen.
Fehleranzeige
CD ER2
CD ER3
CD ER6
Wenn eine andere Fehleranzeige als die oben beschriebenen eingestellt wird, die Neueinstellungstaste
betätigen. Sollte die Störung nicht behoben werden, Ausschaltung vornehmen und das Geschäft benachrichtigem, wo Sie das Gerät gekauft haben.
Wird angezeigt, wenn sich eine CD im CD-Deck
festgeklemmt hat und nicht ausgeworfen wird.
Wird angezeigt, wenn die CD aufgrund von
Kratzern, usw. nicht wiedergegeben werden
kann.
Wird angezeigt, wenn eine CD im CD-Deck verkehrt herum eingelegt wurde und nicht wiedergegeben werden kann.
Ursache Behebung
Dies ist eine Störung beim Mechanismus des
CD-Decks. Wenden Sie sich deshalb an das
Geschäft, wo Sie das Gerät gekauft haben.
Gegen eine CD ohne Kratzer und Verformungen
austauschen.
Die CD auswerfen und erneut korrekt einlegen.
Deutsch
57
Page 59

Grazie per avere acquistato il Clarion PU2312.
* Prima di utilizzare l’apparecchio, leggete il presente manuale.
* Dopo aver letto il manuale, tenetelo sempre a portata di mano (ad es. vano portaoggetti).
* Verificate il contenuto della garanzia allegata e conservatela insieme al manuale.
* Il presente manuale comprende le modalità operative del CD/MD
Il CD/MD
le funzioni.
CHANGER, consultate l’apposito manuale che, tuttavia, non comprende le spiegazioni concernenti
CHANGER collegato via cavo C-BUS. Per
Indice
1. PRECAUZIONI ........................................................................................................................ 58
2. COMPACT DISC ..................................................................................................................... 59
3. CONTROLLI ............................................................................................................................ 5
4. FRONTALINO ESTRAIBILE (DCP) ......................................................................................... 60
5. NOMENCLATURA .................................................................................................................. 61
Descrizione dei tasti.................................................................................................................. 61
Voci del display ........................................................................................................................ 61
6. FUNZIONI ................................................................................................................................62
Funzioni di base........................................................................................................................ 62
Funzioni radio............................................................................................................................ 64
Funzioni RDS............................................................................................................................ 66
Funzioni CD .............................................................................................................................. 70
Funzioni del CD CHANGER.......................................................................................................... 72
7. IN CASO DI DIFFICOLTÀ ....................................................................................................... 74
8. VISUALIZZAZIONE DEGLI ERRORI ...................................................................................... 75
Italiano
9. SPECIFICHE ........................................................................................................................... 149
1. PRECAUZIONI
1. Se all’interno dell’autovettura fa molto freddo
ed il riproduttore viene utilizzato poco dopo
aver acceso il riscaldamento, sul disco o sulle
componenti ottiche del riproduttore potrebbe
formarsi una patina di umidità per cui l’ascolto
potrebbe non essere ottimale. Se l’umidità si
formasse sulle componenti ottiche del riproduttore, non usatelo per almeno un’ora. In tal
modo la condensa sparirà naturalmente e si
ripristinerà il normale funzionamento.
58
2. La guida su strade dissestate che comporta
forti vibrazioni potrebbe causare salti dei suoni.
Page 60

2. COMPACT DISC
Modo corretto di tenere
il compact disc
Estrazione del disco
Questo apparecchio è stato progettato specificatamente per la riproduzione dei compact disc che
recano il marchio . Gli altri dischi non possono essere riprodotti.
Per estrarre il compact disc dalla custodia, premete sul centro della stessa e sollevate il disco
tenendolo con cura dai bordi.
Prendete il compact disc sempre dai bordi. Non
toccate mai la superficie.
Per rimuovere le impronte digitali e la polvere, utilizzate un panno soffice a partire dal centro del
compact disc verso la circonferenza.
Errato
Note sui compact disc
Non incollate etichette sulla superficie del compact disc né scrivete sulla superficie con matite o
penne.
Errato
Non usate solventi quali smacchiatori, spray antistatici o diluenti in commercio per pulire i compact
disc.
Errato
Italiano
Non usate compact disc molto graffiati, incrinati,
deformati, ecc. L’uso di tali dischi comporterà malfunzionamento o danni.
Errato
I dischi nuovi possono risultare ruvidi intorno ai
bordi. Quando si utilizzano questi dischi, l’apparecchio potrebbe non funzionare o il suono
potrebbe saltare. Per rimuovere la ruvidità dal
bordo del disco usate una penna a sfera, ecc.
Non esponete i compact disc alla luce del sole
Penna a sfera
Ruvidità
Nota:
• Non usate i fogli protettivi dei CD in commercio o dischi dotati di stabilizzatori, ecc. in quanto potrebbero
incastrarsi nel meccanismo interno e danneggiare il disco.
diretta o a qualsiasi fonte di calore.
Errato
59
Page 61

4. FRONTALINO ESTRAIBILE (DCP)
Il frontalino può essere rimosso per prevenire
eventuali furti. Quando rimuovete il frontalino,
conservatelo nella custodia apposita FRONTALINO ESTRAIBILE (DCP) in modo da prevenire
eventuali graffi.
Quando lasciate l’autovettura vi raccomandiamo
di portare con voi il DCP.
Rimozione del frontalino (DCP)
1. Tenere premuto il tasto POWER 3 per 1
secondo o più a lungo per spegnere l’apparecchio.
2. Spingere a fondo il tasto di rilascio del frontali-
no (DCP) 1.
Tasto di rilascio del frontalino
(DCP) 1
Italiano
3. Rimuovere il frontalino.
DCP
é PRECAUZIONE
• Il frontalino può essere danneggiato facilmente dagli urti. Dopo averlo rimosso, fate
attenzione a non farlo cadere o a sottoporlo
a forti urti.
• Quando il tasto di sgancio viene premuto e il
frontalino è sbloccato, le vibrazioni dell’automobile potrebbero farlo cadere. Per evitare un possibile danneggiamento del frontalino, si raccomanda di conservarlo nell’apposita custodia dopo averlo staccato.
(Vedi figura)
Custodia del DCP
• Il connettore che collega l’apparecchio principale ed il frontalino estraibile è una componente estremamente importante. Fate
attenzione a non danneggiarla premendo
con le unghie, cacciaviti, ecc.
Nota:
• Se il DCP fosse sporco, rimuovete la sporcizia sol-
tanto con un panno asciutto e soffice.
Inserimento del frontalino estraibile
1. Inserite il lato destro del DCP nell’apparecchio
principale.
2. Inserite il lato sinistro del DCP nell’apparecchio
principale.
2.
1.
60
Page 62

5. NOMENCLATURA
Nota: Leggete il presente capitolo che fa riferimento agli schemi del capitolo “3. CONTROLLI” a pagina 5
(da dischiudere).
Descrizione dei tasti
1 Tasto di rilascio del frontalino (DCP)
2 Tasto A-M (Modalità audio)
Tasto LD (Livello sonoro)
3 Tasto POWER (Alimentazione)
Tasto FNC (Funzione)
4 Vano d’inserimento CD
5 Tasto di espulsione (Q)
6 Tasto DISP (Display)
7 Tasto TA (Notiziario di informazioni sul traffi-
co)
8 Tasto PTY (Tipo programma)
Tasto RDM (Riproduzione casuale)
9 Tasto AF (Frequenza alternativa)
Tasto RPT (Ripetizione)
Voci del display
1 Indicazione di volume (VOL)
2 Indicazione modalità audio (A-M)
3 Indicazione altoparlanti posteriori (R)
Indicazione altoparlanti anteriori (F)
4 Indicazione stato operativo
* Vengono visualizzati la frequenza, il tipo di
programma, il tempo di riproduzione, l’orologio, ecc.
5 Indicazione livello sonoro (LD)
6 Indicazione potenziatore Z (Z-EHCR)
7 Indicazione di modo del CD/MD
8 Indicazione di numero contenitore
9 Indicazione di disco (DISC)
0 Indicazione di riproduzione casuale (RDM)
! Indicazione di ripetizione (RPT)
CHANGER
0 Tasto PS/AS (Scansione delle stazioni pre-
selezionate/Memorizzazione automatica)
Tasto SCN (Scansione)
! Tasti di preselezione (da 1 a 6)
Tasti diretti (da 1 a 6)
@ Tasto Z-EHCR (Potenziatore Z)
# Tasto BND (Banda)
Tasto TOP (Ritorno all’inizio)
Tasto MAG (Cassetta di caricamento)
$ Tasti di ricerca (verso sinistra a e verso
destra d)
% Manopola rotante
¥ Tasto Riproduzione/Pausa (s)
Tasto di silenziamento (MUTE)
@ Indicazione di scansione (SCN)
# Indicazione canali preselezionati (da 1 a 6)
Indicazione numero disco (da 1 a 6)
* I numeri dei dischi corrispondono ai dischi
nel CD/MD
$ Indicazione tipo programma (PTY)
% Indicazione stazioni con bollettini sul traffico
(TP)
¥ Indicazione di bollettino sul traffico (TA)
& Indicazione di stazione regionale (REG)
* Indicazione frequenza alternativa (AF)
( Indicazione manuale (MANU)
) Indicazione altoparlante sinistro (L)
Indicazione altoparlante destro (R)
CHANGER
Italiano
61
Page 63

6. FUNZIONI
Nota: Leggete il presente capitolo relativo agli schemi frontali del capitolo “3. CONTROLLI” a pagina 5
(da dischiudere).
Funzioni di base
éPRECAUZIONE
Prima di spegnere l’apparecchio, regolate il
volume al minimo. Se il volume è troppo alto
quando accendete l’apparecchio, l’ascolto
non sarà ottimale e l’apparecchio potrebbe
subire danni.
Accensione/spegnimento
Nota:
• Non utilizzare per troppo tempo l’autoradio con
motore spento; ciò potrebbe provocare difficoltà
di avviamento della vettura e ridurre la durata della
batteria.
1. Premere il tasto POWER 3.
2. Il display dell’apparecchio si accende.
L’apparecchio memorizza automaticamente la
Italiano
sua ultima modalità operativa e passerà subito
alla visualizzazione di quella modalità.
3. Premere e tenere premuto il tasto POWER 3
per 1 secondo o più a lungo per spegnere l’apparecchio.
Selezione modalità di ascolto
1. Per selezionare una modalità, premete il tasto
FNC 3.
2. Il modo di funzione varia secondo il seguente
ordine:
Radio ➜ CD ➜ CD/MD
* Se il CD/MD CHANGER non è collegato, la
modalità di CD/MD
selezionata.
CHANGER ➜ Radio …
CHANGER non può essere
Regolazione del volume
Ruotare la manopola % in senso orario per
aumentare il volume, ruotarla in senso antiorario
per diminuire il volume.
* I livelli del volume vanno da 0 (minimo) a 33 (mas-
simo).
Impostazione del potenziatore Z
L’unità viene fornita con 3 tipi di effetti di tono
sonoro immagazzinati in memoria. Selezionare
quello che si preferisce.
* L’impostazione predefinita alla fabbrica è “OFF”.
Ogni volta che si preme il tasto Z-EHCR @, l’effetto tono cambia nell’ordine seguente:
“Z-ENHANCER 1” ➜ “Z-ENHANCER 2” ➜
“Z-ENHANCER 3” ➜ “OFF” ➜ “Z-ENHANCER 1”...
• Z-ENHANCER 1 : potenziamento dei bassi
• Z-ENHANCER 2 : potenziamento degli alti
• Z-ENHANCER 3 : potenziamento degli alti e
dei bassi
• OFF : nessun effetto audio
Regolazione del tono
Premere il tasto A-M 2 e selezionare la voce da
regolare.
Ogni volta che si preme il tasto A-M 2, le voci
cambiano nell’ordine seguente:
“BASS” ➜ “TREB” ➜ “BAL” ➜ “FAD” ➜
Modalità funzione...
Regolazione dei bassi
1. Premere il tasto A-M 2 e selezionare “BASS”.
2. Ruotando la manopola % in senso orario si
aumentano i bassi, ruotandola in senso antiorario si diminuiscono i bassi.
* L’impostazione predefinita alla fabbrica è “0”.
(Gamma di regolazione: da –6 a +6)
3. Quando si è completata la regolazione, premere il tasto A-M 2 diverse volte fino a che si raggiunge la funzione modalità.
Regolazione degli alti
1. Premere il tasto A-M 2 e selezionare “TREB”.
2. Ruotando la manopola % in senso orario si
aumentano gli alti, ruotandola in senso antiorario si diminuiscono gli alti.
* L’impostazione predefinita alla fabbrica è “0”.
(Gamma di regolazione: da –6 a +6)
3. Quando si è completata la regolazione, premere il tasto A-M 2 diverse volte fino a che si raggiunge la funzione modalità.
62
Page 64

Funzioni di base
Regolare il bilanciamento
1. Premere il tasto A-M 2 e selezionare “BAL”.
2. Ruotando la manopola % in senso orario si
aumenta il volume dell’altoparlante destro; ruotandola in senso antiorario si aumenta il volume
dell’altoparlante sinistro.
* L’impostazione predefinita alla fabbrica è “0”.
(Gamma di regolazione: da L9 a R9)
3. Quando si è completata la regolazione, premere il tasto A-M 2 diverse volte fino a che si raggiunge la funzione modalità.
Regolazione della dissolvenza
1. Premere il tasto A-M 2 e selezionare “FAD”.
2. Ruotando la manopola % in senso orario si
aumenta il volume degli altoparlanti anteriori,
mentre ruotandola in senso antiorario si
aumenta il volume degli altoparlanti posteriori
* L’impostazione predefinita alla fabbrica è “0”.
(Gamma di regolazione: da F9 a R9)
3. Quando si è completata la regolazione, premere il tasto A-M 2 diverse volte fino a che si raggiunge la funzione modalità.
Loudness
L’effetto del loudness mette in risalto i bassi e gli
acuti per creare un tono sonoro naturale.
Consigliamo di usare l’effetto del loudness ogni
volta che ascoltate la musica a basso volume.
● Attivazione e disattivazione dell’Effetto
del Loudness
Tenendo premuto il tasto LD 2 per 2 secondi o
più, l’effetto del loudness si attiverà o si disattiverà. Quando l’effetto del loudness è attivato, sul
display apparirà “LD”.
Display di commutazione
Premere il tasto DISP 6 per selezionare il display
desiderato.
Il display cambia nell’ordine di seguito indicato :
Principale ➜ Orologio (CT) ➜ Principale …
* Se il display viene commutato con altri tasti di
funzione quando appare l’orologio (CT), quest’ultimo riapparirà automaticamente dopo questa
operazione.
* L’esempio mostra il display nella modalità radio.
Funzione CT (Clock Time)
La funzione CT consente di visualizzare l’orologio
soltanto quando si ricevono i dati CT.
Per visualizzare la funzione CT agire sul tasto
DISP 6.
* Quando i dati CT non vengono ricevuti, sul display
verrà visualizzato “CT--:--”.
Nota:
• In alcuni paesi e stazioni i dati dell’orologio non
vengono trasmessi. In alcune aree, il CT potrebbe
pertanto risultare visualizzato in modo errato.
Azzeramento automatico
del volume durante le telefonate
Nel caso in cui sia presente il telefono cellulare, il
volume della modalità selezionata, durante le
telefonate, viene azzerato automaticamente e la
scritta TEL MUTE viene visualizzata sul display.
Per abilitare la funzione tenere premuto il tasto #
contemporaneamente al numero 5 dei tasti di preselezione !.
Italiano
63
Page 65

Funzioni radio
Modalità radio
Indicazione della sintonizzazione automatica
Indicazione TP
Ascolto della radio
1. Per selezionare la modalità radio premete il
tasto FNC 3. La frequenza o PS appariranno
sul display.
* PS: Nome Servizio Programma
2. Per selezionare una banda premete il tasto
Italiano
BND #.La banda subirà le seguenti modifiche:
FM1 ➜ FM2 ➜ FM3 ➜ AM (OM/OL) ➜ FM1 …
3. Per sintonizzarsi sulla stazione desiderata
agire sul tasto di ricerca $ sinistro o destro.
Sintonizzazione
Sono disponibili tre modi di sintonizzazione: sintonizzazione automatica, sintonizzazione manuale
e sintonizzazione di preselezione.
Sintonizzazione automatica
Sono disponibili 2 tipi di sintonizzazione automatica: SINTONIZZAZIONE AUTOMATICA DISTANTE (DX SEEK) e SINTONIZZAZIONE AUTOMATICA LOCALE (LOCAL SEEK).
La funzione DX SEEK può sintonizzarsi automaticamente sulle stazioni emittenti ricevibili; LOCAL
SEEK, può invece, sintonizzarsi solo sulle stazioni
emittenti con una buona sensibilità di ricezione.
1. Premere il tasto BND # e selezionare la banda
desiderata (FM o AM (MW, LW)).
2. Sintonizzarsi sulla stazione desiderata.
* Se sul display appare il messaggio “MANU”,
premere e tenere premuto il tasto per 1 secondo o più BND
pare dal display ed è subito disponibile la sintonizzazione automatica.
* Se sul display appare il messaggio “TA”, vengono
ricercate automaticamente le stazioni TP.
#. Il messaggio “MANU” scom-
64
Indicazione del canale di
preselezione
● Sintonizzazione automatica distante
(DX SEEK)
Premere il tasto di ricerca (sinistra o destra) $
per ricercare automaticamente una stazione.
Premendo il tasto destro di ricerca $, la stazione
viene ricercata in direzione delle frequenze più
alte, mentre premendo il tasto sinistro di ricerca
$, la stazione viene ricercata in direzione delle
frequenze più basse.
* Quando si avvia la ricerca automatica, sul display
il messaggio “DX”.
● Sintonizzazione automatica locale
(LOCAL SEEK)
Premendo e tenendo premuto per 1 secondo o
più il tasto di ricerca (sinistra o destra) $, viene
eseguita una ricerca per la sintonizzazione locale.
Vengono selezionate solo le stazioni radio con
buona sensibilità di ricezione.
* Quando si avvia la ricerca locale, sul display viene
visualizzato il messaggio il messaggio “LO”.
Sintonizzazione manuale
1. Premete il tasto BND # per selezionare la
banda.
2. Premete e tenete premuto per almeno 2 secondi il tasto BND # .
3. L’indicazione “MANU” scompare dal display e
sarà possibile effettuare la sintonizzazione
manuale.
4. Usate il tasto di ricerca (sinistra o destra) $ per
sintonizzare le stazioni.
* Il modo ritorna automaticamente alla modalità
di sintonizzazione automatica dopo 7 secondi.
Page 66

Funzioni radio
Richiamo di una emittente preselezionata
Mediante i tasti di Preselezione si possono preselezionare fino a 24 emittenti (6 per ciascuna emittente FM1, FM2, FM3 e AM (OM/OL)).
La sintonizzazione di preselezione è una funzione
che serve a memorizzare le emittenti sui tasti di
Preselezione (da 1 a 6). Questa funzione consente di selezionare una emittente premendo il tasto
di preselezione corrispondente.
1. Per selezionare una banda premete il tasto
BND #.
2. Per selezionare una emittente memorizzata
premete uno dei tasti di preselezione !.
Nota:
• Per memorizzare l’emittente attualmente in fase di
ricezione tenete premuto per 2 secondi o più
(memoria di preselezione) il tasto di preselezione
!.
Memorizzazione manuale
1. Per selezionare una banda premete il tasto
BND #.
2. Per sintonizzarsi sulla stazione desiderata
agire sul tasto di ricerca $ sinistro o destro.
3. Per memorizzare l’emittente attualmente in
fase di ricezione, tenete premuto per 2 secondi
o più uno dei tasti di preselezione !.
Memorizzazione automatica
La memorizzazione automatica è una funzione
che serve a memorizzare fino a 6 emittenti automaticamente sintonizzate in sequenza.
Note:
• L’unica banda FM che può memorizzare le emit-
tenti è la FM3. Se tentate di memorizzare le emittenti in FM1 o FM2, queste verranno automaticamente memorizzate in FM3.
• Quando viene effettuata la memorizzazione auto-
matica, l’emittente precedentemente memorizzata
in quella posizione verrà cancellata.
• Nel caso in cui siano presenti meno di 6 emittenti
aventi una buona ricezione, le emittenti precedentemente memorizzate sui rimanenti tasti di
Preselezione non verranno cancellate.
• Una emittente già memorizzata su uno dei tasti di
Preselezione non può essere memorizzata su altri
tasti di Preselezione.
1. Per selezionare una banda dell’emittente desi-
2. Tenete premuto il tasto AS 0 per 2 secondi o
Scansione di preselezione
Questa funzione effettua la scansione di ogni
emittente preselezionata per 7 secondi in sequenza.
Questa funzione risulta utile quando ricercate una
emittente desiderata.
Nota:
• Non dimenticate che se tenete premuto per 2
1. Premete il tasto PS 0.
2. Quando viene sintonizzata una emittente che
Silenziamento (MUTE)
Questa funzione consente di silenziare immediatamente il suono dell’apparecchio.
Premete il tasto MUTE ¥. Il suono viene disattivato e sul display compare l’indicazione
“MUTE”. Per disattivare la funzione di silenziamento premete il nuovamento il tasto MUTE.
derata premete il tasto BND #.
più. Le emittenti con buona ricezione verranno
memorizzate automaticamente sui tasti di preselezione !.
secondi o più il tasto PS 0, si avvierà la funzione
di memorizzazione automatica e l’apparecchio
comincerà a memorizzare le emittenti.
desiderate ascoltare, per fermare la scansione
premete nuovamente il tasto PS 0 o il tasto di
preselezione corrispondente !.
* Una emittente che non può essere sintonizzata
viene saltata e verrà sintonizzata la successiva
emittente preselezionata.
Italiano
65
Page 67

Funzioni RDS
Modalità RDS
Indicazione della sintonizzazione automatica
Indicazione AF
Indicazione REG
Indicazione TA
RDS (Radio Data System)
Il presente apparecchio comprende un decodificatore del sistema RDS da utilizzare con le emittenti che trasmettono dati RDS.
Tale sistema consente alla radio di visualizzare il
nome dell’emittente ricevuta (PS), ed effettua una
commutazione automatica su una eventuale frequenza ottimale mentre percorrete grandi distanze (commutazione AF).
Italiano
Inoltre interrompe un CD o una cassetta per trasmettere informazioni sul traffico o il tipo di programma trasmesso da una emittente RDS.
Fra l’altro, quando si ricevono informazioni EON,
queste ultime innestano automaticamente la commutazione di altre emittenti preselezionate sulla
stessa rete ed interrompono l’emittente in fase di
ricezione con informazioni sul traffico provenienti
da altre emittenti. (TP). Questa funzione può non
essere operativa in alcune regioni.
Per poter usufruire di queste funzioni RDS , la
radio deve essere regolata sulla modalità FM.
• AF: Frequenze Alternative
• PS: Nome Servizio Programma
• PTY: Tipo di Programma
• EON: Altre Reti Espanse
• TP: Programma sul Traffico
* Nel caso in cui non si riuscisse più a ricevere chia-
ramente un’emittente RDS nella posizione attuale
sul display lampeggerà “AF”. Una volta ripristinata la ricezione, “AF” smetterà di lampeggiare.
Funzione AF
La funzione AF consente all’apparecchio di mantenere una ricezione ottimale effettuando la commutazione in diverse frequenze sulla stessa rete.
* L’impostazione di fabbrica è su “on”.
66
Indicazione del canale di
preselezione
Indicazione PTY
IndicazioneTP
● Disattivazione della funzione AF
Se “AF” è acceso o lampeggia sul display, premete il tasto AF 9. “AF” sparirà dal display e si
disattiverà.
● Attivazione della funzione AF
Se “AF” non si illumina sul display, premete nuovamente il tasto AF 9. “AF” si illuminerà sul
display e si attiverà.
Se la ricezione di una emittente sintonizzata peggiorasse, “AF” inizierà a lampeggiare e l’apparecchio tenterà di passare su una frequenza alternativa. Se la commutazione non potesse avere
luogo, il display passerà su “SEARCH” e l’apparecchio ricercherà lo stesso programma.
Funzione REG (Programma Regionale)
Se la funzione REG è attivata, la ricezione dell’emittente regionale sarà ottimale.
Se tale funzione è disattivata, l’apparecchio si sintonizzerà sull’emittente regionale nell’area locale
successiva quando entrerete nell’area successiva, mentre state ricevendo l’emittente regionale
dell’area locale precedente.
* L’impostazione di fabbrica è su “off”.
Note:
• Questa funzione non è attiva quando si riceve
un’emittente nazionale quale la BBC 2 FM.
• L’impostazione REG è effettiva quando AF è attivato.
● Attivazione della funzione REG
Se “REG” non si illumina sul display, tenendo premuto il tasto AF 9 per 2 secondi o più, “REG” si
illuminerà sul display.
● Disattivazione della funzione REG
Tenete premuto il tasto AF 9 nuovamente per 2
secondi o più. “REG” si spegnerà sul display.
Page 68

Funzioni RDS
Sintonizzazione manuale delle
emittenti regionali collegate
1. Questa funzione è attiva quando AF è attivato
e REG è disattivato.
Nota:
• Questa funzione è attiva quando si ricevono emit-
tenti regionali collegate.
2. Premete uno dei tasti di preselezione ! per
richiamare un’emittente regionale.
3. Se la ricezione di un’emittente richiamata non è
ottimale, premete lo stesso tasto di preselezione !. L’apparecchio si posizionerà su una
emittente regionale collegata.
TA (Annunci sul Traffico)
Se l’apparecchio si trova nella modalità di standby
TA, potrete ascoltare gli annunci sul traffico in via
preferenziale sin dall’inizio, a prescindere dalla
modalità che si sta ascoltando.
Potete anche sintonizzarvi automaticamente sulle
emittenti TP (programma sul traffico).
● Impostazione della modalità di standby TA
Se premete il tasto TA 7 quando sul display si
illumina soltanto “TP”, “TP” e “TA” si illumine-
ranno sul display e l’apparecchio si posizionerà
sulla modalità di standby TA fin quando avranno
inizio gli annunci sul traffico.
Una volta iniziati gli annunci sul traffico, “TRA
INFO” apparirà sul display, seguito da PS (Nome
Servizio Programma).
Se premete il tasto TA 7 durante la trasmissione
degli annunci sul traffico, questi verranno cancellati e l’apparecchio entrerà in modalità di standby
TA .
● Disattivazione della modalità di standby TA
Se premete il tasto TA 7 quando “TP”e “TA”
sono illuminati sul display, “TA” sparirà dal display
e in modalità di standby TA si disattiverà.
● Regolazione della modalità di sintonizzazione automatica per le emittenti TP
Se premete il tasto TA 7 quando solo “TP” è illuminato o “TP” e “TA” non sono illuminati sul
display, “TA” si illuminerà e l’apparecchio si sintonizzerà automaticamente sulle emittenti TP.
Nota:
• Se non riceve emittenti TP, l’apparecchio conti-
nuerà a sintonizzarsi automaticamente. Per bloccare la sintonizzazione automatica, premete nuovamente il tasto TA 7.
Funzione di memorizzazione
per le emittenti TP
● Memorizzazione automatica mentre “TA”
è illuminato:
Soltanto le emittenti TP vengono memorizzate
automaticamente.
* Fate riferimento alla funzione PS/AS della moda-
lità radio.
PTY
Questa funzione consente di ascoltare il tipo di
programma selezionato a prescindere dal modo
di funzione.
Nota:
• Le trasmissioni PTY non sono ancora disponibili in
tutti i paesi.
Nella modalità standby TA, le emittenti TP hanno
la priorità sulle emittenti di trasmissioni PTY.
* I messaggi di emergenza interrompono tutte le
modalità di operazione. Possono essere ricevuti
soltanto da emittenti RDS. “ALARM” appare sul
display ed il messaggio può essere ascoltato.
* Per cancellare le trasmissioni ALARM premete il
tasto AF 9.
Italiano
67
Page 69

Funzioni RDS
Selezione PTY
1. Quando premete il tasto PTY 8, “PTY” si illu-
minerà ed apparirà sul display. L’apparecchio si
posizionerà in modalità di selezione PTY.
Se il controllo è inattivo per 7 secondi dopo l’inserimento della modalità di selezione PTY, il
display tornerà automaticamente alla visualizzazione della modalità radio e l’apparecchio
entrerà in modalità di standby PTY.
2. Selezione di un PTY.
Per selezionare la stazione PTY desiderata
agire su uno dei tasti di preselezione !, o spostarsi verso l’alto o verso il basso utilizzando la
manopola % sino ad individuare la stazione
PTY desiderata.
Italiano
* La seguente tabella è già stata memorizzata sui
tasti di preselezione ! per facilitarne l’uso.
N°
Preselezione
1
2
3
4
5
6
ENGLISH
NEWS
INFO
CLASSICS
SPORT
POP M
M, O, R, M
3. Per entrare in modalità di standby per il PTY
selezionato premete nuovamente il tasto PTY
8.
Quando ha inizio la trasmissione PTY selezio-
nata, il PTY selezionato appare sul display e
viene visualizzato il PS.
Se durante le trasmissioni PTY premete il tasto
PTY 8, le trasmissioni PTY verranno temporaneamente cancellate e l’apparecchio entrerà in
modalità di standby PTY.
● Disattivazione della modalità
di standby PTY
Per disattivare il “PTY” che appare sul display
tenete premuto per 2 secondi o più il tasto PTY
8.
PTY
(Italiano)
(Notizie)
(Informazioni)
(Classica)
(Sport)
(Pop)
Middle of the Road Music
(Musica di strada)
Memoria di preselezione PTY
1. Per attivare la modalità di selezione PTY premete il tasto PTY 8.
Se il controllo è disattivo per 7 secondi dopo l’inserimento della modalità di selezione PTY, il
display ritornerà automaticamente alla visualizzazione della modalità radio e l’apparecchio entrerà
in modalità di standby PTY.
2. Spostarsi verso l’alto o verso il basso utilizzando la manopola % sino ad individuare la stazione PTY desiderata.
Si possono selezionare i seguenti 15 PTY.
Display PTY
ENGLISH
NEWS
AFFAIRS
INFO
SPORT
EDUCATE
DRAMA
CULTURE
SCIENCE
VARIED
POP M
ROCK M
M, O, R, M
LIGHT M
CLASSICS
OTHER M
(Notizie)
(Avvenimento di oggi)
(Informazioni)
(Sport)
(Educazione)
(Teatro)
(Cultura)
(Scienza)
(Varietà)
(Pop)
(Rock)
Middle of the Road Music
(Musica di strada)
(Musica leggera)
(Musica classica)
(Altra musica)
3. Per inserire un tipo di programma in memoria,
tenete premuto per 2 secondi o più uno dei tasti
di Preselezione ! da 1 a 6. Dopo che i PTY
sono stati memorizzati, sul display apparirà
“PTY MEMO”.
(Italiano)
68
Page 70

Sintonizzazione automatica dei PTY
1. Per attivare la modalità di selezione PTY premete il tasto PTY 8.
2. Selezionate un PTY.
3. Quando si trova un PTY desiderato o che può
essere ricevuto selezionate il tasto di ricerca $
(sinistro o destro). Verrà sintonizzato automaticamente. Se selezionate sinistra o destra, il
PTY verrà ricercato in direzione di un canale di
frequenza più alta o più bassa.
Se nessuna emittente di trasmissione ha selezionato un PTY, la sintonizzazione automatica
si arresterà sull’emittente precedente e l’apparecchio rimarrà in modalità di standby PTY.
Impostazione del volume di TA,
ALARM (diffusione di emergenza) e
PTY
Il volume utilizzato nelle interruzioni TA, ALARM e
PTY può essere definito durante tali interruzioni.
L’impostazione di default adottata in produzione è
“15”.
Durante un’interruzione TA, ALARM o PTY, ruotare la manopola # in senso orario o antiorario sino
al raggiungimento del volume desiderato (da 0 a
33).
* Al termine dell’interruzione TA, ALARM o PTY, il
livello del volume torna ad essere quello precedente.
Funzioni RDS
Italiano
69
Page 71

Funzioni CD
Modalità CD
Inserimento di un CD
Inserire un CD al centro della fessura d’inserimento CD 4 con l’etichetta rivolta verso l’alto.Sul
display appare “LOADING”, il CD entra nella fessura e la riproduzione ha inizio.
Italiano
Per CD (12 cm) Per singolo CD (8 cm)
Note:
• Non infilare la mano, le dita o altri corpi estranei
nella fessura d’inserimento CD
• Se è già stato inserito un CD, non è possibile inse-
rirne un altro. Non tentare di inserirne un altro forzando.
• I dischi che non recano il marchio non pos-
sono essere riprodotti con quest’apparecchio.
Non è possibile la riproduzione di dischi CD-ROM.
• Certi compact disc registrati con la modalità CD-R
possono risultare non utilizzabili.Certi compact disc
possono risultare non utilizzabili anche se registrati con la modalità CD-R/W.
• I CD singoli (8 cm) vanno inseriti senza adattatore
nella parte destra della fessura d’inserimento.
Fessura di inserimento
4.
Indicazione di scansione
Indicazione di riproduzione
Riproduzione di un CD già inserito
Premete il tasto FNC 3 e selezionate la modalità
CD. La riproduzione inizia automaticamente.
Se un CD non è inserito, sul display apparirà “NO
DISC”.
Pausa di riproduzione
1. Premete il tasto di riproduzione/pausa ¥ per
mettere in pausa la riproduzione. Sul display
appare “PAUS”.
4
dei CD
2. Per riprendere la riproduzione, premete nuovamente il tasto di riproduzione/pausa ¥.
Estrazione di un CD
1. Premete il tasto di espulsione 5 per espellere
il CD. Sul display appare “EJECT”.
* Se un CD viene lasciato nella posizione di espul-
sione per oltre 15 secondi, l’apparecchio lo reinserisce automaticamente (reinserimento automatico).
* 4 secondi dopo che è stato premuto il tasto di
espulsione 5, viene impostata automaticamente la modalità radio.
Nota:
• I CD singoli (8 cm) non vengono reinseriti. Non
dimenticare di rimuoverli dopo l’espulsione.
Indicazione casuale
70
Page 72

Funzioni CD
Selezione di un brano
● Brano successivo:
Selezionate il tasto di ricerca $ destro.
● Brano in fase di riproduzione:
Selezionate il tasto di ricerca $ sinistro.
● Brano precedente:
Selezionate il tasto di ricerca $ sinistro, ripetete
la stessa operazione.
* Ogni volta che selezionate i tasti SRCH, sinistro o
destro il relativo brano verrà saltato automaticamente.
Avanzamento-Riavvolgimentoveloci (FF/FB)
● Avanzamento veloce:
Premete il tasto SRCH (destro) e mantenetelo
premuto per 1 secondo o più.
● Riavvolgimento veloce:
Premete il tasto SRCH (sinistro) e mantenetelo
premuto per 1 secondo o più.
* Per aumentare la velocità premere e tenere pre-
muto per almeno 3 secondi il tasto di ricerca
sinistro o destro utilizzato.
$
Funzione di ritorno a inizio CD
La funzione di ritorno a inizio CD consente di
ascoltare il primo brano del CD in fase di riproduzione.
Per ascoltare il primo brano del CD (brano n.1)
premete il tasto TOP #.
Ripetizione brano
La ripetizione brano consente di riascoltare il
brano selezionato.
1. Premete il tasto RPT 9. “RPT” si illuminerà sul
display.
2. Per cancellare l’ascolto ripetuto, premete nuovamente il tasto RPT 9. “RPT” sparirà dal
display e si ripristinerà l’ascolto normale.
Riproduzione casuale
La riproduzione casuale consente l’ascolto
casuale di tutti i brani incisi sul CD in modo casuale.
1. Premete il tasto RDM 8. “RDM” si illuminerà
sul display.
2. Per cancellare la riproduzione casuale, premete nuovamente il tasto RDM 8. “RDM” sparirà
dal display e si ripristinerà la riproduzione normale.
Italiano
Funzione di scansione brani CD
La funzione di scansione consente l’ascolto dei
primi 10 secondi di tutti i brani incisi sul CD.
* La funzione di scansione è utile per selezionare il
brano desiderato
1. Premete il tasto SCN 0. “SCN” si illuminerà
sul display.
2. Per cancellare la funzione di scansione, pre-
mete nuovamente il tasto SCN 0. “SCN” spa-
rirà dal display e si ripristinerà l’ascolto normale.
71
Page 73

Funzioni del CD CHANGER
Modalità CD CHANGER (se collegato)
Indicazione del numero del disco
Ascolto di un CD con il CD CHANGER
Potete ascoltare un CD se un CD CHANGER è collegato all’autoradio.
1. Per avviare la riproduzione premete il tasto
FNC 3 e selezionate il modo del CD
* I numeri delle cassette di caricamento dei CD in
cui questi ultimi sono caricati si illumineranno
sul display.
2. Se nel CD CHANGER non è inserita una cassetta di caricamento, “NO MAGA” apparirà sul
display.
Italiano
* Se una cassetta di caricamento è inserita men-
tre il display visualizza “NO MAGA”, e le scritte
“LOADING” e “PAUS” appariranno sul display
e la funzione si disattiverà.
3. Quando un CD non è inserito nella cassetta di
caricamento, “NO DISC” appariranno sul
display.
* Inserite un CD nella cassetta di caricamento ed
inserite quest’ultima nel CD
é PRECAUZIONE
I CD-ROM non possono essere riprodotti con
il CD CHANGER.
Nota:
• Nel caso in cui un CD CHANGER fosse collegato,
accertatevi di spegnere l’apparecchio principale e
di riaccenderlo.
CHANGER.
Indicazione della modalità CD CHANGER
Indicazione di scansione
Indicazione di ripetizione
Pausa riproduzione
1. Premere il tasto di riproduzione/pausa ¥ per
mettere in pausa la riproduzione. Sul display
appare “PAUS”.
CHANGER.
2. Per riprendere la riproduzione, premere un’altra
volta il tasto di riproduzione/pausa ¥.
Selezione di un CD
Ogni tasto diretto ! corrisponde a un disco caricato nel caricatore.
● Selezione dei dischi da 1 a 6
Per selezionare il disco desiderato agire sul tasto
! corrispondente al disco desiderato (da 1 a 6).
● Selezione dei caricatori da 1 a 3
(solo se contenenti dischi)
Per selezionare il caricatore desiderato agire sul
tasto BND #.
* Se in uno scomparto del caricatore non è stato
inserito un CD, premendo il tasto ! corrispondente a quel numero del disco non si ha alcun
effetto.
Selezione di un brano
● Brano successivo:
Selezionate il tasto di ricerca $ destro.
● Brano in fase di riproduzione:
Selezionate il tasto di ricerca $ sinistro.
● Brano precedente:
Selezionate il tasto di ricerca sinistro $ e ripetete l’operazione.
* Ad ogni successiva pressione dei tasti di ricerca
$ sinistro o destro, il relativo brano viene automaticamente saltato.
Indicazione del numero
della cassetta di caricamento
Indicazione disco
Indicazione casuale
72
Page 74

Funzioni del CD CHANGER
Avanzamento veloce/
Riavvolgimento veloce (FF/FB)
● Avanzamento veloce:
Premete e tenete premuto per 1 secondo o più il
tasto destro di ricerca $.
● Riavvolgimento veloce:
Premete e tenete premuto per 1 secondo o più il
tasto sinistro di ricerca $ .
* Per aumentare la velocità di avanzamento o riav-
volgimento veloce premere e tenere premuto per
almeno 3 secondi il tasto sinistro o destro di ricerca $.
Selezione di una cassetta
di caricamento
Questa funzione può essere utilizzata solo quando il CD CHANGER collegato può alloggiare vari
contenitori.
Ad ogni pressione del tasto MAG # viene selezionato il contenitore successivo.
Funzione “Top” (ritorno all’inizio)
Con la funzione di ritorno all’inizio si ottiene la
riproduzione del primo brano del CD correntemente in riproduzione.
Premere il tasto TOP # per far riprodurre il primo
brano (brano No. 1) del CD.
Funzione di scansione brani
La funzione di scansione consente l’ascolto dei
primi 10 secondi di tutti i brani contenuti nel disco.
* La funzione di scansione risulta utile per selezio-
nare il brano desiderato.
1. Premete il tasto SCN 0. “SCN” si illuminerà
sul display.
2. Per disattivare la funzione di scansione, preme-
te nuovamente il tasto SCN 0. “SCN” sparirà
dal display e si ripristinerà la riproduzione normale.
Funzione di scansione dei dischi
La funzione di scansione dei dischi consente l’ascolto dei primi 10 secondi dei primi brani di tutti i
CD inseriti nel CD CHANGER.
* La funzione di scansione dei dischi risulta utile per
selezionare il CD desiderato.
1. Tenete premuto il tasto SNC 0 per 2 secondi o
più. “DISC” e “SCN” si illumineranno sul
display.
2. Per disattivare la funzione di scansione dei
dischi, premete nuovamente il tasto SCN 0.
“DISC” e “SCN” spariranno dal display e si
ripristinerà la riproduzione normale.
Riproduzione ripetuta
La riproduzione ripetuta consente di ascoltare
ripetutamente il brano selezionato.
1. Premete il tasto RPT 9. “RPT” si illuminerà sul
display.
2. Per cancellare la riproduzione ripetuta, preme-
te nuovamente il tasto RPT 9. “RPT” sparirà
dal display e si ripristinerà la riproduzione normale.
Riproduzione ripetuta dei dischi
La riproduzione ripetuta dei dischi consente di
ascoltare ripetutamente il CD in fase di riproduzione.
1. Tenete premuto per 2 secondi o più il tasto RPT
9, “DISC” e “RPT” si illumineranno sul display.
2. Per cancellare la riproduzione ripetuta dei
dischi, premete nuovamente il tasto RPT 9
“DISC” e “RPT” spariranno dal display e si
ripristinerà la riproduzione normale.
Riproduzione casuale
La riproduzione casuale consente l’ascolto
casuale di tutti i brani contenuti nel CD in fase di
riproduzione.
1. Premete il tasto RDM 8. “RDM” si illuminerà
sul display.
2. Per disattivare la riproduzione casuale, premete nuovamente il tasto RDM 8. “RDM” sparirà
dal display e si ripristinerà la riproduzione normale.
Riproduzione casuale dei dischi
La riproduzione casuale dei dischi consente l’ascolto casuale di tutti i brani contenuti nei CD del
CD CHANGER.
1. Tenete premuto per 2 secondi o più il tasto
RDM 8. “DISC” e “RDM” si illumineranno sul
display.
2. Per disattivare la riproduzione casuale dei
dischi, premete nuovamente il tasto RDM 8.
“DISC” e “RDM” spariranno dal display e si
ripristinerà la riproduzione normale.
Nota:
• MD CHANGER
Se, in collegamento con questo apparecchio, si
fa uso di un MD
cambiadischi sulla posizione “A” (modalità del
CD). Il MD
modalità di cambiadischi per compact disc. In
questa modalità di uso, però, i titoli non possono
venire visualizzati. Tenere inoltre presente, che
non è possibile collegare contemporaneamente
all’apparecchio un CD
CHANGER.
CHANGER, disporre la modalità del
CHANGER può così venire utilizzato nella
CHANGER ed uno per MD
Italiano
73
Page 75

7. IN CASO DI DIFFICOLTÀ
Problema
Non si accende.
(non si produce il suono).
Il compact disc non può
essere caricato.
Il suono salta o è
rumoroso.
Il suono è disturbato subito
dopo l’accensione.
Quando si premono i tasti
non succede niente.
Italiano
La visualizzazione
non è corretta
Causa
È saltato il fusibile.
Collegamento errato.
È già stato caricato un altro
compact disc.
Il compact disc è sporco.
Il compact disc è molto graffiato
o deformato.
Se l’autovettura è parcheggiata
in un luogo umido, sulle lenti
interne si possono formare
goccioline d’acqua.
Il microprocessore non funziona
bene a causa del rumore, ecc.
I connettori del frontalino estraibile (DCP) o dell’apparecchio
principale sono sporchi.
Soluzione
Sostituite con un fusibile dello stesso
amperaggio. Se il fusibile dovesse nuovamente
bruciarsi, consultate il vostro rivenditore.
Consultate il vostro rivenditore.
Estraete il compact disc prima di caricarne
un altro.
Pulite il compact disc con un panno soffice.
Sostituitelo con un compact disc senza graffi.
Lasciate asciugare per almeno un’ora in fase di
accensione.
Spegnere l’apparecchio, poi premere il tasto di rilascio del frontalino 1 e rimuovere il frontalino estraibile (DCP).
Premete per circa 2 secondi il tasto di inizializzazione
mediante una sbarretta sottile.
Tasto di inizializzazione
Rimuovere la sporcizia con un panno soffice inumidito con alcool.
74
Page 76

8. VISUALIZZAZIONE DEGLI ERRORI
Quando si verifica un errore, il display visualizzerà una delle seguenti diciture. Per eliminare il problema
adottate le soluzioni descritte nel seguito.
Errore sul display Causa Contromisura
CD ER2
CD ER3
Visualizzato quando un CD rimane nella piastra
e non viene estratto.
Visualizzato quando il disco non può essere
riprodotto a causa dei graffi, ecc.
Si tratta di un difetto del meccanismo della
piastra del CD. Consultate il vostro
rivenditore.
Sostituitelo con un disco senza graffi
o deformazioni.
CD ER6
Se il display dovesse visualizzare un errore diverso da quelli precedentemente elencati, premete il tasto
di inizializzazione. Se il problema dovesser permanere spegnete l’apparecchio e consultate il vostro
rivenditore.
Visualizzato quando un CD viene caricato capovolto all’interno della piastra del CD e non viene
riprodotto.
Estraete il disco e ricaricatelo
in modo corretto.
Italiano
75
Page 77

Dank u voor de aanschaf van de Clarion PU2312.
* Lees deze gebruiksaanwijzing geheel door alvorens het toestel in gebruik te nemen.
* Bewaar deze gebruiksaanwijzing op een handige plaats (bijvoorbeeld in het handschoenenvak van de
auto).
* Kontroleer de gegevens op het bijgeleverde garantiebewijs en bewaar het garantiebewijs goed tezamen
met deze gebruiksaanwijzing.
* Deze gebruiksaanwijzing beschrijft tevens de handelingen voor het bedienen van de CD/MD-
die middels de C-BUS kabel is verbonden. Raadpleeg voor de CD/MD CHANGER de specifieke handleiding, die echter geen uitleg bevat met betrekking tot de functies.
CHANGER
Inhoud
1. VOORZORGEN ....................................................................................................................... 76
2. BEHANDELEN VAN CD’s........................................................................................................ 77
3. REGELAARS ........................................................................................................................... 5
4. DCP (VERWIJDERBAAR BEDIENINGSPANEEL) ................................................................ 78
5. BENAMINGEN ........................................................................................................................ 79
Namen van toetsen................................................................................................................... 79
Display onderdelen ................................................................................................................... 79
6. BEDIENING .............................................................................................................................. 80
Basisbediening.......................................................................................................................... 80
Bediening van de radio ............................................................................................................. 82
Gebruik van RDS...................................................................................................................... 84
Bediening van de CD-speler..................................................................................................... 88
Bediening van de CD-CHANGER ................................................................................................. 90
7. OPLOSSEN VAN PROBLEMEN ............................................................................................ 92
8. FOUTMELDINGEN ................................................................................................................ 93
9. TECHNISCHE GEGEVENS...................................................................................................... 150
Nederlands
1. VOORZORGEN
1. Het is mogelijk dat er kondens op de CD of de
optische onderdelen van de CD-speler wordt gevormd wanneer het koud in de auto is en u de
verwarming inschakelt. Een juiste weergave is in
dat geval niet mogelijk.Veeg indien nodig kondens van de CD met een zachte doek. Indien er
kondens op de optische onderdelen van de CDspeler is gevormd moet u met gebruik ongeveer
een uur wachten totdat de kondens op natuurlijke wijze is verdampt.
76
2. Het geluid slaat vanwege trillingen mogelijk af en
toe over wanneer u op onverharde of slechte wegen rijdt.
Page 78

2. BEHANDELEN VAN CD’s
Juiste wijze van vasthouden
van een CD
Verwijderen van de CD
Dit toestel is speciaal ontworpen voor weergave van
CD’s voorzien van de markering kunt geen
andere CD’s afspelen.
Voor het verwijderen van een CD uit het doosje
moet u op het midden van het doosje drukken en
de CD voorzichtig aan de randen omhoog tillen.
Houd CD’s altijd aan de randen vast. Raak het oppervlak van de CD zelf niet aan.
Gebruik een zachte doek om vingerafdrukken en
vuil van de CD te vegen.Veeg in een rechte lijn
vanaf het midden naar de buitenrand van de CD.
Verkeerd
De randen van nieuwe CD’s zijn soms wat ruw.Het
toestel zal met ruwe CD’s mogelijk niet juist werken
of het geluid valt af en toe weg. Haal in dat geval
een pen rond de binnen- en buitenrand om de “bramen” te verwijderen.
Voorzorgen voor CD’s
Plak nooit labels of stickers op het oppervlak van
een CD en schrijf er tevens nooit op.
Verkeerd
Gebruik geen oplosmiddelen zoals in de handel verkrijgbare reinigers, anti-statische spray’s of thinner
voor het reinigen van CD’s.
Verkeerd
Gebruik geen CD’s die erg veel diepe krassen hebben, beschadigd of verbogen zijn. Het gebruik van
dergelijke CD’s veroorzaakt een onjuiste werking
en kan het toestel mogelijk beschadigen.
Nederlands
Verkeerd
Pen
Bramen
Opmerking:
• Gebruik geen in de handel verkrijgbare CD-beschermingsvellen of CD’s voorzien van een stabilisator, etc.
Dit soort onderdelen kunnen namelijk in het interne mechanisme verstrikt raken en de CD beschadigen.
Stel CD’s niet aan het direkte zonlicht of hitte van
een warmtebron bloot.
Verkeerd
77
Page 79

4. DCP (VERWIJDERBAAR BEDIENINGSPANEEL)
Het bedieningspaneel (DCP; Detachable Control
Panel) van dit toestel kan ter beveiliging tegen diefstal worden verwijderd.Voorkom beschadiging van
het bedieningspaneel en bewaar het na het verwijderen derhalve in de speciale houder voor het DCP
(bedieningspaneel).
Neem het DCP (bedieningspaneel) bij voorkeur mee
wanneer u de auto verlaat.
Verwijderen van het DCP (bedieningspaneel)
1. Houd de POWER toets 3 langer dan 1 seconde
ingedrukt om het apparaat uit te schakelen.
2. Druk de DCP-ontgrendeltoets 1 diep in.
DCP-ontgrendeltoets 1
3. Verwijder het DCP bedieningspaneel.
DCP
Nederlands
é LET OP
• Het DCP bedieningspaneel kan gemakkelijk
door schokken worden beschadigd. Zorg dat
het DCP bedieningspaneel na het verwijderen
niet valt en niet aan schokken onderhevig is.
• Het DCP bedieningspaneel zou door trillingen
van de auto kunnen vallen met beschadiging
tot gevolg indien u op de ontgrendeltoets
drukt en het paneel wordt ontgrendeld.
Voorkom beschadiging en berg het DCP bedieningspaneel na het verwijderen in de houder op.
(Zie de onderstaande afbeelding.)
Houder voor DCP
bedieningspaneel
• De aansluiting die het hoofdtoestel en het DCP
bedieningspaneel verbindt is zeer belangrijk.
Let op dat deze aansluiting niet wordt beschadigd door de druk van uw vingers, nagels,
schroevedraaiers en andere voorwerpen.
Opmerking:
•
Veeg indien nodig vuil met een zachte, droge doek
van het DCP bedieningspaneel.
Weer terugplaatsen van het DCP
bedieningspaneel
1. Steek het DCP bedieningspaneel in de rechterkant van het hoofdtoestel.
2. Druk vervolgens de linkerkant van het DCP bedieningspaneel op zijn plaats.
2.
1.
78
Page 80

5. BENAMINGEN
Opmerking: Lees dit hoofdstuk door aan de hand van de afbeeldingen in hoofdstuk “3. REGELAARS”
op blz. 5 (uitgevouwen).
Namen van toetsen
1 DCP-ontgrendeltoets
2 Audio functie toets (A-M)
Loudness toets (LD)
3 Aan/uit toets (POWER)
Functie toets (FNC)
4 CD invoer sleuf
5 Uitwerp toets (Q)
6 Display toets (DISP)
7 Verkeersbericht toets (TA)
8 Programma type toets (PTY)
Willekeur toets (RDM)
9 Alternatieve frequentie toets (AF)
Herhaal toets (RPT)
0 Voorkeuze/automatisch opslaan toets (PS/AS)
Scan toets (SCN)
! Voorkeuze toetsen (1 t/m 6)
Direct toetsen (1 t/m 6)
@ Z-verbeter toets (Z-EHCR)
# Band toets (BND)
TOP toets (TOP)
Magazijntoets (MAG)
$ Zoektoetsen (links a en rechts d)
% Draaiknop
¥ Afspeel/pauze toets (s)
Dempingstoets (MUTE)
Display onderdelen
1 Volume-indicator (VOL)
2 Audio functie indicator (A-M)
3 Achterluidspreker-indicator (R)
Voorluidspreker-indicator (F)
4 Bedieningstoestand indicator
* De frequentie, PTY, speeltijd, CT (klok), enz
worden getoond.
5 Loudness indicator (LD)
6 Z-verbetering indicator (Z-EHCR)
7 CD/MD
8 Magazijnnummer-indicator
9 Disc indicator (DISC)
0 Willekeur indicator (RDM)
! Herhaal indicator (RPT)
CHANGER indicator
@ Scan indicator (SCN)
# Voorkeuzekanaal indicator (1 t/m 6)
Disc nummer indicator (1 t/m 6)
* De disc nummers die corresponderen met
de discs in de CD/MD CHANGER lichten op.
$ Programma type indicator (PTY)
% Verkeersprogramma indicator (TP)
¥ Verkeersbericht indicator (TA)
& Regionale programma indicator (REG)
* Alternatieve frequentie indicator (AF)
( Handbediening indicator (MANU)
) Linkerluidspreker-indicator (L)
Rechterluidspreker-indicator (R)
Nederlands
79
Page 81

6. BEDIENING
Opmerking: Lees dit hoofdstuk door aan de hand van de afbeeldingen in hoofdstuk “3. REGELAARS” op
blz. 5 (uitgevouwen).
Basisbediening
éLET OP
Stel het volume in de minimale stand alvorens
de spanning van het toestel uit of in te schakelen. Een uitermate hoog volume bij het inschakelen van de spanning kan namelijk uw gehoor
of het toestel beschadigen.
De stroom aan/uit zetten
Opmerking:
• Gebruik de autoradio niet te lang bij afgezette
motor; dit kan startproblemen van het voertuig en
een verminderde levensduur van de accu tot
gevolg hebben.
1. Druk op de POWER toets 3.
2. De verlichting en het display op het apparaat zullen oplichten. De instellingen die golden toen het
apparaat voor het laatst werd uitgeschakeld zijn
onthouden en zullen automatisch weer precies
zo ingesteld worden..
3. Houd de POWER toets 3 1 seconde of langer
ingedrukt om het apparaat weer uit te schakelen.
Nederlands
Kiezen van de ingangsbron
1. Druk op de FNC toets 3 om de gewenste ingangsbron te kiezen.
2. De bron schakelt in de volgende volgorde:
Radio ➜ CD speler ➜ CD/MD CHANGER ➜ Radio …
* De CD/MD CHANGER kan niet worden gekozen
indien u geen CD/MD CHANGER heeft aangesloten.
Regelen van het volume
Draai de draaiknop % met de klok mee om het volume te verhogen en tegen de klok in om het volume te verlagen.
* Het volume kan ingesteld worden van o (mini-
mum) tot 33 (maximum).
Instellen van de Z-verbetering
Dit apparaat heeft 3 typen geluidstoon-effecten opgeslagen in het geheugen. U kunt degene selecteren die uw voorkeur geniet.
* De fabrieksinstelling is “OFF” (uit).
Elke keer dat u de Z-EHCR toets @, indrukt zal de
instelling volgens de volgende reeks veranderen:
“Z-ENHANCER 1” ➜ “Z-ENHANCER 2” ➜
“Z-ENHANCER 3” ➜ “OFF” ➜ “Z-ENHANCER 1”...
• Z-ENHANCER 1 : de lage tonen worden bena-
• Z-ENHANCER 2 : de hoge tonen worden bena-
• Z-ENHANCER 3 : zowel de lage als de hoge
• OFF : geen geluidseffect
drukt.
drukt.
tonen worden benadrukt.
Regelen van de toon
Druk op de A-M toets 2 en selecteer het onderdeel dat u wilt instellen.
Elke keer dat u op de A-M toets 2 drukt, verandert
het in te stellen onderdeel volgens de volgende
reeks:
“BASS” ➜ “TREB” ➜ “BAL” ➜ “FAD” ➜ Functie...
Regelen van de lage tonen (bass)
1. Druk op de A-M toets 2 en selecteer “BASS”.
2. De draaiknop % met de klok mee draaien zal de
lage tonen benadrukken, tegen de klok in draaien
zal de lage tonen terugbrengen.
* De fabrieksinstelling is “0”. (Bereik: –6 t/m +6)
3. Wanneer u klaar bent met het maken van de instelling, drukt u net zo vaak op de A-M toets 2
tot u de gewenste bedieningfunctie weer heeft
bereikt..
Regelen van de hoge tonen (treble)
1. Druk op de A-M toets 2 en selecteer “TREB”.
2. De draaiknop % met de klok mee draaien zal de
hoge tonen benadrukken, tegen de klok in
draaien zal de hoge tonen terugbrengen.
* De fabrieksinstelling is “0”. (Bereik: –6 t/m +6)
3. Wanneer u klaar bent met het maken van de instelling, drukt u net zo vaak op de A-M toets 2
tot u de gewenste bedieningfunctie weer heeft
bereikt.
80
Page 82

Basisbediening
Regelen van de balans
1. Druk op de A-M toets 2 en selecteer “BAL”.
2. Draai de draaiknop % met de klok mee om de
rechter luidspreker te benadrukken en tegen de
klok in om de linker luidspreker te benadrukken.
* De fabrieksinstelling is “0”. (Bereik: L9 tot R9)
3. Wanneer u klaar bent met het maken van de instelling, drukt u net zo vaak op de A-M toets 2
tot u de gewenste bedieningfunctie weer heeft
bereikt.
Regelen van de fader
1. Druk op de A-M toets 2 en selecteer “FAD”.
2. Draai de draaiknop % met de klok mee om het
geluid uit de voor luidspreker te benadrukken, en
tegen de klok in om het geluid uit de achter luidspreker te benadrukken.
* De fabrieksinstelling is “0”. (Bereik: F9 tot R9)
3. Wanneer u klaar bent met het maken van de instelling, drukt u net zo vaak op de A-M toets 2
tot u de gewenste bedieningfunctie weer heeft
bereikt.
Toonversterking
Met de toonversterking worden de lage en hoge tonen voor een natuurgetrouw klankbeeld versterkt.
Deze funktie is vooral effektief bij weergave met een
laag volume.
● Aktiveren en uitschakelen van de
toonversterking
Houd de LD toets 2 tenminste 2 sekonden ingedrukt om de toonversterkingsfunktie te aktiveren en
uit te schakelen. “LD” wordt op het display getoond
wanneer de toonversterking is geaktiveerd.
Omschakelen van het display
Druk op de DISP toets 6 om het gewenste display te kiezen.
Het display schakelt in de volgende volgorde:
Hoofd➜ Klok (CT) ➜ Hoofd …
* Indien de aanduidingen op het display verande-
ren vanwege een druk op een andere bedieningstoets wanneer de klok (CT) wordt getoond, zal
nadat de overeenkomende bediening is uitgevoerd de klok weer verschijnen.
* Dit voorbeeld toont het display met de radio-
funktie geaktiveerd.
Klokfunktie CT: (Clock Time)
Met de CT funktie kan uitsluitend de tijd op de klok
worden getoond wanneer CT data worden ontvangen.
Druk op de DISP toets 6 om over te schakelen
naar CT (kloktijd).
* “CT--:--” wordt op het display getoond indien er
geen CT data worden ontvangen.
Opmerking:
• Zenders in bepaalde landen zenden geen data
voor de klok uit. Het is mogelijk dat de tijd in
bepaalde gebieden niet juist op het display wordt
getoond.
Nederlands
Automatisch afzetten van het
volume tijdens telefoongesprekken
Bij aanwezigheid van een mobiele telefoon wordt
het volume van de geselecteerde modus tijdens de
telefoongesprekken automatisch afgezet en wordt
de tekst TEL MUTE op het display weergegeven.
Om de functie in te schakelen, de toets # gelijktij-
dig met het nummer 5 van de voorkeuzetoetsen !
ingedrukt houden.
81
Page 83

Bediening van de radio
Radiofunktie
Automatische afstemindikator
TP indikator
Luisteren naar de radio
1. Druk op de FNC toets 3 om de radio te kiezen.
De frekwentie of PS (zendernaam) wordt op het
display getoond.
* PS: Programma Service Naam
2. Druk op de BND toets # om de gewenste golfband te kiezen. De golfband verandert in de volgende volgorde:
FM1 ➜ FM2 ➜ FM3 ➜ AM (OM/OL) ➜ FM1 …
3. Druk op de linker of rechter zoektoets $ om op
de gewenste zender af te stemmen.
Nederlands
Afstemmen
U kunt op drie verschillende manier afstemmen: automatisch zoeken (afstemmen), handmatig afstemmen en oproepen van voorkeuzezenders.
Automatisch zoeken
Er zijn twee soorten automatisch zoeken: DX SEEK
en LOCAL SEEK.
Met de DX SEEK methode kunt het apparaat automatisch af laten stemmen op hoorbare stations;
LOCAL SEEK zal alleen afstemmen op stations met
een goede ontvangst.
1. Druk op de BND toets # en selecteer de gewenste band (FM of AM (MW/LW)).
2. Stem af op een station.
* Als “MANU”, voor handmatig afstemmen, oplicht
in het display, houd dan de BND toets # 1 seconde of langer ingedrukt. “MANU” zal doven in
het display en u kunt het apparaat nu automatisch laten zoeken met de SEEK functie.
* Als “TA”, voor verkeersberichten, oplicht in het dis-
play, zal het apparaat automatisch zoeken naar stations die dit soort gegevens uitzenden.
Voorkeuzezenderindikator
● DX SEEK
Druk op de rechter of de linkerkant van de zoektoets $ om automatisch een station op te zoeken.
Wanneer u de rechterkant van de zoektoets $ indrukt, zal er gezocht worden in hogere frequenties,
als u de linkerkant van de zoektoets $ indrukt zal
er in lagere frequenties dan de huidige gezocht worden.
* Wanneer het automatisch zoeken en afstemmen be-
gint, zal “DX” verschijnen in het display.
● LOCAL SEEK
Wanneer u de rechter of de linkerkant van de zoektoets $ 1 seconde of langer indrukt, zal er automatisch gezocht worden naar stations met een
goede ontvangst.
* Wanneer het automatisch zoeken naar stations met
een goede ontvangst begint, zal “LO” in het display
verschijnen.
Handbediende afstemming
1. Druk op de BND toets # om de band te kiezen.
2. Druk minstens 2 seconden lang op de BND toets
#.
3. “MANU” verdwijnt van de display en handbe-
diend afstemmen is mogelijk.
4. Gebruik de zoektoets (links/rechts) $ om af te
stemmen op zenders.
*Na 7 seconden wordt automatisch opnieuw over-
geschakeld op de zenderzoekafstemming.
82
Page 84

Bediening van de radio
Oproepen van een voorkeuzezender
U kunt maximaal 24 zenders (6 voor de FM1, FM2,
FM3, en AM (MW/LW) golfband) onder de voorkeuzetoetsen in het geheugen vastleggen.
Zenders kunnen onder de voorkeuzetoetsen (1 t/m
6) worden vastgelegd. U kunt daarna deze “voorkeuzezenders” gemakkelijk oproepen door op de
toets van de gewenste zender te drukken.
1. Druk op de BND toets # om de golfband te kiezen.
2. Druk op een van de voorkeuzetoetsen ! om op
een voorkeuzezender af te stemmen.
Opmerking:
• Houd een voorkeuzetoets ! tenminste 2 sekonden
ingedrukt om de zender die u momenteel beluistert
als voorkeuzezender in het geheugen vast te leggen.
Handmatig vastleggen van
voorkeuzezenders
1. Druk op de BND toets # om de golfband te kiezen.
2. Druk op de linker of rechter zoektoets $ om op
de gewenste zender af te stemmen.
3. Houd een van de voorkeuzetoetsen ! tenmin-
ste 2 sekonden ingedrukt om de zender die u nu
ontvangt als voorkeuzezender vast te leggen.
Automatisch vastleggen van
voorkeuzezenders
Met de automatische funktie worden maximaal 6
zenders op volgorde van frekwentie in het geheugen als voorkeuzezenders vastgelegd.
Opmerkingen:
• Er kunnen uitsluitend zenders voor FM3 worden
vastgelegd. Wanneer u probeert zenders van de FM1
of FM2 golfband vast te leggen, zullen deze zenders
automatisch voor FM3 worden vastgelegd.
• Eventuele zenders die in het geheugen voor FM3
zijn vastgelegd worden gewist wanneer u de funktie voor het automatisch vastleggen start.
• Indien er minder dan 6 zenders met een redelijke
ontvangst worden gevonden, zullen de overige eerder vastgelegde zenders niet worden gewist.
• Eenzelfde zender kan op deze manier niet onder
meerdere voorkeuzetoetsen worden vastgelegd.
1. Druk op de BND toets # om de golfband voor
de gewenste zender te kiezen.
2. Houd de AS toets 0 tenminste 2 sekonden ingedrukt. Zenders waarvan de ontvangst goed is
worden automatisch in het geheugen onder de
voorkeuzetoetsen ! vastgelegd.
Aftasten van voorkeuzezenders
Met deze funktie worden de vastgelegde voorkeuzezenders ieder achtereenvolgend ongeveer 7 sekonden weergegeven.
Gebruik deze funktie voor het opzoeken van de gewenste zender.
Opmerking:
• Vergeet niet dat wanneer u de PS toets 0 2 sekon-
den of langer indrukt de funktie voor het automatisch
vastleggen van zenders wordt geaktiveerd.
1. Druk op de PS toets 0.
2. Druk nogmaals op de PS toets 0 of op de overeenkomende voorkeuzetoets ! wanneer u de
zender hoort die u wilt beluisteren. Het aftasten
wordt nu gestopt en u kunt de uitzending van
deze zender normaal beluisteren.
* Een zender waarop niet kan worden afgestemd
zal worden overgeslagen. In dit geval wordt op
de volgende voorkeuzezender afgestemd.
Dempingsfunctie (MUTE)
Gebruik deze functie om het geluid onmiddellijk te
dempen.
Bij indrukken van de MUTE toets ¥ wordt het geluid gedempt en licht “MUTE” in het display op.
Druk nogmaals op de MUTE toets om de dempingsfunctie weer uit te schakelen.
Nederlands
83
Page 85

Gebruik van RDS
RDS funktie
Automatische afstemindikator
Voorkeuzezenderindikator
AF indikator
REG indikator
TA indikator
RDS (Radio Data Systeem)
Dit toestel beschikt over een RDS dekodeerder zodat de RDS data van zenders die gebruik van dit systeem maken kunnen worden verwerkt.
RDS biedt u diverse extra mogelijkheden en funkties.
De naam van de zender die wordt ontvangen kan bijvoorbeeld op het display worden getoond (PS) en er
kan automatisch naar een andere frekwentie worden
overgeschakeld wanneer de ontvangst bijvoorbeeld
tijdens de rit verslechtert (alternatieve frekwentie).
Tevens kan met gebruik van RDS op ieder moment
verkeersinformatie of een uitzending van een bepaald
programatype worden ontvangen zodra deze aanvangt. De weergave van de CD of cassette kan hiervoor automatisch worden onderbroken.
Daarbij kan bij ontvangst van EON informatie automatisch naar andere voorkeuzezenders van hetzelfde
netwerk worden overgeschakeld voor ontvangst van
Nederlands
verkeersinformatie.De uitzending van de huidige zender wordt dan even onderbroken en er wordt naar de
andere zender met verkeersin-formatie (TP zender)
overgeschakeld.
Deze funktie werkt mogelijk niet in bepaalde gebieden.
De FM funktie van de radio moet voor gebruik van
RDS zijn geaktiveerd.
• AF: Alternatieve Frekwentie
• PS: Programma Service Naam
• PTY: Programma Type
• EON: Enhanced Other Network
• TP: Verkeersinformatie (Traffic Programma)
* “AF” knippert op het display indien de ontvangst
van een RDS zender verslechtert (op de huidige
frekwentie). “AF” stopt te knipperen wanneer de
ontvangst weer bevredigend is.
PTY indikator
TP indikator
AF funktie
Met de AF funktie wordt naar een andere frekwentie
van hetzelfde netwerk overgeschakeld indien de ontvangst van de huidige zender verslechtert. Er blijft zo
indien mogelijk een goede ontvangst gegarandeerd.
* Bij het verlaten van de fabriek is de funktie geakti-
veerd “on”.
● Uitschakelen van de AF funktie
Druk wanneer “AF” is opgelicht of op het display
knippert op de AF toets 9. “AF” zal doven en de
AF funktie wordt uitgeschakeld.
● Aktiveren van de AF funktie
Druk wanneer “AF” niet op het display is opgelicht
nogmaals op de AF toets 9. “AF” licht vervolgens
op het display op en de AF funktie wordt weer geaktiveerd.
“AF” gaat knipperen wanneer de ontvangst van de
ingestelde zender verslechtert. Het toestel zal nu
proberen naar een andere, alternatieve frekwentie
over te schakelen. “SEARCH” wordt tijdens het zoeken naar een alternatieve frekwentie voor de huidige zender op het display getoond.
REG (Regionaal Programma) funktie
De ontvangst van regionale zenders is optimaal
wanneer de REG funktie is geaktiveerd.
Met deze funktie uitgeschakeld schakelt het toestel
naar een regionale zender in het volgende lokale
gebied dat u bereikt terwijl de regionale zender van
het voorgaande lokale gebied nog wordt ontvangen.
* Bij het verlaten van de fabriek is de funktie uitge-
schakeld (“off”).
Opmerkingen:
• Deze funktie werkt niet wanneer een nationale zen-
der, bijvoorbeeld “BBC 2 FM” wordt ontvangen.
• De instelling voor REG is effektief wanneer de AF funk-
tie is geaktiveerd.
84
Page 86

Gebruik van RDS
● Aktiveren van de REG funktie
Houd de AF toets 9 tenminste 2 sekonden ingedrukt wanneer “REG” niet op het display is opgelicht. “REG” zal nu op het display oplichten.
● Uitschakelen van de REG funktie
Houd de AF toets 9 weer tenminste 2 sekonden
ingedrukt. “REG” zal van het display doven.
Handmatig afstemmen op
gerelateerde regionale zenders
1. Deze funktie werkt wanneer AF is geaktiveerd en
REG is uitgeschakeld.
Opmerking:
• Deze funktie is effektief wanneer gerelateerde re-
gionale zenders worden ontvangen.
2. Druk op een van de voorkeuzetoetsen ! om een
regionale zender op te roepen.
3. Druk nogmaals op dezelfde voorkeuzetoets !
indien de ontvangst van de opgeroepen zender
niet-bevredigend is. Er wordt nu naar een gerelateerde regionale zender overgeschakeld.
Verkeersinformatie
(TA: Traffic Announcement)
Met de TA (verkeersinformatie) standbyfunktie geaktiveerd kunt u de verkeersinformatie beluisteren
zodra het aanvangt, ongeacht welke bron is ingeschakeld.
U kunt tevens automatisch op zenders die verkeersinformatie hebben (TP zenders) afstemmen.
●Aktiveren van de TA standbyfunktie
Wanneer u op de TA toets 7 drukt met uitsluitend
“TP” op het display opgelicht, zullen “TP” en “TA”
oplichten en de TA standbyfunktie worden geaktiveerd totdat een verkeersinformatie-uitzending start.
Bij aanvang van verkeersinformatie zal “TRA INFO”
eerst op het display en daarna de PS (Programma
Service Naam, oftewel zendernaam) verschijnen.
● Uitschakelen van de TA standbyfunktie
Druk op de TA toets 7 wanneer “TP” en “TA” op
het display oplichten. “TA” zal doven en de TA
standbyfunktie wordt uitgeschakeld.
● Instellen van de automatische afstemfunktie voor TP zenders
Wanneer u op de TA toets 7 drukt als uitsluitend
“TP” is opgelicht of “TP” en “TA” niet op het display zijn opgelicht, zal “TA” oplichten en het toestel
automatisch op TP zenders afstemmen.
Opmerking:
• Het automatische zoeken blijft doorgaan indien er
geen TP zender wordt gevonden. Druk in dat geval
op de TA toets 7 om het automatische zoeken (afstemmen) te stoppen.
Funktie voor automatisch
vastleggen van TP zenders
● Automatisch vastleggen terwijl “TA”
is opgelicht:
Uitsluitend TP zenders worden automatisch vastgelegd.
* Zie de PS/AS funktie tijdens de radiofunktie.
Programmatype (PTY)
Deze funktie maakt het mogelijk om uitsluitend te
luisteren naar zenders die een programma overeenkomstig een bepaald programmatype uitzenden.
Opmerking:
• In bepaalde landen wordt PTY nog niet gebruikt.
Tijdens de TA standbyfunktie hebben TP zenders
de prioriteit over zenders met andere programmatypen.
* Noodberichten onderbreken alle bedieningsfunk-
ties. Noodberichten (of “alarm” berichten) kunnen
uitsluitend via RDS zenders worden ontvangen. Bij
aanvang van een noodbericht licht “ALARM” op het
display op en zal het bericht worden weergegeven.
* Druk op de AF toets 9 om de uitzending van het
ALARM noodbericht te stoppen.
Nederlands
Indien u tijdens ontvangst van verkeersinformatie
op de TA toets 7 drukt, zal de verkeersinformatie
worden uitgeschakeld en de TA standbyfunktie weer
worden geaktiveerd.
85
Page 87

Gebruik van RDS
Kiezen van een programmatype (PTY)
1. “PTY” licht op en het programmatype wordt op
het display getoond wanneer u op de PTY toets
8 drukt. De funktie voor het kiezen van een programmatype wordt geaktiveerd.
Indien u gedurende 7 sekonden nadat de PTY
keuzefunktie werd geaktiveerd geen bediening
uitvoert, zullen de aanduidingen voor de radio
weer op het display verschijnen en het toestel in
de PTY standbyfunktie schakelen.
2. Kies een programmatype.
Druk op een van de voorkeuzetoetsen ! om het
gewenste programmatype te kiezen of draai aan
de draaiknop %.
* De volgende programmatypen zijn voor de han-
digheid reeds onder de voorkeuzetoetsen !
vastgelegd.
Voorkeuzetoets nummer
1
Nederlands
2
3
4
5
6
ENGLISH
NEWS
INFO
CLASSICS
SPORT
POP M
M, O, R, M
Programmatype
(Nederlands)
(Nieuws)
(Informatie)
(Klassieke muziek)
(Sportprogramma’s)
(Popmuziek)
Middle of the Road Music
(“Middle of the Road” muziek)
Vastleggen van programmatypen
in het geheugen
1. Druk op de PTY toets 8 om de PTY keuzefunktie
te aktiveren.
Indien u gedurende 7 sekonden nadat de PTY keuzefunktie werd geaktiveerd geen bediening uitvoert,
zullen de aanduidingen voor de radio weer op het
display verschijnen en het toestel in de PTY standbyfunktie schakelen.
2. Draai de draaiknop % totdat het gewenste programmatype wordt getoond.
U kunt de volgende 15 programmatypen kiezen.
PTY Display
ENGLISH
NEWS
AFFAIRS
INFO
SPORT
EDUCATE
DRAMA
CULTURE
SCIENCE
VARIED
POP M
ROCK M
M, O, R, M
LIGHT M
CLASSICS
OTHER M
(nieuws)
(aktualiteiten)
(informatie)
(sportprogramma’s)
(educatief)
(hoorspelen)
(cultuur)
(wetenschap)
(gevarieerd)
(popmusik)
(rockmuziel)
Middle of the Road Music
(“Middle of the Road” muziek)
(lichte muziek)
(klassiek)
(orverige muziek)
(Nederlands)
3. Druk nogmaals op de PTY toets 8 om de standbyfunktie voor het gekozen programmatype te aktiveren.
Wanneer een uitzending met het gekozen programmatype start, zal dit programmatype op het
display worden getoond.
Indien u tijdens ontvangst van een uitzending van
het gekozen programmatype op de PTY toets 8
drukt, zal de uitzending tijdelijk worden onderbroken en het toestel in de PTY standbyfunktie
schakelen.
● Uitschakelen van de PTY standbyfunktie
Houd de PTY toets 8 tenminste 2 sekonden ingedrukt zodat “PTY” op het display dooft.
86
3. Houd een van de voorkeuzetoetsen ! 1 t/m 6
tenminste 2 sekonden ingedrukt om het gekozen
programmatype vast te leggen. “PTY MEMO”
wordt op het display getoond nadat de programmatypen in het geheugen zijn vastgelegd.
Page 88

Automatisch afstemmen op zenders
met een bepaald PTY
1. Druk op de PTY toets 8 om de PTY keuzefunktie
te aktiveren.
2. Kies een programmatype.
3. Druk op de linker of rechter zoektoets $ .Er
wordt overeenkomstig naar een zender met een
hogere of lagere frekwentie gezocht die voldoet
aan het gekozen programmatype en er wordt automatisch op deze zender afgestemd.
Indien er geen zender wordt gevonden die een
programma van het gekozen type uitzendt, zal
het automatisch zoeken stoppen en de PTY
standbyfunktie worden geaktiveerd.
Einstellung der Lautstärke für TA,
ALARM (Notdiffusion) und PTY
Lautstärke, Verwendung bei den Unterbrechungen
von TA, ALARM und PTY, kann während diesen
Unterbrechungen festgelegt werden.
Die bei der Fertigung verwendete Grundeinstellung
ist “15”.
Bei einer Unterbrechung von TA, ALARM oder PTY,
den Drehknopf # im Uhrzeigersinn oder gegen den
Uhrzeigersinn drehen bis die gewünschte Lautstärke
erreicht ist (von 0 bis 33).
* Am Ende der Unterbrechung von TA, ALARM
oder PTY, erfolgt die Rückkehr zur vorhergehenden Lautstärke.
Gebruik van RDS
Nederlands
87
Page 89

Bediening van de CD-speler
CD-funktie
Plaatsen van een CD
Plaats een CD in het midden van de CD-houder 4
met de kant met het label omhoog. “LOADING”
wordt op het display getoond, de CD in positie geplaatst en de weergave start.
Voor CD (12 cm)
Voor CD single (8 cm)
CD-houder 4
Nederlands
Opmerkingen:
• Steek uw handen, vingers of andere voorwerpen
nooit in de CD-houder 4.
• U kunt geen CD plaatsen indien er reeds een CD in
de houder zit. Forceer geen tweede CD in de houder.
• Disks zonder de markering kunnen niet met dit
toestel worden weergegeven. CD-ROM’s kunnen
niet met dit toestel worden gebruikt.
• Sommige CD’s die zijn opgenomen in de CD-R stand
zijn niet bruikbaar. Ook wanneer de CD’s zijn opgenomen in de CD-R/W stand is het mogelijk dat deze niet
bruikbaar zijn.
• CD “singles” (8 cm) moeten zonder adapter aan de
rechterkant van de houder worden geplaatst.
Aftastindikator
Herhaalindikator
Willekeurige
weergave-indikator
Beluisteren van een reeds
geplaatste CD
Druk op de FNC toets 3 en kies de CD-bron. De
weergave wordt automatisch gestart.
“NO DISC” wordt op het display getoond indien er
geen CD is geplaatst.
Pauzeren van de weergave
1.Druk op de weergave-/pauzetoets ¥ om de
weergave te pauzeren. “PAUS” licht op het dis-
play op.
2. Druk weer op de weergave-/pauzetoets ¥ om
de weergave voort te zetten.
Uitwerpen van een CD
1. Druk op de uitwerptoets 5 om de CD uit te werpen. “EJECT” wordt op het display getoond.
* De CD wordt weer automatisch in positie gebracht
wanneer een CD na het uitwerpen niet binnen 15
sekonden wordt verwijderd. (Automatisch opnieuw
laden)
* De radiofunktie wordt automatisch 4 sekonden
na een druk op de uitwerptoets 5 geaktiveerd.
Opmerking:
• CD “singles” (8 cm) worden niet automatisch op-
nieuw geladen. Verwijder de “single” na het uitwerpen.
88
Page 90

Bediening van de CD-speler
Kiezen van een fragment
● Volgende fragment:
Druk de zoektoets $ naar rechts.
● Huidige fragment:
Druk de zoektoets $ naar links.
● Voorgaande fragment:
Druk de zoektoets $ tweemaal naar links.
* Iedere keer dat u op de linker of rechter zoektoets
$ drukt wordt in overeenkomende richting één fragment versprongen.
Snel voorwaarts/achterwaarts
(FF/FB)
● Snel voorwaarts:
Houd de zoektoets $ tenminste 1 sekonde naar
rechts gedrukt.
● Snel achterwaarts:
Houd de zoektoets $ tenminste 1 sekonde naar
links gedrukt.
* Houd de linker of rechter zoektoets $ 3 sekonden
of langer naar ingedrukt om de snelheid te verhogen.
Topfunktie
Met de topfunktie wordt het eerste fragment van de
ingestelde CD weergegeven.
Druk op de TOP toets # om het eerste fragment
(fragmentnummer 1) van de CD weer te geven.
Aftastweergave
Met aftastweergave worden de eerste 10 sekonden
van ieder fragment van de CD weergegeven.
* Gebruik aftastweergave bijvoorbeeld voor het kie-
zen van een gewenst fragment wanneer u het nummer niet weet.
1. Druk op de SCN toets 0.“SCN” licht op het dis-
play op.
2. Druk nogmaals op de SCN toets 0 om de af-
tastweergave te stoppen. “SCN” zal doven en de
normale weergave wordt hervat.
Herhaalde weergave
Met de herhaalde weergavefunktie kunt u het spelende fragment herhalen.
1. Druk op de RPT toets 9.“RPT” licht op het display op.
2. Druk nogmaals op de RPT toets 9 om de herhaalde weergave te stoppen. “RPT” zal doven
en de normale weergave wordt hervat.
Willekeurige weergave
Met de willekeurige weergavefunktie kunt u de fragmenten van de huidige CD kris-kras doorelkaar (in
een willekeurige volgorde) weergeven.
1. Druk op de RDM toets 8. “RDM” licht op het
display op.
2. Druk nogmaals op de RDM toets 8.om de willekeurige weergave te stoppen. “RDM” zal doven en de normale weergave wordt hervat.
Nederlands
89
Page 91

Bediening van de CD-CHANGER
CD CHANGER funktie (waar voorzien)
CD-nummerindikator
Beluisteren van een CD
in de CD CHANGER
U kunt een CD afspelen als een CD CHANGER op de
autoradio is aangesloten.
1. Druk op de FNC toets 3 en kies de CD
voor het starten van de weergave.
* De nummers van de houder in het magazijn waar
CD’s zijn geplaatst lichten op het display op.
2. “NO MAGA” wordt op het display getoond indien
er geen magazijn in de CD CHANGER is geplaatst.
* Indien een magazijn wordt geplaatst wanneer
“NO MAGA” wordt getoond, zal “LOADING”
eerst even op het display verschijnen. Daarna
wordt “PAUS” getoond en de werking gepauzeerd.
3. “NO DISC” wordt op het display getoond indien
Nederlands
er geen CD in het magazijn is geplaatst.
* Plaats een CD in het magazijn en plaats het ma-
gazijn in de CD
U kunt geen CD-ROMs met de CD-CHANGER
weergeven.
Opmerking:
• Schakel de spanning van het hoofdtoestel beslist uit
alvorens een CD CHANGER aan te sluiten. Schakel de
spanning daarna weer in.
CHANGER.
éLET OP
Indikator CD CHANGER - funktie
Aftastindikator
Herhaalindikator
Pauzeren van de weergave
1.Druk op de weergave-/pauzetoets ¥ om de
weergave te pauzeren. “PAUS” licht op het dis-
play op.
CHANGER
2. Druk weer op de weergave-/pauzetoets ¥ om
de weergave voort te zetten.
Selecteren van een CD
Elke Direct toets ! correspondeert met een disc
die in het magazijn geladen is.
● Kiezen van disc 1 t/m 6
Druk op de corresponderende Direct toets ! (1 t/m
6) om de gewenste disc te kiezen.
● Kiezen van magazijn 1 t/m 3 (alleen wanneer er een disc in het magazijn is)
Druk op de BND toets # om het gewenste magazijn te kiezen.
* Als er geen CD in het magazijn zit op die plaats,
heeft het drukken op de corresponderende Direct
toets ! geen effect.
Kiezen van een fragment
● Volgende fragment:
Druk de zoektoets $ naar rechts.
● Huidige fragment:
Druk de zoektoets $ naar links.
● Voorgaande fragment:
Druk de zoektoets $ tweemaal naar links.
* Ledere keer dat u op de linker of rechter zoektoets
$ drukt wordt in overeenkomende richting één frag-
ment versprongen.
Magazijnnummer
indikator
CD-indikator
Willekeurige
weergave-indikator
90
Page 92

Bediening van de CD CHANGER
Snel voorwaarts/achterwaarts
(FF/FB)
● Snel voorwaarts:
Houd de zoektoets $ tenminste 1 sekonde naar
rechts gedrukt.
● Snel achterwaarts:
Houd de zoektoets $ tenminste 1 sekonde naar
links gedrukt.
* Houd de linker of rechter zoektoets $ 3 sekonden
of langer ingedrukt om de snelheid te verhogen.
Kiezen van een magazijn
Deze funktie is slechts beschikbaar als de aangesloten CD CHANGER meerdere magazijns tegelijk kan
bevatten.
Telkens wanneer u op de MAG-toets # drukt, wordt
ingesteld op het volgende magazijn.
Topfunktie
Met de topfunktie wordt het eerste fragment van de
huidige CD weergegeven.
Druk op de TOP toets # om het eerste fragment
(fragmentnummer 1) van de CD af te spelen.
Aftastweergave
Met aftastweergave worden de eerste 10 sekonden
van ieder fragment van de CD weergegeven.
* Gebruik aftastweergave bijvoorbeeld voor het kie-
zen van een gewenst fragment wanneer u het nummer niet weet.
1. Druk op de SCN toets 0.“SCN” licht op het dis-
play op.
2. Druk nogmaals op de SCN toets 0 om de af-
tastweergave te stoppen.“SCN” zal doven en de
normale weergave wordt hervat.
Aftasten van CD’s
Met deze funktie worden de eerste 10 sekonden
van iedere CD in de CD CHANGER achtereenvolgend
weergegeven.
* Gebruik de CD-aftastweergave bijvoorbeeld voor
het kiezen van een gewenste CD wanneer u het
nummer niet weet.
1. Druk tenminste 2 sekonden op de SCN toets 0.
“DISC” en “SCN” lichten op het display op.
2. Druk nogmaals op de SCN toets 0 om de CD-
aftastweergave te stoppen. “DISC” en “SCN”
zullen doven en de normale weergave wordt hervat.
Herhaalde weergave
Met de herhaalde weergavefunktie kunt u een gewenst fragment herhalen.
1. Druk op de RPT toets 9.“RPT” licht op het dis-
play op.
2. Druk nogmaals op de RPT toets 9 om de herhaalde weergave te stoppen. “RPT” zal doven
en de normale weergave wordt hervat.
Herhaalde weergave van CD’s
Met de herhaalde weergavefunktie van CD’s kunt
u de spelende CD herhalen.
1.Druk tenminste 2 sekonden op de RPT toets
9 “DISC” en “RPT” lichten op het display op.
2. Druk nogmaals op de RPT toets 9 om de herhaalde weergave van een CD te stoppen.“DISC”
en “RPT” zullen doven en de normale weergave
wordt hervat.
Willekeurige weergave
Met de willekeurige weergavefunktie kunt u de fragmenten van de huidige CD kris-kras doorelkaar (in
een willekeurige volgorde) weergeven.
1.ruk op de RDM toets 8.“RDM” licht op het
display op.
2. Druk nogmaals op de RDM toets 8 om de willekeurige weergave te stoppen. “RDM” zal doven en de normale weergave wordt hervat.
Willekeurige weergave van CD’s
Met de willekeurige weergavefunktie voor CD’s kunt
u de fragmenten van al de in het magazijn geplaatste CD’s kris-kras doorelkaar (in een willekeurige volgorde) weergeven.
1. Druk tenminste 2 sekonden op de RDM toets 8.
“DISC” en “RDM” lichten op het display op.
2. Druk nogmaals op de RDM toets 8. om de wil-
lekeurige weergave te stoppen. “DISC” en
“RDM” zullen doven en de normale weergave
wordt hervat.
Opmerking:
• Betreffende MD CHANGER
Wanneer u een MD-CHANGER met dit apparaat gebruikt, moet u de “A” (CD-functie) wisselaar-instelling kiezen. De MD-CHANGER kan dan in de CD-
CHANGER stand gebruikt worden. In dit geval kunt u
echter geen titels in het display weergeven. Ook is
het niet mogelijk om gelijktijdig een CD-CHANGER en
een MD-CHANGER aan te sluiten.
Nederlands
91
Page 93

7. OPLOSSEN VAN PROBLEMEN
Spanning kan niet
worden ingeschakeld.
(Geen weergave.)
CD kan niet worden
geplaatst.
Geluid valt af en toe
weg of ruis.
Slechte geluidskwaliteit
direkt na inschakelen
van spanning.
Er gebeurt niks als u
op de toetsen drukt.
Nederlands
De weergave is niet juist.
Probleem
Oorzaak
Zekering doorgebrand.
Verkeerde verbindingen.
Reeds een CD geplaatst.
CD is vuil.
CD heeft veel krassen of is
vervormd.
Kondens wordt mogelijk op de
lens gevormd wanneer het
vochtig in de auto is.
De microprocessor functioneert
niet naar behoren vanwege ruis
of storing enz.
De aansluiting van de hoofdunit
of van het DCP bedieningspaneel is vuil.
Oplossing
Vervang door een zekering van hetzelfde ampèrage.
Raadpleeg de plaats van aankoop indien de zekering
regelmatig doorbrandt.
Raadpleeg de plaats van aankoop.
Verwijder de CD alvorens de volgende te plaatsen.
Reinig de CD met een zachte doek.
Gebruik een andere, niet beschadigde CD.
Wacht ongeveer 1 uur met de spanning ingeschakeld
zodat de kondens verdampt.
Schakel de stroom uit, druk op de open DCP-ontgrendeltoets 1 en verwijder het DCP bedieningspaneel.
Houd het resetknopje ongeveer 2 seconden ingedrukt
met een dun voorwerp.
Resetknopje
Veeg het vuil weg met een zachte doek
bevochtigd met wat reinigings-alcohol.
92
Page 94

8. FOUTMELDINGEN
Bij problemen zal een van de volgende foutmeldingen op het display verschijnen.Neem de overeenkomende
maatregelen om het probleem op te lossen.
Foutmelding Oorzaak Oplossing
CD ER2
CD ER3
CD ER6
Druk op de terugsteltoets indien u een andere foutmelding op het display ziet die niet in de bovenstaande
lijst wordt beschreven. Schakel de spanning uit en raadpleeg de plaats van aankoop indien het probleem
dan nog niet is opgelost.
Wordt getoond wanneer de CD in de CD-speler
niet kan worden uitgeworpen omdat deze vast
zit.
Wordt getoond wanneer de CD in de CD-speler
niet kan worden weergegeven vanwege
krassen, etc. op de CD.
Wordt getoond wanneer de CD in de CD-speler
niet kan worden weergegeven omdat de CD
ondersteboven is geplaatst.
Het mechanisme van de CD-speler werkt niet
juist. Raadpleeg de plaats van aankoop.
Plaats een CD die geen krassen heeft en niet
vervormd is.
Werp de CD uit en plaats terug op de juiste
manier.
Nederlands
93
Page 95

Muchas gracias por la adquisición del Clarion PU2312.
* Antes de utilizar el equipo, lea completamente este Manual de instrucciones.
* Después de haber leído este manual, cerciórese de guardarlo a mano (p. ej., en la guantera).
* Compruebe el contenido de la tarjeta de garantía adjunta y guárdela cuidadosamente con este manual.
* Este manual incluye los procedimientos de operación del CD/MD
cable C-BUS. Para el CD/MD
explicaciones correspondenties a las funciones.
CHANGER, consulte el manual especifico que, sin embargo, no incluye las
CHANGER que se conecta a través de un
Índice
1. PRECAUCIONES .................................................................................................................... 94
2. MANEJO DE LOS DISCOS COMPACTOS ............................................................................ 95
3. CONTROLES ........................................................................................................................... 5
4. PANEL DE CONTROL DESMONTABLE (DCP) ..................................................................... 96
5. NOMENCLATURA.................................................................................................................... 97
Nombres de los botones........................................................................................................... 97
Ítemes de visualización ........................................................................................................... 97
6. OPERACIÓN ........................................................................................................................... 98
Operaciones básicas ................................................................................................................ 98
Operaciones de la radio............................................................................................................ 100
Operaciones del sistema de datos radiofónicos (RDS)............................................................ 102
Operaciones del reproductor de discos compactos ................................................................. 106
Operaciones del CD CHANGER.................................................................................................. 108
7. SOLUCIÓN DE PROBLEMAS ................................................................................................ 110
8. INDICACIONES DE ERROR .................................................................................................. 111
9. ESPECIFICACIONES .............................................................................................................. 150
1. PRECAUCIONES
Español
1. Si el interior del automóvil esté muy frío y utiliza
la unidad inmediatamente después de haber encendido el calefactor, es posible que se condense
humedad en el disco o en las piezas del reproductor, y que resulte imposible realizar la reproducción apropiada. Si se condensa humedad
en el disco, frótelo con un paño seco. Si se condensa humedad en las piezas ópticas del reproductor, no lo utilice durante aproximadamente
una hora, y la humedad condensada desaparecerá de forma natural para permitir la operación
normal.
94
2. La conducción por carreteras accidentadas que
causen vibraciones notables puede causar el
salto del sonido.
Page 96

2. MANEJO DE LOS DISCOS COMPACTOS
Forma adecuada de sujetar
el disco compacto
Extracción del disco
Esta unidad ha sido diseñada específicamente para
reproducir discos compactos con la marca . No
podrá reproducir ningún otro tipo de discos.
Para extraer el disco compacto de su caja, presione
la parte central de dicha caja y levante el disco hacia afuera, sujetándolo cuidadosamente por su
borde.
Maneje siempre los discos compactos por sus bordes. No toque nunca su superficie.
Para eliminar las huellas dactilares y el polvo, utilice un paño suave, y frote el disco en línea recta
del centro hacia la periferia del disco compacto.
No
Nota sobre los discos compactos
No pegue nunca etiquetas sobre la superficie del
disco compacto ni marque la superficie del mismo
con un lápiz ni con un bolígrafo.
No
No utilice disolventes tales como limpiadores comerciales, rociadores antiestáticos, ni diluidor de
pintura para limpiar los discos compactos.
No
No utilice discos compactos demasiado rayados,
deformados, agrietados, etc. La utilización de tales
discos podría causar el mal funcionamiento o daños.
No
Los discos compactos nuevos pueden tener cierta
rugosidad en sus bordes. Es posible que la unidad
no trabaje o que el sonido se salte con tales discos.
Para eliminar tal rugosidad del borde del disco, utilice un bolígrafo, etc.
No exponga los discos compactos a la luz solar di-
Bolígrafo
Rugosidad
Nota:
• No utilice hojas protectoras de discos compactos, vendidas en establecimientos del ramo, ni discos provistos de estabilizadores, etc. Estos elementos podrían atascarse en el mecanismo interno y dañar el disco.
recta ni a fuentes térmicas.
No
Español
95
Page 97

4. PANEL DE CONTROL DESMONTABLE (DCP)
El panel de control podrá desmontarse como medida antirrobo. Después de haber desmontado el
panel de control, guárdelo en el estuche para el panel de control desmontable (DCP) para evitar que
se raye.
Le recomendamos que lleve el panel de control consigo cuando salga del automóvil.
Extracción del panel de control
desmontable (DCP)
1. Mantenga presionado el botón POWER 3du-
rante 1 segundo o más para desconectar la alimentación.
2. Presione a fondo el botón de liberación del DCP
1.
Botón de liberación
del (DCP) 1
3. Extraiga el DCP.
DCP
é PRECAUCIÓN
• El DCP puede dañarse fácilmente con los golpes. Después de haberlo extraído, colóquelo
en su estuche, y tenga cuidado de no dejarlo
caer ni de someterlo a golpes fuertes.
• Cuando presione el botón de liberación y desbloquee el DCP, las vibraciones del automóvil pueden hacer que se caiga. Para evitar dañar el DCP, guárdelo siempre en su caja después de haberlo extraído.
Estuche del DCP
(Consulte la figura de abajo.)
• El conector de la unidad principal al DCP es
una pieza extremadamente importante. Tenga
cuidado de no dañarlo presionándolo con sus
uñas, bolígrafos, destornilladores, etc.
Nota:
• Si el DCP se ensucia, frótelo con un paño suave y
seco.
Español
Instalación del panel de control desmontable (DCP)
1. Inserte la parte derecha del DCP en la unidad
principal.
2. Inserte la parte izquierda del DCP en la unidad
principal.
2.
1.
96
Page 98

5. NOMENCLATURA
Nota: Cerciórese de leer este capítulo consultando los diagramas de la parte frontal del capítulo
“3. CONTROLES” de la página 5 (desplegada).
Nombres de los botones
1 Botón de liberación del DCP
2 Botón selector de modo de audio (A-M)
Botón de sonoridad (LD)
3 Botón de alimentación (POWER)
Botón selector de función (FNC)
4 Ranura de inserción del disco compacto
5 Botón de expulsión (Q)
6 Botón selector de visualización (DISP)
7 Botón de anuncios sobre el tráfico (TA)
8 Botón de tipo de programa (PTY)
Botón de reproducción aleatoria (RDM)
9 Botón de frecuencia alternativa (AF)
Botón de reproducción repetida (RPT)
Ítemes de visualización
1 Indicación de volumen (VOL)
2 Indicación de modo de audio (A-M)
3 Indicación altavoz trasero (R)
Indicación altavoz delantero (F)
4 Indicación de estado de operación
* Se visualizará la frecuencia, el tipo de pro-
grama (PTY), el tiempo de reproducción, el
reloj (CT), etc.
5 Indicación de sonoridad (LD)
6 Indicador de reforzador Z (Z-EHCR)
7 Indicación del modo de CD/MD
8 Indicación del número de cargador
9 Indicación de disco (DISC)
0 Indicación de reproducción aleatoria (RDM)
! Indicación de reproducción repetida (RPT)
CHANGER
0 Botón de exploración de emisoras memori-
zadas/almacenamiento automático (PS/AS)
Botón de exploración (SCN)
! Botones de memorización (1 a 6)
Botones de selección directa (1 a 6)
@ Botón del reforzador Z (Z-EHCR)
# Botón selector de banda (BND)
Botón de paso al comienzo (TOP)
Botón del cargador (MAG)
$ Botones de búsqueda (izquierdo a y dere-
cho d)
% Mando giratorio
¥ Botón de reproducción/pausa (s)
Botón de silenciamiento (MUTE)
@ Indicación de exploración (SCN)
# Indicación de canal memorizado (1 a 6)
Indicación de número de disco (1 a 6)
* Se visualizarán los números de discos
correspondientes a los discos del
CD/MD
CHANGER
$ Indicación de tipo de programa (PTY)
% Indicación de programa sobre el tráfico (TP)
¥ Indicación de anuncio sobre el tráfico (TA)
& Indicación de programa regional (REG)
* Indicación de frecuencia alternativa (AF)
( Indicación de manual (MANU)
) Indicación altavoz izquierdo (L)
Indicación altavoz derecho (R)
Español
97
Page 99

6. OPERACIÓN
Nota: Cerciórese de leer este capítulo consultando los diagramas de la parte frontal del capítulo
“3. CONTROLES” de la página 5 (desplegada).
Operaciones básicas
é PRECAUCIÓN
Antes de desconectar la alimentación de la unidad, cerciórese de reducir el volumen al nivel
mínimo. El sonido fuerte al conectar la alimentación podría perjudicar sus oídos o dañar la
unidad.
Conexión/desconexión
de la alimentación
Nota:
• Con el motor apagado, no utilice el radiocasete por
demasiado tiempo ya que podría tener dificultates
para poner en marcha el motor y se reduce la duración de la bateria.
1. Presione el botón POWER 3.
2. Se encenderán la iluminación el visualizador de
la unidad. La unidad recuerda automáticamente
el último modo de operación, y cambiará de
forma automática a la visualización de tal modo.
3. Para desconectar la alimentación de la unidad,
mantenga presionado el botón 3 durante 1 segundo o más.
Selección de un modo
1. Presione el botón FNC 3 para seleccionar un
modo de función.
2.El modo de función cambiará en el orden siguiente:
Español
Radio ➜ Reproductor de discos compactos ➜
CD/MD
CHANGER ➜ Radio …
* Si no hay CD/MD CHANGER conectado, no po-
drá seleccionarse el modo de cambiador de discos compactos ni el de minidiscos.
Ajuste del volumen
Si gira el mando giratorio % hacia la derecha, el
volumen aumentará, y si lo gira hacia la izquierda,
se reducirá.
* El margen de ajuste del volumen es de 0 (mínimo)
a 33 (máximo).
Ajuste del reforzador Z
Esta unidad dispone de 3 tipos de efectos de tono
de sonido almacenados en la memoria. Seleccione
el deseado.
* El ajuste de fábrica es “OFF”.
Cada vez que presione el botón Z-EHCR @, el
efecto del tono cambiará en el orden siguiente:
“Z-ENHANCER 1” ➜ “Z-ENHANCER 2” ➜
“Z-ENHANCER 3” ➜ “OFF” ➜ “Z-ENHANCER 1”...
• Z-ENHANCER 1 : graves acentuados
• Z-ENHANCER 2 : agudos acentuados
• Z-ENHANCER 3 : graves y agudos acentua-dos
• OFF : sin efecto acústico
Ajuste del tono
Presione el botón A-M 2 y seleccione el ítem que
desee ajustar.
Cada vez que presione el botón A-M 2, el ítem
cambiará en el orden siguiente:
“BASS” ➜ “TREB” ➜ “BAL” ➜ “FAD” ➜ Modo de
función...
Ajuste de los graves
1.Presione el botón A-M 2 para seleccionar
“BASS”.
2. Al girar el mando giratorio % hacia la derecha
se acentuarán los graves, y al girarlo hacia la izquierda, se atenuarán.
* El ajuste de fábrica es “0”. (Margen de ajuste:
–6 a +6)
3. Cuando haya finalizado el ajuste, presione varias
veces el botón A-M 2 hasta seleccionar el modo
de función deseado.
Ajuste de los agudos
1.Presione el botón A-M 2 para seleccionar
“TREB”.
2. Al girar el mando giratorio % hacia la derecha
se acentuarán los agudos, y al girarlo hacia la izquierda, se atenuarán.
* El ajuste de fábrica es “0”. (Margen de ajuste:
–6 a +6)
3. Cuando haya finalizado el ajuste, presione varias
veces el botón A-M 2 hasta seleccionar el modo
de función deseado.
98
Page 100

Operaciones básicas
Ajuste del equilibrio entre los
altavoces izquierdos y derechos
1.Presione el botón A-M 2 para seleccionar
“BAL”.
2. Al girar el mando giratorio % hacia la derecha se
acentuará el sonido de los altavoces derechos,
y al girarlo hacia la izquierda se acentuará el de
los altavoces izquierdos.
* El ajuste de fábrica es “0”. (Margen de ajuste:
L9 a R9)
3. Cuando haya finalizado el ajuste, presione varias
veces el botón A-M 2 hasta seleccionar el modo
de función deseado..
Ajuste del equilibrio entre los
altavoces delanteros y traseros
1.Presione el botón A-M 2 para seleccionar
“FAD”.
2. Al girar el mando giratorio % hacia la derecha se
acentuará el sonido de los altavoces delanteros,
y al girarlo hacia la izquierda se acentuará el de
los altavoces traseros.
* El ajuste de fábrica es “0”. (Margen de ajuste:
F9 a R9)
3. Cuando haya finalizado el ajuste, presione varias
veces el botón A-M 2 dhasta seleccionar el
modo de función deseado.
Sonoridad
El efecto de sonoridad acentúa los graves y los agudos para crear un tono de sonido natural.
Cuando escuche música a bajo volumen, se recomienda que utilice el efecto de sonoridad.
● Activación y desactivación del efecto
de sonoridad
Manteniendo presionado el botón LD 2 durante 2
segundos o más, el efecto de sonoridad se activará
y desactivará. Cuando active el efecto de sonoridad, en el visualizador aparecerá “LD”.
Cambio de visualización
Presione el botón DISP 6 para seleccionar la visualización deseada.
La visualización cambiará en el orden siguiente:
Principal ➜ Reloj (CT) ➜ Principal …
* Si cambia la visualización con cualquier operación
de botones cuando esté visualizándose el reloj (CT),
la visualización del reloj volverá a aparecer automáticamente después de la operación.
* El ejemplo muestra la visualización en el modo de
radio.
Función de hora del reloj (CT)
La función de CT permitirá que se visualice la hora
del reloj solamente cuando se reciban datos de CT.
Presione el botón DISP 6 y el visualizador cambiará al modo CT (hora del reloj).
* Cuando no se reciban datos de CT, se visualizará
“CT--:--”.
Nota:
• Algunos países y emisoras no transmiten datos de
hora del reloj. En algunas áreas, es posible que la
hora del reloj (CT) no se visualice correctamente.
Anulación automática del volumen
durante las llamadas telefónicas
En caso de que esté presente el teléfono móvil,
cuando se recibe una llamada telefónica, el volumen de la modalidad seleccionada se anula automáticamente y en la pantalla se visualiza el mensaje TEL MUTE.
Para habilitar la función, pulse al mismo tiempo la
tecla # y el número 5 de las teclas de preselección !.
Español
99
 Loading...