

Page 1
Page 2

The radio is fixed, designed according to the compartment’s specific characteristics and with a personalised de-
sign meeting perfectly the style of dashboard.
The radio is installed in an ergonomic position for the driver and passenger, and controls can be quickly locat-
ed from the graphical display on the front, making the device easy to use.
To increase protection against theft, the device has a protection system that only allows it to be used on the
car in which it has originally been installed.
The instructions for use are given below and we recommend you to read them carefully and always keep them
at hand (for example, inside glove compartment).
We hope you enjoy reading this manual!
RADIO
1
Page 3

TTAABBLLEEOOFFCCOONNTTEENNTTS
SUGGESTIONS
ROAD SAFETY ..................................................................... 3
RECEPTION CONDITIONS ............................................. 3
CARE AND MAINTENANCE........................................... 3
COMPACT DISCS................................................................ 4
RADIO WITH CD and CD MP3 PLAYER
(for versions/markets, where provided)
GENERAL FEATURES ........................................................ 7
– Audio section ............................................................... 7
– Radio section................................................................ 7
RADIO
– Compact disc section ................................................. 7
– CD Section Changer: ................................................. 7
– USB – WIP Plug/Connection/
®
iPod
Player Section ................................................... 8
– WIP Bluetooth
Bluetooth
– Streaming Audio Bluetooth
®
Section –
®
Telephone ................................................ 8
®
Section ..................... 8
S
CONTROLS ON FRONT PANEL ................................... 8
CONTROLS ON STEERING WHEEL............................. 10
FUNCTIONS AND ADJUSTMENTS ............................... 11
– Device Lighting/Power off ........................................ 11
– Volume and sound control........................................ 11
RADIO MODE ...................................................................... 12
CD MODE.............................................................................. 15
CD-CHANGER MODE
(non-compatible with MP3)................................................. 17
USB-WIP PLUG PLAYER MODE ..................................... 19
®
IPOD
WIP Bluetooth
STREAMING AUDIO Bluetooth
CONNECTION ..................................................... 20
®
MODE -
Bluetooth
®
TELEPHONE .................................................. 20
®
MODE ...................... 21
2
Page 4

SSUUGGGGEESSTTIIOONNS
S
ROAD SAFETY
Please, learn how to use all different
radio functions (i.e. save stations) before
beginning to drive.
WARNING
High volume can be a risk for
driver and for other people
in road traffic. The volume must
therefore always be adjusted so that
you can still hear noise from the surroundings (e.g. horns, ambulance
sirens, police sirens, etc.).
RECEPTION CONDITIONS
Reception conditions change constantly
while driving. Reception may be interfered
with by the presence of mountains, buildings or bridges, or when you are far from
the broadcaster.
WARNINGS The volume may increase to above normal levels when receiving traffic bulletins.
CARE AND MAINTENANCE
The radio system is designed for a long
operational life and therefore does not require particular maintenance. If there is
a fault, contact a
.
work
Clean the cover with a soft antistatic
cloth only. Cleaning and polishing products could damage the surface.
Fiat Service net-
RADIO
3
Page 5
COMPACT DISC
Dirt, scratches or any distortions on
CDs could cause problems when playing
and poor sound quality. For optimal playback conditions, follow these guidelines:
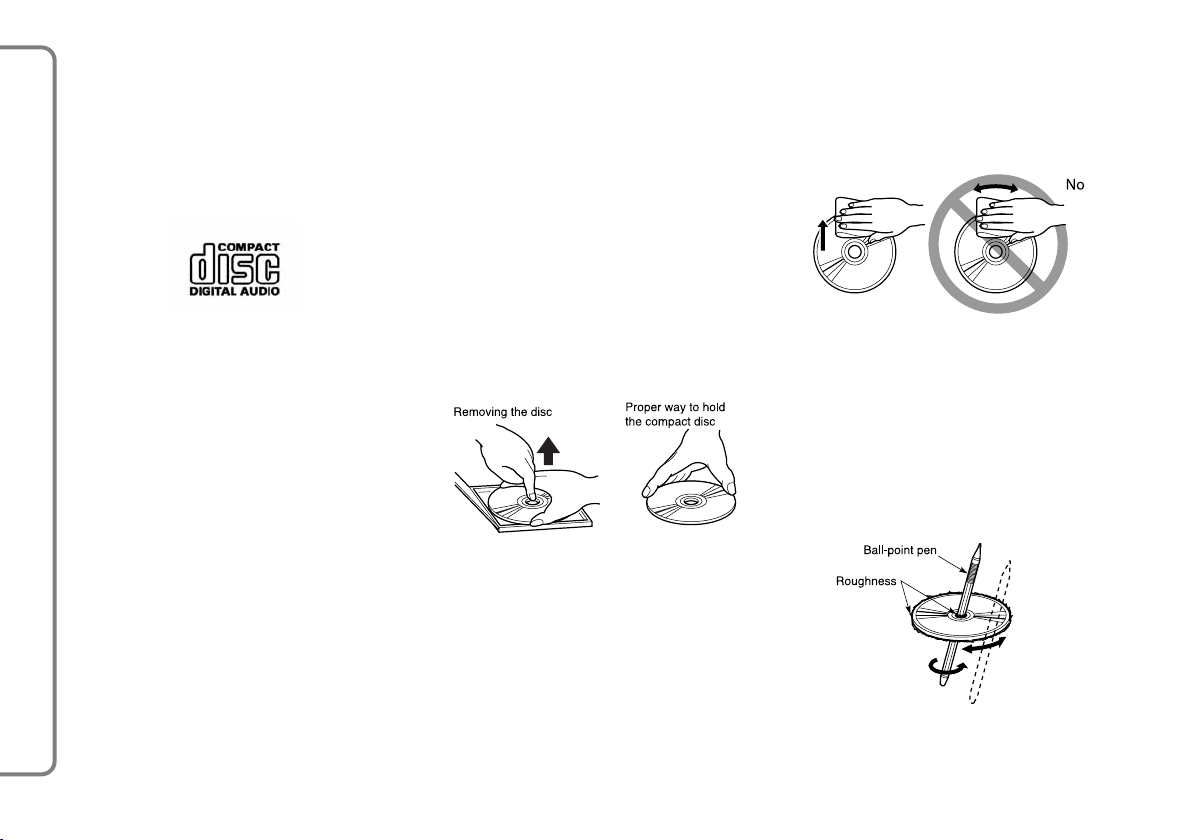
– use only Compact Discs with the logo:
– once listened, put Compact Discs in
boxes to avoid marks or scratches which
can cause problems when playing;
– do not expose CDs to direct sunlight,
high temperatures or moisture for long
periods, to prevent them from warping.
– don’t stick labels on Compact Disc surfaces or write on the recorded surface
with pens or pencils.
To extract the Compact Disc from its
box, press in the middle of it and lift up
the disc holding it carefully by outside.
To remove fingermarks and dust, use
a soft cloth starting from the centre of the
CD and moving outwards.
– clean every CD thoroughly removing
any fingermarks or dust using a soft cloth.
Hold CDs by the outside and clean them
RADIO
from the middle outwards;
– never use chemical products for cleaning (e.g. antistatic and thinner sprays) as
they can damage the Compact Disc surface;
4
New CDs can be rough around the
edges. When such discs are used, the device might not function or the sound might
jump. To remove the roughness from the
disc edges, use, for example, a ballpoint
pen.
Always hold CD by the outside rim.
Never touch the surface.
Page 6

The use of original CD supports is required for the best quality audio production. Correct operation is not guaranteed
when CD-R/RW media are used that
were not correctly burned and/or with
a maximum capacity of 650 MB.
WARNINGS When using copy-pro-
tected CDs, they may be a delay of a few
seconds before the system starts to play
them. In addition, since many new and different protection methods are continuously being introduced, it is not possible
to guarantee that the CD player will play
any protected CD. The presence of copy
protection is often in small letters or may
be difficult to read on the cover of the actual CD and it may say something like, for
example, “COPY CONTROL”, “COPY
PROTECTED”, “THIS CD CANNOT BE
PLAYED ON A PC/MAC”, or identified
through the use of symbols, such as, for
example:
In addition, protected discs often do not
display the audio disc identification symbol on the discs and on their cases:
WARNING Do not use commercially
available CD protective skins or discs with
stabilisers, etc. since they might become
jammed in the internal mechanism and
damage the disc.
RADIO
5
Page 7

WARNING The CD player is able to
read most of the compression systems currently on the market (e.g.:LAME, BLADE,
XING, FRAUNHOFER) but as these systems are continually evolving, playback of
all compression formats is not guaranteed.
WARNING If a multisession disk is
loaded, only the first session will be played.
Notes about Compact Discs
Don’t stick labels on the surface of
a Compact Disc or write on the recorded surface with pens or pencils.
RADIO
Do not use solvents such as commercially
available stain removers, antistatic sprays
or thinners to clean CDs.
Do not use CDs that are very scratched,
flawed, distorted, etc. Using discs like
these will result in malfunctions or damage to the player.
Do not expose CDs to direct sunlight or
any heat source.
6
Page 8
RRAADDIIOOW
WIITTHHCCDDaannddCCDDMMPP33PPLLAAYYEERR
(for versions/markets, where provided)
GENERAL
INFORMATION
The equipment offers the following func-
tions:
AUDIO SECTION
– Separate bass/treble adjustment.
– Right/left channel balance (BAL).
– Automatic loudness function (LOUD).
– Front/rear balance (FAD).
RADIO SECTION
– PLL tuning (Phase Locked Loop) with
FM/AM frequency bands.
– RDS (Radio Data System) with TA
(Traffic Announcement) functions – EON
(Enhanced Other Network) – REG (Regional Programmes) – PTY (Program
Type).
– Alternative frequency search selection
in RDS mode (Radio Data System).
– Automatic/manual tuning of stations.
– Manual programming of 24 stations: 18
on FM (6 on FM1, 6 on FM2, 6 on FMast),
6 on AM band.
– Automatic memorising (AUTOSTORE
function) of 6 stations on dedicated FM
band.
– Automatic Stereo/Mono selection.
COMPACT DISC SECTION
– Direct selection of the disc.
– Track selection (forward/back).
– Fast track play (forward/back).
– RDM function (random track reproduction).
CD-CHANGER SECTION
(for versions/markets, where provided)
– Direct selection of the disc.
– Track selection (forward/back).
– Fast track play (forward/back)
– RDM function (random track reproduction).
For installing and relative
connecting, contact Fiat
Dealerships only.
WARNING
On multimedia CDs, besides
audio tracks, there are data
tracks too. Playlist of such CD can
cause wind noise to a volume which
can affect road safety as well as
cause cause damages to final audios
and speakers.
USB – WIP PLUG/IPOD
CONNECTION PLAYER
SECTION
(for versions/markets, where provided)
– Reading list selection.
– Track selection (forward/back).
– Fast track play (forward/back).
®
RADIO
7
Page 9

WIP Bluetooth
®
SECTION –
Bluetooth®TELEPHONE
– Combination with mobile phones (up
to 4 mobile phones)
– Incoming/outgoing call control
– Phonebook control (with totally com-
patible mobile phones only)
CONTROLS ON FRONT PANEL
F0P0500m
STREAMING AUDIO Bluetooth
SECTION
(for versions/markets, where provided)
– Direct selection of phone tracks
– Playback of tracks
RADIO
8
®
fig. 1
A
B MODE Button for selecting
C SOURCE Selection button of
˚
CD/CD MP3 ejection
button
D BAND Range selection button
ALT Frequency FM1, FM2,
FMast, AM
type of information
shown on the right of
the display (Radio,
CD, etc.)
E
F
+
CD/CD MP3 housing
Audio control button:
right/left and front/rear
balance, Loudness, sound
G LIST Button for displaying list
operating mode: Radio, CD, CD Changer,
USB Player, iPod
®
REFRESH of local broadcasters that
can be received, list of CD
tracks and MP3/USB files
Player, Streaming Audio Bluetooth®Mode
Page 10

H ESC Button for cancella-
tion of operation in
progress (return to
previous display)
I TA/PTY Button for selecting
TA function (traffic information) and PTY
(Program Type)
L ÷˜ Buttons for automat-
ic lower/higher frequency search and CD
or MP3 (for versions/
markets, where provided) and USB player.
M NO Buttons for automatic
lower/higher frequency
search and CD or MP3
(for versions/ markets,
where provided) and
USB player
N OK Function selected con-
firmation button
(Pressing for a long
time confirms choice
but it does not save it)
O MENU Button for access to
general menu
P 1----6 Memory keys for ra-
dio stations, selection
of stored radio stations, select CD in CD
Changer (for versions/market, where
provided). Holding
down: updates stations received
Q DARK With successive impulses:
display darkening until it become completely dark.
From complete dark, an additional impulse reactivates
standard light
R
Radio lighting/power off button/knob (hold down) and
volume control (turn)
RADIO
9
Page 11

STEERING WHEEL
CONTROLS
1. Increase volume button
2. Decrease volume button
1+2 MUTE function is activated if but-
tons 1 and 2 are pressed simultaneously; press just one of the two
buttons to restore volume
3. Radio mode: higher frequency automatic search
Holding the button down produces
continuous sliding along the frequency; this is interrupted as soon
as the button is released
RADIO
CD/CD Changer/MP3 (for versions/markets, where provided):
select next track
F0P0501m
Holding the button down plays
back the track at a fast speed;
as soon as the button is released
normal speed is resumed
Select previous track
4. Radio mode: lower frequency automatic search
Keeping the button pressed produces continuous sliding along the
frequency; this is interrupted as
soon as the button is released
CD/CD Changer/MP3 (for versions/markets, where provided):
select previous track
Holding the button down plays
back the track at a fast speed;
as soon as the button is released
normal speed is resumed
Select next track
5. Radio/CD/CD Changer operating
mode selection and confirmation of
function selected
Telephone mode: accept/end a call
and access to telephone menu (by
pressing for 2 seconds)
6. Upwards rotation
Radio mode: select higher stored
station
CD Changer Mode: Select next CD
With MP3 (for versions/markets,
where provided): select next file
Menu activated: select next track
7. Rotation downwards
Radio mode: select lower stored
station
CD Changer Mode: Select previous
CD
With MP3 (for versions/markets,
where provided): select previous
file
Menu activated: select previous
track
10
fig. 2
Page 12

FUNCTIONS AND
ADJUSTMENTS
DEVICE LIGHTING/POWER OFF
Turn the ignition key to M to light the
device and press the button/knob (
Press the button/knob (
the device.
With the engine switched off, the radio
switches off after 30 minutes.
VOLUME AND SOUND
CONTROL
Volume adjustment
Turn the button/knob (R).
WARNINGS If the vehicle is equipped
with a telephone with “mute” signal output connected to the radio or a telephone
with a Bluetooth
telephone is in use the radio will automatically activate the MUTE function.
®
R) to switch off
connection, when the
R).
Audio adjustment
It is possible to control settings of
bass/treble, balance, fader and loudness.
The balance and fader controls are used
to emphasize the sound from the left/right
and front/rear speakers. The loudness
control is used to emphasize bass and treble tones when the playing volume is low.
Repeatedly press the + button (F) to
control the audio to set bass, treble, loudness, fader and balance.
The radio deactivates the audio setting
procedure after a few seconds if no action
is carried out or when + (F) is pressed after finishing the settings
WARNINGS The bass and treble adjustment is specific to each source; this
means that they can be adjusted differently
in RADIO, CD or CD changer modes.
Bass adjustment
When “BASS“ appears on display, press
N or O buttons to adjust to within the
following audio levels:
– “BASS −9” to adjust the bass to a min-
imum level;
– “BASS 0” to adjust to an average level;
– “BASS +9” to adjust the bass to the
maximum level.
Treble adjustment
When “TREB“ appears on display, press
buttons N or O to adjust to within the
following audio levels:
– “TREB −9” to adjust the treble to a
minimum level;
– “TREB 0” to adjust to an average level;
– “TREB +9” to adjust the treble to the
maximum level.
RADIO
11
Page 13

Loudness function
This function can be used to automatically emphasise bass and treble when the
volume is low.
Press the buttons N or O to activate or
deactivate the function.
Front/rear sound adjustment
When display shows “FAD”, press the
buttons N or O to change adjustment.
Press the button N to emphasize the
sound from the front speakers or the button O to emphasize the sound from rear
speakers.
RADIO
Left/right sound adjustment
When display shows “BAL”, press but-
tons N or O to change adjustment.
Press the button N to emphasize the
sound from the right speakers or the button O to emphasize the sound from left
speakers.
Automatic volume correction
This function is used to adjust the device
volume automatically on the basis of vehicle speed. Press the buttons N or O
to activate or deactivate the function.
RADIO MODE
Listening to the radio
Repeatedly press the SOURCE (C)
button and select radio mode.
Selecting a frequency band
Press the BAND/ALT (D) button to
select frequency bands FM1, FM2, FMAST
or AM respectively.
Automatic search for stations
To activate an automatic search for sta-
tions, briefly press one of the keys ÷
or ˜ to select the previous or next
station respectively.
Hold the key pressed down in the selected direction to scroll through the frequencies.
When one of the keys is released,
the scrolling stops on the first receivable
station.
12
Page 14

If the TA function is active, only stations
that broadcast traffic information are
stored.
The station search is carried out initially with low sensitivity (selecting the most
powerful stations) and then with “high”
sensitivity (selecting the weakest stations).
To carry out a direct search with “DX”
sensitivity, press ÷ key or ˜ twice.
Manual search for stations
Press button N or O briefly to select
the next or previous station respectively.
Hold the button pressed down in the selected direction to scroll through the frequencies. Scrolling stops as soon as the
key is released.
Manual station storage
To store the stations manually:
1) select the required station using the
buttons ÷ or ˜;
2) press one of the buttons from 1 to 6
(P) and hold it down for longer than
2 seconds.
Automatic storage of FM stations
(Autostore)
The radio can store automatically the six
most powerful FM stations on the storing band FMast.
Press the BAND/ALT (D) button and
hold it down for more than 2 seconds.
WARNINGS The six stations previously sorted in FM will be replaced by
storing with Autostore; when less than
6 stations are receivable, memory positions are not deleted, but remain the
same.
Memorized station tuning
Proceed as follows to tune to a stored
station:
1) Press the BAND/ALT (D) button to
select frequency bands FM1, FM2, FMAST
or AM respectively.
2) Press one of the buttons from 1 to
6 (P) and the radio will tune on the cor-
respondent station.
Display the list of local stations
It is possible to display in alphabetical
number the list of the most powerful receivable stations (mx. 30 stations) by
pressing LIST/REFRESH (G). Press the
button for at least 2 seconds to update
this list.
Select the desired station through the
buttons N or O and confirm by pressing
the OK (N) button.
RDS FUNCTIONS
RDS (Radio Data System)
The RDS function can receive the same
station on any frequency used in the region you are driving through.
Press the MENU (O) button to acti-
vate/deactivate the RDS function, then
with ÷ or ˜buttons:
1) select “AUDIO FUNCTIONS” on the
radio display and confirm by pressing the
OK (N) button;
2) select “FM BAND PREFERENCES”
and confirm with the OK (N) button;
3) select the “ACTIVATE SEARCH FRE-
QUENCIES (RDS)” mode and confirm
with the OK (N) button.
RADIO
13
Page 15

When the RDS function is activated,
RDS will appear on the display followed
by the name of the selected station. If only RDS is displayed, the function is activated but not available for the tuned
station.
WARNINGS When the RDS function
is activated, the radio continuously searches for the station broadcasting the same
program with the best reception. However, under certain conditions, searching
for an RDS station is not guaranteed all
over the country, as radio stations do not
cover 100% of the ground. This explains
the possible lost of station reception during the journey.
TA function
RADIO
(Traffic announcements)
It is possible to receive traffic information with the TA function active.
When traffic information is broadcast, the
radio automatically switches to the broadcasting station; once the information has
been broadcast, the radio automatically goes
back to the audio source that was playing.
To activate/deactivate the function, press
the TA/PTY (I) button.
When the TA function is active, the dis-
play shows “TA”; if the display shows
“TA”, it means the function is active but
not available at the moment.
All traffic information broadcasts will
take priority in any radio mode (RADIO,
CD or CD CHANGER).
WARNING The traffic information
broadcast volume is independent of the
radio’s normal playing volume. It may be
adjusted with the volume knob. This setting will be stored and used to receive subsequent broadcasts.
During the transmission of a traffic bulletin, “TRAFFIC” is shown on the display
alternating with the name of the station
broadcasting the bulletin.
When the selected station cannot broadcast traffic information, “NO TA” is
shown on the display.
Traffic information interruption
Press the TA/PTY (I) button during
broadcasting of traffic information to stop
it. In this case the TA function is deactivated.
REG function (Regional program
search)
When stations in a single network
broadcast regional programs, they broadcast regional programs which may be received in the different regions you are driving through.
The REG function prioritises reception
of a program even when the reception
zone is changed.
Hold down the TA/PTY (I) button for
more than 2 seconds to activate/deactivate the function.
PTY function (Program Type)
This function makes it possible to receive
stations broadcasting a specific type of
program (bulletins, culture, sports, rock
music, etc...).
Proceed as follows to activate or deactivate the PTY function:
1) Press the BAND (D) button to se-
lect the FM1, FM2, FMAST or AM frequency bands, respectively.
2) Hold down the TA/PTY (I) button
for more than 2 seconds.
14
Page 16

Searching for PTY programs
Proceed as follows to search for a PTY
program:
1) Press the BAND (D) button to se-
lect the FM1, FM2, FMAST or AM frequency bands, respectively.
2) Hold down the TA/PTY (I) button
for more than 2 seconds.
3) Press the buttons ÷ or ˜ briefly
to scroll the list of proposed programs;
4) When the desired program appears,
hold down the ÷ or ˜ button for
more than 2 seconds to activate the automatic search (after automatic searching,
the PTY function is deactivated).
When the PTY function is active, it is
possible to store the programs: hold down
one of pre-selection buttons from 1 to 6
(P) for more than two seconds. Press the
relative button briefly to recall the stored
program type.
EON function (Enhanced Other
Networks)
This function interconnects stations that
are part of the same network. The function makes it possible to receive news on
the traffic situation or a PTY programme
transmitted by a station that is part of the
same network as the tuned station.
This service is activated automatically
when the TA or PTY function is selected.
CD MODE
Select CD player
Playing starts automatically when a CD
is inserted with its printed side facing
upwards.
WARNING Some anti-pirating systems
present on the original CD or CDs copied
with non-professionals burners can cause
mulfunctioning independently of the quality of the original player.
Listening to the CD already in
the player
If you are playing another audio source
and a CD is already present in the player, press the SOURCE (C) button. The
CD will start to play automatically.
CD ejection
To extract the CD press
Select a track of the CD.
Proceed as follows to select a CD track:
1) briefly press ˜ button to select the
next track;
2) briefly press ÷ to go back to the
beginning of the track that is playing; press
again to select the previous track.
(A).
˚
RADIO
15
Page 17

Fast track play (forward/back)
Proceed as follows to play a track rapid-
ly:
To play a track quickly, press and hold
down ˜ or ÷ to play CD tracks forward or backward at a fast speed; release
to go back to normal playing speed.
Random track reproduction
(RDM)
Proceed as follows to play tracks in ran-
dom order.
1) select CD mode with the
ton;
2) press the
hold it down for two seconds. CD tracks
RADIO
will be played in random order.
Press
seconds to return to standard play.
Displaying tracklist
Press the LIST/REFRESH (G) button
to show the list of CD tracks or MP3 files
(for versions/markets, where provided).
Select the desired station with the
O
button and confirm by pressing
OK (N).
m
(C) button again and
m
(C) and hold it down for two
m
(C) but-
N
or
MP3 CDS – Information
and suggestions
MP3 format (MPEG 1, 2 & 2.5 Audio Layer 3) is a standard audio compression system able to record many music files on the
same CD. Whether an MP3 disk can be
read and the titles displayed may depend
on the burning program and/or parameters used.
When burning, select the standard ISO
966 0 level 1, 2 or Joliet to ensure that the
burned CDR or CDRW will be playable.
If CD is burned in another format, a reading malfunction may occur.
For a perfect sound quality, we suggest
you use the same burning standard for all
pieces on the CD, with the lowest possible writing speed. In the particular case
of a multi-session CD, use of the Joliet
standard is recommended.
The radio plays audio files with the .mp3
extension only. All other kinds of files
(.wma, .mp4...) cannot be read.
We suggest use of file names with less
than 20 characters, excluding special characters (e.g.: “ ” ? ; ù) to prevent problems
during reading or displaying.
CD MP3 – File listening
Insert the CD MP3 in the player: the radio automatically starts searching for audio tracks. The operation may last a few
seconds or even a few dozen seconds before beginning to play, depending on the
number of tracks present.
On a same CD, the CD player can read
up to 255 MP3 files distributed on 8 folder levels. We suggest you use two levels
only in order to reduce access time for
reading the CD.
If you are playing another audio source
and an MP3 CD is already present in the
player, press SOURCE (C): The CD will
start to play automatically. Press the
LIST/REFRESH (G) button to show the
MP3 folder list.
16
Page 18

CD-CHANGER MODE (not compatible with MP3)
(for versions/markets, where provided)
Select CD CHANGER
Press the SOURCE (C) button and se-
lect CD Changer mode.
Select a CD
To select the required CD, press 1 to
6 (P) keys on the keypad.
Select a track of the CD.
To select a track on a CD in the CD
Changer, proceed as follows:
1) briefly press ˜ to select the next
track;
2) briefly press ÷ to go back to the
beginning of the track that is playing; press
again to select the previous track.
Fast track play (forward/back)
Proceed as follows to play rapidly
a track:
To play a track quickly, press ˜ or
÷ and hold down to play CD tracks
forward or backward at a fast speed; release to go back to normal playing speed.
Random track reproduction
(RDM)
Proceed as follows to play tracks in ran-
dom order.
1) select CD Changer mode with the
I
(D) button;
2) press
I
(D) again and hold it down
for two seconds. CD tracks will be played
in random order.
Press the
I
(D) button again and hold
it down for two seconds to return to standard play.
F0P0120m
RADIO
fig. 3
17
Page 19

CD Changer extraction
The CD changer is installed in the glove
compartment on the passenger side
(fig. 3) and can hold up to six CDs.
Proceed as follows to gain access to the
loader:
1) open the passenger side glove com-
partment;
2) open the sliding flap A-fig. 4 of the
CD Changer;
3) press B-fig. 4 to eject the CD loader.
RADIO
Inserting a CD into the CD loader
Proceed as follows to put a CD into the
CD loader:
1) pull tab D-fig. 5 to open one of the
six loader compartments C;
2) insert the CD with the printed side
and the label turned up;
3) re-close the compartment.
Insert the loader into the CD
changer
Proceed as follows to insert the loader
in the CD changer:
1) insert loader C-fig. 6 into the CD
changer, pushing in carefully until it clicks
home;
2) slide flap A-fig. 6 closed again.
18
fig. 4
F0P0213m
fig. 5
F0P0214m
F0P0215m
fig. 6
Page 20

USB-WIP PLUG PLAYER
MODE
(for versions/markets, where provided)
Recognised file formats
Recognised file formats are mp3 (mpeg
1 layer 3 only), .wma (9 standard only),
.wav and .ogg.
USB connection
Connect the key to the USB port located under the radio A-fig. 7 directly or with
an appropriat cable. Lift up the cover to access the port.
If the radio is on, USB mode is immediately activated upon key connection. The
radio plays automatically after a certain period of time, depending on USB key
capacity.
F0P0615m
Do not connect hard disks
or USB devices other than
audio devices to the USB
port to prevent radio
damage.
Reading lists
The system includes reading lists (with
temporary memory) whose creation time
depends on USB reader: other listening
modes may be accessed during this
interval.
Lists are as follows: Folders/Artist/Type/
Playlist, and are authorised every time the
radio or USB connection is switched off.
Upon first connection, tracks are
ordered according to folders, then the
classification system is maintained as previously.
Press the LIST/REFRESH (G) button
for a while to show different classifications.
Choose according to Folder/Artist/Genre/
Playlist, press OK (N) to select the desired classification, then confirm by pressing OK (N).
Classifications are composed according
to the following information:
– Folder: all folders including audio files
recognised on the device, listed in alphabetical order without respecting the structure;
– Artist: all artists’ names defined in ID3
tags, listed in alphabetical order;
– Genre: all genres defined in the ID3
tags;
– Playlist: according to playlists saved on
the USB key
Select reading lists
Press the LIST/REFRESH (G) button
briefly to show the Folder/Genre/Artist/
Playlist lists for the USB player.
Scroll through the list with the ÷/
˜ and
Press OK (N) to confirm the selected
choice.
Selecting tracks
Press one of the ÷/˜ buttons to
go to the next/previous track in the list
while reading. To go forward/back rapidly, hold down the corresponding button.
Press one of the
access to previous/next Genre, Folder,
Artist or Playlist while reading.
N/O
buttons.
N/O
buttons to gain
RADIO
fig. 7
19
Page 21

iPOD®CONNECTION
(for versions/markets, where provided)
®
iPod
connection
The iPod®must be connected to the
port B-fig. 7 placed under the radio, close
to the USB port. Lift up the cover to gain
access to the port.
To prevent damage to the
radio system, do not connect to iPod
other than audio devices.
RADIO
Reading lists/Select tracks
Available lists are Artist, Genre and
Playlist (as defined in the iPod®).
Selection and Navigation are described
in previous phases, from 1 to 5.
Selection of classification and tracks lists
is as described for the USB reader.
®
port devices
WIP Bluetooth ®MODE - Bluetooth®TELEPHONE
Bluetooth®technology allows wireless
communication without any electrical connections (wireless) between your mobile
phone and the hands-free set on the vehicle.
The Bluetooth
®
services offered depend on your phone provider, your
SIM card and compatibility between
the devices used; check the available
services in your mobile phone user
handbook and with your service
provider.
WARNING
For safety reasons, the Blue-
tooth®connection procedure
between the mobile phone and the
hands-free system must be carried out
only with the vehicle parked and the
ignition key turned to M.
First mobile phone connection
In order to make the initial connection
between a mobile phone and the handsfree system, the Bluetooth
®
function on the
phone must be activated according to the
instructions (consult the phone instruction
manual). When the function is active, the
icon appears on the display and the telephone researches for Bluetooth®accessories near the phone.
Press the MENU (O) button to activate
the Bluetooth®function, then use the ÷
/˜ buttons to select, in order:
– Bluetooth telephony - Audio
– Bluetooth configuration.
– Perform a Bluetooth search
“Search in progress..” is shown on the display followed by the list of the first 4 recognised telephones.
Use the ÷/˜ buttons to select the
telephone to connect to in the list and
confirm with OK (N).
WARNING It is possible to connect to
only one telephone at a time.
20
Page 22

A keyboard appears on the display
through which you have to dial a code of
at least 4 letters. Confirm the code with
the OK (N) button.
Now, a message of connection acceptance will appear on the selected telephone. Dial the previous radio code to
accept and confirm.
If the operation fails, repeat it: the number of tests is unlimited.
If the operation is successfully completed,
“Connection Telephone_Name Succeeded”
appears on the radio display.
WARNINGS The authorised automatic connection is activated only after
having configured the telephone. The
phone book and the list of calls are accessible after timed synchronisation. Depending on mobile telephone compatibility, the “TELEPHONE” menu allows you
to access the “Phone book” function (in
the case of total compatibility only) and
the “List of calls” and “Connection settings” functions.
WARNING The initial connection may
also be done by the mobile phone.
Receiving a call
A phone called is indicated by an acoustic
warning and a message on the multi-function display.
Use the ˜ or ÷ (L) button to se-
lect SI mode on the radio display and confirm with OK (N).
The phone call can also be accepted by
holding down(5) button at the end of radio controls lever on the steering-wheel
for at least two seconds.
Making a call
Press the MENU (O button, then
through the ˜/÷ buttons select in
sequence:
– Bluetooth telephony - Audio
– Manage the phone call
– Call
– List of calls
or
– Contact list
Use the ˜/÷ buttons to select the
number to call in the list and then press
OK (N).
Hold down the (5) button at the end of
the radio controls lever on the steeringwheel for at least two seconds to show
the contact list of the mobile telephone directly on the radio display.
Use the mobile phone keypad to dial
a telephone number.
WARNING
The telephone number must
be dialled on the mobile
phone when the vehicle is completely
stationary.
Bluetooth
®
AUDIO STREAMING
MODE
(for versions/markets, where provided)
This mode allows wireless broadcasting
of music files stored on the mobile phone
through the radio device.
To use this mode, the telephone must
manage the right Bluetooth
®
profiles
(A2DP/AVRCP profiles).
RADIO
21
Page 23

Mobile phone connection
Make the initial connection to the mobile phone following the instructions
shown in the paragraph “WIP Bluetoothth
®
MODE – Bluetooth®TELEPHONE” or, in case of one or more connected mobile phones, press the button
MENU (O) and select the telephone to
connect.
During the initial connection, the audio
system connects automatically.
Streaming mode activation.
Repeatedly press the button SOURCE
(C) and select Streaming mode.
WARNINGS In some cases, track
reading must be activated with the key-
RADIO
pad.
Selecting tracks
If the telephone supports the function,
it is possible to select tracks through the
controls on the radio front or through the
controls on the steering-wheel. Contextual information can be shown on the
display
22
Page 24

NOTES
Page 25

Fiat Group Automobiles S. p. A. – Customer Services – Technical Services
Service Engineering Largo Senatore G. Agnelli, 5 – 10040 Volvera – Torino (Italia)
Print no. 603.97.184 – 06/2009 – 1 Edition
Page 26

 Loading...