

Page 1
Instruction manual
Page 3
IMPORTANT
Guide d’utilisation
Page 12
IMPORTANT:
Manual de instrucciones
Página 22
IMPORTANTE
: Read all instructions before using.
Lire toutes les instructions avant de démarrer les travaux.
: Lea todas las instrucciones antes de usar.
S Y S L I T E
STL 450
709057_001
Page 2
1
1-1
1-2
1-3
1-4
Page 3
Original operating manual
1 About this manual................. 3
2 Symbols................................ 4
3IMPORTANT SAFETY
INSTRUCTIONS..................... 5
4 Intended use......................... 6
5 Technical data....................... 6
6 Functional description.......... 7
7 Commissioning..................... 7
8 Setup..................................... 7
9 Service and maintenance...... 11
10 Environment.......................... 11
11 Accessories........................... 11
1About this manual
Save these instructions
It is important for you to read and understand this manual. The information it contains relates to protecting
are used to help you recognize this information.
your safety
and
preventing problems
. The symbols below
DANGER Description of imminent hazard and failure to
avoid hazard will result in death.
WARNING Description of hazard and possible resulting
injures or death.
CAUTION Description of hazard and possible resulting
injuries.
NOTICE Statement including nature of hazard and possi-
ble result.
HINT Indicates information, notes, or tips for improv-
ing your success using the tool.
3
Page 4
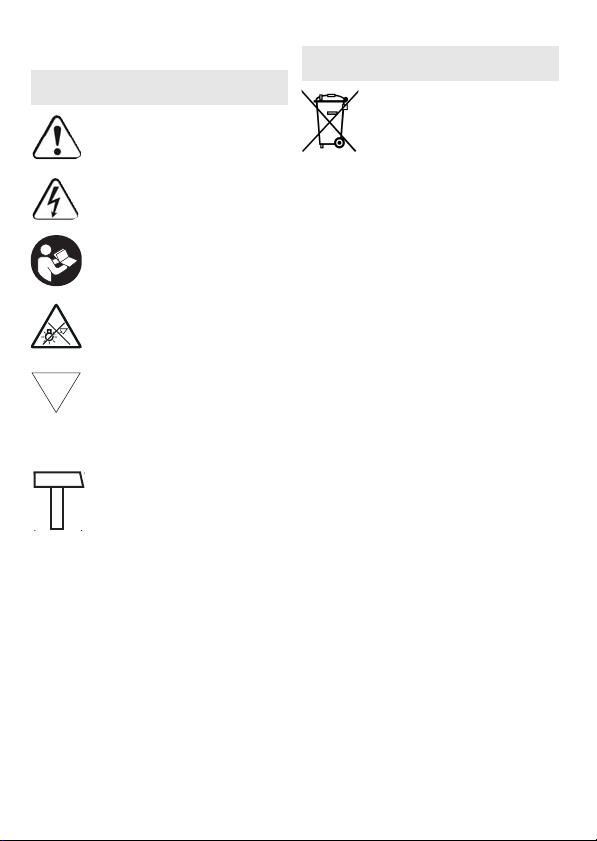
2Symbols
D
Symbol Significance
Warning of general danger
Symbol Significance
Do not dispose of as domestic
waste.
Risk of electric shock
Read operating instructions
and safety notices!
CAUTION!
into the light beam!
The surface temperature
should not exceed 194 °F (90
°C) on horizontal and 302 °F
(150 °C) on vertical outer surfaces.
Device qualifies for "rough
use" according DIN EN 60598.
Do not look directly
Vvolts
Hz hertz
Kkelvins
W watts
lm lumens
hhours
°C degree centigrade
ft feet
lb. pound
°F degree Fahrenheit
m meter
kg kilograms
4
Page 5
3IMPORTANT SAFETY
INSTRUCTIONS
This grazing light has a polarized plug (one blade is wider than the other) as a feature
to reduce the risk of electric shock. This plug will fit in a polarized outlet only one way.
If the plug does not fit fully in the outlet, reverse the plug. If it still does not fit, contact
a qualified electrician. Never use with an extension cord unless plug can be fully inserted. Do not alter the plug.
WARNING!
fications provided with this tool.
result in electric shock, fire and/or serious injury.
Save all warnings and instructions for future reference.
–
Handle the device with care.
vice may generate heat that increases the risk of fire and explosions.
–
Never use the device in potentially
explosive environments.
–
Do not cover the device when
switched on.
during operation and can burn the
surface of the skin.
light beam towards other people or
animals.
age the eyes.
–
Do not use the device for illuminating the road.
proved for illuminating the road.
Read all safety warnings, instructions, illustrations and speci-
The device heats up
–
Warning of harmful light
radiation. Do not look into
the light beam for long periods. Do not direct the
Optical radiation can dam-
The device is not ap-
Failure to follow all instructions listed below may
The de-
–
Do not connect the device to a power
supply when it is wet.
falls into water, it must be dried before being connected to a power supply.
–
Have your device repaired by qualified specialist staff and always use
original spare parts
fitted in this device must only be replaced by the manufacturer or a customer service workshop in order to
ensure that your device operates reliably.
–
Check the mains plug and the power
cable regularly in order to prevent a
hazard.
Disconnect any damaged
power cables from the power supply
immediately and have them replaced
by an authorised service workshop.
–
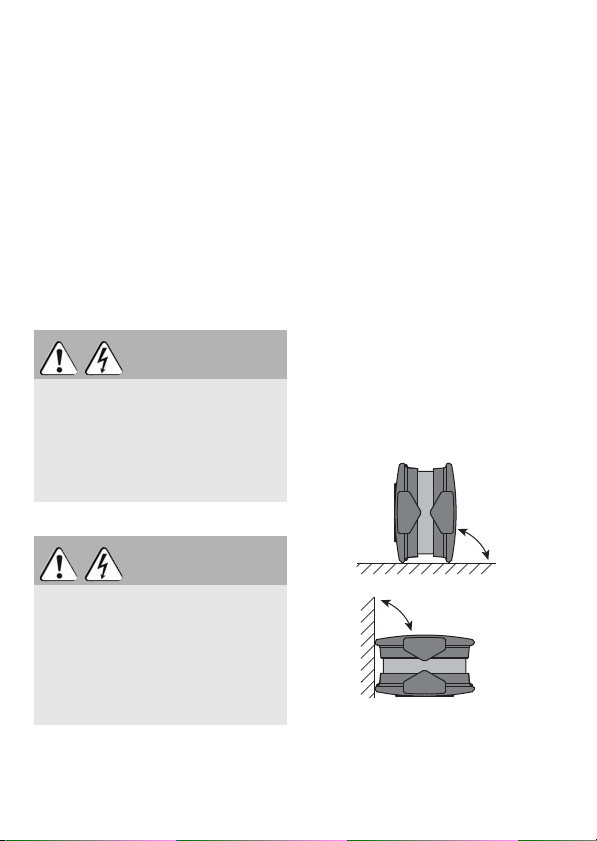
When placing the device on a tripod,
ensure that it is stable.
of unstable footing or insecure
mounting, the device may fall and
If the device
The light source
In the event
5
Page 6
cause physical injury, electric shock
or material damage.
–
Place the tripod on a dry, level and
stable surface.
pod are not folded out to the limit
stop or if the tripod has unstable
footing, this can cause physical injury, electric shock or material dam-
age.
– Discontinue use if device is damaged.
– Device is no toy! Keep away from
children.
If the legs of the tri-
4 Intended use
The grazing light is designed for inspecting surfaces when working on rough surface areas. Ensure the electrical safety of
all electricity sources.
The device is
rooms in residential buildings.
not
suitable for illuminating
The user is liable for improper
or non-intended use.
5Technical data
Grazing light STL 450
Nominal voltage 120 V
Frequency 60 Hz
Lighting device 64 x 0,25 W LED 5,000 K
Maximum output 18 W
LED luminous flux 1,200 lm
Colour temperature 5,000 K
Colour rendering index, Ra >80
Service life (L70) >10,000 h
Permitted operating temperature range -50 °F (-10 °C) to +113 °F (+45 °C)
Maximum height (upper edge of grazing
light range) with adapter and tripod
Max. reach 8-13/64 ft (2.50 m)
Weig ht 3.3 lb. (1.5 kg)
Protection class IP 55
8-13/64 ft (2.50 m)
6
Page 7
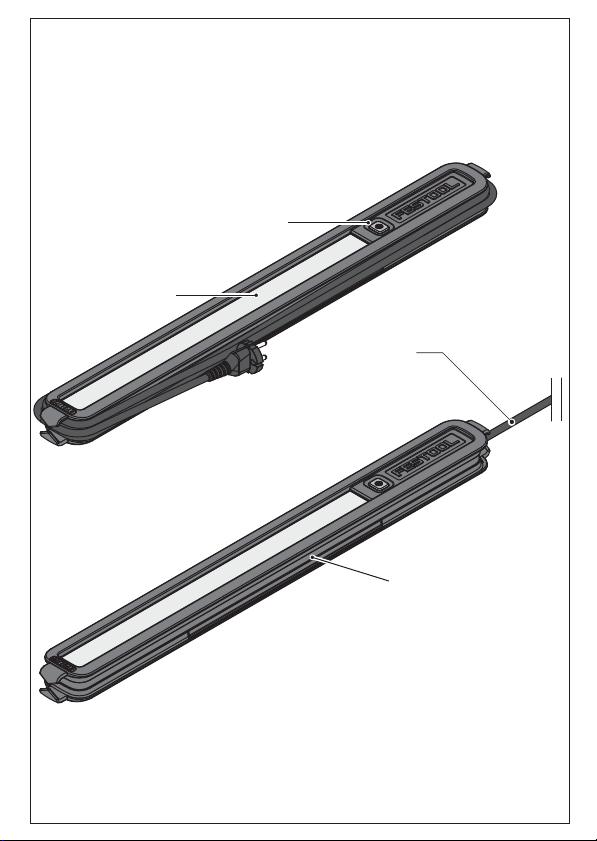
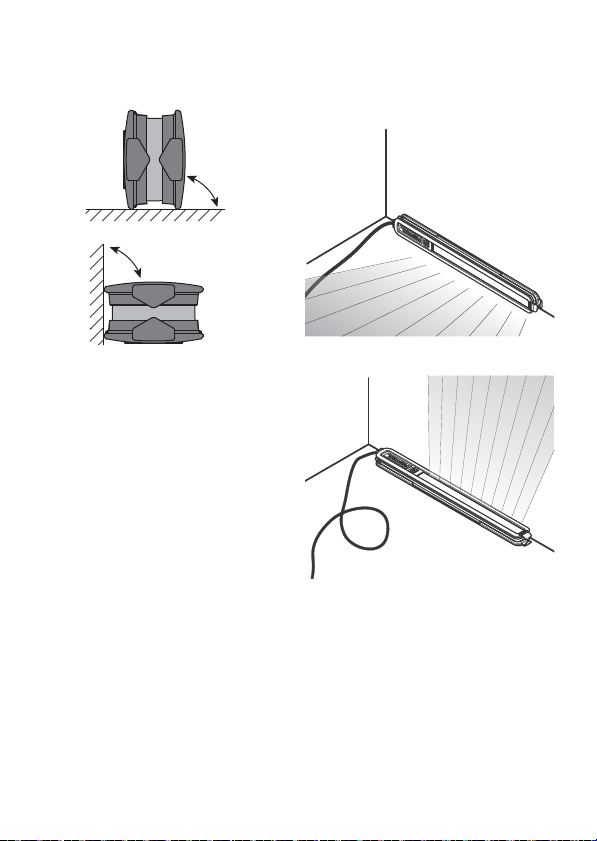
6 Functional description
90°
90°
2
The pictures for the functional description are on a fold-out page at the beginning of the instruction manual. While
reading the manual you can fold out the
page for comparison and quick reference.
[1-1]
On/Off switch
[1-2]
Luminous area
[1-3]
Power cable
[1-4]
Cable holder
7 Commissioning
WARNING
Unauthorised voltage or frequency!
Risk of accidents
Observe the specifications on the rating plate.
Observe country-specific regulations.
WARNING
Electric shock caused by penetrating
moisture.
Physical injury and damage to the
mains plug.
Do not insert the mains plug in the
socket if the surroundings are damp.
7.1 On/Off switch [1-1]
Switching on
Unwind the power cable from the cable
holder
[1-4]
.
Insert mains plug into socket.
Press the ON/OFF switch
Switching off
Press the ON/OFF switch
Unplug the mains plug.
Wind the power cable onto the cable
holder
[1-4]
.
7.2 Temperature monitoring
When the permissible operating temperature range is not reached/is exceeded, the grazing light switches itself off.
[1-1]
[1-1]
.
again.
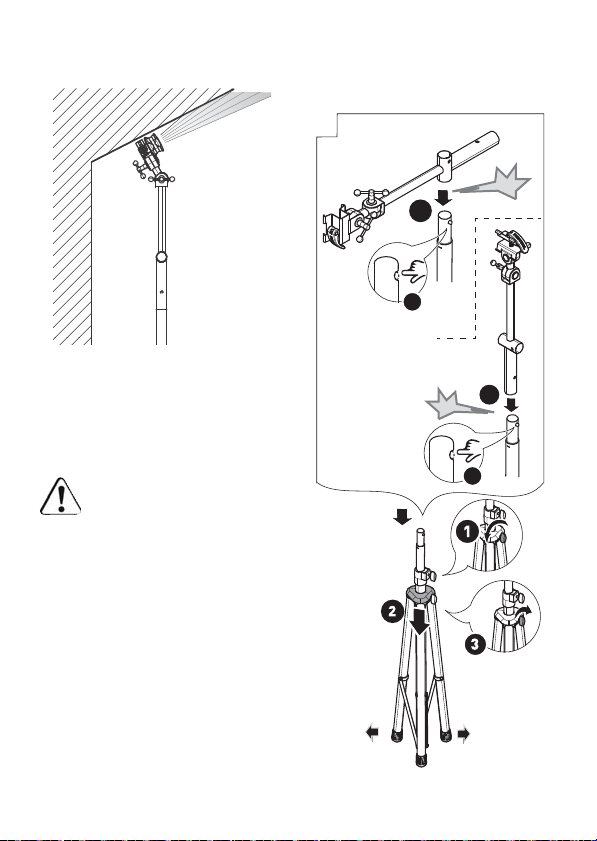
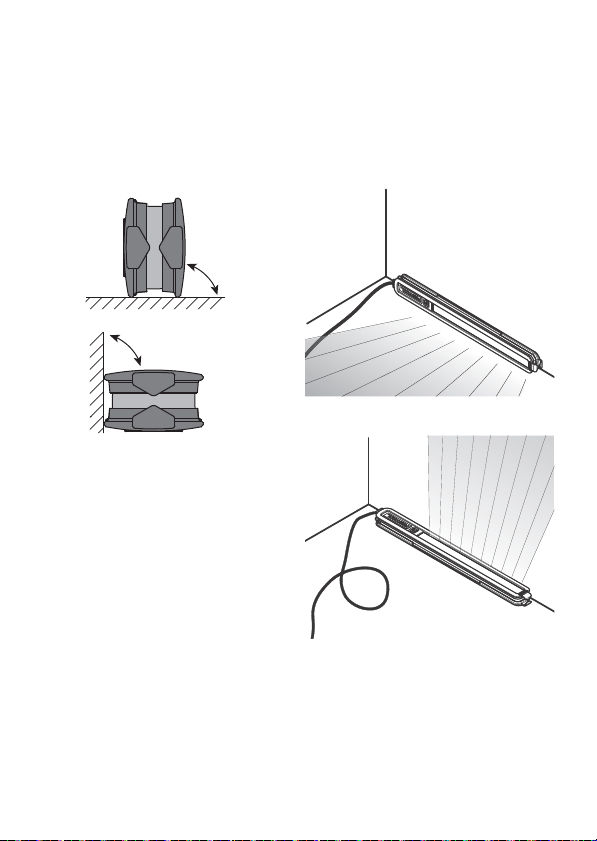
8Setup
The grazing light has a range of 8-13/64
ft. When this range is exceeded, uneven
surfaces may not be detected.
7
Page 8
To ensure the surface is perfectly illumi-
3A
3B
3C
3D
nated, position the grazing light at a 90°
angle to the surface
The grazing light can illuminate various
target surfaces:
[3 A]
[3 B]+[3 C]
[3 D]
[3 E]
[2]
.
Floor -> 8.1 section.
Wall -> 8.1 and 8.2 sections.
Ceiling -> 8.2 section.
Inclined surfaces -> 8.2 sec-
tion.
8
Page 9
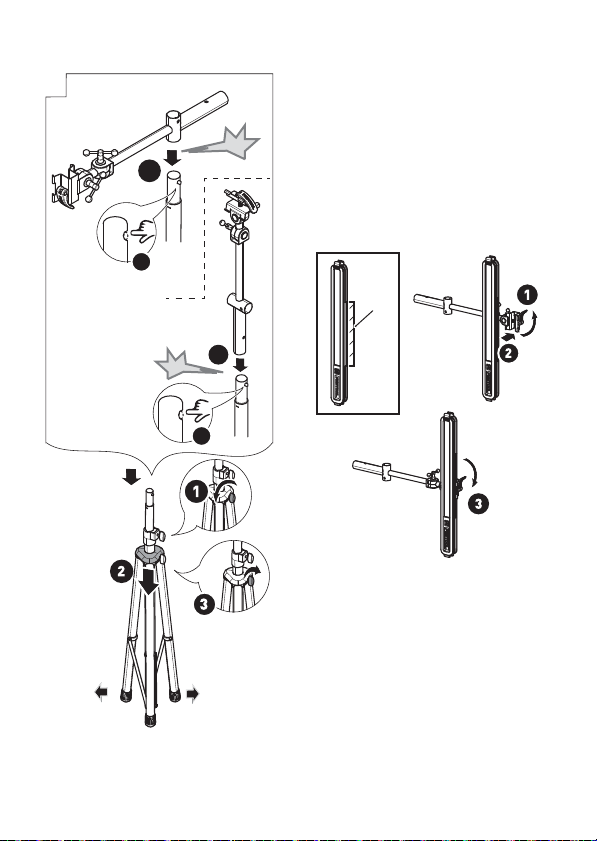
3E
4
ST DUO 200
click
5
AD-ST DUO 200
5
4
4
click
Turn the adapter until it clicks into
place.
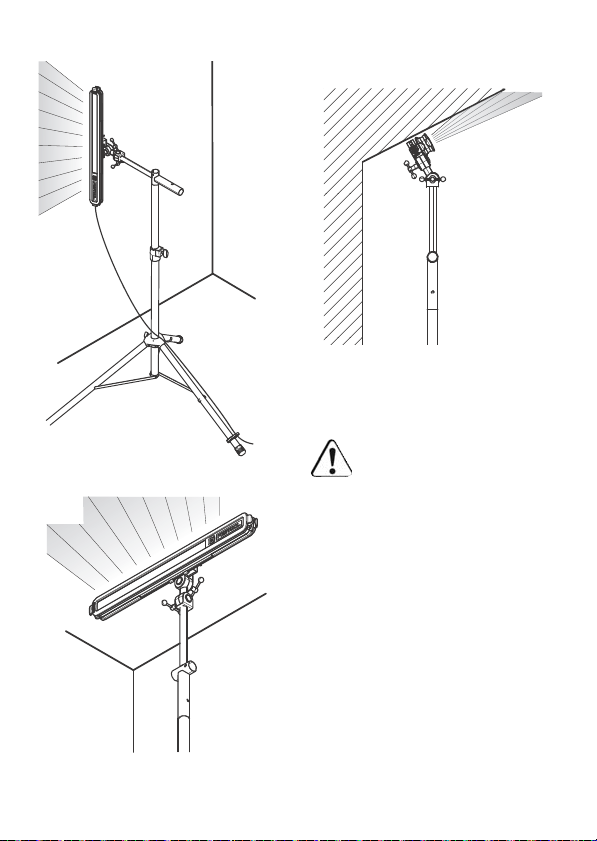
8.1 Setting device up for use at floor
The grazing light can be set up in two different positions
8.2 Setting device up for use above
Please follow the instructions contained
in the operating manual for the tripod
and the adapter.
Place the tripod on a dry, level and stable
surface. Fold out the tripod legs to the
limit stop.
Connecting the tripod and adapter [4]
level
[3 A]+[3 B]
floor level
Only use the device together
with the Festool tripod ST
DUO 200 and the Festool
adapter AD-ST DUO 200
(some items not included).
.
Open the tripod to the limit stop.
Place the adapter in the required posi-
tion on the tripod up to the limit stop.
9
Page 10
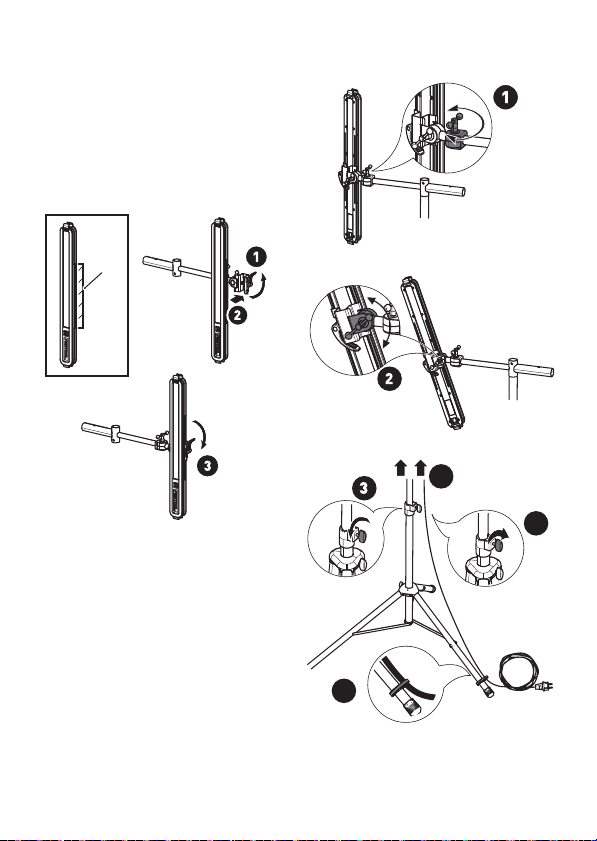
Connecting the adapter and grazing
5
5-1
9
6
4
5
6
light [5]
Only fit the grazing light clip to the
marked area on the grazing light [5-1].
Insert the back of the grazing light into
the grazing light clip.
Positioning the grazing light [6]
Use the two rotary hinges to align the
grazing light in the direction of the target surface.
Adjust the height of the tripod.
10
Page 11

9 Service and maintenance
WARNING
Risk of injury, electric shock
Always pull the mains plug from the
socket before performing any servicing and maintenance work!
All maintenance and repair work
which requires the housing to be
opened should always be carried out
by an authorised service workshop.
Customer service and repair
only through manufacturer or
service workshops: Please
find the nearest address at:
www.festoolusa.com/service
EKAT
4
Use only original Festool
5
spare parts! Order No. at:
3
2
1
–
www.festoolusa.com/service
Always clean the plastic cover on the
grazing light using a soft, dry cloth
and a mild cleaning agent to prevent
any damage. Do not use solvents.
10 Environment
Do not dispose of
the device in household waste!
Recycle
devices, accessories
and packaging. Observe applicable national regulations.
11 Accessories
Use only original Festool accessories
and Festool consumable material intended for this machine. These components are designed specifically for this
machine. Using accessories and consumable material from other suppliers
will most likely affect the quality of your
results and limit warranty claims. Machine wear or your own personal workload may increase depending on the application. Protect yourself and your machine, and preserve your warranty
claims by always using original Festool
accessories and Festool consumable
material!
The order numbers of the accessories
and tools can be found in the Festool catalogue or on the Internet under
"www.festoolusa.com".
11
Page 12

Notice d'utilisation d'origine
1 À propos de ce manuel.......... 12
2 Symboles............................... 13
3 CONSIGNES DE SÉCURITÉ
IMPORTANTES...................... 14
4 Utilisation en conformité
avec les instructions............. 15
5 Caractéristiques techniques. 15
6 Description fonctionnelle...... 16
7 Mise en service...................... 16
8 Installation............................ 17
9 Entretien et maintenance..... 20
10 Environnement...................... 21
11 Accessoires........................... 21
1 À propos de ce manuel
Conservez ces instructions
Il est impor tant pou r vous de lire et de co mprend re ce manu el. Les i nform ations q u'il
contient, se rapporte à la protection
blèmes
. Les symboles suivants sont utilisés pour vous aider à reconnaître cette in-
formation.
de votre sécurité
et
de prévention des pro-
DANGER Description du risque imminent et l'incapacité à
AVERTISSEMENT Description des dangers possibles et des bles-
ATTENTION Description des dangers et des éventuelles bles-
AVIS Déclaration incluant le type de danger et consé-
CONSEIL Indique des informations, des notes ou des
12
éviter tout risque qui peut entraîner la mort.
sures qui en résultent ou la mort.
sures qui en résultent.
quences possibles.
conseils pour améliorer votre succès en utilisant
l'outil.
Page 13

2Symboles
D
Symbole Signification
Avertissement de danger
Symbole Signification
Ne pas jeter l'appareil avec
les ordures ménagères.
Avertissement contre le
risque d'électrocution
Notice d'utilisation, lire les
consignes de sécurité !
ATT ENT IO N !
jamais dans l'axe du faisceau
lumineux !
La température de la surface
ne dépasse pas 194 °F (90 °C)
sur les surfaces horizontales
et 302 °F (150 °C) sur les surfaces verticales extérieures.
Appareil convient aux utilisations difficiles selon DIN EN
60598.
Ne regardez
VVolt
Hz Hertz
Kkelvin
Wwatt
lm lumen
hheure
°C centigrade
ft pieds
lb. livre
°F degrés Fahrenheit
mmètre
kg kilogramme
13
Page 14

3 CONSIGNES DE SÉCURITÉ
IMPORTANTES
Cette lampe rasante a une fiche polarisée (une broche est plus large que l'autre) afin
de réduire le risque d'électrocution. Cette fiche se branche dans une prise polarisée
d'une seule manière. Si elle n'entre pas entièrement dans la prise, essayer de l'entrer dans l'autre sens. Si elle n'entre toujours pas, contacter un électricien qualifié.
Ne jamais utiliser de câble de rallonge, excepté si la fiche peut être insérée entièrement. Ne pas modifier la fiche.
Avertissement !
tions.
Le non-respect des consignes d'avertissement et des instructions peut occa-
sionner un choc électrique, un incendie et/ou des blessures graves.
Conserver toutes les consignes de sécurité et notices d'instructions pour une référence future.
–
Utiliser l'appareil avec précaution.
L'appare il peut générer de la chaleur,
d'où un risque accru d'incendie et
d'explosion.
–
Ne pas travailler avec l'appareil
dans un environnement présentant
un risque d'explosion.
–
Ne pas couvrir l'appareil pendant
son fonctionnement.
de l'appareil augmente pendant son
utilisation et la chaleur accumulée
peut provoquer des brûlures.
–
rayonnements lumineux
nocifs. Ne pas regarder
faisceau lumineux. Ne pas diriger le
faisceau lumineux sur d'autres personnes ou animaux.
optique peut être dommageable pour
les yeux.
14
longtemps dans l'axe du
Veuillez lire toutes les consignes de sécurité et instruc-
–
Ne pas utiliser pas l'appareil pour la
conduite sur route.
pas homologué pour l'éclairage de la
chaussée.
–
Ne pas raccorder d'appareil mouillé
à l'alimentation électrique.
pareil tombe dans l'eau, il doit être
séché avant de le raccorder à l'ali-
La température
Avertissement sur les
Le rayonnement
mentation électrique.
–
Faites réparer votre appareil uniquement par un personnel qualifié ;
les réparations doivent être effectuées avec des pièces d'origine uniquement.
contenue dans cet appareil doit uniquement être remplacée par le fabricant ou un atelier du Service AprèsVente afin de garantir la fiabilité de
l'appareil.
–
Vérifier régulièrement la fiche secteur et le câble secteur pour éviter
La source lumineuse
L'appareil n'est
Si l'ap-
Page 15
tout danger.
un câble secteur endommagé de
l'alimentation électrique et le faire
remplacer par un atelier du Service
Après-Vente autorisé.
–
La fixation à un trépied doit être bien
stable.
tion inappropriée, l'appareil peut
tomber et provoquer des blessures,
un choc électrique ou des dommages
matériels.
–
Poser le trépied sur une surface
sèche, stable et plane.
du trépied ne sont pas dépliés
jusqu'en butée ou si le trépied n'a pas
une assise stable, cela peut provoquer des blessures, un choc électrique ou des dommages matériels.
Retirer immédiatement
En cas d'instabilité ou de fixa-
Si les pieds
– Ne pas utiliser l'appareil quand il est
endommagé.
– L'appareil n'est pas un jouet ! Main-
tenir l'appareil hors de portée des
enfants.
4 Utilisation en conformité
avec les instructions
Le projecteur rampe est prévu pour vérifier des surfaces dans un environnement
rude. Veiller à la sécurité électrique au
point de raccordement électrique.
L'appareil
une pièce dans une maison.
n'est pas
L'utilisateur est responsable
des dommages provoqués par
une utilisation non conforme.
prévu pour éclairer
5 Caractéristiques techniques
Projecteur rampe STL 450
Tension nominale 120 V
Fréquence 60 Hz
Éclairage 64 x 0,25 W LED 5,000 K
Puissance maximale 18 W
Flux lumineux LED 1,200 lm
Température de couleur 5,000 K
Rendu des couleurs RA >80
Longévité (L70) >10,000 h
Plage de températures admissible -50 °F (-10 °C) à +113 °F (+45 °C)
Hauteur maximale (bord supérieur du
projecteur rampe) avec adaptateur et
trépied
8-13/64 ft (2.50 m)
15
Page 16
Projecteur rampe STL 450
Portée max. 8-13/64 ft (2.50 m)
Poids 3.3 lb. (1.5 kg)
Degré de protection IP 55
6 Description fonctionnelle
Des eléments fournis sont disponibles
sur le volet qui se trouve au début de
cette notice d'utilisation. Vous pouvez
ainsi déplier cette page et visualiser en
permanence les différentes parties de
l'outil lorsque vous lisez la notice.
[1-1]
Interrupteur de marche/arrêt
[1-2]
Surface d'éclairage
[1-3]
Câble secteur
[1-4]
Enroulement de câble
7 Mise en service
AVERTISSEMENT
Tension ou fréquence non admissible !
Risque d'accident
Respecter les consignes indiquées
sur la plaque signalétique.
Respecter les particularités propres
au pays.
Choc électrique dû à la pénétration
d'humidité.
Dommages corporels et endommagement de la fiche secteur.
Brancher la fiche secteur hors d'un
environnement humide.
7.1 Marche/arrêt [1-1]
Mise en marche
Dérouler le câble secteur de l'enroulement de câble
Brancher la fiche secteur.
Appuyer sur l'interrupteur
marche/arrêt.
Désactivation
Appuyez de nouveau sur l'interrupteur
marche/arrêt
Débrancher la fiche secteur.
Enrouler le câble secteur sur l'enroulement de câble
7.2 Surveillance de la température
Si la plage de températures admissible
est dépassée par le haut/le bas, le projecteur rampe s'éteint.
AVERTISSEMENT
[1-4]
.
[1-1]
.
[1-4]
.
[1-1]
16
Page 17
8Installation
90°
90°
2
3A
3B
La portée du projecteur rampe est de 813/64 ft. À une plus grande distance, les
irrégularités ne sont plus détectées de
manière fiable.
Pour un éclairage optimal de la surface,
maintenir le projecteur rampe à un angle
de 90° par rapport à la surface
Le projecteur rampe peut éclairer plusieurs surfaces cibles :
[3 A]
[3 B]+[3 C]
sol -> chap. 8.1
mur -> chap. 8.1 et 8.2
[2]
.
[3 D]
[3 E]
plafond -> chap. 8.2
inclinaison -> chap. 8.2
17
Page 18
3C
3D
3E
8.1 Installation au sol
Le projecteur rampe peut être installé dans
deux positions différentes
8.2 Installation en hauteur
Utiliser l'appareil unique-
pecter la notice d'emploi du trépied et de
l'adaptateur.
18
Poser le trépied sur une surface sèche,
stable et plane. Ouvrir les pieds du trépied jusqu'en butée.
Relier le trépied et l'adaptateur [4]
ment avec le trépied Festool
ST DUO 200 et l'adaptateur
Festool AD-ST DUO 200 (partiellement non fournis). Res-
Ouvrir le trépied jusqu'en butée.
Placer l'adaptateur dans la position
souhaitée jusqu'en butée sur le trépied.
Tourner l'adaptateur jusqu'à enclenchement.
[3 A]+[3 B]
.
Page 19
4
ST DUO 200
click
5
AD-ST DUO 200
5
4
4
click
5
5-1
9
Relier l'adaptateur et le projecteur
rampe [5]
Placer les attaches du projecteur rampe
uniquement à l'endroit marqué du projecteur rampe
Insérer la partie arrière du projecteur
rampe dans l'attache du projecteur
rampe.
[5-1]
.
Positionner le projecteur rampe [6]
Orienter le projecteur rampe à l'aide
des deux articulations en fonction de
la surface cible.
Régler la hauteur du trépied.
19
Page 20

6
4
5
6
EKAT
1
2
3
5
4
9 Entretien et maintenance
AVERTISSEMENT
Risques de blessures, choc électrique
Avant tout travail de maintenance ou
d'entretien, toujours retirer la fiche
secteur de la prise de courant !
Tous les travaux de maintenance et
de réparation nécessitant une ouverture du boîtier doivent uniquement
être effectués par un atelier de service après-vente agréé.
Seuls le fabricant et
un atelier homologué sont habilités
à effectuer
paration ou service
Les adresses à
proximité sont disponibles sur:
www.festoolusa.com/service
Utilisez uniquement
des pièces de rechange Festool
d‘origine. Référence
sur: www.festoolusa.com/service
– Nettoyer le disque plastique du pro-
jecteur rampe uniquement avec un
chiffon doux et sec et un détergent
doux afin de ne pas l'endommager.
N'utilisez pas de solvant.
toute ré-
.
20
Page 21

10 Environnement
Ne pas jeter l'appareil avec les ordures ménagères !
Éliminer l'appareil,
les accessoires et
les emballages de
façon compatible
avec l'environnement. Respecter les
prescriptions nationales en vigueur.
11 Accessoires
Utilisez uniquement les accessoires Festool et consommables Festool d'origine
prévus pour cette machine, car ces composants systèmes sont parfaitement
adaptés les uns par rapport aux autres.
Si vous utilisez des accessoires et
consommables d'autres marques, la
qualité du résultat peut être dégradée et
les recours en garantie peuvent être
soumis à des restrictions. L'usure de la
machine ou votre charge personnelle
peuvent augmenter selon chaque application. Pour cette raison, protégez-vous,
votre machine et vos droits à la garantie
en utilisant exclusivement des
accessoires Festool et des
consommables Festool d'origine !
Les références des accessoires et des
outils figurent dans le catalogue Festool
ou sur Internet sous "www.festoolusa.com".
21
Page 22
Manual de instrucciones original
1 Sobre este manual................ 22
2 Símbolos............................... 23
3 INSTRUCCIONES DE SEGU-
RIDAD IMPORTANTES........... 24
4 Uso conforme a lo previsto... 25
5 Datos técnicos....................... 25
6 Descripción de las funciónes 26
7 Puesta en servicio................. 26
8 Instalación............................. 27
9 Mantenimiento y cuidado...... 30
10 Medio ambiente..................... 31
11 Accesorios............................. 31
1Sobre este manual
Guarde estas instrucciones
Es importante que usted lea y entienda este manual. La información que contiene se
relaciona con la protección de
bolos que siguen se utilizan para ayudarlo a reconocer esta información.
su seguridad
y
la prevención de problemas
. Los sím-
PELIGRO Descripción de peligro inminente y fracaso para
ADVERTENCIA Descripción de peligro y posibles lesiones resul-
PRECAUCIÓN Descripción de peligro y posibles lesiones resul-
AVISO Declaración incluyendo el tipo de riesgo y posi-
CONSEJO Indica informaciónes, notas, o consejos para
22
evitar riesgos que podran causar la muerte.
tantes o la muerte.
tantes.
ble resultados.
mejorar su éxito con la herramienta.
Page 23
2Símbolos
D
Símbolo Significado
Aviso de peligro general
Símbolo Significado
No depositar en la basura
doméstica.
Peligro de electrocución
¡Leer el manual de instrucciones y las indicaciones de
seguridad!
¡ATENCIÓN!
de luz directamente!
La temperatura superficial no
excede los 194 °F (90 °C) en
superficies horizontales y los
302 °F (150 °C) en superficies
exteriores verticales.
Herramienta apta para el uso
en condiciones difíciles según
DIN EN 60598.
¡No mire al haz
V voltios
Hz hertzios
Kkelvin
Wvatio
lm lumen
hhora
°C centigrados
ft pies
lb. libras
°F grados Fahrenheit
mmetro
kg kilogramo
23
Page 24
3INSTRUCCIONES DE
SEGURIDAD IMPORTANTES
Esta luz rasante tiene un enchufe polarizado (una patilla es más ancha que la otra)
para reducir el riesgo de una descarga eléctrica. El enchufe encajará en un tomacorriente polarizado en una sola posición. Si el enchufe no encaja por completo en el
tomacorriente, inviértalo. Si aún así no encaja, llame a un electricista calificado. No
utilice el enchufe con un cable alargador a menos que el enchufe pueda insertarse
por completo. No modifique el enchufe.
Advertencia:
se cumplen debidamente las indicaciones de advertencia y las instrucciones, puede
producirse una descarga eléctrica, quemaduras o lesiones graves.
Guarde todas las indicaciones de seguridad e instrucciones para que sirvan de futura referencia.
–
Maneje la herramienta con cuidado.
La herramienta puede generar calor
e incrementar el riesgo de incendio o
explosión.
–
No trabaje con la herramienta en
entornos potencialmente explosivos.
–
No cubra la herramienta mientras
esté funcionando.
calienta durante su funcionamiento y
puede provocar quemaduras si se
acumula el calor.
ca el haz de luz hacia otras personas
o hacia animales.
puede provocar lesiones en los ojos.
24
Lea todas las indicaciones de seguridad e instrucciones.
–
No utilice la herramienta en la cir-
La herramienta se
–
Peligro de daños por radiación luminosa. No mire
al haz de luz durante mucho tiempo. No dirija nun-
La radiación óptica
culación vial.
homologada para la iluminación en
la circulación vial.
–
No conecte una herramienta húmeda al suministro de corriente.
herramienta cae al agua, debe secarse antes de conectarla a un suministro de corriente.
–
Haga reparar su herramienta únicamente por personal técnico cualificado y solo con piezas de recambio
originales.
te de luz instalada en esta herramienta debe encargarse únicamente
al fabricante o a un taller de servicio
técnico autorizado. De esta forma
queda garantizada la seguridad de la
herramienta.
–
Compruebe periódicamente el enchufe y el cable de red para evitar
La herramienta no está
La sustitución de la fuen-
Si no
Si la
Page 25

riesgos.
Los cables de red dañados
deben desconectarse inmediatamente del suministro de corriente y
llevarse a un taller de servicio técnico autorizado para su renovación.
–
Si fija la herramienta a un trípode,
procure que la base sea estable.
la base o la fijación no son seguras,
la herramienta puede caer y causar
lesiones, descargas eléctricas o daños materiales.
–
Coloque el trípode sobre una superficie seca, plana y estable.
tas del trípode no están desplegadas
hasta el tope o el trípode no tiene una
base estable, pueden producirse lesiones, descargas eléctricas o daños
materiales.
Si las pa-
– No seguir usando la herramienta si
está dañada.
– La herramienta no es ningún jugue-
te. Mantenga la herramienta alejada
de los niños.
4 Uso conforme a lo previsto
Si
Conforme a las especificaciones, la luz
rasante está prevista para comprobar
superficies en entornos adversos. Debe
prestarse atención a la seguridad eléctrica del punto de conexión de corriente.
La herramienta no es apta para la iluminación de estancias en el hogar.
El usuario será responsable
de cualquier utilización indebida.
5 Datos técnicos
Luz rasante STL 450
Tensión nominal 120 V
Frecuencia 60 Hz
Iluminación 64 x 0,25 W LED 5,000 K
Potencia máxima 18 W
Corriente débil LED 1,200 lm
Temperatura de color 5,000 K
Reproducción de los colores RA >80
Vida útil (L70) >10,000 h
Margen de temperaturas de funciona-
miento permitido
Altura máxima (borde superior de la luz
rasante) con adaptador y trípode
de -50 °F (-10 °C) a +113 °F (+45 °C)
8-13/64 ft (2.50 m)
25
Page 26

Luz rasante STL 450
Alcance máx. 8-13/64 ft (2.50 m)
Peso 3.3 lb. (1.5 kg)
Tipo de protección IP 55
6 Descripción de las funció-
nes
Las imágenes con la dotación de suministro se encuentran en una hoja desplegable al comienzo de este manual de
instrucciones. Cuando lea este manual,
le recomendamos que despliegue esta
página para disponer fácilmente de una
vista general de la máquina.
[1-1]
Interruptor de conexión y desconexión
[1-2]
Superficie de iluminación
[1-3]
Cable de red
[1-4]
Enrollacables
7 Puesta en servicio
ADVERTENCIA
Tensión o frecuencia no permitida
Peligro de accidente
Observar los datos indicados en la
placa de características.
Tener en cuenta las particularidades
de cada país.
Descarga eléctrica por la entrada de
humedad.
Daños personales y deterioro del enchufe.
Evitar enchufar la herramienta en
entornos húmedos.
7.1 Interruptor de conexión y desconexión [1-1]
Conexión
Desenrollar el cable de red del enrollacables
Insertar el enchufe.
Pulsar el interruptor de conexión y
desconexión
Desconexión
Volver a pulsar el interruptor de conexión y desconexión
Extraer el enchufe.
Enrollar el cable de red en el enrollacables
[1-4]
[1-4]
ADVERTENCIA
.
[1-1]
.
[1-1]
.
.
26
Page 27
7.2 Control de temperatura
90°
90°
2
3A
3B
Si se excede o no se alcanza el margen
de temperaturas de funcionamiento admitido, la luz rasante se desconecta.
8Instalación
La luz rasante tiene un alcance de 8-13/
64 ft. En caso de distancias mayores, ya
no se detectan de forma fiable las irregularidades.
Para iluminar la superficie de forma óptima, colocar la luz rasante en un ángulo
de 90° respecto a la superficie
La luz rasante puede iluminar diferentes
superficies objetivo:
[2]
[3 A]
[3 B]+[3 C]
[3 D]
[3 E]
.
Suelo -> cap. 8.1
Pared -> cap. 8.1 y 8.2
Tec ho -> cap. 8.2
Plano inclinado -> cap. 8.2
27
Page 28

3C
3D
3E
8.1 Colocación en el suelo
La luz rasante puede colocarse en dos
posiciones distintas
8.2 Colocación en altura
dotación de suministro). Observar el manual de instrucciones del trípode y del
28
adaptador.
Colocar el trípode sobre una superficie
seca, plana y estable. Desplegar las pa-
tas del trípode hasta que hagan tope.
Conexión del trípode y del adaptador [4]
Desplegar el trípode hasta el tope.
Poner el adaptador en la posición deseada sobre el trípode hasta que haga tope.
Girar el adaptador hasta que quede
enclavado.
[3 A]+[3 B]
Utilizar la herramienta únicamente con el trípode ST DUO
200 de Festool y el adaptador
AD-ST DUO 200 de Festool
(en parte no incluidos en la
.
Page 29

4
ST DUO 200
click
5
AD-ST DUO 200
5
4
4
click
5
5-1
9
Conexión del adaptador y de la luz rasante [5]
Colocar la abrazadera de la luz rasante
únicamente en la zona marcada de la luz
rasante
[5-1]
.
Introducir la parte posterior de la luz
rasante en la abrazadera.
Posicionamiento de la luz rasante [6]
Alinear la luz rasante mediante las
dos articulaciones giratorias en función de la superficie objetivo.
Ajustar la altura del trípode.
29
Page 30

6
4
5
6
EKAT
1
2
3
5
4
9 Mantenimiento y cuidado
ADVERTENCIA
Peligro de lesiones y electrocución
Desconectar el enchufe de la red antes de realizar cualquier trabajo de
mantenimiento o conservación.
Todos los trabajos de mantenimiento
y reparación que exijan abrir la carcasa tan solo pueden ser llevados a
cabo por un taller de servicio técnico
autorizado.
El
Servicio de atención al cliente y reparaciones
está disponible por
parte del fabricante
o de los talleres de
reparación. Encuen-
tre la dirección más próxima a usted en:
www.festoolusa.com/service
Utilice únicamente
piezas de recambio
Festool originales.
Referencia en:
www.festoolusa.com/service
– Limpie el cristal de material sintético
de la luz rasante solo con un paño
suave y seco y un detergente suave a
fin de evitar cualquier desperfecto.
No utilice disolventes.
solo
30
Page 31

10 Medio ambiente
No desechar con la
basura doméstica.
Reciclar las herramientas, accesorios
y embalajes de forma respetuosa con
el medio ambiente.
Respetar las disposiciones nacionales
vigentes.
11 Accesorios
Utilice únicamente los accesorios Festool originales y el material de consumo
Festool diseñados para esta máquina,
puesto que los componentes de este sistema están óptimamente adaptados entre sí. La utilización de accesorios y ma-
terial de consumo de otros fabricantes
puede afectar a la calidad de los resultados de trabajo y conllevar una limitación
de los derechos de la garantía. El desgaste de la máquina o de su carga personal puede variar en función de la aplicación. Utilice únicamente accesorios originales y material de consumo de
Festool para su propia protección y la de
la máquina, así como de los derechos de
la garantía.
Los números de pedido para los respectivos accesorios y herramientas se encuentran en su catálogo Festool o en la
dirección de Internet "www.festoolusa.com".
31
Page 32

Festool GmbH
Wertstraße 20
73240 Wendlingen
Germany
www.festoolusa.com
 Loading...