

Page 1

Symmetric SYM 70 E
Seen at Ideal Tools.
Bedienungsanleitung Leistensäge 4 - 6
Operating Instructions Bench saw 7 - 9
Mode demploi Scie à baguette 10 -12
Instrucciones de servicio Sierra para listones 13 - 15
Istruzioni duso Sega per listelli 16 - 18
Gebruiksaanwijzing Plintenzaag 19 - 21
Bruksanvisning Listsåg 22 - 24
Käyttöohje Listasaha 25 - 27
Driftsvejledning Listesav 28 - 30
Bruksanvisning Listsag 31 - 33
Instruções de uso Serra de ripas 34 - 36
Руководство по эксплуатации Дисковая пила 37 - 39
Návod k obsluze Pila na lity 40 - 42
Instrukcja obs³ugi Pi³a do listew 43 - 45
Kezelési utasítás Gérvágó 46 - 48
464 266_001
ПдзгЯб лейфпхсгЯбт Рсйьнй рЮчещн 49 - 51
Festool GmbH Wertstr. 20 D-73240 Wendlingen ( 07024/804-0
Page 2
Seen at Ideal Tools.
Page 3
Seen at Ideal Tools.
Page 4

Technical specifications Symmetric
Seen at Ideal Tools.
SYM 70 E
Fence adjustment
Inner angle 0° - 68°
Outer angle 0° - 60°
Cutting range max. workpiece height: 70 mm
max. workpiece width: 80 mm
Saw blade dimensions 216 x 2.4 x 30 mm
Power consumption 1,150 W
No-load speed 2,500 - 5,500 min
Weight 9.6 kg
Protection class
The illustrations specified are located at the
beginning of the operating instructions.
/ II
The manufacturer accepts no liability for
damage caused as a result of unauthorised
modifications, such as the attachment of third
party/non-Festool accessories.
The user bears responsibility for damage and
accidents caused by improper use.
1.3 Emission levels
Levels determined in accordance with
-1
EN 61 029 are typically:
sound-pressure level 90 dB(A)
noise level 103 dB(A)
measured acceleration <2.5 m/s²
Wear ear protection.
1 Read before use
1.1 Safety instructions
Please read the enclosed safety notes
before using the machine.
- The operator must have sufficient skills for
setup, adjustment and operation.
- Any machine faults, including protection
devices and tools, should be reported
immediately.
- Only use the machine if protection devices
are set correctly, the machine is fully
operational and has been well maintained.
- Ensure that the floor around the machine is
level, in good condition and free of loose
objects (e.g. chips and offcuts).
- Do not remove offcuts or other workpiece
parts from the cutting area while the machine
is still running and until the saw blade stops.
- Once switched off, the saw blade must not be
braked using lateral counter-pressure.
- The pendulum protective cover must be able
to move freely; it must not become stuck in
the open position.
- Wear suitable protective
equipment:
ear protection, safety goggles,
dust mask when carrying out
work which creates dust, and
protective gloves when
working with rough materials
or when changing the saw
blade.
1.2 Intended use
The machine is intended for the sawing of wood,
plastic or aluminium strips in accordance with
normal use.
The machine must not be used to work on any
other materials, in particular steel, concrete and
mineral-based materials.
To saw aluminium, only use aluminiumcutting saw blades provided by Festool
(see Festool catalogue).
1.4 Other risks
In spite of compliance with all relevant design
regulations, dangers may still present
themselves when the machine is operated, e.g.:
- workpiece parts being thrown off;
- parts of damaged tools being thrown off;
- sawdust emission;
- noise emission.
2 Power supply and startup
The mains voltage should correspond to the
specification on the power output label.
Fuse protection for 230 V - 240 V:
10 A fuse or suitable electric cutout.
Switch (1.4) is for switching on / off
(I = ON, 0 = OFF).
The switch can only be operated once the lever
(1.5) for unlocking the saw unit has been
actuated.
3 Machine settings
Always disconnect the mains plug from
the socket before making any adjustments or carrying out maintenance
work on the machine.
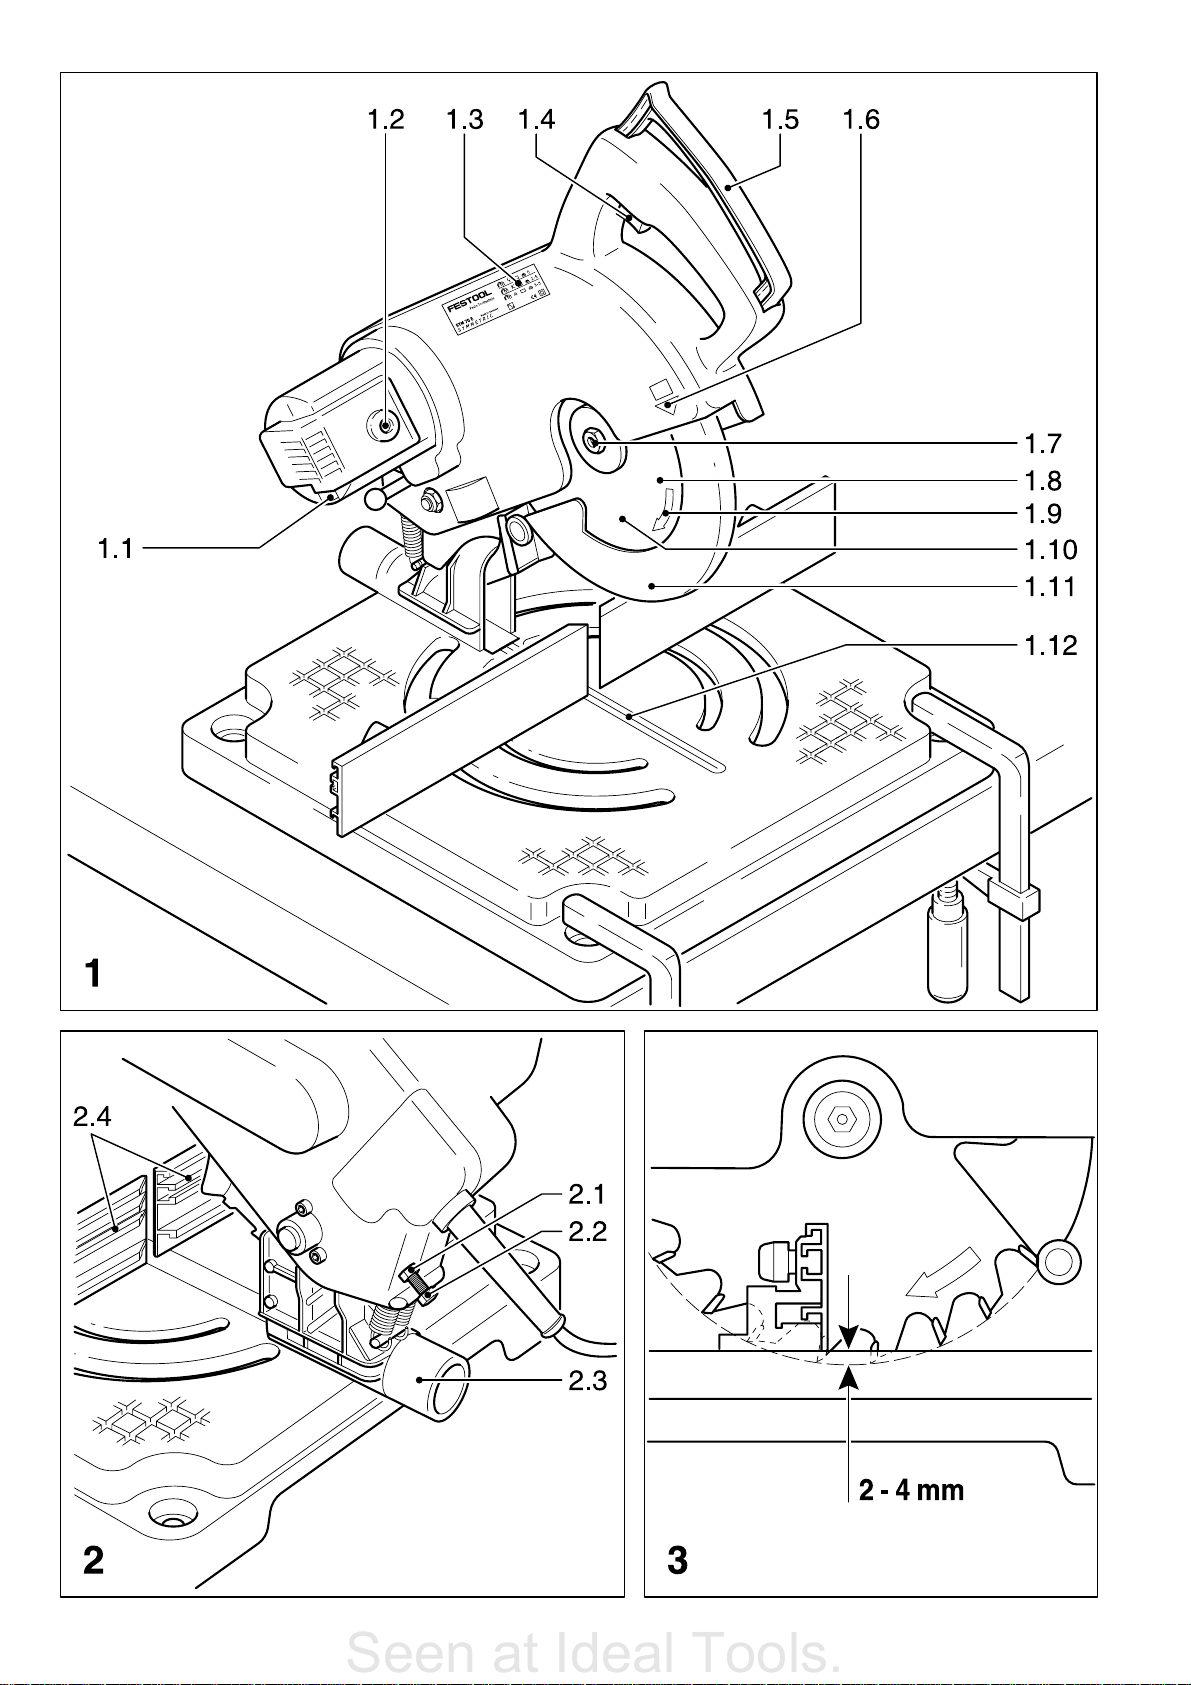
3.1 Mounting the machine
Position the machine on level ground or use
screw clamps (see Fig. 1) to secure the machine
to a level, stable base (e.g. workbench), so
that it cannot move during use.
3.2 Electronic speed control
The adjusting knurl (1.2) is used to
ELECTRONIC
This enables you to optimize the cutting speed
to suit the respective material (see table 1.3).
adjust the speed in infinite variables
between 2,500 min
-1
and 5,500 min-1.
7
Page 5

3.3 Changing tools
Seen at Ideal Tools.
Safety instructions
- For your own safety, only use original Festool
tools (see Festool catalogue).
Only saw blades that
correspond to EN 847-1,
have been approved for the maximum speed
of the machine (5,500 min
have a diameter of 216 mm
can be used.
- Crack ed saw blade s , o r s aw bl ad e s w hi ch h av e
otherwise become deformed, may not be
used.
- High-alloy, high-speed steel (HSS) saw blades
may not be used.
- Always use tools that are appropriate for the
material being worked.
- Only use tools that have been sharpened
correctly.
To change a tool, proceed as follows:
- Lock the motor shaft by pressing the lock
button (1.1);
- Unscrew screw (1.8) using the accompanying
hexagon spanner; Note: left-hand thread.
- Remove boss flange (1.7);
- Fully retract pivot guard (1.11) and remove
saw blade (1.10);
- Clean supporting surface between saw blade
and boss flanges
- Insert new saw blade and tighten.
The running direction of the machine
(1.6) must correspond to the rotation
direction of the saw blade (1.9).
The screw (1.8) must be very tight.
- Check whether the saw blade rotates freely
before switching on the machine.
-1
),
3.5 Dust extraction
When working with wood and woodbased materials, connect the machine
to an extraction system with the
following features:
- extractor corresponding to EN 60 335-2-69,
dust class M;
- Flow rate of at least 90 m3/h;
- Vacuum of approx. 5,000 Pa.
Note: Festool extractors CTM 22 E - CTM 55 E
meet these requirements.
For connection to a Festool extractor, either
insert a 27 mm-diameter extraction hose in the
dust extraction outlet (2.3) or push a 36 mmdiameter extraction hose over the dust
extraction outlet.
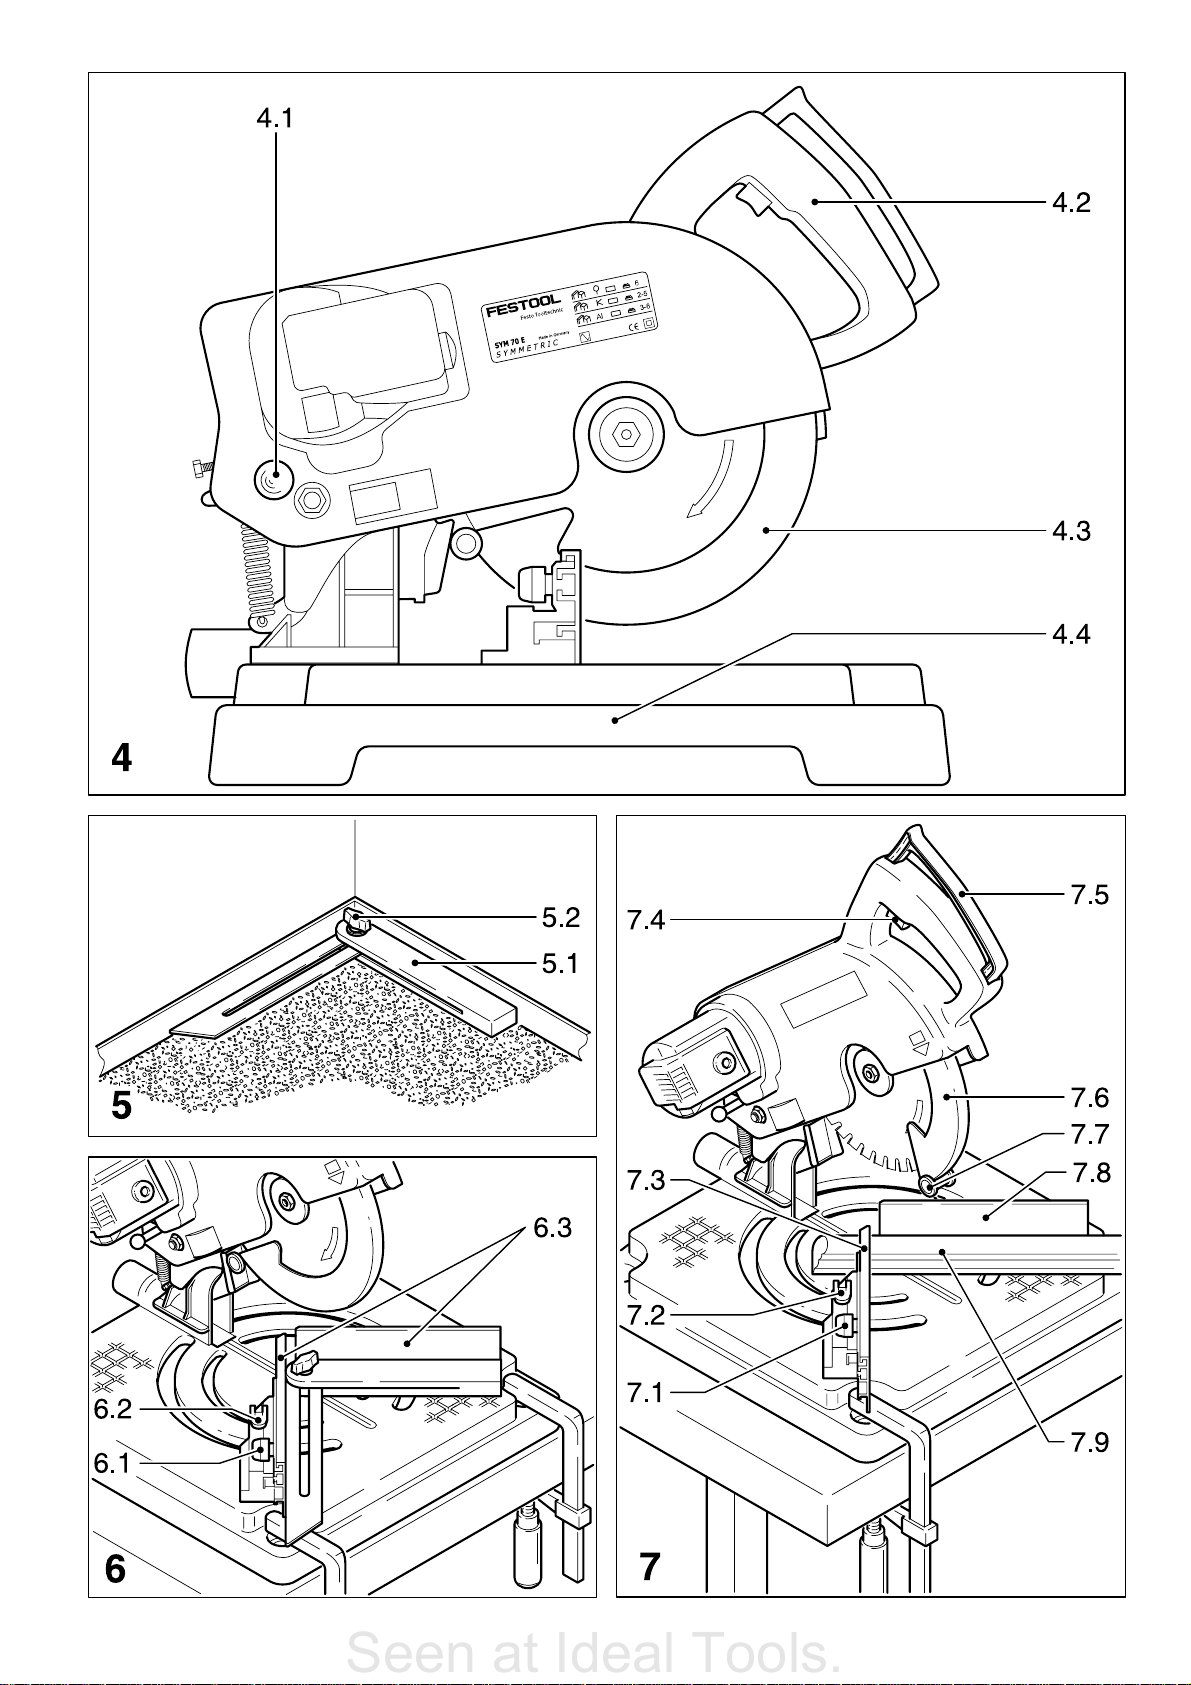
3.6 Transportation
For transportation, the saw unit should be
locked with the transport safety device (4.1)
pushed down and the pivot guard (4.3) closed.
Lift and carry the machine by the hand grip
(4.2) or by the base (4.4).
Never carry or lift the machine by the movable
pivot guard.
4 Working with the machine
4.1 Setting the cutting angle
- Offer up an adjustable square (5.1) to the
original angle (e.g. corner of room) and
tighten the wing nut (5.2);
- Open the cam levers (6.2) on both adjustable
fences;
- Transfer the original angle to the saw by
placing the adjustable square on the saw base
and then positioning both pivoted fences flush
to the adjustable square (Fig. 6)
- Close both cam levers.
3.4 Adjusting the saw unit
The swivelling range of the saw unit can be
readjusted via screw (2.2). The swivelling range
may need to be adjusted if the diameter of the
saw blade alters during sharpening or if a new
saw blade is fitted.
The saw unit must be set to the lowest position,
as shown in Fig. 3.
The saw blade must not saw into the
aluminium base.
Procedure
- Set fences (2.4) to 0°;
- Loosen lock nut (2.1);
- Swivel the saw unit downwards until it reaches
the fence;
- Adjust the saw unit by turning screw (2.2)
(turn to the left ® saw unit is lowered;
turn to the right ® saw unit is raised);
- Tighten lock nut (2.1);
4.2 Adjusting the fences
Once the rotary knobs (6.1) have been opened,
the sliding fences (6.3) can be adjusted
longitudinally.
Position the fences as close as possible to the
saw blade and close the rotary knobs.
4.3 Sawing workpieces
In unfortunate cases, the separated
workpiece parts can be caught by the
rotating saw blade and thrown back
when sawing strips. This effect occurs
especially with hard woods (oak, beech)
and is dependent on the profile of the
strip.
- Always ensure, therefore, that no persons or
objects that could be injured or damaged are
located behind the machine.
8
Page 6

- If this effect occurs when sawing a strip, put
Seen at Ideal Tools.
an additional 25 to 30 mm thick softwood strip
(e.g. roofing board) between the stop and
the strip, and saw through both strips
together. This prevents or significantly reduces
the throw-back effect.
Before sawing, make sure that the cam
levers (7.2) and rotary knobs (7.1) on
both fences are closed.
When sawing acute angles or
aluminium (in particular aluminium
profiles), there is a danger of the
workpiece being caught by the saw
blade and thrown backwards.
Therefore, hold the workpiece firmly
and lower the saw unit very slowly.
Only saw one workpiece at a time. If
several workpieces are sawn
simultaneously, there is a danger of the
saw blade throwing individual pieces off
unexpectedly.
5 Service and maintenance
Always disconnect the mains plug from
the socket before making any adjustments or carrying out maintenance
work on the machine.
All maintenance and repair work which requires
the motor housing to be opened, must only be
carried out by an authorized service workshop.
To ensure constant air circulation, always keep
the cooling-air openings in the motor housing
clean and free of blockages.
Re p l a ce the saw blade base in s e r t (1.12) if it is
damaged.
6 Accessories
Refer to the Festool catalogue or the Internet
under www.festool.com for the order numbers
of accessories and tools.
For your own safety, only use original Festool
accessories and tools.
- Place the workpiece (7.9) flush to a fence
(7.8) and hold it in that position with one
hand.
Long pieces that overhang the surface of the
base should be supported so that the working
end does not tip up.
Note: When sawing inner angles, it may be
necessary to move the redundant sliding fence
(7.3) outwards.
- Push the lever (7.5): this unlocks the saw
unit, opens the pivot guard (7.6) up to halfway
and overrides the activation lock for switch
(7.4);
- Switch on the machine by activating the switch
(7.4) and saw the workpiece by lowering the
saw unit downwards up to the fence.
When the saw unit is lowered, the rollers (7.7)
on the pivot guard slide over the workpiece
which opens the pivot guard.
Never open the pivot guard with your
hands.
7 Warranty
Our equipment is under warranty for at least
12 months with regard to material or production
faults in accordance with national legislation.
In the EU countries, the warranty period is 24
months (an invoice or delivery note is required
as proof of purchase).
Damage resulting from, in particular, normal
wear and tear, overloading, improper handling,
or caused by the user or other damage caused
by not following the operating instructions, or
any fault acknowledged at the time of purchase,
is not covered by the warranty.
Complaints will only be acknowledged if the
equipment has not been dismantled before
being sent back to the suppliers or to an
authorised Festool customer support workshop.
Store the operating instructions, safety notes,
spare parts list and proof of purchase in a safe
place.
In addition, the manufacturer's current
warranty conditions apply.
- Raise the saw unit and switch the machine
off by releasing the switch (7.4).
Always guide the saw unit steadily
upwards and never release it in the
lower position.
Note
We reserve the right to make changes to the
technical data contained in this information as
a result of ongoing research and development
work.
9
Page 7

EG-Konformitätserklärung. Wir erklären in alleiniger
Seen at Ideal Tools.
Verantwortung, dass dieses Produkt mit den
folgenden Normen oder normativen Dokumenten
übereinstimmt:
EN 61 029, EN 55 014, EN 61 000 gemäß den Bestimmungen
der Richtlinien 73/23/EWG, 98/37/EG, 89/336/EWG.
CE-Konformitetserklæring. Vi erklærer på eget
ansvar at dette produktet er i overensstemmelse
med følgende normer eller normative dokumenter: EN 61 029,
EN 55 014, EN 61 000 i henhold til bestemmelsene i
direktivene 73/23/EØF, 98/37/EF, 89/336/EØF.
EC-Declaration of Conformity: We declare at our
sole responsibility that this product is in conformity
with the following standards or standardised documents:
EN 61 029, EN 55 014, EN 61 000 in accordance with the
regulations 73/23/EEC, 98/37/EC, 89/336/EEC.
CE-Déclaration de conformité communautaire. Nous
déclarons sous notre propre responsabilité que ce
produit est conforme aux normes ou documents de
normalisation suivants: EN 61 029, EN 55 014, EN 61 000
conformément aux prescriptions des directives 73/23/CEE,
98/37/CE, 89/336/CEE.
CE-Declaración de conformidad. Declaramos bajo
nuestra exclusiva responsabilidad que este
producto corresponde a las siguientes normas o documentos
normalizados: EN 61 029, EN 55 014, EN 61 000 conforme
a las prescripciones estipuladas en las directrices 73/23/
CEE, 98/37/CE, 89/336/CEE.
CE-Dichiarazione di conformità. Dichiariamo sotto
la nostra esclusiva responsabilità che il presente
prodotto è conforme alle norme e ai documenti normativi
seguenti: EN 61 029, EN 55 014, EN 61 000 conformemente
alle normative delle direttive 73/23/CEE, 98/37/CE,
89/336/CEE.
CE-Declaração de conformidade: Declaramos, sob
a nossa exclusiva responsabilidade, que este
produto corresponde às normas ou aos documentos
normativos citados a seguir: EN 61 029, EN 55 014, EN 61
000 segundo as disposições das directivas
73/23/CEE, 98/37/CE, 89/336/CEE.
Заявление о конформности СЕ. Мы заявляем в
единоличной ответственности, что данное
изделие соответствует требованиям следующих стандартов
или нормативов: EN 61 029, EN 55 014, EN 61 000 в
соответствии с постановлениями директив ЕЭС 73/23,
ЕС 98/37,ЕЭС 89/336.
Prohláení o souladu s normami CE. Prohlaujeme
na vlastní zodpovìdnost, e tento výrobek odpovídá
následujícím normám nebo normativním dokumentùm:
EN 61 029, EN 55 014, EN 61 000 v souladu s ustanoveními
smìrnic 73/23/EHS, 98/37/EHS, 89/336/EHS.
Owiadczenie o zgodnoci CE. Niniejszym
owiadczamy z ca³¹ odpowiedzialnoci¹, ¿e wyrób
ten odpowiada nastêpuj¹cym normom wzglêdnie dokumentom
normatywnym: EN 61 029, EN 55 014, EN 61 000 zgodnie z
postanowieniami wytycznych 73/23/EWG, 98/37/EG,
89/336/EWG.
EG-conformiteitsverklaring. Wij verklaren op eigen
verantwoordelijkheid dat dit produkt voldoet aan
de volgende normen of normatieve documenten. EN 61 029,
EN 55 014, EN 61 000 conform de richtlijnen 73/23/EEG,
98/37/EG, 89/336/EEG.
EG-konformitetsförklaring. Vi förklarar i eget ansvar,
att denna produkt stämmer överens med följande
normer och normativa dokument: EN 61 029, EN 55 014,
EN 61 000 enligt bestämmelserna i direktiven 73/23/EEG,
98/37/EG, 89/336/EEG.
EY-standardinmukaisuusvakuutus. Vakuutamme
yksinvastuullisina, että tuote on seuraavien
standardien ja normatiivisten ohjeiden mukainen: EN 61 029,
EN 55 014, EN 61 000 direktiivien 73/23/EY, 98/37/EY,
89/336/EY määräysten mukaan.
EF-konformitetserklæring: Vi erklærer at have alene
ansvaret for, at dette produkt er i overensstemmelse
med de følgende normer eller normative dokumenter:
EN 61 029, EN 55 014, EN 61 000 i henhold til
bestemmelserne af direktiverne 73/23/EØF, 98/37/EF,
89/336/EØF.
CE-konformitás-nyilatkozat.Kizárólagos
felelõsségvállalás mellett ezennel tanúsítjuk, hogy
a jelen termék megfelel az alábbi szabványoknak ill.
szabványdokumentációnak: EN 61 029, EN 55 014,
EN 61 000 a 73/23/EWG, 98/37EG, 89/336/EWG
irányvonalak rendelkezései szerint.
Дзлщуз ухммьсцщузт ЕК. Ме бнЬлзшз фзт
ухнплйкЮт ехиэнзт дзлюнпхме, ьфй фп рбсьн рспйьн
ухмцщнеЯ ме фб рбсбкЬфщ рсьфхрб кбй ме фб
рсьфхрб рпх бнбцЭспнфбй уфб учефйкЬ Эггсбцб ЕН 61 029,
ЕН 55 014, EN 61 000 уэмцщнб ме фпхт кбнпнйумпэт
73/23 ЕПК, 98/37ЕК, 89/336/ЕПК.
Leitung Forschung und Entwicklung
Management Research and Development
Direction de recherce et développement
Festool GmbH
Wertstr. 20
D-73240 Wendlingen
Dr. Johannes Steimel
449 699/05.02
Page 8

Festool GmbH
Seen at Ideal Tools.
Postfach 1163
D-73236 Wendlingen
Wertstraße 20
D-73240 Wendlingen
) (07024) 804-0
Fax (07024) 804-608
http://www.festool.com
 Loading...