

Page 1
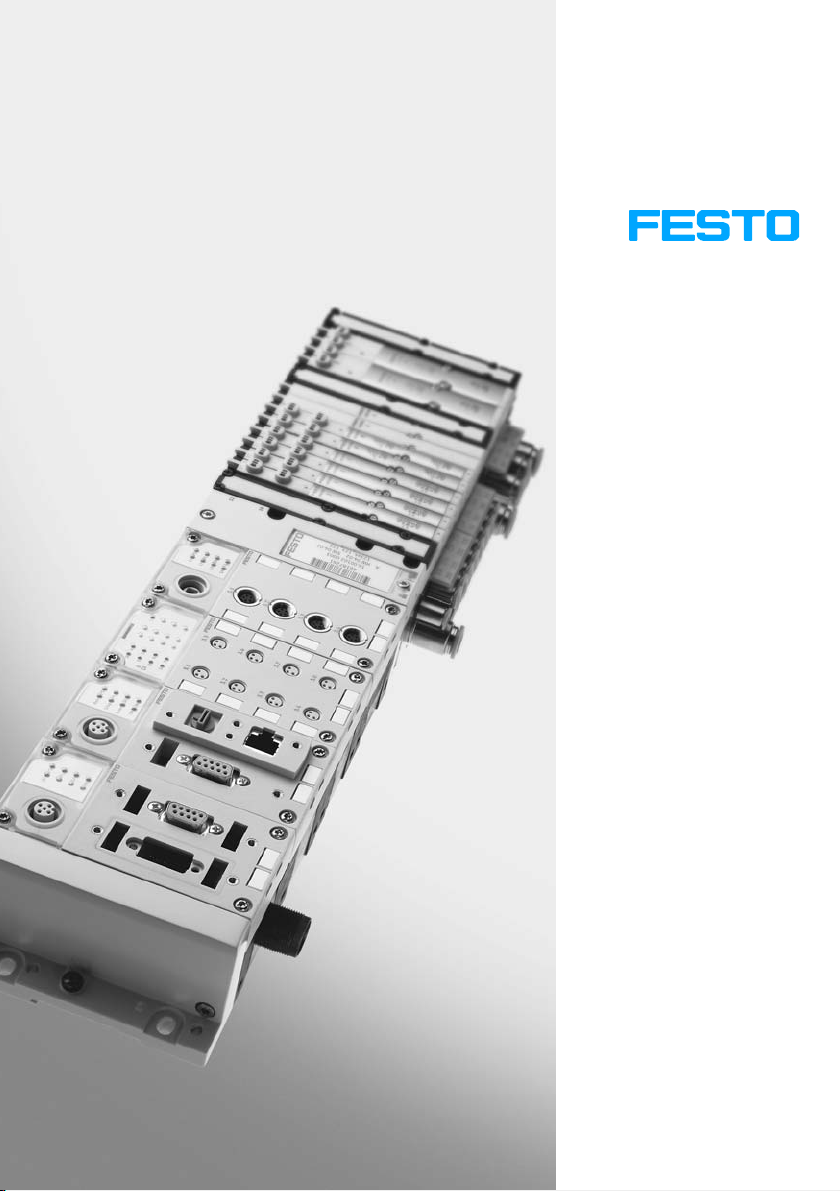
CPX terminal
Description
Electronics
System manual
Installing and
commissioning CPX
terminals
Description
526 446
en 0902e
[742939]
Page 2

Page 3

Contents and general safety instructions
Original en. . . . . . . . . . . . . . . . . . . . . . . . . . . . . . . . . . . . . . .
Edition en 0902e. . . . . . . . . .
. . . . . . . . . . . . . . . . . . . . . . . .
Designation P.BE−CPX−SYS−EN. . . . . . . . . . . . . . . . . . . . . . . .
Orderno. 526 446
. . . . . . . . . . . . . . . . . . . . . . . . . . . . . . . . .
E (Festo AG&Co. KG, D73726 Esslingen, Germany, 2009)
Internet:http://www.festo.com
E−mail: [email protected]
The copying, distribution and utilisation of this document
as well
as the communication of its contents to others
without expressed authorization is prohibited. Offenders
will be held liable for compensation of damages. All rights
are reserved, in particular the right to carry out patent,
registered design or ornamental design registration.
Festo P.BE−CPX−SYS−EN en 0902e
I
Page 4

Contents and general safety instructions
HARAX®, INTEL®, Interbus®, Modbus®, MOTOROLA®,
PROFIBUS
®
, Push−Pull®, TÜV® and VDE® are registered
trademarks of the respective trademark owners in certain
countries.
II
Festo P.BE−CPX−SYS−E N en 0902e
Page 5

Contents and general safety instructions
Contents
Intended use VII . . . . . . . . . . . . . . . . . . . . . . . . . . . . . . . . . . . . . . . . . . . . . . . . . . . . . . . . . .
Range of application and certification VIII . . . . . . . . . . . . . . . . . . . . . . . . . . . . . . . . . . . .
Target group IX . . . . . . . . . . . . . . . . . . . . . . . . . . . . . . . . . . . . . . . . . . . . . . .
Service IX . . . . . . . . . . . . . . . . . . . . . . . . . . . . . . . . . . . . . .
Important user instructions X . . . . . . . . . . . . . . . . . . . . . .
Notes on the use of this manual XII . . . . . . . . . . . . . . . . . . . .
. . . . . . . . . . . . . . . . . . . . . . . . .
. . . . . . . . . . . . . . . . . . . . . . . .
. . . . . . . . . . . . . . . . . . . . . . .
. . . . . . . . . . .
. .
1. Overview of components 1−1 . . . . . . . . . . . . . . . . . . . . . . . .
1.1 Structure of the CPX terminal 1−3 . . . . . . . . . . . . . . . . . . . . . . . . . . . . . .
1.1.1 Mode of operation of the CPX terminal 1−7 . . . . . . . . . . . . . . . . . . . . . .
1.1.2 Structure of the electric CPX modules 1−17 . . . . . . . .
1.1.3 The power supply concept of the CPX terminal 1−19 . . . . . . . . . . . . . . . .
1.2 Commissioning, diagnosis and operational functions 1−24 . . . . . . .
2. Assembly 2−1 . . . . . . . . . . . . . . . . . . . . . . . . . . . . . . . . . . . . . .
2.1 General instructions on assembly and dismantling 2−3 . . . . . . . . . . . . . . . . . . . .
2.2 Assembling electric modules with plastic interlinking blocks 2−6 . . .
2.2.1 Replacing a complete module or interlinking block with tie rod
interlinking 2−7 . . . . . . . . . . . . . . . . . . . . . . . . . . . . . . .
2.2.2 Increasing or reducing the number of electric modules 2−10 . . . . . . . . .
2.2.3 Fitting the right−hand end plates with Midi/Maxi valves 2−15 . . . . . . . . .
2.3 Assembling electric
2.3.1 Replacing a complete module or interlinking block 2−18 . . . . . . . . . . . .
2.4 Fitting the CPX terminal 2−21 . . . . . . . . . .
2.4.1 Fitting CPX terminals without pneumatics onto a H−rail 2−21 . . . . . . . . .
2.4.2 Fitting
2.4.3 Fitting CPX terminals with Midi/Maxi pneumatics onto an H−rail 2−26 . .
2.4.4 Wall mounting 2−29 . . . . . . . . . . . . . . . . . . . .
modules with metal interlinking blocks 2−17 . . . . . . . . . . . . .
. . . . . . . . . . . . . . . . . . . . . . . . . . . . . . . .
CPX terminals with pneumatics onto an H−rail 2−22 . . . . . . . . . . .
. . . . . . . . . . . . . . . .
. . . . . . .
. . . . . . . . . . . . . . .
. . . . . . . . . . .
. . . . . . . . . . . . . . .
. . . . . . . . .
. . . . . . . . . . . . . .
. . . . . . . . . . . . . . . . . . . . . .
3. Installation 3−1 . . . . . . . . . . . . . . . . . . . . . . . . . . .
3.1 General installation instructions 3−3 . . . . . . . . . . . . . . . . . . . . . . . .
3.1.1 Connecting cable 3−3 . . . . . . . . . . . . . . . . . . . . . . . . . . . . . . . . . . . . .
Festo P.BE−CPX−SYS−EN en 0902e
. . . . . . . . . . . . . . . . . . . . . . . .
. . . . . . . . . . .
. . .
III
Page 6

Contents and general safety instructions
3.1.2 Configuration of the CPX bus node 3−6 . . . . . . . . . . . . . . . . . . . . . . . . .
3.1.3 Configuration of the pneumatics 3−7 . . . . . . . . . . . . . . . .
3.1.4 Selecting the power supply unit 3−8 . . . . . . . . . . . . . . . . . . . . . . . . . . . .
3.1.5 Power supply of the CPX terminal 3−12
. . . . . . . . . . .
. . . . . . . . . . . . . . . . . . . . . . . . . .
4. Commissioning 4−1 . . . . . . . . . . . . . . . . . . . . . . . .
4.1 Procedure for commissioning 4−3 . . . . . . . . . . . . . . . . . . . . . . .
. . . . . . . . . . . . . . . . . . . . . . . .
. . . . . . . . . . . . . .
4.2 Preparing the CPX terminal for commissioning 4−4 . . . . . . . . . . . . . . . . . . . . . . .
4.2.1 Parameter types 4−6 . . . . . .
4.2.2 Possibilities of parametrisation 4−9 . . . . . . . . . . . . .
. . . . . . . . . . . . . . . . . . . . . . . . . . . . . . . . . .
. . . . . . . . . . . . . . .
4.3 Start−up behaviour of the CPX terminal 4−10 . . . . . . . . . . . . . . . . . . . . . . . . . . . . .
5. Diagnostics
5.1 General notes on diagnosis 5−3 . . . . . . . .
5.1.1 On the spot diagnosis with LEDs 5−5 . . . . . . . . . . . . . .
5.1.2 CPX−specific LEDs 5−6 . . . . . . . . . . . . . . . . . . . . . . . . . . . . . . . . . . .
and error handling 5−1 . . . . . . . . . . . . . . . . . . . . . . . . . . . . . . . . . . .
. . . . . . . . . . . . . . . . . . . . . . . . . . . . . . .
. . . . . . . . . . . . .
. . . .
5.2 Diagnosis via status bits or the I/O diagnostic interface 5−11 . . . . . . . . . . . . . . . .
5.2.1 Structure of the status bits 5−12 . . . . . . . . . . . . . . . . .
. . . . . . . . . . . . . . .
5.2.2 The I/O diagnostic interface 5−14 . . . . . . . . . . . . . . . . . . . . . . . . . . . . . . .
5.2.3 Error numbers 5−19 . . . . . . . . . . . . . . . . . . . . . . . . . . . . . . . . . . . . . . . . . .
A. Technical appendix A−1 . . . . .
A.1 Technical data A−3 . . . . . . . .
A.2 Cable length and cross−sectional area A−7 . . . .
B. Parameters and data of the CPX terminal B−1 . . . . . . . . . . . . . . . . .
. . . . . . . . . . . . . . . . . . . . . . . . . . . . . . . . . . . . . . . .
. . . . . . . . . . . . . . . . . . . . . . . . . . . . . . . . . . . . . . . . . .
. . . . . . . . . . . . . . . . . . . . . . . . . .
. . . . . . . . . .
B.1 Access to internal parameters and data B−3 . . . . . . . . . . . . . . . . . . . . . . . . . . . . .
B.2 Description of the parameters and data B−4
B.2.1 Overview of the function numbers B−5 . . . . . . . . . . . . . . . .
. . . . . . . . . .
B.2.2 System parameters B−8 . . . . . . . . . . . . . . . . . . . . . . . . . . . . . . . . . . . . . .
B.2.3 Module
B.2.4 Diagnostic memory parameters B−23 . . . . . . . .
B.2.5 Diagnostic memory data B−29 . . . . . . . . . . . . . . . . . . . . . . . . . . . .
IV
parameters B−15 . . . . . . . . . . . . . . . . . . . . . . . . . . . . . . . . . . . . . .
. . . . . . . . . . . . . . . . . . . .
. . . . . .
Festo P.BE−CPX−SYS−E N en 0902e
. . . . . . . . . . . . . . . . . . . . . . . . . . . . .
Page 7

Contents and general safety instructions
B.2.6 System diagnostic data B−32 . . . . . . . . . . . . . . . . . . . . . . . . . . . . . . . . . . .
B.2.7 Module diagnostic data B−34 . . . . . . . . . .
B.2.8 System data B−36 . . . . . . . . . . . . . . . . . . . . . . . .
B.2.9 Module data B−42 . . . . . . . . . . . . . . . . . . . . . . . . . . . . .
. . . . . . . . . . . . . . . . . . . . . . . .
. . . . . . . . . . . . . . . . . . . .
. . . . . . . . . . . . . . .
C. General information on parametrisation C−1 . . . . . . . . . . . . . . . . . . . . . . . . . . .
C.1 Input debounce time C−3 .
C.2 Signal extension C−5 . . . . . .
. . . . . . . . . . . . . . . . . . . . . . . . . . . . . . . . . . . . . . . . . . .
. . . . . . . . . . . . . . . . . . . . . . . . . . . . . . . . . . . . . . . . . .
C.3 Influence of signal states C−8 . . . .
C.3.1 Force C−11 . . . . . . . . . . . . .
C.3.2 Signal status in the event of a fault (Fail safe) C−15 . . .
C.3.3 Signal status in Idle status (Idle mode) C−18 . . . . . . . . . . . . . . . . . . . . . .
C.4 Diagnostic memory C−20 . . . . . .
. . . . . . . . . . . . . . . . . . . . . . . . . . . . . . . . . . . . . . .
C.5 Monitoring errors C−23 . . . . . . . . .
D. Index D−1 . . . . . . . . . . . .
. . . . . . . . . . . . . . . . . . . . . . . . . . . . . . . . . . . . . . . . . . . . .
. . . . . . . . . . . . . . . . . . . . . . . . . . . . . . . . . . . . .
. . . . . . . . . . . . . . . . . . . . . . . . . . . . . . . . . . . . .
. . . . . . . . . . . . . .
. . . . . . . . . . . . . . . . . . . . . . . . . . . . . . . . . . . . . .
Festo P.BE−CPX−SYS−EN en 0902e
V
Page 8

Contents and general safety instructions
VI
Festo P.BE−CPX−SYS−E N en 0902e
Page 9

Contents and general safety instructions
Intended use
CPX terminals are intended for installation in machines or
automation systems. Depending on the CPX bus node used,
they can be connected to a special field bus system and serve
to interrogate sensor signals and to control pneumatic and
electric actuators.
The individual CPX modules of the CPX terminal are docu
mented in specific
the manuals must always be observed and the relevant CPX
module must only be used as intended. CPX modules and
cables are only to be used as follows:
Only in an industrial environment
As intended
In original status without unauthorised modifications.
Only the conversions or modifications described in
documentation supplied with the product are permitted.
manuals. The safety instructions listed in
the
Festo P.BE−CPX−SYS−EN en 0902e
In perfect technical condition.
When used together with commercially available compo
nents, such as sensors and actuators, the specified limits for
pressures, temperatures, electrical data, torques etc. must be
observed. Also observe the standards specified in the rele
vant chapters, as well as national and local
laws and technical
regulations.
VII
Page 10
Contents and general safety instructions
Range of application and certification
The product fulfils the requirements of the EU directives and
is marked with the CE marking symbol.
Standards and test values, which the product must comply
with and fulfil, can be found in the section Technical data".
The product−relevant EU directive can be found in the decla
ration of conformance.
Certain configurations of the product have been certified by
Underwriters Laboratories Inc. (UL) for the USA and Canada.
These configurations are
marked as follows:
VIII
ULRecognized Component Mark for Canada and the United
States
Note
Observe the following if the UL requirements are to be
complied with in your application:
Rules for observing the UL certification can be found in
the separate UL−specific documentation. The relevant
technical specifications listed there also apply here.
The technical specifications in this documentation may
show different values.
Festo P.BE−CPX−SYS−E N en 0902e
Page 11

Contents and general safety instructions
Target group
This manual is directed exclusively at technicians trained in
control and automation technology.
Service
Please consult your local Festo repair service if you have any
technical problems.
Festo P.BE−CPX−SYS−EN en 0902e
IX
Page 12
Contents and general safety instructions
Important user instructions
Danger categories
This manual contains instructions on the possible dangers
which can occur if the product is not used correctly. These
instructions are marked (Warning, Caution, etc), printed on
ashaded background and marked additionally with a picto
gram. A distinction is made between the following danger
warnings:
Warning
... means that failure to observe this instruction may result
in serious personal injury or material damage.
Caution
... means that failure to observe this instruction may result
in personal injury or material damage.
Note
... means that failure to observe this instruction may result
in material damage.
The following pictogram marks passages in the text which
describe activities with electrostatically sensitive devices:
Electrostatically sensitive devices: inappropriate handling can
result in damage to components.
X
Festo P.BE−CPX−SYS−E N en 0902e
Page 13
Contents and general safety instructions
Identification of specific information
The following pictograms designate texts that contain special
information.
Pictograms
Information:
Recommendations, tips and references to other sources of
information
Accessories:
Information about necessary or useful accessories for the
Festo product.
Environment:
Information on the environmentally friendly use of
Festo products.
Festo P.BE−CPX−SYS−EN en 0902e
Text designations
· Bullet points indicate activities that may be carried out in
any order.
1. Numerals denote activities which must be carried out in
the numerical order specified.
Arrowheads indicate general lists.
XI
Page 14

Contents and general safety instructions
Notes on the use of this manual
This manual contains general basic information on the me
thod of operation, on fitting, installing and commissioning
CPX terminals.
Special information on commissioning, parameterising and
diagnosing a CPX terminal with the CPX bus node you are
using can be found in the appropriate manual for the CPX bus
node.
Information about further CPX modules
can be found in the
manual for the relevant module. An overview is provided in
Table0/1.
Conventions
The parameters and data of the CPX terminal are described in
Appendix B.2. These appear in English on the handheld type
CPX−MMI−1.
XII
Festo P.BE−CPX−SYS−E N en 0902e
Page 15
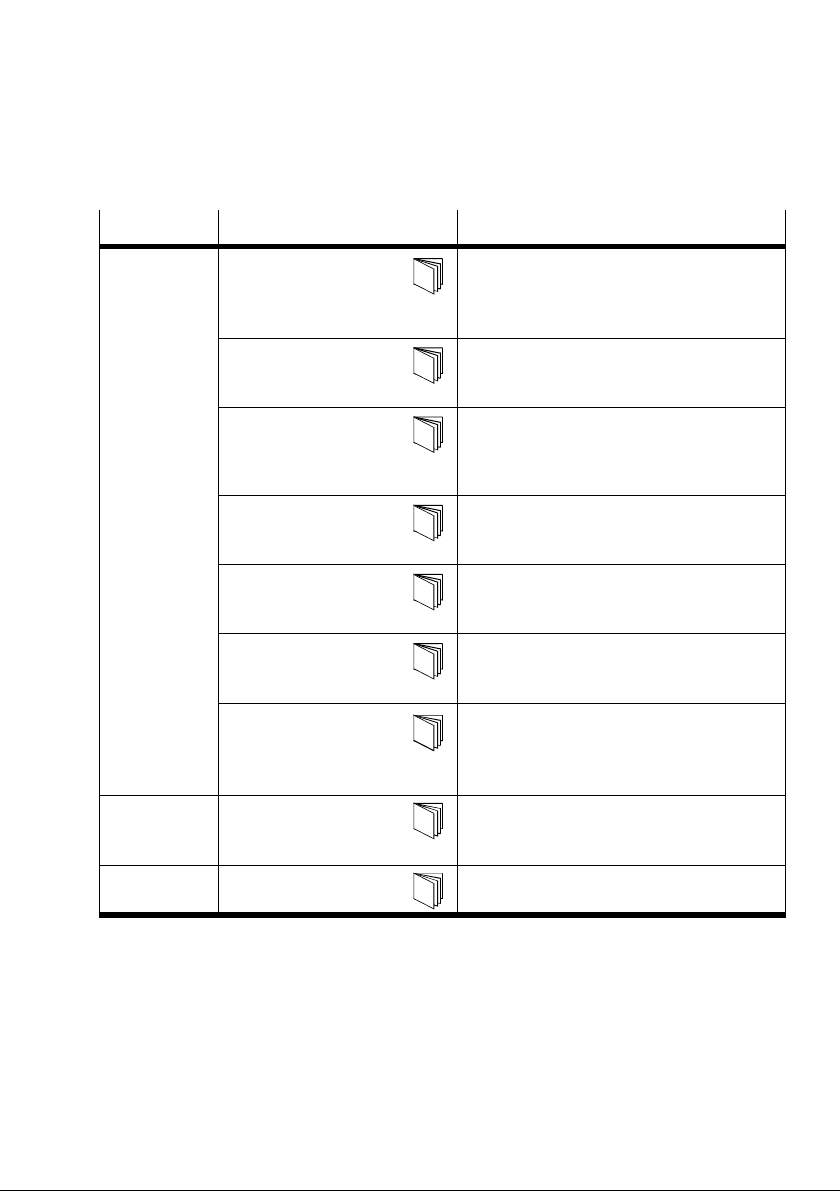
Contents and general safety instructions
Type Title Description
Description
Electronics
Manual
Electronics
Software
package
System description"
Type P.BE−CPX−SYS−...
CPX bus node"
Type P.BE−CPX−FB...
CPX I/O modules"
Type P.BE−CPX−EA−...
CPX analogue I/O mo
dules"
Type P.BE−CPX−AX−...
"CPX−CP interface"
Type P.BE−CPX−CP−..
Handheld"
Type P.BE−CPX−MMI−1−..
MPA electronics modu
les"
Type P.BE−MPA−
ELEKTRONIK−...
CPX−FEC"
Type P.BE−CPX−FEC−...
FST" Programming in statement list and ladder
Overview of structure, components and mode
of operation of CPX terminals;
installation and commissioning instructions as
well as basic principles of parametrisation
Instructions on assembly, installation, commis
sioning and diagnostics of the relevant bus
nodes
Notes on connections and instructions on fit
ting, installing and commissioning input and
output modules of type CPX−.... and the MPA,
CPA and Midi/Maxi pneumatic interfaces
Notes about connection types and instructions
for fitting, installing and commissioning CPX
analogue I/O modules
Instructions on fitting, installing, commissio
ning and diagnosing CP systems with the
CP interface type CPX−CP−4−FB
Instructions for commissioning and diagnosing
CPX terminals with the handheld typeCPX−
MMI−1
Instructions on assembly, installation, commis
sioning and diagnostics of the MPA pneumatic
and electronic modules.
Instructions for fitting, installing,
commissioning and diagnosing the
CPX Front End Controller.
diagram for the FEC
Table0/1: Descriptions for the CPX terminal part 1
Festo P.BE−CPX−SYS−EN en 0902e
XIII
Page 16
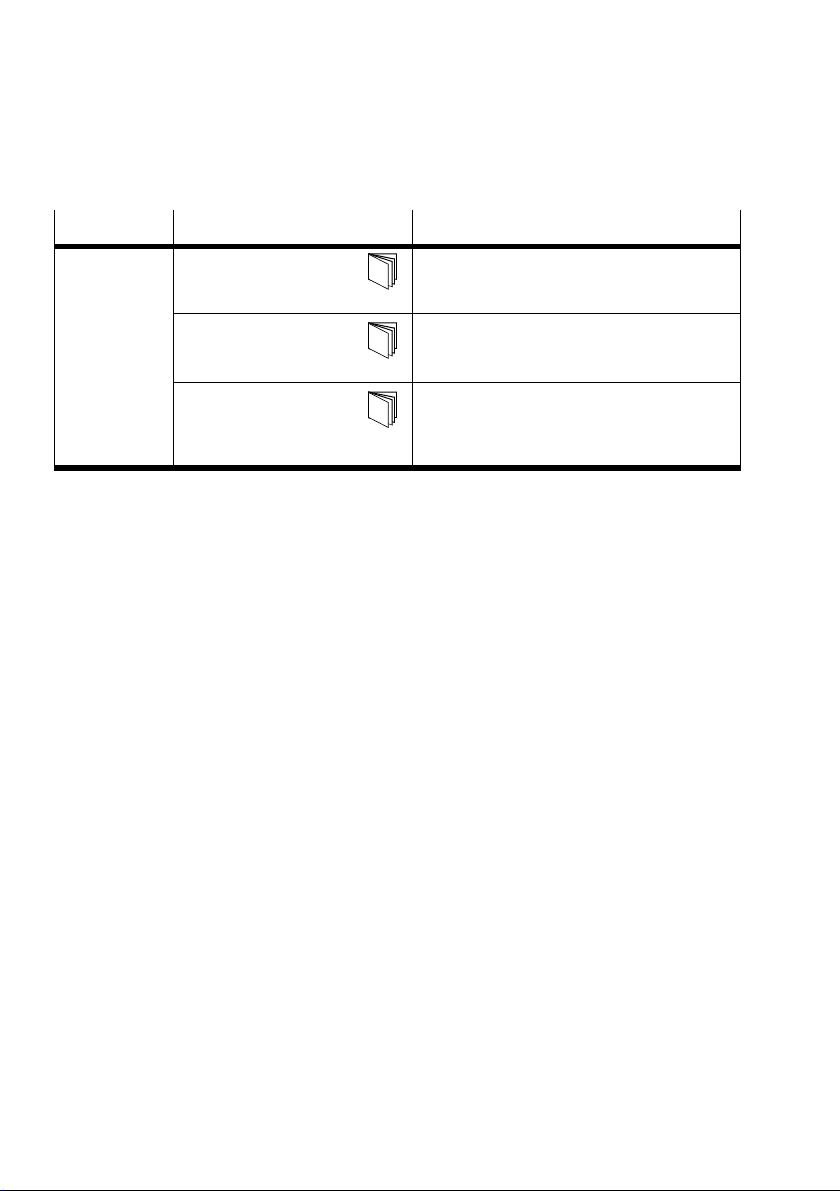
Contents and general safety instructions
Type Title Description
Description
Pneumatics
Valve terminals with
MPA pneumatics"
Type P.BE−MPA−...
Valve terminals with
CPA pneumatics"
Type P.BE−CPA−...
Valve terminals with
Midi/Maxi pneumatics"
Type P.BE−Midi/
Maxi−03−...
Instructions for fitting, installing, commissio
ning, maintaining and converting the MPA
pneumatics
Instructions for fitting, installing, commissio
ning, maintaining and converting the CPA
pneumatics (type 12)
Instructions for fitting, installing, commissio
ning, maintaining and converting the Midi/
Maxi pneumatics (type 03)
Table0/2: Descriptions for the CPX terminal part 2
XIV
Festo P.BE−CPX−SYS−E N en 0902e
Page 17
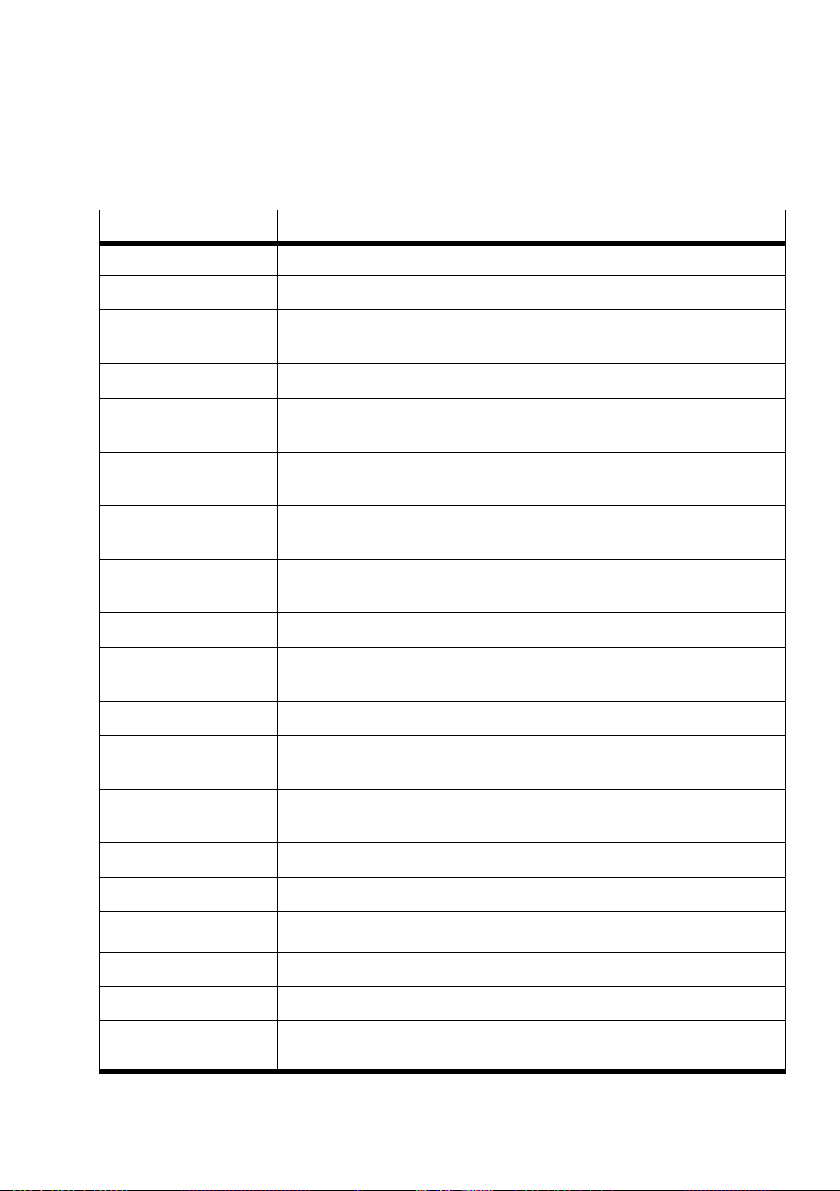
Contents and general safety instructions
Term/abbreviation Meaning
Connection block Exchangeable housing upper part of modules with connection technology.
CP Compact Performance
CPX bus node Provides the connection to specific fieldbuses. Transmits control signals
CPX terminal Modular, electric terminal type 50
CPX modules Collective term for the various modules which can be integrated in a CPX
DIL switch Dual−in−line switches consist of several logic elements with which settings
Fieldbus Data bus via which the CPX modules communicate with each other and
Function modules Function modules are also known as technology modules (e.g. CPX−CP
Input module CPX input module
Interlinking block Lower part of the housing of a module or block for interlinking the module
I Digital input
I/O diagnostic interface The I/O diagnostic interface is a bus−independent diagnostic interface at
I/O modules Common term for the CPX modules which provide digital inputs and out
I/Os Digital inputs and outputs
NBR Nitrile butadiene rubber, material for seals
to the connected modules and monitors their ability to function.
terminal.
can be made.
are supplied with the necessary operating voltage.
interface)
electrically with the terminal
I/O level, permitting access to internal data of the CPX terminal.
puts (CPX input modules and CPX output modules).
O Digital output
Output module CPX output module
PLC/IPC Programmable logic controller/industrial PC
Pneumatic interface The pneumatic interface is the interface between the modular electrical
peripherals and the pneumatics.
Festo P.BE−CPX−SYS−EN en 0902e
XV
Page 18
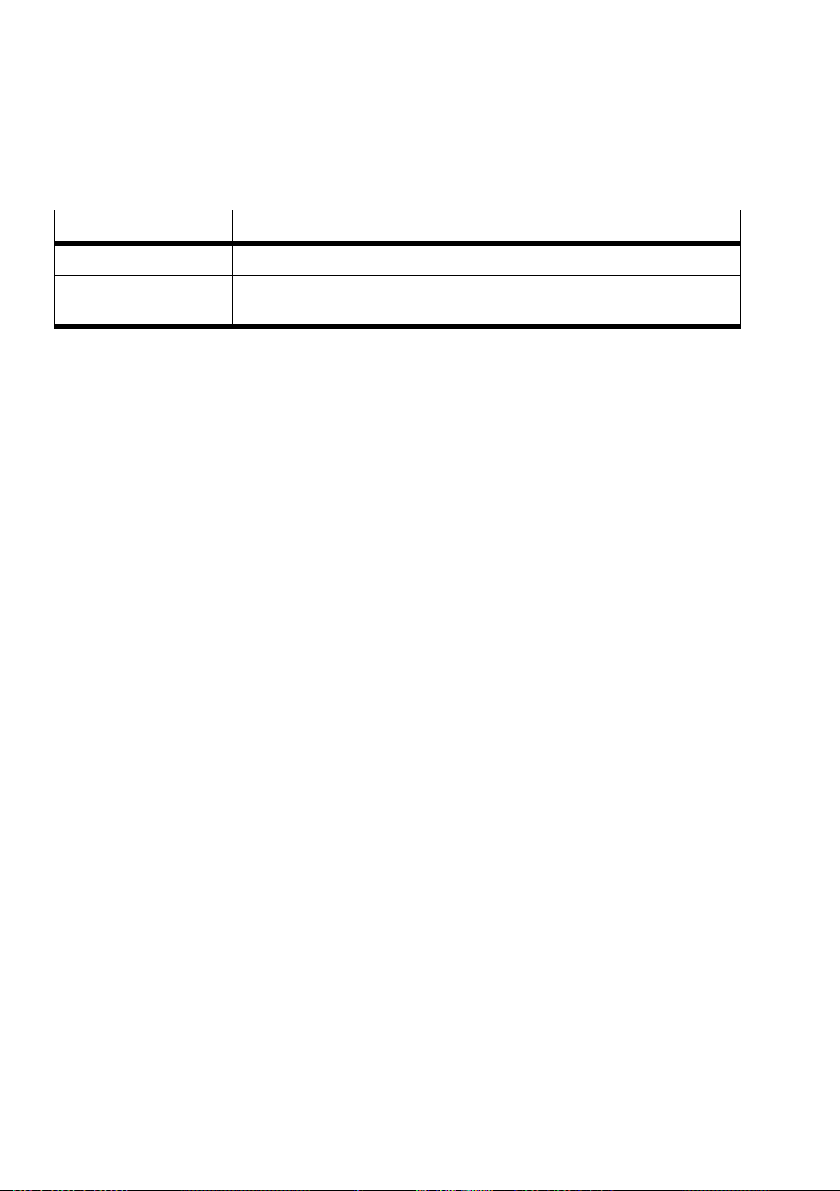
Contents and general safety instructions
Term/abbreviation Meaning
Status bits Internal inputs that supply coded common diagnostic messages
Technology modules Function modules are also known as technology modules (e.g. CPX−CP
interface)
Table0/3: Product−specific terms and abbreviations
XVI
Festo P.BE−CPX−SYS−E N en 0902e
Page 19

Overview of components
Chapter 1
1−1Festo P.BE−CPX−SYS−EN en 0902e
Page 20

1. Overview of components
Contents
1. Overview of components 1−1 . . . . . . . . . . . . . . . . . . . . . . . . . . . . . . . . . . . . . . . .
1.1 Structure of the CPX terminal 1−3 . . .
1.1.1 Mode of operation of the CPX terminal 1−7 . . . . . . . . .
1.1.2 Structure of the electric CPX modules 1−17 . . . . . . . . . . . . . . . . . . . . . . .
1.1.3 The power supply concept of the CPX terminal 1−19 .
1.2 Commissioning, diagnosis and operational functions 1−24 . . . . . . . . . . . . . . . . . .
. . . . . . . . . . . . . . . . . . . . . . . . . . . . . . . . . .
. . . . . . . . . . . . .
. . . . . . . . . . . . . . .
1−2
Festo P.BE−CPX−SYS−E N en 0902e
Page 21
1. Overview of components
1.1 Structure of the CPX terminal
CPX terminals consist of electric and pneumatic modules for
controlling pneumatic actuators and low−current consuming
electric devices (further valves, bulbs, etc.). They are usually
placed decentrally directly on the machine or system.
Design variants CPX terminals are available in plastic version (type CPX−...)
and in metal version (type CPX−M−...) with various different
functions. They can
matic modules (valves) in accordance with the customer’s
wishes. The equipment fitted on the CPX terminal in this man
ual may therefore differ from the equipment you are using.
be fitted with different electric and pneu
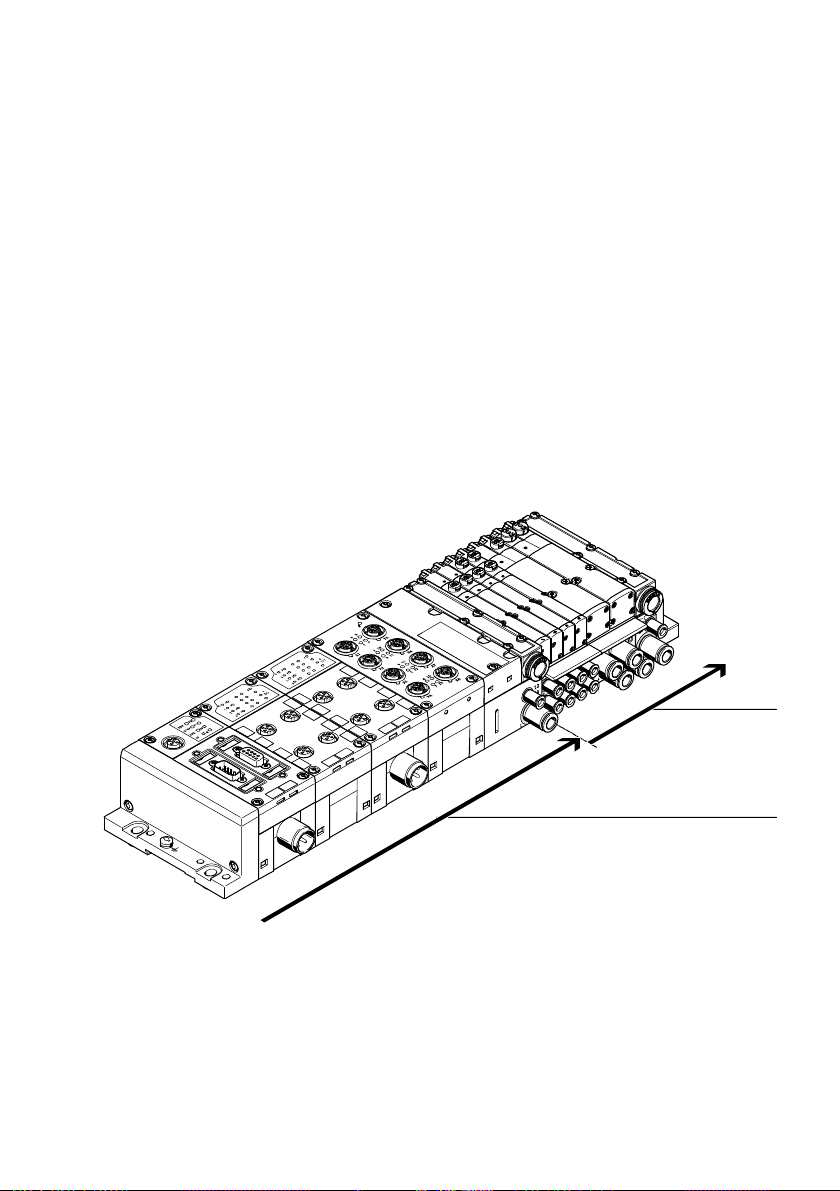
1 Electric modules (electric side) 2 Pneumatic modules (pneumatic side);
optional
Fig.1/1: Structure of a CPX terminal with CPA pneumatics (example in plastic version)
Festo P.BE−CPX−SYS−EN en 0902e
2
1
1−3
Page 22
1. Overview of components
Fieldbus connection CPX terminals with fieldbus connection permit communica
tion with remotely−situated higher−order control systems.
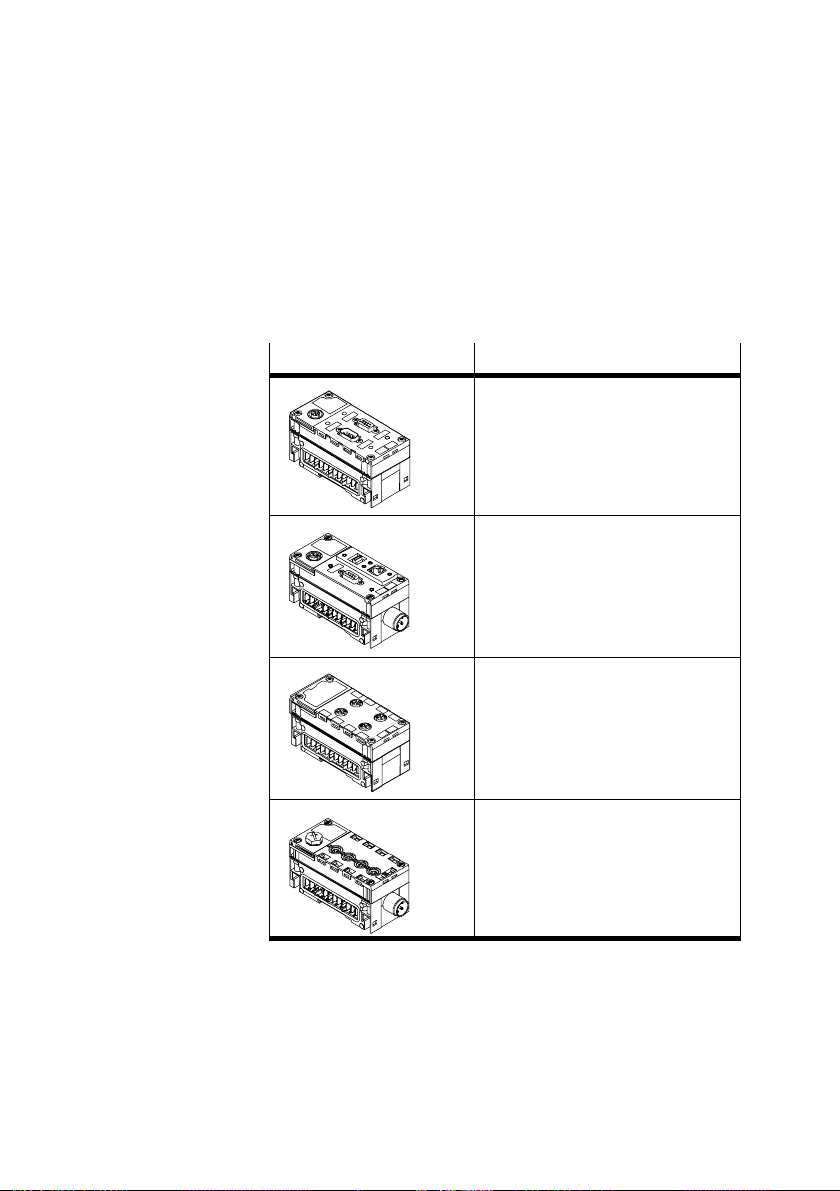
CPX terminals are constructed on a modular basis and can
consist of the following modules, for example:
Modules
Brief description
CPX bus node for connecting to
higher−order control systems via the
fieldbus;
Connections depend on the design of
the CPX bus node
CPX Front End Controller for control
ling pneumatic and electric actua
tors; communication via Ethernet
(web server, e−mail, Modbus TCP ,
EasyIP etc.)
CPX I/O modules for evaluating pro
cess signals;
Selectable connection technology
(M12 connections here)
CPX−CP interface for connecting de
centrally arranged CP I/O modules
and CP valve terminals (technology
module)
1−4
Tab.1/1: Electrical modules of a CPX terminal (examples in
plastic version)
Festo P.BE−CPX−SYS−E N en 0902e
Page 23
1. Overview of components
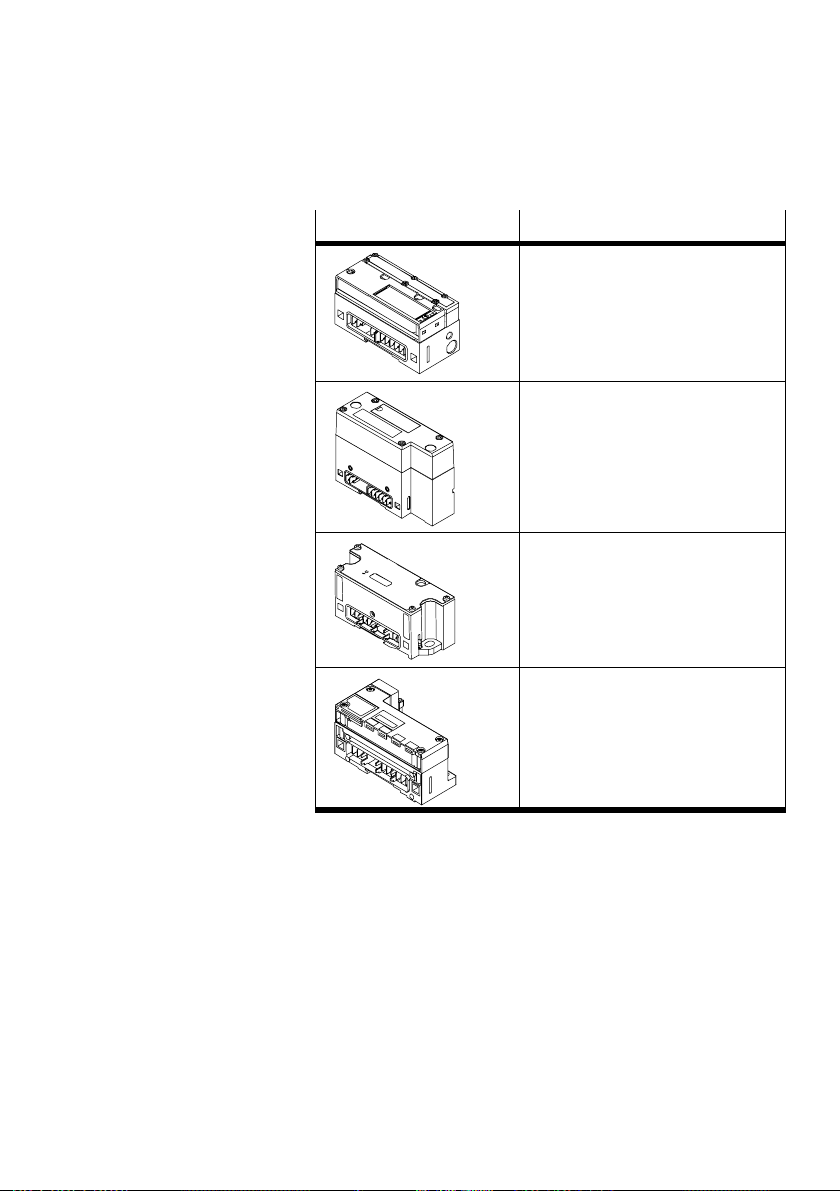
Modules Brief description
Pneumatic interface for connecting
the modular electrical peripherals of
type50 (CPX) to valve terminals of
type32 (MPA)
Pneumatic interface for connecting
the modular electrical peripherals of
type50 (CPX) to VTSA/ISO valves
(type44)
Pneumatic interface for connecting
the modular electrical periphery
type50 (CPX) to valve terminals of
type03 (Midi/Maxi).
Festo P.BE−CPX−SYS−EN en 0902e
Pneumatic interface for connecting
the modular electrical peripherals of
type50 (CPX) to valve terminals of
type12 (CPA)
Tab.1/2: Pneumatic interface modules for CPX terminals
1−5
Page 24
1. Overview of components
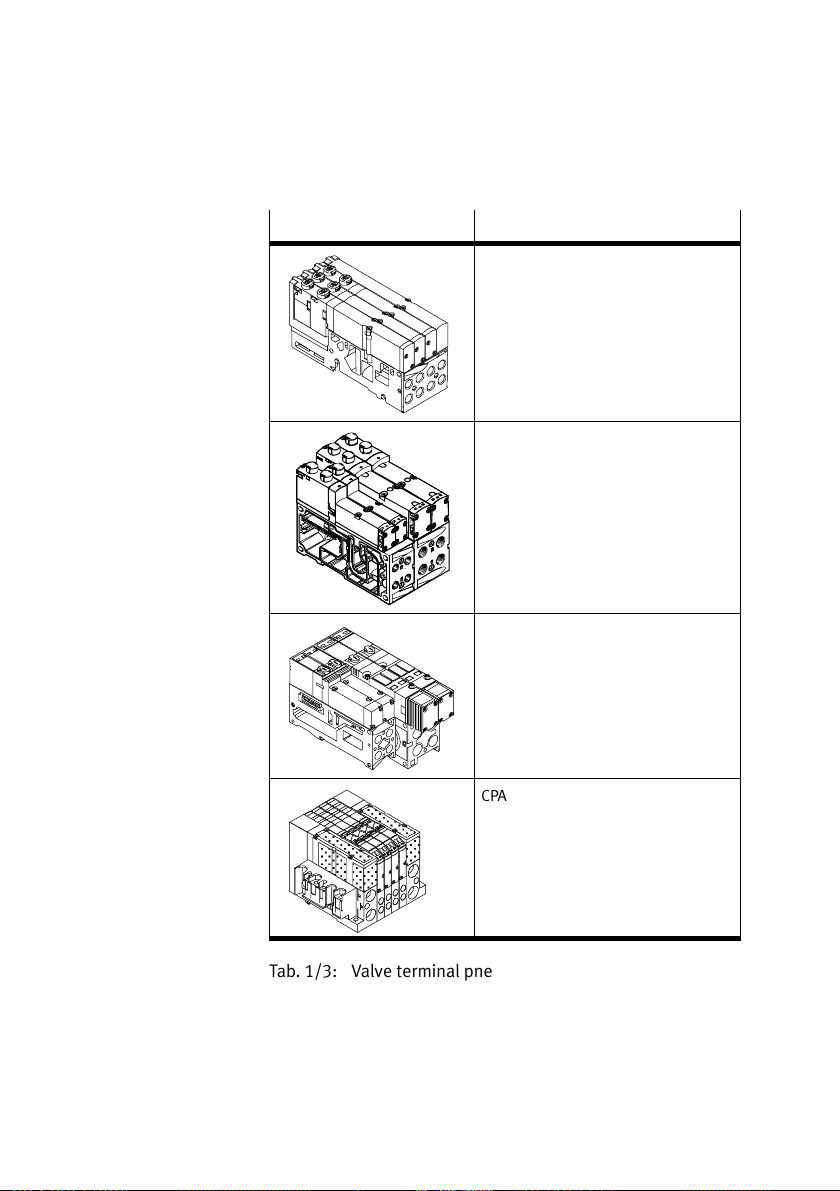
Modules Brief description
MPA
VTSA
Midi/Maxi
1−6
CPA
Tab.1/3: Valve terminal pneumatics for CPX terminals
The electric and pneumatic side of the CPX terminal can be
adapted to various requirements. The electric side can be
fitted with various electric CPX modules, e.g.a CPX bus node,
digital and analogue CPX I/O modules etc. (see Tab.1/1).
Festo P.BE−CPX−SYS−E N en 0902e
Page 25
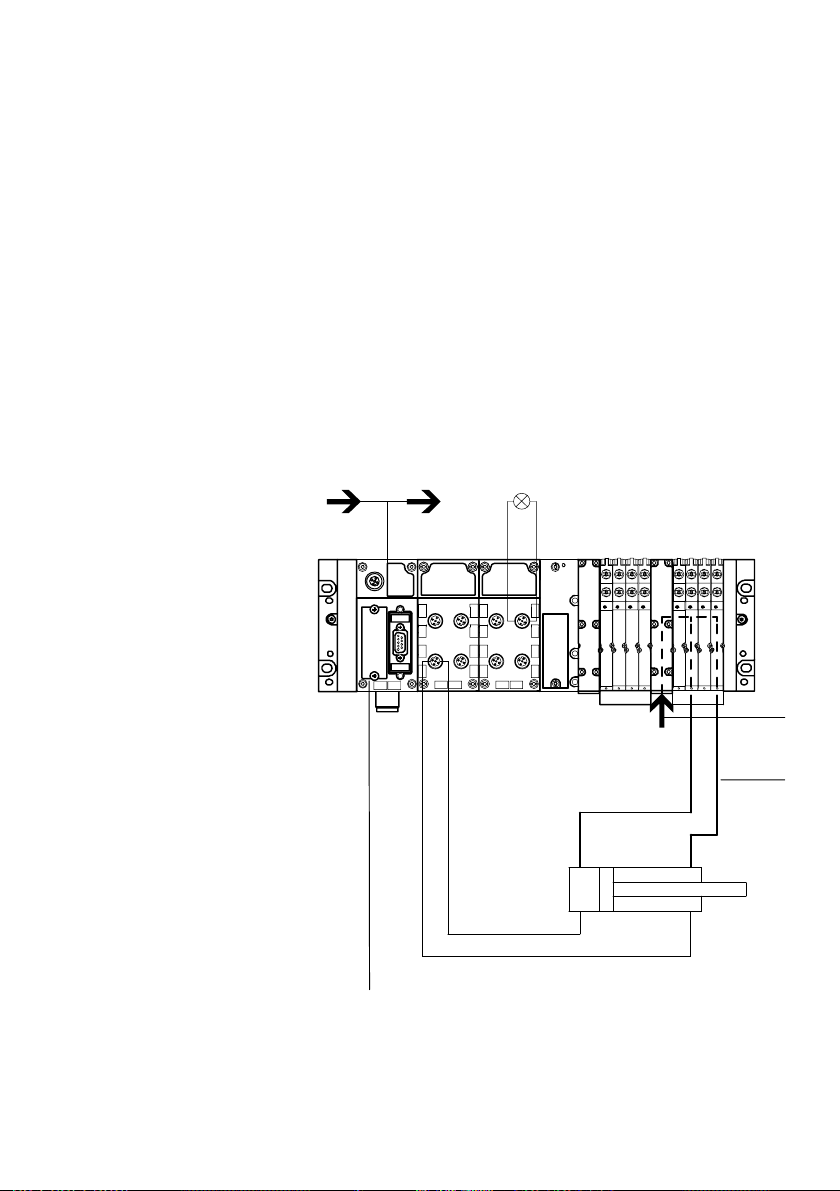
1. Overview of components
3
4
The pneumatic side can be fitted with pneumatics of type
MPA, VTSA, Midi/Maxi or CPA (see Tab.1/3). Different sizes
of valves are possible here. Pneumatic modules are not abso
lutely necessary. CPX terminals can consist exclusively of
electric modules. If pneumatic modules are to be used, the
pneumatic interface appropriate to the pneumatics
tion is required (see Tab.1/2).
1.1.1 Mode of operation of the CPX terminal
1
Fieldbus
incoming
12
2 Fieldbus
continuing
3 Compressed air
supply
in ques
4 Supply air (2/4)
5 CPX bus node
5
Fig.1/2: Function overview of CPX terminal (here with MPA pneumatics)
Festo P.BE−CPX−SYS−EN en 0902e
1−7
Page 26

1. Overview of components
CPX bus node
The node point of a CPX terminal with fieldbus connection is
the CPX bus node, which controls the following functions:
The connection of the terminal to the relevant field bus
The control of data transfer to/from the field bus module
of your control system
Read and write access (depending on the CPX bus
to system−relevant parameters and diagnostic data
(access to internal data and parameters)
Internal control of the terminal
CPX bus nodes provide the connection to certain fieldbuses,
pass control signals on to the other CPX modules and monitor
their ability to function. Basic settings for fieldbus communi
cation can usually be made by DIL
bus node.
Detailed information on the CPX bus node you are using can be
found in the manual for the relevant CPX bus node.
switch directly on the CPX
node)
CPX Front End Controller (CPX−FEC)
The CPX Front End Controller can be used together with a CPX
bus node or independently of a CPX bus node. It offers the
following functions, for example:
Independent control of the CPX valve terminal (Stand
Alone)
Communication via Ethernet (e.g. web server, e−mail,
EasyIP)
1−8
Ethernet slave function (via Modbus TCP)
Communication via fieldbus (only
appropriate CPX bus node)
in conjunction with the
Festo P.BE−CPX−SYS−E N en 0902e
Page 27
1. Overview of components
CPX I/O modules
Processing signals can be evaluated with the CPX I/O mod
ules. Input modules provide inputs for connecting sensors
and enable cylinder positions to be scanned, for example.
Output modules provide universally usable electric outputs
for controlling low−current consuming devices (further valves,
bulbs, etc.).
Note
Including the CPX bus node, a maximum of10 electric CPX
modules plus a pneumatic interface are permitted on the
electric side.
The CPX I/O modules have various types of connections. The
connections are on a sub−base which can be removed from
the module. This offers the following advantages:
Festo P.BE−CPX−SYS−EN en 0902e
The CPX terminal can be
fitted with the desired con
nections. It can be adapted easily to various applica
tions and operating conditions.
When servicing is required, the electronics of the I/O
modules can be replaced without the need to dis
mantle the CPX terminal, or to loosen individual con
nections on the I/O modules.
The following types of
connection can be used:
M12 connection, 5− or 8−pin
M8 connection, 3− or 4−pin
Terminal strips, 16−pin
Sub−D connection, 25−pin
HARAX connection, 4−pin
Further information on the CPX I/O modules can be found in the
manual CPX I/O modules", type P. BE−CPX−EA−...
1−9
Page 28
1. Overview of components
CPX−CP interface
The CPX−CP interface serves for connecting decentrally ar
ranged CP modules (CP valve terminals and CP I/O modules).
It transmits control signals to the connected CP modules and
monitors their ability to function. Maximum 128 external I/Os
are possible per CPX−CP interface.
Detailed information on the CPX−CP interface can be found in
the manual
for the CPX−CP interface type P. BE−CPX−CP−...
Pneumatic interface
If the CPX terminal is to be fitted with valves, a pneumatic
interface will be required (see Tab.1/2). The pneumatic inter
face is the interface between the electric and pneumatic pe
ripherals. It forms the mechanical connection between the
pneumatic and electric modules and transmits the electric
signals.
1−10
The CPX pneumatic interface is mounted
side of the last electric module. Pneumatic interfaces can be
used for e.g.:
Pneumatics of type MPA (maximum 128solenoid coils)
Pneumatics of type VTSA (maximum 32solenoid coils)
Pneumatics of type Midi/Maxi (maximum 26solenoid
coils)
Pneumatics of type CPA (maximum 22solenoid coils)
on the right−hand
Festo P.BE−CPX−SYS−E N en 0902e
Page 29

1. Overview of components
Pneumatic interface for
MPA pneumatics
Pneumatic interfaces for
VTSA pneumatics,
Midi/Maxi pneumatics
or CPA pneumatics
The pneumatic interface for MPA pneumatics provides the
mechanical and electrical connection to the MPA pneumatic
modules. Therefore, from the point of view of the CPX termi
nal, the MPA pneumatic interface does not count as an elec
tric module. Instead, the individual MPA pneumatic modules
each represent an
electric module with digital outputs for
triggering the integrated valves.
From a technical point of view, the pneumatic interfaces
for VTSA pneumatics, Midi/Maxi pneumatics or CPA pneu
matics represent electrical modules with a variable (configu
rable) number of digital outputs for activating the integrated
valves.
Detailed information on the CPX pneumatic interfaces and
MPA pneumatic modules can be found in the manual for the
CPX I/O modules of type P. BE−CPX−EA−...
Valve terminal pneumatics
The valve terminal pneumatics provide the following:
Common channels for supply and exhaust air
Electric signals for all valve solenoid coils
Festo P.BE−CPX−SYS−EN en 0902e
Working lines 2 and 4 are provided for each valve position on
the individual pneumatic modules. The valves are supplied
with compressed air via the common channels or via special
supply modules. Both
the air and auxiliary pilot air from the
valves are also exhausted via these common channels.
Further modules for pressure supply are also available,
e.g. in order to permit work to be carried out with different
work pressures.
1−11
Page 30
1. Overview of components
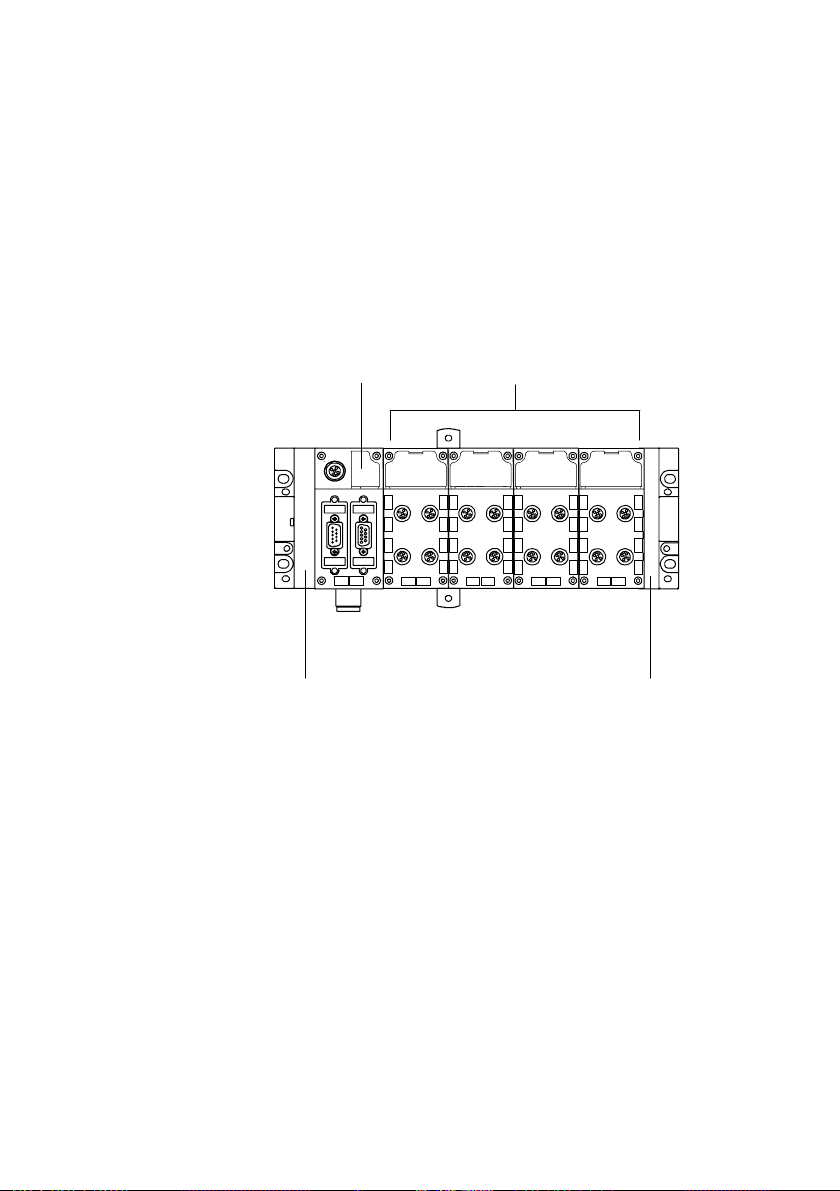
CPX terminals without pneumatics
CPX terminals without pneumatic modules possess an end
plate instead of the pneumatic interface. This design provides
digital and analogue inputs and outputs on the relevant
fieldbus. A maximum of 10 electric modules (including the
CPX bus node) are permitted on a CPX terminal.
1 CPX bus node
1 2
2 I/O modules
3 Right end plate
4 Left end plate
4
Fig.1/3: CPX terminal as fieldbus I/O slave
X 1
X 3
X 1
X 3
X 1
X 2
X 4
X 2
X 4
X 3
X 2
X 4
3
1−12
Festo P.BE−CPX−SYS−E N en 0902e
Page 31
1. Overview of components
Valve terminal pneumatics of type MPA
MPA pneumatics consist of serially linked MPA pneumatic
modules. From a technical viewpoint, the MPA pneumatic
modules in a CPX terminal represent digital output modules
for controlling the integrated valves (valve solenoid coils).
The pneumatic interface for MPA pneumatics provides the
mechanical and electrical connection to the MPA pneumatic
modules.
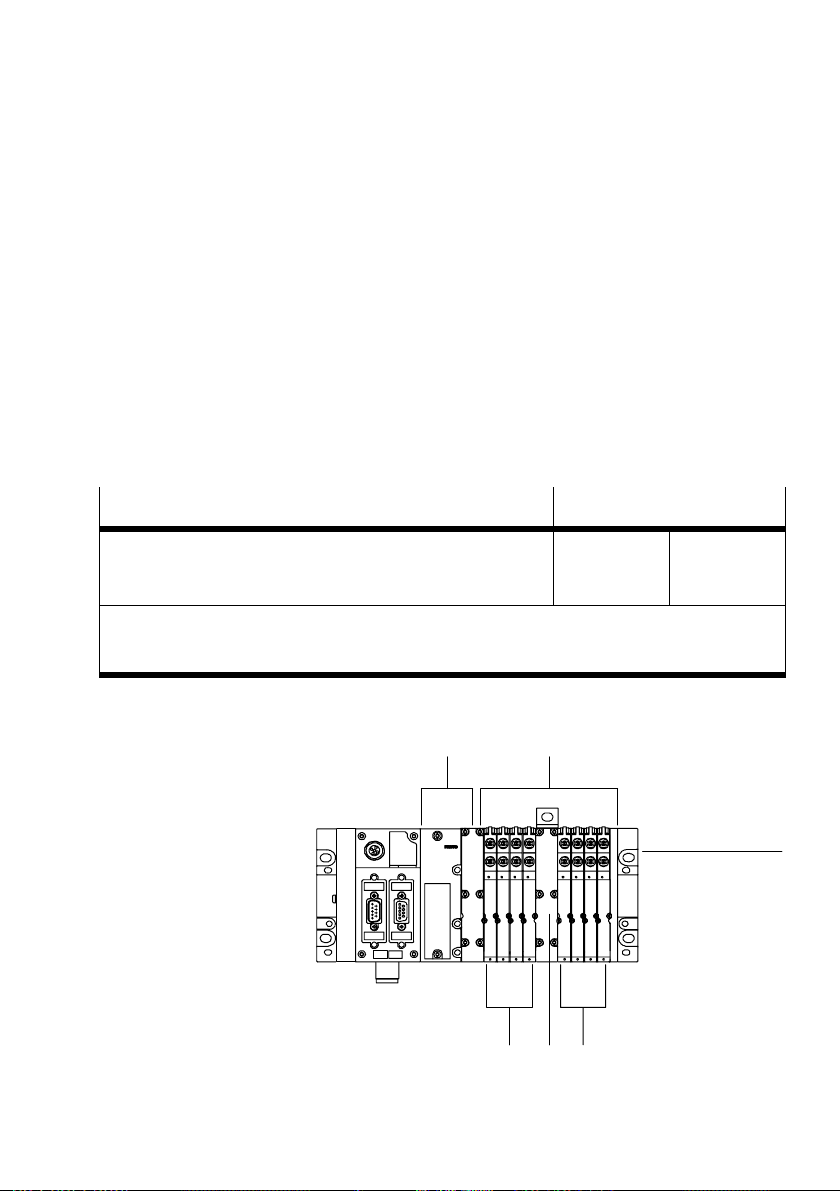
CPX terminals with MPA
pneumatics can be expanded as fol
lows:
CPX terminal with MPA pneumatics
Load voltage supply for the valves via ...
CPX terminal
CPX terminal and electric supply plate (MPA)
1) Two solenoid coils can be controlled per valve position.
2) A max. of 64 solenoid coils can be supplied.
3) A max. of 128 solenoid coils can be supplied.
2)
3)
Number of valve positions
MPA1
4, 8, 12 ... 32
4, 8, 12 ... 64
MPA2
2, 4, 6 ... 16
2, 4, 6 ... 32
Tab.1/4: Number of valve positions of the CPX terminal with MPA pneumatics
1 Pneumatic
interface for MPA
12
pneumatics
2 Valve terminal
pneumatics of
type MPA
3 Right end plate
4 MPA1 pneumatic
module
1)
3
5 Supply plate
Fig.1/4: CPX terminal with MPA pneumatics
Festo P.BE−CPX−SYS−EN en 0902e
4
45
1−13
Page 32
1. Overview of components
Valve terminal pneumatics of type VTSA
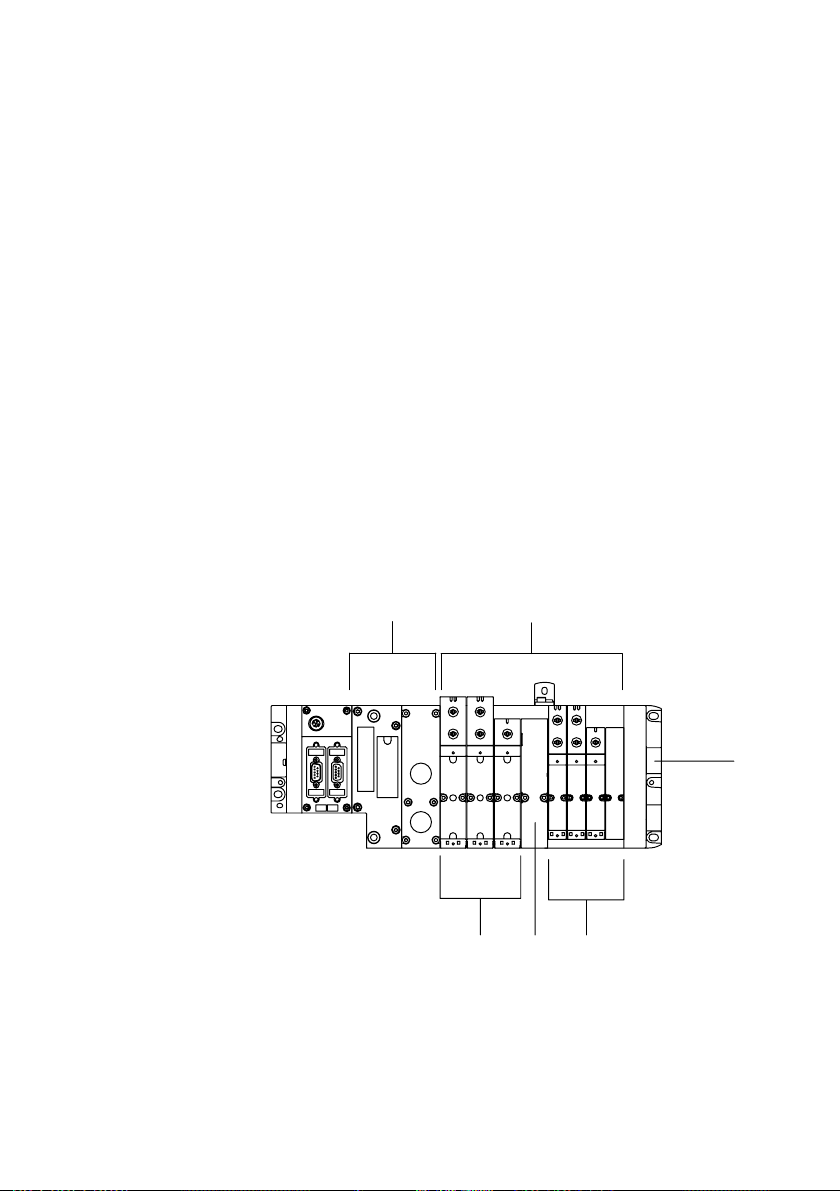
Valve terminal pneumatics of type VTSA are built up on a
modular basis and can be equipped with combinations of
valves in the following sizes:
Size02 (to ISO15407−2), 18mm
Size01 (to ISO15407−2), 26mm
Size1 (to ISO5599−2), 42mm
In this way adaptation to the requirements of the machine or
system can also be made on
The valve positions can be configured individually (sizes 18
and 26mm) or in steps of two (size 42mm) up to a maximum
of 32 valve positions. Unused valve positions can be sealed
with blanking plates.
the pneumatic side.
1 Pneumatic
interfaces for
VTSA pneumatics
1
2 Valve terminal
pneumatics of
type VTSA
3 Right end plate
4 Valves of size
18mm
5 Supply plate
6 Valves of size
26mm
Fig.1/5: CPX terminal with VTSA pneumatics
1−14
6
2
5
4
Festo P.BE−CPX−SYS−E N en 0902e
3
Page 33
1. Overview of components
Valve terminal pneumatics of type Midi/Maxi
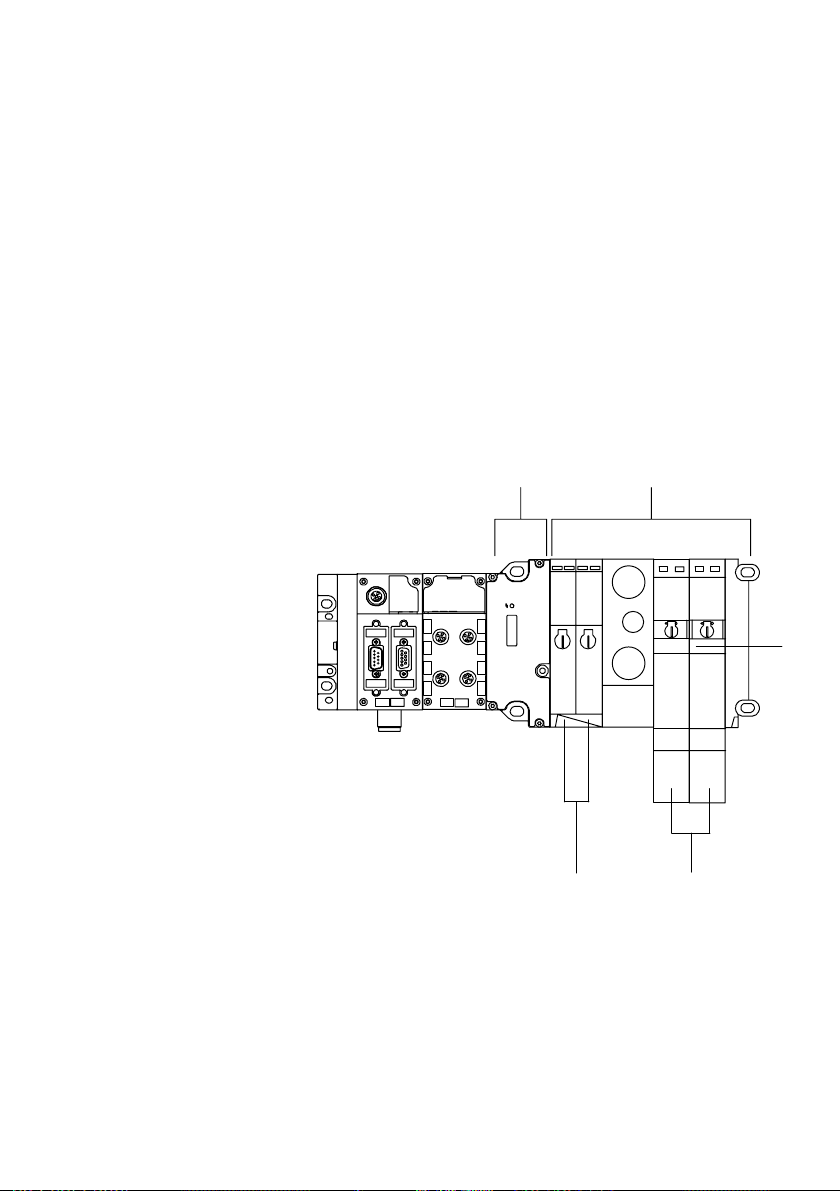
Valve terminal pneumatics of type Midi/Maxi are also built up
on a modular basis. These valve terminal pneumatics consist
of MIDI and MAXI valves. Valves of both sizes can be oper
ated together on a CPX terminal. In this way adaptation to the
requirements of the machine or system can also be made
the pneumatic side.
The valve positions can be configured in steps of two from 2
to 26 valve locations. Unused valve positions can be sealed
with blanking plates.
on
1 Pneumatic
interface for
Midi/Maxi
2 Valve terminal
pneumatics of
type Midi/Maxi
3 Right end plate
4 Maxi valves
5 Midi valves
Fig.1/6: CPX terminal with Midi/Maxi pneumatics
12
5
4
3
Festo P.BE−CPX−SYS−EN en 0902e
1−15
Page 34
1. Overview of components
Valve terminal pneumatics of type CPA
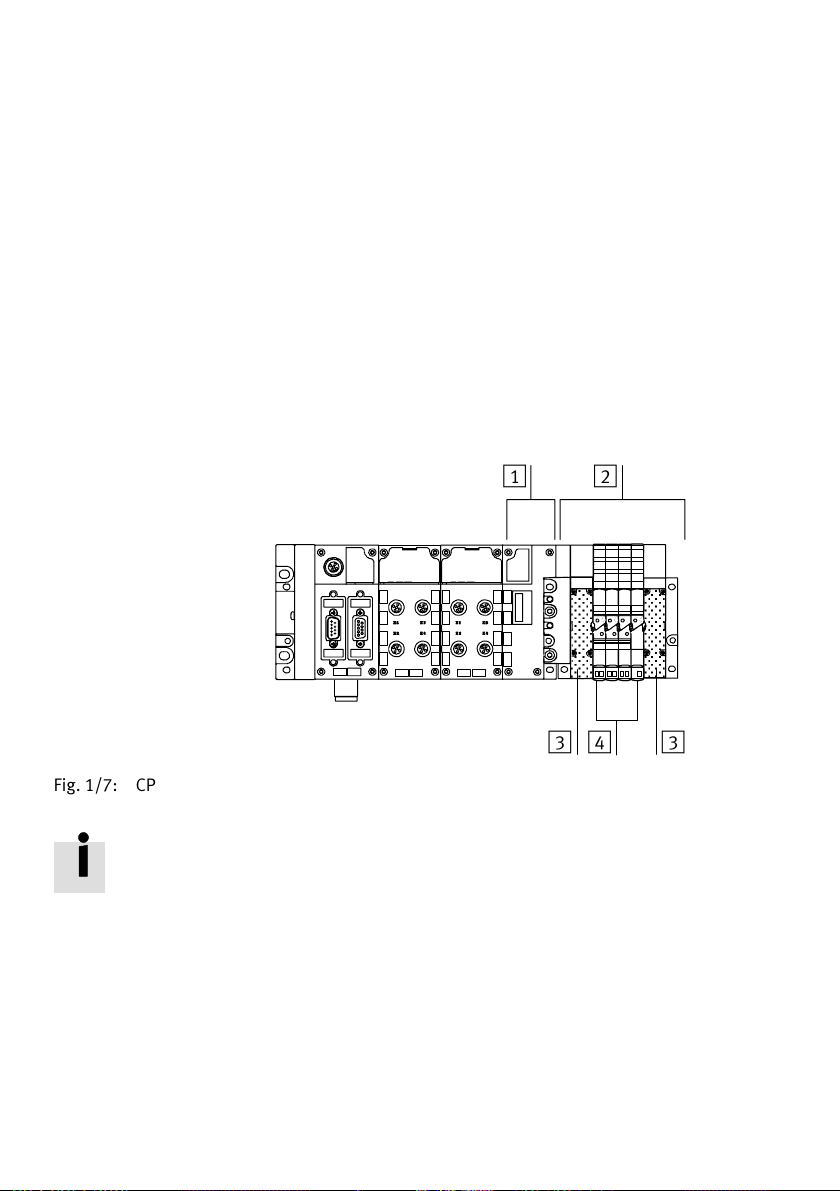
Valve terminal pneumatics of type CPA are distinguished by
compact exterior dimensions in proportion to the high flow
rates. They have replaceable valve plates that are mounted
on sub−bases. The sub−bases are connected mechanically by
tie rods and have an end plate at the side. Valve plates are
available in different sizes.
The valve
to 22valve positions.
positions can be configured in single steps from 2
1 Pneumatic
interface for CPA
(here CPA10)
2 Valve terminal
pneumatics of
type CPA
3 End plates
4 Valve plates (here
CPA10)
Fig.1/7: CPX terminal with CPA pneumatics
Further information on the pneumatics of your CPX valve ter
minal can be found in the appropriate Pneumatics Manual.
12
343
1−16
Festo P.BE−CPX−SYS−E N en 0902e
Page 35
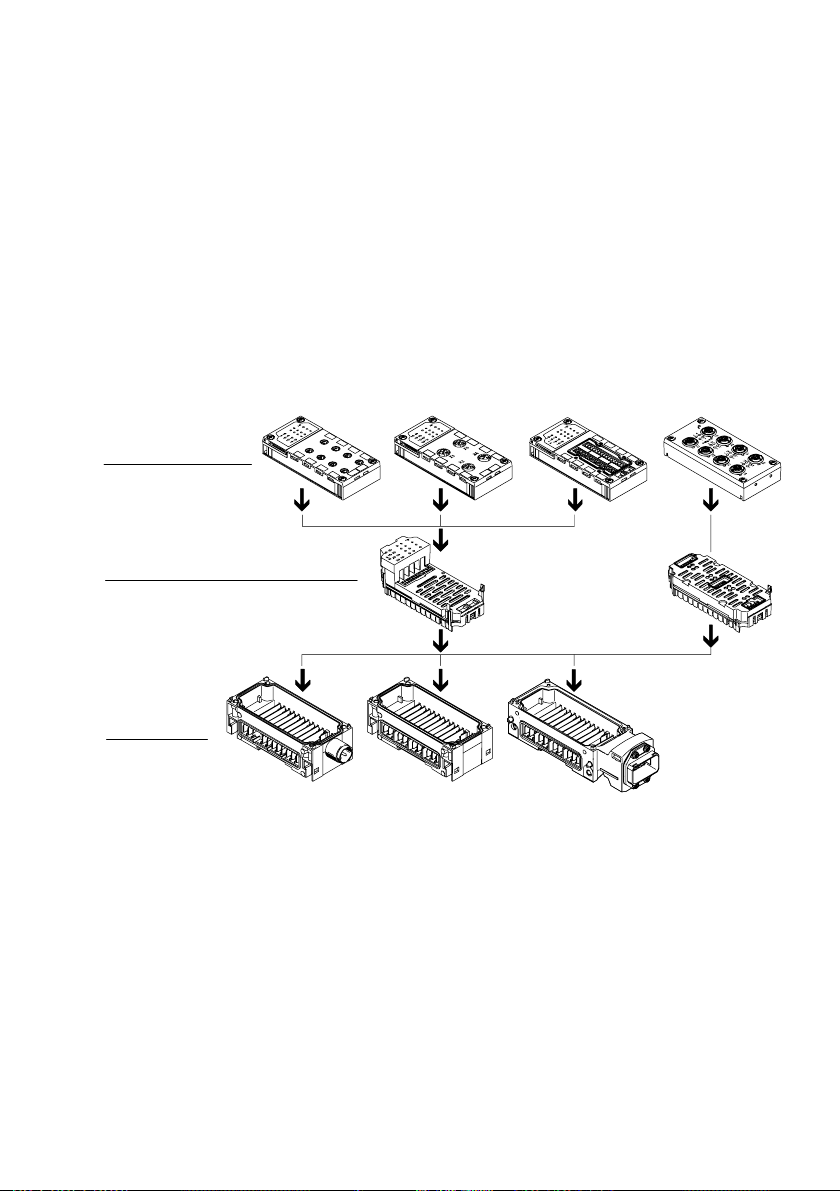
1. Overview of components
1.1.2 Structure of the electric CPX modules
An electric CPX module always consists of:
An interlinking block (see section1.1.3 for variants)
An electronics module
A connection block (selectable for I/O modules)
1
2
3
1 Sub−base (selectable housing upper
part)
3 Interlinking block (selectable housing
lower part)
2 Electronics module
Fig.1/8: Structure of the CPX modules (example)
Connection block The upper part of the housing selected for the CPX I/O mod
ules is called the connection block. Connection blocks provide
the necessary connections for sensors and actuators. In this
way, the CPX terminal offers a high degree of flexibility with
regard to adaptation to different applications and operating
conditions.
Festo P.BE−CPX−SYS−EN en 0902e
1−17
Page 36
1. Overview of components
Electronic module The electronic module contains the electronic components.
Itis connected to the interlinking block and to the connection
block by means of electric plug connectors. Many electronics
modules can be combined with various connection blocks.
In the case of the CPX bus node, the connection technology is
an integral part of the module;
in other words, the connection
block and the electronics module form a single unit.
Interlinking block The lower part of the housing of the electric modules is called
the interlinking block. Interlinking blocks serve for the electri
cal and mechanical linking of the modules. They can provide
aconnection for supplying the operating voltage and/or
load
voltage and transmit the operating and load voltages to the
neighbouring modules (see section1.1.3). In the plastic ver
sion of the interlinking blocks, the mechanical link between
the electric modules is made via tie rods (see section2.2.1).
Interlinking blocks in the metal version are bolted together
individually (see section2.3).
1−18
You can replace electronics
modules with connection blocks
during servicing without the need to dismantle the CPX ter
minal or loosen individual connections. Instead the entire
connection block is removed, the electronics module is re
placed and the connection block is placed into position again
(see manual for the CPX I/O modules", type P. BE−CPX−
EA−...).
Festo P.BE−CPX−SYS−E N en 0902e
Page 37
1. Overview of components
Note
With a combination of connection blocks and interlinking
blocks with metal on plastic or plastic on metal, always use
the appropriate screws for the interlinking block (see
www.festo.com\catalogue):
With plastic interlinking block: thread−cutting screws
With metal interlinking blocks: screws with metric thread
1.1.3 The power supply concept of the CPX terminal
The operating and load voltages for the CPX terminal are sup
plied via the interlinking blocks (see Tab.1/5 and Tab.1/6).
These conduct the operating and load voltages to the neigh
bouring modules.
Interlinking blocks are available in various housing designs
and with alternative connections:
Festo P.BE−CPX−SYS−EN en 0902e
Type of plug con
nector of pins
M18 4−pin ·
7/8" 4−pin ·
Push pull 5−pin ·
· Available
Not available
Number
Interlinking block in
plastic
version
5−pin · ·
metal
version
Interlinking blocks with 5−pin plug connectors enable separ
ate electrical circuits for the operating voltage for electronics/
sensors and the load voltage for outputs/valves.
1−19
Page 38
1. Overview of components
Interlinking blocks are available in plastic and metal designs
and with various alternative connections:
M18 plug, 4−pin
7/8" plug, 4−pin
7/8" plug, 5−pin
Push−pull plug, 5−pin
The pin allocation for all alternative connections is described
in Tab.3/4 and in the package insert for the interlinking
blocks with supply.
Section3.1.4 describes the criteria for selecting an
appropri
ate power supply unit, and calculation tables for designing
the electrical circuits.
1−20
Festo P.BE−CPX−SYS−E N en 0902e
Page 39
1. Overview of components
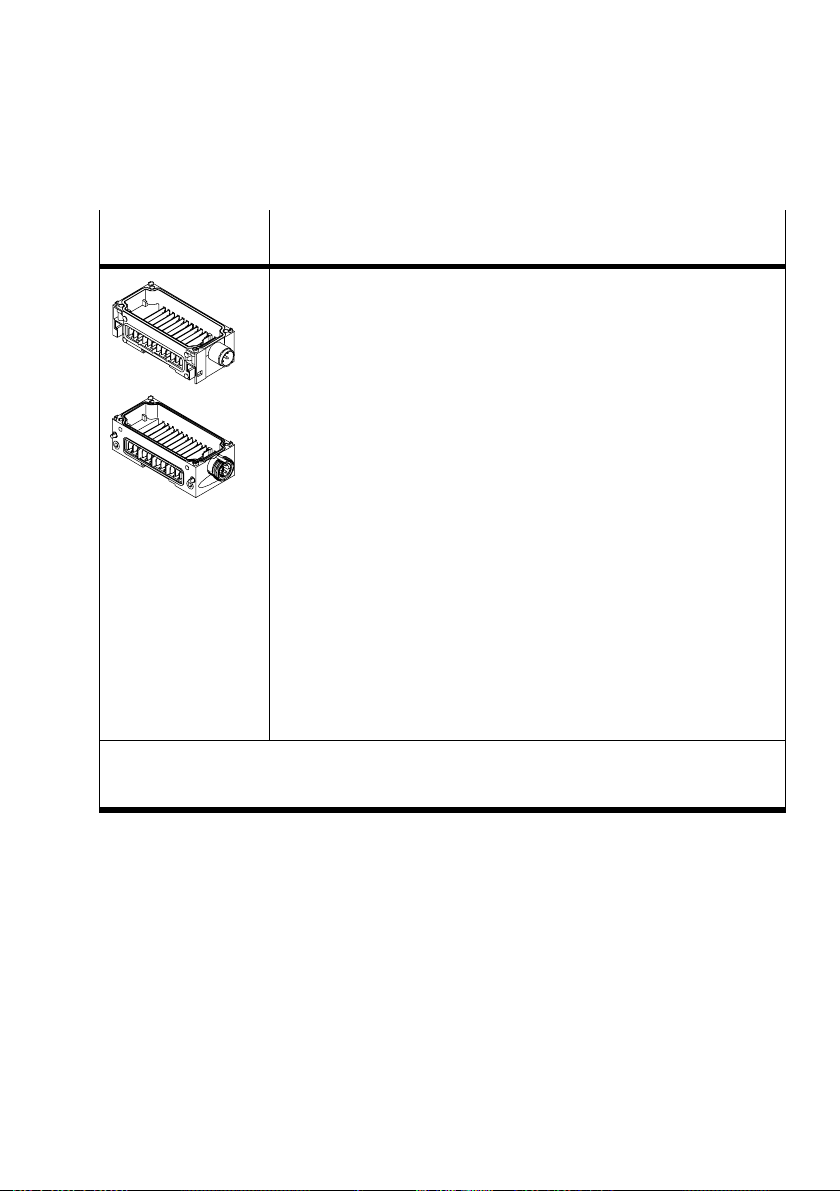
Interlinking blocks
Description
M18 or 7/8"
Types CPX−(M−)GE−EV−S...
Interlinking blocks in plastic and metal version with system supply, of
which precisely one of each must be available for each CPX terminal.
Operating voltage for internal electronics and for the internal electronics
of the CP modules connected to the CPX−CP interface
Sensor supply for internal input modules and for the CP input modules
connected to the CPX−CP interface
Load voltage supply for internal output modules and valves
Load voltage supply for the CP modules connected to the CPX−CP inter
face
Types CPX−(M−)GE−EV−Z...
Interlinking blocks in plastic and metal version with additional power
supply for electrical outputs
Load voltage supply for the output module inserted and for the
subsequent output modules inserted to the right.
Type CPX−GE−EV−V...
Interlinking blocks with additional power supply for valves
Load voltage supply for the pneumatic modules/valves inserted
subsequently to the right.
Load voltage supply for CP modules which are connected to the fitted
CPX−CP interface and to those CPX−CP interfaces subsequently fitted to
the right
1) Optional − depends on the current consumption of the CPX modules and the connected compo
nents.
2) Not available for all alternative connections.
1)
1) 2)
Tab.1/5: Interlinking blocks with supply (M18 or 7/8")
Festo P.BE−CPX−SYS−EN en 0902e
1−21
Page 40
1. Overview of components
Interlinking blocks
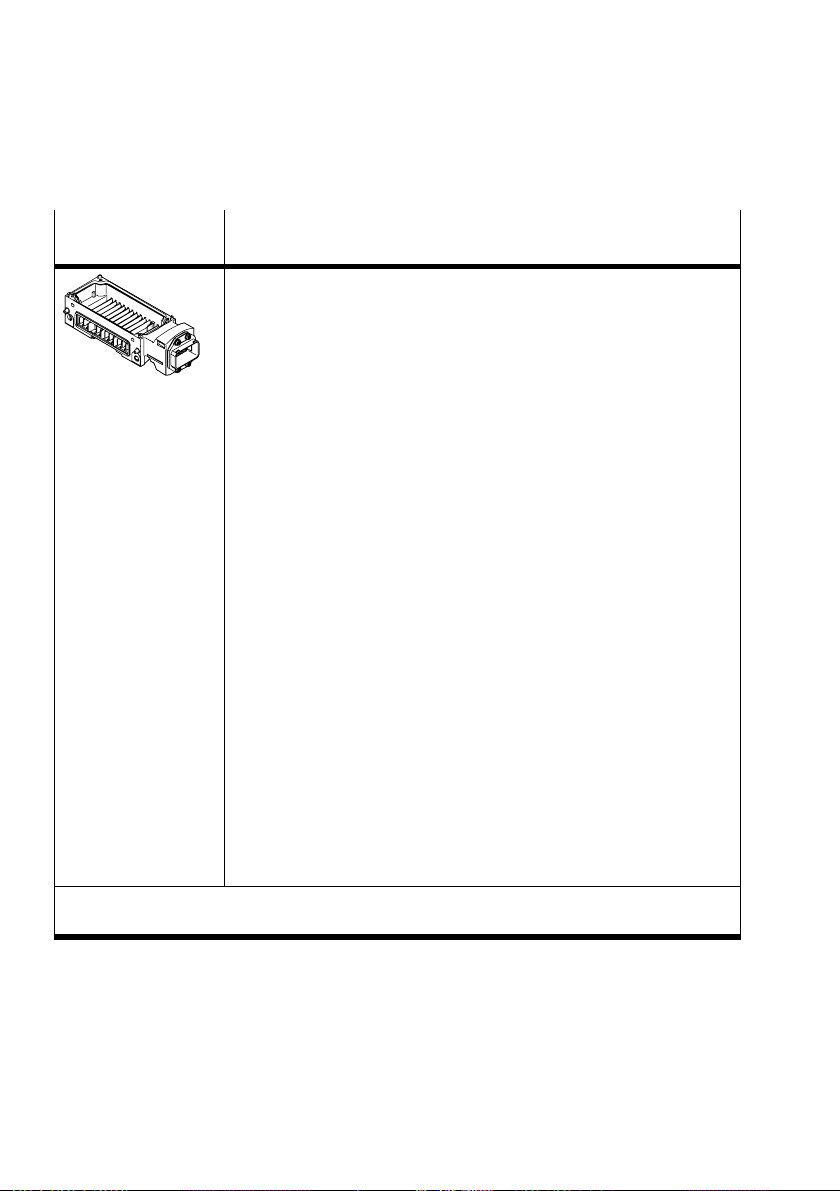
Push pull
Description
Type CPX−M−GE−EV−S−PP−5POL
Interlinking blocks with push−pull system supply, of which precisely one of
each must be available for each CPX terminal.
Operating voltage for internal electronics and for the internal electronics
of the CP modules connected to the CPX−CP interface
Sensor supply for internal input modules and for the CP input modules
connected to the CPX−CP interface
Load voltage supply for internal output modules and valves
Load voltage supply for the CP modules connected to the CPX−CP inter
face
Type CPX−M−GE−EV−S−PP−5POL
Interlinking blocks with push−pull forwarding function for supplying power
to subsequent equipment
Must be placed immediately to the right of the system power supply.
Only one interlinking block with forwarding function may be used for
each CPX terminal and
The forwarding function must not be combined with additional power
supplies.
Interlinking blocks with a push−pull forwarding function are identically
constructed to those with with a push−pull system power supply. It is
therefore necessary to provide external protection in both cases (see
section3.1.4)
Type CPX−M−GE−EV−Z−PP−5POL
Interlinking blocks in metal version with push−pull additional power supply
for electrical outputs
Must be placed to the right of the system power supply.
The additional power supply must not be combined with the forwarding
function.
Load voltage supply for the output module fitted and for the subsequent
output modules fitted to the right.
1)
1)
1) Optional − depends on the current consumption of the CPX modules and the connected compo
nents.
Tab.1/6: Interlinking blocks with supply (push−pull)
1−22
Festo P.BE−CPX−SYS−E N en 0902e
Page 41
1. Overview of components
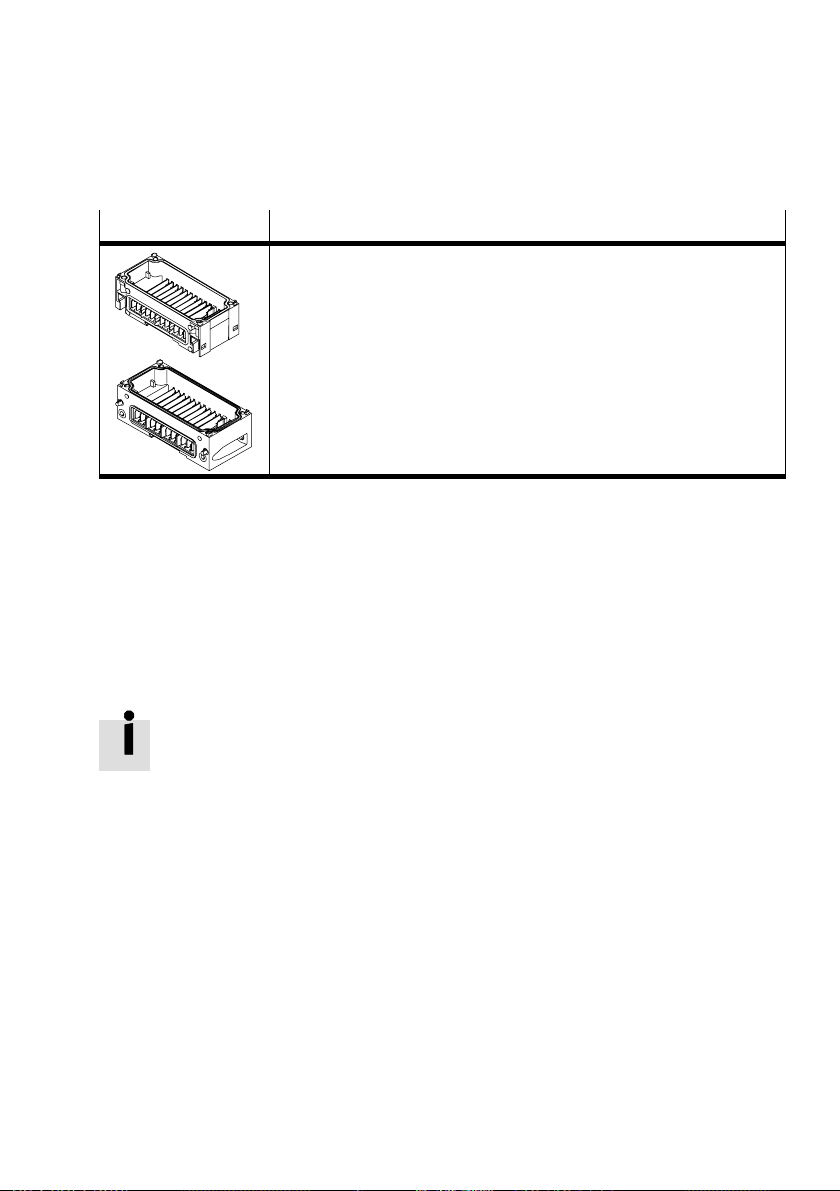
Interlinking blocks Description
Types CPX−(M−)GE−EV
Interlinking blocks without supply
Tab.1/7: Interlinking blocks without supply
Intermediate supply for
load voltage supply of
valves in MPA
When using MPA pneumatics, a max. of8 sub−bases
equipped with valves can be supplied electrically with
load voltage by the CPX terminal. If the pneumatics side
is expanded further (>8sub−bases), an electric supply plate
must be used for the
power supply.
For additional information about permissible power supplies,
see the relevant manual for MPA−... pneumatics", type
P.BE−MPA−... in the section Replacing electronics modules".
Festo P.BE−CPX−SYS−EN en 0902e
1−23
Page 42
1. Overview of components
1.2 Commissioning, diagnosis and operational functions
The system reaction of the CPX terminal can be adapted to
the relevant application. For this purpose, the CPX terminal
provides extensive functions for commissioning, diagnosis
and operation.
Commissioning and operational functions
The reaction of the CPX terminal can be adapted to individual
requirements by parameterising. The following reactions of
the CPX terminal can be influenced, for example, by accessing
the internal parameters:
The reaction of the outputs and valves to fieldbus com
munication faults (fail−safe settings)
The reaction to fault elimination
1−24
The debounce times for
The signal extension for digital input signals
The force settings (force signal status)
The operating method of the diagnostic memory
The CPX terminal is supplied from the factory with preset
parameters.
Caution
A different parametrisation will result in different characte
ristics. Check especially when replacing CPX terminals to
see which settings are necessary and make sure that these
are restored (e.g. in the start−up phase by the higher−order
PLC/IPC).
digital input signals
Festo P.BE−CPX−SYS−E N en 0902e
Page 43

1. Overview of components
Information about the module−specific parameters supported
by the module you use can be found in the manual for the
relevant module. Basic information on the different para
meters can be found in Appendix C in this manual.
Diagnostic functions
Extensive diagnostic information can be accessed depending
on the fieldbus used.
Status bits Common diagnostic messages (global error messages) are
displayed by means of 8 internal inputs (8 status bits).
I/O diagnostic interface With fieldbuses that do not possess extensive diagnostic
functions, the diagnostic information of the CPX terminals is
available via the I/O diagnostic interface.
interface enables bus−independent access to diagnostic in
formation, data and parameters via internal digital I/Os
(16inputs and 16 outputs).
The I/O diagnostic
Diagnostic memory Faults that occur during operation are entered in a diagnostic
memory. The first or the last 40 entries are saved, as well as
the relevant time measured from the moment
the power sup
ply was switched on.
Fieldbus−specific diagnos
tic functions
Special diagnostic functions or communication services are
available, depending on the fieldbus used. For example
communication services on:
DPV1 (PROFIBUS)
The PCP channel (Interbus)
SDO access (CANopen)
etc.
Festo P.BE−CPX−SYS−EN en 0902e
1−25
Page 44

1. Overview of components
1−26
Festo P.BE−CPX−SYS−E N en 0902e
Page 45

Assembly
Chapter 2
2−1Festo P.BE−CPX−SYS−EN en 0902e
Page 46

2. Assembly
Contents
2. Assembly 2−1 . . . . . . . . . . . . . . . . . . . . . . . . . . . . . . . . . . . . . . . . . . . . . . . . . . . . .
2.1 General instructions on assembly and dismantling 2−3 . . . . . . . . . . . . . . . . . . . .
2.2 Assembling electric modules with plastic interlinking blocks 2−6 . . . . . . . . . . . .
2.2.1 Replacing a
with tie rod interlinking 2−7 . . . . . . . . . . . . . . . . . . . . . . . . . . . . . . . . . . .
2.2.2 Increasing or reducing the number of electric
2.2.3 Fitting the right−hand end plates with Midi/Maxi valves 2−15 . . . . . . . . .
2.3 Assembling electric modules with metal interlinking blocks 2−17 . . . . . . . . . . . . .
2.3.1 Replacing a complete
2.4 Fitting the CPX terminal 2−21 . . . . . . . . . . . . . . . . . . . . . . . . . . . . . . .
2.4.1 Fitting CPX terminals without pneumatics onto a H−rail 2−21 . . . . . . . . .
2.4.2 Fitting CPX terminals with pneumatics onto an H−rail 2−22 . . . . . . . . . . .
2.4.3 Fitting CPX terminals
an H−rail 2−26 . . . . . . . . . . . . . . . . . . . . . . . . . . . . . . . . . . . . . . . . . . . . .
2.4.4 Wall mounting 2−29 . . . . . . . . . . . . . . . . . . . . . . . . . . . . . . . . . . . . . . . . . .
complete module or interlinking block
modules 2−10 . . . . . . . . .
module or interlinking block 2−18 . . . . . . . . . . . .
. . . . . . . . . . .
with Midi/Maxi pneumatics onto
. .
2−2
Festo P.BE−CPX−SYS−E N en 0902e
Page 47
2. Assembly
2.1 General instructions on assembly and dismantling
Warning
Uncontrolled movements of the connected actuators and
uncontrolled movements of loose tubing can cause injury
to human beings or damage to property.
Before carrying out assembly and maintenance work,
switch off the following:
Compressed air supply
The operating and load voltage supplies.
Note
Handle all modules and components of the CPX terminal
with great care. Note especially the following:
Screw connections must be fitted without distortion and
mechanical tension. Screws must be fitted accurately
(otherwise threads will be damaged).
The specified torques must be observed.
The modules must not be offset (IP 65).
Contact surfaces must be
tact faults).
The contacts of the midi/maxi valve solenoid coils must
not be bent (not resistant to bending, i.e. they will break
off if they are bent back).
Electrostatically sensitive devices.
Do not touch the contact surfaces of the plug connectors
on the modules and components.
clean (avoid leakage and con
Festo P.BE−CPX−SYS−EN en 0902e
2−3
Page 48
2. Assembly
Rules for assembly
Including the CPX bus node, a maximum of 10 electric
modules plus a pneumatic interface are permitted on the
electric side.
For MPA pneumatics:
The MPA pneumatic interface does not count as an elec
tric module. Instead, the individual MPA pneumatic mod
ules each represent an electric module with digital out
puts for triggering
16MPA pneumatic modules are permissible. If there are
more than 8modules, an additional load voltage power
supply is needed for the valves.
Except for the pneumatic interface, each electric module
including the CPX bus node can be fitted in any position
on the electrical side.
the integrated valves. A maximum of
2−4
The electric modules
can be arranged in any sequence in the
CPX terminal. Depending on the fieldbus protocol used, it
may however be sensible to arrange modules of the same
type one after the other. In these cases, the address assign
ment and therefore communication between the fieldbus
master and the individual CPX terminals can be
optimised.
The pneumatic interface must be placed on the right−hand
side as the last electric module.
Interlinking blocks can be used universally for CPX bus
nodes and I/O modules.
If interlinking blocks with additional supply are not re
quired, the interlinking block with the system supply can
be fitted in any desired position.
If interlinking
blocks with additional supply are required,
these must always be placed to the right of the system
supply (see also section 1.1.3).
Connection blocks can be used universally for different
I/O modules.
Festo P.BE−CPX−SYS−E N en 0902e
Page 49

2. Assembly
The maximum number of pneumatic components sup
ported is as follows:
128valve solenoid coils of type MPA (16MPA pneu
matic modules with max.8valve solenoid coils each)
32valve solenoid coils of type VTSA/VTSA−F
26valve solenoid coils of type Midi/Maxi
22valve solenoid coils of type CPA
Festo P.BE−CPX−SYS−EN en 0902e
2−5
Page 50
2. Assembly
2.2 Assembling electric modules with plastic interlinking blocks
Caution
Inappropriate handling can result in damage to the mod
ules.
· Observe the handling specifications for electrostatically
sensitive devices.
· Discharge yourself before installing or removing sub−
assemblies to protect the sub−assemblies from static
discharges.
You can adapt the CPX terminal to your requirements by ad
ding or removing modules. The mechanical link between the
electric modules is made via tie rods in the interlinking
blocks. The length of the tie rod is determined
number of interlinking blocks or electric modules.
Dismantle the CPX terminal before you add or remove inter
linking blocks. If you are using the additional fastenings of
type CPX−BG−RW−... for fastening onto a wall, it may be
necessary to loosen existing fastenings (see also Tab.2/4).
by the possible
2−6
Festo P.BE−CPX−SYS−E N en 0902e
Page 51
2. Assembly
2.2.1 Replacing a complete module or interlinking block with tie rod inter
linking
The interlinking blocks in the plastic version are connected to
each other mechanically by means of two tie rods. The tie
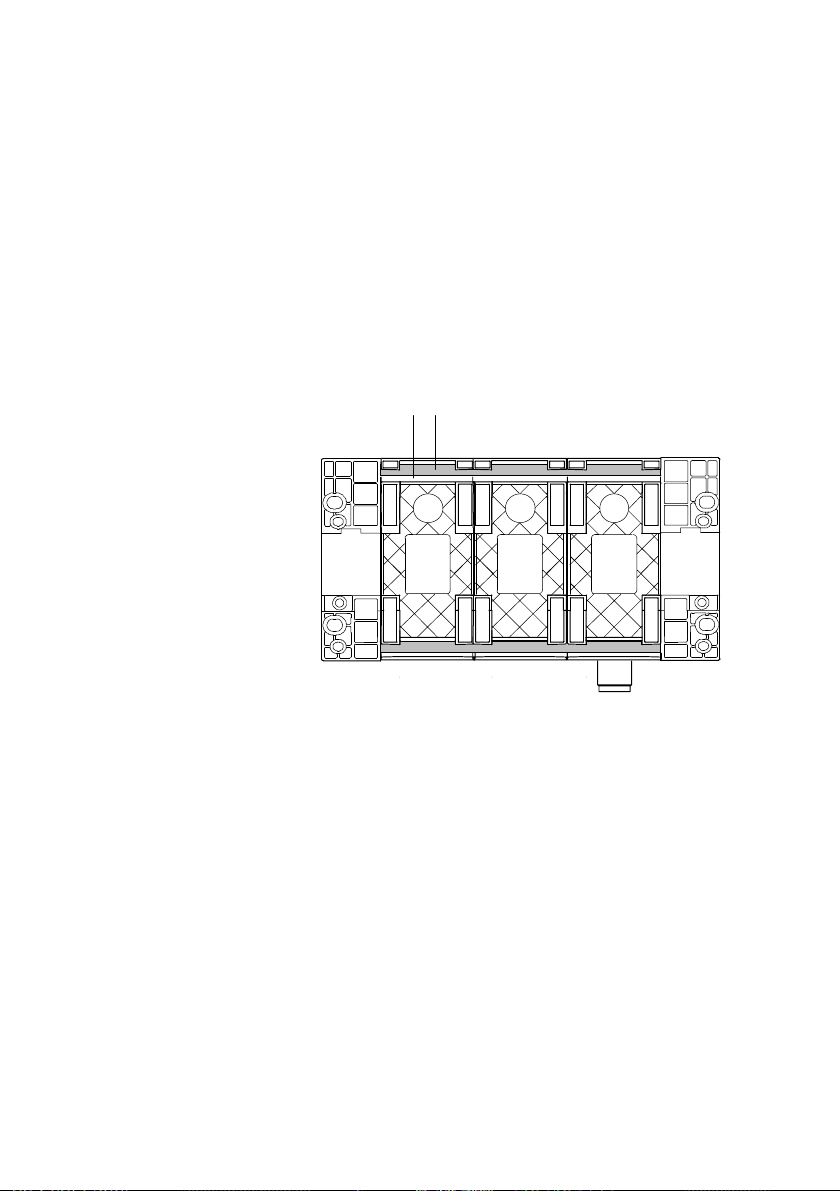
rods are situated in a groove in the housing open at the rear.
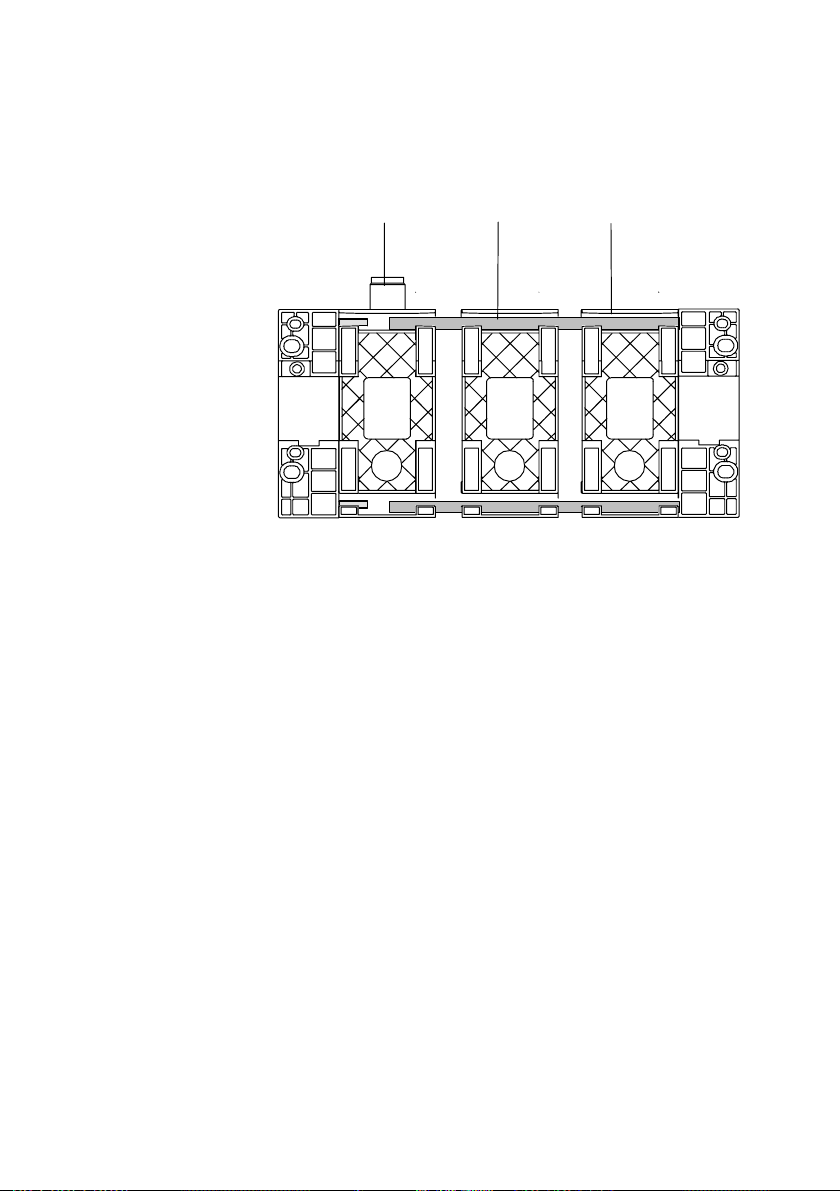
1 Tie rod groove
12
2 Tie rod
Fig.2/1: CPX terminal with tie rod interlinking (rear view)
Dismantling Proceed as follows in order to remove a complete module or a
interlinking block:
1. Dismantle the CPX terminal
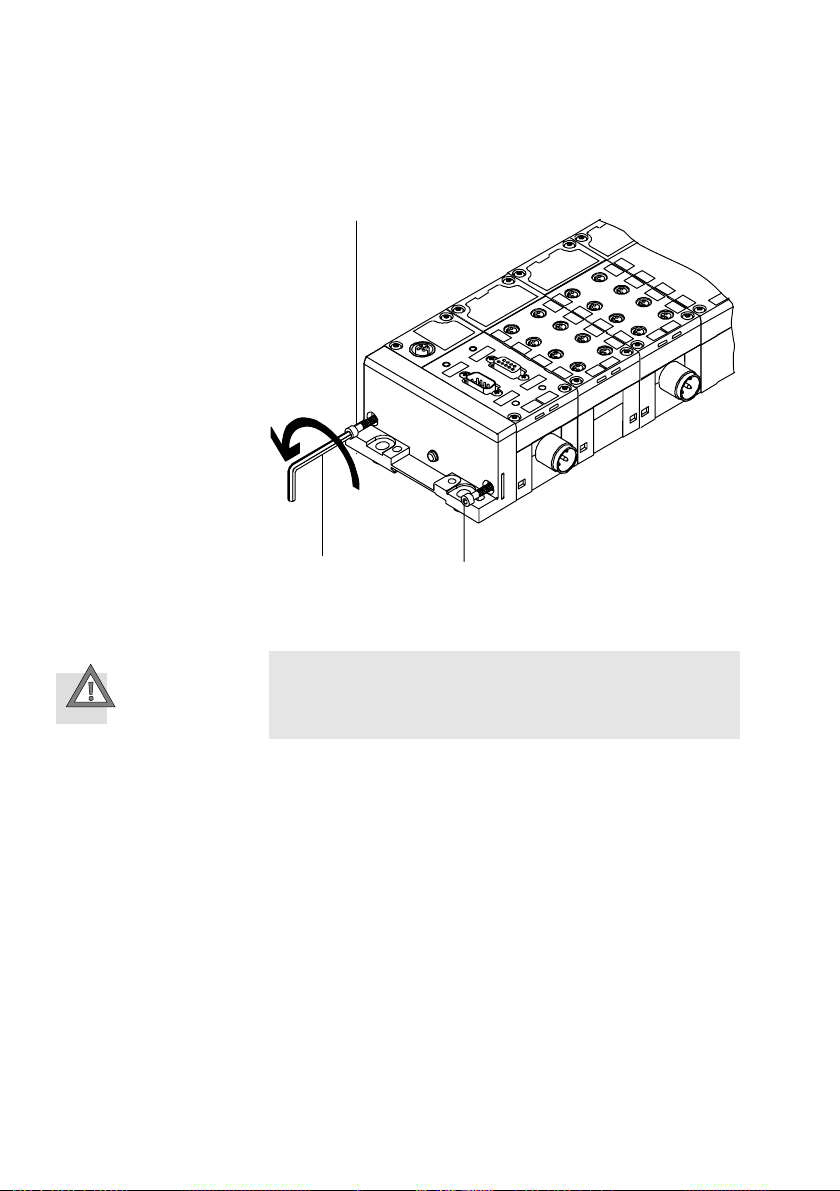
2. Unscrew and remove completely the tie rod screws in the
left−hand end plate (see Fig.2/2). The interlinking blocks
are now held together only by the electrical plug con
nectors.
Festo P.BE−CPX−SYS−EN en 0902e
2−7
Page 52
2. Assembly
1 Tie rod screw
1
2 Allen key size3
2
Fig.2/2: Dismantling electric I/O modules
Caution
Make sure that the electric plug connectors of the inter−
linking blocks are not bent.
3. Loosen the electrical plug connectors on the relevant
interlinking block by taking the interlinking block apart
carefully and without tilting it.
1
2−8
4. Now push the modules to the left of the module to be
replaced approx. 3cm to the
5. Now push the module to be replaced approx. 1.5 cm to
the left.
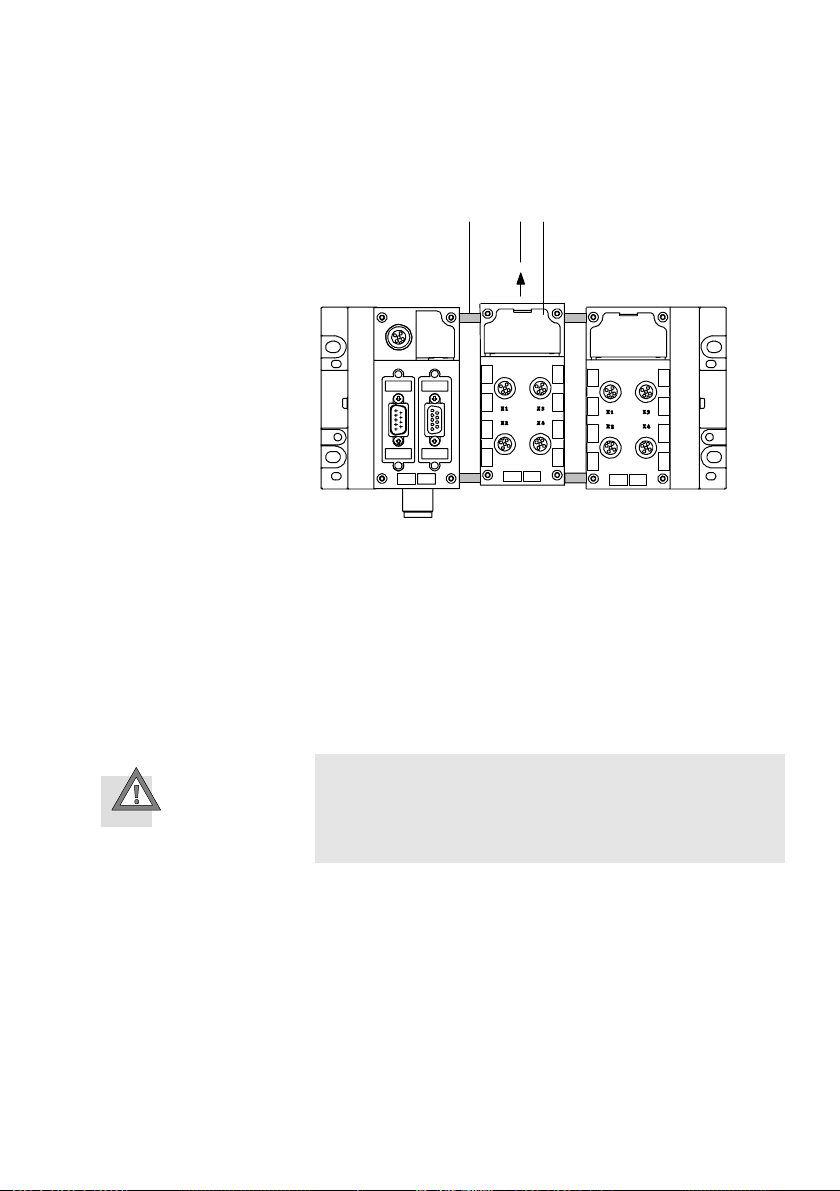
6. Make sure that the tie rod lies over the tie rod groove of
the module to be replaced by shifting the module accord
ingly (see arrow A in Fig.2/3).
left.
Festo P.BE−CPX−SYS−E N en 0902e
Page 53
2. Assembly
1 Tie rod
1
A
2
2 Loosened module
Fig.2/3: Dismantling a module or interlinking block
7. Carefully remove the loosened module by lifting it up
wards.
Assembly To insert a module or interlinking block, proceed as follows:
1. Insert the module in the desired position (see Fig.2/3).
The tie rod must lie exactly over the tie rod groove.
Caution
When interlinking blocks are arranged in series:
Make sure that the electric plug connectors of the inter−
linking blocks are not bent.
Festo P.BE−CPX−SYS−EN en 0902e
2. Align the CPX terminal on a flat surface so that the compo
nents are not offset. Use the bearing surface for the H−rail
to align the component correctly. It is easier
use an H−rail. Alternatively, you can place the CPX ter
minal without pneumatics or with the CPA pneumatics in
such a way that the interlinking blocks’ electrical connec
tions are facing upwards (see Fig.2/4). The tie rod is held
in the tie rod groove by the force due to
to align if you
weight.
2−9
Page 54
2. Assembly
1 Electrical
connection faces
upwards
1
2
2 Tie rod
3 Tie rod groove
Fig.2/4: CPX terminal with loosened tie rod interlinking (rear view)
3. Slide the interlinking blocks together carefully and with
out tilting.
4. Place the end plate on the tie rod.
5. Make sure that the tie rods and plug connectors are
correctly seated. Carefully screw the tie rod screws a few
turns into the tie rods.
6. Then tighten
hexagon socket with 2Nm ±0.3Nm.
the screws equally with a size3 internal
3
7. Assemble the CPX terminal (see section2.4).
2.2.2 Increasing or reducing the number of electric modules
The length of the tie rod is determined by the possible
number of interlinking blocks or electric modules. In order to
add an electric module to the CPX terminal, you will require a
tie rod extension (see Tab.2/1).
2−10
Festo P.BE−CPX−SYS−E N en 0902e
Page 55
2. Assembly
In order to increase or reduce the number of modules by
more than one module, you must replace the tie rods by tie
rods of the appropriate length. The following table contains
alist of the tie rods which you will need in order to adapt the
length of the tie rods to the
desired number of modules.
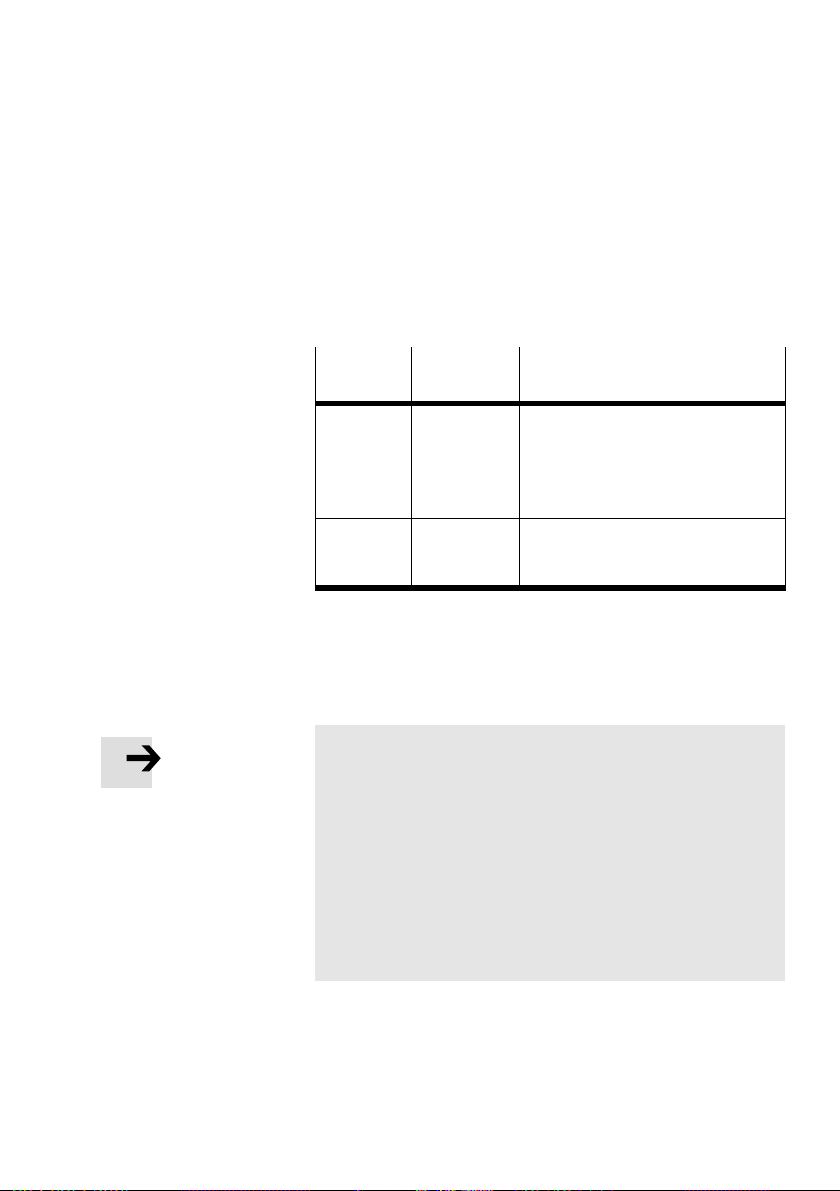
Type
Number of
Description
modules
CPX−ZA−1
CPX−ZA−2
...
CPX−ZA−9
CPX−ZA−10
CPX−ZA−1−E +1 Tie rod extension for a further electric
1
2
...
9
10
Tie rod sets (each contains two tie
rods of the appropriate length)
module (max. one tie rod extension
per tie rod permitted)
Tab.2/1: Tie rod sets and tie rod extension
Fitting the tie rod extension
Note
Please observe the following instructions when fitting the
tie rod extension in order to avoid damage to the CPX ter
minal:
· Fit the tie rod extension so that it is flush with the tie rod
(it need not be tightened).
· Only one tie rod extension is permitted for each tie rod.
· Maximum 10 electric modules including the CPX bus
node plus a pneumatic interface are permitted for each
CPX terminal.
Festo P.BE−CPX−SYS−EN en 0902e
2−11
Page 56
2. Assembly
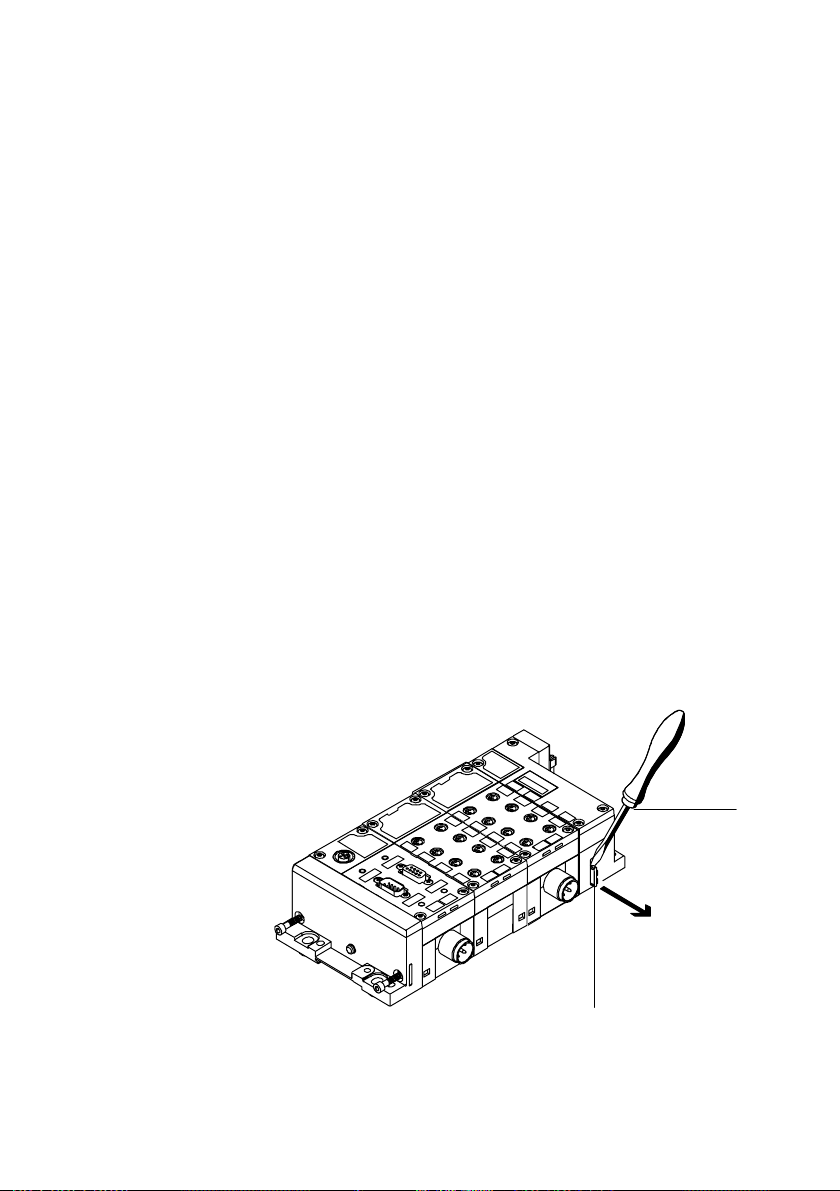
Dismantling Remove the electric modules or interlinking blocks as follows
(see also following Fig.2/5):
1. Unscrew and remove completely the tie rod screws in the
left−hand end plate (see Fig.2/2). The interlinking blocks
are now held together only by the electrical plug con
nectors.
2. Remove the left−hand end plate from the tie rods.
1 Screwdriver
2 Fastening plate
and locking plate
in the pneumatic
interface or the
right−hand end
plate
3. To remove the
Loosen the electrical plug connectors on the relevant in
terlinking block by taking the interlinking block apart
carefully and without tilting it.
4. Pull the loosened interlinking blocks away from the tie
rod.
5. To remove a tie rod:
With the aid of a suitable tool, e.g. a screwdriver, remove
the appropriate fastening and locking
matic interface or in the right−hand end plate (see
Fig.2/5).
interlinking blocks:
plate in the pneu
2
1
Fig.2/5: Fastening plate and locking plate in the pneumatic interface
2−12
Festo P.BE−CPX−SYS−E N en 0902e
Page 57
2. Assembly
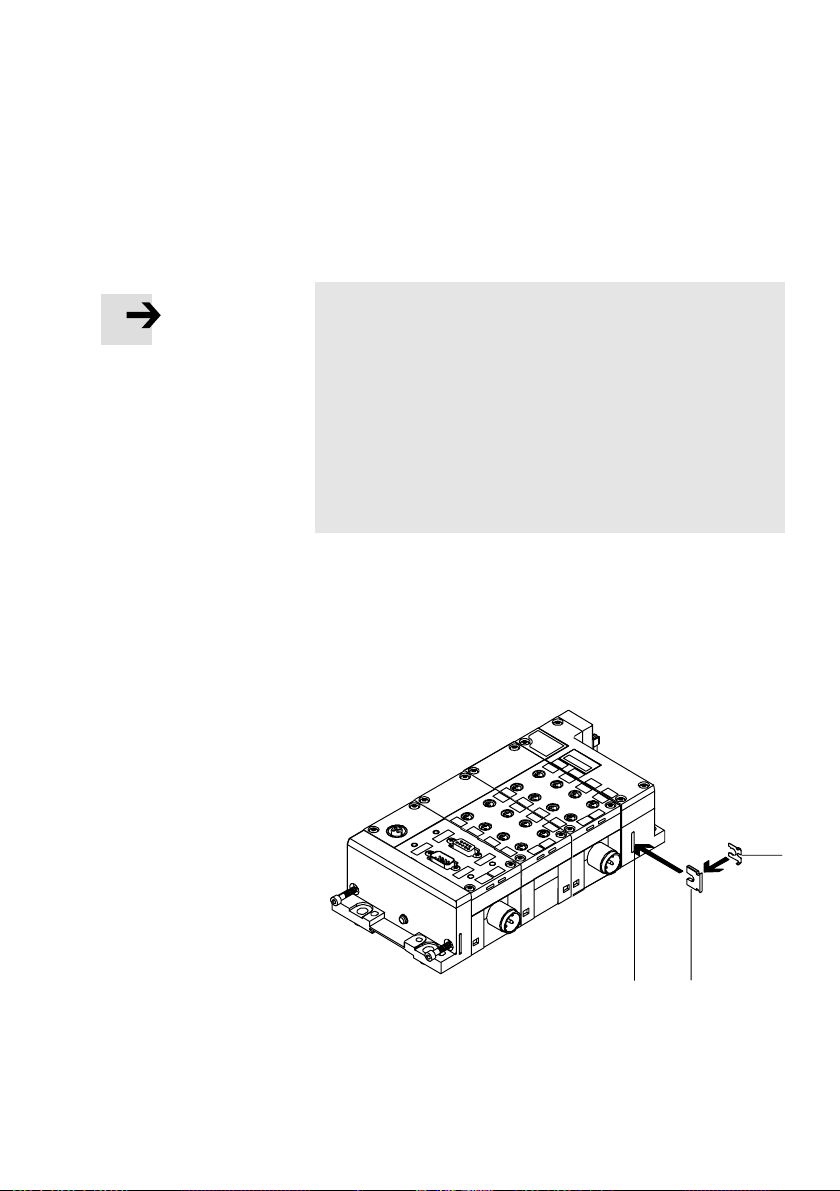
Assembly Fit the tie rod and the electric modules or interlinking blocks
as follows (see Fig.2/6):
Note
· Place subsequently ordered modules where possible
after the last module before the pneumatic interface or
in front of the right−hand end plate.
· Do not fit more than 10 electric modules and one pneu
matic interface.
· Fit modules of the same type where possible in series
(e.g. first all input modules then all output modules).
This can be an advantage for the address assignment of
the CPX terminal, depending on the fieldbus used.
1. Fasten the tie rod in the pneumatic interface or the right−
hand end plate, by placing
locking plate and pushing these together into the groove
intended for this purpose. The locking plate must lie on
the side facing the pneumatics. The hooks on the locking
plate must grip into the grooves in the fastening plate.
the fastening plate over the
1 Locking plate
2 Fastening plate
3 Groove for tie rod
fastening
Fig.2/6: Fastening plate and locking plate in the pneumatic interface
Festo P.BE−CPX−SYS−EN en 0902e
3
1
2
2−13
Page 58
2. Assembly
2. Push the interlinking blocks onto the tie rod carefully and
without tilting.
Caution
When interlinking blocks are arranged in series:
Make sure that the electric plug connectors of the inter−
linking blocks are not bent.
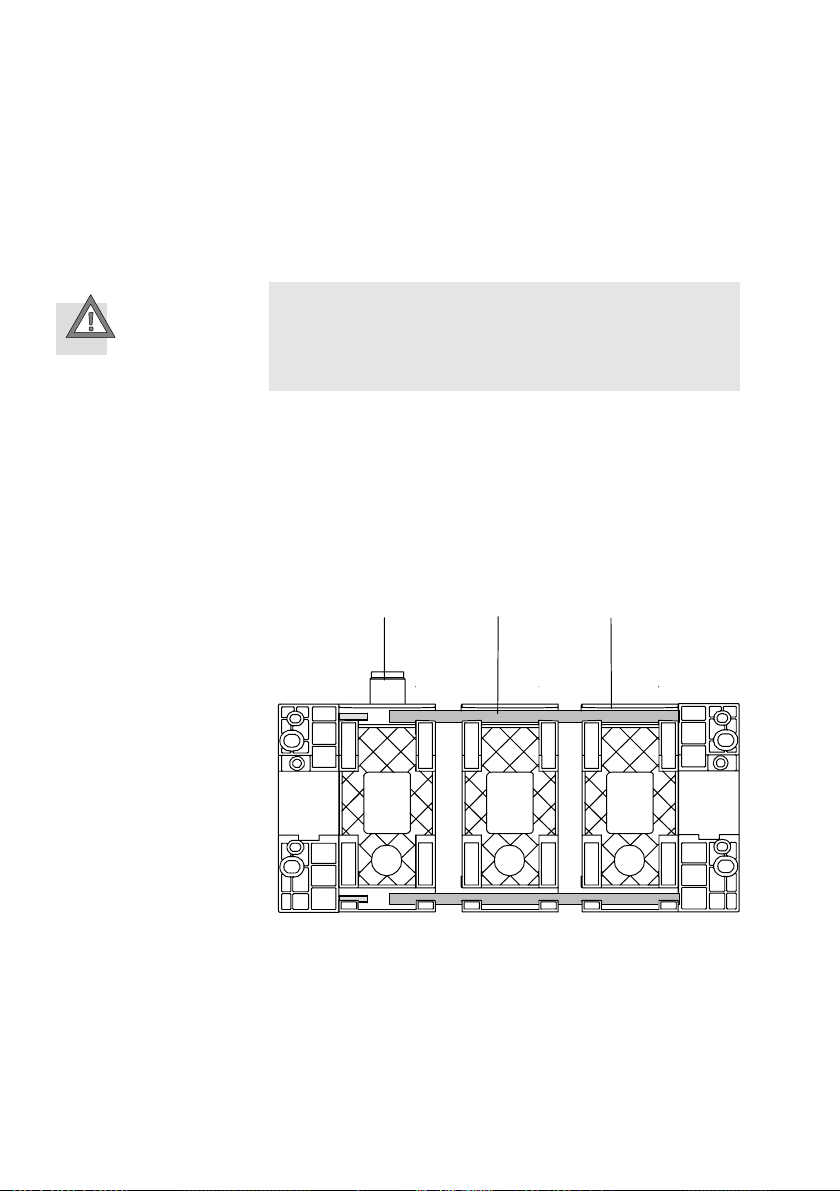
3. Align the CPX terminal on a flat surface so that the compo
nents are not offset. Use the bearing surface for the H−rail
to align the component correctly. It is easier
use an H−rail. Alternatively, you can place the CPX ter
minal without pneumatics or with the CPA pneumatics in
such a way that the interlinking blocks’ electrical connec
tions are facing upwards (see Fig.2/7). The tie rod is held
in the tie rod groove by the force due to
to align if you
weight.
1 Electrical
connection faces
upwards
1
2
2 Tie rod
3 Tie rod groove
Fig.2/7: CPX terminal with loosened tie rod interlinking (rear view)
4. Slide the interlinking blocks together carefully and with
out tilting.
5. Place the end plate on the tie rod.
2−14
Festo P.BE−CPX−SYS−E N en 0902e
3
Page 59
2. Assembly
6. Make sure that the screw connectors are seated correctly
and carefully screw the tie rod screws a few turns into the
tie rods.
7. Then tighten the screws equally with a size3 internal
hexagon socket with 2Nm ±0.3Nm.
2.2.3 Fitting the right−hand end plates with Midi/Maxi valves
Note
With Midi/Maxi valves, the right−hand end plate is earthed
internally when the valve terminal is supplied from the
factory. If you undertake extensions/conversions to the
valve terminal, earth the right−hand end plate of the valve
terminal as described below.
In this way, you will avoid interference from electromagne
tic sources.
Festo P.BE−CPX−SYS−EN en 0902e
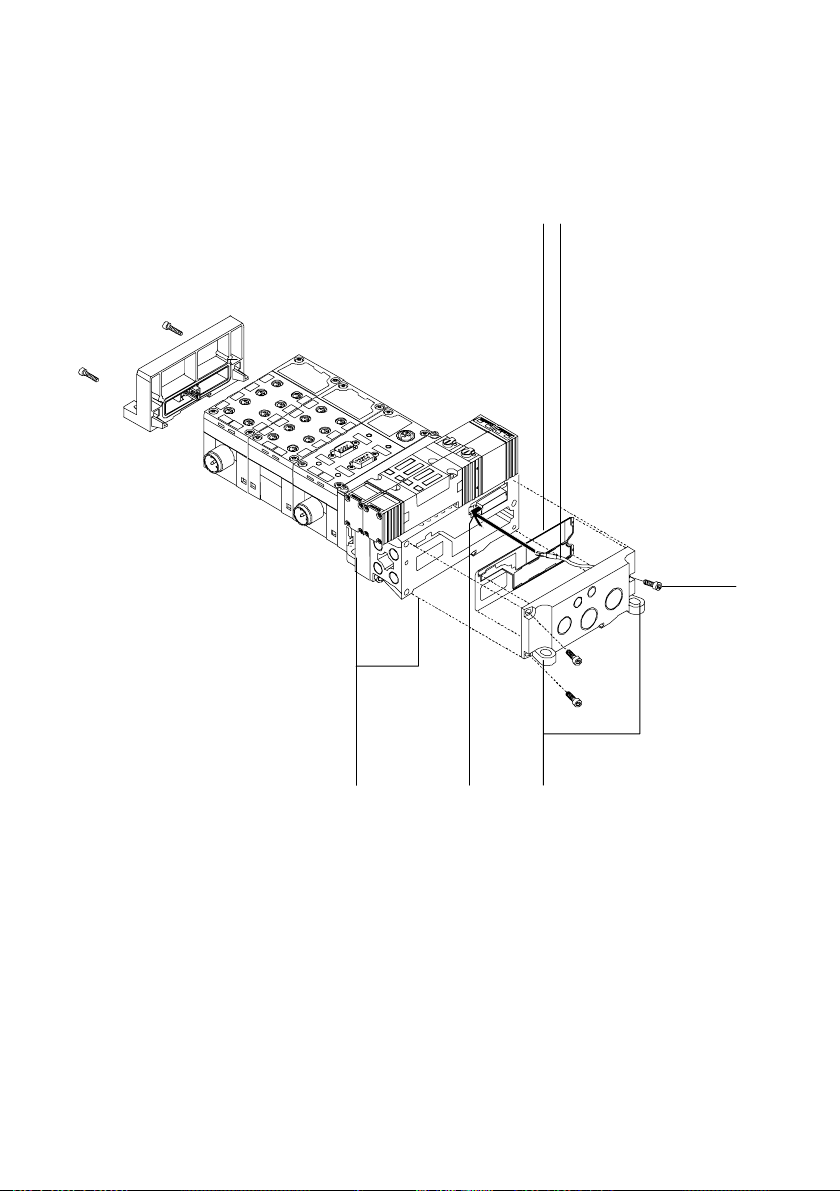
Earth the end plates
after extension/conversion as follows:
1. Right−hand end plate (Midi/Maxi):
In order to earth the right−hand end plate, connect the
cable fitted on the inside onto the appropriate contacts of
the pneumatic module or the CPX bus node (see Fig.2/8).
2. Left−hand end plate:
The left−hand end plate is connected conductively with
the other components by means
of rails in the interlinking
block.
Instructions on earthing the entire valve terminal can be
found in section 3.1.5. Fig.2/8 shows you how to fit the
right−hand end plates with Midi/Maxi valves.
2−15
Page 60
2. Assembly
1
2
3
5
1 Seal
2 Pre−assembled earth cable
4
4 Contact for earth cable
5 With wall mounting: use spacer
discs(4x)
3 Fastening screws approx.1Nm
Fig.2/8: Fitting the end plates with Midi/Maxi pneumatics
2−16
5
Festo P.BE−CPX−SYS−E N en 0902e
Page 61
2. Assembly
2.3 Assembling electric modules with metal interlinking blocks
Caution
Inappropriate handling can result in damage to the mod
ules.
· Observe the handling specifications for electrostatically
sensitive devices.
· Discharge yourself before installing or removing sub−
assemblies to protect the sub−assemblies from static
discharges.
You can adapt the CPX terminal to your requirements by ad
ding or removing modules. The mechanical link between the
electric modules is made via the threaded connectors be
tween the interlinking blocks.
Festo P.BE−CPX−SYS−EN en 0902e
Dismantle the CPX terminal before you
add or remove inter
linking blocks. If you are using the additional fastenings of
type CPX−M−BG−RW−... for fastening onto a wall, it may be
necessary to loosen existing fastenings (see also Tab.2/4).
2−17
Page 62

2. Assembly
2.3.1 Replacing a complete module or interlinking block
The interlinking blocks in the metal version are each linked to
the adjacent interlinking block or end plate by means of
screws.
1 Connector screws
Fig.2/9: CPX terminal with connection block and interlinking blocks in metal version
Dismantling Proceed as follows in order to remove a complete module or
ainterlinking block:
1. Dismantle the CPX terminal
2. Unscrew and remove completely the two screws on the
interlinking block you wish to remove (see Fig.2/9). The
interlinking blocks are now held together only by
trical plug connectors.
1
1
1
the elec
2−18
Caution
Make sure that the electric plug connectors of the interlink
ing blocks are not bent.
Festo P.BE−CPX−SYS−E N en 0902e
Page 63
2. Assembly
3. Carefully pull apart the two halves of the CPX terminal
without tilting them.
4. Repeat steps 1 to 3 on the left−hand side of the interlink
ing block you wish to remove.
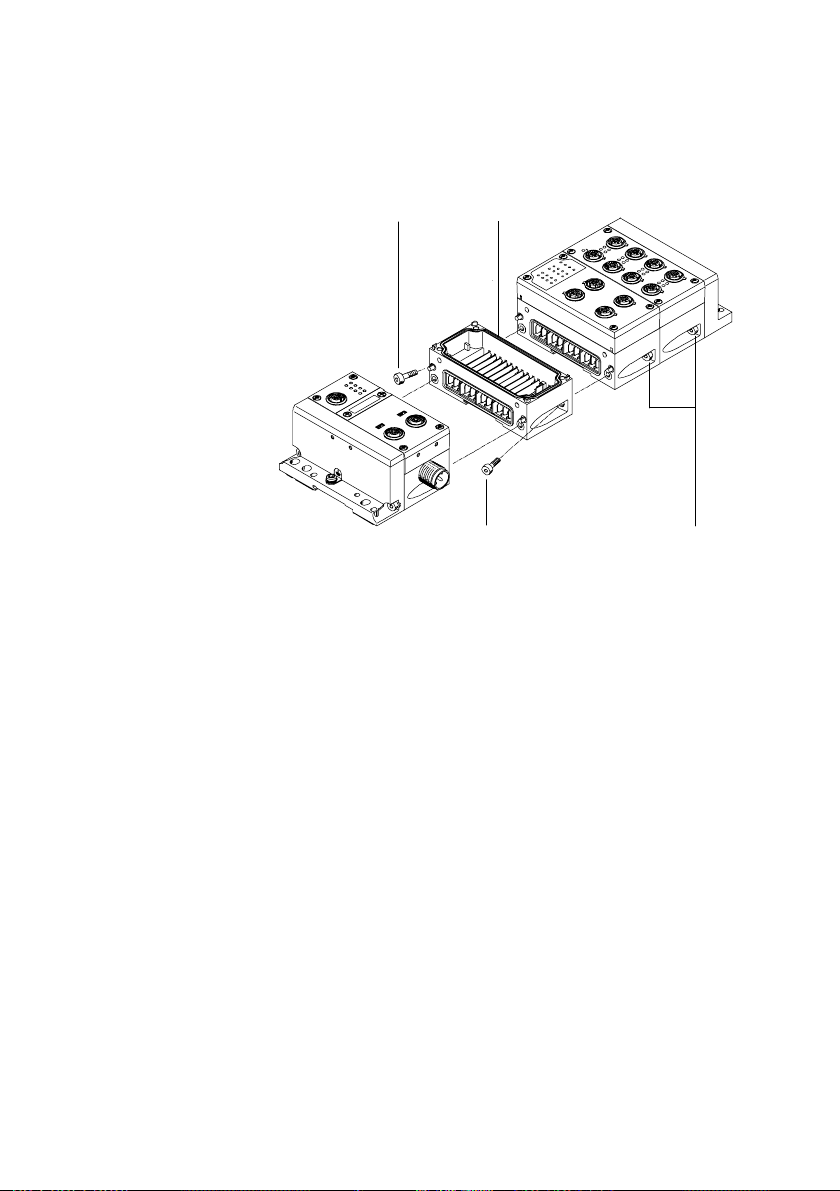
Assembly To insert a module or interlinking block, proceed as follows:
1. Separate the CPX terminal at the place where you wish to
insert the
new component by loosening the two connector
screws (see Fig.2/10), if you have not already done so.
Caution
When interlinking blocks are arranged in series:
Make sure that the electric plug connectors of the interlink
ing blocks are not bent.
2. Align the CPX terminal on a flat surface so that the compo
nents are not offset. The bolts attached to the left−hand
side of the interlinking block help you with the
alignment.
Festo P.BE−CPX−SYS−EN en 0902e
3. Slide the interlinking blocks together carefully and with
out tilting.
4. Screw the connector screws a few turns into the adjacent
interlinking block.
5. Then tighten the screws equally with a sizeSW4 internal
hexagon socket with 3Nm ±0.3Nm.
6. Before fitting the connection blocks, make sure that the
NBR seal is seated in the corresponding groove
on the
interlinking block without twisting (see Fig.2/10).
7. Assemble the CPX terminal (see section2.4).
2−19
Page 64
2. Assembly
1 Connector screws
1
2
2 Inserted NB R
seal
1
Fig.2/10: CPX terminal with connection block and interlinking blocks in metal version
1
2−20
Festo P.BE−CPX−SYS−E N en 0902e
Page 65
2. Assembly
2.4 Fitting the CPX terminal
Note
Fit the CPX terminal so that there is sufficient space for
heat dissipation and ensure that the maximum limits for
temperatures are observed (see Technical data).
You can fit the CPX terminal in one of two ways:
Mounting method Description
H−rail mounting The CPX terminal is suitable for fitting onto an H−rail (mounting rail as
Wall mounting The end plates and the pneumatic interface contain holes for fitting
per EN60715). There is a guide groove on the back for hanging the
valve terminal onto the H−rail.
the terminal onto a wall. CPX terminals with four or more interlinking
blocks require additional mounting components for the electric
modules.
Tab.2/2: Methods of fitting the CPX terminal
2.4.1 Fitting CPX terminals without pneumatics onto a H−rail
For fitting the CPX terminal without pneumatics onto an H−rail,
you will require mounting kit type CPA−BG−NRH. This kit con
tains 2clamping components and 2M4x12 screws.
Fitting onto an H−rail is carried out in the same manner as
fitting CPX terminals with pneumatics onto an H−rail (see sec
tion2.4.2).
Festo P.BE−CPX−SYS−EN en 0902e
2−21
Page 66
2. Assembly
2.4.2 Fitting CPX terminals with pneumatics onto an H−rail
For fitting the CPX terminal onto an H−rail you will require
mounting kit type CPX−CPA−BG−NRH. This kit contains
3clamping components and 3M4x12 screws.
Caution
H−rails with mounted valve terminals can break if they are
subjected to vibration exceeding severity level 1:
0.15 mm path at 15 ... 85 Hz
2 g acceleration at 58 ... 150 Hz
This can damage the valve terminal, your machine or your
system.
· In this case use wall mounting.
· Note the permitted values for vibration and shock in
appendix A.1 Technical data".
2−22
Caution
H−rail mounting without an H−rail clamping unit is not
permitted.
· If the terminal is fitted in a sloping position or if it is sub
jected to vibration, secure the H−rail clamping unit addi
tionally
against sliding down with the retaining screws
intended for this purpose (see 3 in Fig.2/11)
against unintentional loosening/opening.
Festo P.BE−CPX−SYS−E N en 0902e
Page 67
2. Assembly
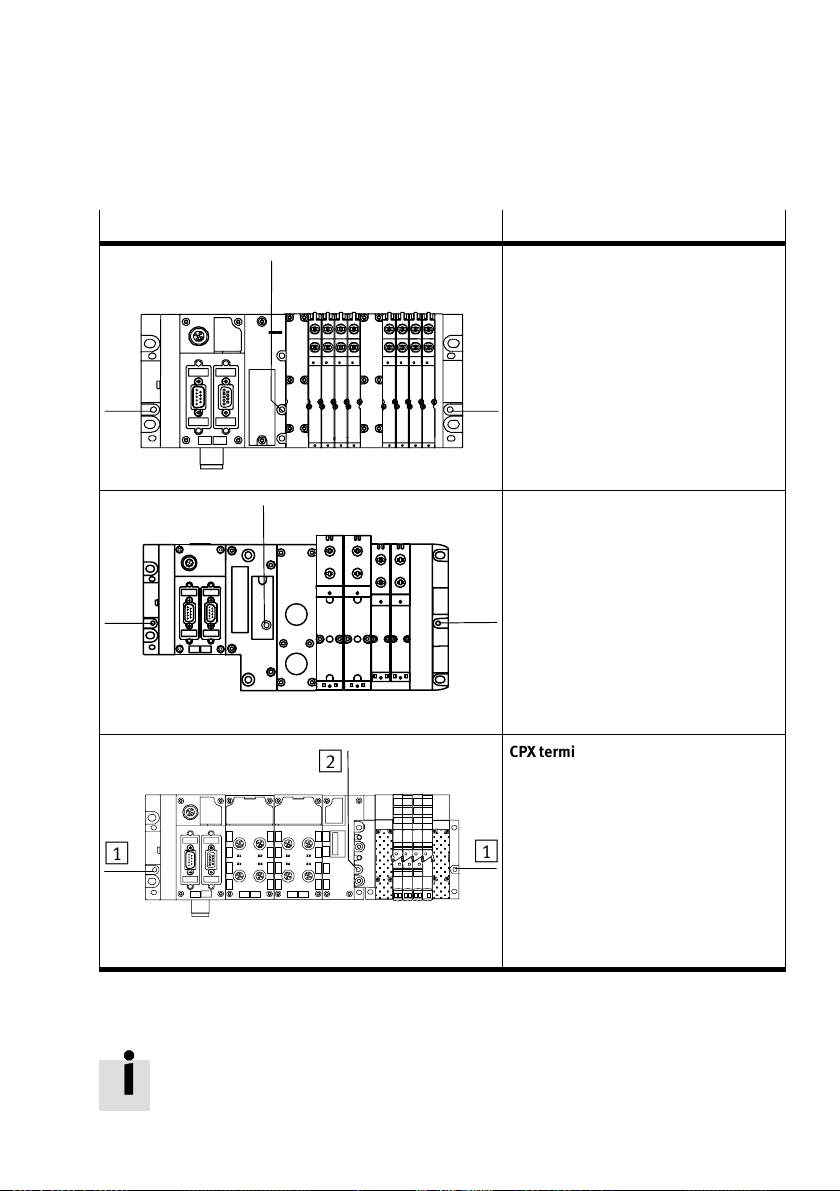
Variant Mounting points
1
1
1
2
2
2
CPX terminal with MPA pneumatics
Required mounting of the H−rail clamp
ing units:
In the end plates:
each with one M4 screw 1
In the pneumatic interface:
with an M4 screw 2
1
CPX terminal with VTSA pneumatics
Required mounting of the H−rail clamp
ing units:
In the end plates:
each with one M4 screw 1
In the pneumatic interface:
1
with an M4 screw 2
CPX terminal with CPA pneumatics
Required mounting of the H−rail clamp
ing units:
In the end plates:
each with one M4 screw 1
In the pneumatic interface:
1
with an M4 screw 2
Tab.2/3: Required mounting points for H−rail mounting
For information about H−rail mounting of CPX terminals with
Midi/Maxi pneumatics, see section 2.4.3.
Festo P.BE−CPX−SYS−EN en 0902e
2−23
Page 68
2. Assembly
Proceed as follows:
1. Make sure that the fastening surface can support the
weight of the CPX terminal.
2. Fit the H−rail (support rail EN 60715 − 35x7.5; width
35mm, height 7.5 mm).
Make sure there is sufficient space to connect the com
pressed air supply tubing.
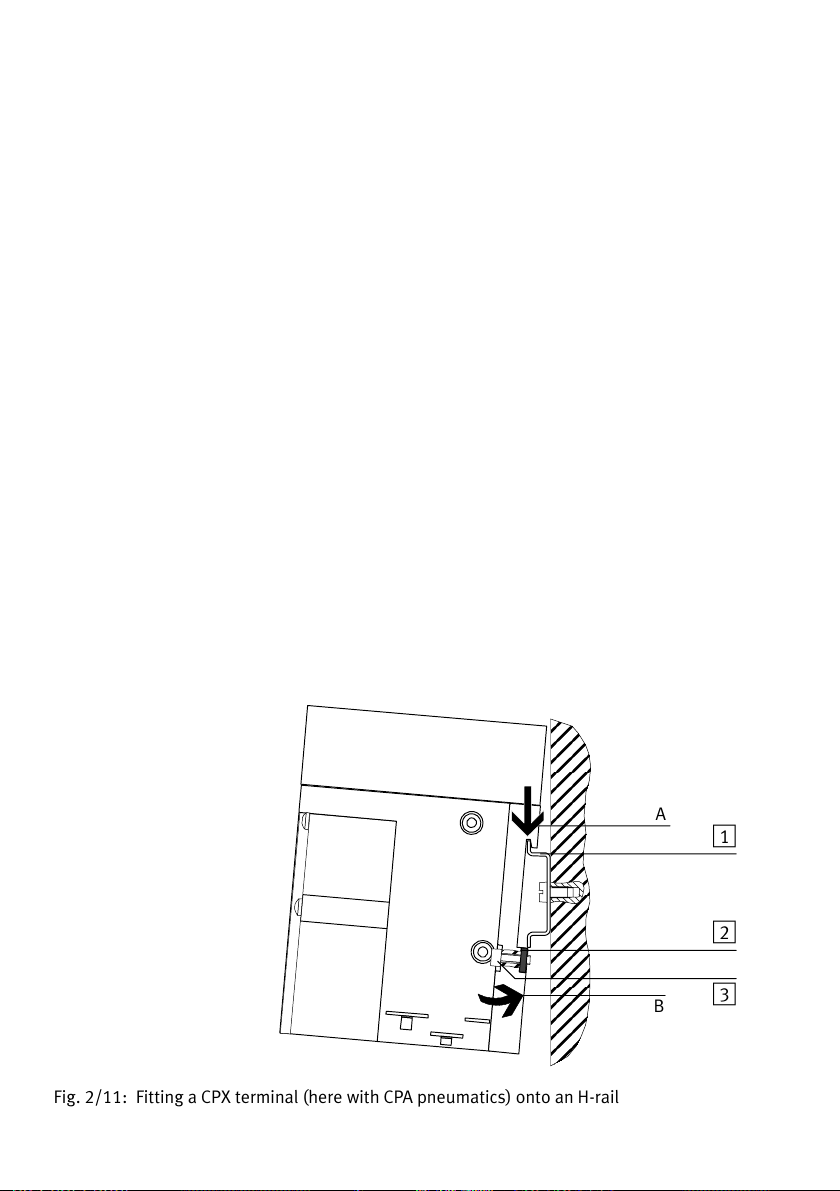
1 H−rail
2 Clamping
component of the
H−rail clamping
unit
3 Retaining screw
of the H−rail
clamping unit
3. Fasten the H−rail to the mounting surface at intervals
approx. every 100 mm.
4. Fit an H−rail clamping unit to both the left and the right−
hand end plates and the pneumatic interface of the CPX
terminal.
5. Hang the CPX terminal onto the H−rail (see Fig.2/11,
arrow A).
6. Swing the CPX terminal onto the H−rail (see Fig.2/11,
arrow B). Make sure that the clamping
zontally to the H−rail.
element lies hori
of
A
B
1
2
3
Fig.2/11: Fitting a CPX terminal (here with CPA pneumatics) onto an H−rail
2−24
Festo P.BE−CPX−SYS−E N en 0902e
Page 69
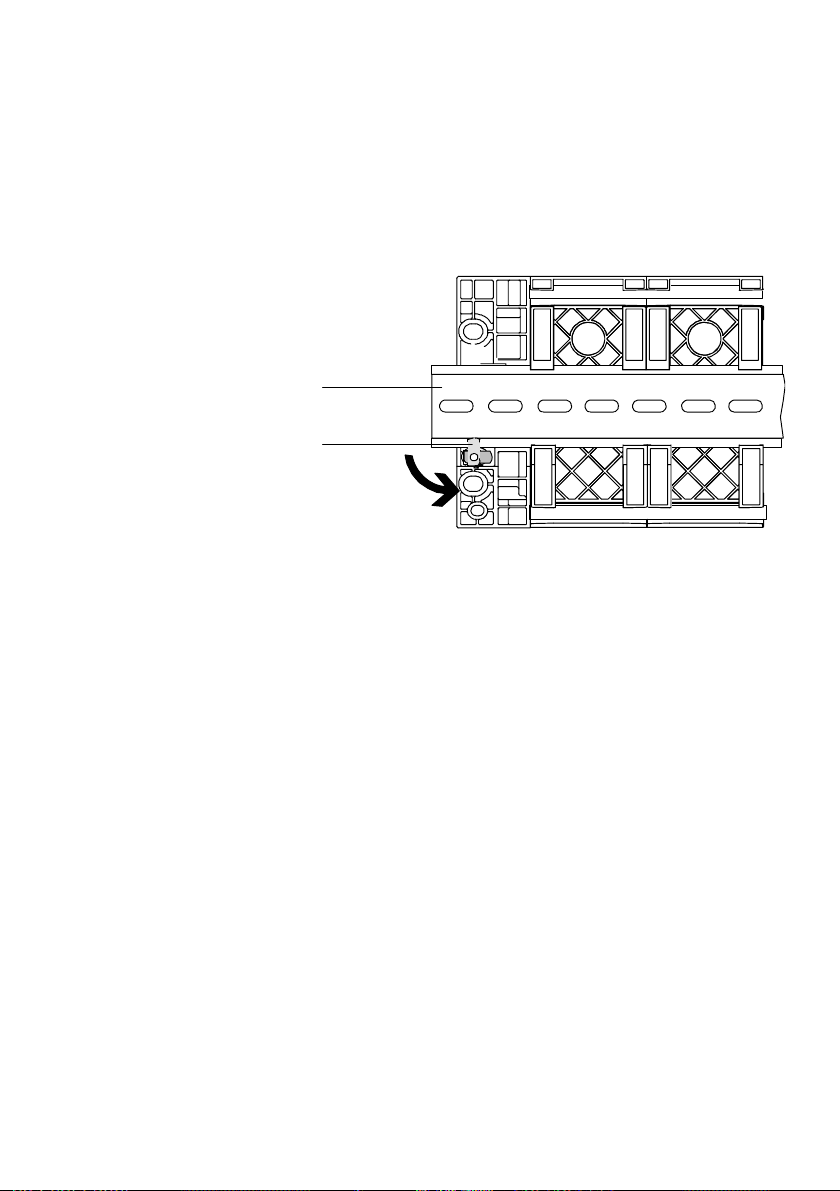
2. Assembly
7. Fasten the CPX terminal against tilting or sliding by
tightening the locking screws with 1.3Nm.
1 H−rail
2 Clamping
component of the
H−rail clamping
unit
1
2
Fig.2/12: Rear view: Fitting the CPX terminal onto an H−rail
Festo P.BE−CPX−SYS−EN en 0902e
2−25
Page 70
2. Assembly
2.4.3 Fitting CPX terminals with Midi/Maxi pneumatics onto an H−rail
For fitting the valve terminal onto the H−rail you will require an
H−rail clamping unit type CPX−03−4,0 (Midi) or type
CPX−03−7,0 (Maxi).
Caution
H−rail mounting without an H−rail clamping unit is not
permitted.
· If the terminal is fitted in a sloping position or if it is sub
jected to vibration, secure the H−rail clamping unit addi
tionally
against sliding down with the retaining screws
intended for this purpose (see Fig.2/13, item 6)
against unintentional loosening/opening.
2−26
Note
If the terminal is fitted in a horizontal position and the
load is at rest, it is not necessary to use the screws to
secure the H−rail clamping unit (see Fig.2/13, item 6).
If your CPX terminal does not have an H−rail clamping
unit, you can order this and fit it at
a later stage.
The existing end plates (MIDI/MAXI) determine whether
MIDI or MAXI clamping elements are to be used.
Fasten the H−rail clamping unit to the rear of the right−hand
end plate and the pneumatic interface as described below.
Before fitting
· Glue the rubber feet on (4 in Fig.2/13). Make sure that
the surfaces to be glued are clean (clean with spirit).
· Tighten the flat−head screws (see Fig.2/13, item 3).
· Make sure that the spacer discs have been removed.
Festo P.BE−CPX−SYS−E N en 0902e
Page 71
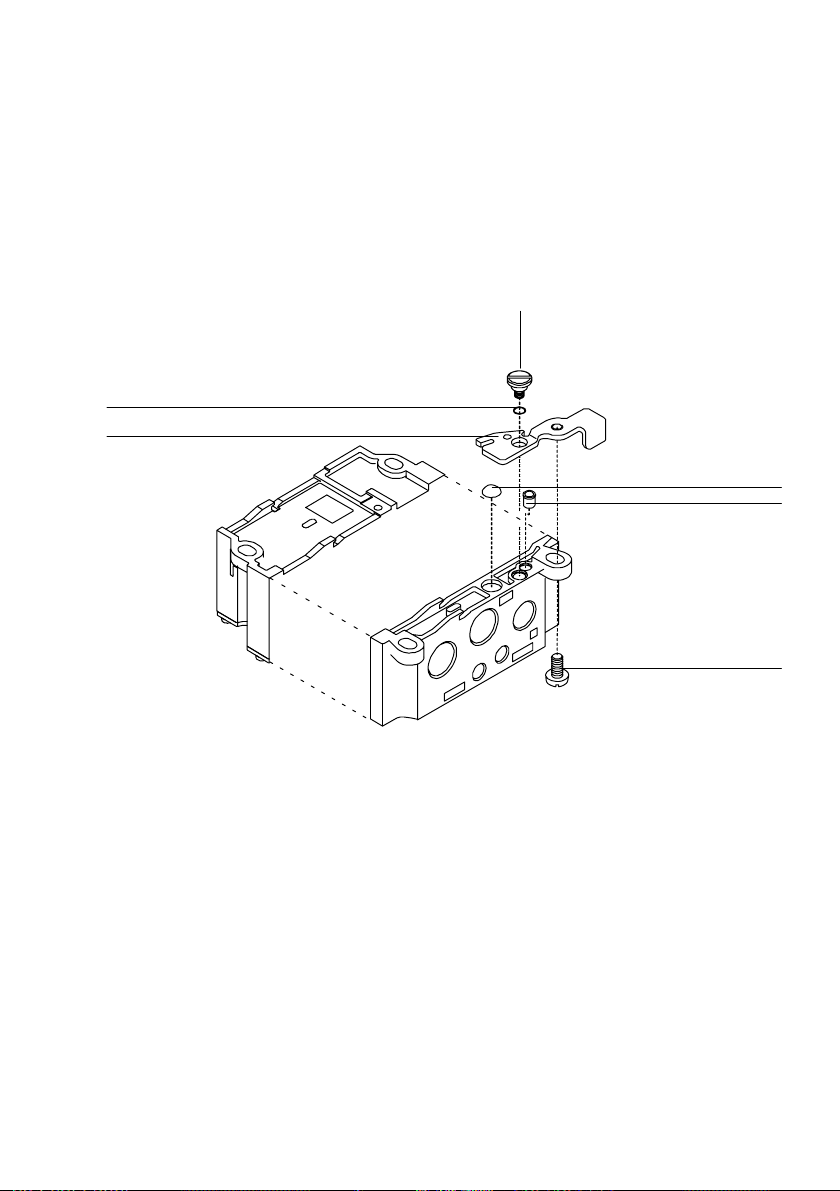
2. Assembly
2
After fitting
· Secure the levers with the aid of the locking screws (see
Fig.2/13, item 6).
3
1
1 Lever
*)
2 O−ring
3 Flat−head screw
*) Different lever lengths with MIDI and MAXI
Fig.2/13: Fitting the H−rail clamping unit
4
5
6
4 Self−adhesive rubber foot
5 Clamping elements
6 Retaining screw
Festo P.BE−CPX−SYS−EN en 0902e
2−27
Page 72
2. Assembly
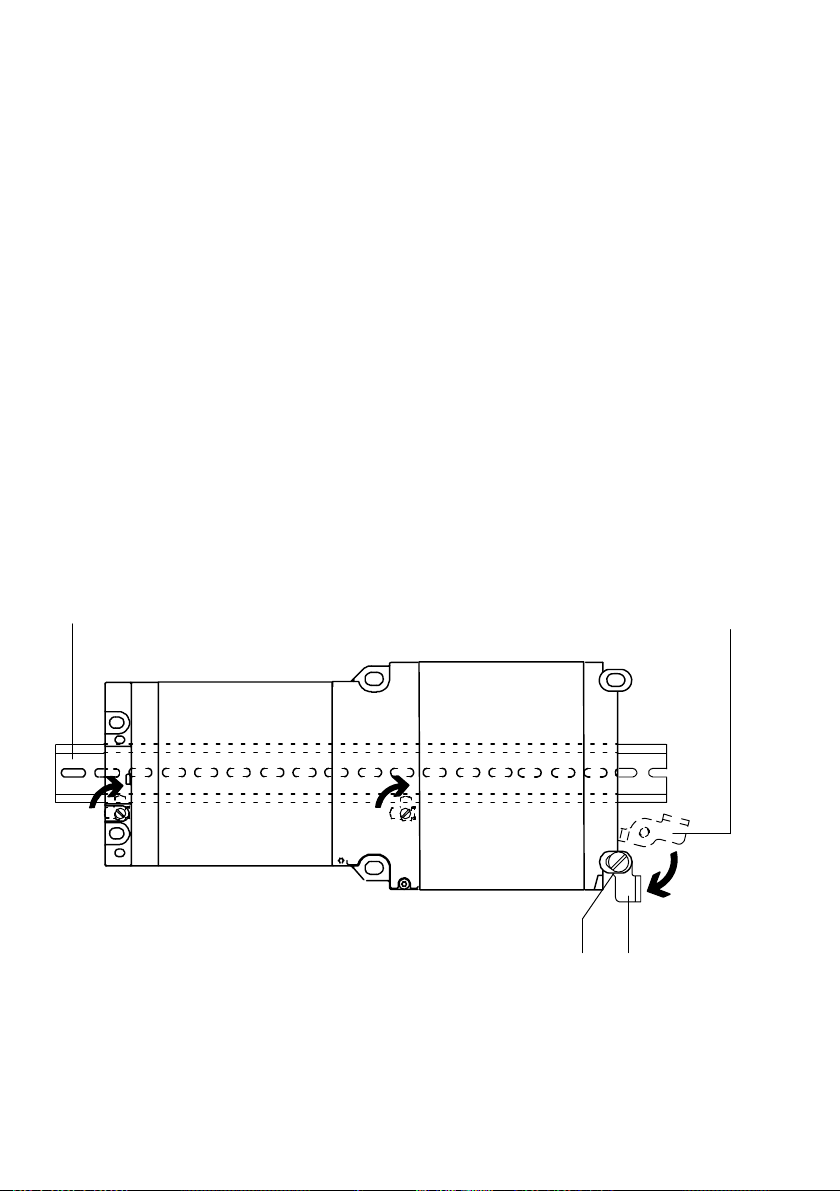
Fit the H−rail as follows:
1. Make sure that the fastening surface can support the
weight of the CPX terminal.
2. Fit an H−rail (support rail as per EN 60715 − 35x15;
width 35 mm, height 15 mm).
3. Fasten the H−rail at least every 100 mm to the fastening
surface.
1
1 H−rail
4. Hang the CPX terminal onto the
terminal on both sides with the H−rail clamping unit
against tilting or sliding down (see Fig.2/14).
5. With a vibrating load or if the node is fitted in a sloping
position, secure the H−rail clamping unit against uninten
tional loosening or opening with two locking screws
(Fig.2/14, item 4).
H−rail. Secure the CPX
4
3
3 H−rail clamping unit locked
2
2 H−rail clamping unit unlocked
Fig.2/14: Top view: Fitting the valve terminal onto an H−rail
2−28
4 Retaining screw
Festo P.BE−CPX−SYS−E N en 0902e
Page 73

2. Assembly
2.4.4 Wall mounting
Caution
When fitted onto a wall, the CPX terminal can bend and be
damaged in the following cases:
When fitted to an uneven, flexible surface
When CPX terminals with Midi/Maxi pneumatics are
fitted without spacer discs (see Fig.2/15)
When fitted to a wall without additional fastening (see
Tab.2/4)
Fit the CPX terminal only onto a
sure that the spacer discs are fitted before you mount the
CPX terminal with Midi/Maxi pneumatics.
The end plates and the pneumatic interface contain holes for
fitting the terminal onto a wall.
flat fixed surface. Make
Festo P.BE−CPX−SYS−EN en 0902e
Spacer discs for Midi/Maxi pneumatics
To compensate for the differences in height between the
pneumatic and electrical sides, you have to fit spacer discs
for a CPX terminal with Midi/Maxi pneumatics. Fit two spacer
discs on each of the following:
On the pneumatic interface for Midi/Maxi
On the end plate
The spacer discs have one self−adhesive side to simplify
assembly process. Remove the protective foil before mount
ing.
Note Fig.2/15 and the relevant fitting instructions.
the
2−29
Page 74
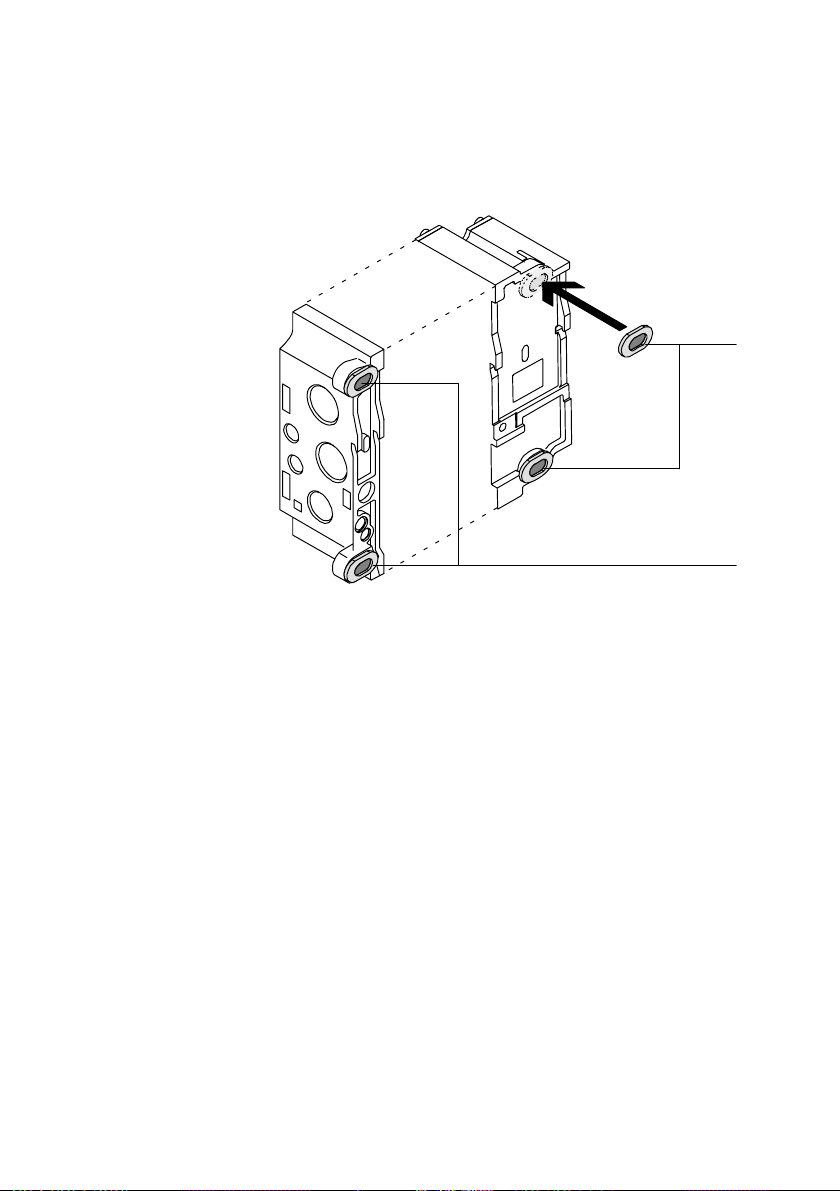
2. Assembly
1 Spacer discs on
the Midi/Maxi
pneumatic
interface
2 Spacer discs on
the right−hand
end plate
Fig.2/15: For wall mounting with Midi/Maxi pneumatics: remove the protective foil from
the adhesive surface and fit the spacer disc (rear view)
1
2
2−30
Festo P.BE−CPX−SYS−E N en 0902e
Page 75
2. Assembly
Fitting the CPX terminal onto a wall
Caution
Overloading the mounting holes, bending the CPX terminal
or natural resonance can cause damage.
Every 100 or 150 mm, use additional mountings of the type
CPX−BG−RW−... for plastic version interlinking blocks, or
type CPX−M−BG−RW−... for metal version interlinking blocks.
Fastenings of type CPX−BG−RW−... can be clipped into two
adjacent interlinking blocks (see
tional holes for fitting onto a wall. Note the relevant fitting
instructions.
Fastenings of type CPX−M−BG−RW−... can be screwed onto
metal version interlinking blocks with the enclosed screws
(see Tab.2/4) and provide additional holes for fitting onto
a wall.
Tab.2/4) and provide addi
Festo P.BE−CPX−SYS−EN en 0902e
2−31
Page 76
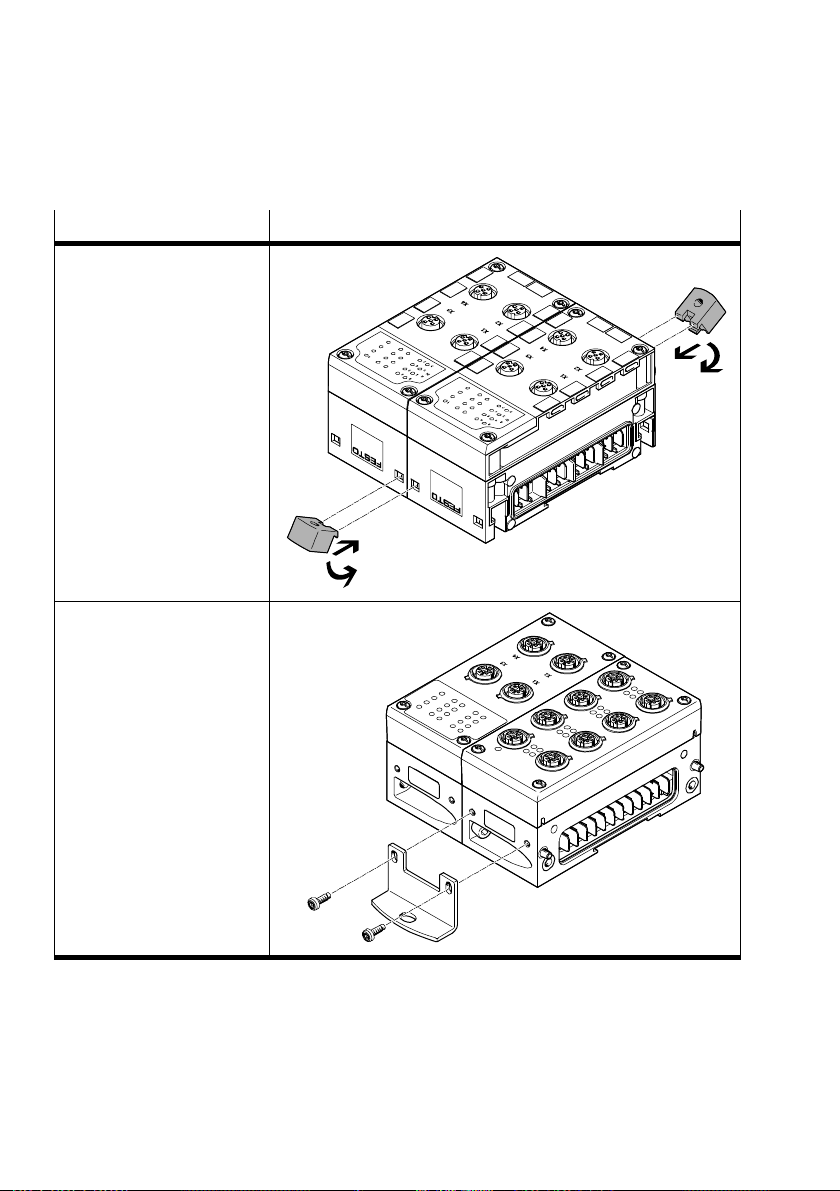
2. Assembly
Mounting Assembly
Type CPX−BG−RW−...
for interlinking blocks in
plastic design:
1. Fit the fastenings 1
2. Clip the fastenings into
place 2
Type CPX−M−BG−RW−...
for interlinking blocks in metal
design:
Fix the mounting bracket 1
to the interlinking block with
the enclosed screws 2
1
2
2
1
Tab.2/4: Fitting additional attachments for wall mounting
For fitting onto a wall, proceed as follows:
1. Make sure that the fastening surface is flat and can sup
port the weight of the CPX terminal.
2−32
Festo P.BE−CPX−SYS−E N en 0902e
Page 77

2. Assembly
2. For CPX terminals with 4 or more interlinking blocks: you
will require additional mounting brackets of type
CPX−(M−)BG−RW−... every 100 or150 mm. These are ready−
fitted on delivery.
3. For CPX terminals with MPA pneumatics:
Check whether you need additional wall supports for the
pneumatics module (see MPA pneumatics manual).
For CPX terminals with Midi/Maxi
pneumatics:
Make sure that the spacer rings have been fitted (see
above in this section).
4. Configure the CPX terminal as follows (see also Tab.2/5
and Tab.2/6):
Any mounting position
Two screws at each of the end plates
Screws on the additional mounting elements of type
CPX−(M−)BG−RW−...
Festo P.BE−CPX−SYS−EN en 0902e
2 or 3screws on the pneumatic interface
Make sure there
is sufficient space for connecting the power
supply cables and tubing and for heat dissipation.
2−33
Page 78
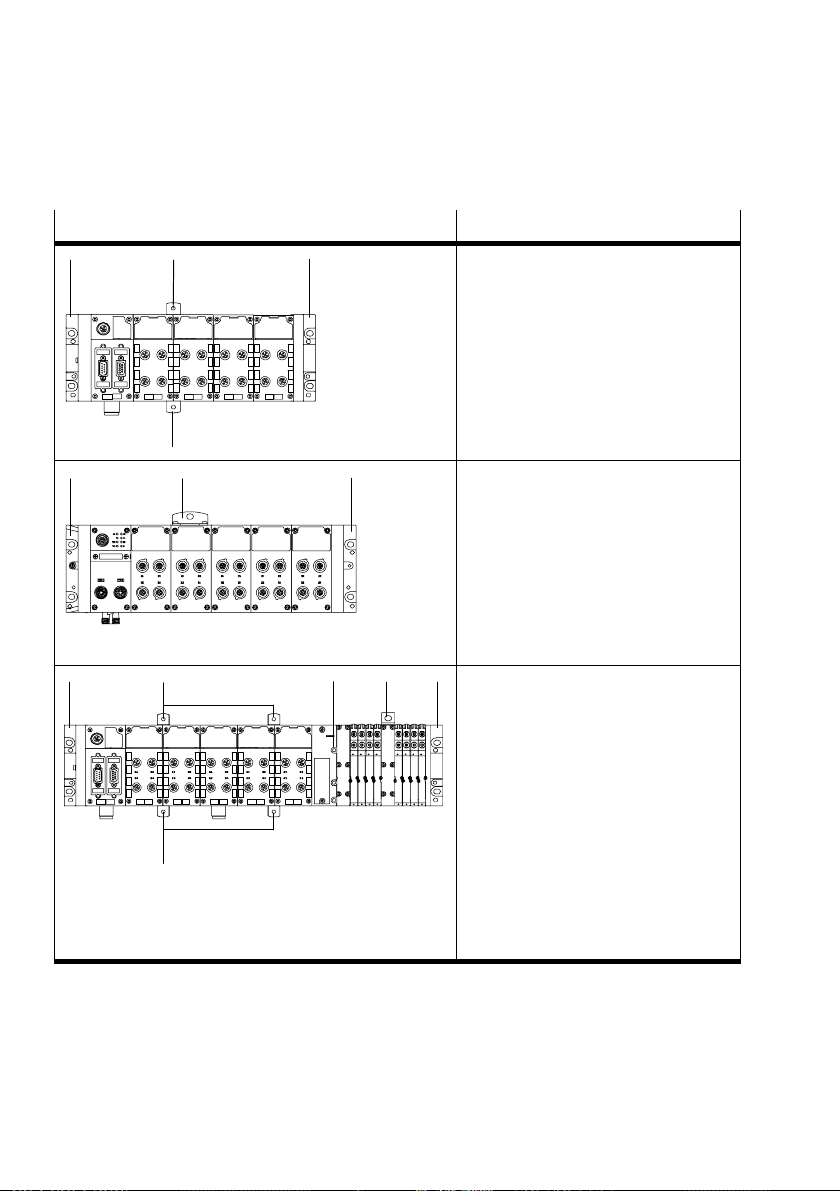
2. Assembly
Variant Mounting points
1
2
X 1
X 2
X 3
X 4
1
X 1
X 3
X 1
X 3
X 2
X 4
X 2
X 4
2
1
2
1 1
1
4
32
2
CPX terminal in plastic version, without
pneumatics
Required mounting with:
End plates 1: two M4 or M6 screws
each
For each additional mounting
bracket2 (needed if 4 or more
interlinking blocks are used, see
Tab.2/4), type CPX−BG−RW−...: one
M4 screw
CPX terminal in metal version, without
pneumatics
Required mounting with:
End plates 1: two M4 or M6 screws
each
For each additional mounting
bracket2 (needed if 4 or more
interlinking blocks are used, see
Tab.2/4), type CPX−M−BG−RW−...: one
M6 screw
CPX terminal in plastic version with
MPA pneumatics
Required mounting with:
End plates 1: two M4 or M6 screws
each
For each additional mounting
bracket2 (needed if 4 or more
interlinking blocks are used, see
Tab.2/4), type CPX−BG−RW−...: one
M4 screw
Pneumatic interface 3:
two M4 screws
For each mounting bracket 4 (see
MPA pneumatics manual) for MPA
pneumatics: one M6 screw
Tab.2/5: Mounting points required for wall mounting (part 1)
2−34
Festo P.BE−CPX−SYS−E N en 0902e
Page 79
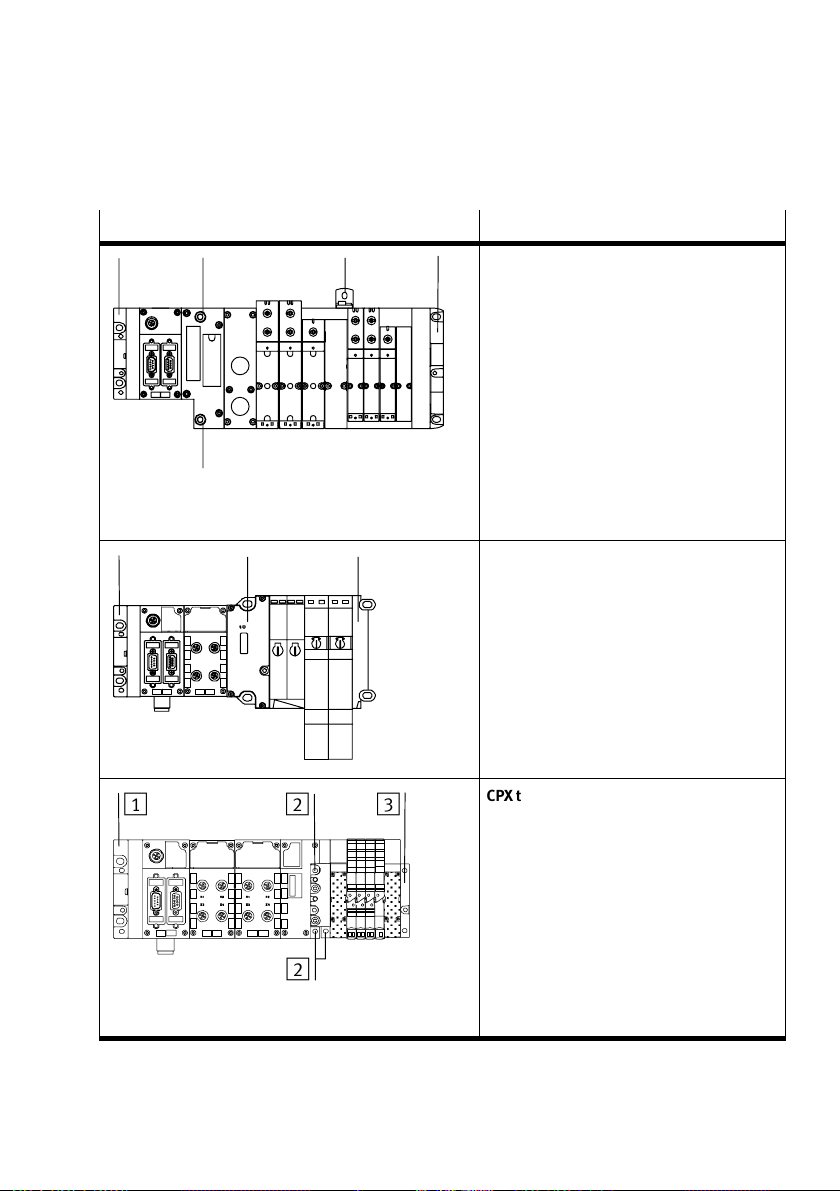
2. Assembly
Variant Mounting points
1 2
2
1
1
2
34
3
2
3
2
CPX terminal in plastic version with VTSA
pneumatics
Required mounting with:
Left end plate 1: two M4 or M6 screws
For each additional mounting bracket
(not shown, needed if 4 or more inter−
linking blocks are used, see Tab.2/4),
type CPX−BG−RW−...: one M4 screw
Pneumatic interface 2: two M6 screws
with internal hex
Optional: Mounting bracket 3 (second
variant not shown) for VTSA pneumatics
on the pneumatic supply plate: one M5
screw or one M5 and one M6 screw
Right end plate 4: two M6 screws
CPX terminal in plastic version with Midi/
Maxi pneumatics
Required mounting with:
Left end plate 1: two M4 or M6 screws
For each additional mounting bracket
(not shown, needed if 4 or more inter−
linking blocks are used, see Tab.2/4),
type CPX−BG−RW−...:one M4 screw
Pneumatic interface 2: two M6 screws
Right end plate 3: two M6 screws
CPX terminal in plastic version with CPA
pneumatics
Required mounting with:
Left end plate 1: two M4 or M6 screws
each
For each additional mounting bracket
(not shown, needed if 4 or more inter−
linking blocks are used, see Tab.2/4),
type CPX−BG−RW−...:
one M4 screw
Pneumatic interface:
two (optionally three) M4 screws 2
Right end plate 3: two M4 screws
Tab.2/6: Mounting points required for wall mounting (part 2)
Festo P.BE−CPX−SYS−EN en 0902e
2−35
Page 80

2. Assembly
2−36
Festo P.BE−CPX−SYS−E N en 0902e
Page 81

Installation
Chapter 3
3−1Festo P.BE−CPX−SYS−EN en 0902e
Page 82

3. Installation
Contents
3. Installation 3−1 . . . . . . . . . . . . . . . . . . . . . . . . . . . . . . . . . . . . . . . . . . . . . . . . . . .
3.1 General installation instructions 3−3 . . . . . . . . . . . . . . . . . . . . . . . . . . . . . . . . . . .
3.1.1 Connecting cable 3−3 . . . . . . . . .
3.1.2 Configuration of the CPX bus node 3−6 . . . . . . . . . . . . . .
3.1.3 Configuration of the pneumatics 3−7 . . . . . . . . . . . . . . . . . . . . . . . . . . .
3.1.4 Selecting the power supply unit 3−8 . . .
3.1.5 Power supply of the CPX terminal 3−12 . . . . . . . . . . . . . . . . . . . .
. . . . . . . . . . . . . . . . . . . . . . . . . . . . . . .
. . . . . . . . . . .
. . . . . . . . . . . . . . . . . . . . . . . . .
. . . . . .
3−2
Festo P.BE−CPX−SYS−E N en 0902e
Page 83
3. Installation
3.1 General installation instructions
Note
Observe the following if the UL requirements are to be
complied with in your application:
Rules for observing the UL certification can be found in
the separate UL−specific documentation. The relevant
technical specifications listed there also apply here.
The technical specifications in this documentation may
show different values.
Warning
Uncontrolled movements of the connected actuators and
uncontrolled movements of loose tubing can cause injury
to human beings or damage to property.
Before carrying out installation and maintenance work,
switch off the following:
Compressed air supply
The operating and load voltage supplies.
3.1.1 Connecting cable
Field bus cable Use a suitable cable for your field bus system. Refer to the
manual for your controller for the type of cable to be used.
Also take into account here the distance and the fieldbus
baud rate.
Operating voltage cable Use a cable for the operating voltage with sufficient cross−
sectional area. Avoid
and the CPX terminal. Long operating voltage cables reduce the
voltage supplied by the power unit.
If necessary, ascertain the suitable cross−sectional area of the
cable and the maximum permitted cable length in accordance
with the general rule in section A.2.
Festo P.BE−CPX−SYS−EN en 0902e
long distances between the power unit
3−3
Page 84

3. Installation
Pre−assembling the connecting cable
Caution
The position of the pins on the plug is different from that
on the socket.
See the manual for the CPX bus node in question for
adescription of the pin assignment of the fieldbus inter
face.
See manual CPX I/O modules" for the pin assignment
of the sensor and actuator connections of input
put modules.
The operating voltage and load voltage connections are
in the form of plugs. The pin assignment can be found in
the following sections.
Use plugs and sockets from the Festo supply programme
which match the outer diameter of the cables used.
and out
3−4
Festo P.BE−CPX−SYS−E N en 0902e
Page 85
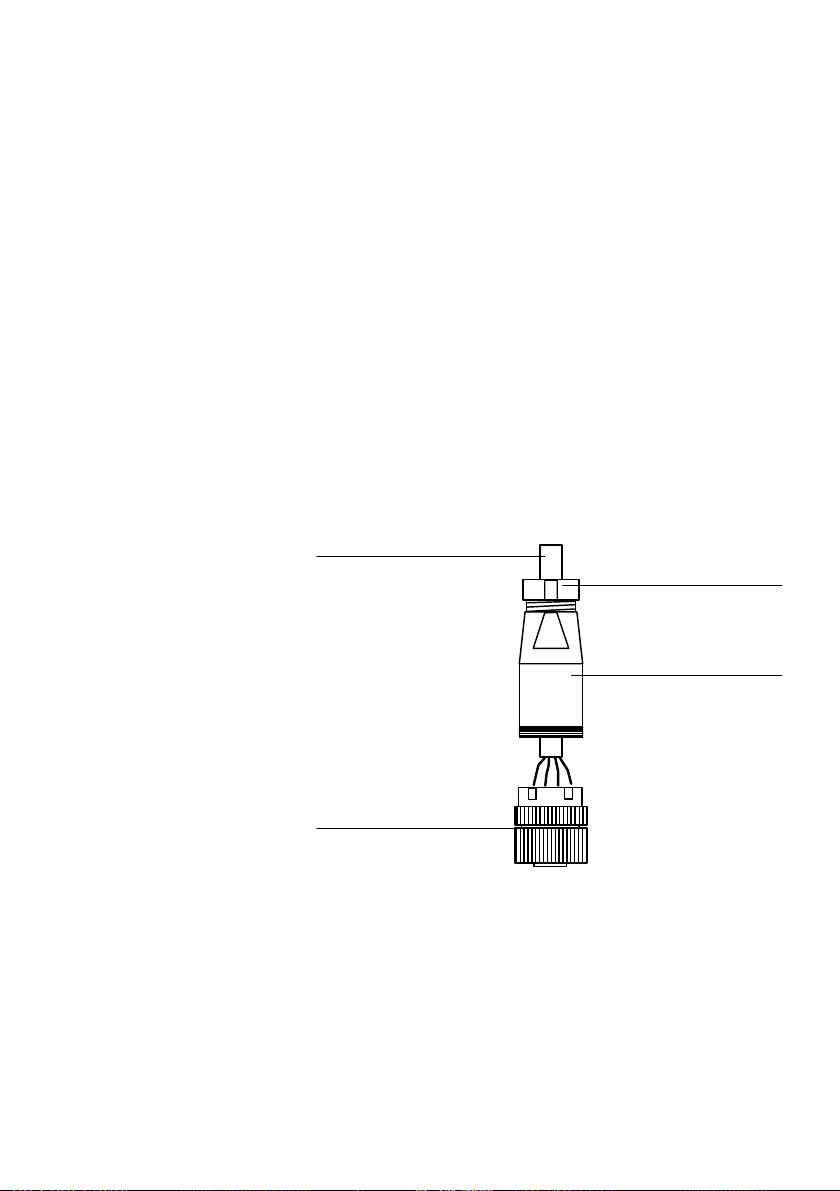
3. Installation
Pre−assembling the plugs
and cables
1 Cable
2 Strain relief
3 Housing
4 Connecting part
Connect the plugs and cables as follows (example):
1. Open the plugs/sockets as follows:
· Power supply socket:
Insert the mains power socket into the operating volt
age connection of the CPX terminal. Unscrew the
housing of the socket.
Then remove the connecting part of the socket, which
is inserted in the operating voltage connection.
· Fieldbus socket and sensor plug (only with PG...):
Loosen the centre knurled nut.
1
2
3
4
Fig.3/1: Individual parts of the socket and cable exit
2. Open the strain relief on the rear part of the housing.
Then pass the cable through.
3. Remove 5 mm of insulation from the end of the conduc
tors and fit cable−end sleeves on the stranded wires.
4. Connect the ends of the conductors.
Festo P.BE−CPX−SYS−EN en 0902e
3−5
Page 86

3. Installation
5. Replace the connecting part on the housing of the plug/
socket. Pull the cable back so that there are no loops in
side the housing.
6. Tighten the strain relief.
3.1.2 Configuration of the CPX bus node
The characteristics of the CPX terminal can be adapted to
various requirements.
Settings on the CPX bus
node
CPX terminals can be coupled to various fieldbuses.
Coupling is made via a CPX bus node that is adapted to
suit the relevant fieldbus. The following settings can be
made, depending on the CPX node
used:
The fieldbus configuration (e.g. fieldbus address)
Error characteristics of the CPX terminal
Diagnostic behaviour of the CPX terminal
Depending on the CPX bus node used, important, application−
specific settings can be made, if applicable, with DIL switches
on the CPX bus node. The DIL switches are behind an easily
accessible cover on the
CPX bus node.
Information about the installation and the setting options for
your CPX bus node can be found in the manual for the CPX
bus node.
3−6
Festo P.BE−CPX−SYS−E N en 0902e
Page 87
3. Installation
3.1.3 Configuration of the pneumatics
MPA pneumatics
From a technical point of view, the individual MPA pneumatic
modules on the CPX terminal each represent an electric mod
ule with digital outputs for controlling the valves fitted. In the
case of VMPA1−FB−...−8, 8digital outputs will always be as
signed and in the case of VMPA2−FB−...−4, 4digital outputs
will always be
VTSA, Midi/Maxi or CPA pneumatics
From a technical point of view, the pneumatic interfaces on
the CPX terminal are electric modules with digital outputs.
Note
When the pneumatics have been converted or extended,
the number of output addresses occupied by the pneuma
tics for 8, 16, 24 or 32 outputs must be set on a DIL switch
on the pneumatic interface.
assigned.
Festo P.BE−CPX−SYS−EN en 0902e
The DIL switch is situated under the transparent cover on the
pneumatic interface.
Detailed information on the
pneumatic interfaces and MPA
pneumatic modules can be found in the manual for the CPX
I/O modules" of type P. BE−CPX−EA−...
3−7
Page 88
3. Installation
3.1.4 Selecting the power supply unit
Warning
· Use only PELV circuits as per IEC/DIN EN 60204−1 for the
electric power supply (protective extra−low voltage,
PELV).
Also observe the general requirements for PELV circuits
laid down in IEC/DIN EN 60204−1.
· Use only power sources that guarantee reliable electri
cal isolation of the operating voltage as per
IEC/DINEN60204−1.
Protection against electric shock (protection against direct
and indirect contact) is guaranteed in accordance with
IEC/DIN EN 60204−1 by using PELV circuits (electrical equip
ment of machines, general requirements).
3−8
The current consumption of a CPX terminal
depends on the
number and type of integrated modules and components.
Recommendation:
· Use regulated power supply units, to ensure that the load
voltage of the outputs remains within the permitted toler
ances even during continuous operation.
· Select power supply units that provide sufficient output
reserves for later extensions to the CPX terminal.
Note
When selecting the power supply units, check that they
have sufficient output. If necessary, ascertain the current
consumption according to the following tables.
Festo P.BE−CPX−SYS−E N en 0902e
Page 89
3. Installation
Calculation The following tables show how to calculate the current con
sumption of the system supply and the additional supplies.
Please refer to the relevant technical specifications for the
current consumption of the valves and modules.
System supply type CPX−(M−)GE−EV−S...
Current consumption of the operating voltage supply for the electronics and sensors
CPX bus node current consumption (rounded) approx. 200mA
Maximum current consumption of the CPX modules sup
plied via the system supply (internal electronics)
1)
+ _____ A
Current consumption of the sensors supplied via the sys
tem supply (see manufacturer’s specifications) + _____ A
Current consumption of the technology modules sup
2)
plied
+ _____ A
Sum of the current consumption of the operating voltage = _____ A ______ A
Current consumption of the load voltage supply for valves and outputs
Current consumption of all simultaneously activated
electric outputs that are supplied via the system supply
(internal consumption at logic 1)
3)
Load current of simultaneously activated outputs sup
plied via the system supply
Current consumption of all simultaneously energised
valve coils
Current consumption of the technology modules sup
plied
4)
2)
Sum of the current consumption of the load voltage = _____ A + ______ A
_____ x _____A
+ _____ A
+ _____ A
+ _____ A
Total current consumption of the system supply = ______ A
1)
See technical specifications of the I/O modules, pneumatic modules and MPA modules
2)
Including further modules and components supplied via the technology module
3)
Internal consumption at logical 1 see technical specifications for the output module
4)
Current consumption depends on valve type (see technical specifications of the valves)
Tab.3/1: Table for calculating the current consumption − system supply
Festo P.BE−CPX−SYS−EN en 0902e
3−9
Page 90
3. Installation
Caution
Short circuits can cause damage.
Provide external fuse protection for the system supply and
the additional supplies. The permissible current per pin at
the supplies is:
7/8" plug, 4−pin: max. 10A
7/8" plug, 5−pin: max. 8A
M18 plug (4−pin): max. 16A
1) 2)
1)
2)
Push−pull plug (5−pin): max. 16A
1)
Limited by the specification of the connected plug con
nector. Values apply for plug connectors from Festo Acces
sories. If using third−party products, comply with the appli
cable specifications.
2)
Please note that with a 4−pin system supply via pin
0V", the sum of both currents of the operating and load
voltages flows.
Additional supply (optional) for outputs type CPX−(M−)GE−EV−Z...
Current consumption of load voltage supply outputs
Current consumption of all simultaneously activated
electric outputs that are supplied via the additional sup
ply (internal consumption at logic 1)
Load current of simultaneously activated outputs sup
plied via the additional supply
Current consumption of the technology modules sup
2)
plied
Sum of the current consumption of the load voltage = _____ A + ______ A
1)
_____ x _____A
+ _____ A
+ _____ A
Total current consumption of the additional supply = ______ A
1)
For the internal consumption at logical 1, see technical data for the output module
2)
Including further modules and components supplied via the technology module
Tab.3/2: Table for calculating the current consumption of the additional supply for the
outputs
3−10
Festo P.BE−CPX−SYS−E N en 0902e
Page 91
3. Installation
Additional supply (optional) for valves of type CPX−(M−)GE−EV−V...
Current consumption of load voltage supply valves
Current consumption of all simultaneously energised
valve coils
Current consumption of the technology modules sup
plied
Sum of the current consumption of the load voltage = _____ A + ______ A
1)
2)
_____ A
+ _____ A
Total current consumption of the additional supply = ______ A
1)
Current consumption depends on valve type (see technical data for the valves)
2)
Including further modules and components supplied via the technology module
Tab.3/3: Table for calculating the current consumption of the additional supply for the
valves
Information about the power supply concept of the CPX ter
minal can be found in section 1.1.3.
The pin allocation for all alternative connections is described
in Tab.3/4 and in the package insert for the interlinking
block, together with the supply.
Festo P.BE−CPX−SYS−EN en 0902e
3−11
Page 92
3. Installation
3.1.5 Power supply of the CPX terminal
Note
Check within the framework of your EMERGENCY STOP
concept to ascertain the measures necessary for putting
your machine/system into a safe state in the event of an
EMERGENCY STOP (e.g.switching off the operating voltage
for the valves and output modules, switching off the com
pressed air).
Note
When supplying power to CPX terminals with connected
pneumatics:
· Note that the lower tolerance range of the pneumatics
must be observed when the operating and load voltage
supplies are provided by a power unit.
Tolerance ranges:
− MPA pneumatics: ±25%,
− VTSA pneumatics: ±10%
− Midi/Maxi pneumatics: ±10%
− CPA pneumatics: +10/−15% or
− CPX−CP interface: +10/−15%.
3−12
Power is supplied to the CPX terminal (in the form of operat
ing and load voltages) via supplies in the interlinking blocks
(see section1.1.3 for an overview of the supplies). These con
duct the operating and load voltages to the neighbouring
modules.
Festo P.BE−CPX−SYS−E N en 0902e
Page 93

3. Installation
Supplying operating and load voltage
Interlinking blocks with
system supply
Types CPX−(M−)GE−EV−S...
Interlinking blocks with
additional supply for elec
tric outputs
Types CPX−(M−)GE−EV−Z...
The operating and load voltages for the CPX terminal are
supplied via these interlinking blocks. The voltages are sup
plied via an M18, 7/8" or push−pull plug and can be used for
further electric modules and for the valves on either side.
If interlinking blocks with
additional supply are not required,
the interlinking block with the system supply can be fitted in
any desired position.
If interlinking blocks with additional supply are required,
these must always be placed to the right of the system supply
(see also Fig.3/2).
The additional
load voltage for the electric outputs is sup
plied via these interlinking blocks. The load voltage for the
output modules is also supplied via an M18, 7/8" or push−
pull plug and can be switched off separately.
These interlinking blocks must always be placed to the right
of a system supply and,
in the case of a push−pull connec
tion, must not be combined with a forwarding function
within a CPX terminal.
The use of interlinking blocks with additional supply for elec
tric outputs causes the following (see also Fig.3/2):
The load voltage for electric output modules will be
interrupted to the previous module on the
left.
Festo P.BE−CPX−SYS−EN en 0902e
The load voltage supplied will be available to the inte
grated module and, where applicable, to the following
modules on the right.
The operating and load voltage supplies for the valves
will be transmitted further.
Several additional supplies for electric outputs in a
CPX terminal are possible.
3−13
Page 94

3. Installation
Interlinking block with
additional power supply
for valves
Types CPX−GE−EV−V...
These interlinking blocks enable separate circuits to be
created for supplying load voltage to the valves. The load
voltage for the valves, which is also supplied via an M18 or
7/8" plug, can be switched off separately. This interlinking
block must also always
be placed to the right of a system
supply.
The use of interlinking blocks with additional supply for
valves causes the following (see also Fig.3/2):
The load voltage for the valves will be interrupted at the
previous module on the left.
The load voltage supplied is available for the following
modules:
Subsequent pneumatic modules/valves to
the right
CP modules that are connected to the fitted CPX−CP
interface and to those CPX−CP interfaces subsequently
fitted to the right
The operating and load voltage supplies for the electric
outputs will be transmitted further.
These additional supplies must not be used for MPA
pneumatics with MPA electronic modules of the type
VMPA...−FB−EMS
−... (see description of P.BE−MPA−ELEK
TRONIK−...).
Interlinking blocks with
push−pull forwarding
function of type CPX−
M−GE−EV−S−PP−5POL
3−14
These interlinking blocks are used to forward the power
supply to subsequent external equipment.
These interlinking blocks must be placed directly to the right
of a system supply and must not be used more than once
within a CPX
terminal. They must not be combined with an
additional supply, either.
Festo P.BE−CPX−SYS−E N en 0902e
Page 95

3. Installation
Caution
Damage to device and the environment
CPX terminals with push−pull forwarding function must
have external fuse protection to 16A in order to avoid
overloading and resultant damage to the device and its
environment.
The use of interlinking blocks with forwarding function for
supplying power to subsequent equipment causes the follow
ing (see also Fig.3/2):
The operating voltage supply and the load voltage
supply are forwarded/connected through to subse
quent equipment via the push−pull connection. This
replaces a T−adapter in the field.
The operating voltage supply and the load voltage
supply are available to the fitted output module and
subsequent output modules to the right.
Interlinking blocks without
supply
Types CPX−(M−)GE−EV
Festo P.BE−CPX−SYS−EN en 0902e
Interlinking blocks with a
push−pull forwarding func
tion are identically constructed to those with apush−
pull system power supply
These interlinking blocks serve for the electrical linking of
modules which do not require a separate load voltage
supply.
3−15
Page 96
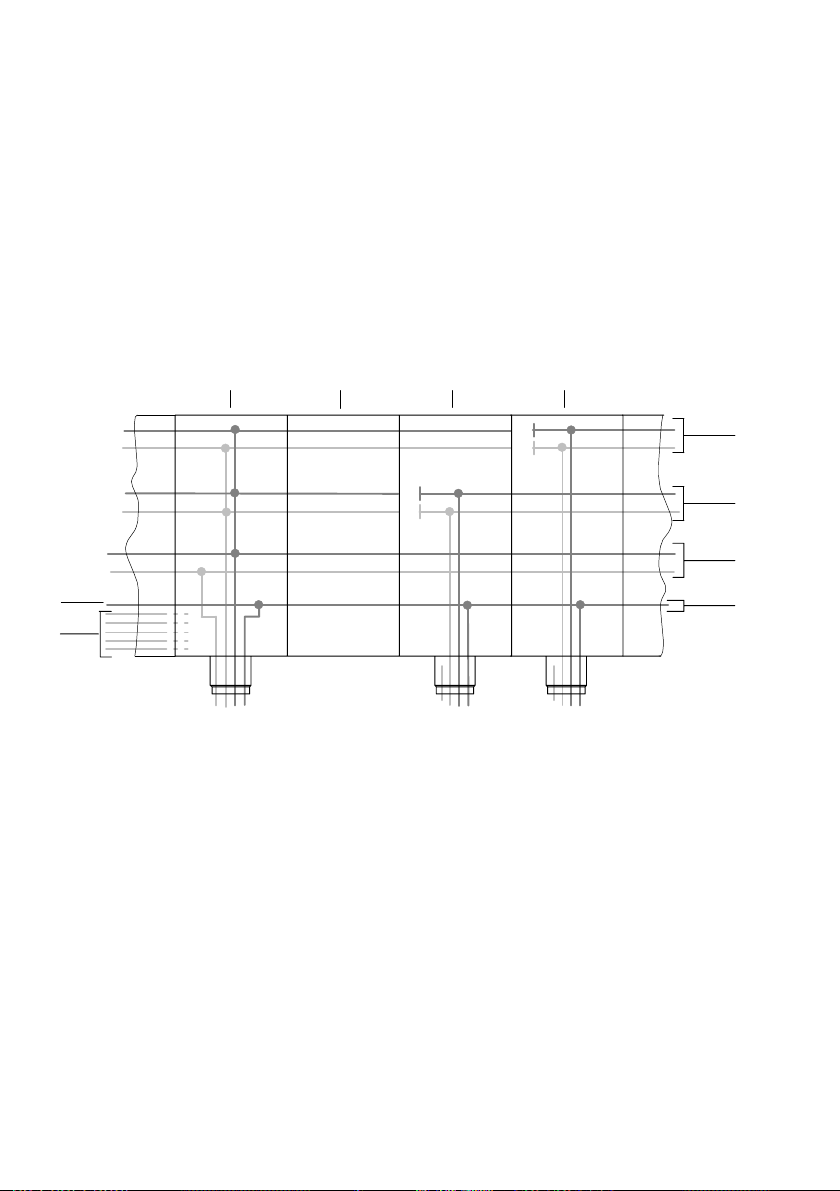
3. Installation
Internal voltage forwarding
The operating voltage supplied (internal electronics/inputs)
and load voltage (valves/outputs) are forwarded in the inter
linking blocks via what are known as contact rails. Fig.3/2
and Fig.3/3 show the differences between 4−pin and 5−pin
alternative connections:
6
CPX−GE−EV−S CPX−GE−EV
0 V
val
24 V
val
0 V
OUT
24 V
OUT
0 V
el/sen
24 V
el/sen
FE
CPX−GE−EV−Z
24 V
0 V
OUT
OUT
CPX−GE−EV−V
0 V
val
24 V
val
5
1 Load voltage for valves (24 V
0 V
)
val
val
and
4 Functional earth (FE)
5 Rails for internal functions
2 Load voltage for digital outputs
(24 V
and 0 V
out
out
)
6 Connection to FE connection on end
plate
3 Operating voltage for electronics and
sensors (24 V
Fig.3/2: Basic representation of the power supply concept for interlinking blocks with
4−pin alternative connections (M18, 7/8")
el/sen
and 0 V
el/sen
)
1
2
3
4
3−16
Festo P.BE−CPX−SYS−E N en 0902e
Page 97
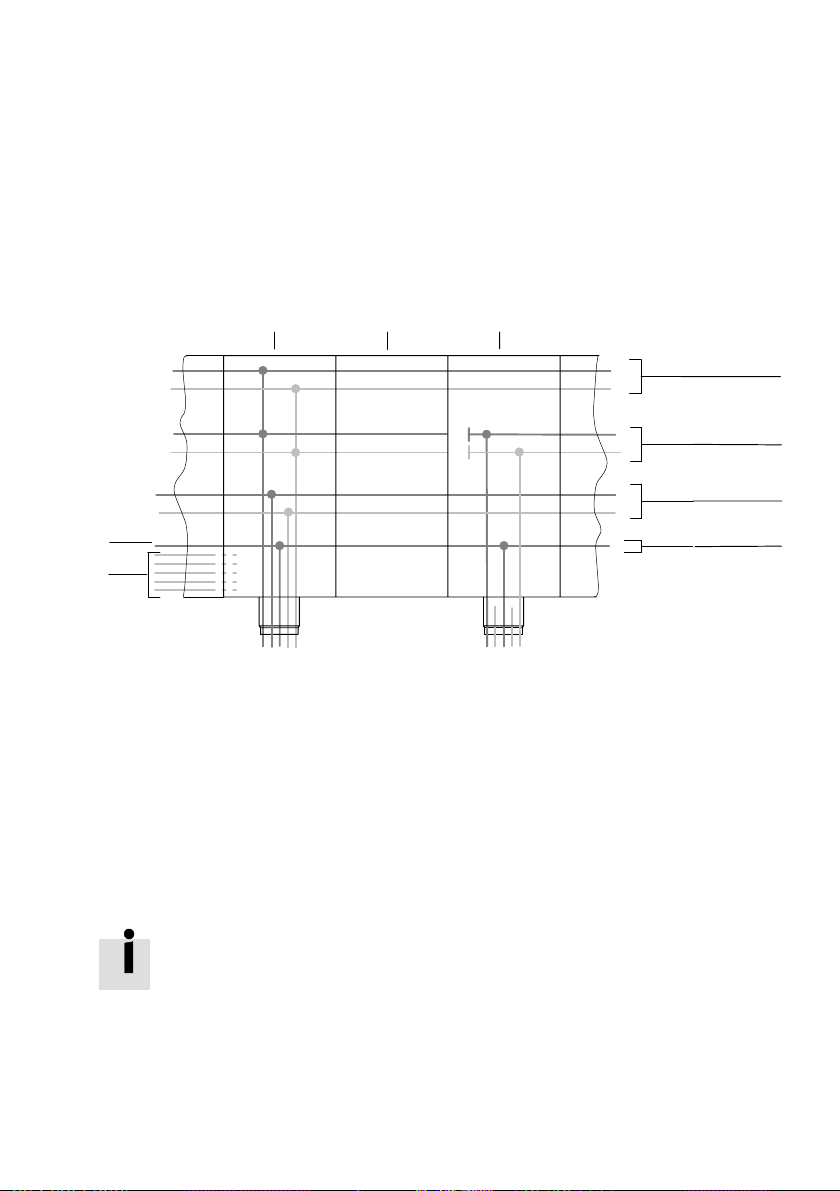
3. Installation
Separate circuits Interlinking blocks with a 5−pin plug enable separate circuits
to be created for supplying load voltage to the outputs/
valves and for supplying operating voltage to the electronics/
sensors. Fig.3/3 provides an overview.
val
CPX−(M−)GE−EV−Z−...
0 V
OUT
24 V
OUT
6
CPX−(M−)GE−EV−S−... CPX−(M−)GE−EV
0 V
val
24 V
0 V
OUT
24 V
OUT
0 V
el/sen
24 V
el/sen
FE
5
1 Load voltage for valves (24V
0V
)
val
val
and
4 Functional earth (FE)
5 Rails for internal functions
2 Load voltage for digital outputs
(24V
and 0V
out
out
)
6 Connection to FE connection on
end plate
3 Operating voltage for electronics and
sensors (24V
Fig.3/3: Basic representation of the power supply concept for interlinking blocks with
5−pin alternative connections (7/8", push−pull)
el/sen
and 0V
el/sen
)
1
2
3
4
Festo P.BE−CPX−SYS−EN en 0902e
The pin allocation for all alternative connections is described
in Tab.3/4 and in the package insert for the interlinking
blocks with supply.
3−17
Page 98
3. Installation
Special features concerning the use of the CPX−CP interface
Note
The CPX−CP interface connects the current rails 0V
and 0V
of the CPX valve terminal. This means that the
val
el/sen
separate circuits for the operating voltage for the electro
nics/sensors (V
(V
) will no longer be effective until the next additional
val
) and the load supply for the valves
el/sen
supply for valves following the CPX−CP interface.
Further information on the power supply for the CPX terminal
in conjunction with the CPX−CP interface can be found in the
manual for the CPX−CP interface in the section Installation"
section Power supply concept −
forming voltage zones."
Pin allocation for the alternative connections
3−18
Caution
Short circuits can cause damage.
Provide external fuse protection for the system supply and
additional supplies. The permissible current per pin at the
supply is:
7/8" plug, 4−pin: max. 10A
7/8" plug, 5−pin: max. 8A
M18 plug (4−pin): max. 16A
1) 2)
1)
2)
Push−pull plug (5−pin): max. 16A
1)
Limited by the specification of the connected plug con
nector. Values apply for plug connectors from Festo Acces
sories. If using third−party products, comply with the appli
cable specifications.
2)
Please note that with a 4−pin system supply via pin
0V", the sum of both currents of the operating and load
voltages flows.
Festo P.BE−CPX−SYS−E N en 0902e
Page 99
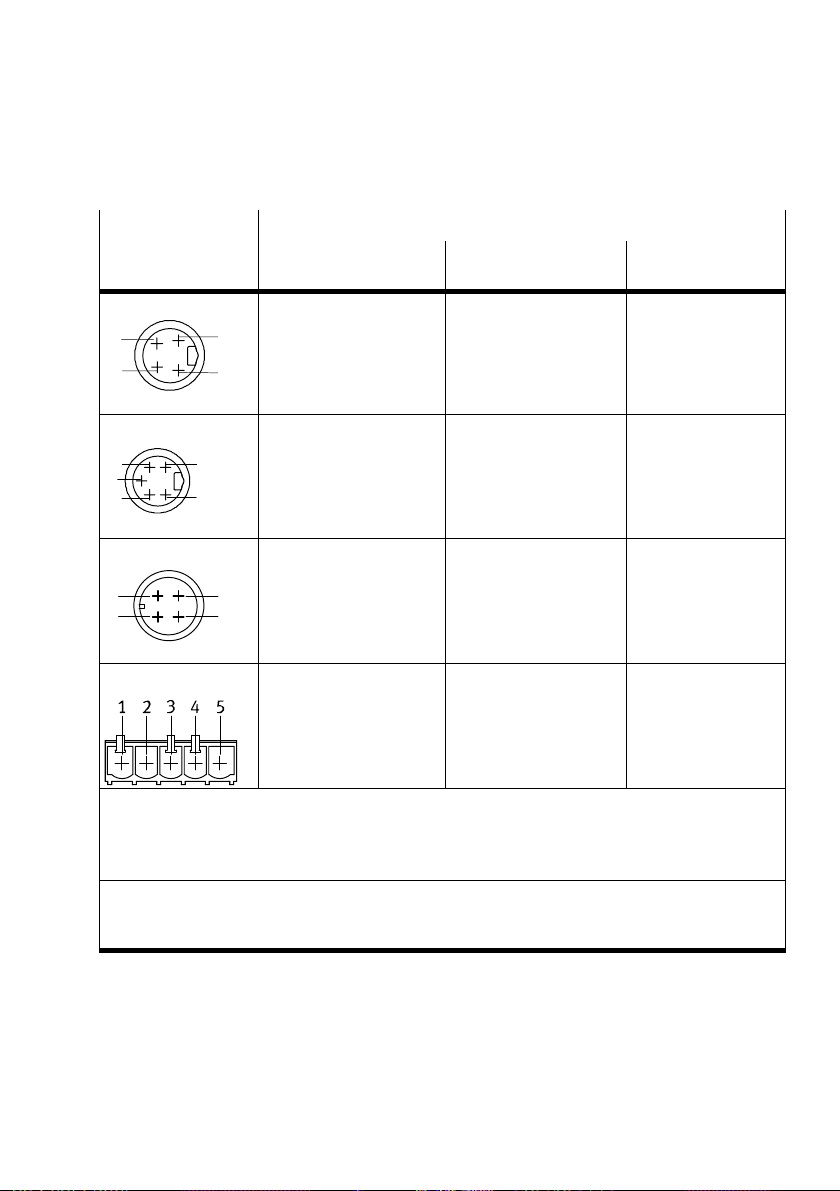
3. Installation
1)
)
Plugs
(top view
of device)
7/8"−4POL
C
B
7/8"−5POL
2
3
4
M18
1
4
Push−pull
Interlinking block with
System supply
Type CPX−(M−)GE−EV−S...
A: 24V
el/sen
B: 24V
D
C: FE
D:0V
A
1: 0V
1
5
2: 0V
3: FE
4: 24V
5: 24V
1: 24V
2: 24V
3: 0V
2
3
4: FE
2
1: 24V
2: 0V
3: 24V
4: 0V
0V
0V
val
el/sen
/ 0V
val
/ 0V
val
el/sen
el/sen
val
el/sen
val
el/sen
/ 0V
val
el/sen
el/sen
val
/ 0V
val
/ 24V
/
out
out
/ 24V
/ 24V
/
out
/ 24V
out
out
out
out
out
5: FE
Additional power supply
Type CPX−(M−)GE−EV−Z...
A: not connected
B: 24V
out
C: FE
D:0V
out
1: 0V
out
2: not connected
3: FE
4: not connected
5: 24V
out
1: not connected
2: 24V
out
3: 0V
out
4: FE
1: not connected
2: not connected
3: 24V
out
4: 0V
out
5: FE
Valve supply
Type CPX−GE−EV−V...
A: not connected
B: 24V
val
C: FE
D:0V
val
1: not connected
2: 24V
val
3: 0V
val
4: FE
V
: Operating voltage for electronics/sensors
el/sen
V
: Load voltage for outputs
out
V
: Load voltage for valves
val
FE: Functional earth
1)
Note the specifications on the plug.
2) Interlinking blocks with forwarding function and interlinking blocks with system supply are
identically constructed.
Tab.3/4: Pin assignment for interlinking blocks with system supply, additional supply or
valve supply
Festo P.BE−CPX−SYS−EN en 0902e
3−19
Page 100
3. Installation
Potential equalisation
The CPX terminal has two earthing connections for potential
equalisation:
The functional earth" pin from system supply, additional
supply or valve supply (see Tab.3/4)
Earth connection on the left−hand end plate (see Fig.3/4).
Note
· Always connect the functional earth" to the earth po
tential.
· Connect the earth connection of the left−hand end plate
to the earth potential with low impedance (short cable
with large cross−sectional area).
· With low−impedance connections you can ensure that
the earth connection at the left−hand end plate and the
earth connection at the supplies have the same potential
and that there are no equalising currents.
You can thereby avoid interference from electromagnetic
sources and ensure electromagnetic compatibility in accor
dance with EMC directives.
Connection examples
Connection example 1 Fig.3/4 shows as an example the connection of a common
24V supply for pin1 and pin2 on the M18 plug. Please note
that:
The tolerance of 24VDC ±25% must be observed.
Both connections for potential equalisation are connected
and that compensating currents must be prevented
The load voltage at pin2 of the
puts) can be switched off separately
External fuses are used, depending on the application
(maximum value at pin 0V" in total for both fuses: 16A)
3−20
M18 plug (valves and out
Festo P.BE−CPX−SYS−E N en 0902e
 Loading...