

Page 1
Ferm b.v. • P.O. Box 134 • 8280 AC Genemuiden NL • Web: www.ferm.nl 0105/28.1
Art.nr. 319590
FAG-230
USERS MANUAL
Angle grinder 02
GEBRAUCHSANWEISUNG
Winkelschleifer 06
GEBRUIKSAANWIJZING
Haakse slijper 10
MODE D’EMPLOI
Meuleuse d’angle 14
BRUKSANVISNING
Vinkelslipmaskin 18
KÄYTTÖOHJE
Kulmahiomakone 22
BRUKSANVISNING
Vinkelsliper 26
BRUGER VEJLEDNING
Vinkelslibere 30
GB
D
NL
F
SV
SU
N
DK
UK Subject to change
D Änderungen vorbehalten
NL Wijzigingen voorbehouden
F Sous réserve de modifications
SV Ändringar förbehålles
SU Pidätämme oikeuden muutoksiin
NO Rett till endringer forbeholdes
DK Ret til ændringer forbeholdes
Page 2
2 Ferm
Angle grinder
The following symbols are used throughout this manual:
Denotes risk of personal injury, loss of life or
damage to the tool in case of non-observance of
the instructions in this manual.
Denotes risk of electric shock.
Risk of fire.
Carefully read this manual before using the machine.
Make sure that you know how the machine functions and
how to operate it. Maintain the machine in accordance
with the instructions to make sure it functions properly.
Keep this manual and the enclosed documentation with
the machine.
SAFETY INSTRUCTIONS
When using electric machines always observe the
safety regulations applicable in your country to
reduce the risk of fire, electric shock and personal
injury. Read the following safety instructions and also
the enclosed safety instructions. Keep these instructions in a safe place!
- Check that the maximum speed indicated on the grinding disc corresponds to the maximum speed of the
machine. The speed of the machine must not exceed
the value on the grinding disc.
- Make sure that the dimensions of the grinding disc correspond to the specifications of the machine.
- Make sure that the grinding disc has been mounted
and fastened properly. Do not use reducing rings or
adapters to make the grinding disc fit properly.
- Treat and store grinding discs in conformance with the
supplier’s instructions.
- Do not use the machine for grinding workpieces with a
maximum thickness exceeding the maximum grinding
depth of the grinding disc.
- Do not use grinding discs for deburring.
- When grinding discs have to be mounted on the thread
of the spindle, make sure that the spindle has sufficient
thread. Make sure that the spindle is sufficiently protected and does not touch the grinding surface.
- Before use, inspect the grinding disc for any damage.
Do not use grinding discs which are crack-ed, ripped or
otherwise damaged.
- Before use, let the machine run idle for 30 seconds.
Immediately switch off the machine in case of abnormal vibrations or occurrence of another defect. Care-
fully inspect the machine and grinding disc before switching the machine on again.
- Make sure that sparks do not put people into danger or
that they contact highly flammable substances.
- Make sure that the workpiece is sufficiently supported
or clamped. Keep your hands away from the surface to
be cut.
- Always wear safety goggles and hearing protection. If
desired or required also use another kind of protection
like for example an apron or helmet.
- Ensure that mounted wheels and points are fitted in
accordance with the manufacturer’s instructions.
- Ensure that blotters are used when they are provided
with the bonded abrasive product and when they are
required.
- If a guard is supplied with the tool never use the tool without such a guard.
- For tools intended to be fitted with threaded hole
wheel, ensure that the thread in the wheel is long
enough to accept the spindle length.
- Ensure that ventilation openings are kept clear when
working in dusty conditions. If it should become nessesary to clear dust, first disconnect the tool from the
mains supply (use non metallic objects) and avoid
damaging internal parts.
- Though poor conditions of the electrical mains, shortly
voltage drops can appear when starting the equipment. This can influence other equipment (eq. blinking
of a lamp). If the mains-impedance Zmax <0.348 Ohm,
such disturbances are not expected. (In case of need,
you may contact your local supply authority for further
information.
GB
English
Ferm 35
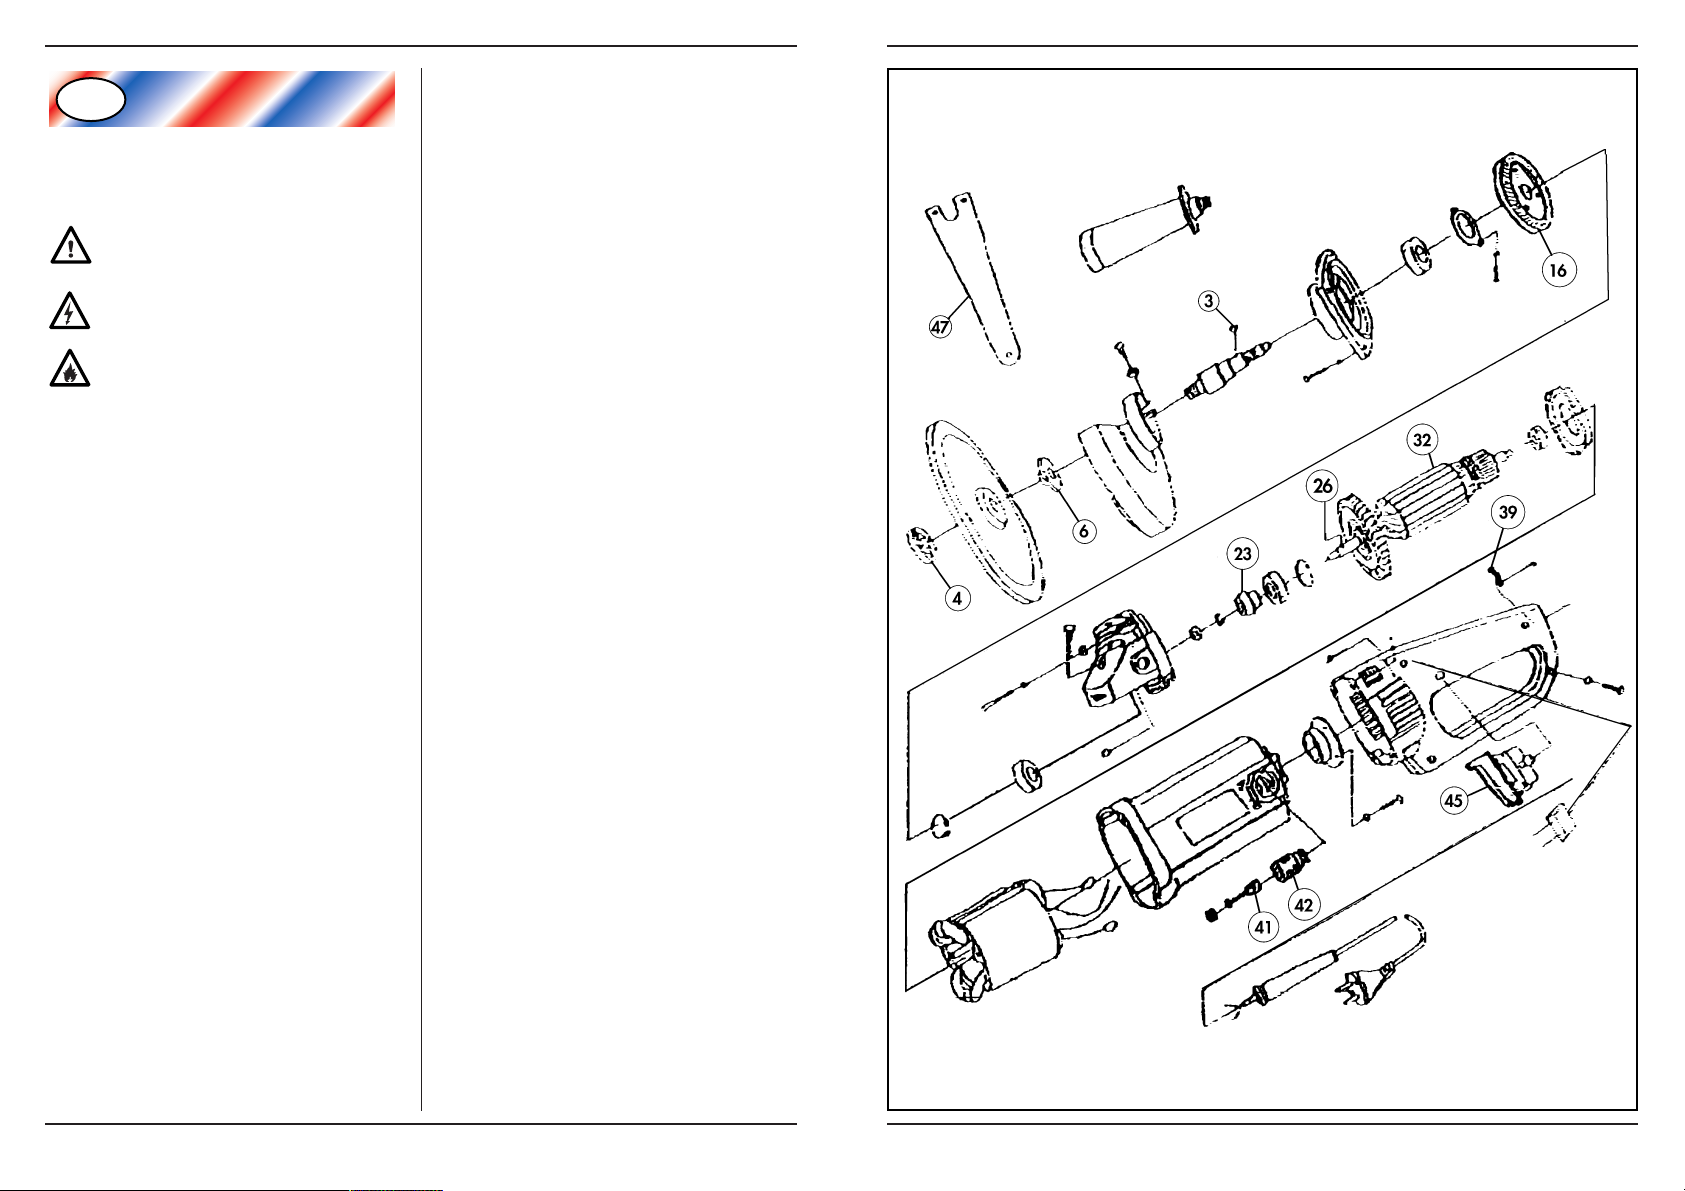
EXPLODED VIEW
Page 3
Ferm 3
TECHNICAL SPECIFICATIONS
Voltage 230 V~
Frequency 50 Hz
Power input 1650 W
No-load speed 6000/min
Disc diameter 230 mm
Spindle dimension M14
Weight 3.75 kg
Lpa(sound pressure) 94.6 dB(A)
Lwa(acoustic power) 107.6 dB(A)
Vibration value 0.8 m/s
2
Electrical safety
Always check that the power supply corresponds to the voltage on the rating plate.
Your machine is double insulated in accordance
with EN 50144; therefore no earthwire is required.
Replacing cables or plugs
Immediately throw away old cables or plugs when they
have been replaced by new ones. It is dangerous to insert
the plug of a loose cable in the wall outlet.
Using extension cables
Only use an approved extension cable suitable for the
power input of the machine. The minimum conductor size
is 1.5 mm
2
. When using a cable reel always unwind the reel
completely.
PACKAGE CONTENTS
The package contains:
1 angle grinder
1 side handle
1 spanner
Set carbon brushes
instruction manual
safety instructions
guarantee card
Check the machine, loose parts and accessories for transport damage.
PRODUCT INFORMATION
Fig. A:
1. on/off switch
2. screw-on lid carbon brush (both sides)
3. spindle lock
4. grinding disc
5. side handle
6. lock-off button
34 Ferm
SPARE PARTS LIST
REF.NR. DESCRIPTION FERM NR.
4 FLANGE OUTSIDE 406847
6 FLANGE INSIDE 406846
16 SPINDLE GEAR FAG-230 406754
23 PINION GEAR FAG-230 406756
26 WOODRUFF KEY 406752
32 ROTOR 406757
39 BRUSH CAP 406758
41 CARBON BRUSH 406759
42 CARBON BRUSH HOLDER 406760
45 SWITCH 406761
47 CAM WRENCH 406762
4
3 2 1 6
5
Page 4
VEDLIGEHOLDELSE
Sørg for at maskinen ikke står under strøm, når
der udføres vedligeholdelsesarbejder på meka-
nikken.
Maskinerne fra Ferm er udviklet til at fungere længe uden
problemer med et minimum af vedligeholdelse. Ved at
rengøre maskinen regelmæssigt og behandle den korrekt, bidrager De til en længere levetid for maskinen.
Rengøring
Rengør regelmæssigt maskinkappen med en blød klud,
helst efter hvert brug. Sørg for at ventilationshullerne er fri
for støv og snavs.
Brug en blød klud, der er vædet i sæbevand til at fjerne
hårdnakket snavs. Brug ingen opløsningsmidler, så som
benzin, alkohol, ammoniak, osv. Den slags stoffer beskadiger kunststofdelene.
Smøring
Maskinen behøver ingen ekstra smøring.
Fejl
Kontakt Deres Ferm-forhandler, hvis der opstår fejl som
følge af slitage af en del.
Bagerst i denne brugsanvisning finder De en reservedelstegning med de reservedele, der kan bestilles.
MILJØ
For at undgå transportbeskadigelse leveres maskinen i
en solid emballage. Emballagen er så vidt muligt lavet af
genbrugsmateriale. Genbrug derfor emballagen.
Når de udskifter Deres maskinen bør De tage den gamle
maskine med til Deres lokale Ferm-forhandler. Der vil
maskinen blive bearbejdet på miljøvenlig vis.
GARANTI
Læs det separat vedlagte garantikort for garantibetingelserne.
ClEl
■
KONFORMITETSERKLÆRING
(
DK
)
Vi erklærer at under almindeligt ansvar, at dette
produkt er i overenstemmelse med følgende
normer eller normative dokumenter
EN50144-1, prEN50144-2-3, EN55014-1, EN55014-2,
EN61000-3-2, EN61000-3-3
i henhold til bestemmelserne i direktiverne:
98/37EØF
73/23EØF
89/336EØF
frà 01-06-2000
GENEMUIDEN NL
G.M. Ensing
Quality department
Ferm 33
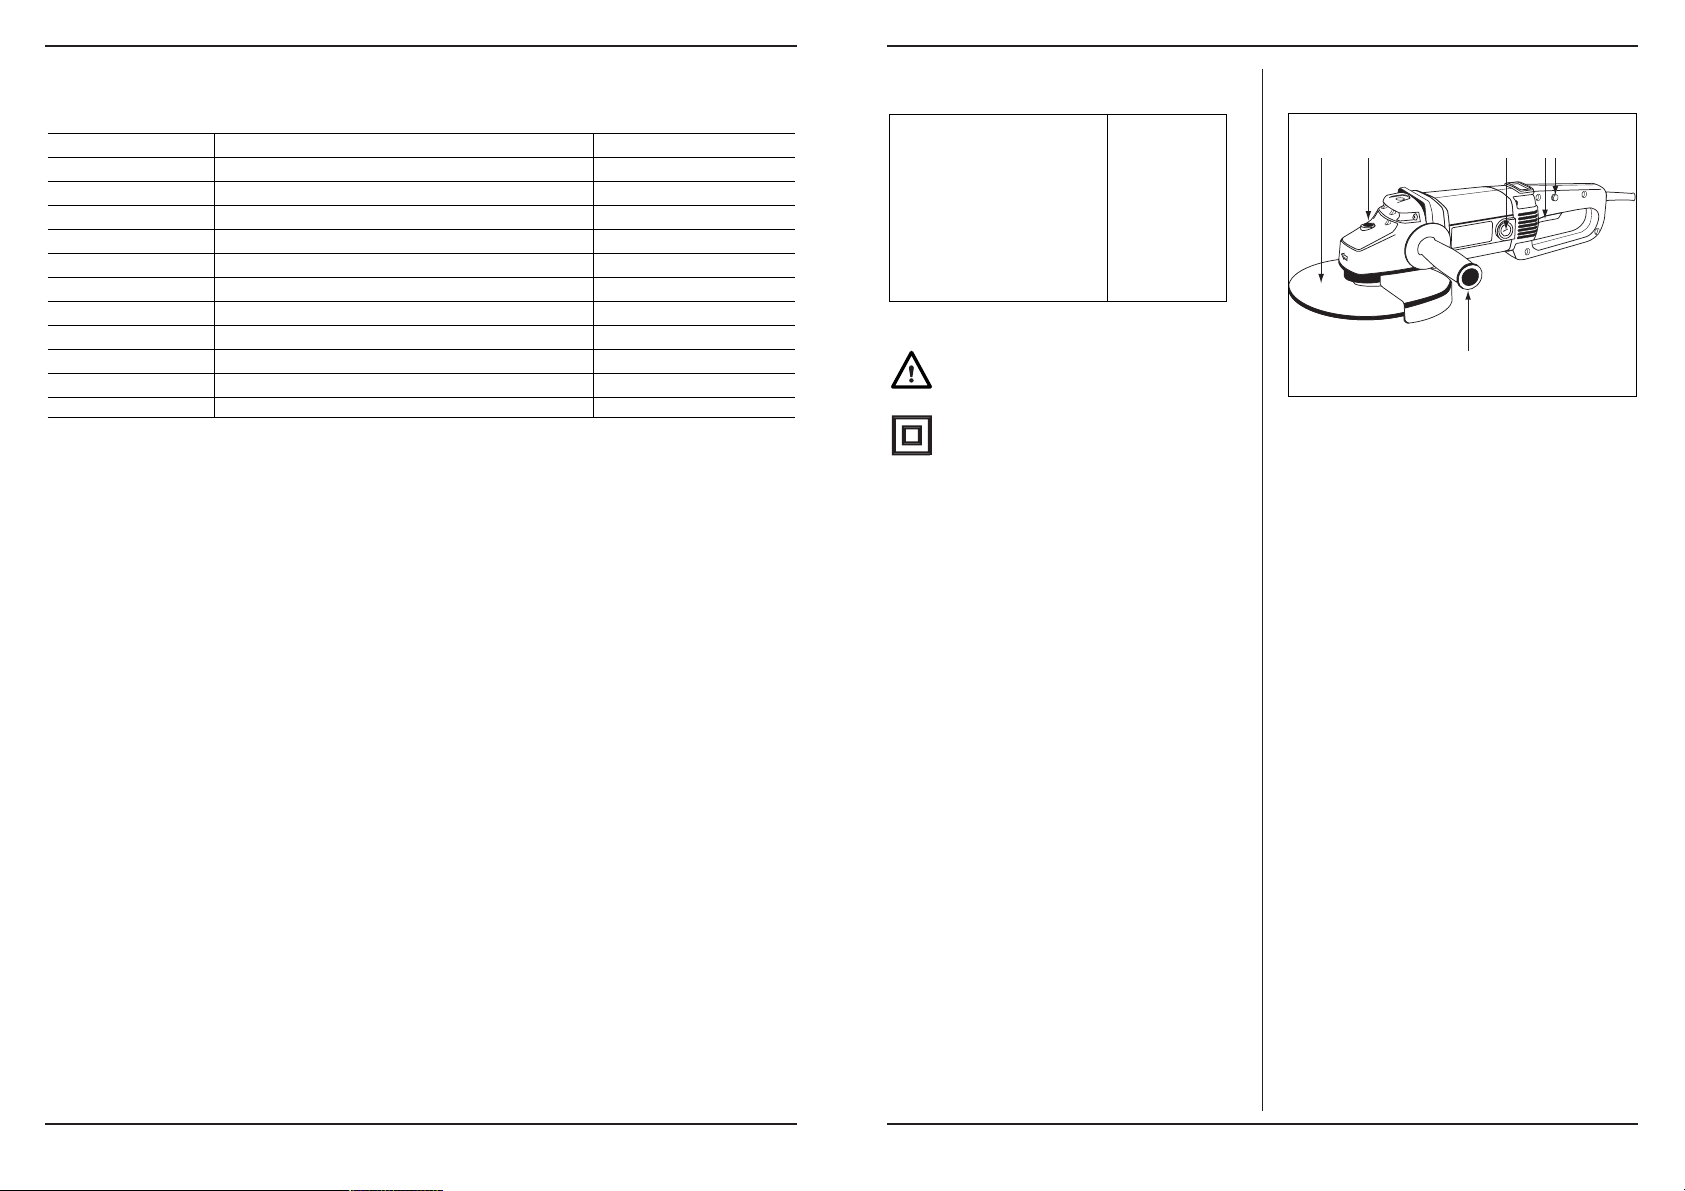
MOUNTING ACCESSORIES
Fig. B
Prior to mounting an accessory always unplug
the tool.
Mounting a grinding disc.
Use grinding discs of the correct dimension. Use fibre reinforced grinding discs only. The grinding disc must not
touch the edge of the guard.
- Press the spindle lock (6) and turn the spindle (9) until it
engages in the lock. Keep the spindle lock pressed
during this procedure.
- Remove the flange nut (12) from the spindle using the
spanner (11).
- Position the grinding disc (7) on the flange (5).
- Place the flange nut on the spindle an tighten it using
the spanner.
- Release the spindle lock and check that the spindle is
unlocked by rotating it.
Mounting the side handle
The side handle can be used for both left-hand and righthand control.
- Fasten the side handle (Fig. A-5) for left-hand operation on the right-hand side of the machine.
- Fasten the side handle for right-hand operation on the
left-hand side of the machine.
- Fasten the side handle for upright working at the top of
the machine.
Make sure that the side handle is fastened properly and cannot loosen unexpectedly.
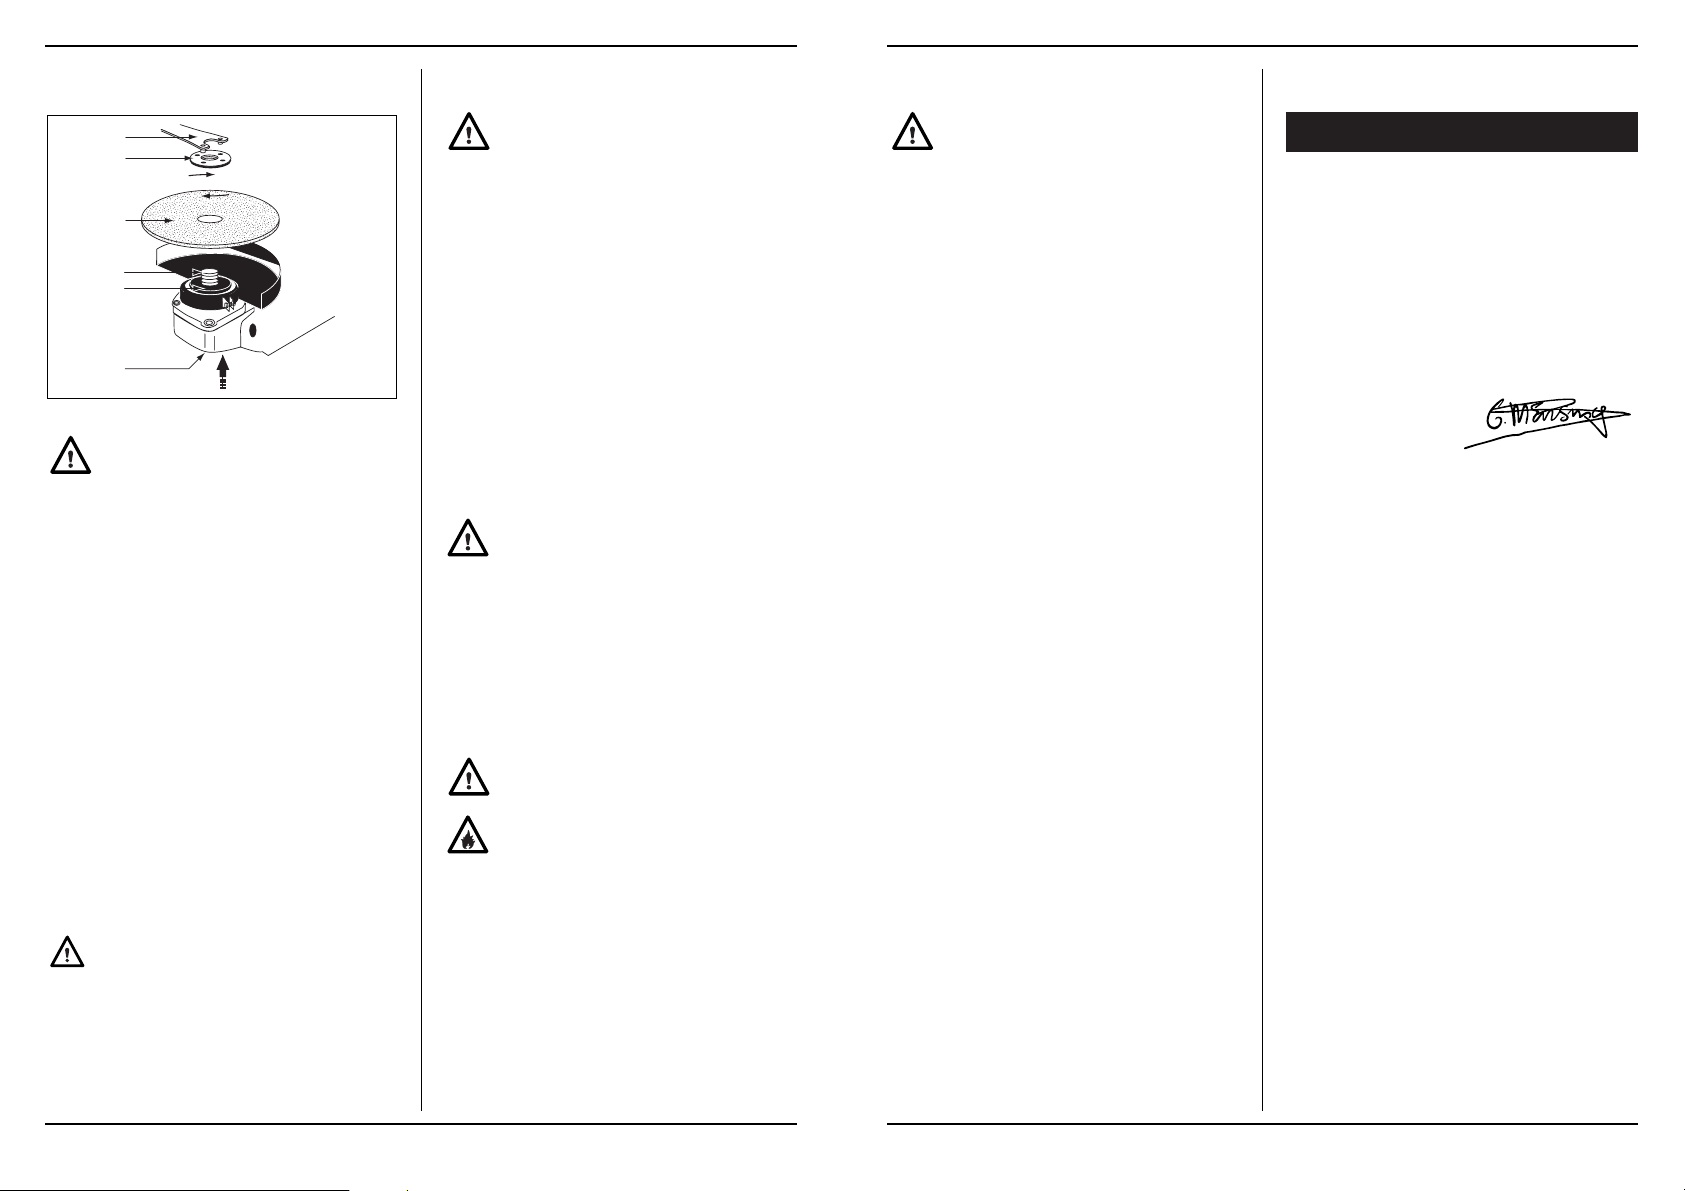
OPERATION
Always observe the safety instructions and
applicable regulations.
Do not place the machine on the workpiece when switching the machine on or off. The grinding disc may
damage the workpiece.
- Clamp the workpiece and make sure that the workpiece cannot slide from under the machine during the
cutting activities.
- Hold the machine firmly and press it under an angle of
approximately 15˚ against the workpiece. Move the
grinding disc evenly across the workpiece.
- Regularly inspect the grinding disc. Worn grinding
discs have a negative effect on the efficiency of the
machine. Replace a grinding disc on time.
- Always switch off the machine first before removing
the plug from the wall socket.
Switching on and off
- This machine is equipped with a safety switch.
- Start the machine by pressing the “lock off” button (to
disengrage the switch) and switch on the machine.
Before start working, the machine must be run
according to the max. speed.
- Always put the angle grinder in zero load (without load)
when you connect or disconnect.
- Always keep the mains lead away from moving parts.
- During the grinding you have to work under an angle
between 10° and 15°, so that you get in touch with
splashing sparks as few as possible.
During cutting between 30° and 45°.
Do not put the machine down when the motor is still running. Do not place the machine on a dusty surface. Dust
particles may enter the mechanism.
Never use the spindle lock to stop the motor.
Never use the machine for grinding magnesium
workpieces.
4 Ferm
11
12
+
7
9
5
6
Page 5
MAINTENANCE
Make sure that the machine is not live when carrying out maintenance work on the motor.
The Ferm machines have been designed to operate over
a long period of time with a minimum of maintenance. Continuous satisfactory operation depends upon proper
machine care and regular cleaning.
Cleaning
Regularly clean the machine housing with a soft cloth, preferably after each use. Keep the ventilation slots free from
dust and dirt.
If the dirt does not come off use a soft cloth moistened with
soapy water. Never use solvents such as petrol, alcohol,
ammonia water, etc. These solvents may damage the
plastic parts.
Lubrication
The machine requires no additional lubrication.
Faults
Should a fault occur, e.g. after wear of a part, please contact your local Ferm dealer.
In the back of this manual you find an exploded view
showing the parts that can be ordered.
ENVIRONMENT
In order to prevent the machine from damage during transport, it is delivered in a sturdy packaging. Most of the packaging materials can be recycled. Take these materials to
the appropriate recycling locations.
Take your unwanted machines to your local Ferm-dealer.
Here they will be disposed of in an environmentally safe
way.
GUARANTEE
The guarantee conditions can be found on the separately
enclosed guarantee card.
ClE l
■
DECLARATION OF CONFORMITY
(
GB
)
We declare under our sole responsibility that this
product is in conformity with the following
standards or standardized documents
EN50144-1, prEN50144-2-3, EN55014-1, EN55014-2,
EN61000-3-2, EN61000-3-3
in accordance with the regulations:
98/37/EEC
73/23/EEC
89/336/EEC
from 01-06-2000
GENEMUIDEN NL
G.M. Ensing
Quality department
Ferm 5
MONTAGE AF TILBEHØR
Fig. B
Tag altid stikket ud af kontakten før montage.
Anvend slibeskiver med den rette størrelse. Anvend udelukkende fiberforstærkede slibeskiver. Slibeskiven må
ikke komme i kontakt med beskyttelseskappens kant.
- Tryk aksellåsen (6) ind, og drej akslen (9) til denne falder i låsen. Hold aksellåsen indtrykt, sålænge De følger denne procedure.
- Fjern flangemøtrikken (12) fra akslen ved hjælp af
klampernøglen (11).
- Placér slibeskiven (7) på flangen (5).
- Skru flangemøtrikken på akslen igen og drej den fast
ved hjælp af klampernøglen.
- Kontrollér, at spærreanordningen er frigjort ved at
dreje på akslen og slip herved aksellåsen.
Montage af sidehåndgreb
Sidehåndgrebet er egnet til såvel venstrehåndet som højrehåndet betjening.
- Ved venstrehåndet betjening drejes sidehåndgrebet
(Fig. A-5) i optagelsen på maskinens højre side.
- Ved højrehåndet betjening drejes sidehåndgrebet i
optagelsen på maskinens venstre side.
- Ved vertikale arbejder drejes sidehåndgrebet i optagelsen på maskinens overkant.
Sørg for, at sidehåndgrebet sidder godt fast og
ikke uventet kan rystes løs
BETJENING
Følg altid sikkerhedsinstruktionerne og hold
Dem til de gældende forskrifter.
Hold maskinen væk fra arbejdsstykket, når De tænder
eller slukker den. Slibeskiven kan beskadige arbejdsstykket.
- Klem arbejdsstykket fast eller sørg på anden måde for,
at det under arbejdet ikke kan glide væk under maskinen.
- Hold maskinen godt fast, og tryk den under en vinkel
på cirka 15˚ mod arbejdsstykket. Bevæg slibeskiven
regelmæssigt henover arbejdsstykket.Inspicér
regelmæssigt slibeskiven.
- Slidte slibeskiver har en negativ indflydelse på maskinens effektivitet. Erstat slibeskiven i tide.
- Sluk efter endt arbejde altid først maskinen, før De
trækker stikket ud af stikkontakten.
Ind/udkobling
- Denne maskine er udstyret med en sikkerhedsafbryder. Maskinen startes ved at trykke på knappen
"udløs" (for at udløse afbryderen) og starte maskinen.
- Sørg for, at vinkelsliberen ikke er belastet, når den
tændes og slukkes.
Når maskinen har nået det maksimale omdrejningstal, kan den skubbes frem over arbejd-
semnet
- Hold altid netledningen borte fra bevægelige dele.
- For mindst muligt at komme i berøring med opsprøjtende gnister og metaldele, skal man under slibningen
arbejde i en vinkel på mellem 10º og 15º. Når der gennemslibes, skal vinkelen være mellem 30º og 45º.
Sæt maskinen først ned, når motoren er helt slukket. Sæt
aldrig maskinen på en støvet undergrund. Støvdele kan
trænge ind i mekanikken.
Anvend aldrig aksellåsen til at stoppe motoren.
Anvend ikke maskinen til at slibe arbejdsstykker
af magnium.
32
11
12
+
7
9
5
6
Page 6
TEKNISKE SPECIFIKATIONER
Spænding 230 V~
Frekvens 50 Hz
Optaget effekt 1650 W
Antal slag, ubelastet 6000/min
Skivediameter 230 mm
Akselmål M14
Vægt 3.75 kg
Lpa(lydtryk) 94.6 dB(A)
Lwa(lydevne) 107.6 dB(A)
Vibrationsværdi 0.8 m/s
2
Elektrisk sikkerhed
Kontroller altid om netspændingen svarer til
værdien på typeskiltet.
Maskinen er dobbeltisoleret i henhold til
EN50144; det er derfor ikke nødvendigt med en
jordledning.
Ved udskiftning af ledninger og stik
Kasser gamle ledninger og stik, så snart de er skiftet ud
med nye. Det er farligt at sætte et stik fra en løs ledning i en
stikkontakt.
Ved brug af forlængerledninger
Brug udelukkende godkendte forlængerledninger, der er
beregnede til maskinens effekt. Lederne skal have et gennemsnit på mindst 1,5 mm
2
. Hvis forlængerledningen sid-
der på en tromle, rulles ledningen helt af.
EMBALLAGENS INDHOLD
1 vinkelsliber
1 sidehåndgreb
1 klampernøgle
kontaktkullene
brugsanvisning
sikkerhedsfolder
garantikort
Kontroller maskinen, løsdele og tilbehør for transportskade.
PRODUKTINFORMATION
Fig. A.
Den vinkelsliber er egnet til professionelt slibearbejde.
1. ænd/sluk-kontakt
2. gevindsokkel kulbørste (begge sider)
3. aksellås
4. slibeskive
5. sidehåndgreb
6. knappen "udløs"
Ferm 31
Winkelschleifer
In dieser Betriebsanleitung erscheinen folgende Piktogramme:
Verweist auf Verletzungsgefahr, Gefahr für
Leben und mögliche Beschädigung der
Maschine, falls die Anweisungen in dieser Betriebsanleitung nicht befolgt werden
Deutet das Vorhandensein elektrischer Span-
nung an.
Feuergefahr.
Lesen Sie diese Betriebsanleitung aufmerksam, bevor
Sie die Maschine in Betrieb nehmen. Machen Sie sich vertraut mit der Funktionsweise und der Bedienung. Warten
Sie die Maschine entsprechend den Anweisungen, damit
sie immer einwandfrei funktioniert. Die Betriebsanleitung
und die dazugehörende Dokumentation müssen in der
Nähe der Maschine aufbewahrt werden.
SICHERHEITSVORSCHRIFTEN
Beachten beim Benutzen von Elektromaschinen
immer die örtlichen Sicherheitsvor-schriften bezüglich Feuerrisiko, Elektroschock und Verletzung.
Lesen Sie außer den folgenden Hinweisen ebenfalls
die Sicherheitsvorschriften im einschlägigen Sonderteil.
Die Hinweise müssen sicher aufbewahrt werden!
- Überprüfen Sie, ob die Höchstdrehzahl, die auf der
Schleifscheibe angegeben ist, mit der Höchstdrehzahl der Maschine übereinstimmt. Die Drehzahl der
Maschine darf nicht höher sein als der Wert auf der
Schleifscheibe.
- Achten Sie darauf, daß die Abmessungen der Schleif-
scheibe mit den Angaben der Maschine übereinstimmen.
- Achten Sie darauf, daß die Schleifscheibe richtig mon-
tiert und ordnungsgemäß festgesetzt wurde. Verwenden Sie keine Reduzierringe oder Adapter, um die
Schleifscheibe passend zu machen.
- Behandeln und lagern Sie Schleifscheiben gemäß
den Vorschriften des Lieferanten.
- Verwenden Sie die Maschine nicht, um Werkstücke
durchzuschleifen, die dicker sind als die maximale
Schleiftiefe der Schleifscheibe.
- Verwenden Sie keine Schleifscheiben für Abgratar-
beiten.
- Sorgen Sie dafür, daß bei Verwendung von Schleif-
scheiben, die auf dem Gewinde der Spindel befestigt
wird, die Spindel genügend Gewinde hat. Sorgen Sie
dafür, daß die Spindel ausreichend geschützt ist und
die Schleifoberfläche nicht berührt.
- Überprüfen Sie die Schleifscheibe vor Benutzung auf
eventuelle Beschädigungen. Verwenden Sie keine
Schleifscheiben, die geborsten, gerissen oder anders
beschädigt sind.
- Lassen Sie die Maschine vor Inbetriebnahme 30
Sekunden lang unbelastet laufen. Schalten Sie die
Maschine sofort aus, wenn diese deutlich zu zittern
anfängt oder wenn ein anderer Defekt auftritt.
Überprüfen Sie die Maschine und Schleifscheibe
gründlich, bevor Sie die Maschine erneut einschalten.
- Sorgen Sie dafür, daß ein eventueller Funkenregen
keine Gefahr für Personen bildet oder in Richtung von
leicht entflammbaren Substanzen spritzt.
- Sorgen Sie dafür, daß das Werkstück ausreichend
unterstützt oder eingeklemmt wird. Bleiben Sie mit
den Händen von der Schleiffläche fern.
- Tragen Sie immer eine Schutzbrille und einen Hörschutz. Benutzen Sie, falls erforderlich oder
gewünscht, andere Schutzkleidung, wie z.B. eine
Schürze oder einen Helm.
- Befestigen Sie Scheiben und sonstige Einzelteile
gemäß den Vorschriften des Herstellers.
- Verwenden Sie falls erforderlich Fließpapier, wenn
diese mit den Schleifmitteln mitgeliefert worden sind.
- Verwenden Sie immer eine Sicherheitsvorrichtung,
wenn diese mit dem Gerät mitgeliefert worden ist.
- Bei Werkzeugen, die mit einer Lochscheibe mit
Gewinde ausgerüstet werden, muss das Gewinde in
der Bohrung für die Spindellänge lang genug sein.
- Achten Sie darauf, dass Lüftungsöffnungen bei der
Arbeit in staubiger Umge-bung nicht verschmutzt
sind. Bevor Sie Lüftungsöffnungen reinigen, ziehen
Sie den Netzstecker. Verwenden Sie zum Reinigen
keine Metallgegenstände, vermeiden Sie die Beschädigung von Innenteilen.
- Bei einem schwachen Stromnetz kann es beim Einschalten der Anlage zur Span-nungsabsenkung kommen. Dies kann sich auf andere Geräte auswirken
(beispielsweise Blinken einer Anzeigelampe). Solche
Störungen sind ausgeschlossen, wenn die Netzimpedanz Zmax < 0,348 Ohm beträgt. Im Zweifelsfall fragen Sie bei Ihrem Ver-sorgungsbetrieb nach.
Deutsch
D
6 Ferm
4
3 2 1 6
5
Page 7

TECHNISCHE DATEN
Spannung 230 V~
Frequenz 50 Hz
Aufgenommene Leistung 1650 W
Drehzahl, ohne Last 6000/min
Scheibendurchmesser 230 mm
Spindeldurchmesser M14
Gewicht 3.75 kg
Lpa(Schalldruck) 94.6 dB(A)
Lwa(Schalleistung) 107.6 dB(A)
Vibrationswert 0.8 m/s
2
Elektrische Sicherheit
Überprüfen Sie immer, ob Ihre Netzspannung
der des Typenschilds entspricht.
Die Maschine ist nach EN 50144 doppel-isoliert;
daher ist Erdung nicht erforderlich.
Austauschen von Kabeln oder Steckern
Entsorgen Sie alte Kabel oder Stecker, unmittelbar nachdem Sie durch neue ersetzt sind. Das Anschließen eines
Steckers eines losen Kabels an eine Steckdose ist gefährlich.
Verwendung von Verlängerungskabeln
Benutzen Sie nur ein genehmigtes Verlängerungskabel,
das der Maschinenleistung entspricht. Die Ader müssen
einen Mindestquer-schnitt von 1,5 mm
2
haben. Befindet
das Kabel sich auf einem Haspel, muß es völlig abgerollt
werden.
INHALT DER VERPACKUNG
1 Winkelschleifer
1 Seitenhandgriff
1 Spannschlüssel
Kohlenbürstensatz
Betriebsanleitung
Sicherheitsheft
Garantiekarte
Überprüfen Sie die Maschine, lose Teile und Zubehör auf
Transportschäden.
PRODUKTINFORMATION
Abb. A.
Der Winkelschleifer ist geeignet für professionelle Schleifarbeiten.
1. Ein-/Aus-Schalter
2. Schraubdeckel Kohlebürste (Beidseitig)
3. Spindelarretierung
4. Schleifscheibe
5. Seitengriff
6. “Lock-off” Knopf
Ferm 7
Vinkelsliber
I denne brugsanvisning anvendes de følgende piktogrammer:
Angiver risiko for legemensbeskadigelse, livsfare eller maskinskade, hvis instruktionerne i
denne brugsanvisning tilsidesættes.
Angiver elektrisk spænding.
Brandfare.
Læs denne brugsanvisning godt igennem før maskinen
tages i brug. Sørg for at De kender maskinens funktion og
betjening. Vedligehold maskinen i følge instruktionerne,
for at maskinen altid kan fungere optimalt. Bevar denne
brugsanvisning og den vedlagte dokumentation til maskinen.
SIKKERHEDSFORSKRIFTER
Ved anvendelse af elektriske maskiner skal man altid
følge de lokalt gældende sikkerhedsforskrifter i forbindelse med brandfare, fare for elektrisk stød og
legemensbeskadigelse. Læs udover de nedenstående instruktioner også sikkerhedsforskrifterne i
den separat vedlagte sikkerhedsfolder.
Bevar instruktionerne godt!
- Kontrollér, at det maksimale omdrejningstal, der er
angivet på slibeskiven, stemmer overens med maskinens maksimale omdrejningstal. Maskinens omdrejningstal må ikke være højere end den på slibeskiven
angivne værdi.
- Vær opmærksom på, at slibeskivens mål stemmer
overens med maskinens specifikationer.
- Vær opmærksom på, at slibeskiven er monteret rigtigt
og ordentligt spændt fast. Brug ikke reduktionsringe
eller adaptere for at få en slibeskive til at passe.
- Brug og opbevar slibeskiver i henhold til leverandørens anvisninger.
- Brug ikke maskinen til gennemslibning af arbejdsemner med en tykkelse, der er større end skæreskivens
maksimale slibedybde.
- Brug ikke skæreskiver til afgratning.
- Ved anvendelse af slibeskiver, der fastspændes på
spindlens gevind, skal der sørges for at spindlen har et
tilstrækkeligt stort gevind. Forvis dig om, at spindlen er
godt afskærmet og ikke kan komme i kontakt med slibeoverfladen.
- Inden anvendelse skal slibeskiven kontrolleres for
eventuelle skader. Brug ikke revne eller brudte sli-
beskiver eller sådanne skiver, der på anden måde er
beskadiget.
- Lad maskinen køre ubelastet i 30 sekunder inden
brug. Sluk øjeblikkeligt for maskinen, når den begynder at vibrere for meget eller når der opstår en anden
defekt. Kontrollér maskinen og slibeskiven omhyggeligt, før du igen tænder for maskinen.
- Sørg for, at den eventuelle gnistregn fra slibeskiven
ikke er til fare for mennesker og at den ikke kommer i
kontakt med letantændelige stoffer.
- Sørg for, at arbejdsemnet understøttes tilstrækkeligt
eller at det klemmes ind. Hold hænderne væk fra slibeoverfladen.
- Bær altid sikkerhedsbriller og høreværn. Brug om
ønsket eller om nødvendigt andre beskyttelsesmidler
såsom et forklæde eller en hjelm.
- Kontrollér, at hjul og punkter er monteret i overensstemmelse med producentens anvisninger.
- Kontrollér, at der bruges filtre, når de leveres med den
bundne slibeskive, og når det er påkrævet.
- Hvis værktøjet leveres med afskærmning, må det ikke
benyttes uden brug af denne afskærmning.
- Ved anvendelse af værktøjer, der skal påmonteres
gevindskårne hjul, skal det kontrolleres, at gevindet i
hjulet er langt nok til spindlen.
- Kontrollér, at ventilationsåbningerne holdes fri ved
arbejde under støvede forhold. Hvis det er nødvendigt
at rengøre for støv, skal maskinen først afbrydes fra
forsyningsnettet (brug ikke metalobjekter). Undgå at
beskadige indvendige dele.
- Hvis der er fejl på ledningsnettet, kan der ske spændingsfald ved start af udstyret. Det kan påvirke andet
udstyr (f.eks. en lampe, der blinker). Hvis netimpedansen Zmaks. < 0,348 Ohm, forventes der ikke sådanne
forstyrrelser. Yderligere oplysninger fås ved henvendelse til det lokale elforsyningsselskab.
DK
Dansk
30 Ferm
4
3 2 1 6
5
Page 8

VEDLIKEHOLD
Sørg for at maskinen er spenningsløs når det
skal utføres vedlikeholdsarbeid på de meka-
niske delene.
Maskinene fra Ferm er konstruert slik at de kan fungere
uten problemer med et minimum av vedlikehold. Hvis
maskinen rengjøres regelmessig og behandles på riktig
måte, bidrar dette til å gi maskinen en lang levetid.
Rengjøring
Rengjør maskinhuset regelmessig med en myk klut, helst
etter hver bruk. Sørg for at ventilasjonsåpningene er fri for
støv og skitt.
Hardnakket skitt fjernes med en myk klut som er fuktet
med såpevann. Bruk ikke løsemidler som bensin, alkohol,
ammoniakk o.kl. Slike stoffer skader kunststoffdelene.
Smøring
Maskinen trenger ikke ekstra smøring.
Feil
Hvis det skulle opptre en feil som følge av f.eks. slitasje på
en del, må man ta kontakt med den lokale Ferm-forhandleren.
Bakerst i denne bruksanvisningen finnes det en deltegning med de deler som kan bestilles.
MILJØ
For å unngå transportskader leveres maskinen i solid
emballasje. Emballasjen er i den grad dette er mulig fremstilt av resirkulerbart materiale. Benytt derfor anledningen
til å resirkulere emballasjen.
GARANTI
Garantibetingelsene er å finne på det vedlagte garantikortet.
ClE l
■
ERKLÆRING AV ANSVARSFORHOLD
(N)
Vi erklærer at det er under várt ansvar at
dette produkt er i overenstemmelse med følgende
standarder eller standard-dokumenter
EN50144-1, prEN50144-2-3, EN55014-1, EN55014-2,
EN61000-3-2, EN61000-3-3
i samsvar med reguleringer
98/37EEC
73/23EEC
89/336EEC
frà 01-06-2000
GENEMUIDEN NL
G.M. Ensing
Quality department
Ferm 29
MONTAGE DES ZUBEHÖRS
Abb. B
Ziehen Sie immer den Netzstecker, bevor Sie
mit der Arbeit anfangen.
Arbeiten Sie mit Schleifscheiben mit den richtigen Abmessungen. Benutzen Sie nur glasfaserverstärkte Schleifscheiben. Die Schleifscheibe darf den Rand der Schutzkappe nicht berühren.
- Drücken Sie die Spindelverriegelung (6) und drehen
Sie die Spindel (9) bis diese einrastet. Halten Sie die
Verriegelung gedrückt, solange Sie hiermit tätig sind.
- Lösen Sie mit Hilfe des Spannschlüssels (11) die Flanschmutter (12) vom Spindel.
- Setzen Sie die Schleifscheibe (7) auf die Flansche (5).
- Drehen Sie die Flanschmutter zurück auf die Spindel
und ziehen Sie sie anschließend mit dem Spannschlüssel an.
- Lassen Sie die Spindelverriegelung los und überprüfen Sie, ob die Verriegelung aufgehoben wurde,
indem Sie an der Spindel drehen.
Montieren des Seitengriffs
Der Seitengriff eignet sich für links- und rechtshändige
Bedienung.
- Drehen Sie zwecks linkshändige Bedienung den Seitengriff (Abb. A-5) in die Aufnahme rechts der
Maschine.
- Drehen Sie zwecks rechtshändige Bedienung den
Seitengriff in die Aufnahme links der Maschine.
- Drehen Sie zwecks vertikaler Arbeiten den Seitengriff
in die Aufnahme oben in der Maschine.
Achten Sie auf einen festen Sitz des Seitengriffs, damit dieser sich durch Vibration nicht
unerwartet löst.
BEDIENUNG
Beachten Sie immer die Sicherheitshinweise
und halten Sie sich an die einschlägigen Vor-
schriften.
Halten Sie die Maschine beim Ein- bzw. Ausschalten vom
Werkstück fern, die Schleif-scheibe könnte das Werkstück beschädigen.
- Klemmen Sie das Werkstück ein oder versichern Sie
auf andere Weise, daß es während der Arbeit nicht
verrutscht.
- Halten Sie die Maschine gut fest und drücken Sie sie
unter einem Winkel von 15° gegen das Werkstück.
Führen Sie die Schleifscheibe gleichmäßig über das
Werkstück
- Überprüfen Sie die Scheiben regelmäßig. Abgenutzte
Schleifscheiben haben einen negativen Einfluß auf
die Wirksamkeit der Maschine. Montieren Sie rechtzeitig eine neue Schleifscheibe.
- Schalten Sie am Ende der Arbeit immer zuerst die
Maschine ab, bevor Sie den Netzstecker ziehen.
Ein- und Ausschalten
- Diese Maschine ist mit einem Sicherheitsschalter
ausgerüstet. Starten Sie die Maschine, indem Sie den
"lock-off"-Knopf betätigen (hierdurch wird der Schalter entsichert) und die Maschine einschalten.
- Sorgen Sie dafür das dem Winkelschleifer immer in
Leerlauf (ohne Belastung) dreht beim ein und aus
schalten.
Warten Sie mit dem Schleifen bis die Maschine
das normale Tempo erreicht hat.
- Entfernen Sie das Netzkabel aus der Nähe der bewegende Teilen.
- Um beim Schleifen so wenig möglich mit der absprühende Funke in Kontakt zu kommen, sollte man beim
schleifen mit einem Winkel zwischen 10˚ und 15˚
arbeiten. Beim Trennen zwischen 30˚ und 45˚.
Stellen Sie die Maschine erst hin, wenn der Motor völlig
zum Stillstand gekommen ist. Stellen Sie die Maschine
nicht auf einem staubigen Untergrund. Staubpartikeln
können in die Maschine hineindrängen.
Benutzen Sie zum stoppen des Motors niemals
die Spindelverriegelung.
Benutzen Sie die Maschine nicht zum Bearbeiten von Magnesium.
8 Ferm
11
12
+
7
9
5
6
Page 9

WARTUNG
Trennen Sie die Maschine vom Netz, wenn Sie
am Mechanismus Wartungsarbeiten ausführen
müssen.
Die Maschinen von Ferm sind entworfen, um während
einer langen Zeit problemlos und mit minimaler Wartung
zu funktionieren. Sie Verlängern die Lebensdauer, indem
Sie die Maschine regelmäßig reinigen und fachgerecht
behandeln.
Reinigen
Reinigen Sie das Maschinengehäuse regelmäßig mit
einem weichen Tuch, vorzugsweise nach jedem Einsatz.
Halten Sie die Lüfterschlitze frei von Staub und Schmutz
Entfernen Sie hartnäckigen Schmutz mit einem weichen
Tuch, angefeuchtet mit Seifenwasser. Verwenden Sie
keine Lösungsmittel wie Benzin, Alkohol, Ammonia, usw.
Derartige Stoffe beschädigen die Kunststoffteile.
Schmieren
Die Maschine braucht keine zusätzliche Schmierung.
Störungen
Wenden Sie sich in Störungsfällen, z.B. durch Verschleiß
eines Teils, an Ihren örtlichen Ferm-Vertragshändler.
Am Ende dieser Betriebsanleitung finden Sie eine Zeichnung der erhältlichen Ersatzteile.
UMWELT
Um Transportschäden zu verhinderen, wird die Maschine
in einer soliden Verpackung geliefert. Die Verpackung
besteht weitgehend aus verwertbarem Material. Benutzen Sie also die Möglichkeit zum Recyclen der Verpackung.
Bringen Sie bei Ersatz die alten Maschinen zu Ihren örtlichen Ferm-Vertagshändler. Er wird sich um eine umweltfreundliche Verarbeitung ïhrer alten Maschine bemühen.
GARANTIE
Lesen Sie die Garantiebedingungen auf der separat beigefügten Garantiekarte.
ClEl
■
KONFORMITÄTSERKLÄRUNG
(D)
Wir erklären in alleiniger Verantwortung, daß
dieses Produkt mit den folgenden Normen oder
normativen Dokumenten übereinstimmt:
EN50144-1, prEN50144-2-3, EN55014-1, EN55014-2,
EN61000-3-2, EN61000-3-3
gemäß den Bestimmungen der Richtlinien:
98/37EWG
73/23EWG
89/336EWG
ab 01-06-2000
GENEMUIDEN NL
G.M. Ensing
Quality department
Ferm 9
MONTERING AV TILBEHØR
Fig. B
Ta alltid støpselet ut av stikkontakten før montering.
Bruk slipeskiver med riktig størrelse. Bruk kun fiberforsterkede slipeskiver. Slipeskiven må ikke komme i kontakt
med kanten av vernehetten.
- Trykk inn spindellåsen (6) og vri spindelen (9) til denne
faller i låsen. Hold spindellåsen inntrykket så lenge
denne prosedyren følges.
- Fjern flensmutteren (12) fra spindelen ved hjelp av
spennøkkelen (11).
- Plasser slipeskiven (7) på flensen (5).
- Skru flensmutteren på spindelen igjen og stram den
med spennøkkelen.
- Løsne spindellåsen og kontroller om sperringen er
opphevet ved dreie på spindelen.
Montering av sidehåndtaket
Sidehåndtaket er egnet til både venstre- og høyrehåndsbruk.
- Ved venstrehåndsbruk skrus sidehåndtaket (Fig. A-5)
i åpningen på høyre side av maskinen.
- Ved høyrehåndsbruk skrus sidehåndtaket i åpningen
på venstre side av maskinen.
- For vertikal arbeide skrus sidehåndtaket i åpningen på
oversiden av maskinen.
Sørg for at sidehåndtaket sitter godt fast slik at
det ikke uventet kan ristes løs.
BETJENING
Overhold alltid sikkerhetsinstruksene og
respekter de gjeldende forskriftene.
Hold maskinen borte fra arbeidsemnet når maskinen
skrus av eller på. Slipeskiven kan skade arbeidsemnet.
- Klem fast arbeidsemnet eller sørg på annen måte for
at det ikke kan gli bort under maskinen under arbeidet.
- Hold maskinen godt fast og press den mot arbeidsemnet i en vinkel på ca. 15˚. Før slipeskiven jevnt over
arbeidsemnet.
- Inspiser slipeskiven regelmessig. Slitte slipeskiver
gjør maskinen mindre effektiv. Skift ut slipeskiven i
tide.
- Etter at arbeidet er avsluttet, må maskinen alltid først
skrus av før støpselet tas ut av stikkontakten.
Inn-/utkopling
- Denne maskinen har en sikkerhetsbryter.
Start maskinen ved å trykke på knappen "slå av lås"
(for å frigjøre bryteren) og slå maskinen på.
- Se til at vinkelsliperen alltid går helt uten belastning når
den slås på og av.
Når apparatet har nådd det høyeste turtallet,
kan du skyve det over arbeidsstykket.
- Hold alltid nettkabelen borte fra vinkelsliperens bevegelige deler.
- For å komme så lite som mulig i kontakt med gnistregnet og små metalldeler som løsner under sliping, bør
du arbeide i en vinkel mellom 10 og 15 grader. Under
kappearbeider mellom 30 og 45 grader.
Vent med å sette bort maskinen til motoren har stanset
helt. Plasser ikke maskinen på et støvet underlag. Støvdeler kan trenge inn i mekanikken.
Bruk aldri spindellåsen til å stanse maskinen.
Bruk ikke maskinen til sliping av magnesiumarbeidsemner.
28 Ferm
11
12
+
7
9
5
6
Page 10

TEKNISKE SPESIFIKASJONER
Spenning 230 V~
Frekvens 50 Hz
Opptatt effekt 1650 W
Turtall, ubelastet 6000/min
Skivediameter 230 mm
Spindelstørrelse M14
Vekt 3.75 kg
Lpa(lydtrykk) 94.6 dB(A)
Lwa(lydeffekt) 107.6 dB(A)
Vibrasjonsverdi 0.8 m/s
2
Elektrisk sikkerhet
Kontroller alltid om nettspenningen er i overensstemmelse med verdien på typeskiltet.
Maskinen er dobbelt isolert i henhold til
EN50144; det er derfor ikke nødvendig med
jordledning.
Utskifting av ledninger og støpsler
Kast gamle ledninger og støpsler så snart de har blitt
erstattet av nye. Det er farlig å stikke støpselet på en løs
ledning i stikkontakter.
Bruk av skjøteledninger
Bruk utelukkende en godkjent skjøteledning som er egnet
til maskinens effekt. Ledningene må ha et tverrsnitt på
minst 1,5 mm
2
. Hvis skjøteledningen sitter på en rull, må
den rulles helt ut.
PAKKENS INNHOLD
1 vinkelsliper
1 sidehåndtak
1 spennøkkel
1 kolbørster
bruksanvisning
sikkerhetshefte
garantikort
Kontroller at maskinen, løse deler og tilbehør ikke har fått
transportskader.
PRODUKTINFORMASJON
Fig. A.
Vinkelsliper er egnet til profesjonelt slipearbeid.
1. på-/av-bryter
2. skrudeksel for kullbørster (på begge sider)
3. spindellås
4 slipeskive
5. sidehåndtak
6. “slå av lås” bryter
Ferm 27
Haakse slijper
In deze handleiding worden de volgende pictogrammen
gebruikt:
Duidt op mogelijk lichamelijk letsel, levensge-
vaar of kans op beschadiging van de machine
indien de instructies in deze handleiding worden genegeerd.
Geeft elektrische spanning aan.
Brandgevaar.
Lees deze handleiding aandachtig door voor u de
machine in gebruik neemt. Zorg dat u kennis heeft van de
werking van de machine en op de hoogte bent van de
bediening. Onderhoud de machine volgens de instructies
opdat deze altijd goed functioneert. Bewaar deze handleiding en de bijgevoegde documentatie bij de machine.
VEILIGHEIDSVOORSCHRIFTEN
Neem bij het gebruik van elektrische machines altijd
de plaatselijk geldende veiligheidsvoorschriften in
acht in verband met brandgevaar, gevaar voor elektrische schokken en lichamelijk letsel. Lees behalve
onderstaande instructies ook de veiligheidsvoorschriften in het apart bijgevoegde veiligheidskatern
door.
Bewaar de instructies zorgvuldig!
- Controleer of het maximum toerental dat op de slijp-
schijf staat aangegeven, overeenkomt met het maximum toerental van de machine. Het toerental van de
machine mag niet hoger zijn dan de waarde op de slijpschijf.
- Let op dat de afmetingen van de slijpschijf overeenko-
men met de specificaties van de machine.
- Let op dat de slijpschijf juist is gemonteerd en naar
behoren is vastgezet. Gebruik geen ver-loopringen of
adapters om een slijpschijf passend te maken.
- Behandel en bewaar slijpschijven volgens de voor-
schriften van de leverancier.
- Gebruik de machine niet voor het doorslijpen van
werkstukken met een dikte die groter is dan de maximale slijpdiepte van de doorslijpschijf.
- Gebruik geen doorslijpschijven voor afbraamwerk-
zaamheden.
- Zorg bij gebruik van slijpschijven die op het schroef-
draad van de spindel worden bevestigd dat de spindel
voldoende schroefdraad heeft. Zorg dat de spindel
voldoende beschermd is en niet in contact komt met
het slijpoppervlak.
- Inspecteer de slijpschijf voor gebruik op eventuele
beschadigingen. Gebruik geen slijpschijven die
gebarsten, gescheurd of anderszins beschadigd zijn.
- Laat voor gebruik de machine 30 seconden onbelast
draaien. Schakel de machine onmiddellijk uit als deze
aanzienlijk begint te trillen of als een ander defect
optreedt. Controleer de machine en slijpschijf grondig
voordat u de machine weer inschakelt.
- Zorg dat een eventuele vonkenregen geen gevaar
voor mensen oplevert of wegspat in de richting van
licht ontvlambare substanties.
- Zorg dat het werkstuk voldoende wordt ondersteund
of ingeklemd. Houd uw handen weg van het te slijpen
oppervlak.
- Draag altijd een veiligheidsbril en gehoorbescherming. Gebruik desgewenst of indien nodig andere
bescherming, zoals bijvoorbeeld een schort of een
helm.
- Zie erop toe dat schijven en punten overeenkomstig
de instructies van de fabrikant worden gemonteerd.
- Zorg ervoor dat het vloeipapier wordt gebruikt als dit bij
het gelaagde schuurproduct wordt geleverd, of als dit
nodig is.
- Werk nooit zonder afschermkap, als deze bij een
apparaat meegeleverd wordt.
- Bij gereedschap voor schijven met schroefboringen,
dient de schroefdraad in de schijf voldoende lengte te
hebben om de as onder te kunnen brengen.
- Zorg ervoor dat bij het werken in een stoffige omgeving
de ventilatieopeningen vrij gehouden worden. Trek
eerst de stekker uit het stopcontact als de stof verwijderd moet worden (gebruik geen metalen voorwerpen). Voorkom hierbij beschadiging van inwendige
delen.
- Bij een slecht spanningsnet kunnen bij het starten van
de apparatuur korte spanningsvallen optreden. Dit
kan andere apparatuur beïnvloeden (bijv. een lamp
die gaat knipperen). Bij een impedantie van het net
Zmax < 0,348 Ohm kan men ervan uitgaan, dat dergelijke verschijnselen zich niet voor zullen doen. (Indien
nodig kunt u voor nadere informatie contact opnemen
met uw plaatselijke energieleverancier).
Nederlands
NL
10 Ferm
4
3 2 1 6
5
Page 11

TECHNISCHE SPECIFICATIES
Spanning 230 V~
Frequentie 50 Hz
Opgenomen vermogen 1650 W
Toerental onbelast 6000/min
Schijfdiameter 230 mm
Spindelmaat M14
Gewicht 3.75 kg
Lpa (geluidsdruk) 94.6 dB(A)
Lwa (geluidsvermogen) 107.6 dB(A)
Vibratiewaarde 0.8 m/s
2
Elektrische veiligheid
Controleer altijd of uw netspanning overeenkomt met de waarde op het typeplaatje.
De machine is dubbel geïsoleerd overeenkomstig EN 50144; een aarddraad is daarom niet
nodig.
Bij vervanging van snoeren of stekkers
Gooi oude snoeren of stekkers direct weg zodra ze door
nieuwe exemplaren zijn vervangen. Het is gevaarlijk om
de stekker van een los snoer in het stopcontact te steken.
Bij gebruik van verlengsnoeren
Gebruik uitsluitend een goedgekeurd verlengsnoer, dat
geschikt is voor het vermogen van de machine. De aders
moeten een doorsnede hebben van minimaal 1,5 mm
2
.
Wanneer het verlengsnoer op een haspel zit, rol het snoer
dan helemaal af.
INHOUD VAN DE VERPAKKING
1 haakse slijper
1 zijhandgreep
1 spansleutel
set koolborstels
gebruiksaanwijzing
veiligheidskatern
garantiekaart
Controleer de machine, losse onderdelen en accessoires
op transportschade.
PRODUCTINFORMATIE
Fig. A:
De haakse slijper is geschikt voor professionele slijpwerkzaamheden.
1. aan/uit-schakelaar
2. schroefdeksel koolborstel (aan weerskanten)
3. spindelblokkeerknop
4. slijpschijf
5. zijhandgreep
6. “lock-off” knop
Ferm 11
Vinkelsliper
I denne bruksanvisningen benyttes følgende symboler:
Henviser til mulig personskade, livsfare eller
fare for skader på maskinen hvis instruksene i
denne bruksanvisningen ikke overholdes.
Viser til elektrisk spenning.
Brannfare.
Les denne bruksanvisningen nøye før maskinen tas i
bruk. Sørg for å vite hvordan maskinen virker og hvordan
den skal betjenes. Vedlikehold maskinen i henhold til instruksene, slik at den alltid virker som den skal. Oppbevar
denne bruksanvisningen og den vedlagte dokumentasjonen ved maskinen.
SIKKERHETSFORSKRIFTER
Overhold ved bruk av elektriske maskiner alltid de
lokale sikkerhetsforskriftene. Dette for å unngå brannfare, fare for elektrisk støt og personskade. Les i tillegg til nedenstående instrukser også sikkerhetsforskriftene i det vedlagte separate sikkerhetsheftet.
Ta godt vare på instruksene!
- Kontroller om det maksimale turtallet, som er angitt på
slipeskiva, stemmer overens med maskinens maksimale turtall. Maskinens turtall må ikke overstige slipeskivas maksimale turtall.
- Pass på at slipeskivas dimensjoner stemmer overens
med maskinens spesifikasjoner.
- Pass på at slipeskiva er montert korrekt og at den er
festet skikkelig. Bruk aldri noen form for foringer eller
adaptere for å få ei slipeskive til å passe.
- Slipeskivene må behandles og oppbevares ifølge
leverandørens egne forskrifter.
- Ikke bruk maskinen til å kappe arbeidsstykker som er
tykkere enn kappeskivas maksimale slipedybde.
- Ikke bruk kappeskiver til vanlige slipeoppgaver.
- Se til at det er tilstrekkelig med gjenger på spindelen
når du bruker slipeskiver som festes ved å skrus inn på
spindelgjengene. Pass på at spindelen er tilstrekkelig
beskyttet og ikke kan komme i kontakt med slipeflaten.
- Kontroller slipeskivene for eventuelle skader før bruk.
Ikke bruk slipeskiver som er sprukket, opprevet eller
skadet på annen måte.
- La maskinen gå i 30 sekunder uten belastning før den
tas i bruk. Slå av maskinen øyeblikkelig hvis den
begynner å vibrere unaturlig mye eller hvis det viser
seg at den er defekt på en annen måte. Kontroller maskinen og slipeskiva grundig før du starter maskinen på
nytt.
- Pass på at det eventuelle gnistregnet ikke kan være til
fare for mennesker i nærheten og at gnistregnet ikke
spruter i retning av lett antennelige stoffer.
- Pass på at arbeidsstykket er tilstrekkelig godt støttet
opp eller klemt fast. Hold hendene borte fra den flaten
som skal slipes.
- Bruk alltid vernebriller og hørselsvern. Bruk gjerne
annet verneutstyr også, som for eksempel verneforkle
eller hjelm, og alltid når det er påkrevet.
- Pass på at monterte slipeskiver og -hoder er festet i
samsvar med produsentens instruksjoner.
- Pass på at festeskiver brukes når slike festeskiver følger med slipeproduktene og når det ellers kreves.
- Hvis verktøyet leveres med vernehette, må verktøyet
aldri brukes uten denne vernehetten.
- For verktøy som bruker slipeskiver som festes med
gjenger, må du passe på at gjengene i skiven er så
lange at hele spindelen skrus inn.
- Pass på at ventilasjonsåpningene ikke blokkeres når
verktøyet brukes på steder med mye støv. Hvis verktøyet må rengjøres for støv, må verktøyet først
kobles fra strømnettet. Ikke bruk metalliske objekter til
å rengjøre verktøyet, og unngå å skade interne deler.
- Hvis strømnettet er i dårlig forfatning, kan det oppstå
kortvarige spenningsfall når vinkelsliperen startes.
Dette kan virke inn på annet utstyr (for eksempel kan
lamper blinke). Hvis nettimpedansen er mindre enn
0,348 ohm, skal det vanligvis ikke oppstå slike forstyrrelser. (Hør med din lokale forhandler hvis du har
behov for mer informasjon).
Norsk
N
26 Ferm
4
3 2 1 6
5
Page 12

HUOLTO
Irrota aina kone virtalähteestä ennen huollon
aloittamista.
Ferm-koneet on suunniteltu toimimaan pitkään ja mahdollisimman pienellä huoltotarpeella. Puhdistamalla ja käyttämällä sitä oikealla tavalla voit itsekin vaikuttaa koneen
käyttöikään.
Puhdistaminen
Puhdista koneen ulkopinta säännöllisesti pehmeällä kankaalla. Parasta olisi puhdistaa se jokaisen käyttökerran
jälkeen. Pidä koneen jäähdytysaukot puhtaina.
Jos lika on pinttynyt, voit käyttää saippuavedellä kostutettua kangaspalaa. Älä kuitenkaan käytä liuottimia kuten
bensiiniä, alkoholia, ammoniakkia jne, koska ne vahingoittavat koneen muoviosia.
Voitelu
Konetta ei tarvitse voidella.
Häiriöt
Jos koneen toiminnassa ilmenee häiriö esim. jonkin osan
kulumisen johdosta, ota yhteyttä lähimpään Ferm-jälleenmyyjään.
Näiden käyttöohjeiden lopusta löydät kokoonpanopiirustuksen ja varaosalistan..
YMPÄRISTÖ
Kuljetusvaurioiden välttämiseksi kone on pakattu tukevaan laatikkoon. Tämä pakkaus on mahdollisimman
ympäristöystävällinen. Kierrätä se.
Jos vaihdat koneen uuteen, voit viedä vanhan koneen
Ferm-jälleenmyyjällesi, joka huolehtii ympäristöystävällisestä jätehuollosta.
TAKUU
Lue takuuehdot koneen mukaan liitetystä takuukortista.
ClEl
■
TODISTUS STANDARDINMUKAISUUDESTA
(SF)
Todistamme täten ja vastaamme yksin siitä,
että tämä tuote on allalueteitujen standardien ja
standardoimisasiakirjojen vaatimusten mukainen:
EN50144-1, prEN50144-2-3, EN55014-1, EN55014-2,
EN61000-3-2, EN61000-3-3
seruaavien sääntöjen mukaisesti:
98/37/EEC
73/23/EEC
89/336/EEC
01-06-2000
GENEMUIDEN NL
G.M. Ensing
Quality department
Ferm 25
MONTAGE VAN ACCESSOIRES
Fig. B
Haal vóór het monteren altijd de stekker uit het
stopcontact.
Gebruik slijpschijven van de juiste maat. Gebruik uitsluitend vezelversterkte slijpschijven. De slijpschijf mag niet
met de rand van de beschermkap in contact komen.
- Druk het spindelslot (6) in en draai aan de spindel (9)
tot deze in het slot valt. Houd het spindelslot ingedrukt
zolang u deze procedure volgt.
- Verwijder de flensmoer (12) van de spindel met behulp
van de spansleutel (11).
- Plaats de slijpschijf (7) op de flens (5).
- Schroef de flensmoer weer op de spindel en draai hem
vast met behulp van de spansleutel.
- Laat het spindelslot los en controleer of de vergrendeling is opgeheven door aan de spindel te draaien.
Monteren van de zijhandgreep
De zijhandgreep is geschikt voor zowel links- als rechtshandige bediening.
- Draai voor linkshandige bediening de zijhandgreep in
de opname aan de rechterkant van de machine.
- Draai voor rechtshandige bediening de zijhandgreep
in de opname aan de linkerkant van de machine.
- Draai voor verticale werkzaamheden de zijhandgreep
in de opname aan de bovenkant van de machine.
Zorg dat de zijhandgreep goed vast zit en niet
onverwachts kan lostrillen.
BEDIENING
Neem altijd de veiligheidsinstructies in acht en
houd u aan de geldende voorschriften.
Houd de machine los van het werkstuk wanneer u de
machine in- of uitschakelt. De slijpschijf kan het werkstuk
beschadigen.
- Klem het werkstuk vast of zorg anderszins dat het tijdens de werkzaamheden niet onder de machine kan
wegglijden.
- Houd de machine stevig vast en druk deze onder een
hoek van ongeveer 15° tegen het werkstuk aan.
Beweeg de slijpschijf gelijkmatig over het werkstuk.
- Inspecteer regelmatig de slijpschijf. Versleten slijpschijven hebben een negatief effect op de efficiency
van de machine. Vervang de slijpschijf op tijd.
- Schakel na beëindiging van de werkzaamheden altijd
eerst de machine uit voordat u de stekker uit het stopcontact trekt.
In- en uitschakelen
- De machine is uitgerust met een veiligheidsschakelaar. De schakelaar van de machine moet eerst worden ontgrendeld door de “lock-off” knop in te drukken.
- Zorg ervoor dat de haakse slijper altijd in nullast (dit is
zonder belasting) draait bij in- en uitschakelen.
Laat de machine volledig op toeren komen voordat u de machine gebruikt.
- Houd het netsnoer altijd uit de buurt van bewegende
delen.
- Om tijdens het slijpen zo min mogelijk met afspattende
vonken en metaaldelen in aanraking te komen, dient u
tijdens het slijpen onder een hoek tussen de 10° en 15°
te werken. Tijdens het doorslijpen tussen de 30° en
45°.
Leg de machine pas neer wanneer de motor volledig is uitgedraaid. Leg de machine niet weg op een stoffige ondergrond. Stofdeeltjes kunnen het mechaniek binnendringen.
Gebruik nooit het spindelslot om de motor tot
stilstand te brengen.
Gebruik de machine niet voor het slijpen van
magnesium werkstukken.
12 Ferm
11
12
+
7
9
5
6
Page 13

ONDERHOUD
Zorg dat de machine niet onder spanning staat
wanneer onderhoudswerk-zaamheden aan het
mechaniek worden uitgevoerd.
De machines van Ferm zijn ontworpen om gedurende
lange tijd probleemloos te functioneren met een minimum
aan onderhoud. Door de machine regelmatig te reinigen
en op de juiste wijze te behandelen, draagt u bij aan een
hoge levensduur van uw machine.
Reinigen
Reinig de machine-behuizing regelmatig met een zachte
doek, bij voorkeur iedere keer na gebruik. Zorg dat de ventilatiesleuven vrij van stof en vuil zijn.
Gebruik bij hardnekkig vuil een zachte doek bevochtigd
met zeepwater. Gebruik geen oplosmiddelen als benzine,
alcohol, ammonia, etc. Dergelijke stoffen beschadigen de
kunststof onderdelen.
Smeren
De machine heeft geen extra smering nodig.
Storingen
Indien zich een storing voordoet als gevolg van bijvoorbeeld slijtage van een onderdeel, neem dan contact op
met uw plaatselijke Ferm-dealer.
Achterin deze gebruiksaanwijzing vindt u een onderdelentekening met de na te bestellen onderdelen.
MILIEU
Om transportbeschadiging te voorkomen, wordt de
machine in een stevige verpakking geleverd. De verpakking is zo veel mogelijk gemaakt van recyclebaar materiaal. Maak daarom gebruik van de mogelijkheid om de verpakking te recyclen.
Breng oude machines wanneer u ze vervangt naar uw
plaatselijke Ferm-dealer. Daar zal de machine op milieuvriendelijke wijze worden verwerkt.
GARANTIE
Lees voor de garantievoorwaarden de garantiekaart achter in deze gebruiksaanwijzing.
ClE l
■
CONFORMITEITSVERKLARING
(
NL
)
Wij verklaren dat dit product
voldoet aan de volgende
normen of normatieve documenten
EN50144-1, prEN50144-2-3, EN55014-1, EN55014-2,
EN61000-3-2, EN61000-3-3
overeenkomstig de bepalingen in de richtlijnen
98/37/EEG
73/23/EEG
89/336/EEG
vanaf 01-06-2000
GENEMUIDEN NL
G.M. Ensing
Quality department
Ferm 13
OSIEN ASENNUS
Kuva B
Irrota aina pistoke pistorasiasta ennen asennusta.
Käytä oikeankokoisia hiomalaikkoja. Käytä ainoastaan
kuituvahvisteisia hiomalaikkoja. Hiomalaik-ka ei saa koskettaa teräsuojuksen reunaa.
- Paina karalukko (6) sisään ja kierrä karaa (9), kunnes
se putoaa lukkoon. Pidä karalukkoa koko ajan painettuna.
- Irrota karan laippamutteri (12) kiristysavaimen (11)
avulla.
- Aseta hiomalaikka (7) laipan (5) päälle.
- Kierrä laippamutteri takaisin karaan ja kiristä se kiristysavaimen avulla.
- Päästä karalukko auki ja tarkista, että lukitus on auki
kääntämällä karaa.
Sivukahvan asentaminen
Sivukahva on tarkoitettu sekä oikea- että vasenkätiseen
käyttöön.
- Vasenkätistä käyttöä varten kierrä sivukahva (Kuva
A-5) koneen oikeassa reunassa olevaan aukkoon.
- Oikeakätistä käyttöä varten kierrä sivukahva koneen
vasemmassa reunassa olevaan aukkoon.
- Pystysuorissa töissä kierrä sivukahva koneen yläpuolella olevaan tilaan.
Varmista että sivukahva on kunnolla kiinni ja
ettei se voi irrota vahingossa.
KÄYTTÖ
Noudata aina turvallisuusohjeita ja voimassaolevia määräyksiä.
Pidä kone irti työstettävästä pinnasta, kun kytket koneen
päälle tai pois päältä. Hiomalaikka voi muuten vahingoittaa työstettävää kappaletta.
- Purista työstettävä kappale kiinni tai varmista muuten,
ettei kappale pääse liukumaan koneen alle työstämisen aikana.
- Pidä koneesta tukevasti kiinni ja paina sitä noin 15º:n
kulmassa työstettävää kappaletta vasten. Liikuta hiomalaikkaa tasaisesti työstettävän kappaleen pinnalla.
- Tarkista säännöllisesti hiomalaikan kunto. Kuluneet
hiomalaikat heikentävät koneen hiontatehoa. Vaihda
hiomalaikka ajoissa.
- Kun lopetat työskentelyn, kytke kone aina ensin pois
päältä virtakytkimestä ennen kuin irrotat koneen pistotulpan pistorasiasta.
Käynnistys ja sammuttaminen
- Tämä kone on varustettu turvakytkimellä.
Käynnistä kone painamalla "lock off"-painiketta (kytkimen vapauttamiseksi) ja kytkemällä koneeseen virta.
- Huolehdi, että käynnistymisen ja pysähtymisen
aikana kone pyörii ilman kuormitusta.
Odota, kunnes laite saavuttaa täyden pyörimisnopeutensa ja työnnä johto eteenpäin.
- Pidä sähköjohto aina poissa koneen liikkuvista osista.
- Varo kipinöitä ja lentäviä metallin kappaleita. Hiominen tapahtuu yleensä turvallisesti 10º ja 15º välisellä
kulmalla. Katkaisemiseen sopiva kulma on 30º - 45º.
Laske kulmahiomakone käsistäsi vasta, kun moottori on
pysähtynyt kokonaan. Älä laske konetta pölyiselle alustalle. Pölyhiukkaset voivat päästä koneen mekaanisiin
osiin.
Älä koskaan pysäytä moottoria karalukkon
avulla.
Älä käytä hiomakonetta magnesiumia sisältävien kappaleiden hiomiseen.
24 Ferm
11
12
+
7
9
5
6
Page 14

TEKNISET TIEDOT
Jännite 230 V~
Taajuus 50 Hz
Kulutettu teho 1650 W
Kierrosnopeus, kuormittamaton 6000/min
Laikan halkaisija 230 mm
Karan koko M14
Paino 3.75 kg
Lpa(äänenpaine) 94.6 dB(A)
Lwa(äänen tehotaso) 107.6 dB(A)
Värähtelyarvo 0.8 m/s
2
Sähköturvallisuus
Tarkista aina, ovatko verkkojännite ja koneen
tyyppikilvessä ilmoitettu jännite yhteen sopivia.
Koneessa on kaksinkertainen eristys
EN50144:n mukaan; maadoitusjohto ei ole tarpeellinen.
Johdon tai pistokkeen vaihtaminen
Heitä käytöstä poistetut johdot ja pistokkeet heti pois. On
vaarallista työntää irrotetun johdon pistoke pistorasiaan.
Jatkojohtojen käyttö
Käytä vain virallisesti hyväksyttyjä jatkojohtoja koneen
teho huomioon ottaen. Johdon ytimien on oltava
vähintään 1,5 mm
2
. Käytettäessä johtokelaa koko jatko-
johto on vedettävä kelalta.
PAKKAUKSEN SISÄLTÖ
1 kulmahiomakone
1 sivukahva
1 kiristysavain
Hiiliharjojen
käyttöohje
turvatiedote
takuukortti
Tarkista, että kone, irto-osat ja varusteet eivät ole vaurioituneet kuljetuksen aikana.
TIETOJA TUOTTEESTA
Kuva A:
Kulmahiomakone on tarkoitettu ammattimaisiin hiontatöihin.
1. virtakytkin
2. hiiliharjan kierrekansi (molemmilla puolilla)
3. karalukko
4. hiomalaikka
5. sivukahva
6. “lock off"-painiketta
Ferm 23
Meuleuse d’angle
Dans ce mode d’emploi, il est fait usage des pictogrammes suivants:
Indique un éventuel risque de lésion corporelle,
un danger de mort ou un risque d’endommagement de la machine si les instructions de ce mode d’emploi
ne sont pas respectées.
Indique la présence de tension électrique.
Risque d’incendie.
Lisez attentivement ce mode d’emploi avant d’utiliser la
machine. Assurez-vous d’avoir bien pris connaissance du
fonctionnement de la machine et de son utilisation. Entretenez la machine conformément aux instructions afin
qu’elle fonctionne toujours correctement. Conservez ce
mode d’emploi et la documentation jointe à proximité de la
machine.
CONSIGNES DE SÉCURITÉ
Lors d’utilisation de machines électriques, observez
les consignes de sécurité locales en vigueur en
matière de risque d’incendie, de chocs électriques et
de lésion corporelle. En plus des instructions ci-dessous, lisez entièrement les consignes de sécurité
contenues dans le cahier de sécurité fourni à part.
Conservez soigneusement ces instructions!
- Vérifiez si la vitesse maximale mentionnée sur la
meule correspond à la vitesse maximale de la
machine. La vitesse de la machine ne doit pas dépasser la valeur indiquée sur la meule.
- Veillez à ce que les dimensions de la meule corre-
spondent aux spécifications de la machine.
- Assurez-vous que la meule est correctement montée
et convenablement fixée. N’utilisez jamais des
bagues de réduction ou des adaptateurs pour ajuster
la meule.
- Manipulez et conservez les meules conformément
aux instructions du fournisseur.
- N’utilisez pas la machine pour tronçonner des pièces
dont l’épaisseur est supérieure à la profondeur de
meulage maximale du disque de tronçonnage.
- N’utilisez pas de disques de tronçonnage pour des tra-
vaux d’ébarbage.
- En cas d’usage de meules fixées sur le filetage de l’ar-
bre, veillez à ce que cet arbre ait d’un filet suffisant.
Assurez-vous que l’arbre est suffisamment protégé et
ne vient pas au contact de la surface à meuler.
- Avant de l’utiliser, examiner la meule quant à la présence d’éventuels endommagements. N’utilisez pas
de meules fendues, fissurées ou autrement endommagées.
- Avant d’utiliser la machine, faites la tourner à vide pendant 30 secondes. Éteignez immédiatement la
machine si elle se met à vibrer beaucoup ou si un autre
défaut apparaît. Vérifiez soigneusement l’état de la
machine et de la meule avant de rallumer la machine.
- Assurez-vous qu’une éventuelle gerbe d’étincelles ne
présente aucun danger pour les personnes ni qu’elle
saute en direction de matières hautement inflammables.
- Veillez à ce que la pièce à ouvrer est suffisamment
soutenue ou bloquée. Tenez vos mains éloignées de
la surface à meuler.
- Portez toujours des lunettes de sécurité et un système
de protection auditive. Utilisez si vous le désirez, ou si
c’est nécessaire, un autre moyen de protection
comme un tablier ou un casque par exemple.
- Assurez-vous que les disques et les parties actives
sont montés conformément aux instructions du fabricant.
- Veillez à utiliser les buvards livrés avec les parties
abrasives, le cas échéant.
- Si une garde de protection est livrée avec l’appareil,
utilisez-la systématiquement.
- Pour les outils à visser sur le disque, assurez-vous que
la profondeur du pas de vis du disque et la longueur de
la broche sont identiques.
- Lorsque l’appareil dégage de la poussière au cours de
son utilisation, assurez-vous que les trous d’aération
ne sont pas obturés. Pour les dépoussiérer, débranchez d’abord l’appareil du secteur, nettoyez-le à l’aide
d’un objet non métallique en prenant garde de ne pas
endommager les pièces situées à l’intérieur.
- Selon l’état de votre installation électrique, de brèves
baisses de tension électrique peuvent se produire lors
de la mise en marche de l’appareil. Elles peuvent se
manifester sur d’autres appareils électriques (ex. :
clignotement d’une ampoule). Ces baisses de tension
seront évitées, si le Zmax du rapport installation électrique/impédance est inférieur à 0,348 ohm. (pour de
plus amples informations, veuillez vous adresser à
votre agence EDF locale).
F
Français
14 Ferm
4
3 2 1 6
5
Page 15

SPÉCIFICATIONS TECHNIQUES
Tension 230 V~
Fréquence 50 Hz
Puissance consommée 1650 W
Vitesse, à vide 6000/min
Diamètre du disque 230 mm
Dimension de l’arbre M14
Poids 3.75 kg
Lpa(pression sonore) 94.6 dB(A)
Lwa(puissance sonore) 107.6 dB(A)
Valeur vibratoire 0.8 m/s
2
Sécurité électrique
Vérifiez toujours si la tension de votre réseau
correspond à la valeur mentionnée sur la plaque
signalétique.
La machine est doublement isolée conformément à la norme EN50144 ; un fil de mise à la
terre n’est pas donc pas nécessaire.
En cas de changement de câbles ou de fiches
Jetez immédiatement les câbles ou fiches usagés dès
qu’ils sont remplacés par de nouveaux exemplaires. Il est
dangereux de brancher la fiche d’un câble défait dans une
prise de courant.
En cas d’emploi de câbles prolongateurs
Employez exclusivement un câble prolongateur homologué, dont l’usage est approprié pour la puissance de la
machine. Les fils conducteurs doivent avoir une section
minimale de 1,5 mm
2
. Si le câble prolongateur se trouve
dans un dévidoir, déroulez entièrement le câble.
CONTENU DE L’EMBALLAGE
1 meuleuse d’angle
1 poignée latérale
1 clé de serrage
balais de charbon
mode d’emploi
cahier de sécurité
certificat de garantie
Vérifiez si la machine, les pièces détachées et les accessoires n’ont pas été endommagés au transport.
INFORMATION SUR LE PRODUIT
Fig. A:
La meuleuse d’angle est appropriée pour les travaux de
meulage et de tronçonnage professionnels.
1. bouton marche/arrêt
2. couvercle à vis des charbons (des deux côtés)
3. dispositif de blocage de l’arbre
4. meule
5. poignée latérale
6. bouton “lock-off”
Ferm 15
Kulmahiomakone
Näissä ohjeissa käytetään seuraavia symboleja:
Käytetään, kun on olemassa loukkaantumisvaara, hengenvaara tai koneen rikkoutumis-
vaara, mikäli annettuja ohjeita ei noudateta.
Sähköjännite.
Palovaara.
Lue nämä ohjeet huolellisesti ennen laitteen käyttöönottoa. Tutustu laitteen toimintaan ja käyttöön liittyviin tietoihin. Laitteen moitteettoman toiminnan varmistamiseksi
laite on huollettava näiden ohjeiden mukaisesti. Säilytä
nämä ohjeet ja muut tiedot myöhempää käyttöä varten.
TURVAOHJEET
Sähkölaitteita käytettäessä on aina noudatettava paikallisia turvamääräyksiä tulipalon, sähköiskujen ja
loukkaantumisten välttämiseksi. Lue alla olevat
ohjeet ja erilliset turvaohjeet huolellisesti.
Säilytä nämä ohjeet!
- Tarkista, vastaako hiomalaikkaan merkitty suurin
kierrosnopeus koneen suurinta sallittua kierrosnopeutta. Koneen kierrosnopeus ei saa olla hiomalaikkaan merkittyä arvoa suurempi.
- Tarkista, että hiomalaikan mitat vastaavat koneen teknisiä tietoja.
- Tarkista, että hiomalaikka on asennettu oikein ja kiinnitetty kunnolla paikoilleen. Älä yritä saada hiomalaikkaa sopimaan väkisin koneeseen supistusrenkaiden
tai sovitinten avulla.
- Käytä ja säilytä hiomalaikkoja hankkijalta saamiesi
ohjeiden mukaisesti.
- Älä käytä konetta paksumpien työstökappaleiden
leikkaamiseen kuin leikkauslaikan suurin hiontasyvyys.
- Älä käytä leikkauslaikkoja purseenpoistoon.
- Varmista karan ruuvinkierteisiin kiinnitettävillä hiomalaikoilla, että karassa on riittävästi kierteitä. Varmista,
että kara on riittävästi suojattuna eikä tule kosketukseen hiomapinnan kanssa.
- Tarkista ennen käyttöä, ettei hiomalaikassa ole vaurioita. Älä käytä murtuneita, revenneitä tai muutoin
vahingoittuneita hiomalaikkoja.
- Käytä konetta kuormittamattomana 30 sekuntia
ennen sen käyttöönottoa. Katkaise koneen virta välittömästi, jos se alkaa täristä huomattavasti, tai jos siinä
ilmenee jokin muu vika. Tarkasta kone ja hiomalaikka
huolellisesti ennen kuin käynnistät koneen uudelleen.
- Varmista, ettei mahdollinen kipinöinti aiheuta henkilövahinkoja tai roisku helposti syttyviä aineita kohti.
- Varmista, että työstettävä kappale on riittävästi tuettuna tai puristettuna. Pidä kädet loitolla hiottavasta
pinnasta.
- Käytä aina suojalaseja ja kuulosuojaimia. Käytä halutessasi tai tarvittaessa myös muita suojavarusteita,
esimerkiksi esiliinaa tai kypärää.
- Varmista, että pyörät ja terät on kiinnitetty valmistajan
ohjeiden mukaisesti.
- Varmista, että hiovan tuotteen kanssa mahdollisesti
toimitetut välilevyt ovat tarvittaessa käytössä.
- Jos työkalun mukana on toimitettu suojus, älä käytä
laitetta ilman suojusta.
- Jos työkalu on tarkoitettu kiinnitettäväksi pyörään,
jossa on kierteitetty reikä, varmista, että pyörän kierre
on riittävän pitkä karan pituuteen nähden.
- Varmista, että ilma-aukot pysyvät puhtaina, kun työskentelet pölyisissä tiloissa. Jos pölyn poistaminen on
tarpeen, irrota työkalu ensin verkkovirrasta (älä käytä
tähän metallisia välineitä) äläkä vahingoita laitteen
sisäosia.
- Sähköverkon heikko kunto voi aiheuttaa jännitteen
lyhytaikaisen alenemisen laitteen käynnistysvaiheessa. Tämä voi vaikuttaa muihin laitteisiin (esimerkiksi valaisimen lamppu voi vilkkua). Jos sähköverkon
impedanssi Zmax < 0,348 ohmia, häiriöitä ei todennäköisesti esiinny. (Pyydä tarvittaessa lisätietoja paikalliselta sähkölaitokselta.)
FIN
Suomi
22 Ferm
4
3 2 1 6
5
Page 16

UNDERHÅLL
Tillse att maskinen inte är spänningsförande när
underhållsarbeten utförs på de mekaniska
delarna.
Ferms maskiner har konstruerats för att under lång tid fungera problemfritt med ett minimalt underhåll. Genom att
regelbundet rengöra maskinen och hantera den på rätt
sätt bidrar du till en lång livslängd för din maskin.
Rengöring
Rengör maskinhöljet regelbundet med en mjuk duk,
företrädesvis efter varje användning. Tillse att ventilationsspringorna är fria från damm och smuts.
Använd en mjuk duk fuktad med tvålvatten vid svår smuts.
Använd inga lösningsmedel som bensin, alkohol, ammoniak etc. Sådana ämnen skadar plastdelarna.
Smörjning
Maskinen behöver ingen extra smörjning.
Driftstörningar
Om en driftstörning uppträder till exempel till följd av att en
del har blivit sliten, kontakta då din lokala Ferm-återförsäljare.
Längst bak i denna bruksanvisning finns en ritning med de
delar som kan efterbeställas.
MILJÖ
För att undvika transportskador levereras maskinen i en
så stadig förpackning som möjligt. Förpackningen har så
långt det är möjligt tillverkats av återvinningsbart material.
Ta därför tillvara möjligheten att återvinna förpackningen.
Återlämna gamla maskiner till din lokala Ferm-återförsäljare när du byter ut dem. Där kommer maskinen att tas om
hand på ett miljövänligt sätt.
GARANTI
Garantivillkoren framgår av det separat bifogade garantikortet.
ClE l
■
FÖRSÄKRAN
(S)
Vi intygar och ansvarar för, att denna
produkt överensstammer med följande
norm och dokument
EN50144-1, prEN50144-2-3, EN55014-1, EN55014-2,
EN61000-3-2, EN61000-3-3
enl. bestämmelser och riktlinjema:
98/37/EEC
73/23/EEC
89/336/EEC
fràn 01-06-2000
GENEMUIDEN NL
G.M. Ensing
Quality department
Ferm 21
MONTAGE DES ACCESSOIRES
Fig. B
Avant de procéder au montage des accessoires, retirez toujours la fiche de la prise de cou-
rant.
Employez des meules de dimension correcte. Utilisez
exclusivement des meules armées de fibres. La meule ne
doit pas venir au contact du bord du carter de protection.
- Enfoncez le dispositif de blocage de l’arbre (6) et tournez l’arbre (9) jusqu’à ce qu’il tombe dans le dispositif
de blocage. Maintenez le dispositif de blocage de l’arbre enfoncé aussi longtemps que vous suivez cette
procédure.
- Retirez l’écrou de bride (12) de l’arbre à l’aide de la clé
de serrage (11).
- Placez la meule (7) sur la bride (5).
- Revissez l’écrou de bride sur l’arbre puis serrez-le à
l’aide de la clé de serrage.
- Détachez le dispositif de blocage de l’arbre et vérifiez
si le verrouillage est supprimé en serrant l’arbre.
Montage de la poignée latérale
La poignée latérale est appropriée pour être utilisée aussi
bien de la main gauche que de la main droite.
- Pour l’utilisation avec la main gauche, tournez la
poignée latérale (Fig. A-5) dans le dispositif de prise
situé à droite de la machine.
- Pour l’utilisation avec la main droite, tournez la
poignée latérale dans le dispositif de prise situé à
gauche de la machine.
- Pour les travaux en verticale, tournez la poignée latérale dans le dispositif de prise en haut de la machine.
Veillez à ce que la poignée latérale soit bien
fixée et ne puisse pas se détacher subitement
l’effet des vibrations.
UTILISATION
Observer les consignes de sécurité ainsi que les
règles en vigueur.
Dégagez la machine de la pièce à façonner lorsque vous
allumez ou stoppez la machine. La meule risque, en effet,
d’endommager la pièce à façonner.
- Bloquez la pièce à façonner et assurez-vous qu’elle ne
pourra pas glisser sous la machine pendant les travaux.
- Tenez fermement la machine et appuyez-la sous un
angle d’environ 15º contre la pièce à façonner.
Déplacez la meule uniformément sur la pièce à façonner.
- Examinez régulièrement la meule. Les meules usées
affectent l’efficacité de la machine. Changez de meule
à temps.
- Après avoir achevé les travaux, éteignez toujours d’abord la machine avant de retirer la fiche de la prise de
courant.
Mise en marche et arrêt
- Avant de mettre en marche la machine, appuyez sur la
touche "débloquer" (pour le déblocage de l'interrupteur) et branchez la machine.
- Prenez soin que la meuleuse angulaire soit toujours
en ralenti (sans charge) si vous branchez ou coupez.
Avant de meuleuse il faut attendre jusqu’au
moment où l’appareil a atteint la vitesse cor-
recte.
- Tenez le fil d’alimentation toujours loin de parties mouvantes.
- Pendant le mouler vous doît travailler sous un angle
entre 10° et 15° pour mettre en contact avec étincelles
crachant le moins possible. Pendant le meuler en
deux entre 30° et 45°.
Ne mettez la machine de côté que si le moteur a complètement fini de tourner. Ne rangez pas la machine sur un support poussiéreux sinon les particules de poussière risquent de s’infiltrer dans la mécanique de la machine.
N’utilisez jamais le dispositif de blocage de l’arbre pour immobiliser le moteur.
N’utilisez pas la machine pour le meulage de
pièces à façonner en magnésium.
16 Ferm
11
12
+
7
9
5
6
Page 17

ENTRETIEN
Assurez-vous que la machine n’est pas sous
tension si vous allez procéder à des travaux
d’entretien dans son système mécanique.
Les machines de Ferm ont été conçues pour fonctionner
longtemps sans problème avec un minimum d’entretien.
En nettoyant régulièrement et correctement la machine,
vous contribuerez à une longue durée de vie de votre
machine.
Nettoyage
Nettoyez régulièrement le carter au moyen d’un chiffon
doux, de préférence à l’issue de chaque utilisation. Veillez
à ce que les fentes d’aération soient indemnes de poussière et de saletés.
En présence de saleté tenace, employez un chiffon doux
humecté d’eau savonneuse. Proscrivez l’emploi de solvants comme l’essence, l’alcool, l’ammoniaque etc. car
ces substances attaquent les pièces en plastique.
Graissage
Cette machine ne nécessite pas de graissage supplémentaire.
Pannes
En cas de panne survenue par exemple à la suite de l’usure d’une pièce, contactez votre distributeur Ferm local.
Au dos de ce mode d’emploi, vous trouverez un dessin
des pièces avec les pièces dont vous pouvez renouveler
la commande.
ENVIRONNEMENT
Pour éviter les dommages liés au transport, la machine est
livré dans un emballage robuste. L’emballage est autant
que possible constitué de matériau recyclable. Veuillez
par conséquent destiner cet emballage au recyclage.
Si vous allez changer de machines, apportez les machines usagées à votre distributeur Ferm local qui se chargera de les traiter de la manière la plus écologique possible.
GARANTIE
Pour les conditions de garantie, lisez le certificat de garantie joint à part.
ClE l
■
DÉCLARATION DE CONFORMITÉ
(F)
Nous declarons sous notre propre responsabilité
que ce produit est en conformité avec les normes
ou documents normalisés suivants
EN50144-1, prEN50144-2-3, EN55014-1, EN55014-2,
EN61000-3-2, EN61000-3-3
conforme aux réglementations:
98/37/CEE
73/23/CEE
89/336/CEE
dès 01-06-2000
GENEMUIDEN NL
G.M. Ensing
Quality department
Ferm 17
MONTERING AV TILLBEHÖR
Fig. B
Ta alltid stickkontakten ur vägguttaget före
monteringen.
Använd slipskivor av rätt format. Använd endast
fiberförstärkta slipskivor. Slipskivan får inte vidröra skyddskåpans kant.
- Tryck in spindellåset (6) och vrid spindeln (9) tills den
griper i låset. Håll under tiden spindellåset intryckt.
- Avlägsna flänsmuttern (12) från spindeln med spännyckeln (11).
- Placera slipskivan (7) på flänsen (5).
- Sätt tillbaka flänsmuttern på spindeln och vrid fast den
med spännyckeln.
- Släpp spindellåset och vrid spindeln för att kontrollera
att spärren har lossats.
Montering av sidohandtaget
Sidohandtaget kan användas för både höger och vänster
hand.
- Skruva för vänsterhänt användning in sidohandtaget
(5) i öppningen i maskinens högra sida.
- Skruva för högerhänt användning in sidohandtaget i
öppningen i maskinens vänstra sida.
- Skruva för vertikala verksamheter in sidohandtaget i
uttaget ovanpå maskinen.
Se till att sidohandtaget sitter fast ordentligt och
inte oväntat kan skaka lös.
ANVÄNDNING
Iaktta alltid säkerhetsinstruktionerna och
respektera gällande föreskrifter.
Håll maskinen undan från arbetsstycket när du startar och
stänger av den. Slipskivan kan skada arbetsstycket.
- Kläm fast arbetsstycket eller se på ett annat sätt till att
det inte kan glida undan under arbetet.
- Håll maskinen stadigt och tryck den under en vinkel på
ca. 15º mot arbetsstycket. För slip-skivan med jämna
rörelser över arbetsstycket.
- Syna regelbundet slipskivan. Slitna slipskivor reducerar maskinens effektivitet. Byt ut slipskivan i tid.
- Stäng efter avslutat arbete alltid först av maskinen
innan du drar ut kontakten ur vägguttaget.
Till- och frånkoppling
- Denna maskin är utrustad med en säkerhetsbrytare.
Starta maskinen genom att trycka på knappen "lås
från" (för att frigöra brytaren) och sätt igång maskinen.
- Se till att maskinen är obelastad och att skivan går fritt
när strömmen slås på eller från.
Låt maskinen komma upp i varv före användning.
- Se noga till att elkabeln inte kommer i kontakt med
maskinens rörliga delar.
- Vid slipning; håll maskinen i 10-15° vinkel mot arbetsstycket för att i så stor utsträckning som möjligt undvika gnistorna.
Lägg inte undan maskinen förrän motorn har stannat helt.
Lägg inte maskinen på ett dammigt underlag. Dammpartiklar kan tränga in i mekanismen.
Använd aldrig spindellåset till att stanna motorn.
Använd aldrig maskinen till att slipa arbetsstycken av magnesium.
20 Ferm
11
12
+
7
9
5
6
Page 18

TEKNISKA SPECIFIKATIONER
Spänning 230 V~
Frekvens 50 Hz
Effektförbrukning 1650 W
Varvtal, obelastad 6000/min
Skivdiameter 230 mm
Spindelformat M14
Vikt 3.75 kg
Lpa(bullernivå) 94.6 dB(A)
Lwa(bullereffekt) 107.6 dB(A)
Vibrationsvärde 0.8 m/s
2
Elektrisk säkerhet
Kontrollera alltid om din nätspänning överensstämmer med värdet på typplattan.
Maskinen är dubbelt isolerad i överensstämmelse med EN50144, vilket innebär att det inte
behövs någon jordledare.
Vid utbyte av kablar eller stickkontakter
Släng omedelbart bort gamla kablar eller stickkontakter
så fort de har ersatts av nya exemplar. Det är farligt att
sticka in stickkontakten till en lös kabel i vägguttaget.
Vid användning av förlängningskablar
Använd uteslutande en godkänd förlängningskabel som
är lämplig för maskinens effekt. Ledarna måste ha en diameter på minst 1,5 mm
2
Om förlängningskabeln sitter på
en haspel, rulla då ut den helt och hållet.
INNEHÅLL I FÖRPACKNINGEN
1 vinkelslip
1 sidohandtag
1 spännyckel
kolborstarna set
bruksanvisning
blad med säkerhetsföreskrifter
garantikort
Kontrollera om maskinen, lösa delar eller tillbehör uppvisar transportskador.
PRODUKTINFORMATION
Fig. A:
1. strömbrytare
2. skruvlucka kolborste (ömse sidor)
3. spindellås knappen
4. slipskiva
5. sidohandtag
6. “lock-off” knappen
Ferm 19
Vinkelslip
I denna bruksanvisning används följande symboler:
Anger att det föreligger risk för kropps-skada,
livsfara eller risk för skador på maskinen om
instruktionerna i denna bruksanvisning inte efterlevs.
Anger elektrisk spänning.
Brandfara.
Läs igenom denna bruksanvisning noggrant innan maskinen tas i bruk. Se till att du känner till hur maskinen fungerar och är insatt i hur den skall användas. Följ underhållsinstruktionerna för att maskinen alltid skall fungera på
bästa sätt. Förvara denna bruksanvisning och den bifogade dokumentationen vid maskinen.
SÄKERHETSFÖRESKRIFTER
Vid användning av elektriska maskiner, iaktta alltid de
säkerhetsföreskrifter som gäller lokalt i samband
med brandfara, fara för elektriska stötar och kroppsskada. Läs förutom nedanstående instruktioner även
igenom bladet med säkerhetsföreskrifter som bifogas separat.
Förvara instruktionerna omsorgsfullt!
- Kontrollera att det maximala varvtalet som anges på
slipskivan överenskommer med maskinens maximala varvtal. Maskinens varvtal får ej överskrida värdet på slipskivan.
- Se till att slipskivans dimensioner överenskommer
med maskinens specifikationer.
- Se till att slipskivan är rätt monterad och ordentligt
fastsatt. Använd inga passringar eller adaptar för att få
en slipskiva att passa.
- Behandla och förvara slipskivor enligt leverantörens
anvisningar.
- Använd aldrig maskinen för genomslipning av arbetsstycken vars tjocklek överskrider slipskivans maximala slipdjup.
- Använd aldrig genomslipningsskivor för avgradning.
- Se vid bruk av slipskivor som monteras på spindelns
gänga till att spindelns gänga är tillräckligt djup. Se till
att spindeln är ordentligt skyddad och inte vidrör slipytan.
- Syna slipskivan före bruk på eventuella skador.
Använd inga slipskivor som är spruckna, brustna eller
skadade på annat sätt.
- Låt maskinen före bruk löpa obelastad under 30
sekunder. Stäng genast av maskinen om den börjar
skaka kraftigt eller om andra störningar uppträder.
Kontrollera maskinen och slipskivan grundligt innan
du startar maskinen på nytt.
- Se till att eventuella gnistor inte orsakar fara för personer eller stänker i riktning av lättantändliga ämnen.
- Se till att arbetsstycket stöds eller spänns fast ordentligt. Håll händerna undan från ytan som ska slipas.
- Bär alltid skyddsglasögon och hörselskydd. Bär vid
behov vidare personligt skydd, t.ex. hjälm eller
förkläde.
- Se till att monterade skivor och stycken har fästs
ordentligt enligt tillverkarens instruktioner.
- Se till att mellanlägg används när det medföljer gjutna
slipprodukter och när det behövs.
- Om ett skydd medföljer verktyget, använd aldrig verktyget utan skyddet.
- När det gäller verktyg som använder skivor med gängande hål, se till att skivans gängor är tillräckligt långa
för att hålla axellängden.
- Se till att ventilationsöppningar hålls öppna när du
arbetar under dammiga förhållanden. Om du behöver
avlägsna damm, koppla först ur verktyget från eluttaget (använd icke-metalliska föremål) och var försiktig
så att du inte skadar några inre delar.
- P.g.a. bristande förhållande i elnätet, kan korta spänningsfall uppstå när man startar utrustningen. Detta
kan påverka annan utrustning (t.ex. en lampa kan
börja blinka). Om nätimpedans Zmax < 0.348 Ohm, är
det inte troligt att sådana störningar uppstår. (Vid
behov kan du kontakta din lokala elleverantör för mer
information).
S
Svenska
18 Ferm
4
3 2 1 6
5
 Loading...