

Page 1
Reference and Owner’s Manual
for the SFX Satellite
Page 2
A Message from the Chairman
Since 1946, Fender realized the importance of your amplifier. You see, your
amplifier is more than just a combination of dials, wires and speakers. It is a
finely tuned musical instrument. And like any fine musical instrument, it
should be treated with special care and attention to detail.
At Fender, we know what building guitar amplifiers is all about. For over half a
century, we have been designing and producing some of the world’s best
amplifiers, helping shape the face of music. In fact, many of the world’s most
classic and best sounding amplifiers proudly wear the Fender name.
Whether you are after that classic Fender tone, a clean crisp sound for your
Bass or Keyboard or the raw driving power of modern distortion, your
decision to purchase a Fender amplifier is one you will appreciate with each
passing note for years to come.
Wishing you years of enjoyment and a heartfelt thank you,
Bill Schultz
Bill Schultz
Chairman of the Board
Fender Musical Instruments Corporation
Page 3
YOUR FENDER®SFX SATELLITE
®
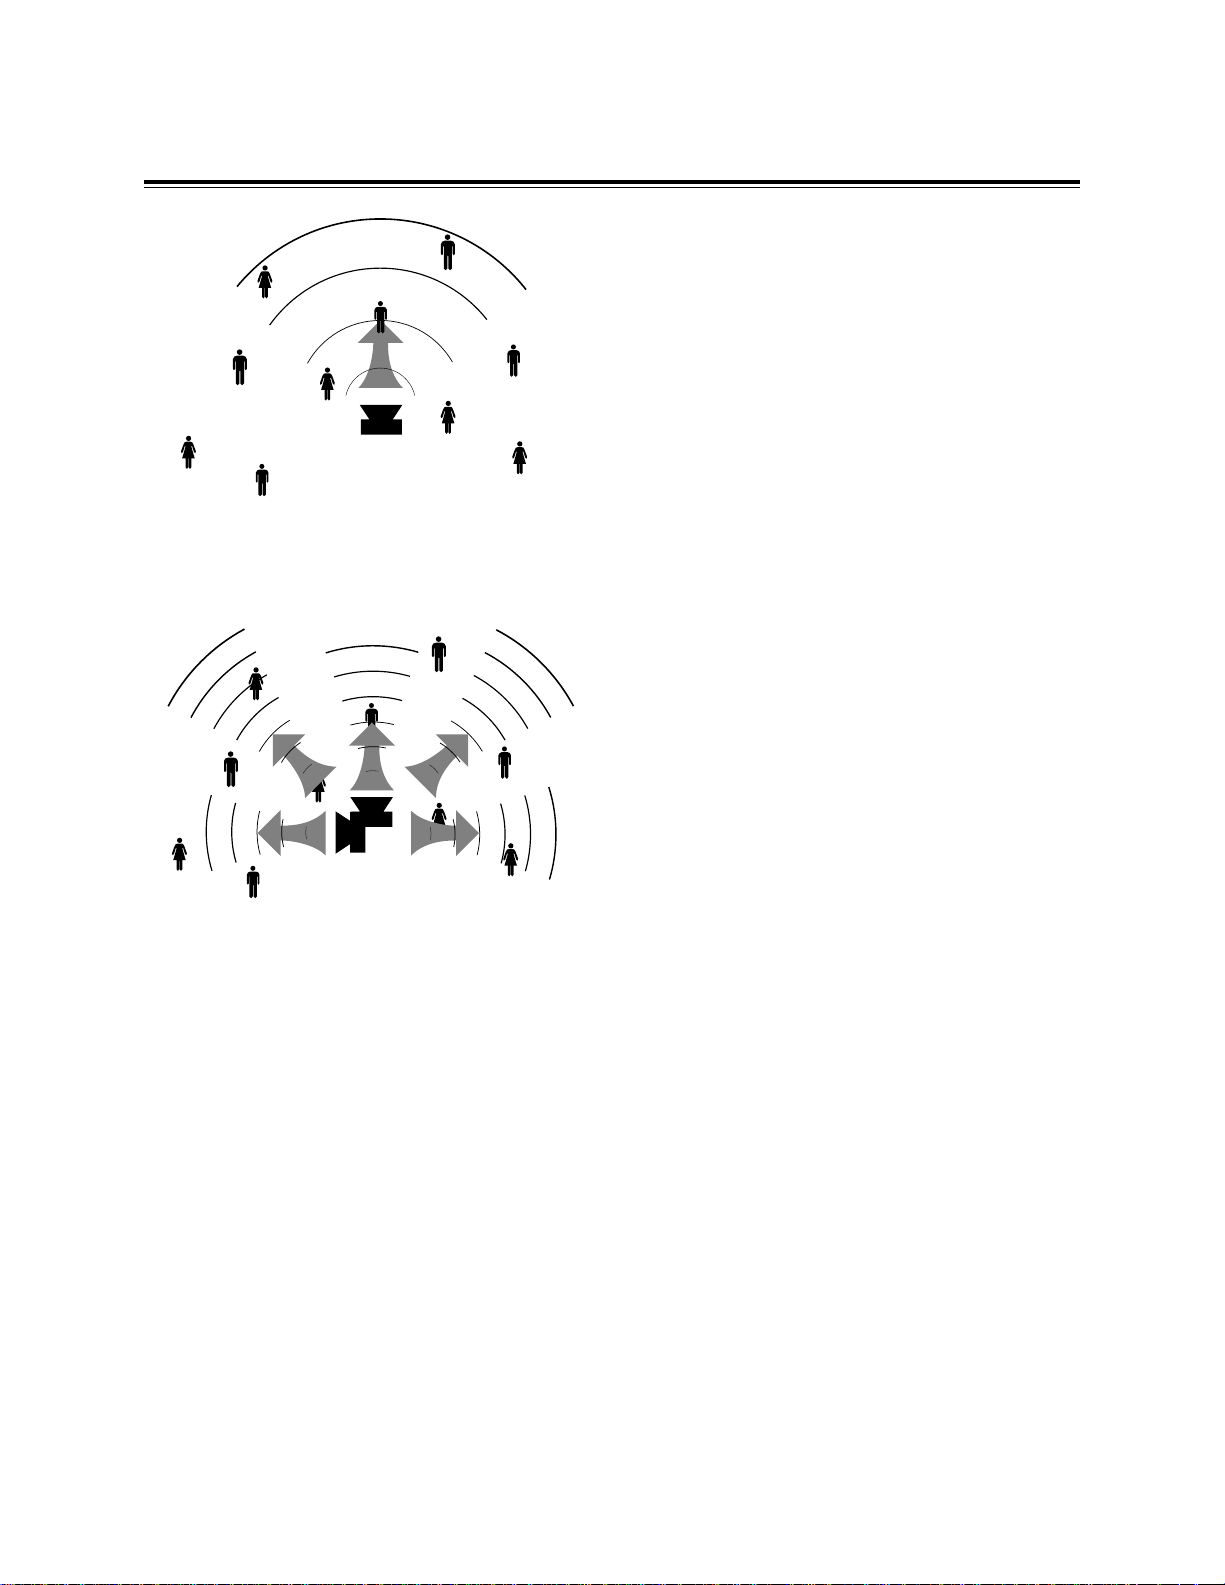
Traditional Amp
Fig. A The sound waves from a traditional guitar amplifier
project forward, focusing their energy in one direction.
Congratulations on your purchase of a Fender SFX
Satellite. Your new Fender SFX Satellite is designed
by the same Tone-Team that has created many other
classic Fender amps: like the Tone-Master®,
Princeton®Chorus and the versatile Hot Rod Series.
Built with care and special attention to detail, your
SFX Satellite offers you the ability to add the “spatially
exciting” Stereo Field eXpansion effect (patent
pending) to your traditional guitar rig. (See figures at
left for an explanation of the SFX effect.)
Designed to sit under your traditional guitar amplifier,
your Fender SFX Satellite features: 80 Watts of
power, on-board digital signal processing and a 12”
4-ohm speaker for a full-bodied tone. Moreover, the
footswitch circuitry allows for remote on/off selection
of the SFX effect.
For the musician who wants to expand the capability
of their guitar amplifier, your SFX Satellite is a quality
Fender product. To ensure maximum performance
from your SFX Satellite, please read through this
manual and reference it as needed. Also, please
heed all safety warnings relating to your new SFX
Satellite Extension.
Traditional Amp
with SFX Effect
Fig. B Fender’s Stereo Field eXpansion circuitry (patent
pending) processes the signal through one of 32 available
stereo digital effects. The stereo signal is then processed
by the exclusive SFX matrix circuit and sent to the speakers
creating a psychoacoustic event that results in up to 300º
of stereo imaging.
Take the time to get to know each other... Tune-up,
Plug-in and ... Play On!
WARNING:
-TO PREVENT DAMAGE, FIRE OR SHOCK
HAZARD, DO NOT EXPOSE THIS UNIT TO RAIN
OR MOISTURE.
-NO USER SERVICEABLE PARTS INSIDE,
REFER SERVICING TO QUALIFIED PERSONNEL
ONLY.
-THIS UNIT MUST BE EARTH GROUNDED.
3
Page 4
SFX SATELLITE SET-UP PROCEDURE
Your Fender SFX Satellite offers endless possibilities
for enhancing and creating new and exciting sounds
from your traditional guitar rig. By following the setup procedures listed below and on the following
page, in a matter of minutes you will be exploring
your SFX Satellite’s capabilities.
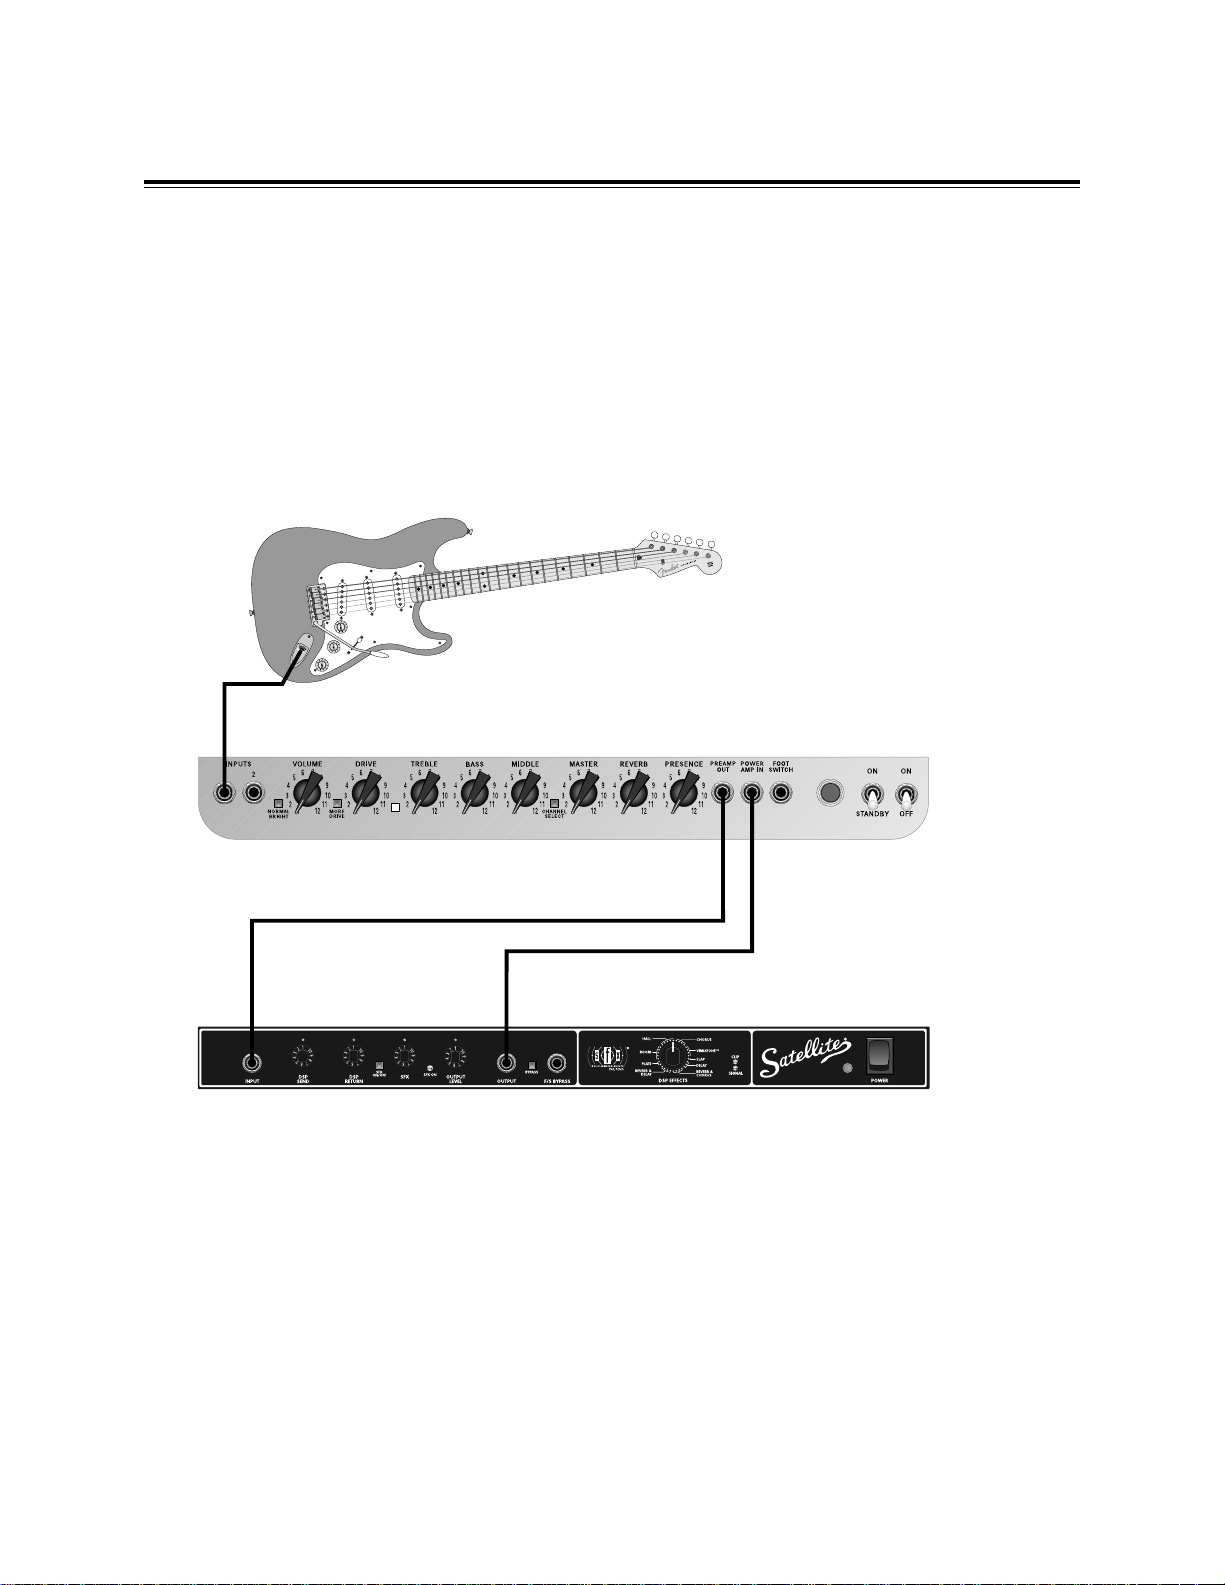
1. To set up your SFX Satellite, begin by making sure
both your amplifier and your SFX Satellite are turned
OFF or are in their standby positions. Next, connect
your guitar line cords from your amplifier to your SFX
Satellite as demonstrated in the illustration below.
From Preamp Out To Power Amp In
To SFX Satellite Input
From SFX Satellite Output
2. With the Bypass button in on your SFX Satellite,
turn on your SFX Satellite and then your guitar amp.
Next, raise the volume and tone knobs on your guitar
amp to the volume and sound levels desired.
4
Page 5

SFX SATELLITE SET-UP PROCEDURE, CONTINUED
3. Next, place all knobs on your SFX Satellite at 1 or
their minimum positions.
4. Make sure the SFX On/Off button pressed in
(green light on) and the Bypass button in its out
position.
5. Play your guitar at your average volume through
your rig. At this point, no sound will emanate from
your SFX Satellite. Refer to the chart below to help
determine the SFX Satellite speaker operation modes
of your SFX Satellite and guitar amp.
Switch Control Table
SFX On/OffBypass Result
Button In
Button In
Button Out
Button Out
Button In
Button Out
Button Out
Button In
Guitar Amp Only
-No Effects
Guitar Amp Only
-No Effects
Guitar Amp w/ DSP Effects
-No Satellite Sound
SFX Effect Active
-Sound from Satellite
6. Adjust the DSP Send knob on your SFX Satellite
so the “signal” light comes on.
7. Next, play at your hardest strength to ensure the
DSP “clip” light does not come on. If the DSP “clip”
light does come on, reduce the signal via the DSP
Send knob.
9. Push the Bypass switch in and out to match the
volume levels between your SFX Satellite and your
guitar amp by itself. The table below offers a few
suggestions on setting up the DSP Send and Output
Level adjustments. As a general rule of thumb, when
increasing your guitar amp volume it may be necessary
to decrease DSP send level on your SFX Satellite.
SFX DSP Send / Output Level Configurations
Amplifier
Hot Rod Deluxe 37
Deluxe 112
Vibro-King
Guitar Amp
Volume
337
3102
Output
Level
3
DSP
Send
10. Adjust the DSP Return knob for the desired
effect level or “wetness”. Remember, extreme
adjustments to the DSP Receive knob will require an
adjustment of Output Level using the Bypass switch.
11. Finally, slowly rotate the SFX knob clockwise for
the desired spatial effect.
12. When shutting down your rig, turn off your guitar
amp first then your SFX Satellite.
8. Set the DSP Return knob at 5. Next, adjust the
Output level knob on your SFX Satellite to a level
comparable to your guitar amp.
5
Page 6

SFX SATELLITE FRONT CONTROL PANEL
A. INPUT - Plug your guitar amplifier’s preamp
output or its effects send output in here.
B. DSP SEND - This knob adjusts the input level
received from your guitar amp to the SFX Satellite,
setting the level of signal input to the Digital Signal
Processing card. Rotating the knob to the right
increases the signal level input to the DSP card. Set
the knob so your average playing level lights the
yellow “signal” light. Playing peaks should not light
the red “clip” light as this will indicate distortion.
C. DSP RETURN - This knob adjusts the output
level from the DSP card and the wet dry signal mix
prior to the SFX matrix. Rotating the knob to the
right increases the signal level input to the SFX
Satellite amplifier.
D. SFX ON / OFF - This push-push button is the On
/ Off control of the Stereo Field eXpansion or SFX
effect. When the button is out, the SFX signal will
not emanate from the bottom speaker, however,the
SFX front signal is still sent to your traditional amp.
Turning off the SFX feature does not impact the DSP
effects sent to your amplifier. Note: Refer to the
chart on page 7 for the various configurations
available when using the SFX On/Off and Bypass
buttons and Footswitch.
E. SFX - This knob controls the volume level of the
bottom speaker. Rotating the knob clockwise
increases the volume to the bottom speaker varying
the SFX spatial effect.
F. SFX ON - This green LED illuminates when the
SFX effect is active on your SFX Satellite.
G. OUTPUT LEVEL - Controls the signal level from
the SFX Satellite to your guitar amp’s power amp
input or effects receive input.
H. OUTPUT - This 1/4 inch jack sends the signal
from your SFX Satellite to your guitar amp’s power
amp input or its effects receive input.
6
Page 7

SFX SATELLITE FRONT CONTROL PANEL
I. BYPASS - This push-push button is the On / Off
switch for the bypass feature. When this button is
pressed, the SFX and DSP effects are bypassed and
the guitar amp’s signal is routed back to your
amplifier. Note: Refer to the chart below for the
various configurations available when using the SFX
On/Off and Bypass buttons and Footswitch.
J. F/S BYPASS - This jack, for the one button
footswitch (included), is used for hands free
deactivation of the SFX effect. Using this jack
overrides the bypass switch. When the footswitch is
pressed the SFX and DSP effects are inactive and the
guitar’s signal is routed directly back to your amplifier.
Switch Control Table
SFX On/OffBypass Result
Button In
Button In
Button Out
Button In
Button Out
Button Out
Guitar Amp Only
-No Effects
Guitar Amp Only
-No Effects
Guitar Amp w/ DSP Effects
-No Satellite Sound
K. DSP EFFECTS - This 32-position data wheel
selects among the various on-board digital effects.
These effects will only be heard if the DSP Send and
Receive knobs are turned up. For a complete listing
of all on-board effects available refer to the chart
located on page 8.
L. SIGNAL - This yellow LED illuminates when an
adequate signal level exists at the DSP input. CLIP This red LED illuminates when an excessive signal
level exists at the DSP input. If this occurs lower the
input signal via the DSP Send knob.
M. POWER INDICA TOR - This LED illuminates when
your SFX Satellite is receiving power.
N. POWER SWITCH - Turns the AC power ON and
OFF. When the switch is OFF, the SFX Satellite is
completely shut down.
Button Out
Button In
SFX Effect Active
-Sound from Satellite
7
Page 8

SFX SATELLITE REAR PANEL
DSP EFFECTS CHART
LINE CORD - Your SFX Satellite is equipped with a
grounding type supply cord to reduce the possibility
of shock hazard. Be sure to connect it to a
grounded AC receptacle. The line cord should be
connected to a suitable power source in accordance
with voltage and frequency as shown in the power
rating on the rear panel. DO NOT ALTER THE AC
PLUG.
Below is a listing of all effects available on the SFX
Satellite. To choose among these various effects
simply rotate the dial to the desired effect.
Remember both the DSP Send and DSP Return
knobs must be above their minimum positions in
order for the effect to be heard. (To change from
slower to faster sweeps,
shorter to longer delays
or smaller to larger
reverbs, turn the DSP
effects selection knob
clockwise.)
Reverb- 1 - Medium Room / Short Delay
Delay 2 - Medium Room / Medium Delay
3 - Medium Room / Long Delay
4 - Medium Hall / Short Delay
5 - Medium Hall / Medium Delay
6 - Medium Hall / Long Delay
Reverbs
Room 1 - Small
2 - Large
Plate 1 - Small
2 - Large
Hall 1 - Small
2 - Medium
3 - Large
Vibratone* 1 - Slow Deep Sweep
2 - Medium Slow Deep Sweep
3 - Medium Fast Shallow Sweep
4 - Fast Shallow Sweep
*Note: For maximum Vibratone effect, turn the DSP Send,
DSP Return and SFX knobs fully clockwise and turn the
Output Level knob counterclockwise. Experiment with
these settings in order to obtain your optimum settings.
Chorus 1 - Slow Deep Sweep
2 - Medium Sweep
3 - Fast Shallow Sweep
Flange Medium Sweep
Delay 1 - Short Delay
2 - Short to Medium Delay
3 - Medium Delay
4 - Medium to Long Delay
5 - Long Delay
Slap Quick, Single Echo
Reverb- 1 - Medium Room / Slow Sweep
Chorus 2 - Medium Room / Medium Sweep
3 - Medium Hall / Slow Sweep
4 - Medium Hall / Medium Sweep
5 - Medium Room / Flange-Like
8
Page 9

TROUBLESHOOTING COVERING CARE
If the SFX Satellite is set up but does
not function, check the following
items:
• Is the power cord properly plugged into an
electrical outlet?
• Is there power at the outlet?
• Are the control knobs turned above 1?
• Is the volume control on the instrument turned up?
• Are the control knobs on your external
equipment turned above 1?
• Is the power cord on your external equipment
properly plugged into an electrical outlet?
• Are any cords cut, frayed or damaged?
• Are the DSP control knobs turned above 1?
• Is the instrument properly plugged into
the amplifier?
• Is the guitar amp properly plugged into the SFX
Satellite?
• Are the BYPASS and SFX ON/OFF switches
configured correctly?
The exclusive covering on your
Fender SFX Satellite cabinet has been
especially designed for years of
lasting beauty. A light soapy solution
on a sponge can be used to remove
dirt and residue that may accumulate
in the fabric. Be careful not to let any liquid come in
contact with operating surfaces. REMEMBER TO
UNPLUG THE POWER CORD BEFORE
CLEANING AND WAIT UNTIL THE UNIT IS
COMPLETELY DRY BEFORE PLUGGING IT IN.
(Eliminate any effects pedals, external signal processing
devices and try using another cord.)
If after checking all of the above your amplifier is still
not performing correctly, consult your nearest
authorized Fender Service Center.
9
Page 10

SFX SATELLITE SPECIFICATIONS
TYPE: PR 378
PART NUMBER: 22-2001 (120V)
22-2031 (240V) Aust
22-2041 (230V)UK
22-2061 (230V) Eur
22-2071 (100V)
POWER REQUIREMENTS: 100V AC, 50/60 Hz 360W
120V AC, 60 Hz, 360W
230V AC, 50 Hz, 360W
240V AC, 50 Hz, 360W
POWER AMPLIFIER SECTION
POWER OUTPUT: 80W R.M.S. into 4Ω @ <1% T.H.D.
PREAMP SECTION
INPUT IMPEDANCE: 18.2k Ω (@ INPUT jack)
OUTPUT IMPEDANCE: 1k Ω (@ OUTPUT jack)
SPEAKER COMPLIMENT: One Fender Special Design 12” speaker (P/N 048878)
DIMENSIONS: Height: 19.6 in 39 cm
Width: 24.5 in 57 cm
Depth: 15.6 in 26 cm
WEIGHT: 55 lbs 25.2 kg
Fender®, SFX®, Satellite®, Tone-Master®and Princeton®Chorus
are registered trademarks of the Fender Musical Instruments
Corporation.
The SFX Effect, patent pending, is manufactured under license
from Aspen Pittman and Drew Daniels of SFX Technology.
Product specifications are subject to change without notice.
10
Page 11

SFX SATELLITE BLOCK DIAGRAM
INPUT
FROM GUITAR AMP
L
R
DIFF
AMP
DSP
SEND
SFX
MATRIX
BYPASS
SIGNAL
LEVEL
SENSE
AMP
OUTPUT
DRY
LEVEL
SIGNAL
PRESENT
DRIVER
EFFECT
SELECT
DRIVER
DSP
+ V
CLIP
BYPASS
BYPASS SWITCH*
DSP
RETURN
DSP
RETURN
DRY
+
+
OUTPUT
TO GUITAR
AMP
+
L
+
R
+
SFX
AMP
HPF
SFX
BYPASS
SWITCH*
*For switch functions refer
to the table on page 7.
FENDER MUSICAL INSTRUMENTS CORP.
A PRODUCT OF:
CORONA, CA 91720 USA
PA
12"
SIDE
SPEAKER
P/N 053458 REV B
 Loading...