

Page 1

BASS AMPLIFIER
EXPANDED OWNER’S MANUAL
Page 2

CONTENTS
Introduction 1
Control Panel 2
Presets Basics 3
Editing and Saving Presets 4
Accessing Preset Contents 4
Editing and Saving Amplier Control Settings 4
Changing the Amplier Model in a Preset 7
List of Rumble LT25 Amplier Models 8
Editing and Saving Eects Control Settings 9
Replacing, Adding and Deleting Eects 10
Setting Delay Times with the Tap Button 12
List of Rumble LT25 Eect Models 13
Menu Functions 14
Tuner 15
Footswitch 16
Settings 17
Restore 17
Auxiliary Input and Headphone Output 18
USB Port 18
Specications 19
Page 3
INTRODUCTION
This expanded owner’s manual is a thorough user’s guide to the features and functions of the Rumble LT25
amplier.
As a complement to the Rumble LT25 Quick Start Guide that comes with each amplier, this manual presents a detailed look at the amp’s versatile features. This includes navigation and modication of the onboard
presets, and comprehensive descriptions of the amplier and eect models. It also includes illustrated stepby-step instructions for using Rumble LT25’s onboard tuner, footswitch, USB port and other functions.
While this expanded manual presents the most current version of the amplier, also check back for updated
manual versions that will serve as even more helpful guides as Rumble LT25 and its capabilities evolve.
Be sure to check fender.com/rmware/support regularly for rmware updates that improve and enhance the
Rumble LT25 experience.
1
Page 4
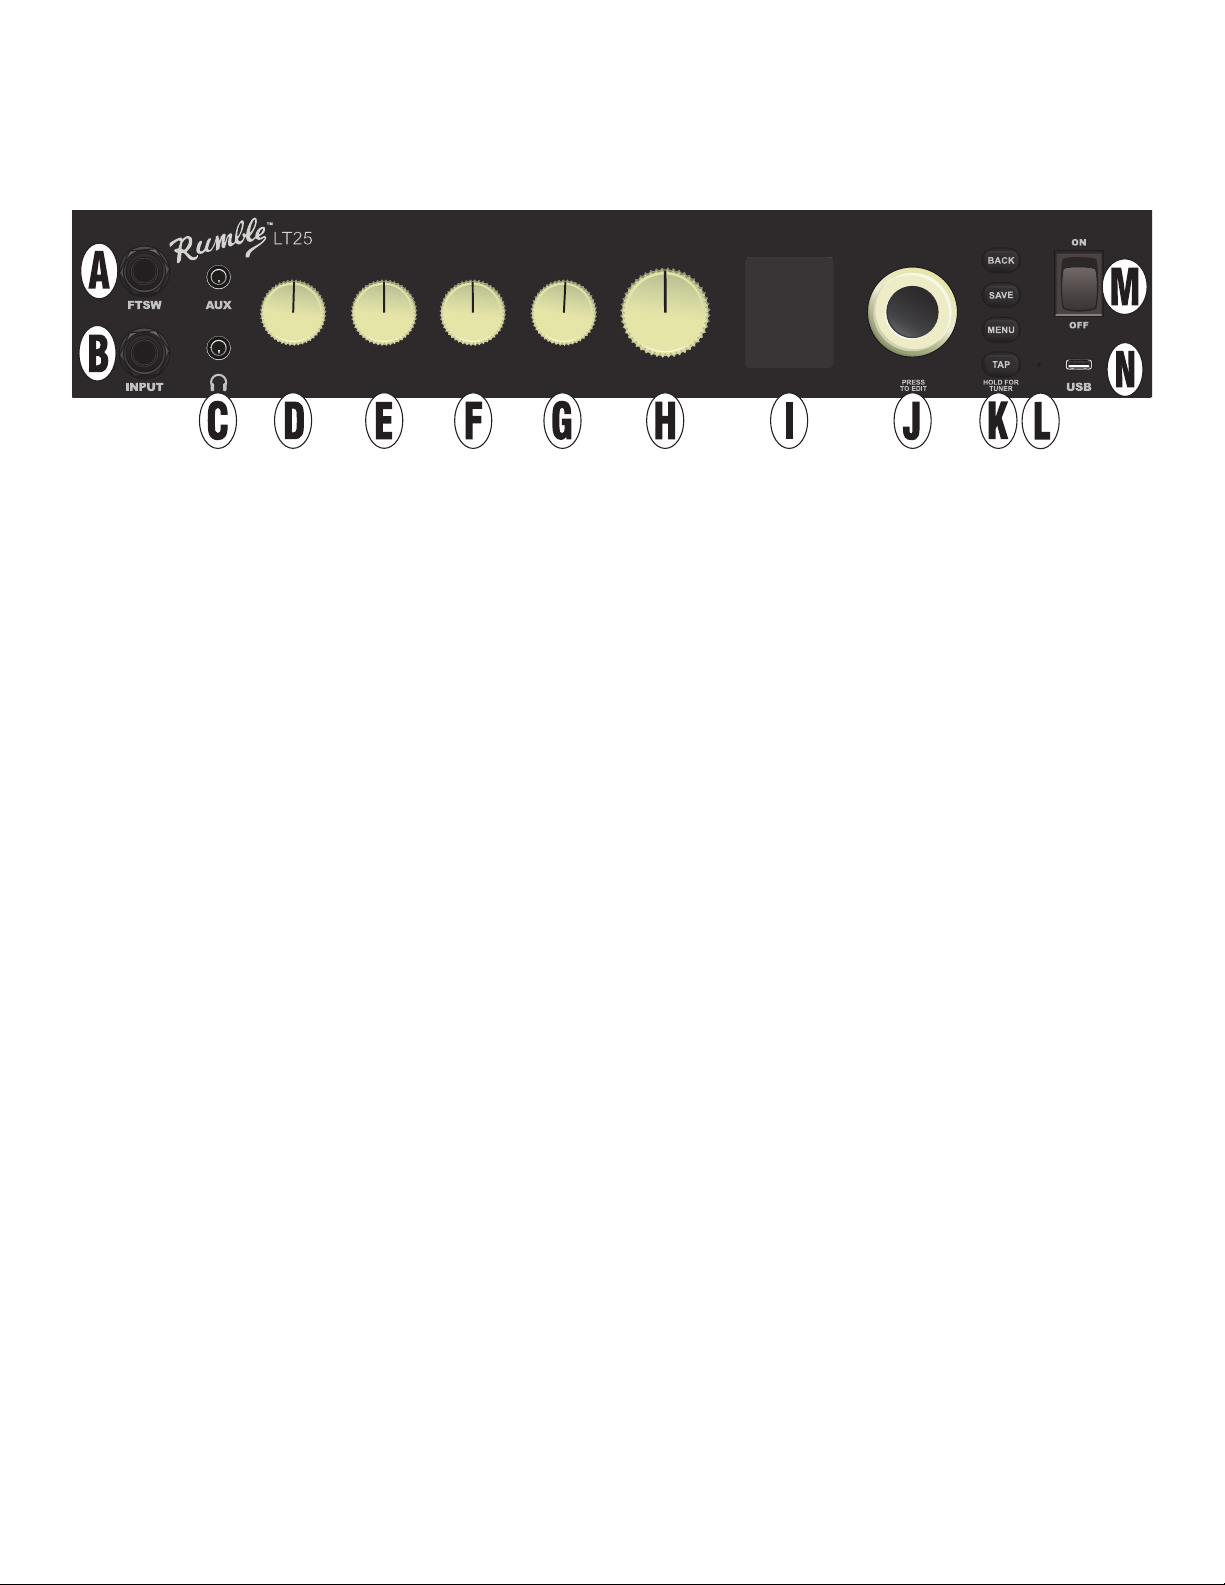
CONTROL PANEL
The Rumble LT25 top control panel consists of an INSTRUMENT INPUT, ve CONTROL KNOBS, a DISPLAY
WINDOW, an ENCODER wheel, four UTILITY pushbuttons, a FOOTSWITCH INPUT, an AUXILIARY INPUT (1/8”),
a HEADPHONE OUTPUT (1/8”), a TAP LIGHT and a USB PORT.
GAIN
BASS
MIDDLE
TREBLE
MASTER
A. FOOTSWITCH (“FTSW”): Connect optional single-button footswitch here (page 16).
B. INPUT: Plug instrument in here.
C. AUXILIARY INPUT, HEADPHONE OUTPUT: 1/8” auxiliary input for connecting external audio devices,
and 1/8” output for headphone use (page 18). Headphone output disables speaker.
D. GAIN: Aects gain setting in each preset.
E. BASS: Aects bass tone setting in each preset.
F. MIDDLE: Aects midrange tone setting in each preset.
G. TREBLE: Aects treble tone setting in each preset.
H. MASTER VOLUME: Controls overall volume.
I. DISPLAY WINDOW: Shows preset in use, preset contents and parameters, and other functions (i.e., tuner
and other menu functions).
J. ENCODER: Rotary control with press-switch function. For viewing, selecting and adjusting Rumble LT25
presets, controls and other functions.
K. UTILITY BUTTONS
BACK: Returns user to the previous screen or original preset screen.
SAVE: For saving preset modications, renaming presets and saving presets to a new location.
MENU: For accessing tuner, footswitch and other functions (page 14).
TAP: For setting delay times (page 12) and accessing built-in tuner (page 15).
L. TAP LIGHT: Flashes in time with delay eects.
M. POWER: Turns amplier on and o.
N. USB PORT: Amp connection point for USB audio recording (page 18).
O. IEC POWER INLET (REAR PANEL; NOT SHOWN): Using the included power cord, connect to a grounded
outlet in accordance with the input power voltage and frequency specied at the power inlet.
2
Page 5
PRESET BASICS
Rumble LT25 features 30 sequentially numbered presets. Each preset consists of an amplier and one or
more eects (or, in some cases, no eects). Note that when turning the amplier on, the default active preset
is always factory preset 01. Further, 20 additional presets are available when using the “REPLACE” feature
(page 7).
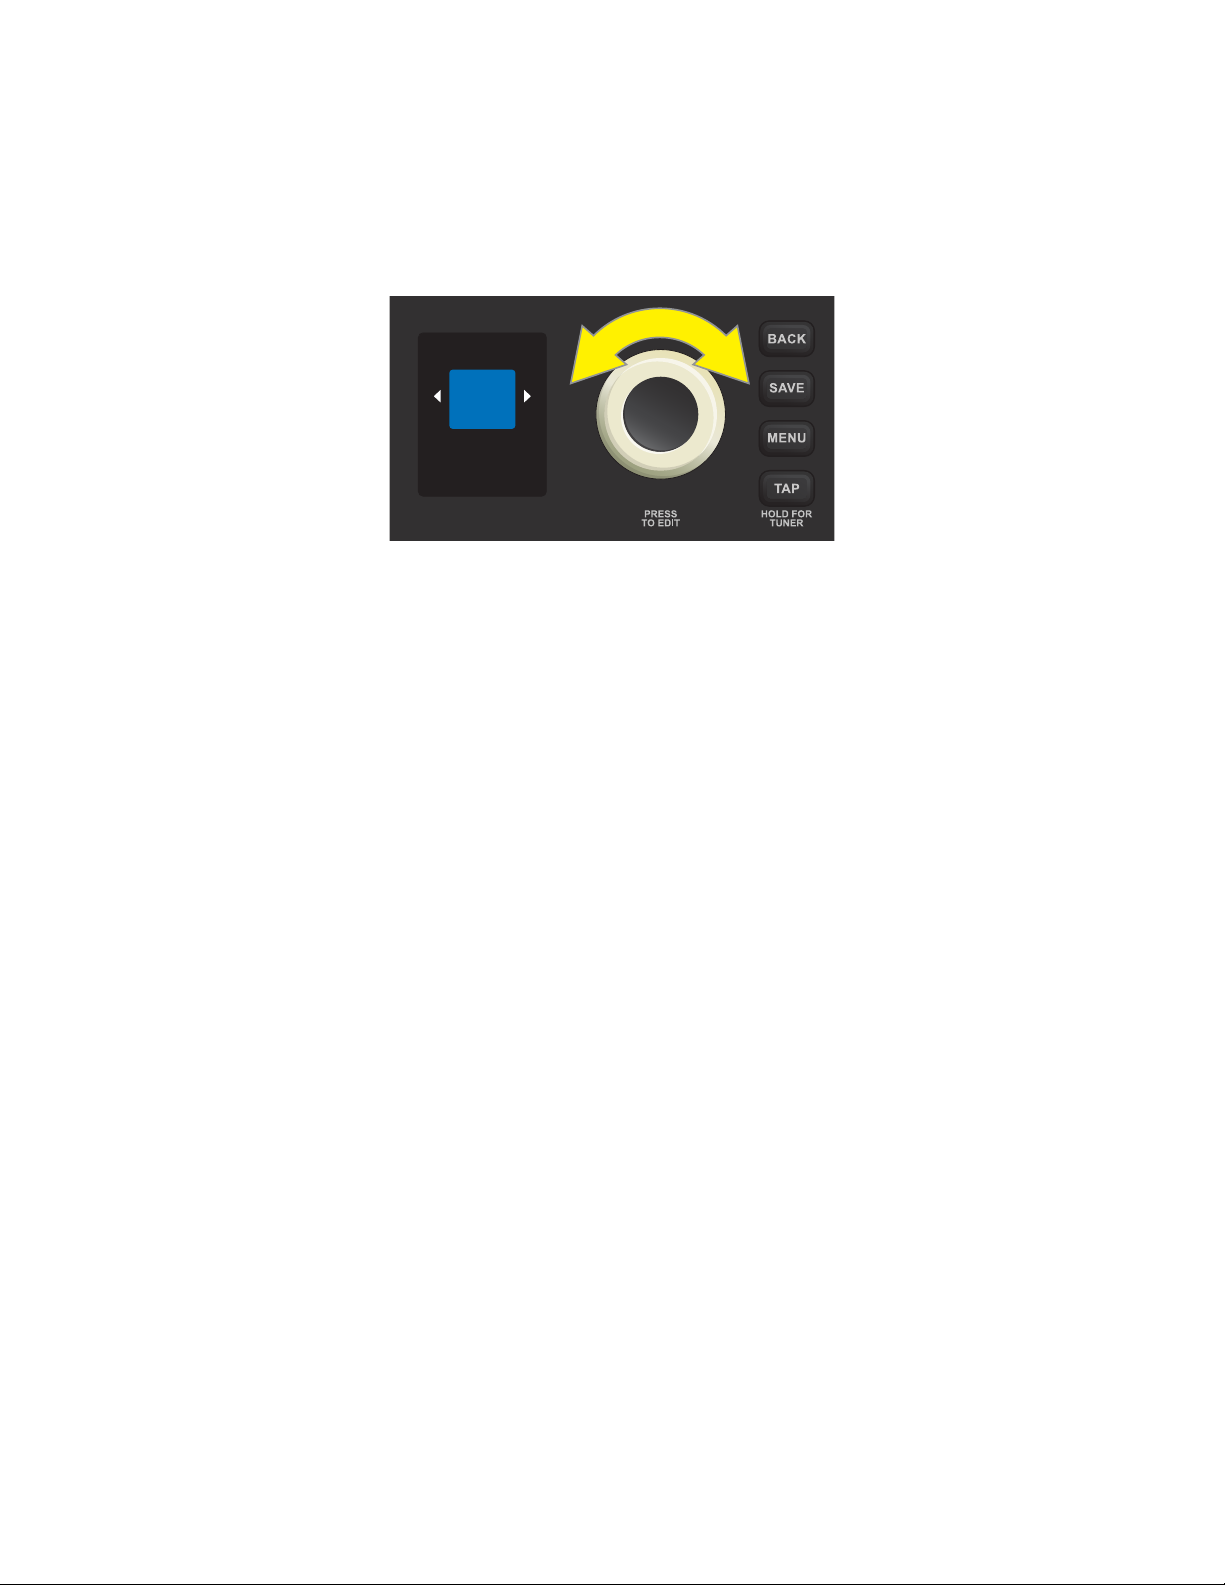
To scroll through presets, turn the ENCODER; whichever preset is displayed becomes active:
07
ORGAN
TONE
Rumble LT25’s 30 original factory presets are:
01 STUDIO CLEAN 11 FLANGER BASS 21 RUMBLE OD
02 STUDIO SQUEEZE 12 BAY AREA PUNK 22 BIG ECHO
03 RUMBLE 13 PUNCHY OCTAVE 23 WAH ECHO
04 ELEKTRIK UPRIGHT 14 CHORUS 24 WARM WAH
05 DIRTY ROCKBASS 15 FILTHY PUNCH 25 SHOWMAN OD
06 FAT OLD BASSMAN 16 HAND OF DOOM 26 HESHER
07 ORGAN TONE 17 70S ROCK 27 PHASER BASS
08 SLAP BASS 18 FAT BOTTOM 28 TREMOLO
09 SYNTH FUZZ 19 MONSTER BOT 29 AUDIO RAGE
10 VINTAGE FUZZ 20 GRUNGE 30 CLICKY PICK
Additionally, 20 more presets are available using the “REPLACE” function described on page 7. These are:
31 DARK ROOM 38 STEP AND GRIND 45 BASS ODYSSEY
32 BIG SUSTAIN 39 SHOWMAN BOT WAH 46 300 GRIT
33 SPACE PAD 40 GRITS N CREAM 47 FEEL THE PAIN
34 BUZZ BOMB 41 WARM BOT WAH 48 SLAPPY SCOOP
35 WARM CHORUS 42 HEART BREAKER 49 SOCAL SKA PUNK
36 80S BRIT 43 CHORUS DIRT 50 GOOD TO BE KING
37 MONSTER BOT WAH 44 ANCIENT MARINER
3
Page 6
EDITING AND SAVING PRESETS
Presets can be easily edited and, if desired, renamed and saved in place or saved in a dierent location. The
controls of each amplier type can be adjusted, or an amp model can be replaced with a dierent one. Similary, various eects controls can be adjusted, or eects can be removed from or added to a preset.
When a preset is active, the box containing its number is blue, indicating that no edits have been made. Once
an edit is made, the box containing the preset number turns red and the preset title screen will read “UNSAVED”. When edits are saved, the preset number box returns to blue and the “UNSAVED” title clears.
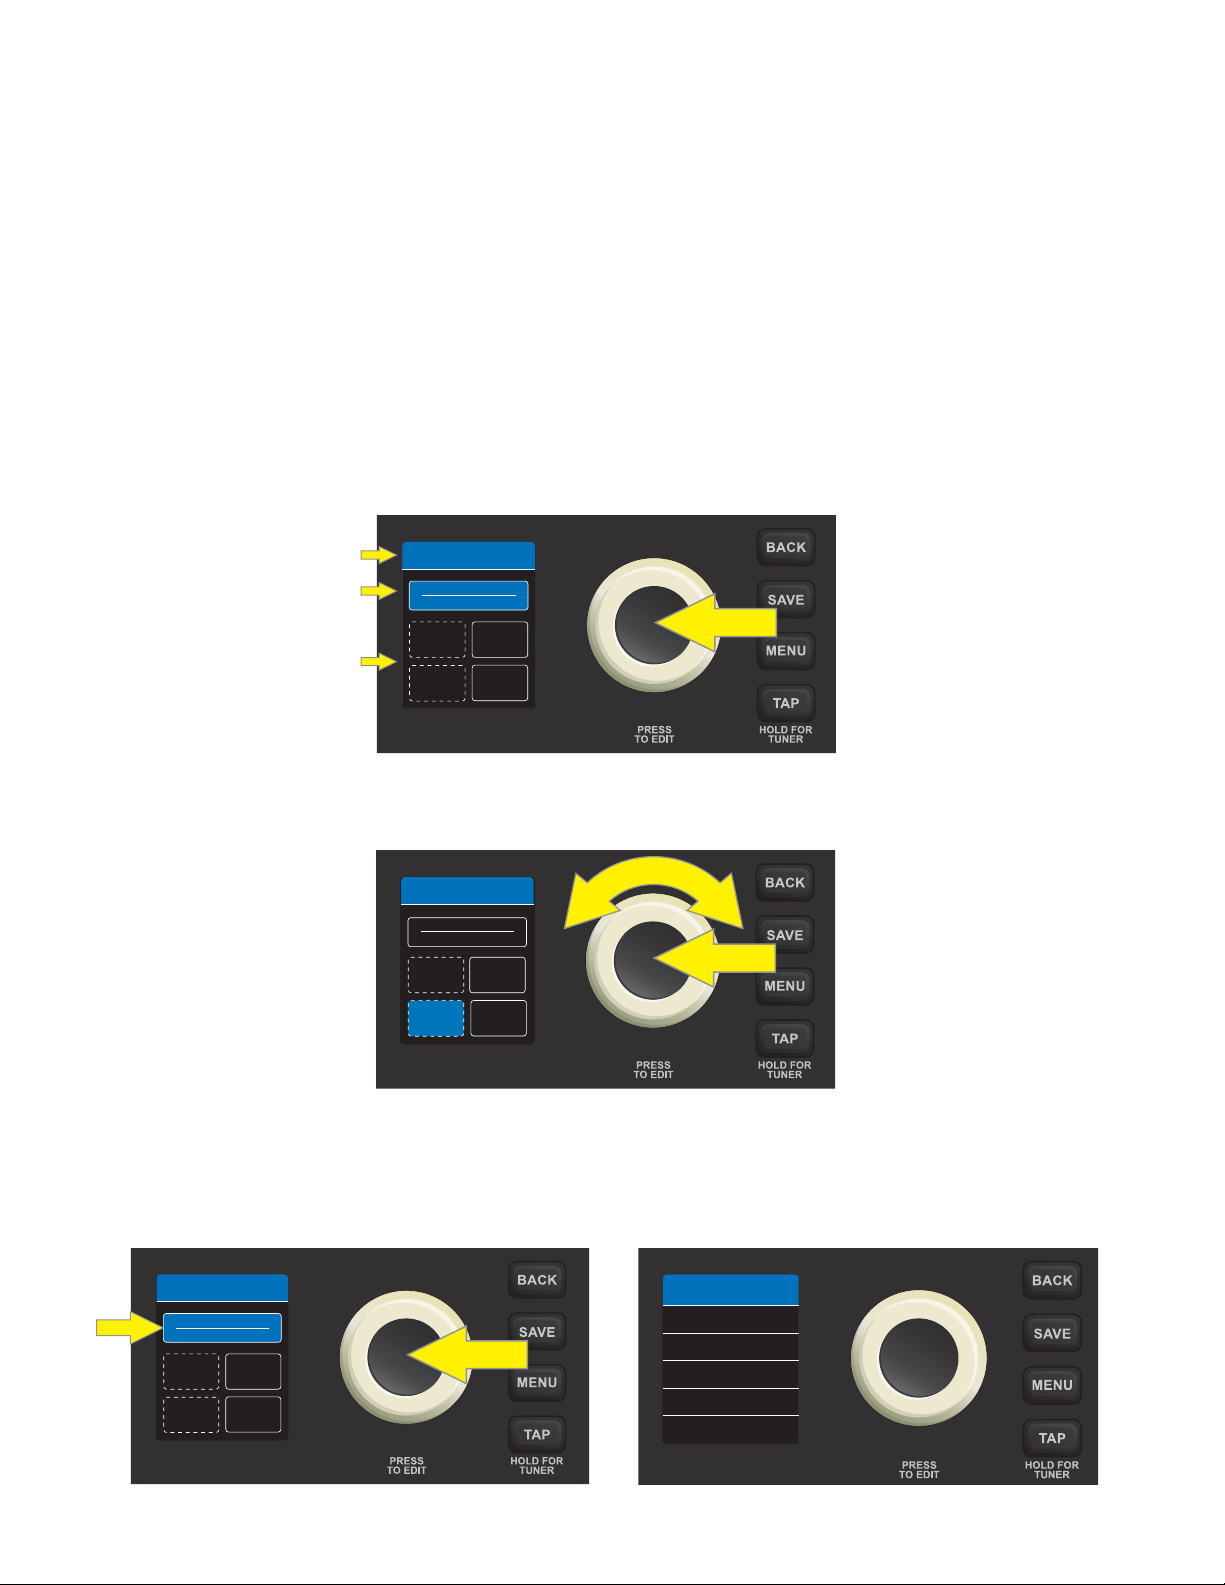
ACCESSING PRESET CONTENTS
To access the contents of a preset, press the ENCODER. From the top down, the DISPLAY WINDOW will then
show the number and name of the preset, the amplier type in use, and four boxes that organize the eects
used for that preset (if any). These eects category boxes are labeled STOMP (stompbox), MOD (modulation),
EQ and DELAY. When rst accessing preset contents, the preset name and amplier type are highlighted in blue:
PRESET NAME AND NUMBER
AMPLIFIER TYPE
23 WAH ECHO
AMPLIFIER
BIG RUMBLE
STOMPEQMOD
EFFECTS CATEGORY BOXES
DELAY
Select the amp model or one of the eects category boxes by turning and pressing the ENCODER. The active
selection is then highlighted in blue:
23 WAH ECHO
AMPLIFIER
AMPLIFIER
BIG RUMBLE
80S ROCK
STOMP MOD
STOMP MOD
EQ
DELAY
REV
EDITING AND SAVING AMPLIFIER CONTROL SETTINGS
To edit and save individual control settings of a preset’s amplier model, rst select the amp model by pressing the ENCODER on it. The DISPLAY WINDOW will then show a list of controls for the amp model in use:
23 WAH ECHO
AMPLIFIER
BIG RUMBLE
STOMPEQMOD
DELAY
4
BIG RUMBLE
GAIN
BASS
MIDDLE
VOLUME
7.0
5.5
5.5
5.5TREBLE
10.0
Page 7
There are two ways to adjust an amp control knob setting. A control parameter that corresponds to an actual
MIDDLE
TREBLE
MASTER
physical knob on the control panel can be adjusted simply by turning the physical control knob until the
desired value is reached in the DISPLAY WINDOW. In the example below, the amp model’s MIDDLE setting is
adjusted by turning the physical MIDDLE control knob on the control panel:
80S ROCK
BIG RUMBLE
GAIN
GAIN
VOLUME
BASS
MIDDLE
VOLUME
BASS
7.3
7.0
4.1
5.5
5.5
7.9TREBLE
5.5TREBLE
4.5MIDDLE
10.0
6.4
GAIN
BASS
MIDDLE
TREBLE
MASTER
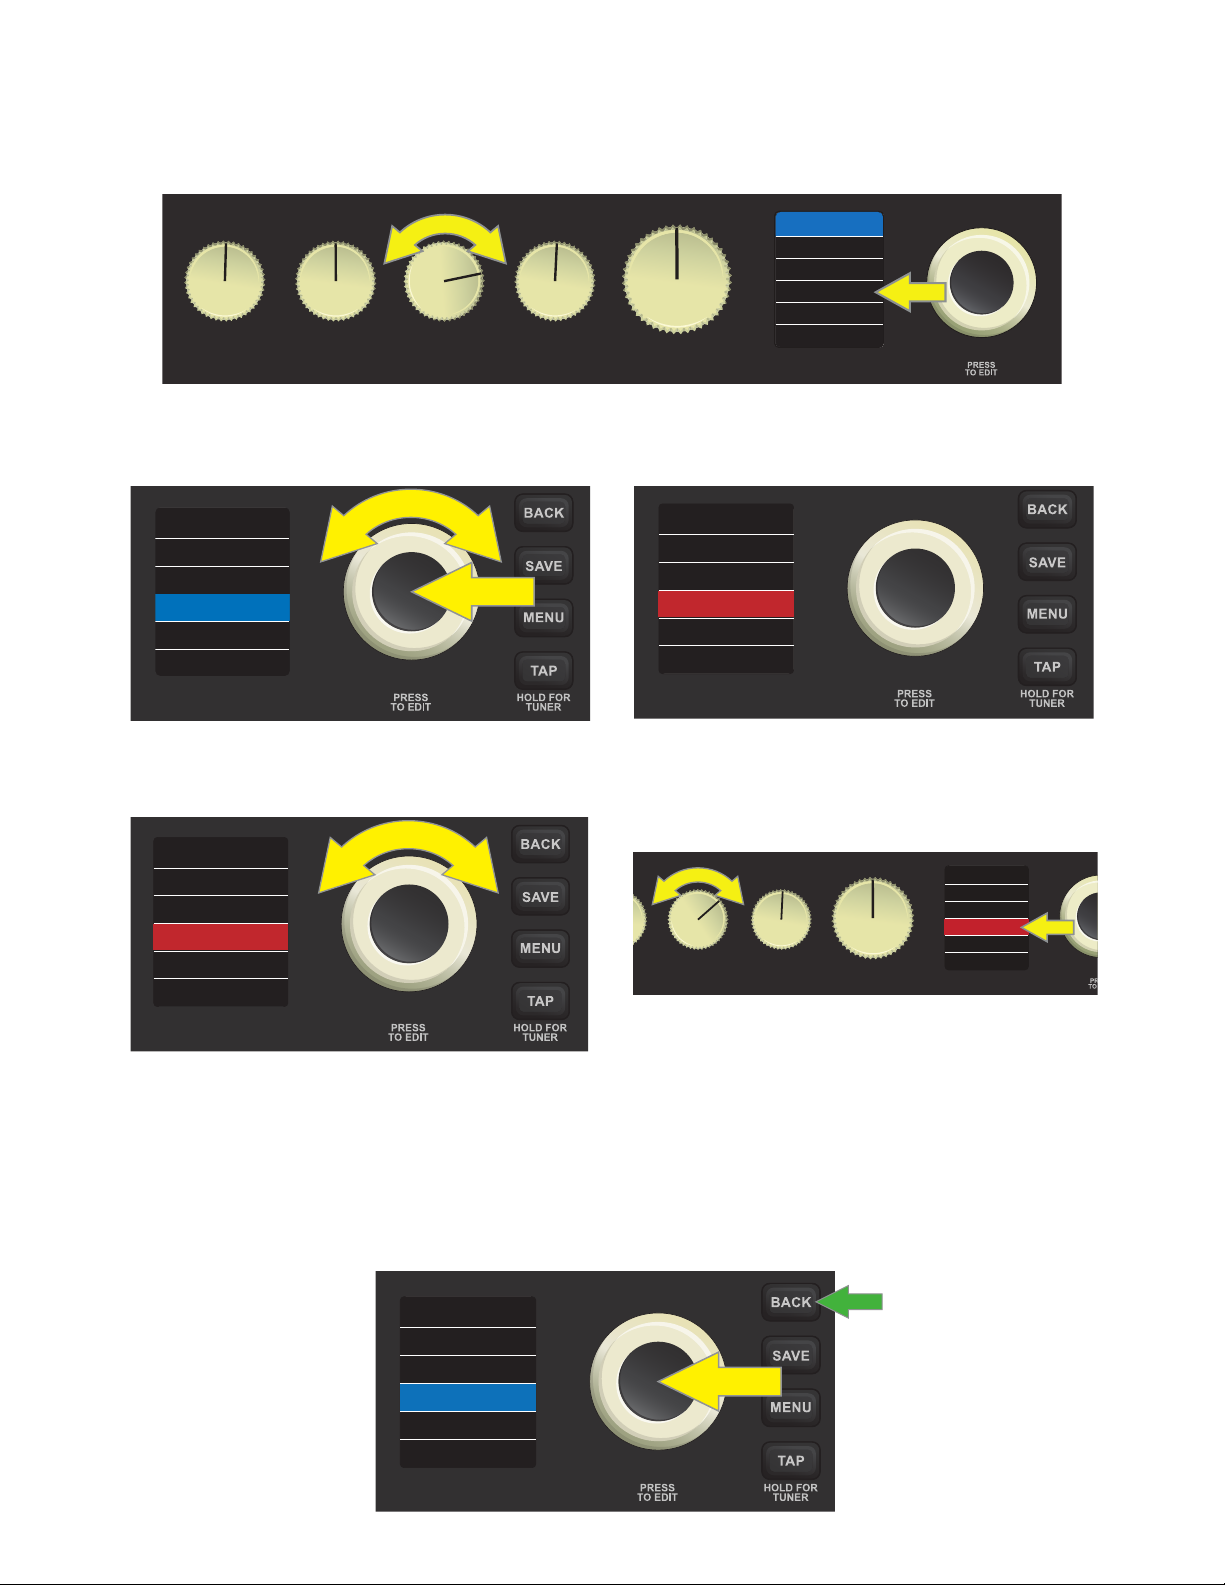
Alternately, select a control parameter by turning and pressing the ENCODER; its surrounding box will turn
from blue to red:
BIG RUMBLE
GAIN
BASS
VOLUME
7.0
5.5
5.5MIDDLE
5.5TREBLE
10.0
BIG RUMBLE
GAIN
BASS
VOLUME
7.0
5.5
5.8TREBLE
5.5MIDDLE
5.5TREBLE
10.0
The control can then be adjusted by turning the ENCODER or by turning a corresponding physical control
knob on the control panel (if present*):
BIG RUMBLE
GAIN
BASS
VOLUME
7.0
5.5
7.9MIDDLE
5.5TREBLE
10.0
BIG RUMBLE
GAIN
BASS
VOLUME
7.0
5.5
7.9MIDDLE
5.5TREBLE
10.0
*
Note that for control parameters such as VOLUME that have no corresponding physical knob
on the control panel, this is the only method of adjustment.
At this point, press the ENCODER or the BACK utility button (green arrow) to accept the adjusted control values. Pressing BACK returns the user to the preset contents screen; pressing the ENCODER lets the user continue making controls setting changes, and the box surrounding the control setting will return to blue. When
control setting edits are complete, press the SAVE utility button to save the changes to the preset.
BIG RUMBLE
GAIN
BASS
VOLUME
7.0
5.5
7.9MIDDLE
5.5TREBLE
10.0
5
Page 8

IMPORTANT: If edited amp control settings are not saved, the preset will revert to its original amp control
settings when returning to the preset after leaving it, or when turning the amplier o and back on again. To
save edited amp control settings, press the SAVE utility button and use the ENCODER to scroll to one of three
options—SAVE, SAVE AS or REPLACE. Each is detailed below.
SAVE: Keeps an edited preset in the same location with the same name. To do this, press the SAVE utility
button and use the ENCODER to scroll to “SAVE”. Press the SAVE utility button again or press the ENCODER. A
brief “PRESET SAVED!” screen will then ash before returning to the original preset screen:
02
STUDIO
SQUEEZE
SAVE
SAVE AS
REPLACE
PRESET SAVED!
SAVE AS: Enables saving an edited preset in a dierent position, with or without a dierent name. To do this, press
the SAVE utility button and use the ENCODER to scroll to “SAVE AS”. Press the ENCODER to access a “CHOOSE SLOT”
list of locations where the preset can be moved. Select a new location by turning and pressing the ENCODER:
02
STUDIO
SQUEEZE
SAVE
SAVE AS
REPLACE
CHOOSE SLOT
06 FAT OLD...
07 ORGAN T...
08 SLAP BASS
04 ROCK A B...
09 SYNTH FU...
10 VINTAGE...
NOTE: When using “SAVE AS”, note that a preset can be moved to a dierent position even if no edits have been made.
Also note that saving a preset to a dierent location permanently deletes the previous contents of the new location.
Whether renaming the preset or not when using “SAVE AS”, a name must be entered by pressing the ENCODER to activate a cursor, then spelling out the name by turning and pressing the ENCODER to scroll through
and select characters. All characters can be cleared by using the ENCODER to scroll to and select “CLEAR ALL”.
When name entry is completed for the new location, save it by pressing the SAVE utility button or by using
the ENCODER to scroll to and select “SAVE”. A brief “PRESET SAVED!” screen will then ash before returning to
the original preset screen:
RENAME
S T U D I O _ _
Q U E E Z E _
S
CLEAR ALL
SAVE
PRESET SAVED!
6
Page 9

REPLACE: Any existing preset can be replaced with another by pressing the SAVE utility button, using the
ENCODER to scroll to and select “REPLACE” and choosing from 50 replacement presets (the 30 factory presets, plus 20 additional presets listed on page 3). After selecting “REPLACE”, use the ENCODER to scroll to any
of the 50 available presets; each one is automatically “previewed” so the user can hear the sound before the
preset is loaded. Press the ENCODER to select the preset, conrm it by using the ENCODER to scroll to and
select “NO CANCEL” or “YES REPLACE” (not shown) and save and save it in the chosen slot:
02
STUDIO
SQUEEZE
SAVE
SAVE
SAVE AS
SAVE AS
REPLACE
REPLACE
17 / 50
SUPER
ROCK
70S ROCK
SAVE
SAVE AS
PRESS SAVE
TO CONFIRM
CHANGING THE AMPLIFIER MODEL IN A PRESET
The amplier model in a preset can be replaced with another one (see list of Rumble LT25 amplier models on
page 8). To do this, acess the contents of a preset by pressing the ENCODER on it; the amp model will au-
tomatically be highlighted. Press the ENCODER again to see a list of controls for the amp model in use; the
name of the amp model appears at the top of this list.
Press the ENCODER once more to activate the amplier replacement function; the box surrounding the amp
name will turn from blue to red, and white arrows will bracket the amp name. Turn the ENCODER to scroll to a
new amp model. Press the ENCODER to accept the amp model change, after which the box surrounding the
amp name will return to blue; or press the BACK utility button (green arrow) to accept the amp model change
and return to the preset contents screen:
18 AUDIO RA...
AMPLIFIER
ARENA BASS
STOMPEQMOD
DELAY
BURN
MONSTER
GAIN
BASS
MIDDLE
VOLUME
5.5
7.1
3.7
4.2TREBLE
8.6
ARENA BASS
GAIN
BASS
MIDDLE
VOLUME
MONSTER
GAIN
BASS
MIDDLE
VOLUME
5.5
6.5
3.2
6.5TREBLE
6.8
5.5
7.1
3.7
4.2TREBLE
8.6
IMPORTANT: If an amplier replacement is not saved, the preset will revert to its original amp type when returning to the preset after leaving it, or when turning the amplier o and back on again. To save a preset amp
replacement, follow the SAVE, SAVE AS or REPLACE instructions on page 6 and at the top of this page.
7
Page 10

RUMBLE LT25 AMPLIFIER MODELS
This table lists the amp models in Rumble LT25. The amp label used in each preset appears in the lefthand
column, followed by the amp type and a brief description in the righthand column.
PRESET AMP LABEL AMP TYPE AND DESCRIPTION
STUDIO 1
STUDIO 2
RUMBLE
BIG RUMBLE
WARM COMBO
ARENA BASS
CLEAN BASS
SLAP BASS
BASS 300
MONSTER
Direct-to-mixing-desk studio purity with clean, uncolored tonal response
Similar to the above, but like a tube console for increased harmonic coloration
Based on the clean-to-gritty 2x10” tone of Fender’s best-selling bass amps
Same as above, but with the added boom of a 1x15 cab
Based on the beloved mid-’60s Ampeg B-15NF
Inspired by the seismic all-tube sound of the Ampeg SVT
Based on the ’80s/’90s-era power and clarity of the Gallien-Krueger 800RB
Inspired by the full-range high-end 1990s indispensability of the SWR® Redhead
Based on Fender’s Bassman® 300 Pro all-tube giant with distinctively versatile tone
shaping and blendable overdrive
High-gain all-tube boutique guitar amp re-imagined for bass
OLD FENDER
SHOWMAN
GRUNGE BASS
70S ROCK
ANGRY BRIT
BASSMAN 2K
Champ, Deluxe, Bassman, Princeton, Deluxe Reverb and Twin Reverb are trademarks of FMIC. All other non-FMIC product names and trademarks appearing in this manual
are the property of their respective owners and are used solely to identify the products whose tones and sounds were studied during sound model development for this
product. The use of these products and trademarks does not imply any aliation, connection, sponsorship, or approval between FMIC and with or by any third party.
Based on the original-era boom of Fender’s vintage “TV-Front” Bassman
Based on the ’60s/’70s all-tube Fender classic Dual Showman, used on big stages
everywhere
Inspired by the “sludgy” majesty of 1970s-era Orange amps
Inspired by a late ’60s/early ’70s Marshall Super Bass, a quintessential
early hard-rock bass amp
Inspired by the ’80s metal tone of the Marshall JCM800 guitar amp
Based on Fender’s present-day agship Super Bassman amp, with blendable tube
overdrive
8
Page 11

EDITING AND SAVING EFFECTS CONTROL SETTINGS
To edit and save individual control settings of a preset’s various eects (if any), rst select the eect category box
containing the eect to be edited by turning and pressing the ENCODER. There are four eects category boxes
that can each contain one eect: STOMP (stompbox), MOD (modulation), EQ and DELAY:
29 AUDIO RA...
AMPLIFIER
ARENA BASS
STOMP
EQ
MOD
DELAY
The DISPLAY WINDOW will then show a list of controls for the eect model in use in that category; use the ENCODER to scroll to a particular eect control. Press the ENCODER to select the eect control; its surrounding
box will turn from blue to red. Turn the ENCODER to set a new value for the selected control value:
HALL RVRB
LEVEL
DECAY
TONE
3.8
3.2
10.0
HALL RVRB
LEVEL
DECAY
TONE
7.6
7.6
3.2
10.0
At this point, press the ENCODER to accept the adjusted eect control value and exit edit mode; the surrounding box will then return to blue. Alternately, press the BACK utility button (green arrow) to accept the
eect control value change and return to the preset contents screen:
HALL RVRB
7.6
LEVEL
DECAY
TONE
7.6
3.2
10.0
IMPORTANT: If an edited eect control setting is not saved, the preset will revert to its original eect control
settings when returning to the preset after leaving it, or when turning the amplier o and back on again. To
save edited eect control settings, follow the SAVE, SAVE AS or REPLACE instructions on pages 6 and 7.
9
Page 12

REPLACING, ADDING AND DELETING EFFECTS
As noted, each of the four eect category boxes can contain one eect. If an eect is present, it can be replaced with another eect in that category, or it can be deleted. If no eect is present, one can be added (see
list of Rumble LT25 eect models on pages 13-14). The signal path is Instrument—Stompbox—Modulation—Amplier—EQ—Delay/Reverb—Speaker, as illustrated at left below.
Note that eects category boxes that already contain an eect have a solid outline, whereas eects category
boxes that do not contain an eect have a dotted outline, as seen in the image at right below:
STOMP
MOD
29 AUDIO RA...
AMPLIFIER
ARENA BASS
DOTTED OUTLINE (NO
EFFECT PRESENT)
SOLID OUTLINE
(EFFECT PRESENT)
BASS
AMPLIFIER
EQ
DELAY/
REVERB
SPKR
STOMP
EQ
MOD
DELAY
Rumble LT25 signal path
To replace an eect, access the contents of a preset by pressing the ENCODER on it, then use the ENCODER
to scroll to one of the four eect category boxes. Press the ENCODER again to see the eect contained in the
eect category box; the name of the eect model is highlighted at the top of the DISPLAY WINDOW:
29 AUDIO RA...
AMPLIFIER
ARENA BASS
STOMP
MOD
HALL RVRB
LEVEL
DECAY
TONE
3.8
3.2
10.0
DELAY
EQ
Press the ENCODER once more to activate the eect replacement function; the box surrounding the eect
name will turn from blue to red, and white arrows will bracket the eect name. Turn the ENCODER clockwise
to scroll through other eects models in that category. Press the ENCODER to accept a replacement eect
and exit edit mode; the surrounding box will return to blue. Alternately, press the BACK utility button (green
arrow) to accept the replacement eect and return to the preset contents screen:
ECHO
LEVEL
400 MS
TIME
FEEDBACK
5.5
3.2
5.5WOW
ECHO
LEVEL
400 MS
TIME
FEEDBACK
5.5
3.2
5.5WOW
10
Page 13

To delete an eect, the steps are very similar to those on page 10. As before, access the contents of a preset
by pressing the ENCODER on it, then use the ENCODER to scroll to an occupied eect category box. Press the
ENCODER again to see the eect contained in the eect category box; the name of the eect model is highlighted at the top of the DISPLAY WINDOW:
29 AUDIO RA...
AMPLIFIER
ARENA BASS
STOMP
EQ
MOD
DELAY
HALL RVRB
LEVEL
DECAY
TONE
3.8
3.2
10.0
Press the ENCODER once more to activate the eect replacement function; the box surrounding the eect
name will turn from blue to red, and white arrows will bracket the eect name. Turn the ENCODER counter-
lockwise until the red-highlighted eect label at the top of the DISPLAY WINDOW reads “NONE”. Press the
ENCODER on “NONE” (or press the BACK utility button), after which the user is returned to the preset screen
with the previously occupied eect category box now empty:
NONE
29 AUDIO RA...
AMPLIFIER
ARENA BASS
STOMP
EQ
MOD
DELAY
To add an eect to an empty eect category box, rst access the contents of a preset by pressing the ENCOD-
ER on it, then use the ENCODER to scroll to the empty eect category box. Press the ENCODER again to access
the empty eect category box; the red-highlighted label “NONE” bracketed by white arrows will appear at the
top of the DISPLAY WINDOW:
23 WAH ECHO
AMPLIFIER
BIG RUMBLE
STOMP
STOMP
EQ
MOD
DELAY
NONE
Turn the ENCODER clockwise to scroll through eects models in that category. Press the ENCODER on the
desired eect, after which the box surrounding the eect name will return to blue and the eect is added—
although not yet saved—to that eect category box. Alternately, press the BACK utility button (green arrow)
to return to the preset contents screen (see illustrations on next page):
11
Page 14

COMPRESSOR
MIDTYPE
COMPRESSOR
MIDTYPE
IMPORTANT: If an eect is not saved once it has been replaced, deleted or added, the preset will revert to
its original eect model(s) when returning to the preset after leaving it, or when turning the amplier o
and back on again. To save a changed, deleted or added eect model, follow the SAVE, SAVE AS or REPLACE
instructions on pages 6 and 7.
SETTING DELAY TIMES WITH THE TAP BUTTON
There are two ways to set delay times for eects in Rumble LT25’s “DELAY” eects category box. The rst way
is to use the “Editing and Saving Eects Control Settings” instructions found on page 9, using the ENCODER
to scroll to, select and adjust individual eect settings, including delay time.
The second way is to use Rumble LT25’s TAP utility button (yellow arrow). If a preset includes a delay eect, the
TAP LIGHT (green arrow) ashes in time with that eect’s default delay time. This time setting can be modied
by tapping the TAP utility button two or more times at the desired tempo, regardless of what screen is shown
in the DISPLAY WINDOW:
IMPORTANT: If an edited delay time is not saved, the eect will revert to its original delay time when returning to the preset after leaving it, or when turning the amplier o and back on again. To save an edited delay
time, follow the SAVE, SAVE AS or REPLACE instructions on pages 6 and 7.
12
Page 15

RUMBLE LT25 EFFECT MODELS
This table lists the eect models in Rumble LT25, organized into the four categories that appear in each preset—
STOMP (stompbox), MOD (modulation), EQ and DELAY/REVERB. The eects labels used in each preset appear in
the lefthand column, followed by the eects types and a brief description in the righthand column. Note that
STOMP and MOD are “pre” eects; that is, they come before the amp model in the signal path. EQ and DELAY/REVERB are “post” eects, placed after the amp model in the signal path.
STOMPBOX EFFECTS
OVERDRIVE
BLUES DRIVE
BASS DRIVE
ROCK DIRT
FUZZ
OCTOBOT
COMPRESSOR
SUSTAIN
5-BAND EQ
Versatile Fender overdrive specially designed for exibilty
Overdrive eect inspired by the original late-’70s Ibanez TS808 Tube Screamer
Inspired by the snarl of the Tech 21 SansAmp Bass Driver pedal
Distortion eect inspired by the Pro Co RAT
Versatile Fender fuzz with variable low-end response specially designed for Rumble LT25
Synth-like combination of octave-down eect plus octave-up fuzz
Compressor with added gain, threshold, attack and release controls
Inspired by the MXR M-163 Sustain, a rare 1980s compressor pedal with an especially
strong compression eect and short attack time
Five-band graphic equalizer
MODULATION EFFECTS
CHORUS
FLANGER
VIBRATONE
TREMOLO
PHASER
STEP FILTER
TOUCH WAH
All non-FMIC product names and trademarks appearing in this manual are the property of their respective owners and are used solely to identify the products whose tones
and sounds were studied during sound model development for this product. The use of these products and trademarks does not imply any aliation, connection, sponsorship, or approval between FMIC and with or by any third party.
Distinctive chorus eect that uses a triangle wave for modulation
Distinctive anging eect that uses a triangle wave for modulation
Classic late-’60s/early-’70s Fender eect with a rotating speaker bae
Smoothly pulsating tube bias tremolo, as heard in amps
such as the Fender Princeton Reverb
Long-indispensable jetliner “whoosh” heard on countless recordings
Rhythmically choppy eect that dices notes into distinctly alternating “steps”
Wah eect controlled by picking dynamics rather than an expression pedal
13
Page 16

EQ
5-BAND EQ
Five-band graphic equalizer
DELAY/REVERB EFFECTS
Note that the control panel TAP utility button and TAP LIGHT work in connection with eects in this category only.
DELAY
REVERSE
ECHO
Tape delay eect based on the analog classic Maestro Echoplex, which had tape im-
HALL REVERB
ROOM REVERB
All non-FMIC product names and trademarks appearing in this manual are the property of their respective owners and are used solely to identify the products whose tones
and sounds were studied during sound model development for this product. The use of these products and trademarks does not imply any aliation, connection, sponsorship, or approval between FMIC and with or by any third party.
Reverses the delayed signal for the classic “backwards guitar” eect
Strong, bright reverb simulating the size of, for example, a major
Warmer, less echo-y reverb typical of smaller spaces and classic echo chambers
Clean, simple and pristine signal repetition
perfections that created distinctive “wow” and “utter”
performance hall and other large, cavernous spaces
MENU FUNCTIONS
Rumble LT25 features four convenient MENU functions—TUNER, FOOTSWITCH, SETTINGS and RESTORE—all
easily accessed by pressing the MENU utility button. The rst function (TUNER) is automatically highlighted;
use the ENCODER to scroll to and select any MENU function:
MENU
TUNER
FOOTSWITCH
SETTINGS
RESTORE
TUNER: Enables use of Rumble LT25’s built-in chromatic tuner (page 15).
FOOTSWITCH: For conguring Rumble LT25’s single-button footswitch to provide easy hands-free selection
of any two presets (page 16).
MENU
TUNER
FOOTSWITCH
SETTINGS
RESTORE
SETTINGS: Displays the rware version (page 17). Also includes a gain control for use when recording using
the USB audio port on the control panel (page 18).
RESTORE: Enables restoration of factory presets and amplier settings (page 17).
14
Page 17

MENU FUNCTION: TUNER
There are two ways to access Rumble LT25’s built-in chromatic tuner. The rst way is to press and hold the TAP
utility button on the control panel until the tuner screen appears in the DISPLAY WINDOW:
TUNER
The second way is to press the MENU utility button on the control panel; the list of MENU functions will
appear in the DISPLAY WINDOW with the TUNER function automatically highlighted atop the list. Press the
ENCODER on TUNER to access the tuner screen:
MENU
TUNER
FOOTSWITCH
SETTINGS
RESTORE
TUNER
To use the TUNER, sound a note; the letter name of the pitch will appear in the box at bottom and the shorter
vertical bars on either side of the longer vertical center bar will illuminate red to indicate varying degrees of
sharpness (to the right) or atness (to the left). When a pitch is precisely in tune, the longer vertical center bar
and the two shorter vertical bars on either side of it will illuminate green:
TUNER
A
TUNER
A
“A” PITCH SLIGHTLY FLAT “A” PITCH IN TUNE
Note that speaker output is muted when tuning, and that the volume control on the instrument being tuned
must be turned up suciently to register a TUNER reading.
15
Page 18

MENU FUNCTION: FOOTSWITCH
Connect an optional Fender single-button footswitch (PN 0994052000) by plugging it into the “FTSW” jack
on the control panel. The footswitch provides convenient hands-free switching between two pre-determined
“quick-access” presets. The second MENU function—FOOTSWITCH—enables easy conguration of any two
presets for quick-access footswitch use. To do this, press the MENU utility button, then use the ENCODER to
scroll to and select FOOTSWITCH:
MENU
TUNER
07
ORGAN
TONE
Two presets will be shown in the DISPLAY WINDOW below the header “QUICK ACCESS”; the upper preset is automatically highlighted in blue. To choose a new preset for this upper quick-access position, press the ENCODER on it; the box surrounding the preset name will turn red. Use the ENCODER to scroll to a new preset for the
upper quick-access position:
FOOTSWITCH
SETTINGS
RESTORE
QUICK ACCESS
01
STUDIO CLEA
02
STUDIO SQUE
QUICK ACCESS
17
70S ROCK
02
STUDIO SQUE
Press the ENCODER to select the new upper quick-access preset; the box surrounding the preset name will
return to blue. To choose a new preset for the lower quick-access position, turn the ENCODER clockwise to
highlight the lower preset, then follow the same steps as above:
QUICK ACCESS
17
70S ROCK
02
STUDIO SQUE
QUICK ACCESS
17
70S ROCK
03
RUMBLE
IMPORTANT: If quick-access footswitch presets are not saved, the quick-access preset slots will revert to
their original contents when returning to the preset after leaving it, or when turning the amplier o and
back on again. To save quick-access footswitch presets, follow the SAVE, SAVE AS or REPLACE instructions on
pages 6 and 7.
16
Page 19

MENU FUNCTION: SETTINGS
The third MENU function—SETTINGS—displays the current rmware version and features a gain control for
use when recording using the USB port on the control panel. To access these options, press the MENU utility button and use the ENCODER to scroll to and select SETTINGS. The USB gain control appears at top (see
instructions under “USB PORT”, page 18), with the rmware version below (“VERSION”):
MENU
TUNER
FOOTSWITCH
SETTINGS
RESTORE
SETTINGS
VERSION
0.3.8
+6.0USB GAIN
Be sure to check fender.com/rmware/support regularly for rmware updates that improve and enhance the
Rumble LT25 experience.
MENU FUNCTION: RESTORE
The fourth MENU function—RESTORE—enables restoration of all original factory presets and amplier settings. To do this, press the MENU utility button, then use the ENCODER to scroll to and select RESTORE:
MENU
TUNER
07
ORGAN
TONE
FOOTSWITCH
SETTINGS
RESTORE
To initiate restoration use the ENCODER to scroll to and select “YES RESTORE”. To cancel restoration, press the
ENCODER on “NO CANCEL”, or press the BACK utility button. While restoration is in progress, a blue waiting
screen will briey appear. When restoration is complete, the user is returned to the rst preset screen:
RESTORE
FACTORY
RESTORE?
NO CANCEL
YES RESTORE
RESTORING
FACTORY
SETTINGS
PLEASE WAIT...
17
Page 20

AUXILIARY INPUT AND HEADPHONE OUTPUT
GAIN
The Rumble LT25 control panel features two 1/8”-inch jacks: an auxiliary input
for connecting external mobile/audio devices and an output for convenient
headphone use.
Note that when using the auxiliary input, volume levels for external devices
are set using volume controls on the external devices themselves (the amp’s
volume controls are for overall volume level only and do not aect individual
volume of external devices connected to the auxiliary input jack). Also note
that when headphones are plugged in, speaker output is muted.
USB PORT
The Rumble LT25 control panel features a USB port for audio recording. Using a micro USB
cable (not included), connect a computer with recording software to this port. No external
driver is needed to connect to an Apple computer. To connect to a Windows-based computer, the user must download the ASIO driver setup with Fender Mustang device, available at www.fender.com/support/articles/fender-universal-asio-drive.
Note that although the USB port and the auxiliary input can be used simultaneously, the
USB port cannot be used to record a signal from the auxiliary input.
When recording using the USB port, a gain control is located in the SETTINGS menu function (page 17). To access and use this gain control, press the MENU utility button and use the
ENCODER to scroll to and select SETTINGS; “USB GAIN” will automatically be highlighted. Press the ENCODER on
“USB GAIN” to select it; the surrounding box will turn from blue to red:
MENU
TUNER
FOOTSWITCH
SETTINGS
RESTORE
SETTINGS
VERSION
0.3.8
+6.0USB GAIN
Turn the ENCODER to set a new “USB GAIN” value. Press the ENCODER to accept the new value; the surrounding box will return to blue (not shown). Alternately, press the BACK utility button (green arrow) to accept the
new value and return to the MENU function screen:
SETTINGS
+8.5USB GAIN
VERSION
0.3.8
Note that the “USB GAIN” control in the SETTINGS menu function is the only one that aects USB recording;
the actual physical GAIN control knob on the control panel does not aect USB recording.
18
Page 21

SPECIFICATIONS
TYPE PR 5250
POWER REQUIREMENTS 84 watt s
POWER OUTPUT 25 watt s into 8Ω
INPUT IMPEDANCE 1MΩ (instrum ent) 15kΩ (aux)
SPEAKER One 8” Fend er Special Design speaker (8Ω)
FOOTSWITCH Fender 1-Button Economy On-Off Footswitch (optional, PN 0994049000)
DIMENSIONS AND WEIGHT Width: 15.3” (38.9 cm) Height: 16.4” (41.6 cm) Depth: 11” (28 cm) Weight: 19.25 lbs. (8.7 kg)
Product specifications subject to change without notice.
Be sure to check fender.com/rmware/support regularly for rmware updates that improve and enhance the
Rumble LT25 experience.
19
Page 22

部件名称
本表格依据 SJ/T 11364 的规定编制。
O: 表示该有毒有害物质在该部件所有均质材料中的含量均在 GB/T 26572 规定的限量要求以下。
X: 表示该有毒有害物质至少在该部件的某一均质材料中的含量超出 GB/T 26572 规定的限量要求。
注: 含有有害物质的部件由于全球技术发展水平限制而无法实现有害物质的替代。
*产品含有喇叭单元时有效。
箱体
喇叭单元*
电子部分
接线端子
电线
附件
有害物质
产品中有害物质的名称及含量
铅
(Pb)
O
O
X
X
X
O
O
O
O
O
O
O
O
O
X
O
O
O
O
O
O
O
O
O
O
O
O
O
O
O
O
O
O
O
O
O
汞
(Hg)
镉
(Cd)
六价铬
(Cr(VI))
多溴联苯
(PBB)
多溴二苯醚
(PBDE)
PART NUMBERS / REFERENCIAS / RÉFÉRENCE / NÚMERO DAS PEÇAS / NUMERO PARTI / TEILENUMMERN
NUMERY REFERENCYJNE / REFERENČNÍ ČÍSLA / REFERENČNÉ ČÍSLA / REFERENČNE ŠTEVILKE /
部品番号
Rumble LT25
2270100000 (120V, 60Hz) NA
2270101000 (110V, 60Hz) TW
2270103000 (240V, 50Hz) AU
2270104000 (230V, 50Hz) UK
2270105000 (220V, 50Hz) ARG
2270106000 (230V, 50Hz) EU
2270107000 (100V, 50/60Hz) JP
2270108000 (220V, 50Hz) CN
2270109000 (220V, 60Hz) ROK
2270113000 (240V, 50Hz) MA
/
型号
A PRODUCT OF
FENDER MUSICAL INSTRUMENTS CORP.
Calle Huerta #279, Int. A. Col. El Naranjo. C.P. 22785. Ensenada, Baja California, México.
IMPORTADO POR: Fender Ventas de México, S. de R.L. de C.V.
Servicio al Cliente: 01(800) 7887395, 01(800) 7887396, 01(800) 7889433
Fender®, Rumble™ and Mustang™ are trademarks of FMIC.
Other trademarks are property of their respective owners.
Copyright © 2019 FMIC. All rights reserved.
311 CESSNA CIRCLE
CORONA, CALIF. 92880 U.S.A.
AMPLIFICADOR DE AUDIO
RFC: FVM-140508-CI0
PN 7715453000 rev. a
 Loading...