

Fender Mustang v.2, Mustang III v.2, Mustang IV v.2, Mustang V v.2, Mustang I v.2 Advanced Owner's Manual
...
™
MUSTANG
GUITAR AMPLIFIERS
(
v.2
)
BY
FENDER
®
ADVANCED OWNER'S MANUAL
MUSTANG™ III/IV/V (v.2)
Advanced Manual
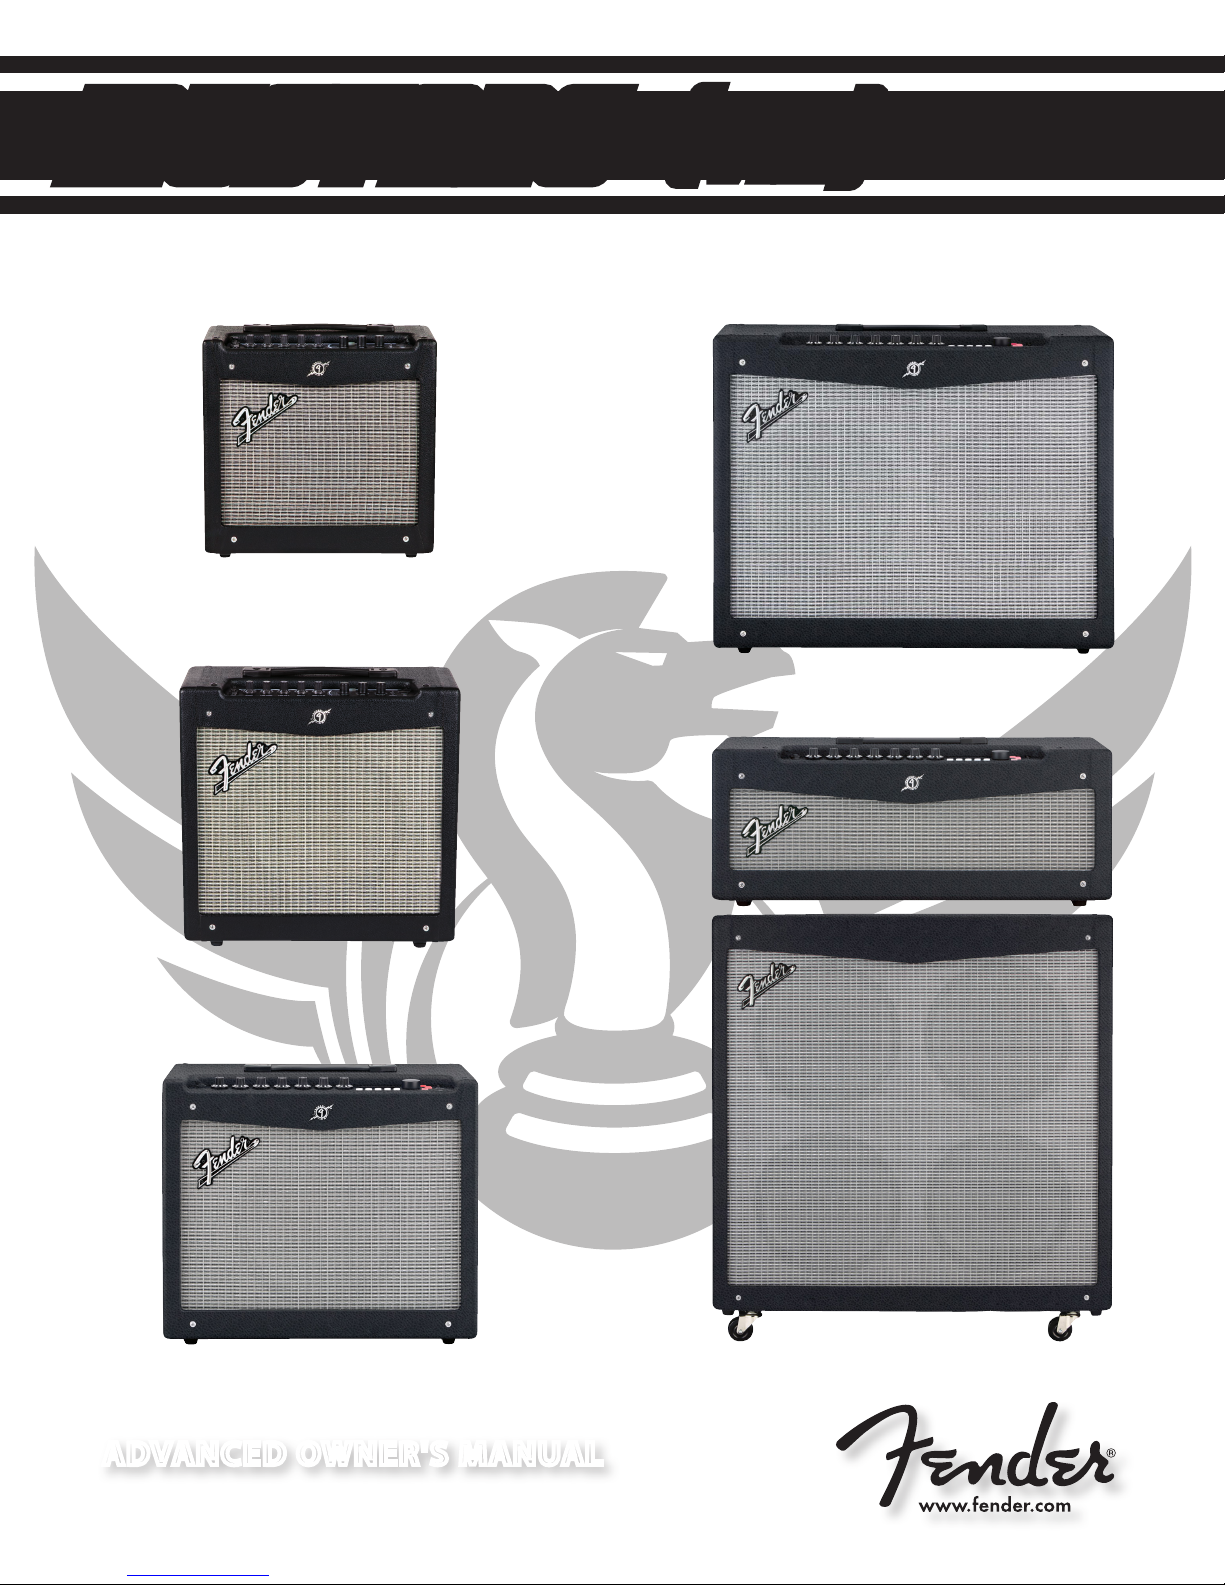
not active and the knob positions will NOT show their actual
settings when a preset is first selected.
Introduction
This manual is your step-by-step guide to the advanced
features found on your Mustang™ (v.2) amplifier. Turn
to page 10 for the Mustang I / II advanced manual. For
information on using Fender® FUSE™, Ableton® Live
or Amplitube®, please see the separate manuals for each
product available at www.fender.com/support.
Navigation
There are just a few basics of Mustang navigation that you
should know before you explore any further...
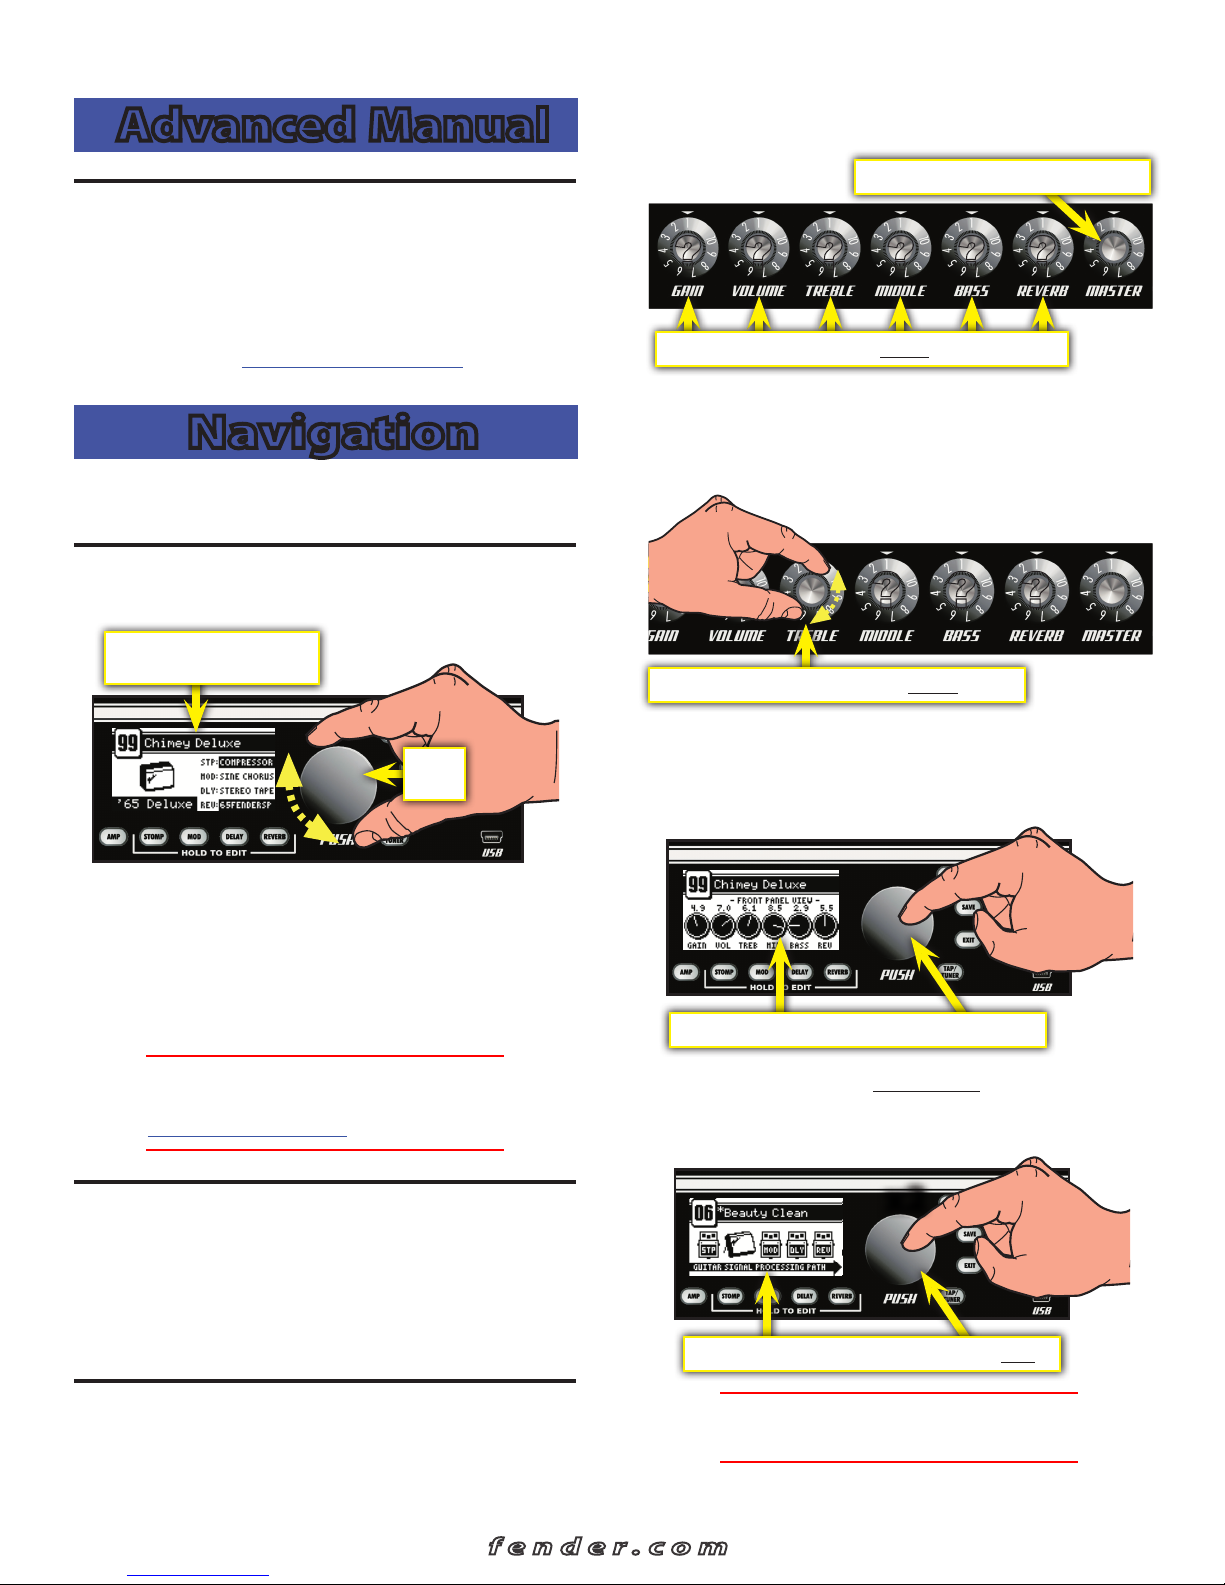
Selecting Presets
Turn the DATA WHEEL to select one of 100 presets.
Preset contents are displayed
on screen for each preset
DATA
WHEEL
MASTER volume is
always
active
PROGRAMMABLE knobs are inactive unless turned
How do I activate a programmable knob? The moment you
turn any programmable knob it instantly becomes active and
it will remain active until you select a different preset, at which
time all the programmable knobs become inactive again.
Turn a PROGRAMMABLE knob to activate it
Press the DATA WHEEL to see what the stored preset settings
are for all the programmable knobs before you turn them.
Press EXIT to return to Play mode.
You will find some presets you like and others that you want
to change...
Each preset stores the settings for:
• Amplifier type — 17 selections
• Effects — 4 categories, 44 selections total
• Knob levels — GAIN through REVERB (not MASTER)
You can also select and edit presets from your computer
♫
using Fender® FUSE™ software, available free of charge
at www.fender.com/support
Master Volume
The MASTER volume knob is always "active." That means the
position of the MASTER knob always shows the true master
volume setting, unlike the programmable knobs.
(Always turn the MASTER volume knob first to adjust the
overall volume output of your Mustang amplifier.)
Programmable Knobs
Because the setting of every knob (except MASTER) is stored
within each preset, the "programmable" knob postitions are
To view preset knob settings, push the DATA WHEEL
Press the DATA WHEEL a second time to see where your
effects are located in the Guitar Signal Processing Path.
Press EXIT to return to Play mode.
x2
To view the Signal Path, push the DATA WHEEL twice.
You can change the order of effects in the Signal Path
♫
using Fender® FUSE™ software.
2
fender.com
MUSTANG™ III/IV/V (v.2)
Amplifier Menus
Select amplifier models and adjust amplifier settings using
the Amp menus.
You can de-select the highlighted amp setting and
♫
return to Amp Model selection mode, as a shortcut, by
pressing and holding the AMP button.
4. Press EXIT to return to Play mode.
Amplifier Models
To select Amplifier Models:
1. Press the AMP button.
2. Turn the DATA WHEEL to select one of 17 amplifier models:
AMP MODELS
Studio Preamp
'57 Champ
'57 Deluxe
'57 Twin
'59 Bassman
'65 Princeton
'65 Deluxe Reverb
'65 Twin Reverb
'60s Thrift
British Watts
British '60s
British '70s
British '80s
British Colour
Super-Sonic (Burn)
American '90s
Metal 2000
3. Press EXIT to return to Play mode.
Effect Menus
Bypassing Effects
You can turn on–off effects that have been selected for the
current preset by pressing the corresponding effect button.
The Effect name is highlighted
and the Effect button lights up
when an effect is active
Effects can also be bypassed (turned on-off) from the
♫
footswitch included with your Mustang amplifier.
Effects that are shown on screen as "–EM PT Y–" can not be
activated until an effect has been selected in that slot.
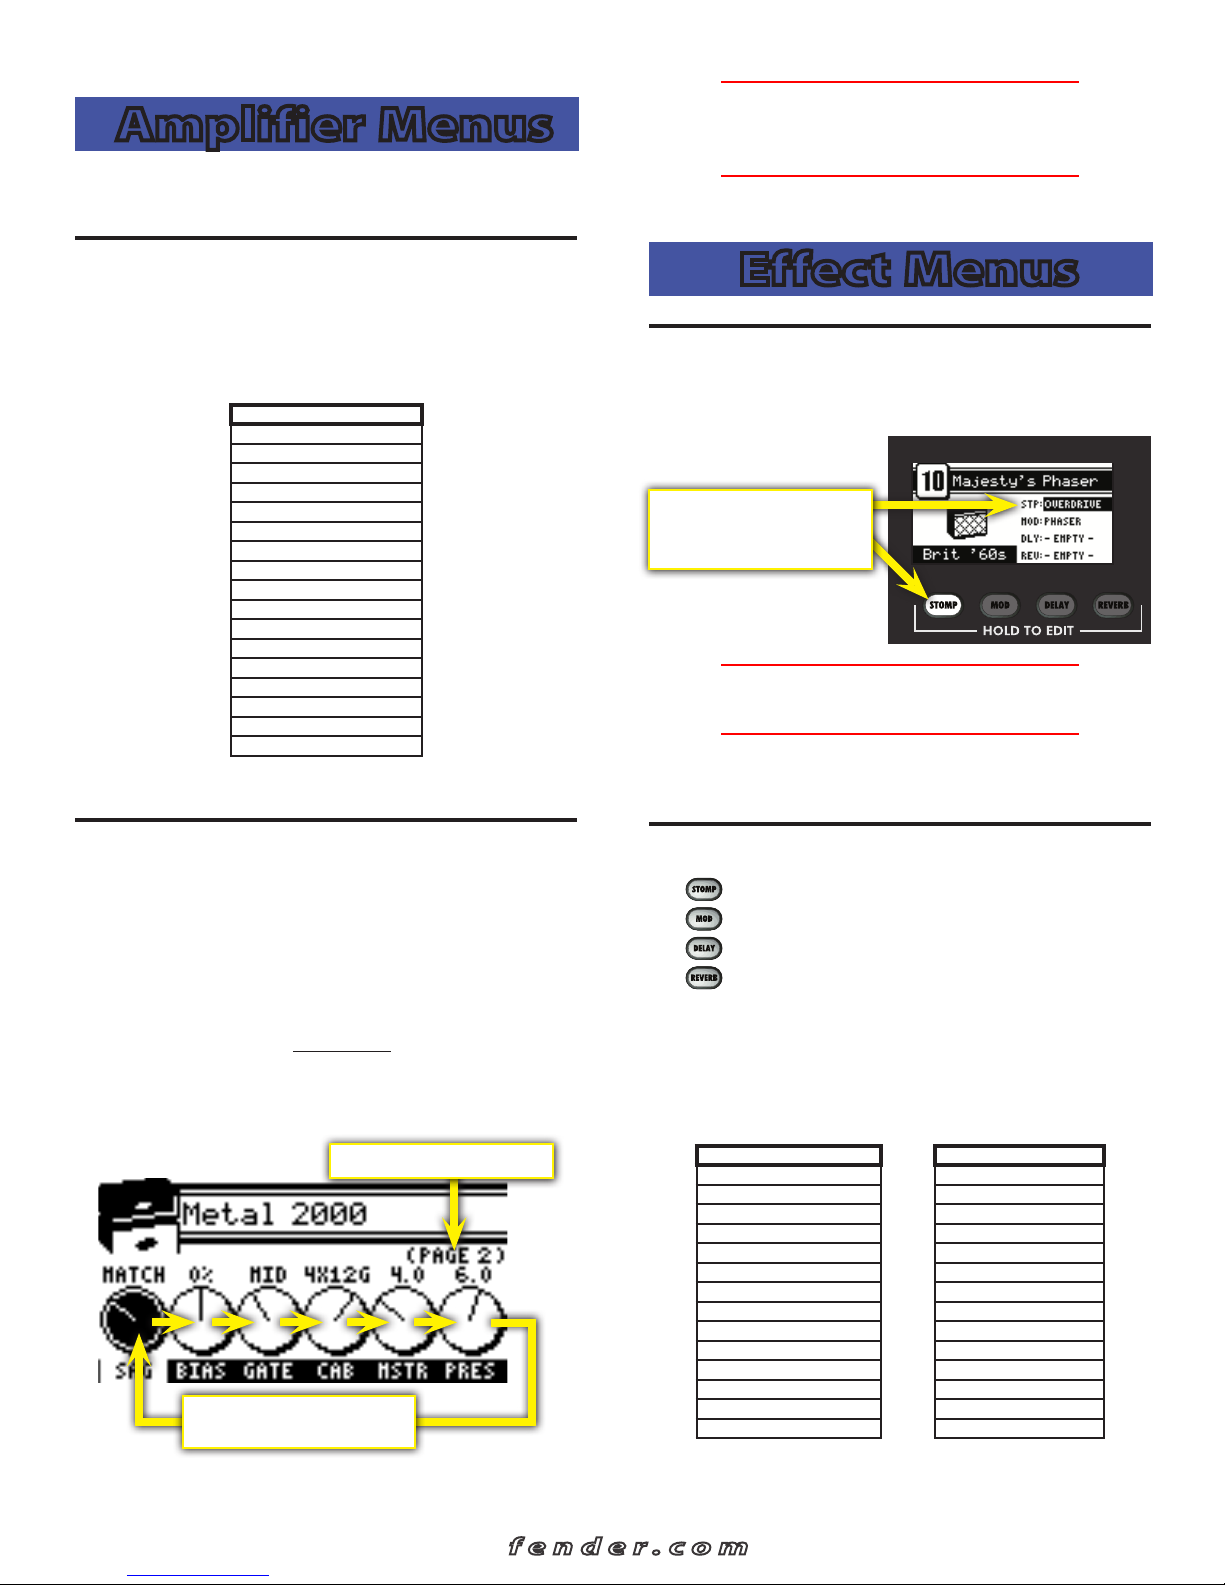
Amplifier Settings
To adjust Amplifier Settings:
1. Press the AMP button.
2. Press the DATA WHEEL one or more times until the setting
that you want to adjust is highlighted, then turn the DATA
WHEEL to adjust the setting.
3. Press the AMP button a second time to access "Page 2" with
more amplifier settings. The settings that appear on "Page2"
will depend on the amp model that is currently selected.
"PAGE 2" of the Amp menus
Press the DATA WHEEL repeatedly
to select the next Amp setting
Selecting Effects
• — Stompbox effects
• — Modulation effects
• — Delay effects
• — Reverb effects
To select Effects:
1. Press and hold one of the four effects buttons.
2. Turn the DATA WHEEL to select one of the following
effects:
STOMPBOX MODULATION
Ranger Boost Sine Chorus
Green Box Triangle Chorus
Overdrive Sine Flanger
Fuzz Triangle Flanger
Orange Box Vibratone
Black Box Vintage Tremolo
Big Fuz z Sine Tremolo
Wah Ring Modulator
Touch Wah Step Filter
Simple Compressor Phaser
Compressor Wah
Touch Wah
Diatonic Pitch
Pitch Shifter
fender.com
3
MUSTANG™ III/IV/V (v.2)
Effects tables continued from previous page...
DE LAY REVERB
Mono Delay Small Hall
Mono Echo Filter Large Hall
Stereo Echo Filter Small Room
Multitap Delay Large Room
Ping Pong Delay Small Plate
Ducking Delay Large Plate
Reverse Delay Ambient
Tape Delay Arena
Stereo Tape Delay Fender '63 Spring
3. Press EXIT to return to Play mode.
You can switch to a different effect category at any time,
even while you are in the effect selection menus, by
♫
pressing and holding a different Effects button.
Fender '65 Spring
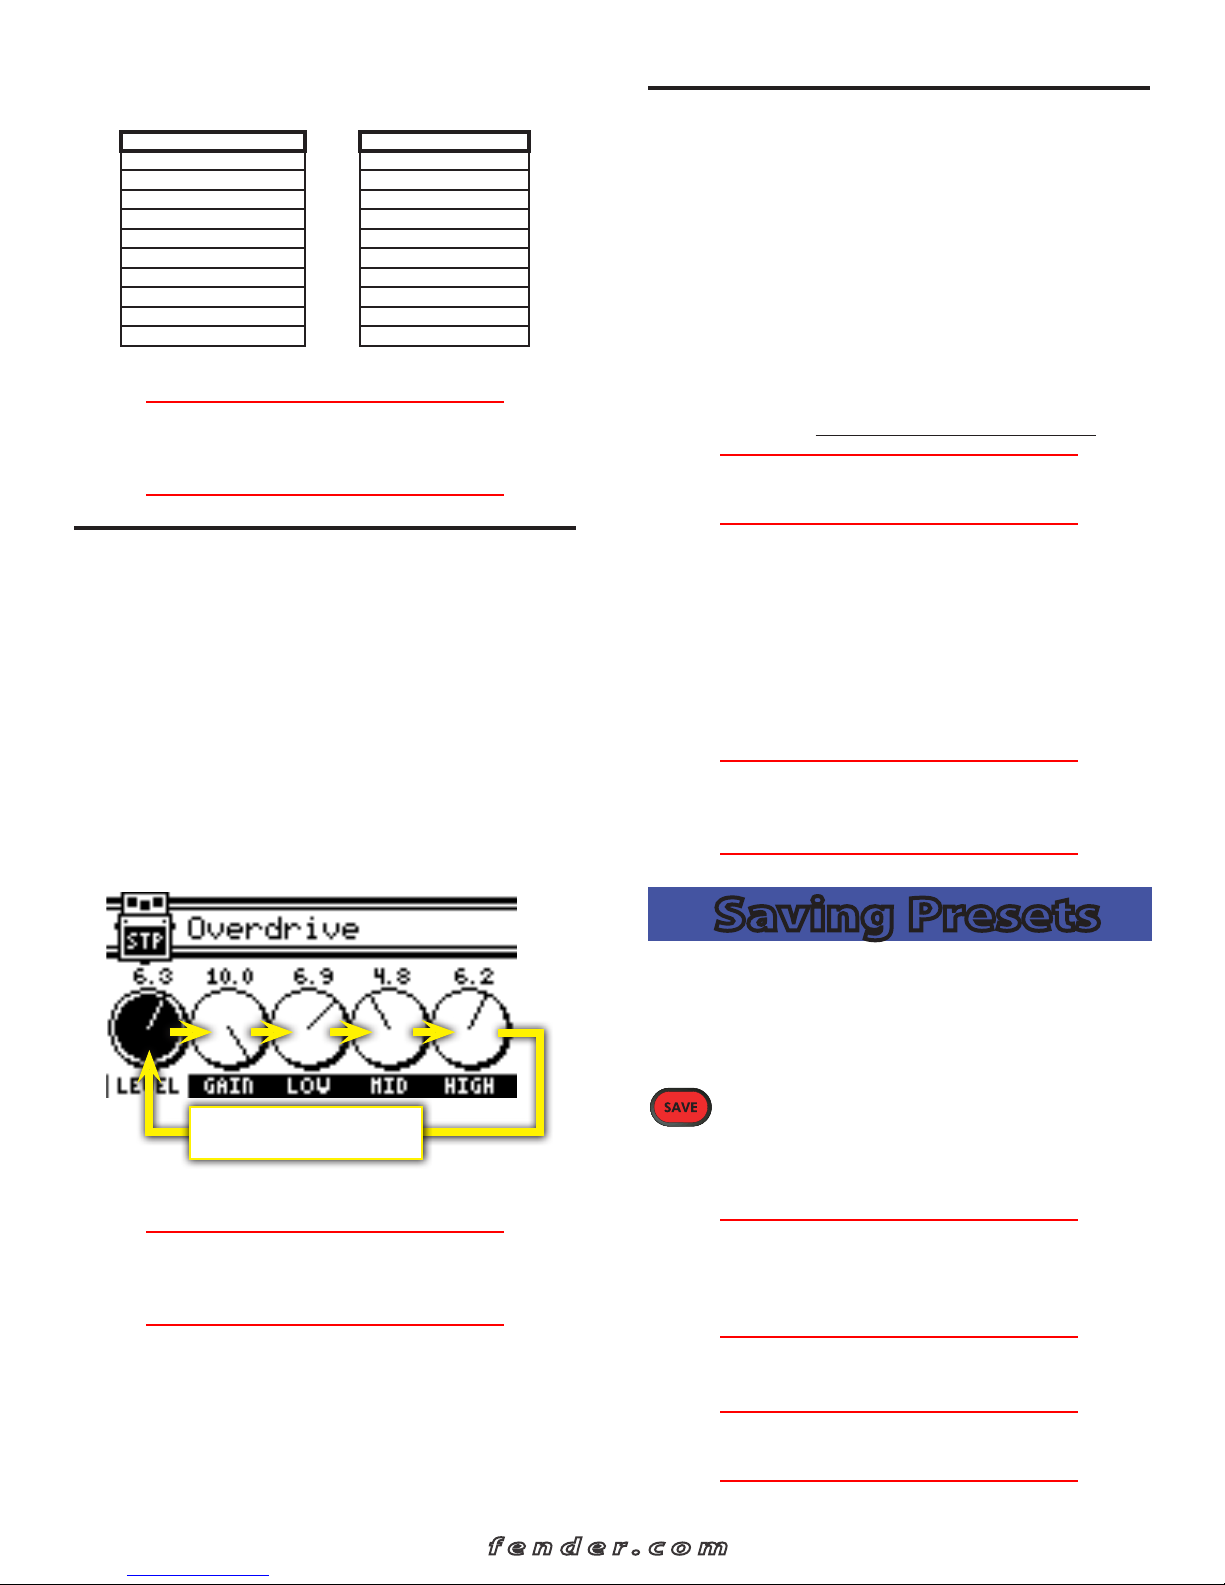
Effect Settings
Use the Effects Settings menus to adjust a dazzling array of
effect settings.
To adjust Effect Settings:
1. Press and hold any Effect button (STOMP, MOD, DELAY,
REVERB).
2. Turn the DATA WHEEL to select the effect you want to
work with.
3. Press the DATA WHEEL one or more times until the setting
that you want to adjust is highlighted, then turn the DATA
WHEEL to adjust the setting.
Tap Button
The TAP button can be used to "tap in" delay time and
modulation rate settings, by rhythmically pressing the TAP
button.
When you select a delay effect, the TAP button will blink
in time with the delay time setting. When you select a
modulation effect, the TAP button will blink in time with
the modulation rate setting (note that modulation rates can
have up to 12 second intervals and the TAP button will flash
infrequently).
When both delay and modulation effects are selected
simultaneously, the TAP button will blink in time with the
delay effect and will only control the delay time setting.
You can use the Effects menus or Fender FUSE to set
♫
delay time and modulation rates more precisely.
To set the TAP interval of effects:
1. Select a Delay or Modulation effect that causes the TAP
button to blink, using the Effects menus (see Selecting
Effects, page 3).
2. Press the TAP button rhythmically (twice minimum) in time
with the desired interval. If you press the TAP button only
once, the interval will be set to the maximum value.
If you open the Effect settings menu (see Effect Settings,
♫
above), you can watch the actual TAP values you are
setting while you are tapping them in!
Press the DATA WHEEL repeatedly
to select the next Effect setting
4. Press EXIT to return to Play mode.
You can bypass an effect at any time, even while you
♫
are in the effect settings menus, by pressing the Effect
button or corresponding footswitch button.
Saving Presets
Your Mustang™ amplifier gives you the powerful ability to
save every setting on the amplifier as part of a preset. When
you select a preset, the level of each knob, every effect
setting, and the amp model selection, are instantly recalled to
your pre-programmed settings.
The SAVE button will light up red when you turn
any programmable knob or edit any other setting
on the amp. This indicates that you have temporarily modified
the preset. You can undo your modifications by turning the
DATA WHEEL to a different preset and then back again.
The EXIT button will not cancel changes to the current
♫
preset. Only by selecting a different preset using the
DATA WHEEL, Footswitch, or Fender FUSE, will your
temporary changes be erased.
To save a preset:
Memory Lock must be OFF to save presets (see Utility
♫
Menus, page 7)
4
fender.com
MUSTANG™ III/IV/V (v.2)
1. To save a preset you should first modify an existing preset,
for example, by turning any of the programmable knobs,
such as GAIN.
2. Press the SAVE button. The SAVE and EXIT buttons should
be illuminated. You can press EXIT at this point to cancel
the save process.
3. Turn the DATA WHEEL select a preset destination to
overwrite.
4. Press the DATA WHEEL if you want to edit the name of
your new preset. Use the buttons to perform the functions
listed along the bottom of the screen; turn the DATA
WHEEL to select characters.
5. Press the SAVE button a second time to confirm the save.
5. Press EXIT or TAP to exit from the Tuner.
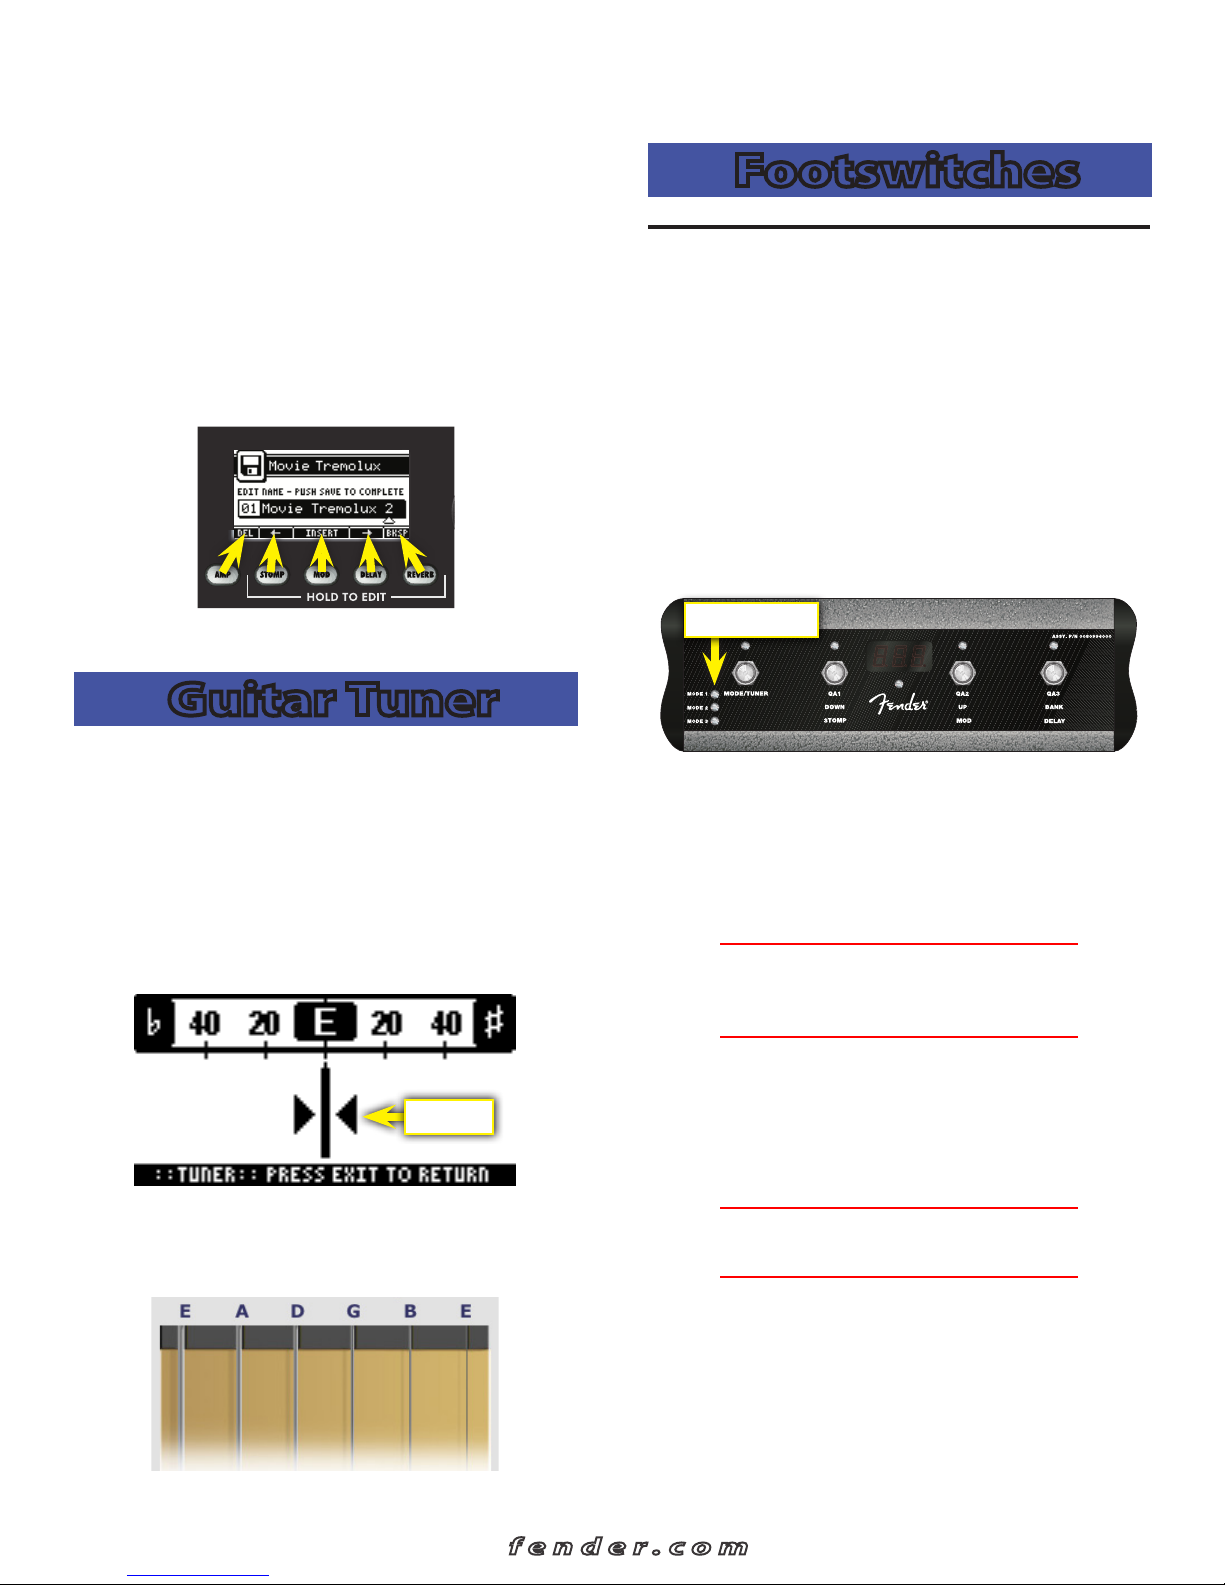
Footswitches
Four-Button Footswitch (0080996000)
Connect a 4-button footswitch to your Mustang amplifier
(included with the Mustang IV & V, optional equipment for the
Mustang III) to enable remote multi-function foot control. The
footswitch display and LEDs show some of the same information as the amplifier screen, so you can, for example, tune
your guitar and select presets by watching the footswitch
without ever looking at the screen onboard the Mustang!
• Select Quick Access presets (QA1/QA2/QA3)
• Select presets (up/down/bank)
• Bypass effects
• Activate the Tuner
Mode indicators
Guitar Tuner
Your Mustang™ amplifier has a built-in Tuner mode that turns
the screen into a guitar tuner.
To use the Tuner:
1. Press and hold the TAP button. The TAP and EXIT buttons
will illuminate.
2. Strike any single string on your guitar and watch the
screen. The note of the string being tuned is displayed
along with a fine tuning needle.
"In tune"
3. Turn the tuning peg on your guitar until the fine tuning
needle indicates the string is in tune, as shown above.
4. Standard guitar tuning is as follows:
The footswitch has three modes that are identified by the
three LEDs labeled MODE 1, MODE 2 and MODE 3. The
footswitch also has a Tuner mode which is indicated when all
of the mode LEDs are off.
To switch between modes, press the MODE button. To activate Tuner mode, press and hold the MODE button.
You can lock the 4-button footswitch in Mode 1, 2 or3
♫
using the Utility menus, to prevent accidental Mode
changes (see Utility Menus, page 7).
• Mode 1—In Mode 1 the footswitch is used to select one of
three Quick Access presets, using the buttons labeled: QA1 /
QA2 / QA3 (in line with the MODE 1 LED). When you select a
Quick Access preset, the number of the preset will appear in
the display of the footswitch.
You can any assign any preset to be a Quick Access
♫
preset in the Utility menus. (see Utility Menus, page 7).
• Mode 2—In Mode 2 the footswitch is used to select presets
down/up, or in banks of 10, using the buttons labeled: DOWN
/ UP / BANK (in line with the MODE2 LED). When you select a
preset, the number of the preset will appear in the display of
the footswitch.
fender.com
5
 Loading...