

Page 1

¨
OWNER’S MANUAL
Page 2

✧
GGGG----DDDDEEEECC
CC ✧
2
✧ ff ee nn dd ee rr .. cc oo mm ✧
• This symbol warns the user of dangerous
voltage levels localized within the enclosure of
the unit.
• This symbol advises the user to read all
accompanying literature for safe operation of
the unit.
• Read, retain, and follow all instructions. Heed all
warnings.
• Only connect the electric line cord to an earth grounded
AC receptacle in accordance with the voltage and
frequency ratings listed under INPUT POWER on the
rear panel of this product.
• WARNING: To prevent damage, fire or shock hazard, do
not expose this unit to rain or moisture.
• Unplug the AC power line cord before cleaning the unit
exterior (use a damp cloth only). Wait until the unit is
completely dry before reconnecting it to power.
• Maintain at least 6 inches of unobstructed air space
behind the unit to allow for proper ventilation and
cooling of the unit.
• This product should be located away from heat sources
such as radiators, heat registers, or other products that
produce heat.
• This product may be equipped with a polarized plug
(one blade wider than the other). This is a safety feature.
If you are unable to insert the plug into the outlet,
contact an electrician to replace your obsolete outlet.
Do not defeat the safety purpose of this plug.
• Protect the power cord from being pinched or abraded.
• This product should be serviced by qualified service
personnel when: the power supply cord or the plug has
been damaged; or objects have fallen, or liquid has been
spilled onto the product; or the product has been
exposed to rain; or the product does not appear to
operate normally or exhibits a marked change in
performance; or the product has been dropped, or the
enclosure damaged.
• Only use a cart or stand with this product that is
recommended by this product’s manufacturer.
• The power supply cord of this product should be
unplugged from the outlet when left unused for a long
period of time, or during electrical storms.
• Do not drip nor splash liquids, nor place liquid filled
containers on the unit.
• CAUTION: No user serviceable parts inside, refer
servicing to qualified personnel only.
• Fender®amplifiers and loudspeaker systems are
capable of producing very high sound pressure levels
which may cause temporary or permanent hearing
damage. Use care when setting and adjusting volume
levels during use.
FCC COMPLIANCE NOTICE
This equipment has been tested and found to comply
within the limits for a Class B digital device, pursuant
to Part 15 of the FCC rules. These limits are designed
to provide a reasonable protection against harmful
interference in a residential installation. This equipment
generates, uses and can radiate radio frequency
energy and if not used in accordance with the
instructions, may cause harmful interference to radio
communications and there is no guarantee that
interference will not occur in a particular installation. If
this equipment does cause harmful interference to
radio or television reception, which can be determined
by turning the equipment off and on, the user is
encouraged to try to correct the interference by one or
more of the following measures: reorient or relocate
the receiving antenna, increase the separation
between the equipment and receiver, connect the
equipment into an outlet on a circuit different from that
of the receiver. Consult the dealer or an experienced
radio/TV technician if help is needed.
A PRODUCT OF:
FENDER MUSICAL INSTRUMENTS CORPORATION
CORONA, CALIFORNIA USA
Trademarks:
Fender®, G–DEC®, Blackface™ and Dyna–Touch™ are trademarks of FMIC.
Other trademarks are property of their respective owners.
© 2006 FMIC. All rights reserved.
Important Safety Instructions
Page 3
3
✧
GGGG----DDDDEEEECCCC
✧
✧ ff ee nn dd ee rr .. cc oo mm ✧
G–DEC®Guitar Digital Entertainment Center includes
everybody in the band but you! Inside G–DEC you
will find a versatile drummer, skilled bass player and
flexible accompanist for virtually any style of music.
And for you, the guitarist: G–DEC is a warehouse of
amplifiers and effects, and what’s better—these are
ready for your sound check!
Turn the G–DEC Data Wheel to access a diverse
collection of band setups. 50 permanent presets
furnish a diverse collection always available to you.
Another 50 rewritable presets store the bands that
you create for your music and playing style.
G–DEC is the ultimate practice tool whether you are
just starting out or playing professionally. As a
beginner, you can have an instructor plug into the
rear input. To learn a new song you can plug your CD
or MP3 player into the G–DEC and play along. For
difficult licks you can record a phrase and play it in a
continuous loop—at half speed if necessary!
Seasoned players enjoy G–DEC as a songwriting
partner or jamming buddy.
G–DEC also has MIDI ports which allow you to link
up with other G–DEC players to trade presets.
Connect G–DEC to your computer* to backup
presets or play General MIDI files through G–DEC!
It’s time to jam—with G–DEC at your command!
*MIDI capable sound card (or MIDI-to-USB device) and
MIDI software required.
Each G–DEC Preset is a complete “band!” Modify any component or select another from the G–DEC arsenal:
• 17 Guitar Amplifiers, each with Gain, Volume, Tone, Compressor, Timbre and Noise Gate parameters
• 29 studio-quality Effects (many in stereo), each with 4 adjustable parameters
• 10 Reverbs with adjustable levels
• 70 Drum Patterns (+1 Metronome) with Tempo, Key, Drum Level, Bass Level and Accompaniment Level parameters
G–DEC MIDI ports provide expanded functionality with your computer and other G–DEC players!
• Trade and backup presets
• Play MIDI files
• Update G–DEC software if necessary
• Front panel MIDI IN and MIDI OUT ports
G–DEC delivers world-class Fender tone and world-standard Fender quality!
• Second input jack for a friend or instructor
• On–board digital chromatic tuner
• Phones jack can be used with stereo headphones or as a stereo line out jack
• Shoulder strap
• 14-second Phrase Sampler
• On-board General MIDI synthesizer
TThhaann kk yyoouu ff oorr cchhoo oo ss iinn gg FFee nn ddee rr
®®
——TToo nn ee,, TTrraa ddii tt iioonn aa nn dd IInn nn oo vv aatt ii oonn ——ss ii nn ccee 11 9944 66
Introduction
Features
Page 4
✧
GGGG----DDDDEEEECC
CC ✧
4
✧ ff ee nn dd ee rr .. cc oo mm ✧
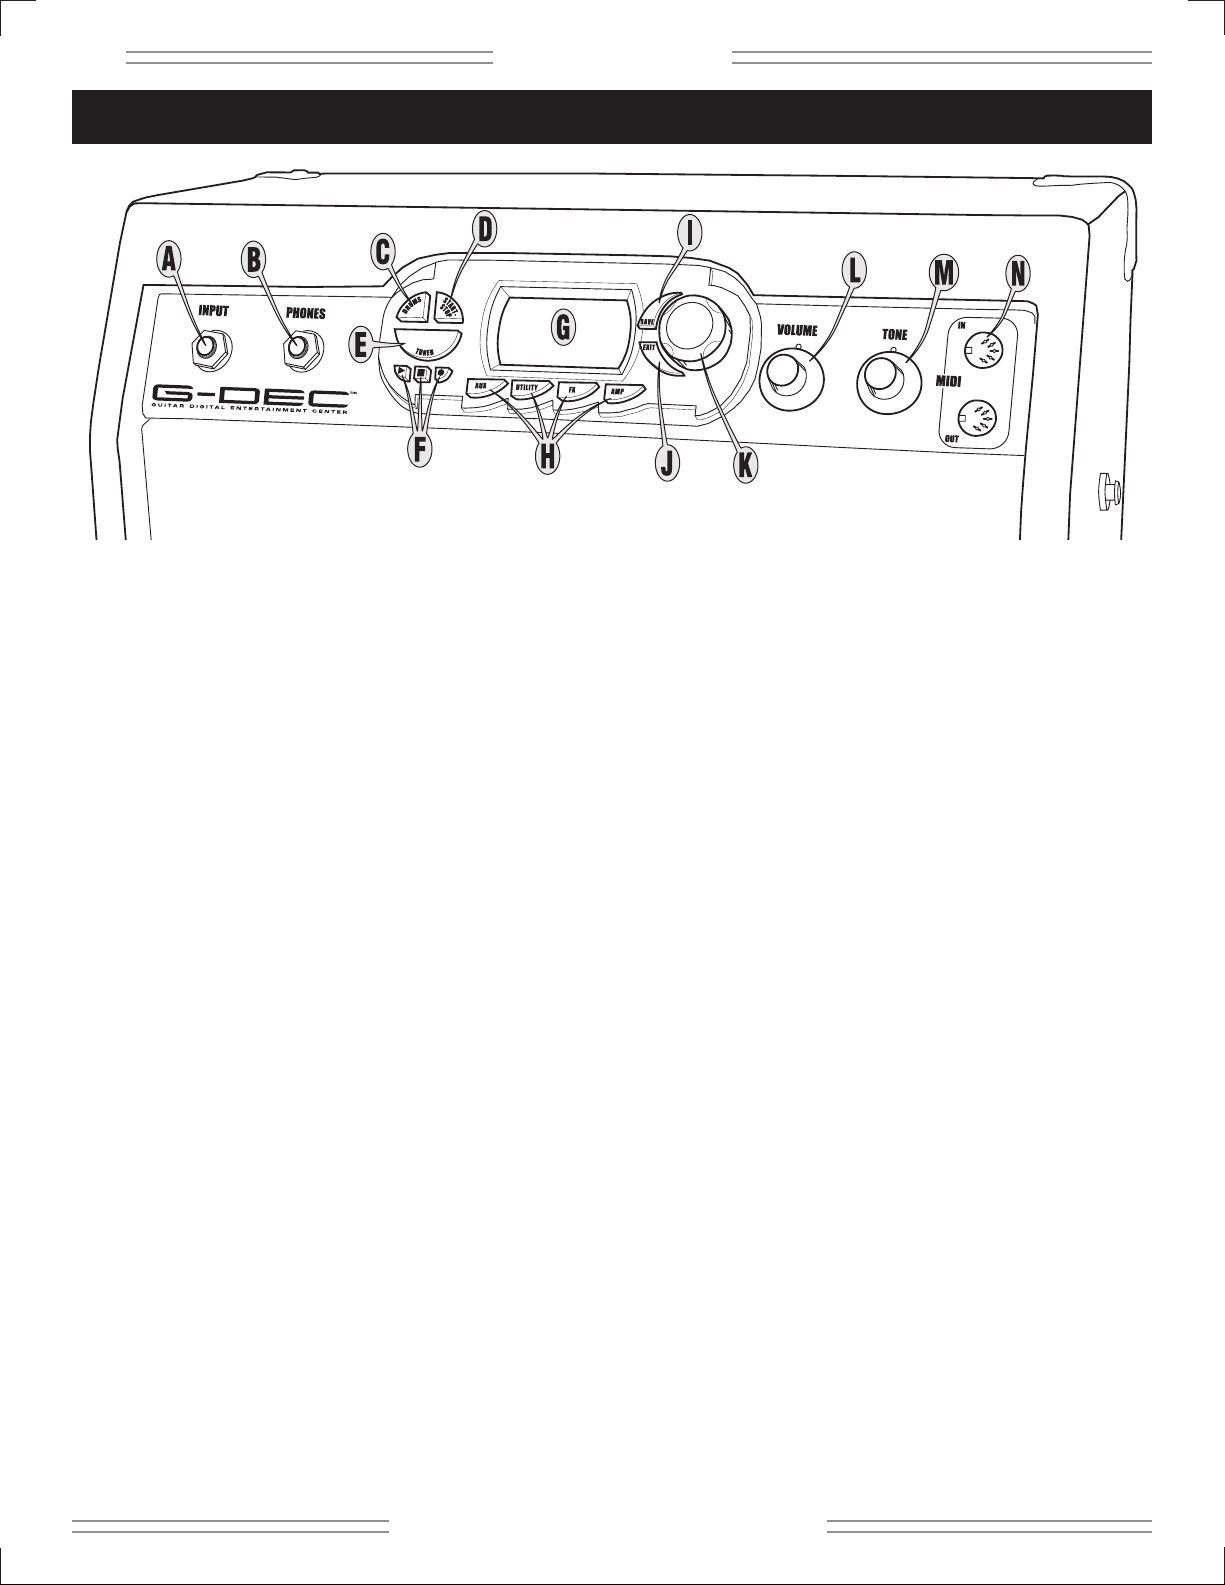
A. INPUT - Plug your guitar in here.
B. PHONES - Plug in your headphones for private
listening or connect a pair of powered speakers (such
as commonly used with computers); the G–DEC
speaker mutes automatically. Enjoy the G–DEC’s
many stereo effects through this jack. You can also
connect PHONES to “Audio In” on your computer to
record with your favorite recording software. NOTE:
You will need the proper cables, adapters and/or
equipment for these connections.
C. DRUMS - Press to access the Drums Mode menus
(see page 10).
D. START-STOP - Press to start and stop the drum loop.
The START-STOP button flashes in time with the tempo.
You can also use START-STOP to set the tempo:
Shortcut 1—Hold START-STOP while rotating the Data
Wheel.
Shortcut 2—Hold DRUMS while tapping START-STOP
to the beat, to set the tempo by “feel.”
E
.
TUNER - Press to activate the Tuner (the G–DEC
speaker mutes automatically).
F. PHRASE SAMPLER - Use the Phrase Sampler to
record up to 14 seconds of G–DEC audio for playback.
Press:
Record—to start sampling
Play—to playback the phrase
Stop—to end a recording or playback in progress
You can change the recording source, playback speed
and many other Phrase Sampler settings through the
Auxiliary/Phrase Mode menus (see page 10).
G. DISPLAY - Shows you information about the current
preset in Play Mode (see page 8), and menus of G–DEC
settings when you press a Mode button {C, H}.
H.AUX / UTILITY / FX / AMP - Press to access the
corresponding Mode menus (see pages 9-11).
I. SAVE - Saves the current G–DEC settings to a user
preset (U00-U49).
J. EXIT - Press to return to Play Mode.
K. DATA WHEEL - Selects presets in Play Mode and
adjusts G–DEC settings in the other Modes.
L. VOLUME - Adjusts the overall loudness of the G–DEC.
M. TONE - Adjusts the tone characteristics of your guitar.
The Tone control does not affect the Drum section or
the Auxiliary Input sound.
N. MIDI IN/OUT - To transfer presets from your G–DEC:
Connect MIDI OUT to the MIDI IN port on another
G–DEC (or your computer) using a MIDI cable. Then
use Utility Mode (see page 11) and initiate either a
“Dump Preset” to transfer the current preset, or a
“Dump All” to transfer all presets. The receiving G–DEC
will prompt you to select a preset to overwrite before a
“Dump Preset” is completed.
To play General MIDI files on your computer through
your G–DEC: Connect MIDI OUT on your properly
configured computer sound card (or interface), to MIDI
IN on the G–DEC. Then load and play the file in your
MIDI playback software on your computer.
Control Panel Overview
Page 5
5
✧
GGGG----DDDDEEEECCCC
✧
✧ ff ee nn dd ee rr .. cc oo mm ✧
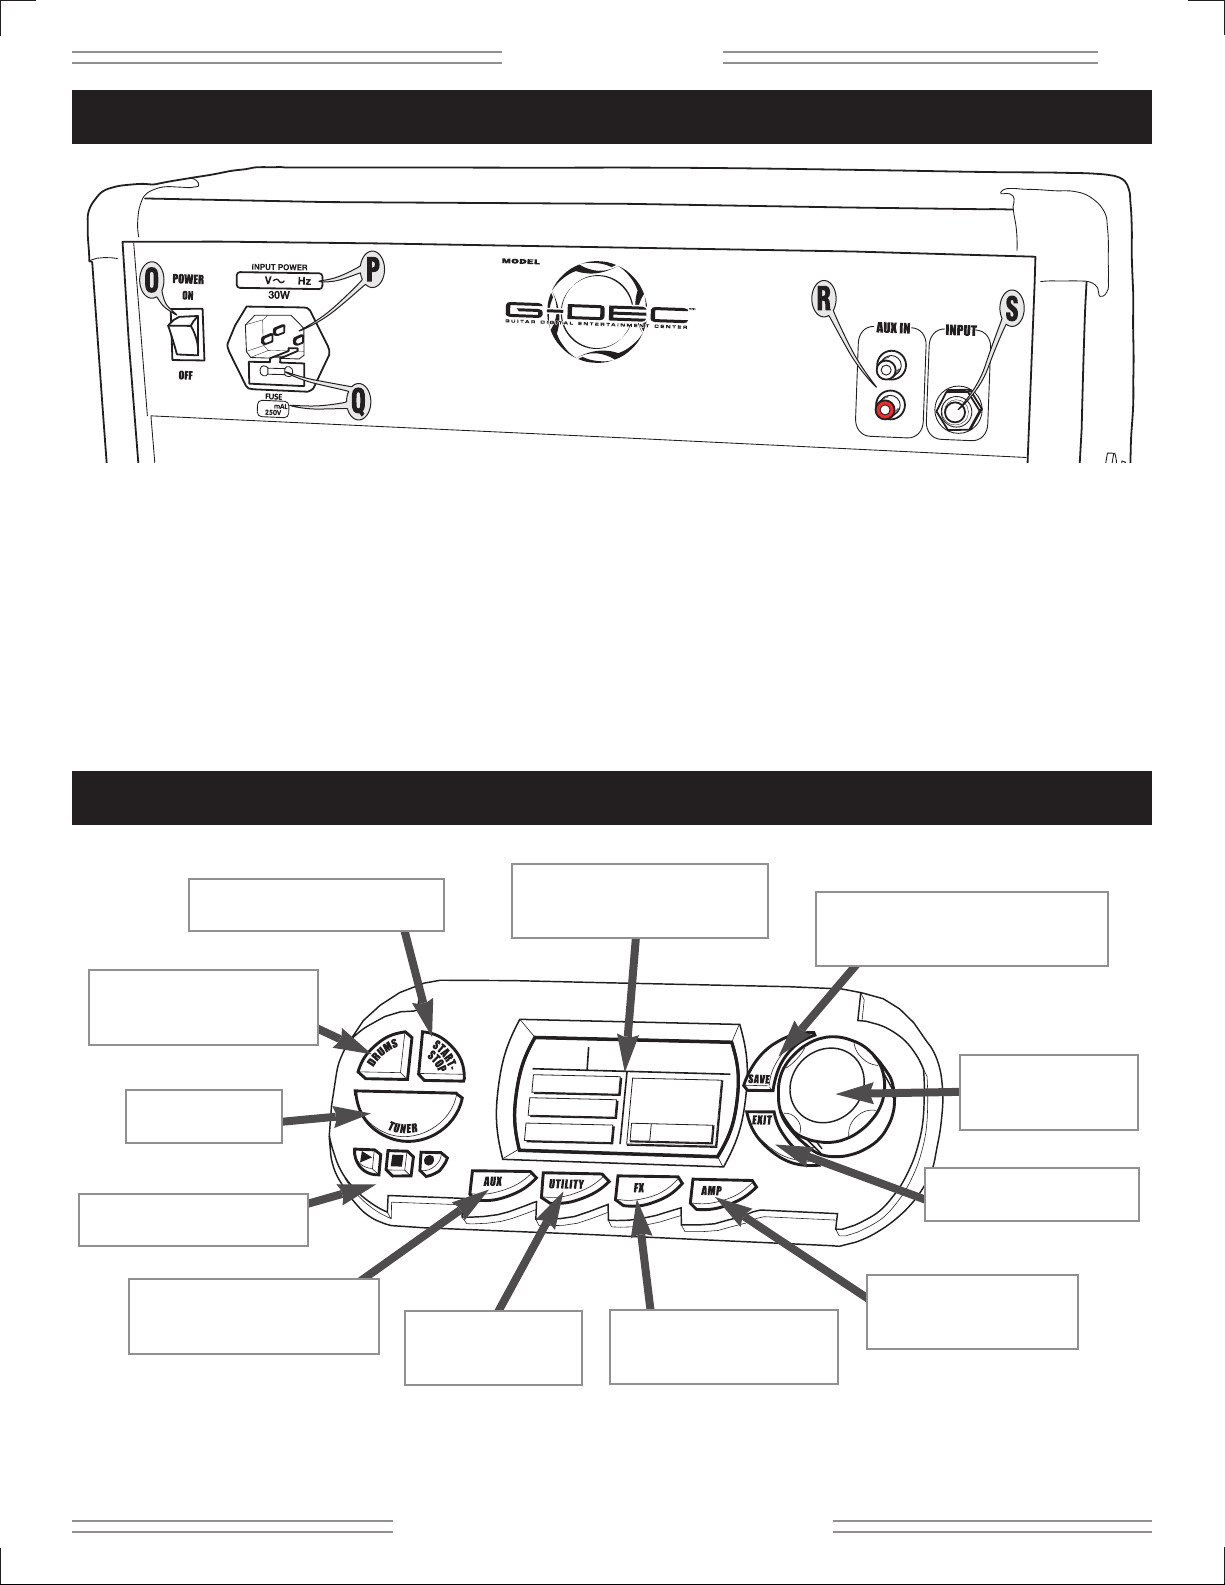
O. POWER - Switches the G–DEC on-off.
P. POWER CORD SOCKET - Connect your G–DEC to an
A/C outlet using the included power cord.
Q. FUSE - Protects your G–DEC from electrical faults.
Replace a blown fuse only with the type and rating
specified below the fuse holder. To remove the fuse
holder: Unplug the G–DEC power cord from the socket
to expose the fuse holder. Use a small screwdriver to
pry out the fuse holder using the notch on top.
R. AUX IN - Auxiliary input for your CD or MP3 player.
Playback music through your G–DEC for
accompaniment or to learn songs. Connect the
(headphones) output on your player to the AUX IN
“RCA” jacks using the proper cable or adapter. You can
select a “focus” filter and adjust the auxiliary input level
through the Aux Mode menus (see page 10).
S. INPUT - An extra input for an instructor or a friend to
plug into.
Rear Panel
How Do I...?
SWITCH DRUM PATTERNS?
Press DRUMS, then
rotate the Data Wheel.
RECORD/PLAY A PHRASE?
Press
Record /
Play.
MODIFY PHRASE SAMPLER
AND AUX INPUT FUNCTIONS?
Use AUX Mode (see page 10).
RENAME A PRESET?
Press UTILITY, then
rotate the Data Wheel.
Play Mode Shor
Play Mode Shor
tcut
tcut—Press and hold this button while rotating the Data Wheel to make a quick adjustment without leaving Play Mode.
SWITCH GUITAR EFFECTS?
Press FX, then
rotate the Data Wheel.
SWITCH GUITAR AMPS?
Press AMP, then
rotate the Data Wheel.
SWITCH PRESETS?
Rotate the Data Wheel
(in Play Mode).
RETURN TO PLAY MODE?
Press EXIT.
SAVE MY CURRENT CHANGES?
Press SAVE, rotate the Data Wheel,
then press SAVE again.
START OR STOP DRUM LOOP?
Press START–STOP.
USE THE TUNER?
Press TUNER.
ADJUST DISPLAY CONTRAST?
Press and hold EXIT while
rotating the Data Wheel.
Page 6

✧
GGGG----DDDDEEEECC
CC ✧
6
✧ ff ee nn dd ee rr .. cc oo mm ✧
Menu Navigation
You can adjust a huge variety of G–DEC settings through the menus of 5 different modes. Press AMP, FX, DRUMS,
AUX or UTILITY (repeatedly) for menus, then turn the Data Wheel to adjust the highlighted menu’s setting.
MENU SHORTCUT: First, press AMP, FX, DRUMS, AUX or UTILITY to enter that mode. Then, press and hold the
same mode button while rotating the Data Wheel to navigate menus—in both directions!
Play Mode
Play Mode is the normal G–DEC mode, active at start-up. Play guitar, select presets and play the drum loop
(or the phrase sampler) in Play Mode. Press EXIT to return to Play Mode from any other mode (Play Mode
activates automatically after 60 seconds of inactivity in the other modes).
Information about the current preset is displayed in Play Mode:
PRESET NUMBER
PRESET NAME
DRUM TEMPO
(Beats Per Minute) or,
during phrase playback,
“Phrase On” appears here.
MEASURE “1”
(“1” appears each time the Drum
Loop reaches the first measure.)
DRUM PATTERN
BASSLINE KEY
REVERB TYPE
EFFECTS TYPE
GUITAR AMPLIFIER TYPE
MENU ITEMS
PARAMETER (SETTING)
(of highlighted menu item)
MODE BUTTONS
DATA WHEEL
Current selection
is highlighted.
(Highlighted if preset is modified.)
Page 7

7
✧
GGGG----DDDDEEEECCCC
✧
✧ ff ee nn dd ee rr .. cc oo mm ✧
Amp Mode
FX/Reverb Mode
Use AMP Mode to select an amplifier type (first menu), then modify that amplifier’s settings in menus 2–9.
Menu Amp Menu Items Settings—(Function)
1 AMP TYPE Tweed–1, 2, 3, Blackface–1, 2, 3, Dyna-Touch–1, 2, 3, 4, British–1, 2, 3, Modern–1, 2, 3, Acoustic
2 GAIN 1-10 — (Adjusts amplifier distortion level.)
3 AMP VOLUME 1-10 — (Adjusts the volume of the current amplifier relative to other presets.)
4 BASS 1-10 — (Low frequency tone.)
5 MIDDLE 1-10 — (Mid-frequency tone.)
6 TREBLE 1-10 — (High-frequency tone.)
7 COMPRESSOR Off, Low, Medium, High, Super — (Moderates volume range and provides sustain.)
8 TIMBRE None, Full Body, Full Stack, Razors Edge, Bright Lite, Bass Boost, Nu Metal, Super Bright, Acoustic — (Tone filters.)
9 NOISE GATE Off, Low, Medium, High, Super — (Cuts low volume noise.)
Use FX/Reverb Mode to select an effect type (first menu), then modify that effect’s settings in menus 2–6.
(FX/Reverb Menus 7 and 8 continued on next page.)
Effect Type Effect Settings (for the Effect selected in Menu 1)
Menu 1 Menu 2 Menu 3 Menu 4 Menu 5 Menu 6
NONE — — — — —
MONO DELAY Level Delay Time Feedback Brightness Input Level
TAPE DELAY Level Delay Time Feedback Flutter Brightness
STEREO TAPE DELAY Level Delay Time Feedback Flutter Brightness
DUCKING DELAY Level Delay Time Feedback Release Response
REVERSE DELAY Level Delay Time Feedback Reverse Feedback Brightness
AUTOPAN DELAY Level Delay Time Feedback Brightness Input
SINE CHORUS Level Rate Depth Average Delay Stereo
TRIANGLE CHORUS Level Rate Depth Average Delay Stereo
SINE FLANGE Level Rate Depth Feedback Stereo
TRIANGLE FLANGE Level Rate Depth Feedback Stereo
PHASER Level Rate Depth Feedback Stereo
TREMOLO Level Rate Depth Duty Cycle Release
RING MODULATION DELAY
Level Ring Mod Frequency Delay Output Level Delay Time Feedback
PITCH SHIFT Level Pitch Detune Feedback Pre-Delay
TOUCH WAH Level Response Minimum Frequency Maximum Frequency Voice Type
FIXED WAH Level Frequency Minimum Frequency Maximum Frequency Voice Type
VIBRATONE Level Rotor Speed Doppler Effect Depth Stereo
AUTOSWELL Level Attack Depth Response Rate
ALIENATOR Level Content Tone Minimum Content Maximum Content
RESOLVER Level Bit Depth Tone Attack Release
FUZZ Level Gain Octave Level Low Tone High Tone
OVERDRIVE Level Gain Low Tone Mid Tone High Tone
TOUCH WAH FUZZ Level Gain Response Octave Mix Voice Type
FUZZ DELAY Level Gain Delay Level Delay Time Feedback
OVERDRIVE DELAY Level Gain Delay Level Delay Time Feedback
CHORUS DELAY Level Rate Depth Delay Time Feedback
FLANGE DELAY Level Rate Depth Delay Time Feedback
PHASE DELAY Level Rate Depth Delay Time Feedback
ALIENATOR DELAY Level Content Delay Level Delay Time Feedback
Page 8

✧
GGGG----DDDDEEEECC
CC ✧
8
✧ ff ee nn dd ee rr .. cc oo mm ✧
Auxiliary/Phrase Mode
Use AUX/Phrase Mode to adjust the AUX IN jack settings (menus 1–2).
Use AUX/Phrase Mode to adjust the Phrase Sampler settings (menus 3–7).
Menu Aux Menu Items Settings—(Function)
1 AUX INPUT LEVEL 1-10 — (Adjusts the volume of whatever you have connected to the AUX IN jacks.)
2 AUX FILTER None, Bass Focus, Bass Cut, Drum Focus, Lead Focus, Guitar Cut — (Use to accent different musical areas.)
3 PHRASE LEVEL 1-10 — (Phrase playback level.)
4 PHRASE MODE Freeform, 4 Beat Lead — (Record with or without a lead in. 4 Beat Lead adjusts measure length for correct timing.)
5 PHRASE SOURCE Aux In, Drums, Aux In + Drums, Guitar, All — (Select the source(s) that the Phrase Sampler records.)
NOTE:
To include drums in the sample (Source set to “All”),
start the Drum Loop before you press
Record.
6 PHRASE SPEED Normal, Half Speed — (Phrase playback speed.)
7 PLAYBACK Once, Repeat — (Playback the Phrase one time, or in an endless loop.)
Use FX/Reverb Mode to select a reverb type (menu 7), and adjust reverb level (menu 8).
Reverb Type Reverb Level
Menu 7 Menu 8
NONE 1-10
AMBIENT 1-10
SMALL ROOM 1-10
LARGE ROOM 1-10
SMALL HALL 1-10
LARGE HALL 1-10
ARENA 1-10
SMALL PLATE 1-10
LARGE PLATE 1-10
SPRING 1-10
63 SPRING 1-10
Drums Mode
Use DRUMS Mode to select a drum pattern (first menu), then modify that drum pattern’s settings in menus 2–6.
Menu Drum Menu Items Settings
1 DRUM PATTERN
1 Drop, 16 Hats, 32 Hats, 4 Beat, 5 On 4, 50 Shuf, 80 Funk, 80s Hop, Aerwalk, Ballad, Beastly, Bossa, Chicago, Clave, Classic, Country, Dblkick,
Dblshuf, Disco, Dr Hop, Drive, Euro, Fever, Fiesta, Funk, Feelin, Grind, Grunge, Halves, Hardroc, Haze, Hiphop, Jazz, Kid, Latin, Latpony,
Levee, Lilith, Mambo, Metal, Metrono, Miami, Party, Pop, Popstar, Punkpop, Reggae, Ride, Rock101, Rocbell, Rocbluz, Rock, Rocker, Salsa,
Samba, Shaker, Shuffle, Ska, Smoke, So Bell, Soul, Speed, Steely, Surftom, Swedes, Swing, Train, Trouble, Viking, Waltz, Western
2 TEMPO 30-240 Beats per Minute
3 KEY A, A#, B, C, C#, D, D#, E, F, F#, G, G#
4 DRUM LEVEL 1-10
5 BASS LEVEL 1-10
6 ACCOMPANIMENT LEVEL 1-10
FX/Reverb Mode
(continued)
Page 9

9
✧
GGGG----DDDDEEEECCCC
✧
✧ ff ee nn dd ee rr .. cc oo mm ✧
MIDI OVERVIEW
The G–DEC is well equipped to handle a number of useful
MIDI functions. MIDI stands for “Musical Instrument
Digital Interface” which is a language that lets multiple
digital musical items (keyboards, effects, synthesizers,
computers, etc.) communicate with each other. This
document can’t possibly cover all the MIDI possibilities
you may encounter. If you desire more information, visit
http://www.midi.org online or search for “MIDI” using
your favorite search engine.
Basic MIDI Setup
The most basic MIDI operations on the G–DEC require
use of a MIDI interface device connected to a personal
computer. Most MIDI interface devices will use USB or
the game port on older PCs and are available at most
musical instrument retailers. Refer to the interface
manufacturer for proper device setup. To get the most out
of the G–DEC MIDI capability, connect the MIDI In port on
the G–DEC to the MIDI Out port on your MIDI interface
with a standard MIDI cable. Also connect the MIDI Out
port on the G–DEC to the MIDI In port on your MIDI
interface. See figure for connections.
Dumping and Loading Presets
The above configuration will allow you to dump and load
presets to and from the computer. To dump any one or all
presets (see Utility Mode page 11) you will need third
party software running on the PC. Search for a MIDI
librarian utility or SYSEX utility from your favorite search
engine online that works with your specific computer. You
will need an application that accepts SYSEX dumps from
external devices. Within your selected software package,
you will need to configure MIDI ports and tell the
application to wait to receive a SYSEX dump. Consult the
documentation for your specific SYSEX application on
how to perform these tasks. Once configured, you can
then dump presets to a “.SYX” file which then can be
posted or emailed to share with other G–DEC users.
To load a preset into the G–DEC you will also need third
party software running on the PC. The same application
used for receiving SYSEX dumps will most likely be able
to send SYSEX data as well. Load a G–DEC preset file
(ending in .SYX) into your configured SYSEX application
and send the preset. The G–DEC is always ready to
receive these files. Once a valid preset file is received by
the G–DEC, it will bring you to the Save prompt (see How
Do I...? on page 7 for the Save function).
G-DEC
®
MIDI Guide
MIDI-to-Computer
Interface
Computer—USB or Game Port
Utility Mode
Use UTILITY Mode to rename presets, lock memory, transfer presets (MIDI) and manage the system.
Menu Utility Menu Items Procedure—(Function)
1 EDIT PRESET NAME Rotate Data Wheel, then follow the instructions displayed on screen.
2 MEMORY LOCK Rotate Data Wheel — (Prevents accidental preset saves and MIDI dumps, but NOT a Factory Reset, see below.)
3 DUMP PRESET Press SAVE — (Transfers the current preset to another G–DEC or computer connected to the MIDI OUT port.)
4 DUMP ALL Press SAVE — (Transfers ALL presets to another G–DEC or computer connected to the MIDI OUT port.)
5 FACTORY RESTORE Press SAVE twice — (Restores every G–DEC setting to the original settings. OVERRIDES MEMORY LOCK.)
6 AMP UPDATE (Reserved for future G–DEC software updates.)
Page 10

✧
GGGG----DDDDEEEECC
CC ✧
10
✧ ff ee nn dd ee rr .. cc oo mm ✧
Updating the G–DEC Software
The above MIDI configuration will also allow you to
update your G–DEC software if and when an update
becomes available from Fender, downloadable from
http://www.fender.com. G–DEC update information will
be made available from the download site. In general, to
perform this operation, access the “Amp Update” item in
the Utility Menu (see Utility Mode, page 11) and follow the
on-screen instructions. Press Save to start the process.
When the G–DEC states it is ready to receive a MIDI
Update, use your selected SYSEX application (the same
used for preset dumps and loads) to send the G–DEC
update file to the amp. Other important instructions may
be included with the update package.
Using the On-Board Synthesizer with an External
Controller
The G–DEC has a full General MIDI compatible
synthesizer on board that may be triggered using an
external MIDI controller. Simply connect the MIDI Out
port of your MIDI controller device (typically a keyboard
or PC) to the MIDI In port on the G–DEC. Set your MIDI
controller device onto any channel other than 10 and it
will control the onboard G–DEC synthesizer (channel 10
is used for a drum kit). To change voices, use the
appropriate program change message on your MIDI
controller. Consult the MIDI controller device
documentation on how to perform this function on your
specific controller. Refer to the Appendix for channels of
General MIDI voicings.
Streaming MIDI Files to the G–DEC
If you wish to play any available General MIDI file from
your PC through the G–DEC, you will need a third party
PC application that is able to play MIDI files to an external
MIDI port. Search for a MIDI player or MIDI sequence
utility from your favorite search engine online that works
with your specific computer. Consult the documentation
for your application on proper configuration. Once
properly configured, play any MIDI file (typically a file with
the .MID extension) from your MIDI player or sequence
application. The MIDI Out port of your MIDI interface
device must be connected to the MIDI In port on the
G–DEC. Note that if the song is playing but sounds
cluttered, make sure any MIDI thru function in your
application is disabled, or simply unplug the MIDI cable
from the MIDI Out port on the G–DEC. The G–DEC
always outputs any MIDI information received on the
MIDI In port on the MIDI Out port which may result in a
repeated loop if your application has MIDI throughput
enabled.
Advanced MIDI sequence applications will allow you to
create your own MIDI songs for playback on the G–DEC.
Note also that the G–DEC does not store MIDI files
onboard. It simply “streams” the MIDI song data to the
onboard synthesizer and requires a connection to the PC
or MIDI sequencer at all times for this functionality.
If you would like to construct a MIDI song of your own
using some of the patterns onboard the G–DEC simply
play the pattern you would like and record as much MIDI
Out data from the G–DEC as you desire using your MIDI
sequence utility application on the PC. Note this will not
record any guitar audio, simply MIDI data from the
patterns. You can then modify and arrange patterns into
songs using your MIDI sequencer software application
and stream the resulting file back to the G–DEC as
mentioned above. Refer to the Appendix for channels of
General MIDI voicings.
Connecting Two G–DECs Together
You may also share presets directly from one G–DEC to
another by simply connecting the two G–DECs with a
standard MIDI cable. Connect the MIDI cable to the MIDI
Out port of the G–DEC that holds the preset you want to
share. Then connect the other end of that MIDI cable to
the MIDI In port on the G–DEC into which you wish to
load the preset. Then follow the Dump Preset procedure
(see Utility Mode, page 11) on the G–DEC that holds the
preset you want to share.
Sending
MIDI
Receiving
MIDI
Page 11

11
✧
GGGG----DDDDEEEECCCC
✧
✧ ff ee nn dd ee rr .. cc oo mm ✧
Another fun thing to try with two G–DECs is to connect
them with a MIDI cable as described above for a
synchronized jam session or lesson! On the G–DEC with
the MIDI Out port connected, select a desired preset to
jam along with. On the other G–DEC select any guitar
tone desired. Then press Start/Stop on the first G–DEC to
start the drum pattern. The MIDI data is then sent from
the first G–DEC to the second and is synchronized. Now
you are both able to jam along to the same synchronized
drum pattern with two different guitar tones!
1 (Grand) Piano 1
2 (Bright) Piano 2
3 (Electric Grand) Piano 3
4 Honky-Tonk Piano
5 Electric Piano 1
6 Electric Piano 2
7 Harpsichord
8 Clavi
9 Celesta
10 Glockenspiel
11 Music Box
12 Vibraphone
13 Marimba
14 Xylophone
15 Tubular Bells
16 Santur
17 Drawbar Organ
18 Percussive Organ
19 Rock Organ
20 Church Organ
21 Reed Organ
22 Accordian (French)
23 Harmonica
24 Tango Accordian
25 Acoustic Guitar (Nylon)
26 Acoustic Guitar (Steel)
27 Electric Guitar (Jazz)
28 Electric Guitar (Clean)
29 Electric Guitar (Muted)
30 Overdriven Guitar
31 Distortion Guitar
32 Guitar Harmonics
33 Acoustic Bass
34 Finger Bass
35 Picked Bass
36 Fretless Bass
37 Slap Bass 1
38 Slap Bass 2
39 Synth Bass 1
40 Synth Bass 2
41 Violin
42 Viola
43 Cello
44 Contrabass
45 Tremolo Strings
46 Pizzicato Strings
47 Orchestral Harp
48 Timpani
49 String Ensemble 1
50 String Ensemble 2
51 Synth Strings 1
52 Synth Strings 2
53 Choir Aahs
54 Voice Oohs
55 Synth Voice
56 Orchestra Hit
57 Trumpet
58 Trombone
59 Tuba
60 Muted Trumpet
61 French Horn
62 Brass Section
63 Synth Brass 1
64 Synth Brass 2
APPENDIX: MIDI CHANNEL – (Any except Channel 10)
P
ROGRAM CHANGE GENERAL MIDI PROGRAM
CHANGE GENERAL MIDI
(continued on next page)
Page 12

✧
GGGG----DDDDEEEECC
CC ✧
12
✧ ff ee nn dd ee rr .. cc oo mm ✧
65 Soprano Sax
66 Alto Sax
67 Tenor Sax
68 Baritone Sax
69 Oboe
70 English Horn
71 Bassoon
72 Clarinet
73 Piccolo
74 Flute
75 Recorder
76 Pan Flute
77 Blown Bottle
78 Shakuhachi
79 Whistle
80 Ocarina
81 Lead 1 (Square)
82 Lead 2 (Sawtooth)
83 Lead 3 (Calliope)
84 Lead 4 (Chiff)
85 Lead 5 (Charang)
86 Lead 6 (Voice)
87 Lead 7 (Fifths)
88 Lead 8 (Bass + Lead)
89 Pad 1 (Fantasia)
90 Pad 2 (Warm)
91 Pad 3 (Polysynth)
92 Pad 4 (Choir)
93 Pad 5 (Bowed)
94 Pad 6 (Metallic)
95 Pad 7 (Halo)
96 Pad 8 (Sweep)
97 FX 1 (Rain)
98 FX 2 (Soundtrack)
99 FX 3 (Crystal)
100 FX 4 (Atmosphere)
101 FX 5 (Brightness)
102 FX 6 (Goblins)
103 FX 7 (Echoes)
104 FX 8 (Sci-Fi)
105 Sitar
106 Banjo
107 Shamisen
108 Koto
109 Kalimba
110 Bag Pipe
111 Fiddle
112 Shanai
113 Tinkle Bell
114 Agogo
115 Steel Drums
116 Woodblock
117 Taiko Drum
118 Melodic Tom
119 Synth Drum
120 Reverse Cymbal
121 Guitar Fret Noise
122 Breath Noise
123 Seashore
124 Bird Tweet
125 Telephone Ring
126 Helicopter
127 Applause
128 Gunshot
APPENDIX (continuation): MIDI CHANNEL – (Any except Channel 10)
P
ROGRAM CHANGE
GENERAL MIDI P
ROGRAM CHANGE GENERAL MIDI
Access G-DEC®Drums from an External Controller
The G-DEC synthesizer also contains a standard drum kit
accessible using MIDI channel 10 using a program change
value of 1 (which may be set on most MIDI controller
devices). Most MIDI notes on the keyboard correspond to
a different instrument within the standard drum kit (not all
notes are used). Other drum kits are available on MIDI
channel 10 using program change values 9, 17, 25, 26, 33,
41, 49, 57, or 127.
Page 13

13
✧
GGGG----DDDDEEEECCCC
✧
✧ ff ee nn dd ee rr .. cc oo mm ✧
TYPE: PR 520
PART NUMBER: 2350000000 (120V, 60Hz) US 2350000900 (120V, 60Hz) US DS
2350001900 (110V, 60Hz) TW DS 2350003900 (240V, 50Hz) AUS DS
2350004900 (230V, 50Hz) UK DS 2350005900 (220V, 50Hz) ARG DS
2350006900 (230V, 50Hz) EUR DS 2350007900 (100V, 50Hz) JPN DS
2350009900 (220V, 60Hz) ROK DS
POWER REQUIREMENTS: 50W
POWER OUTPUT: 15W RMS into 8Ω @ 5%THD
POWER AMP INPUT IMPEDANCE: 1MΩ
FUSES: 630mA, 250V for 100/110/120V versions
315mA, 250V for 220V/230V/240V versions
DIMENSIONS HEIGHT: 15.75 in (40 cm)
WIDTH: 13.75 in (35 cm)
DEPTH: 7.25 in (18.5 cm)
WEIGHT: 16.5 lb (7.4 kg)
Product specifications are subject to change without notice.
Specifications
Page 14

✧
nnnnooootttteeeess
ss ✧
✧ ff ee nn dd ee rr .. cc oo mm ✧
Page 15

✧
GGGG----DDDDEEEECCCC
✧
✧ ff ee nn dd ee rr .. cc oo mm ✧
Page 16

fender.com REV C
 Loading...