


Personal Laminator
A4
A5
A6
A4
A6
4R
Insert Sealed
Edge First
A6
A5
A4
A6
4R
A4
READY
POWER

GB
Please read these instructions before use.
FR
Lire ces instructions avant utilisation.
ES
Lea estas instrucciones antes de usar la
máquina.
DE
Diese Anleitungen vor Gebrauch genau
durchlesen.
IT
Primo dell’uso, si raccomanda di leggere
questo manuale di istruzioni.
NL
Lees deze instructies zorgvuldig door voordat u de machine in gebruik neemt.
SE
Läs dessa anvisningar innan du använder
apparaten.
DK
Læs venligst denne vejledning før anvendelse.
FI
Lue nämä ohjeet ennen käyttöä.
N0
Vennligst les nøye igjennom denne bruksanvisningen før bruk.
PL
Przed użyciem proszę zapoznać się z niniejszą
instrukcją.
RU
Перед эксплуатацией устройства
ознакомьтесь с содержанием данной
инструкции.
GR
Διαβάστε τις παρακάτω οδηγίες πριν από τη
χρήση.
TR
Kullanmadan önce lutfen bu talimatlari
okuyen.
CZ
Pred použitím si pročtěte tyto pokyny.
SK
Pred poużitím si prečítajte tieto pokyny.
HU
Kérjük, hogy használat elött olvassa el az
utasításokat.
PT
Leia estas instruções antes da utilização.
BG
Моля, прочетете инструкциите преди
употреба.
RO
Vă rugăm să citiţi instrucţiunile înainte de
utilizare.
HR
Pažljivo pročitajte ove upute prije korištenja.
SI
Pred uporabo izdelka preberite ta navodila
za uporabo.
CONTENTS
LOCATION OF CONTROLS 3
ENGLISH 4-6
FRANCAIS 7-9
ESPAÑOL 10-12
DEUTSCH 13-15
ITALIANO 16-18
NEDERLANDS 19-21
SVENSKA 22-24
DANSK 25-27
SUOMI 28-30
NORSK 31-33
POLSKI 34-36
РУССКИЙ 37-39
EΛΛΗΝΙΚΑ 40-42
TÜRKÇE 43-45
ČESKY 46-48
SLOVENSKY 49-51
MAGYAR 52-54
PORTUGUÊS 55-57
БЪЛГАРСКИ 58-60
ROMÂNĂ 61-63
HRVATSKI 64-66
SLOVENŠČINA 67-69
LAMINATOR CONTROLS
READY
POWER
A5
A4
READY
POWER
A6
A5
A4
READY
POWER
POWER
READY
POWER
A6
A5
A4
READY
POWER
POWER
READY
READY
POWER
A6
A5
A4
A4
A5
A6
A6
A5
A4
Insert Sealed
Edge First
READY
POWER
A4
A6
4R
A6
4R
A4
A4
A5
A6
A6
A5
A4
Insert Sealed
Edge First
READY
POWER
A4
A6
4R
A6
4R
A4
C
A4
A4
D
QUICK START GUIDE
E
A5
A6
Insert Sealed
Edge First
A6
A6
4R
A5
A4
A6
4R
A4
READY
POWER
B
F
A
1
2
3
4
50cm
A4
A5
A6
READY
POWER
Insert Sealed
Edge First
A6
A5
A4
5
A4
A5
6
READY
A6
POWER
Insert Sealed
Edge First
A6
A5
A4
7
8
9
3

ENGLISH
GB
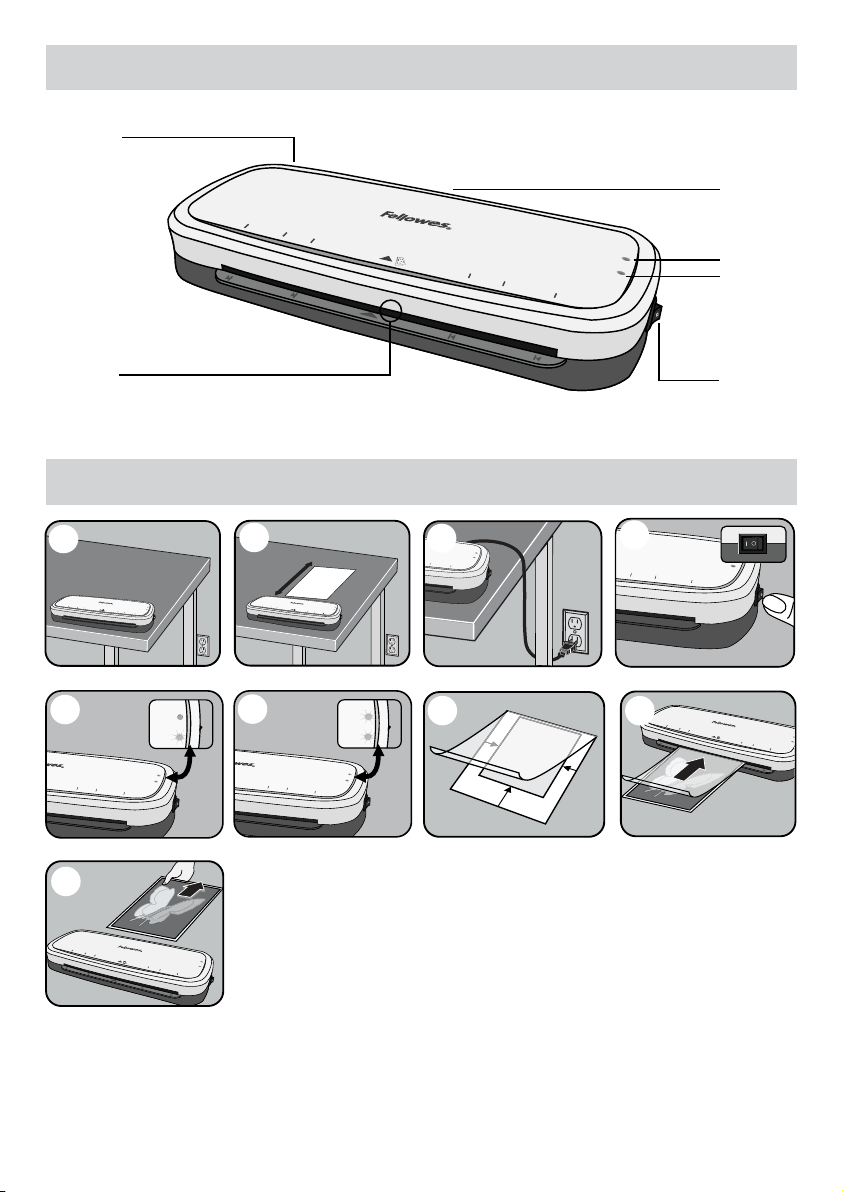
LAMINATOR CONTROLS
A On / off switch
B Ready LED (Green)
C Release lever ( )
CAPABILITIES
Performance
Format 9.5” / 241mm
Entry width A4 = 241mm
Pouch thickness (min) 75 microns (per side)
Pouch thickness (max) 125 microns (per side)
Warm up time (estimate) 4 minutes
Lamination speed approx. 30cm/min
(+/- 5%) (fixed speed)
Number of rollers 2
Ready indication Light (Green)
Release lever Yes
Auto Shut Off Yes
D Pouch / document entry slot
E Pouch / document exit
F Power on LED (Red)
Technical Data
Voltage / Frequency /
Current(Amps) 220-240V AC, 50/60Hz,
1.5A
Wattage 300 Watts
Dimensions (HxWxD) 66mm x 356mm x 158mm
Net weight 1,3 Kg
Max document thickness
(laminating capacity) 0.02” / 0.4mm
IMPORTANT SAFETY INSTRUCTIONS - KEEP FOR FUTURE USE
- The machine is for indoor use only. Plug the machine into an easily accessible socket.
- To prevent electrical shock - do not use the appliance close to water, do not spill water on to the appliance, power
cord or wall socket.
DO ensure the machine is on a stable surface.
DO test laminate scrap sheets and set the machine before
final laminations.
DO remove staples and other metal articles prior to
laminating.
DO keep the machine away from heat and water sources.
DO turn off the machine after each use.
DO unplug the machine when not in use for an extended
period.
DO use pouches designed for use at the appropriate
settings.
DO keep away from pets, while in use.
4
DO NOT leave the power cord in contact with hot
surfaces.
DO NOT leave power cord hanging from cupboards or
shelves.
DO NOT use appliance if the power cord is damaged.
DO NOT attempt to open or otherwise repair the
machine.
DO NOT exceed the machines quoted performance.
DO NOT allow children to use this machine without adult
supervision.
DO NOT laminate sharp or metal objects (eg: staples,
paper clips).
DO NOT laminate heat-sensitive documents (eg: tickets,
ultrasounds etc) on hot settings.
DO NOT laminate with self-adhesive pouches on hot
settings.
DO NOT laminate an empty pouch.

FEATURES & TIPS
‘Release’ function
To remove or re-align a pouch during
lamination, activate the release lever
located on the back of the machine. The
pouch can only be removed from the
entry slot when the lever is activated.
Auto
Shut
Off
Auto Shut Off
After 30 minutes the machine will
automatically go in to Auto Shut Off
mode. The Power LED will flash red for
5 minutes and then turn off. The ready
LED will turn off. To continue using the
machine press the ON/OFF switch. The
machine will reset itself.
SETTING UP THE LAMINATOR
1.
Ensure the machine is on a stable surface.
Check there is enough clear space (min 50cm) behind
2.
the machine to allow items to pass through freely.
HOW TO LAMINATE
Switch the power on (located at the side of the
4.
machine).
The red ‘Power on’ lamp will light up. The machine is
5.
now heating up.
When the machine is ready, the green ‘Ready’ lamp
6.
will remain on.
Place the document into the open pouch. Ensure the
7.
document is centred against the sealed edge. Use the
appropriate pouch size for the document.
• For best results, use Fellowes ® brand pouches:
80 - 125 micron.
• This machine does not need a carrier to laminate.
It is a carrier-free mechanism.
• Always put the item to be laminated into the appropriate sized pouch.
• Always test laminate with a similar size and thickness before final process.
• Prepare pouch and item for lamination. Place item
within pouch centred and touching the leading
sealed edge. Ensure the pouch is not too large for
the item.
• If required, trim excess material from around the
item after lamination and cooling.
Plug the machine into an easily accessible mains
3.
socket.
Ensure the pouch enters the machine sealed edge
8.
first. Keep the pouch straight and central within the
slot, not on an angle. Use the entry markings as a
guide.
Upon exit, the laminated pouch may be hot and soft.
9.
To prevent jamming remove the pouch immediately.
Place pouch on to a flat surface to cool. Take care
when handling a hot pouch.
NEED HELP?
Let our experts help you with a solution.
Customer Service... www.fellowes.com
Always call Fellowes before contacting your place of purchase, see the rear cover for contact details.
Consider registering your machine at www.fellowes.com/register to receive updates and additional information.
5
TROUBLESHOOTING
Problem Possible cause Solution
No ‘power on’ lamp (red LED) Machine not switched on
No ‘ready’ lamp after a long period
(green LED)
The Power LED is flashing red and the
Ready LED (green) has turned off
The ready lamp (green) and the Power
LED (red) have turned off
Pouch does not completely seal the
item
Pouch has waves or bubbles Pouch thickness may be incorrect Laminator accepts 75 - 125 micron pouches
Pouch is lost in the machine Pouch is jammed
Jamming
Pouch is damaged after lamination Damaged rollers or adhesive on rollers
Machine is in a hot or humid area Move the machine to a cooler and dry area
The laminator has gone in to Auto Shut
Off mode
The laminator is in Auto Shut Off mode
Item may be too thick to laminate Maximum document thickness equals .40mm
Pouch was used ‘open end’ first
Pouch was not centred on entry
Pouch was not straight upon entry
Empty pouch was used
Switch on machine at the side and at the wall
socket
Press the ON/OFF switch. The machine will reset
itself
Press the ON/OFF switch. The machine will reset
itself
Press release lever and pull out the item by
hand
Pass cleaning sheets through the machine to test
and clean rollers
STORAGE & CLEANING
Switch off the machine at the wall. Allow the machine to cool. The outside of the machine can be cleaned with a damp cloth. Do not use
solvents or flammable materials to polish the machine. Cleaning sheets can be purchased for use with the machine. When the machine
is warm – run the sheets through the machine to clean any residue off the rollers. For optimum performance, it is recommended that
cleaning sheets are used with the machine regularly. (Cleaning sheet order code #5320604).
PRODUCT REGISTRATION / WORLDWIDE WARRANTY
Thank you for purchasing a Fellowes product. Please visit www.fellowes.com/register to register your product and benefit from
product news, feedback and offers. Product details can be found listed on the rating plate positioned on the rear side or underside of
the machine. Fellowes warrants all parts of the laminator to be free of defects in material and workmanship for 1 year from the date
of purchase by the original consumer. If any part is found to be defective during warranty period, your sole and exclusive remedy
will be repair or replacement, at Fellowes’ option and expense, of the defective part. This warranty does not apply in cases of abuse,
mishandling or unauthorised repair. Any implied warranty, including that of merchantability or fitness for particular purpose, is hereby
limited in duration to the appropriate warranty period set forth above. In no event shall Fellowes be liable for any consequential
damages attributable to this product. This warranty gives you specific legal rights. You may have other legal rights that vary from this
warranty. The duration, terms and conditions of this warranty are valid worldwide, except where different limitations, restrictions or
conditions may be required by local law. For more details or to obtain services under this warranty, please contact Fellowes or your
dealer.
W.E.E.E.
This product is classified as Electrical and Electronic Equipment. Should the time come for you to dispose of
this product please ensure that you do so in accordance with the European Waste of Electrical and Electronic
Equipment (WEEE) Directive and in compliance with local laws relating to this directive.
6
For more information on the WEEE Directive please visit www.fellowesinternational.com/WEEE

FRANÇAIS
FR
COMMANDES DE LA PLASTIFIEUSE
A Interrupteur Marche/Arrêt
B LED machine prête (vert)
C Levier de débrayage ( )
CAPACITÉS
Performance
Format 9,5” / 241 mm
Largeur d'entrée A4 = 241 mm
Épaisseur de pochette (min) 75 microns (par face)
Épaisseur de pochette (min) 125 microns (par face)
Délai de préchauffage
(estimation) 4 minutes
Vitesse de plastification environ 30 cm/min
(+/- 5%) (vitesse fixe)
Nombre de rouleaux 2
Indication « prêt » Voyant lumineux (vert)
Levier de débrayage oui
Arrêt automatique oui
D Fente d'introduction de pochette / document
E Sortie de pochette / document
F LED alimentation (rouge)
Fiche technique
Tension / Fréquence /
Intensité (A) 220-240 V ca, 50/60 Hz,
1,5 A
Puissance 300 Watts
Dimensions (HxLxP) 66mm x 356mm x 158mm
Poids net 1,3 kg
Épaisseur max. de document
(capacité de plastification) 0,02” / 0,4 mm
CONSIGNES DE SÉCURITÉ IMPORTANTES - À CONSERVER
Cet appareil est destiné uniquement à être utilisé à l'intérieur. Brancher la machine à une prise secteur facile d'accès.
- Pour éviter les risques de court-circuit - ne pas utiliser l'appareil à proximité de l'eau, ne pas renverser d'eau sur
l'appareil, sur le cordon d'alimentation ou sur la prise secteur.
IL FAUT veiller à ce que la machine repose sur une
surface stable
IL FAUT faire un essai de plastification sur du papier
brouillon et régler la machine avant de plastifier les
documents.
IL FAUT enlever les agrafes et autres objets métalliques
avant de procéder à la perforation.
IL FAUT tenir la machine éloignée des sources de chaleur
et d'eau.
IL FAUT arrêter la machine après chaque utilisation.
IL FAUT débrancher la machine lorsqu'elle n'est pas
utilisée pendant une longue période.
IL FAUT utiliser des pochettes conçues pour utilisation
aux réglages appropriés.
IL FAUT tenir les animaux domestiques à l'écart lors de
l'utilisation.
NE PAS laisser le cordon en contact avec des surfaces
chaudes.
NE PAS laisser le cordon pendre de placards ou
d'étagères.
NE PAS utiliser l'appareil si le cordon est endommagé.
NE PAS tenter d'ouvrir ou de réparer la machine.
NE PAS dépasser les performances nominales de la
machine.
NE PAS laisser des enfants utiliser la machine sans la
surveillance d'un adulte.
NE PAS tenter de perforer des objets métalliques tels que
des agrafes ou des trombones.
NE PAS plastifier de documents sensibles à la chaleur
(tickets, échographies, etc.) sur les réglages chauds.
NE PAS plastifier avec des pochettes auto-adhésives sur
des réglages chauds.
NE PAS plastifier une pochette vide.
7

FONCTIONS & CONSEILS
Fonction 'Déblocage'
Pour enlever ou repositionner une pochette
pendant la plastification, actionner le levier
de déblocage qui se trouve à l'arrière de la
machine. La pochette peut uniquement être
extraite de la fente d'introduction lorsque
ce levier est actionné.
Auto
Shut
Off
Arrêt automatique
Au bout de 30 minutes, la machine passe
automatiquement en mode d’arrêt automatique. Le LED d’alimentation clignotera
pendant 5 minutes puis s’éteindra. Le
LED indiquant que la machine est prête
s’éteindra. Pour continuer à utiliser la
machine, appuyer sur le bouton ON/OFF. La
machine se réinitialisera.
PRÉPARATION DE LA PLASTIFIEUSE
1.
Veiller à ce que la machine repose sur une surface stable
Vérifier que l'espace derrière la machine est suffisant
2.
(50 cm min.) pour que les documents passent sans
difficulté dans la machine.
POUR PLASTIFIER
• Pour les meilleurs résultats, utiliser des pochettes de
la marque Fellowes® : 80 - 125 microns.
• Cette machine n'a pas besoin d'un transporteur pour
plastifier. Son mécanisme est un mécanisme sans
transporteur.
• Toujours placer le document à plastifier dans une
pochette de la taille appropriée.
• Toujours effectuer un test avec un document de taille
et d'épaisseur similaires avant de plastifier le document proprement dit.
• Préparer la pochette et le document à plastifier.
Placer le document dans la pochette, il doit être bien
centré et toucher le bord déjà soudé. Vérifier que la
pochette n'est pas trop grande pour le document.
• Le cas échéant, recouper les bords une fois le document plastifié et refroidi.
Brancher la machine à une prise secteur facile d'accès.
3.
Mettre la machine en marche (l'interrupteur se
4.
trouve sur le côté de la machine).
Le voyant rouge « Alimentation » s'allumera. La
5.
machine commence à chauffer.
Quand la machine est prête, le voyant vert 'Ready'
6.
reste allumé.
Placer le document dans la pochette ouverte. Prendre
7.
soin de bien centrer le document par rapport au bord
soudé. Utiliser la taille de pochette correcte pour le
document.
Veiller à introduire le bord soudé de la pochette
8.
en premier dans la machine. Tenir la pochette bien
droite et centrée dans la fente, pas de travers.
Utiliser les repères de l'entrée comme guide.
En sortant de la machine, la pochette plastifiée peut
9.
être chaude et souple. Pour éviter le bourrage, retirer
immédiatement la pochette. Placer la pochette sur
une surface plane pour la laisser refroidir. Prendre
des précautions lors de la manipulation d'une
pochette chaude.
BESOIN D'AIDE ?
Nos experts sont là pour vous aider.
Service clientèle... www.fellowes.com
Toujours appeler Fellowes avant de contacter le lieu d'achat de la machine ; voir la dernière page de couverture pour
les coordonnées.
N'oubliez pas d'enregistrer votre machine sur www.fellowes.com/register pour recevoir des mises à jour et des
informations complémentaires.
8
DÉPANNAGE
Problème Cause possible Solution
Pas de voyant 'alimentation' (DEL rouge) La machine n'a pas été mise sous tension
Pas de voyant 'prêt' après une longue
période (DEL verte)
Le LED d’alimentation clignote en rouge et
le LED indiquant que la machine est prête
(vert) est éteint
Le voyant indiquant que la machine est
prête (vert) et le LED d’alimentation (rouge)
sont éteints
La pochette n'est pas entièrement scellée
Il y a des plis ou des bulles sur la pochette
La pochette disparaît dans la machine La pochette est bloquée
Blocage
La pochette est endommagée après la
plastification
La machine se trouve dans un endroit chaud
ou humide
La plastifieuse est passée en mode d’arrêt
automatique
La plastifieuse est en mode d’arrêt
automatique
Le document est peut-être trop épais pour
être plastifié
L'épaisseur de la pochette est peut-être
incorrecte
La pochette a été insérée par le côté ouvert
La pochette n'était pas centralisée au mo-
ment de son introduction
La pochette n'était pas droite au moment de
son introduction
Une pochette vide a été utilisée
Rouleaux endommagés ou colle sur les
rouleaux
Mettre la machine sous tension en actionnant
l'interrupteur sur le côté et, éventuellement, au niveau
de la prise murale
Déplacer la machine dans un endroit plus frais et sec
Appuyer sur le commutateur ON/OFF. La machine se
réinitialisera
Appuyer sur le commutateur ON/OFF. La machine se
réinitialisera
L’épaisseur maximale du document est de ,40mm
La plastifieuse accepte les pochettes de 75-125 microns
Appuyer sur le levier de débrayage et extraire le
document manuellement
Introduire des feuilles nettoyantes dans la machine
pour tester et nettoyer les rouleaux
RANGEMENT & NETTOYAGE
Éteindre la machine en la débranchant de la prise secteur. Laisser la machine refroidir. L'extérieur de la machine peut être nettoyé à l'aide d'un chiffon humide. Ne pas utiliser de solvants ou de produits inflammables pour nettoyer la machine. Des feuilles de nettoyage peuvent être achetées pour les utiliser dans
la machine. Alors que la machine est chaude, passer les feuilles dans la machine pour éliminer les résidus déposés sur les rouleaux. Pour une performance
optimale, il est conseillé de passer régulièrement des feuilles de nettoyage dans la machine. (Référence de commande des feuilles nettoyantes #5320604).
ENREGISTREMENT DU PRODUIT / GARANTIE MONDIALE
Merci d’avoir acheté un produit Fellowes. Veuillez visiter www.fellowes.com/register pour enregistrer votre produit et recevoir les dernières nouvelles, commentaires et offres concernant les produits. Les détails concernant le produit figurent sur la plaque signalétique à l’arrière ou sur le dessous de la machine.
Fellowes garantit que les pièces de la plastifieuse ne présenteront aucun défaut de matière ou de fabrication pendant 1 an à compter de la date d’achat par
le premier utilisateur. En cas de défaut pendant la période de garantie, votre recours unique et exclusif sera la réparation ou l’échange, au choix et aux frais
de Fellowes, de la pièce défectueuse. Cette garantie ne s’applique pas en cas d’utilisation abusive, de mauvaise manipulation ou de réparation non autorisée.
Toute garantie implicite, y compris la garantie de qualité marchande ou d’aptitude à une utilisation particulière, est ainsi limitée dans le temps à la période
de garantie appropriée présentée ci-dessus. Fellowes ne sera en aucun cas responsable des dommages indirects attribuables à ce produit. Cette garantie
vous donne des droits légaux spécifiques. Il est possible que vous ayez d’autres droits légaux différents de ceux conférés par cette garantie. La durée et les
conditions de cette garantie sont valides dans le monde entier, sauf lorsque des limitations, restrictions ou conditions différentes peuvent être exigées par la loi
locale. Pour obtenir un complément d’information ou des services aux termes de la présente garantie, veuillez contacter Fellowes ou votre revendeur.
D.E.E.E.
Ce produit est classé dans la catégorie « Équipement électrique et électronique ». Lorsque vous déciderez de vous en
débarrasser, assurez-vous d’être en parfaite conformité avec la directive européenne relative à la gestion des déchets
d’équipements électriques et électroniques (DEEE), et avec les lois de votre pays liées à cette directive.
Pour obtenir des plus amples informations sur cette directive, rendez-vous sur www.fellowesinternational.com/WEEE
9

ESPAÑOL
ES
CONTROLES DE LA PLASTIFICADORA
A Interruptor On/off
B Luz LED de listo (verde)
C Palanca de liberación ( )
CARACTERÍSTICAS
Rendimiento
Formato 9,5” / 241 mm
Anchura de entrada A4 = 241 mm
Grosor (mín) de la bolsa 75 micras (por cada lado)
Grosor (máx) de la bolsa 125 micras
(por cada lado)
Tiempo de calentamiento
(aproximado) 4 minutos
Velocidad de plastificado aprox. 30 cm/min
(+/- 5%) (velocidad fija)
Número de rodillos 2
Indicación de "Ready" (listo) Luz (verde)
Palanca de liberación Sí
Apagado automático Sí
D Ranura de entrada de bolsa / documento
E Salida de bolsa / documento
F Luz LED de encendido
Especificaciones técnicas
Tensión / Frecuencia /
Corriente (Amperios) 220-240 V CA 50/60 Hz,
1,5 A
Potencia 300 W
Dimensiones 66mm x 356mm x 158mm
(altura x anchura x profundidad)
Peso neto 1,3 Kg
Grosor del documento
máx. (capacidad de 0,4 mm (0,02 pulg.)
plastificación)
INSTRUCCIONES IMPORTANTES DE SEGURIDAD - CONSÉRVELAS PARA UN USO FUTURO
- La máquina debe usarse únicamente en interiores. Enchúfela a una toma eléctrica de fácil acceso.
- Para evitar una descarga eléctrica - no utilice la máquina cerca del agua, no derrame agua sobre la máquina, el
cable o el enchufe.
ASEGURARSE de que la máquina se encuentra sobre
una superficie estable.
PRUEBE a plastificar trozos de hoja y ajuste la máquina
antes de los plastificados definitivos.
RETIRAR las grapas y otros objetos de metal antes de
plastificar.
MANTENER la máquina alejada de fuentes de calor y
de agua.
APAGAR la máquina después de cada uso.
DESCONECTAR la máquina de la toma cuando no vaya
a ser utilizada durante un largo período de tiempo.
UTILIZAR bolsas diseñadas para el uso con la configura-
ción apropiada.
MANTENERLA alejada de los animales cuando se esté
utilizando.
10
NO dejar el cable de corriente en contacto con superficies
calientes.
NO dejar el cable de corriente colgando de armarios o
estanterías.
NO utilizar la máquina si el cable de corriente está
dañado.
NO intentar abrir o reparar la máquina.
NO sobrepasar el rendimiento estimado de la máquina.
NO permitir a los niños utilizar esta máquina sin la
supervisión de un adulto.
NO plastificar objetos afilados o de metal (p. ej: grapas,
clips de papel).
NO plastificar documentos sensibles al calor (p. ej.:
tiquets, ultrasonidos, etc.) en ajustes calientes.
NO plastificar con bolsas autoadhesivas en ajustes
calientes.
NO plastificar una bolsa vacía.

CARACTERÍSTICAS & CONSEJOS
Función 'Liberar'
Para retirar o realinear una bolsa durante la
plastificación, activar la palanca de liberación
situada en la parte posterior de la máquina. La
bolsa sólo puede retirarse desde la ranura de
entrada cuando la palanca está activada.
Auto
Shut
Off
Apagado automático
Después de 30 minutos la máquina pasará
automáticamente a modo de apagado automático. La luz LED de encendido parpadeará
en rojo durante 5 minutos y luego se apagará.
La luz LED de listo se apagará. Para continuar
utilizando la máquina, pulse el interruptor de
encendido/apagado. La máquina se reiniciará.
CONFIGURACIÓN DE LA PLASTIFICADORA
Asegurarse de que la máquina está sobre una
1.
superficie estable.
Comprobar que haya suficiente espacio libre (mín.
2.
50 cm) detrás de la máquina para que los objetos
pasen libremente.
CÓMO PLASTIFICAR
Encender la máquina (interruptor situado en el
4.
lateral de la máquina).
Se iluminará el LED rojo de Alimentación conectada.
5.
La máquina se está ahora calentando.
Cuando la máquina esté preparada, la luz verde de
6.
"Listo" permanecerá encendida.
Ponga el documento en la bolsa abierta. Asegurarse
7.
de que el documento está centrado contra el borde
sellado. Utilice el tamaño de bolsa adecuado para el
documento.
• Para un mejor resultado, utilizar las bolsas de la marca
Fellowes ®: 80 - 125 micras.
• Esta máquina no necesita transportador para plastificar.
Es un mecanismo sin transportador.
• Ponga siempre el objeto a plastificar en la bolsa del
tamaño correcto.
• Probar siempre la plastificación con un tamaño y grosor
similares antes del proceso final.
• Preparar una bolsa y un objeto a plastificar. Coloque el
objeto dentro de una bolsa centrada y tocando la guía
delantera. Compruebe que la bolsa no es demasiado
grande para el objeto.
• Si es necesario, recorte cualquier exceso de material
alrededor del objeto después de la plastificación y el
enfriamiento.
Enchufe la máquina a una toma de red de fácil
3.
acceso.
Asegúrese de que la bolsa entre en la máquina prim-
8.
ero por el borde sellado. Mantenga la bolsa recta y
centrada respecto a la ranura, no girada. Utilice las
marcas de entrada como guía.
Cuando sale, la bolsa plastificada puede estar
9.
caliente y blanda. Para evitar atascos saque la bolsa
inmediatamente. Ponga la bolsa en una superficie
lisa para que se enfríe. Tenga cuidado al manipular
una bolsa caliente.
¿NECESITA AYUDA?
Deje que nuestros expertos le ayuden buscando una solución.
Servicio de atención al cliente... www.fellowes.com
Llame siempre a Fellowes antes de contactar con el punto de venta, busque en la tapa posterior los datos de contacto.
Considere registrar su máquina en www.fellowes.com/register para recibir actualizaciones e información adicional.
11
LOCALIZACIÓN Y RESOLUCIÓN DE PROBLEMAS
Problema Posible causa Solución
No se ilumina luz ‘alimentación
conectada’ (LED rojo)
No se ilumina el piloto de ‘listo’
después de un largo período (LED
verde)
La luz LED de encendido parpadea en
rojo y la luz LED de listo (verde) se ha
apagado
La luz de listo (verde) y la luz LED de
encedido (rojo) se han apagado
La bolsa no sella completamente el
elemento
La bolsa tiene ondas o burbujas
La máquina no está conectada
La máquina se encuentra en un lugar
húmedo o caliente
La plastificadora ha pasado al modo
Apagado automático
La plastificadora está en el modo
Apagado automático
El elemento puede que sea demasiado
grueso para ser plastificado
El espesor de la bolsa puede que sea
incorrecto
La bolsa se ha perdido en la máquina La bolsa está atascada
La bolsa se utilizó con el "extremo
abierto" primero
Atasco
La bolsa no estaba centrada al entrar
La bolsa no estaba recta al entrar
Se ha utilizado una bolsa vacía
La bolsa está dañada tras la plastificación
Los rodillos están dañados o hay
adhesivo sobre los mismos
Conectar la máquina en el lateral y a la toma
de la pared
Mover la máquina hacia una zona más fría y
seca
Pulse el interruptor de encendido/apagado. La
máquina se reiniciará.
Pulse el interruptor de encendido/apagado. La
máquina se reiniciará.
Verifique que el espesor máximo del documento
sea de ,40mm
La plastificadora acepta bolsas de 75-125
micrones
Seleccione la palanca de liberación y tire del
elemento a mano
Pase hojas de limpieza por la máquina para
comprobar y limpiar los rodillos
ALMACENAMIENTO & LIMPIEZA
Desconecte la máquina de la toma de la pared. Deje que la máquina se enfríe. El exterior de la máquina puede limpiarse con un trapo húmedo. No utilice
disolventes o materiales inflamables para pulir la máquina. Pueden adquirirse toallitas limpiadoras para utilizarse en la máquina. Cuando la máquina esté
caliente, pase las toallitas por la máquina para limpiar los residuos de los rodillos. Para un rendimiento óptimo, se recomienda el uso regular de toallitas
limpiadoras en la máquina. (Código de pedido de toallitas limpiadoras # 5320604).
REGISTRO DEL PRODUCTO / GARANTÍA MUNDIAL
Gracias por comprar un producto Fellowes. Visite www.fellowes.com/register para registrar su producto y beneficiarse de noticias, información y ofertas sobre
el producto. Se pueden encontrar los detalles acerca del producto en la placa situada en la parte trasera o inferior de la máquina.
Fellowes garantiza durante 1 año desde la fecha de compra del consumidor original que todas las partes de la encuadernadora carecen de defectos materiales
y de fabricación. Si se encontrara alguna parte defectuosa durante el período de garantía, se reparará o sustituirá la parte defectuosa a cuenta de Fellowes.
Esta garantía no se aplica en caso de abuso, mala utilización o reparación no autorizada. Toda garantía implícita, incluyendo la de mercancía o adecuación
para un fin concreto se limita por la presente en duración al período de garantía apropiado establecido más arriba. En ningún caso Fellowes se hará responsable por cualquier daño consecuente atribuible a este producto. Esta garantía otorga derechos legales específicos. Puede tener otros derechos legales aparte
de los de esta garantía. La duración, términos y condiciones de esta garantía son válidos en todo el mundo, excepto cuando las leyes locales puedan exigir
limitaciones, restricciones o condiciones diferentes. Para más detalles o para obtener servicios de esta garantía, contactar con Fellowes o su comercio.
R.A.E.E.
Este producto está clasificado como Equipamiento Eléctrico y Electrónico. Cuando llegue el momento de deshacerse de este
producto, asegúrese de que lo hace de acuerdo con la Directiva Europea sobre Residuos de Aparatos Eléctricos y Electrónicos
(RAEE) y en cumplimiento de las leyes locales referentes a esta directiva.
Para obtener más información acerca de la directiva RAEE visitar www.fellowesinternational.com/WEEE
12

DEUTSCH
DE
BEDIENELEMENTE
A Ein/Aus-Schalter
B Betriebsbereitschaftsanzeige (grün)
C Freigabehebel ( )
LEISTUNGSMERKMALE
Leistung
Format 9,5” / 241 mm
Eingabebreite A4 = 241 mm
Folienstärke (min.) 75 Micron (pro Seite)
Folienstärke (max.) 125 Micron (pro Seite)
Aufheizzeit (geschätzt) 4 Minuten
Laminiergeschwindigkeit ca. 30 cm/min
(+/- 5%) (konstante Geschwindigkeit)
Anzahl Walzen 2
Anzeige der
Betriebsbereitschaft Anzeigeleuchte
Freigabehebel Ja
Automatische Abschaltung Ja
D Eingabeschlitz für Laminierfolie/Dokument
E Ausgabeschlitz für Laminierfolie/Dokument
F Netzanzeige (rot)
Technische Daten
Spannung / Frequenz /
Stromstärke (A) 220-240 V AC, 50/60 Hz,
1,5 A
Leistung 300 Watt
Abmessungen (HxBxT) 66mm x 356mm x 158mm
Nettogewicht 1,3 kg
Max. Dokumentendicke
(Laminierkapazität) 0,4mm
WICHTIGE SICHERHEITSVORSCHRIFTEN – BITTE AUFBEWAHREN
- Das Gerät ist nur zum Gebrauch in Innenräumen vorgesehen. Schließen Sie das Gerät an einer einfach zu erreichenden Netzdose
an.
- Zur Verhütung eines Stromschlags das Gerät nicht in der Nähe von Wasser betreiben und sicherstellen, dass kein Wasser auf Gerät,
Netzkabel oder Steckdose gelangt.
IMMER sicherstellen, dass das Gerät auf einer sicheren und
stabilen Fläche steht.
IMMER zunächst einige Probeblätter laminieren und das Gerät
entsprechend einstellen, bevor die endgültigen Dokumente
laminiert werden.
IMMER vor dem Laminieren zunächst Heftklammern und
andere Metallartikel entfernen.
IMMER das Gerät vor Wärme und Feuchtigkeit schützen.
IMMER das Gerät nach Gebrauch ausschalten.
IMMER den Gerätestecker aus der Netzsteckdose ziehen, wenn
das Gerät für längere Zeit nicht benutzt wird.
IMMER geeignete Laminierfolien verwenden und entsprech-
ende Einstellungen vornehmen.
IMMER Tiere während des Gebrauchs vom Gerät fernhalten.
KEINESFALLS das Stromkabel mit heißen Oberflächen in
Berührung kommen lassen.
KEINESFALLS das Stromkabel von Schränken oder Regalen
herunterhängen lassen.
KEINESFALLS das Gerät benutzen, wenn das Stromkabel
beschädigt ist.
KEINESFALLS versuchen, das Gerät zu öffnen oder selbst zu
reparieren.
KEINESFALLS die angegebene Leistung des Geräts übersch-
reiten.
KEINESFALLS Kindern erlauben, das Gerät unbeaufsichtigt zu
verwenden.
KEINESFALLS scharfe oder spitze Objekte bzw. Metallgegen-
stände (z. B. Heft- oder Büroklammern) laminieren.
KEINESFALLS wärmeempfindliche Dokumente (z. B. Tickets,
Ultraschallbilder usw.) bei heißen Einstellungen laminieren.
KEINESFALLS selbstklebende Laminierfolien bei heißen Einstel-
lungen laminieren.
KEINESFALLS leere Folien laminieren.
13

FUNKTIONSMERKMALE & TIPPS
Freigabefunktion
Zum Entfernen oder Neuausrichten eines Dokuments während des Laminierens betätigen
Sie den Freigabehebel an der Rückseite des
Geräts. Die Laminierfolie lässt sich nur bei
Betätigung des Hebels aus dem Eingabeschlitz
entfernen.
Auto
Shut
Off
Automatische Abschaltung
Nach 30 Minuten geht die Maschine
automatisch in den Auto-Abschaltmodus. Die
Netzanzeige blinkt 5 Minuten rot und schaltet
sich dann aus. Die Betriebsbereitschaftsanzeige schaltet sich ab. Um das Gerät wieder zu
benutzen, drücken Sie den EIN/AUS-Schalter.
Das Gerät setzt sich selbst zurück.
AUFSTELLEN DES LAMINIERGERÄTS
1.
Vergewissern Sie sich, dass das Gerät auf einer sicheren
und stabilen Fläche steht.
2.
Achten Sie darauf, dass ausreichend freier Platz (mind.
50 cm) auf der Geräterückseite vorhanden ist, damit die
Objekte ungehindert durchlaufen können.
LAMINIEREN
Schalten Sie das Gerät am Hauptschalter an der Geräteseite
4.
ein.
Die rote Netz-LED leuchtet auf. Das Gerät heizt sich nun
5.
auf.
Sobald die richtige Temperatur erreicht ist, leuchtet die
6.
grüne Bereitschafts-LED konstant.
Legen Sie das Dokument in die offene Folie ein. Achten
7.
Sie darauf, dass das Dokument mittig an der versiegelten
Kante anliegt. Verwenden Sie Laminierfolien in der für das
Dokument passenden Größe.
• Um beste Ergebnisse zu gewährleisten, empfehlen wir
original Fellowes®-Laminierfolien: 80 - 125 Mikron.
• Zum Laminieren mit diesem Gerät sind keine Schutzkartons
(Carrier) erforderlich. Es handelt sich um einen Mechanismus ohne Schutzkartons.
• Legen Sie das zu laminierende Objekt immer in eine
Laminierfolie der passenden Größe.
• Laminieren Sie stets ein Probeexemplar ähnlicher Größe
und Dicke, bevor Sie das endgültige Dokument laminieren.
• Bereiten Sie die Laminierfolie und das zu laminierende
Objekt vor. Legen Sie das Objekt mittig in die Laminierfolie,
sodass es die vordere versiegelte Kante berührt. Achten
Sie darauf, dass die Laminierfolie nicht zu groß für das
Objekt ist.
• Gegebenenfalls schneiden Sie überschüssiges Material nach
dem Laminieren und Abkühlen ab.
Schließen Sie das Gerät an eine einfach zu erreichende
3.
Netzsteckdose an.
Achten Sie darauf, die Folie mit der versiegelten Kante
8.
voraus in das Gerät einzuführen. Führen Sie die Folie
gerade und mittig ausgerichtet in den Schlitz ein, nicht
schräg. Orientieren Sie sich an den Eingabemarkierungen.
Bei der Ausgabe ist das laminierte Dokument noch heiß
9.
und weich. Um Staus zu vermeiden, nehmen Sie die
Folie sofort heraus. Lassen Sie die Folie auf einer flachen
Oberfläche abkühlen. Vorsicht bei der Handhabung heißer
Folien.
BRAUCHEN SIE HILFE?
Unsere Experten helfen Ihnen gern.
Kundendienst... www.fellowes.com
Rufen Sie stets zuerst Fellowes an, bevor Sie sich an Ihre Verkaufsstelle wenden. Die Kontaktangaben finden Sie auf der hinteren
Umschlagseite.
Wir empfehlen Ihnen, Ihr Gerät bei www.fellowes.com/register zu registrieren, damit Sie aktuelle Miteilungen und zusätzliche
Informationen erhalten.
14
FEHLERSUCHE UND -BEHEBUNG
Problem Mögliche Ursache Lösung
Die Betriebsanzeige (rote Netz-LED) leuchtet
nicht.
Die Bereitschaftsanzeige (grüne
Bereitschafts-LED) leuchtet auch nach
längerer Zeit nicht auf.
Die Netzanzeige blinkt rot und die Betriebsbereitschaftsanzeige (grün) ist aus.
Die Betriebsbereitschaftsanzeige (grün) und
die Netzanzeige (rot) sind aus.
Das Objekt wird nicht vollständig in der
Laminiertasche eingeschlossen.
Folie wirft Wellen oder Blasen. Folienstärke eventuell falsch.
Die Laminiertasche ist im Gerät verschwunden.
Folienstau
Die Laminiertasche ist nach dem Laminieren
beschädigt.
Das Gerät ist nicht eingeschaltet. Schalten Sie das Gerät an der Seite ein.
Das Gerät befindet sich in heißer oder
feuchter Umgebung.
Das Laminiergerät hat sich automatisch
abgeschaltet.
Das Laminiergerät hat sich automatisch
abgeschaltet.
Das zu laminierende Objekt ist unter
Umständen zu dick.
Laminiertasche steckt fest.
Die Laminiertasche wurde mit dem offenen
Ende zuerst eingeführt.
Die Laminiertasche wurde nicht mittig
eingeführt.
Die Laminiertasche wurde nicht gerade
eingeführt.
Es wurde eine leere Laminiertasche
verwendet.
Die Walzen sind beschädigt oder mit Klebstoff
verschmutzt.
Stellen Sie das Gerät an einen kühleren, trockenen
Platz.
Drücken Sie den EIN/AUS-Schalter. Das Gerät setzt sich
selbst zurück.
Drücken Sie den EIN/AUS-Schalter. Das Gerät setzt sich
selbst zurück.
Die maximale Dokumentstärke beträgt ,40mm.
Das Laminiergerät akzeptiert Laminiertaschen von 75
bis 125 Mikron.
Betätigen Sie den Freigabehebel und ziehen Sie das
Objekt von Hand heraus.
Lassen Sie Reinigungsblätter durch das Gerät laufen,
um das Gerät zu testen und die Walzen zu reinigen.
AUFBEWAHRUNG & REINIGUNG
Schalten Sie das Gerät an der Netzsteckdose aus bzw. ziehen Sie den Netzstecker. Lassen Sie das Gerät abkühlen. Die Außenseite des Geräts kann mit einem
feuchten Tuch abgewischt werden. Verwenden Sie keine Lösungsmittel oder leicht entzündliche Materialien zum Abwischen des Geräts. Zur Reinigung des
Geräts können separat erhältliche Reinigungsblätter verwendet werden. Die Blätter durch das warme Gerät laufen lassen, um Rückstände von den Walzen zu
entfernen. Um eine optimale Funktion zu gewährleisten, empfehlen wir, regelmäßig Reinigungsblätter zu verwenden. (Bestellnummer 5320604)
PRODUKTREGISTRIERUNG / WELTWEITE GARANTIE
Vielen Dank, dass Sie sich für ein Produkt von Fellowes entschieden haben. Bitte registrieren Sie Ihr Produkt auf der Website www.fellowes.com/register,
damit wir Sie über Produktneuheiten, Feedback und Angebote informieren können. Die Produktdaten finden Sie auf dem Typenschild an der Rück- bzw.
Unterseite des Geräts.
Fellowes gewährt auf alle Teile des Geräts eine Garantie gegen Herstellungs- und Materialfehler für 1 Jahre ab dem Kaufdatum durch den Erstkäufer. Wird
ein Teil des Gerätes während der Gewährleistungsfrist als defekt befunden, wird dieses nach Fellowes‘ Ermessen und auf dessen Kosten entweder repariert
oder ausgetauscht. Andere Gewährleistungsansprüche bestehen nicht. Die Garantieansprüche entfallen, falls das Produkt bestimmungsfremd gebraucht, falsch
gehandhabt oder unbefugt repariert wird. Jede Art gesetzlicher Gewährleistung, einschließlich der Gewährleistung der Durchschnittsqualität oder der Eignung
für einen bestimmten Zweck, ist hierdurch auf die oben angegebene Garantiefrist beschränkt. In keinem Fall haftet Fellowes für Folgeschäden, die auf dieses
Produkt zurückzuführen sind. Diese Garantie bietet Ihnen bestimmte Rechtsansprüche, gegebenenfalls haben Sie auch andere Rechtsansprüche, die von dieser
Garantie abweichen. Die Dauer, Bestimmungen und Konditionen dieser Garantie gelten weltweit, außer dort, wo durch die regionale Gesetzgebung eventuell
andere Haftungsbeschränkungen, Einschränkungen oder Bedingungen vorgeschrieben sind. Für weitere Angaben oder für Leistungsansprüche im Rahmen
dieser Garantie wenden Sie sich bitte an Fellowes oder Ihre zuständige Vertretung.
W.E.E.E.
Dieses Produkt ist als Elektro- und Elektronikgerät klassifiziert. Entsorgen Sie das Produkt zu gegebener Zeit gemäß der
europäischen WEEE-Richtlinie zur Entsorgung von Elektro- und Elektronikaltgeräten und gemäß den örtlich geltenden
jeweiligen Bestimmungen.
Weitere Informationen über die WEEE-Richtlinie finden Sie auf der Website www.fellowesinternational.com/WEEE
15

ITALIANO
IT
COMANDI DELLA PLASTIFICATRICE
A Tasto di accensione/spegnimento
B LED di pronto (verde)
C Leva di rilascio ( )
CARATTERISTICHE TECNICHE
Prestazioni
Formato 9,5” / 241 mm
Larghezza imboccatura A4 = 241 mm
Spessore pouch (min) 75 micron (per lato)
Spessore pouch (max) 125 micron (per lato)
Tempo di riscaldamento
(stimato) 4 minuti
Velocità di plastificazione 30 cm/min circa
(+/- 5%) (velocità fissa)
Numero di rulli 2
Indicatore di pronto
macchina Acceso (verde)
Leva di rilascio Sì
D Fessura per inserimento pouch/documento
E Uscita pouch/documento
F LED di accensione (rosso)
Spegnimento automatico Sì
Specifiche tecniche
Tensione / Frequenza /
Corrente (Amp) 220-240 V CA, 50/60 Hz,
1,5 A
Potenza 300 Watt
Dimensioni (AxLxP) 66mm x 356mm x 158mm
Peso netto 1,3 Kg
Spessore massimo dei documenti
(capacità di plastificazione) ,0,02 poll. / 0,4 mm
- La macchina è idonea a un uso esclusivamente in interni. Collegare la macchina a una presa di corrente facilmente accessibile.
- Per scongiurare il rischio di una scossa elettrica, non utilizzare la macchina vicino all'acqua, non versare acqua sulla macchina, sul
cavo o sulla presa di alimentazione.
VERIFICARE che la macchina sia posizionata su una superficie
stabile.
ESEGUIRE alcune prove e regolare la macchina prima di
procedere alla plastificazione dei documenti.
RIMUOVERE punti e altri oggetti metallici prima di plastificare.
TENERE la macchina lontana da fonti di calore e acqua.
SPEGNERE la macchina dopo ogni utilizzo.
SCOLLEGARE la macchina in caso di periodi di inutilizzo
prolungati.
UTILIZZARE pouch apposite e con le impostazioni corrette.
TENERE lontano dagli animali durante l'utilizzo.
16
NON lasciare il cavo di alimentazione a contatto con superfici
calde.
NON lasciar pendere il cavo di alimentazione da scaffali o
ripiani.
NON utilizzare la macchina se il cavo di alimentazione è
danneggiato.
NON aprire né tentare di riparare la macchina.
NON superare i limiti di prestazione indicati.
NON consentire ai bambini di utilizzare la macchina senza la
supervisione di un adulto.
NON plastificare oggetti taglienti o metallici (ad es.: punti
metallici, graffette).
NON plastificare documenti sensibili al calore (ad es.: biglietti,
ecografie, ecc.) con impostazioni a caldo.
NON plastificare con pouch autoadesive con impostazioni a
caldo.
NON plastificare una pouch vuota.

FUNZIONI E SUGGERIMENTI
Funzione “Rilascio”
Per rimuovere o riallineare una pouch durante
la plastificazione, attivare la leva di rilascio
situata sul retro della macchina. È possibile
rimuovere la pouch dalla fessura per inserimento solo quando la leva è attivata.
Auto
Shut
Off
Spegnimento automatico
Dopo 30 minuti, la macchina passerà automaticamente alla modalità di Spegnimento
automatico. Il LED di accensione lampeggia
per 5 minuti, quindi si spegne. Il LED di pronto
si spegnerà. Per continuare a utilizzare la
macchina, premere il tasto di accensione/
spegnimento. Verrà eseguito il reset della
macchina.
IMPOSTAZIONE DELLA PLASTIFICATRICE
Accertarsi che la macchina sia posizionata su una superficie
1.
stabile.
Verificare che dietro alla macchina vi sia spazio sufficiente
2.
(min. 50 cm) per consentire la fuoriuscita dei documenti.
COME PLASTIFICARE
Accendere la macchina (l'interruttore si trova sul lato).
4.
L'indicatore di accensione si illumina. La plastificatrice
5.
inizia a riscaldarsi.
• Per risultati ottimali, utilizzare le pouch Fellowes ®:
80 - 125 micron.
• La macchina non utilizza un carrier per plastificare; si
tratta infatti di un meccanismo senza carrier.
• Utilizzare sempre pouch per la plastificazione adatte alle
dimensioni del documento.
• Eseguire sempre alcune prove con modelli di dimensioni
e spessore simili ai documenti da plastificare.
• Preparare la pouch e il documento da plastificare.
Inserire il documento al centro della pouch e a contatto
con il bordo sigillato di quest'ultima. Accertarsi che
la pouch non sia troppo grande per il documento da
plastificare.
• Se necessario, tagliare il bordo in eccesso dopo la
plastificazione e il raffreddamento.
Collegare la macchina a una presa di corrente facilmente
3.
accessibile.
Accertarsi di introdurre la pouch inserendo per primo il
8.
bordo sigillato. Tenere la pouch diritta e al centro della
fessura facendo attenzione che non venga inserita storta.
Utilizzare gli appositi segni come riferimento.
Quando è pronta, l'indicatore verde di pronto macchina
6.
rimane acceso.
Inserire il documento in una pouch aperta. Verificare che il
7.
documento sia centrato e allineato contro il bordo sigillato.
Utilizzare pouch di dimensioni adeguate al documento da
plastificare.
Una volta espulsa, la pouch plastificata potrebbe essere
9.
calda e morbida. Per impedire l'inceppamento del meccanismo, rimuovere immediatamente la pouch. Appoggiare
la pouch su una superficie piatta per farla raffreddare.
Fare attenzione quando si maneggia una pouch calda.
BISOGNO DI AIUTO?
I nostri esperti sono a disposizione per risolvere qualsiasi problema.
Servizio Clienti... www.fellowes.com
Prima di contattare il rivenditore, rivolgersi sempre a Fellowes. Vedere le informazioni di contatto sul retro del presente documento.
È possibile registrare il prodotto all'indirizzo www.fellowes.com/register per ricevere aggiornamenti e ulteriori informazioni.
17

RISOLUZIONE DEI PROBLEMI
Problema Possibile causa Soluzione
L'indicatore di accensione è spento (LED
rosso)
L'indicatore di pronto macchina non si accende dopo un lungo periodo (LED verde)
Il LED di accensione lampeggia di colore
rosso e il LED di pronto (verde) è spento
Il LED di pronto (verde) e LED di accensione
(rosso) sono spenti
La pouch non sigilla completamente il
documento
La pouch presenta ondulazioni o bolle
La pouch è rimasta all'interno della
plastificatrice
Inceppamento
La pouch si è danneggiata dopo la
plastificazione
La machina è spenta
La macchina si trova in un ambiente caldo
o umido
La plastificatrice si è portata in modalità
Spegnimento automatico
La plastificatrice è in modalità Spegnimento
automatico
Il documento potrebbe essere troppo spesso
per poter essere plastificato
Lo spessore della pouch potrebbe non essere
corretto
La pouch è inceppata
La pouch è stata inserita con il lato aperto
in avanti
La pouch non era centrata al momento
dell'inserimento
La pouch non era diritta al momento
dell'inserimento
È stata utilizzata una pouch vuota
Rulli danneggiati o presenza di adesivo
sui rulli
Accendere la macchina sul lato e all'ingresso della
spina sul muro
Spostare la macchina in un ambiente più fresco e
asciutto
Premere il tasto di accensione/spegnimento; verrà
eseguito il reset della macchina
Premere il tasto di accensione/spegnimento; verrà
eseguito il reset della macchina
Lo spessore massimo della pouch corrisponde a
,40mm
La plastificatrice accetta pouch da 75-125 micron
Attivare la leva di rilascio ed estrarre il documento
manualmente
Verificare lo stato dei rulli inserendo dei fogli di
pulizia nella macchina
CONSERVAZIONE E PULIZIA
Togliere la spina dalla presa a muro. Lasciar raffreddare la macchina. La parte esterna può essere pulita con un panno umido. Non utilizzare solventi o
materiali infiammabili per pulire la plastificatrice. È possibile acquistare degli appositi fogli di pulizia da usare con questa macchina. Quando la macchina
è ancora calda, inserirvi i fogli per eliminare eventuali residui dai rulli. Per prestazioni ottimali si raccomanda di utilizzare regolarmente i fogli di pulizia.
(Codice di ordine fogli di pulizia n. 5320604).
REGISTRAZIONE DEL PRODOTTO / GARANZIA A LIVELLO MONDIALE
Grazie per aver acquistato un prodotto Fellowes. Registrare il prodotto sul sito www.fellowes.com/register per conoscere tutte le novità, le informazioni e
le offerte sui prodotti. I dati relativi al prodotto sono riportati nella targhetta posizionata sul lato posteriore o sotto la macchina.
Fellowes garantisce l’assenza di difetti materiali e di lavorazione della plastificatrice e dei suoi componenti per 1 anni dalla data di acquisto da parte
del cliente originale. Se durante il periodo di garanzia vengono rilevati difetti in un componente, il rimedio unico ed esclusivo sarà la riparazione o la
sostituzione, a discrezione e a spese di Fellowes, del componente difettoso. Questa garanzia non si applica in caso di utilizzo errato, manipolazione
impropria o riparazione non autorizzata. Qualsiasi garanzia implicita, compresa quella di vendibilità o idoneità a un particolare scopo, viene qui limitata
in durata al periodo di garanzia indicato sopra. In nessun caso Fellowes può essere ritenuta responsabile per danni indiretti attribuibili a questo prodotto.
Questa garanzia conferisce all’utente diritti legali specifici. L’utente può essere detentore di altri diritti legali diversi da quelli indicati dalla presente
garanzia. La durata, i termini e le condizioni della presente garanzia sono validi in tutto il mondo, tranne nei casi in cui le normative locali impongano
limiti, restrizioni o condizioni diverse. Per ulteriori informazioni o per ottenere l’assistenza prevista dalla garanzia, contattare Fellowes o il rivenditore.
W.E.E.E.
Questo prodotto rientra nella classificazione di apparecchiatura elettrica ed elettronica. Quando sarà il momento di eliminare
questo prodotto assicurarsi di smaltirlo nel rispetto della Direttiva Rifiuti di apparecchiature elettriche ed elettroniche
(European Waste of Electrical and Electronic Equipment - WEEE) e nel rispetto delle leggi locali relative a questa direttiva.
Per maggiori informazioni sulla Direttiva WEEE visitare il sito www.fellowesinternational.com/WEEE
18

NEDERLANDS
NL
BEDIENINGSKNOPPEN LAMINEERMACHINE
A Aan/uit-schakelaar
B LED ‘Ready’ (groen)
C Ontgrendeling ( )
OVERZICHT
Prestatie
Formaat 9,5” / 241 mm
Invoerbreedte A4 = 241 mm
Hoesdikte (min.) 75 micron (per zijde)
Hoesdikte (max.) 125 micron (per zijde)
Opwarmtijd (schatting) 4 minuten
Lamineersnelheid ca. 30 cm/min
(+/- 5%) (vaste snelheid)
Aantal rollen 2
Indicatie "Gereed" Lampje (groen)
Ontgrendeling Ja
Automatisch uitschakelen Ja
D Invoeropening lamineerhoes/document
E Uitvoeropening lamineerhoes/document
F LED ‘Power’ (rood)
Technische gegevens
Spanning / Frequentie /
Stroomsterkte (amp.) 220-240 VAC, 50/60 Hz,
1,5 A
Elektrisch vermogen 300 watt
Afmetingen (HxBxD) 66mm x 356mm x 158mm
Netto gewicht 1,3 kg
Maximale documentdikte
(lamineercapaciteit) 0,02” / 0,4 mm
BELANGRIJKE VEILIGHEIDSINSTRUCTIES - BEWAREN VOOR TOEKOMSTIG GEBRUIK
- Het apparaat is uitsluitend bestemd voor gebruik binnenshuis. Steek de stekker van de machine in een gemakkelijke toegankelijk
stopcontact.
- Om elektrische schok te voorkomen, mag de machine niet in de buurt van water worden gebruikt. Ook mag er geen water op de
machine, het snoer of het stopcontact worden gemorst.
Zorg ervoor dat de machine op een stabiele ondergrond staat.
Lamineer eerst een proefblad om de machine goed in te stellen
voordat u originele documenten gaat lamineren.
Verwijder nietjes en andere metalen voorwerpen voordat u
begint met lamineren.
Houd de machine uit de buurt van water of warmtebronnen.
Zet de machine na gebruik uit.
Trek de stekker uit het stopcontact wanneer u de machine
langere tijd niet gebruikt.
Gebruik de juiste lamineerhoezen en de juiste instellingen.
Houd huisdieren uit de buurt van de laminator wanneer u de
machine gebruikt.
Laat het netsnoer niet in contact komen met een heet oppervlak.
Laat het netsnoer niet van een kast of plank omlaag hangen.
Gebruik de machine niet als het netsnoer is beschadigd.
Probeer de machine niet te openen of repareren.
Overschrijd nooit de opgegeven specificaties van de machine.
Laat kinderen de machine nooit zonder toezicht van een
volwassene gebruiken.
Lamineer geen scherpe of metalen voorwerpen (bv. nietjes,
paperclips).
Lamineer geen warmtegevoelige documenten (bv. toegangsbe-
wijs, echoscopie...) met de functie heet lamineren.
Lamineer zelfklevende hoezen niet met de functie heet
lamineren.
Lamineer geen lege hoezen.
19

KENMERKEN & TIPS
Ontgrendelfunctie
Om een hoes tijdens het lamineren te
verwijderen of recht te duwen, drukt u op u
de ontgrendeling aan de achterkant van de
machine. De hoes kan pas worden verwijderd
uit de invoeropening wanneer de ontgrendel-
Auto
Shut
Off
ing is geactiveerd.
Automatisch uitschakelen
Na 30 minuten wordt het apparaat
automatisch uitgezet. De LED ‘Power’ knippert
gedurende 5 minuten en gaat dan uit. De
LED ‘Ready’ gaat uit. Om door te gaan met
lamineren, drukt u op de Aan/uit-schakelaar.
De machine reset zichzelf.
INSTELLEN VAN LAMINEERMACHINE
Zorg ervoor dat de machine op een stabiele ondergrond
1.
staat.
Controleer of er voldoende vrije ruimte (min. 50 cm)
2.
achter de machine is voor een ongehinderde doorvoer van
de documenten.
HOE TE LAMINEREN
Zet de aan-/uitschakelaar aan (deze bevindt zich aan de
4.
zijkant van de machine).
Het rode ‘Power on’ lampje licht op. De machine is nu aan
5.
opwarmen.
Nadat de machine gereed is zal het lampje ' Gereed '
6.
aanblijven.
Plaats het document in de open lamineerhoes. Zorg ervoor
7.
dat het document gecentreerd tegen de smeltkant is geplaatst. Gebruik een lamineerhoes met de juiste afmetingen
voor het document.
• Voor de beste resultaten gebruikt u lamineerhoezen van
het merk Fellowes®, zoals: 80 - 125 micron
• Deze machine heeft geen drager nodig om te lamineren.
Het is een lamineermachine zonder drager.
• Plaats het te lamineren document altijd in een lamineerhoes met de juiste afmeting.
• Lamineer altijd eerst een testdocument van dezelfde
grootte en dikte voordat u het origineel lamineert.
• Maak de lamineerhoes en het document klaar voor het
lamineren. Plaats het document in het midden van de
lamineerhoes tegen de gesealde rand aan. De hoes mag
niet te groot zijn voor het document.
• Knip na het lamineren en afkoelen indien nodig overtollig materiaal rondom het document af.
Steek de stekker van de machine in een gemakkelijke
3.
toegankelijk stopcontact.
Steek de lamineerhoes met de smeltkant eerst in de
8.
machine. Houd de lamineerhoes recht en centraal in de
invoeropening en steek deze er niet scheef in. Gebruik de
aanlegtekens als richtlijn.
De lamineerhoes kan heet en zacht zijn na uitvoer uit
9.
de machine. Verwijder de lamineerhoes onmiddellijk om
vastlopen te voorkomen. Leg de lamineerhoes op een
vlakke ondergrond om af te koelen. Wees voorzichtig bij
het aanraken van een hete hoes.
HULP NODIG?
Laat onze experts u helpen bij het vinden van een oplossing.
Klantenservice ... www.fellowes.com
Neem altijd eerst contact op met Fellowes, voordat u contact opneemt met de winkel waar u de machine heeft gekocht. Zie
achterzijde voor contactgegevens.
Overweeg om uw machine te registreren op www.fellowes.com/register om updates en extra informatie te ontvangen.
20
PROBLEEMOPLOSSING
Probleem Mogelijke oorzaak Oplossing
‘Power on’ lampje (rode LED) licht
niet op
‘Ready’ lampje (groene LED) gaat ook
na lange tijd niet aan.
De LED ‘Power’ knippert rood en de
LED ‘Ready’ (groen) is uit
De LED ‘Ready’ (groen) en de LED
‘Power’ (rood) zijn uit
Machine niet ingeschakeld
Machine staat op een warme of
vochtige plaats
De lamineermachine staat nu in de
stand ‘Automatisch uitschakelen’
De lamineermachine staat in de stand
‘Automatisch uitschakelen’
Hoes sluit het item niet volledig af Item is te dik om te lamineren Maximale documentdikte is ,40mm
Hoes is gegolfd of heeft bubbels Hoesdikte is onjuist
Hoes blijft zitten in de machine Hoes is vastgelopen
Hoes is met het 'open uiteinde' eerst
ingevoerd
Vastloop
Hoes is niet gecentreerd tijdens het
invoeren
Hoes is niet recht in de invoer gestoken
Er is een lege lamineerhoes gebruikt
Hoes is beschadigd na het lamineren
De rollen zijn beschadigd of er zit
lijm op
Controleer of de stekker in het stopcontact zit en
schakel de machine in aan de zijkant
Zet de machine op een koelere en droge plaats
Druk op de Aan/uit-schakelaar. De machine
reset zichzelf
Druk op de Aan/uit-schakelaar. De machine
reset zichzelf
De lamineermachine is geschikt voor hoezen
van 75-125 micron
Druk op de ontgrendeling en trek de hoes er
handmatig uit
Voer reinigingsvellen door de machine om te
testen en de rollen te reinigen
OPSLAG & REINIGING
Verwijder de stekker uit het stopcontact. Laat de machine afkoelen. De buitenkant van de machine kan met een vochtige doek worden gereinigd.
Gebruik geen oplosmiddelen of ontvlambare middelen om de machine te reinigen. Er zijn reinigingsvellen te koop om de machine te reinigen. Voer de
reinigingsvellen door de machine wanneer de rollen warm zijn. Voor optimale prestaties raden we aan om de rollen regelmatig met reinigingsvellen te
reinigen. (Bestelnummer reinigingsvellen #5320604).
PRODUCTREGISTRATIE / WERELDWIJDE GARANTIE
Hartelijk dank voor het aanschaffen van een Fellowes product. Ga naar www.fellowes.com/register om uw product te registreren en om gebruik te kunnen maken van de voordelen van ons productnieuws, terugkoppeling en aanbiedingen. Op het productidentificatieplaatje aan de achter- of onderkant
van het apparaat treft u de productgegevens aan.
Fellowes garandeert gedurende 1 jaar vanaf de datum van aankoop door de oorspronkelijke gebruiker dat alle onderdelen van de laminator vrij
zijn van materiaaldefecten en fabricagefouten. Indien enig onderdeel tijdens de garantieperiode toch defect blijken te zijn, dan bestaat uw enige en
uitsluitende genoegdoening uit reparatie of vervanging van het defecte onderdeel, dit ter beoordeling van en op kosten van Fellowes. Deze garantie is
niet van toepassing in het geval van misbruik, onoordeelkundig gebruik of niet-geautoriseerde reparatie. Enige geïmpliceerde garantie, inclusief die van
verkoopbaarheid of geschiktheid voor een bepaald doel, is hierbij beperkt tot de duur van de bovengenoemde garantieperiode. Fellowes wijst expliciet
alle aansprakelijk in het kader van enige gevolgschade af, die aan dit product te wijten zou kunnen zijn. Deze garantie verschaft u bepaalde juridische
rechten. U hebt mogelijk andere juridische rechten, die van deze garantie afwijken. De duur, bepalingen en voorwaarden van deze garantie gelden
wereldwijd, behalve wanneer op basis van plaatselijke wetgeving andere beperkingen, restricties of voorwaarden van kracht zijn. Voor meer informatie,
of om garantie te verkrijgen onder de voorwaarden van deze garantie, kunt u contact opnemen met Fellowes, of met uw plaatselijke dealer.
W.E.E.E.
Dit product is geclassificeerd als Elektrisch en Elektronisch apparatuur. Als de tijd komt dat u dit product niet meer wilt
gebruiken, zorg dan dat u het product afdankt volgens de Europese richtlijn WEEE ofwel AEEA Afgedankte Elektrisch en
Elektronisch Apparatuur en volgens de plaatselijke wetgeving die aan deze richtlijn is gerelateerd.
Voor meer informatie over de WEEE richtlijn, ga naar www.fellowesinternational.com/WEEE
21

SVENSKA
SV
LAMINERINGSKONTROLLER
A På/av-knapp
B Klarlampa (grön)
C Frigöringsspak ( )
SPECIFIKATIONER
Kapacitet
Format 9,5"/241 mm
Inmatningsbredd A4 = 241mm
Tjocklek ficka (min.) 75 mikron (per sida)
Tjocklek ficka (max.) 125 mikron (per sida)
Uppvärmningstid (beräknad) 4 minuter
Lamineringshastighet Ca 30cm/min.
(+/- 5 %) (fast hastighet)
Antal valsar 2
Klarindikering Lampa (grön)
Frigöringsspak Ja
Automatisk avstängning Ja
D Ingångslucka för ficka/dokument
E Utmatningsfack för ficka/dokument
F Strömlampa (röd)
Tekniska data
Spänning/Frekvens/
Ström (A) 220−240 V AC, 50/60 Hz
1,5 A
Strömförbrukning 300 W
Mått (HxBxD) 66mm x 356mm x 158mm
Nettovikt 1,3 kg
Max. dokumenttjocklek
(lamineringskapacitet) 0,02tum/0,4mm
VIKTIGA SÄKERHETSANVISNINGAR – SPARA FÖR FRAMTIDA REFERENS
− Maskinen är endast avsedd för inomhusbruk. Anslut maskinen till ett lättillgängligt uttag.
– För att förhindra elektrisk stöt ska du inte använda utrustningen nära vatten eller spilla vatten på utrustningen,
elkabeln eller vägguttaget.
DU SKA se till att maskinen står på ett plant underlag.
DU SKA testlaminera papper och ställa in maskinen
innan slutlig laminering.
DU SKA avlägsna häftklamrar och andra metallföremål
innan lamineringen.
DU SKA hålla maskinen på behörigt avstånd från värme
och vatten.
DU SKA stänga av maskinen efter varje användning-
stillfälle.
DU SKA koppla ur maskinen när den inte ska användas
under en längre tid.
DU SKA använda fickor som är avsedda för användning
med de relevanta inställningarna.
DU SKA hålla husdjur borta under användningen.
22
DU SKA INTE låta elkabeln komma i kontakt med heta
ytor.
DU SKA INTE låta elkabeln hänga från skåp eller hyllor.
DU SKA INTE använda utrustningen om elkabeln är
skadad.
DU SKA INTE försöka att öppna eller på annat sätt
reparera maskinen.
DU SKA INTE överskrida maskinens angivna kapacitet.
DU SKA INTE låta barn använda maskinen utan tillsyn
av en vuxen.
DU SKA INTE laminera vassa föremål eller
metallföremål (t.ex. häftklamrar och gem).
DU SKA INTE laminera värmekänsliga dokument (t.ex.
biljetter, ultraljud osv.) med varma inställningar.
DU SKA INTE laminera med självhäftande fickor vid
varma inställningar.
DU SKA INTE laminera en tom ficka.

FUNKTIONER OCH TIPS
Frigöringsfunktion
Aktivera frigöringsspaken på maskinens
baksida om du vill ta bort eller justera en ficka
under laminering. Fickan kan bara tas bort
från ingångsluckan när spaken har aktiverats.
Auto
Shut
Off
Automatisk avstängning
Efter 30 minuter försätts maskinen automatiskt i autoavstängningsläge. Strömlampan
blinkar rött i fem minuter och släcks sedan.
Klarlampan släcks. Tryck på På/av-knappen
om du vill fortsätta att använda maskinen.
Maskinen återställs.
FÖRBEREDA LAMINERINGSMASKINEN
1.
Kontrollera att maskinen står på ett plant underlag.
Kontrollera att det finns tillräckligt med utrymme
2.
(minst 50cm) bakom maskinen så att dokumenten
kan passera fritt igenom.
LAMINERA
Slå på strömmen (på maskinens sida).
4.
Den röda strömlampan tänds. Maskinen värms upp.
5.
När maskinen är klar att användas lyser den gröna
6.
klarlampan.
7.
Placera dokumentet i den öppna fickan. Se till att
dokumentet är centrerat mot den förseglade änden.
Använd lämplig fickstorlek för dokumentet.
• För bästa resultat bör Fellowes®-märkesfickor användas: 80–125 mikron.
• Maskinen behöver inte någon carrier för att laminera.
Det är en carrier-fri maskin.
• Lägg alltid det föremål som ska lamineras i en ficka av
rätt storlek.
• Provlaminera alltid med en liknande storlek och tjocklek
innan den slutliga processen.
• Förbered fickan och föremålen för laminering. Placera
föremålet mitt i fickan så att det vidrör den första
förseglade kanten. Kontrollera att fickan inte är för stor
för föremålet.
• Om det behövs ska överloppsmaterial kring föremålet
putsas bort efter laminering och nedkylning.
Anslut maskinen till ett lättillgängligt vägguttag.
3.
Se till att fickan förs in i maskinen med den
8.
förseglade änden först. Håll fickan rakt och i mitten
av öppningen, inte på snedden. Använd inmatningsmarkörerna som vägledning.
9.
Den laminerade fickan kan vara varm och mjuk när
den kommer ut ur maskinen. För att förhindra att
fickan fastnar ska du avlägsna den direkt. Låt fickan
svalna på en plan yta. Var försiktig när du arbetar
med varma fickor.
BEHÖVER DU HJÄLP?
Låt våra experter hjälpa dig att finna en lösning.
Kundtjänst ... www.fellowes.com
Ring alltid Fellowes innan du kontaktar din återförsäljare. Se emballagets baksida för kontaktuppgifter.
Registrera maskinen på www.fellowes.com/register så får du uppdateringar och ytterligare information.
23

FELSÖKNING
Problem Möjlig orsak Lösning
Strömlampan (röd) lyser inte Maskinen är inte påslagen
Klarlampan (grön) lyser inte trots att
det har gått en lång stund
Strömlampan blinkar rött och klarlampan (grön) är släckt
Klarlampan (grön) och strömlampan
(röd) har släckts
Fickan förseglar inte föremålet helt
Fickan är vågig eller bubblig Fickans tjocklek kan vara fel inställd
Fickan försvann i maskinen Fickan sitter fast
Blockering
Fickan är skadad efter lamineringen Skadade valsar eller lim på valsarna
Maskinen står på ett varmt eller fuktigt
ställe
Lamineringsmaskinen har växlat till det
automatiska avstängningsläget
Lamineringsmaskinen är i det automatiska avstängningsläget
Föremålet kan vara för tjockt för att
laminera
Fickan användes med den ”öppna
änden” först
Fickan var inte centrerad vid inmatningen
Fickan var inte rak vid inmatningen
En tom ficka användes
Starta maskinen (på maskinens sida och via
uttaget)
Flytta maskinen till ett svalare och torrare ställe
Tryck på På/av-knappen. Maskinen återställs
av sig själv
Tryck på På/av-knappen. Maskinen återställs
av sig själv
Maximal dokumenttjocklek är ,40mm
Lamineringsmaskinen hanterar fickor på
75–125mikron
Aktivera frigöringsspaken och dra ut föremålet
för hand
Kör rengöringsark genom maskinen för att testa
och göra rent valsarna
FÖRVARING OCH RENGÖRING
Stäng av maskinen och dra ut elkabeln. Låt maskinen svalna. Maskinens utsida kan rengöras med en fuktig trasa. Använd inte
lösningsmedel eller brandfarliga material för att putsa maskinen. Rengöringsark kan köpas och användas med maskinen. Kör arken
igenom maskinen när maskinen är varm för att avlägsna eventuella rester från valsarna. För optimal prestanda rekommenderas att
rengöringsark används regelbundet i maskinen. (Beställningskod för rengöringsark: #5320604)
PRODUKTREGISTRERING / GLOBAL GARANTI
Tack för att du köpt en Fellowes produkt. Gå in på www.fellowes.com/register för att registrera din produkt och läs om produktnyheter,
få feedback och erbjudanden. Produktinformationen finns på klassificeringsskylten som sitter på bak- eller undersidan av maskinen.
Fellowes garanterar att alla delar på lamineringsmaskinen är felfria vad gäller material och utförande i 1 år från den ursprungliga
kundens inköpsdatum. Om någon del är defekt under garantiperioden erbjuder Fellowes sig att efter eget gottfinnande bekosta en
reparation eller ett byte av den delen. Denna garanti gäller inte i händelse av vanvård, felaktig hantering eller obehörig reparation.
Eventuella implicita garantier, inklusive säljbarhet och lämplighet för ett visst syfte, begränsas härmed i varaktighet till den vederbörliga garantiperioden som anges ovan. Fellowes ansvarar under inga omständigheter för eventuella följdskador som kan hänföras till
denna produkt. Denna garanti ger dig särskilda juridiska rättigheter. Du kan ha andra juridiska rättigheter, som skiljer sig från denna
garanti. Denna garantis varaktighet och villkor gäller globalt, förutom där andra begränsningar, restriktioner eller villkor kan gälla
enligt lokal lagstiftning. För mer information eller för service under denna garanti, var god kontakta Fellowes eller din försäljare.
W.E.E.E.
Denna produkt är klassificerad som elektrisk och elektronisk utrustning. Kommer det en tid när du måste
slänga denna produkt skall du se till att göra så i överensstämmelse med europadirektivet för avfallshantering
av elektrisk och elektronisk utrustning (WEEE) och i överensstämmelse med lokala föreskrifter relaterade till
detta direktiv.
För mer information om WEEE var god besök www.fellowesinternational.com/WEEE
24

DANSK
DK
BETJENINGSANORDINGER TIL LAMINERINGSMASKINE
A Tænd/sluk-knap
B Klar-lampe (grøn)
C Udløserhåndtag ( )
D Lomme/dokumentindføringsåbning
E Lomme/dokumentudgang
F Tændt-lampe (rød)
KAPACITET
Ydeevne
Format 241 mm
Indføringsbredde A4 = 241 mm
Lommetykkelse (min) 75 mikroner (per side)
Lommetykkelse (maks.) 125 mikroner (per side)
Opvarmningstid (skøn) 4 minutter
Lamineringshastighed ca. 30 cm/min
(+/- 5%) (fast hastighed)
Antal ruller 2
Klarmelding Lys (grøn)
Udløserhåndtag Ja
Auto-sluk Ja
Tekniske data
Spænding/frekvens/
strømstyrke (A) 220-240 V AC, 50/60 Hz
1,5 A
Effekt 300 watt
Mål (HxBxD) 66mm x 356mm x 158mm
Nettovægt 1,3 kg
Maks. dokumenttykkelse
(lamineringskapacitet) 0,4mm
VIGTIGE SIKKERHEDSINSTRUKTIONER – GEMMES TIL SENERE BRUG
– Maskinen er kun til indendørs brug. Tilslut maskinen til en lettilgængelig stikkontakt.
– For at forhindre elektrisk stød – brug ikke apparatet tæt på vand, spild ikke vand på apparatet, strømledningen
eller stikkontakten.
DU SKAL sørge for, at maskinen står på en stabil
overflade.
DU SKAL sørge for at kontrollere lamineringsmaskinens indstillinger ved at laminere kasserede ark, før du
laminerer uerstattelige dokumenter.
DU SKAL fjerne hæfteklammer og andre metalgenstande før laminering.
DU SKAL holde maskinen på afstand af varme- og
vandkilder.
DU SKAL slukke maskinen efter brug.
DU SKAL tage maskinens stik ud af stikkontakten, når
den ikke skal anvendes i en længere periode.
DU SKAL anvende lommer, der er beregnet til brug med
de relevante indstillinger.
DU SKAL holde husdyr på afstand, når maskinen
anvendes.
DU MÅ IKKE lade strømledningen komme i kontakt
med varme overflader.
DU MÅ IKKE lade strømledningen hænge ned fra skabe
eller hylder.
DU MÅ IKKE anvende enheden, hvis strømledningen er
beskadiget.
DU MÅ IKKE forsøge at åbne eller på anden måde
reparere maskinen.
DU MÅ IKKE overstige maskinens angivne ydeevne.
DU MÅ IKKE lade børn benytte maskinen uden opsyn
af en voksen.
DU MÅ IKKE laminere skarpe genstande eller metalgen-
stande (for eksempel: hæfteklammer, papirclips).
DU MÅ IKKE laminere varmefølsomme dokumenter (for
eksempel: billetter, ultralyd osv.) på varmeindstillinger.
DU MÅ IKKE laminere med selvklæbende lommer på
varmeindstillinger.
DU MÅ IKKE laminere en tom lomme.
25

FUNKTIONER & TIPS
Udløserfunktion
En lomme kan fjernes eller justeres under
lamineringen ved at aktivere udløserhåndtaget, som sidder bag på maskinen. Lommen
kan kun fjernes fra indføringsåbningen, når
håndtaget er aktiveret.
Auto
Shut
Off
Auto-sluk
Efter 30 minutter vil maskinen automatisk
gå til Autosluk-tilstand. Tændt-lampen
blinker rødt i fem min. og slukkes derefter.
Klar-lampen slukkes. Hvis du vil fortsætte med
at bruge maskinen, skal du trykke på Tænd/
sluk-knappen. Maskinen nulstiller sig selv.
OPSÆTNING AF LAMINERINGSMASKINEN
1.
Sørg for, at maskinen står på en stabil overflade.
Kontroller at der er plads nok (min. 50 cm) bag
2.
maskinen, så dokumenterne uhindret kan passere
igennem.
SÅDAN LAMINERER DU
Tænd for strømmen (placeret på siden af maskinen).
4.
Den røde lampe "Tændt" tændes. Maskinen opvarmes
5.
nu.
• Brug mærkelommer fra Fellowes ® for at opnå de
bedste resultater: 80-125 mikron
• Denne maskine har ikke brug for et indføringsark for at
laminere. Den er en mekanisme uden indføringsark.
• Læg altid den genstand, der skal lamineres, i en lomme
i passende størrelse.
• Prøvelaminer altid med en lignende størrelse og tykkelse inden den endelige behandling.
• Forbered lomme og dokument til laminering. Anbring
dokumentet centreret inde i lommen, så det berører den
forreste lukkede kant. Kontroller, at lommen ikke er for
stor til genstanden.
• Hvis det er nødvendigt, skal du skære overskydende
materiale af genstanden efter laminering og nedkøling.
Tilslut maskinen til en lettilgængelig stikkontakt.
3.
Kontroller, at lommen kommer ind i maskinen med
8.
den lukkede kant først. Hold lommen lige og centralt
placeret i åbningen, ikke i en vinkel. Brug indføringsmarkeringerne som guide.
Lampen "Klar" forbliver tændt, når maskinen er klar.
6.
Anbring dokumentet i den åbne lomme. Kontroller,
7.
at dokumentet er centreret mod den lukkede kant.
Brug den egnede lommestørrelse til dokumentet.
Når det laminerede dokument kommer ud af
9.
lamineringsmaskinen, er lommen varm og blød. For
at forhindre blokering skal det laminerede dokument
straks fjernes. Placer lommen på en flad overflade til
afkøling. Pas på, når du håndterer varme lommer.
HAR DU BRUG FOR HJÆLP?
Lad vores eksperter hjælpe dig med en løsning.
Kundeservice... www.fellowes.com
Ring altid til Fellowes, før du kontakter forhandleren – se kontaktoplysningerne på bagsiden.
Overvej at registrere maskinen på www.fellowes.com/register for at modtage opdateringer og yderligere oplysninger.
26

FEJLFINDING
Problem Mulig årsag Løsning
Lampen "Tændt" lyser ikke (rød diode) Maskinen er ikke tændt Tænd for maskinen bagpå og på vægkontakten.
Ingen "klar"-lampe, selvom den
grønne lampe har været tændt længe
(grøn diode)
Tændt-lampen blinker rødt, og Klarlampen (grøn) er slukket
Klar-lampen (grøn) og Tændt-lampen
(rød) er slukkede
Lommen forsegler ikke genstanden
helt
Lommen har bølger eller bobler Lommetykkelsen kan være forkert
Lommen er tabt i maskinen Lommen sidder fast
Blokering
Lommen er beskadiget efter laminering
Maskinen er i et varmt eller fugtigt
område
Laminatormaskinen er slukket
automatisk
Laminatormaskinen er slukket
automatisk
Genstanden kan være for tyk til at
blive lamineret
Lommen blev brugt med den "åbne
ende" først
Lommen var ikke centreret ved
indførsel
Lommen var ikke lige ved indførsel
Tom lomme blev brugt
Beskadigede ruller eller lim på rullerne
Flyt maskinen til et køligere og tørt sted
Tryk på Tænd/sluk-knappen. Maskinen nulstiller
sig selv
Tryk på Tænd/sluk-knappen. Maskinen nulstiller
sig selv
Maksimal dokumenttykkelse er ,40mm
Laminatormaskinen kan tage lommer fra 75 til
125 mikron
Tryk på udløserhåndtaget, og træk genstanden
ud med hånden
Afprøv og rengør rullerne ved at køre et
rengøringsark gennem lamineringsmaskinen
OPBEVARING & RENGØRING
Sluk for maskinen på væggen. Lad maskinen køle ned. Lamineringsmaskinen kan rengøres udvendigt med en fugtig klud. Brug
ikke opløsningsmidler eller brandfarlige materialer til at polere maskinen med. Til rengøring af lamineringsmaskinen kan benyttes
rengøringsark, som kan købes separat. Når maskinen er varm – kør arkene gennem maskinen for at rengøre enhver rest fra rullerne.
For optimal ydeevne anbefales det, at rengøringsarkene anvendes sammen med maskinen regelmæssigt. (Bestillingsnummer til
rengøringsark #5320604)
PRODUKTREGISTRERING / VERDENSOMSPÆNDENDE GARANTI
Tak fordi du købte et Fellowes produkt. Besøg www.fellowes.com/register for at registrere dit produkt og nyde godt af produktnyheder, feedback og
tilbud. Produktdetaljer kan findes på typeskiltet, der er placeret på bagsiden eller undersiden af maskinen.
Fellowes garanterer at alle dele af lamineringsmaskinen er fri for defekter i materiale og udførelse i 1 år fra købsdatoen for den oprindelige forbruger.
Hvis det konstateres, at en del er defekt under garantiperioden, vil den eneste og eksklusive afhjælpende foranstaltning være reparation eller
udskiftning af den defekte del efter Fellowes’ valg og for Fellowes’ regning. Denne garanti gælder ikke i tilfælde af misbrug, forkert håndtering eller
uautoriseret reparation. Eventuelle implicitte garantier, inklusive salgbarhed eller egnethed til et bestemt formål, begrænses hermed i varighed til den
relevante garantiperiode, der er anført ovenfor. Fellowes er under ingen omstændigheder ansvarlig for eventuelle følgeskader, der kan tilskrives dette
produkt. Denne garanti giver dig specifikke juridiske rettigheder. Du kan have andre juridiske rettigheder, som adskiller sig fra denne garanti. Varighed,
vilkår og betingelser under denne garanti er gældende på verdensplan, undtagen hvor andre begrænsninger, restriktioner eller betingelser kræves af
den lokale lovgivning. For yderligere oplysninger eller for service under denne garanti, bedes du kontakte Fellowes eller din forhandler.
W.E.E.E.
Dette produkt er klassificeret som elektrisk og elektronisk udstyr. Kommer det tidspunkt, hvor du skal bortskaffe dette
produkt, skal du sikre dig at du gør dette i overensstemmelse med det europæiske direktiv om affald af elektrisk og
elektronisk udstyr (WEEE) og i overensstemmelse med lokale love i forbindelse med dette direktiv.
For yderligere information om WEEE Direktivet se venligst www.fellowesinternational.com/WEEE
27

SUOMI
FI
LAMINAATTORIN SÄÄTIMET
A Virtakytkin
B Valmis-merkkivalo (vihreä)
C Vapautusvipu ( )
KAPASITEETIT
Suorituskyky
Formaatti 241mm
Syöteleveys A4 = 241mm
Taskun paksuus (vähint.) 75 mikronia (/puoli)
Taskun paksuus (enint.) 125 mikronia (/puoli)
Lämpenemisaika (arvio) 4minuuttia
Laminointinopeus noin 30cm / min
(+/- 5%) (kiinteä nopeus)
Telojen määrä 2
Valmiuden osoitin Valo (vihreä)
Vapautusvipu Kyllä
Automaattinen sammutus Kyllä
D Tasku / dokumentin syöttöaukko
E Taskun/dokumentin ulostulo
F Virran merkkivalo (punainen)
Tekniset tiedot
Jännite / taajuus /
virta (A) 220–240VAC, 50/60Hz,
1,5A
Tehonkulutus 300wattia
Mitat (K × L × S) 66mm x 356mm x 158mm
Nettopaino 1,3kg
Dokumentin enimmäispaksuus
(laminointikapasiteetti) 0,4 mm
TÄRKEITÄ TURVALLISUUSOHJEITA: SÄILYTÄ MYÖHEMPÄÄ KÄYTTÖÄ VARTEN
– Laite on tarkoitettu käytettäväksi ainoastaan sisätiloissa. Kytke laite pistorasiaan, jonka luo on helppo päästä.
– Älä käytä laitetta veden lähettyvillä äläkä läikytä vettä laitteen, virtajohdon tai pistorasian päälle. Sähköiskuvaara.
VARMISTA, että laite on vakaalla alustalla.
TEE koelaminointi harjoitusarkeilla ja säädä laitteen
asetuksia ennen lopullista laminointia.
POISTA niitit ja muut metalliosat ennen laminointia.
PIDÄ laite etäällä lämmönlähteistä ja vedestä.
MUISTA katkaista laitteen virta käytön jälkeen.
IRROTA laitteen virtajohto, kun laite on käyttämättä
pidemmän aikaa.
KÄYTÄ käytettäviä asetuksia varten suunniteltuja
taskuja.
PIDÄ lemmikit etäällä laitteesta käytön aikana.
28
ÄLÄ anna virtajohdon joutua kosketuksiin kuumien
pintojen kanssa.
ÄLÄ anna virtajohdon roikkua kaapista tai hyllystä.
ÄLÄ käytä laitetta, jos virtajohto on vaurioitunut.
ÄLÄ yritä avata tai muuten korjata laitetta.
ÄLÄ ylitä laitteen ilmoitettua suorituskykyä.
ÄLÄ anna lasten käyttää laitetta ilman aikuisen
valvontaa.
ÄLÄ laminoi teräviä tai metallisia esineitä (kuten niittejä
ja paperiliittimiä).
ÄLÄ laminoi lämmölle herkkiä asiakirjoja (kuten
pääsylippuja ja ultraäänikuvia) kuumalaminointiasetuksilla.
ÄLÄ laminoi itsekiinnittyviä taskuja kuumalaminointiasetuksilla.
ÄLÄ laminoi tyhjää taskua.

OMINAISUUKSIA JA VINKKEJÄ
Vapautustoiminto
Taskun voi poistaa tai kohdistaa uudelleen
laminoinnin aikana laitteen takaosassa
olevan vapautusvivun avulla. Tasku voidaan
poistaa vain syöttöaukon kautta, kun vipua
käytetään.
Auto
Shut
Off
Automaattinen sammutus
Laite siirtyy 30 minuutin kuluttua automaattisesti automaattisen sammutuksen tilaan. Virran
merkkivalo vilkkuu punaisena viiden minuutin
ajan ja sammuu sitten. Valmis-merkkivalo
sammuu. Jatka laitteen käyttöä painamalla
virtakytkintä. Laite nollautuu.
LAMINAATTORIN ASENNUS
1.
Varmista, että laite on vakaalla alustalla.
Varmista, että laitteen takana on riittävästi tyhjää
2.
tilaa (vähintään 50cm), jotta kohteet pääsevät
siirtymään vapaasti laitteen läpi.
LAMINOINTI
Kytke virta (virtakytkin sijaitsee laitteen sivulla).
4.
Punainen virran merkkivalo syttyy. Laite lämpenee
5.
nyt.
Kun laite on valmis, vihreä Valmis-valo jää pala-
6.
maan.
7.
Aseta dokumentti avoimeen taskuun. Varmista, että
dokumentti on keskitetty suljettua sivua vasten.
Käytä dokumentille sopivaa taskukokoa.
• Parhaaseen tulokseen päästään käyttämällä Fellowes®taskuja: 80–125 mikronia.
• Tässä laitteessa ei tarvitse käyttää kelkkaa laminointia
varten. Siinä on kelkaton mekanismi.
• Aseta laminoitava kohde aina sopivan kokoiseen
taskuun.
• Tee aina koelaminointi samankokoisella ja -paksuisella
kohteella ennen lopullista prosessia.
• Valmistele tasku ja kohde laminointia varten. Aseta
kohde taskun keskelle siten, että se koskettaa suljettua
etureunaa. Varmista, että tasku ei ole kohteelle liian
suuri.
• Leikkaa ylimääräinen materiaali kohteen ympäriltä
tarvittaessa laminoinnin ja jäähdytyksen jälkeen.
Kytke laite seinäpistorasiaan, johon pääsee helposti
3.
käsiksi.
Varmista, että tasku syötetään laitteeseen suljettu
8.
sivu edellä. Pidä tasku suorassa ja keskellä aukkoa,
ei vinossa. Käytä syöttömerkintöjä ohjausapuna.
9.
Laitteesta poistuva laminoitu tasku voi olla kuuma
ja pehmeä. Poista tasku välittömästi, jotta se ei tartu
kiinni laitteeseen. Aseta tasku tasaiselle alustalle
jäähtymään. Käsittele kuumia taskuja varovasti.
TARVITSETKO APUA?
Ammattilaisemme voivat auttaa ongelmien ratkaisussa.
Asiakaspalvelu... www.fellowes.com
Soita aina Fellowesille ennen kuin otat yhteyden jälleenmyyjääsi. Katso yhteystiedot takakannesta.
Rekisteröimällä laitteesi osoitteessa www.fellowes.com/register saat päivityksiä ja lisätietoja.
29

VIANMÄÄRITYS
Ongelma Mahdollinen syy Ratkaisu
Punainen virran merkkivalo ei pala Laitteen virtaa ei ole kytketty
Valmis-valo ei syty palamaan pitkän
odotuksen jälkeen
Virran merkkivalo vilkkuu punaisena
ja Valmis-merkkivalo (vihreä) on sammunut
Valmis-merkkivalo (vihreä) ja virran
merkkivalo (punainen) ovat sammuneet
Tasku ei sulje kohdetta kokonaan Kohde voi olla liian paksu laminoitavaksi Dokumentin enimmäispaksuus on ,40mm
Taskussa on aaltoja tai kuplia Taskun paksuus voi olla väärä
Tasku jää laitteeseen Tasku on juuttunut kiinni
Tukos
Tasku on vahingoittunut laminoinnin
jälkeen
Laite on kuumassa tai kosteassa
ympäristössä
Laminaattori on siirtynyt Automaattinen
sammutus -tilaan
Laminaattori on Automaattinen sammutus
-tilassa
Tasku vietiin laitteeseen avoin reuna
edellä
Taskua ei keskitetty syötettäessä
Tasku ei ollut suorassa syötettäessä
Käytettiin tyhjää taskua
Telat ovat vioittuneet tai niissä on liimaa
Kytke virta laitteen sivusta ja varmista, että
pistoke on kytketty pistorasiaan
Siirrä laite viileämpään tai kuivempaan
ympäristöön
Paina virtakytkintä. Laite nollautuu
Paina virtakytkintä. Laite nollautuu
Laminaattorissa voidaan käyttää 75–125
mikronin taskuja
Paina vapautuspainiketta ja vedä kohde ulos käsin
Testaa ja puhdista telat viemällä puhdistusarkkeja
laitteen läpi
VARASTOINTI JA PUHDISTUS
Kytke laite irti seinäpistorasiasta. Anna laitteen jäähtyä. Laitteen ulkopuoli voidaan puhdistaa kostealla liinalla. Älä käytä liuottimia
tai syttyviä materiaaleja laitteen puhdistamiseen. Puhdistusarkkeja voidaan ostaa laitteessa käytettäväksi. Puhdista jäämät teloista
ajamalla arkit laitteen läpi sen ollessa lämmin. Parhaisiin tuloksiin päästään, kun puhdistusarkkeja käytetään säännöllisesti. (Puhdistusarkkien tilauskoodi: 5320604)
TUOTEREKISTERÖINTI / MAAILMANLAAJUINEN TAKUU
Kiitos, että ostit Fellowes-tuotteen. Käy osoitteessa www.fellowes.com/register rekisteröidäksesi tuotteen ja hyötyäksesi tuoteuutisista,
palautteesta ja tarjouksista. Tuotteen tiedot on luetteloitu laitteen taka- tai alapuolella olevassa merkinnässä.
Fellowes takaa, että laminaattorin kaikkien osien materiaalit ja työtaito ovat virheettömiä 1 vuotta alkuperäisestä ostopäivämäärästä.
Mikäli jokin osa ilmenee virheelliseksi takuukauden aikana, sinun ainoa ja ehdoton oikeutesi on virheellisen osan huolto tai vaihtaminen Fellowesin harkinnan ja tarjonnan mukaan. Tämä takuu ei kata tapauksia, joissa laitteistoa on käytetty väärin, huolimattomasti tai
huollettu luvattomasti. Kaikki hiljaiset takuut, mukaan lukien takuut kaupallisesti hyväksyttävästä laadusta tai soveltuvuudesta tiettyyn
tarkoitukseen, on täten rajattu kestoltaan yllä mainitun ja asiaankuuluvan takuukauden mukaisesti. Fellowes ei ota missään tapauksessa vastuuta tästä tuotteesta johtuvista vahingoista. Tämä takuu antaa sinulle tiettyä laillisia oikeuksia. Sinulla saattaa olla muita laillisia
oikeuksia, jotka poikkeavat tästä takuusta. Tämän takuun kesto, ehdot ja edellytykset ovat voimassa maailmanlaajuisesti, pois lukien
paikallisten lakien vaatimat rajoitukset, estot ja edellytykset. Saadaksesi lisätietoja tai tämän takuun kattamia palveluita, ota yhteyttä
Fellowesiin tai jälleenmyyjääsi.
W.E.E.E.
Tämä tuote on luokiteltu Sähkö- ja elektroniikkalaitteeksi. Mikäli sinun tarvitsee joskus hävittää tämä
tuote, varmista, että teet sen Euroopan sähkö- ja elektroniikkalaiteromua (Waste of Electrical and
Electronic Equipment, WEEE) koskevan direktiivin ja siihen liittyvien paikallisten lakien mukaisesti.
Saadaksesi lisätietoa WEEE-direktiivistä, käy osoitteessa www.fellowesinternational.com/WEEE
30

NORSK
N
LAMINERINGSKONTROLLER
A På/av-bryter
B Klar-LED (grønn)
C Utløsningshåndtak ( )
KAPASITET
Kapasitet
Format 9,5" / 241 mm
Inngangsbredde A4 = 241 mm
Posetykkelse (min.) 75 mikroner (per side)
Posetykkelse (maks.) 125 mikroner (per side)
Oppvarmingstid (estimert) 4 minutter
Lamineringshastighet ca. 30 cm/min.
(+/- 5 %) (fast hastighet)
Antall ruller 2
Klarsignal Lys (grønt)
Utløsningshåndtak Ja
Automatisk avstenging Ja
D Innleggsport for pose/dokument
E Utgang for pose/dokument
F På-LED (rød)
Tekniske data
Nettspenning / frekvens /
strøm (Ampere) 220–240V AC, 50/60 Hz,
1,5 A
Wattforbruk 300 Watt
Dimensjoner (HxBxD) 66mm x 356mm x 158mm
Nettovekt 1,3 kg
Maks. dokumenttykkelse
(lamineringskapasitet) 0,4 mm
VIKTIGE SIKKERHETSINSTRUKSER – TA VARE PÅ DISSE FOR FREMTIDIG BRUK
- Maskinen er kun beregnet på innendørs bruk. Koble maskinen til en lett tilgjengelig stikkontakt.
- For å unngå elektrisk støt må du ikke bruke maskinen nær vann. Ikke søl vann på maskinen, ledningen eller veggkontakten.
HUSK å forsikre deg om at maskinen står på et stabilt
underlag.
HUSK å teste biter av laminatark og stille inn maskinen
før endelig laminering.
HUSK å fjerne stifter og andre metallartikler før laminering.
HUSK å holde maskinen unna varme- og vannkilder.
HUSK å slå av maskinen etter hver bruk.
HUSK å koble fra maskinen når den ikke skal brukes på
en stund.
HUSK å bruke poser som er lagd for de gjeldende
innstillingene.
HUSK å holde kjæledyr unna maskinen når den er i
bruk.
IKKE la strømkabelen komme i kontakt med varme
overflater.
IKKE la strømkabelen henge fra skap eller hyller.
IKKE bruk apparatet hvis strømkabelen er skadet.
IKKE forsøk å åpne maskinen eller reparere den.
IKKE overskrid maskinens oppgitte kapasitet.
IKKE la mindreårige betjene maskinen uten oppsyn av
en voksen.
IKKE laminer skarpe gjenstander eller metallgjenstander
(f.eks: stifter, binders).
IKKE laminer varmesensitive dokumenter (f.eks.: billet-
ter, ultralydbilder osv.) på varme innstillinger.
IKKE laminer med selvklebende poser på varme
innstillinger.
IKKE laminer tomme poser.
31

EGENSKAPER OG TIPS
Utløsningsfunksjon
Bruk utløsningshåndtaket på baksiden av
maskinen for å fjerne eller rette opp en
pose under laminering. Posen kan bare
fjernes fra innleggsporten når håndtaket
er aktivert.
Auto
Shut
Off
Automatisk avstenging
Etter 30 minutter går maskinen automatisk inn i en auto-av-modus. På-LED vil
blinke rødt i fem minutter og deretter slås
av. Klar-LED slås av. Trykk på/av-bryteren for å fortsette å bruke maskinen.
Maskinen tilbakestiller seg selv.
KLARGJØRE LAMINERINGSMASKINEN
1.
Påse at maskinen står på et stabilt underlag.
Kontroller at det er nok åpen plass (minst 50 cm)
2.
bak maskinen, slik at elementene kan passere fritt
gjennom.
HVORDAN LAMINERE
Slå på maskinen (bryter på siden).
4.
Den røde ”På”-lampen tennes. Maskinen varmes nå
5.
opp.
• Best resultat oppnås ved bruk av poser av merket
Fellowes ®: 80–125 mikron.
• Denne maskinen trenger ikke en bærer for å
laminere. Det er en bærer-fri mekanisme.
• Legg alltid elementet som skal lamineres, i en pose
av riktig størrelse.
• Test alltid laminering med noe i lignende størrelse
og tykkelse før endelig laminering.
• Klargjør pose og element for laminering. Plasser
elementet sentrert i posen og i berøring med den
førende forseglede kanten. Forsikre at posen ikke
er for stor for elementet.
• Om nødvendig, kutt av overskytende materiale
rundt elementet etter laminering og avkjøling.
Koble maskinen til en lett tilgjengelig stikkontakt.
3.
Forsikre deg om at posen føres inn i maskinen
8.
med den forseglede kanten først. Hold posen rett
og sentrert til porten, ikke i vinkel. Følg innleggsmarkeringene.
6.
Når maskinen er klar, lyser den grønne ”Klar”lampen kontinuerlig.
Plasser dokumentet i den åpne posen. Påse at
7.
dokumentet er sentrert mot den forseglede kanten.
Bruk riktig posestørrelse for dokumentet.
Den laminerte posen er varm og myk når den
9.
kommer ut. Fjern posen umiddelbart for å forhindre
blokkering. Plasser posen på et flatt underlag for
avkjøling. Vær forsiktig når du håndterer varme
poser.
TRENGER DU HJELP?
La våre eksperter hjelpe deg med å finne en løsning.
Kundeservice: www.fellowes.com
Ta alltid kontakt med Fellowes før du kontakter kjøpsstedet. Se baksideomslaget for kontaktopplysninger.
Du bør vurdere å registrere maskinen din på www.fellowes.com/register for å motta oppdateringer og tilleggsinformasjon.
32

FEILRETTING
Problem Mulig årsak Løsning
Ingen "på"-lampe (rød LED) Maskinen er ikke slått på
Ingen "Klar"-lampe etter en lang
periode (grønn LED)
På-LED blinker rødt, og Klar-LED
(grønn) er av.
Klar-LED (grønn) og På-LED (rød) er
begge av
Posen forsegler ikke elementet helt
Posen har bølger eller bobler Posetykkelsen kan være feil Laminatoren godtar poser på 75–125 mikron
Posen har "forsvunnet" i maskinen Posen blokkerer maskinen
Blokkering
Posen er skadet etter laminering
Maskinen er i et varmt eller fuktig
område
Laminatoren har gått i modusen
Automatisk avstenging.
Laminatoren er i modusen Automatisk
avstenging
Elementet kan være for tykt til å
lamineres
Posen ble brukt med den "åpne enden"
først
Posen var ikke sentrert ved innlegg
Posen var ikke rett ved innlegg
En tom pose ble brukt
Rullene er skadet, eller det er klister
på rullene
Slå på maskinen på siden og koble den til
veggkontakten
Flytt maskinen til et kjøligere og tørt område
Trykk på/av-bryteren. Maskinen tilbakestiller
seg selv
Trykk på/av-bryteren. Maskinen tilbakestiller
seg selv
Maks. dokumenttykkelse er ,40 mm
Trykk ned utløsningshåndtaket og trekk ut
elementet for hånd
Send gjennom renseark for å teste og rense
rullene
OPPBEVARING OG RENGJØRING
Slå av maskinen og koble fra kontakten. Sørg for at maskinen avkjøles. Utsiden av maskinen kan rengjøres med en fuktig klut. Ikke
bruk løsemidler eller brennbare materialer til å polere maskinen. Renseark kan kjøpes for bruk på maskinen. Når maskinen er varm:
Kjør arkene gjennom maskinen for å fjerne eventuelle rester fra rullene. For optimal ytelse er det anbefalt at renseark brukes jevnlig i
maskinen. (Bestillingskode for renseark: nr. 5320604)
PRODUKTREGISTRERING / VERDENSOMSPENNENDE GARANTI
Takk for at du har kjøpt et Fellowes-produkt. Besøk oss på www.fellowes.com/register for å registrere produktet ditt og slik at du kan få
tilgang til informasjon om nyheter, spesielle tilbud og tilbakemeldinger Detaljer om produktet finner du på produktplaten som er plassert
under maskinen på høyre side.
Fellowes garanterer at alle deler i lamineringsmaskinen er frie for feil både når det gjelder materiale og produksjon i to år fra dato for
førstegangs kjøp. Dersom det forekommer feil på noen deler under garantiperioden, vil denne ene og alene bli reparert eller erstattet av
Fellowes uten kostnader for kunden. Denne garantien gjelder ikke dersom utstyret er misbrukt, vandalisert eller reparert av uautorisert
personell. Enhver implisert garanti, innbefattet omsettelighet eller egnhethet for et spesielt formål, er herved begrenset til varigheten av
perioden nevnt over. Fellowes skal ikke i noe tilfelle gjøres ansvarlig for skader som følger av bruk av dette produktet. Denne garantien
gir deg et sett lovmessige rettigheter. Du kan ha andre rettigheter som er fravikende fra denne garantien. Varigheten, betingelsene og
forholdene som gjelder for denne garantien gjelder over hele verden, med unntak at begrensininger for forhold som er regulert av lokal
lovgivning. For nærmere detaljer, evt. informasjon om tjenester under denne garantien, ta kontakt med Fellowes eller din forhandler.
W.E.E.E.
Dette produtet er klassifisert som ’Electric and Electronic Equipment’ (elektrisk/elektronisk utstyr). Dersom
du skal kvitte deg med dette produktet, vennligst forsikre deg om at du gjør det i henhold til reglementet
i Eropean Waste of Electrical and Electronic Equipment ((WEEE) (det felleseuropeiske reglementet for
avhending av elektrisk/elektronisk utstyr).
For mer informasjon om WEEE-direktivet, gå inn på www.fellowesinternational.com/WEEE
33

POLSKI
PL
ELEMENTY STEROWANIA LAMINATORA
A Przycisk włącz/wyłącz
B Kontrolka Připraveno (zelená)
C Dźwignia zwolnienia ( )
SPECYFIKACJE
Charakterystyka robocza
Format 9.5” / 241 mm
Szerokość wejścia A4 = 241 mm
Grubość folii (min.) 75 mikronów
(każda strona)
Grubość folii (max.) 125 mikronów
(każda strona)
Czas nagrzewania
(w przybliż.) 4 minuty
Szybkość laminacji ok. 30 cm/min.
(+/- 5%) (stała prędkość)
Liczba rolek 2
Wskaźnik gotowości Svítí (zeleně)
Dźwignia zwolnienia Ta k
D Szczelina do wprowadzania
dokumentu do laminacji
E Wyjście zalaminowanego
dokumentu
F Kontrolka Zapnuto (červená)
Automatické vypnutí Ta k
Dane Techniczne
Napięcie/ częstotliwość/
natężenie
220-240 V (prąd
przemienny), 50/60
Hz, 1,5 A
Moc znamionowa 300 W
Wymiary (Wys.xSzer.xGł.)
66mm x 356mm x
158mm
Waga netto 1,3 kg
Maksymalna grubość dokumentu
(zdolność laminowania) 0,02”/0,4 mm
WAŻNE ZASADY BEZPIECZEŃSTWA - ZACHOWAĆ DO PÓŹNIEJSZEGO UŻYTKU
- Urządzenie do użytku wyłącznie w pomieszczeniach. Podłączyć urządzenie do gniazdka z łatwym dostępem.
- Aby ograniczyć ryzyko porażenia prądem elektrycznym, nie należy stosować urządzenia w pobliżu wody, rozlewać wody na
obudowę urządzenia, przewód zasilający ani gniazdko elektryczne.
NALEŻY ustawić urządzenie na stabilnej powierzchni.
NALEŻY przeprowadzić laminację próbną i ustawić parametry
urządzenia przed jego użyciem.
NALEŻY usunąć zszywki i inne metalowe przedmioty przed
rozpoczęciem laminacji.
NALEŻY umieścić urządzenie z dala od źródeł ciepła i wody.
NALEŻY wyłączyć urządzenie po każdym użyciu.
NALEŻY odłączyć wtyczkę, gdy urządzenie nie jest używane
przez dłuższy czas.
NALEŻY dostosować ustawienia do używanej folii laminacyjnej.
NALEŻY trzymać zwierzęta z dala od urządzenia będącego w
użytku.
34
NIE pozostawiać przewodu zasilającego w styczności z gorącymi
powierzchniami.
NIE pozostawiać przewodu zasilającego zwisającego z szafek
lub półek.
NIE używać urządzenia, jeżeli przewód zasilający jest uszkodzon y.
NIE otwierać urządzenia ani nie podejmować prób jego
naprawy.
NIE przekraczać określonej w specykacji wydajności
urządzenia.???
NIE pozwalać dzieciom na samodzielną obsługę urządzenia.
NIE laminować przedmiotów ostrych lub metalowych (np.
zszywki, spinacze biurowe).
NIE laminować na gorąco dokumentów wrażliwych na wysokie
temperatury (np. bilety, zdjęcia USG itp).
NIE laminować na gorąco folią samoprzylepną do laminacji na
zimno.
NIE laminować pustych koszulek do laminacji.

FUNKCJE I PORADY
Funkcja zwolnienia
Dźwignia zwolnienia, znajdująca się w tylnej
części urządzenia, umożliwia wyjęcie lub
ponowne wyrównanie folii laminacyjnej. Folię
można wyjąć od strony szczeliny wejściowej
wyłącznie po zwolnieniu dźwigni.
Auto
Shut
Off
Automatické vypnutí
Po upływie 30 minut maszyna przejdzie
automatycznie do trybu automatycznego
wyłączenia. Kontrolka Zapnuto bude 5 minut
červeně blikat a potom zhasne. Kontrolka
Připraveno zhasne. Pokud chcete přístroj dále
používat, stiskněte vypínač. Přístroj se sám
resetuje.
PRZYGOTOWANIE LAMINATORA DO PRACY
Należy ustawić urządzenie na stabilnej powierzchni.
1.
Należy sprawdzić, czy za urządzeniem znajduje się
dostateczna wolna przestrzeń (minimum 50 cm), aby
umożliwić swobodne wysuwanie laminowanych dokumentów.
HOW TO LAMINATE
Włączyć zasilanie (włącznik znajduje się z boku obudowy
4.
urządzenia).
5.
Zaświeci się czerwona kontrolka „Zasilanie”. Urządzenie
nagrzewa się.
6.
Zielona kontrolka „Gotowość” sygnalizuje gotowość
urządzenia do pracy.
Umieścić dokument w otwartej folii do laminacji. Doku-
7.
ment powinien być wyśrodkowany i dosunięty do krawędzi
zgrzanej. Należy zastosować folię do laminacji o odpowiednim rozmiarze dla danego dokumentu.
• W celu uzyskania najlepszych rezultatów należy
stosować artykuły marki Fellowes ®: 80-125 mikronů
• Ten model laminatora nie wymaga używania carriera.
Jest to urządzenie laminujące bez carriera.
• Dokument należy zawsze umieszczać w folii do laminacji
odpowiedniego rozmiaru.
• Przed laminacją właściwą należy zawsze wykonać
laminację próbną o podobnym rozmiarze i grubości.
• Przygotować folię i dokument do laminacji. Umieść
dokument w folii tak, aby był wyśrodkowany i stykał
się z wiodącą krawędzią zgrzaną. Upewnij się, że
folia do laminacji nie jest za duża dla laminowanego
dokumentu.
• W razie potrzeby, po zalaminowaniu i ostygnięciu można
przyciąć nadmiar materiału wokół dokumentu.
Podłącz urządzenie do gniazdka z łatwym dostępem.
3.
Wprowadź dokument do urządzenia zgrzaną krawędzią
8.
z przodu. Folia powinna być ustawiona prosto i
wyśrodkowana w obrębie szczeliny do wprowadzania
dokumentu (nie pod kątem). Należy wykorzystać znaczniki
wprowadzania jako punkty orientacyjne.
Po wysunięciu zalaminowany dokument może być gorący
9.
i miękki. Aby zapobiec zacięciu natychmiast wyjąć dokument. Umieścić zalaminowany dokument na płaskiej powierzchni do wystygnięcia. Zachowaj ostrożność przenosząc
gorący laminat.
POTRZEBNA POMOC?
Nasi eksperci z przyjemnością zaoferują pomoc w rozwiązaniu ewentualnych problemów.
Dział Obsługi Klienta: www.fellowes.com
Przed skontaktowaniem się z punktem zakupu urządzenia, prosimy o kontakt telefoniczny z rmą Fellowes. Dane kontaktowe znajdują się na
zewnętrznej okładce.
Zalecamy rejestrację urządzenia na stronie www.fellowes.com/register, aby otrzymywać dodatkowe informacje i aktualizacje.
35

ROZWIĄZYWANIE PROBLEMÓW
Problem Możliwa przyczyna Rozwiązanie
Nie pali się czerwona kontrolka gotowości Urządzenie nie jest włączone
Zielona kontrolka gotowości nie zapala się
przez długi okres czasu
Kontrolka Zapnuto bliká červeně a kontrolka Připraveno (zelená) nesvítí
Kontrolka Připraveno (zelená) a kontrolka
Zapnuto (červená) nesvítí
Folia nie laminuje całkowicie dokumentu
Folia jest pofałdowana lub ma bąbelki Nieodpowiednia grubość folii do laminacji
Folia została w laminatorze Zacięcie folii
Zacięcie
Folia została uszkodzona podczas laminacji Rolki są uszkodzone lub znajduje się na nich klej
Urządzenie znajduje się w miejscu o wysokiej
temperaturze lub wilgotności
Laminovačka je v režimu Automatického vypnutí Stiskněte vypínač. Přístroj se sám resetuje
Laminovačka je v režimu Automatického vypnutí Stiskněte vypínač. Přístroj se sám resetuje
Dokument może mieć zbyt dużą grubość, aby go
zalaminować
Folia została wsunięta najpierw krawędzią
otwartą
Folia nie została wyśrodkowana na wejściu
Folia nie była umieszczona prosto na wejściu
Wprowadzono pustą folię do laminacji
Podłączyć urządzenie do źródła zasilania i włączyć
przycisk zasilania z boku urządzenia
Należy przenieść urządzenie w chłodniejsze i
suchsze miejsce
Maksymalna grubość dokumentu to ,40 mm
Laminovačka akceptuje kapsy o tloušťce 75-125
mikronů
Nacisnąć dźwignię zwalniania i wyciągnąć folię
ręcznie
Wprowadzić arkusz czyszczący, aby przetestować i
oczyścić rolki
PRZECHOWYWANIE I CZYSZCZENIE
Odłącz urządzenie od gniazdka. Poczekaj, aż urządzenie ostygnie. Zewnętrzne powierzchnie urządzenia można czyścić zwilżoną ściereczką. Do
polerowania urządzenia nie wolno używać rozpuszczalników ani materiałów łatwopalnych. Do czyszczenia urządzenia można zakupić arkusze czyszczące.
Arkusze należy przepuścić przez rozgrzane urządzenie, aby usunąć wszelkie zanieczyszczenia z wałków. W celu uzyskania optymalnych rezultatów zaleca
się regularne stosowanie arkuszy czyszczących. (Kod do zamawiania arkuszy czyszczących #5320604).
REJESTRACJA PRODUKTU / GLOBALNA GWARANCJA
Dziękujemy za zakupienie produktu marki Fellowes. Prosimy odwiedzić stronę internetową www.fellowes.com/register aby zarejestrować nabyty produkt
i korzystać z powiadomień o nowych produktach, informacji zwrotnych i ofert. Szczegóły dotyczące produktu są podane na tabliczce znamionowej
umieszczonej z tyłu lub pod spodem urządzenia.
Firma Fellowes gwarantuje, że wsz ystkie części bindownicy będą wolne od wad materiałowych i wykonania przez okres 1 lat od daty zakupu przez
pierwotnego klienta Jeśli w okresie gwarancji zostanie stwierdzone, że dowolna część jest wadliwa, wyłącznym zadośćuczynieniem będzie naprawa
lub wymiana wadliwej części, wedle wyboru i na koszt rmy Fellowes. Niniejsza gwarancja nie ma zastosowania w przypadkach nieprawidłowego
wykorzystania, niepoprawnej obsługi lub nieautoryzowanej naprawy Wszelkie gwarancje dorozumiane, w tym prz ydatności handlowej lub możliwości
zastosowania w określonym celu, zostają niniejszym ograniczone czasowo do właściwego okresu gwarancji określonego powyżej. W żadnym wypadku
rma Fellowes nie będzie ponosić odpowiedzialności za jakiekolwiek szkody wtórne, które można by przypisać temu produktowi. Niniejsza gwarancja
nadaje użytkownikowi określone prawa. Użytkownikowi mogą przysługiwać inne prawa, które różnią się od postanowień niniejszego gwarancji.
Czas trwania, warunki i zasady niniejszej gwarancji obowiązują na całym świecie, z wyjątkiem gdy inne ograniczenia, restrykcje lub warunki mogą
być wymagane lokalnie obowiązującym prawem. W celu uzyskania bardziej szczegółowych informacji lub usług na mocy niniejszej gwarancji należy
skontaktować się z rmą Fellowes lub lokalnym dystrybutorem.
W.E.E.E.
Niniejszy produkt jest klasykowany jako sprzęt elektryczny i elektroniczny. W chwili wycofywania produktu z użycia należy
dopilnować, aby zutylizować go zgodnie z Europejską Dyrektywą w sprawie zużytego sprzętu elektrycznego i elektronicznego
(WEEE) i lokalnymi przepisami powiązanymi z tą dyrektywą.
Więcej informacji o dyrektywie WEEE można znaleźć pod adresem: w ww.fellowesinternational.com/WEEE
36

РУССКИЙ
RU
ЭЛЕМЕНТЫ УПРАВЛЕНИЯ ЛАМИНАТОРА
A Выключатель
B Индикатор готовнос ти (зеленый)
C Рычаг освобождения ( )
ТЕХНИЧЕСКИЕ ВОЗМОЖНОСТИ
Рабочие характеристики
Формат 241мм/9,5 дюйма
Входная ширина A4 = 241мм
Толщина пакета (мин.) 75 микрон (с торона)
Толщина пакета (макс.) 125 микрон (сторона)
Время нагрева (примерно) 4 минуты
Скорость
ламинирования прибл. 30см/мин
(+/- 5%)(фиксированная скорость)
Количество валиков 2
Индикация готовности Световой сигнал
(зеленый)
Рычаг освобождения Да
D Отверстие для подачи пакета/
документа
E О тверстие выхода пакета/документа
F Индикатор питания (красный)
Автоматическое
выключение Да
Технические данные
Напряжение питания/частота/
сила тока (Амперы) 220—240В
переменного тока,
50/60Гц, 1,5А
Мощность 300Ватт
Размеры (ВхШхГ) 66mm x 356mm x 158mm
Масса нетто 1,3кг
Макс. толщина документа
(параметры ламинирования)
0,4мм/0,02дюйма
ВАЖНЫЕ ИНСТРУКЦИИ ПО ТЕХНИКЕ БЕЗОПАСНОСТИ — СОХРАНИТЬ ДЛЯ ИСПОЛЬЗОВАНИЯ В ДАЛЬНЕЙШЕЙ РАБОТЕ
- Устройства предназначено только для эксплуатации в помещениях. Включите устройство в легкодоступную розетку.
- Во избежание поражения электрическим током не пользуйтесь устройством в непосредственной близости от воды, а
также избегайте попадания воды на устройство, шнур питания и в настенную розетку.
УСТАНОВИТЕ устройство на устойчивой поверхности.
ПРОВЕРЯЙТЕ качество ламинирования на черновых листах,
настраивайте устройство перед последним (чистовым)
этапом ламинирования.
УДАЛЯЙТЕ скобы и другие металлические детали перед
началом ламинирования.
ХРАНИТЕ устройство отдельно от источников тепла и влаги.
ВЫКЛЮЧАЙТЕ устройство после завершения работы.
ОТКЛЮЧАЙТЕ устройство от электросети во время
длительного простоя.
ИСПОЛЬЗУЙТЕ пакеты, соответствующие установленным
рабочим параметрам.
ИСКЛЮЧИТЕ присутствие домашних животных в
непосредственной близости от работающего устройства.
НЕ допускайте контакта шнура питания с горячей
поверхностью.
НЕ допускайте свисания шнура питания со шкафов и полок.
НЕ эксплуатируйте устройство с поврежденным шнуром
питания.
НЕ пытайтесь самостоятельно вскрывать или ремонтировать
устройство.
НЕ подвергайте устройство нагрузкам, превышающим
характеристики, указанные в его спецификации.
НЕ разрешайте детям пользоваться устройством без
присмотра взрослых.
НЕ ламинируйте острые и металлические предметы
(например, скобы, скрепки для бумаг).
НЕ ламинируйте документы, чувствительные к тепловому
воздействию (например, билеты, рентгеновские снимки и
т.д.) в режимах высокой рабочей температуры.
НЕ используйте самоклеющиеся пакеты в режимах высокой
рабочей температуры.
НЕ ламинируйте пустые пакеты.
37

ФУНКЦИИ И РЕКОМЕНДАЦИИ
Функция «освобождения»
Чтобы извлечь или поправить пакет во время
ламинирования, воспользуйтесь рычагом
освобождения, который расположен на задней
части устройства. Пакет можно извлечь из
приемной прорези лишь с помощью рычага.
Auto
Shut
Off
Автоматическое выключение
Через 30 минут машина автоматически
перейдет в режим автоматического отключения.
Индикатор питания мигает красным цветом
в течение 5 минут, после чего отключается.
Индикатор готовности отключается. Чтобы
продолжить использование устройства, нажмите
выключатель. Устройство само перезагружается.
ПОДГОТОВКА ЛАМИНАТОРА К ЭКСПЛУАТАЦИИ
• Для получения оптимальных результатов ламинирования
используйте фирменные пакеты Fellowes®: 80—125
микрон.
• Данный тип устройства не предполагает использование
несущего приспособления для ламинирования. Несущего
приспособления для эксплуатации данного устройства не
требуется.
• Всегда вставляйте ламинируемый предмет в пакет
соответствующих размеров.
• Перед окончательным ламинированием всегда проверяйте
работу устройства на черновых листах соответствующего
размера и толщины.
• Приготовьте пакет и ламинируемый предмет. Помес тите
предмет в центре пакета так, чтобы обеспечить его контакт
с направляющей уплотненной кромкой. Проверьте, чтобы
пакет не был слишком большим для ламинируемого
предмета.
• В случае необходимости, после ламинирования и
охлаждения предмета обрежьте избыточный материал
вокруг него.
Убедитесь, что устройство установлено на устойчивой
1.
поверхности.
Обеспечьте достаточное количес тво свободного пространства
2.
(минимум 50см) за тыльной стороной устройства для
беспрепятственного прохождения предметов через рабочую
область.
Включите устройство в легкодоступную розетку.
3.
ОПИСАНИЕ ПРОЦЕССА ЛАМИНИРОВАНИЯ
Включите питание (переключатель питания расположен на
4.
боковой стенке устройства).
Загорится индикатор питания (Power on). Устройство
5.
нагревается.
По достижению устройством состояния готовности включится
6.
индикатор готовности (Ready).
Поместите документ в открытый пакет. Расположите документ
7.
по центру относительно уплотненной кромки пакета. Для
каждого документа используйте пакет соответствующего
размера.
Пакет должен подаваться в устройство уплотненной кромкой
8.
вперед. Удерживайте пакет прямо и по центру щелевого
отверстия. Для ориентации используйте маркировку входа.
9.
После выхода из рабочей области устройства пакет может
быть горячим и мягким. Для предотвращения замятия
незамедлительно извлеките пакет. Положите пакет на плоскую
поверхность для охлаждения. Осторожно обращайтесь с
горячим пакетом.
ТРЕБУЕТСЯ ПОМОЩЬ?
Наши квалифицированные специалисты готовы оказать вам помощь.
Служба поддержки клиентов... www.fellowes.com
Прежде чем обращаться по месту приобретения, позвоните представителю Fellowes; контактная информация указана на задней крышке
устройства.
Чтобы получать новости и дополнительную информацию, зарегистрируйте свое устройство на странице www.fellowes.com/register.
38

УСТРАНЕНИЕ НЕИСПРАВНОСТЕЙ
Неисправность Возможная причина Способ устранения
Индикатор питания не включается (красный
индикатор)
Долгое время не загорается индикатор
готовности (зеленый индикатор)
Индикатор питания мигает красным
цветом, а индикатор готовности (зеленый)
отключается
Индикатор готовности (зеленый) и индикатор
питания (красный) отключаются
Пакет на ламинированном предмете не
полностью герметичен
Поверхность пакета неровная или имеет
пузырьки
Пакет застрял внутри устройства Замятие пакета
Замятие
Пакет поврежден в процессе
ламинирования
Устройство не включено
Устройство не нагрелось или находится в
месте с повышенной влажностью
Ламинатор переходит в режим
автоматического выключения
Ламинитор находится в режиме
автоматического выключения
Возможно, предмет имеет слишком
большую толщину
Возможно, выбрана неверная толщина
пакета
Пакет подавался открытым краем вперед
Пакет сместился от центра при подаче
Пакет подавался в нерасправленном виде
Использовался пустой пакет
Валики повреждены либо на них есть
клейкое вещество
Включите устройство в розетку и установите
выключатель на боковой стенке во включенное
положение
Переставьте устройство в более прохладное и
сухое место
Нажмите выключатель. Устройство само
перезагружается
Нажмите выключатель. Устройство само
перезагружается
Максимальная толщина документа — ,40
mmдюйма
В ламинаторе могут использоваться пакеты
толщиной 75—125 микрон
Нажмите на рычаг освобождения и извлеките
пакет вручную
Для очистки и проверки валиков выполните
рабочий цикл устройства с листами для чис тки
ХРАНЕНИЕ& ЧИСТКА
Выключите устройство из настенной розетки. Дайте ему остыть. Для очистки наружных поверхностей можно использовать влажную ткань.
Не используйте растворители и легковоспламеняющиеся вещества для полировки устройства. В продаже имеются специальные листы
для очистки. Очистка валиков от остаточных элементов выполняется путем прогона очищающих листов через устройство, находящееся в
прогретом состоянии. Для поддержания оптимального режима работы рекомендуется регулярно использовать листы для очистки. (Код заказа
листов для очистки: #5320604).
РЕГИСТРАЦИЯ ПРОДУКТА / МЕЖДУНАРОДНАЯ ГАРАНТИЯ
Благодарим Вас за приобретение изделия компании Fellowes. Посетите веб-сайт www.fellowes.com/register, зарегистрируйте приобретенное
изделие и оставайтесь в курсе последних новостей, отзывов потребителей и предложений. Информация об изделии размещена на паспортной
табличке, расположенной на задней панели либо в нижней части устройства. Компания Fellowes выступает гарантом качества материала и
безукоризненной работы всех деталей ламинатора в течение 1 лет с даты непосредственного приобретения устройства. В случае выявления
дефектных частей в течение гарантийного периода компания Fellowes за свой счет устраняет дефект путем замены либо ремонта неисправной
детали. Данная гарантия не распространяется на неисправности, являющиеся следствием нарушения правил эксплуатации станка, либо его
несанкционированного ремонта. Гарантийные обязательства, касающиеся товарного состояния и эксплуатационной пригодности устройства,
действуют в течение ограниченного периода времени, см. выше. Компания Fellowes не несет ответственность за ущерб, нанесенный в
результате эксплуатации данного станка. Настоящая гарантия предоставляет ее владельцу определенный перечень законных прав. Владелец
гарантии может обладать другими законными правами, не имеющими отношения к содержанию данного гарантийного документа.
Длительность и условия настоящей гарантии действуют во всех странах мира в рамках местного законодательства. Для получения подробной
информации о порядке гарантийного обслуживания обратитесь к представителю компании Fellowes либо вашему региональному дилеру.
W.E.E.E.
Данное изделие относится к категории электротехнического и элек тронного оборудования. При утилизации станка соблюдайте
Европейскую директиву об утилизации электротехнического и электронного оборудования (WEEE), а также любые другие
региональные законы и предписания, касающиеся данной директивы. Подробная информация о директиве WEEE содержится на
сайте www.fellowesinternational.com/WEEE
39

EΛΛΗΝΙΚΑ
GR
ΧΕΙΡΙΣΤΗΡΙΑ ΣΥΣΚΕΥΗΣ ΠΛΑΣΤΙΚΟΠΟΙΗΣΗΣ
A Διακόπτης λειτουργίας (οn/o)
B Ενδεικτική λυχνία LED ετοιμότητας
(πράσινη)
C Μοχλός ανοίγματος (
)
ΔΥΝΑΤΟΤΗΤΕΣ
Απόδοση
Διαστάσεις εγγράφου 9,5 ίντσες / 241 mm
Πλάτος εισόδου A4 = 241 mm
Πάχος σάκου (ελάχ.) 75 micron (ανά
πλευρά)
Πάχος σάκου (μέγ.) 125 micron (ανά
πλευρά)
Χρόνος προθέρμανσης
(εκτίμηση) 4 λεπτά
Ταχύτητα
πλαστικοποίησης περίπου 30 cm/
(+/- 5%) λεπτό (σταθερή
ταχύτητα)
Αριθμός κυλίνδρων 2
Ένδειξη ετοιμότητας
μηχανήματος Ενδεικτική λυχνία
(πράσινη)
Μοχλός ανοίγματος Ναι
Αυτόματη απενεργοποίηση Ναι
D ποδοχή εισαγωγής σάκου/ εγγράφου
E Έξοδος σάκου/εγγράφου
F Ενδεικτική λυχνία LED λειτουργίας
(κόκκινη)
Τεχνικά στοιχεία
Τάση / Συχνότητα /
Ένταση ρεύματος (Amp) 220-240 V AC,
50/60 Hz,
1,5 A
Ισχύς 300 Watt
Διαστάσεις (ΥxΠxΒ) 66mm x 356mm x
158mm
Καθαρό βάρος 1,3 Kg
Μέγιστο πάχος εγγράφου
(δυνατότητα
πλαστικοποίησης) 0,02 ίν τσες / 0,4 mm
ΣΗΜΑΝΤΙΚΕΣ ΟΔΗΓΙΕΣ ΓΙΑ ΤΗΝ ΑΣΦΑΛΕΙΑ - ΦΥΛΑΞΤΕ ΓΙΑ ΜΕΛΛΟΝΤΙΚΗ ΑΝΑΦΟΡΑ
- Το μηχάνημα προορίζεται για χρήση μόνο σε εσωτερικό χώρο. Συνδέστε το μηχάνημα σε μια εύκολα προσβάσιμη πρίζα.
- Για να αποφευχθεί τυχόν ηλεκτροπληξία, μη χρησιμοποιείτε τη συσκευή κοντά σε νερό και μη χύνετε νερό επάνω στη συσκευή, στο καλώδιο
ρεύματος ή στην πρίζα.
ΝΑ διασφαλίζετε την τοποθέτηση του μηχανήματος σε μια σταθερή
επιφάνεια.
ΝΑ εκτελείτε δοκιμές πλαστικοποίησης σε πρόχειρα φύλλα και να
ρυθμίζετε το μηχάνημα πριν από τις τελικές πλαστικοποιήσεις.
ΝΑ αφαιρείτε τις βελόνες συρραφής και άλλα μεταλλικά πρόσθετα από το
φύλλο πριν από την πλαστικοποίηση.
ΝΑ διατηρείτε το μηχάνημα μακριά από τις πηγές θερμότητας και το
νερό.
ΝΑ θέτετε το μηχάνημα εκτός λειτουργίας μετά από κάθε χρήση.
ΝΑ αποσυνδέετε το μηχάνημα από την πρίζα όταν δεν πρόκειται να
χρησιμοποιηθεί για παρατεταμένο χρονικό διάστημα.
ΝΑ χρησιμοποιείτε σάκους που έχουν σχεδιαστεί για χρήση με τις
κατάλληλες ρυθμίσεις.
ΝΑ διατηρείτε το μηχάνημα μακριά από τα κατοικίδια ζώα, ενόσω
βρίσκεται σε χρήση.
40
ΝΑ ΜΗΝ αφήνετε το καλώδιο ρεύματος να έρχεται σε επαφή με θερμές
επιφάνειες.
ΝΑ ΜΗΝ αφήνετε το καλώδιο ρεύματος να κρέμεται από ντουλάπια ή
ράφια.
ΝΑ ΜΗΝ χρησιμοποιείτε τη συσκευή εάν το καλώδιο ρεύματος έχει
υποστεί ζημιά.
ΝΑ ΜΗΝ επιχειρείτε να ανοίξετε ή να επισκευάσετε με άλλο τρόπο το
μηχάνημα.
ΝΑ ΜΗΝ υπερβαίνετε τα αναγραφόμενα στοιχεία απόδοσης του
μηχανήματος.
ΝΑ ΜΗΝ επιτρέπετε σε παιδιά να χρησιμοποιούν αυτό το μηχάνημα
χωρίς επιτήρηση από ενήλικο.
ΝΑ ΜΗΝ πλαστικοποιείτε αιχμηρά ή μεταλλικά αντικείμενα (π.χ.: βελόνες
συρραφής, συνδετήρες).
ΝΑ ΜΗΝ πλαστικοποιείτε έγγραφα ευαίσθητα στη θερμότητα
(π.χ.: εισιτήρια, υπερηχογραφήματα κ.λπ.) στις ρυθμίσεις θερμής
πλαστικοποίησης.
ΝΑ ΜΗΝ πλαστικοποιείτε με αυτοκόλλητους σάκους στις ρυθμίσεις
θερμής πλαστικοποίησης.
ΝΑ ΜΗΝ πλαστικοποιείτε κενούς σάκους.

ΧΑΡΑΚΤΗΡΙΣΤΙΚΑ & ΣΥΜΒΟΥΛΕΣ
Λειτουργία ‘Ανοίγματος’
Για να αφαιρέσετε ή να επανευθυγραμμίσετε το
σάκο κατά την πλαστικοποίηση, ενεργοποιήστε το
μοχλό ανοίγματος που βρίσκεται στο πίσω μέρος
του μηχανήματος. Ο σάκος μπορεί να αφαιρεθεί από
την υποδοχή εισαγωγής μόνο όταν ενεργοποιηθεί
ο μοχλός.
Auto
Shut
Αυτόματη απενεργοποίηση
Μετά από 30 λεπτά το μηχάνημα θα
μεταβεί αυτόματα σε λειτουργία αυτόματης
απενεργοποίησης. Η ενδεικτική λυχνία LED
Off
λειτουργίας θα αναβοσβήσει με κόκκινο χρώμα για
5 λεπτά και, στη συνέχεια, θα σβήσει. Η ενδεικτική
λυχνία LED ετοιμότητας θα σβήσει. Για να συνεχίσετε
να χρησιμοποιήσετε το μηχάνημα πατήστε το
διακόπτη λειτουργίας (ON/OFF). Το μηχάνημα θα
επανεκκινηθεί.
ΡΥΘΜΙΣΗ ΤΗΣ ΣΥΣΚΕΥΗΣ ΠΛΑΣΤΙΚΟΠΟΙΗΣΗΣ
• Για καλύτερα αποτελέσματα, να χρησιμοποιείτε σάκους μάρκας
Fellowes®: 80 - 125 micron.
• Αυτό το μηχάνημα δεν χρειάζεται φορέα για να εκτελέσει
πλαστικοποίηση. Είναι ένας μηχανισμός χωρίς φορέα.
• Να τοποθετείτε πάντα το αντικείμενο που θέλετε να
πλαστικοποιήσετε σε σάκο των κατάλληλων διαστάσεων.
• Να εκτελείτε πάντα δοκιμές πλαστικοποίησης με ένα αντικείμενο
παρόμοιων διαστάσεων και πάχους πριν από την τελική
διαδικασία.
• Προετοιμάστε το σάκο και το αντικείμενο για πλαστικοποίηση.
Τοποθετήστε το αντικείμενο μέσα στο σάκο, έτσι ώστε να
είναι κεντραρισμένο και να αγγίζει το εμπρός σφραγισμένο
άκρο. Βεβαιωθείτε ότι ο σάκος δεν είναι πολύ μεγάλος για το
αντικείμενο.
• Εάν απαιτείται, να αποκόπτετε το πλεόνασμα υλικού γύρω από
το αντικείμενο μετά από την πλαστικοποίηση και την ψύξη.
Να διασφαλίζετε την τοποθέτηση του μηχανήματος σε μια σταθερή
1.
επιφάνεια.
Βεβαιωθείτε ότι υπάρχει αρκετός ελεύθερος χώρος (τουλάχιστον
2.
50 cm) πίσω από το μηχάνημα, προκειμένου να περνούν ελεύθερα
τα αντικείμενα.
Συνδέστε το μηχάνημα σε μια εύκολα προσβάσιμη πρίζα δικτύου.
3.
ΠΩΣ ΘΑ ΚΑΝΕΤΕ ΠΛΑΣΤΙΚΟΠΟΙΗΣΗ
Θέστε το μηχάνημα σε λειτουργία (ο διακόπτης βρίσκεται στο πλάι
4.
του μηχανήματος).
5.
Θα ανάψει η κόκκινη λυχνία λειτουργίας ‘Power on’. Το μηχάνημα
προθερμαίνεται.
6.
Όταν το μηχάνημα είναι έτοιμο, η πράσινη λυχνία ετοιμότητας
‘Ready’ θα παραμείνει αναμμένη.
Τοποθετήστε το έγγραφο μέσα στον ανοιχτό σάκο. Βεβαιωθείτε
7.
ότι το έγγραφο είναι κεντραρισμένο πάνω στο σφραγισμένο άκρο.
Χρησιμοποιήστε το κατάλληλο μέγεθος σάκου για το έγγραφο.
Διασφαλίστε ότι ο σάκος εισέρχεται στο μηχάνημα με το
8.
σφραγισμένο άκρο πρώτο. Διατηρήστε το σάκο ευθειασμένο και
κεντραρισμένο με την υποδοχή και όχι υπό γωνία. Χρησιμοποιήστε
τις ενδείξεις εισαγωγής ως οδηγό.
Όταν εξέρχεται από το μηχάνημα, ο πλαστικοποιημένος σάκος ίσως
9.
να είναι θερμός και μαλακός. Για να αποτραπεί τυχόν εμπλοκή,
αφαιρέστε αμέσως το σάκο. Τοποθετήστε το σάκο σε μια επίπεδη
επιφάνεια για να ψυχθεί. Να προσέχετε όταν χειρίζεστε ένα θερμό
σάκο.
ΧΡΕΙΑΖΕΣΤΕ ΒΟΗΘΕΙΑ;
Αφήστε τους ειδικούς μας να σας βοηθήσουν να βρείτε μια λύση.
Υπηρεσία εξυπηρέτησης πελατών... www.fellowes.com
Να καλείτε πάντα την εταιρεία Fellowes πριν επικοινωνήσετε με το κατάστημα από όπου αγοράσατε το μηχάνημα. Ανατρέξτε στο οπισθόφυλλο για
στοιχεία επικοινωνίας.
Καταχωρίστε το μηχάνημά σας στη διαδικτυακή διεύθυνση www.fellowes.com/register για να λάβετε ενημερώσεις και πρόσθετες πληροφορίες.
41

ΑΝΤΙΜΕΤΩΠΙΣΗ ΠΡΟΒΛΗΜΑΤΩΝ
Πρόβλημα Ενδεχόμενη αιτία Λύση
Δεν ανάβει η λυχνία λειτουργίας ‘power on’
(κόκκινη λυχνία LED)
Δεν ανάβει η λυχνία ετοιμότητας ‘ready’ μετά από
παρατεταμένη χρονική περίοδο (πράσινη λυχνία
LED)
Η ενδεικτική λυχνία λειτουργίας LED αναβοσβήνει
με κόκκινο χρώμα και η ενδεικτική λυχνία LED
ετοιμότητας (πράσινη) έχει σβήσει
Η ενδεικτική λυχνία ετοιμότητας (πράσινη) και η
ενδεικτική λυχνία LED λειτουργίας (κόκκινη) έχουν
απενεργοποιηθεί
Ο σάκος δεν σφραγίζει πλήρως το αντικείμενο
Το μηχάνημα δεν είναι ενεργοποιημένο
Το μηχάνημα βρίσκεται σε θερμό ή υγρό
χώρο
Η συσκευή πλαστικοποίησης έχει μεταβεί σε
λειτουργία αυτόματης απενεργοποίησης
Η συσκευή πλαστικοποίησης περνά σε
λειτουργία αυτόματης απενεργοποίησης
Το αντικείμενο ίσως να έχει υπερβολικό
πάχος για πλαστικοποίηση
Ο σάκος έχει κυματισμούς ή φυσαλίδες Το πάχος σάκου ίσως να είναι εσφαλμένο
Ο σάκος χάθηκε μέσα στο μηχάνημα Ο σάκος έχει εμπλακεί
Ο σάκος τοποθετήθηκε με το ανοιχτό άκρο
πρώτο
Ο σάκος δεν ήταν κεντραρισμένος κατά την
Εμπλοκή
εισαγωγή
Ο σάκος δεν ήταν ευθειασμένος κατά την
εισαγωγή
Χρησιμοποιήθηκε κενός σάκος
Ο σάκος έχει υποστεί ζημιά μετά από την
πλαστικοποίηση
Οι κύλινδροι είναι φθαρμένοι ή υπάρχει
κολλητική ουσία επάνω στους κυλίνδρους
Θέστε το μηχάνημα σε λειτουργία από το
διακόπτη στο πλάι του και την πρίζα
Μετακινήστε το μηχάνημα σε πιο ψυχρό και
ξηρό χώρο
Πατήστε το διακόπτη λειτουργίας (ON/OFF). Το
μηχάνημα θα επανεκκινηθεί αυτόματα
Πατήστε το διακόπτη λειτουργίας (ON/OFF). Το
μηχάνημα θα επανεκκινηθεί αυτόματα.
Το μέγιστο πάχος εγγράφου είναι ,40 mm
Η συσκευή πλαστικοποίησης δέχεται σάκους των
75-125 micron
Πατήστε το μοχλό ανοίγματος και τραβήξτε το
αντικείμενο έξω με το χέρι
Περάστε μερικά φύλλα καθαρισμού μέσα από το
μηχάνημα, για να δοκιμάσετε και να καθαρίσετε
τους κυλίνδρους
ΑΠΟΘΗΚΕΥΣΗ & ΚΑΘΑΡΙΣΜΟΣ
Θέστε το μηχάνημα εκτός λειτουργίας από την πρίζα. Αφήστε το μηχάνημα να ψυχθεί. Το εξωτερικό του μηχανήματος μπορεί να καθαριστεί με ένα υγρό πανί. Μη χρησιμοποιείτε
διαλυτικά ή εύφλεκτα υλικά για τη στίλβωση του μηχανήματος. Μπορείτε να αγοράσετε φύλλα καθαρισμού για τον καθαρισμό του μηχανήματος. Όταν το μηχάνημα είναι θερμό,
περάστε τα φύλλα μέσα από το μηχάνημα για να καθαρίσετε τυχόν κατάλοιπα από τους κυλίνδρους. Για τη βέλτιστη απόδοση, συνιστάται να χρησιμοποιούνται τακτικά φύλλα
καθαρισμού για τον καθαρισμό του μηχανήματος. (Κωδικός παραγγελίας φύλλου καθαρισμού: 5320604).
ΕΓΓΡΑΦΗ ΠΡΟΪΟΝΤΟΣ / ΔΙΕΘΝΗΣ ΕΓΓΥΗΣΗ
Σας ευχαριστούμε που αγοράσατε ένα προϊόν της εταιρείας Fellowes. Παρακαλούμε επισκεφθείτε την ηλεκτρονική διεύθυνση www.fellowes.com/register για να κάνετε
εγγραφή του προϊόντος σας και να επωφεληθείτε από ειδήσεις, σχόλια και προσφορές σχετικά με τα προϊόντα. Λεπτομέρειες σχετικά με τα προϊόντα αναγράφονται στην πινακίδα
στοιχείων που υπάρχει στο πίσω μέρος ή τη βάση του μηχανήματος.
Η εταιρεία Fellowes εγγυάται ότι όλα τα μέρη της συσκευής πλαστικοποίησης είναι ελεύθερα ελαττωμάτων στα υλικά και την εργασία επί 1 έτη από την ημερομηνία αγοράς από τον
αρχικό καταναλωτή. Εάν οποιοδήποτε μέρος εντοπιστεί ότι είναι ελαττωματικό κατά τη διάρκεια της περιόδου εγγύησης, η μόνη και αποκλειστική αποζημίωση θα είναι η επισκευή ή
η αντικατάσταση του ελαττωματικού μέρους, κατά τη διακριτική ευχέρεια και με δαπάνες της Fellowes. Αυτή η εγγύηση δεν ισχύει στις περιπτώσεις κακής χρήσης, κακού χειρισμού ή
μη εξουσιοδοτημένης επισκευής. Δια της παρούσης, οποιαδήτε έμμεση εγγύηση, συμπεριλβμανομένης εκείνης της εμπορευσιμότητας ή της καταλληλότητας για συγκεκριμένο σκοπό,
περιορίζεται ως προς τη διάρκεια στην κατάλληλη περίοδο εγγύησης, όπως προσδιορίζεται παραπάνω. Η εταιρεία Fellowes δεν φέρει απολύτως καμία ευθύνη για τυχόν παρεπόμενες
ζημίες, οι οποίες θα εκχωρηθούν στο προϊόν αυτό. Η εγγύηση αυτή σας εκχωρεί συγκεκριμένα έννομα δικαιώματα. Ενδέχεται να έχετε και άλλα έννομα δικαιώματα, διαφορετικά από τα
προβλεπόμενα στην εγγύηση αυτήν. Η διάρκεια, οι όροι και οι προϋποθέσεις της παρούσας εγγύησης ισχύουν παγκοσμίως, με εξαίρεση όπου επιβάλλονται διαφορετικοί περιορισμοί,
περιοριστικές διατάξεις ή προϋποθέσεις από την τοπική νομοθεσία. Για περισσότερες λεπτομέρειες ή για τη λήψη υπηρεσιών στο πλαίσιο της παρούσας εγγύησης, επικοινωνήστε με
την εταιρεία Fellowes ή την τοπική αντιπροσωπία.
W.E.E.E.
Αυτό το προϊόν έχει ταξινομηθεί ως Ηλεκτρικός και Ηλεκτρονικός Εξοπλισμός. Όταν θα έλθει ο καιρός να απορρίψετε το προϊόν αυτό,
διασφαλίστε ότι θα το κάνετε σύμφωνα με την Ευρωπαϊκή Οδηγία περί Απόρριψης Ηλεκτρικού και Ηλεκτρονικού Εξοπλισμού (WEEE) και
σύμφωνα με την τοπική νομοθεσία που σχετίζεται με την οδηγία αυτή.
Για περισσότερες πληροφορίες σχετικά με την Οδηγία WEEE, επισκεφθείτε την ηλεκτρονική διεύθυνση www.fellowesinternational.com/WEEE
42

TÜRKÇE
TR
LAMİNASYON MAKİNESİ KONTROLLERİ
A Açma / kapama düğmesi
B Hazır LED’i (Yeşil)
C Serbest bırakma kolu ( )
ÖZELLİKLER
D Kaplama / doküman girişi yuvası
E Kaplama / doküman çıkışı
F Güç Açma LED’i (Kırmızı)
Performans
Biçim 9,5” / 241mm
Giriş genişliği A4 = 241mm
Kaplama kalınlığı (min.) 75 mikron (taraf başına)
Kaplama kalınlığı (maks.) 125 mikron (taraf başına)
Isınma süresi (tahmini) 4 dakika
Laminasyon hızı yaklaşık 30cm/dak
(+/- %5) (sabit hız)
Merdane adedi 2
Hazır göstergesi Lamba (Yeşil)
Serbest bırakma kolu Evet
Tıkanmaz Girişli /
Otomatik Kapatma Evet
Teknik Veriler
Voltaj / Frekans /
Akım (Amper) 220-240V AC, 50/60Hz,
1,5A
Watt Gücü 300 Wat
Boyutlar (YxGxD) 66mm x 356mm x 158mm
Net ağırlık 1,3 Kg
Maks. doküman kalınlığı
(laminasyon kapasitesi) 0.02” / 0.4mm
ÖNEMLİ GÜVENLİK YÖNERGELERİ - GELECEKTE KULLANMAK İÇİN SAKLAYIN
- Bu makine kapalı mekanlarda kullanım içindir. Makinenin şini, kolaylıkla erişilebilen bir prize takın.
- Elektrik çarpmasını önlemek için - cihazı suya yakın yerlerde kullanmayın, cihaza, elektrik kablosuna veya prize su dökmeyin.
HER ZAMAN makinenin düzgün bir yüzeyde bulunduğundan
emin olun.
HER ZAMAN son laminasyon işleminden önce boş kağıtlarda
laminasyon testi yapın ve makineyi ayarlayın.
HER ZAMAN laminasyon öncesinde zımba ve benzeri metal
parçaları çıkartın.
HER ZAMAN makineyi su ve ısı kaynaklarından uzak tutun.
HER ZAMAN kullandıktan sonra makineyi kapatın.
HER ZAMAN uzun süre kullanmayacaksanız makinenin şini
prizden çekin.
HER ZAMAN uygun ayarlarda tasarlanmış kaplamalar kullanın.
HER ZAMAN kullanım sırasında evcil hayvanlardan uzak tutun.
HİÇBİR ZAMAN elektrik kablosunu sıcak yüzeylerle temas
ettirmeyin.
HİÇBİR ZAMAN elektrik kablosunu dolap ya da raf üzerine asılı
bırakmayın.
HİÇBİR ZAMANelektrik kablosu hasarlıysa cihazı kullanmayın.
HİÇBİR ZAMAN makineyi açmaya veya tamir etmeye
çalışmayın.
HİÇBİR ZAMAN makinenin belirtilen performans değerlerini
aşmayın.
HİÇBİR ZAMAN çocukların yetişkin gözetimi olmadan
kullanmasına izin vermeyin.
HİÇBİR ZAMANkeskin veya metal nesneleri kaplamayın (örn:
zımba, ataç).
HİÇBİR ZAMANısıya karşı hassas dokümanları (örn: bilet,
ultrason vb.) sıcak ayarlarla lamine etmeyin.
HİÇBİR ZAMAN kendinden yapışkanlı kaplamaları sıcak ayar-
larla lamine etmeyin.
HİÇBİR ZAMAN boş kaplamaları lamine etmeyin.
43

ÖZELLİKLER & İPUÇLARI
‘Serbest Bırakma’ işlevi
Laminasyon sırasında bir kaplamayı çıkartmak
ya da yeniden hizalamak için makinenin
arkasına yerleştirilen serbest bırakma
kolunu etkinleştirin. Kaplama yalnızca
kol etkinleştirildiğinde giriş yuvasından
Auto
Shut
Off
çıkarılabilir.
Otomatik Kapatma
30 dakika sonra makine otomatik olarak
Otomatik Kapanma moduna geçecektir.
Güç LED’i 5 dakika boyunca kırmızı yanıp
sönecek ve ardından kapanacaktır. Hazır LED’i
kapanacaktır. Makineyi kullanmaya devam
etmek için, AÇIK/KAPALI düğmesine basın.
Makine kendisini sıfırlayacaktır.
LAMİNASYON MAKİNESİNİ AYARLAMA
Makinenin düzgün bir yüzeyde bulunduğundan emin olun.
1.
Öğelerin serbestçe geçebilmesi için makinenin arkasında
2.
yeterli boşluk mesafesi (min. 50 cm) olup olmadığını
kontrol edin.
LAMİNASYON İŞLEMİ
Makineyi açın (makinenin yan tarafında bulunmaktadır).
4.
Kırmızı ‘Güç açık’ lambası yanacaktır. Makine bu durumda
5.
ısınıyordur.
• En iyi sonuçları elde etmek için, Fellowes ® marka
kaplamalar kullanın: 80 - 125 mikron.
• Bu makine, laminasyon için bir taşıyıcıya ihtiyaç duymaz.
Taşıyıcısız mekanizmaya sahiptir.
• Kaplanacak öğeyi her zaman uygun boyutta bir kaplama
içine yerleştirin.
• Son işlemden önce her zaman benzer boyut ve kalınlıkta
test laminasyonu yapın.
• Laminasyon kaplamasını ve öğeyi hazırlayın. Öğeyi,
kaplamayı ortalayarak ve ön kapalı kenara dokunacak
şekilde yerleştirin. Kaplamanın öğe için çok geniş
olmadığından emin olun.
• Gerekirse, laminasyon ve soğuma işleminden önce
öğenin çevresindeki malzeme fazlalığını kırpın.
Makinenin şini, kolaylıkla erişilebilen bir prize takın.
3.
8.
Kaplamanın makineye önce kapalı kenarı girecek şekilde
yerleştirildiğinden emin olun. Kaplamayı yuvaya açılı
olacak şekilde değil, düz ve ortalı bir şekilde yerleştirin.
Giriş işaretlerini kılavuz olarak kullanın.
Makine hazır olduğunda yeşil ‘Hazır’ lambası yanık
6.
kalacaktır.
Dokümanı açık kaplamaya yerleştirin. Doküman kapalı
7.
kenara ortalandığından emin olun. Doküman için uygun
boyutta kaplama kullanın.
9.
Lamine edilen kaplama, sıcak ve yumuşak bir halde
çıkabilir. Sıkışmayı önlemek için kaplamayı derhal çıkartın.
Kaplamayı soğuması için düz bir yüzeye bırakın. Sıcak
kaplamayı tutarken dikkatli olun.
YARDIMA MI İHTİYACINIZ VAR?
Uzmanlarımız sizin için en uygun çözümü bulsun.
Müşteri Hizmetleri... www.fellowes.com
Ürünü satın aldığınız yeri aramadan önce her zaman Fellowes'i arayın, iletişim bilgileri arka kapakta bulunmaktadır.
Güncellemeler ve ek bilgileri almak için makinenizi www.fellowes.com/register adresinde kaydettirmeyi unutmayın.
44

SORUN GİDERME
Sorun Olası neden Çözüm
'Kırmızı' güç LED'i yanmıyor Makine açılmamıştır
Uzun süre bekledikten sonra 'Yeşil' hazır
lambası yanmıyor
Güç LED’i kırmızı yanıp sönüyor ve Hazır
LED’i (yeşil) kapandı
Hazır lambası (yeşil) ve Güç LED’i (kırmızı)
kapandı
Kaplama maddeye tam olarak yapışmıyor Madde laminasyon için fazla kalın olabilir Maksimum doküman kalınlığı: ,40 mm
Kaplamada dalgalanma veya hava
kabarcıkları oluyor
Kaplama makinenin içinde kayboldu Kaplama sıkışmıştır
Sıkışma
Laminasyon sonrası kaplama hasar görüyor
Makine sıcak veya nemli bir alandadır Makineyi daha serin ve kuru bir alana taşıyın
Laminasyon makinesi Otomatik Kapatma
moduna girmiştir
Laminasyon makinesi Otomatik Kapatma
modundadır
Kaplama kalınlığı yanlış olabilir
Kaplamanın açık ucu önce yerleştirilmiştir
Kaplama girişte ortalanmamıştır
Kaplama girişe düz sokulmamıştır
Boş kaplama kullanılmıştır
Merdaneler hasarlıdır veya merdanelerde
yapıştırıcı kalmıştır
Makineyi yan tarafından ve duvardaki elektrik
prizinden açın
AÇIK/KAPALI düğmesine basın. Makine kendisini
sıfırlayacaktır
AÇIK/KAPALI düğmesine basın. Makine kendisini
sıfırlayacaktır
Laminasyon makinesinde 75-125 mikron kaplama
kullanılır
Ters düğmesine basın ve maddeyi elinizle çekerek
çıkarın.
Merdaneleri test edip temizlemek için makineden
temizleme yaprakları geçirin
SAKLAMA VE TEMİZLİK
Makinenin elektrik kablosunu prizden çıkarın. Makineyi soğumaya bırakın. Makinenin dış yüzeyi, nemli bir bezle temizlenebilir. Makineyi
parlatmak için çözücü veya yanıcı malzemeler kullanmayın. Makinede kullanım için temizlik kağıtları satın alınabilir. Makine sıcak
durumdayken - kağıtları makineye yerleştirerek merdanelerdeki kalıntıları temizleyin. Optimum performans için, temizlik kağıtları
kullanılarak makinenin düzenli aralıklarla temizlenmesi önerilir. (Temizleme kağıdı sipariş kodu 5320604).
ÜRÜN KAYDI / DÜNYA ÇAPINDA GARANTİ
Bir Fellowes ürünü satın aldığınız için teşekkür ederiz. Lütfen www.fellowes.com/register adresini ziyaret ederek ürününüzü kaydedin
ve ürün haberleri, geri bildirim ve teklierden yararlanın. Ürün ile ilgili ayrıntılı bilgileri, makinenin arka tarafında veya altında bulunan
anma değerleri plakasında bulabilirsiniz.
Fellowes, son tüketici tarafından satın alım tarihinden itibaren geçerli olmak üzere laminasyon makinesinin tüm parçaları için 1 yıllık
malzeme ve işçilik garantisi sağlamaktadır. Garanti süresi boyunca herhangi bir arızalı parça bulunursa, tek ve yegane çözümünüz
masraarı Fellowes tarafından karşılanmak üzere arızalı parçayı onarmak veya değiştirmektir. Arızanın hatalı kullanım, yanlış taşıma
veya izinsiz onarımdan kaynaklandığı durumlarda, bu garanti geçerli değildir. Ticari olarak satılabilirlik ya da belli bir amaca uygunluk
garantisi de dahil olmak üzere tüm dolaylı garantiler, yalnızca yukarıda belirtilen makul garanti süresi boyunca geçerlidir. Fellowes,
hiçbir durumda bu üründen kaynaklanan dolaylı zararlardan sorumlu tutulamaz. Bu garanti size belirli yasal haklar tanır. Bu garantiden
farklı başka yasal haklarınız olabilir. Bu garantinin süresi, şartlar ve koşulları, yerel yasaların farklı sınırlamalar, kısıtlamalar veya koşullar
gerektirdiği yerler dışında tüm dünya çapında geçerlidir. Daha ayrıntılı bilgi veya bu garanti kapsamında hizmet alabilmek için, lütfen
Fellowes'a veya bayiinize başvurun.
W.E.E.E.
Bu ürün, Elektrikli ve Elektronik Ekipman olarak sınıandırılmaktadır. Bu ürünü atacağınız zaman
geldiğinde, lütfen ürünü Avrupa Birliği'nin Elektrikli ve Elektronik Ekipmanların Atılması (WEEE) Direkti'ne
ve bu direktie ilgili yerel düzenlemelere uygun şekilde atın.
WEEE Direkti ile ilgili daha fazla bilgi için, lütfen www.fellowesinternational.com/WEEE
45

ČESKY
CZ
OVLÁDACÍ PRVKY LAMINÁTORU
A Vypínač
B Kontrolka Připraveno (zelená)
C Uvolňovací páčka ( )
VLASTNOSTI
Výkon
Formát 9,5” / 241mm
Vstupní šířka A4 = 241mm
Tloušťka laminovací
kapsy (min.) 75 mikronů (jedna
strana)
Tloušťka laminovací
kapsy (max.) 125 mikronů (jedna
strana)
Doba ohřevu
(přibližná) 4 minuty
Laminovací rychlost přibližně 30cm/min.
(+/- 5%) (pevná rychlost)
Počet laminovacích válců 2
Indikace připravenosti Svítí (zeleně)
Uvolňovací páčka Ano
Automatické vypnutí Ano
D Otvor pro vkládání laminovacích kapes/dokumentů
E Výstup laminovacích kapes/dokumentů
F Kontrolka Zapnuto (červená)
Technické údaje
Napětí / frekvence /
Elektrický proud (ampéry) 220-240V AC,
50/60Hz, 1,5A
El. příkon 300 wattů
Rozměry (VxŠxH) 66mm x 356mm x
158mm
Čistá hmotnost 1,3 kg
Max. tloušťka dokumentu
(laminovací kapacita)0,02”/0,4 mm
DŮLEŽITÉ BEZPEČNOSTNÍ POKYNY – UCHOVEJTE PRO POZDĚJŠÍ POUŽITÍ
- Přístroj se používá pouze ve vnitřním prostředí. Připojte přístroj do snadno přístupné elektrické zásuvky.
- Přístroj nepoužívejte v blízkosti vody, zabraňte polití přístroje, napájecí šňůry nebo zásuvky vodou – předejdete tak riziku zasažení
elektrickým proudem.
Zajistěte, aby byl přístroj umístěn na stabilním povrchu.
Před provedením finální laminace proveďte zkušební
laminaci na nepotřebných listech a nastavte přístroj.
Před laminováním odstraňte svorky a jiné kovové předměty.
Uchovávejte přístroj mimo zdroje tepla a vody.
Vypínejte přístroj po každém použití.
Pokud přístroj delší dobu nepoužíváte, odpojte jej ze sítě.
Používejte pouze laminovací kapsy určené pro příslušná
nastavení.
Při použití dbejte na to, aby se k přístroji nepřibližovala domácí
zvířata.
46
Napájecí kabel by se neměl dostat to styku s horkým
povrchem.
Napájecí kabel nesmí viset ze skříněk nebo polic.
Přístroj nepoužívejte, pokud je napájecí kabel poškozen.
Přístroj neotevírejte ani jinak neopravujte.
Přístroj nezatěžujte nad uvedený výkon.
Přístroj nesmějí obsluhovat děti bez dohledu dospělých.
Nepokoušejte se laminovat ostré nebo kovové předměty (např.
svorky, spony na papír).
Nepokoušejte se laminovat dokumenty citlivé vůči teplu (např.
vstupenky, ultrazvukové snímky apod).
Neprovádějte laminaci samolepicích kapes při nastavení pro
teplou laminaci.
Nelaminujte prázdné laminovací kapsy.

VLASTNOSTI & TIPY
Uvolňovací funkce
Chcete-li během laminování odebrat nebo
zarovnat laminovací kapsu, použijte uvolňovací
páčku umístěnou na zadní straně přístroje.
Laminovací kapsu lze ze vstupního otvoru
uvolnit pouze po použití této páčky.
Auto
Shut
Off
Automatické vypnutí
Po 30 minutách zařízení automaticky přejde
do režimu automatického vypnutí. Kontrolka
Zapnuto bude 5 minut červeně blikat a potom
zhasne. Kontrolka Připraveno zhasne. Pokud
chcete přístroj dále používat, stiskněte vypínač.
Přístroj se sám resetuje.
NASTAVENÍ LAMINÁTORU
Přesvědčte se, zda je zařízení umístěno na pevném
1.
podkladu.
Zkontrolujte, zda je za přístrojem dostatek volného místa
2.
(min. 50 cm), které zajistí hladký výstup laminovaných
dokumentů.
POSTUP PŘI LAMINOVÁNÍ
• Nejlepší výsledky dosáhnete slaminovacími kapsami
značky Fellowes®: 80-125 mikronů
• S přístrojem není třeba používat nosič fólií. Jeho mechanismus pracuje bez využití nosiče.
• Předměty k laminování vkládejte vždy do laminovací
kapsy přiměřené velikosti.
• Před laminováním vždy proveďte zkušební laminování s
laminovací kapsou stejné velikosti a tloušťky.
• Připravte laminovací kapsu a laminovaný dokument.
Dokument vložte do středu laminovací kapsy tak, aby se
dotýkal zataveného zaváděcího okraje. Přesvědčte se,
zda laminovací kapsa není pro laminovaný dokument
příliš veliká.
• Po skončení laminování a ochlazení laminovací kapsy
v případě potřeby odřízněte přebytečný materiál na
okrajích.
Připojte přístroj do snadno přístupné elektrické zásuvky.
3.
4.
Zapněte napájení (stisknutím vypínače umístěného na
straně zařízení).
5.
Rozsvítí se červená kontrolka „Zapnuto“. Nyní se přístroj
zahřívá.
6.
Až bude přístroj připraven, zelená kontrolka „Připraveno“
bude nepřerušovaně svítit.
7.
Vložte dokument do otevřené laminovací kapsy. Zkontrolujte, zda je správně vycentrován proti zatavené hraně. Zvolte
velikost laminovací kapsy odpovídající dokumentu.
Dbejte na to, abyste vkládali laminovací kapsu do přístroje
8.
vždy zatavenou stranou napřed. Laminovací kapsu
vkládejte rovně a na střed otvoru, nikoli pod úhlem. Řiďte
se značkami pro vkládání dokumentů.
Laminovací kapsa, která vychází z laminátoru, může být
9.
horká a měkká. Okamžitě ji vyjměte, abyste předešli jejímu
zachycení v přístroji. Položte laminovací kapsu na rovnou
plochu, aby vychladla. Při manipulaci s horkou laminovací
kapsou postupujte opatrně.
POTŘEBUJETE POMOC?
Dovolte našim odborníkům, aby vám pomohli s řešením.
Zákaznický servis... www.fellowes.com
Před kontaktováním prodejce se nejprve telefonicky obraťte na společnost Fellowes. Kontaktní údaje najdete na zadní straně.
Zvažte registraci přístroje na stránce www.fellowes.com/register, abyste získali aktualizace a další informace.
47

ŘEŠENÍ PROBLÉMŮ
Problém Možná příčina Řešení
Nesvítí červená kontrolka "zapnuto" Přístroj není zapnutý
Po delším časovém intervalu nesvítí zelená
kontrolka "připraveno"
Kontrolka Zapnuto bliká červeně a kontrolka Připraveno (zelená) nesvítí
Přístroj pracuje v horkém nebo vlhkém
prostředí
Laminovačka je v režimu Automatického
vypnutí
Zapojte přístroj do zásuvky a zapněte pomocí tlačítka
na straně
Přemístěte přístroj do chladnějšího a suchého
prostředí
Stiskněte vypínač. Přístroj se sám resetuje.
Kontrolka Připraveno (zelená) a kontrolka
Zapnuto (červená) nesvítí
Laminovací kapsa zcela netěsní laminovaný
dokument
Laminovací kapsa vykazuje zvlnění nebo
bubliny
Laminovací kapsa uvízla v přístroji Došlo k zachycení laminovací kapsy v přístroji
Uváznutí
Laminací došlo k poškození laminovací
kapsy
Laminovačka je v režimu Automatického
vypnutí
Laminovaný dokument je pro laminování
příliš silný
Nesprávná tloušťka laminovací kapsy
Laminovací kapsa byla vložena otevřeným
koncem napřed
Laminovací kapsa nebyla vložena do středu
vstupního otvoru
Laminovací kapsa nebyla vložena rovně do
vstupního otvoru
Byla použita prázdná laminovací kapsa
Poškozené laminovací válce nebo chybějící
lepidlo na laminovacích válcích
Stiskněte vypínač. Přístroj se sám resetuje.
Maximální tloušťka dokumentu je ,40 mm
Laminovačka akceptuje kapsy o tloušťce 75-125
mikronů
Stiskněte uvolňovací páčku a rukou vytáhněte
laminovaný dokument
Z důvodu kontroly a čištění laminovacích válců
nechejte přístrojem projít čisticí listy.
UCHOVÁVÁNÍ & ČIŠTĚNÍ
Odpojte laminátor z elektrické zásuvky. Nechejte ho vychladnout. Vnější povrch přístroje lze otřít vlhkým hadříkem. K leštění přístroje nepoužívejte
rozpouštědla ani hořlavé látky. Můžete zakoupit čisticí listy pro přístroj. Je-li přístroj zahřátý, nechejte jím projít čisticí listy, které odstraní pozůstatky
laminační činnosti z válců. Pro optimální výkon doporučujeme, aby byly čisticí listy používány pravidelně. (Objednací kód čistících listů #5320604).
REGISTRACE PRODUKTU / CELOSVĚTOVÁ ZÁRUKA
Děkujeme, že jste si zakoupili výrobek společnosti Fellowes. Navštivte stránky www.fellowes.com/register a zaregistrujte svůj výrobek a využijte výhod
novinek o produktech, reakcí a nabídek. Údaje o výrobku jsou uvedeny na typovém štítku na zadní či spodní straně zařízení.
Společnost Fellowes ručí za veškeré vady materiálu a zpracování všech částí laminátoru po dobu dvou let od data nákupu původním zákazníkem. Pokud
bude k poruše kterékoliv části během záručního doby, jediným a výlučným prostředkem bude oprava nebo výměna vadného dílu na základě rozhodnutí
společnosti Fellowes. Tato záruka se nevztahuje na nesprávné použití, špatné zacházení nebo neoprávněnou opravu. Jakákoliv domnělá záruka, včetně
prodejnosti nebo vhodnosti pro určitý účel, se tímto omezuje na příslušné záruční období, které je stanoveno výše. Společnost Fellowes nebude v žádném
případě odpovídat za následné škody, které by mohly být spojovány s tímto výrobkem. Toto záruka vám uděluje zvláštní zákonná práva. Můžete mít
další zákonná práva, která se liší od této záruky. Doba a podmínky této záruky jsou platné na celém světě, kromě zemí, ve kterých jsou omezení, výhrady
nebo podmínky stanoveny místními předpisy. Chcete-li se dozvědět podrobnější informace nebo využít služeb v rámci této záruky, obraťte se laskavě na
společnost Fellowes nebo na jejího obchodního zástupce.
48
W.E.E.E.
Tento výrobek je klasikován jako elektrické a elektronické zařízení. V případě, že budete chtít zařízení zlikvidovat, laskavě
postupujte podle Směrnice o likvidaci elektrických a elektronických zařízeních (OEEZ)
Další informace o směrnici OEEZ naleznete na www.fellowesinternational.com/WEEE

SLOVENSKY
SK
OVLÁDACIE PRVKY LAMINÁTORA
A Vypínač
B Indikátor pripravenosti (zelený)
C Uvoľňovacia páčka ( )
PARAMETRE
Výkon
Formát 9,5”/241 mm
Šírka vstupu A4 = 241 mm
Hrúbka puzdra (min.) 75 mikrónov (na každej
strane)
Hrúbka puzdra (max.) 125 mikrónov (na každej
strane)
Čas zahrievania (približne) 4 minút
Rýchlosť laminovania cca 30 cm/min
(+/- 5%) (konštantná
rýchlosť)
Počet valčekov 2
Indikátor pripravenosti Svieti (zelená)
Uvoľňovacia páčka Áno
Automatické vypnutie Áno
D Otvor na vstup puzdra/
dokumentu
E Výstup puzdra/dokumentu
F Indikátor zapnutia (červený)
Technické údaje
Napätie/frekvencia/
prúd (A) 220-240 V stried.,
50/60 Hz, 1,5 A
Príkon 300 W
Rozmery (v x š x h) 66mm x 356mm x
158mm
Čistá hmotnosť 1,3 kg
Max. hrúbka dokumentu
(kapacita laminovania) 0,02”/0,4 mm
DÔLEŽITÉ BEZPEČNOSTNÉ POKYNY – USCHOVAJTE NA POUŽITIE V BUDÚCNOSTI
- Zariadenie je určené len na použitie v interiéri. Zariadenie zapojte do jednoducho prístupnej zásuvky.
– Predchádzajte zásahu elektrickým prúdom – nepoužívajte zariadenie v blízkosti vody, nerozlejte vodu na zariadenie, napájací
kábel ani na zásuvku.
DBAJTE NA TO, aby zariadenie bolo na stabilnom povrchu.
OTESTUJTE laminovanie pomocou skúšobného hárka a nastavte
zariadenie, až potom uskutočnite nálne laminovanie.
ODSTRÁŇTE pred laminovaním svorky a iné kovové predmety.
UDRŽUJTE zariadenie mimo zdrojov tepla a vody.
VYPNITE zariadenie po každom použití.
ODPOJTE zariadenie od elektrickej siete, ak ho nebudete dlhšie
používať.
POUŽÍVAJTE puzdrá určené na používanie pri príslušných
nastaveniach.
DBAJTE NA TO, aby sa domáce zvieratá nezdržiavali v blízkosti
zariadenia počas jeho používania.
NEDOVOĽTE, aby sa napájací kábel dostal do kontaktu s
horúcimi povrchmi.
NENECHÁVAJTE elektrický kábel visieť zo skriniek alebo poličiek.
NEPOUŽÍVAJTE zariadenie, ak je napájací kábel poškodený.
NEPOKÚŠAJTE SA otvoriť ani inak opraviť toto zariadenie.
NEPREKRAČUJTE menovitý výkon zariadenia.
NEDOVOĽTE malým deťom používať toto zariadenie bez
dohľadu dospelých osôb.
NELAMINUJTE ostré ani kovové predmety (napr. spinky alebo
svorky).
NELAMINUJTE dokumenty citlivé na teplo (napr. vstupenky,
ultrazvukové snímky a pod.) s použitím tepla.
NELAMINUJTE samolepiace puzdrá pri horúcich nastaveniach.
NELAMINUJTE prázdne puzdro.
49

FUNKCIE A TIPY
Funkcia uvoľnenia
Ak chcete vybrať alebo opätovne zarovnať puzdro počas laminovania, použite uvoľňovaciu
páčku na zadnej strane zariadenia. Puzdro
je možné vybrať cez vstupný otvor, len ak je
páčka posunutá do uvoľňovacej polohy.
Auto
Shut
Off
Automatické vypnutie
Po 30 minútach počítač automaticky prejde
do režimu automatického vypnutia. Červený
indikátor zapnutia bude 5 minúť blikať a
potom zhasne. Indikátor pripravenosti zhasne.
Ak chcete ďalej zariadenie používať, stlačte
vypínač. Zariadenie sa samo reštartuje.
NASTAVENIE LAMINÁTORA
Dbajte na to, aby zariadenie bolo na stabilnom povrchu.
1.
Skontrolujte, či je za zariadením dostatok voľného miesta
2.
(min. 50cm), aby ním mohli laminované dokumenty voľne
prechádzať.
POSTUP LAMINOVANIA
Zapnite napájanie (vypínač sa nachádza na bočnej strane
4.
zariadenia).
Rozsvieti sa červený indikátor zapnutia. Zariadenie sa
5.
zahrieva.
Keď je zariadenie pripravené, indikátor pripravenosti
6.
zostane svietiť.
Vložte dokument do otvoreného puzdra. Dbajte na to, aby
7.
bol dokument vycentrovaný a opretý o zatavený okraj. Na
dokument použite puzdro vhodnej veľkosti.
• Najlepšie výsledky dosiahnete s puzdrami značky
Fellowes ®: 80 až 125 mikrónov.
• Toto zariadenie nevyžaduje nosič na laminovanie. Ide o
mechanizmus bez nosiča
• Laminovaný predmet vždy vložte do puzdra vhodnej
veľkosti.
• Pred nálnym laminovaním otestujte laminovanie
pomocou skúšobného hárka podobnej veľkosti a hrúbky.
• Pripravte puzdro a predmet na laminovanie. Vložte
predmet do stredu puzdra tak, aby bol v strede a dotýkal
sa predného zataveného okraja. Dbajte na to, aby puzdro
nebolo pre predmet príliš veľké.
• V prípade potreby po laminovaní a vychladnutí
odstrihnite okolo laminovaného predmetu nadbytočný
materiál.
Zapojte zariadenie do jednoducho prístupnej zásuvky.
3.
Dbajte na to, aby ste puzdro do zariadenia vložili zataveným
8.
koncom. Dbajte na to, aby puzdro do zariadenia vchádzalo
rovno a na stred otvoru, nie pod uhlom. Ako pomôcku
použite značky na vkladanie dokumentov.
Zalaminovaný dokument, ktorý vychádza zo zariadenia,
9.
môže byť horúci a mäkký. Ihneď puzdro vyberte, aby ste
predišli jeho zachyteniu v zariadení. Puzdro položte na
rovný povrch a nechajte ho vychladnúť. Pri manipulácii s
horúcim puzdrom buďte opatrní.
POTREBUJETE POMOC?
50
S riešením vám pomôžu naši odborníci.
Služba zákazníkom... www.fellowes.com
Skôr než sa obrátite na predajcu, telefonicky kontaktujte spoločnosť Fellowes. Kontaktné informácie nájdete na zadnej strane
obálky.
Ak máte záujem o ďalšie informácie a novinky, zaregistrujte zariadenie na adrese ww w.fellowes.com/register.

RIEŠENIE PROBLÉMOV
Problém Možná príčina Riešenie
Nesvieti indikátor zapnutia (červený indikátor) Zariadenie nie je zapnuté
Indikátor pripravenosti nezasvieti ani po
dlhom čase (zelený indikátor)
Indikátor zapnutia bliká červenou a indikátor
pripravenosti (zelený) zhasol
Zariadenie je v horúcom alebo vlhkom
prostredí
Laminátor prešiel do režimu automatického
vypnutia
Zapnite zariadenie na bočnej strane azapojte ho
do zásuvky.
Premiestnite zariadenie do chladnejšieho a
suchšieho priestoru
Stlačte vypínač. Zariadenie sa samo reštartuje
Indikátor pripravenosti (zelený) a indikátor
zapnutia (červený) sú zhasnuté
Laminovaný dokument nie je zalaminovaný
celý
Puzdro je zvlnené alebo obsahuje bublinky Hrúbka puzdra môže byť nesprávna
Puzdro zostalo zachytené v zariadení Puzdro je uviaznuté
Zaseknutie
Puzdro je po laminovaní poškodené
Laminátor je v režime automatického
vypnutia
Laminovaný dokument je zrejme príliš hrubý
na to, aby mohol byť zalaminovaný
Puzdro bolo do zariadenia vložené
otvoreným koncom
Puzdro nebolo vložené v strede vstupu
Puzdro bolo vložené do vstupu nakrivo
Použilo sa prázdne puzdro
Valčeky sú poškodené alebo je na nich
lepidlo
Stlačte vypínač. Zariadenie sa samo reštartuje
Maximálna hrúbka dokumentu je ,40 mm
Laminátor dokáže pracovať s puzdrami s hrúbkou 75
až 125 mikrónov
Stlačte uvoľňovaciu páčku a dokument vytiahnite
ručne
Vložte do zariadenia čistiace hárky, čím sa skontrolujú avyčistia valčeky
SKLADOVANIE A ČISTENIE
Zariadenie vytiahnite zo zásuvky. Nechajte zariadenie vychladnúť. Zariadenie je možné zvonku vyčistiť vlhkou handričkou. Na čistenie nepoužívajte rozpúšťadlá
ani horľavé látky. Na čistenie zariadenia je možné zakúpiť čistiace hárky. Keď je zariadenie ešte teplé, nechajte hárky prejsť zariadením, aby sa z valčekov
odstránili nalepené zvyšky. Pre optimálny výkon sa odporúča používať čistiace hárky pravidelne. (Objednávkový kód čistiacich hárkov: 5320604).
REGISTRÁCIA PRODUKTU / CELOSVETOVÁ ZÁRUKA
Ďakujeme, že ste si zakúpili výrobok značky Fellowes. Navštívte lokalitu www.fellowes.com/register, na ktorej zaregistrujete svoj produkt a budete dostávať
novinky o produktoch, spätnú väzbu a ponuky. Podrobné informácie o výrobku sa nachádzajú na typovom štítku na zadnej alebo spodnej strane zariadenia.
Spoločnosť Fellowes zaručuje, že všetky súčasti zariadenia budú bez chýb materiálu a výroby počas 1 rokov od dátumu nákupu pôvodným spotrebiteľom. Ak
sa počas záručnej doby preukáže niektorá časť ako chybná, vaším výlučným nápravným opatrením je oprava alebo výmena chybného dielu, podľa rozhodnutia
spoločnosti Fellowes a na jej náklady. Táto záruka sa nevzťahuje na prípady zlého zaobchádzania, nesprávnej manipulácie alebo nedovolenej opravy. Všetky
implikované záruky vrátane záruky predajnosti alebo vhodnosti pre konkrétny účel sa týmto obmedzujú na dobu trvania podľa príslušnej vyššie uvedenej
záručnej doby. Spoločnosť Fellowes v žiadnom prípade nezodpovedá za následné škody, ktoré je možné pripísať na vrub tomuto produktu. Táto záruka vám
udeľuje konkrétne zákonné práva. Môžete mať iné zákonné práva, ktoré sa líšia od tejto záruky. Doba trvania a podmienky tejto záruky sú platné na celom svete
okrem prípadov, kde miestne právne predpisy vyžadujú iné obmedzenia alebo podmienky. So žiadosťou o ďalšie informácie alebo záručný servis sa obráťte na
spoločnosť Fellowes alebo na predajcu.
W.E.E.E.
Tento výrobok je klasikovaný ako elektrické a elektronické zariadenie. Ak nastane čas jeho likvidácie, dbajte na to, aby sa tak
stalo v súlade so smernicou EÚ o odpade z elektrických a elektronických zariadeniach (WEEE) a v zhode s miestnymi zákonmi
vzťahujúcimi sa na túto smernicu.
Podrobnejšie informácie o smernici WEEE nájdete na adrese www.fellowesinternational.com/WEEE
51

MAGYAR
HU
LAMINÁLÓGÉP VEZÉRLŐI
A Be/Ki kapcsoló
B Kész LED (zöld)
C Kioldó kar ( )
TELJESÍTMÉNY
D Fólia / irat bemeneti nyílása
E Fólia / irat kimenete
F Bekapcsolva LED (piros)
Teljesítmény
Formátum 9,5 / 241 mm
Bemeneti nyílás
szélessége A4 = 241 mm
Tasakvastagság (min.) 75 mikron
(oldalanként)
Tasakvastagság (max) 125 mikron
(oldalanként)
Bemelegedési idő
(becslés) 4 perc
Laminálás sebessége kb. 30 cm/perc
(+/- 5%) (állandó sebesség)
Görgők száma 2
Készenlét kijelzés Lámpa (zöld)
Kioldó kar Igen
Automatikus kikapcsolás Igen
Műszaki adatok
Feszültség / Frekvencia /
Áramerősség (A) 220-240 V AC,
50/60 Hz, 1,5 A
Teljesítmény: 300 Watt
Méretek (MxSZxH) 66mm x 356mm x
158mm
Nettó súly 1,3 kg
Max. dokumentum vastagság
(laminálási kapacitás)0,02” / 0,4mm
FONTOS BIZTONSÁGI UTASÍTÁSOK – ŐRIZZE MEG!
A készülék kizárólag beltéri használatra készült. Csatlakoztassa a készüléket egy könnyen hozzáférhető dugaszaljzatba.
- Az áramütés elkerülés érdekében ne használja a készüléket víz közelében, ne öntsön vizet a készülékre, a kábelre vagy a fali
dugaszaljzatra.
MINDIG stabil felületre helyezze a készüléket.
MINDIG tesztelje a laminálást próbaoldalakkal, és állítsa be a
készüléket a végső laminálás előtt.
MINDIG távolítsa el a tűzőkapcsokat és az egyéb fém alkatrésze-
ket laminálás előtt.
MINDIG tartsa távol a készüléket hő- és vízforrásoktól.
MINDIG kapcsolja ki a készüléket használat után.
MINDIG húzza ki a készülék csatlakozóját a hálózati aljzatból, ha
hosszabb ideig nem használja.
MINDIG az adott beállításhoz kifejlesztett tasakot használja.
MINDIG tartsa távol a háziállatokat, amíg a gép működik.
SOHA ne hagyja, hogy a tápkábel forró felületekkel érintkezzen.
SOHA ne hagyja a tápkábelt polcokról vagy szekrényekről
lelógni.
SOHA ne használja a készüléket, ha a tápkábel megsérült.
SOHA ne próbálja meg kinyitni, vagy más módon megjavítani a
készüléket.
SOHA ne lépje túl a készülék névleges teljesítményét.
SOHA ne engedje, hogy gyerekek használják a készüléket felnőtt
felügyelete nélkül.
SOHA ne lamináljon éles vagy fém tárgyakat (pl.: tűzőkapcsokat,
gemkapcsokat).
SOHA ne lamináljon hőre érzékeny iratokat (pl.: jegyeket,
ultrahangképeket stb.) meleg beállításokkal.
SOHA ne lamináljon öntapadó tasakot meleg beállítással.
SOHA ne lamináljon üres tasakot.
52

FUNKCIÓK &TIPPEK
"Eleresztési" funkció
Egy fólia laminálás közbeni eltávolításához
vagy újraigazításához használja a gép hátoldalán található kioldó kart. A fólia csak akkor
távolítható el a bemeneti nyíláson keresztül,
ha a kioldó kart aktiválta.
Auto
Shut
Automatikus kikapcsolás
30 perc elteltével a készülék automatikusan
Auto Shut O (Automatikus kikapcsolás)
módra vált. Az Áram alatt LED pirosan világít
Off
5 percig, majd kialszik. A Kész LED kialszik.
Ha tovább szeretné használni a készüléket,
nyomja meg a Be/ki kapcsolót. A készülék
újraindítja magát.
A LAMINÁLÓGÉP BEÁLLÍTÁSA
1.
Ügyeljen arra, hogy a készülék stabil felületen álljon.
Ügyeljen arra, hogy elég szabad hely (min. 50 cm) legyen a
2.
készülék mögött, hogy a lapok szabadon ki tudjanak jönni.
HOGYAN LAMINÁLJUNK
4.
Kapcsolja be a gépet (a főkapcsoló a gép oldalán van).
A piros "Bekapcsolás" lámpa ki fog gyulladni. A készülék
5.
bemelegedése folyamatban.
6.
Amikor a gép készen áll, a zöld "Kész" lámpa fog világítani.
Helyezze az iratot a nyitott fóliába. Győződjön meg róla,
7.
hogy az irat a zárt szélhez képest középen helyezkedik el.
Mindig az iratnak megfelelő méretű fóliát használjon.
• A legjobb eredmény érdekében használjon Fellowes®
márkájú tasakokat: 80 - 125 mikron.
• Ez a készülék nem igényel hordozót a lamináláshoz. A
gép hordozómentes mechanizmussal működik.
• A laminálni kívánt tételt mindig megfelelő méretű
fóliába kell tenni.
• A végső laminálás előtt mindig tesztelni kell egy hasonló
méretű és vastagságú próbadarabbal.
• Készítse elő a dokumentumot és a tasakot a lamináláshoz. Helyezze a lapot a fólia közepére úgy, hogy
érintse a fólia zárt szélét. Győződjön meg róla, hogy a
fólia nem túl nagy a laphoz.
• Ha szükséges, a laminálás és lehűlés után le lehet vágni
a felesleges anyagot a laminált lap körül.
Csatlakoztassa a készüléket egy könnyen hozzáférhető fali
3.
aljzatba.
A fóliát mindig úgy tegye be a gépbe, hogy a zárt széle
8.
legyen elöl. A fólia egyenesen és a nyílás közepén legyen,
ne legyen ferde. Útmutatóként használja a bemeneti
jelzéseket.
9.
Kilépéskor a laminált tasak forró és lágy lehet. Az elakadás
elkerülése érdekében azonnal vegye ki a fóliát. Helyezze
a fóliát egyenes felületre, amíg lehűl. A még forró fóliával
bánjon óvatosan.
SEGÍTSÉGRE VAN SZÜKSÉGE?
Szakértőink szívesen segítenek Önnek megtalálni a megoldást.
Ügyfélszolgálat...
Mielőtt felkeresné a vásárlás helyét, mindig lépjen kapcsolatba a Fellowes vállalattal. A kapcsolattartási adatokat ld. a készülék
hátulján.
Érdemes regisztrálnia készülékét a www.fellowes.com/register oldalon, így frissítésekhez és további információkhoz juthat.
www.fellowes.com
53

HIBAELHÁRÍTÁS
Probléma Lehetséges ok Megoldás
Nem világít a "Bekapcsolva" fény (piros
LED)
A gép nincs bekapcsolva Kapcsolja be a gépet oldalt és a fali dugaszaljzatnál
Régóta nem gyullad ki a "Készenlét" fény
(zöld LED)
Az Áram alatt LED pirosan világít és a Kész
LED (zöld) kialudt
A Kész jelzőlámpa (zöld) és az Áram alatt
LED (piros) kialudtak
A fólia nem teljesen zárja körbe a lapot A lap esetleg túl vastag a lamináláshoz Max. dokumentumvastagság: ,40 mm
A fóliában hullámok vagy buborékok
vannak
A fólia elveszett a gépben A fólia elakadt
Elakadás
A fólia megsérült a laminálás után
A gép meleg vagy párás helyen van Vigye a gépet hűvösebb és száraz helyre
A laminálógép Automatikus kikapcsolás
üzemmódra váltott
A laminálógép Automatikus kikapcsolás
üzemmódban van
Lehetséges, hogy a fóliavastagság nem
megfelelő
A fóliát a ‘nyitott szélével’ előre használták.
A fólia nem volt középen a bemenetnél
A fólia nem volt egyenes a bemenetnél
Üres fóliát használtak
Sérült görgők, vagy ragasztó került a
görgőkre
Nyomja meg a Be/ki kapcsolót. A készülék újraindítja
magát
Nyomja meg a Be/ki kapcsolót. A készülék újraindítja
magát
A laminálógép 75-125 mikron tasakokkal működik
Használja a Hátrameneti gombot és húzza ki a lapot
kézzel
Küldjön át egy tisztítólapot a gépen a görgők
ellenőrzése és tisztítása céljából
TÁROLÁS &TISZTÍTÁS
Kapcsolja ki a készüléket a falnál. Hagyja a gépet lehűlni. A gép külső része nedves ruhával tisztítható. A gép fényesítéséhez nem használható oldószer
vagy gyúlékony anyag. A készülékben tisztítólapok vásárolhatók. Amikor a készülék bemelegedett, futtassa át a lapot a készüléken, így letisztíthatóak a
maradványok a görgőkről. Az optimális teljesítmény érdekében ajánlott a tisztítólapokat rendszeresen használni a készülék működése során. (A tisztítólapok rendelési száma: 5320604).
TERMÉKREGISZTRÁCIÓ / NEMZETKÖZI GARANCIA
Köszönjük, hogy Fellowes terméket vásárolt. Kérjük, látogassa meg a www.fellowes.com/register oldalt a termék regisztrálásához, így megkaphatja a
termékkel kapcsolatos híreket, visszajelzéseket és ajánlatokat. A termék részletes leírása a gép hátoldalán vagy alján található géptörzslapon olvasható.
A Fellowes a vásárlástól számított 1 évig garanciát vállal az eredeti vásárló számára arra, hogy a laminálógép alkatrészei mind anyagukat, mind
kivitelezésüket tekintve nem hibásodnak meg. Ha a garanciás időszak alatt bármely alkatrész meghibásodik, a Fellowes kizárólag a meghibásodott
alkatrész javítását vagy cseréjét vállalja a cég költségén, a Fellowes döntése szerint. A garancia nem érvényes hibás, illetve nem rendeltetésszerű
használat, vagy engedélyezetlen javítás esetén. Bármilyen hallgatólagos garancia, beleértve az eladhatóságot vagy adott célra való megfelelőséget, csak
a fenti garanciális időszakra korlátozódik. A Fellowes semmilyen esetben sem vállal felelősséget a terméknek tulajdonítható következményi károkért.
Ez a garancia bizonyos jogokkal ruházza Önt fel. Ön rendelkezhet a garancián kívüli, más jogokkal is. A garancia időtartama és feltételei világszerte
érvényesek, kivéve a helyi törvények által megkövetelt eltérő korlátozásokat vagy feltételeket. Ha további tájékoztatást szeretne kapni a jótállás keretében
elérhető szolgáltatásokról, lépjen kapcsolatba a Fellowes vállalattal vagy kereskedőjével.
54
W.E.E.E.
A termék elektromos és elektronikus berendezésként került besorolásra. Amennyiben eljön az az idő, hogy a terméket ki
kell dobni, akkor azt az elektromos és elektronikus berendezések hulladék aira vonatkozó európai WEEE irányelv, valamint
az irányelvhez kapcsolódó helyi törvények betartásával kell megtenni. A WEEE irányelvről további információkat az alábbi
honlapon talál: www.fellowesinternational.com/WEEE

PORTUGUÊS
P
COMANDOS DO LAMINADOR
A Interruptor liga / desliga
B LED “Pronto” (Verde)
C Alavanca de abertura ( )
CAPACIDADES
Desempenho
Formato 9,5” / 241 mm
Largura da entrada A4 = 241 mm
Espessura da bolsa (mín.) 75 microns (por lado)
Espessura da bolsa (máx.) 125 microns (por lado)
Tempo de aquecimento
(aproximado) 4 minutos
Velocidade de laminação aprox. 30 cm/min
(+/- 5%) (velocidade fixa)
Número de roletos 2
Indicação "Ready" (Pronto) Luz (Verde)
Alavanca de abertura Sim
D Ranhura de entrada da bolsa/documento
E Saída de bolsa/documentos
F LED “Ligado” (Vermelho)
Encerramento automático Sim
Dados técnicos
Tensão / Frequência /
Intensidade (Amps) 220-240 V CA 50/60 Hz
1,5A
Potência 300 Watts
Dimensões (AxLxP) 66mm x 356mm x 158mm
Peso líquido 1,3 Kg
Espessura máx. do documento
(capacidade de laminação) 0,02 pol. / 0,4 mm
IMPORTANTES INSTRUÇÕES DE SEGURANÇA - GUARDAR PARA UTILIZAÇÃO FUTURA
- A máquina destina-se apenas para utilização no interior. Ligue o aparelho a uma tomada de fácil acesso.
- Para impedir choque eléctrico - não utilize o aparelho próximo de água, não derrame água sobre o aparelho, sobre
o cabo eléctrico ou sobre a tomada de parede.
CERTIFIQUE-SE de que o aparelho se encontra numa
superfície estável.
TESTE a laminação em folhas que tencione deitar fora e
ajuste o aparelho antes das laminações finais.
REMOVA os agrafos e outros artigos de metal antes de
laminar.
CERTIFIQUE-SE de que mantém o aparelho afastado de
fontes de calor e água.
CERTIFIQUE-SE de que desliga o aparelho depois de
cada utilização.
CERTIFIQUE-SE de que desliga o aparelho da tomada
quando não o for utilizar durante um longo período de
tempo.
UTILIZE bolsas concebidas para utilização com as
definições adequadas.
MANTENHA os animais de estimação afastados
enquanto estiver a utilizar a máquina.
NÃO deixe o cabo de alimentação em contacto com
superfícies quentes.
NÃO deixe o cabo de alimentação pendurado em
armários ou prateleiras.
NÃO utilize o aparelho se o cabo de alimentação estiver
danificado.
NÃO tente abrir nem efectuar reparações no aparelho.
NÃO exceda o desempenho indicado do aparelho.
NÃO permita que menores de idade utilizem esta
máquina sem supervisão de adultos.
NÃO lamine objectos afiados ou de metal (ex.: agrafos,
clipes).
NÃO lamine documentos sensíveis ao calor (ex.: bilhetes,
papel para ecografias, etc.) com definições a quente.
NÃO lamine com bolsas autocolantes em definições a
quente.
NÃO lamine uma bolsa vazia.
55

FUNÇÕES & SUGESTÕES
Função "Release" (Abertura)
Para remover ou realinhar uma bolsa durante
a laminação, active a alavanca de abertura
situada na parte de trás da máquina. A bolsa
só pode ser removida da ranhura de entrada
quando a alavanca estiver activada.
Auto
Shut
Off
Encerramento automático
Após 30 minutos a máquina passará automaticamente para o modo de Desligamento
Automático. O LED “Ligado” fica intermitente
durante 5 minutos e depois desliga. O LED
“Pronto” desliga. Para continuar a utilizar a
máquina, prima o interruptor ON/OFF (liga/
desliga). A máquina executa uma reiniciação
automática
PREPARAÇÃO DO LAMINADOR
• Para obter os melhores resultados, utilize bolsas da
marca Fellowes ®: 80 - 125 mícrones.
• Este aparelho não necessita de um transportador para
laminar. Trata-se de um mecanismo sem transportador.
• Coloque sempre o artigo a ser laminado na bolsa com as
dimensões adequadas.
• Antes do processamento final, teste sempre o laminado
com uma dimensão e uma espessura semelhantes.
• Prepare a bolsa e o artigo para laminação. Coloque o
artigo na bolsa centrada e em contacto com a extremidade dianteira selada. Certifique-se de que a bolsa não
tem uma dimensão excessiva para o artigo.
• Se necessário, corte o excesso de material à volta do
artigo após a laminação e depois de arrefecer.
Certifique-se de que o aparelho se encontra numa
1.
superfície estável.
2.
Verifique se existe espaço suficiente (mín. 50 cm) na
traseira da máquina para permitir que os artigos passem
sem obstrução.
Ligue o aparelho a uma tomada de alimentação de fácil
3.
acesso.
COMO LAMINAR
Ligue o aparelho (interruptor situado na parte lateral do
4.
aparelho).
5.
A luz vermelha "Ligado" acende. A máquina está agora em
aquecimento.
Quando a máquina estiver pronta, a luz verde "Pronto"
6.
permanece acesa.
Coloque o documento na bolsa aberta. Certifique-se de que
7.
o documento está centrado na extremidade selada. Utilize
o tamanho de bolsa adequado para o documento.
Certifique-se de que a bolsa entra primeiro para a
8.
extremidade selada do aparelho. Mantenha a bolsa direita
e centrada com a ranhura, não enviesada. Oriente-se
utilizando as marcas da entrada.
Quando sair, a bolsa laminada poderá apresentar-se-á
9.
quente e macia. Para evitar o encravamento, remova a
bolsa imediatamente. Coloque a bolsa numa superfície
plana para arrefecer. Cuidado ao manusear uma bolsa
quente..
NECESSITA DE AJUDA?
Permita que os nossos especialistas o ajudem a encontrar uma solução.
Assistência ao Cliente... www.fellowes.com
Contacte sempre a Fellowes antes de contactar o local onde adquiriu o aparelho; veja os detalhes de contacto na
contracapa.
Considere a possibilidade de registar o seu aparelho em www.fellowes.com/register para receber actualizações e
informações adicionais.
56

DETECÇÃO E RESOLUÇÃO DE PROBLEMAS
Problema Causa possível Solução
Nenhuma luz "Ligado" (LED vermelho) O aparelho não se encontra ligado
Nenhuma luz verde "Pronto" ao fim de
um longo período (LED verde)
O LED “Ligado” fica intermitente com
a cor vermelha e LED “Pronto” (verde)
desliga
A lâmpada “pronto” (verde) e o LED
“Ligado” (vermelho) desligam
bolsa não veda totalmente o artigo
A bolsa tem ondulações ou bolhas
O aparelho encontra-se em local quente
ou húmido
O laminador passa ao modo de encerramento automático
O laminador encontra-se no modo de
encerramento automático
O artigo pode ser demasiado espesso
para laminar
A espessura da bolsa pode estar
incorrecta
A bolsa perdeu-se no aparelho Bolsa encravada
A bolsa foi utilizada com a "extremidade aberta" em primeiro lugar
Encravamento
A bolsa não foi centrada na entrada
A bolsa não estava direita na entrada
Foi utilizada uma bolsa vazia
Bolsa danificada após laminação
Roletos danificados ou adesivo nos
roletos
Ligue o aparelho na parte da frente e na
tomara de parede
Coloque a máquina num local mais fresco e seco
Prima o interruptor ON/OFF (liga/desliga). A
máquina executa uma reiniciação automática
Prima o interruptor ON/OFF (liga/desliga). A
máquina executa uma reiniciação automática
Espessura máxima do documento igual a
,40mm
O laminador permite a utilização de bolsas de
75 a 125 mícrones
Prima a alavanca de libertação e puxe o artigo
manualmente para fora
Passe folhas de limpeza pelo aparelho para
testar e limpar os roletos
ARMAZENAGEM & LIMPEZA
Retire a ficha do aparelho da tomada de parede. Deixe o aparelho arrefecer. O exterior do aparelho pode ser limpo com um pano húmido. Não utilize
dissolventes nem materiais inflamáveis para polimento da máquina. É possível adquirir folhas de limpeza para utilização no aparelho. Quando a máquina
estiver quente – passe as folhas de limpeza na máquina para eliminar quaisquer resíduos dos rolamentos. Para um óptimo desempenho, recomenda-se a
utilização regular de folhas de limpeza. (Código de encomenda para folhas de limpeza Nº 5320604)
REGISTO DO EQUIPAMENTO / GARANTIA MUNDIAL
Obrigado por adquirir equipamento da Fellowes. Visite www.fellowes.com/register para registar o seu equipamento e beneficiar de novidades sobre
equipamento, feedback e ofertas. É possível encontrar detalhes sobre o equipamento na chapa de especificações existente na traseira ou na parte de baixo do
aparelho.
A Fellowes garante que todos os componentes do aparelho estão livres de defeitos de material e de fabrico por 1 ano a partir da data de aquisição pelo consumidor original. Se qualquer componente apresentar defeitos durante o período de garantia, as suas únicas soluções disponíveis serão a reparação ou a substituição,
opção ao critério da Fellowes que assume os custos do componente defeituoso. Esta garantia não se aplica em casos de má utilização, manuseamento inadequado ou reparação não autorizada. Toda e qualquer garantia implícita, incluindo a comercialização ou adequação para um fim específico, encontra-se limitada
ao período de garantia adequado acima estipulado. A Fellowes não assume, em situação alguma, qualquer responsabilidade por quaisquer danos consequentes
imputáveis a este produto. Esta garantia confere-lhe direitos legais específicos. É possível que disponha de outros direitos legais que variem dos constantes nesta
garantia. A duração, termos e condições desta garantia são válidos a nível mundial, excepto onde limitações, restrições ou condições diferentes sejam exigidas
pela legislação local. Para obter mais pormenores ou para obter serviços cobertos por esta garantia, contacte a Fellows ou o seu distribuidor.
W.E.E.E.
Este equipamento está classificado como Equipamento Eléctrico e Electrónico. Caso seja necessário eliminar este
equipamento, certifique-se de que procede em conformidade com a Directiva Europeia relativa a Equipamento Eléctrico e
Electrónico (REEE) e de acordo com a legislação local relativa a esta directiva.
Para mais informações sobre a Directiva REEE, visite www.fellowesinternational.com/WEEE
57

българи
BG
БУТОНИ ЗА УПРАВЛЕНИЕ НА ЛАМИНАТОРА
A Бутон за включване/изключване
(On/o)
B LED (светодиод) за състояние на
готовност (зелен)
C Освобождаващ лост (
)
ФУНКЦИОНАЛНИ ВЪЗМОЖНОСТИ
Характеристики
Формат 9.5” / 241 mm
Ширина на входа A4 = 241 mm
Дебелина на
фолиото (мин.) 75 микрона
(на страна)
Дебелина на
фолиото (макс.) 125 микрона
(на страна)
Време на загряване
(приблизително) 4 минути
Скорост на
ламиниране прибл. 30 cm/min
(+/- 5%) (фиксирана
скорост)
Брой валове 2
Индикация за готовност Светлина (зелена)
Освобождаващ лост Да
Автоматично изключване Да
D Входен отвор за фолиото / документа
E Изходен отвор за фолиото / документа
F LED (светодиод) за включено електрозахранване
(червен)
Технически данни
Волтаж / Честота /
Ток (амп.) 220-240 V AC,
50/60 Hz, 1.5 A
Консумирана
мощност 300 вата
Размери
(В х Ш х Д) 66mm x 356mm x
158mm
Нетно тегло 1,3 Kg
Максимална дебелина на документа
(капацитет на ламиниране) 0.02” / 0,4mm
ВАЖНИ ИНСТРУКЦИИ ЗА БЕЗОПАСНОСТ - ЗАПАЗЕТЕ ГИ ЗА БЪДЕЩА УПОТРЕБА
- Машината е предназначена само за употреба на закрито. Включете щепсела на машината в лесно достъпна електрическа розетка.
— За да предотвратите електрически удар, не използвайте уреда в близост до вода, не разливайте вода върху уреда, електрическия кабел
или стенната розетка.
УВЕРЕТЕ СЕ, че машината е върху стабилна повърхност.
НАПРАВЕТЕ тест с бракувани листове и настройте машината преди
окончателното ламиниране.
ОТСТРАНЕТЕ тел бод и други метални части преди ламиниране.
ПАЗЕТЕ машината от източници на топлина и вода.
ИЗКЛЮЧВАЙТЕ машината след всяка употреба.
ИЗКЛЮЧВАЙТЕ машината от щепсела, когато не се използва
продължително време.
ИЗПОЛЗВАЙТЕ фолио, предназначено за употреба при подходящи
настройки.
ПАЗЕТЕ машината от домашни животни, когато е в процес на
използване.
58
НЕ оставяйте електрическия кабел в контакт с горещи повърхности.
НЕ оставяйте електрическия кабел да виси от шкафове или рафтове.
НЕ използвайте уреда, ако силовият кабел е повреден.
НЕ правете опити да отваряте или да ремонтирате машината.
НЕ надвишавайте обозначеното време за работа на машината.
НЕ позволявайте на деца да използват машината без надзор.
НЕ ламинирайте остри или метални предмети (напр. тел бод,
кламери).
НЕ ламинирайте топлочувствителни документи (напр. билети,
ултразвукови изследвания) в режим на топло ламиниране.
НЕ ламинирайте със самозалепващо фолио в режим на топло
ламиниране.
НЕ ламинирайте празно фолио.

ХАРАКТЕРИСТИКИ И СЪВЕТИ
Функция „Освобождаване“ („Release“)
За да отстраните или изравните отново
фолиото по време на ламиниране, активирайте
освобождаващия лост, разположен в задната
част на машината. Фолиото може да бъде
отстранено от отвора за подаване, когато лос тът
е активиран.
Auto
Shut
Off
Автоматично изключване
След 30 минути машината автоматично ще
премине в режим на автоматично изключване.
Червеният светодиод за захранването ще мига 5
минути и ще изгасне. Светодиодът за със тояние
на готовност ще изгасне. За да продължите
да използвате машината натиснете бутона за
включване/изключване (ON/OFF). Машината ще
се рестартира.
НАСТРОЙВАНЕ НА ЛАМИНАТОРА
• За постигане на най-добри резултати, използвайте фолио
на търговската марка Fellowes ®: 80 - 125 микрона.
• За да може да се извършва ламиниране, не е необходимо
носещо устройство. Това е механизъм без носещо
устройство.
• Винаги поставяйте документа за ламиниране в подходящ
размер фолио.
• Винаги извършвайте пробно ламиниране със сходен
размер и дебелина преди окончателния процес на
ламиниране.
• Подгответе фолиото и документа за ламиниране. Поставете
документа в центъра на фолиото, така че да докосва горния
слепен край. Уверете се, че фолиото не е прекалено широко
за документа.
• Ако е необходимо, подрежете излишния материал около
документа, след като го ламинирате и след като се охлади.
Проверете дали машината е поставена върху стабилна
1.
повърхност.
Проверете дали има достатъчно пространство зад машината
2.
(мин. 50 см), за да могат документите да преминават
свободно.
Включете щепсела на машината в лесно достъпна
3.
електрическа розетка.
КАК СЕ ЛАМИНИРА
Включете електрозахранването (намира се в страничната част
4.
на машината).
Червената лампа за включено електрозахранване ще светне.
5.
Сега машината започва да загрява.
6.
Когато машината е готова, зелената лампа за състояние на
готовност остава светната.
7.
Поставете документа в отвореното фо лио. Уверете се, че
документът е центриран спрямо слепения край. Използвайте
подходящ размер фолио за документа.
Уверете се, че фолиото влиза в машината откъм с лепения
8.
край. Дръжте фолиото изпънато и центрирано в отвора, не
към ъглите. Използвайте маркировката на входа за ориентир.
На изхода ламинираното фолио може да е горещо и меко. За
9.
да предотвратите задръстване, отстранете незабавно фолиото.
Поставете фолиото върху равна повърхност, за да се охлади.
Внимавайте, когато боравите с горещо фолио.
ИМАТЕ НУЖДА ОТ ПОМОЩ?
Нашите експерти могат да ви помогнат да решите проблема.
Обслужване на клиенти... www.fellowes.com
Винаги осъществявайте контакт Fellowes, преди да се свържете с мяс тото, откъдето сте купили продукта, вижте задната обложка за
данни за контакт.
Можете да регистрирате машината си на www.fellowes.com/register, за да получавате актуализации и допълнителна информация.
59

ОТСТРАНЯВАНЕ НА НЕИЗПРАВНОСТИ
Проблем Възможна причина Решение
Няма светлина за включено
електрозахранване (червена LED
светлина)
След дълъг период от време лампата за
състояние на готовност не светва (зелена
LED светлина)
Червеният светодиод за захранването
мига, а светодиодът за със тояние на
готовност (зелен) е изгаснал
Светодиодът за с ъстояние на готовност
(зелен) и светодиодът за захранването
(червен) са изгаснали
Фолиото не херметизира напълно
документа
Фолиото има гънки или мехурчета
Фолиото не излиза от машината Фолиото е задръстено
Задръстване
Фолиото е повредено след ламиниране
Машината не е включена
Машината се намира в горещо или влажно
помещение
Ламинаторът е преминал в режим
„Автоматично изключване“
Ламинаторът е в режим „Автоматично
изключване“
Документът може да е с твърде голяма
дебелина за ламиниране
Дебелината на фолиото може да не е
правилна
Фолиото е прекарано през машината откъм
отворения край
Фолиото не е центрирано на входа
Фолиото не е било изпънато на входа
Използвано е празно фолио
Валовете са повредени или върху тях е
полепнало лепило
Включете машината от страничната част и към
стенната розетка
Преместете машината на по-прохладно и сухо
място
Натиснете бутона за включване/изключване
(ON/OFF). Машината ще се рестартира
Натиснете бутона за включване/изключване
(ON/OFF). Машината ще се рестартира
Максималната дебелина на документа трябва
да е ,40mm
Ламинаторът приема фолио с дебе лина 75-125
микрона
Задействайте освобождаващия лост и
издърпайте документа ръчно
Прекарайте почистващи листове през машината,
за да изпробвате и почистите валовете
СЪХРАНЕНИЕ И ПОЧИСТВАНЕ
Изключете машината от стенната розетка. Изчакайте, докато машината се охлади. Външната част на машината може да бъде почистена с
влажно парче плат. Не използвайте разтворители или запалими материали, за да полирате машината. Могат да бъдат закупени почистващи
листове, които да бъда използвани с машината. Когато машината е загряла, прекарайте листовете през машината, за да почистите евентуални
остатъци, полепнали по валовете. За постигане на оптимални резултати се препоръчва почис тващите листове да бъдат използвани редовно.
(Код за поръчване на почистващи листове #5320604).
РЕГИСТРАЦИЯ НА ПРОДУКТ / СВЕТОВНА ГАРАНЦИЯ
Благодарим ви, че закупихте продукт на Fellowes. Моля, посетете www.fellowes.com/register, за да регистрирате своя продукт и да се
възползвате от известия за продуктите, отзиви и оферти. Подробна информация за продукта може да бъде открита върху табелката с основни
данни, поставена на задната или долна страна на машината. Fellowes гарантира, че всички части на ламинатора са изработени качествено от
изправни материали и дава 1-годишна гаранция за тях от датата на покупка, извършена от първоначалния потребител. Ако някоя от час тите
даде дефект по време на гаранционния период, единствено и изключително решение на проблема е ремонт или замяна на дефектната част по
преценка на Fellowes и за нейна сметка. Тази гаранция не важи в случай на злоупотреба, неправилна употреба или неразрешен ремонт. Всяка
косвена гаранция, включително за търговско качество или годност за определена цел, е ограничена до определения гаранционен период,
посочен по-горе. Fellowes е освободена от всякаква отговорност за случайни повреди на този продукт. Гаранцията ви дава определени законни
права. Може да имате други законни права, които се различават от тази гаранция. Продължите лността и общите условия на тази гаранция са
валидни навсякъде по света, освен където местният закон изисква различни срокове, ограничения или условия. За повече информация или за
да бъдете обслужени съгласно гаранцията, моля, свържете се с Fellowes или със своя дилър.
W.E.E.E.
Този продукт е класифициран като електрическо и електронно оборудване. Когато дойде време да изхвърлите
продукта, моля, уверете се, че извършвате това в с ъответствие с Директивата относно отпадъци от електрическо и
електронно оборудване (ОЕЕО) и в съгласие с местното законодателство, свързано с тази директива.
За повече информация за Директивата ОЕЕО, моля, посетете www.fellowesinternational.com/WEEE
60

ROMÂNĂ
RO
COMENZI LAMINATOR
A Comutator pornire/oprire
B LED disponibilitate (Verde)
C Mâner de eliberare ( )
SPECIFICAŢII
D Fantă de intrare a foliei /
documentului
E Ieşire folie / document
F LED Alimentare pornită (Roşu)
Performanţă
Format 9,5” / 241 mm
Lăţime de intrare A4 = 241 mm
Grosimea foliei (min) 75 de microni
(pentru o faţă)
Grosimea foliei (max) 125 de microni
(pentru o faţă)
Timp de încălzire
(estimat) 4 minute
Viteza de laminare aprox. 30 cm/min
(+/- 5%) (viteză xă)
Numărul de role 2
Led care indică faptul
că aparatul este gata
de operare Lumină (Verde)
Mâner de eliberare Da
Oprire automată Da
Date tehnice
Tensiune/Frec venţă
curent (amperi) 220-240V CA,
50/60Hz, 1,5A
Putere în waţi 300 W
Dimensiuni
(î x lăţ x ad) 66mm x 356mm
x 158mm
Greutate netă 1,3 Kg
Grosimea maximă a documentului
(capacitate de laminare) 0,02” / 0,4mm
INSTRUCŢIUNI IMPORTANTE PRIVIND SIGURANŢA - A SE PĂSTRA PENTRU FOLOSIREA ULTERIOARĂ
- Aparatul trebuie folosit numai în spaţii interioare. Conectaţi aparatul la o priză uşor accesibilă.
- Pentru prevenirea şocurilor electrice - nu utilizaţi aparatul în apropierea apei, nu turnaţi apă pe aparat, pe cablul de alimentare sau
pe priza de alimentare din perete.
ASIGURAŢI-VĂ că aparatul este plasat pe o suprafaţă stabilă.
TESTAŢI cu ajutorul colilor laminate uzate şi setaţi aparatul
înainte de laminările nale.
îNDEPĂRTAŢI capsele şi alte articole metalice înainte de
laminare.
PĂSTRAŢI aparatul departe de sursele de căldură şi de apă.
îNCHIDEŢI aparatul după ecare utilizare.
SCOATEŢI aparatul din priză atunci când nu este folosit pentru
mai mult timp.
Folosiţi foliile concepute pentru utilizare la setările
corespunzătoare.
PĂSTRAŢI la distanţă de animalele de companie în timpul
utilizării.
NU lăsaţi cablul de alimentare să intre în contact cu suprafeţele
erbinţi.
NU lăsaţi cablul de alimentare să atârne de pe rafturi.
NU folosiţi aparatul în cazul în care cablul de alimentare este
deteriorat.
NU încercaţi să deschideţi sau să reparaţi în alt fel aparatul.
NU depăşiţi limitele de performanţă ale aparatului.
NU permiteţi copiilor să folosească aparatul în lipsa supravegh-
erii unui adult.
NU laminaţi obiecte ascuţite sau metalice (de ex: capse, cleme
pentru hârtii).
NU laminaţi documente sensibile la căldură (de ex.: bilete,
radiograi etc.) cu setările la cald.
NU laminaţi cu foliile autoadezive la setările de laminare la cald.
NU laminaţi folii goale.
61

CARACTERISTICI & SFATURI
Funcţia „Release”
(Eliberare)
Pentru a scoate sau pentru a realinia o folie
pe parcursul laminării, activaţi mânerul de
eliberare din partea posterioară a aparatului.
Auto
Shut
Folia poate scoasă din fanta de intrare doar
atunci când mânerul este activat.
Oprire automată
După 30 de minute, utilajul intră în mod
Off
automat în modul de oprire automată. LED-ul
de alimentare se va aprinde intermitent roşu,
după care se va opri. LED-ul de disponibilitate
se va stinge. Pentru a continua utilizarea
maşinii, apăsaţi comutatorul Pornire / Oprire.
Maşina se va reseta.
CONFIGURAREA LAMINATORULUI
• Pentru cele mai bune rezultate, folosiţi foliile marca
Fellowes: 80 - 125 microni.
• Acest aparat nu necesită un transportator pentru laminare. Acesta este un mecanism fără transportator.
• Puneţi întotdeauna articolul ce urmează să e laminat în
folia de mărime corespunzătoare.
• Testaţi întotdeauna laminarea cu o folie de mărime şi
grosime corespunzătoare, înainte de laminarea nală.
• Pregătiţi folia şi articolul pentru laminare. Plasaţi
articolul în cadrul foliei, centrat şi atingând marginea
sigilată de dirijare. Asiguraţi-vă că folia nu este prea
mare pentru articol.
• Dacă este necesar, tăiaţi materialul în exces din jurul
articolului după laminare şi răcire.
Asiguraţi-vă că aparatul este plasat pe o suprafaţă stabilă.
1.
Asiguraţi-vă că există sucient spaţiu liber (min. 50 cm) în
2.
spatele aparatului pentru a permite articolelor să treacă
neobstrucţionate.
Conectaţi aparatul la o priză de alimentare uşor accesibilă.
3.
MODUL DE LAMINARE
Porniţi alimentarea (situată în partea laterală a aparatului).
4.
Lumina roşie de alimentare Power se va aprinde. Aparatul
5.
se încălzeşte.
Atunci când aparatul este pregătit, lumina verde;Ready
6.
care arată că aparatul este gata de funcţionare, va rămâne
aprinsă.
Plasaţi documentul în folia deschisă. Asiguraţi-vă că
7.
documentul este centrat faţă de marginea sigilată. Utilizaţi
folia de mărime potrivită pentru document.
Asiguraţi-vă că folia pătrunde în aparat cu marginea sigilată
8.
mai întâi. Menţineţi folia în poziţie dreaptă şi centrală
în cadrul fantei, şi nu în unghi. Folosiţi marcajele intrării
pentru ghidare.
La ieşire, folia laminată ar putea erbinte şi moale. Pentru
9.
a preveni înţepenirea, scoateţi folia imediat. Plasaţi folia
pe o suprafaţă plată pentru a se răci. Aveţi grijă atunci când
manevraţi o folie erbinte.
AVEŢI NEVOIE DE AJUTOR?
Permiteţi-le experţilor noştri să vă ajute oferindu-vă o soluţie.
Asistenţă clienţi... www.fellowes.com
Apelaţi întotdeauna Fellowes înainte de a contacta centrul de achiziţie al aparatului. A se vedea coperta spate pentru detaliile de
contact.
Vă invităm să vă înregistraţi produsul la www.fellowes.com/register pentru a primi actualizări şi informaţii suplimentare.
62

DEPANARE
Problemă Cauză posibilă Soluţie
Ledul roşu de alimentare nu se aprinde Aparatul nu este pornit
Ledul verde care arată că aparatul este
gata de funcţionare nu se aprinde după o
perioadă lungă
LED-ul de alimentare se va aprinde
intermitent roşu şi LED-ul de Disponibilitate
(verde) s-a oprit.
LED-ul de disponiblitate (verde) şi LED-ul de
alimentare (roşu) s-au oprit
Folia nu sigilează complet obiectul
Folia prezintă denivelări sau bule de aer Grosimea foliei poate incorectă Laminatorul acceptă folii de 75-125 microni
Folia s-a pierdut în interiorul aparatului Folia s-a blocat
Blocare
Folia a fost avariată în urma laminării Role avariate sau prezenţa adezivului pe role
Aparatul se aă într-o zonă umedă sau cu
temperatură înaltă
Laminatorul a trecut în regimul de Oprire
Automată
Laminatorul este în regimul de Oprire
Automată
Este posibil ca obiectul să e prea gros
pentru a putea laminat
Folia a fost folosită cu capătul deschis înainte
Folia nu a fost centrată la intrare
Folia nu era dreaptă la intrare
S-a folosit o folie goală
Porniţi aparatule din partea laterală şi din priza de
perete
Deplasaţi aparatul într-o zonă mai răcoroasă şi mai
uscată
Apăsaţi comutatorul Pornire / Oprire. Maşina se va
reseta
Apăsaţi comutatorul Pornire / Oprire. Maşina se va
reseta
Grosimea maximă a documentului este de ,40 mm
Apăsaţi maneta de eliberare şi trageţi afară obiectul
cu mâna
Treceţi o coală de curăţare prin aparat, pentru a testa
şi curăţa rolele
DEPOZITARE ŞI &CURĂŢARE
Deconectaţi aparatul de la priză. Lăsaţi-l să se răcească. Partea exterioară a aparatului poate curăţată cu ajutorul unei cârpe umede. Nu folosiţi solvenţi
sau materiale inamabile pentru a lustrui aparatul. Colile de curăţare pot achiziţionate împreună cu aparatul. Atunci când aparatul este cald - treceţi colile prin aparat pentru a curăţa orice reziduuri rămase pe role. Pentru performanţe optime, se recomandă utilizarea regulată a colilor de curăţare împreună
cu aparatul. (Codul de comandă al colilor de curăţare - 5320604).
ÎNREGISTRARE PRODUS/GARANŢIE APLICABILĂ LA NIVEL MONDIAL
Vă mulţumim pentru achiziţionarea unui produs Fellowes. Vă rugăm să vizitaţi pagina www.fellowes.com/register pentru a înregistra produsul
dumneavoastră şi pentru a benecia de ştiri, reacţii şi oferte de produse. Detaliile produsului se găsesc pe plăcuţa de identicare a acestuia, situată pe
partea din spate sau dedesubtul aparatului. Fellowes garantează că toate piesele laminatorului nu prezintă defecte materiale sau de construcţie timp de
1 ani de la data achiziţionării de către primul client. Dacă se determină că o piesă este defectă pe parcursul perioadei de garanţie, singura despăgubire,
exclusivă, va reprezentată de repararea sau înlocuirea piesei defecte, la latitudinea şi pe cheltuiala Fellowes. Această garanţie nu se aplică în cazul
abuzului, manipulării necorespunzătoare sau a reparaţiilor neautorizate. Orice garanţie implicită, inclusiv cea de vandabilitate sau potrivire pentru un anumit scop, este prin prezentul document limitată la perioada de garanţie corespunzătoare, stabilită mai sus. Fellowes nu va în nicio situaţie răspunzătoare
pentru orice fel de daune consecutive, ce ar putea atribuite acestui produs. Această garanţie vă asigură drepturi legale specice. Există posibilitatea
să aveţi şi alte drepturi legale diferite de cele din cadrul acestei garanţii. Durata, termenii şi condiţiile acestei garanţii sunt valabile la nivel mondial, cu
excepţia situaţiei în care diferite limitări, restricţii sau condiţii ar putea impuse de legislaţia locală. Pentru mai multe detalii sau pentru a obţine servicii
în baza acestei garanţii, vă rugăm să contactaţi Fellowes sau distribuitorul dumneavoastră.
W.E.E.E. (D.E.E.E.)
Acest produs este clasicat drept un echipament electric şi electronic. În momentul în care trebuie să îl eliminaţi, vă rugăm
să vă asiguraţi că procedaţi la eliminarea acestuia în conformitate cu Directiva europeană privind eliminarea echipamentului
electric şi electronic uzat (WEEE) şi în conformitate cu legislaţia locală referitoare la această directivă. Pentru mai multe
informaţii cu privire la Directiva WEEE, vă rugăm să vizitaţi www.fellowesinternational.com/WEEE
63

HRVATSKI
HR
KONTROLE PLASTIFIKATORA
A Sklopka uključeno/isključeno
B LED-žaruljica pripravnosti (zelena)
C Otpusna poluga ( )
D Ulazni utor za foliju/dokument
E Izlaz za foliju/dokument
F LED-žaruljica napajanja (crvena)
RADNE ZNAČAJKE
Učinak
Format 9,5"/241mm
Širina ulaza A4 = 241mm
Debljina folije (min) 75 mikrona (na svakoj
strani)
Debljina folije (maks) 125 mikrona (na svakoj
strani)
Vrijeme zagrijavanja (procjena) 4 minute
Brzina plasticiranja otpr. 30 cm/min
(+/- 5%) (ksna brzina)
Broj valjaka 2
Pokazivač stanja pripravnosti Lampica (zelena)
Otpusna poluga Da
Automatsko isključivanje Da
Tehnički podaci
Napon/frekvencija/
struja (ampera) 220-240 V AC, 50/60 Hz,
1,5 A
Nazivna snaga 300 vata
Dimenzije (V x Š x D) 66mm x 356mm x 158mm
Neto težina 1,3 kg
Maksimalna debljina dokumenta
(kapacitet plasticiranja) 0,02 inča/0,4 mm
VAŽNE SIGURNOSNE UPUTE - SAČUVAJTE IH ZA BUDUĆU UPORABU
- Ovaj je stroj namijenjen samo za korištenje u zatvorenom prostoru. Ukopčajte stroj u utičnicu na lako dostupnom mjestu.
- Za sprječavanje električnog udara uređaj nemojte upotrebljavati u blizini vode. Uređaj, kabel napajanja ni zidnu utičnicu
ne polijevajte vodom.
OBAVEZNO postavite stroj na stabilnu podlogu.
OBAVEZNO provedite probno plasticiranje praznim
listovima i podesite stroj prije konačnog plasticiranja.
OBAVEZNO uklonite spojnice i druge metalne predmete
prije plasticiranja.
OBAVEZNO držite stroj podalje od izvora topline i vode.
OBAVEZNO isključite stroj nakon svake uporabe.
OBAVEZNO iskopčajte stroj kad se njime ne služite dulje
vrijeme.
OBAVEZNO upotrijebite folije namijenjene uporabi s
odgovarajućim postavkama.
OBAVEZNO držite podalje kućne ljubimce od stroja kada
ga upotrebljavate.
64
NEMOJTE dozvoliti da kabel napajanja dodiruje vruće
podloge.
NEMOJTE ostaviti kabel napajanja da visi s ormarića ili
polica.
NEMOJTE upotrebljavati uređaj ako je kabel napajanja
oštećen.
NEMOJTE pokušavati otvoriti ili na bilo koji drugi način
popravljati stroj.
NEMOJTE prekoračiti navedene radne značajke stroja.
NEMOJTE dozvoliti da se djeca koriste ovim strojem bez
nadzora odrasle osobe.
NEMOJTE plasticirati oštre ili metalne predmete (prim-
jerice, spojnice ili spajalice).
NEMOJTE plasticirati dokumente osjetljive na toplinu
(primjerice, karte ili slike ultrazvuka) uz tople postavke.
NEMOJTE plasticirati sa samoupijajućim folijama uz
toplu postavku.
NEMOJTE plasticirati praznu foliju.

MOGUĆNOSTI I SAVJETI
Funkcija "Release" (Otpusti)
Kako biste uklonili ili ponovno izravnali
foliju tijekom plastikacije, pokrenite
otpusnu polugu na stražnjoj strani stroja.
Foliju možete ukloniti iz ulaznog utora
Auto
Shut
Off
jedino kad je poluga aktivirana.
Automatsko isključivanje
Nakon 30 minuta stroj će se automatski
prebaciti u način rada Automatsko
isključivanje. LED-žaruljica napajanja
treperit će crveno 5 minuta i potom se
isključiti. LED-žaruljica pripravnosti će
se isključiti. Za nastavak korištenja stroja
pritisnite sklopku ON/OFF. Stroj će se sam
resetirati.
POSTAVLJANJE PLASTIFIKATORA
1.
Osigurajte da je stroj na stabilnoj podlozi.
Provjerite ima li iza stroja dovoljno slobodnog
2.
prostora (najmanje 50 cm) koji omogućuje slobodan
prolaz plasticiranih artikala.
POSTUPAK PLASTIFICIRANJA
• Za najbolje rezultate koristite originalne folije
tvrtke Fellowes ®: 80 do 125 mikrona
• Ovom stroju ne treba zaštitni karton za plasticiranje. To je mehanizam bez zaštitnog kartona.
• Artikl uvijek plasticirajte u foliji odgovarajuće
veličine.
• Uvijek provedite probno plasticiranje uz sličnu
veličinu i debljinu prije završnog postupka.
• Pripremite foliju i artikl za plasticiranje. Centrirajte artikl u foliji tako da dodiruje zatvoreni prednji
rub. Pobrinite se da folija nije prevelika za artikl.
• Prema potrebi odrežite višak materijala oko artikla
nakon plasticiranja i hlađenja.
Ukopčajte stroj u lako dostupnu utičnicu.
3.
Uključite napajanje (sklopka se nalazi na bočnoj
4.
strani stroja).
5.
Zasvijetlit će crvena lampica "Power on" (Napajanje).
Stroj se sada zagrijava.
Kada stroj bude spreman za rad, zelena lampica
6.
"Ready" (Stanje pripravnosti) nastavit će svijetliti.
Stavite dokument u otvorenu foliju. Pobrinite se da
7.
je dokument centriran i da dodiruje zatvoreni rub
folije. Upotrijebite odgovarajuću veličinu folije za
dokument.
8.
Pobrinite se da najprije zatvoreni rub folije ulazi u
stroj. Foliju držite ravnom i centriranu unutar utora,
izbjegavajte nagib folije. Za usmjeravanje folije
upotrijebite ulazne oznake.
9.
Nakon izlaza iz stroja plasticirana folija može biti topla i mekana. Da biste izbjegli zaglavljivanje, odmah
uklonite foliju. Stavite foliju na ravnu podlogu da se
hladi. Budite oprezni pri rukovanju toplom folijom.
TREBATE LI POMOĆ?
Naši stručnjaci mogu vam pomoći riješiti problem.
Korisnička služba... www.fellowes.com
Uvijek nazovite Fellowes prije nego se obratite vašem prodajnom mjestu (informacije za kontakt potražite na
stražnjem poklopcu).
Razmotrite mogućnost registriranja stroja na mrežnom mjestu www.fellowes.com/register kako biste primali
ažuriranja i dodatne informacije.
65

OTKLANJANJE POTEŠKOĆA
Problem Mogući uzrok Rješenje
Lampica "power on" (napajanje) ne svijetli
(crvena LED lampica)
Lampica "ready" (stanje pripravnosti) ne
svijetli nakon duljeg vremena (zelena LED
lampica)
LED-žaruljica napajanja treperi crveno,
a LED-žaruljica pripravnosti (zelena) je
isključena
LED-žaruljica pripravnosti (zelena) i LEDžaruljica napajanja (crvena) su isključene
Folija nije potpuno zatvorila artikl Artikl je možda prevelike debljine Maksimalna debljina dokumenta iznosi ,40 mm
Folija je naborana ili ima mjehuriće Debljina folije možda nije odgovarajuća Plastikator prihvaća folije debljine 75 do 125 mikrona
Folija ne izlazi iz stroja Folija se zaglavila
Zaglavljivanje
Folija je oštećena nakon plasticiranja Oštećeni su valjci ili ljepljivi sloj na valjcima
Stroj nije uključen Uključite stroj na bočnoj strani i u zidnu utičnicu
Stroj se nalazi u vrućem ili vlažnom prostoru Premjestite stroj u hladniji i suhi prostor
Plastikator je prešao u način rada za
automatsko isključivanje
Plastikator je u načinu rada za automatsko
isključivanje
Foliju ste umetnuli otvorenom stranom
prema naprijed
Foliju niste centrirali na ulazu
Folija nije bila ravno postavljena na ulazu
Upotrijebili ste praznu foliju
Pritisnite sklopku ON/OFF. Stroj će se sam resetirati
Pritisnite sklopku ON/OFF. Stroj će se sam resetirati
Pritisnite polugu za otpuštanje i rukom izvucite artikl
Propustite listove za čišćenje kroz stroj kako biste
provjerili valjke i očistili ih
POHRANA I ČIŠĆENJE
Iskopčajte stroj iz zidne utičnice. Pričekajte da se ohladi. Vanjski dio plastikatora očistite lagano navlaženom krpom. Nemojte primjenjivati otapala ili
zapaljive materijale kako biste očistili stroj. Možete kupiti i maramice za čišćenje stroja. Kad se stroj zagrije, maramicama očistite sve ostatke s valjaka. Za
najveći učinak preporučujemo redovito čišćenje stroja maramicama za čišćenje. (Narudžbeni kôd maramica za čišćenje je #5320604).
REGISTRACIJA PROIZVODA / GLOBALNO JAMSTVO
Hvala vam na kupnji proizvoda tvrtke Fellowes. Posjetite web stranicu ww w.fellowes.com/register da biste registrirali uređaj i saznali novosti o proizvodima, povratne informacije i ponude. Pojedinosti o proizvodu možete pronaći na natpisnoj pločici postavljenoj na stražnjoj ili donjoj strani stroja. Tvrtka
Fellowes jamči da u trajanju od 1 godine od datuma prodaje prvobitnom kupcu nijedan dio plastikatora nema oštećenja u materijalu niti izradi. Ukoliko
tijekom jamstvenog perioda dođe do oštećenja bilo kojeg dijela, jedino i isključivo vi imate pravo, prema Fellowesovoj prosudbi, na besplatan popravak
ili zamjenu oštećenog dijela. Ovo se jamstvo ne primjenjuje u slučaju neispravnog korištenja, neodgovarajućeg rukovanja ili neovlaštenog popravljanja.
Svako prešutno jamstvo, uključujući jamstvo u pogledu utrživosti odnosno pogodnosti za određenu svrhu, ovime je ograničeno na trajanje u prethodno
navedenom jamstvenom periodu. Tvrtk a Fellowes ni u kom slučaju neće biti odgovorna za bilo koju posljedičnu štetu povezanu s ovim proizvodom. Ovo
vam jamstvo daje posebna zakonska prava. Možete steći i druga zakonska prava koja se razlikuju od ovog jamstva. Trajanje, odredbe i uvjeti ovog jamstva
vrijede širom svijeta, izuzev tamo gdje mjesni zakoni propisuju drugačija ograničenja, zabrane ili uvjete. Za više pojedinosti ili korištenje usluga u okviru
ovog jamstva obratite se tvrtki Fellowes ili vašem distributeru.
W.E.E.E.
Ovaj je uređaj klasiciran kao električna i elektronička oprema. Kad odlučite odstraniti ovaj uređaj, pobrinite se da to učinite u
skladu s Europskom direktivom o električnom i elektroničkom otpadu (WEEE, Waste of Electrical and Electronic Equipment) te
odgovarajuće mjesnim zakonima u vezi s ovom direktivom.
Više informacija o WEEE direktivi možete pronaći na web stranici: www.fellowesinternational.com/WEEE
66

SLOVENŠČINA
SI
KONTROLE NA LAMINATORJU
A Stikalo za vklop/izklop
B LED za stanje pripravljenosti (zelena)
C Ročka za sprostitev ( )
ZMOGLJIVOST
Zmogljivost
Oblika 9,5” / 241 mm
Širina za vstavljanje A4 = 241 mm
Debelina žepka (min) 75 mikronov (na stran)
Debelina žepka (maks) 125 mikronov (na stran)
Čas za zagon (približno) 4 minute
Laminiranje pribl. 30 cm/min
(+/- 5%) (ksna hitrost)
Število valjev 2
Označba pripravljenosti Lučka (zelena)
Ročka za sprostitev Da
Samodejni izklop Da
D Folijski žepek / reža za vstavljanje
dokumentov
E Folijski žepek / izhod dokumenta
F LED za napajanje (rdeča)
Tehnični podatki
Napetost / Frekvenca /
Tok (Amperi) 220-240 V AC, 50/60 Hz,
1,5 A
Moč 300 Vatov
Mere (V x Š x G) 66mm x 356mm x 158mm
Neto teža 1,3 kg
Največja debelina dokumentov
(zmogljivost laminiranja) 0,02” / 0,4mm
POMEMBNA VARNOSTNA NAVODILA — HRANITE ZA PRIHODNJO UPORABO
- Napravo uporabljajte samo v notranjih prostorih. Napravo priključite v lahko dostopno vtičnico.
- Da bi preprečili električni udar, naprave ne uporabljajte v bližini vode ter je ne polivajte po napravi, kablih ali stenski
vtičnici.
ZAGOTOVITE, da je naprava na ravni površini.
POSKUSNO laminirajte nekaj listov in napravo nastavite
pred končnim laminiranjem.
ODSTRANITE sponke in ostale kovinske predmete, preden
začnete z laminiranjem.
HRANITE napravo stran od virov toplote in vode.
IZKLOPITE napravo po vsaki uporabi.
IZKLJUČITE napravo iz električnega napajanja, če je ne
boste uporabljali dlje časa.
UPORABITE folijske žepke, ki so narejeni za uporabo pri
primernih nastavitvah.
HRANITE izven dosega hišnih ljubljenčkov, ko je naprava
v uporabi.
NE puščajte napajalnega kabla v stiku z vročimi
površinami.
NE puščajte napajalnega kabla, da visi s polic ali omar.
NE uporabljajte naprave, če je napajalni kabel
poškodovan.
NE poskušajte sami odpreti ali kakor koli popravljati
naprave.
NE prekoračite navedene učinkovitosti naprave.
NE dovolite otrokom, da napravo uporabljajo brez nadzora
odrasle osebe.
NE laminirajte ostrih ali kovinskih predmetov (npr. sponk
ipd.).
NE laminirajte dokumentov, občutljivih na toploto (npr.
kart, ultrazvočnih posnetkov ipd.) pri vročih nastavitvah.
NE laminirajte s samolepljivimi folijskimi žepki pri vročih
nastavitvah.
NE laminirajte praznega folijskega žepka.
67

FUNKCIJE IN NAPOTKI
Funkcija "Sprostitev"
Če želite folijski žepek med laminiranjem
odstraniti ali prilagoditi, aktivirajte ročko za
sprostitev na zadnji strani naprave. Žepek
lahko iz reže za vstavljanje odstranite samo, ko
je ročka aktivirana.
Auto
Shut
Off
Samodejni izklop
Po 30 minutah bo stroj samodejno preklopil v
način samodejnega izklopa. LED za napajanje
5 minut utripa rdeče in nato ugasne. LED za
stanje pripravljenosti ugasne. Če želite stroj še
naprej uporabljati, pritisnite stikalo za vklop/
izklop. Stroj se sam ponastavi.
POSTAVITEV LAMINATORJA
• Za boljše rezultate uporabite folijske žepke znamke
Fellowes ®: 80–125 mikronov.
• Naprava za laminiranje ne potrebuje nosilca. Mehanizem
je brez nosilca.
• Predmet, ki ga želite laminirati, vedno vstavite v folijski
žepek ustrezne velikosti.
• Pred končnim postopkom vedno preizkusite delovanje na
dokumentu podobne velikosti in debeline.
• Pripravite folijski žepek in predmet za laminiranje.
Predmet vstavite na sredino žepka tako, da se dotika
glavnega zatesnjenega roba. Preverite, da žepek ni
prevelik za vaš predmet.
• Po potrebi po laminiranju in hlajenju odvečen material
okrog predmeta obrežite.
Zagotovite, da je naprava na ravni površini.
1.
Preverite, ali je za napravo dovolj prostora (najmanj 50 cm)
2.
za neoviran prehod predmetov.
Napravo priključite v lahko dostopno vtičnico.
3.
KAKO LAMINIRATI
Napravo vklopite (stikalo je ob strani naprave).
4.
Zasveti rdeča lučka za stanje "Vklopljeno". Naprava se zdaj
5.
zaganja.
Ko je naprava pripravljena, sveti zelena lučka za stanje
6.
"Pripravljen".
Dokument vstavite v odprt folijski žepek. Preverite, ali je
7.
dokument vstavljen na sredino zatesnjenega roba. Za dokument uporabite folijski žepek ustrezne velikosti.
Zagotovite, da boste žepek v napravo vstavili z zatesnjenim
8.
robom naprej. Žepek postavite naravnost in na sredino reže,
ne ob rob. Za vodilo uporabite oznake za vstavljanje.
Pri izhodu je laminiran žepek lahko vroč in mehak. Žepek
9.
takoj odstranite, da bi preprečili morebitno zagozdenje.
Žepek položite na ravno površino, da se ohladi. Pri rokovanju z vročim folijskim žepkom bodite previdni.
POTREBUJETE POMOČ?
Dovolite, da vam naši strokovnjaki pomagajo z rešitvijo.
Oddelek za pomoč uporabnikom ...
Preden se obrnete na svojega prodajalca, vedno najprej stopite v stik s podjetjem Fellowes. Za kontaktne podatke si oglejte zadnjo
stran.
Razmislite o registraciji svojega izdelka na www.fellowes.com/register, kjer boste prejeli najnovejše in dodatne informacije.
www.fellowes.com
68

ODPRAVLJANJE TEŽAV
Teža va Možen vzrok Rešitev
Lučka "Vklopljeno" ne sveti (rdeča LED) Naprava ni vklopljena
Dolgo časa ni lučke za stanje "Pripravljen"
(zelena LED)
LED za napajanje utripa rdeče, LED za stanje
pripravljenosti (zelena) ne sveti
Naprava se nahaja v vročem ali vlažnem
okolju
Laminator je prešel v način samodejnega
izklopa
Vklopite napravo ob strani in jo vključite v stensko
vtičnico
Napravo prestavite na hladnejše in bolj suho mesto
Pritisnite stikalo za vklop/izklop. Stroj se sam
ponastavi
Lučka stanja pripravljenosti (zelena) in LED
za napajanje (rdeča) sta ugasnili
Žepek predmeta ne zatesni popolnoma Predmet je morda predebel za laminiranje Maksimalna debelina dokumenta je lahko ,40 mm
Folijski žepek vsebuje valove ali mehurčke Nastavitev debeline žepka je morda napačna Laminator sprejme vrečke dolžine 75–125 mikronov
Folijski žepek se je izgubil v napravi Žepek je zagozden
Zagozdenje
Žepek je po laminiranju poškodovan Poškodovani valjčki ali samolepilni valjčki
Laminator je v načinu samodejnega izklopa
PŽepek ste v napravo vstavili z odprtim
delom naprej
Žepek ob vstavljanju dokumenta v napravo
ni bil poravnan na sredino
Žepek ob vstavljanju dokumenta v napravo
ni bil poravnan
Uporabili ste prazen žepek
Pritisnite stikalo za vklop/izklop. Stroj se sam
ponastavi
Obrnite ročko za sprostitev in predmet izvlecite z roko
Skozi napravo spustite liste za čiščenje, da preverite in
očistite valjčke
HRAMBA & ČIŠČENJE
Iz zidne vtičnice izvlecite napajalni kabel. Počakajte, da se naprava ohladi. Zunanjost naprave lahko očistite z vlažno krpo. Za lesk ne uporabljajte topil
ali vnetljivih materialov. Na napravi lahko uporabite liste za čiščenje, ki so tudi v prodaji. Ko je naprava topla, skoznjo spustite liste za čiščenje, da
očistite morebitne ostanke na valjih. Za optimalno učinkovitost priporoč amo, da liste za čiščenje uporabljate redno. (Koda za naročanje listov za čiščenje
#5320604)
REGISTRACIJA IZDELKA / SVETOVNA GARANCIJA
Zahvaljujemo se vam za nakup izdelka Fellowes. Za registracijo izdelka in pregled novic o izdelku, povratnih informacijah in ponudbah obiščite spletno
mesto www.fellowes.com/register. Podrobnosti o izdelku najdete na ploščici s specikacijami na zadnji strani ali spodnjem delu naprave.
Podjetje Fellowes jamči, da so vsi deli laminatorja brez napak v materialu in izdelavi 1 leti od dneva nakupa prvega uporabnika. Če se v času trajanja
garancijske dobe kateri koli del okvari, je vaša edina možnost popravilo ali zamenjava okvarjenega dela na podlagi mnenja in na stroške podjetja Fellowed. Ta garancija ni veljavna v primeru zlorabe, neprimerne rabe ali nepooblaščenega popravila. Katera koli implicirana garancija, vključno garancija
o ustreznosti prodaje ali ustreznosti za določen namen uporabe, je tukaj v trajanju omejena na ustrezno garancijsko obdobje, navedeno zgoraj. Podjetje
Fellowes v nobenem primeru ne prevzema odgovornosti za poškodbe, ki so posledica uporabe tega izdelka. Ta garancija vam daje določene pravne
pravice. Morda vam pripadajo tudi druge pravne pravice, ki se razlikujejo od te garancije. Trajanje in pogoji te garancije so veljavni povsod po svetu, razen
v državah, kjer zakonsko veljajo drugačne omejitve ali pogoji. Za več podrobnosti ali za servis v sklopu te garancije se obrnite na podjetje Fellowers ali
vašega prodajalca.
W.E.E.E.
Ta izdelek se šteje kot električna in elektronska oprema. Ko boste želeli zavreči izdelek, vas prosimo, da to storite v skladu z
Direktivo Evropskega parlamenta in Sveta o odpadni električni in elektronski opremi (WEEE) in predpisi, ki veljajo v vaši državi.
Za več informacij o Direktivi WEEE obiščite www.fellowesinternational.com/WEEE
69

Personal Laminator
Declaration of Conformity
Fellowes Manufacturing Company
Yorkshire Way, West Moor Park, Doncaster, South Yorkshire, DN3 3FB, England declares that the model L125-A4 conforms with
the requirements of the Restriction of Hazardous Substances Directive (2011/65/EU), the Low Voltage Directive (2006/95/EC),
the Electromagnetic Compatability Directive (2004/108/EC), the WEEE directive (2002/96/EC), and the following Harmonised
European Normes EN standards.
Safety: EN60950-1
EMC Standards: EN55014-1, EN55014-2, EN61000-3-2, EN61000-3-3
Year Affixed: 14
Itasca, Illinois, USA James Fellowes
February 2014
Help Line
Australia +1-800-33-11-77
Canada +1-800-665-4339
Europe 00-800-1810-1810
México +001-800-514-9057
United States +1-800-955-0959
Fellowes
Australia +61-3-8336-9700
Benelux +31-(0)-13-458-0580
Canada +1-905-475-6320
Deutschland + 49-(0)-511-545-489-0
España/Portugal +34-91-748-05-01
France +33-(0)-1-78-64-91-00
Italia +39-071-730041
1789 Norwood Avenue, Itasca, Illinois 60143-1095 • USA • 630-893-1600
© 2014 Fellowes, Inc. Part No. 407895 Rev B
Japan +81-(0)-3-5496-2401
Korea +82-2-3462-2884
Malaysia +60-(0)-35122-1231
Polska +48-(22)-2052110
Russia +7-495-280-7180
Singapore +65-6221-3811
United Kingdom +44-(0)-1302-836800
fellowes.com
 Loading...