

Page 1
RAPHAEL
Kullanım Kılavuzu
Buhar Kazanlı Ütü
TR
Instructions Manual
Steam Station Iron
GB
Page 2

İÇİNDEKİLER
2
TR
Güvenlik...........................................................................3
Önemli Güvenlik Notları .................................................... 3
Kullanım Öncesi..............................................................5
Cihaz Parçaları .................................................................5
Kontrol Paneli.................................................................... 6
Teknik Özellikler................................................................ 6
Su Tankı Çıkartma Tetiği...................................................7
Su Tankı Dolurma Kapağı.................................................7
Ütü Kilit Açma Düğmesi.....................................................7
Arka Destek Askısı............................................................ 7
Ön Destek Askısı ............................................................. 7
On/Off Düğmesi ............................................................... 7
Termostat Ayar Düğmesi ..................................................7
Pilot Işığı........................................................................... 7
Buhar Ayar Düğmesi ........................................................8
Su Az Göstergesi ............................................................. 8
Kireç Göstergesi ...............................................................8
Tahliye Vanası ................................................................. 8
Kablo Tutucu.....................................................................8
Kilit Mandalı ......................................................................8
Otomatik Kapanma ........................................................... 8
Kullanım Öncesi ...............................................................9
Kullanım......................................................................... 10
Kuru Ütüleme..................................................................10
Buharlı Ütüleme ............................................................. 10
Kullanım Sonrası........................................................... 12
Temizlik Ve Bakım .......................................................... 12
Ütüleme Önerileri ...........................................................14
CE Uygunluk Deklerasyonu ............................................ 15
Cihazın geri dönüşüm noktalarına bırakılması ................ 15
Sevk................................................................................ 15
Page 3

3
GÜVENLİK
TR
Önemli Güvenlik Notları
Tercihinizi Fakir RAPHAEL Buhar Kazanlı Ütü’den yana
kullandığınız için teşekkür ederiz. Ürünümüz size uzun
süre sorunsuz hizmet vermek için tasarlanıp üretilmiştir.
Cihazı kullanmadan önce aşağıdaki bilgiler dikkate
alınmalıdır;
1. Kullanma klavuzunun tamamını okuyunuz.
2. Cihazı kullanmadan önce tip etiketinde yazan voltaj
değerlerinin şebekenizle uyumlu olup olmadığını kontrol
ediniz.
3. Cihaz güç kablosu, fişi, ışığı ya da cihazın kendisinde
gözle görülebilir hasar var ise veya cihaz düşmüş ve su
sızdırıyorsa cihazı kullanmayınız. Derhal Fakir Yetkili
Servisi’ne başvurunuz.
4. Cihaz güç kablosunu tabana; taban sıcak iken temas
ettirmeyiniz.
5. Sıcak metal parçalara dokunmak; sıcak su ve buhar
yanıklara neden olabilir.
6. Cihaz güç kablosunun ütü masasından sarkmadığından ve
sıcak yüzeylere temas etmediğinden emin olunuz.
7. Elektrik çarpmasından kaçınmak için cihazı suya ve başka
sıvılara daldırmayınız. Eğer böyle bir şey olmuş ise cihazı
artık kullanmayınız.
8. Cihazı çocukların ulaşamayacağı yerlerde muhafaza
ediniz.
9. Cihaz güç kablosu fişe takılı iken veya cihaz ütü masasının
üzerinde iken korumasız bırakmayınız.
10. Cihazı her zaman düz, stabil ve yatay bir zemine koyunuz.
11. Orijinal olmayan aksesuar kullanımı size ve cihaza zarar
verebilir.
12. Ütüyü kendi standına bıraktığınız zaman cihazın
konulduğu yerin stabil olduğundan emin olunuz.
13. Tahliye Vanası kullanım süresince tamamen kapalı
olmalıdır.
14. Cihazın su tankını; sıcak su, esans, sirke, kola, yumuşatıcı
veya diğer kimyasallar ile doldurmayınız.
15. Cihazı kullanmadığınız zamanlarda, su tankını
dolduracağınız zaman ve temizlik yapacağınız zaman;
cihazın güç kablosunu fişten çekiniz.
16. Cihazı belirtilen amaçlar dışında kullanmayınız.
17. Cihaz güç kablosu fişe takılı iken; cihaz korumasız
bırakılmamalıdır.
18. Cihaz su tankı su ile doldurulacağı zaman; cihazın güç
kablosu fişten çekilmelidir.
Page 4

4
GÜVENLİK
TR
19. Cihaz stabil bir yüzeyde kullanılmalı ve muhafaza
edilmelidir.
20. Ütü yere düşerse ve gözle görülebilir bir hasar varsa veya
su sızdırıyorsa kullanılmamalıdır.
21. Cihazı dışarıda kullanmayınız.
22. Bu talimatları saklayınız.
23. Kullanıcı cihazın güç kablosu fişe takılı haldeyken,
gözetimsiz bırakmamalıdır.
24. Ütüyü ve güç kablosunu; cihaz çalışır haldeyken 8
yaşından küçük çocuklardan uzak tutunuz.
25. Su püskürtme veya buhar direk olarak elektrik aletlere
veya elektrik ile ilgili parçalara sıkılmamalıdır.
26. Cihaz güç kablusu; cihaz kullanılmayacağı zaman, cihaz
temizliği veya bakımı yapılacağı zaman fişten çekilmelidir.
27. Cihaz yüzeyi çalışır haldeyken sıcak olabilir.
SICAK METAL PARÇALARA, SICAK SUYA VEYA
BUHARA TEMAS HALİNDE YANIKLAR OLUŞABİLİR.
CİHAZA TEMAS HALİNDE DİKKATLİ OLUNUZ.
Page 5
5
KULLANIM ÖNCESİ
TR
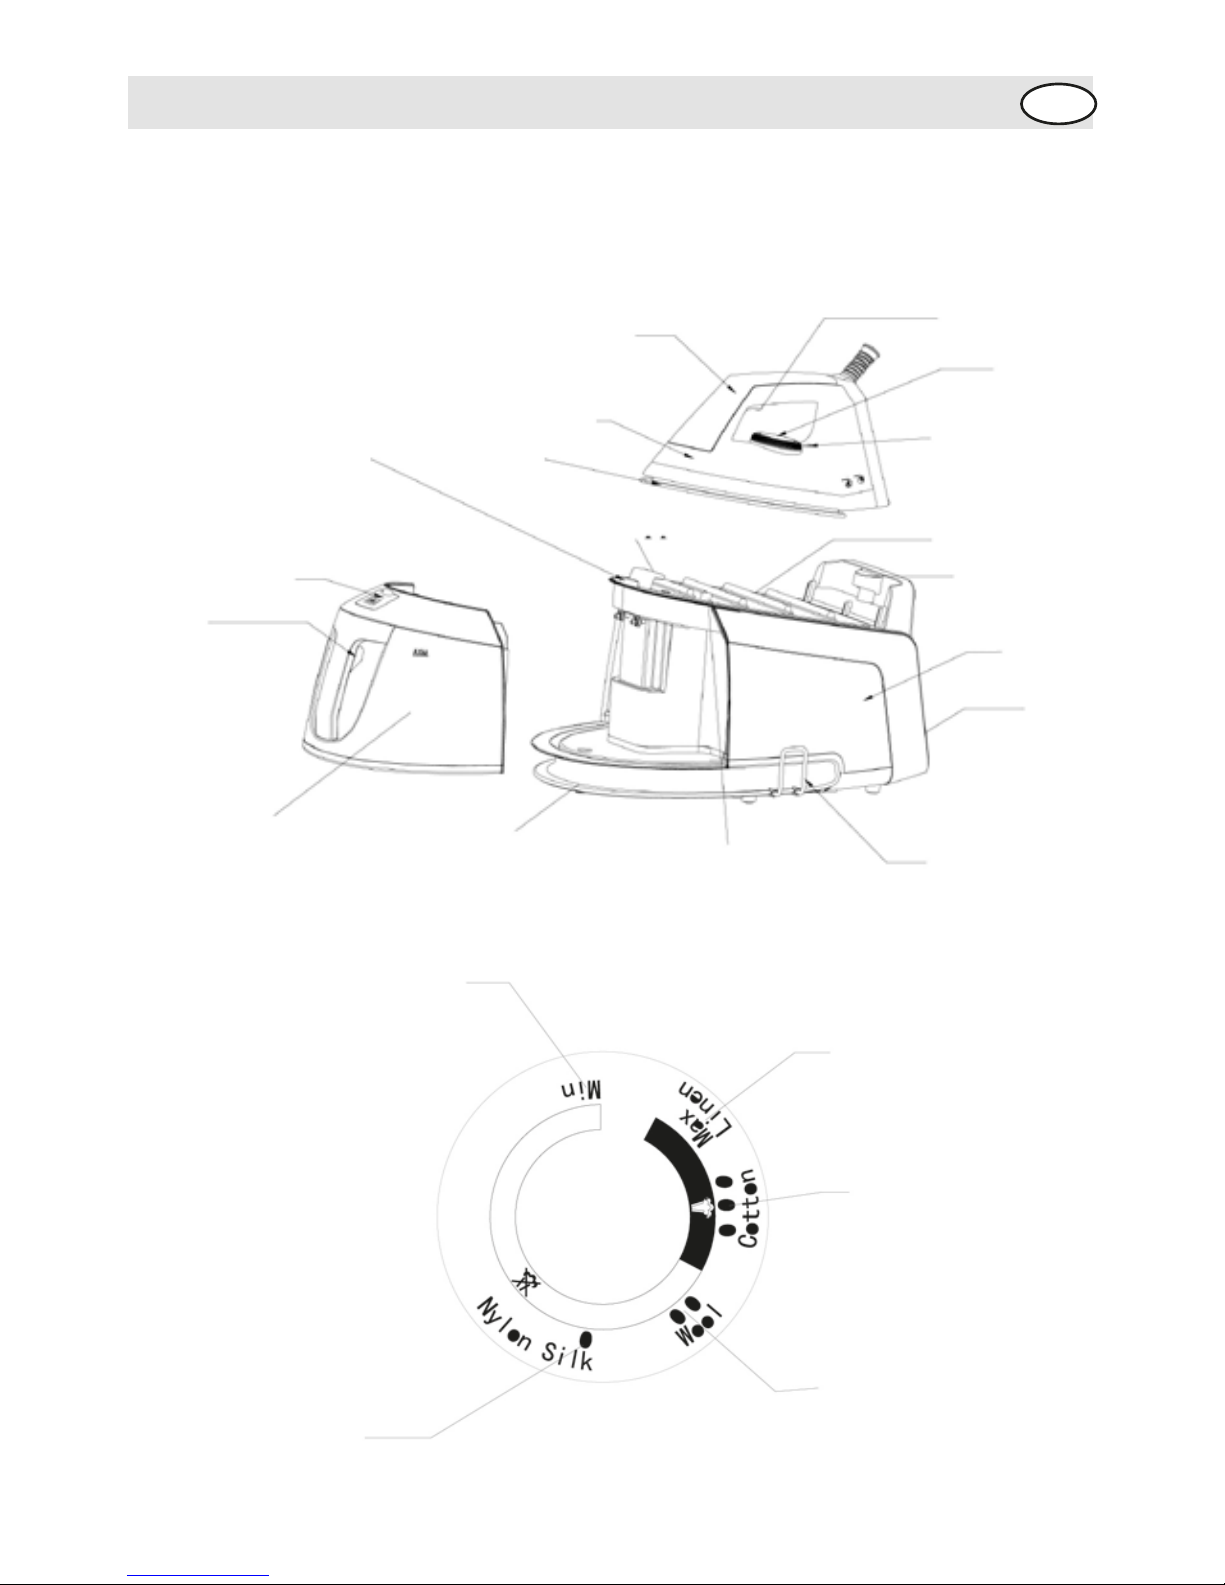
Cihaz Parçaları
Tutma Kulbu
Taban
Ütü Kilit Açma
Düğmesi
Su Tankı Dolum
Kapağı
Su Tankı
Kablo Yolu
Ütü Kilidi
Kablo Tutucu
Kontrol
Paneli
Buhar
Kazanı
Termal
İzole Bant
Arka Destek
Askısı
Ön Destek Askısı
Su Tankı
Çıkartma
Tetiği
Pilot Işığı
Ütü
Buhar Düğmesi
Termostat
Ayar Düğmesi
Minimum Ayar
Maksimum Ayar
3. Kademe
2. Kademe
1. Kademe
Page 6
6
KULLANIM ÖNCESİ
TR
Teknik Özellikler
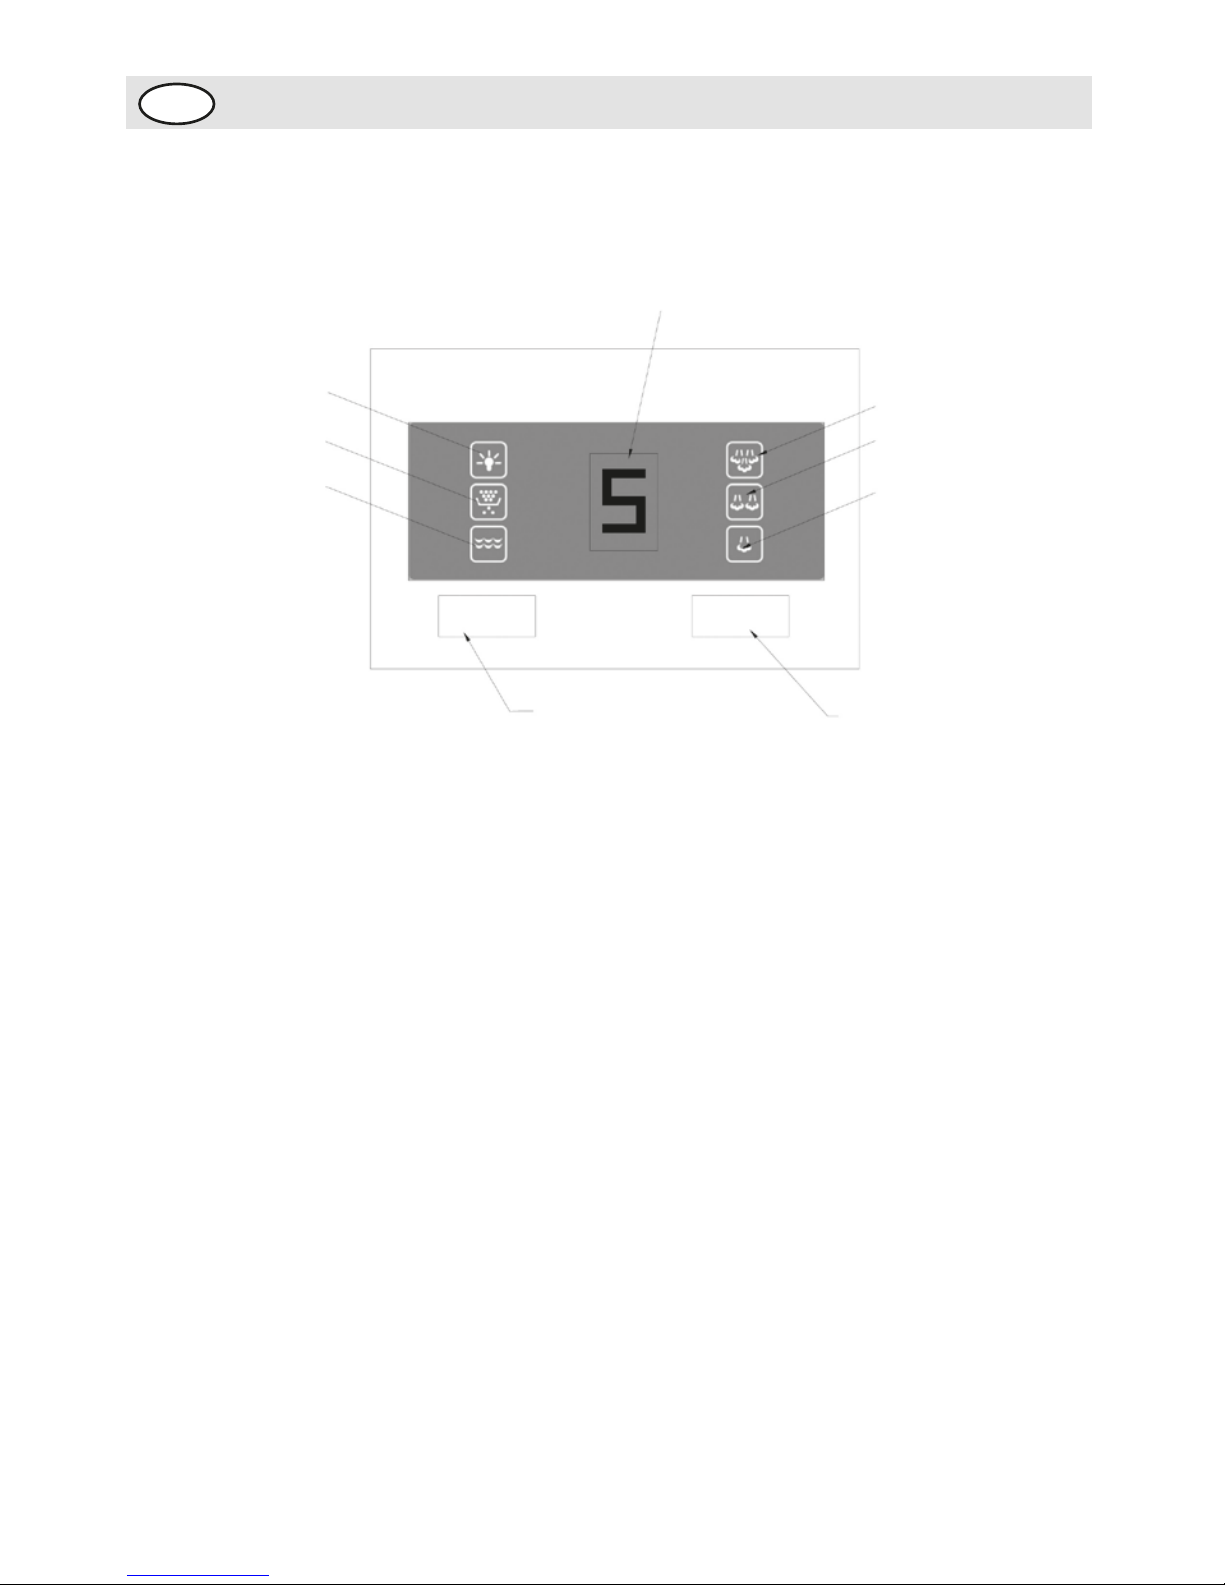
Kontrol Paneli
2400 Watt
220-240 V
50/60 Hz
Kullanım ömrü: 7 Yıl
Güç ikaz göstergesi
ON/OFF düğmesi Buhar ayar düğmesi
Kireç göstergesi
Su az göstergesi
3. Kademe Buhar
Basınç Göstergesi
2. Kademe Buhar
1. Kademe Buhar
OFF/ON BUHAR
Page 7

7
KULLANIM ÖNCESİ
TR
Su Tankı Çıkartma Tetiği Cihaz su tankını elinizle tutunuz ve tetiği bastırınız.
Böylece su tankını yerinden çıkartabilirsiniz.
Su Tankı Dolurma Kapağı Cihaz su tankındaki su azaldığı zaman kapağı kaldırıp su
ekleyiniz ve cihazı kullanmaya devam ediniz.
Ütü Kilit Açma Düğmesi Ütü kilit açma düğmesine parmağınızla basınız ve ütüyü
elinizle tutup sola doğru kaydırınız. Böylece ütü kilitten
çıkmış olacak.
Arka Destek Askısı Ütüyü termal izole tabana koyacağınız zaman ilk önce
ütünün arkasını arka destek askısına oturtturunuz ve ütü
kilit açma düğmesine basarak ütüyü öne destek askısına
doğru kaydırınız.
Ön Destek Askısı Ütüyü kullanırken; ütü ucu ön destek askısının üzerine
gelecek şekilde bırakabilirsiniz. Ayrıca ütüleme işlemi
bittiğinde ütü kilit açma düğmesini basarak ütü tabanı ön
destek askısından aşağıda olacak şekilde ütüyü
kilitleyebilirsiniz.
On/Off Düğmesi Cihaz güç kablosunu fişe takınız ve On/Off düğmesine
basınız. Dijital sesle birlikte ekran açılacak ve düşük buhar
seviyesi varsayılan ayar olarak gözükecektir. Cihazı
kapatmak için ise; On/Off düğmesine 2 saniye basınız.
Dijital ses ile birlikte ekran kapanacaktır. Cihaz güç
kablosunu fişten çekerek cihazı soğumaya bırakınız.
Termostat Ayar Düğmesi Kumaş türüne göre termostat ayar düğmesini çevirerek ütü
tabanında istenilen sıcaklığı ayarlayınız.
Pilot Işığı Ütü tabanı ısınıyor iken pilot ışığı yanacaktır. Ütü tabanı
ayarlanan sıcaklığa geldiğinde ise sönecektir. Ütüleme
işlemi yapılırken taban sıcaklığına göre yanıp, sönebilir.
Page 8

KULLANIM ÖNCESİ
TR
8
Buhar Ayar Düğmesi Buhar düzeyi az, orta ve yüksek olarak ayarlanabilir.
İstenilen buhar düzeyine ulaşmak için buhar ayar
düğmesine basmanız gerekmektedir. LED ekran üzerinde
buhar düzeyini gösteren üç adet şekil vardır. Az buhar
düzeyi varsayılan düzey olarak cihaz her açıldığında
otomatik olarak ayarlanacaktır. Buhar düzeyleri en alttan
en üste doğru: az, orta ve yüksek olarak sıralanmıştır.
İstenilen buhar düzeyi seçildiğinde gösterge önce yanıp
sönecektir daha sonra ise devamlı görünecektir. Bu
durumda cihaz buhar vermeye hazırdır.
Su Az Göstergesi Cihazdaki su azaldığında gösterge yanıp sönecek, arka
arkaya iki kere dijital ses verecek ve buhar jeneratörü
çalışmayı durduracaktır. Cihaza su ekleyip kullanmaya
devam edebilirsiniz.
Kireç Göstergesi Eğer kireç göstergesi yanıyor ise cihazın içerisindeki
mineral kalıntılarının temizlenmesi gerekmektedir. Sistem
içerideki mineral kalıntılarını temizlendiğini algılarsa
gösterge sönecektir.
Tahliye Vanası Cihazı temizlemek için vanayı açınız.
Kablo Tutucu Cihaz kullanılmadığı zamanlarda güç kablosu ve ütü
kablosu düzgün bir şekilde muhafaza edilmelidir. Öncelikle
kablo tutucuyu çekerek açınız, daha sonra güç kablosunu
ve ütü kablosunu cihaz etrafından geçirerek kablo tutucuya
tutturunuz ve kablo tutucuyu ittiriniz.
Kilit Mandalı Ütü termal izole tabana kilit mandalı da kullanılarak
kilitlenebilir.
Otomatik Kapanma Eğer tabandan 10 dakika buhar verilmez ise cihaz kendi
kendini kapatacaktır.
Page 9

KULLANIM ÖNCESİ
TR
9
Kullanım Öncesi 1. Taban üzerindeki bütün stickerları, koruyucu kağıtları vb.
nesneleri çıkartınız.
2. Taban sıcaklığını maksimum dereceye ayarlayınız ve
ayarlanan sıcaklık hazır olduğunda eski bir kumaşı birkaç
dakika ütüleyiniz.
NOT!
İlk kullanımda cihazdan koku ve duman gelmesi
normaldir. Birkaç dakika sonra geçecektir.
NOT!
İlk kullanımda tabandan bazı partiküller gelebilir. Bu
normal bir durumdur ve birkaç dakika sonra duracaktır.
NOT!
Cihaz açıldığında buhar jeneratörü pompalama sesi
çıkarabilir. Bu normal bir sestir ve suyun jeneratörün
içerisine pompalandığını gösterir.
NOT!
Tabanın ısınma sürecinde; tabandan az miktarda buhar
gelecektir. Bu durum 3 saniye kadar sürecektir.
Bu normal bir durumdur.
Page 10

10
TR
KULLANIM
Cihaz hem kuru ütülemeye hem de buharlı ütülemeye
uygundur.
Kuru Ütüleme
1. Cihazı stabil ve düz bir zemine koyunuz.
2. Ütü kilit açma düğmesine basınız ve ütüyü sola
kaydırarak kilitten çıkarınız. Ütünün öne tarafı ön destek
askısına denk gelecek şekilde yerleştiriniz. Ütü tabanının
sadece termal izole bandına temas ettiğinden emin olunuz.
Buharlı Ütüleme
1. Su tankını elinizle tutunuz ve su tankı çıkartma tetiğine
basarak çekiniz. Daha sonra su tankı doldurma kapağını
açınız ve içerisine su doldurunuz. Eğer saf su kullanırsanız
cihaz ömrü için daha sağlıklı olacaktır. Su dolum işlemi
bittikten sonra kapağı kapatınız . Su tankının max.
kapasitesi 1,5L’dir. Su tankındaki su max. seviyeyi
geçmemelidir.
2. Su tankını tekrar yerleştiriniz.
3. Ütü kilit açma düğmesine basınız ve ütüyü sola
kaydırarak kilitten çıkarınız. Ütünün öne tarafı ön destek
askısına denk gelecek şekilde yerleştiriniz. Ütü tabanının
sadece termal izole bandına temas ettiğinden emin olunuz.
4. Cihaz güç kablosunu fişe takınız ve On/Off düğmesine
basınız. Varsayılan buhar ayarı az seviyede olacaktır.
Termostat ayarını arzu ettiğiniz seviyeye getiriniz. Pilot
ışığı yanıyorken ütü tabanı ısınıyor demektir.
3. Cihaz güç kablosunu fişe takınız ve On/Off düğmesine
basınız.
4. Termostat ayar düğmesini arzu ettiğiniz seviyeye
getiriniz. Pilot ışığı yanıyorken ütü tabanı ısınıyor demektir.
5. Pilot ışığı söndüğünde ayarlanan sıcaklığa ulaşılmış
demektir.
DİKKAT!
Olası yaralanmaları önlemek için ütüyü kilitten kurtarmak
için; ütüyü kilit mandalına basarak kilitten kurtarmayınız.
UYARI!
Ütü tabanı sıcakken kesinlikle dokunmayınız.
Page 11

11
TR
KULLANIM
5. Pilot ışığı söndüğünde ayarlanan sıcaklığa ulaşılmış
demektir. LED ekrandaki buhar göstergesi yanıp
sönmekten devamlı yanar bir hale geçti ise bu size buharın
hazır olduğunu göstermektedir.
6. Kumaş türünüze göre buhar ayarını az, orta ve yüksek
olarak ayarlayabilirsiniz. Buhar üretimi için su tankında
yeterli miktarda su olduğundan emin olunuz.
7. Cihaz ile işiniz bittiğinde kapatmak için On/Off
düğmesine iki saniye basılı tutunuz. Cihaz kapanacak ve
bütün göstergeler sönecektir. Güç kablosunu fişten çekiniz
fakat taban hala sıcak olacağından kesinlikle
dokunmayınız.
8. Cihaz soğuduktan sonra ütüyü termal izole bandına
kilitleyebilirsiniz. Bunun için öncelikle ütünün arka tarafını
arka destek askısına yerleştiriniz. Daha sonra ütü tabanını
kilit mandalının üzerine koyarak sağa doğru kaydırınız.
Ütünün tamamen kilitlendiğinden emin olunuz.
DİKKAT!
1. Ütü tabanı sıcakken kesinlikle dokunmayınız.
2.Buharı kesinlikle insanlara ya da hayvanlara doğrudan
vermeyiniz.
Page 12

12
TR
KULLANIM SONRASI
NOT!
Kesinlikle kimyasal, çelik, tahta veya aşındırıcı
temizleyicilerle tabanı kazımayınız.
Temizlik Ve Bakım
Cihaz temizliğine başlamadan önce cihaz güç kablosunu
fişten çekiniz ve cihazın soğumasını bekleyiniz.
1. Nemli bir bezle taban üzerindeki kalıntıları siliniz.
2. Ütünün üst kısmını nemli ve yumuşak bir bezle
temizleyiniz. Buhar kazanı ve termal izolasyon taban
üzerindeki su damlacıklarını kuru bir bezle temizleyiniz.
3. Buhar kazanı içerisindeki mineral kalıntılarını
temizlemek için; öncelikle cihazı yatay bir zemine
yerleştiriniz. Daha sonra cihazı biraz salladıktan sonra
tahliye vanasını cihaz kolisinden çıkacak anahtar
yardımıyla açınız ve içerideki suyu boşaltınız.
UYARI!
Cihazı kullanırken veya kullandıktan sonra ütü tabanını
termal izole bandından başka bir yere değdirmeyiniz.
Page 13

13
TR
KULLANIM SONRASI
NOT!
Eğer anahtarı kaybetmiş iseniz tahliye vanasını bozuk
para yardımıyla da açabilirsiniz.
NOT!
Ütü; buhar kazanına kilitlenip sabitlendikten sonra ütü
tutma kulbundan tutarak cihazı taşıyabilirsiniz.
1. Suyu boşalttıktan sonra tahliye vanasını tekrar kapatınız
ve cihazı yatay pozisyonda tutunuz.
2. Cihazı uzun süre kullanmayacağınız zaman; su tankı
içerisindeki suyu boşaltınız ve ütüyü termal izole taban
üzerinde kilitli olarak saklayınız.
3. Cihaz güç kablosunu ve ütü kablosunu kablo sarma
yuvalarına sarınız ve kablo tutucular ile sabitleyiniz.
UYARI!
Yanık ihtimaline karşı; tahliye vanasını açmadan önce
cihazın tamamen soğuduğundan emin olunuz.
Buhar kazanının altı
Su Tahliye Vanası Anahtar
Page 14

14
TR
KULLANIM SONRASI
NOT!
Yünlü kumaşlar ütülenirken parlama yapabilir.
Bu yüzden bu tür kumaşları tersten ütüleyiniz.
Ütüleme Önerileri
• Her zaman ütüleyeceğiniz kumaşın etiketindeki ütüleme
talimatlarına uyunuz.
• Ütünün ısınması, soğumasına göre daha hızlıdır. Bu
yüzden ütüleme yapacağınız kumaşları ütüleme
sıcaklıklarına göre ayırınız ve en düşük ısı gerektiren
gruptan yüksek ısıya doğru gidiniz.
• Eğer ütüleyeceğiniz kumaş birden fazla kumaş türü
içeriyorsa en düşük sıcaklık isteyen kumaş türüne göre
ütüleme yapınız.
• İpek ve benzeri kumaşlar parlama yapabileceğinden
dolayı ütüleme işlemini içten yapınız.
• Kadife ve benzer kumaşlar hızlıca parlayabileceğinden
dolayı; tek bir yöne doğru, çok fazla baskı yapmadan ve
ütüyü her zaman gezdirerek ütüleyiniz.
• %100 yünlü kumaşlar buharlı ütülenebilir. Termostat
ayarını max. seviyeye getiriniz ve kuru bir kumaşı koruyucu
olarak kullanınız.
• Kesinlike fermuar ve düğme gibi yerleri ütülemeyiniz. Ütü
tabanına zarar verebilirsiniz. Böyle maddeleri etrafından
ütüleyiniz.
Ütüleme Tablosu
Sembol Kumaş
Sentetik
Kumaşlar/İpek
Yün
Kumaş
Keten
Not: Bu sembol kumaşın ütülenemeyeceğini gösterir!
Not: “√” işareti kullanılabilir anlamındadır.
Not: “×” işareti kullanılamaz anlamındadır.
Buhar
√
√
x
Isı
Page 15

15
TR
KULLANIM SONRASI
Cihazın geri dönüşüm
noktalarına bırakılması
Cihazın kullanım ömrünün bitmesi halinde, elektrik
kablosunu keserek kullanılamayacak hale getiriniz.
Ülkenizde mevcut bulunan yasalara göre, bu tür cihazlar
için özel olarak belirlenmiş çöp kutularına cihazı bırakınız.
Elektriksel atıklar, normal çöplerle birlikte atılmamalıdır.
Cihazı elektriksel atıklar için belirlenmiş çöp kutularına
atınız.
Cihazın paketleme elemanları geri dönüşüme uygun
maddelerden üretilmiştir. Bunları geri dönüşüm çöp
kutularına atınız.
Kullanılmış toz torbası ve filtreleri genel çöp kutularına
atabilirsiniz.
CE Uygunluk
Deklerasyonu
Bu cihaz Avrupa Birliği’nin 2004/108/EC Elektromanyetik
Uyumluluk ve 2006/95/EC Gerilim Direktifleri’ne tamamen
uygundur. Bu ürün cihaz tip etiketinde CE işaretine
sahiptir.
Cihazın, orijinal ambalajında veya zarar görmesini önlemek
için, iyi ve yumuşak pakette taşınması gerekmektedir.
Sevk:
Ürünümüz Fakir Elektrikli Ev Aletleri Dış Ticaret A.Ş adına
GUANG DONG XINBAO ELECTRICAL APPLIANCES
HOLDINGS CO., LTD. South Zhenghe Road, Leliu Town,
Shunde District, Foshan City, Guangdong, China
Tel: +86-757-25333888 tarafından üretilmiştir.
Page 16

16
SAFETY
GB
Safety..............................................................................17
Important safeguards ...................................................... 17
Before Use......................................................................19
Overview.........................................................................19
Control Panel .................................................................. 20
Technical Specification....................................................20
Trigger ............................................................................21
Filling cap........................................................................ 21
Release button................................................................21
Rear support hook...........................................................21
Front support hook..........................................................21
ON/OFF switch ...............................................................21
Temperature dial.............................................................21
Temperature indicator ....................................................21
Steam switch .................................................................. 22
Lack of water indicator .................................................... 22
Descaling indicator.......................................................... 22
Drain water cap...............................................................22
Cord clamp .....................................................................22
Locking pin...................................................................... 22
Automatic power off ........................................................22
Before first use................................................................23
Operating........................................................................ 24
Dry ironing.......................................................................24
Steam ironing..................................................................24
After Use.........................................................................26
Cleaning and maintenance..............................................26
Ironinig tips...................................................................... 28
CE Declaration of Conformity.......................................... 29
Waste disposal................................................................ 29
Dispatch..........................................................................29
Page 17

17
SAFETY
GB
Important safeguards
Thank you for purchasing Fakir RAPHAEL Steam Station
Iron which has been designed and manufactured to give
you many years of trouble-free service.
You may already be familiar with using a similar product,
but do please take time to read these instructions – they
have been written to ensure you get the very best from
your purchase.
Before using the electrical appliance, basic precautions
should always be followed including the following:
1. Read all instructions.
2. Before using check that the voltage of wall outlet
corresponds to the one shown on the rating plate.
3. Do not use the appliance if the main cord, plug, light or the
appliance itself shows visible damage, or the appliance
has been dropped or is leaking. Take it to the nearest
authorized service facility or a qualified serviceman for
examination and repair in order to avoid a hazard.
4. Do not allow the cord to come into contact with the
soleplate when it is hot.
5. Burns may occur from touching hot metal parts, hot water,
or steam
6. Do not let cord hang over edge of table or hot surface.
7. To protect against a risk of electric shock, never
immerse the iron in water or other liquids. If this has
happened, do not use this appliance any more;
dispose of the appliance.
8. Keep the appliance out of the reach of children.
9. Do not leave iron unattended while connected into power
supply or on an ironing board.
10. Always place or use the appliance on a stable, level and
horizontal surface.
11. The use of accessory not recommended by manufacturer
may cause injury to persons or damage to appliance.
12. When placing the iron on its stand, ensure that the surface
on which the stand is placed is stable.
13. The drain water cap must be always well closed during the
use
14. Never fill the water tank with hot water, scent, vinegar,
starch, descaler, fabric softener or other chemical reagent.
15. Unplug from outlet when not in use, before filling water or
cleaning.
16. Do not use the appliance for other than its intended use.
17. The iron must not be left unattended while it is connected
to the supply mains;
Page 18

18
SAFETY
GB
18. The plug must be removed from the socket-outlet before
the water reservoir is filled with water.
19. The iron must be used and rested on a stable surface;
20. The iron is not to be used if it has been dropped, if there
are visible signs of damage or if it is leaking;
21. Do not use outdoors.
22. Save these instructions
23. The user must not leave the iron unattended while
connected to the supply
24. Keep the iron and its cord out of reach of children
less than 8 years of age when it is energized or
cooling down.
25. Liquid or steam must not be directed towards
equipment containing electrical components, such as the
interior of ovens.
26. The appliance has to be unplugged after use and before
cleaning or user maintenance of the appliance.
27. The surfaces are liable to get hot during use.
BURNS CAN OCCUR FROM TOUCHING HOT METAL
PARTS,HOT WATER OR STEAM. EXERCISE CARE
WHEN HANDLING!
Page 19

19
BEFORE USE
GB
Overview
Handle
Soleplate
Release
button
Filling cup
Water tank
Cord winding groove
Locking pin
Cord clamp
Control panel
(see below)
Steam
generator
Thermal
insulating cushion
Front supprt hook
Trigger
Temperature
indicator
Iron
Steam control button
Temperature dial
(see below)
Minimum setting
Maximum setting
The third setting
The second setting
The first setting
Page 20

20
BEFORE USE
GB
Technical
Specification
Control Panel
2400 Watt
220-240 V
50/60 Hz
Usage Life: 7 Years
Power indicator
Descaling indicator
Lack of water indicator
OFF/ON switch Steam switch
High steam rate indicator
LED Indicator
Medium steam rate indicator
Low steam rate indicator
OFF/ON BUHAR
Page 21

BEFORE USE
21
GB
Trigger Grasp the water tank’s handle with the hand and press the
trigger with one finger, then you can take out of the water
tank for filling water.
Filling cap The filling cap is attached in the water tank, if less water in
the tank, you shall open the cap and fill water. After filling
water, close it.
Release button Press the release button with one finger and grasp the
iron’s handle with the hand, and then you can slide out the
iron anti-clockwise.
Rear support hook When you need to replace the iron onto the thermal
insulating cushion, you can firstly insert the back of the iron
into the rear support hook, then put the soleplate on the
locking pin and press the locking pin down, and then you
can rotate the iron clockwise until the iron is fixed into the
front support hook. At this time, the iron can be secured
onto the thermal insulating cushion.
Front support hook You can put the iron on the front support hook for
operation, and you can also secure the iron into the front
support hook after finishing ironing.
ON/OFF switch Plug in the appliance and press down the ON/OFF switch,
a “D” sound of buzzer will be heard and the power indicator
will be illuminated, also the low steam rate regarded as
defaulted one and its indicator will flash. Press down the
ON/OFF switch for 2 seconds, together with a “D” sound of
buzzer, both the power indicator and steam indicator will
be extinguished, and the appliance will be disconnected
from the power supply.
Temperature dial Turn the dial to set ironing temperature to meet the
garment changed.
Temperature indicator When the iron is heating up, the temperature indicator will
be illuminated. Once the iron has reached the selected
temperature, it will extinguish. The temperature indicator
will be cycled on and off as the iron maintains the selected
temperature during ironing.
Page 22

22
BEFORE USE
GB
Steam switch The steam rate can be selected low, medium or high with
one button operation. You can select your desired steam
rate by pressing the “Steam switch”. And there are three
corresponding indicators to indicate the steam rate you
have selected. The default setting is low steam rate. Any
one to be selected, its indicator will flash, after a few
minutes, the indicator will be changed to illuminating. At
this time, the appliance can produce steam and you can
use the steam for ironing.
Lack of water indicator If less water in the tank, the indicator will be illuminated,
following with two “D” sounds of buzzer, the steam
generator stops working. It prompts you to add water into
the tank.
Descaling indicator If the descaling indicator illuminating, it indicates the steam
generator shall be cleaned by virtue of the mineral deposits
collecting to a degree. When the system ensures the
mineral deposits have been removed, the indicator will be
extinguished.
Drain water cap Open the cap for cleaning the steam generator (see Fig. 4).
Cord clamp When not in use, the iron cord and power cord shall be
stored. Pull out the cord clamp first, after winding the cord
around the cord winding groove, push the cord clamp back.
Locking pin The iron can be tightly secured onto the thermal insulating
cushion by the locking pin.
Automatic power off The appliance will be automatically turned off if no steam
sprayed out from the soleplate within 10 minutes.
Page 23

23
BEFORE USE
GB
Before first use 1. Remove any sticker, protective foil or storage cover from
the soleplate.
2. Heat up the iron to maximum temperature and iron over
a piece of damp cloth for several minutes for the purpose
of removing any residue on the soleplate according to the
section of “Steam ironing”.
NOTE!
It is normal that strange odor comes out from the unit
for the first use. This will cease after a short while.
NOTE!
Some particles may come out of the soleplate when you
use the iron for the first time. This is normal; the
particles are harmless and stop coming out of the iron
after a short while.
NOTE!
When you switch on the appliance, the steam generator
may produce a pumping sound. This is normal; the
sound tells you that water is pumped into the steam
generator.
NOTE!
During the heating process of the soleplate, there will
be little steam coming out from the soleplate
automatically and this phenomenon will continue for
about 3 seconds, This is normal.
Page 24

24
OPERATING
GB
Cihaz hem kuru ütülemeye hem de buharlı ütülemeye The
appliance has two iron portions. You can use dry ironing or
steam ironing, the details refer to the following:.
Dry ironing
1. Place the steam station on a stable and level surface.
2. Press the release button with one finger and grasp the
iron’s handle with the hand to rotate the iron anti-clockwise
to take out of the iron, and then put the iron on the steam
generator’s front hook. And you do not need to secure the
iron onto the thermal insulating cushion during the
operation and can just put the iron on the front hook for
convenient using.
Steam ironing
1. Grasp the water tank’s handle with the hand and press
the trigger with one finger to take out of the water tank,
then open the filling cap and fill water into it. You had
better use purified water with less calcium particles. After
it, close the filling cap. The max capacity of water tank is
1.5L, the water level shall not be exceeded the MAX mark.
2. Replace the detachable water tank properly.
3. Press the release button with one finger and grasp the
iron’s handle with the hand to rotate the iron anti-clockwise
(see Fig. 1) to take out of the iron, and then put the iron on
the steam generator’s front hook. And you do not need to
secure the iron onto the thermal insulating cushion during
the operation and can just put the iron on the front hook for
convenient using.
4. Connect plug to the wall outlet, press down the ON/OFF
switch, and the defaulted low steam rate indicator will
flash. Turn temperature dial to your desired setting, which
is depended on the fabric of garment, and the temperature
indicator will illuminate. Refer to IRONING TIPS latter.
5. After a few minutes, the temperature indicator will be
extinguished, it indicates the soleplate temperature has
achieved the selected temperature. If the indicator of
defaulted steam rate has been changed flashing to
illuminating, it indicates you can take out of the iron and
iron the garment with steam by pressing the steam control
button of the iron.
CAUTION!
Avoid being hurt, never press the locking pin to take out
of the iron.
Page 25

25
OPERATING
GB
CAUTION!
1) Do not touch hot soleplate at any time before cooling
down!
2) Never direct the steam at people!
6. According to your requirement, you can select the
desired steam output for each garment, there are three
modes of low, medium, high on available. Make sure that
there is enough water in the tank.
7. After ironing, press down the ON/OFF switch for a while
and the appliance will be turned off, all the indicators will
be extinguished. Remove the plug from the wall socket.
But the soleplate is still hot, never touch it with hand.
8. After cooling down, you can replace the iron onto the
thermal insulating cushion according to the following
operation: firstly, you can insert the back of the iron into the
rear support hook, then put the soleplate on the locking pin
and press the locking pin down, and then you can rotate
the iron clockwise until the iron is fixed into the front
support hook (see Fig. 2). At this time, the iron can be
secured onto the thermal insulating cushion.
Fig. 2
Page 26

26
AFTER USE
GB
NOTE!
Do not use chemical, steel, wooden or abrasive
cleaners to scrape the soleplate.
Cleaning and
maintenance
Before cleaning, firstly disconnect the power outlet and let
the appliance cools down.
1. Wipe flakes and any other deposits on the soleplate with
a damp cloth or a non-abrasive (liquid) cleaner.
2. Clean the upper part of iron with a soft damp cloth. Wipe
the water drop on the steam generator and the thermal
insulating cushion with dry cloth.
3. To remove the mineral deposits collecting at inner steam
generator, firstly put the iron horizontally on a level surface,
then tilt the steam generator and unscrew the drain water
cap with the attached screwer, and then drain the steam
generator, see Fig. 4.
UYARI!
During the operation or after finish ironing, never place
the hot soleplate on the area except the thermal
insulating cushion. (see Fig.3)
Fig. 3
Page 27

27
AFTER USE
GB
NOTE!
If the attached screwer is lost, you can unscrew the
drain water cap with coin.
NOTE!
Make sure that the whole steam generator together with
the iron can be lifted up together by grasping the iron’s
handle after the iron is properly secured on the thermal
insulating cushion.
4. After drainage, screw the drain water cap tight and
recover the steam generator standing.
5. When do not use the appliance for a long time, pour out
the water in the tank, and store the iron on the thermal
insulating cushion.
6. Wind the iron cord and power cord around the cord
winding groove and secure it by the cord clamps.
WARNING!
To avoid a risk of scald, make sure the steam generator
has been cooled down completely before unscrewing the
drain water cap.
Bottom of steam generator
Drain water cap Screwer
Fig. 4
Page 28

28
AFTER USE
GB
NOT!
When ironing woolen fabrics, shining of the fabric may
occur. So it is suggested that you should turn the article
inside out and iron the reverse side.
Ironinig tips
• Always check first whether a label with ironing
instructions is attached to the article. Follow these ironing
instructions in any case.
• The iron heats up quicker than cooling it down, therefore,
you should start ironing the articles requiring the lowest
temperature such as those made of synthetic fiber.
• If the fabric consists of various kinds of fibers, you must
always select the lowest ironing temperature to iron the
composition of those fibers.
• Silk and other fabrics that are likely to become shiny
should be ironed on the inner side. -Velvet and other
textures that rapidly become shiny should be ironed in one
direction with light pressure applied. Always keeps the iron
moving at any moment.
• Pure wool fabrics (100% wool) may be ironed with the
steam iron. Preferably set temperature dial to the
maximum position and use a dry cloth as a mat.
• Never iron over zip, rivet in the cloth. This will damage
the soleplate. Iron around any such object.
Additional table
Symbol Fabric
Synthetic
fibers/silk
Wool
Cotton
Linen
Note: The symbol means: This article cannot be ironed!
Note: “√”stands for being able to use;
“×”stands for being NOT able to use.
Veriable steam
√
√
x
Temp.
Page 29

29
AFTER USE
GB
Waste disposal If the service life of the device has ended, in particular if
functional disturbances occur, make the worn-out device
unusable by cutting through the power cable.
Dispose of the device according to the environmental regulations applicable in your country.
Electrical waste must not be disposed of together with
household waste. Bring the worn-out device to a collection
center. The packaging of the device consists of
recycling-capable materials. Place these, sorted out
according to material, in the collectors provided, so that
recycling can be carried out on them.
For advice on recycling, refer to your local authority or your
dealer.
Dispose of used dust bag and filters in domestic waste.
CE Declaration of
Conformity
This appliance fulfills the requirements of the Appliance and
Product Safety Law (GPSG) and the EU Directives
2004/108/EC “Electromagnetic Compatibility” and
2006/95/EC “Low-Voltage Directive.” The appliance bears
the CE mark on the rating plate.
Dispatch: Carry the appliance in the original package or a similar,
wellpadded package to prevent damage to the appliance.
This product is produced on behalf of Fakir Elektrikli Ev
Aletleri Dış Ticaret A.Ş. by GUANG DONG XINBAO
ELECTRICAL APPLIANCES HOLDINGS CO., LTD, South
Zhenghe Road, Leliu Town, Shunde District, Foshan
City, Guangdong, China, Tel: +86-757-25333888
Page 30

İmalatçı / İthalatçı Firma:
Fakir Elektrikli Ev Aletleri Dış. Tic. A.Ş.
Meşrutiyet Cad. No:43 Tepebaşı-İstanbul TÜRKİYE
Tel:(212) 249 70 69 (pbx) Fax:(212) 251 51 42
 Loading...