

Page 1
ES - MANUAL DE INSTRUCCIONES
PT - MANUAL DE INSTRUÇÕES
EN - INSTRUCTIONS FOR USE
FR - MANUEL D’UTILISATION
DE - GEBRAUCHSANWEISUNG
IT - MANUALE DI ISTRUZIONI
EL - ENTY¶√ √¢∏°πøN
HU - HASZNÁLATI ÚTMUTATÓ
CZ - NÁVOD K POUŽITÍ
SK - NÁVOD NA POUŽITIE
PL - INSTRUKCJA OBSŁUGI
BG- ИНСТРУКЦИЯ ЗА УПОТРЕБА
RU -
ИНСТРУКЦИЯ ПО ЭКСПЛУАТАЦИИ
N.I.F. F-20.020.517 - Bº. San Andrés, nº 18 • Apartado 49 - 20500 MONDRAGON (Guipúzcoa) ESPAÑA
Diciembre 2005
El fabricante se reserva los derechos de modificar los modelos descritos en este Manual de Instrucciones.
O fabricante, reserva-se os direitos de modificar os modelos descritos neste Manual de Instruções.
The manufacturer reserves the right to modify the models described in this User’s Manual.
Le fabricant se réserve le droit de modifier les modèles décrit dans le présente notice.
Der Hersteller behält sich das Recht vor, die in dieser Gebrauchsanweisung beschrieben Modelle zu verändern.
Il fabbricante si riserva il diritto a modificare i modelli descritti in questo Manuale d’Istruzioni.
O k·t·ÛkÂv·Ût‹ç ‰È·tËp› ·okÏÂÈÛtÈk¿ to ‰Èk·›ˆÌ· v· tpoooÈ‹Û› t· Ìovt¤Ï· ou ÂpÈyp¿ºovt·È Ûto ·pfiv Evtuo O‰ËyÈÒv
.
A gyártó fenntartja magának a jogot a használati útmutatóban közölt műszaki adatok megváltoztatására.
Výrobce si vyhrazuje právo modifikovat modely popsané v tomto uživatelském návodu.
Výrobca si vyhradzuje právo modifikovať modely opísané v tomto užívateľskom návode.
Producent zastrzega sobie prawo do modyfikowania modeli opisanych w niniejszej instrukcji obsługi.
Производителя си запазва правото променя моделите описани в този наръчник.
Производитель оставляет за собой право замены модели, описанные в данном Руководстве пользователя.
MOD.: PL-2210RC
PLANCHA CON RECOGECABLE / FERRO DE ENGOMAR COM CABO RETRÁCTIL /
IRON WITH RETRACTABLE CABLE / FER À REPASSER AVEC ENROULEUR DE CÂBLE /
BÜGELEISEN MIT VORRICHTUNG FÜR KABELAUFZUG / FERRO DA STIRO CON
AVVOLGICAVO /
™π¢∂ƒ√ ª∂ ™À™∆∏ª∞ ¶∂ƒπ∆À§π•∏™ ∆√À ∫∞§ø¢π√À ∆ƒ√º√¢√™π∞™ /
VASALÓ KÁBELFELCSÉVÉLŐVEL / ŽEHLIŚKA S AUTOMATICKÝM NAVÍJENÍM KABELU /
ŽEHLIŚKA S AUTOMATICKÝM NAVÍJANÍM KÁBLA / ŻELAZKO Z AUTOMATYCZNYM SYSTE-
MEM ZWIJANIA KABLA
/ ЮТИЯ СЪС СИСТЕМА ЗА АВТОМАТИЧНО ПРИБИРАНЕ НА
КАБЕЛА / УТЮГ С СИСТЕМОЙ НАМОТКИ ШНУРА ПИТАНИЯ
N.I.F. F-20.020.517 - Bº. San Andrés, nº 18 •
Apartado 49 - 20500 MONDRAGON (Guipúzcoa) ESPAÑA
portada .qxd 29/12/05 17:24 Página 1
Page 2
1
ES
• La seguridad eléctrica del aparato se
garantiza solamente en caso de que
esté conectado a una instalación de
tierra eficaz tal como prevén las vigentes
normas de seguridad eléctrica. El
fabricante no puede ser considerado
responsable de daños derivados de la
falta de toma de tierra de la instalación.
En caso de dudas diríjase a personal
profesionalmente cualificado.
• Después de quitar el embalaje, verificar
que el aparato esté en perfectas
condiciones, en caso de duda, dirigirse
al Servicio de Asistencia Técnica más
cercano.
• Los elementos del embalaje (Bolsas de
plástico, espuma de poliestireno, etc.),
no deben dejarse al alcance de los niños
porque son potenciales fuentes de
peligro
• Se desaconseja el uso de adaptadores,
tomas múltiples y/o prolongaciones. En
caso de que fuera indispensable usarlos,
hay que utilizar únicamente adaptadores
y prolongaciones que sean conformes a
las normas de seguridad vigentes,
prestando atención a no superar el limite
de potencia indicado en el adaptador.
• Este aparato debe utilizarse solo para
uso doméstico. Cualquier otro uso se
considerará inadecuado o peligroso.
• El fabricante no será responsable de
daños que puedan derivar del uso
inapropiado equivocado o poco
adecuado o bien de reparaciones
efectuadas por personal no cualificado.
El uso de cualquier aparato eléctrico
requiere que se respeten algunas reglas
fundamentales.
EN ESPECIAL
•
No tocar el aparato con manos o pies
mojados o húmedos.
• No sumergir el aparato en agua ni poner
el aparato bajo el grifo para añadir agua.
• No usar el aparato en lugares húmedos
o que se utilizan como baño.
• No permitir que los niños utilicen el
aparato.
• Antes de utilizar este aparato por primera
vez, lea detenidamente este manual de
instrucciones y guárdelo para posteriores
consultas. Solo así podrá obtener los
mejores resultados y la máxima
seguridad de uso.
• Antes de utilizar el aparato verificar que
la tensión de la red doméstica
corresponda con la indicada en el
aparato.
• En caso de incompatibilidad entre la
toma de corriente y el enchufe del
aparato, sustituir la toma por otra
adecuada sirviéndose de personal
profesionalmente cualificado.
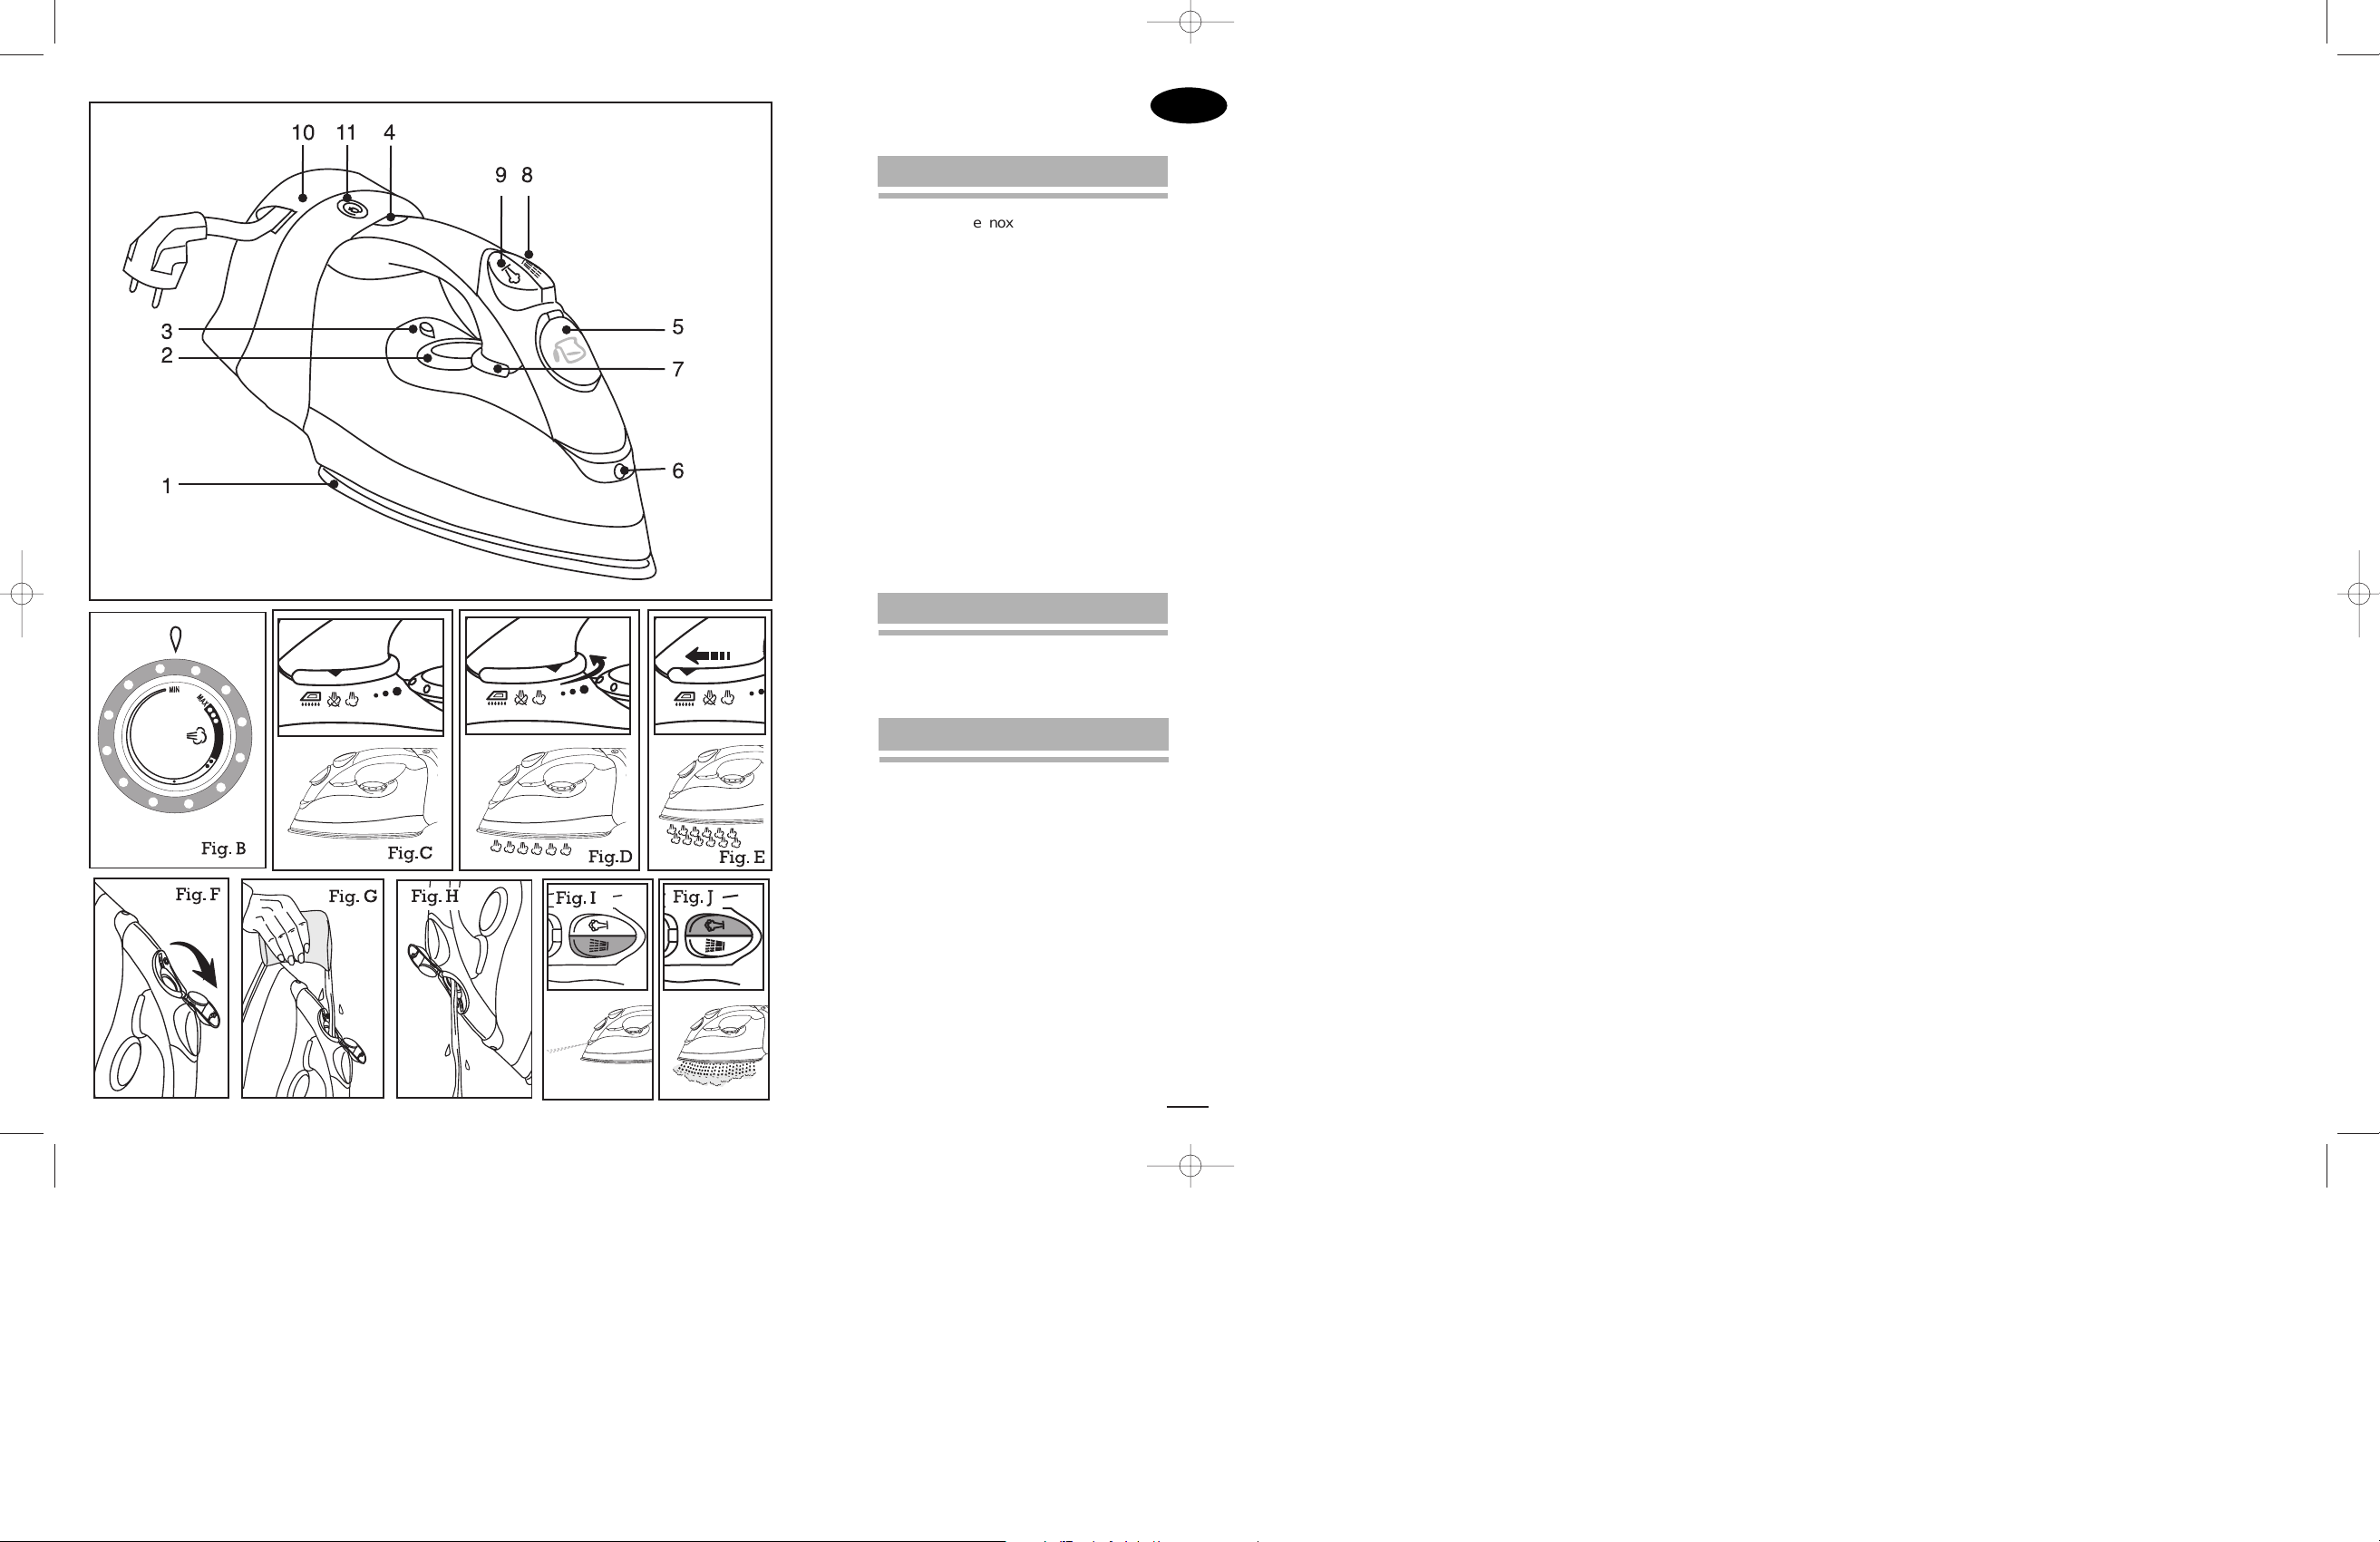
1. DESCRIPCION (Fig. A)
1. Suela de inox
2. Selector de temperatura
3. Indicador selección de temperatura
4. Indicador luminoso
5. Tapa entrada de agua
6. Spray
7. Regulador de vapor / Autolimpieza
8. Pulsador spray
9. Pulsador vapor extra
10. Talón/recogecable
11. Botón recogecable
Supresión de interferencias: Este aparato
ha sido desparasitado conforme a las
directivas sobre supresión de interferencias.
Compatibilidad electromagnética: Este
aparato ha sido desparasitado conforme a
las directivas CEM (compatibilidad
electromagnética).
3. ADVERTENCIAS DE SEGURIDAD
2. CARACTERISTICAS TECNICAS
Tensión/Frecuencia: 230V - 240V~50/60Hz
Potencia: 2020 – 2200W
Volumen depósito: 300cm
3
portada .qxd 29/12/05 17:24 Página 2
Page 3
2
• No abandonar el aparato encendido
porque puede ser una fuente de peligro.
• Al desenchufar la clavija nunca tire del
cable.
• Desenchufar el aparato antes de efectuar
cualquier operación de limpieza o
mantenimiento.
• En caso de avería y/o mal funcionamiento
del aparato, apagarlo y no tratar de
arreglarlo. En caso de necesitar
reparación dirigirse únicamente a un
Servicio de Asistencia Técnica autorizado
por el fabricante y solicitar el uso de
recambios originales. De no respetar lo
anteriormente indicado se pondrá en
peligro la seguridad del aparato.
• El usuario no debe proceder a la
sustitución del cable. En caso de que esté
estropeado o haya que sustituirlo, dirigirse
exclusivamente a un Servicio de
Asistencia Técnica autorizado por el
fabricante.
• Evitar que el cable toque las parte
calientes del aparato.
• El uso de este aparato, produce elevadas
temperaturas, y por tanto existe peligro de
quemaduras durante su manipulación. Por
ello, debe coger el aparato por el asa y
evitar el contacto con las partes metálicas
y con el vapor.
• No dirigir el chorro de vapor hacia las
personas porque es peligroso.
• No usar la plancha en tejidos
excesivamente húmedos.
• No guardar la plancha apoyada sobre su
base mientras esté caliente, hay que
esperar a que se enfríe.
• No hacer mezclas con quitamanchas o
productos similares sobre tejidos a planchar.
• Desenchufar el aparato cuando no se
utiliza. No dejarlo enchufado si no es
necesario.
• Este aparato dispone de un dispositivo de
seguridad que cuando actúa, el aparato
deja de funcionar. Para reactivarlo debe
dirigirse a un Servicio de Asistencia
Técnica autorizado.
• Cuando decida deshacerse
definitivamente del aparato, es
conveniente desenchufarlo y dejarlo
inservible cortando el cable de
alimentación por ejemplo.
Quite las pegatinas o protectores de la suela
y de la carcasa
Agarre el cable y tire lentamente de él
hasta la longitud deseada. Tenga cuidado
en no sobrepasar la marca roja. (Vea
apartado 4)
Siga las instrucciones del apartado
"
Autolimpieza" del punto "11 LIMPIEZA",
para que la plancha quede lista para su uso.
5. ANTES DE UTILIZAR LA PLANCHA
POR PRIMERA VEZ
Esta plancha está equipada con recogecables
para guardar cómodamente el cable de
alimentación. Sujete el cable y tire lentamente
la longitud que necesite para planchar.
Atención: El final del cable está indicado con
una señal roja. No tire del cable cuando vea
esta señal.
Para enrollar el cable, para evitar que le
golpee la clavija sujétela con la mano y pulse
el botón recogecable (11).
4. SISTEMA RECOGECABLE
AUTOMÁTICO
1. Sitúe la plancha en una superficie estable y
resistente al calor
2. Coloque el selector de temperatura (2) en la
posición MIN (Fig. B)
3. Asegúrese de que el regulador de vapor (7)
está en la posición de planchado en seco
(fig. C)
4. Coloque la plancha en posición vertical
apoyándola sobre su talón (10)
5. Enchufe la plancha y elija la temperatura de
planchado mediante el selector de
temperatura. El indicador luminoso (4) se
encenderá.
6. Cuando el indicador luminoso (4) se apague,
la plancha habrá alcanzado la temperatura
seleccionada.
Durante el planchado este indicador
luminoso se encenderá y apagará a
6. PLANCHADO EN SECO
INSTRUCCIONES PARA EL USO
interior.qxd 29/12/05 17:13 Página 1
Page 4
3
intervalos regulares, indicando los ciclos del
termostato. Tenga en cuenta que si cambia
de una temperatura a otra más
baja, el indicador luminoso (4), permanecerá
apagado hasta que la suela (1) baje a la
temperatura seleccionada, y en ese
momento, se encenderá nuevamente
7. Cuando haya terminado, gire el selector de
temperatura a la posición "MIN", y
desenchufe la plancha. Deje que se enfríe
antes de proceder a su limpieza exterior y a
guardarla
Durante el planchado en seco, puede utilizar
la función spray siempre y cuando disponga
de agua en el depósito. (Ver apartados
"Spray" y "Llenado del depósito")
Atención: Para el planchado en seco,
asegurarse de que el regulador de vapor
esté siempre en la posición de planchado
en seco. (Fig. C)
7. LLENADO DEL DEPÓSITO DE AGUA
Coloque la plancha desenchufada en una
superficie estable.
1. Desplace el regulador de vapor (7) a la
posición de planchado en seco (fig. C)
2. Abra la tapa (5) que cubre el orificio de
llenado de agua (Fig F).
3. Eche el agua lentamente por el orificio
de llenado de agua con la ayuda de un
vaso (Fig. G). No eche ningún producto
de limpieza o disolvente en el depósito
de agua.
4. Compruebe que el agua no sobrepase el
nivel máximo de llenado y cierre el
orificio de llenado.
Nota: Si en la zona que vive el agua es
demasiado dura, >27ºF, le recomendamos
que utilice agua destilada.
No utilice agua de
baterías ni agua con aditivos como almidón,
perfume, suavizantes, etc.
8. PLANCHADO A VAPOR
Antes de planchar con vapor, verifique que
el tejido sea idóneo para este tipo de
planchado. El aparato funciona con agua
normal.
En el caso de agua muy calcárea
(dureza superior a 27ºF), aconsejamos el
uso de agua destilada sin ningún aditivo.
1.
Coloque la plancha desenchufada en una
superficie estable y resistente al calor
2. Llene el depósito con agua (Ver "Llenado
del depósito de agua
")
3. Sitúe el selector de temperatura (2) en la
posición de "MIN" (Fig. B).
4. Coloque la plancha en posición vertical
apoyándola sobre su talón (10).
5. Enchufe la plancha y gire el selector de
temperatura a la posición " " o la
posición "Max". Para obtener la máxima
calidad del planchado a vapor, no utilice las
posiciones " " ó " " .
El indicador luminoso (4) se encenderá.
Cuando este indicador luminoso se
apague, la plancha habrá alcanzado la
temperatura seleccionada. Durante el
planchado el indicador luminoso de
funcionamiento se encenderá y apagará a
intervalos regulares, indicando los ciclos
del termostato. Si cambia de una
temperatura a otra más baja, el indicador
luminoso (4) permanecerá apagado hasta
que la suela baje a la temperatura
seleccionada, y en ese momento, se
encenderá nuevamente.
6. Gire el regulador de vapor (7) a una
posición de planchado con vapor (fig. D).
Coloque la plancha en posición horizontal
y el vapor comenzara a salir a través de
los orificios. En caso de que la plancha no
expulsase vapor, golpee con suavidad la
suela sobre la superficie de planchado.
Siempre que sitúe la plancha en posición
vertical apoyándola sobre su talón
interrumpirá la emisión de vapor.
¡Atención! Evite el contacto con el vapor
y no lo dirija hacia las personas.
7.
Cuando haya terminado, gire el selector
de temperatura a la posición "MIN",
desplace el regulador de vapor a la
posición de planchado en seco (Fig. C),
desenchufe la plancha y vacíe el depósito.
El depósito debe vaciarse después de
cada uso, para ello proceda de la forma
siguiente:
Abra la tapa (5) y vacíe el agua del
depósito (Fig. H).Presione el botón de
vapor extra para que caiga el agua que
haya podido quedar en el depósito cuando
la suela esté todavía caliente Deje la
interior.qxd 29/12/05 17:13 Página 2
Page 5
4
9. SPRAY (fig. I)
Para el uso de esta función es necesario que
haya agua en el depósito. Presione el
Pulsador de spray (8) (Fig. I), si lo que
desea es obtener
agua pulverizada a fin de humedecer tejidos
secos y difíciles como pueden ser, por
ejemplo el lino, el algodón o la lana o con
objeto de actuar sobre arrugas resistentes. La
función spray es, de igual modo, útil para
humedecer arrugas generadas por accidente
en el tejido durante el planchado.
La salida del agua pulverizada se realiza a
través de la boquilla de salida del spray (6)
Nota: Para iniciar la acción del pulverizador, es
posible que, la primera vez que utilice su plancha,
tenga usted que presionar el pulsador de spray,
varias veces.
11. LIMPIEZA Y MANTENIMIENTO
Desenchufe la plancha y espere hasta que
se enfríe antes de proceder a su limpieza.
Limpie el exterior y la suela de la plancha
con un paño húmedo. No utilice detergentes
ni productos abrasivos para su limpieza.
La superficie de la Suela (1) debe estar
siempre limpia, y para su limpieza, es
suficiente pasar un paño húmedo sobre la
superficie fría.
Con el fin de impedir que la suela se raye,
deberá evitar planchar corchetes
cremalleras, botones metálicos, etc. y de
igual modo, no deberá colocar la plancha
sobre superficies metálicas o ásperas.
Después de cada uso, vacíe el depósito y
deje enfriar la plancha antes de retirarla.
No sumerja la plancha en agua ni la
ponga bajo el grifo.
Auto Limpieza
Con el fin de prevenir la concentración de
minerales perjudiciales que pudieran obstruir
la plancha y garantizar el correcto
calentamiento y vaporizado. Es aconsejable
utilizar esta función al menos una vez al
mes, dependiendo de la dureza del agua y
del uso de la plancha.
1. Situar el Selector de temperatura en la
posición "MIN"
2. Posicione el regulador de vapor en la
posición de planchado en seco (Fig. C).
3. Llene al máximo el depósito de agua.
4. Coloque la plancha en posición vertical
apoyándola sobre su talón.
5. Enchufe la plancha y gire el selector de
temperatura a la posición "MAX". Espere
hasta que el indicador luminoso se
apague y se encienda unas 2 ò 3 veces.
6. Gire el selector de temperatura a la
posición "Min"y desenchufe la plancha
7. Sujete la plancha en posición horizontal
sobre un lavabo o fregadero y gire el
regulador de vapor a la posición de
10. VAPOR EXTRA (Fig. J)
Ponga la plancha en marcha tal y como se ha
indicado en "
Planchado con vapor".
Cuando la plancha haya alcanzado la
temperatura seleccionada, presione con
firmeza el pulsador de vapor extra (9)
(Fig.J), si lo que desea es una
expulsión intensa de vapor para planchar con
mayor rapidez o alisar arrugas difíciles.
Espere durante al menos 5 segundos entre
cada actuación sobre el pulsador vapor extra
a fin de permitir que la plancha se caliente de
nuevo y se obtenga de éste modo el nivel
máximo de vapor adicional.
Nota: Antes de empezar a planchar,
presione e botón de vapor extra varias
veces para activarlo.
Para obtener la mejor calidad de vapor,
no presione el botón de vapor extra
más de tres veces una vez que haya
apagado el indicador luminoso.
Vapor vertical: El vapor extra también
funciona cuando la plancha está en posición
vertical. Para utilizar esta función, sostenga la
plancha en posición vertical hasta que se
enfríe.
Nota: Si durante el planchado necesita
llenar el depósito, desenchufe la plancha
para llenarlo de agua.
plancha en posición vertical a una distancia
de aprox 15 a 20cm del tejido y presione el
pulsador de vapor extra (9)
Atención: Evite el contacto con el vapor.
No dirija el flujo de vapor hacia las
personas.
interior.qxd 29/12/05 17:13 Página 3
Page 6
5
Autolimpieza (Fig. E). Mantenga el
regulador de vapor en esta posición para
que el vapor junto con gotas de agua
hirviendo fluyan por los orificios de salida
de la suela.
8. Mueva suavemente la plancha hacia
delante y hacia atrás, hasta que el
depósito se haya vaciado.
9. Pase la plancha por encima de un trapo
húmedo con objeto de limpiar la suela
10. Cuando haya terminado, deje que la
plancha se enfríe antes de retirarla.
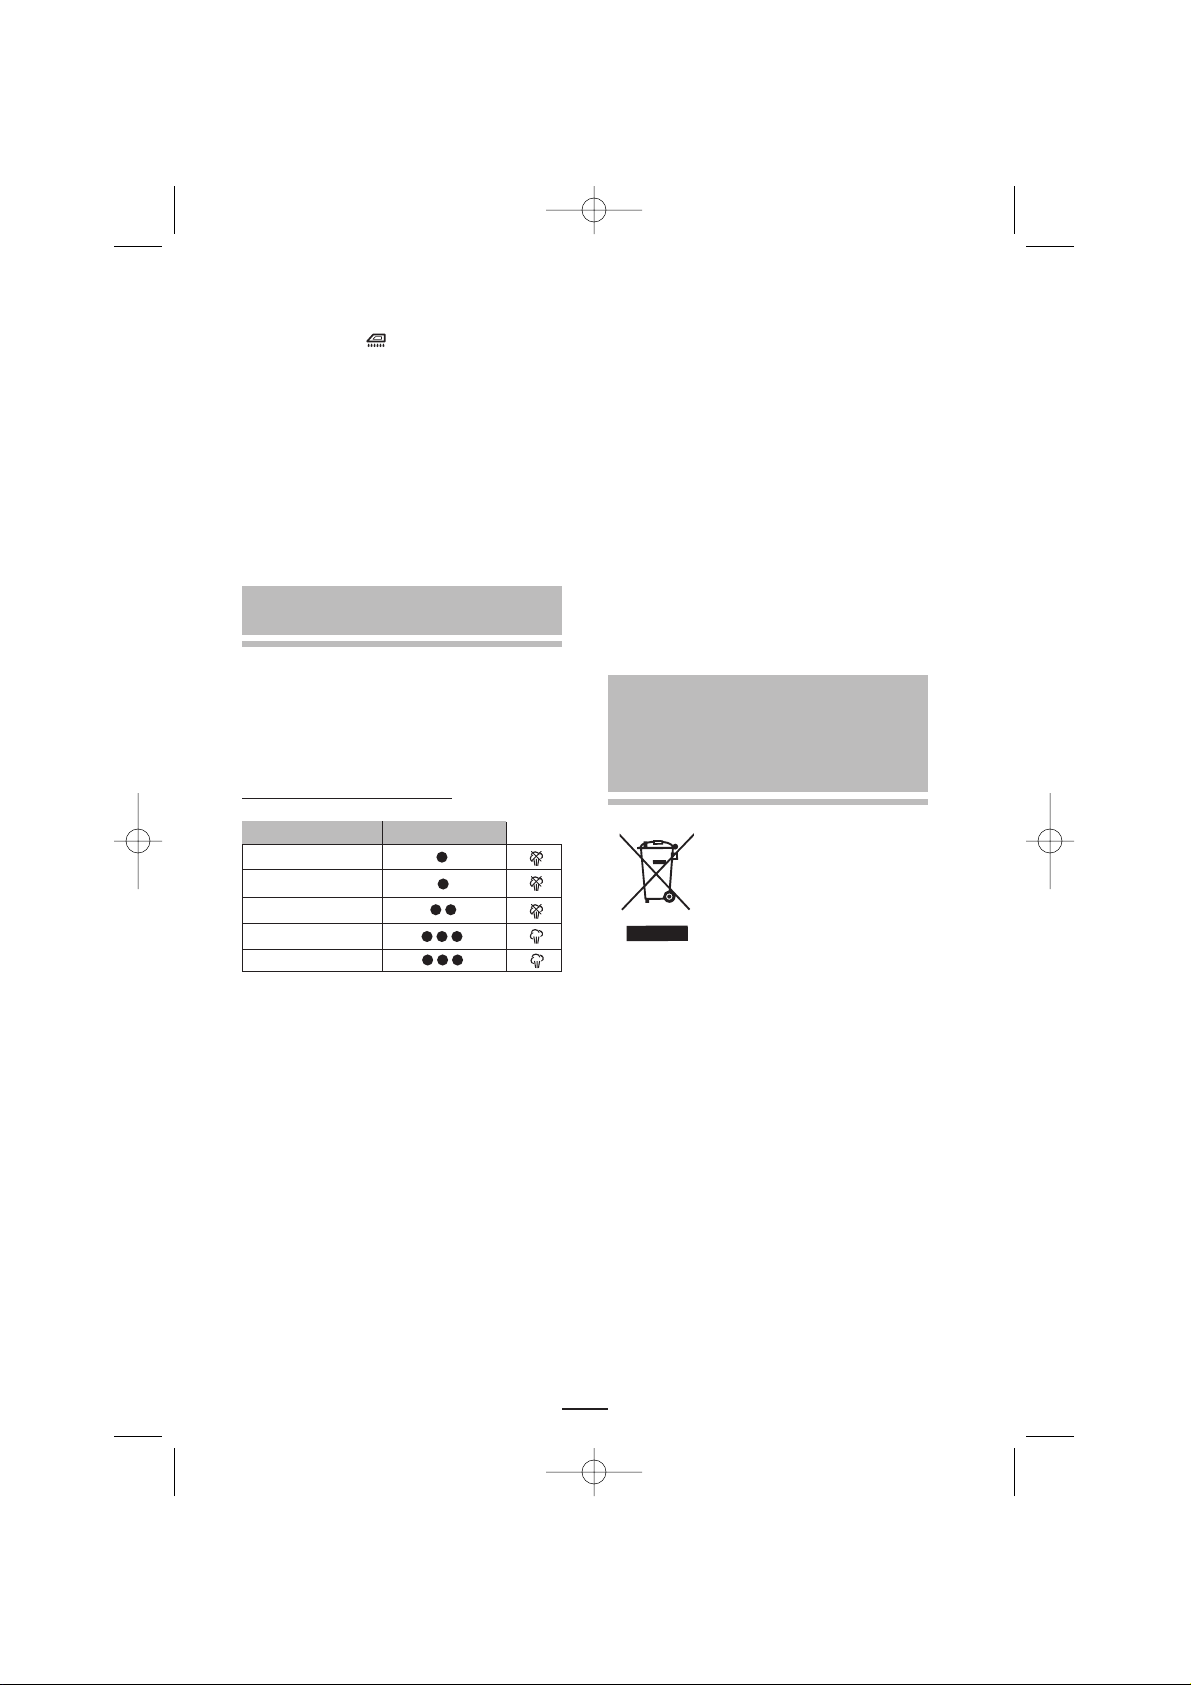
Fibras sintéticas
Seda
Lana
Algodón
Lino
Tejido Temperatura
12. CONSEJOS PARA UN BUEN
PLANCHADO
A la hora de seleccionar la temperatura guíese
de las indicaciones de la etiqueta de la prenda a
planchar. En caso de que no la tuviera, en la
siguiente tabla tiene una orientación para la
selección de la temperatura
T
ABLA DE TEMPERATURAS
Si tiene dudas sobre la composición del tejido de
la prenda, empiece con una temperatura baja,
planchando en una zona oculta de la prenda, y
aumente progresivamente la temperatura hasta
que las arrugas desaparezcan sin estropear el
tejido.
• Los tejidos, como terciopelo lana, etc. Así
como guantes y bolsos, podrán recuperar el
aspecto y suavidad originales pasando
lentamente la plancha a poca distancia de
los mismos, con el vapor en función.
• Las alfombras quedarán como nuevas
eliminando las huellas de los muebles,
gracias al vapor que penetra donde el pelo
está aplastado y luego cepillando
delicadamente
• Dividir las prendas según la temperatura
requerida, comenzando por aquellas que la
necesitan más baja
• Los tejidos de seda, se deben planchar por el
revés.
• Los tejidos de lana, algodón y lino fino, se
pueden planchar con vapor por el revés, o
bien por el derecho, interponiendo una tela
fina para evitar el "brillo". Los tejidos
almidonados necesitan más humedad.
Planchar por el derecho del tejido los colores
blancos y claros y por el revés, los colores
oscuros así como los bordados para darles
realce.
• Los tejidos de lino, se pueden planchar con
vapor, vaporizando abundantemente y
planchando por el revés los tejidos oscuros
para evitar el "brillo". Planchar por el derecho
las solapas para darles mayor realce.
13. INFORMACIÓN PARA LA
CORRECTA GESTIÓN DE LOS
RESIDUOS DE APARATOS
ELÉCTRICOS Y ELECTRÓNICOS
Al final de la vida útil del
aparato, éste no debe
eliminarse mezclado con los
residuos domésticos
generales.
Puede entregarse, sin coste
alguno, en centros específicos de recogida,
diferenciados por las administraciones
locales, o distribuidores que faciliten este
servicio.
Eliminar por separado un residuo de
electrodoméstico, significa evitar posibles
consecuencias negativas para el medio
ambiente y la salud, derivadas de una
eliminación inadecuada, y permite un
tratamiento, y reciclado de los materiales
que lo componen, obteniendo ahorros
importantes de energía y recursos.
Para subrayar la obligación de colaborar con
una recogida selectiva, en el producto
aparece el marcado que se muestra como
advertencia de la no utilización de
contenedores tradicionales para su
eliminación.
Para mas información, ponerse en contacto
con la autoridad local o con la tienda donde
adquirió el producto.
interior.qxd 29/12/05 17:13 Página 4
Page 7
11
1. Stainless steel base
2. Temperature Selector
3. Temperature selection indicator
4. Pilot light
5. Water inlet cover
6. Spray
7. Steam control / Self-cleaning knob
8. Spray button
9. Extra steam button
10. Support base/cable retractor
11. Cable retractor button
Interference suppression: The
interference of this appliance has been
suppressed in accordance with interference
suppression standards.
Electromagnetic compatibility: This
appliance complies with the CEM standards
of electromagnetic compatibility.
3. SAFETY WARNINGS
• Before using this appliance for the first time read
this instruction manual carefully and keep it for
future reference. Only by doing this can you
obtain the best results from your iron and ensure
its safe use.
• Before using the appliance, make sure that the
mains voltage in your home corresponds to that
indicated for the iron.
• In the event of the socket and plug being
incompatible, have a qualified electrician replace
the socket.
• The electrical safety of your appliance is only
guaranteed if it is connected to an efficient earth
installation, as stipulated in current electrical
safety regulations. The manufacturer accepts no
responsibility for any damage resulting from the
appliance not being connected to an earth
installation. If in doubt, contact a qualified
professional.
• After removing the packaging, check that the
appliance is in perfect condition. If in doubt,
contact your nearest Technical Assistance centre.
• The packaging materials (plastic bags,
polystyrene foam etc.) should be kept out of the
reach of children, as they could constitute a
safety hazard.
• The use of adapters, and/or extension leads is
not advised. In the event of their use being
absolutely necessary, always ensure that they
conform to current safety standards, and take
care not to exceed the indicated maximum
voltage level.
• This appliance is for domestic use only. Any other
use is considered unsuitable and dangerous.
• The manufacturer accepts no responsibility for
damage resulting from improper use or repairs
carried out by unqualified personnel.
Certain fundamental rules must be respected in
the use of any electric appliance.
IN PARTICULAR
•
Never touch the appliance with wet or damp
hands or when your feet are wet. Do not
submerge the appliance in water.
• Do not use the appliance in damp places or in
rooms that are used as bathrooms.
• Do not let children touch the appliance.
• Do not leave the iron unattended when it is
switched on, as this could constitute a potential
safety hazard.
• Never pull on the cable to unplug the appliance.
• Always unplug the appliance before carrying out
any cleaning or maintenance operations.
• In the event of technical failure or improper
working, switch the machine off and do not try to
repair it. Repairs should only be carried out by a
Technical Assistance Service authorised by the
manufacturer. Always demand the use of original
spare parts. Any failure to follow the above
instructions could affect the safe functioning of
the appliance.
• If you decide never to use the appliance again,
cut the lead, first ensuring that the appliance is
unplugged.
• The user should never attempt to change the
cable. If, for any reason, the cable requires
changing, contact a Technical Assistance Service
authorised by the manufacturer.
• Never hold the appliance under the tap to fill the
water deposit.
• Do not let the mains cable touch the hot parts of
the iron.
1. DESCRIPTION (Fig. A)
2. TECHNICAL DETAILS
EN
Voltage/Frequency: 230V - 240V~50/60Hz
Wattage: 2020 – 2200W
Deposit capacity: 300cm
3
interior.qxd 29/12/05 17:13 Página 10
Base
Page 8

12
• During use, the appliance becomes extremely hot
and can cause serious burns. Always pick up the
iron by the handle and avoid contact with the
metallic parts and steam.
• Do not turn the iron towards people when it is
expelling steam. This is extremely dangerous.
• Do not use the iron on very wet fabrics.
• Do not store the iron in a horizontal position (base
down) whilst still hot. Wait until it has cooled.
• Do not mix stain-removers or similar products on
fabrics to be ironed.
• Unplug the iron when not in use. Never leave
plugged in when not absolutely necessary.
• The appliance contains a safety device which,
when activated, interrupts the working of the iron.
To reactivate your iron, contact an authorised
Technical Assistance Service.
• If you decide never to use the appliance again,
remove the plug from the socket and render it
useless by cutting the power cable.
5. BEFORE USING YOUR IRON FOR
THE FIRST TIME
Remove all stickers or protective labels from
the base and the body.
Grasp the cable and pull out as much as
you need slowly. Make sure not to go
beyond the red mark. (See section 4)
Follow the instructions given in the "Selfcleaning
" section in point "11 – CLEANING",
in order to prepare your iron for use.
4. AUTOMATIC CABLE RETRACTOR
SYSTEM
This iron is equipped with a cable retractor to
store the power cable conveniently. Hold the
cable and slowly pull out the length that you
need for ironing.
Warning: The end of the cable is marked in red.
Do not pull the cable any further when the red
mark is visible.
When rolling up the cable, to avoid being hit by
the plug, hold it in your hand and press the cable
retractor button (11).
6. DRY IRONING
1. Place the iron on a stable and heat-resistant
surface.
2. Turn the temperature selector knob (2) to
MIN (Fig. B).
3. Slide the steam control knob (7) to the dry
iron position (Fig. C).
4. Place the iron in an upright position, resting it
on the support base (10).
5. Plug it in and turn the temperature selector to
the desired position. The pilot light (4) will
come on.
6. When the iron has reached the selected
temperature, the pilot light (4) will switch off.
This pilot light may turn on and off several
times while you are ironing, indicating the
cycles of the thermostat. Remember that if
you change from a higher to a lower
temperature, the pilot light (4) will remain off
until the temperature of the base (1) has
dropped to the selected level, at which point it
will come on again.
7. When you have finished, turn the
temperature selector to MIN and unplug the
iron. Leave to cool before cleaning the
exterior and storing.
When you are dry ironing, you can use the
spray option at any moment, providing there
is water in the deposit. (See sections entitled
"Spray" and "Filling the deposit").
Warning: For dry ironing, make sure that the
steam control knob is always on the dry
ironing setting. (Fig. C)
INSTRUCTIONS FOR USE
7. FILLING THE WATER DEPOSIT
Place the unplugged iron on a stable surface.
1. Slide the steam control knob (7) to the dry iron
position (Fig. C).
2. Open the lid that covers the water inlet (5) (Fig. F).
3. Slowly pour water into the inlet using a cup
(Fig. G). Never pour cleaning products or
solvents into the water deposit.
4. Check that the water does not exceed the
maximum water level and replace the cover.
Note: If the water in your area is too hard,
>27º F, we recommend that you use distilled
water.
Do not use battery water or water mixed
with starch, perfume, fabric softener, etc.
interior.qxd 29/12/05 17:13 Página 11
Page 9

13
9. SPRAY (FIG. I)
This function will only work if there is water
in the deposit. Press the spray button (8)
(Fig. I), to obtain a burst of sprayed water
to dampen dry or difficult-to-iron fabrics such
as linen, cotton or wool. Dampening the fabric
slightly will help remove stubborn creases.
The spray option is also useful for dampening
accidental creases created whilst ironing.
Spray is released through spray outlet nozzle
(6).
Note: The first time you use your iron, you
may have to press the spray button a few
times before the option will work.
10. EXTRA STEAM (FIG. J)
Turn the iron on as indicated in the "Steam
ironing" section.
When the iron has reached the selected
temperature, press the extra steam button
(9) down firmly (Fig. J), for an intense
steam expulsion. This option enables you to
iron more quickly and to smooth out
stubborn creases more easily. Wait for at
least 5 seconds before pressing the extra
steam button again, in order to enable the
iron to reach the optimum temperature
required for maximum additional steam
expulsion.
Note: Before ironing, press the extra steam
button a few times to activate it. For
best results, do not press the extra
steam button more than three times
after the pilot light has gone off.
Vertical steam: The extra steam function
can also be used when the iron is in an
upright position. To do so, hold the iron in
an upright position approx. 15 to 20 cm
from the fabric and press the extra steam
button (9)
Warning: Avoid contact with the steam.
Do not direct the steam jets towards
people.
8. STEAM IRONING
Before steam ironing any garment, check that
the fabric is designed for this kind of treatment.
The appliance works with normal tap water.
If
the water in your area is very hard
(hardness level over 27º F), we recommend
the use of pure distilled water.
1.
Place the unplugged iron on a stable, heatresistant surface.
2. Fill the water deposit (See "Filling the
deposit"
).
3. Turn the temperature selector (2) to "MIN"
(Fig. B).
4. Place the iron in an upright position, resting it
on the support base (10).
5. Plug the iron in and turn the temperature
selector to " " or "Max". To obtain
optimum results when steam ironing, do not
use the " " or " " positions.
The pilot light (4) will come on. When this
pilot light switches off, the iron will have
reached the selected temperature. The pilot
light will turn on and off at regular intervals
during the ironing process, indicating the
cycles of the thermostat. Remember that if
you change from a higher to a lower
temperature, the pilot light (4) will remain off
until the temperature of the base has
dropped to the selected level, at which point
it will come on again
6. Turn the steam control knob (7) to one of the
steam iron positions (fig. D). Hold the iron in
a horizontal position and the steam outlets
will begin to expel steam. If no steam is
produced, lightly tap the iron base against
the ironing board. Setting the iron in an
upright position, resting on the support base,
will interrupt the steam expulsion.
Caution! Avoid contact with the steam
and do not direct it towards people.
7.
When you have finished, turn the
temperature selector to "MIN", slide the
steam control knob to the dry iron position
(Fig. C), unplug the cable and empty the
deposit. The deposit should be emptied after
each use as follows:
Open the cover (5) and pour the water out of
the deposit (Fig. H). Press the extra steam
button to remove any water that may still be
in the deposit while the base is still hot.
Leave in an upright position until cool.
Note: If you need to top up the deposit
while ironing, always unplug the iron
beforehand.
interior.qxd 29/12/05 17:13 Página 12
Page 10

14
11. CLEANING AND MAINTENANCE
Unplug the iron and wait until it has cooled
before cleaning.
Clean the exterior and base with a damp cloth.
Do not use detergents or abrasive products.
The surface of the iron base (1) should be kept
clean at all times. To clean the base, wait until
it has cooled completely and then wipe with a
damp cloth.
In order to prevent scratching, do not iron over
hook and eye fastenings, zips or metallic
buttons, etc. and do not place the iron on
metallic or rough surfaces.
After each use, empty the deposit and leave
the iron to cool before storing.
Never submerge the iron in water or hold it
under a running tap.
Self-cleaning
In order to prevent the accumulation of harmful
minerals that may obstruct the iron, and to
guarantee correct heating and steam generation,
we recommend that you use this function at
least once a month, depending on frequency of
use and the hardness of the water in your area.
1. Turn the temperature selector to "MIN".
2. Slide the steam control knob to the dry iron
position (Fig. C).
3. Fill the water deposit to the maximum level.
4. Place the iron in an upright position, resting
on its support base.
5. Plug it in and turn the temperature selector
to "MAX". Wait until the pilot light switches
off and on 2 or 3 times.
6. Turn the temperature selector to "MIN" and
unplug the iron.
7. Hold the iron in a horizontal position over a
sink or basin and turn the steam control
knob to the self-cleaning position
(Fig. E). Leave the knob in this position to
enable steam and boiling water droplets to
flow through the base’s steam outlets.
8. IGently move the iron backwards and
forwards until the deposit is completely
empty.
9. Iron over a damp cloth in order to clean the
base
10. When you have finished, leave the iron to
cool before storing.
Synthetic fibres
Silk
Wool
Cotton
Linen
Fabric Temperature
12. IRONING TIPS
When selecting the temperature, follow the
instructions printed on the label of the garment to
be ironed. If the garment does not have a label,
use the table below:
TEMPERATURE TABLE
If you have any doubts about the composition
of the fabric, always begin ironing at a low
temperature on a concealed part of the
garment and slowly increase the temperature
setting, taking care not to spoil the fabric, until
all the creases have disappeared.
• Fabrics such as velvet, wool, etc., and
items such as gloves and bags, can be
revamped by slowly passing the iron a few
inches above them with the steam option
on.
• Carpets can be made to look like new and
furniture marks eliminated by lightly
steaming the flattened area and then
brushing gently.
• Divide the items to be ironed into
temperature groups and begin with those
that require the lowest setting.
• Silken fabrics should be ironed inside out.
• Wool, cotton and fine linen should be steam
ironed inside out. Alternatively, you can iron
them the right way round covering them first
with a thin piece of cloth to avoid "shiny"
results. Starched fabrics need to be
dampened slightly. For best results, iron
white and light coloured garments the right
way round, and dark and embroidered
items inside out.
• Linen fabrics should be steam ironed. Use
the spray option liberally and iron dark
garments inside out to avoid "shiny" results.
Iron lapels the right way round for best
results.
interior.qxd 29/12/05 17:13 Página 13
Page 11

15
13. INFORMATION FOR THE CORRECT
DISPOSAL OF ELECTRICAL AND
ELECTRONIC APPLIANCES
At the end of its working life,
the product must not be
disposed of as urban waste. It
must be taken to a special
local authority differentiated
waste collection centre or to a
dealer providing this service. Disposing of a
household appliance separately avoids
possible negative consequences for the
environment and health deriving from
inappropriate disposal and enables the
constituent materials to be recovered to
obtain significant savings in energy and
resources.
To remind you that you must collaborate with
a selective collection scheme, the symbol
shown appears on the product warning you
not to dispose of it in traditional refuse
containers.
For further information, contact your local
authority or the shop where you bought the
product.
interior.qxd 29/12/05 17:13 Página 14
Page 12

16
1. DESCRIPTION (Fig. A)
1. Semelle
2. Sélecteur de température
3. Indicateur sélection de température
4. Témoin lumineux
5. Bouchon entrée d’eau
6. Spray
7. Régulateur de débit vapeur /
Autonettoyage
8. Bouton-poussoir spray
9. Bouton-poussoir vapeur extra
10. Talon d’appui/enrouleur de câble
11. TBouton enrouleur de câble
Suppression d’interférences: Cet appareil a
été déparasité, conformément aux Directives
de suppression des interférences.
Compatibilité électromagnétique: Cet
appareil est conforme aux Directives CEM
(Compatibilité Électromagnétique).
3. CONSEILS DE SÉCURITÉ
• Avant d’utiliser cet appareil pour la première
fois, lisez attentivement ce manuel d’utilisation
et gardez-le pour le consulter ultérieurement.
C’est la seule façon d’obtenir les meilleurs
résultats et une sécurité d’utilisation optimale.
• Avant d’utiliser l’appareil vérifier que la tension
du réseau domestique correspond à celle
indiquée sur l’appareil.
• En cas d’incompatibilité entre la prise de
courant et la fiche de l’appareil, remplacer la
prise par une autre qui convient en vous
adressant à un professionnel qualifié.
• La sécurité électrique de l’appareil est garantie
seulement s’il est raccordé à une installation de
terre efficace tout comme le prévoient les
normes de sécurité électrique en vigueur. Le
fabricant ne peut être porté responsable des
dommages qui découlent du manque de prise
de terre de l’installation. En cas de doute,
adressez-vous au personnel
professionnellement qualifié.
• Après avoir enlevé l’emballage, vérifier que
l’appareil est en parfait état, en cas de doute,
s’adresser au Service d’Assistance Technique
le plus proche.
• Les éléments de l’emballage (Sacs en
plastique, polystyrène, etc.) ne doivent pas
être laissés à la portée des enfants car il s’agit
là de sources potentielles de danger.
• L’utilisation d’adaptateurs, et/ou de rallonges
est déconseillée. Si ces éléments s’avéraient
indispensables, utiliser seulement des
adaptateurs et des rallonges qui respectent
les normes de sécurité en vigueur. Veillez à
ne pas dépasser la limite de puissance
mentionnée sur l’adaptateur.
• Cet appareil est destiné uniquement à un
usage domestique. Toute autre utilisation est
considérée inappropriée et dangereuse.
• Le fabricant ne sera pas responsable des
dommages pouvant survenir à la suite de
l’usage inapproprié, erroné, peu correct ou
des réparations effectuées par un personnel
non qualifié.
L’utilisation de tout appareil électrique
implique le respect de quelques règles
fondamentales.
NOTAMMENT
•
Ne pas toucher l’appareil à l’aide de mains ou
de pieds mouillés ou humides. Ne pas plonger
l’appareil dans de l’eau.
• Ne pas utiliser l’appareil dans des endroits
humides ou qui sont utilisés comme salle de
bains.
• Ne pas autoriser les enfants à utiliser
l’appareil.
• Ne pas abandonner l’appareil allumé car il
peut représenter une source de danger.
• En débranchant la fiche, ne jamais tirer sur le
câble.
• Débrancher l’appareil avant d’effectuer toute
opération de nettoyage ou de maintenance.
• En cas de panne et/ou de mauvais
fonctionnement de l’appareil, éteindre ce
dernier et ne pas essayer de le réparer. S’il
requiert une réparation, s’adresser
uniquement à un Service d’Assistance
Technique autorisé par le fabricant et
demander à utiliser des pièces de rechange
2. CARACTÉRISTIQUES TECHNIQUES
FR
Tension /Fréquence: 230 V – 240 V~50/60 Hz
Puissance: 2020 – 2200 W
Volume réservoir: 300cm
3
interior.qxd 29/12/05 17:13 Página 15
Page 13

17
semblables aux pièces d’origine. Si vous ne
respectez pas ceci, la sécurité de l’appareil
sera mise en danger.
• L’usager ne doit pas procéder au
remplacement du câble. Dans le cas où il
serait endommagé ou qu’il faudrait le
remplacer, s’adresser exclusivement à un
Service d’Assistance Technique autorisé par
le fabricant.
• Ne jamais mettre l’appareil sous le robinet
pour ajouter de l’eau.
• Éviter que le câble ne touche les parties
chaudes de l’appareil.
• L’utilisation de cet appareil entraîne des
températures élevées, et par conséquent il
existe un danger de brûlures au cours de sa
manipulation. Par conséquent, vous devez
prendre l’appareil par l’anse et éviter le
contact avec les parties métalliques et avec
la vapeur.
• Ne pas diriger le jet de vapeur vers les
personnes car cela est dangereux.
• Ne pas utiliser le fer à repasser sur des
tissus excessivement humides.
• Ne pas laisser le fer à repasser appuyé sur
sa base alors qu’il est encore chaud, il faut
attendre qu’il refroidisse.
• Ne pas faire de mélanges avec des
dégraisseurs ou produits similaires sur des
tissus à repasser.
• Débrancher l’appareil lorsqu’il n’est pas
utilisé. Ne pas le laisser branché si cela
n’est pas nécessaire.
• Cet appareil possède un dispositif de
sécurité, lorsque celui-ci est actionné,
l’appareil cesse de fonctionner. Pour le
réactiver vous devez vous adresser à un
Service d’Assistance Technique agréé.
• Si vous décidez vous séparer définitivement
de l’appareil, débranchez la prise et de suite
coupez le câble, et ainsi inutilisés l’appareil.
Enlevez les étiquettes ou protecteurs de la
semelle et du corps
Tirer lentement sur le câble pour le dérouler
à la longueur souhaitée. Veiller à ne pas
dépasser la marque rouge (Voir point 4).
Suivez les instructions de la rubrique "Autonettoyage" du point "11 NETTOYAGE", pour
que le fer à repasser soit prêt à l’emploi.
5. AVANT D’UTILISER LE FER À
REPASSER POUR LA PREMIÈRE FOIS
Ce fer à repasser est muni d’un enrouleur
automatique de câble, pour faciliter son
rangement. Saisir le câble et le dérouler
lentement à la longueur souhaitée pour un
repassage aisé.
Attention: La marque rouge indique le bout
du câble. Ne plus tirer sur le câble dès que
cette marque apparaît.
Pour enrouler le câble et pour éviter qu’il ne
heurte la fiche, le saisir avec la main et appuyer
sur le bouton enrouleur de câble (11).
4. ENROULEUR AUTOMATIQUE DE
CÂBLE
6. REPASSAGE À SEC
1. Placez le fer à repasser sur une surface
stable et résistante à la chaleur
2. Mettez le sélecteur de température (2) sur
la position MIN (Fig. B)
3. Assurez-vous que le régulateur de vapeur
(7) se trouve sur la position de repassage à
sec (fig. C)
4. Placez le fer à repasser en position verticale
en l’appuyant sur son talon (10)
5. Branchez le fer à repasser et choisissez la
température de repassage grâce au
sélecteur de température. Le témoin
lumineux (4) s’allumera.
6. Lorsque le témoin lumineux (4) s’éteindra, le
fer à repasser aura atteint la température
sélectionnée.
Au cours du repassage ce témoin lumineux
s’allumera et s’éteindra à intervalles
réguliers, indiquant les cycles du thermostat.
Tenez compte du fait que si vous passez
d’une température à une autre plus basse,
le témoin lumineux (4) restera éteint jusqu’à
ce que la semelle (1) atteigne la
température sélectionnée, et à ce momentlà, il s’allumera de nouveau.
7. Lorsque vous aurez terminé, tournez le
sélecteur de température sur la position
"MIN", et débranchez le fer à repasser.
Laissez-le refroidir avant de procéder à son
INSTRUCTIONS POUR L’UTILISATION
interior.qxd 29/12/05 17:13 Página 16
Page 14

18
7. REMPLISSAGE DU RÉSERVOIR
D’EAU
Placez le fer à repasser débranché sur une
surface stable.
1. Mettez le régulateur de vapeur (7) sur la
position de repassage à sec (fig. C)
2. Ouvrez le bouchon (5) qui couvre l’orifice
de remplissage d’eau (Fig.F).
3. Versez l’eau lentement par l’orifice de
remplissage d’eau à l’aide d’un verre
(Fig.G). Ne versez aucun produit de
nettoyage ou dissolvant dans le réservoir
d’eau.
4. Vérifiez que l’eau ne dépasse pas le
niveau maximum de remplissage et
fermez l’orifice de remplissage.
Remarque: Si dans la région où vous
habitez l’eau est trop dure, >27ºF, nous
vous recommandons d’utiliser de l’eau
distillée.
N’utilisez pas d’eau de batteries ni
d’eau avec des additifs tels que amidon,
parfum, adoucissants, etc.
nettoyage extérieur et avant de le ranger.
Au cours du repassage à sec, vous avez
la possibilité d’utiliser la fonction spray à
condition d’avoir de l’eau dans le réservoir.
(Cf. points "Spray" et "Remplissage du
réservoir").
Attention: Pour le repassage à sec,
veillez à ce que le régulateur de vapeur
se trouve toujours en position repassage
à sec (Fig. C).
8. REPASSAGE À VAPEUR
Avant de repasser avec de la vapeur, vérifiez
que le tissu convient pour ce type de
repassage. L’appareil fonctionne avec de
l’eau normale.
Si l’eau de votre région est
très calcaire (dureté supérieure à 27ºF),
nous vous recommandons d’utiliser de
l’eau distillée sans le moindre additif.
1.
Placez le fer à repasser débranché sur une
surface stable et résistante à la chaleur
2. Remplissez le réservoir avec de l’eau (Cf.
"Remplissage du réservoir")
3. Mettez le sélecteur de température (2) sur
la position de "MIN" (Fig. B).
4. Placez le fer à repasser en position
verticale en l’appuyant sur son talon (10).
5. Branchez le fer à repasser et tournez le
sélecteur de température sur la position
" " ou sur la position "Max". Pour
obtenir la qualité maximale du repassage à
vapeur, n’utilisez pas les positions " " ou
" ".
Le témoin lumineux (4) s’allumera. Quand
ce voyant s’éteindra, le fer à repasser aura
atteint la température sélectionnée. Au
cours du repassage le témoin de
fonctionnement s’allumera et s’éteindra à
intervalles réguliers, indiquant les cycles du
thermostat. Si vous passez d’une
température à une autre plus basse,
l’indicateur lumineux (4) restera éteint
jusqu’à ce que la semelle baisse pour
atteindre la température sélectionnée, et à
ce moment-là il s’allumera de nouveau.
6. Tounez le régulateur de débit vapeur (7) sur
une position de repassage à vapeur (fig. D).
Placez le fer à repasser en position
horizontale et la vapeur commencera à
sortir à travers les orifices. Au cas où le fer à
repasser ne débiterait pas de vapeur,
frappez doucement la semelle sur la surface
de repassage. Chaque fois que vous
placerez le fer à repasser en position
verticale en l’appuyant sur son talon,
l’émission de vapeur sera interrompue.
Attention ! Évitez le contact avec la vapeur
et ne la dirigez pas vers les personnes.
7.
Quand vous aurez terminé, tournez le
sélecteur de température sur la position
"MIN", déplacez le régulateur de vapeur sur
la position de repassage à sec (Fig. C),
débranchez le fer à repasser et videz le
réservoir. Le réservoir doit être vidé après
chaque utilisation, pour ce faire procédez de
la façon suivante :
Ouvrez le bouchon (5) et videz l’eau du
réservoir (Fig. H). Appuyez sur le bouton de
vapeur extra pour que l’eau qui est
éventuellement restée dans le réservoir
tombe, faites-le lorsque la semelle est
encore chaude. Laissez le fer à repasser en
position verticale jusqu’à ce qu’il refroidisse.
Remarque: Si au cours du repassage vous avez
besoin de remplir le réservoir, débranchez le fer à
repasser pour le remplir d’eau.
interior.qxd 29/12/05 17:13 Página 17
Page 15

19
9. SPRAY (FIG. I)
Pour l’utilisation de cette fonction il est
indispensable que le réservoir contienne de
l’eau. Appuyez sur le Bouton-poussoir de
spray (8) (Fig. I), si ce que vous souhaitez
obtenir c’est de l’eau pulvérisée afin
d’humidifier des tissus secs et difficiles comme
peuvent l’être par exemple le lin, le coton ou la
laine ou dans le but d’agir sur des froissures
résistantes. De même, la fonction du
pulvérisateur est utile pour humidifier des
froissures provoquées par accident sur le tissu
au cours du repassage.
La sortie de l’eau pulvérisée s’effectue par le
biais de la buse de sortie du spray (6)
Remarque: Pour actionner le pulvérisateur, il
est possible qu’à la première utilisation de
votre fer à repasser, vous ayez à appuyer
plusieurs fois sur le bouton-poussoir de spray.
10. VAPEUR EXTRA (FIG. J)
Mettez le fer à repasser en marche tel
qu’indiqué dans "Repassage à vapeur".
Une fois que le fer à repasser a atteint la
température sélectionnée, appuyez
fermement sur le bouton-poussoir de vapeur
extra (9) (Fig.J), si c’est un débit
intense de vapeur que vous souhaitez pour
repasser plus rapidement ou aplanir des
froissures difficiles. Attendez 5 secondes au
moins entre chaque pression sur le boutonpoussoir vapeur extra afin de permettre au
fer à repasser de chauffer à nouveau et
d’obtenir de cette manière le niveau
maximum de vapeur supplémentaire.
Remarque: Avant de commencer à repasser,
appuyez sur le bouton de vapeur extra
plusieurs fois pour l’activer.
Pour obtenir la meilleure qualité de
vapeur, n’appuyez pas sur le bouton
de vapeur extra plus de trois fois
lorsque vous aurez éteint le témoin
lumineux.
Vapeur verticale: La vapeur extra
fonctionne également lorsque le fer à
repasser se trouve en position verticale. Pour
utiliser cette fonction, maintenez le fer à
repasser en position verticale à une distance
de 15 à 20 cm du tissu et appuyez sur le
11. NETTOYAGE ET ENTRETIEN
Débranchez le fer à repasser et attendez qu’il
refroidisse avant de procéder à son nettoyage.
Nettoyez l’extérieur et la semelle du fer à
repasser à l’aide d’un chiffon humide. N’utilisez
pas de détergents ni de produits abrasifs pour
son nettoyage.
La surface de la Semelle (1) doit toujours être
propre, pour son nettoyage, il suffit de passer
un chiffon humide sur la surface froide.
Afin d’empêcher la semelle de rayer, vous
devrez éviter de repasser agrafes, fermetures
Éclair, boutons métalliques, etc. et vous ne
devrez pas non plus placer le fer à repasser sur
des surfaces métalliques ou rugueuses.
Après chaque utilisation, videz le réservoir et
laissez le fer à repasser refroidir avant de le
ranger.
Ne plongez pas le fer à repasser dans de l’eau
et ne le mettez pas non plus sous l’eau.
Auto-nettoyage
Afin de prévenir la concentration de
minéraux nuisibles qui pourraient boucher les
orifices du fer à repasser, et de garantir la
chauffe correcte et le vaporisage, il est
recommandé d’utiliser cette fonction au
moins une fois par mois, tout dépend de la
dureté de l’eau et de l’utilisation du fer à
repasser.
1. Mettre le Sélecteur de température sur la
position "MIN"
2. Positionnez le régulateur de vapeur sur la
position de repassage à sec (Fig. C).
3. Remplir complètement le réservoir d’eau.
4. Placez le fer à repasser en position
verticale en l’appuyant sur son talon.
5. Branchez le fer à repasser et tournez le
sélecteur de température sur la position
"MAX". Attendez que le témoin lumineux
s’éteigne et s’allume à deux ou trois
reprises.
6. Tournez le sélecteur de température sur la
position "Min" et débranchez le fer à
repasser.
bouton-poussoir de vapeur extra (9).
Attention: Évitez le contact avec la
vapeur. Ne dirigez pas le jet de vapeur
vers les personnes.
interior.qxd 29/12/05 17:13 Página 18
Page 16

20
7. Gardez le fer à repasser en position
horizontale sur un lavabo ou évier et
tournez le régulateur de vapeur sur la
position d’Autonettoyage (Fig. E).
Maintenez le régulateur de vapeur sur
cette position pour que la vapeur ainsi
que les gouttes d’eau bouillante passent
par les orifices de sortie de la semelle.
8. Déplacez doucement le fer à repasser
vers l’avant et vers l’arrière, jusqu’à ce
que le réservoir soit complètement vide.
9. Passer le fer à repasser sur un chiffon
humide afin de nettoyer la semelle.
10. Laisser le fer à repasser refroidir
complètement avant de le ranger.
Fibres synthétiques
Soie
Laine
Coton
Lin
Tissu Température
12. CONSEILS IMPORTANTS POUR UN
BON REPASSAGE
Au moment de sélectionner la température
guidez-vous à l’aide des indications de l’étiquette
du vêtement à repasser. Au cas où ce dernier
n’en aurait pas, vous trouverez dans la table
suivante une orientation pour la sélection de la
température.
TABLE DE TEMPÉRATURES
Si vous avez des doutes quant à la composition du
tissu du vêtement, commencez par repasser à
basse température sur une zone occulte du
vêtement, et augmentez progressivement la
température jusqu’à ce que les froissures
disparaissent sans abîmer le tissu.
• Les tissus, tels que velours, laine, etc. ainsi que
gants et sacs, pourront récupérer l’aspect et la
douceur d’origine en passant lentement le fer à
repasser à peu de distance de ces derniers, avec
la vapeur en marche.
• Les tapis deviendront comme neufs en éliminant
les traces des meubles, grâce à la vapeur qui
pénètre là où le poil est aplati, puis en brossant
délicatement.
• Répartir les vêtements en fonction de la
température requise, en commençant par ceux
qui requièrent la température la plus basse.
• Les tissus en soie doivent être repassés à
l’envers.
• Les tissus en laine, coton et lin fin, peuvent être
repassés à vapeur à l’envers, ou bien à l’endroit,
en interposant un tissu fin pour éviter l’éclat. Les
tissus empesés requièrent plus d’humidité.
Repasser à l’endroit du tissu les couleurs
blanches et claires, à l’envers les couleurs
sombres ainsi que les broderies pour leur donner
du relief.
• Les tissus en lin peuvent être repassés à vapeur,
en vaporisant abondamment et en repassant à
l’envers les tissus sombres pour éviter l’éclat.
Repasser à l’endroit les revers pour leur donner
plus de relief.
13. INFORMATION POUR LA
CORRECTE GESTION DES RÉSIDUS
D'APPAREILS ÉLECTRIQUES ET
ÉLECTRONIQUES
A la fin de la vie utile de
l’appareil, ce dernier ne doit
pas être éliminé mélangé aux
ordures ménagères brutes.
Il peut être porté aux centres
spécifiques de collecte,
agréés par les administrations locales, ou
aux prestataires qui facilitent ce service.
L’élimination séparée d’un déchet
d’électroménager permet d’éviter
d’éventuelles conséquences négatives pour
l’environnement et la santé, dérivées d’une
élimination inadéquate, tout en facilitant le
traitement et le recyclage des matériaux qu’il
contient, avec la considérable économie
d’énergie et de ressources que cela
implique.
Afin de souligner l’obligation de collaborer à
la collecte sélective, le marquage ci-dessus
apposé sur le produit vise à rappeler la nonutilisation des conteneurs traditionnels pour
son élimination.
Pour davantage d’information, contacter les
autorités locales ou votre revendeur.
interior.qxd 29/12/05 17:13 Página 19
Page 17

21
1. BESCHREIBUNG (Abb. A)
1. Rostfreie Sohle
2. Temperaturwahlschalter
3. Anzeige der gewählten Temperatur
4. Leuchtanzeige des Betriebs
5. Deckel Wassereinfüll-Öffnung
6. Spraydüse
7. Dampfregler
8. Sprühknopf
9. Drucktaste Extra-Dampf
10. Sockel / Kabeleinzug
11. Knopf für Kabeleinzug
Störungsunterdrückung: Dieses Gerät
wurde gem. der Richtlinien zur Unterdrückung
von Interferenzen entstört.
Elektromagnetische Vereinbarkeit: Dieses
Gerät wurde gem. der EMV-Vorschriften
(elektromagnetische Vereinbarkeit) entstört.
3. SICHERHEITSHINWEISE
• Bevor Sie dieses Gerät zum ersten Mal benutzen,
lesen Sie bitte aufmerksam diese Anleitungen und
bewahren Sie sie zum späteren Nachschlagen
auf. Nur so erreichen Sie optimale Leistungen und
höchste Sicherheit beim Umgang mit dem Gerät.
• Bevor Sie das Gerät anschließen, prüfen Sie
bitte, ob die Netzspannung mit den Angaben
auf dem Typenschild des Geräts
übereinstimmt.
• Sollten Steckdose und Gerätestecker nicht
übereinstimmen, ist die Steckdose von
qualifiziertem Personal austauschen zu lassen.
• Die elektrische Sicherheit des Geräts kann nur
garantiert werden, wenn dieses an einen
wirksamen Erdungsanschluss angeschlossen
ist, der den gültigen Normen für elektrische
Sicherheit entspricht. Der Hersteller kann nicht
für Schäden haftbar gemacht werden, die durch
das Fehlen eines Erdungsanschlusses
hervorgerufen wurden. Im Zweifelsfalle
wenden Sie sich bitte an qualifiziertes
Fachpersonal.
• Nach dem Entfernen der Verpackung prüfen
Sie bitte, ob sich das Gerät in einwandfreiem
Zustand befindet. Im Zweifelsfalle wenden
Sie sich bitte an den nächstgelegenen
Technischen Kundendienst.
• Die Verpackungselemente (Plastiktüten,
Polystyrolschaum, etc.) sind potentielle
Gefahrenquellen und müssen für Kinder
unzugänglich aufbewahrt werden.
• Von der Verwendung von Adaptern,
Mehrfachsteckdosen und/oder
Verlängerungskabeln ist abzuraten. Sollte
deren Benutzung unvermeidbar sein, dürfen
nur solche Adapter und Verlängerungskabel
verwendet werden, die den geltenden
Sicherheitsnormen entsprechen. Dabei ist
darauf zu achten, dass die auf dem Adapter
angegebene Leistung nicht überschritten wird.
• Dieses Gerät ist nur für den häuslichen
Gebrauch vorgesehen. Jede andere
Verwendung ist unsachgemäß und
gefährlich.
• Der Hersteller haftet nicht für Schäden, die
aus unsachgemäßer, falscher oder nicht
angemessener Benutzung entstehen oder
durch Reparaturen durch nicht qualifiziertes
Personal hervorgerufen werden.
Bei der Benutzung von Elektrogeräten sind
stets bestimmte Grundregeln zu beachten.
VOR ALLEM
•
Berühren Sie das Gerät nicht mit feuchten
oder nassen Händen bzw. Füßen. Tauchen
Sie das Gerät nicht in Wasser .
• Das Gerät darf nicht in feuchten oder als
Badezimmer genutzten Räumen verwendet
werden.
• Das Gerät darf nicht von Kindern gehandhabt
werden.
• Das eingeschaltete Gerät darf nicht
unbeaufsichtigt gelassen werden, da es in
diesem Zustand eine Gefahrenquelle darstellt.
• Ziehen Sie den Stecker niemals am Kabel aus
der Steckdose.
• Bevor Sie das Gerät reinigen oder
Instandhaltungsmaßnahmen vornehmen,
unterbrechen Sie bitte immer den
Netzanschluss.
• Bei Schäden und/oder Funktionsstörungen
2. TECHNISCHE EIGENSCHAFTEN
DE
Spannung/Frequenz: 230 V – 240 V~50/60 Hz
Leistung: 2020 – 2200 W
Tankgröße: 300cm
3
interior.qxd 29/12/05 17:13 Página 20
Sohle
Page 18

22
schalten Sie das Gerät bitte aus und
versuchen Sie nicht, es zu reparieren. Sollte
eine Reparatur notwendig sein, wenden Sie
sich bitte an einen von dem Hersteller
beauftragten Technischen Kundendienst.
Bestehen Sie darauf, dass stets OriginalErsatzteile verwendet werden. Sollten diese
Hinweise nicht befolgt werden, ist die
Sicherheit des Geräts nicht gewährleistet.
• Das Kabel darf nicht vom Benutzer
ausgetauscht werden. Sollte dieses
beschädigt sein oder ein Austausch notwendig
werden, wenden Sie sich bitte stets an einen
vom Hersteller beauftragten Technischen
Kundendienst.
• Halten Sie das Gerät niemals unter den
Wasserhahn, wenn Sie Wasser nachfüllen
wollen.
• Achten Sie darauf, dass das Kabel nicht mit
den heißen Teilen des Geräts in Berührung
kommt.
• Das Gerät entwickelt bei der Benutzung hohe
Temperaturen. Es besteht also
Verbrennungsgefahr. Fassen Sie das Gerät
daher stets an dem dafür vorgesehenen Griff
an und vermeiden Sie jeden Kontakt mit den
Metallteilen und mit dem Dampf.
• Richten Sie den Dampfstrahl niemals auf
Personen.
• Benutzen Sie das Bügeleisen nicht auf sehr
feuchten Geweben.
• Stellen Sie das Bügeleisen nicht in heißem
Zustand der Sohle ab. Warten Sie, bis es
abgekühlt ist.
• Mischen Sie auf zu bügelnden Geweben
keine Fleckenmittel oder ähnliche Produkte.
• Unterbrechen Sie den Netzanschluss, wenn
Sie das Gerät nicht verwenden. Lassen Sie
das Gerät nicht angeschlossen, wenn dies
nicht unbedingt notwendig ist.
• Dieses Gerät verfügt über eine
Sicherheitsvorrichtung. Wird diese ausgelöst,
wird das Gerät außer Betrieb gesetzt. Um
den ursprünglichen Zustand wieder
herzustellen, wenden Sie sich bitte an einen
zugelassenen Technischen Kundendienst.
• Wollen Sie das Gerät entsorgen, ziehen Sie
bitte den Stecker aus der Steckdose und
machen es anschließend durch Abschneiden
des Speisekabels unbrauchbar. Das
unbrauchbar gemachte Gerät an einer
Sammelstelle abgeben. Das Gerät oder Teile
desselben außerhalb der Reichweite von
Kindern aufbewahren.
4. SYSTEM ZUM AUTOMATISCHEN
AUFZUG DES KABELS
Dieses Bügeleisen ist mit einem Kabelaufzug
ausgestattet, um das Stromkabel bequem
aufbewahren zu können. Hallten Sie das Kabel
fest und ziehen Sie vorsichtig soviel heraus, wie
Sie zum Bügeln benötigen..
Achtung: Das Ende des Kabels ist mit einem
roten Signal bezeichnet. Ziehen Sie nicht weiter
am Kabel, wenn Sie das Signal sehen. .
Um das Kabel einzurollen, und um zu
vermeiden, dass Sie von dem Stecker getroffen
werden, halten Sie ihn in der Hand, wenn Sie
den Knopf zum Aufrollen (11) betätigen.
5. VOR DER ERSTMALIGEN
BENUTZUNG DES BÜGELEISENS
Entfernen Sie die Etiketten oder Schutzfolien von
Sohle und Gehäuse.
Hallten Sie das Kabel fest und ziehen Sie
vorsichtig soviel heraus, wie Sie zum Bügeln
benötigen. Seien Vorsichtig damit, die rote
Marke nicht zu überschreiten. (Siehe
Abschnitt 4)
Damit das Bügeleisen gebrauchsfertig wird,
gehen Sie nun bitte gemäß der Hinweise unter
"
Selbstreinigung" in Punkt 11 REINIGUNG" vor.
6. TROCKENBÜGELN
1. Stellen Sie das Bügeleisen auf eine stabile
und hitzebeständige Fläche.
2. Stellen Sie den Temperaturschalter (2) auf
Position MIN (Abb. B)
3. Vergewissern Sie sich bitte, dass der
Dampfregler (7) auf Position Trockenbügeln
steht (Abb. C)
4. Stellen Sie das Bügeleisen in vertikaler
Position auf den Sockel (10)
5. Stecken Sie den Stecker in die Steckdose
und wählen Sie mit dem Temperaturschalter
die gewünschte Bügeltemperatur. Die
GEBRAUCHSANLEITUNG
interior.qxd 29/12/05 17:13 Página 21
Page 19

23
Betriebsleuchte (4) leuchtet auf.
6. Sobald diese Leuchtanzeige (4) erlischt,
hat das Bügeleisen die gewünschte
Temperatur erreicht.
Während des Bügelvorgangs schaltet die
Betriebsleuchte in regelmäßigen, die
Thermostatzyklen anzeigenden Abständen
ein und aus. Beachten Sie bitte, dass die
Betriebsleuchte (4) beim Umschalten auf
eine niedrigere Temperatur so lange nicht
aufleuchtet, bis die Sohle (1) auf die
gewünschte Temperatur abgekühlt ist. In
diesem Moment leuchtet sie dann auf.
7. Nach Beendigung des Bügelvorgangs
drehen Sie bitte den Temperaturschalter
auf Position "MIN" und unterbrechen Sie
den Netzanschluss. Bevor Sie das
Bügeleisen von außen reinigen und
aufbewahren, warten Sie bitte, bis es
vollständig abgekühlt ist.
Während des Trockenbügelns können Sie
jederzeit die Sprayfunktion benutzen,
vorausgesetzt es befindet sich Wasser im
Behälter. (Vgl. dazu die Abschnitte "Spray"
und "Auffüllen des Wasserbehälters")
Achtung: Wenn Sie Trockenbügeln wollen,
versichern Sie sich, dass der Dampfregler
immer auf der Position für Trockenbügeln
steht. (Abb. C)
7. FÜLLEN DES WASSERBEHÄLTERS
Stellen Sie das Bügeleisen auf eine stabile
Fläche, schließen sie es
nicht ans Stromnetz
an.
1. Den Dampfregler (7) auf Position
Trockenbügeln stellen (Abb. C)
2. Öffnen Sie den Deckel (5) der
Einfüllöffnung (Abb.F).
3. Gießen Sie nun mit einem Glas langsam
Wasser in die Einfüllöffnung (Abb.G).
Unter keinen Umständen dürfen
Reinigungs- oder Lösemittel in den
Wasserbehälter gefüllt werden.
4. Überprüfen Sie, dass das Wasser nicht den
maximalen Füllstand überschreitet und
schließen Sie die Einfüllöffnung.
Anmerkung: Sollte Ihr Leitungswasser zu hart
sein ( >27ºF), ist es ratsam, destilliertes
Wasser zu verwenden.
Füllen Sie weder
Bateriewasser noch irgendwelche Zusätze wie
Wäschestärke, Parfüm, Weichspülmittel, etc. ein.
8. DAMPFBÜGELN
Vor dem Dampfbügeln muss sichergestellt werden,
dass das Gewebe für diese Bügelart geeignet ist.
Das Gerät funktioniert mit Leitungswasser.
Wenn
Ihr Leitungswasser zu viel Kalk enthält
(Härtegrad über 27ºF), raten wir Ihnen an,
destilliertes Wasser ohne jegliche Zusätze zu
benutzen.
1.
Stellen Sie das nicht ans Netz geschlossene
Bügeleisen auf eine stabile und
hitzebeständige Fläche.
2. Füllen Sie den Wasserbehälter (Vgl. "Füllen
des Wasserbehälters"
)
3. Stellen Sie den Temperaturschalter (2) auf die
Position "MIN" (Abb. B).
4. Stellen Sie das Bügeleisen in vertikaler
Position auf den Sockel (10).
5. Stecken Sie nun den Stecker in die
Steckdose und drehen Sie den
Temperaturschalter auf die Position "
" oder auf Position "Max". Um eine optimale
Qualität beim Dampfbügeln zu erreichen,
dürfen dabei die Positionen " " oder "
" nicht benutzt werden.
Die Betriebsleuchte (4) leuchtet auf. Sobald
sie erlischt, hat das Bügeleisen die
gewünschte Temperatur erreicht. Während
des Bügelvorgangs schaltet die
Betriebsleuchte in regelmäßigen, die
Thermostatzyklen anzeigenden
Abständen ein und aus. Wenn Sie auf eine
niedrigere Temperatur umschalten, bleibt die
Betriebsleuchte (4) so lange ausgeschaltet,
bis die Sohle (1) auf die gewünschte
Temperatur abgekühlt ist. In diesem Moment
leuchtet sie dann auf.
6. Stellen Sie den Dampfregler (7) auf die
Position Dampfbügeln (Abb. D). Stellen Sie
das Bügeleisen in horizontale Position. Der
Dampf beginnt aus den Öffnungen
auszutreten. Sollte kein Dampf austreten,
klopfen Sie die Sohle bitte leicht gegen die
Bügelfläche. Sobald das Bügeleisen in
vertikaler Position auf den Sockel gestellt
wird, wird der Dampfaustritt unterbrochen.
Achtung! Halten Sie sich von dem
austretenden Dampf fern und richten Sie
ihn niemals gegen andere Personen.
7.
Nach dem Bügeln drehen Sie den
Temperaturschalter bitte auf Position "MIN".
Schieben Sie den Dampfregler auf Position
interior.qxd 29/12/05 17:13 Página 22
Page 20

24
Trockenbügeln (Abb. C). Unterbrechen Sie
den Netzanschluss und leeren Sie den
Wasserbehälter. Der Wasserbehälter muss
nach jedem Gebrauch entleert werden.
Gehen Sie dabei bitte folgendermaßen vor:
Öffnen Sie den Deckel (5) und leeren Sie den
Behälter (Abb. H). Betätigen Sie den Knopf für
Extra-Dampf, damit möglicherweise im Behälter
verbliebenes Restwasser herauslaufen kann,
solange die Sohle noch heiß ist. Lassen Sie
das Bügeleisen in vertikaler Stellung vollständig
abkühlen.
Anmerkung: Sollte es während des Bügelns
notwendig sein, den Behälter aufzufüllen,
unterbrechen Sie bitte den Netzanschluss
und geben Sie dann Wasser in den Behälter.
9. SPRAY (ABB. I)
Um diese Funktion benutzen zu können,
muss der Wasserbehälter gefüllt sein.
Betätigen Sie die Spraytaste (8) (Abb.
I), wenn Sie zum Anfeuchten
trockener und schwierig zu bügelnder
Gewebe wie z.B. Leinen, Baumwolle oder
Wolle, oder zum Glätten von Falten Wasser
auf die Bügelfläche sprühen möchten. Diese
Sprühfunktion dient gleichfalls zum
Anfeuchten von während des Bügelns
unbeabsichtigt im Gewebe hervorgerufenen
Falten.
Dieses Sprühwasser tritt durch die
Spraydüse (6) aus.
Anmerkung: Bei der erstmaligen Benutzung
des Bügeleisens kann es vorkommen, dass
die Spraytaste mehrmals betätigt werden
muss, bis Sprühwasser austritt.
10. EXTRA-DAMPF (ABB. J)
Nehmen Sie das Bügeleisen wie in
Abschnitt "Dampfbügeln" beschrieben in
Betrieb.
Wenn das Gerät die gewünschte
Temperatur erreicht hat, betätigen Sie bitte
die Taste für Extra-Dampf (9) (Abb. J).
Sie lösen damit einen intensiven
Dampfaustritt aus, der ein schnelleres
Bügeln ermöglicht und das Glätten
schwieriger Falten erleichtert. Bitte warten
Sie jeweils 5 Sekunden, bevor Sie die Taste
für Extra-Dampf erneut betätigen, damit das
Bügeleisen erneut aufheizen kann und die
maximale Menge an zusätzlichem Dampf
erreicht werden kann.
Anmerkung: Bevor Sie zu bügeln beginnen,
betätigen Sie bitte die Taste für ExtraDampf mehrmals, um sie zu
aktivieren. Um optimale Dampfqualität
zu erhalten, betätigen Sie bitte die
Taste für Extra-Dampf nach
Ausschalten der Anzeigeleuchte nicht
mehr als drei Mal.
Seitlicher Dampf: Die Dampffunktion
funktioniert auch, wenn das Bügeleisen
aufrecht steht. Um sie zu nutzen, halten Sie
das Bügeleisen in aufrechter Lage in einem
Abstand von 15 bis 20 Zentimeter zum
Gewebe und drücken Sie auf den Knopf für
Extra Dampf (9)
Achtung: Halten Sie sich von dem
austretenden Dampf fern und richten Sie
ihn niemals gegen andere Personen.
11. REINIGUNG UND INSTANDHALTUNG
Unterbrechen Sie den Netzanschluss und
warten Sie, bis das Bügeleisen vollkommen
abgekühlt ist. Dann können Sie mit der
Reinigung beginnen.
Reinigen Sie das Gehäuse und die Sohle bitte
mit einem feuchten Tuch. Verwenden Sie keine
Reinigungs- oder Scheuermittel zum Reinigen.
Die Oberfläche der Sohle (1) muss immer
sauber sein. Es genügt, die kalte Sohlenfläche
mit einem feuchten Tuch abzuwischen.
Um ein Verkratzen der Sohle zu vermeiden, darf
das Bügeleisen beim Bügeln nicht über Haken
und Ösen, Reißverschlüsse, Metallknöpfe etc.
geführt oder auf metallenen oder rauhen
Oberflächen abgestellt werden.
Entleeren Sie den Wasserbehälter nach jedem
Gebrauch und lassen Sie das Bügeleisen
vollkommen abkühlen, bevor Sie es
aufbewahren.
Das Bügeleisen darf nicht in Wasser
getaucht oder unter fließendes Wasser
gehalten werden.
Selbstreinigung
Mit dieser Funktion wird einem Zusetzen des
Bügeleisens durch eine Konzentration
schädlicher Mineralien vorgebeugt und das
korrekte Aufheizen und eine einwandfreie
interior.qxd 29/12/05 17:13 Página 23
Page 21

25
Dampfproduktion garantiert. Es ist
empfehlenswert, diese Funktion je nach
Härtegrad des Wassers und
Gebrauchshäufigkeit mindestens einmal pro
Monat zu betätigen.
1. Stellen Sie den Temperaturschalter auf
Position "MIN"
2. Stellen Sie den Dampfregler auf
Trockenbügeln (Abb. C).
3. Füllen Sie den Wasserbehälter zu einem
Viertel seiner Kapazität.
4. Stellen Sie das Bügeleisen vertikal auf den
Sockel.
5. Stecken Sie nun bitte den Stecker in die
Steckdose und drehen Sie den
Temperaturschalter auf "MAX". Warten Sie,
bis die Betriebsleuchte 2 oder 3 Mal ausund einschaltet.
6. Stellen Sie den Temperaturschalter dann auf
"Min" und unterbrechen Sie den
Netzanschluss.
7. Halten Sie das Bügeleisen horizontal über
ein Waschbecken oder eine Spüle und
drehen Sie den Schalter auf die Position
Selbstreinigung (Abb. E). Halten
Sie den Regulator in dieser Position,
damit der Dampf mit heißen Tropfen durch
die Austrittsöffnungen der Sohle strömen.
8. Bewegen Sie das Bügeleisen nach vorne
und nach hinten, bis der Wasserbehälter
leer ist.
9. Führen Sie das Bügeleisen über ein
feuchtes Tuch, um die Sohle zu reinigen.
10. Lassen Sie das Bügeleisen abkühlen,
nachdem der Vorgang beendet ist, und
bevor Sie es verwahren.
Synthetische Fasern
Seide
Wolle
Baumwolle
Leinen
Gewebe Temperatur
12. HINWEISE ZUM GUTEN BÜGELN
Beim Einstellen der Temperatur folgen Sie bitte
den Anweisungen auf dem Etikett des zu
bügelnden Kleidungsstücks. Sollte kein Etikett
vorhanden sein, richten Sie sich bitte bei der
Temperaturwahl nach den Angaben
nachfolgender Tabelle.
TEMPERA
TUR-T ABELLE
Sollten Zweifel an der Art des Gewebes eines
Kleidungsstücks bestehen, bügeln Sie dieses zunächst
bei niedriger T emperatur an einer verdeckten Stelle und
erhöhen Sie dann die T emperatur schrittweise, bis die
Falten geglättet werden können, ohne dass dabei das
Gewebe beschädigt wird.
• Gewebe wie Samt, Wolle, etc. sowie
Handschuhe und Taschen erhalten ihr
ursprüngliches Aussehen und Geschmeidigkeit
zurück, wenn man das Bügeleisen mit
eingeschalteter Dampffunktion langsam in
geringer Entfernung an ihnen entlang führt.
• Teppiche werden wie neu und die Abdrücke
von Möbeln verschwinden, wenn man den
Dampf in die zusammengepressten Stellen
des Teppichs eindringen lässt und diese dann
vorsichtigt bürstet.
• Teilen Sie vor dem Bügeln die Kleidungsstücke
nach ihrer Bügeltemperatur auf. Beginnen Sie
mit denen, die die niedrigste Temperatur
benötigen.
• Seidengewebe sind auf der Rückseite zu
bügeln.
• Um "Glanzstellen" zu vermeiden, kann man
Woll-, Baumwoll- und feine Leinengewebe von
links bügeln oder aber auf die rechte Seite
einen dünnen Stoff legen, auf dem man dann
bügelt. Gestärkte Gewebe benötigen mehr
Feuchtigkeit. Weiße und helle Gewebe werden
von rechts gebügelt, dunkle von links, ebenso
wie Stickereien, die dadurch nicht flach
gebügelt werden.
• Leinenstoffe können mit Dampf gebügelt
interior.qxd 29/12/05 17:13 Página 24
Page 22

26
werden. Dabei ist ausreichend Dampf
anzuwenden; dunkle Stoffe sind von links zu
bügeln, um "Glanzstellen" zu vermeiden. Um
Umschläge hervorzuheben, sollten diese von
rechts gebügelt.
13. INFORMATION ZUR
ORDNUNGSGEMÄSSEN
ENTSORGUNG ELEKTRISCHER UND
ELEKTRONISCHER ALTGERÄTE
Am Ende seiner Nutzzeit
darf das Produkt NICHT
zusammen mit dem
Hausmüll beseitigt
werden.
Es kann zu den eigens
von den örtlichen Behörden
eingerichteten Sammelstellen oder zu
den Fachhändlern, die einen
Rücknahmeservice anbieten, gebracht
werden. Die getrennte Entsorgung
eines Haushaltsgerätes vermeidet
mögliche negative Auswirkungen auf
die Umwelt und die Gesundheit, die
durch eine nicht vorschriftsmäßige
Entsorgung bedingt sind. Zudem
ermöglicht sie die Wiederverwertung
der Bestandteile des Gerätes, was
wiederum eine bedeutende Einsparung
an Energie und Ressourcen mit sich
bringt.
Zum Unterstreichen der Verpflichtung
zur Mitwirkung bei der getrennten
Entsorgung ist auf dem Produkt ein
Hinweissymbol dafür angebracht, dass
dieses Produkt nicht in üblichen
Hausmüllcontainern entsorgt werden
darf.
Für weitere Informationen wenden Sie
sich bitte an die örtliche Verwaltung
oder an den Händler, bei dem Sie das
Produkt erworben haben.
interior.qxd 29/12/05 17:13 Página 25
 Loading...