

Page 1

5H-730*
User Manual for Your Oven
Le guide d’utilisation de votre four
FR
EN
99639111_A_ML.qxp 02/03/2006 16:49 Page 1
Page 2

2
Table of Contents
Throughout the manual,
indicates safety recommendations,
indicates advice and tips
Introduction P.3
What does your oven look like?
P.4
Description of the appliance P.4
Accessories P.5
Safety recommendations P.6
How do you install your oven?
Electrical connection P.7-8
How do you change the bulb? P.8
Useful dimensions for installing your oven P.9
How does your oven work?
Close-up of your programmer P.10
How do you set the clock on the oven? P.11
How do you program for immediate cooking? P.12
How do you set a cooking programme? P.12-14
How do you use the timer? P.15
Oven cooking modes P.16-17
How do you clean the cavity of your oven?
What is pyrolysis? P.18
In what situations should pyrolysis be used? P.18
How do you use the pyrolysis function? P.18-19
What do you do in case of operating
malfunctions? P.20
99639111_A_ML.qxp 02/03/2006 16:49 Page 2
Page 3

3
EN
Introduction
Dear Customer,
You have just acquired a FAGOR oven and we would like to thank you.
Our research teams have created this new generation of appliances for
you so that cooking is a pleasure every day.
With pure lines and modern aesthetics, your new FAGOR oven will
blend harmoniously into your kitchen and will perfectly combine cooking
performance and ease of use.
In the FAGOR product line, you will also find a wide range of hobs,
ventilation hoods, dishwashers and referigerators that you can coordinate
with your new FAGOR oven.
Of course, in an ongoing effort to best satisfy your demands with regard
to our products, our after-sales service department is at your disposal
and ready to listen in order to respond to all of your questions and
suggestions (contact information at the end of this booklet).
At the cutting edge of innovation, FAGOR helps to improve the quality of
everyday life by bringing you products that are ever more effective, easy
to use, environmentally friendly, attractive and reliable.
The FAGOR Brand
99639111_A_ML.qxp 02/03/2006 16:49 Page 3
Page 4

4
What does your oven look like?
DESCRIPTION OF THE APPLIANCE
1
2
5
6
73
4
Temperature selector
Programmer
Function selector
Light
Shelf support indicator
Hole for turnspit
Contact for open door
detector
2
1
3
4
5
7
6
99639111_A_ML.qxp 02/03/2006 16:49 Page 4
T˚
c
40
275
240
220
210
65
100
150
165
200
180
9
1
9
6
3
3
2
-
5
5
3
1
Page 5

5
EN
Accessories
Anti-tipping safety grid
The grid can be used to hold all dishes and
moulds containing foodstuffs to be cooked or
browned. It can be used for barbecues (to be
placed directly on the grid).
Multi-purpose dish
(cake dish or drip tray)
It serves as a cake dish and has a sloped
edge. It is used for cooking pastries such as
cream puffs, meringues, madeleines, puff
pastry, etc.
Inserted under the grid, it catches barbecue
juices and grease. It can also be used half-full
of water for double-boiler cooking methods.
Avoid placing roasts or meats directly in the dish because you are certain to have
major splattering on the oven walls.
Turn spit
To use it:
• Place the hollow dish on the grid on shelf
support number 1 to catch the cooking juices
or on the bottom heating element if the piece
of meat being roasted is too big.
• Attach one of the forks onto the spit; pierce
the piece of meat being roasted; insert the
second fork; centre the meat and tighten the
assembly by screwing in the two forks.
• Place the spit in its support.
• Gently push to lodge the tip of the spit in the guide slot located at the back of
the oven (6).
• Remove the handle by unscrewing it. After cooking, screw the handle back into
the spit to remove it without burning yourself.
REAR
FRONT
99639111_A_ML.qxp 02/03/2006 16:49 Page 5
Page 6

6
Safety recommendations
Please become familiar with these recommendations before installing
and using your oven. This oven was designed for use by private persons in their
homes. It is intended solely for cooking foodstuffs. This oven does not contain any
asbestos-based components.
FIRST USE:
Before using your oven for the first time, heat it up while empty with the door
closed for approximately 15 minutes using the maximum setting in order to "cure"
the appliance. The rock wool that surrounds the oven cavity may initially release
a particular odour caused by its composition. Similarly, you may notice the release
of some smoke. All of this is normal.
SUBSEQUENT USE:
- Ensure that the door of your oven is completely closed so that the seal can
properly do its job.
- Do not let anyone lean against or sit on the oven door when it is open.
- When using the grill with the door semi-open, exposed parts and
surfaces may become hot. Keep small children away.
- When in use, the appliance becomes hot. Be careful not to touch the heating
elements located inside the oven.
- After cooking, do not use bare hands to touch the dishes or accessories (grid,
turnspit, drip tray, turnspit support, etc.); use a potholder or heat-resistant
material.
- Do not line your oven with sheets of aluminium. Otherwise, the result could be
an accumulation of heat that could have an undesirable effect on cooking and
roasting results and could damage the enamel.
- Before beginning a pyrolysis cleaning cycle in your oven, remove all parts of your
grids, trays and accessories and remove major spill residue.
- Do not use a steam cleaner or high-pressure cleaner.
- During pyrolysis, the exposed surfaces become hotter than during normal use.
Keep small children away.
- Before any cleaning is undertaken in the oven cavity, the oven must be
turned off.
ENVIRONMENTAL PROTECTION
This appliance’s packaging material is recyclable. Help recycle it and protect the
environment by dropping it off in the municipal receptacles provided for this
purpose.
Your appliance also contains a great amount of recyclable material. It is
marked with this label to indicate the used appliances that should not be
mixed with other waste. This way, the appliance recycling organised by
your manufacturer will be done under the best possible conditions, in
compliance with European Directive 2002/96/EC on Waste Electrical and
Electronic Equipment. Contact your town hall or your retailer for the used
appliance collection points closest to your home.
We thank you doing your part to protect the environment.
The function selector absolutely must be returned to 0 in order
to use your oven again.
99639111_A_ML.qxp 02/03/2006 16:49 Page 6
Page 7

7
EN
How do you install your oven?
Monophase 20A Meter
220-240 V ~ 50 Hz
Electrical outlet
2-prong receptacle
+ ground lead
IEC Standard 60083
Monophase line 220-240 V ~
Electrical connection
Power cable
length:
approximately 1.5 m
16A fuse or differential
circuit breaker
Before making the connection, ensure that the wires in your
electrical set-up have enough cross-sectional area to properly
supply electricity to the appliance (cross-sectional area must be
at least equal to that of the power cable).
The fuse in your set-up must be 16 amperes.
The electrical connection should be performed before the appliance is installed in the
cabinet.
• The oven must be connected with a power cable (standardised) with three 1.5 mm
2
conductors (1 ph +1 N + ground) that must be connected to a monophase 220-240
V network via a IEC 60083 standardised receptacle (1 ph +1 N + ground lead) or an
all-pole cut-off device with a minimum distance between contact openings of 3 mm.
The safety wire (green-yellow) is connected to the appliance's terminal and must
be connected to the ground lead of the electrical set-up.
• In the case of connections with an electric receptacle, it must remain accessible
after installation of the appliance.
• The oven's neutral conductor (blue wire) must be connected to the network's
neutral conductor.
99639111_A_ML.qxp 02/03/2006 16:50 Page 7
Page 8

8
• The power cable (H05 RR-F, H05 RN-F or H05 VV-F) must be of sufficient length to
be connected to the build-in oven while it sits on the floor in front of the cabinet.
To do this the appliance must be disconnected from the electrical network:
• Open the inspection flap located at the lower right of the back cover by unscrewing
the two screws, then pivot the inspection flap.
• Strip 12 mm along each wire of the new power cable.
• Carefully twist together the strands.
• Loosen the screws from the terminal board and remove the power cord to be
replaced.
• Introduce the power cable through the side of the cover in the cable clip located to
the right of the terminal board.
• Connect the power cord wires in accordance with the written markings on the terminal
board.
• All the strands of the electricity wires must be captured under the screws.
• The phase wire on the L terminal.
• The green-yellow coloured ground wire should be connected to the terminal.
• The neutral conductor (blue) on the N terminal.
• Screw down tightly the screws on the terminal board and check the connection by
pulling on each wire.
• Attach the cable with the cable clip located to the right of the terminal board.
• Close the inspection flap using the two screws.
Changing the power cable
We cannot be held liable for any accident resulting from an
inexistent, defective or incorrect ground lead.
How do you install your oven?
• The bulb is located on the ceiling of your oven's cavity.
a) Unscrew the view port (see
adjacent diagram).
b) Unscrew the light bulb in the
same direction.
Bulb specifications:
- 15 W
- 220-240 V
- 300°C
- E 14 cap
c) Replace the bulb then reposition
the view port and reconnect your oven.
Bulb
Unscrew
View port
Disconnect your oven before performing any task on the bulb to avoid
the risk of electric shock and, if necessary, let the appliance cool down.
How do you change the bulb?
To unscrew the view port and the light, use a rubber glove, which
will make disassembly easier.
99639111_A_ML.qxp 02/03/2006 16:50 Page 8
Page 9

9
EN
How do you install your oven?
To be certain that you have properly installed your appliance, do
not hesitate to call on a household appliance specialist.
Useful dimensions for installing your oven
The oven can be installed under a work top or in a column of cabinetry
(open* or closed) having the appropriate dimensions for built-in
installation (see adjacent diagram).
Your oven has optimised air circulation that allows it to achieve remarkable
cooking and cleaning results if the following guidelines are respected:
• Centre the oven in the cabinet so as to guarantee a minimum distance of 5 mm
between the appliance and the neighbouring cabinet.
• The material of the built-in cabinetry must be heat resistant (or be covered with
such a material).
• For greater stability, attach the oven in the cabinet with two screws through the
holes provided for this purpose on either side of the front inner panel (see
diagram).
To do this:
1) Remove the rubber screw covers to access the mounting holes.
2) Drill a Ø 3 mm hole in the cabinet panel to avoid splitting the wood.
3) Attach the oven with the two screws.
4) Replace the rubber screw covers (they also serve to absorb the shock caused
by closing the oven door).
(*) If the cabinet is open, its opening must be 70 mm (maximum).
577
577
585600
99639111_A_ML.qxp 02/03/2006 16:50 Page 9
Page 10

10
How does your oven work?
1. Close-up of your programmer
Display area for clock and cooking times
Cooking time icon
Cooking end time icon
Independent timer
Touch control for accessing various time setting programmes
Touch controls for setting time
1
2
3
4
5
6
7
1
2
3
4
5
6
7
APPLIANCE DESCRIPTION
99639111_A_ML.qxp 02/03/2006 16:50 Page 10
Page 11
11
EN
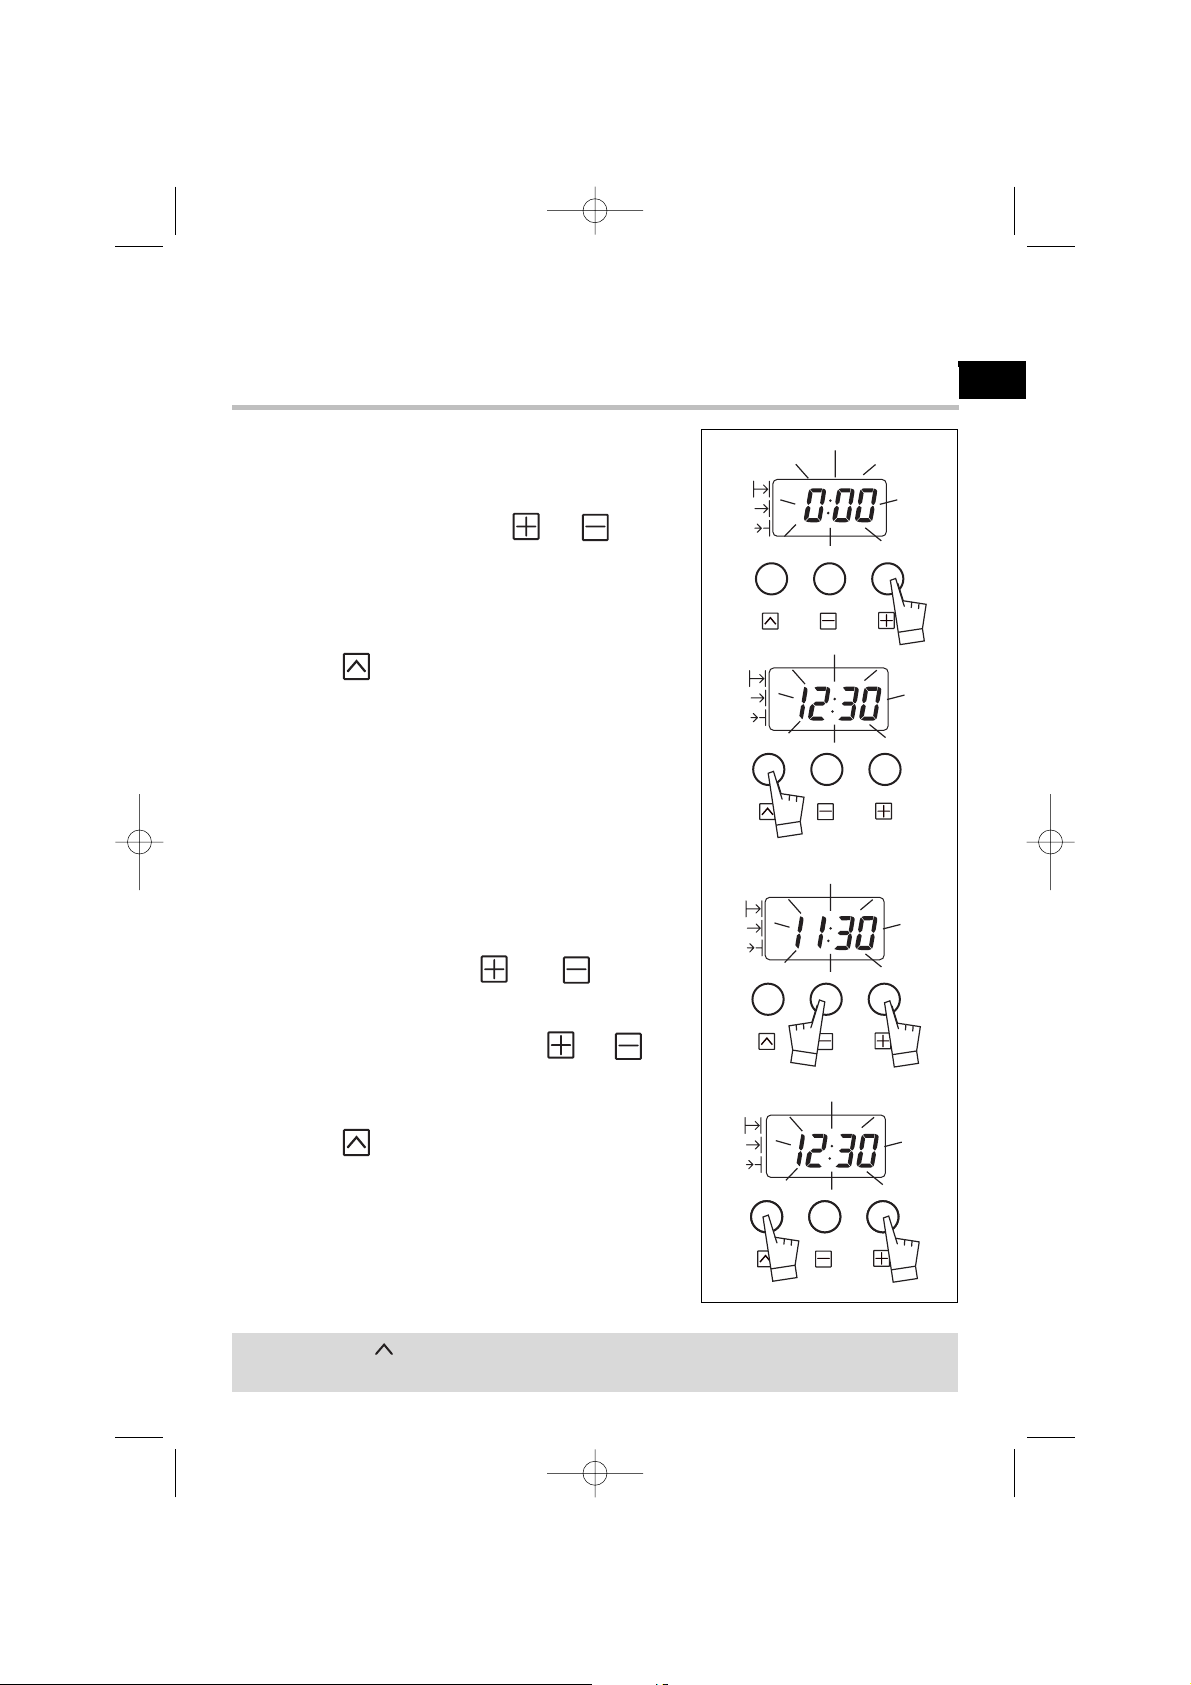
a) When supplied with electricity
• The display flashes.
• Set the time by pressing the or touch
controls (holding your finger on the touch control
allows for rapid number advancement).
• Press the touch control to enter.
Example:12:30.
b) Resetting the clock time
• Simultaneously press the and touch
controls for a few seconds until the display flashes.
• Adjust the clock setting with the or
touch controls.
• Press the touch control to enter.
2. How do you set the clock on the oven?
How does your oven work?
If the touch control is not pressed, the setting will be
automatically recorded after a few seconds.
1
2
3
2
1
1
99639111_A_ML.qxp 02/03/2006 16:50 Page 11
Page 12

12
How does your oven work?
3. How do you program for immediate cooking?
The analogue programmer should display only the time; it should not be
flashing.
• Choose the cooking mode:
Turn the selector knob to the position of your
choice.
Example: " " position.
• Choose the cooking temperature
Turn the thermostat (temperature selector) to
the temperature recommended in your recipe.
Example: Temperature set to 200°.
4.
How do you set a cooking programme?
a) Program a cooking cycle with a defined duration:
• Choose the cooking mode.
Turn the selector knob to the position of your
choice.
Example: " " position.
• Choose the cooking temperature.
Turn the selector knob(temperature selector)
to the temperature recommended in your recipe.
Example: Temperature set to 200°.
99639111_A_ML.qxp 02/03/2006 16:50 Page 12
9
1
9
6
3
3
2
-
5
T˚
c
275
240
220
210
200
40
65
100
150
165
180
9
1
9
6
3
3
2
-
5
T˚
c
275
240
220
210
200
40
65
100
150
165
180
Page 13

13
EN
How does your oven work?
• Choose the cooking time.
Press the touch control once.
The cooking time (at 0:00) and the corresponding
icon flash to indicate that you can now enter the
information. You can now set the cooking time.
Press the or touch controls to set the
desired time.
Example: 30 minutes cook time.
The countdown of the cooking duration begins
immediately after the or
touch controls
have been released.
• After these steps, the oven starts heating up and
the thermostat indicator lights up.
The cooking time icon is lit up and the time of day
is displayed again.
At the end of cooking (end of programmed time),
- The oven stops,
- The cooking time icon is no longer displayed,
- 0:00 is displayed,
- A series of beeps is emitted for a few minutes.
The beeps are definitively deactivated by pushing on any touch control, when
the display also returns to the time of day.
b) How do you program a delayed cooking cycle with a defined
cooking time:
(programming the time at which cooking
is complete)
• Adjust the temperature and set the cooking
mode.
Example: " " position,
temperature set to 200°.
99639111_A_ML.qxp 02/03/2006 16:50 Page 13
9
1
9
6
3
3
2
-
5
T˚
c
275
240
220
210
200
40
65
100
150
165
180
Page 14

14
How does your oven work?
It is possible to
- Adjust the cooking time at any moment.
- View the cooking end time at any moment by pressing the
" " touch control,
- Cancel the programme at any time by holding for a few seconds the
" " touch control until you hear a beep.
Please note: at this moment, your oven begins to heat up.
To stop this heating, return the temperature and function selectors
to "Off".
• Press the touch control once.
The cooking time (at 0:00) and the corresponding icon
flash to indicate that you can now enter the information.
Now you can set the cooking time for up to 23:59 hours.
• Press the or touch controls to set the desired
time.
Example: 25 min cooking time
When you first press the , touch control, the flashing
stops.
• Press again the touch control until the cooking end
time flashes, along with the corresponding icon.
• You can now set the cooking end time.
• Program the desired cooking end time by pressing on
the and touch controls.
Example at right: cooking is to end at 13:00.
The cooking end time is automatically recorded after a few
seconds.
After these steps, the heating of the oven is delayed so
that cooking will finish at the programmed time (e.g.
13:00).
When cooking begins, the cooking end time programme
icon is no longer displayed.
At the end of cooking (end of programmed time),
- The oven stops,
- The cooking time icon is no longer displayed,
- 0:00 is displayed
- A series of beeps is emitted for a few minutes.
The beeps are definitively deactivated by pushing on any touch control, when the
display also returns to the time of day.
99639111_A_ML.qxp 02/03/2006 16:50 Page 14
Page 15

15
EN
5. H
ow do you use the timer?
Your oven is equipped with a timer that is
independent of the oven functions, making it
possible to measure times.
• Press several times on the touch control until
the timer icon starts flashing, along with the
corresponding display .
• Enter the desired time by pressing the touch controls
or . The time is programmed in 30-second
increments and the time displayed is in
minutes/seconds.
If you hold down the touch control, you will obtain
rapid advance of the numbers.
The countdown begins a few seconds after you have finished setting the time
and can be viewed at all times on the display.
When the selected time has expired, a series of beeps is emitted (display 0:00).
The beeping can be stopped by pressing the button of your choice.
It is possible to change or cancel the timer programme at any
time.
99639111_A_ML.qxp 02/03/2006 16:50 Page 15
Page 16

16
* Programme(s) used to obtain the results indicated on the energy label in compliance with European standa
7. Cooking methods
Symbol
Name of cooking mode Description of cooking mode
Grill (fan-assisted) + Turnspit
Cooking controlled, alternately, by the
upper element and by the fan.
Bottom-cooking, fan-assisted
Cooking controlled by the bottom
element combined with a slight dose
of the grill and the fan.
Grill
Cooking controlled by the upper
element without the fan.
No need for preheating
Roasts and poultry that are
juicy and crispy all over.
The turnspit continues to work
until the door is opened.
Slide the drip tray onto the
bottom shelf support.
Preheat the oven for five
minutes.
Slide the drip tray onto the
bottom shelf support.
Cooking heat from the bottom
with a small amount of heat
from the top.
Place the grid on the lower
shelf support.
Hold warm function
Heat regulated by the upper and
lower elements with use of fan.
Stabilisation at low temperatures.
*
Traditional fan heating
Cooking controlled by the upper and
lower heating elements and by the
fan.
Quick temperature increase.
Some dishes can be placed in
the oven while it is still cold.
*
Traditional
Cooking controlled by the upper
and lower heating elements with
no fan.
Requires preheating before
placing the dish in the oven.
*
99639111_A_ML.qxp 02/03/2006 16:50 Page 16
Page 17

17
Cooking methods
EN
Recommendations
Recommended for all poultry or roasts on the
turnspit.
For sealing and thoroughly cooking lamb roasts,
beef cuts.
For preserving tenderness in filets of fish.
Recommended for grilling chops, sausages,
slices of bread, prawns placed on the grid.
Recommended for moist dishes (quiches, juicy
fruit tarts, etc.).
The crust will be thoroughly cooked on the bottom.
Recommended for dishes that rise (cake,
brioche, kouglof, etc.) and for soufflés that will not
be stuck by a crust formed on the top.
Recommended for letting dough rise for bread,
brioche, kouglof... without exceeding 40° C
(plate warming, defrosting).
Recommended for meats, fish and vegetables,
preferably placed in a terra-cotta dish.
Recommended for slow, gentle cooking:
tender game meat, etc.
To seal roasts of red meat
To simmer in a covered stew pan dishes
that were begun on the hob
(coq au vin, stew, etc.)
99639111_A_ML.qxp 02/03/2006 16:50 Page 17
Page 18

18
1. What is pyrolysis?
3. How do you use the pyrolysis function?
RELATIVELY Biscuits, vegetables, Splatter-free cooking
CLEAN COOKING pastry, quiches, Pyrolysis is not warranted
APPLICATIONS soufflés
DIRTY COOKING Meats, fish, (in a dish) Pyrolysis is warranted after
APPLICATIONS stuffed vegetables three cooking cycles
VERY DIRTY Large cuts of meat Pyrolysis can be performed
COOKING on the spit after one cooking application
APPLICATIONS of this kind if there is
a lot of splattering
If your oven emits smoke during preheating or releases large volumes of smoke
during cooking.
If your oven releases an unpleasant odour when cooled after various cooking
applications (lamb, fish, barbecue, etc.).
2. In what situations should pyrolysis be used?
You should not wait until the oven is coated in grease to initiate
a cleaning cycle.
- Pyrolysis is a cycle during which the oven cavity is heated to a very high
temperature in order to eliminate soiling from splattering and spills. The smoke
and odours released are destroyed as they move through a catalyzer.
- Pyrolysis is not necessary after each cooking cycle, but simply when the dirtiness
warrants it.
- As a safety measure, the cleaning operation only begins after the door has
automatically locked. As soon as the internal temperature of the oven exceeds
cooking temperatures, it is impossible to unlock the door - even if the "function
selector" knob is turned to 0.
How do you clean the cavity of your oven?
a) Remove the grids, trays and wire shelf
supports from the oven and clean any major spill
residue.
b) Ensure that the analogue programmer displays
the time of day and that it is not flashing.
99639111_A_ML.qxp 02/03/2006 16:50 Page 18
Page 19

19
EN
c) Turn the "function selector" knob to the "PYRO"
position.
The oven will be unavailable for cooking for 2:30
"PYRO"(cannot be modified).
This time includes the cooling time until the door can be
unlocked.
• During the pyrolysis cycle, the lock warning light is
activated to indicate that the door is locked.
• Pyrolysis automatically stops when the lock warning light turns off and it is then
possible to open the door.
d) Return the function selector to the 0 position.
e) When the oven is cool, use a damp cloth to remove the white ashes. The oven
is clean and once again ready for the cooking application of your choice.
99639111_A_ML.qxp 02/03/2006 16:50 Page 19
Page 20

20
Sommaire
Tout au long de la notice,
vous signale les consignes de sécurité,
vous signale les conseils et les astuces
Edito
P.21
Comment se présente votre four ?
D
escriptif de l’appareil
P.22
A
ccessoires
P.23
Conseils de sécurité
P.24
Comment installer votre four ?
Raccordement électrique P.25-26
Comment changer l’ampoule ? P.26
Dimensions utiles pour encastrer votre four P.27
Comment utiliser votre four ?
Le détail de votre programmateur P.28
C
omment mettre à l’heure l’horloge du four ?
P.29
Comment faire une cuisson immédiate ? P.30
Comment programmer une cuisson ? P.30-32
Comment utiliser la minuterie ? P.33
Modes de cuisson du four P.34-35
Comment nettoyer la cavité de votre four ?
Qu’est-ce qu’une pyrolyse ? P.36
Dans quel cas faut-il effectuer une pyrolyse ? P.36
Comment faire une pyrolyse ? P.36-37
Que faire en cas d’anomalies de fonctionnement ?
P.38
99639111_A_ML.qxp 02/03/2006 16:50 Page 20
Page 21

21
FR
Edito
Chère Cliente, Cher Client,
Vous venez d'acquérir un four FAGOR et nous vous en remercions.
Nos équipes de recherche ont conçu pour vous une nouvelle génération
d'appareils pour cuisiner chaque jour avec plaisir.
Avec des lignes pures et une esthétique moderne, votre nouveau four
FAGOR s'intègre harmonieusement dans votre cuisine et allie
parfaitement facilité d'utilisation et performances de cuisson.
Vous trouverez également dans la gamme des produits FAGOR, un vaste
choix de tables de cuisson, de hottes aspirantes, de lave-vaisselle et de
réfrigérateurs, que vous pourrez coordonner à votre nouveau four
FAGOR.
Bien entendu, dans un souci permanent de satisfaire au mieux vos
exigences vis à vis de nos produits, notre service consommateurs est à
votre disposition et à votre écoute pour répondre à toutes vos questions
ou suggestions (coordonnées à la fin de ce livret).
A la pointe de l'innovation, FAGOR contribue ainsi à l'amélioration de la
qualité de la vie quotidienne en vous apportant des produits toujours plus
performants, simples d'utilisation, respectueux de l'environnement,
esthétiques et fiables.
La Marque FAGOR
99639111_A_ML.qxp 02/03/2006 16:50 Page 21
Page 22

22
1
2
5
6
7
3
4
Sélecteur de température
Programmateur
Sélecteur de fonctions
Lampe
Indicateur de gradin
Trou pour tourne broche
Contact de détection
d’ouverture de porte
Comment se présente votre four ?
DESCRIPTIF APPAREIL
2
1
3
4
5
7
6
99639111_A_ML.qxp 02/03/2006 16:50 Page 22
T˚
c
40
275
240
220
210
65
100
150
165
200
180
9
1
9
6
3
3
2
-
5
5
3
1
Page 23

23
FR
Accessoires
Inséré dans les gradins sous la grille, il recueille les jus et les graisses des grillades. Il peut
aussi être utilisé à demi rempli d'eau pour des cuissons au bain-marie.
Evitez de poser directement dans ce plat des rôtis ou des viandes car vous aurez
automatiquement d'importantes projections sur les parois du four.
Plat multi usages
(
plat à gâteaux ou lèchefrite)
Il sert de plat à gâteaux et dispose d'un
rebord incliné. Il s'utilise pour la cuisson de
pâtisseries telles que choux à la crème,
meringues, madeleines, pâtes feuilletées..
.
Tournebroche
Pour l'utiliser :
• disposez le plat multi-usages au gradin N° 1 pour
recueillir les jus de cuisson ou sur la sole si la pièce
à rôtir est trop grosse.
• enfilez une des fourchettes sur la broche ;
embrochez la pièce à rôtir ; enfilez la deuxième
fourchette ; centrez et serrez en vissant les deux
fourchettes.
• placez la broche sur son berceau.
• poussez légèrement pour engager la pointe de la broche dans le carré d'entraînement
situé au fond du four (6).
• retirez la poignée en la dévissant. Après la cuisson, revissez la poignée sur la broche pour
la retirer sans se brûler.
Grille sécurité anti basculement
La grille peut être utilisée pour supporter tous
les plats et moules contenant des aliments à
cuire ou à gratiner. Elle sera utilisée pour les
grillades (à poser directement dessus).
AR
AV
99639111_A_ML.qxp 02/03/2006 16:50 Page 23
Page 24

24
Conseils de sécurité
Merci de prendre connaissance de ces conseils avant d’installer et
d’utiliser votre four. Ce four a été conçu pour être utlilisé par des particuliers
dans leur lieu d’habitation. Il est destiné exclusivement à la cuisson des denrées
alimentaires. Ce four ne contient aucun composant à base d’amiante.
PREMIERE UTILISATION :
Avant d’utiliser votre four pour la première fois, chauffer le à vide, porte fermée,
pendant 15 minutes environ sur la position maxi afin de “roder” l’appareil. La laine
minérale qui entoure la cavité du four peut dégager, au début, une odeur
particulière due à sa composition. De même, vous constaterez peut-être un
dégagement de fumée. Tout ceci est normal.
UTILISATIONS SUIVANTES :
- Assurez vous que votre porte de four est bien fermée afin que le joint
d’étanchéité remplisse correctement sa fonction.
- Ne laissez personne s’appuyer ou s’asseoir sur la porte du four ouverte.
- Lors de l’utilisation du gril porte entre-ouverte, les parties accessibles
ou les surfaces peuvent devenir chaudes. Eloignez les jeunes enfants.
- Lors de son utilisation, l’appareil devient chaud. Veillez à ne pas toucher les
éléments chauffants situés à l’intérieur du four.
- Après une cuisson, ne prenez pas à main nue la casserolerie (grille,
tournebroche, léchefrite, berceau de tournebroche...), utilisez une manique ou un
tissu isolant.
- Ne garnissez pas votre four de feuilles en aluminium. Sinon, il en résulterait une
accumulation de chaleur qui influencerait désavantageusement le résultat de la
cuisson et du rôtissage et endommagerait l’émail.
- Avant de procéder au nettoyage pyrolyse de votre four, retirez tous les éléments
de casserolerie et enlevez les débordements importants.
- Ne pas utiliser de nettoyeur vapeur ou à haute pression.
- Pendant une pyrolyse, les surfaces accessibles deviennent plus chaudes qu’en
usage normal. Eloigner les jeunes enfants.
- Pour toute intervention de nettoyage dans la cavité du four, le four doit
être arrêté.
PROTECTION DE L’ENVIRONNEMENT
Les matériaux d’emballage de cet appareil sont recyclables. Participez à leur
recyclage et contribuez ainsi à la protection de l’environnement en les déposant
dans les conteneurs municipaux prévus à cet effet.
Votre appareil contient également de nombreux matériaux recyclables. Il
est donc marqué de ce logo afin de vous indiquer que les appareils
usagés ne doivent pas être mélangés avec d’autres déchets. Le recyclage
des appareils qu’organise votre fabricant sera ainsi réalisé dans les
meilleures conditions, conformément à la directive européenne
2002/96/CE sur les déchets d’équipements électriques et électroniques.
Adressez vous à votre mairie ou à votre revendeur pour connaître les
points de collecte des appareils usagés les plus proches de votre domicile.
Nous vous remercions pour votre collaboration à la protection de l’environnement.
Remettez impérativement le sélecteur de fonction sur 0 pour
réutiliser votre four.
99639111_A_ML.qxp 02/03/2006 16:50 Page 24
Page 25

25
FR
Comment installer votre four ?
Compteur 20A Mono
220-240 V ~ 50 Hz
Prise de courant
2 pôles + terre
norme CEI 60083
Ligne Mono 220-240 V ~
Raccordement électrique
Câble
d'alimentation
longueur 1,50 m
environ
Disjoncteur différentiel
ou fusible 16A
Avant d'effectuer le branchement, s'assurer que les fils de votre
installation électrique sont d'une section suffisante pour
alimenter normalement l'appareil (section au minimum égale à
celle du câble d'alimentation).
Le fusible de votre installation doit être de 16 Ampères.
Le raccordement électrique est à réaliser avant la mise en place de l'appareil
dans le meuble.
• Le four doit être branché avec un câble d'alimentation (normalisé) à
3 conducteurs de 1,5 mm2(1 ph + 1 N + terre) qui doivent être raccordés sur
réseau 220-240 V ~ monophasé par l'intermédiaire d'une prise de courant 1 ph
+ 1 N + terre normalisée CEI 60083 ou d'un dispositif à coupure omnipolaire
ayant une distance d'ouverture des contacts d'au moins 3 mm. Le fil de protection
(vert-jaune) est
relié à la borne de l'appareil et doit être relié à la terre de
l'installation.
• Dans le cas d’un branchement avec prise de courant, celle-ci doit rester
accessible après l’installation de l’appareil.
• Le neutre du four (fil bleu) doit être raccordé au neutre du réseau.
99639111_A_ML.qxp 02/03/2006 16:50 Page 25
Page 26

26
• Le câble d’alimentation (H05 RR-F, H05 RN-F ou H05 VV-F) doit avoir une longueur
suffisante pour être raccordé au four à encastrer posé au sol devant le meuble.
Pour cela l’appareil doit être déconnecté du réseau :
• Ouvrez la trappe située en bas à droite du capot arrière en dévissant les 2 vis,
puis faîtes pivoter la trappe.
• Dénudez chaque fil du nouveau câble d’alimentation sur 12mm.
• Torsadez soigneusement les brins.
• Desserrez les vis du bornier et retirez le cordon d’alimentation à changer.
• Introduire le câble d’alimentation par le côté du capot dans le serre-câble situé
à droite du bornier.
• Raccordez les fils du câble conformément au(x) repère(s) écrit(s) sur le bornier.
• Tous les brins des fils d’alimentation doivent être emprisonnés sous les vis.
• Le fil de la phase sur la borne L.
• Le fil de terre couleur vert-jaune doit être relié à la borne .
• Le fil du neutre (bleu) sur la borne N.
• Vissez à fond les vis du bornier et vérifiez le branchement en tirant sur chaque fil.
• Fixez le câble au moyen du serre-câble situé à droite du bornier.
• Refermez la trappe à l’aide des 2 vis.
Changement du câble d’alimentation
Notre responsabilité ne saurait être engagée en cas d'accident
consécutif à une mise à la terre inexistante, défectueuse ou incorrecte.
Comment installer votre four ?
• L'ampoule se situe au plafond de la cavité de votre four.
a) Dévissez le hublot (voir ci-contre).
b) Dévissez l'ampoule dans le même
sens.
Caractéristiques de l'ampoule :
- 15 W
- 220-240 V
- 300°C
- culot E 14
c) Changer l'ampoule puis remonter
le hublot et rebrancher votre four
Ampoule
Dévissez
Hublot
Débrancher votre four avant toute intervention sur l'ampoule
pour eviter tout risque de choc électrique et laisser refroidir si
besoin l’appareil.
Comment changer l’ampoule ?
pour dévisser le hublot et la lampe, utiliser un gant de
caoutchouc qui facilitera le démontage.
99639111_A_ML.qxp 02/03/2006 16:51 Page 26
Page 27

27
FR
Comment installer votre four ?
Pour être assuré d’avoir une installation conforme, n’hésitez
pas à faire appel à un spécialiste électroménager.
Dimensions utiles pour encastrer votre four
Le four peut indifféremment être installé sous un plan de travail ou dans
un meuble en colonne (ouvert* ou fermé) ayant les dimensions
d’encastrement adaptées (voir schéma ci-contre).
Votre four possède une circulation d’air optimisée qui permet d’obtenir des
résultats de cuisson et de nettoyage remarquables en respectant les éléments
suivants :
• Centrez le four dans le meuble de façon à garantir une distance mini de 5 mm
avec le meuble voisin.
• La matière du meuble d’encastrement doit résister à la chaleur (ou être revêtu
d’une telle matière).
• Pour plus de stabilité, fixez le four dans le meuble par 2 vis au travers des trous
prévus à cet effet sur les montants latéraux (cf schéma).
Pour ce faire :
1) Retirez les cache vis en caoutchouc pour accéder aux trous de fixation.
2) Effectuez un trou de Ø 3 mm dans la paroi du meuble pour éviter l’éclatement du bois.
3) Fixez le four avec les 2 vis.
4) Remettez les cache vis en caoutchouc (ceux-ci servent également à amortir la
fermeture de la porte du four).
(*) si le meuble est ouvert, son ouverture doit être de 70 mm (maxi).
577
577
585600
99639111_A_ML.qxp 02/03/2006 16:51 Page 27
Page 28

28
Affichage des temps et durées
Symbole de durée de cuisson
Symbole de fin de cuisson
Minuteur indépendant
Touche d’accès aux différents programmes de réglage du temps
Touches de réglages du temps
1
2
3
4
5
6
7
1. Le détail de votre programmateur
1
2
3
4
5
6
7
Comment utiliser votre four ?
DESCRIPTIF APPAREIL
99639111_A_ML.qxp 02/03/2006 16:51 Page 28
Page 29

29
FR
a) A la mise sous tension
• L’afficheur clignote.
• Réglez l’heure en appuyant sur les touches
ou (le maintien du doigt sur la touche permet
d’obtenir un défilement rapide).
• Appuyez sur la touche pour valider.
Exemple :12h30.
b) Remise à l’heure de l’horloge
• Appuyez simultanément sur les touches et
pendant quelques secondes jusqu’à faire
clignoter l’affichage
• Ajustez le réglage de l’heure avec les touches
ou .
• Appuyez sur la touche pour valider.
2. Comment mettre à l'heure l’horloge du four ?
S’il n’y a pas de validation par la touche , l’enregistrement
est automatique au bout de quelques secondes.
1
2
3
2
1
1
Comment utiliser votre four ?
99639111_A_ML.qxp 02/03/2006 16:51 Page 29
Page 30

30
Comment utiliser votre four ?
Le programmateur ne doit afficher que l'heure; celle-ci ne doit pas clignoter.
• Choisissez le mode de cuisson :
Tournez le sélecteur de fonctions sur la
position de votre choix.
Exemple : position " ".
• Choisissez la température de cuisson
Tournez le thermostat (sélecteur de
température) sur la température recommandée
par votre recette.
Exemple : repère de température 200°.
3. Comment faire une cuisson immédiate ?
4.
Comment programmer une cuisson ?
a) Faire une cuisson avec une durée définie :
• Choisissez le mode de cuisson.
Tournez le sélecteur de fonctions sur la
position de votre choix.
Exemple : position " ".
• Choisissez la température de cuisson.
Tournez le thermostat (sélecteur de
température) sur la température recommandée
par votre recette.
Exemple : repère de température 200°.
99639111_A_ML.qxp 02/03/2006 16:51 Page 30
240
220
210
9
1
9
6
3
3
2
-
5
T˚
c
275
200
40
65
100
150
165
180
9
1
9
6
3
3
2
-
5
T˚
c
275
240
220
210
200
40
65
100
150
165
180
Page 31

31
FR
Comment utiliser votre four ?
• Choisissez la durée de cuisson.
Appuyez une fois sur la touche .
La durée de cuisson (à 0H00) et le symbole associé
clignotent pour indiquer que le réglage est alors
possible. Il est possible de régler la durée de
cuisson.
Appuyez sur les touches ou pour régler le
temps souhaité.
Exemple : 30 minutes de cuisson.
Le décomptage de la durée se fait immédiatement
après le relâchement des touches ou .
• Après ces actions, le four chauffe, le voyant de
thermostat s’allume.
Le symbole de durée de cuisson est fixe et l’heure
se réaffiche.
En fin de cuisson (fin du temps programmé),
- le four s’arrête,
- le symbole de durée de cuisson s’éteint,
- 0:00 s’affiche
- une série de bips sonores est émise durant quelques minutes.
L’arrêt définitif des bips sonores se fait en appuyant sur n’importe quelle touche
et l’affichage repasse à l’heure.
b) Faire une cuisson différée avec une durée définie
(heure de fin choisie)
• Ajustez la température et réglez le mode de
cuisson.
Exemple : position " ",
repère de température 200°.
99639111_A_ML.qxp 02/03/2006 16:51 Page 31
9
1
9
6
3
3
2
-
5
T˚
c
275
240
220
210
200
40
65
100
150
165
180
Page 32

32
Il est possible
- de modifier à tout moment la durée de cuisson,
- de consulter à tout moment la durée restante de cuisson en
appuyant sur la touche « »,
- d’annuler à tout moment la programmation en maintenant pendant
quelques secondes la touche « » jusqu’au bip.
Attention : à ce moment, votre four se remet à chauffer.
Pour arrêter la chauffe, remettez les sélecteurs de température
et de fonctions sur arrêt.
• Appuyez une fois sur la touche .
La durée de cuisson à 0H00 et le symbole associé
clignotent pour indiquer que le réglage est alors possible.
Il est possible de régler la durée de cuisson jusqu’à 23h59.
• Appuyez sur les touches ou pour régler le
temps souhaité.
Exemple : 25 min de cuisson
Au premier appui sur la touche , le clignotement
s’arrête.
• Appuyez à nouveau sur la touche jusqu’ à faire
clignoter l’heure de fin de cuisson et son symbole associé.
Son réglage est alors possible.
• Ajustez l'heure de fin de cuisson souhaitée en appuyant
sur les touches ou .
Exemple ci-contre : fin de cuisson souhaitée à 13h00.
L’enregistrement de la fin de cuisson se fait automatiquement au bout de quelques secondes.
Après ces actions, le départ de la chauffe du four est
différé pour que la cuisson soit finie à l’heure programmée
(ex : 13h00).
Au démarrage de la cuisson, le symbole de fin de cuisson
s’éteint.
En fin de cuisson (fin du temps programmé),
- le four s’arrête,
- le symbole de durée de cuisson s’éteint,
- 0:00 s’affiche
- une série de bips sonores est émise durant quelques minutes.
L’arrêt définitif des bips sonores se fait en appuyant sur n’importe quelle touche
et l’affichage repasse à l’heure du jour.
Comment utiliser votre four ?
99639111_A_ML.qxp 02/03/2006 16:51 Page 32
Page 33

33
FR
Votre four est équipé d'un minuteur indépendant
du fonctionnement du four permettant de
décompter un temps.
• Appuyez à plusieurs reprises sur la touche
jusqu’à faire clignoter le symbole minuterie et
l’affichage correspondant .
• Ajustez le temps choisi en appuyant sur les touches
ou . Le réglage se fait par tranches de
30 secondes et le temps affiché est en
minute/seconde.
Le maintien de l’appui sur la touche permet d’obtenir
un défilement rapide.
Le décomptage débute quelques secondes après la fin du réglage et est visible
en permanence sur l’affichage.
En fin de décomptage du temps choisi, une série de bips est émise
(affichage 0:00).
L'arrêt des bips se fait en appuyant une fois sur la touche de votre choix.
5. Comment utiliser la minuterie ?
Il est possible de modifier ou d’annuler à n’importe quel moment
la programmation de la minuterie.
Comment utiliser votre four ?
99639111_A_ML.qxp 02/03/2006 16:51 Page 33
Page 34

34
* Séquences(s) utilisée(s) pour l’annonce écrite sur l’étiquette énergétique conformément à la norme eur
7. Modes de cuisson du four
Traditionnel pulsé
La cuisson s’effectue par les
éléments inférieur et supérieur et
par l’hélice de brassage d’air.
Gril pulsé + Tournebroche
La cuisson s’effectue,
alternativement, par l’élément
supérieur et par l’hélice de
brassage d’air.
Traditionnel
La cuisson s’effectue par les
éléments inférieur et supérieur
sans brassage d’air.
Sole pulsée
La cuisson s’effectue par l’élément
inférieur associé à un léger
dosage du gril et à l’hélice de
brassage d’air.
Gril
La cuisson s’effectue par l’élément
supérieur sans brassage d’air.
Montée rapide en température.
Certains plats peuvent être
enfournés four froid.
Préchauffage inutile
Volailles et rôtis juteux et
croustillants sur toutes les faces.
Le tourne broche continue de
fonctionner jusqu’à l’ouverture de
la porte.
Glissez la lèche frite au gradin du
bas.
Nécessite un préchauffage avant
d’enfourner le plat.
Effectuez un préchauffage de
5 minutes.
Glissez la léche frite sur le gardin
du bas.
Cuisson par le dessous avec léger
dosage dessus.
Placez la grille sur le gradin bas.
Maintien au chaud
Dosage de l’élément supérieur et
inférieur associés au brassage
d’air.
Maintien au chaud.
Symbole
Nom de la fonction Description de la fonction
*
*
99639111_A_ML.qxp 02/03/2006 16:51 Page 34
Page 35

35
Modes de cuisson du four
FR
Recommandé pour les viandes, poissons,
légumes, posés dans un plat en terre de
préference.
Recommandé pour toutes les volailles ou
rôtis au tourne-broche.
Pour saisir et cuire à coeur gigot, côtes de
bœuf.
Pour garder leur fondant aux pavés de
poissons.
Recommandé pour les cuissons lentes et
délicates : gibiers moelleux...
Pour saisir rôtis de viande rouge.
Pour mijoter en cocotte fermée plats
prealablement démarrés sur table de cuisson
(coq au vin, civet...).
Recommandé pour griller les côtelettes,
saucisses, tranches de pain, gambas
posées sur la grille.
Recommandé pour les plats humides
(quiches, tartes aux fruits juteux…).
La pâte sera bien cuite dessous.
Recommandé pour les préparations qui
lèvent (cake, brioche, kouglof...) et pour les
soufflés qui ne seront pas bloqués par une
croute dessus.
Recommandé pour faire lever les pâtes à
pain, à brioche, kouglof... en ne dépassant
pas 40°C (chauffe-assiettes, décongélation).
Recommandations
99639111_A_ML.qxp 02/03/2006 16:51 Page 35
Page 36

36
1. Qu’est-ce une pyrolyse ?
3. Comment faire une pyrolyse ?
CUISSONS PEU Biscuits, légumes, patisseries Cuissons sans éclaboussures
SALISSANTES quiches, soufflés une pyrolyse n’est pas justifiée
CUISSONS viandes, poissons, la pyrolyse peut se justifier
SALISSANTES (dans un plat) légumes farcis toutes les 3 cuissons
CUISSONS TRES grosses pièces de viandes la pyrolyse peut se faire après
SALISSANTES à la broche 1 cuisson de ce type si les
projections sont importantes
Votre four fume lors d’un préchauffage ou fume énormément lors d’une cuisson.
Votre four dégage une odeur à froid désagréable suite à différentes cuissons
(mouton, poisson, grillades...).
2. Dans quel cas faut il effectuer une pyrolyse ?
Il ne faut pas attendre que le four soit chargé de graisses pour
effectuer ce nettoyage.
-La pyrolyse est un cycle de chauffe de la cavité du four à très haute
température qui permet d’éliminer toutes les salissures qui proviennent des
éclaboussures ou des débordements. Les fumées et odeurs dégagées sont
détruites par le passage dans un catalyseur.
- La pyrolyse n’est toutefois pas nécessaire après chaque cuisson, mais
seulement si le degré de salissure le justifie.
- Par mesure de sécurité, l’opération de nettoyage ne s’effectue qu’après
blocage automatique de la porte. Dès que la température à l’intérieur du four
dépasse les températures de cuisson, il est impossible de déverrouiller la porte
même en positionnant la manette «sélecteur de fonctions» sur 0.
Comment nettoyer la cavité de votre four ?
a) Retirez la casserolerie du four et enlevez les
débordements importants qui auraient pu
se produire
b) Vérifiez que le programmateur affiche
l’heure du jour et que celle-ci ne clignote pas.
99639111_A_ML.qxp 02/03/2006 16:51 Page 36
Page 37

37
FR
c) Positionnez la manette «sélecteur de
fonctions» sur la position «PYRO» .
La durée d’indisponibilité du four est de 2h30 en
«PYRO»(non modifiable).
Ce temps prend en compte la durée de refroidissement
jusqu’au déverrouillage de la porte.
• Au cours du cycle de pyrolyse, le voyant
de verrouillage s’allume pour vous indiquer que la porte est verrouillée.
• La pyrolyse s’arrête automatiquement lorsque le voyant de verrouillage s’éteint,
il est alors possible d’ouvrir la porte.
d) Ramenez le sélecteur de fonctions sur la position 0.
e) Lorsque le four est froid, utilisez un chiffon humide pour enlever la cendre
blanche. Le four est propre et à nouveau utilisable pour effectuer une cuisson de
votre choix.
99639111_A_ML.qxp 02/03/2006 16:51 Page 37
Page 38

38
Que faire en cas d’anomalies de fonctionnement ?
Vous avez un doute sur le bon fonctionnement de votre four, ceci ne
signifie pas forcément qu'il y a une panne.
Dans tous les cas, vérifiez les point
suivants :
Vous constatez que...
Les causes possibles Que faut-il faire ?
Le four ne chauffe pas.
• Le four n'est pas branché.
• Le fusible de votre installation est
hors service.
• La température sélectionnée est
trop basse.
• Le capteur est défectueux
• Le thermostat est défectueux.
• Le four a subi une surchauffe,
il
s’est mis en sécurité.
- Brancher le four.
- Changer le fusible de votre
installation et vérifier sa valeur (16A).
- Augmenter la température
sélectionnée.
- Faire appel au Service Après-Vente.
- Faire appel au Service Après-Vente.
- Faire appel au Service Après-Vente.
L’indicateur T°c clignote.
• Défaut de verrouillage de la porte.
• Capteur de température
défectueux.
- Faire appel au Service Après-Vente.
- Faire appel au Service Après-Vente.
La lampe du four ne fonctionne
plus.
• La lampe est hors service.
• Le four n'est pas branché ou le
fusible est hors service.
- Changer la lampe.
- Brancher le four ou changer le
fusible.
Le nettoyage par pyrolyse ne se
fait pas.
• La porte est mal fermée.
• Le système de verrouillage est
défectueux.
• Le capteur de T° est défectueux.
• Le contact de détection de
« porte fermée » est défectueux.
- Vérifier la fermeture de la porte.
- Faire appel au Service Après-Vente.
- Faire appel au Service Après-Vente.- Faire appel au Service Après-Vente.
- Faire appel au Service Après-Vente.
99639111_A_ML.qxp 02/03/2006 16:51 Page 38
Page 39

39
99639111_A_ML.qxp 02/03/2006 16:51 Page 39
Page 40

40
99639111 02/06
99639111_A_ML.qxp 02/03/2006 16:51 Page 40
 Loading...