

Page 1
IT
GB
FR
DE
ES
NL
PT
GAZ
GAS
GAS
PIANO DI COTTURA
Installazione - Uso - Manutenzione
COOKING HOB
Installation - Use - Maintenance
TABLES DE CUISSON
Installation - Emploi - Entretien
GAS
EINBAUKOCHGERÄT
GAS
GAS
PLACA DE COCCIÓN
Installation - Gebrauch - Wartung
Instalación - Uso - Mantenimiento
INBOUWKOOKTOESTEL
Installatie - Gebruik - Onderhoud
GÁS
MESAS DE ENCASTRAR
Instalação - Uso - Manutenção
Page 2

IGBF
Caro Cliente,
sentitamente La ringraziamo e ci congratuliamo
per la scelta da Lei fatta.
Questo nuovo prodotto,
accuratamente progettato
e costruito con materiali di
primissima qualità, è stato
accuratamente collaudato
per poter soddisfare tutte
le Sue esigenze di una
perfetta cottura.
La preghiamo pertanto di
leggere e rispettare le facili
istruzioni che Le permetteranno di raggiungere
eccellenti risultati sin dalla
prima utilizzazione.
Con questo moderno apparecchio Le formuliamo i
nostri più vivi auguri.
IL COSTRUTTORE
Dear customer,
We thank you and congratulate you on your
choice.
This new carefully designed product, manufactured with the highest
quality materials, has been
carefully tested to satisfy
all your cooking demands.
We would therefore request
you to read and follow these
easy instructions which
will allow you to obtain excellent results right from
the start.
May we wish you all the
very best with your modern
appliance!
THE MANUFACTURER
Chère cliente, Cher client,
merci et sincères félicitations pour le choix que
vous avez fait.
Ce nouveau produit,
développé avec soin et
fabriqué avec des matières
de toute première qualité,
a été soigneusement rodé
pour satisfaire toutes Vos
exigences d’une cuisson
parfaite.
Veuillez lire attentivement
les instructions simples
portées sur cette notice qui
vous permettront d’obtenir d’excellents résultats
dès la première utilisation.
Nous vous souhaitons une
entière et pleine satisfaction quant à l’utilisation
de cet appareil moderne.
LE CONSTRUCTEUR
Indice
Istruzioni
per l’utente
Installazione 4
Uso 4-6
Manutenzione 12
Istruzioni per
l’installatore
Installazione 16
Collegamento gas 18
Collegamento
elettrico 18
Caratteristiche
utilizzatori 24-25
QUESTO PRODOTTO È
CONCEPITO PER UN
STATO
DI TIPO DOME-
IMPIEGO
STICO. IL COSTRUTTORE
DECLINA
SABILITÀ NEL CASO DI
EVENTUALI
O
UNA
INSTALLAZIONE
IMPROPRIO
ASSURDO
OGNI RESPON-
DANNI A COSE
PERSONE DERIVANTI DA
NON CORRETTA
O DA USO
, ERRONEO OD
.
Index
Instructions
for use
Installation 4
Use 4-6
Maintenance 12
Instructions
for the installater
Installation 16
Gas connection 18
Electrical connection
18
User characteristics
24-25
THIS APPLIANCE IS
CONCEIVED
USE
MANUFACTURER
NOT
RESPONSIBLE
WHATEVER
DAMAGES
INCORRECT
OR
WRONG OR ABSURD USE.
FOR DOMESTIC
ONLY. THE
SHALL
IN ANY WAY BE HELD
FOR
INJURIES OR
ARE CAUSED BY
INSTALLATION
BY UNSUITABLE,
Index
Notice
d’emploi
Installation 4
Mode d’emploi 4-6
Entretien 12
Modalités
d’installation
Installation 16
Connexion gaz 18
Branchement
électrique 18
Caractéristiques
utilisateurs 24-25
CE PRODUIT EST CONÇU
EXCLUSIVEMENT
DOMESTIQUE. LE
USAGE
CONSTRUCTEUR
RESPONSABILITÉ
TOUTE
DOMMAGES ET
POUR
BLESSURES
INSTALLATION
UNE
INCORRECTE
IMPROPRE,
USAGE
ERRONÉ OU ABSURDE.
POUR
DÉCLINE
CAUSÉES PAR
OU PAR UN
2
Page 3

Sehr geehrter Kunde,
wir danken Ihnen und beglückwünschen uns für Ihre
Wahl.
Dieses neue Produkt, sorgfältig entworfen und mit
erstklassigen Materialien
hergestellt, wurde genau
geprüft um alle Ihre Forderungen an ein perfektes Kochen zu erfüllen.
Wir bitten Sie deshalb die
einfachen Anweisungen zu
lesen und einzuhalten, damit
von der ersten Anwendung
an ausgezeichnete Ergebnisse erreicht werden
können.
Mit diesem modernen
Apparat wünschen wir
Ihnen das Beste.
DER HERSTELLER.
EDNLP
Estimado Cliente,
le agradecemos mucho y
le felicitamos por su
elección.
Este nuevo producto,
cuidadosamente
estudiado y construido
con materiales de primera
calidad, ha sido probado
esmeradamente para
poder satisfacer todas sus
exigencias de una perfecta
cocción.
Por lo tanto le rogamos lea
y respete las fáciles instrucciones que le permitirán llegar a resultados
excelentes desde la
primera utilización.
Con este moderno aparato
le expresamos nuestras
mejores felicitaciones.
EL CONSTRUCTOR
Geachte klant,
wij danken u en feliciteren
ons met de door u gedane
keuze.
Dit nieuwe produkt, zorgvuldig ontworpen en
geconstrueerd uit materialen
van de allerbeste kwaliteit, is
gedegen uitgetest om al uw
eisen voor een perfect
kookresultaat te kunnen
bevredigen.
Wij verzoeken u daarom de
eenvoudige instructies te
lezen en te respecteren,
dewelke het u toe zullen
staan om al vanaf het eerste
gebruik uitstekende
resultaten te bereiken.
Met dit moderne apparaat
doen wij u onze welgemeende
gelukwensen toekomen.
DE FABRIKANT
Ex.mo. Sr. Cliente,
Agradecemos, muito
sinceramente a sua
escolha, e aproveitamos
da ocasião para o felicitar.
Este novo produto, que foi
projectado com grande
atenção e construído com
os melhores materiais, foi
verificado e aprovado, de
maneira a dar-lhe imensa
satisfação para um cozinhado perfeito.
Por conseguinte, pedimos
que leia e siga as fáceis
instruções que lhe permitirão de alcançar excelentes resultados desde
o início da sua utilização.
Juntamente com este moderno aparelho, aproveitamos para lhe enviar
os nossos melhores cumprimentos.
O FABRICANTE
Inhaltsverzeichnis
Anweisungen
für den Benutzer
Installation 5
Gebrauch 5-7
Wartung 13
Anweisungen
für den Installateur
Installation 17
Gasanschluß 19
Elektroanschluß
19
Technische Daten
24-25
DIESES PRODUKT IST ALS
HAUSHALTSGERÄT
DACHT. FÜR SCHADEN AN
ODER PERSONEN,
SACHEN
DIE AUF FALSCHE
INSTALLATION
UNGEEIGNETEN GEBRAUCH
MISSBRAUCH
ODER
ZURÜCKZUFÜHREN
ÜBERNIMMT DER
HERSTELLER
VERANTWORTUNG
GE-
BZW.
SIND,
KEINERLEI
.
Indice
Instrucciones
para el usuario
Instalación 5
Utilización 5-7
Mantenimiento 13
Instrucciones
para el instalador
Instalación 17
Conexión gas 19
Conexión eléctrica
19
Caracteristícas
utilizadores 24-25
ESTE PRODUCTO FUE
CONCEBIDO
TIPO DOMÉSTICO. EL
DE
CONSTRUCTOR
CUALQUIER
PONSABILIDAD EN EL CA-
SO DE DAÑOS
EVENTUALES
PERSONAS
UNA INSTALACIÓN
DE
INCORRECTA
USO
ABSURDO
PARA UN USO
DECLINA
RES-
A COSAS O
QUE DERIVEN
O DE UN
IMPROPIO, ERRADO O
.
Index
Instructies
voor de gebruiker
Installatie 5
Gebruik 5-7
Onderhoud 13
Instructies
voor de installateur
Installatie 17
Gasaansluiting 19
Elektrische
aansluiting 19
Karakteristieken
verbruikers 24-25
DIT PRODUKT IS ALS
HUISHOUDELIJK
GEDACHT
BESCHADIGINGEN
SPULLEN
AAN VERKEERDE
DIE
INSTALLATIE
VERKEERDE
WIJTEN, NEEMT DE
TE
FABRIKANT
VERANTWOORDELIJKHEID
ZICH.
OP
APPARAAT
. VOOR
AAN
OF PERSONEN
, MISBRUIK OF
GEBRUIK ZIJN
GEEN
Índice
Instruções
para o utilizador
Instalação 5
Utilização 5-7
Manutenção 13
Instruções
para o instalador
Instalação 17
Conexão do gás 19
Conexão eléctrica
19
Caracteristícas das
pecas a utilizar 24-25
ESTE PRODUTO FOI CON-
CEBIDO PARA UMA UTILI-
ZAÇÃO DE TIPO DOMÉS-
TICA. O FABRICANTE DE-
CLINA TODAS AS RESPON-
SABILIDADES NO CASO DE
EVENTUAIS
COISAS
DERIVADOS
INSTALAÇÃO
OU
ERRÓNEO OU ABSURDO.
DANOS A
OU PESSOAS
DE UMA
INCORRECTA
DE USO IMPRÓPRIO,
3
Page 4

IGBF
Istruzioni
per l’utente
Installazione
Tutte le operazioni relative all’installazione (allacciamento elettrico, allacciamento gas, adattamento al tipo di gas,
conseguenti regolazioni,
ecc.) devono essere eseguite da personale qualificato secondo le norme
vigenti. Per le istruzioni
specifiche vedi la parte
riservata all’installatore.
Uso
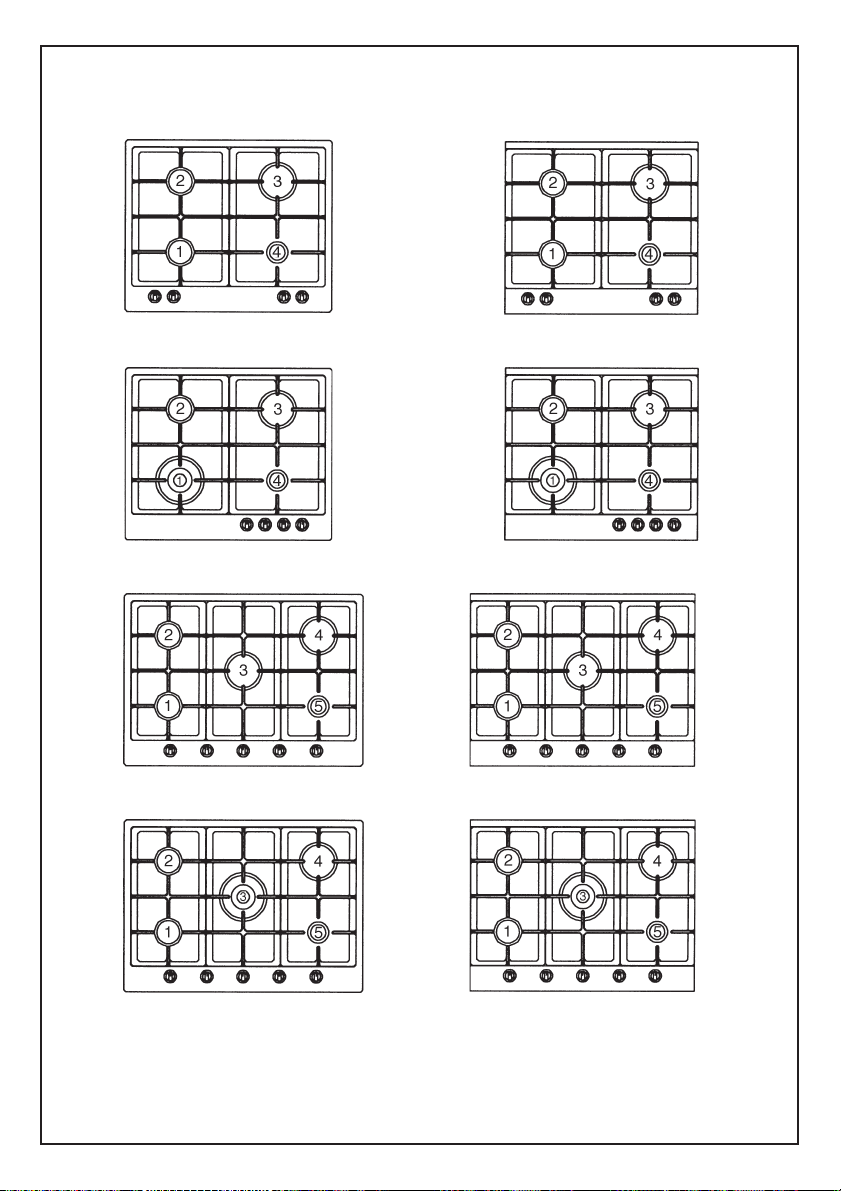
Bruciatori gas (Figg. 1-2-2a-
2b). L'accensione del
bruciatore avviene
avvicinando una fiammella
ai fori della parte superiore
dello stesso premendo e
ruotando in senso antiorario
la manopola corrispondente
sino a farne coincidere l'indice con la posizione di
massimo. Ad accensione avvenuta regolare la fiamma
secondo la necessità. La
posizione di minimo si
trova al termine delle rotazione antioraria. Nei
modelli con accensione
automatica agire sulla manopola come sopra
descritto, premendo contemporaneamente l'apposito pulsante. Nei modelli
con accensione automatica/
simultanea (a una mano) è
sufficiente agire come sopra
descritto sulla sola
manopola corrispondente.
La scarica elettrica fra
candelina e bruciatore dà
luogo all'accensione del
bruciatore interessato. Ad
accensione avvenuta rilasciare immediatamente il
pulsante regolando la fiamma secondo necessità.
L’accensione del bruciatore
nei modelli con sicurezza
termoelettrica avviene come
nei diversi casi sopra de-
Instructions
for use
Installation
All the operations concerned with the installation (electrical connection) must be carried
out by qualified technicians, in terms with the
standards in force.
For specific instructions,
kindly read the part reserved for the installation technician.
Use
Gas burners (Fig. 1-2-2a-
2b). The ignition of the gas
burner is carried out by
putting a small flame to the
upper part holes of the
burner, pressing and
rotating the corresponding
knob in an anti-clockwise
manner, until the maximum position has coincided
with the marker. When the
gas burner has been turned
on, adjust the flame
according to need. The
minimum position is found
at the end of the anticlockwise rotation
direction.
In models with automatic
ignition, operate the knob
as described above, pressing
simultaneously, the corresponding push-button.
For models with automatic/
simultaneous (with one
hand) ignition, it is
sufficient to proceed as
described above using the
corresponding knob. The
electric spark between the
ignition plug and the
burner provides the
ignition of the burner itself.
After ignition, immediately
release the push-button and
adjust the flame according
to need.
For models with a
thermoelectric safety
Notice
d’emploi
Installation
Toutes les opérations relatives à l’installation
(branchement électrique)
doivent être effectuées
par des spécialistes
suivant les normes en
vigueur.
Pour les instructions spécifiques, voir la partie
qui concerne les modalités d’installation.
Mode d’emploi
Brûleurs à gaz (Fig. 1-2-2a-
2b). On allume le brûleur en
approchant une petite flamme aux trous de sa partie
supérieure en poussant et
tournant dans le sens
contraire des aiguilles d’une
montre la manette correspondant jusqu’à faire coïncider l’aiguille avec la
position de maximum.
Quand le bruleur est en
marche, règler la flamme
selon la nécéssité. La position de minimum se
trouve à la fin de la rotation
contraire au sens des aiguilles d’une montre.
Pour les modèles à allumage automatique tourner
la manette comme indiquè
ci-dessus, en poussant en
meme temps le bouton
spècial. Pour les modèles à
allumage automatique/
simultané (à une main), il
suffit d’agir sur le bouton
correspondant, comme il est
indiqué ci-dessus. La décharge électrique entre la
petite bougie et le brûleur
allume le brûleur interessé.
Quand le brûleur est
allumé, lâcher la manette, et
regler la flamme selon
nécéssité.
Dans le cas de modèles
doués de sûreté thermoélectrique, l'allumage du
4
Page 5

EDNLP
Anweisungen
für den Benutzer
Installation
Sämtliche Installationsarbeiten (Elektroanschluß,
Gasanschluß, Anpassung
an einen anderen Gastype,
darauffolgende Einstellungen, usw.) müssen laut der
geltenden Vorschriften
durch Fachpersonal ausgeführt werden.
Für die spezifischen Anleitungen verweisen wir an
den dem Installateur vorbehaltenen Teil.
Gebrauch
Gasbrenner (Abb. 1-2-2a-
2b). Zur Anzündung des
Gasbrenners eine Flamme
gegen die kleinen Löcher an
der Brennstelle halten, wobei
man den entsprechenden
Knopf entgegen dem
Uhrzeigersinn bis zur
Großstellung dreht und
gedrückt hält. Sobald der
Brenner angezündet ist,
Gasflamme auf die
gewünschte Stellung regeln.
Die Kleinstellung befindet
sich am Ende der Drehung
entgegen dem Uhrzeigersinn.
Bei den Modellen mit automatischer Anzündung den
Knopf wie oben beschrieben
bis zur Kleinstellung drehen,
wobei man gleichzeitig auf
das dafür bestimmte Anzündungsknöpfchen drückt. Bei
den Modellen mit
automatischer/simultaner
Zündung (einhändig) nur
den entsprechenden
Bedienknopf wie oben
beschrieben betätigen.
Die elektrische Entladung
zwischen diesem Element und
dem Brenner verursacht die
Anzündung der gewünschten
Brennstelle. Sobald der
Brenner an ist, den Knopf
sofort loslassen und die
Flamme nach Wunsch regeln.
Die Brennerzündung bei den
Modellen mit thermo-
Instrucciones
para el usuario
Instalación
Todas las operaciones
relativas a la instalación
(conexión eléctrica)
tienen que ser efectuadas
por personal cualificado
según las normas
vigentes.
Para las instrucciones específicas véase la parte
reservada al instalador.
Utilización
Quemadores de gas
(Fig. 1-2-2a-2b). El encendido del quemador tiene
lugar acercando una llama
a los agujeros de la parte
de arriba del mismo
quemador presionando y
girando en sentido antihorario el puño correspondiente hasta que su indicador coincida con la posición de máximo. Una vez
efectuado el encendido regular la llama según la necesidad. La posición de
mínimo está al final de la
rotación antihoraria.
En los modelos con encendido automático actuar sobre el puño como descrito
arriba, presionando
contemporáneamente el
apropiado pulsador. En
los modelos con encendido
automático/simultáneo
(con una mano) es
suficiente accionar el
mando respectivo como se
indicó anteriormente.
La descarga eléctrica entre
bujía y quemador provoca
el encendido del
quemador interesado. Una
vez efectuado el
encendido soltar inmediatamente el pulsador regulando la llama según la necesidad.
El encendido de los
Instructies voor
de gebruiker
Installatie
Alle handelingen met betrekking tot de installatie (elektrische verbinding) moeten
worden uitgevoerd door gekwalificeerd personeel volgens
de geldende normen. Zie voor
de specifieke instructies het
gedeelte gereserveerd voor de
installateur.
Gebruik
Gasbrander (Afb. 1-2-2a-
2b). De ontsteking van de
brander gebeurt door een
vlammetje dicht bij de gaatjes
bovenop de brander te houden
en gelijktijdig de corresponderende knop in te drukken
en tegen de klok in te draaien
totdat deze overeenkomt met
de ‘maximum’- indicatie.
Regel na ontsteking de vlam
naar wens. De ‘minimum’positie bevindt zich aan het
einde van de draaiing tegen
de klok in.
Bij de modellen met automatische ontsteking de
draaiknop bedienen zoals
boven omschreven, terwijl
tegelijkertijd de drukknop
ernaast wordt ingedrukt. De
hierbij ontstane vonk zal de
desbetrefende brander doen
ontsteken.
In de modellen die
automatisch / gelijktijdig
(met een hand) kunnen
worden aangestoken, hoeft u
enkel en alleen op de
overeenstemmende knop de
voormelde werkwijze te
volgen.
Na ontsteking de drukknop
direct loslaten en de vlam
naar wens regelen.
Op de modellen met een
thermo-elektrische veiligheid
kan u de vuren aansteken
zoals in de diverse
Instruções
para o
utilizador
Instalação
Todas as operações relativas à instalação (conexão eléctrica) terão de
ser efectuadas por
pessoal qualificado,
segundo as normas em
vigor.
Para instruções
específicas, veja-se a
parte reservada para o
técnico instalador.
Utilização
Queimador de gás (Fig. 1-2-
2a-2b). Para acender o
queimador de gás, ponha a
chama nos furos da parte
superior do dito queimador,
fazendo pressão e rodando
o punho correspondente em
sentido anti-horário até
fazer coincidir o índice com
a posição máxima. Logo
que o queimador de gás
estiver aceso, regule a
chama segundo a
necessidade. A posição
mínima encontra-se no
termo da rotação antihorária. Nos modelos com
atamento automático,
accionar o punho como
descrito em cima, fazendo
pressão, simultâneamente,
sobre o correspondente
botão de pressão. Nos
modelos com acendimento
automático/simultâneo
(com uma mão), basta
seguir o procedimento
descrito acima apenas no
botão correspondente.
A descarga eléctrica entre a
velazinha e o queimador de
gás acenderá este último.
Logo que o queimador
estiver aceso, solte
imediatamente o botão de
pressão, regulando a chama
segundo a necessidade.
5
Page 6
IGBF
scritti tenendo premuta a
fondo la manopola nella
posizione di massimo per
circa 3/5 secondi. Nel
rilasciare la manopola assicurarsi che il bruciatore
rimanga acceso.
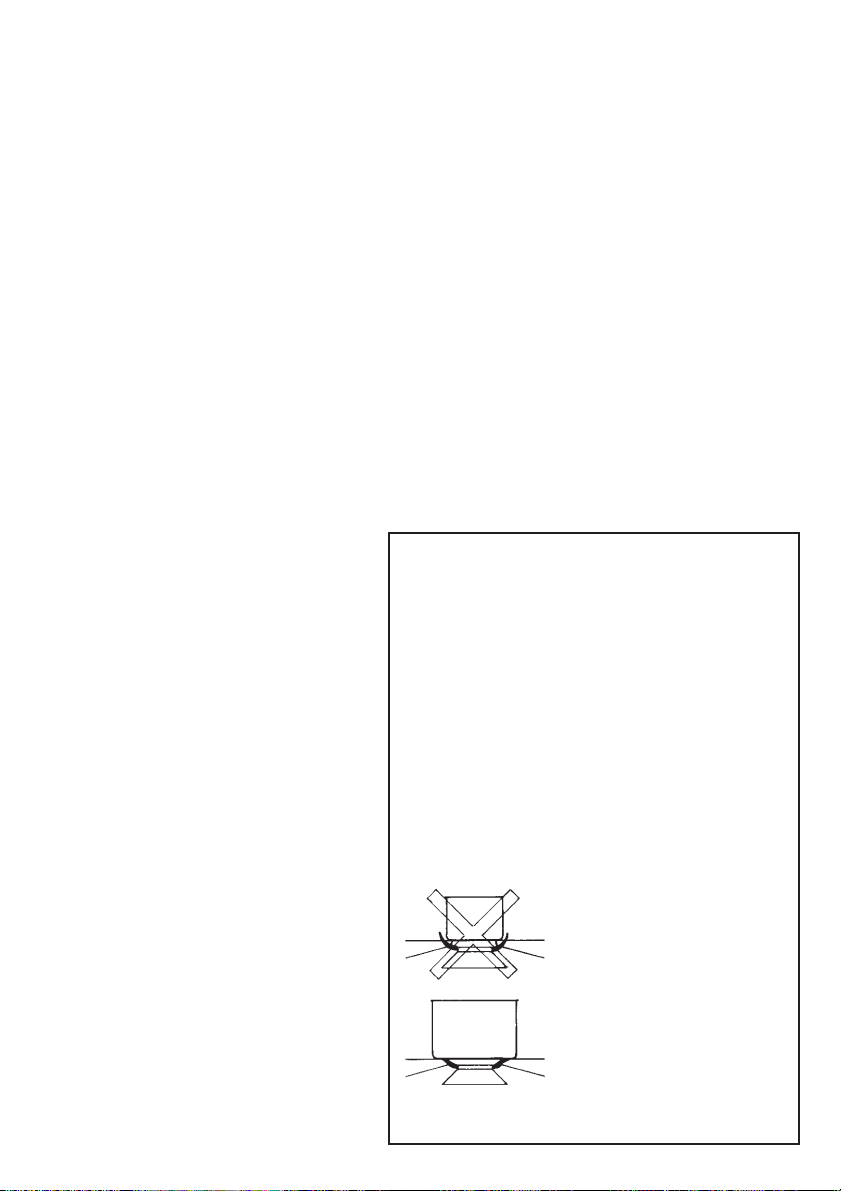
N.B. - si consiglia di usare
pentole di diametro adatto
ai bruciatori evitando che la
fiamma al massimo
fuoriesca dal fondo delle
stesse
- non lasciare pentole vuote
sul fuoco acceso
- sui piani Crystal non usare
accessori di cottura alla
griglia.
Al termine della cottura è
buona norma provvedere
anche alla chiusura del rubinetto principale del
condotto e/o della bombola.
6
system, the burner is
ignited as in the various
cases described above,
keeping the knob fully
pressed on the maximum
position for approximately
3/5 seconds. After releasing
the knob, make sure the
burner is actually lit.
N.B. - we recommend the
use of pots and pans with a
diameter matching that of
the burner, thus preventing
the flame from escaping
from the bottom part and
surrounding the pot
- do not leave any empty
pots or pans on the fire
- do not use any tools for
grill-cooking on Crystal
hobs.
When cooking is finished, it
is also a good norm to close
the main gas pipe tap and/
or cylinder.
GAS
GAZ
* con griglia di riduzione
with reduction grid
avec grille de réduction
mit Reduziergitter
con rejilla de reducción
met reductierooster
com rede de redução
Fig. 1 - Abb. 1 - Afb. 1
brûleur a lieu comme dans
les cas décrits ci-dessus en
appuyant à fond sur la
manette placée à la position
maximale pendant environ
3/5 secondes. Au moment
où vous relâchez la manette,
assurez-vous que le brûleur
est allumé.
N.B.: - on Vous conseille
d’utiliser des casseroles
avec un diamètre proportionné aux brûleurs évitant
que la flamme au maximum
déborde de leur fond
- ne laissez jamais de casseroles vides sur le feu allumé
- n'employez pas d'ustensiles pour cuisson à grille
sur les plans Crystal.
A la fin de la cuisson il faut
fermer le robinet principal
du conduit et/ou de la bouteille.
pesciera 20x32
corona Ø 20-32
rapido Ø 20-26
semirapido Ø 14-20
ausiliario Ø 10-14
fish 20x32
wok Ø 20-32
fast Ø 20-26
semifast Ø 14-20
auxiliary Ø 10-14
poisson 20x32
wok Ø 20-32
rapide Ø 20-26
semirapide Ø 14-20
auxiliaire Ø 10-14
fischpfannel 20x32
wok Ø 20-32
schnell Ø 20-26
halbschnell Ø 14-20
hilfbrenner Ø 10-14
pesciera 20x32
corona Ø 20-32
rápido Ø 20-26
semirápido Ø 14-20
auxiliar Ø 10-14
vis 20x32
wok Ø 20-32
snel Ø 20-26
matig snel Ø 14-20
sudderpit Ø 10-14
pesciera 20x32
coroa Ø 20-32
rápido Ø 20-26
semi-rápido Ø 14-20
auxiliar Ø 10-14
*
*
*
*
*
*
*
Page 7

elektrischer Sicherheit erfolgt
wie in den oben beschriebenen
Fällen, den Bedienknopf dabei
auf max. Leistungsstufe ca. 3/
5 Sekunden bis zum
Anschlag gedrückt
halten.Wenn der Knopf
wieder losgelassen wird,
kontrollieren Sie, daß der
Brenner angezündet bleibt.
Es wird empfohlen, Töpfe mit
dem richtigen Durchmesser
im Verhältnis zur Größe der
Brennstelle zu verwenden,
um zu vermeiden, daß die
Flammen um den Topf herum
züngeln. Lassen Sie die
Kochstellen nicht mit leeren
Töpfen eingeschaltet;
verwenden Sie keine
Grillgeräte auf CrystalKochstellen. Es wird
empfohlen, den Haupthahan
der Gasleitung und/oder der
Gasflasche nach dem Kochen
immer zu schließen.
quemadores en los
modelos con seguridad
termoeléctrica se efectúa
como en los casos ya
descritos, manteniendo el
mando presionado a fondo
en la posición de máximo
durante unos 3/5
segundos. Al soltar la
perrilla asegurarse que el
quemador permanezca
encendido.
N.B.: - se aconseja utilicen
sartenes de diámetro apto
a los quemadores evitando
que la llama al máximo
salga del fondo de las
mismas
- no dejar ollas vacías con
el fuego encendido
- sobre los planos Crystal
no usar accesorios de
cocción a la parrilla.
Al final de la cocción se aconseja cierren el grifo
principal del tubo y/o de
la bombona.
EDNLP
voorgaande gevallen is
uitgelegd: houd de knop
ongeveer 3/5 seconden in de
maximale stand ingedrukt.
Wanneer men de knop
loslaat, moet men zich ervan
verzekeren, dat de vlam aan
blijft.
N.B.: - Het wordt aangeraden
pannen te gebruiken met een
diameter die overeenkomt met
de betreffende brander,
voorkomend dat in de
maximumstand de vlam
buiten de pan uit slaat
- laat de kookplaten niet met
lege pannen ingeschakeld
- vermijdt het gebruik van
grilgerei op de Crystalkookplaten.
Na beeindiging van het koken
is het goed om ook de
hoofdkraan van het systeem
en/of van de gasfles te
sluiten.
O acendimento do
queimador nos modelos
com dispositivo segurança
termoeléctrico, é feito da
mesma forma que os casos
acima descritos,
mantendo carregado o
botão na posição de
máximo por 3/5 segundos
Ao deixar de novo o manípulo certificar-se que o
queimador fique aceso.
N.B. - Recomenda-se o uso
de panelas com diâmetro
igual ao dos queimadores
evitando que a chama,
quando estiver alta, saia por
debaixo das ditas panelas
- não deixar panelas vazias
sobre o lume aceso
- sobre planos Crystal não
utilizar acessórios de
cozedura à grelha.
Quando terminou de cozinhar, siga a boa regra de
fechar igualmente a torneira
principal do conduto e/ou
do balâo de gás.
7
Page 8
IGBF
12 34
1234
1234 5
12 34
1 234
1234 5
1234 5
Fig. 2 - Abb. 2 - Afb. 2
8
1234 5
Page 9

EDNLP
123 456
12 3 45
12 345
123 456
12 3 45
12 34 5
123456
Fig. 2a - Abb. 2a - Afb. 2a
1 23456
12 34 5
9
Page 10

IGBF
Fig. 2b - Abb. 2b - Afb. 2b
10
Page 11

EDNLP
FISSAGGIO ANTERIORE
FRONT FIXING
FIXATION AVANT
FRONTSEITIGE BEFESTIGUNG
FIJACIÓN DELANTERA
VOORBEVESTIGING
FIXAÇÃO ANTERIOR
Fig. 3 - Abb. 3 - Afb. 3
FISSAGGIO POSTERIORE
REAR FIXING
FIXATION ARRIÉRE
RÜCKSEITIGE BEFESTIGUNG
FIJACIÓN TRASERA
ACHTERBEVESTIGING
FIXAÇÃO POSTERIOR
11
Page 12

IGBF
Manutenzione
Gas
Prima di ogni operazione
disinserire elettricamente
l'apparecchiatura. Per una
maggiore durata dell'apparecchiatura è indispensabile eseguire periodicamente un'accurata pulizia
generale tenendo presente
quanto segue:
• le parti in vetro, acciaio
e/o smaltate devono
essere pulite con
prodotti idonei
(reperibili in commercio) non abrasivi o
corrosivi. Evitare prodotti a base di cloro
(varechina, ecc.)
• evitare di lasciare sul
piano lavoro sostanze
acide o alcaline (aceto,
sale, succo di limone, ecc.)
• gli spartifiamma ed i
coperchietti (parti mobili del bruciatore) vanno frequentemente lavati con acqua bollente
e detersivo avendo cura
di togliere ogni eventuale incrostazione,
asciugati accuratamente, controllare che nessuno dei fori dello spartifiamma risulti otturato
anche parzialmente.
• le griglie inox del piano
di lavoro dopo essere
state riscaldate assumono una colorazione bluastra che non ne deteriora
la qualità. Per riportarle
all'aspetto originale usare un prodotto leggermente abrasivo.
Maintenance
Gas
Prior to any operation,
disconnect the appliance
from the electrical
system.
For long-life to the
equipment, a general
cleaning operation must
take place periodically,
bearing in mind the
following:
• the glass, steel and/or
• avoid leaving acid or
• the wall baffle and the
• the stainless steel grids
enamelled parts must
be cleaned with
suitable non-abrasive
or corrosive products
(found on the market).
Avoid chlorine-base
products (bleach, etc.);
alkaline substances on
the working area
(vinegar, salt, lemon
juice, etc.).
small covers (mobile
parts of the burner)
must be washed
frequently with
boiling water and
detergent, taking care
to remove every
possible encrustation.
Dry carefully and
check that none of the
burner holes is fully or
partially clogged;
of the working area,
after having been
heated, take on a
bluish tint which does
not deteriorate the
quality. To bring
colour back to its
original state, use a
slightly abrasive
product.
Entretien
Gaz
Avant de toute opèration,
débrancher l’appareil du
reseau électrique. Pour
assurer une longue vie á
l’appareil il faut
absolument effectuer de
temps en temps un nettoyage général soigneux
en gardant à l’esprit ce qui
suit:
• les parties en vitre, acier
et/ou émaillées doivent
etre nettoyées avec des
produits appropriés
(faciles à trouver ans les
magasins) non abrasifs
ni corrosifs. Eviter les
produits qui contiennent du chlore (eau de
Javel.etc,)
• éviter de laisser sur la
table de travail des substances acides ou alcalines (vinaigre, sel, jus
de citron, etc.)
• les orifices du bruleûr et
les chapeaux (pièces
mobiles du bruleur)
doivent etre frequemment lavés avec de
l’eau bouillante et du
détergent, en ayant soin
d’enlever tout incrustation, ensuite ils
doivent etre essuyés
soigneusement, en controlant que tous les
trous soient débouchés.
• les grilles inox du plan
de travail après avoir
été chauffées prennent
une couleur bleuâtre
qui ne deterieoure pas
leur qualité. Pour leur
rendre leur aspect original employer un produit un peu abrasif.
12
Page 13

Wartung
Gas
Vor jeder Wartungsarbeit
das Gerät ausschalten.
Für eine lange Lebensdauer
des Geräts muß es
unbedingt regelmäßig
gründlich gereinigt werden. Dazu folgendes beachten:
• Die Teile aus Glas, Stahl
und/oder Email müssen
mit milden, im Handel
erhältlichen Mitteln
gesäubert werden.
Verwenden Sie auf
keinen Fall chlorhaltige
Mittel (Bleichmittel,
usw.).
• Lassen Sie keine säurehaltigen oder alkalischen
Speisereste (Essig,
Zitronensaft, usw.) auf
der Arbeitsfläche;
• Die losen Teile der
Brennstellen müssen in
warmem Seifenwasser
regelmäßig gewaschen
und gut abgetrocknet
werden. Kontrollieren
Sie, daß die Löcher nicht
verstopft sind.
• Die rostfreien Roste aus
Stahl bekommen einen
bläulichen Beschlag,
nachdem sie erhitzt
worden sind, aber dies
bedeutet keinerlei
Beeinträchtigung der
Qualität. Um sie wieder
auf ihren ursprünglichen
Anschein zu bringen,
kön–nen Sie sie mit
einem leichten
Scheuermittel reiben.
EDNLP
Mantenimiento
Gas
Antes de cualquier operación desconectar eléctricamente el aparato.
Para una mayor duración
del aparato es indispensable
efectuar periódicamente
una cuidadosa limpieza general teniendo en cuenta lo
siguiente:
• las partes en vidrio, de
acero y/o esmaltadas
tienen que ser limpiadas
con productos idóneos
(que se pueden encontrar
a la venta) no abrasivos
ni corrosivos. Eviten
productos a base de cloro
(lejía de algas, ecc.)
• eviten dejar sobre el tablero de trabajo substancias ácidas o alcalinas (vinagre, sal, zumo de limón, ecc.)
• los rompellamas y las
tapaderas (partes movibles del quemador) tienen que ser lavados a
menudo con agua muy
caliente y detergente
teniendo el cuidado de
quitar toda incrustación,
tienen que ser secados
cuidadosamente, y hay
que controlar que ninguno de los agujeros de
los rompellamas esté obturado, ni siquiera parcialmente.
• las rejillas inox de la superficie de cocción después de haber sido calentadas toman una coloración azulada que no daña
su calidad. Para que
vuelvan a su apariencia
original utilicen un producto ligeramente abrasivo.
Onderhoud
Gas
Voor iedere handeling de
apparatuur elektrisch
uitschakelen. Voor een lange
levensduur van de
apparatuur is het onontbeerlijk periodiek een degelijke
algemene schoonmaak uit te
voeren en daarbij rekening te
houden met het volgende:
• de glasdelen, de stalen en/
• vermijdt zure of alkali-
• de vlamverdelers en de
• de stalen roosters van het
Manutenção
Gás
Antes de qualquer operação, desligue o aparelho da
corrente eléctrica.
Para uma maior duração, é
indispensável executar periódicamente uma esmerada
limpeza geral ao aparelho
tomando sempre em
consideração o que segue:
of geglazuurde gedeelten
moeten schoongemaakt
worden met passende,
niet-schurende of -corrosieve produkten (commercieel verkrijgbaar).
Vermijdt produkten op
basis van chloor (bleekmiddelen, enz.)
sche stoffen (azijn, zout,
citroensap, enz.) op de
plaat achter te laten
dekseltjes (verwijderbare
delen van de brander)
moeten regelmatig
gewassen worden met
kokend water en zeep, er
zorg voor dragend elk
eventueel aanbaksel te
verwijderen, en goed afgedroogd worden waarbij gecontroleerd moet worden
dat geen van gaatjes van de
vlamverdelers ook maar gedeeltelijk geblokeerd is.
werkblad verkleuren
blauwachtige nadat ze zijn
verwarmd, dit vermindert
de kwaliteit niet. Om het
originele aspect terug te
krijgen gebruikt men een
licht schurend produkt.
• as partes em vidro, aço
• evite de deixar substân-
• os bicos de gás e as pe-
• As grelhas em aço inoxi-
e/ou esmaltadas terão de
ser limpas com produtos
apropriados (que se encontram no comércio) e
que não sejam nem abrasivos nem corrosivos.
Evite de usar produtos
com base de cloro (substâncias para branquear,
etc.);
cias ácidas ou alcalinas
(vinagre, sal, sumo de limão, etc.) sobre a chapa
de trabalho;
quenas tampas (partes
móveis do queimador)
têm de ser lavados frequentemente com água
fervente e detersivo, tomando grande cuidado
com possíveis incrustações. Depois, enxugue
com cuidado, e controle
que nenhum dos buracos
estejam completa ou parcialmente obturados;
dável da chapa de trabalho, depois de terem sido
aquecidas, podem tornarse de uma cor azulada, o
que não deteriora a
qualidade. Para lhes dar
novamente o aspecto
original, use um produto
ligeiramente abrasivo.
13
Page 14

IGBF
N.B.- L'eventuale lubrificazione dei rubinetti deve essere eseguita da personale
qualificato al quale è bene
rivolgersi in caso di anomalie di funzionamento.
Controllare periodicamente lo stato di conservazione del tubo flessibile di
alimentazione gas. In caso
di perdite richiedere
l'immediato intervento del
personale qualificato per
la sostituzione.
N.B.- Cleaning of the
taps must be carried out
by qualified personnel,
who must be consulted
in case of any
functioning anomaly.
Check periodically the
state of conservation of
the flexible gas feed pipe.
In case of leakage, call
immediately the
qualified technicians for
its replacement.
N.B.: - Le graissage eventuel des robinets doit etre
faite par des spécialités,
qui doivent etre appelés
en cas d’anomalie de fonctionnement. Controler de
temps en temps l’état de
conservation du conduit
flexible d’alimentation
gaz. Si il y a des fuites
remplacer
immediatement. Dans
tous les cas ne pas oublier
de la changer avant la
date limite indiquée sur le
tube.
14
Page 15

N.B.: - Das eventuelle
Schmieren der Hähne muß
immer durch Fachpersonal
und nur im Fall von
Betriebsstörungen
vorgenommen werden.
Der Gasschlauch muß auf
seinen guten Zustand
regelmäßig kontrolliert
werden. Im Fall von Lecken
den Schlauch durch
Fachpersonal sofort
ersetzen lassen.
EDNLP
N.B. - La eventual
lubricación de los grifos
tiene que ser efectuada por
personal cualificado con el
cual se aconseja ponerse en
contacto en caso de anomalías de funcionamiento.
Controlar periódicamente el
estado de conservación del
tubo flexible de alimentación gas. En caso de pérdidas solicitar la intervención
inmediata del personal cualificado para su sustitución.
N.B.: - De eventuele smering
van de kranen moet
uitgevoerd worden door
gekwalificeerd personeel, tot
welke het goed is zich te
wenden in geval van
gebrekkige werking.
Controleer periodiek de staat
van de flexibele gastoevoerslang. In geval van
lekkage is de onmiddellijke
tussenkomst van
gekwalificeerd personeel
vereist ter vervanging.
N.B. - Toda a possível lubrificação das torneiras, deverá
ser efectuada por um
soal qualificado, o qual terá
de ser consultado em caso
de anomalias no bom
funcionamento. Controle
periódicamente o estado de
conservação do tubo flexível de alimentação do gás.
No caso de perdas de gás,
chamar imediatamente o
pessoal qualificado, para a
substituiçao do dito tubo.
pes-
15
Page 16

IGBF
Istruzioni
per l’installatore
Instructions
for the
installer
Installazione
Questo apparecchio
non è provvisto di un
dispositivo di scarico
del prodotti della combustione. Si raccomanda che sia installato in
locali sufficientemente
areati secondo le disposizioni di legge vigenti. La quantità
d'aria necessaria alla
combustione non deve
essere inferiore a 2.0
m3/h per ogni kW di
potenza installato.
Vedi tabella potenze
bruciatori.
Posizionamento
(Fig. 3). L'apparecchio è
previsto per essere incassato in un piano di
lavoro come illustrato
nell'apposita figura.
Predisporre su tutto il
perimetro del piano il
sigillante a corredo.
Installation
This appliance is not
provided with a combustion product discharge.
It is recommended that it
be installed in
sufficiently aerated
places, in terms of the
laws in force. The
quantity of air which is
necessary for combustion must not be below
2.0 m3/h for each kW of
installed power.
See table of burner
power.
Positioning
(Fig. 3). The appliance
can be fitted into a
working area as
illustrated on the
corresponding figure.
Apply the seal provided
over the whole of the
area perimeter.
Modalités
d’installation
Installation
Cet appareil n’est pas
pourvu de dispositif d’évacuation des produits
de la combustion. On
doit donc l’installer dans
des endroits suffisamment aerés suivant
les dispositions des lois
en vigueur. La quantitè
d’air nécéssaire à la combustion ne doit pas etre
inférieure à 2.0 m3/h
pour chaque kW de
puissance installer. Voir
tableau puissances
brûleurs.
Positionnement
L’appareil est prévu
pour etre encastré dans
un plan de travail
comme indiqué dans la
fig. 3. Mettre le joint sur
tout le périmètre de la
table.
16
Page 17

EDNLP
Anleitungen für
den Installateur
Installation
Dieses Gerät ist mit einer
Vorrichtung zur Beseitigung der Verbrennungsgase
nicht angeschlossen.
Installation und Anschluß
müssen laut den geltenden
Vorschriften ausgefürt werden. Gerät nur in
ausreichend belüfteten
Räumen und nach den
gesetzlichen Vorschriften
aufstellen.
Die Menge der benötigten
Verbrennungsluft darf nicht
unter 2,0 m3/h pro installierte kW-Leistungseinheit
liegen. Siehe Heizleistungstabelle.
Aufstellung
(Abb. 3) Das Gerät ist für
den Einbau in einer Arbeitsfläche vorgesehen, wie
aus der Abbildung ersichtlich wird.
Die gesamte Außenlinie der
Fläche mit dem mitgelieferten Abdichtungsmittel versiegeln.
Instrucciones
para el instalador
Instalación
Este aparato no tiene un
dispositivo de descarga
de los productos de la
combustión. Se aconseja
instalarlo en locales
suficientemente aireados
según las disposiciones
de ley vigentes. La
cantidad de aire
necesaria a la
combustión no tiene que
ser menos que 2.0 m3/h
por cada kW de potencia
instalado. Véase tabla
potencias quemadores.
Colocación
(Fig. 3). El aparato está
preparado para ser
empotrado en un tablero
de trabajo como ilustrado
en la relativa figura.
Preparar sobre todo el
perímetro de la superficie
la masilla impermeable
en dotación.
Instructies voor
de installateur
Installatie
Dit apparaat is niet voorzien van een afvoermogelijkheid voor de verbrandingsprodukten. Het
wordt aanbevolen het apparaat te installeren in een
voldoende geventileerde
ruimte volgens de geldende
wettelijke voorzieningen.
De voor de verbranding
benodigde hoeveelheid lucht
mag niet minder zijn dan
2,0 m3 /h per kW geinstalleerd vermogen. Zie de
tabel vermogen branders.
Plaatsing
(Afb. 3). Het apparaat is
voorzien om te worden
verzonken in een keukenblad zoals geillustreerd in
de betreffende figuur. Dicht
de ruimte tussen het
keukenblad en de plaat
rondom af met de
bijgeleverde kit.
Instruções
para o
instalador
Instalação
Este aparelho não possui
um dispositivo de descarga do produto da combustâo. Recomenda-se por
conseguinte, que venha
instalado em lugares
suficientemente arejados
segundo as disposições
das leis em vigor. A quantidade necessária de ar
para a combustão, não
deverá ser inferior a 2.0
m3/h por cada kW de
força instalada. Veja a
tabela relativa à força dos
queimadores.
Posicionamento
(Fig. 3). O aparelho foi fabricado para poder ser
montado num plano de
trabalho como ilustrado na
figura correspondente. É
necessário vedar todo o
perímetro do plano de trabalho com o vedador fornecido com o dito aparelho.
17
Page 18

IGBF
Collegamento gas
(Fig. 4) Collegare
l'apparecchiatura alla
bombola o all'impianto
secondo le prescrizioni
delle norme in vigore
accertandosi
preventivamente che l'apparecchiatura sia
predisposta al tipo di gas
disponibile. In caso
contrario vedi: "Adattamento a diverso tipo di
gas". Verificare inoltre che
la pressione di alimentazione rientri nei valori
riportati nella tabella: "Caratteristiche utilizzatori".
Gas connection
(Fig. 4) Connect the
appliance to the gas
cylinder or to the installation according to the
prescribed standards in
force, and ensure
beforehand, that the
appliance matches the
type of gas available.
Otherwise, see
"Adaptation to various
types of gas".
Furthermore, check that
the feed pressure falls
within the values
described on the table:
"User chacteristics".
Connexion gaz
(Fig. 4) Effectuer la connexion de l’appareil à la
bouteille ou à l’installation selon les prescriptions des normes en vigueur s’assurant à
l’avance que l’appareil
est reglé pour le type de
gaz disponible. En cas
contraire voir: “Adaptation à un type de gaz
différent”.
Verifier aussi que la
pression d’alimentation
correspond aux valeurs
du tableau: “Caractéristiques utilisateurs”.
Allacciamento metallico
rigido/semirigido
Eseguire l'allacciamento
con raccordi e tubi metallici (anche flessibili) in
modo da non provocare
sollecitazioni agli organi
interni all'apparecchio.
N.B. - Ad installazione
ultimata controllare, con
una soluzione saponosa,
la perfetta tenuta di tutto
il sistema di
collegamento.
Collegamento elettrico
(Fig. 5) Prima di effettuare
l’allacciamento elettrico accertarsi che:
• le caratteristiche dell’impianto siano tali da
soddisfare quanto indicato sulla targa matricola applicata sul fondo
del piano;
Rigid/semi rigid metal
connection
Carry out the connection
with fittings and metal
pipes (even flexible
pipes) so as to obtain
counter stress the inner
parts of the appliance.
N.B. - when the installation has been carried
out, check the perfect
sealing of the entire
connection system, by
using a soapy solution.
Electrical
connection
(Fig. 5) Prior to
carrying out the
electrical connection,
please ensure that:
• the plant characteristics are such as to follow what is indicated
on the matrix plate
placed at the bottom of
the working area;
Branchement métallique
rigide/semirigide
Effectuer le branchement
avec des raccords à conduits métalliques (meme
flexibles) de façon à ne pas
provoquer de contraintes
aux organes internes à l’appareil.
N.B.: - Quand l’installation
est terminée, controler,
avec une solution savonneuse, la parfaite etoncheité de tout le système de
branchement.
Branchement
électrique
(Fig. 5) Avant d’effectuer
le branchement électrique, s’assurer que:
• la tension de l’installation électrique correspond au voltage indiqué sur la plaque signalétique appliquée
au fond du plan;
18
ISO 7/1
ISO 228/1 (FR)
Fig. 4 - Abb. 4 - Afb. 4
Page 19

Gasanschluß
(s. Abb. 4) Das Gerät an die
Gasflasche oder an das
Gasversorgungsnetz nach
den geltenden Vorschriften
anschließen und dabei
sicherstellen, daß das Gerät
auf den vorhandenen Gastyp
eingestellt ist (wenn es nicht
der Fall sein sollte, wird auf
das Kapitel “Anpassung an
einen anderen Gastyp”
verwiesen). Man sollte
außerdem kontrollieren, daß
der Förderdruck den in Tab.
“Technische Daten” angegebenen Werten entspricht.
EDNLP
Conexión gas
(Fig. 4) Conectar el
aparato a la bombona o a
la instalación según las
prescripciones de las
normas vigentes
comprobando antes que
el aparato esté preparado
para el tipo de gas
disponible. En caso
contrario véase: “Adaptación a un distinto tipo de
gas”. Además comprobar
que la presión de
alimentación esté dentro
de los valores citados en la
tabla “Características
utilizadores”.
Gasaansluiting
(Afb. 4) Sluit de apparatuur
aan op de gasfles of de
gasleiding volgens de van
kracht zijnde voorschriften,
zich er vantevoren van overtuigend dat de apparatuur geschikt is voor het beschikbare
type gas. Is dit niet het geval
zie dan: “Aanpassing aan een
ander type gas”. Ga
bovendien na of de toevoerdruk valt binnen de waarden,
vermeld in de tabel: “Verbruikers karakteristieken”.
Ligação do gás
(Fig. 4) Ligue o aparelho
ao balão do gás ou à
instalação segundo as
disposições das normas
em vigor, assegurando de
antemão que o aparelho
esteja conforme ao tipo de
gás que utilizar. Em caso
contrário, veja a
“Adaptação a diversos
tipos de gás”. Verifique
igualmente que a pressão
de alimentação seja
conforme aos valores
descritos sobre a tabela
“Características das partes
a utilizar”.
Anschluß mit Metallanschlußstutzen und röhren, fest/halbfest
Den Anschluß mit Anschlußstutzen und (ev.
flexiblen) Röhren aus Metall
so ausführen, daß die inneren Teile des Geräts nicht
belastet werden. Hinweis:
Bei vollendeter Installation
muß die gesamte
Anschlußleitung mit einer
Seifenlösung auf
vollständige Dichtigkeit
überprüft werden.
Elektroanschluß
(Abb. 5) Bevor der Elektroanschluß hergestellt
wird, versichern Sie sich:
• ob die Merkmale der
Anlage den Angaben
des Kenndatenschilds
an der Unterseite der
Kochfläche entsprechen;
Conexión metálica rígida/
semirígida
Efectuar la conexión con
racores y tubos metálicos
(también flexibles), de manera que no se provoquen
solicitaciones a los órganos
interiores del aparato.
N.B. - Una vez efectuada la
instalación controlen, con
una solución jabonosa, la
perfecta estanqueidad de
todo el sistema de
conexión.
Conexión eléctrica
(Fig. 5) Antes de efectuar la
conexión eléctrica comprobar que:
• las características de la
instalación satisfagan
cunato indicado en la
placa matrícula colocada
sobre el fondo de la superficie de cocción;
Stijve/halfstijve
metalen aansluiting
Voor de aansluiting uit met
metalen verbindingsstukken
en leidingen (eventueel flexibel), zodanig dat er geen
spanning komt te staan op
de interne delen van de
apparatuur.
N.B.: - Na beeindigen van
de installatie de
gasdichtheid van alle
verbindingen controleren
met een zeepoplossing.
Elektrische aansluiting
(Afb. 5) Alvorens de elektrische aansluiting te
verrichten verzekert men zich
ervan dat:
• de karakteristieken van het
Ligação metálica
rígida/semi-rígida
Efectuar a ligação com a
junção e os tubos metálicos
(mesmo se são flexiveis),
de modo a não provocar
uma pressão sobre os órgãos internos do aparelho.
N.B. - Quando a instalação
tiver sido efectuada controle a perfeita vedação de
todo o sistema de ligação,
usando uma solução de
sabão.
Conexão eléctrica
(Fig. 5) Antes de efectuar a
conexão eléctrica, será preciso assegurar que:
• as características da insta-
stroomvoorzienende apparaat voldoen aan hetgeen is
vermeld op de registratieplaat onderop de kookplaat;
FERMACAVO
CABLE-CLAMP
SERRE-FILS
KABELKLEMME
PISACABLE
KABELKLEM
PRENSA-CABO
lação sigam o que está indicado sobre a chapa da
matriz aplicada no fundo
da chapa de cozimento.
Fig. 5 - Abb. 5 - Afb. 5
19
Page 20

IGBF
• l’impianto sia munito di
un efficace collegamento di terra secondo le
norme e le disposizioni
di legge in vigore. La
messa a terra è obbligatoria a termini di legge.
Nel caso che l’apparecchiatura non sia munita di
cavo e/o di relativa spina
utilizzare materiale idoneo
per l’assorbimento indicato in targa matricola e per
la temperatura di lavoro. Il
cavo in nessun punto dovrà raggiungere una temperatura superiore di 50
°C a quella ambiente.
Desiderando un collegamento diretto alla rete, è
necessario interporre un
interruttore onnipolare
con apertura minima fra i
contatti di 3 mm dimensionato per il carico di targa e
rispondente alle norme in
vigore (il cavo di terra
giallo/verde non deve essere interrotto dall’interruttore). La presa o l’interruttore onnipolare devono
essere facilmente raggiungibili con l’apparecchiatura installata.
N.B.: - Il costruttore declina ogni responsabilità nel
caso che quanto sopra e le
usuali norme antiinfortunistiche non vengano rispettate.
• that the plant is fitted
Should there be no cable
and/or plug on the
equipment, use suitable
absorption material for
the working temperature
as well, as indicated on
the matrix plate. Under
no circumstance must
the cable reach a temperature above 50°C of
the ambient temperature.
Should a direct connection to the network be
required, it will be necessary to interpose an
omnipolar switch with
minimum aperture between the 3 mm. contacts, dimensioned to
bear the plate load and it
must follow the standards in force (the yellow/green earth cable
must not be interrupted
by the switch). The plug
or omnipolar switch
must be easily reached
on the installed
equipment.
The manufacturers decline any responsibility
in the event of non-compliance with what is described above and the accident prevention norms
not being respected and
followed.
with an efficient earth
connection, following
the standards and law
provisions in force.
The earth connection
is compulsory in
terms of the law.
• l’installation a une
connexion de terre efficace suivant les normes et les dispositions
de loi en vigueur. La
mise à terre est obligatoire aux termes de la
loi.
Si l’appareil n’a pas de
câble et /ou de prise correspondante, ne utiliser
que des câbles et des prises, selon les données indiquées sur la plaque signalétique et à la température de travail. Le câble
ne devra jamais atteindre
une température supérieure de 50°C à celle de
l’ambiance.
Si on désire une connexion directe au réseau, il
faut prévoir un dispositif
de coupure omnipolaire
avec une distance d’ouverture entre les contacts
de 3 mm dimensionné
pour la puissance
absorbée et qui suit les
normes en vigueur (le fil
de terre de couleur jaune/vert ne doit pas être
coupé par l’interrupteur). La prise ou l’interrupteur omnipolaire
doivent être facilement
accessibles après la mise
en place de l’appareil.
Le Constructeur décline
toute responsabilité au
cas où ces normes et les
autre normes contre les
accidents ne seraient pas
observées.
20
Page 21

• ob die Anlage selbst
nach den gesetz!ichen
Vorschriften geerdet
ist. Die Erdung ist
bindend
vorgeschrieben.
Falls das Gerät kein Kabel
und/oder keinen Stecker
besitzt, verwenden Sie
den Kenndaten und der
Betriebstemperatur
entsprechendes Material.
Das Kabel darf an keiner
Stelle eine Temperatur
erreichen, die mehr als
50°C über der Raumtemperatur liegt.
Falls direkt an das Netz
angeschlossen werden
soll, wird ein allpoliger
Schalter mit einer
minimalen Öffnung der
Kontakte von 3 mm
entsprechend der
Kenndaten und der
geltenden Vorschriften
(das gelb/ grüne
Erdungskabe darf nicht
vom Schalter
unterbrochen werden)
benötigt.
Die Steckdose oder der
allpoliger Schalter
müssen bei installiertem
Gerät einfach zu erreichen
sein.
N.B. Der Hersteller
übernimmt keinerlei
Verantwortung falls die
angeführten
Sicherheitsvorschriften
nicht eingehalten werden.
EDNLP
• que la instalación tenga
una eficaz conexión de
tierra según las normas
y las prescripciones de
ley vigentes. La puesta a
tierra es obligatoria por
ley.
En el caso de que el aparato no tenga el cable y/o el
relativo enchufe utilizar
material apto para la absorción indicado en la placa matrícula y para la temperatura de trabajo. El cable en ningún punto tendrá
que llegar a una temperatura superior de 50°C a la
temperatura ambiente.
Si se quiere una conexión
directa a la red, es necesario
interponer un interruptor
omnipolar con abertura mínima entre los contactos de
3 mm dimensionado para la
carga de placa y responder
a las normas vigentes (el
cable de tierra amarillo/
verde no tiene que ser
interrumpido por el interruptor). El enchufe o el interruptor omnipolar tienen
que ser fácilmente alcanzables con el aparato instalado.
El constructor declina
cualquier responsabilidad
en el caso de que lo dicho
arriba y las usuales normas
contra los infortunios no
sean respetadas.
• dat het stroomvoorzienende
In het geval dat het apparaat
niet is uitgerust met een kabel
en/of stekker, dient gebruik gemaakt te worden van materiaal, geschikt voor de
stroomvoering en de werktemperatuur, zoals aangegeven op
de registratieplaat. De kabel
mag op geen enkel punt een
temperatuur bereiken die
hoger is dan 50°C boven de
omgevingstemperatuur.
Wenst men een directe verbinding met het lichtnet, dan
is het noodzakelijk een onderbrekingsschakelaar tussen te
plaatsen, met een minimale
afstand van 3 mm tussen de
contacten, die
gedimensioneerd is voor het
geregistreerd vermogen en
voldoet aan de geldende normen (de aardekabel geel/groen
mag niet door de schakelaar
worden onderbroken). De
stekker of schakelaar moet
gemakkelijk bereikbaar zijn als
de apparatuur eenmaal geinstalleerd is.
De fabrikant wijst iedere verantwoordelijkheid af in geval
dat het bovenstaande en de gebruikelijke preventieve normen
niet worden gerespecteerd.
apparaat voorzien is van
•a instalação esteja muni-
een effectieve aardeverbinding volgens de wettelijk
voorgeschreven normen en
beschikkingen. Het aarden
is verplicht volgens de wet.
No caso que o aparelho não
esteja munido de cabo e/ou
da relativa tomada, utilize o
material apropriado para
absorver o que está indicado na chapa da matriz, para
uma devida temperatura de
cozimento. O tubo não deverá nunca atingir a temperatura de 50°C acima da
temperatura ambiente.
Se desejar uma conexão directa à rede, será necessário
interpor um interruptor onipolar com abertura mínima
de 3 mm. entre os contactos,
cuja dimensão deverá
seguir a carga mencionada
na chapa, seguindo
igualmente as normas em
vigor ( o cabo de terra amarelo/verde não deve ser
interrompido pelo interruptor). A tomada ou o interruptor onipolar deverão
ser posicionados para uma
fácil manipulação do aparelho instalado.
O construtor declina qualquer responsabilidade no
caso que não tenham sido
respeitadas todas as disposições aqui em cima, assim
como as normas para a
prevenção de acidentes.
da de uma conexão à terra eficaz, segundo as normas e disposições das leis
em vigor. A conexão à
terra é obrigatória nos
termos da lei.
21
Page 22

IGBF
Adattamento
a diverso tipo di gas
(Fig. 6) Se l'apparecchiatura risulta predisposta
per un diverso tipo di
gas da quello di alimentazione disponibile, si
deve procedere:
• alla sostituzione degli
iniettori (Fig. 6) con i
corrispondenti al tipo
di gas da utilizzare
(vedi tabella "Caratteristiche utilizzatori").
• per la regolazione del
minimo agire con opportuno cacciavite sulla vite posta sul rubinetto (Fig. 7) dopo
averlo ruotato in posizione di minimo. Per
GPL (butano/propano) avvitare a fondo.
Adaptation to
various types of gas
(Fig. 6) Should the
appliance be pre-set for a
different type of gas than
that available, proceed as
follows:
• replace the injectors
(Fig. 6) with the
corresponding type of
gas to be used (see
table "Uses characteristics").
• to adjust to the
minimum, use a
screwdriver on the
screw placed on the
tap (Fig. 7) after
turning the tap to its
minimum position.
For LPG (butane/
propane) screw tight.
Adaptation à un
différent type de
gaz
(Fig. 6) Si l’appareil
prévoit un type de gaz
différent de celui d’alimentation disponible,
on doit proceder:
•à la substitution des
injecteurs (Fig. 6) avec
ceux corréspondants
au type de gaz qu’il
faut utiliser (voir tableau “Caractéristiques utilisateurs”).
• pour le réglage au
minimum, tournez à
l'aide d'un tournevis
approprié la vis qui se
trouve sur le robinet
(Fig. 7) après avoir
placé le robinet sur la
position du minimum.
Pour GPL (butane/
propane) serrez à fond.
solo corona DUAL
wok DUAL only
seulement wok DUAL
nur wok DUAL
sólo corona DUAL
alleen wok DUAL
apenas corona DUAL
22
Fig. 6 - Abb. 6 - Afb. 6
Page 23

Anpassung an einen
anderen Gastyp
(s. Abb. 6) Wenn das Gerät
für einen anderen Gastyp
als der vorhandene
ausgelegt ist, ist folgende
Vorgehensweise
durchzuführen:
• die Düsen (s. Abb. 6)
mit den für den vorhandenen Gastyp bestimmten Düsen (siehe
Tab. “Technische Daten”) ersetzen;
• bei der Einstellung des
Mindestwertes, den
Hahnhebel auf das Minimum drehen und die
Einstellschraube am
Hahn mit entsprechendem Schraubenzieher
drehen (s. Abb. 7). Bei
Betrieb mit Flüssiggas
(Butan- /Propangas)
Einstellschraube fest
anziehen.
EDNLP
Adaptación a un tipo
diferente de gas
(Fig. 6) Si el aparato
estuviera preparado para
un tipo de gas diferente
del de la alimentación
disponible, hay que
efectuar:
• la sustitución de los
inyectores (Fig. 6) con
los correspondientes
al tipo de gas a utilizar
(véase tabla
“Características
utilizadores”).
• para la regulación del
mínimo, usar un
destornillador
apropiado en el
tornillo puesto sobre
la llave (Fig. 7)
después de averlo
girado en la posición
de mínimo. Para GPL
(Butano/propano)
atornillar a fondo.
Aanpassing aan een
ander type gas
(Afb. 6) Als blijkt dat de
apparatuur uitgevoerd is
voor een ander type gas dan
ter plaatse beschikbaar,
dient men:
• de injectoren (Afb. 6) te
vervangen door degene
die corresponderen met
het te gebruiken gas (zie
de tabel “Karakteristieken verbruikers”).
• teneinde het minimum
in te stellen draait men
met een schroevedraaier
de schroef aan de kraan
(z. afb. 7), nadat deze op
het minimum gedraaid
werd. Bij toestellen die
op vloeibaar gas (butaan/
propaan) werken moet
men de stelschroef vast
aandraaien.
Adaptação
a diversos tipos de
gás
(Fig. 6) No caso que o
aparelho esteja predisposto
para um tipo de gás diferente do gás de alimentação que utilizar, deverá
proceder da seguinte forma:
• substitua os bicos (Fig.
6) ocm outros próprios
ao tipo de gás que
utilizar (veja a tabela
relativa às “Características das peças a
utilizar”;
• para a regulação do
mínimo agir com uma
oportuna chave de
parafuso sobre o
parafuso colocado na
torneira (Fig. 7) depois
de o ter rodado à
posição mínimo. Para
GPL (butano/
propano) ataraxar a
fundo.
Fig. 7 - Abb. 7 - Afb. 7
23
Page 24

IT - GB - ES - IE - PT - CH
CARATTERISTICHE UTILIZZATORI -
IGBF
USER CHARACTERISTICS
CARACTERISTICAS UTILIZADORES - CARACTERÍSTICAS DAS PEÇAS A UTILIZAR
BRUCIATORI GAS -
ALIMENTAZIONE
FEED BURNER Ø INJECTORS
ALIMENTACION
ALIMENTAÇÃO
TIPO PRESSIONE mbar NOMINALE CONSUMO
TYPE PRESSURE mbar NOMINAL CONSUMPTION
TIPO PRESION mbar NOMINAL
TIPO PRESSÃO mbar NOMINAL CONSUMO
gas naturale
natural gas
gas natural
gás natural
gas liquido
liquefied gas
gas licuefacto
gás liquefeito
IT
G110
ES
G110 G110/G140 8
PT
G140
gas città /
DE - AT - CH
G20 20
G30/G31 28-30/37
gas ciudad / gas ciudade
GAS BURNERS -
NORM.
rapido/fast/rápido/rápido
semirapido/semifast/semirápido/semi-rápido
ausiliario/auxiliary/auxiliar/auxiliar
corona/wok/coroa
corona/wok/coroa
corona/wok/coroa 4
pesciera/fish/pecera/peixera/fisch
rapido/fast/rápido/rápido
semirapido/semifast/semirápido/semi-rápido
ausiliario/auxiliary/auxiliar/auxiliar
corona/wok/coroa
corona/wok/coroa
corona/wok/coroa 4
pesciera/fish/poisson
rapido/rápido/rápido
semirapido/semirápido/semi-rápido
ausiliario/auxiliar/auxiliar
corona/wok/coroa
corona/wok/coroa 4
pesciera/fish/pecera/peixera
QUEMADORES DE GAS - QUEIMADORES DE GAS
BRUCIATORE Ø INIETTORI
QUEMADOR Ø INYECTORES
QUEIMADOR Ø BICOS
1/100 mm W
129 3000 286
101 1750 167
- DUAL 63A-121B 3500 333
- DUAL 63A-140B 4250 405
- DUAL 37A-90B 3500 254
- DUAL 37A-97B 4250 309
- DUAL 150A-350B/175A-360B 3500/3300 794/783
77 1000 95
87 3000 218
66 1750 127
50 1000 73
320/340 3000 680/711
192/210 1750 397/415
150/160 1000 227/237
PORTATA TÉRMICA
THÉRMAL CAPACITY
CAPACIDAD TÉRMICA
CAPACIDADE TÉRMICA
TECHNISCHE DATEN
GASBRENNSTELLEN
CONSUMO
l/h
g/h
l/h
SPEISUNG
BRENNERTYP Ø DÜSENELEMENTE
WÄRMEBELASTUNG
TYP DRUCK mbar NOMINAL VERBRAUCH
NORMAL
schnell 129 3000 286
halbschnell 101 1750 167
Naturgas G20 20 wok - DUAL 63A-121B 3500 333
Naturgas G25 20 wok - DUAL 71A-133B 3500 388
Flüssiggas G30/G31 50 wok - DUAL 37A-76B 3500/3150 254/225
hilfsbrenner 77 1000 95
wok - DUAL 63A-140B 4250 405
wok 4
fischpfannel
schnell 138 3000 333
halbschnell 107 1750 194
hilfsbrenner 85 1000 111
wok - DUAL 71A-148B 4250 472
wok 4
fischpfannel
schnell 79 3000/2700 218/193
halbschnell 58 1750/1575 127/112
hilfsbrenner 46 1000/900 73/64
wok - DUAL 37A-83B 4250/3825 309/274
wok 4
fischpfannel
1/100 mm W
24
l/h
l/h
g/h
Page 25

FR - BE
EDNLP
CARACTERISTIQUES UTILISATEURS - KARAKTERISTIEKEN VERBRUIKERS
TECHNISCHE DATEN
BRULEURS A GAZ - GASBRANDERS - GASBRENNSTELLEN
ALIMENTATION
BRULEUR Ø INJECTEURS
DEBIT THERMIQUE
GASTOEVER BRANDER Ø INJECTOREN THERMISCH VERMOGEN
SPEISUNG BRENNERTYP Ø DÜSENELEMENTE WÄRMEBELASTUNG
TYPE PRESSION mbar NOMINAL CONSOMMATION
TYPE DRUK mbar NOMINAAL VERBRUIK
TYP DRUCKmbar NOMINAL VERBRAUCH
NORM.
rapide/snel/schnell 129 3000 286
sémirapide/matig snel/halbschnell
G20 20 wok - DUAL 63A-121B 3500 333
Gaz naturel poisson/vis/fischpfannel
Aardgas
Naturgas rapide/snel/schnell 132 3000 332
G25 25 wok - DUAL 65A-126B 3500 388
Gaz liquéfié auxiliaire/sudderpit/hilfsbrenner 50 1000 73
Vloeibaar gas G30/G31 28-30/37
Flüssiggas wok - DUAL 37A-97B 4250 309
NL
auxiliaire/sudderpit/hilfsbrenner 77 1000 95
wok - DUAL 63A-140B 4250 405
wok 4
sémirapide/matig snel/halbschnell
auxiliaire/sudderpit/hilfsbrenner 80 1000 111
wok - DUAL 65A-141B 4250 472
wok 4
poisson/vis/fischpfannel
rapide/snel/schnell 87 3000 218
sémirapide/matig snel/halbschnell 66 1750 127
wok - DUAL 37A-90B 3500 254
wok 4
poisson/vis/fischpfannel
1/100 mm W
101 1750 167
102 1750 194
KARAKTERISTIEKEN VERBRUIKERS
GASBRANDERS
l/h
l/h
g/h
GASTOEVER
BRANDER Ø INJECTOREN
THERMISCH VERMOGEN
TYPE DRUK mbar NOMINAAL VERBRUIK
NORM.
Aardgas G25 25
Vloeibaar gas G30/G31 30
snel 132 3000 332
matig snel 102 1750 194
sudderpit 80 1000 111
wok - DUAL 65A-126B 3500 388
wok - DUAL 65A-141B 4250 472
wok 4
vis
snel 87 3000/2700 218/193
matig snel 66 1750/1575 127/112
sudderpit 50 1000/900 73/64
wok - DUAL 37A-90B 3500/3150 254/225
wok - DUAL 37A-97B 4250/3825 309/274
wok 4
vis
1/100 mm W
l/h
g/h
25
Page 26

IGBF
26
Page 27

EDNLP
27
Page 28

O Fabricante não assume nenhuma responsabilidade acerca de eventuais inexactidões contidas na
presente publicação, devidas a erros de impressão ou de transcrição. Reserva-se o direito de efectuar
nos próprios produtos as eventuais modificações que considerar necessárias ou úteis, sem prejudicar
Die Herstellerfirma übernimmt keinerlei Verantwortung für eventuell in dieser Broschüre enthaltene
Ungenauigkeiten, die auf Druckfehler zurückzuführen sind und behält sich das Recht vor an ihren Produkten
Dans un souci constant d’amélioration qualitative, le constructeur se réserve la possibilité d’apporter
The manufacturer declines all responsibility for possible inaccuracies contained in this pamphlet, due to
La Casa costruttrice declina ogni responsabilità per le possibili inesattezze contenute nel presente
opuscolo, imputabili ad errori di stampa o di trascrizione. Si riserva il diritto di apportare ai propri
prodotti quelle modifiche che ritiene necessarie o utili, senza pregiudicare le caratteristiche essenziali.
printing or copying errors. We reserve the right to make on our own products those changes to be considered
necessary or useful, without jeopardizing the essential characteristics.
à ses produits les modifications utiles, sans compromettre ses caractéristiques essentielles.
Le constructeur décline toutes responsabilité pour d’eventuelles inexactitudes contenues dans cette
notice, imputables à des erreurs d’impression ou de transcription.
alle für notwendig erachteten Änderungen anzubringen, ohne die wesentlichen Eigenschaften zu beeinflussen.
El constructor declina toda responsabilidad por las posibles inexactitudes contenidas en el presente
documento, imputables a errores de impresión o relacionadas. El constructor se reserva el derecho de
aportar a sus propios productos aquellas modificaciones que se considere necesarias o útiles, sin
De Fabrikant wijst iedere verantwoordelijkheid af voor enige onjuistheden in deze brochure welke geweten
kunnen worden aan copie - of drukfouten. Hij behoudt zich het recht voor aan zijn eigen produkten wijzigingen
aan te brengen die hij voor noodzakelijk of nuttig houdt zonder dat de wezenlijke kenmerken erdoor benadeeld
perjudicar las características esenciales.
worden.
as características essenciais.
COD. 1.003.00.0
 Loading...